
REF75PRR - Refrigerator BERTAZZONI - Free user manual and instructions
Find the device manual for free REF75PRR BERTAZZONI in PDF.


| Product type | Refrigerator with FlexMode freezer compartment |
| Brand | Bertazzoni |
| Model | REF75PRR |
| Power supply | 16 A, Schuko plug |
| Water pressure (ice maker) | 0.5 to 5 bar (0.05 to 0.5 MPa) |
| Water connection | Yes, 3/4" thread (if present) |
| Refrigerant | Isobutane (R600a) |
| Special functions | Refrigerator Shopping, Refrigerator Vacation, FlexMode Shopping, FlexMode Vacation, Bottle Cooler, Sabbath Mode (option), FlexMode (freezer/refrigerator/Freshness) |
| Ice maker | Automatic, production of 10 ice cubes/cycle, adjustable (Large/Medium), Super Ice function |
| Water filter | Yes, capacity 3000 L or 12 months, with change indicator |
| Lighting | LED, refrigerator, Freshness and freezer compartments |
| Control panel | Interactive, display temperature, date, time, menu |
| Temperature ranges | Refrigerator: +2°C to +8°C (default +5°C); Freezer: -15°C to -22°C (default -18°C) |
| Freshness compartment | Controlled humidity |
| Maintenance and cleaning | Condenser cleaning every 6 months, replaceable water filter, interior with warm water and mild dish soap |
| Safety | Keypad lock, audible alarm, detailed safety instructions |
| Spare parts | Original manufacturer parts, available from authorized service |
| Repairability | Repairs reserved for qualified personnel or authorized service |
| General information | Manual available in French and other languages, technical support: toll-free number 800 927 987, email customercare@bertazzoni.com |
Frequently Asked Questions - REF75PRR BERTAZZONI
User questions about REF75PRR BERTAZZONI
0 question about this device. Answer the ones you know or ask your own.
Ask a new question about this device
Download the instructions for your Refrigerator in PDF format for free! Find your manual REF75PRR - BERTAZZONI and take your electronic device back in hand. On this page are published all the documents necessary for the use of your device. REF75PRR by BERTAZZONI.
USER MANUAL REF75PRR BERTAZZONI
REF75PIXL
REF75PIXR
REF75PRL
REF75PRR
REF90PIXL
REF90PIXR
REF90PRL
REF90PRR
natural_image
Diagram of a connector with a bulb and screw, showing internal components (no text or symbols)natural_image
Illustration of hands using a power plug to install a wall socket (no text or symbols visible)
Importante
natural_image
Pure technical line drawing of a mechanical assembly without any text, numbers, or symbolsUp/Down Freezer (FlexMode)
Vano Freezer (FlexMode)
Ice maker (solo freezer OF)

Importante
Funzioni → √ → ^ shopping Flex Mode → √ → ^
Shopping Flex Mode ON/OFF → √ → ^
Shopping Flex Mode ON → √
Per disattivare
Funzioni → √ → ^ shopping FlexMode → √ → ^
Shopping FlexMode ON/OFF → √ → ^
Shopping FlexMode OFF → √
Funzioni → √ → ^Ice maker → √ → ^ Dimens. Cubetti → √ → ^Size: GRANDI → ^→ √
natural_image
Line drawing of a hand opening a drawer with a handle (no text or symbols)Cassetto FlexMode
natural_image
Illustration of a hand opening a rectangular box with a circular button on top (no text or symbols)Bacinella Ghiaccio
natural_image
Architectural cross-section diagram of a building facade with structural elements and ventilation grilles (no text or labels)
Attenzione
natural_image
Illustration of a hand holding a metal bracket with a curved arrow indicating rotation (no text or symbols)natural_image
Illustration of a hand holding a metal shelf with measurement arrows indicating depth (no text or symbols)Balconcini Porta
natural_image
Technical line drawing of a mechanical component with directional arrows and dimension lines (no text or symbols)natural_image
Illustration of a baby lying on a bed with a medical device, no text or symbols presentnatural_image
Front view of a modern refrigerator with double door and side table (no visible text or symbols)natural_image
Illustration showing a door panel being inserted into a vent with a hand inserting a tube (no text or symbols present)
Attenzione
1.1 Safety and Hazard Warnings 4
1.2 During Daily Use 4
1.3 Environmental Protection.... 5
1.4 Cleaning, Disinfection and Maintenance of the Ice and/or Water Dispenser (where fitted).... 5
2 INSTALLATION 5
2.1 Installation.... 5
2.2 Water Connection.... 5
2.3 Mains Electrical Connection.... 6
2.4 Refrigerant.... 6
3 GETTING STARTED 6
3.1 Getting to Know Your Bertazzoni Appliance.... 6
3.2 Main Components.... 7
3.3 Electronic Controls.... 8
3.4 Main Control Panel 8
4 SWITCHING YOUR APPLIANCE ON AND OFF 9
4.1 Switching Off and On.... 9
4.2 How to Adjust the Temperature to Requirements.... 9
4.3 Activating the Ice Maker (optional).... 10
4.4 Information Signals and Faults with the Display.... 10
5 SETTINGS AND SPECIAL FUNCTIONS 10
5.1 Customisation and Language Setting.... 10
5.2 Special Functions Available via Menu.... 11
5.3 Base Menu Settings.... 13
6 INTERNAL LAYOUT 15
6.1 Internal Layout (positioning, adjustment, removal).... 15
7 ACTIVATING AND USING THE ICE MAKER 16
7.1 Activating and Using the Ice Maker.... 16
7.2 Water Filter 17
7.3 Water Filter for Freezer Column Ice Makers 17
8 LIGHTING 18
8.1 Lighting.... 18
9 FOOD PRESERVATION 18
9.1 General Indications.... 18
9.2 Maintaining the Quality of Stored Foodstuffs.... 19
0 RECOMMENDED FOOD STORAGE TIMES 20
0.1 Recommended Food Storage Times.... 20
11 CARE AND CLEANING 21
1.1 Care and Cleaning.... 21
1.2 Cleaning the Ventilation Grille, Filter and Condenser 21
1.3 Cleaning the Interior.... 22
2 TROUBLESHOOTING 22
2.1 Troubleshooting.... 22
2.2 Fault Indications which May Appear on the Display.... 25
3 MENUS MAP 25
3.1 Functions.... 25
3.2 Settings.... 26
1.1 Safety and Hazard Warnings
If this appliance is replacing an existing one which must be set aside or disposed of, ensure that it does not become a child entrapment hazard by cutting off the power cord and removing or modifying the door so that it cannot be closed. Use the same precautions at the end of the new product's life.
This appliance is designed to refrigerate food and drink in a domestic environment.
The appliance must be installed in accordance with the instructions given in the Installation Guide: in particular, the ventilation openings of the appliance (or those in the kitchen carcase for built-in installations) must be kept free of obstructions.
The appliance is equipped with a concentrated LED lighting system. Do not look into the lamps when these are on in order to avoid potential damage to eyesight.
This warning is also given on the label applied to the inside of the refrigerator door.
When the freezer is on, do not touch the internal steel surfaces with damp or wet hands, as they could freeze and stick to particularly cold surfaces.
Do not use electrical appliances of any type inside the appliance.
Keep fingers away from the sliding guides when repositioning shelves.
Do not place containers containing flammable liquids in the vicinity of the appliance.
When cleaning, completely shut off the appliance and isolate its power supply by unplugging it/switching it off at the socket. If the plug is not accessible, shut off the relative circuit breaker to isolate the circuit the appliance is connected to.
Components of the packaging may be hazardous to children: do not allow them to play with plastic films, bags and polystyrene.
Any repairs must only be performed by qualified technicians.
This appliance is not intended for use by people with reduced physical, sensory or mental capacity (including children), or those lacking in experience in the use of electrical appliances, provided that they are supervised or instructed by adults who are responsible for their safety. Children must be supervised at all times to ensure they do not play with the appliance.
Ensure that the appliance's refrigeration system piping does not sustain damage.
Do not place spray cans or other items containing propellant or flammable substances inside the appliance.
The quantity of refrigerant contained in your
appliance is indicated on the data plate located inside it. If the power supply cable should be damaged, it must be replaced by an authorised service technician, or else by a professional electrician qualified to perform this procedure.
Installations or repairs performed by persons not authorised and/or qualified to do so can create a hazard to users and may damage the appliance.
Repairs must be performed by service technicians authorised by the manufacturer.
Only the manufacturer's original spare parts must be used. The manufacturer is only able to guarantee that the product safety requirements have been maintained when original spare parts are used.
1.2 During daily use
Never defrost or clean the appliance with a steam cleaner. Steam could come into contact with electrical components and cause a short circuit. Electric shock hazard!
Do not use sharp or pointed objects to remove ice or frost. Damage could be sustained by the connections in the refrigerant circuit, which would make the appliance impossible to repair.
Refrigerant leaking out under pressure could cause eye irritation.
Do not lean on or use the base, drawers, doors etc. for supporting or storing objects.
When cleaning, unplug the appliance or isolate the relative circuit at the fuse board. Do not attempt to unplug the appliance by pulling on the power cable: instead, grip the plug by its body.
Pure alcohol or high-proof spirits should be kept upright in a sealed container.
Do not allow oil or fat to come into contact with plastic components or the door seals. They could degrade such components, making them brittle and ineffective.
Do not obstruct the appliance's air openings.
Do not allow children under the age of eight to use the appliance. Keep an eye on children during cleaning and maintenance.
Symbols used in this manual:

N.B.
Suggestions for correct use of the appliance

Important
Instructions for preventing damage to the appliance

Warning
Instructions for preventing personal injury
1.3 Environmental Protection

Pay particular attention to the correct method of disposal for all packaging components.
The appliance must not be disposed of with general domestic refuse. Enquire at an authorised local waste disposal/recycling centre about disposal of recyclable materials.
When disposing of the appliance, cut the power cable off and remove or modify the door so that it cannot be closed.
Ensure that the refrigeration circuit does not sustain damage during disposal.
The appliance's refrigeration circuit and insulation do not contain substances which can damage the ozone layer.
1.4 Cleaning, Disinfection and Maintenance of the Ice and/or Water Dispenser (where equipped)
Failure to comply with the disinfection instructions given can compromise the hygiene of the dispensed water.
On first using the appliance, and each time the filter is changed, it is recommended to run water through the circuit using the "Manual Cleaning" function and to discard the ice produced over the preceding 24 hours.
If the water dispenser has not been used for at least 4-5 days, it is recommended to rinse the circuit by discarding the first litre of water dispensed.Reposition the removable water dispenser (where present) only with clean hands.
Only use potable water to clean the ice cube tray and container.
The filter MUST be changed when indicated by the control panel, or if the ice/water dispensing system has not been used for at least 30 days.
Each time the filter is changed, it is recommended to disinfect he ice/water distribution system using a food-safe disinfectant (e.g. sodium hypochlorite-based products) which does not alter the characteristics of the material. Rinse with at least 2 litres of water before use.
Components of the ice and water distribution system must only be replaced with original spare parts supplied by the manufacturer.
Repairs and maintenance must only be performed by the manufacturer's technical support department or by other qualified technicians.
2.1 Installation
Ensure that installation is performed correctly, in full compliance with all instructions given in the specific installation guide supplied with the appliance.

Warning
The appliance MUST be plumbed in before the electrical connections are made.
2.2 Mains Water Connection
natural_image
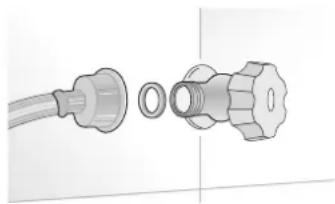
Diagram of a pipe fitting with a valve and connector (no text or symbols)Models equipped with an ice maker require a connection to the mains water supply.
This is performed using the new pipe with 34 " thread supplied.
The mains supply pressure must be between 0.05 MPa and 0.5 MPa (0.5 bar to 5 bar).
Pressures outside of this range can lead to malfunctions or leaks in the system.
The water supply must be potable.

Warning
The water supply must be potable.

Warning
Ensure that installation is performed correctly, in full compliance with all instructions given in the specific installation guide supplied with the appliance.

Warning
Do not attempt to use a garden hose adapter or a braided tap connector: these could damage the thread on the appliance's water connection.
2.3 Mains Electrical Connection
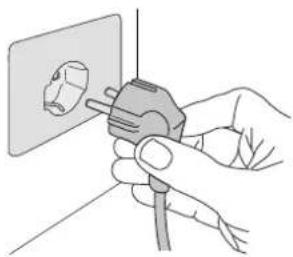
The appliance is fitted with a 16A Schuko plug and must be connected to the mains via a Schuko socket.
Do not use extensions and/or gang sockets for connection.
natural_image
Hand inserting a plug into an electrical socket (no text or symbols visible)
Important
Do not use extensions and/or gang sockets for connection.
2.4 Refrigerant
Take great care not to damage the refrigerant circuit.
It contains isobutane (R600a), a natural gas which is more eco-compatible than previous refrigerants, but is, however, flammable.
If the refrigerant circuit should sustain damage, ensure that no naked flames or sparks are created in the area. Thoroughly ventilate the area.

7010 W021
3.1 Getting to Know Your Bertazzoni Appliance
Congratulations on the purchase of your new Bertazzoni appliance: you can now start to use our innovative food preservation system, which will allow you to optimally preserve your food.
This user manual will answer most questions on the product's features and operation.
If you should need further information, do not hesitate to contact our Technical Support Centre by:
Calling our freephone number (within Italy)
800 927 987
Sending an email to
customercare@bertazzoni.com
Visiting our website
www.universal.bertazzoni.com
Important
Before calling, note down the appliance's serial number, which you can find on the data plate on the bottom left of the appliance's frame.
natural_image
Pure technical line drawing of a mechanical assembly without any text, numbers, or symbols3.2 Main Components
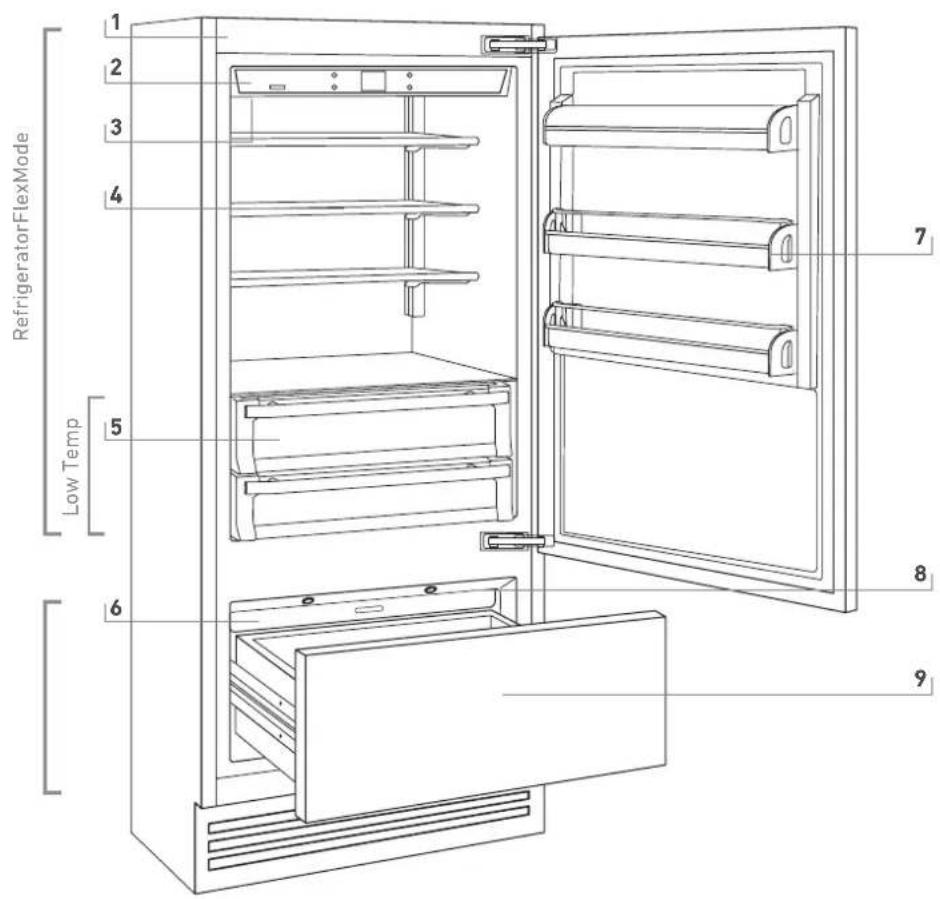
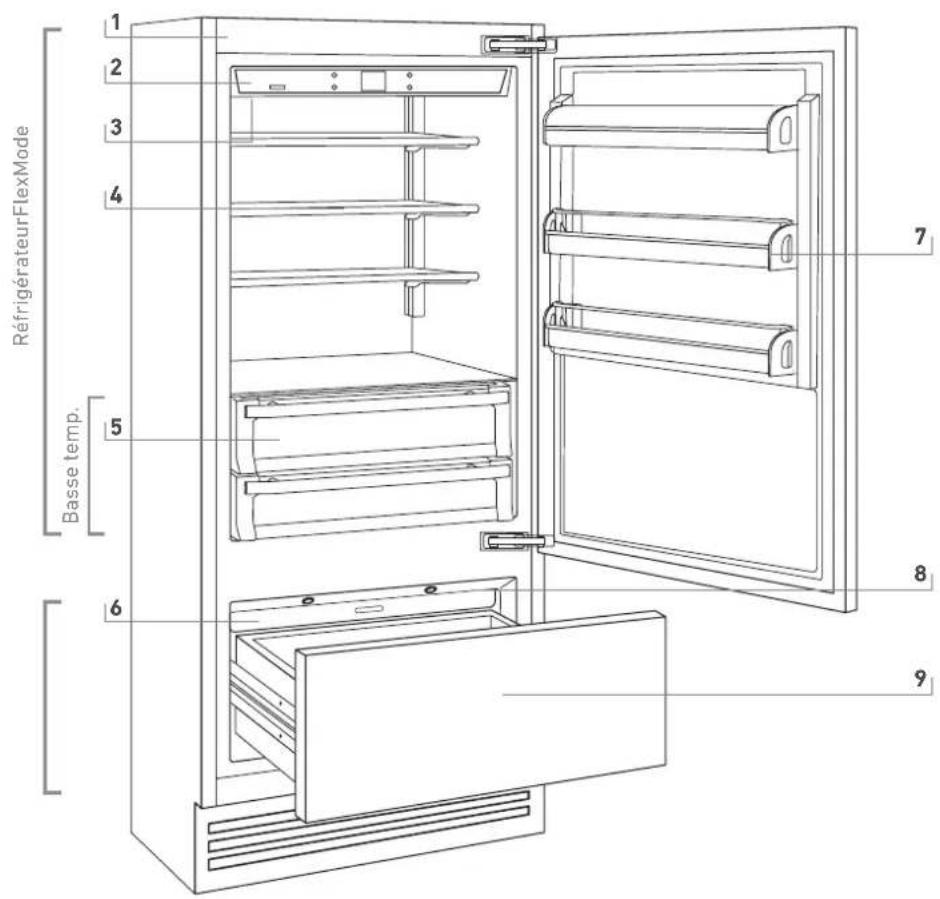
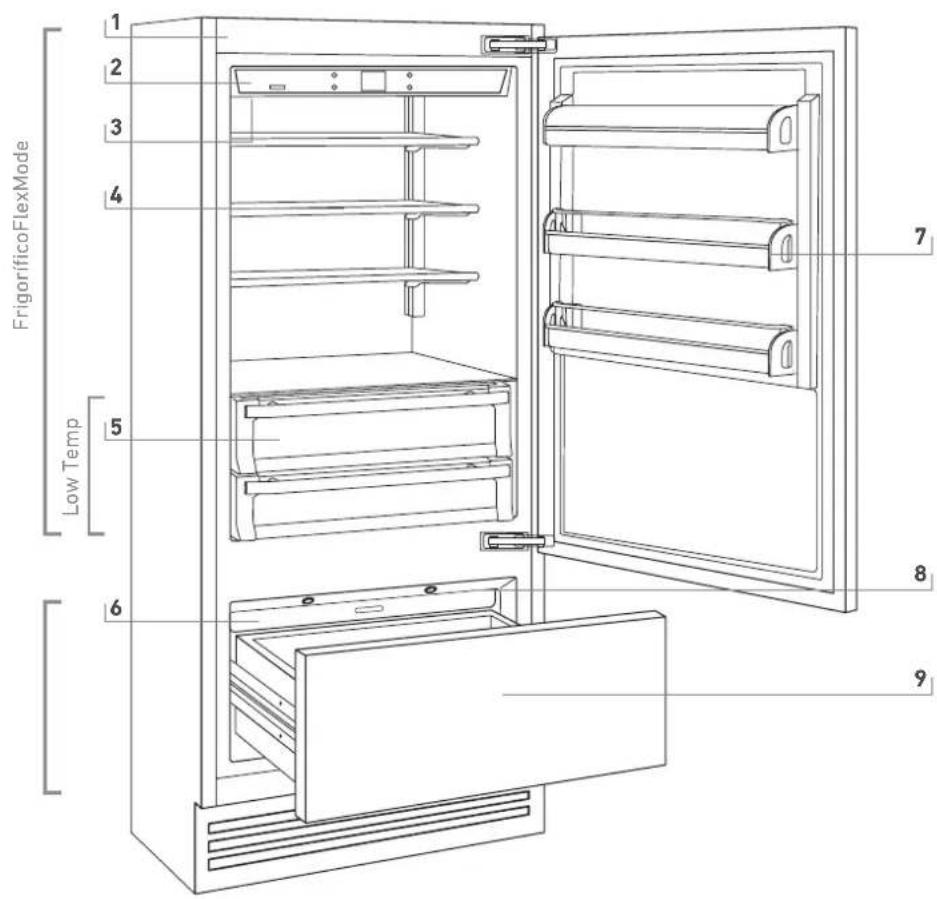
1 Stainless-steel structure with aluminium trim
2 Interactive control panel
3 Water filter (*)
4 Patented shelf repositioning system
5 Controlled humidity Fresh Compartment
6 Automatic ice maker (*)
7 Spacious door balconies
8 LED lighting
9 Freezer drawer which can be turned into a refrigerator compartment or Fresh compartment (FlexMode operation)
(*) certain models only
3.3 Electronic Control System
Bertazzoni's innovative electronic control system keeps the temperature of the compartments constant and displays it on the control panel; it also allows the user to interact with the control system by customising the different functions and providing audible and/or visual warnings whenever operational faults should occur.
3.4 Main Control Panel





1 2 3 4 5 6 7 8 9
ON/OFF
Unit Switches the appliance on and shuts it off completely (press and hold for three seconds).
FRIDGE
Fridge Switches the refrigerator compartment only on and off (press and hold for three seconds).
MENU
Menu Provides access to the appliance functions menu

Up/down Fridge
The Up and Down buttons allow you to change the preset temperature for the refrigerator and move around the interactive menu.

Display
Displays the temperatures of the refrigerator and freezer compartment, the date and time, the menu functions and visual messages.

Up/Down Freezer (FlexMode)
The Up/Down buttons allow you change the preset temperature depending on the compartments operating mode (freezer, refrigerator or Fresh), and to move around the interactive menu.
SELECT
Enter Allows you to enable or disable selections via the Menu.
ICE
Ice maker Enables or disables automatic ice production.
ALARM
Alarm
Flashes to indicate any operational faults, also highlighted through an audible warning, which can be disabled by pressing the button.
4.1 Switching On and Off
First Use
When the appliance is connected to the mains power supply but has not yet been turned on, the following message will be shown on the display
Stand by
To switch on all the appliance's compartments, press and hold the Unit ⏻ button for three seconds. When first switched on, the FlexMode compartment is set to Freezer mode.
Shutting off the FlexMode Compartment
This can be shut off only by completely switching off the appliance.
Press and hold the Unit ⏻ button for three seconds.
Switching On Again
Press on the same buttons to switch on again.
The Freezer compartment remains on at all times and cannot be shut off except by completely turning off the appliance.
Press and hold the Unit ⏻ button for three seconds.
Shutting off the Appliance for Long Periods
For long periods of absence, it is advisable to switch off the appliance by pressing and holding the Unit ⏻ button for three seconds and then switching off the socket or unplugging the appliance.
Empty the appliance of all foodstuffs, clean and dry the interior and leave the doors and drawers ajar to prevent the formation of foul odours.

On first use, if text other than Stand-by appears, this means that the appliance has already begun the cooling process.
When the appliance first starts up, it will not be possible to use the Menu to change the factory settings until the preset temperature has been reached. It is nevertheless possible to set the date and time immediately, as these parameters are required to activate some special functions. Each time the appliance is turned on it performs a self-diagnostic procedure lasting three minutes before starting up completely.
If the Refrigerator or Fresh Compartment only is switched off, the relative fan will continue to run independently in order to prevent the formation of mould and foul odours.
Before shutting the appliance off for an extended period, remove all foodstuffs from the interior and leave the doors and drawers ajar to prevent the formation of mould and unpleasant odours.
4.2 How to Adjust the Temperature to Requirements
Each model is carefully tested before leaving the factory and regulated in order to optimise performance and energy consumption.
It is normally not necessary to adjust these settings. The temperature settings can nevertheless be adjusted as follows, if required:
Refrigerator Compartment
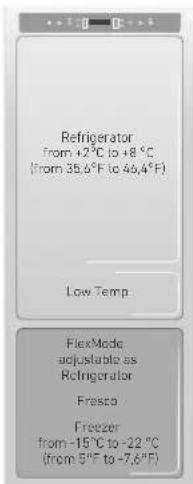
From +2°C to +8°C (35.6°F to 46.4°F): the recommended temperature is factory set to +5°C (41°F).
Press the Up/Down ^ buttons to adjust.
The first touch will show the set temperature on the display. To change it, continue pressing the buttons until the required temperature is reached.
Freezer Compartment (FlexMode)
From -15^ to -22^ (5°F to -7.6^ ): the recommended temperature is factory set to -18^ (0°F).
Press the Up/Down ↗ buttons to adjust.
The first touch will show the set temperature on the display. To change it, continue pressing the buttons until the required temperature is reached.
If the compartment is being used in Refrigerator or Fresh Mode (FlexMode function), the recommended and default temperatures will be those which correspond to the respective compartments.

The displayed temperature may vary slightly from that set following repeated opening of the doors, or insertion of items at room temperature or large quantities of foodstuffs.
It may take six to twelve hours to reach the set temperature.
4.3 Activating the Ice Maker (optional)
The Ice Maker button, located on the main control panel, enables the ice maker.
The button is lit when this is operational.
Before starting up the ice maker for the first time, check that the water filter has been inserted, and perform an initial rinse of the water circuit. To do so, press the Enter √ and Ice Maker ⏻ buttons simultaneously. After a few minutes, the Ice Maker can be activated.
Ice maker (freezer OF only)

Important
Do not enable the Ice Maker if the appliance is not connected to the water supply.
4.4 Information Signals and Faults with the Display
An integrated monitoring system provides information via symbols or messages shown on the display.
Information is always displayed with stationary text, while fault warnings are shown with flashing text.
The audible warning which accompanies some fault signals can be disabled by pressing the Alarm button on the main control panel.
The list of fault signals is given at the end of this manual.
5.1 Customisation and Language Setting
flowchart
graph TD
    A["ON/OFF"] --> B["FRIDGE"]
    B --> C["MENU"]
    C --> D["UPPER"]

To prevent accidental modification of the settings, the keypad locks automatically after a certain period of time, and the message "keypad lock" is displayed.
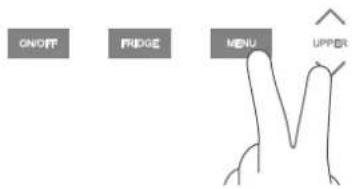
To re-enable it, press and hold the Menu ⬆ and Fridge Down ⬇ buttons simultaneously for at least three seconds, or else press and hold the Menu ⬆ button alone for at least three seconds.
The keypad lock can be deactivated via the specific function in the Settings menu.
It is possible to customise the operation of your Bertazzoni to adapt it to your requirements, via the main settings or by activating special functions.
Functions are shown on the main display by pressing the Menu ⚠ button. The Up/Down ⚡ buttons allow you to scroll through the available functions, which can be selected by pressing the Enter ⚡ button; the display will show the current status of the function. The Up/Down ⚡ buttons also allow you to move around within the selected function, enabling it or disabling it by pressing Enter ⚡ Once the function has been confirmed, the display will automatically show the main menu to allow you to choose other functions.
It is possible to return to the previous choice at any time via the Menu ⚠ button.
The language for the messages shown on the display can be set as follows:
Access the menu by pressing the Menu ▲ button, then use the Up/Down ▼ buttons to select Settings, and confirm with the Enter ▼ button. Then select the Language function and the required language.
5.2 Special Functions which Can Be Activated via the Menu
To use the special functions, select the Menu button and then use the Up/Down buttons to access the menu and confirm the Functions selection.
Refrigerator Shopping
This function lowers the refrigerator temperature to +2°C (35.6°F) for 12 hours to cool down newly inserted produce more quickly. The function will shut off automatically after 12 hours and return to the previously set temperature.
It is possible to schedule activation of this function in advance.
The function will need to be reset if the power to the appliance is cut for a prolonged period.
Enabling
Functions → √ → ^ Refrigerator Shopping → √ → ^ Refrigerator Shopping ON/OFF → √ → ^ Refrigerator Shopping ON → √
Disabling
Functions → √ → ^ Refrigerator Shopping → √ → ^ Refrigerator Shopping ON/OFF → √ → ^ Refrigerator Shopping OFF → √
Scheduling activation in advance
Functions → √ → ^ Refrigerator Shopping → √ → ^ Shopping Duration → √ → ^ Time Setting I → ^ → √
This can be scheduled between one and twelve hours in advance.

The various Shopping modes help Refrigerator and FlexMode cooling when a significant amount of produce at ambient temperature is added to the appliance.
This mode can also be effective in maintaining the internal temperature when the drawers and upper door are opened frequently.
Refrigerator Vacation
This function – recommended for extended periods of absence as it provides significant energy savings – increases the temperature of the refrigerator compartment to +14°C (57.2°F).
It is possible to set a duration for this function, or else it can be deactivated manually upon your return. The function will remain active even following an extended power cut.
Enabling
Functions → √ → ^ Refrigerator Vacation → √ → ^ Refrigerator Vacation ON/OFF → √ → ^ Refrigerator Vacation ON → √
Disabling on Your Return
Functions → √ → ^ Refrigerator Vacation → √ → ^ Refrigerator Vacation ON/OFF → √ → ^ Refrigerator Vacation OFF → √
Setting the Duration
Functions → √ → ^ Refrigerator Vacation → √ → ^ Vacation Duration → √ → ^ Set Days I → √
It is possible to set a period ranging from 1 to 90 days.
FlexMode Shopping
This function must be enabled at least 24 hours before adding products at ambient temperature to the FlexMode compartment, or a few hours before adding already frozen foodstuffs which have undergone a moderate temperature increase.
The function will be disabled automatically when the scheduled period of operation expires. It is possible to schedule activation of this function in advance.
The function will need to be reset if the power to the appliance is cut for a prolonged period. This can be scheduled between one and twelve hours in advance.
Enabling
Functions → √ → ^ Flexmode shopping → √ → ^ FlexMode shopping ON/OFF → √ → ^ FlexMode Shopping ON → √
Disabling
Functions → √ → ^ FlexMode Shopping → √ → ^ FlexMode Shopping ON/OFF → √ → ^ FlexMode Shopping OFF → √
Scheduling activation in advance
Functions → ✅ → ^ Flexpde Shopping → ✅ → ^ Shopping Duration → ✅ → ^ Time Setting I → ^ → ∅
FlexMode Vacation
This function – recommended for extended periods of absence as it provides significant energy savings – increases the temperature of the FlexMode compartment to -18^ ( 46.4^ ) if it is set as Freezer, and to +14^ ( 57.2^ ) if it is set as Refrigerator. The function cannot be activated if it is set to operate as Fresh compartment. The function will remain active even in the event of an extended power cut. It is possible to set a period ranging from 1 to 90 days.
Enabling
$$ \begin{array}{l} \text { Functions } \rightarrow \checkmark \rightarrow \bigwedge_ {\text { Flex mode vacation }} \rightarrow \checkmark \rightarrow \bigwedge \ \text { FlexMode Vacation ON / OFF } \rightarrow \checkmark \rightarrow \hat {\vee} \ \text { FlexMode Vacation ON } \rightarrow \checkmark \ \end{array} $$
Disabling on Your Return
$$ \begin{array}{l} \text { Functions } \rightarrow \checkmark \rightarrow \hat {\vee} \text { FlexMode Vacation } \rightarrow \checkmark \rightarrow \hat {\vee} \ \text { Flexmode vacation ON / OFF } \rightarrow \checkmark \rightarrow \hat {\vee} \ \text { Flexmode vacation OFF } \rightarrow \checkmark \ \end{array} $$
Setting the Duration
$$ \begin{array}{l} \text { Functions } \rightarrow \checkmark \rightarrow \bigwedge \text { Flex mode vacation } \rightarrow \checkmark \rightarrow \bigwedge \ \text { Vacation duration } \rightarrow \checkmark \rightarrow \hat {\vee} \quad \text { Set Days I } \rightarrow \checkmark \ \end{array} $$
Bottle Cooler
This function can be used to cool beverages in the freezer compartment in a short space of time. A duration of between one and 45 minutes can be set for the cooling function. An audible signal indicates when the optimum temperature has been reached. When removing the beverages, disable the audible signal by pressing the Alarm ⏻ button.
Enabling
$$ \begin{array}{l} \text { Functions } \rightarrow \checkmark \rightarrow \hat {\vee} \text { Bottle Cooler } \rightarrow \checkmark \rightarrow \hat {\vee} \ \text { Bottle cooler ON / OFF } \rightarrow \checkmark \rightarrow \hat {\vee} \text { Bottle cooler ON } \rightarrow \checkmark \ \end{array} $$
Disabling
$$ \begin{array}{l} \text { Functions } \rightarrow \checkmark \rightarrow \hat {\vee} \text { Bottle Cooler } \rightarrow \checkmark \rightarrow \hat {\vee} \ \text { Bottle Cooler ON / OFF } \rightarrow \checkmark \rightarrow \hat {\vee} \text { Bottle Cooler OFF } \rightarrow \checkmark \ \end{array} $$
Setting the Duration
$$ \begin{array}{l}\text { Functions } \rightarrow \checkmark \rightarrow \hat {\vee} \text { Bottle Cooler } \rightarrow \checkmark \rightarrow \hat {\vee}\\text { Cooling Time } \rightarrow \checkmark \rightarrow \text { Time setting 20 min } \rightarrow \hat {\vee} \rightarrow \checkmark\end{array} $$
Ice Maker (optional)
The Ice Maker allows you to select the size of the ice cubes produced, choosing between Large (default) and Medium; and to activate the SuperIce function, which increases the amount of ice produced.
The Superlce function is disabled automatically after 24 hours.
Selecting Large Ice Cubes
$$ \begin{array}{l} \text { Functions } \rightarrow \checkmark \rightarrow \hat {\vee} \text { Ice maker } \rightarrow \checkmark \rightarrow \hat {\vee} \ \text { Cube Size } \rightarrow \checkmark \rightarrow \hat {\vee} \text { Size: LARGE } \rightarrow \hat {\vee} \rightarrow \checkmark \ \end{array} $$
Selecting Medium-Sized Ice Cubes
$$ \begin{array}{l} \text { Functions } \rightarrow \checkmark \rightarrow \hat {\vee} \text { Ice Maker } \rightarrow \checkmark \rightarrow \hat {\vee} \ \text { Cube Size } \rightarrow \checkmark \rightarrow \hat {\vee} \text { Size: MEDIUM } \rightarrow \hat {\vee} \rightarrow \checkmark \ \end{array} $$
Activating the SuperIce Function
$$ \begin{array}{l} \text { Functions } \rightarrow \checkmark \rightarrow \hat {\vee} \text { Ice maker } \rightarrow \checkmark \rightarrow \hat {\vee} \ \text { SuperIce ON / OFF } \rightarrow \checkmark \rightarrow \hat {\vee} \text { SuperIce ON } \rightarrow \hat {\vee} \rightarrow \checkmark \ \end{array} $$
Disabling
$$ \begin{array}{l} \text { Functions } \rightarrow \checkmark \rightarrow \hat {\vee} \text { Ice maker } \rightarrow \checkmark \rightarrow \hat {\vee} \ \text { SuperIce ON / OFF } \rightarrow ⓨ \rightarrow \bigwedge \text { Super Ice OFF } \rightarrow \bigwedge \rightarrow ⓥ \ \end{array} $$
Sabbath Mode (Optional)
This function allows users to comply with religious requirements stating that operation of the appliance must not be influenced by the opening of the doors (thermostatic operation, internal lighting and ice production are disabled).
Enabling
$$ \begin{array}{l} \text { Functions } \rightarrow \checkmark \rightarrow \hat {\vee} \text { Sabbath Mode } \rightarrow \checkmark \rightarrow \hat {\vee} \ \text { Sabbath Mode ON / OFF } \rightarrow \checkmark \rightarrow \hat {\vee} \text { Sabbath Mode ON } \rightarrow \checkmark \ \end{array} $$
Disabling
$$ \text { Functions } \rightarrow \checkmark \rightarrow \hat {\vee} \text { Sabbath Mode } \rightarrow \checkmark \rightarrow \hat {\vee} $$
$$ \text { sabbath mode ON / OFF } \rightarrow \checkmark \rightarrow \hat {\vee} \text { sabbath mode OFF } \rightarrow \checkmark $$
Water Filter
The Water Filter function provides a precise display of the quantity of water which has been filtered, in litres, and the time remaining before the filter must be replaced.
Checking the Status of the Filter
Functions → √ → ∧ Water Filter → √ → ∧ Filter Status → √ Display Status → √ Enter > Confirm → √
The number of days and quantity in litres remaining before the filter must be replaced are displayed.
Reset Filter
The Reset Filter function resets the quantity of water filtered and time since the last filter change. This must be performed each time the filter cartridge is changed.
Alternatively, press and hold the Enter √ button for five seconds.
Resetting the Filtered Water Meter
Functions → √ → ∧ Water Filter → √ → ∧ Filter Status → √ → ∧ Reset Filter → √ Enter > Confirm → √
Filter Bypass
This function is activated when it is not necessary to filter the water as that from the mains water supply is already of sufficiently high quality.
Enabling the Filter Bypass
Functions → √ → ∧ Water Filter → √ → ∧ Filter Status → √ → ∧ Filter Bypass → √ → ∧ Filter Bypass ON → √
Disabling the Filter Bypass
Functions → √ → ∧ water Filter → √ → ∧ Filter status → √ → ∧ Filter Bypass → √ → ∧ Filter Bypass OFF → √
Manual Water Filter Cleaning
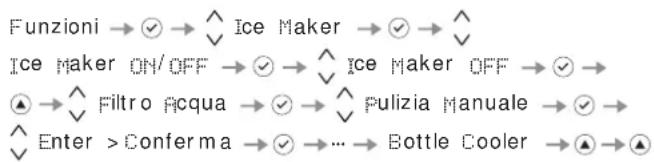
If ice production has been disabled or not used for an extended period, it is recommended to carry out manual cleaning in order to flush the water left in the system during this period. Repeat the operation until the water comes out clean. It is important to shut off the ice maker by pressing the Ⓧ button before proceeding.
Manually Cleaning the Filter
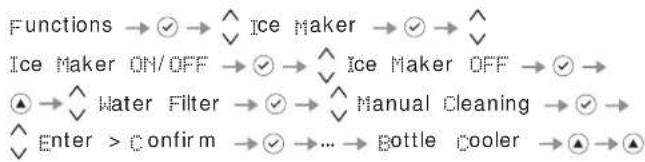
Functions → √ → ∧ ∨ Water Filter → √ → ∧ ∨ Manual Cleaning → √ Enter > Confirm → √
Repeat the operation until the water comes out clean.

Place the ice container or another suitable container under the Ice Maker in order to catch the water, then reclose the drawer. Wash the container when finished.
5.3 Base Menu Settings
Select the Menu button, then use the Up/Down button to select
FlexMode Options
The freezer compartment can, when required, be set to operate as a refrigerator or fresh compartment, therefore running at an appropriate temperature for these functions.
Selecting the Refrigerator Function
Settings → √ → ^ FlexMode Options → √ → ^ Refrigerator → √ Enter > Confirm → √
Selecting the Fresh Function
Settings → √ → ^ FlexMode Options → √ → ^ Fresh → √ Enter > Confirm → √
Restoring the Freezer Function
Settings → √ → ^ Flex Mode Options → √ → ^ Freezer → √ Enter > Confirm → √
Base Settings
This returns the settings to the factory defaults, causing any subsequent changes to be lost.
Restoring the Base Settings
Settings → √ → ^ Base Settings → √ Enter > Confirm → √

Important
When the base settings are restored, the FlexMode compartment setting must be selected again if it was previously set to operate in Refrigerator or Fresh mode.
DATE
Date Setting
The display will show the date in dd:mm:yy format; the day will be flashing. Use the Up/Down √ buttons to edit the setting, then confirm with the Enter √ button to move to the next setting; when the year is confirmed, the date is set.
Setting the Date
$$ \begin{array}{l}\text { Settings } \rightarrow \checkmark \rightarrow \hat {\bigvee} \text { Date } \rightarrow \checkmark \rightarrow \hat {\bigvee} \text { Date Setting }\\rightarrow \checkmark \text { DATE:01 - 01 - 2009} \rightarrow \checkmark\end{array} $$
Show Date
This function allows you to enable/disable date display.
Enabling Date Display
$$ \begin{array}{l}\text { Settings } \rightarrow \checkmark \rightarrow \hat {\vee} \text { Date } \rightarrow \checkmark \rightarrow \hat {\vee} \text { Show Date }\\rightarrow \checkmark \rightarrow \hat {\vee} \text { DATE: 01 - 01 - 2009 ON } \rightarrow \checkmark\end{array} $$
Disabling Date Display
$$ \begin{array}{l}\text { Settings } \rightarrow \textcircled {\checkmark} \rightarrow \bigwedge_ {\vee} \text { Date } \rightarrow \textcircled {\checkmark} \rightarrow \bigwedge_ {\vee} \text { show } \text { Date }\\rightarrow \textcircled {\checkmark} \rightarrow \bigwedge_ {\vee} \text { DATE: 01 - 01 - 2009 OFF } \rightarrow \textcircled {\checkmark}\end{array} $$
CLOCK
Time Setting
The time is displayed in hh:mm format, with the hour flashing.
Use the Up/Down √ buttons to modify the setting, which must then be confirmed with the Enter √ button to move to the next setting; when the minutes are confirmed, the time is set.
Setting the Time
$$ \begin{array}{l}\text { Settings } \rightarrow \checkmark \rightarrow \hat {\vee} \text { Clock } \rightarrow \checkmark \rightarrow \hat {\vee} \text { Time Setting }\\rightarrow \checkmark \text { TIME:01:01 } \rightarrow \checkmark\end{array} $$
12/24 h Setting
This function allows you to select 12 or 24 hour time display.
Setting 12 h display
$$ \begin{array}{l}\text { Settings } \rightarrow \checkmark \rightarrow \hat {\vee} \text { Clock } \rightarrow \checkmark \rightarrow \hat {\vee} \text { Display } 1 2 / 2 4\\rightarrow \checkmark \rightarrow \hat {\vee} \text { Set: } 1 2 \rightarrow \checkmark\end{array} $$
Setting 24 h display
$$ \begin{array}{l}\text { Settings } \rightarrow \checkmark \rightarrow \hat {\vee} \text { Clock } \rightarrow \checkmark \rightarrow \hat {\vee} \text { display } 1 2 / 2 4\\rightarrow \checkmark \rightarrow \hat {\vee} \text { set: } 2 4 \rightarrow \checkmark\end{array} $$
Show Time
This function allows you to enable/display permanent time display.
Enabling Permanent Time Display
$$ \begin{array}{l}\text {settings} \rightarrow \checkmark \rightarrow \hat {\vee} \text {Clock} \rightarrow \checkmark \rightarrow \hat {\vee} \text {show time}\\rightarrow \checkmark \rightarrow \hat {\vee} \text {TIME: 01:01 ON} \rightarrow \checkmark\end{array} $$
Disabling Permanent Time Display
$$ \begin{array}{l}\text {settings} \rightarrow \checkmark \rightarrow \hat {\bigvee} \text {clock} \rightarrow \checkmark \rightarrow \hat {\bigvee} \text {show} \quad \text {time}\\rightarrow \checkmark \rightarrow \hat {\bigvee} \text {TIME: 01:01 OFF} \rightarrow \checkmark\end{array} $$
LANGUAGE
Allows you to select the message display language.
Italian
$$ \text { Settings } \rightarrow \checkmark \rightarrow \bigwedge_ {\vee} \text { Language } \rightarrow \checkmark \rightarrow \bigwedge_ {\vee} \text { Italian } \rightarrow \checkmark $$
English
$$ \text { Settings } \rightarrow \checkmark \rightarrow \hat {\vee} \text { Language } \rightarrow \checkmark \rightarrow \hat {\vee} \text { English } \rightarrow \checkmark $$
French
$$ \text { Settings } \rightarrow \checkmark \rightarrow \bigwedge_ {\vee} \text { Language } \rightarrow \checkmark \rightarrow \bigwedge_ {\vee} \text { Français } \rightarrow \checkmark $$
German
$$ \text { Settings } \rightarrow \checkmark \rightarrow \bigwedge_ {\text { Language }} \rightarrow \checkmark \rightarrow \bigwedge_ {\text { Deutsch }} \rightarrow \checkmark $$
Spanish
$$ \text { Settings } \rightarrow \checkmark \rightarrow \bigwedge_ {\text { Language }} \rightarrow \checkmark \rightarrow \bigwedge_ {\text { Espanol }} \rightarrow \checkmark $$
Set ^ C / ^
This function sets the temperature display to degrees centigrade or Fahrenheit. The appliance is set to display degrees centigrade by default.
Selecting Degrees Centigrade
settings → √ → ^ set °C/°F → √ → ^ set °C → √
Selecting Degrees Fahrenheit
settings → √ → ⬇ set ℃/℉ → √ → ⬇ set ℃ F → √
Keypad Lock
This function enables/disables the keypad lock.
Enabling
Functions → √ → ^ Keypad Lock → √ → ^ ON → √
Disabling
Functions → √ → ⬇ Keypad Lock → √ → ⬇ OFF → √
6.1 Internal layout (positioning, adjustment, removal)
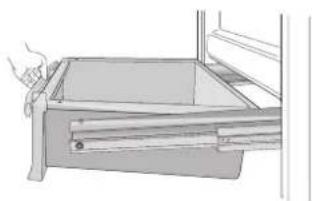
Drawer
Simply position in the sliding guides.
To remove the drawer, unscrew the two side fastening knobs, lift and pull out.
natural_image
Line drawing of a hand opening a drawer with drawers (no text or symbols)FlexMode Drawer
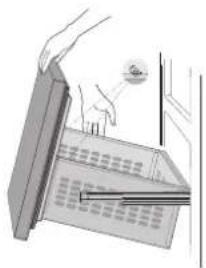
The FlexMode drawer is removed in the same way as the Fresh drawer, after unscrewing the two side fastening knobs.
To remove the internal FlexMode drawer, follow the same procedure as for the large drawer.
When replacing the drawers, ensure that the rear of the drawers is locked under the clips of the sliding guides.
natural_image
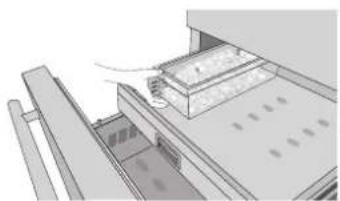
Illustration of a hand opening a rectangular box with a small circular inset showing a magnified view (no text or symbols)Ice Container
Located in the upper part of the freezer compartment, on some models it is fastened with locking panels.
Ensure it is repositioned correctly after removal.
natural_image
Architectural diagram of a multi-level building with structural elements and ventilation grilles (no text or symbols)
Warning
Keep hands and fingers away from the Ice Maker during operation.
Shelves
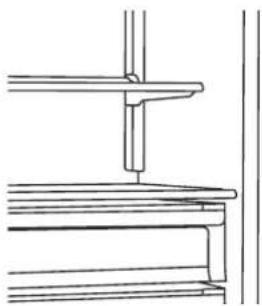
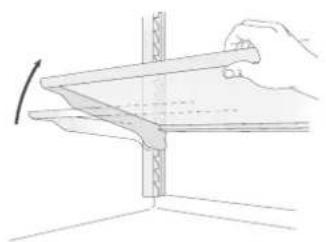
The shelves slide vertically and can be easily repositioned by users as follows:
Unscrew the rear fastening knob slightly.
Lift the front of the shelf and tilt slightly.
natural_image
Diagram of a hand holding a wooden plank with a curved arrow indicating rotation (no text or symbols)To remove a shelf, slide upwards and then pull out.
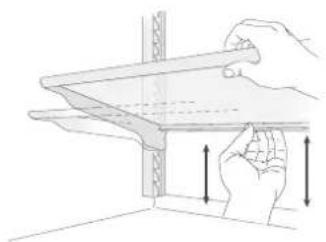
natural_image
Illustration of a hand holding a shelf with arrows indicating movement or force (no text or symbols)Door Balconies
The door balconies can be easily removed for cleaning.
Grasp the balcony by its sides and push it upwards until it is released from its seat, then pull outwards.
Reinstall by following the same procedure in reverse.
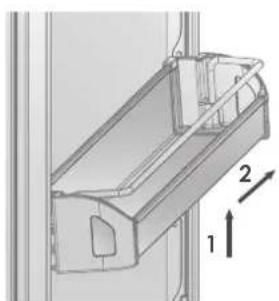
natural_image
Technical line drawing of a mechanical component with numbered callouts (1, 2) and directional arrows, no readable text or symbols.7.1 Activating and Using the Ice Maker

Notes
If the ice is not used frequently, it is advisable to empty the ice container every 8-10 days.
If the ice is not used regularly, older cubes will lose their clarity, may take on an unusual taste and will shrink.
It is normal for some cubes to stick together.
The Ice Maker is disabled automatically when the Vacation function is enabled.
When the Ice Maker is activated for the first time, it is advisable to discard the first ice produced when the container fills up for the first time.
If the unit remains switched off for a month or more, it is advisable to carry out a wash cycle of the water filter.
If it is necessary to shut off the mains water supply, disable the Ice Maker first via the Menu.
The Ice Maker will only produce ice if the FlexMode compartment is set to Freezer mode.
The Ice Maker will continue to operate even when the ice container is not in position
To enable the Ice Maker following installation, press the Ice Maker Ⓞ button.
Note that it will take between 12 and 24 hours for automatic ice production to occur.
Production is around ten cubes per cycle, with about ten cycles every 24 hours.
The device's output will depend on the temperature set for the freezer, the ambient temperature, and how often the doors are opened. If the refrigerator is operated without a water connection, ensure that the Ice Maker is disabled via the corresponding button ⓤ.
The Ice Maker produces ice until the container is completely filled, and stops automatically when the maximum level is reached.
The SuperIce function increases the quantity of ice produced over 24 hours, while the Set Cube Size function changes the size of the cubes produced.
Why does the ice have a strange odour?
Ice is a porous material which can absorb odours from the surrounding environment. Any ice cubes which remain in the container for a long period can absorb such odours, stick together, and shrink. It is recommended to discard this ice.
Other methods for preventing odours from occurring:
Clean the ice container with hot water every so often. Check that the ice dispenser is switched off before cleaning the container. Rinse thoroughly and dry with a tea towel.
Check whether the freezer contains food which has gone off or passed its use-by date. To prevent the build-up of odours, strong-smelling foods should be kept in air-tight boxes.
The water filter may be replaced on some models.
In some cases, the quality of the home's water supply must be checked.
Operational Noises
Normal Noises
Hum: the refrigeration system is running. The air recirculation system fan is operational.
Gurgling, rumbling and humming: these sounds are caused by the refrigerant flowing through the lines.
Click: the motor switching on or off. The water connection valve opening or closing.
Gentle noise: ice cubes falling into the tray.

The appliance is powered by two independent compressors. It is therefore normal for one of the two compressors to be operational at all times.

Warning
Never place bottles or foodstuffs in the ice tray to cool them down quickly, in order to prevent blockages or damage to the Ice Maker.
7.2 Water Filter
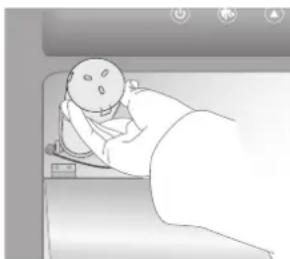
natural_image
Illustration of a baby lying in bed with a medical device, no text or symbols presentReset the water filter in the menu, or press and hold the Enter √ button for five seconds.
The Water Filter guarantees high-quality water for the production of ice cubes, for a total of 3,000 litres over a maximum time of 12 months.
When it is exhausted, the message 'Replace Filter' will appear on the display.
Filter Change
The filter is located behind the frosted glass in the upper section of the refrigerator.
Before changing the filter, disable the Ice Maker by pressing the Ice Maker button.
Pull both levers on the front part of the glass to release the locking mechanism, then pull the glass downward before carefully rotating the filter cartridge a quarter-turn to the left before removing it from its seat.
It is normal for a small quantity of water to leak out. Remove the cap on the new cartridge and insert it in its seat, then gently give it a quarter-turn to the right to lock it into position.
Then access the Menu and select the "Manual Clean" function. At the end of the cleaning cycle, remove the water from the ice container and dry it.
7.3 Water Filter for Freezer column Ice Makers
Column freezers equipped with automatic ice makers include an externally mounted water filter kit.
The water filter manifold and water connections must be plumbed in before final positioning of the refrigerator.
The water connection connecting the rear of the appliance to the filter kit must be in position before installing the unit.
The filter kit must be installed in an accessible position (such as an adjacent or underlying cabinet) in order to allow replacement of the water filter cartridge annually.
If you choose not to use a water filter (for example if the appliance is connected to a filter water supply), set the "Filter Bypass" function to ON in order to avoid receiving unnecessary filter change reminders.
For further details on how to access this function setting, follow the instructions on page 17 of the included instruction manual:
"Enabling the Filter Bypass".
8.1 Lighting
natural_image
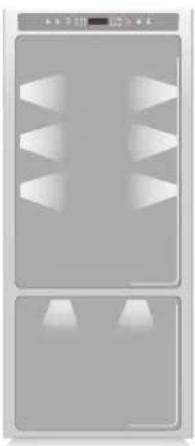
Pure electrical circuit lines without any symbolsIn order to provide better visibility, the appliance incorporates an LED lighting system which illuminates different areas of the refrigerator, the Fresh drawers and the Freezer drawer.
Some models also include a night-time external lighting system located in the appliance base.
In the even of faults and/or malfunctions in the lighting system, you must only contact Bertazzoni's technical support service.
9.1 General Instructions
Your Bertazzoni has been designed to guarantee constant temperatures and appropriate humidity levels in all compartments. Moreover, the dual refrigeration system ensures that frozen foods and ice are not impregnated with odours from fresh foods, and that the moisture in the refrigerator does not freeze and form frost.
In any case, optimum preservation of your foodstuffs not only requires a high-quality refrigerator, but also knowledge of the rules of food preservation.
Bear in mind that all foodstuffs degrade with the passage of time. These changes occur long before consumption, as they contain micro-organisms which cause the food to perish as they multiply.
This is accelerated by inappropriate humidity levels, storage temperatures and handling.
We therefore recommend that you follow the instructions given below which will allow you to use your fridge-freezer in the most effective and safest manner, in order to preserve your foodstuffs for as long and as safely as possible.
Bear in mind that the Fresh or Low Temp zone is that which offers the best conservation of the most perishable fresh foods, as it maintains a medium-low temperature with the ideal humidity level.
Regularly check that all foodstuffs are in good condition. It is often clear when foods have perished, as there will be mould growth, unpleasant odours and an unattractive appearance.
However, this is not always the case.
If you think that food has been kept for too long and may therefore have gone bad, do not consume it or even taste it to check, even if it still looks good – the bacteria responsible for spoiling can cause food poisoning or other ailments. If in any doubt, throw the food away.
9.2 Maintaining the Quality of Stored Foodstuffs
When Food Shopping
Always follow these precautions:
Always place packs of raw meat, fish or poultry in suitable containers.
Purchase meat, fish and poultry last. Do not leave them in a hot car after going shopping.
Keep a cool bag/box in your car and use it when temperatures are high or when you have to travel long distances.
Check the production and expiry dates on foods to ensure they are fresh.
When buying fresh foodstuffs, be sure not to buy more than you can eat in a couple of days.
Leave hot foods to cool down for at least two hours before placing them in the refrigerator.
When Placing Foods in the Refrigerator
Check the refrigeration temperatures of the various compartments on the control panel:
The temperature of the refrigerator must be 8^ C ( 46.4^ F) or below, and the freezer temperature must be -18^ C ( 0^ F).
Follow the storage times and temperatures given in the tables below.
Keep raw meat, fish and poultry separate from other foodstuffs, and ensure they cannot drip onto other items.
When placing fish, meat or poultry in the refrigerator, leave them in their original packages, unless these are broken or perforated.
Repeated handling increases the chance of bacterial growth or contamination.
It is advisable to use dedicated freezer containers when freezing.
Date and label packages.
Take care to correctly arrange items in such a way as not to block the cold air circulation openings inside the appliance.

Notes
In some situations of high ambient humidity, or with high levels of moisture present in vegetables or other foods stored in the fresh drawer, you may notice water in the bottom of the fresh drawer, or else a layer of ice if the temperature of this compartment is set to between 0 and -2 degrees.
This is absolutely normal, and is caused by the high humidity level which the fresh drawers must maintain at all times in order to ensure long conservation times.
The water or ice may disappear by itself if the humidity level of the air drops; otherwise, it is possible to dry any water with a cloth, or else melt the ice by increasing the temperature to +2 for a day before removing the water; if this is not sufficient, shut off the fresh compartment for 12-24 hours before removing the residual water.

Warning
When the power is restored after an extended power cut, an audible signal will indicate that the refrigerator temperature has exceeded the correct storage temperature threshold, while the displays will show the highest temperatures measured inside the compartments for one minute in order to allow the user to determine how best to use the foodstuffs.
The displays will resume normal operation after one minute, while the Alarm ⏻ button will continue to flash; press the Alarm ⏻ button again to display the highest recorded temperatures once more.
FRESH FOODS STORAGE ZONE TIMES
Raw meat
Large cuts Fresh compartment 4 days
Steaks, poultry and game Fresh compartment 3 days
Minced meat Fresh compartment 1-2 days
Carpaccio Fresh compartment immediately
Cooked meat
Boiled/roast meat Refrigerator compartment 2 days
Meat sauce Refrigerator compartment 6 days
Fish
Cooked and raw fish Fresh compartment 2 days
Miscellaneous
Soups, stocks and broths Refrigerator compartment 2 days
Pasta Refrigerator compartment 2 days
Cold cuts (open packets) Fresh compartment 3 days
Fresh cheeses Fresh compartment 2-3 days
Mature cheeses (well packaged) Refrigerator compartment several months
Eggs (fresh, unwashed) Refrigerator compartment 2 weeks
Open tins Refrigerator compartment 2-3 days
Raw vegetables (in perforated packages) Fresh compartment 1 week
| FROZEN FOODS | STORAGE ZONE | TIMES | |
| Beef, veal, lamb, mutton etc. | Freezer compartment | (steaks) | 6-12 months |
| Beef, veal, lamb, mutton etc. | Freezer compartment | (bone-in cuts/joints) | 4-6 months |
| Minced beef | Freezer compartment | 1-2 months | |
| Pork | Freezer compartment | (boneless) | 4-6 months |
| Pork | Freezer compartment | (bone-in) | 2-3 months |
| Minced pork | Freezer compartment | 1-2 months | |
| Meat leftovers | Freezer compartment | 2-3 months | |
FROZEN FOODS STORAGE ZONE TIMES
Whole chicken/turkey Freezer compartment 8-12 months
Goose, duck, guinea fowl Freezer compartment 4-8 months
Fish Freezer compartment 1-2 months
Shellfish Freezer compartment 2-3 months
Cooked foods Freezer compartment 1-2 months
Vegetables Freezer compartment 8-12 months
Fruit Freezer compartment 6-12 months
Cakes, sweets, pies Freezer compartment 2-3 months
11.1 Care and Cleaning
Use a microfibre cloth and sponge to clean steel parts.
Always follow the grain direction of the steel when using a cloth or sponge.
Every so often, pass over the steel with a moistened microfibre cloth to restore its shine.
Do not use a sponge on aluminium components such as the handles and glass shelf profiles.
In particular, the internal and external ventilation openings must be kept free of obstructions.

Closely follow the detailed instructions provided in the supplied kit, and in no case use abrasive or metal products as these could scratch and permanently damage the appliance's satin finish.
Isolate the appliance's power supply before performing any cleaning operations.
Take great care not to damage the refrigerant circuit in any way.
Warning

Do not use chlorine-based detergents such as bleach (sodium hypochlorite).
Exposure to corrosive substances such as lemon juice, vinegar, limescale removers and other similar domestic cleaning products should also be avoided.
11.2 Cleaning the Ventilation Grille, Filter and Condenser
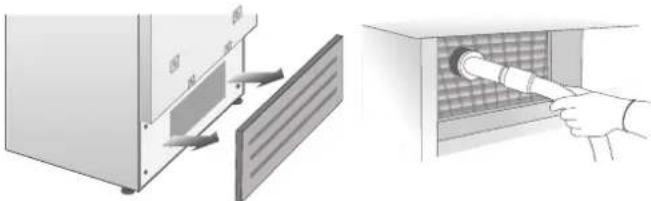
The condenser is located behind the front ventilation grille (at the bottom of the appliance).
Use a vacuum cleaner with soft brush attachment at maximum power to clean it, passing it over the slots of the grille.
In the event of significant dust build-up, the ventilation grille can be removed to allow more thorough cleaning.
Every six months, the message "Check Cond." will appear on the display: clean the condenser and then press and hold the Enter √ button for five seconds to reset.
Proceed as follows:
Shut off the appliance by pressing and holding the Unit ⏻ button on the main control panel for around three seconds.
Wait for around 30 minutes to allow the condenser to reach ambient temperature.
Remove the grille.
Thoroughly clean all dust deposits from the condenser as shown in the figure, taking care not to damage it.
Switch the appliance back on by pressing and holding the Unit ⏻ button again for three seconds.
natural_image
Illustration showing a device with a ventilation cover and a hand inserting a pipe into a cabinet (no text or symbols)
Warning
The fins of the condenser are sharp: use adequate hand and arm protection when cleaning it.
11.3 Internal Cleaning
Clean the interior and any removable components, washing with warm water with the addition of a very small amount of washing-up liquid.
Rinse and dry immediately.
It is advisable not to use mechanical tools or other methods to accelerate the defrosting process.

Warning
Do not use water on the electrical components, the lights or the control panels.

Warning
Do not use chlorine-based detergents such as bleach (sodium hypochlorite).

Do not allow cold glass parts to come into contact with boiling water.
Do not wash any part of the refrigerator in a dishwasher, as it could be irreparably damaged or deformed.
12.1 Troubleshooting
If you notice operational problems with your appliance, use this guide before calling technical support: it may help you to solve the problem yourself, and otherwise will provide important information to give to technical support in order to ensure faster, more effective service.
Messages on the display and audible warnings
An operational problem is usually indicated on the display.
Problems which cannot be solved by the user are indicated via a fault code. Bear in mind, however, that messages or alarms could appear due to abnormal usage conditions or during start-up. In these cases, disable the audible alarm by pressing the Alarm ⏻ button and leave the appliance running, ensuring the doors are opened as little as possible for around 10-12 hours.
The refrigerator or freezer does not work
Is the appliance connected to the electricity supply?
Is the socket live?
Is the Unit ⏻ button active?
Is the unit in 'Demo' mode?
The refrigerator or freezer is hotter than usual
Is a fault code shown on the display?
Is the temperature set correctly?
Have the doors or drawers been left open for a long time?
Have large quantities of food recently been placed inside?
Is the unit in 'Demo' mode?
The appliance keeps running for a long period of time
Bear in mind that on very hot days with high indoor temperatures, it is normal for the compressor to keep running for extended periods.
Have the doors or drawers been left open for a long time?
Have large quantities of food recently been placed inside?
Check that the doors are tightly closed and that there is nothing inside the appliance preventing them from closing properly.
Is one or more compartment in Shopping mode?
The appliance is making strange noises
It is normal for the fans or compressors to make noises, or else to hear noises during the defrosting process.
The volume may also increase on the basis of the positioning of the appliance and the surrounding environment.
Condensation forming on the inside and outside of the refrigerator
If the climate is very humid, the appearance of a certain amount of condensation is normal. Opening the door or drawers for extended periods can contribute to the formation of condensation.
In any case, ensure that the doors are always kept perfectly closed.
There is frost or ice in the refrigerator or freezer
Have the doors been kept open for an extended period?
Will the doors close properly?
If the doors do not close properly, contact your installer.
In the event of ice or frost forming inside your Fresh compartment due to frequent, prolonged opening of the doors, deactivate the Fresh function for a period of time by pressing the corresponding button on the control panel. Wait for the frost or ice to melt, then remove the drawer and dry the sides and the base of the compartment.
Unpleasant odours are coming from the interior
Clean the appliance fully in accordance with the instructions.
Ensure all foodstuffs inside the refrigerator are kept in sealed containers. Do not keep foodstuffs for prolonged periods.
The door is difficult to open
The appliance has been designed to provide an airtight seal when it is closed. When the door is closed, this may create a partial vacuum inside the appliance: in this case you should wait a few seconds for the pressure to equalise before trying to open it.
The appliance is cooling, but the lights and display are not working
Check whether the appliance has accidentally been placed in Sabbath mode
The ice maker is not working
Check that the Ice Maker is on (Ice Maker ⓞ button on).
Press the button itself to switch it on.
Check that the appliance is connected to the water supply.
If the filter has not been changed for a long time, this may limit the water flow.
The ice maker is not producing a lot of ice
On average, the ice maker produces ten ice cubes every two hours.
The ice cubes are freezing together
If ice is not dispensed regularly, the cubes may freeze together into a block. In this case, remove the cubes which are stuck together and let the container fill up again.
The ice has an unusual colour or flavour
When the Ice Maker is first used, it is advisable to empty the container after it has filled up for the first time.
It may be necessary to change the filter cartridge, above all if the refrigerator has been switched off for more than a month or the cartridge has not been cleaned for over six months.
If necessary, contact a plumber or an expert in water treatment systems to check that the problem is not due to the water supply.

If the purchased appliance has been used as a showroom model, it may have been placed in a special energy-saving mode known as Demo mode in which the appliance appears to be operational (the lights work and a fictitious temperature is displayed), but no cooling is actually performed by the appliance. If you suspect that your appliance is operating in Demo mode, please contact your reseller for support in disabling this function.
12.2 Fault Indications which May Appear on the Display
Message on Display Fault Description
| Current Interr. | Prolonged interruption of the power supplyThe appliance restarts automatically, displaying the highest temperatures recordedPress the Alarm button to disable the audible warning |
| Fr. Door Open | Refrigerator door openThis message is displayed once the door has been open for one minute |
| FlexMode Open | Freezer door openThis message is displayed once the door has been open for one minute |
| Change Filter | Water filter changeThis message appears when the water filter has 20% of its time/capacity remaining |
| Fr too hot | Refrigerator too hotSee troubleshooting |
| Fr too cold | Refrigerator too coldWait twelve hours: if the fault persists, contact the Customer Care service |
| Fresh too hot | Fresh compartment too hotSee troubleshooting |
| Fresh too cold | Fresh compartment too coldWait twelve hours: if the fault persists, contact the Customer Care service |
| FlexMode too hot | Freezer too hotSee troubleshooting |
| FlexMode too cold | Freezer too coldWait twelve hours: if the fault persists, contact the Customer Care service |
| Fault code ... | Fault codeContact the Customer Care service. Check the conditions of use (large quantities of food added, frequent opening of the doors). Press the Alarm button to disable the audible warning. |
| Check condenser | Check CondenserEvery six months the message “Check Cond.” appears; clean the condenser, then press and hold the Enter button for five seconds to reset. |
13.1 Functions
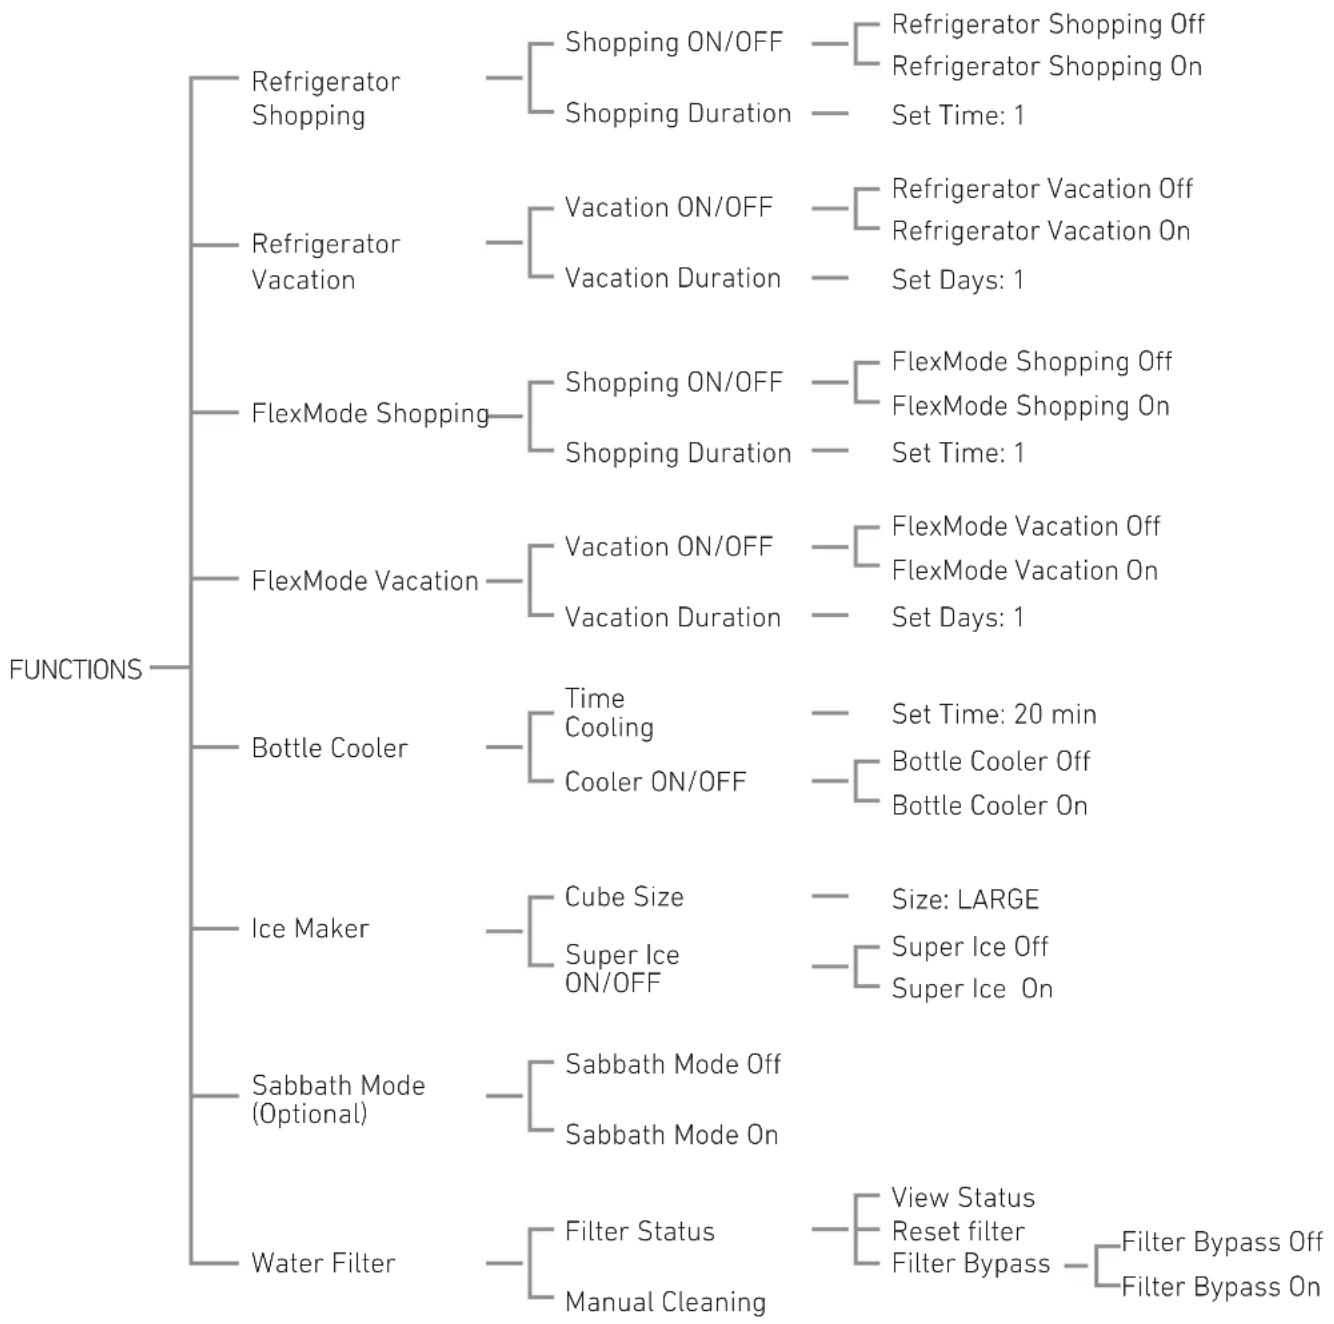
flowchart
graph TD
    A["FUNCTIONS"] --> B["Refrigerator Shopping"]
    A --> C["Refrigerator Vacation"]
    A --> D["FlexMode Shopping"]
    A --> E["FlexMode Vacation"]
    A --> F["Bottle Cooler"]
    A --> G["Ice Maker"]
    A --> H["Sabbath Mode (Optional)"]
    A --> I["Water Filter"]

    B --> B1["Shopping ON/OFF"]
    B --> B2["Shopping Duration"]
    B2 --> B2a["Refrigerator Shopping Off"]
    B2 --> B2b["Refrigerator Shopping On"]
    B2 --> B2c["Set Time: 1"]

    C --> C1["Vacation ON/OFF"]
    C --> C2["Vacation Duration"]
    C2 --> C2a["Refrigerator Vacation Off"]
    C2 --> C2b["Refrigerator Vacation On"]
    C2 --> C2c["Set Days: 1"]

    D --> D1["Shopping ON/OFF"]
    D --> D2["Shopping Duration"]
    D2 --> D2a["FlexMode Shopping Off"]
    D2 --> D2b["FlexMode Shopping On"]
    D2 --> D2c["Set Time: 1"]

    E --> E1["Vacation ON/OFF"]
    E --> E2["Vacation Duration"]
    E2 --> E2a["FlexMode Vacation Off"]
    E2 --> E2b["FlexMode Vacation On"]
    E2 --> E2c["Set Days: 1"]

    F --> F1["Time Cooling"]
    F --> F2["Cooler ON/OFF"]
    F2 --> F2a["Set Time: 20 min"]
    F2 --> F2b["Bottle Cooler Off"]
    F2 --> F2c["Bottle Cooler On"]

    G --> G1["Cube Size"]
    G --> G2["Super Ice ON/OFF"]
    G2 --> G2a["Size: LARGE"]
    G2 --> G2b["Super Ice Off"]
    G2 --> G2c["Super Ice On"]

    H --> H1["Sabbath Mode Off"]
    H --> H2["Sabbath Mode On"]

    I --> I1["Filter Status"]
    I --> I2["Manual Cleaning"]
    I2 --> I2a["View Status"]
    I2 --> I2b["Reset filter"]
    I2 --> I2c["Filter Bypass"]
    I2 --> I2d["Filter Bypass Off"]
    I2 --> I2e["Filter Bypass On"]
13.2 Settings
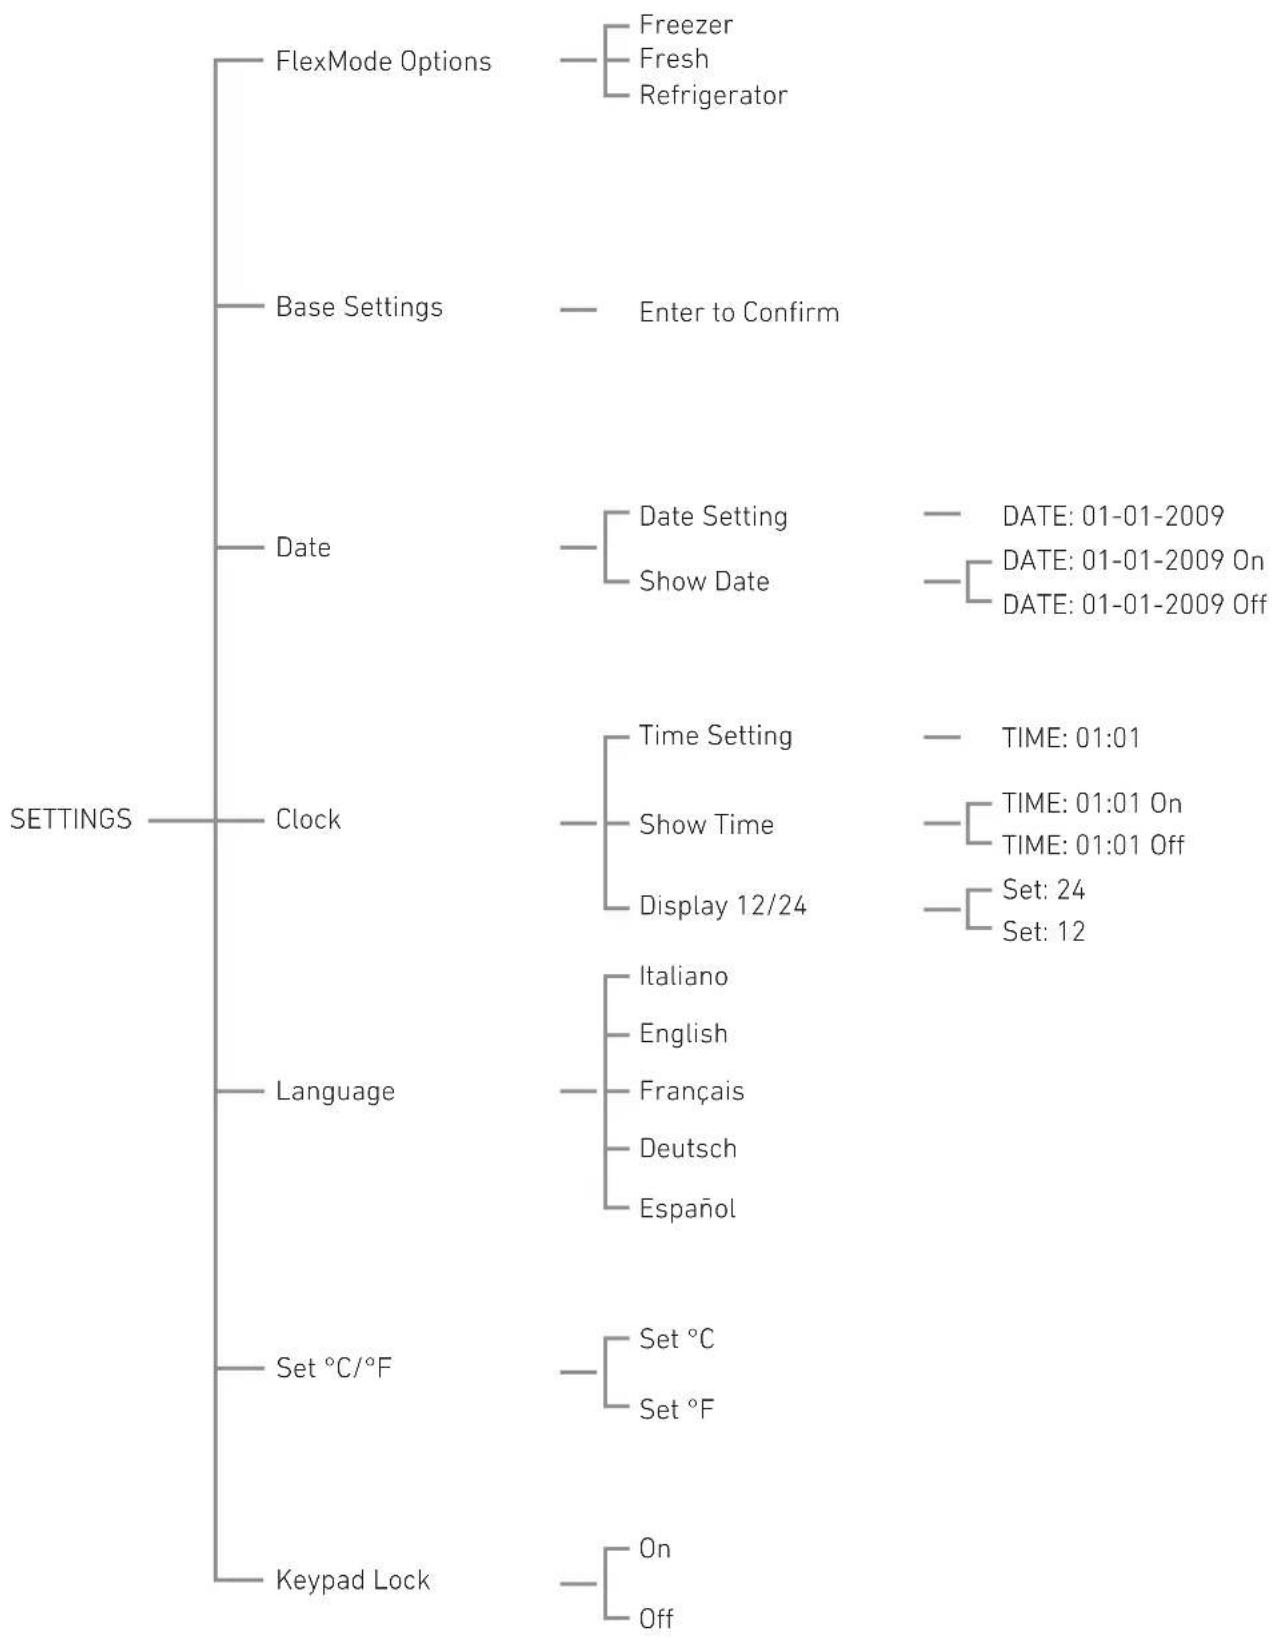
flowchart
graph TD
    A["FIXEMODE Options"] --> B["Freezer"]
    A --> C["Fresh"]
    A --> D["Refrigerator"]
    E["BASE SETTINGS"] --> F["Enter to Confirm"]
    G["DATE"] --> H["Date Setting"]
    G --> I["Show Date"]
    G --> J["DATE: 01-01-2009"]
    G --> K["DATE: 01-01-2009 On"]
    G --> L["DATE: 01-01-2009 Off"]
    M["Clock"] --> N["Time Setting"]
    M --> O["Show Time"]
    M --> P["Display 12/24"]
    Q["Language"] --> R["Italiano"]
    Q --> S["English"]
    Q --> T["Français"]
    Q --> U["Deutsch"]
    Q --> V["Espanol"]
    W["Set °C/°F"] --> X["Set °C"]
    W --> Y["Set °F"]
    Z["Keypad Lock"] --> AA["On"]
    Z --> AB["Off"]
1 NOTES IMPORTANTES POUR LA SÉCURITÉ ET L'ENVIRONNEMENT 4
natural_image
Diagram of a mechanical connector with a cylindrical shaft and flange, showing internal components (no text or symbols)natural_image
Illustration of hands using a power plug to install a wall socket (no text or symbols visible)
Important
natural_image
Pure technical line drawing of a mechanical assembly (no text or symbols)3.2 Parties principales
Fonctions → √ → ^ shopping Flex Mode → √ → ^
Shopping Flex Mode ON/OFF → √ → ^
Shopping Flex Mode ON → √
Pour désactiver
Fonctions → √ → ^ Shopping Flex Mode → √ → ^
Shopping Flex Mode ON/OFF → √ → ^
Shopping Flex Mode OFF → √
Enter > Confirmer → √
Enter > Confirmer → √
By-pass Filtre
Freezer → √ Enter > Confirmer → √
Réglages de base
Enter > Confirmer → √

Important
natural_image
Line drawing of a hand opening a drawer with handle (no text or symbols)Tiroir FlexMode
natural_image
Illustration of a hand holding a rectangular object with a circular symbol on top, next to a ruler and a small scale (no text or symbols present)Bac à glace
natural_image
Architectural elevation drawing of a building facade with structural elements (no text or symbols)
Attention
natural_image
Line drawing of a hand holding a rectangular object with a curved arrow indicating rotation (no text or symbols)natural_image
Illustration of a hand holding a metal shelf with measurement arrows (no text or symbols)Balconnets de porte
natural_image
Technical line drawing of a mechanical component with labeled dimensions (1, 2), no readable text or symbols present.natural_image
Illustration of a baby lying in bed with a medical device, no text or symbols presentnatural_image
Pure electrical circuit lines without any symbolsnatural_image
Illustration showing a door panel being inserted into a rack with a hand inserting a plug into a vent (no text or symbols)
Attention
natural_image
Diagram of a mechanical connector with a bulb and ring (no text or symbols)natural_image
Hand holding a plug inserted into a wall socket (no text or symbols visible)
Importante
natural_image
Pure technical line drawing of a mechanical assembly (no text or symbols)3.2 Componentes principales
Up/Down Freezer (FlexMode)
Funciones → √ → ^ shopping Frigor ifico → √ → ^
Shopping Frigor ifico ON/ OFF → √ → ^
shopping Frigor ifico ON → √
Para desactivar
Funciones → √ → ^ Shopping Frigor ifico → √ → ^
Shopping Frigor ifico ON/ OFF → √ → ^
Shopping Frigor ifico OFF → √
Funciones → √ → ^ shopping Flexmode → √ → ^
shopping Flexmode ON OFF → √ → ^
shopping Flexmode OFF → √
natural_image
Line drawing of a hand opening a drawer with handle (no text or symbols)Vacaciones FlexMode
natural_image
Illustration of a hand placing a small object into a container with a ruler, no text or symbols presentnatural_image
Architectural cross-section diagram of a building facade with storage compartments and structural elements (no text or symbols)
Atención
natural_image
Diagram of a hand holding a rectangular object with a curved arrow indicating rotation (no text or symbols present)natural_image
Illustration of a hand holding a shelf with arrows indicating movement or force (no text or symbols)Bandejas de puerta
natural_image
Technical illustration of a mechanical component with labeled parts and directional arrows (no text or symbols)natural_image
Illustration of a baby lying on a bed, no text or symbols presentnatural_image
Front view of a gray appliance front panel with recessed lighting and ventilation grilles (no text or symbols visible)natural_image
Illustration showing a door panel being inserted into a vent with a hand inserting a tube into a chamber (no text or symbols)
Atención
6 BINNENUITRUSTING 15
2 GIDS VOOR PROBLEEMOPLOSSING 22
natural_image
Diagram of a connector with a bulb and socket, showing internal components (no text or symbols)natural_image
Illustration of hands using a power plug to install an electrical socket (no text or symbols visible)
Belangrijk
natural_image
Pure technical line drawing of a mechanical assembly without any text, numbers, or symbolsUp/Down Freezer (FlexMode)

Belangrijk
Functions → √ → ^ Refrigerator Shopping → √ → ^ Refrigerator Shopping ON/OFF → √ → ^ Refrigerator Shopping ON → √
Hoe uitschakelen
Functions → √ → ^ Refrigerator Shopping → √ → ^ Refrigerator Shopping ON/OFF → √ → ^ Refrigerator Shopping OFF → √
Functions → √ → ^ Refrigerator Shopping → √ → ^ Shopping Duration → √ → ^ Time Setting I → ^ → √
Functions → √ → ^ Refrigerator Vacation → √ → ^
Vacation Duration → √ → ^ Set Days I → √
Functions → √ → ^ FlexMode Shopping → √ → ^ FlexMode Shopping ON/OFF → √ → ^ FlexMode Shopping ON → √
Hoe uitschakelen
Functions → √ → ^ FlexMode Shopping → √ → ^ FlexMode Shopping ON/OFF → √ → ^ FlexMode Shopping OFF → √
Functions → ✅ → ^ Flexpde Shopping → ✅ → ^
Shopping Duration → ✅ → ^ Time Setting I → ^ → ∅
Vakantie FlexMode
Functions → √ → ∧ Water Filter → √ → ∧ Filter Status → √ Display Status → √ Enter > Confirm → √
Functions → √ → ∧ Water Filter → √ → ∧ Filter Status → √ → ∧ Reset Filter → √ Enter > Confirm → √
Filter-bypass
Functions → √ → ∧ Water Filter → √ → ∧ Filter Status → √ → ∧ Filter Bypass → √ → ∧ Filter Bypass ON → √
Functions → √ → ∧ water Filter → √ → ∧ Filter status → √ → ∧ Filter Bypass → √ → ∧ Filter Bypass OFF → √
Functions → √ → ∧ √ Water Filter → √ → ∧ √ Manual Cleaning → √ Enter > Confirm → √
Settings → √ → ^ FlexMode Options → √ → ^ Fresh → √ Enter > Confirm → √
Settings → √ → ^ Flex Mode Options → √ → ^ Freezer → √ Enter > Confirm → √
Defaultinstellingen
Settings → √ → ^ Base Settings → √ Enter > Confirm → √

Belangrijk
natural_image
Line drawing of a hand opening a drawer with drawers (no text or symbols)FlexMode-lade
natural_image
Illustration of a hand placing a component into a container with a magnified inset showing a small circular symbol (no text or labels)IJslade
natural_image
Architectural diagram of a multi-level building with structural elements and ventilation grilles (no text or symbols)
Opgelet
natural_image
Illustration of a hand holding a metal bracket with a curved arrow indicating rotation (no text or symbols)natural_image
Illustration of a hand holding a shelf with arrows indicating movement or force (no text or symbols)Deurrekjes
natural_image
Technical illustration of a mechanical component with labeled parts and directional arrows (no text or symbols)natural_image
Illustration of a baby lying on a bed with a medical device, no text or symbols presentnatural_image
Pure electrical circuit lines without any symbolsnatural_image
Illustration showing a door panel being inserted into a vent with a hand inserting a tube into a rack (no text or symbols)
Opgelet
natural_image
Diagram of a mechanical connector with a bulb and nut, showing internal components (no text or symbols)natural_image
Illustration of hands using a power plug to install an electrical socket (no text or symbols visible)
Viktigt
natural_image
Pure technical line drawing of a mechanical assembly without any text, numbers, or symbols
Viktigt
Functions → √ → ^ Refrigerator Shopping → √ → ^ Refrigerator Shopping ON/OFF → √ → ^ Refrigerator Shopping ON → √
Avaktivering
Functions → √ → ^ Refrigerator Shopping → √ → ^ Refrigerator Shopping ON/OFF → √ → ^ Refrigerator Shopping OFF → √
Functions → √ → ^ Refrigerator Shopping → √ → ^ Shopping Duration → √ → ^ Time Setting I → ^ → √
Functions → √ → ^ Refrigerator Vacation → √ → ^ Vacation Duration → √ → ^ Set Days I → √
Functions → √ → ^ FlexMode Shopping → √ → ^ FlexMode Shopping ON/OFF → √ → ^ FlexMode Shopping ON → √
Avaktivering
Functions → √ → ^ FlexMode Shopping → √ → ^ FlexMode Shopping ON/OFF → √ → ^ FlexMode Shopping OFF → √
Functions → √ → ^ Flexpde Shopping → √ → ^ Shopping Duration → √ → ^ Time Setting I → ^ → √
Semester FlexMode
Functions → √ → ∧ Water Filter → √ → ∧ Filter Status → √ → ∧ Filter Bypass → √ → ∧ Filter Bypass ON → √
Functions → √ → ∧ water Filter → √ → ∧ Filter status → √ → ∧ Filter Bypass → √ → ∧ Filter Bypass OFF → √
Functions → √ → ^ √ Water Filter → √ → ^ √ Manual Cleaning → √ Enter > Confirm → √
Settings → √ → ^ Flex Mode Options → √ → ^ Fresh → √ Enter > Confirm → √
Settings → √ → ⬇ FlexMode Options → √ → ⬇ Freezer → √ Enter > Confirm → √
Grundinställningar
Settings → √ → ^ Base Settings → √ Enter > Confirm → √

Viktigt
Functions → √ → ^ Keypad Lock → √ → ^ ON → √
Avaktivering
Functions → √ → ⬇ Keypad Lock → √ → ⬇ OFF → √
6.1 Inredning (placering, reglering, borttagning)
Låda
natural_image
Line drawing of a hand opening a drawer with drawers (no text or symbols)FlexMode-låda
natural_image
Illustration of a hand opening a rectangular box with a small circular inset showing a magnified view (no text or symbols)Isskål
natural_image
Architectural diagram of a multi-level building with structural elements and ventilation grilles (no text or symbols)
Varning
natural_image
Diagram of a hand holding a rectangular object with a curved arrow indicating rotation (no text or symbols present)natural_image
Illustration of a hand holding a metal shelf with measurement arrows indicating depth (no text or symbols)Dörrhyllor
natural_image
Technical line drawing of a mechanical component with numbered callouts (1, 2) and directional arrows, no readable text or symbols.natural_image
Illustration of a baby lying in bed with hands placed on the blanket (no text or symbols)natural_image
Pure electrical circuit lines without any symbolsnatural_image
Illustration showing a device with a ventilation cover and a hand inserting a pipe into a cabinet (no text or symbols)
Varning
4 TÆNDING OG SLUKNING AF APPARATET 9
natural_image
Diagram of a mechanical connector with a bulb and bolt, showing internal components (no text or symbols)natural_image
Illustration of hands using a power plug to install an electrical socket (no text or symbols visible)
Vigtigt
natural_image
Pure technical line drawing of a mechanical assembly without any text, numbers, or symbols3.2 Hovedkomponenter
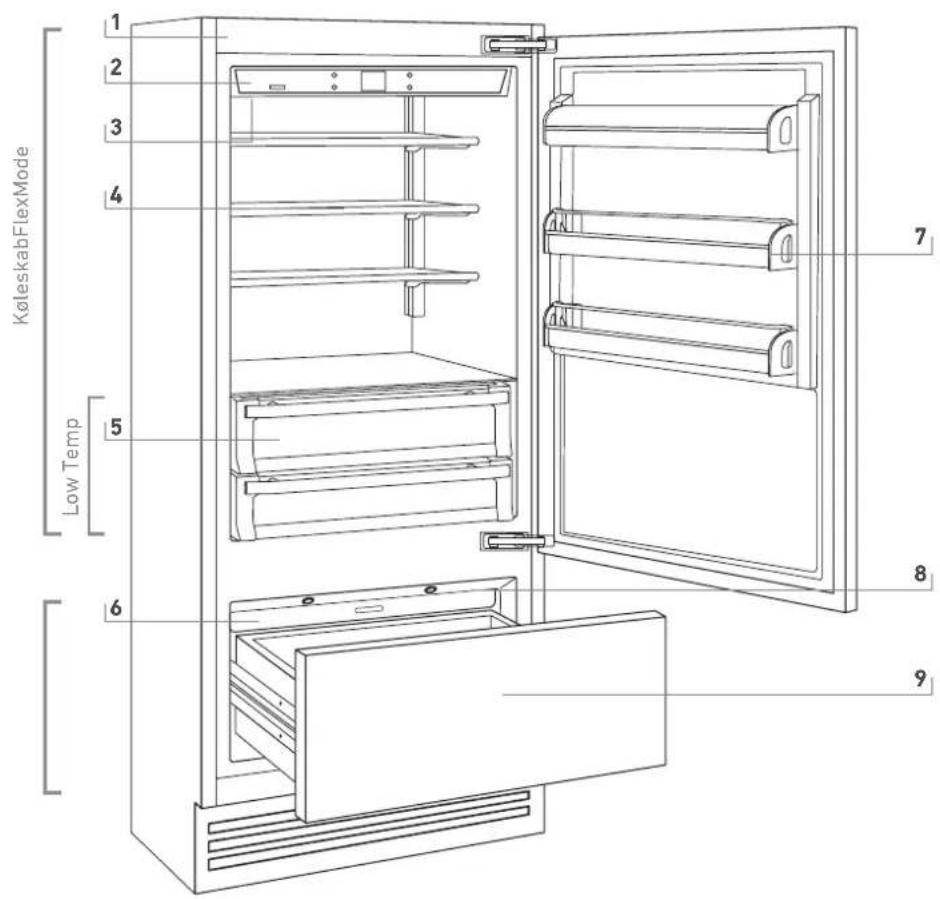
1 Struktur i rustfrit stål med aluminiumsfinish
2 Interaktivt betjeningspanel
3 Vandfilter (*)
Up/Down Freezer (FlexMode)

Vigtigt
Functions → √ → ^ Refrigerator shopping → √ → ^ Refrigerator Shopping ON/OFF → √ → ^ Refrigerator shopping ON → √
For at inaktivere
Functions → √ → ^ Refrigerator Shopping → √ → ^ Refrigerator Shopping ON/OFF → √ → ^ Refrigerator Shopping OFF → √
Functions → √ → ^ Refrigerator Shopping → √ → ^ Shopping Duration → √ → ^ Time Setting I → ^ → √
Functions → √ → ^ Refrigerator Vacation → √ → ^ Vacation Duration → √ → ^ Set Days I → √
En periode på 1 til 90 dage kan programmeres.
Shopping FlexMode
Functions → √ → ^ Flexmode shopping → √ → ^ Flexmode Shopping ON/OFF → √ → ^ FlexMode Shopping ON → √
For at inaktivere
Functions → √ → ^ FlexMode Shopping → √ → ^ FlexMode Shopping ON/OFF → √ → ^ FlexMode Shopping OFF → √
Functions → ✅ → ^ Flexpde Shopping → ✅ → ^ Shopping Duration → ✅ → ^ Time Setting I → ^ → ✅
Ferie FlexMode
For at lave store terninger
$$ \begin{array}{l} \text { Functions } \rightarrow \checkmark \rightarrow \hat {\vee} \text { Ice maker } \rightarrow \checkmark \rightarrow \hat {\vee} \ \text { Cube Size } \rightarrow \checkmark \rightarrow \hat {\vee} \text { Size: LARGE } \rightarrow \hat {\vee} \rightarrow \checkmark \ \end{array} $$
For at lave mellem terninger
$$ \begin{array}{l} \text { Functions } \rightarrow \checkmark \rightarrow \hat {\vee} \text { Ice Maker } \rightarrow \checkmark \rightarrow \hat {\vee} \ \text { Cube Size } \rightarrow \checkmark \rightarrow \hat {\vee} \text { Size: MEDIUM } \rightarrow \hat {\vee} \rightarrow \checkmark \ \end{array} $$
Functions → √ → ∧ Water Filter → √ → ∧ Filter Status → √ Display Status → √ Enter > Confirm → √
Functions → √ → ∧ Water Filter → √ → ∧ Filter Status → √ → ∧ Reset Filter → √ Enter > Confirm → √
Filter-bypass
Functions → √ → ∧ Water Filter → √ → ∧ Filter Status → √ → ∧ Filter Bypass → √ → ∧ Filter Bypass ON → √
Functions → √ → ∧ water Filter → √ → ∧ Filter status → √ → ∧ Filter Bypass → √ → ∧ Filter Bypass OFF → √
Functions → √ → ∧ ∨ Water Filter → √ → ∧ ∨ Manual Cleaning → √ Enter > Confirm → √
Settings → √ → ^ FlexMode Options → √ → ^ Fresh → √ Enter > Confirm → √
Sådan genoprettes funktionen fryser
Settings → √ → ^ Flex Mode Options → √ → ^ Freezer → √ Enter > Confirm → √
Settings → √ → ^ Base Settings → √ Enter > Confirm → √

Vigtigt
Functions → √ → ^ Keypad Lock → √ → ^ ON → √
For at inaktivere
Functions → √ → ⬇ Keypad Lock → √ → ⬇ OFF → √
natural_image
Line drawing of a hand opening a drawer with drawers (no text or symbols)FlexMode-skuffe
natural_image
Illustration of a hand opening a rectangular box with a small circular inset showing a magnified view (no text or symbols)Isbakke
Sidder for oven i fryserrummet, på visse modeller er den fastgjort med låsepaneler.
natural_image
Architectural diagram of a multi-level building with structural elements and access pipes (no text or symbols)
Advarsel
natural_image
Hand holding a metal bracket with a curved arrow indicating rotation (no text or symbols)natural_image
Line drawing of a hand holding a shelf with arrows indicating movement or force (no text or symbols)Dørhylder
natural_image
Technical line drawing of a mechanical component with numbered callouts (1, 2) and directional arrows, no readable text or symbols.natural_image
Illustration of a baby lying on a bed with hands placed on the back (no text or symbols)Nulstil vandfilteret i menuen eller ved at trykke på Enter-tasten √ i 5 sekunder.
natural_image
Pure electrical circuit lines without any symbolsnatural_image
Illustration showing a door panel being inserted into a rack with a hand inserting a pipe into a cabinet (no text or symbols present)
Advarsel
- Importante
- Vano Freezer (FlexMode)
- Ice maker (solo freezer OF)
- Per disattivare
- Cassetto FlexMode
- Bacinella Ghiaccio
- Attenzione
- Balconcini Porta
- INSTALLATION 5
- GETTING STARTED 6
- SWITCHING YOUR APPLIANCE ON AND OFF 9
- SETTINGS AND SPECIAL FUNCTIONS 10
- INTERNAL LAYOUT 15
- ACTIVATING AND USING THE ICE MAKER 16
- LIGHTING 18
- FOOD PRESERVATION 18
- RECOMMENDED FOOD STORAGE TIMES 20
- CARE AND CLEANING 21
- TROUBLESHOOTING 22
- MENUS MAP 25
- Safety and Hazard Warnings
- During daily use
- N.B.
- Important
- Warning
- Environmental Protection
- Cleaning, Disinfection and Maintenance of the Ice and/or Water Dispenser (where equipped)
- Installation
- Mains Water Connection
- Mains Electrical Connection
- Refrigerant
- Getting to Know Your Bertazzoni Appliance
- Main Components
- Electronic Control System
- Main Control Panel
- ON/OFF
- FRIDGE
- MENU
- SELECT
- ICE
- ALARM
- Switching On and Off
- First Use
- Stand by
- Shutting off the FlexMode Compartment
- Switching On Again
- Shutting off the Appliance for Long Periods
- How to Adjust the Temperature to Requirements
- Refrigerator Compartment
- Freezer Compartment (FlexMode)
- Activating the Ice Maker (optional)
- Ice maker (freezer OF only)
- Information Signals and Faults with the Display
- Customisation and Language Setting
- Special Functions which Can Be Activated via the Menu
- Refrigerator Shopping
- Enabling
- Disabling
- Scheduling activation in advance
- Refrigerator Vacation
- Disabling on Your Return
- Setting the Duration
- FlexMode Shopping
- FlexMode Vacation
- Bottle Cooler
- Ice Maker (optional)
- Selecting Large Ice Cubes
- Selecting Medium-Sized Ice Cubes
- Activating the SuperIce Function
- Sabbath Mode (Optional)
- Water Filter
- Checking the Status of the Filter
- Reset Filter
- Resetting the Filtered Water Meter
- Filter Bypass
- Enabling the Filter Bypass
- Disabling the Filter Bypass
- Manual Water Filter Cleaning
- Manually Cleaning the Filter
- Base Menu Settings
- FlexMode Options
- Selecting the Refrigerator Function
- Selecting the Fresh Function
- Restoring the Freezer Function
- Base Settings
- Restoring the Base Settings
- DATE
- Date Setting
- Setting the Date
- Show Date
- Enabling Date Display
- Disabling Date Display
- CLOCK
- Time Setting
- Setting the Time
- 12/24 h Setting
- Setting 12 h display
- Setting 24 h display
- Show Time
- Enabling Permanent Time Display
- Disabling Permanent Time Display
- LANGUAGE
- Italian
- English
- French
- German
- Spanish
- Set ° C / °F
- Selecting Degrees Centigrade
- Selecting Degrees Fahrenheit
- Keypad Lock
- Internal layout (positioning, adjustment, removal)
- Drawer
- FlexMode Drawer
- Ice Container
- Shelves
- Door Balconies
- Activating and Using the Ice Maker
- Notes
- Production is around ten cubes per cycle, with about ten cycles every 24 hours.
- Why does the ice have a strange odour?
- Operational Noises
- Normal Noises
- Water Filter
- Filter Change
- Water Filter for Freezer column Ice Makers
- Lighting
- General Instructions
- Maintaining the Quality of Stored Foodstuffs
- When Food Shopping
- When Placing Foods in the Refrigerator
- FRESH FOODS STORAGE ZONE TIMES
- Raw meat
- Cooked meat
- Fish
- Miscellaneous
- FROZEN FOODS STORAGE ZONE TIMES
- Care and Cleaning
- Cleaning the Ventilation Grille, Filter and Condenser
- Proceed as follows:
- Internal Cleaning
- Troubleshooting
- Messages on the display and audible warnings
- The refrigerator or freezer does not work
- The refrigerator or freezer is hotter than usual
- The appliance keeps running for a long period of time
- The appliance is making strange noises
- Condensation forming on the inside and outside of the refrigerator
- There is frost or ice in the refrigerator or freezer
- Unpleasant odours are coming from the interior
- The door is difficult to open
- The appliance is cooling, but the lights and display are not working
- The ice maker is not working
- The ice maker is not producing a lot of ice
- The ice cubes are freezing together
- The ice has an unusual colour or flavour
- Fault Indications which May Appear on the Display
- Functions
- NOTES IMPORTANTES POUR LA SÉCURITÉ ET L'ENVIRONNEMENT 4
- Parties principales
- Pour désactiver
- By-pass Filtre
- Réglages de base
- Tiroir FlexMode
- Bac à glace
- Attention
- Balconnets de porte
- Componentes principales
- Para desactivar
- Vacaciones FlexMode
- Atención
- Bandejas de puerta
- BINNENUITRUSTING 15
- GIDS VOOR PROBLEEMOPLOSSING 22
- Belangrijk
- Hoe uitschakelen
- Vakantie FlexMode
- Filter-bypass
- Defaultinstellingen
- FlexMode-lade
- IJslade
- Opgelet
- Deurrekjes
- Viktigt
- Avaktivering
- Semester FlexMode
- Grundinställningar
- Inredning (placering, reglering, borttagning)
- Låda
- FlexMode-låda
- Isskål
- Varning
- Dörrhyllor
- TÆNDING OG SLUKNING AF APPARATET 9
- Vigtigt
- Hovedkomponenter
- For at inaktivere
- Shopping FlexMode
- Ferie FlexMode
- For at lave store terninger
- For at lave mellem terninger
- Sådan genoprettes funktionen fryser
- FlexMode-skuffe
- Isbakke
- Advarsel
- Dørhylder
Brand : BERTAZZONI
Model : REF75PRR
Category : Refrigerator