
WAF 13601 - Washing machine BLOMBERG - Free user manual and instructions
Find the device manual for free WAF 13601 BLOMBERG in PDF.


| Product Type | Automatic Washing Machine |
| Brand | Blomberg |
| Model | WAF 13601 |
| Dimensions (H x W x D) | 85.0 x 60.0 x 59.0 cm |
| Depth with Door Open | 104 cm |
| Net Weight | Approx. 71 kg |
| Power Supply | 230 V ~ 50 Hz |
| Rated Power | 2350 W |
| Fuse Protection | 10 A |
| Maximum Load (Cotton) | 6.0 kg |
| Maximum Spin Speed | 1400 rpm (model dependent) |
| Water Pressure Range | 0.1 - 1.0 MPa (1 - 10 bar) |
| Water Connection | 3/4 inch BSP thread |
| Wash Programmes | Hot wash/Coloured, Hygiene+, Active 40°C, Mini 30, Easy-care, Delicates, Woollens, Hand wash, Rinse, Spin, Drain |
| Additional Functions | Prewash, Intensive, Extra rinse, Easy iron, Quick wash, Child-proof lock, Time delay (up to 96:00 h) |
| Safety Features | Aquasafe/Aquasafe+ leak protection, door lock, child lock |
| Display | Digital display with programme progress indicators |
| Detergent Dispenser | 3 compartments (pre-wash, main wash, softener) |
| Energy Consumption (60°C Cotton) | 1.02 kWh |
| Water Consumption (60°C Cotton) | 45 L |
| Accessories Included | Drain hose holder, transit bar caps, water supply hose(s) |
Frequently Asked Questions - WAF 13601 BLOMBERG
User questions about WAF 13601 BLOMBERG
0 question about this device. Answer the ones you know or ask your own.
Ask a new question about this device
Download the instructions for your Washing machine in PDF format for free! Find your manual WAF 13601 - BLOMBERG and take your electronic device back in hand. On this page are published all the documents necessary for the use of your device. WAF 13601 by BLOMBERG.
USER MANUAL WAF 13601 BLOMBERG
Automatic Washing Machine
Operating instructions
DK
Vaskemaskine
Brugsanvisning
WAF 13201, WAF 13601, WAF 1360 A
Blomberg

English - from Page 1

Dansk - fra side 26
Read this first!
Dear customer,
By purchasing this appliance you have decided in favour of the latest in washing technology – premium quality, long service live, high reliability and optimal ease of use.
- At first, please check if the appliance was received undamaged.
- If a transport damage is noticed, notify your supplier immediately; do not operate the appliance!
These operating instructions...
...are intended to help you operate this appliance quickly and safely.
- Read these instructions before installation and initial operation.
- Pay special attention to the safety instructions.
- Keep the instructions for future reference.
- If you sell this appliance, pass on the instructions to the new owner.
- In addition, read all the documents, that you get with the appliance in addition to these operating instructions.
Please note that these operating instructions are applicable to several models. The differences between the models are clearly emphasised.
Explanation of symbols
Throughout these instructions the following symbols are used:

High voltage! Risk of electric shock!

Risk of other personal injury or property damage.

Important information or useful advice.
Contents
Machine overview 2
Overview of additional functions ..... 3
Safety first 4
Disposal....5
Installation....5
Removing the transportation locks ..... 5
The right location of installation 6
Levelling the machine. 6
Connecting the water supply 6
Connecting the water drain ..... 7
Electrical connection 8
The First Use. 8
Preparing to wash 9
Sorting the laundry 9
Preparing clothes for washing. 9
The right load capacity....10
The loading door 10
Detergents and softeners.....10
The detergent dispensing drawer ..... 10
Dosing devices 10
Liquid detergent. 10
Choice of detergent 11
Detergent quantity....11
Fabric softener 11
Starch....11
Washing programmes ..... 12
The programme selector 12
Main programmes ..... 12
Special programmes....12
Options 13
The buttons....13
Prewash 13
Intensive....13
Extra rinse 13
Easy iron....13
Quick wash 13
Child-proof lock 13
Spin speed selector ..... 14
Display 14
Time delay....15
Progress of programme ..... 15
Indicator lamps 16
Quick instructions for daily use . . . 17
Programme table ..... 18
Cleaning and care ..... 20
Troubleshooting 23
Tips for removing stains ..... 24
Technical specifications and consumption data ..... 25
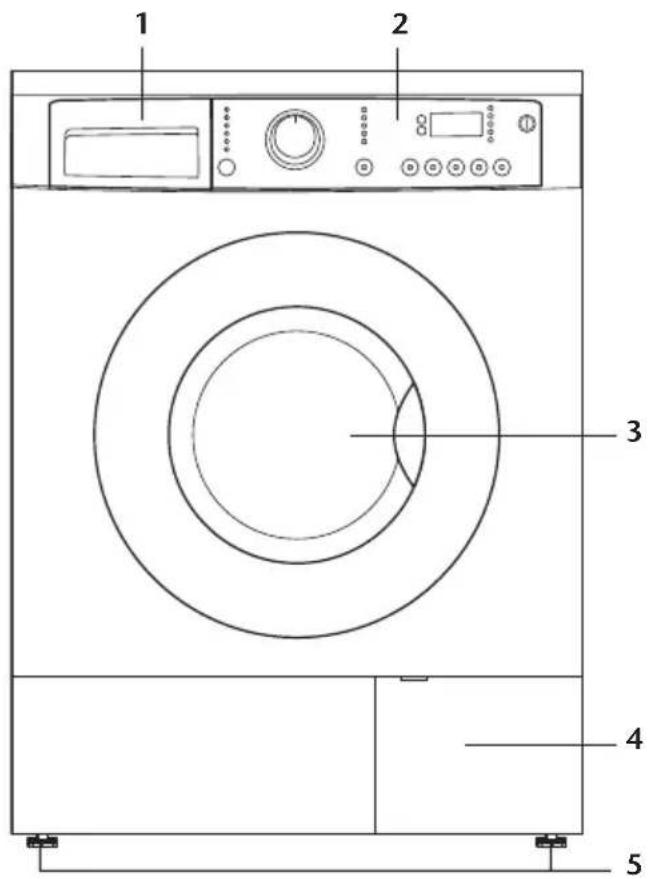
1 Detergent dispensing drawer
2 Control panel
3 Loading door with door opener
4 Service door with foreign matter trap
5 Height-adjustable feet

natural_image
Simple line drawing of a coiled cable with two connectors, labeled '9b' (no text or symbols on the diagram itself)
natural_image
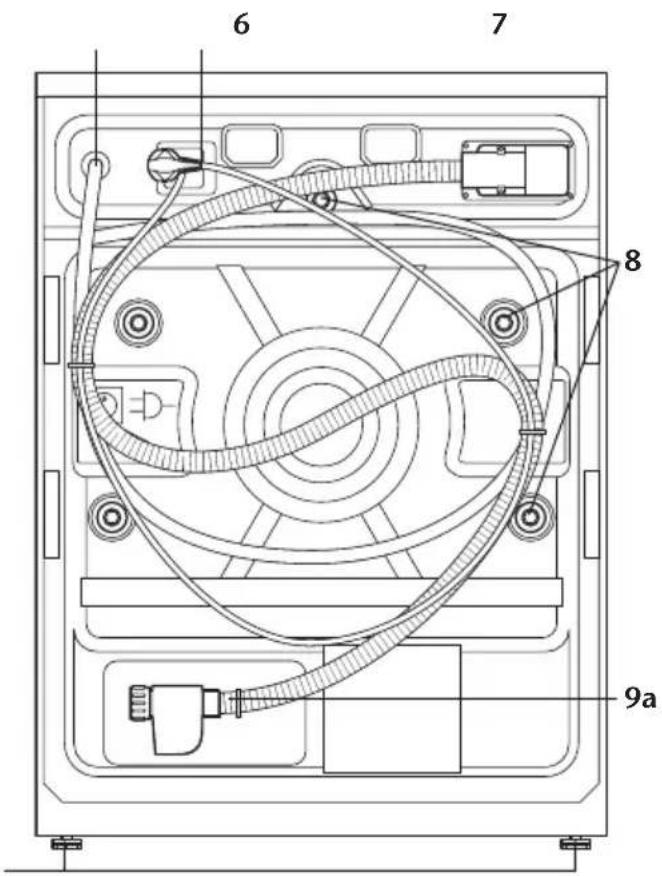
Technical line drawing of a mechanical component with multiple circular washers and a curved handle (no text or symbols)6 Drain hose
7 Power cable
8 Transit bars
9a Water supply hose with "Aquasafe+" protection
9b Water supply hose with "Aquasafe"-protection (alternative to 9a, supplied in drum)
Accessories (in accessory bag):
10 Holder for drain hose
11 five caps for rear wall opening
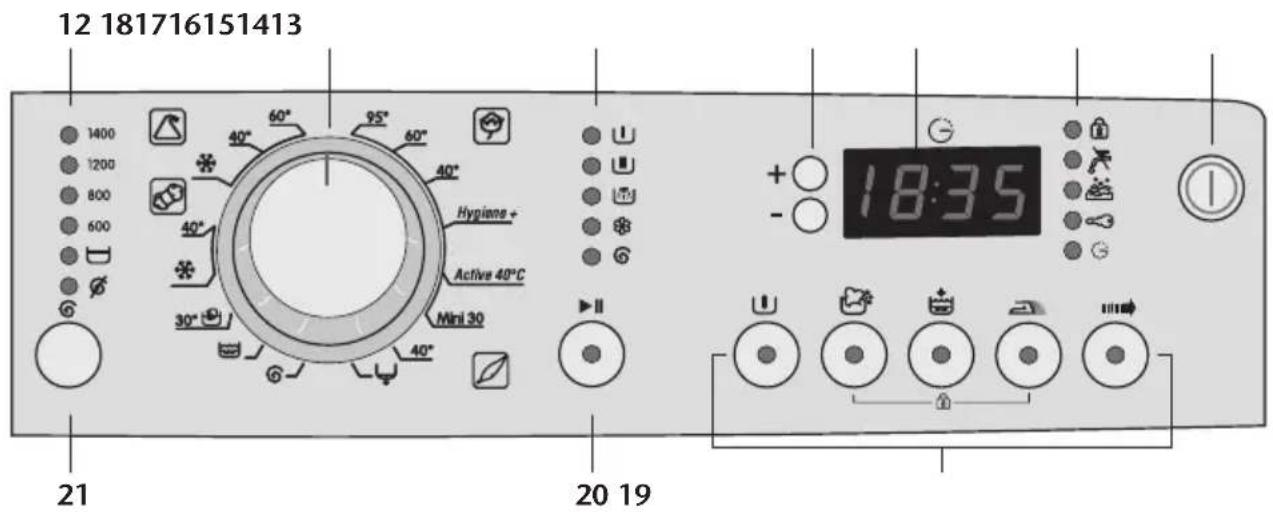
12 Spin speed indicator
13 Programme selector
14 Programme progress indicator
15 Time delay
16 Display
17 Indicator lamps
18 On/Off
19 Additional functions
20 Start/Pause
21 Spin speed selector
Overview of additional functions
| Option Function | Model | |||||||||
| WAF 1300 | WAF 1320 | WAF 1320 A | WAF 13201 | WAF 1340 | WAF 1340 A | WAF 1360 A | WAF 1360 s | WAF 13601 | ||
| Aquasafe | In case of leakages, the water supply is mechanically blocked. | ● | ● | ● | ● | ● | ||||
| Aquasafe+ | In case of leakages, the water supply is electrically blocked. | ● | ● | ● | ● | |||||
| Aquaround | The detergent is optimally utilised through an automatic suds circulation. | ● | ● | ● | ● | ● | ● | |||
| Sensorinse | If residues of detergents still exist after the rinse cycle, the machine introduces additional rinse cycles. | ● | ||||||||
Please observe the following information, as otherwise there will be risk of personal injury or material damage and any warranty and liability is invalidated.
Intended use
- This appliance shall only be used for washing, rinsing and spinning textiles that are marked accordingly.
- Only detergents, softeners and additives suitable for use in washing machines may be used.
- Follow the care instructions in the garments and the information given by the washing detergent manufacturer.
Safety instructions
- This appliance must be connected to a properly installed earthed outlet, which is protected by a fuse of adequate capacity.
The supply hose with Aquasafe+ contains parts, that are energised. Do not damage supply hose and Aquasafe+! Risk of electric shock! Do not use the appliance if damage to the supply hose is noticed and contact the customer service. • Supply and drain hose must always be securely fastened and in perfect condition.
Do not use a washbasin or bathtub to which the drain hose is attached while the machine is running. Risk of scalding due to high washing temperatures!
Never open the loading door or un-screw the foreign matter trap, if there is still water in the drum (e.g. after a power failure). This poses a risk of flooding and possible scalding due to hot suds.
Never open the locked loading door by force! Inform the customer service, if the loading door cannot be opened even a few minutes after programme finishes.
Do not attempt to dry-clean with the machine! Fire and explosion hazard!
- Rinse garments pre-treated with cleaning agents (petroleum ether, liquid stain remover, etc.) thoroughly in clear water before washing.
Never wash down the appliance with a water hose! Risk of electric shock! Always disconnect from the mains by unplugging before cleaning.
- Never touch the plug with wet hands. Never pull on the cable to unplug, always pull on the plug only.
Do not operate the appliance if the power cable or power cable plug is faulty or the appliance shows any other faults! Risk of electric shock!
- For malfunctions that cannot be resolved by following the information in these operating instructions: Turn off the machine, pull the plug, close the water tap and contact the customer service centre.
Never attempt to repair the machine by yourself. This may put your life and the lives of others in danger. Only authorised electricians, such as our customer service staff, are permitted to repair electrical appliances.
If there are children in your household...
- Keep children away from the machine. Electrical appliances are not toys.
- Pull out the plug when the machine in not in use.
- Keep the loading door closed when you leave the room.
Where to dispose of the packaging?
Packaging material can be dangerous to children. Keep the packaging material out of reach of children, or dispose it of according to instructions.
The packing is made of materials which can be recycled.
- Separate the packing material by type:
- Styropor® parts and film go for collection as potential recyclable;
- Wooden parts go into bulky refuse.
The packing is not to be disposed of in the regular household refuse!
What to do with the old machine?
Dispose of your old appliance in an environmentally friendly manner.
- Ask you dealer or your local refuse collection service how to best dispose of your old appliance.
Before disposing old machine, pull out the mains plug, cut through the the mains lead and make the door lock unusable – so as not to pose a risk to children.
Installation
Removing the transportation locks
Before the washing machine is operated, the transit bars must be removed! The machine will otherwise be damaged.
Tool needed: 10 mm spanner.

natural_image
Technical line drawing of a mechanical device interior with no visible text or symbols- Loosen all five bolts with the spanner until they turn freely.

natural_image
Line drawing of a hand connecting cables to a device panel (no text or symbols)- Remove the transport bolts by turning them slightly.

natural_image
Diagram of a mechanical assembly with a rotating shaft and circular components, no text or symbols present- Place the five covers (from the accessories bag) onto the openings in the rear panel and use a suitable tool (such as the handle of a screw driver) to push them into place. The smaller cover is intended for the top-mot opening.

natural_image
Pure technical diagram of a mechanical component with no text, numbers, or symbolsStore the transit bars in a safe place.
• They will be required if the washing machine is to be transported again (e.g. if you move house).
⚠️ Never transport the appliance without installed transit bars!
The right location of installation
Install the appliance in a stable, level position in frost-free surroundings.
If there is danger of frost, drain all remaining water (see "Care and maintenance").
The floor must have sufficient load-carrying capacity!
If, for example, the washing machine and a dryer are stacked upon each other, they can – when loaded – have a total weight of up to 180 kg.
Important:
- Do not stand appliance on the power cable.
- Keep at least 1cm distance to walls of other furniture.
- Place the machine on a firm surface, never on a long-pile carpet or similar surface.
Levelling the machine
Don't use a tool to loosen the lock nuts to avoid damaging them.
- Loosen the lock nuts on the feet.

natural_image
Diagram of a mechanical component with rotational arrows indicating motion (no text or symbols)-
Adjust the feet until the machine is level and stands steady.
-
Important: Retighten all lock nuts.
Connecting the water supply
The machine can be connected to water taps with 3/4 inch BSP thread.
Important:
- Bear the permissible water pressure in mind (see "Technical specifications"). Attach a pressure reducing valve if water pressure is higher.
- Do not connect to a water heater (instantaneous water heater or unpressurised boiler), as the water pressure is insufficient.
- Check with customer service for hose extensions. Do not use homemade extensions with hose clamps or similar!
- Use only the new hose supplied with the machine, not an old existing one!
- Ensure that there are no sharp bends in the hose!
Do not use a tool to tighten it.
- If not already attached, manually screw the bent end of the supply hose tightly onto the rear panel of the machine (not in case of Aquasafe+).

natural_image
Technical diagram showing a pipe fitting attached to a door panel with a threaded component, no text or symbols present.- Screw the Aquasafe or Aquasafe+ (depending on the model) at the end of the supply hose tightly onto the water tap by hand.

natural_image
Line drawing of a faucet with a handle and screw base (no text or symbols)The Aquasafe or Aquasafe+ (depending on model) turns off the water supply should a leakage occur in your hose.
- Turn the water tap all the way on and check all connections for leaks; Turn the water tap off again. Correct the position of seals and screw couplings, if necessary.
Connecting the water drain
You can hang the drain hose over the edge of a wash basin, sink or bathtub – or connect it permanently to a drain pipe (siphon trap).
Important:
- Do not run the drain hose higher than 100 cm above floor level for the suds pump to be able to pump out. Don't go below the minimal height of 40 cm, otherwise water will come out.

- The water must be able to run off unhindered. Washbasins with a small drain are not suitable.
- The end of the hose must not immerge in the pumped-out water.
- Check with customer service for hose extensions. Do not use homemade extensions with hose clamps or similar!
- Use only the new hose supplied with the machine, not an old existing one!
- Ensure that there are no sharp bends in the hose!
Fastening the hose holder:
- Pull the holder included in delivery over the end of the hose.

natural_image
Illustration of a hand holding a flexible tube or hose, no text or symbols present- Hand the drain hose with the holder over the edge of the basin or tub and secure it from sliding off – e.g. by fastening it with a chain around the water tap.
Permanent connection to a siphon trap:

A qualified plumber should attach the hose to prevent the hose from slipping off. There is a risk of flooding.
Electrical connection
Connect the appliance to a properly installed earthed outlet, which is protected by a fuse of adequate capacity.
Important:
- The connection must conform to the applicable regulations in your country and those set by your electricity board.
- The power cable plug must be accessible after installation.
- Voltage and rated fuse protection is specified on the type plate located on the back of the loading door.

natural_image
Diagram of curved cable routing with a control panel and directional arrow (no text or symbols)- The stated voltage must match with your mains voltage.

flowchart
graph TD
    A["CT"] --> B["W"]
    B --> C["V"]
    C --> D["Hz"]
    D --> E["A"]
    F["MPa"] --> G["kg"]
    G --> H["I"]
- Connection by extension cables or trailing sockets is not permitted.

A damaged power cable must be replaced by a qualified electrician. Unless the appliance has been repaired it must not be operated! Risk of electric shock!
The First Use

Refer to the section on "Troubleshooting" if the machine can't be switched on.
To flush out any remaining test water, the first washing cycle should be run without any laundry.
- Open water tap fully. Check if hoses are firmly attached.
- Check that the drum is completely empty; close the loading door.
- Add a small amount of detergent to the second compartment; close detergent dispensing drawer.
- Press »On/Off« 18 button. Some informationa appears in the display after a few seconds.
- Set programme selector to »Hot wash/Coloured 95 °C« (see "Programmes").
The spin speed indicator should be set to maximum speed – if necessary press the »Spin« 21 button.
- Press »Start/Pause« 20 button.
In case of abnormal sounds or leakage of water: Press »On/Off« 18 button, close water tap and pull mains plug out of the socket. Check to see that all transit bars have been removed and the hoses are properly connected.
Preparing to wash
Sorting the laundry
- Sort the laundry by type of fabric, colour, degree of soiling and permissible water temperature.
Always follow the recommendations on the garment label.
| Type of textiles and care symbols | ||
Whites/coloureds: cotton, linen    | ||
Easy-care: Synthetics (polyester, polyamide); Blended fabrics (with cottonit Baumwolle)   | ||
Delicates: Delicate fabrics (rayon, silk, etc.); Curtains   | ||
Woollens: Only with wool stamp and labelled "Machine washable"   machine washable machine washable | ||
Hand wash: Do not | wash: | |
- Don't wash coloureds and whites together. New, dark coloured cottons will stain very much.
Preparing clothes for washing
Items of laundry with metal parts (e.g. underwire bras, belt buckles, metal buttons) will damage the machine. Remove metal parts or place the items
After completion of the programme cycle:
i If the »Door« indicator lamp is glowing, the loading door can be opened (see "indicator lamp").
-
Press »On/Off« 18 button.
-
Turn the water tap off.
-
Leave door and detergent dispensing drawer open to dry.
in a cloth bag, pillow case, or something similar.

natural_image
Illustration of hands performing a medical procedure on a patient's abdomen (no text or symbols present)- Empty pockets, remove all foreign objects (e.g. coins, pens, paper clips). If possible: Turn pockets inside out and brush.
- Place small items of laundry (e.g. tights) in a cloth bag, pillow case or something similar. This can also help you to avoid searching for lost socks.
- Handle curtains with special care. Remove non-stainless curtain runners and lead tape. Place runners that can't be removed in a cloth bag, pillow case or something similar.
- Close zippers, sew on loose buttons, mend unstiched seams and tears.
- Only wash woolens that are labelled "machine washable" or "handwashable" – and only with the appropriate programme.
- Wash new coloured items of laundry separately – they may "bleed".
- Heavy stains should be treated appropriately before washing. If in doubt, check with a chemist or dry-cleaner.
- Use only dyes/discolouring and antiliming agents suitable for machine wash. Make sure to follow the instructions on the package.
- Wash jeans and delicates inside out.
- Keep laundry items made of Angora-wool in the freezer compartment for a few hours before washing – this reduces number of fluff balls formed.
The right load capacity
- The maximum load capacity depends on the type of laundry, the degree of soling and the wash programme you wish to use.

Please follow to the information in the "Programme table".
Detergents and softeners
The detergent dispensing drawer
The detergent dispensing drawer comprises 3 compartments:
– left compartment (II) for main wash
– middle compartment for fabric softener
– right compartment (I) for pre-wash

Washing results are adversely affected by an overloaded drum.

Always try to utilize the max. load.
The loading door
The loading door is locked when a programme is running; in this case the »Door« indicator light is OFF (see "Indicator lamps"). As soon as the »Door« indicator lamp goes on, the door can be opened.
- Pull on the handle to open the loading door.
- Place laundry items loosely in the drum; Add detergent if necessary (in an eco bag or dosing ball).
- Push the loading door firmly shut until you hear it lock into place. Take care no textiles are caught by the door.
- Always add detergent and fabric softener before starting the wash programme.

Never open the detergent dispensing drawer while the wash programme is still running!
Dosing devices
In case of programme without pre-wash, you can add washing detergent directly to the drum with a detergent bag or a dosing ball.
Liquid detergent
When using liquid or gel-like washing detergents, please note the following:

Liquid detergent may cause stains on your laundry if a time delay has been set.
- Don't use liquid detergent if you want to wash using the time delay feature.
- Don't use liquid detergent for the main wash in a cycle with pre-wash.
- Use the detergent manufacturer's dosing cup and follow the instructions on the package.
Choice of detergent
The type of detergent used depends on the type of textile, colour, degree of soiling and desired washing temperature.
- Use regular detergent for cottons (60 - 95 °C), otherwise use special detergent for coloured and delicate wash.
- Wash woollens only with a special detergent for woollens.
- Detergents using a modular system allow you to add bleach and softener individually.
- Use only detergents suitable for washing machines.
Detergent quantity
The amount of washing detergent to use depends on the amount of laundry, the degree of soiling and water hardness.
i Ask your local waterworks for the current level of water hardness.
| Water hardness levels | |||
| 1 | soft | 0...1.3 | 0... 7 |
| 2 | medium | 1.3...2.5 | 7...14 |
| 3 | hard | 2.5...3.8 | 14...21 |
| 4 | very hard | >3.8 | >21 |
| mmol/l ° dH | |||
- It is absolutely necessary you proportion as recommended on the packing!
- For small amounts of laundry or only slight soiling use accordingly less detergent.
⚠️ Dose highly concentrated detergents very precisely.
Too much detergent causes an excessive amount of foaming, bad washing and rinsing results and a strain on water resources.
Too little washing detergent causes laundry to turn grey and calcification of the machine.
Fabric softener
Fabric softener is added into the middle compartment of the detergent dispensing drawer.
• Proportion as recommended on the packing!
- Fill only up to the mark level (»max«).
- Dilute viscous fabric softener with water before adding.
i If you use dryer or dry your laundry outdoors, you do not need fabric softener.
Starch
- Add liquid starch and finishing agent into the middle compartment.
- Mix powdered starch according to the directions on the package and like fabric softener, add to the middle compartment.
- Never use fabric softener and starch together in the same washing cycle.
- Wipe off the drum after using starch.
The programme selector
The programme selector 13 can be rotated clockwise or anticlockwise.

You will find an overview of the programmes 13a to 13k in the "Programme table".
The programme is selected with the programme selector; however, it starts only when you press the »Start/Pause« button 20.
Main programmes
Depending on the type of textile, the following main programmes are available:
• Hot wash/Coloured (13a)
- Easy-care (13k)
• Delicates (13e)
- Woollens (13j)
- Hand wash (13i)
For special cases extra programmes are available:
• Hygiene + (13b)
This programme is only suitable for boil-proof clothes (95 °C). Increased hygiene is provided by an extended boiling period and an extra rinse cycle. Useful for baby-clothes and clothes worn by sick persons.
• Active 40 °C (13c)
This programme thoroughly exploits the detergent at 40 °C and thus saves energy. Suitable for garments for
which you would otherwise use the Coloureds 60 °C programme.
- Mini 30 (13d)
Use this programme, for quickly washing small number of cotton/blended fabrics. Suitable for clothes that are normally worn for a short time such as sportswear.
Each of these main programmes comprises a complete washing process, including washing, rinsing and if required, spin cycles.
Always match the programme to the fabric type, colour, degree of soiling and permissible water temperature. Always follow the recommendations on the garment label.
Different temperatures can be selected in most main programmes.
i Select the temperature only as high as absolutely necessary.
A high temperature means high power consumption.
Special programmes
For specific applications you can select any of the following special programmes:
- Rinse (13h)
Use this programme e.g., when you want to soft rinse or starch separately.
- Spin (13g)
This programme spins with maximum possible rpm in the default setting.
You should reduce the speed for delicate fabrics!
- Drain (13f)
This programme allows you to drain water, e.g. when you put already soaked clothes into the appliance and want to wash them at a later time.
The buttons
Depending on the programme specific additional functions 19a to 19f can be activated by pressing a button.
19a 19b 19c 19d 19e

- Press the required buttons before starting the programme.
- Meaningless combination of buttons cannot be selected together. Example: »Intensive« 19b and »Quick wash« 19e.
Prewash
A pre-wash can be activated with the 19a button.
i A pre-wash is only worth while with heavily soiled laundry.
Without prewash you save energy, water, washing powder – and time.
Intensive
The 19b button extends the washing time in the main wash cycle. Washing powder can work more effectively and you can wash at lower temperatures – thereby saving energy.
- With this button normally soiled linens/coloureds can now be washed at 60 °C instead of 95 °C.
- Normal soiled easy-cares you can wash at 40 °C instead of 60 °C, plus this button.
The »Intensive« function can only be used together with the »Prewash« function. As soon as you press the »Intensive« button a pre-wash cycle is automatically coupled to it.
Extra rinse
An extra rinse cycle is activated with the 19c button.
- Use this function only if you are sensitive to washing detergent residue. The increased water consumption is a burden to the environment – and to your purse.
Easy iron
If you press the button 19d, the drum movement is reduced and spinning is limited to reduce creasing. In addition, the washing is done at a higher water level.
- Use this button for delicate fabrics that easily crease.
The maximum load is then
- for linens/coloureds: .... 3.0 kg
– for synthetics: ..... 1.5 kg
- for delicate fabrics: .... 1.0 kg
Quick wash
With button 19e the wash time is shortened.
- Use this function for small loads or less soiled laundry.
Child-proof lock
With the Child-proof lock 19f you can guard the appliance against children's hands. No changes can then be made to a running programme.

To activate the Child-proof lock:
- Press both buttons shown above at the same time and hold for approx. 2 seconds until the »Child-proof lock« 17a indicator lamp starts glowing.
Spin speed selector
i The appropriate maximum spin speed is automatically set in each programme. The current value is indicated by the lights 12a.

You should reduce the speed for especially delicate fabrics.
To deactivate the Child-proof lock:
- Press the same two buttons at the same time and hold for approx. 2 seconds until the »Child-proof lock« 17a indicator lamp goes off.
- By repeatedly pressing the »Spin« 21 button you can change the speed—or completely disable the spin cycle.
- In the »No spin« 12c setting no spinning takes place; water is only drained.
- In the »Rinse hold« 12b setting the programme stops after the last rinse cycle. The laundry remains in the water (to protect against creasing). A blinking display notifies you that the rinse stop has been reached. For steps after this, refer "Quick instructions for daily use".
The higher the spin speed, the lower the residual moisture. If you wish to dry your laundry subsequently in a dryer, select the maximum possible speed – this saves energy when drying.
Display
The display 16 shows the time remaining for the programme to complete. The time for hours and minutes is displayed as "hh:mm". For example, a time of 10 hours is shown on the display as "10:00" and 1 minute as " : 1".
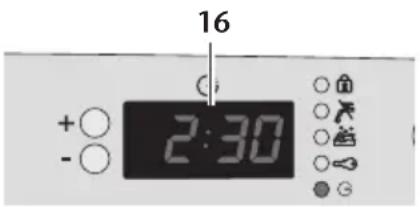
The length of a programm depends on the type of program and the additional functions selected. The details in the table "Technical data and consumption figures" refer to programmes without additional functions.
With the time delay function you can delay the programme start. You can enter a time delay of up to 96:00 hours. Setting can be made in increments of 30-minutes.
Do not use liquid detergent when you set time delay! Risk of staining of the textiles.

- Open tap, load drum and fill in detergent.
- Select programme, select additional functions and spin speed, if necessary.
- Set the desired time delay using the buttons »+/-« 15a/15b. The Time delay 17e indicator lamp starts glowing. The total time delay appears in the display for a few seconds. Afterwards, the time remaining until the end of the programme is displayed.
Example: You select the programme Mini 30. The display indicates " :30". You set a time delay of two hours.
" 2:00" appears in the display for a few seconds. Afterwards the display shows " 2:30".
i Pressing and holding the »+« or »—« button causes the display to change faster.
4. Press the »Start/Pause« button. The time delay countdown phase begins.
Progress of programme
This row of indicator lamps shows the progress of the currently running programme.
The colon at the centre of the display begins blinking.
During the time-delay period more laundry can be loaded. At the end of the delay countdown the »Time delay« 17e indicator lamp goes out and the washing cycle begins.
Changing the delay time
If you want to change the time during the countdown:
- Press the »Start/Pause« button. The colon at the centre of the display stops blinking.
- Set the desired time delay with the »+/—« buttons.
- Press the »Start/Pause« button. The time delay countdown phase begins. The colon at the centre of the display begins blinking. The display shows the time remaining for the programme to complete.
Cancelling the time delay
If you want to cancel the time delay count-down and start the programme immediately:
- Press the »Start/Pause« button. The colon at the centre of the display stops blinking.
- Set the time delay to " : 0" with the »+/-« buttons.
- Press the »Start/Pause« button to start the programme.

i Each indicator lamp goes on at the beginning of its section of the programme cycle and goes out at the end of the programme cycle. The bottom most lamp tells you current status of the programme.
Example: The indicator lamps for »Main wash« 14b and »Rinse« 14c are on: The machine is currently in the rinse cycle.
»Prewash«
The indicator lamp 14a glows at the beginning of the pre-wash cycle – if a programme with pre-wash was selected.
»Main wash«
The indicator lamp 14b glows at the beginning of the main washing cycle.
»Rinse«
The indicator lamp 14c glows at the beginning of the rinse cycle.
Indicator lamps
The indicator lamps 17a to 17e signal important states of the machine to you.

The indicator lamp 17a glows when the Child-proof lock is activated.
- See "Child-proof lock" for information on deactivating the Child-proof lock.
»No water intake«
The indicator lamp 17b glows if water does not flow in properly.
- Things you should check:
– Is the water tap all the way on?
- Inlet hose bent?
– Is the inlet filter soiled? See "Water inlet strainer".
– Is household water pressure noticeably low?
»Softener«
The indicator lamp 14d glows at the beginning of the soft rinsing cycle.
»Spin«
The indicator lamp 14e glows at the beginning of the final spin cycle – after the soft rinse cycle or in the special programmes for »Spin« and »Drain«.
i If the machine isn't spinning, the programme may be in rinsehold. Or the automatic spin correction system has been activated due to excessive imbalance.
A programme can be interrupted by pressing the 20 button. The button then blinks. To continue the programme, press the 20 button again.
- If the indicator lamp still continues to glow, call the customer service – it is possible that the "Aquasafe" or "Aquasafe+" (depending on the model) has blocked the water supply.
»Foaming«
The indicator lamp 17c glows when too much foam is formed.
- Use a bit less detergent the next time you wash.
»Door«
The indicator lamp 17d glows when the loading door can be opened.
»Time delay«
The indicator lamp 17e glows when a time delay has been set.
Preparation
- Open water tap fully. Check if hoses are firmly attached.
- Place laundry in the drum.
- Fill in detergent and fabric conditioner.
Starting
- Press the »On/Off« button.
- Set the programme selector.
-
If desired:
-
activate any additional function(s),
- set the spin speed,
-
set the time delay.
-
Close the loading door.
- Press the »Start/Pause« button.
The display shows the time remaining for the programme to complete.
- Check if the »Door« indicator lamp has gone off (if not, see "Troubleshooting").
Aborting a programme
- Press and hold the »Start/Pause« for approx. 3 seconds. The machine may pump out any water still in the drum or goes through a rinse cycle to cool off the laundry.
Adding more laundry
This is possible only:
– during a time delay,
– at the beginning of a washing cycle (the appliance allows adding laundry at a later stage only when the water level is low or the temperature is low).
- Press the »Start/Pause« button.
- Open the loading door and put in more laundry.
- Close the loading door.
- Press the »Start/Pause« button.
Programme is in rinse and hold
You can see this from the blinking of the »Rinse hold« indicator lamp and the »Start/Pause« button.
If you now want to spin:
- Set spin speed.
- Press the »Start/Pause« button.
The programme continues, pumps out the water and spins.
If you want to pump out the water:
- Set spin speed selector to »No spin«.
- Press the »Start/Pause« button.
The programme continues and only pumps out the water.
Re-spinning the laundry
i The automatic spin-correction-system can prevent spinning in case the drum is out-of-balance.
If you wish to spin again:
- Rearrange the laundry evenly in the drum.
- Set programme selector to »Spin«.
- Set spin speed.
- Press the »Start/Pause« button.
After the programme cycle is completed
When the display shows the original programme length again, the programme is over.
- If the »Door« indicator lamp is on, open the loading door and remove your laundry.
- Press »On/Off« button.
- Turn the water tap off.
- Wipe out the fold in the rubber seal on the door and check for foreign objects.
- Leave door and detergent dispensing drawer open to dry.
| Care symbol | Programme / Fabric type / Remarks | Temperature (°C) | Load (kg) | Option | Spin max. | Time delay | |||||
| Prewash | Intensive | Extra rinse | Easy iron | Quick wash | Rinse hold | ||||||
| Hot wash/Coloured | |||||||||||
| Durable fabrics made of cotton and linen | 40° / 60° / 95° | 6.0 | ○ | ○ | ○ | ○ | ○ | ○ | 1 | ○ | |
| Hygiene +: cotton with high demands for hygiene | 95° | 6.0 | ● | 1 | ○ | ||||||
| Active 40 °C: cotton (energy saving-programme) | 40° | 6.0 | 1 | ○ | |||||||
| Mini 30: Cotton, blended fabric (short programme) | 30° | 2.5 | 1 | ○ | |||||||
| Easy-care | |||||||||||
| Synthetics (polyester, polyamide) and blended fabrics (with cotton) | 40° / 60° Cold | 3.0 | ○ | ○ | ○ | ○ | ○ | ○ | 2 | ○ | |
| ○ | ○ | ○ | ○ | ○ | 2 | ○ | |||||
| Delicates | |||||||||||
| Delicates (rayon, silk, etc.) and curtains | 40° | 2.0 | ○ | ○ | ○ | 3 | ○ | ||||
| Woollens | |||||||||||
| Only if labelled "machine washable" | Cold / 40° | 1.5 | ○ | ○ | 3 | ○ | |||||
| Hand wash | |||||||||||
| Labelled "wash by hand" 30° 1.5 | 3 | ○ | |||||||||
| Special programmes | |||||||||||
| Rinse (Soft rinse, starching) | as above | 1 | ○ | ||||||||
| Spin | as above | 1 | ○ | ||||||||
| Drain | ○ | ||||||||||
○ Individually selectable, in part selectable in combination; illogical combinations are blocked.
● Automatically activated, not deselectable.
① 1400 rpm (depending on model) ② 800 rpm ③ 600 rpm
| Programme | Programme steps | |||
| Main-wash cycle | Rinse cycles with intermediate spin | Rinse cycles without intermediate spin | Final spin | |
| Hot wash/Coloured | ||||
| Standard programme 1 3 – 1 | ||||
| Hygiene + 1 4 – 1 | ||||
| Active 40 °C 1 3 – 1 | ||||
| Mini 30 1 – 2 1 | ||||
| Easy-care | ||||
| Standard programme 1 3 – 1 | ||||
| Delicates | ||||
| Standard programme 1 – 3 1 | ||||
| Woollens | ||||
| Standard programme 1121 | ||||
| Hand wash | ||||
| Standard programme 1 – 2 1 | ||||
| Special programmes | ||||
| Rinse 1 – | ||||
| Spin – - 1 | ||||
| Drain – – – | ||||
The actual number of programme steps can deviate from the specifications listed above depending upon the function (e.g. by pressing the »Extra rinse« button).
Detergent dispensing drawer
Clean when necessary:
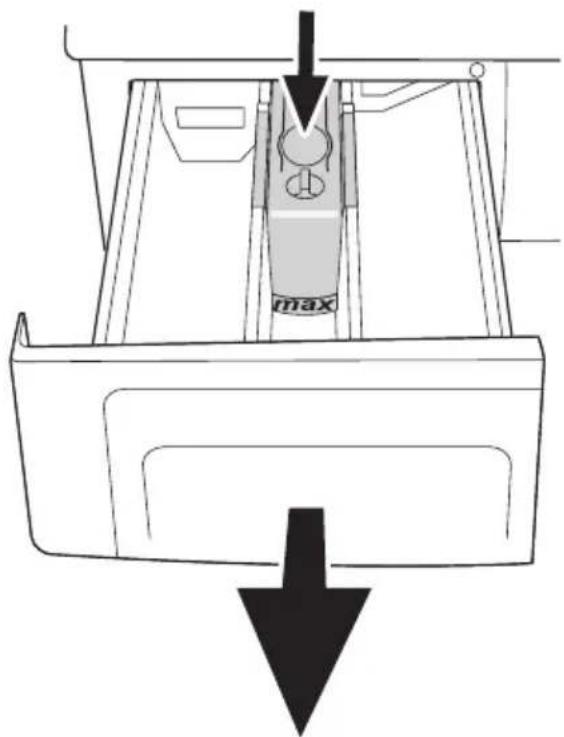
- Open the drawer as far as possible.
- Push down the depression on the suction cup and pull the drawer out completely.
natural_image
Technical diagram of a mechanical component with a downward arrow indicating force or direction (no text or symbols present)- Clean the drawer under warm running water. Pull off the suction cup; Clean suction cup and opening in the drawer with warm running water, pierce the opening with a needle if necessary. Replace the suction cap.

natural_image
Technical line drawing of a mechanical component with an arrow indicating upward motion (no text or symbols)- Wipe off detergent residue from the drawer guides. If present, remove calc deposits from the water-jet nozzles (inside the drawer).
Loading door and drum
After each wash:
- Wipe off the fold in the rubber collar and check for foreign objects.

natural_image
Line drawing of a hand opening a large circular washing machine (no text or symbols)- Check drum for foreign objects.
Rust stains may occur due to foreign objects made of metal. In such cases: Clean the drum with a stainless steel cleaning agent. Never use steel wool or scrub sponges.
Housing and control panel
When necessary:
- Clean cabinet with soap suds or a mild cleaner; wipe dry with a soft cloth.
- Use only a soft, damp cloth to clean the control panel.
Never use a scrub sponge or a scouring agent. These will damage the enamel and plastic parts.
Foreign matter trap
- Clean the foreign matter trap at least once after every 40 wash cycles!
- Clean foreign object trap, if foreign objects (coins, buttons, baby socks, etc.) are blocking the suds pump.
- Drain left-over water before cleaning (see below).
Draining remaining water
Drain off the water completely...
• before cleaning the foreign matter trap;
- before transporting the machine (e.g. when shifting house);
- when there is a power failure ("emergency draining");
- when there is a danger of frost.
At room temperatures below 0 °C the remaining water in the appliance could freeze, damaging it.
- Switch appliance off, unplug the power cable, close the water tap.
⚠ Allow hot suds to cool off sufficiently. This poses a risk of scalding.
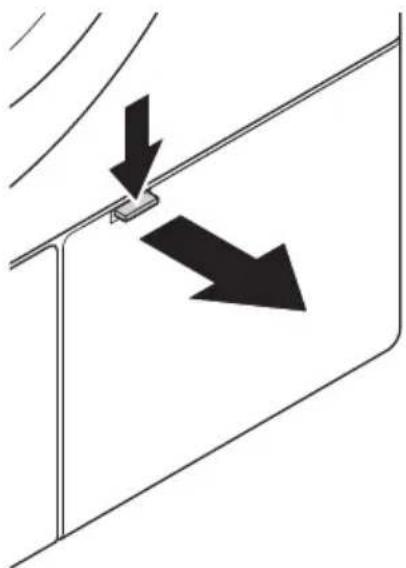
- Open the service door by pushing on the button. Take out the drain pipe and hold it over a bowl. Pull the seal off the drain hose and allow the water to drain out one bowl at a time.
natural_image
Diagram showing two black arrows pointing downward on a structural component, no text or symbols present
natural_image
Line drawing of a washing machine component with a hose and drain tube (no text or symbols)There may be more than 20 litres of water left in the machine when the drum is bull (e.g. after a power failure)!
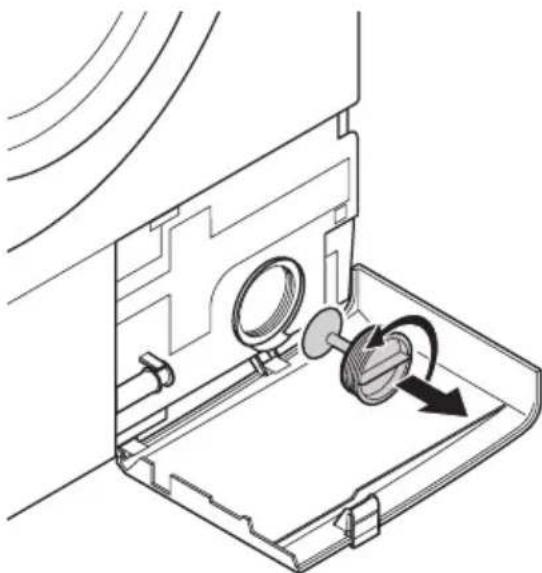
- Turn the foreign object trap 1/2 turn to loosen it (anti-clockwise) and soak up the remaining water with a cloth. Once no more water is coming out, turn the foreign object trap until it is completely free and remove it.
natural_image
Technical line drawing of a mechanical device with a rotating component and housing (no text or symbols)- Clean foreign object trap and the pump opening. Check if the pump impeller (in the pump opening) can be turned freely.
- Replace the cap on the drain hose and put it away.
- Replace the foreign object trap and turn it tight (in clockwise direction).
- Close the service door.
Water inlet strainer
Clean if water flows very slowly, or not at all.
- Switch off the machine, turn off the water tap.
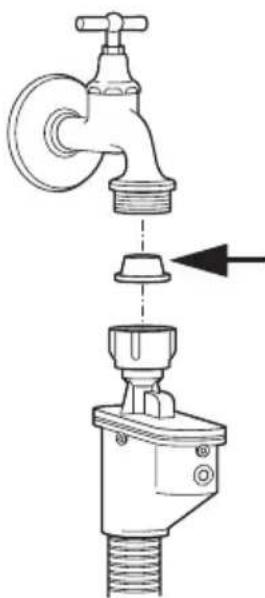
- Take the inlet hose off.
- Pull out the strainer in Aquasafe or the two strainers in Aquasafe+ (depending on the model) with universal or needle nosed pliers, clean with a small soft brush and fit back.
natural_image
Technical diagram of a faucet assembly with a valve and base mount (no text or labels)
natural_image
Diagram of a faucet assembly showing internal components and directional arrows (no text or labels)- Pull out the strainer in the back wall (except in case of Aquasafe+) with universal or needle nosed pliers, clean with a small soft brush and fit back.

natural_image
Line drawing of a hand using a pliers to adjust a component on a door panel (no text or symbols)- Put inlet hose back on and tighten "fingertight".
- Turn the water tap on full and check for leaks at the connections.
Decalcifying
It is not necessary to decalcify the machine if the correct amount of detergent is used.
- When necessary, use only a decalcifying agent suitable for washing machines. Make sure to follow the instructions on the package.
| If you experience this ... then please check this... | |
| Appliance cannot be switched on or programme will not start | Has a programme been set?Has the »Start/Pause« button been pressed?Has the loading door been properly closed?Open the loading door and push it with the palm until you hear it lock into place.Is power cable plugged in?Is fuse for this socket intact? |
| Machine won't react to input | Combination of additional functions not possible.Is Child-proof lock activated? See "Child-proof lock".Has a time delay been set?See "Time delay".If the problem persists: Pull out the mains plug, wait a few seconds, and insert plug back in. |
| »No water intake« indicator lamp is glowing | Is water tap all the way open?Is the inlet hose kinked?Is water inlet strainer clogged? See "Cleaning and care".Is water pressure too low? Ask the responsible waterworks.Has Aquasafe or Aquasafe+ (depending upon model) been activated due to leakages? |
| Detergent or fabric conditioner are not properly washed in | Is the detergent dispensing drawer or siphon soiled? See "Cleaning and care".Is softener too viscous? Add water. |
| Softener compartment (middle compartment in the detergent dispensing drawer) is full of water at end of programme | Is the siphon clogged? See "Cleaning and care". |
| Detergent foams too much • Is there too much detergent? Is load too small?Is water too soft? Ask your local waterworks. | |
| Water runs out (machine is "leaking") | Are hoses properly attached?Is the foreign matter trap properly closed?Is foam coming out as a result of too much detergent? |
| Water does not drain, or drains very slowly | Is Rinse hold set? See "Quick instructions for daily use".Is the drain hose kinked? |
| Appliance does not spin properly, or does not spin at all | Is Rinse hold set? See "Quick instructions for daily use".Is spin speed set too low or spin deselected?Is the distribution of load nonuniform? See "Quick instructions for daily use". |
| Appliance vibrates heavily when spinning | Are the transport locks removed? See "Removing transport locks".Is machine properly positioned? See "Leveling the machine".Is drain hose kinked, water won't drain off? |
| Door will not open • Is programme over? When the »Door« indicator lamp goes out, the door can be opened. | |
| Power failure during washing • Is the duration of power failure going to be long and Does the leftover water need to be drained? See "Cleaning and care".Is the power failure only temporary? The appliance automatically continues with the wash programme at a suitable point as soon as the power supply is restored. | |
| Residual matter on laundry • Grey residues (fat residue)? Increase the amount of detergent.White residual matter (detergent residue)? Brush off. Watch how much detergent you use. | |
Let us help you!
If you can not solve the problem yourself, contact our customer service. Specify the
exact model number given on the type plate.
Tips for removing stains
| Type of stain Before washing... | |
| Grease dab on washing up liquid | |
| Tomato rub with a slice of raw potato | |
| Spinach rub with a slice of raw potato | |
| Egg white rub with gall soap | |
| Carrots dab on baby oil | |
| Beer dab on diluted vinegar | |
| Red wine dab on lemon juice | |
| Chewing gum Place garment in freezer compartment, the brush off | |
| Wax iron between blotter paper | |
| Pollen | Peel off with adhesive tape |
| Lipstick | dab on eucalyptus oil |
| Rust | dab on vinegar or lemon juice |
| Blood | rub with gall soap |
| Iodine | rub with a slice of raw potato |
Technical specifications and consumption data
| Load capacity (dry weight) | |||
| - Hot wash/Coloured, Hygiene +, Active 40 °C | max. 6.0 kg | ||
| - Easy-care | max. 3.0 kg | ||
| - Mini 30 | max. 2.5 kg | ||
| - Delicates | max. 2.0 kg | ||
| - Woollens, Hand wash | max. 1.5 kg | ||
| Spin speeds 1) | |||
| - Hot wash/Coloured | up to 1400 rpm (depending on model) | ||
| - Easy-care | up to 800 rpm | ||
| - Delicates, Woollens, Hand wash | up to 600 rpm | ||
| Dimensions | |||
| - Height/height for built-under installation | 85.0 cm / 82.0 cm | ||
| - Width | 60.0 cm | ||
| - Depth/depth with door open | 59.0 cm / 104 cm | ||
| - Feet height adjustment | 2.5 cm | ||
| Weight when empty approx. 71 kg | |||
| Electrical connection | |||
| - Voltage | 230 V ~ 50 Hz | ||
| - Connected load | 2350 W | ||
| - Fuse protection | 10 A | ||
| Water supply | |||
| - Water pressure (flow pressure) | 0.1...1.0 MPa = 1...10 bar | ||
| - Inlet temperature | max. 25 °C | ||
| - Drain height | max. 100 cm | ||
| Consumption data 2) | Energy (kWh) | Water (Litre) | Time (Min.) |
| - Hot wash/Coloured 95 °C | 2.05 | 55 | 136 |
| - Hot wash/Coloured 60 °C 3) 4) | 1.02 | 45 | 135 |
| - Hot wash/Coloured 40 °C 3) | 0.55 | 45 | 138 |
| - Hygiene + | 2.03 | 65 | 146 |
| - Active 40 °C | 0.70 | 45 | 173 |
| - Mini 30 | 0.20 | 50 | 30 |
| - Easy-care 60 °C | 0.90 | 55 | 112 |
| - Easy-care 40 °C 3) | 0.50 | 55 | 110 |
| - Easy-care Cold | 0.13 | 52 | 90 |
| - Delicates 40 °C | 0.31 | 60 | 66 |
| - Woollens 40 °C | 0.35 | 50 | 60 |
| - Woollens Cold | 0.03 | 50 | 53 |
| - Hand wash 30°C | 0.20 | 40 | 43 |
1) Maximum speed of the particular programme; can be reduced with the Spin speed selector.
2) Depending on water, textile and ambient conditions, the actual values can deviate from the declared standard values.
3) Test programmes according to EN 60456.
4) Standard programme for energy identification label.
natural_image
Simple line drawing of a coiled cable with two connectors, labeled '9b' (no text or symbols on the diagram itself)natural_image
Technical line drawing of a mechanical component with multiple circular washers and a curved handle (no text or symbols)natural_image
Technical line drawing of a device rear panel with internal components and wiring (no text or symbols)natural_image
Line drawing of a hand using a wrench to connect cables to a device panel (no text or symbols present)natural_image
Diagram of a mechanical assembly with a rotating shaft and circular components (no text or symbols)natural_image
Pure mechanical component diagram without any text, numbers, or symbolsGem venligst transportsikringerne.
natural_image
Diagram of a mechanical component with rotational arrows indicating motion (no text or symbols)natural_image
Technical diagram showing a pipe fitting attached to a component with a black arrow indicating direction (no text or symbols present)natural_image
Line drawing of a faucet with a side-mounted valve (no text or symbols)natural_image
Illustration of a hand holding a curved, segmented object (no text or symbols)natural_image
Diagram of curved cable routing with a control panel and directional arrow (no text or symbols)natural_image
Illustration of hands performing a medical procedure on a patient's abdomen (no text or symbols present)natural_image
Technical line drawing of a mechanical component with an arrow indicating upward motion (no text or symbols)natural_image
Line drawing of a hand opening a large circular device with a shaded interior (no text or symbols)- Tromlen kontrolleres for fremmedlegemer.
natural_image
Diagram showing two black arrows pointing downward on a pipe or support structure (no text or symbols)
natural_image
Line drawing of a washing machine component with a hose and drain tube (no text or symbols)natural_image
Technical line drawing of a mechanical device with a rotating component and housing (no text or symbols)natural_image
Technical diagram of a faucet assembly showing valve, handle, and base components (no text or labels)
natural_image
Diagram of a faucet assembly with arrows indicating parts (no text or labels)natural_image
Line drawing of a hand using a pliers to adjust a component on a door panel (no text or symbols)


- Automatic Washing Machine
- Operating instructions
- Vaskemaskine
- Brugsanvisning
- Read this first!
- These operating instructions...
- Explanation of symbols
- Contents
- Accessories (in accessory bag):
- Intended use
- Safety instructions
- If there are children in your household...
- Where to dispose of the packaging?
- What to do with the old machine?
- Installation
- Removing the transportation locks
- The right location of installation
- Levelling the machine
- Connecting the water supply
- Connecting the water drain
- Fastening the hose holder:
- Permanent connection to a siphon trap:
- Electrical connection
- The First Use
- Preparing to wash
- Sorting the laundry
- Preparing clothes for washing
- After completion of the programme cycle:
- The right load capacity
- Detergents and softeners
- The detergent dispensing drawer
- The loading door
- Dosing devices
- Liquid detergent
- Choice of detergent
- Detergent quantity
- Fabric softener
- Starch
- The programme selector
- Main programmes
- Special programmes
- The buttons
- Prewash
- Intensive
- Extra rinse
- Easy iron
- Quick wash
- Child-proof lock
- To activate the Child-proof lock:
- Spin speed selector
- To deactivate the Child-proof lock:
- Display
- Progress of programme
- Changing the delay time
- Cancelling the time delay
- »Prewash«
- »Main wash«
- »Rinse«
- Indicator lamps
- »No water intake«
- »Softener«
- »Spin«
- »Foaming«
- »Door«
- »Time delay«
- Preparation
- Starting
- Aborting a programme
- Adding more laundry
- Programme is in rinse and hold
- Re-spinning the laundry
- After the programme cycle is completed
- Detergent dispensing drawer
- Loading door and drum
- Housing and control panel
- Foreign matter trap
- Draining remaining water
- Water inlet strainer
- Decalcifying
- Let us help you!
- Tips for removing stains
- Technical specifications and consumption data
Brand : BLOMBERG
Model : WAF 13601
Category : Washing machine