
KMC2 - Radio KICKER - Free user manual and instructions
Find the device manual for free KMC2 KICKER in PDF.


| Type de produit | Radio marine |
| Marque | Kicker |
| Modèle | KMC2 |
| Catégorie | Radio |
| Dimensions (H x L x P) | 50 x 180 x 180 mm (approx.) |
| Poids | 1.2 kg (approx.) |
| Alimentation | 12V DC (négative à la masse) |
| Consommation électrique | 15 A max |
| Type d'écran | LCD rétroéclairé |
| Fonctions radio | AM/FM avec RDS |
| Connectivité Bluetooth | Bluetooth 4.2 pour streaming audio et appels mains libres |
| Entrées audio | 1x AUX 3.5 mm, 1x USB (charge et lecture) |
| Sorties audio | 4 canaux (avant/arrière) avec sortie subwoofer |
| Puissance de sortie | 50 W RMS x 4 (selon norme CEA-2006) |
| Indice de protection | IPX6 (résistant aux éclaboussures) |
| Étanchéité | Conforme à la norme maritime |
| Télécommande | Oui, filaire (incluse) |
| Entretien et nettoyage | Essuyer avec un chiffon doux et sec. Ne pas utiliser de produits abrasifs. |
| Sécurité | Fusible de protection 15A à remplacer en cas de surcharge |
| Pièces détachées et réparabilité | Consultez le manuel pour les pièces de rechange ou contactez le service client |
| Informations générales | Utilisation en milieu marin : éviter l'immersion totale |
Frequently Asked Questions - KMC2 KICKER
User questions about KMC2 KICKER
0 question about this device. Answer the ones you know or ask your own.
Ask a new question about this device
Download the instructions for your Radio in PDF format for free! Find your manual KMC2 - KICKER and take your electronic device back in hand. On this page are published all the documents necessary for the use of your device. KMC2 by KICKER.
USER MANUAL KMC2 KICKER
KICKER® KMC2 MEDIA CENTER USER INFORMATION | INFORMACION DEL USUARIO INFORMATIONS DE L'UTILISATEUR | NUTZERINFORMATION
KICKER
Scan here for
owner's manual
Escanee aquí para
Thank you and congratulations on your purchase of the KICKER KMC2 Media Center! The KMC-Series are an absolute must-have for any music enthusiast or audiophile who loves the open water. With features like Bluetooth, USB playback with native support for the most popular audio formats, remote control support, and a nearly infinite number of ways to upgrade and enhance your audio system, you'll wonder how you ever got by with stock marine audio in the first place! Complete your system with KICKER Marine amplifiers, subwoofers, speakers, and towers for an unrivaled marine audio experience.
Sincerely
Steve Irby
President/CEO

IMPORTANT: KICKER recommends a professional installation performed by licensed providers. You are solely responsible for safety mounting and wiring your products.
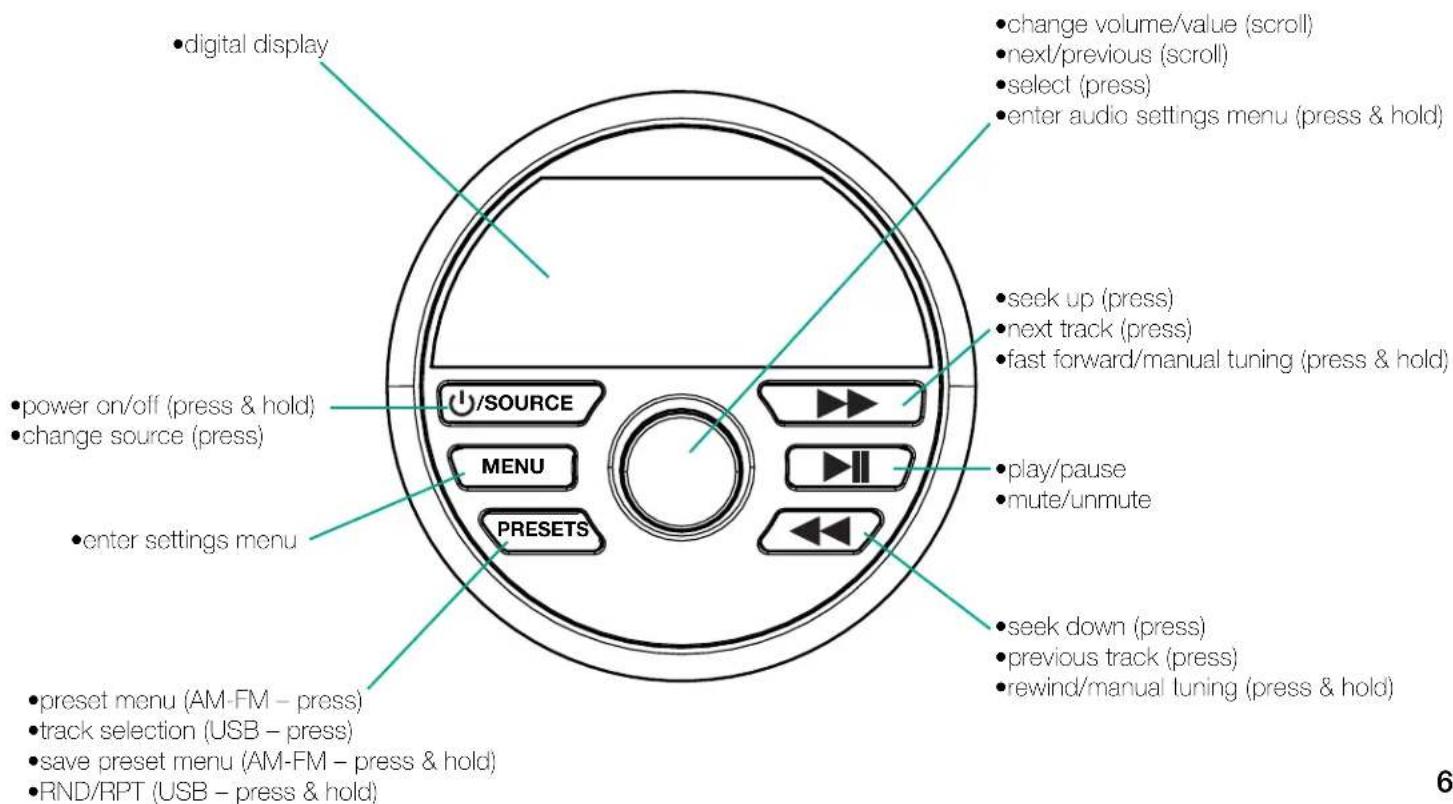
Use the SOURCE button to choose the input source for the KMC2: FM, AM, Bluetooth, USB or AUX.
The KMC2 will automatically enter Bluetooth pairing mode when there is no Bluetooth connection, identifying as "KMC KICKER" to your audio device. You may also select "BT PAIR" from the menu to enter pairing mode.
NOTE: Use short and long presses to operate. Some input sources do not support all functions.
mounting hole cutout template: 3 inches, 76.2 mm
Multi-Media Receiver
KMC2
Owner's Manual | English
KMC2 Multi-Media-Receiver
KMC2 Multi-Media Receiver
FCC Statement
This equipment has been tested and found to comply with the limits for a Class B digital device, pursuant to part 15 of the FCC Rules. These limits are designed to provide reasonable protection against harmful interference in a residential installation. This equipment generates uses and can radiate radio frequency energy and, if not installed and used in accordance with the instructions, may cause harmful interference to radio communications. However, there is no guarantee that interference will not occur in a particular installation. If this equipment does cause harmful interference to radio or television reception, which can be determined by turning the equipment off and on, the user is encouraged to try to correct the interference by one or more of the following measures:
—Reorient or relocate the receiving antenna.
—Increase the separation between the equipment and receiver.
—Connect the equipment into an outlet on a circuit different from that to which the receiver is connected.
—Consult the dealer or an experienced radio/TV technician for help.
FCC Statement
This device complies with FOC radiation exposure limits set forth for an uncontrolled environment.
This device complies with Part 15 of the FCC Rules. Operation is subject to the following two conditions: (1) this device may not cause harmful interference, and (2) this device must accept any interference received, including interference that may cause undesired operation.
Caution! Any changes or modifications not expressly approved by the party responsible for compliance could void the user's authority to operate the equipment.
IC Notice - CAN ICES-3 (B) - This device complies with Industry Canada's licence-exempt RSSs. Operation is subject to the following two conditions:
(1) This device may not cause interference; and (2) This device must accept any interference, including interference that may cause undesired operation of the device.
The device meets the exemption from the routine evaluation limits in section 2.5 of RSS 102 and compliance with RSS-102 RF exposure, users can obtain Canadian information on RF exposure and compliance.
print mounting hole cutout template at 8.5"x11" in "Portrait" and "Actual Size"
It is recommended you mark the screw holes for Surface Mounting after making the mounting hole.
Power Output @ 14.4V, 4Ω stereo, <10% THD+N 25W x 4
Frequency Response [Hz] 20 - 20k
Signal-to-Noise Ratio [dB] 87
Input Sensitivity 500mV
Bluetooth Range [ft] 30
USB Playback MP3, WMA, FLAC, WAV
USB Charging DC 5V, 1A
USB Compatible File System FAT16, FAT32
Line-Out Level [V] 2.5
Outer Trim Ring Diameter [in, cm] 4.4, 11.2
Protrusion From Mounting Surface [in, cm] 1.25, 3.1
Total Mounting Depth [in, cm] 3.9, 10.1
Authorized KICKER Dealer:
Purchase Date:
Serial Number:
Be careful not to drill into wiring or vehicle mechanisms. You are solely responsible for securely mounting the KMC2 Media Center. See page 2-3 for mounting hole cutout template.
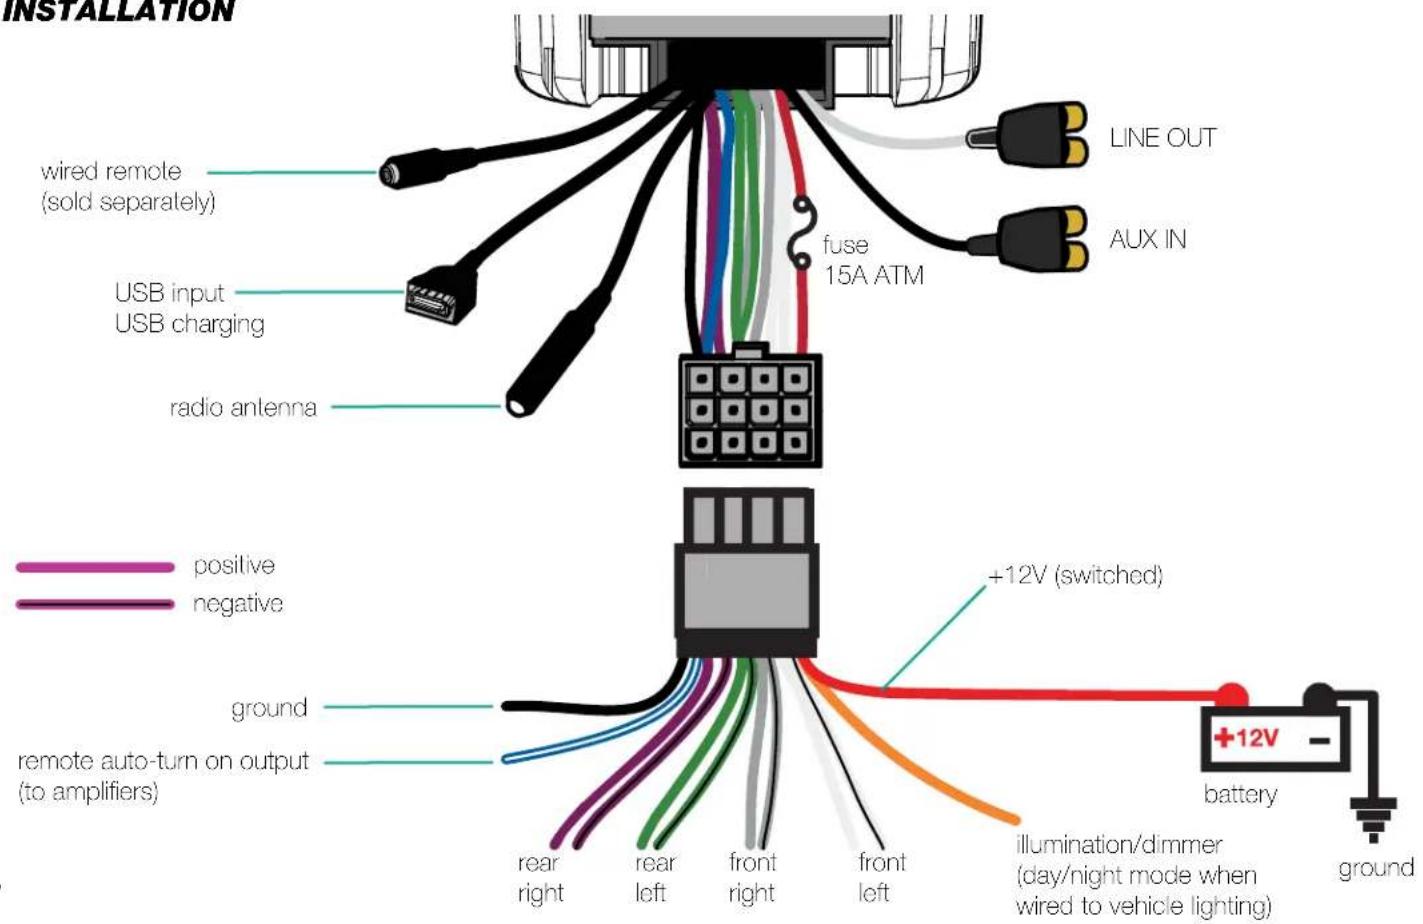
Before installation, you may wish to plan your placement of the USB and Auxiliary inputs, and the optional KRC12 remote (sold separately), for both convenience and looks!
With a KICKER KXM amplifier, a pair of KICKER KM speakers, and a few KICKER cables, you're looking at a full system upgrade that will dominate! KICKER amplifiers and accessories make upgrading a snap. Ask your dealer about KICKER amplifiers and speaker upgrades to complete your system!
All specifications and performance figures are subject to change. Please visit www.kicker.com for the most current information.
WARNING: KICKER products are capable of producing sound levels that can permanently damage your hearing! Turning up a system to a level that has audible distortion is more damaging to your ears than listening to an undistorted system at the same volume level. The threshold of pain is always an indicator that the sound level is too loud and may permanently damage your hearing. Please use common sense when controlling volume.
OVERVIEW
NOTE: use short and long presses to operate. Some input sources do not support all functions.
INSTALLATION
- Attach threaded bolts to the back of the KMC2
- Position the mounting bracket over the bolts.
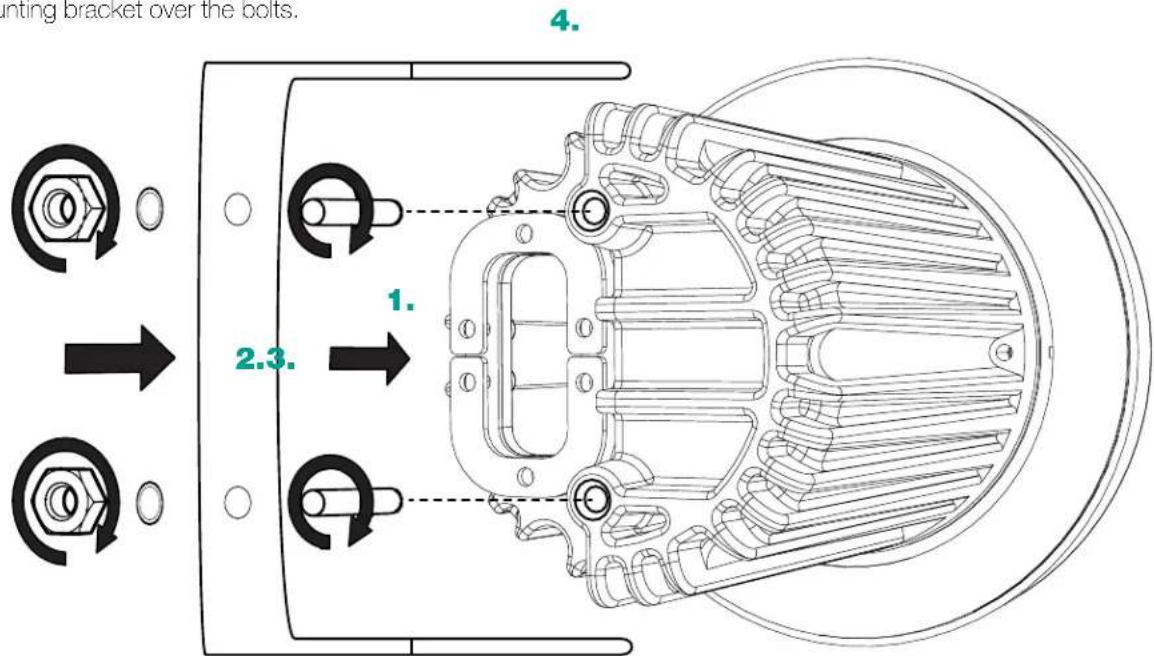
- Place washers over bolts and securely attach nuts.
- Depending on the size of your mounting baffle, you may need to snap off one or more of the metal tabs from the mounting bracket to accommodate installation.
OPERATION
Playback
Use the SOURCE button to choose the input source for the KMC2: FM, AM, Bluetooth, USB, or AUX.
When Bluetooth is selected as the input source, the KMC2 will automatically enter Bluetooth pairing mode if there is no previous Bluetooth connection, identifying as "KMC KICKER" to your audio device. You may also select "BT PAIR" from the menu to enter pairing mode. While in pairing mode, the Bluetooth icon will flash. When successfully paired, the Bluetooth icon will become solid.
The USB input source is only available when there is a USB device connected. The KMC2 will automatically switch to USB input when a USB device is connected and detected, with a USB icon. KICKER recommends SANDISK drives for the best performance. In testing, the KMC2 has been shown to work with some HDD's, however, this is not supported by KICKER! Drives must be formatted in FAT16 or FAT32 file systems. When in USB playback mode, you can access the RANDOM and REPEAT playback settings by pressing and holding the PRESETS button.
To save a preset, tune to the radio station you'd like to save, then hold the PRESETS button to enter the saving presets menu. Scroll to the preset number you'd like assigned to that station, then press the knob. You may save 12 AM presets and 18 FM presets.
Device Settings
Press and hold the MENU button to enter the Device Settings menu. The available settings are: PAIR, BEEP, LOUD, REG. Use the VOLUME KNOB to change the available values for each setting, then press it to confirm the settings. LOUD setting will be applied to the RCA outputs.
BT PAIR - select Bluetooth input source and enter pairing mode BEEP - select whether the KMC2 responds with beeps
LOUD - select On or Off for a low frequency boost
REG - select USA or EUR for tuner region
FM tuner increments of 200kHz (USA) and 100kHz (EUR)
AM tuner increments of 10kHz (USA) and 9kHz (EUR)
Audio Settings
Press and hold the VOLUME KNOB to enter the Audio Settings menu. The available audio settings are: Bass, Treble, Balance, Fader, and EQ. Use the VOLUME KNOB to change the available values for each setting, then press it to confirm the settings. Changes to the Bass, Treble, and EQ settings are applied to the RCA outputs.
Bass - adjust the bass level from -7 to +7 Treble - adjust the treble level from -7 to +7
Balance - adjust the balance from Left 7 to Right 7 Fader - adjust the fader from Front 7 to Rear 7
EQ - select between EQ presets: USER, FLAT, CLASS, POP, and ROCK
TROUBLESHOOTING
If your KMC2 does not appear to be working, check the obvious things first such as blown fuses, poor or incorrect wiring connections etc. If you're using an amplifier, check for incorrect setting of crossover switches and gain controls etc.
No Power? ① Press and hold the SOURCE/POWER button and make sure the KMC2 is turned on. ② Check the +12V power wire, ground wire, and fuse(s) for power and proper connection.
No or low output? ① Check the balance control on the KMC2. ② Check the speaker output connections. ③ Power cycle the KMC2.
Reduced volume? Reverse a speaker connection from positive to negative on the stereo channel(s); if the volume improves, the speaker was out of phase.
Buttons/Device Unresponsive? Perform Factory reset.
Factory reset: Reset the KMC2 to factory default settings by press and holding the PLAY/PAUSE button for ten seconds.
Radio stations not being received? Check the antenna for proper connection and ensure the REG setting in the menu is set to the correct region.
Low Voltage: The KMC2 will monitor voltage levels, displaying the battery icon when voltage drops and flashing "LOW BAT". Functions will continue until voltage drops below +10V, then the KMC2 will power off. Ensure there is adequate battery life, as the KMC2 draws power over time.
Bluetooth Pairing Failed: If your audio device will not pair or connect, clear or 'Forget' the KMC2 on your audio device and perform a factory reset of the KMC2.
If you have more questions about the installation or operation of your new KICKER product, see the Authorized KICKER Dealer where you made your purchase. Please E-mail support@kicker.com or call Technical Services (405) 624-8583 for unanswered or specific questions.
ELECTRONICS LIMITED WARRANTY
When purchased from an Authorized KICKER Dealer, KICKER warrants this product to be free from defects in material and workmanship under normal use for a period of TWO (2) YEARS from date of original purchase with receipt. If this product is identified as "Refurbished" or "B Goods", the warranty is limited to a period of THREE (3) MONTHS from the date of original purchase. In all cases you must have the original receipt. Should service be necessary under this warranty for any reason due to manufacturing defect or malfunction during the warranty period, KICKER will repair or replace (at its discretion) the defective merchandise with equivalent merchandise. Warranty replacements may have cosmetic scratches and blemishes. Discontinued products may be replaced with more current equivalent products. This warranty is valid only for the original purchaser and is not extended to owners of the product subsequent to the original purchaser. Any applicable implied warranties are limited in duration to a period of the express warranty as provided herein beginning with the date of the original purchase at retail, and no warranties, whether express or implied, shall apply to this product thereafter. Some states do not allow limitations on implied warranties; therefore, these exclusions may not apply to you. This warranty gives you specific legal rights; however you may have other rights that vary from state to state.
WHAT TO DO IF YOU NEED WARRANTY OR SERVICE:
Defective merchandise should be returned to your local Authorized Stillwater Designs (KICKER) Dealer for warranty service. Assistance in locating an Authorized Dealer can be found at www.kicker.com or by contacting Stillwater Designs directly. You can confirm that a dealer is authorized by asking to see a current authorized dealer window decal.
If it becomes necessary for you to return defective merchandise directly to Stillwater Designs (KICKER), call the KICKER Customer Service Department at (405) 624-8510 for a Return Merchandise Authorization (RMA) number. Package only the defective items in a package that will prevent shipping damage, and return to:
Stillwater Designs, 3100 North Husband St, Stillwater, OK 74075
The RMA number must be clearly marked on the outside of the package. Please return only defective components. The return of functioning items increases your return freight charges. Non-defective items will be returned freight collect to you. For example, if a subwoofer is defective, only return the defective subwoofer, not the entire enclosure. Include a copy of the original receipt with the purchase date clearly visible, and a "proof-of-purchase" statement listing the Customer's name, Dealer's name and invoice number, and product purchased. Warranty expiration on items without proof-of-purchase will be determined from the type of sale and manufacturing date code. Freight must be prepaid; items sent freight-collect, or COD, will be refused.
WHAT IS NOT COVERED?
This warranty is valid only if the product is used for the purpose for which it was designed. It does not cover:
Damage due to improper installation Freight Damage Subsequent damage to other components
Speakers damaged due to amplifier clipping or distortion
Any cost or expense related to the removal or reinstallation of product
Products returned without a Return Merchandise Authorization (RMA) number
Items previously repaired or modified by any unauthorized repair facility
Damage caused by exposure to moisture, excessive heat, chemical cleaners, and/or UV radiation
Damage through negligence, misuse, accident or abuse. Repeated returns for the same damage may be considered abuse
Return shipping on non-defective items
Products with tampered or missing barcode labels
Products purchased from an UNAUTHORIZED dealer
Service performed by anyone other than KICKER
Products with tampered or missing serial numbers
The cost of shipping product to KICKER
SD stillwaterdesigns
HOW LONG WILL IT TAKE?
KICKER strives to maintain a goal of one week turnaround for all electronics (amplifiers, crossovers, equizers, etc.) returns. Delays may be incurred if lack of replacement inventory or parts is encountered. Failure to follow these steps may void your warranty. Any questions can be directed to the KICKER Customer Service Department at (435) 624-8510. Contact your International KICKER dealer or distributor concerning specific procedures for your country's warranty policies.
P.O. Box 459 • Stillwater, Oklahoma 74076 • USA • (405) 624–8510
20200706-G-KMC2
INTERNATIONAL WARRANTY
Contact your International Kicker dealer or distributor concerning specific procedures for your country's warranty policies.
Our goods come with guarantees that cannot be excluded under the Australian Consumer Law. You are entitled to a replacement or refund for a major failure and for compensation for any other reasonably foreseeable loss or damage. You are also entitled to have the goods repaired or replaced if the goods fail to be of acceptable quality and the failure does not amount to a major failure.
©2016 Stillwater Designs
If you have a problem,
STOP
Please do not return
product to the store.
KICKER Tech Support can assist you.
Call us at 800-256-KICK (5425),
or contact us at support@kicker.com
with any questions or problems.
Thank you for your
KICKER purchase!
U.S. Customers Only
- KICKER® KMC2 MEDIA CENTER USER INFORMATION | INFORMACION DEL USUARIO INFORMATIONS DE L'UTILISATEUR | NUTZERINFORMATION
- KICKER
- Multi-Media Receiver
- KMC2
- FCC Statement
- OVERVIEW
- OPERATION
- Playback
- Device Settings
- Audio Settings
- TROUBLESHOOTING
- ELECTRONICS LIMITED WARRANTY
- WHAT TO DO IF YOU NEED WARRANTY OR SERVICE:
- Stillwater Designs, 3100 North Husband St, Stillwater, OK 74075
- WHAT IS NOT COVERED?
- SD stillwaterdesigns
- HOW LONG WILL IT TAKE?
- INTERNATIONAL WARRANTY
- STOP
- KICKER Tech Support can assist you.
Brand : KICKER
Model : KMC2
Category : Radio