
CEK-41 - Knife CUISINART - Free user manual and instructions
Find the device manual for free CEK-41 CUISINART in PDF.


| Product Type | Knife |
| Brand | Cuisinart |
| Model | CEK-41 |
| Blade Material | High-carbon stainless steel |
| Blade Length | 8 inches (20.3 cm) |
| Handle Material | Ergonomic polypropylene |
| Overall Length | 13 inches (33 cm) |
| Weight | 0.5 lbs (227 g) |
| Care Instructions | Hand wash with mild soap and dry immediately |
| Dishwasher Safe | No, hand wash recommended |
| Safety Features | Blade guard included for storage |
| Warranty | Limited lifetime warranty |
| Country of Origin | China |
| Use | General purpose kitchen knife |
| Edge Type | Fine edge, straight |
Frequently Asked Questions - CEK-41 CUISINART
User questions about CEK-41 CUISINART
0 question about this device. Answer the ones you know or ask your own.
Ask a new question about this device
Download the instructions for your Knife in PDF format for free! Find your manual CEK-41 - CUISINART and take your electronic device back in hand. On this page are published all the documents necessary for the use of your device. CEK-41 by CUISINART.
USER MANUAL CEK-41 CUISINART
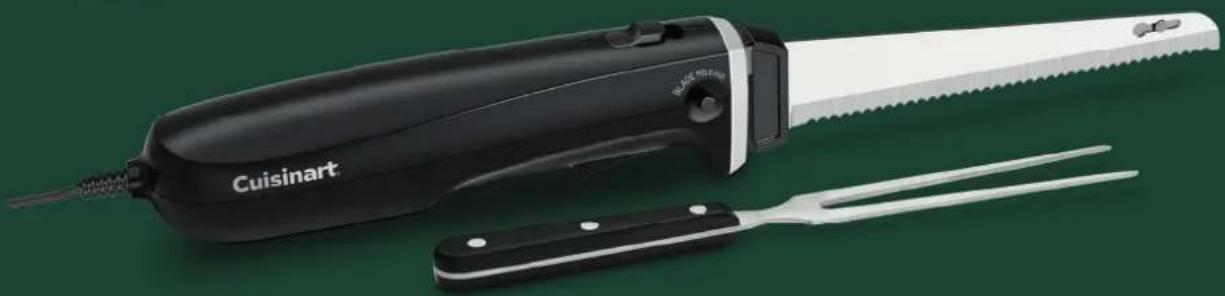
Electric Knife Set with Cutting Board
CEK-41

natural_image
Black and white image of a Cuisinart electric bar with fork, no visible text or symbols on the device itself.Instruction Booklet
For your safety and continued enjoyment of this product, always read the instruction book carefully before using.
IMPORTANT SAFEGUARDS
When using an electrical appliance, especially when children are present, basic safety precautions should always be taken, including the following:
- READ ALL INSTRUCTIONS.
- Unplug from outlet when not in use, before putting on or taking off parts, and before cleaning.
- To protect against risk of electric shock, do not put the knife handle in water or other liquids. If handle or cord falls into liquid, unplug the cord from outlet immediately. Do not reach into the liquid.
- This appliance is not intended for use by children or by persons with reduced physical, sensory, or mental capabilities, or lack of experience and knowledge. Close supervision is necessary when any appliance is used near children. Children should be supervised to ensure that they do not play with the appliance.
- Avoid contact with moving parts. Keep hands, hair, clothing and other utensils away from blade during operation to reduce risk of injury to persons and/or damage to the knife.
- Do not operate any appliance with a damaged cord or plug or after the appliance has malfunctioned or has been dropped or damaged in any way
or is not operating properly. Return the appliance to the nearest Cuisinart Repair Center for examination, repair, mechanical or electrical adjustment.
- The use of attachments not recommended by Cuisinart may cause fire, electric shock, or risk of injury.
- Do not use outdoors or anywhere the cord or knife might come into contact with water while in use.
- To avoid the possibility of the knife being accidentally pulled off work area, which could result in damage to the knife or personal injury, do not let cord hang over edge of table or counter.
- To avoid damage to cord and possible fire or electrocution hazard, do not let cord contact hot surfaces, including a stove.
- Do not operate knife in water or under running water.
- Unplug cord from outlet when inserting, removing or changing blades.
- Blade and fork are sharp. Handle carefully. Always handle with hand away from cutting edge. Always store blade with cutting edge away from you.
- Do not operate your appliance in an appliance garage or under a wall cabinet. When storing in an appliance garage, always unplug the unit from the electrical outlet. Not doing so could create a risk of fire, especially if
the appliance touches the walls of the garage or the door touches the unit as it closes.
- Carefully route the power supply cord to avoid damage from the knife blade while cutting.
SAVE THESE INSTRUCTIONS
This appliance has a polarized plug (one prong is wider than the other). As a safety feature, this plug will fit into a polarized outlet only one way. If the plug does not fit fully in the outlet, reverse the plug. If it still does not fit, contact a qualified electrician. Do not attempt to defeat this safety feature.
CONTENTS
Important Safeguards .... 2
Features and Benefits....3
Use and Care 4
Cleaning, Storage and Maintenance.....4
Helpful Hints 4
How to Carve a Turkey .... 5
How to Carve Ham on the Bone....6
Warranty 6
UNPACKING INSTRUCTIONS
IMPORTANT PLEASE READ
This package contains a Cuisinart® Electric Knife Set with the following parts:
- Fork
- Knife Handle
- Universal Blade
- Bamboo Cutting Board and Storage Tray
- Instruction Booklet
To avoid any injury to yourself or damage to the Cuisinart® Electric Knife Set, please follow these unpacking instructions:
- Place the gift box containing your Cuisinart® Electric Knife Set on a flat, sturdy surface before unpacking.
- Remove the Instruction Booklet and other printed materials.
- Next, turn the box on its side and slide the entire unit out, including packing materials.
- Carefully remove the foam plastic blocks from each side of the unit.
- Lift unit off the corrugated tray.
- Place the unit on a counter or table and read the instructions thoroughly before using.
- Save shipping carton and inserts for later use.
NOTE: Remember to return your warranty card with all information carefully and completely filled out.
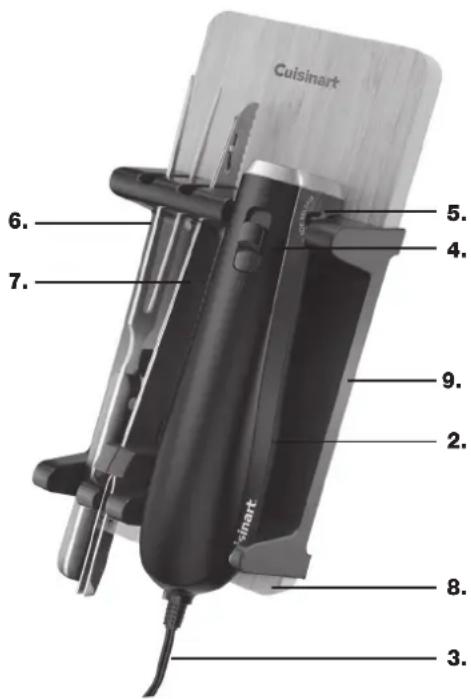
FEATURES AND BENEFITS
- ON/OFF Control (not shown):
One touch, pressure-activated ON/OFF trigger control for simple operation. Convenient for left- or right-hand use.
2.Handle:
Elegant, ergonomic handle reflects look and feel of fine cutlery.
- Electrical cord:
5-foot cord for maximum flexibility.
- SafetyButton:
One touch locks or unlocks the ON/OFF control for safety. Keep the safety button locked when knife is not in use.
- Blade Release Buttons:
Easy inserting, removing or changing blades.
6.Fork
7.Blade:
A universal, single blade.
- Bamboo Cutting Board:
Compact, durable, stores under tray.
9.StorageTray:
Safely stores power handle, blade, fork and cutting board.
USE AND CARE
Assembling the Blade:
- Remove protective sleeves. Before first use, wash blade in hot, soapy water or the dishwasher. CAUTION: BLADE IS SHARP. HANDLE WITH CARE. Dry thoroughly.
Using your Cuisinart® Electric Knife:
- The knife should be unplugged when fitting the blade.
Caution: The blade is very sharp; be careful when handling it.
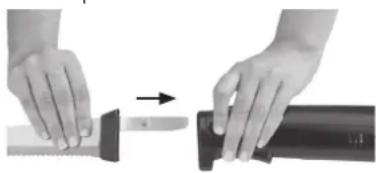
- To insert the Serrated Blade, first assemble the 2-piece, Serrated Blade by inserting the rivet on one blade into the keyhole of the other blade. Press in blade release buttons on both sides of handle and insert blade tabs into the two slots in handle. Release buttons to lock in place.
natural_image
Close-up of hands performing a task on a mechanical component, showing a step and motion direction (no text or symbols visible)Caution: NEVER place your hand on top of the blade to support it while operating the knife, as the blade is designed to move back and forth.
3. Operating Knife:
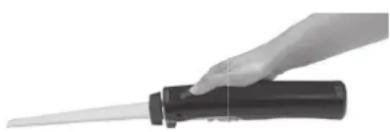
Push Lock/Unlock safety switch forward to Unlock position and hold.
natural_image
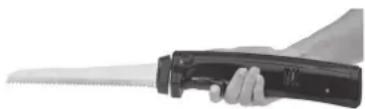
Hand holding a cylindrical tool with a pointed tip, no visible text or symbolsWhile continuing to push the lock/unlock safety switch forward, squeeze and hold the On/Off trigger as you cut, keeping blades parallel to cutting surface.
natural_image
Close-up of a hand holding a black-handled saw, no visible text or symbolsRelease grip on Lock/Unlock switch. NOTE: Blade automatically stops and Lock/Unlock switch returns to Lock positions when trigger is released.
- Storage Tray safely stores power handle, blade, fork and cutting board after use.
CLEANING, STORAGE AND MAINTENANCE
natural_image
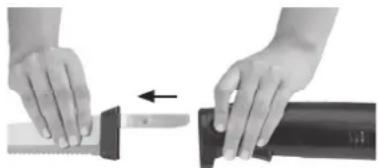
Two hands performing a manual task: one applying a saw to the other with a black tool (no text or symbols visible)- To remove the blade, unplug the knife. Squeeze the Blade Release Buttons and grasp the blade with the cutting edge away from you. Slowly pull blade out from knife handle.
- Wash blade in hot, soapy water or the dishwasher and dry thoroughly.
- Clean the handle with a slightly damp cloth and wipe dry.
Caution: Do not clean handle with blade in place. Do not immerse the appliance in water or other liquids or place it under running water.
Maintenance: Any other servicing should be performed by an authorized service representative.
HELPFUL HINTS
This blade is very versatile. In addition to slicing meats such as turkey, chicken, salami, ham and roasts, it can also be used to cut fruits like melon and pineapple, vegetables such as squash, eggplant and zucchini, as well as hard cheeses.
It also glides through loaves of bread for consistent, even slicing. It can also be used to slice bagels and sandwich rolls.
HOW TO CARVE A TURKEY
Carving a large bird, especially in front of hungry guests, can be a daunting task—the watering mouths, critical eyes, rumbling stomachs. With the Cuisinart® Electric Knife, a little guidance and some helpful hints...we hope to make this task a pleasurable experience.
Tip: Cut dark meat first, as it does not dry out as quickly as the white meat of the breast.
Preparation:
- Remove the turkey from the oven.
- Cover loosely with foil and let stand 15–30 minutes to let the juices set and the meat firm up. The turkey will be more moist, easier to carve, and the slices will hold together better.
- Remove the stuffing.
- Place turkey on a carving board, breast side up, with the legs facing you. You'll need your Cuisinart® Electric Knife and the large carving fork to hold the bird.
Cutting the legs and wings:
-
Hold the tip of one drumstick with your fingers and gently pull the leg away from the body of the turkey.
-
Holding the turkey steady with a carving fork, cut the skin between the thigh and the breast.
- Pull the leg out farther to expose the joint where the thigh connects, and cut through joint with the knife to remove the leg.
- Next, hold the drumstick with the fork and cut at the joint between the drumstick and thigh to separate the two pieces.
- Slice the meat on the drumstick by cutting along the bone to get thick slices.
- Turn the drumstick and continue slicing along the bone until all of the meat is removed.
- To remove meat from the thigh, cut thick slices to the bone. If the turkey is small, the drumstick and thigh may be served whole.
- Using the fork, hold the wing away from the body and cut through the joint. The wing can be served as is.
- Repeat on other side to remove leg and wing.
Tip: The key to carving the thighs, legs, and wings is to cut through the joints, and not through the bones. We do not recommend using your Cuisinart® Electric Knife on bones, as it could cause damage to the knife or personal injury.
Carving the breast:
- Hold the breast with the carving fork, and starting at the outer side of one breast, cut slices parallel to the rib cage, from the top of the breast downward. The slices should be thin, even and the entire length of the breast. The slices will get larger as you work toward the rib cage.
Continue slicing until you reach the bones. - Repeat on the other side of the breast.
Tip: Angle the knife parallel to the rib cage, rather than digging into the meat.
Tip: Some yummy leftovers that can be made from the smaller pieces of meat near the bones include: soup, casserole, chili, salad, tacos, etc.
HOW TO CARVE HAM ON THE BONE
- Remove the ham from the oven, cover loosely with foil and let stand for 20 minutes.
- Place ham on a carving board.
- Holding the ham steady with a carving fork, use your Cuisinart® Electric Knife to trim away the excess fat from the outside of the ham.
-
Next, stand the ham on end, holding the shank (smaller) end in your hand.
-
Slice into the ham just below the shank, at the stifle joint, where the ham gets bigger.
- Cut along the bone, which is curved, and then around the socket joint at the sirloin end. The meat will not cut completely away from the bone yet.
- Rotate the ham so the uncut side is up, and holding the shank end with your hand, slice into the ham at the joint, cutting downward until the meat falls away from bone.
- Cut off any large remaining pieces of meat. Carve the ham in even slices, keeping your knife parallel to the carving board and holding the ham securely with a carving fork.
ROASTING AND CARVING A TURKEY
Chef Steven Shipley, Culinary Arts Instructor Johnson & Wales University
Do you have Thanksgiving Day anxiety when roasting a turkey? It can be challenging, but you can do it with these few easy steps.
If you are using a frozen turkey, the first step is to thaw it. Whenever possible, refrigerator thawing is the best method, though if you don't have time for that, cold-water thawing will work. Never thaw a turkey at room temperature, as this will allow for bacterial growth and is never recommended. If thawing your turkey in the refrigerator, 24 hours per 4 pounds of meat will be necessary (make sure to place the bird on a tray to catch any juices). If thawing in cold water, submerge the unopened turkey, breast side down, and soak for 30 minutes per pound (be sure to change the water occasionally). Of course, if you are working with a fresh turkey, thawing is not necessary.
Here we go. The day before Thanksgiving, remove your thawed, whole turkey from its wrapper and place it in a clean kitchen sink. Remove the giblet bag from inside the turkey and rinse each item with cold water, then, give the bird itself a thorough rinse using cold water inside and out, then pat dry with paper towels. Move the turkey to a clean, dry surface, for instance, place it on parchment paper. Then, make sure to clean your sink with soap and water to avoid any cross contamination. Tuck the wing tips behind the backbone and drizzle a small amount of olive oil on the outside of the bird. Lightly season the turkey and giblets with kosher salt and coarse ground black pepper. Make sure to season the inside of the turkey. If you'd like, chop some Italian parsley, rosemary and fresh thyme and add this herb mixture to some softened, unsalted butter. With a moist index finger, gently lift the skin away from each breast lobe and rub the herbed butter mixture evenly under the skin. Make sure to smooth out the skin afterward. In a shallow roasting pan, add coarsely chopped onions, carrots, celery and giblets (including the neck) to the bottom of the pan. Add a roasting rack, the turkey, and cover and place in the refrigerator. This could all be done the day before, or early on Thanksgiving Day itself by following the same steps. Keeping the turkey covered with plastic or foil in the fridge until you're ready to cook it the next day is how many restaurants and hotels prepare turkeys, chickens and other items in advance. It also gives the seasoning a chance to add that extra bit of flavor to the bird.
Thanksgiving Day. Remove your turkey from the fridge about 30 minutes before you place it in the oven. This will allow the bird to come to room temperature and shorten the amount of cooking time in the oven. By keeping the turkey elevated on a rack when roasting, heat is able to hit all parts of the turkey and promote a crispy skin. Add one cup of chicken stock and one cup of water over the vegetables just before placing everything in the oven.
Place your oven rack in the lowest position and preheat the oven to 400 degrees F. Roast your turkey in the oven for 30 minutes, then reduce the oven temperature to 325 degrees F. If possible, remove turkey from the oven and place it on the cooktop or the counter, and loosely cover the breast meat with aluminum foil to avoid excessive browning. Many cooks carry out this pro-
cedure while leaving the turkey on the oven door, which unfortunately results in significant heat loss from the oven. Baste the turkey with its own juices before returning it to the oven. Continue to roast the bird at 325 degrees F for approximately 15 to 20 minutes per pound. This is only an estimate, so be sure to use a meat thermometer to achieve the perfect level of doneness.
Continue to roast the turkey, basting every 30 minutes until an instant-read meat thermometer reaches 180 degrees F and the juices run clear when it is inserted into the thickest part of the thigh meat without touching the thigh bone. Remember to remove the foil 30 minutes before the turkey is fully cooked to ensure even browning. Make sure that your turkey is cooked! It sounds simple, but it is probably your most important step. Even if your turkey comes with a plastic pop-up thermometer, check it to make sure.
Remove the turkey from the oven and place it on a serving platter. Loosely tent with aluminum foil and allow it to rest out of the oven for a minimum of 20 minutes. This is a very important step that allows all the delicious juices inside the turkey to settle.
Making the gravy. For basic pan gravy, remove the rack from the roasting pan and carefully pour and strain the pan juices into a measuring cup or fat separator. Let the juices stand for a few minutes to allow the fat to separate and rise to the top. Many chefs will place the cooked mirepoix (onions, carrots and celery from the bottom of the roasting pan) into a blender with some additional chicken broth and purée the mixture. This is a natural thickener that doesn't require flour or cornstarch. If you used a fat separator, you can simply pour off the juices, leaving the fat behind and combine the broth with the puréed vegetables. If it gets too thick, loosen with additional chicken broth. Season to taste with salt and pepper if needed, and you'll have a rich and nutritious gravy!
Carving the turkey. Start with the right tools: preferably an electric carving knife and a two-pronged meat fork. The use of the electric carving knife will make this task pleasurable and quick. Start by gently pulling the drumstick away from the bird and cut where the thigh is joined to the body. Slice the thigh from the leg and cut the thigh meat into slices. This will leave you with an even carving surface for more equal slices of breast meat. Make a deep horizontal cut above the wing and hold down the bird with your two-pronged fork. Carefully shave off thin slices of the breast with the electric knife in a downward motion. Serve with your favorite sides and listen for the sound of your guests scraping their plates with their silverware. You won't have to ask them if it's good, you'll see and hear the results!
Happy cooking!
Limited Warranty
Subject to the exclusions and limitations contained herein, Conair LLC dba Cuisinart ("Cuisinart") warrants that the Cuisinart® Electric Knife Set ("Product") will be free from material defects in materials and workmanship under normal home use conditions for a period of THREE (3) years beginning on the date the Product was purchased in its original, sealed packaging, unless otherwise specified in this Limited Warranty. This Limited Warranty is only for U.S. consumers (defined herein as purchasers at retail for personal, family, or household use) who originally purchase the Product from Cuisinart or an authorized Cuisinart® reseller (if you are unsure whether a retailer or other point of sale is an authorized or unauthorized Cuisinart reseller, contact Cuisinart).
This Limited Warranty does NOT cover:
- Normal wear and tear;
- Any Product purchased by commercial purchasers or for commercial or non-household uses;
• Accessories, parts, or software added to the Product after the system is shipped from Cuisinart; - Any costs associated with the replacement or repair of the Product, including labor, installation, or other costs incurred by you without prior Cuisinart approval;
- Damage to the Product, defective conditions, or nonconformities due to: (1) external causes, including shipping, accidents, problems with electrical power (Product designed only for use with 120-volt outlets), abnormal conditions (such as mechanical or environmental); (2) usage not in accordance with Product instructions; (3) misuse, neglect, unauthorized alteration, unauthorized repair; and (4) acts of god or other events beyond Cuisinart's control;
- Though necessary repairs and maintenance might be performed by any company, damage caused by you or any nonauthorized third party, may void, this Limited Warranty;
- Damage caused by accessories or replacement parts not specifically authorized by Cuisinart, may void, this Limited Warranty; and
- Any Product where the original Product identification markings (trademark or serial number) have been removed, altered, or obliterated from the Product.
It is recommended that you visit the website, https://cuisinart.registria.com, for a fast, efficient way to complete your product registration. However, product registration does not eliminate the need for the consumer to maintain the original proof of purchase in order to obtain the warranty benefits. In the event that you do not have proof of purchase date, the purchase date for purposes of this Limited Warranty will be the date of manufacture.
Hassle-free warranty
If the Product that is the subject of this Limited Warranty fails during the warranty period for reasons covered by this Limited Warranty, Cuisinart will, at its option, repair the Product, replace the Product with another identical or reasonably equivalent product, or if Cuisinart is unable to repair or replace the Product, refund the purchase price, less the amount directly attributable to the consumer's prior usage of the Product. To obtain a return shipping label, email us at https://www.cuisinart.com/customer-care/product-assistance/product-inquiry/, or call our Consumer Service Center toll-free at 1-800-726-0190 to speak with a representative.
Upon receipt of the Product, Cuisinart will inspect the Product and, if required under this Limited Warranty, attempt to repair, replace, or refund the Product within thirty (30) days. However, there may be delays beyond Cuisinart's control, in which case that time period may be extended as reasonably necessary.
IMPORTANT: If the nonconforming Product is to be serviced by someone other than Cuisinart's Authorized Service Center, please remind the servicer to call our Consumer Service Center at 1-800-726-0190 to ensure that the problem is properly diagnosed, the Product is serviced with the correct parts, and the product is still under warranty.
California Residents Only
The three (3) year Limited Warranty period begins on the date the Product was delivered, which may be different than the date the Product was purchased. California residents also have the option of obtaining the benefits of this Limited Warranty by bringing the Product to (A) the store where it was purchased or (B) another retail store that sells Cuisinart products of the same type. The retail store shall then, according to its preference, either repair the Product, refer the consumer to an independent repair facility, replace the
Product with another identical or reasonably equivalent product, or refund the purchase price less the amount directly attributable to the consumer's prior usage of the Product. California residents may also, according to their preference, return nonconforming products directly to Cuisinart for repair or, if necessary, replacement with another identical or reasonably equivalent product by calling our Consumer Service Center toll-free at
1-800-726-0190. Cuisinart will be responsible
for the cost of such repair, replacement, and/or shipping and handling for such nonconforming products under warranty.
THIS LIMITED WARRANTY GIVES YOU SPECIFIC LEGAL RIGHTS, AND YOU MAY ALSO HAVE OTHER RIGHTS THAT VARY FROM STATE TO STATE OR BY JURISDICTION. IN THE EVENT THIS LIMITED WARRANTY IS BREACHED, YOU MAY HAVE CLAIMS FOR REPLACEMENT, DAMAGES, OR OTHER PENALTIES
LIMITATIONS OF LIABILITY/ADDITIONAL LIMITATIONS AND EXCLUSIONS
ALL EXPRESS AND IMPLIED WARRANTIES ARE LIMITED IN DURATION TO THE LIMITED WARRANTY PERIOD. NO WARRANTIES APPLY AFTER THAT PERIOD. SOME STATES DO NOT ALLOW LIMITATIONS ON HOW LONG AN IMPLIED WARRANTY LASTS, SO THIS LIMITATION MAY NOT APPLY TO YOU. CUISINART'S RESPONSIBILITY UNDER THIS OR ANY OTHER WARRANTY, IMPLIED OR EXPRESS, IS LIMITED TO REPAIR, REPLACEMENT, OR REFUND, AS SET FORTH ABOVE. THESE REMEDIES ARE THE SOLE AND EXCLUSIVE REMEDIES FOR ANY BREACH OF WARRANTY. TO THE MAXIMUM EXTENT PERMITTED BY LAW, CUISINART IS NOT RESPONSIBLE FOR ANY DIRECT, INDIRECT, SPECIAL, INCIDENTAL, OR CONSEQUENTIAL DAMAGES RESULTING FROM ANY BREACH OF WARRANTY OR UNDER ANY OTHER LEGAL THEORY (INCLUDING, BUT NOT LIMITED TO, LOST PROFITS, DOWNTIME, GOODWILL, DAMAGE TO OR REPLACEMENT OF EQUIPMENT AND PROPERTY, AND ANY COSTS OF RECOVERING, REPROGRAMMING, OR REPRODUCING ANY PROGRAM OR DATA STORED IN OR USED WITH A SYSTEM CONTAINING THE PRODUCT), EVEN IF CUISINART HAS BEEN ADVISED OF THE POSSIBILITY OF SUCH DAMAGES. SOME STATES DO NOT ALLOW THE EXCLUSION OR LIMITATION OF INCIDENTAL OR CONSEQUENTIAL DAMAGES, SO THE ABOVE LIMITATIONS OR EXCLUSIONS MAY NOT APPLY TO YOU. ALL EXPRESS AND IMPLIED WARRANTIES ARE LIMITED IN DURATION TO THE LIMITED WARRANTY PERIOD. NO WARRANTIES APPLY AFTER THAT PERIOD. SOME STATES (OR JURISDICTIONS) DO NOT ALLOW LIMITATIONS ON HOW LONG AN IMPLIED WARRANTY LASTS, SO THIS LIMITATION MAY NOT APPLY TO YOU.
This Limited Warranty is issued by:
Conair LLC
1 Cummings Point Road
Stamford, CT 06902
1-800-726-0190
©2024 Cuisinart
Glendale, AZ 85307
Printed in China
24CE93730
IB-18385-ESP-D
natural_image
Black and white image of a Cuisinart electric bar with fork, no visible text or symbols on the device itself.natural_image
Close-up of hands performing a task on a mechanical component, showing a step and motion direction (no text or symbols visible)natural_image
Hand holding a black cylindrical tool with a long tip, against a white background (no text or symbols visible)natural_image
Close-up of a hand holding a black-handled saw, no visible text or symbolsnatural_image
Close-up of hands using a saw to cut a black object, showing a left-hand rule (no text or symbols visible)1 Cummings Point Road
Stamford, CT 06902
1-800-726-0190
©2024 Cuisinart
Glendale, AZ 85307
Printed in China
24CE93730
IB-18385-ESP-D
- Electric Knife Set with Cutting Board
- IMPORTANT SAFEGUARDS
- SAVE THESE INSTRUCTIONS
- CONTENTS
- UNPACKING INSTRUCTIONS
- IMPORTANT PLEASE READ
- FEATURES AND BENEFITS
- USE AND CARE
- Assembling the Blade:
- Using your Cuisinart® Electric Knife:
- Operating Knife:
- CLEANING, STORAGE AND MAINTENANCE
- HELPFUL HINTS
- HOW TO CARVE A TURKEY
- Preparation:
- Cutting the legs and wings:
- Carving the breast:
- HOW TO CARVE HAM ON THE BONE
- ROASTING AND CARVING A TURKEY
- Limited Warranty
- This Limited Warranty does NOT cover:
- Hassle-free warranty
- California Residents Only
Brand : CUISINART
Model : CEK-41
Category : Knife