
GTE22JMNRES - Freezer GE - Free user manual and instructions
Find the device manual for free GTE22JMNRES GE in PDF.


| Product Type | Freezer - Refrigerator combo (side-by-side) |
| Brand | GE |
| Model | GTE22JMNRES |
| Total Capacity | 22 cubic feet (approx. 623 liters) |
| Dimensions (H x W x D) | Approx. 168 cm x 91 cm x 76 cm (estimated) |
| Weight | Approx. 120 kg (estimated) |
| Power Supply | 115 V AC, 60 Hz, 15-20 A, grounded outlet |
| Refrigerant | R600a (isobutane) - flammable |
| Ambient Temperature Range | 12.7°C to 43.3°C (55°F to 110°F) |
| Temperature Controls | Rotary dial (1-5) for refrigerator and freezer (dual models) |
| Sabbath Mode | Yes, OU / CRC certified, activated by button/switch combo |
| Automatic Ice Maker | Integrated (on some models), produces 70-100 ice cubes/24h |
| Water Connection | Required for ice maker, pressure 40-120 psi |
| Lighting | LED in refrigerator compartment - technician replacement |
| Shelf Material | Tempered glass / sliding metal |
| Number of Doors | 2 (refrigerator and freezer) - reversible |
| Handles | Plastic or stainless steel (depending on model) |
| Exterior Cleaning | Soft cloth + mild detergent, avoid abrasive products |
| Interior Cleaning | Hot water + baking soda (15 ml/L) |
| Safety | Grounding required, disconnect before cleaning, flammable refrigerant instructions |
| Limited Warranty | 1 year parts and labor (US/Canada) |
| Customer Service (US) | 833-4BODEWELL or bodewell.com |
| Customer Service (Canada) | 800-561-3344 or geappliances.ca |
Frequently Asked Questions - GTE22JMNRES GE
User questions about GTE22JMNRES GE
0 question about this device. Answer the ones you know or ask your own.
Ask a new question about this device
Download the instructions for your Freezer in PDF format for free! Find your manual GTE22JMNRES - GE and take your electronic device back in hand. On this page are published all the documents necessary for the use of your device. GTE22JMNRES by GE.
USER MANUAL GTE22JMNRES GE
SAFETY INFORMATION......3
USING THE REFRIGERATOR
Temperature Control .... 5
Garage Operation 5
Sabbath Mode 5
Fresh Food Compartment Shelves ..... 6
Freezer Compartment Shelves ....6
Storage Drawers 7
Automatic Ice Maker 8
CARE AND CLEANING....9
INSTALLATION INSTRUCTIONS
Preparing to Install the Refrigerator .....10
Water Line Installation 11
Installing the Door Handle ..... 14
Reversing the Door Swing ..... 15
TROUBLESHOOTING
Normal Operating Sounds 20
LIMITED WARRANTY 21
CONSUMER SUPPORT ...... 2 2
OWNER'S MANUAL & INSTALLATION INSTRUCTIONS
Models 16, 17, 18, 19, 22
ENGLISH/FRANÇAIS/ ESPAÑOL
Write the model and serial numbers here:
Model # ____
Serial # ____
Find these numbers on a label on the left side, near the middle of the refrigerator compartment.
THANK YOU FOR MAKING GE APPLIANCES A PART OF YOUR HOME.
Whether you grew up with GE Appliances, or this is your first, we're happy to have you in the family.
We take pride in the craftsmanship, innovation and design that goes into every GE Appliances product, and we think you will too. Among other things, registration of your appliance ensures that we can deliver important product information and warranty details when you need them.
Register your GE appliance now online. Helpful websites and phone numbers are available in the Consumer Support section of this Owner's Manual. You may also mail in the pre-printed registration card included in the packing material.

GE APPLIANCES
IMPORTANT SAFETY INFORMATION READ ALL INSTRUCTIONS BEFORE USING THE APPLIANCE
WARNING
To reduce the risk of fire, explosion, electric shock, or injury when using your refrigerator, follow these basic safety precautions:
■ This refrigerator must be properly installed and located in accordance with the Installation Instructions before it is used.
■ Unplug the refrigerator before making repairs or cleaning.
NOTE: Power to the refrigerator cannot be disconnected by any setting on the control panel.
NOTE: Repairs must be performed by a qualified Service Professional.
■ Replace all parts and panels before operating.
■ Do not use an extension cord.
- Keep flammable materials and vapors away from the refrigerator.
■ Do not store explosive substances such as aerosol cans with a flammable propellant in this appliance.
■ To prevent suffocation and entrapment hazards to children, remove the fresh food and freezer doors from any refrigerator before disposing of it or discontinuing its use.
■ To avoid serious injury or death, children should not stand on, or play in or with the appliance.
■ Children and persons with reduced physical, sensory or mental capabilities or lack of experience and knowledge can use this appliance only if they are supervised or have been given instructions on safe use and understand the hazards involved.
This appliance is intended to be used in household and similar applications such as: staff kitchen areas in shops, offices and other working environments; farm houses; by clients in hotels, motels, bed & breakfast and other residential environments; catering and similar non-retail applications.
■ Connect to potable water supply only. A cold water supply is required for automatic icemaker operation. The water pressure must be between 40 and 120 psi (275-827 kilopascals).
■ Do not apply harsh cleaners to the refrigerator. Certain cleaners will damage plastic which may cause parts such as the door or door handles to detach unexpectedly. See the Care and Cleaning section for detailed instructions.
CAUTION
To reduce the risk of injury when using your refrigerator, follow these basic safety precautions.
- Do not clean glass shelves or covers with warm water when they are cold. Glass shelves and covers may break if exposed to sudden temperature changes or impact, such as bumping or dropping. Tempered glass is designed to shatter into many small pieces if it breaks.
- Keep fingers out of the “pinch point” areas; clearances between the doors and between the doors and cabinet are necessarily small. Be careful closing doors when children are in the area.
■ Do not touch the cold surfaces in the freezer compartment when hands are damp or wet, skin may stick to these extremely cold surfaces.
■ Do not refreeze frozen foods which have thawed completely.
In refrigerators with automatic ice makers, avoid contact with the moving parts of the ejector mechanism, or with the heating element that releases the cubes. Do not place fingers or hands on the automatic ice making mechanism while the refrigerator is plugged in.
WARNING

RE OR EXPLOSION HAZARD
Flammable Refrigerant
This appliance contains isobutane refrigerant, also known as R600a, a natural gas with high environmental compatibility. However, it is also combustible. Adhere to the warnings below to reduce the risk of injury or property damage.
- When handling, installing and operating the appliance, care should be taken to avoid damage to the refrigerant tubing.
- Service shall only be performed by authorized service personnel. Use only manufacturer-authorized service parts.
- Dispose of refrigerator in accordance with the Federal and Local Regulations. The flammable refrigerant and insulation material used in this product require special disposal procedures. Contact
your local authorities for the environmentally safe disposal of your refrigerator.
- Keep ventilation openings in the appliance enclosures or in the built-in structure clear of obstruction.
- To remove frost, scrape with a plastic or wood spatula or scraper. Do not use an ice pick or a metal or sharp-edged instrument as it may puncture the freezer liner and then the flammable refrigerant tubing behind it.
- Do not use electrical appliances inside the food storage compartment of the appliance.
- Do not use any electrical device to defrost your freezer.
READ AND SAVE THESE INSTRUCTIONS
IMPORTANT SAFETY INFORMATION READ ALL INSTRUCTIONS BEFORE USING THE APPLIANCE
INSTALLATION
WARNING

RE OR EXPLOSION HAZARD
Keep flammable materials and vapors away from refrigerator. Failure to do so can result in fire, explosion, or death.
CONNECTING ELECTRICITY
WARNING

LECTRICAL SHOCK HAZARD
Plug into a grounded 3-prong outlet
Do not remove the ground prong
Do not use an adapter
Do not use an extension cord.
Failure to follow these instructions can result in death, fire, or electrical shock.
Do not, under any circumstances, cut or remove the third (ground) prong from the power cord. For personal safety, this appliance must be properly grounded.
The power cord of this appliance is equipped with a 3-prong (grounding) plug which mates with a standard 3-prong (grounding) wall outlet to minimize the possibility of electric shock hazard from this appliance.
Have the wall outlet and circuit checked by a qualified electrician to make sure the outlet is properly grounded.
Where a standard 2-prong wall outlet is encountered, it is your personal responsibility and obligation to have it replaced with a properly grounded 3-prong wall outlet. Do not use an adapter.
The refrigerator should always be plugged into its own individual electrical outlet which has a voltage rating that matches the rating plate.
A 115 Volt AC, 60 Hz, 15- or 20-amp fused, grounded electrical supply is required. This provides the best performance and also prevents overloading house wiring circuits which could cause a fire hazard from overheated wires.
Never unplug your refrigerator by pulling on the power cord. Always grip plug firmly and pull straight out from the outlet.
Immediately discontinue use of a damaged supply cord. If the supply cord is damaged, it must be replaced by a qualified service professional with an authorized service part from the manufacturer.
When moving the refrigerator away from the wall, be careful not to roll over or damage the power cord.
PROPER DISPOSAL OF YOUR OLD REFRIGERATOR
WARNING
SUFFOCATION AND ENTRAPMENT HAZARD
Failure to follow these disposal instructions can result in death or serious injury
IMPORTANT: Child entrapment and suffocation are not problems of the past. Junked or abandoned refrigerators are still dangerous even if they will sit for “just a few days.” If you are getting rid of your old refrigerator, please follow the instructions below to help prevent accidents.
Before You Throw Away Your Old Appliance
■ Take off the fresh food and freezer doors.
■ Leave the shelves in place so that children may not easily climb inside.
Refrigerant and Foam Disposal:
Dispose of appliance in accordance with Federal and Local Regulations. Flammable refrigerant and insulation material used requires special disposal procedures. Contact your local authorities for the environmentally safe disposal of your appliance.
READ AND SAVE THESE INSTRUCTIONS
Temperature Control for locations between 55°F-110°F
The temperature control adjusts the refrigerator from its warmest to coldest settings.
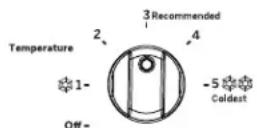
Your refrigerator will come with the recommended factory setting on "3". For colder temperature, turn the knob clockwise to either setting "4" or "5". For warmer temperature, turn the dial counter-clockwise to either setting "1" or "2". To turn off the cooling in both compartments, turn the knob counter-clockwise to setting "Off". Note that this does not shut off power to the refrigerator.
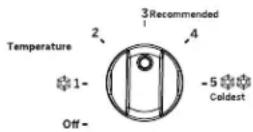
Fresh Food Control
Freezer Control
Models with dual temperature control only.
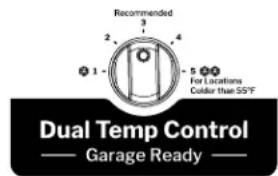
Garage Operation for locations between 38°F-54°F
Models with dual temperature control have an adjustable freezer control and can be operated in locations with ambient temperatures between 38-110°F (3.3-43.3°C). For cold ambient conditions 38-54°F (3.3-12.2°C) the fresh food should be set to setting 3 to prevent food from freezing in the fresh food compartment, and the freezer setting should be adjusted to position 5 to prevent food from thawing in the freezer compartment.
Fresh Food Control
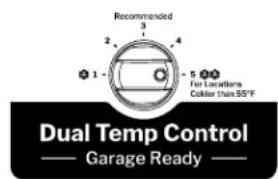
Freezer Control
Cold Ambient Setting
Sabbath Mode OU (Orthodox Union) and CRC (Central Rabbinical Congress)
This refrigerator offers an OU and CRC Sabbath mode that complies with standards set forth by Orthodox Union, the Central Rabbinical Congress, and Halacha Tech, and is 100% certified to the highest halacha standards. Sabbath mode requires that the control knob and light switch are operated at the same time. The light switch is located just to the left of the control knob.
To enter Sabbath Mode, turn the control knob to position 5, then hold down the light switch. While the light switch is held down, turn the control knob to position 3. Once the control knob is in position 3, release the light switch. When you release the light switch, the light will dim and product is in Sabbath mode.
To exit Sabbath mode, turn the control knob to OFF. After 5 secs, then turn the knob to the setting (1 through 5) used prior to entering Sabbath mode. If Sabbath mode is not exited manually, it will end automatically after 96 hours. If power is disconnected from the product while it is in Sabbath mode, it will remain in Sabbath mode after power is reconnected. Sabbath mode does not deactivate the icemaker, if present. The icemaker must be turned off manually by moving the icemaker switch to the off position. The icemaker switch is located on the icemaker in the freezer compartment.
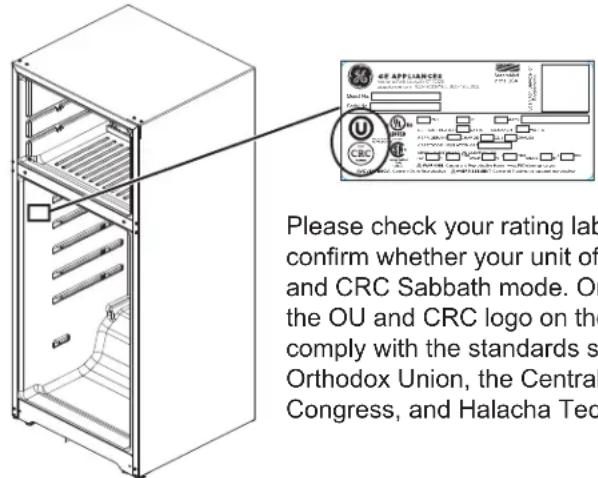



Please check your rating label to confirm whether your unit offers the OU and CRC Sabbath mode. Only units with the OU and CRC logo on the rating label comply with the standards set forth by Orthodox Union, the Central Rabbinical Congress, and Halacha Tech.
Fresh Food Compartment Shelves
Shelf supports at various levels allow you to custom-space your shelves. Not all features are on all models.
Full-Width Shelves
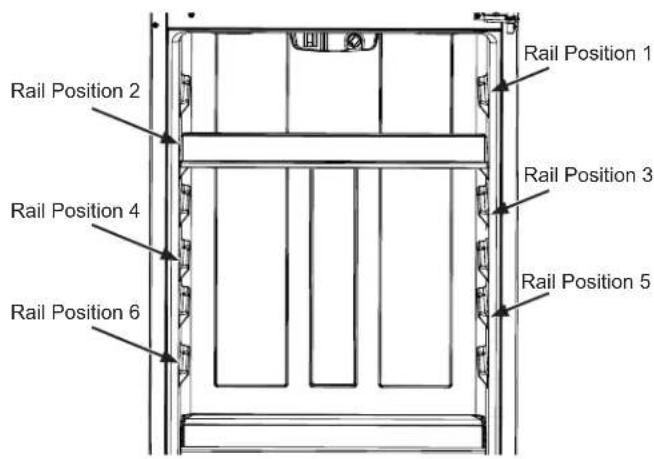
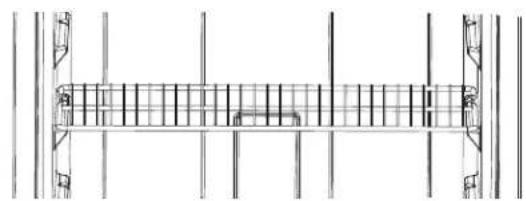
Some models have a stationary tempered glass shelf or two steel wire stationary shelves. These shelves can be moved to another place in the fresh food compartment. When placed correctly on the shelf supports, the shelf will stop before coming completely out of the refrigerator and will not tilt when you place food on it or remove food from it.
Pull glass shelves forward so the glass rests evenly on side rails. For units with glass shelves, rail positions 2 and 4/5 are recommended.
CAUTION
Do not clean glass shelves or covers with warm water when they are cold. Glass shelves and covers may break if exposed to sudden temperature changes or impact such as bumping or dropping. Tempered glass is designed to shatter into many small pieces if it breaks.
natural_image
Architectural line drawing of a multi-level building structure with vertical supports and horizontal beams (no text or symbols)Wire shelf - lift back end and pull forward to remove
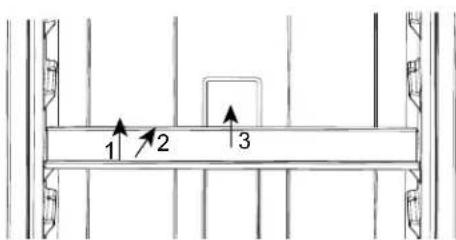
Glass shelf - lift the front edge (1), push shelf back (2), lift shelf up and pull forward (3) to remove.
Freezer Compartment Shelves
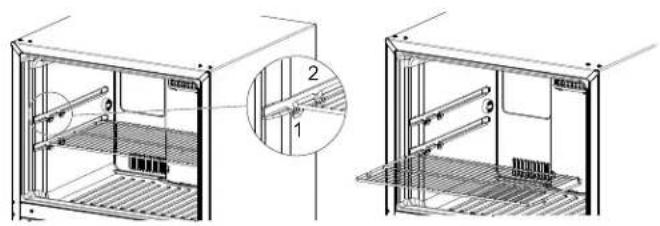
When placed correctly on the shelf supports, the steel wire stationary shelves will stop before coming completely out of the freezer and will not tilt when you place food on it or remove food from it.
natural_image
Technical line drawing of two views of a refrigerated storage unit with internal components and a magnified inset showing part 2 (no text or symbols present)Some models have glass shelves.
To ensure shelf functions as intended, slide shelf to the furthest back retention point:
• Glass Shelf - front slot 1
• Steel Wire Shelf - rear slot 2
CAUTION
Do not clean glass shelves or covers with warm water when they are cold. Glass shelves and covers may break if exposed to sudden temperature changes or impact such as bumping or dropping.
Tempered glass is designed to shatter into many small pieces if it breaks.
Storage Drawers
Not all features are on all models.
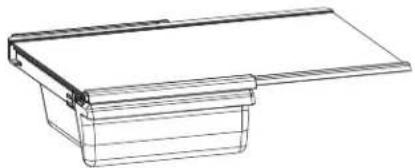
Snack Drawer
The snack drawer can be moved to the most useful location for your family's needs.
natural_image
Technical line drawing of a mechanical assembly with no visible text or symbolsFruit and Vegetable Drawers
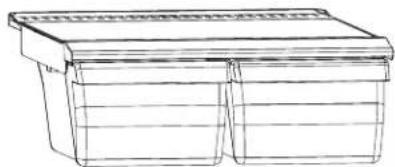
Excess water that may accumulate in the bottom of the drawers should be emptied and the drawers wiped dry.
natural_image
Line drawing of a two-part container or storage unit (no text or symbols)Drawer and Cover
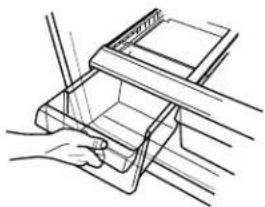
Drawer Removal
Drawers can be removed easily by grasping the sides and lifting up slightly while pulling drawers past the stop location.
natural_image
Line drawing of hands handling a mechanical device with a handle (no text or symbols)Cover Removal
-
Remove the drawers.
-
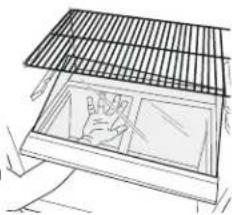
Reach in, push the back of glass cover up, and at the same time, pull it backward as far as it will come.
Tilt it and take it out. Avoid cleaning the cold glass cover with hot water because the extreme temperature difference may cause it to break.
natural_image
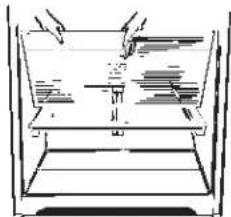
Line drawing of a birdhouse with a tiled roof and window display (no text or symbols)- Remove the drawer frame. (Always remove the glass cover before you take out the drawer frame.)
Lift the frame off the supports at each side and back, pull it forward, tilt it and take it out.
To replace:
-
Lower the frame until it rests on the supports at each side and back.
-
Replace the glass cover, pushing its front edge firmly into the front frame channel and gently lowering the back into place.
-
Replace the drawers.
natural_image
Simple line drawing of a container with liquid and arrows indicating flow (no text or symbols)Automatic Icemaker (on some models)
Not all features are on all models.
WARNING
Connect to potable water supply only.
A cold water supply is required for automatic icemaker operation. The water pressure must be between 40 and 120 psi (275-827 kilopascals).
CAUTION
Avoid contact with the moving parts of the ejector mechanism, or with the heating element (located on the bottom of the ice maker) that releases the cubes. Do not place fingers or hands on the automatic ice making mechanism while the refrigerator is plugged in.
A newly-installed refrigerator may take 12–24 hours to begin making ice.
The ice maker will produce approximately 70-100 cubes in a 24-hour period, depending on the freezer compartment temperature, room temperature, number of door openings and other use conditions.
If the refrigerator is operated before the water connection is made to the ice maker, set the switch OFF.
When the refrigerator has been connected to the water supply, set the switch ON position.
The ice maker will fill with water when it cools to 15^ F ( -9^ C). A newly-installed refrigerator may take 12 to 24 hours to begin making ice cubes.
Once the ice maker starts to make ice, it may take up to 48 hours to fill the bin, depending on the temperature settings and number of door openings.
You will hear a buzzing sound each time the ice maker fills with water.
NOTICE: Throw away the first few batches of ice to allow the water line to clear.
Be sure nothing interferes with the sweep of the feeler arm.
When the bin fills to the level of the feeler arm, the ice maker will stop producing ice.
It is normal for several cubes to be joined together.
If ice is not used frequently, old ice cubes will become cloudy, taste stale, shrink or fuse together.
Ice maker accessory kit:
If your refrigerator did not already come equipped with an automatic ice maker, an ice maker accessory kit is available at extra cost.
This refrigerator will accept accessory icemaker kit IM-4D or IM-6D. Use instructions X supplied in the kit for assembly.
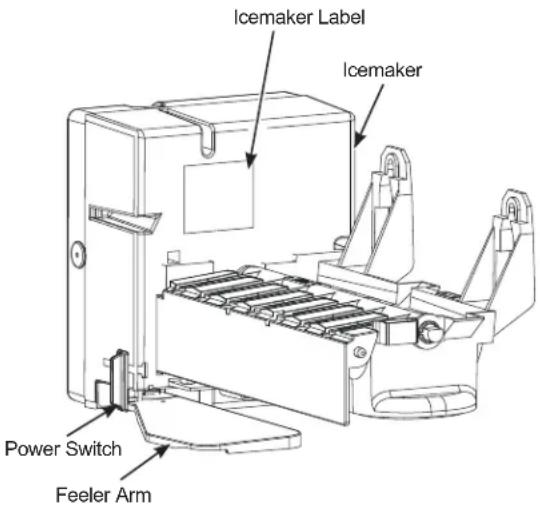
IMPORTANT: This refrigerator requires a red label icemaker. See above for the location of the label on the icemaker. If the icemaker that came with your kit does not have a red label, it will not function. In this case, please call 833.4BODEWELL (in Canada 800.561.3344) for the correct icemaker.
Cleaning the Outside
FINGERPRINT RESISTANT STAINLESS STEEL*, BLACK STAINLESS, SLATE, DARK SLATE, PAINTED - Outside surfaces, door handles, and trim
⚠️ DO NOT use Stainless Steel cleaners on the door surfaces. ⚠️
IMPORTANT: The use of incorrect products may damage the outer finish of Fingerprint Resistant Stainless models. Please follow these instructions and use only the appropriate items below to clean your appliance surfaces.
| DO USE DO NOT USE | |
| On all models:Soft, clean cloth or sponge | Abrasive cloths, scrubbing sponges, scouring or steel wool pads |
| On fingerprint resistant* and painted models:Mild detergent mixed with warm water | Abrasive powders, liquids, or sprays Window sprays, ammonia, or bleach Citrus or plant oil based cleaners Acidic or vinegar based cleaners Oven cleanersAlkaline cleaners Stainless steel cleaners |
| On stainless steel models:Mild detergent mixed with warm water Approved stainless steel cleaners;Visit the GE Appliances parts store for approved stainless steel cleaners:GEAppliancesparts.comor call877.959.8688Cleaners with oxalic acid such as Bar Keepers Friend Soft CleanserTMcan be used to remove surface rust, tarnish and small blemishes on stainless steel surfaces only. | Abrasive powders or sprays Window Sprays or Ammonia Citrus or plant oil-based cleaners Acidic or vinegar-based cleaners Oven cleaners Cleaners containing acetone (propanone) Any cleaner with WARNING about plastic contact |
*Easily wipe away smudges and fingerprints.
NOTE: DO NOT allow stainless steel cleaner to come in contact with any plastic parts such as trim pieces, handle hardware and liners. If unintentional contact of cleaners with plastic parts does occur, clean plastic part with a sponge and mild detergent mixed with warm water.
Cleaning the Inside
To help prevent odors, leave an open box of baking soda in the fresh food and freezer compartments.
Unplug the refrigerator before cleaning. If this is not practical, wring excess moisture out of sponge or cloth when cleaning around switches, lights or controls.
Use warm water and baking soda solution—about a tablespoon (15 ml) of baking soda to a quart (1 liter) of water. This both cleans and neutralizes odors. Rinse and wipe dry.
After cleaning the door gaskets, apply a thin layer of petroleum jelly to the door gaskets at the hinge side. This helps keep the gaskets from sticking and bending out of shape.
CAUTION
Do not clean glass shelves or covers with
warm water when they are cold. Glass shelves and covers may break if exposed to sudden temperature changes or impact such as bumping or dropping. Tempered glass is designed to shatter into many small pieces if it breaks. Do not wash any plastic refrigerator parts in the dishwasher.
Moving the Refrigerator
Be careful when moving the refrigerator away from the wall. All types of floor coverings can be damaged, particularly cushioned coverings and those with embossed surfaces.
Turn the leveling legs at each front corner of the refrigerator counterclockwise until the rollers support the refrigerator. Pull the refrigerator straight out and return it to position by pushing it straight in. Moving the refrigerator in a side direction may result in damage to the floor covering or refrigerator.
When pushing the refrigerator back, make sure you don't roll over the power cord or ice maker supply line (on some models). After rolling the refrigerator back into place, turn the legs clockwise until the legs again bear the weight of the refrigerator.
Replacing the Lights
LED lighting is located at the top center of the fresh food compartment.
An authorized technician will need to replace the LED light.
If this assembly needs to be replaced, call GE Appliances Service at 1.800.432.2737 in the United States or 1.800.561.3344 in Canada.
Preparing for Vacation
For long vacations or absences, remove food and unplug the refrigerator. Move the temperature control dial to the OFF position, and clean the interior with a baking soda solution of one tablespoon (15 ml) of baking soda to one quart (1 liter) of water. Leave the doors open.
Move the switch to the OFF position on the power switch model, and shut off the water supply to the refrigerator.
If the temperature can drop below freezing, have a qualified servicer drain the water supply system (on some models) to prevent serious property damage due to flooding.
Preparing to Move
Secure all loose items such as grille, shelves and drawers by taping them securely in place to prevent damage. To prevent the doors from opening while moving, secure them to the case with tape. Be sure the refrigerator stays in an upright position during moving.
Installation Instructions Models 16, 17, 18, 19, & 22
If you have questions, call 833.4BODWELL (833-426-3393) or visit our website at: GEAppliances.com.
In Canada, call 1.800.561.3344 or visit our website at: geappliances.ca
BEFORE YOU BEGIN
Read these instructions completely and carefully.
- IMPORTANT – Save these instructions for local inspector's use.
- IMPORTANT – Observe all governing codes and ordinances.
- Note to Installer – Be sure to leave these instructions with the Consumer.
- Note to Consumer – Keep these instructions for future reference.
- Skill level – Installation of this appliance requires basic mechanical skills.
- Completion time – Refrigerator Installation 15 minutes Reversing the Door Swing 15 minutes
- Proper installation is the responsibility of the installer.
- Product failure due to improper installation is not covered under the Warranty.
WATER SUPPLY TO THE ICE MAKER (on some models)
If the refrigerator has an ice maker, it will be connected to a cold water line. A water supply kit (containing copper tubing, shutoff valve, fittings and instructions) is available at extra cost from your dealer, by visiting our Website at GEAppliances.com (in Canada at geappliances.ca) or from Parts and Accessories, 1.877.959.8688. See instructions Installing the Water Line.
REFRIGERATOR LOCATION
- Do not install the refrigerator where the ten will go below 55^ (12.7°C) because it will not run often enough to maintain proper temperatures. Models with adjustable control in the freezer compartment can be installed at temperatures at, but not below, 38^ (3.3°C).
- Do not install the refrigerator where the temperature will go above 110^ (43.3°C) because it will not perform properly.
- Do not install the refrigerator in a location to water (rain, etc.) or direct sunlight.
- Install it on a floor strong enough to supp loaded.
CLEARANCES
Allow the following clearances for ease of installation, proper air circulation and plumbing and electrical connections.
- Sides 1/8" (3mm)
- Top 1" (25 mm)
- Back 2" (50 mm) on 18, 19 & 22 cuft
- Back 1" (25 mm) on 16 & 17 cuft models
models
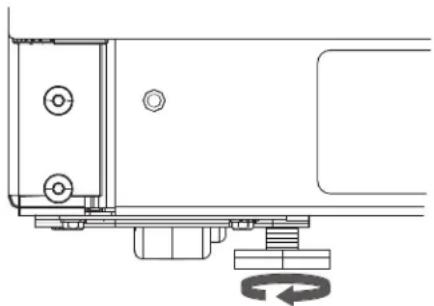
Leveling legs near each front corner of the refrigerator are adjustable. They firmly position the refrigerator and prevent it from moving when the doors are opened. Leveling legs should be set so the front of the refrigerator is raised just enough that the doors close easily when opened about halfway.
Turn the leveling legs clockwise to raise the refrigerator, counterclockwise to lower it.
Rollers next to the leveling legs allow you to move the refrigerator away from the wall for cleaning.
Turn the legs counterclockwise until the weight of the refrigerator is transferred from them to the rollers. After rolling the refrigerator back into place, turn the have leg to clockwise until the legs again bear the weight of the refrigerator.
natural_image
Technical line drawing of a mechanical assembly with mounting bracket and circular component (no text or symbols)exposed
ort it fully
INSTALLING THE WATER LINE (on some models)
BEFORE YOU BEGIN
Recommended copper water supply kits are WX8X2, WX8X3 or WX8X4, depending on the amount of tubing you need. Approved plastic water supply lines are SmartConnect™ Refrigerator Tubing (WX08X10006, WX08X10015 and WX08X10025).
When connecting your refrigerator to a GE Appliances Reverse Osmosis Water System, the only approved installation is with a GE Appliances RVKit. For other reverse osmosis water systems, follow the manufacturer's recommendations.
This water line installation is not warranted by the refrigerator or ice maker manufacturer. Follow these instructions carefully to minimize the risk of expensive water damage.
Water hammer (water banging in the pipes) in house plumbing can cause damage to refrigerator parts and lead to water leakage or flooding. Call a qualified plumber to correct water hammer before installing the water supply line to the refrigerator.
To prevent burns and product damage, do not hook up the water line to the hot water line.
If you use your refrigerator before connecting the water line, make sure the ice maker power switch is in the OFF position (on power switch models) or operating arm is in OFF position.
Do not install the ice maker tubing in areas where temperatures fall below freezing.
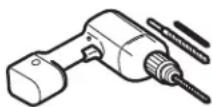
When using any electrical device (such as a power drill) during installation, be sure the device is double insulated or grounded in a manner to prevent the hazard of electric shock, or is battery powered.
All installations must be in accordance with local plumbing code requirements.
WARNING
Connect to potable water supply only.
WHAT YOU WILL NEED
- Copper or SmartConnect™ Refrigerator Tubing kit, 1/4" outer diameter to connect the refrigerator to the water supply. If using copper, be sure both ends of the tubing are cut square.
To determine how much tubing you need: measure the distance from the water valve on the back of the refrigerator to the water supply pipe. Then add 6' (1.8 m). Be sure there is sufficient extra tubing (about 6' [1.8 m] coiled into 2 turns of about 10" [25 cm] diameter) to allow the refrigerator to move out from the wall after installation.
WHAT YOU WILL NEED (Cont.)
SmartConnect™ Refrigerator Tubing Kits are available in the following lengths:
8' (2.4 m) - WX08X10006
15' (4.6 m) - WX08X10015
25' (7.6) m) - WX08X10025
Be sure that the kit you select allows at least 6' (1.8 m) as described above.
NOTE: The only GE Appliances approved plastic tubing is that supplied in SmartConnect™ Refrigerator Tubing kits. Do not use any other plastic water supply line because the line is under pressure at all times. Certain types of plastic will crack or rupture with age and cause water damage to your home.
- A GE Appliances water supply kit (containing tubing, shutoff valve and fittings listed below) is available at extra cost from your dealer or from Parts and Accessories, 877.959.8688.
-
A cold water supply. The water pressure must be between 20 and 120 psi (138 – 827 kilopascals) on models without a water filter and between 40 and 120 psi (275 – 827 kilopascals) on models with a water filter.
-
Power drill.
- 1/2" or adjustable wrench.
- Straight and Phillips blade screwdriver.
- Two 1/4" outer diameter compression nuts and 2 ferrules (sleeves)—to connect the copper tubing to the shutoff valve and the refrigerator water valve.
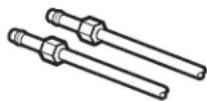
OR
- If you are using a SmartConnect™ Refrigerator Tubing kit, the necessary fittings are preassembled to the tubing.
- If your existing copper water line has a flared fitting at the end, you will need an adapter (available at plumbing supply stores) to connect the water line to the refrigerator OR you can cut off the flared fitting with a tube cutter and then use a compression fitting. Do not cut formed end from SmartConnect™ Refrigerator tubing.
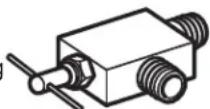
- Shutoff valve to connect to the cold water line. The shutoff valve should have a water inlet with a minimum inside diameter of 5/32" at the point of connection to the COLD WATER LINE. Saddle-type shutoff valves are included in many water
supply kits. Before purchasing, make sure a saddle-type valve complies with your local plumbing codes.
INSTALLING THE WATER LINE (Cont.)
BEFORE YOU BEGIN
Read these instructions completely and carefully.
WARNING
To reduce the risk of
electric shock or injury during installation, you must first unplug the refrigerator before proceeding.
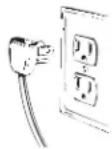

SHUT OFF THE MAIN WATER SUPPLY AND UNPLUG REFRIGERATOR
Turn on the nearest faucet (counterclockwise) long enough to clear the line of water.

CHOOSE THE VALVE LOCATION
Choose a location for the valve that is easily accessible. It is best to connect into the side of a vertical water pipe. When it is necessary to connect into a horizontal water pipe, make the connection to the top or side, rather than at the bottom, to avoid drawing off any sediment from the water pipe.
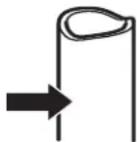

DRILL THE HOLE FOR THE VALVE
Drill a 1/4" hole in the water pipe (even if using a self-piercing valve), using a sharp bit. Remove any burrs resulting from drilling
the hole in the pipe. Take care not to allow water to drain into the drill. Failure to drill a 1/4" hole may result in reduced ice production or smaller cubes.
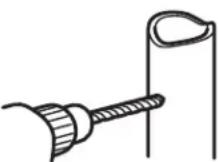

FASTEN THE SHUTOFF VALVE
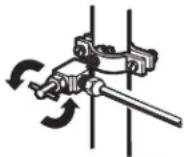
Fasten the shutoff valve to the cold water pipe with the pipe clamp.
Tighten the clamp screws until the sealing washer begins to swell.
NOTE: Do not overtighten or you may crush the tubing. ____ Washer
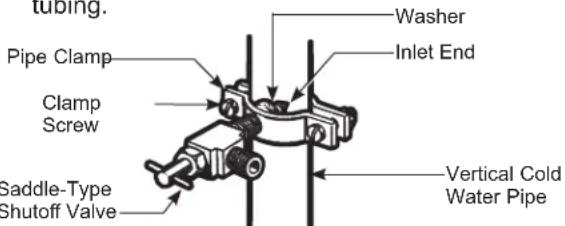

FASTEN THE SHUTOFF VALVE (Cont.)
NOTE: Commonwealth of Massachusetts Plumbing Codes 248CMR shall be adhered to. Saddle valves are illegal and use is not permitted in Massachusetts. Consult with your licensed plumber.

ROUTE THE TUBING
Route the tubing between the cold water line and the refrigerator.
Route the tubing through a hole drilled in the wall or floor (behind the refrigerator or adjacent base cabinet) as close to the wall as possible.
NOTE: Be sure there is sufficient extra tubing (about 6 feet [1.82 m] coiled into 2 turns of about 10" [25 cm] diameter) to allow the refrigerator to move out from the wall after installation.

CONNECT THE TUBING TO THE VALVE
Place the compression nut and ferrule (sleeve) for copper tubing onto the end of the tubing and connect it to the shutoff valve.
Make sure the tubing is fully inserted into the valve. Tighten the compression nut securely. For plastic tubing from a SmartConnect™ Refrigerator Tubing kit, insert the molded end of the tubing into the shutoff valve and tighten compression nut until it is hand tight, then tighten one additional turn with a wrench. Overtightening may cause leaks.
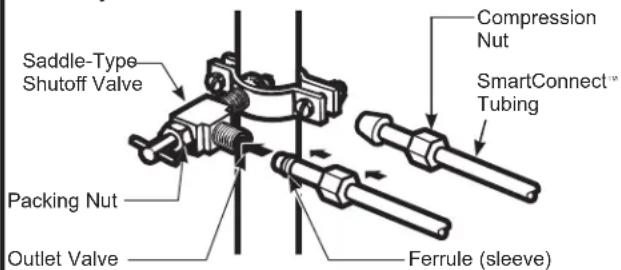
NOTE: Commonwealth of Massachusetts Plumbing Codes 248CMR shall be adhered to. Saddle valves are illegal and use is not permitted in Massachusetts. Consult with your licensed plumber.

FLUSH OUT THE TUBING
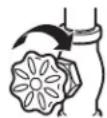
Turn the main water supply on (counterclockwise) and flush out the tubing until the water is clear.
Shut the water off at the water valve after about one quart (1 liter) of water has been flushed through the tubing.
INSTALLING THE WATER LINE (Cont.)
8 CONNECT THE TUBING TO THE REFRIGERATOR
NOTES:
- Before making the connection to the refrigerator, be sure the refrigerator power cord is not plugged into the wall outlet.
- We recommend installing a water filter (GXRLQ, available on gewaterfilters.com or 877.959.8688) if your water supply has sand or particles that could clog the screen of the refrigerator's water valve. Install it in the water line near the refrigerator. If using SmartConnect™ Refrigerator Tubing kit, you will need an additional tube (WX08X10002) to connect the filter. Do not cut plastic tube to install filter.
WARNING
To reduce the risk of death or electric shock, you must follow these instructions:
■ Unplug the refrigerator before removing any panels.
■ Do not damage any wiring while the panel is removed.
■ Replace all parts and panels before plugging the refrigerator back in.
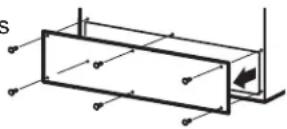
- Remove the access cover.
- Remove the plastic flexible or screw cap from the water valve (refrigerator connection) and discard.
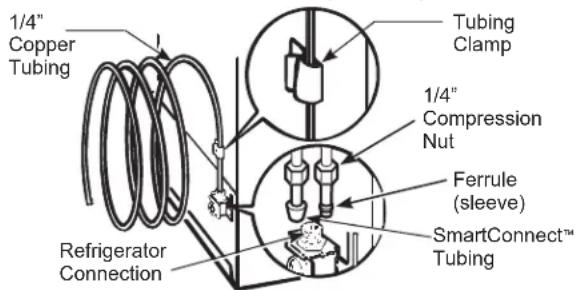
- Place the compression nut and ferrule (sleeve) onto the end of the tubing as shown. On SmartConnect™ Refrigerator Tub nuts are already assembled to the
- Insert the end of the tubing into the water valve connection as far as possible. While holding the tubing, tighten the fitting.
- For plastic tubing from a SmartConnect™ Refrigerator Tubing kit, insert the molded end of the tubing into the shutoff valve and tighten compression nut until it is hand tight, then tighten one additional turn with a wrench. Overtightening may cause leaks.
- Fasten the tubing into the clamp provided to hold it in a vertical position. You may need to pry open the clamp.
WARNING

.ECTRIC SHOCK HAZARD
Attach tubing clamp using existing hole only.
DO NOT drill into the refrigerator.
8 CONNECT THE TUBING TO THE REFRIGERATOR (Cont.)
• Reattach the access cover.
9 TURN THE WATER ON AT THE SHUTOFF VALVE
Tighten any connections that leak.
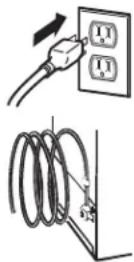
10 INSTALLING THE REFRIGERATOR
Plug in the refrigerator.
Arrange the coil of tubing so that it does not vibrate against the back of the refrigerator or against the wall. Push the refrigerator back to the wall.
11 START THE ICE MAKER
Set the ice maker power switch to the ON position. The ice maker will not begin to operate until it reaches its operating temperature
of 15^ F (-9^) or below. It will then begin operation automatically.
Power switch
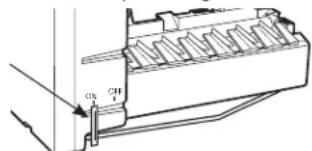
Power switch model
INSTALLING THE DOOR HANDLE
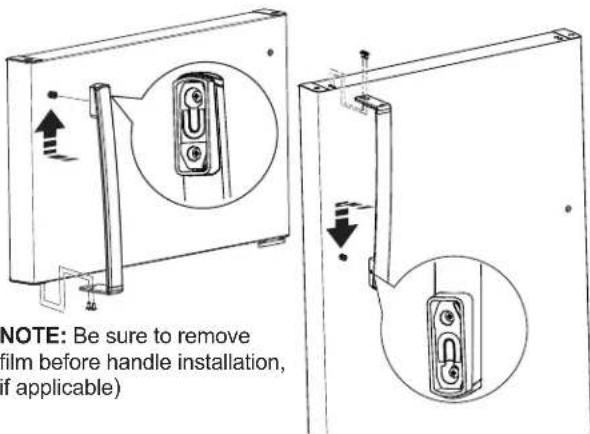
1A PLASTIC HANDLE
Install the handle fastener into the hole on the freezer and fresh food doors. The fasteners correspond with the handle side (the side opposite the hinge).
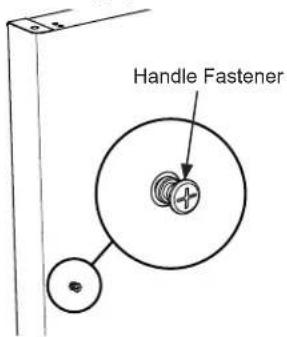
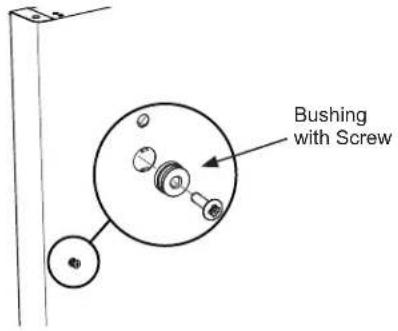
1B STAINLESS STEEL HANDLE
Attach plastic bushing to the door with the screw on both freezer and fresh food doors. The fasteners correspond with the handle side (the side opposite the hinge).
2 HANDLE INSTALLATION
-
Attach handle to freezer door by sliding handle up onto plastic bushing or fastener with the screws at the bottom of the handle.
-
Attach handle to fresh food door by sliding handle down onto plastic bushing or fastener with the screws at top of handle.
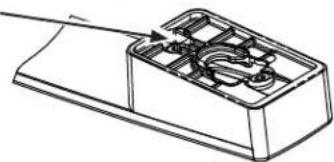
For Stainless Steel Handles Only
Do not remove the film that covers the door contact surface shown in the picture. This film protects the door surface from direct contact with the handle
natural_image
Technical line drawing of a mechanical component with internal cavities and a handle (no text or symbols)3 BADGE AND PLUG BUTTON INSTALLATION \*
- Place a plug button on the opposite side of the fresh food door across from the handle.
- Remove the backing on the GE Appliances badge and carefully place it in the hole opposite the handle on the freezer door. Be sure the badge is oriented the correct way before applying it to the door.
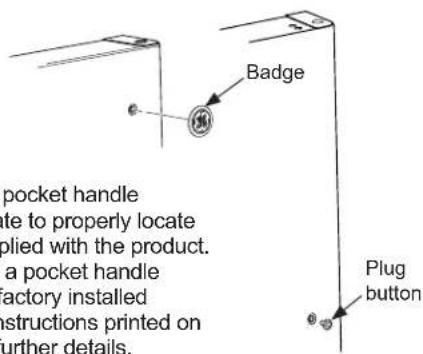
* NOTE: on some pocket handle models, a template to properly locate the badge is supplied with the product. If you purchased a pocket handle model without a factory installed badge, see the instructions printed on the template for further details.
REVERSING THE DOOR SWING
WARNING
Follow all steps when reversing
the door swing. Failure to follow these instructions, leaving off parts, or overtightening screws, can lead to the door falling off and result in injury and property damage.
IMPORTANT NOTES:
When reversing the door swing:
- Read the instructions all the way through before starting.
- Handle parts carefully to avoid scratching paint.
- Set screws down by their related parts to avoid losing them.
- Provide a non-scratching work surface for the doors.
IMPORTANT: Once you begin, do not move the cabinet until door-swing reversal is completed.
These instructions are for changing the hinges from the right side to the left side—if you ever want to change the hinges back to the right side, follow these same instructions and reverse all references to left and right.
CAUTION
Lifting Hazard
The fresh food and freezer doors are heavy. Use both hands to secure the doors before lifting.
TOOLS REQUIRED

Phillips screwdriver
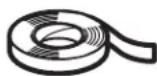
Masking tape

3/8" hex-head socket driver (optional)
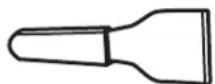

Putty knife or
thin-blade screwdriver
(optional)
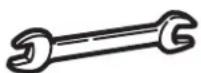
7/16" open-end wrench (optional)
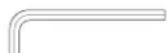
Allen wrench (Stainless Steel Handle Models)
1 BEFORE YOU START
1.1 Unplug the refrigerator from its electrical outlet.
1.2 Empty all door shelves, including the dairy compartment.
CAUTION
Do not let either door drop to the
floor. To do so could damage the door stop.
2 REMOVE THE FREEZER DOOR
2.1 Tape the door shut with masking tape.
2.2 Remove the screws that hold the top hinge to the cabinet.
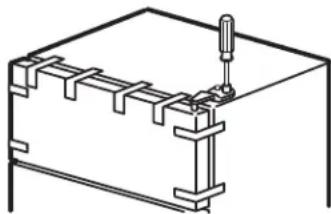
natural_image
Technical line drawing of a mechanical assembly with a screw and bracket (no text or symbols)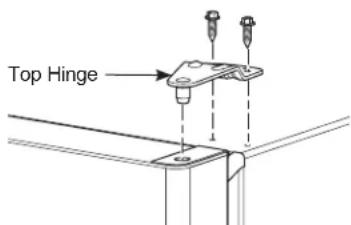
2.3 Lift the hinge straight up to free the hinge pin from the socket in the top of the door and set it aside, along with its screws.
2.4 Remove the tape.
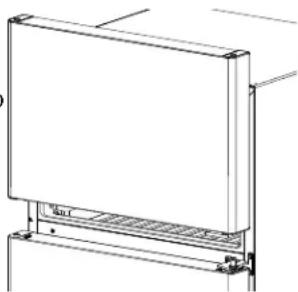
Lift it off the center
hinge pin.
2.5 Set the door on a non-scratching surface with the outside up.
2.6 Transfer the 2 screws from the opposite side of the cabinet to the screw holes vacated by the top hinge removal.
natural_image
Technical line drawing of a rectangular panel mounted on a support frame (no text or symbols)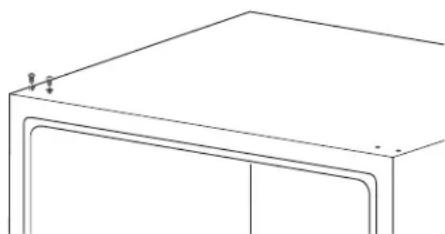
natural_image
Pure technical line drawing of a rectangular frame with corner brackets and mounting holes (no text or symbols)REVERSING THE DOOR SWING (Cont.)
WARNING
Follow all steps when reversing the door swing. Failure to follow these instructions, leaving off parts, or overtightening screws, can lead to the door falling off and result in injury and property damage.

REMOVE THE FRESH FOOD DOOR
3.1 Tape the door shut with masking tape.
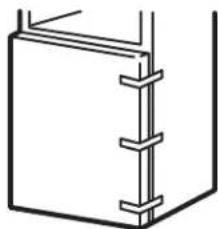
3.2 Unscrew the center hinge pin and remove it from its socket. Be careful not to lose the center hinge and washer.
natural_image
Simple line drawing of a rectangular frame with vertical connectors (no text or symbols)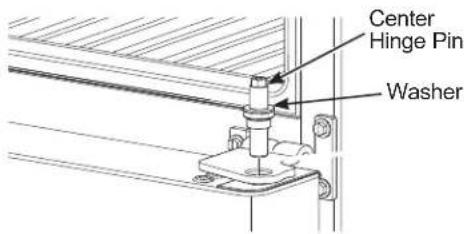
3.3 Remove the tape and tilt the door away from the cabinet. Lift the door from the pin in the bottom hinge. (If the plastic washer sticks to the door bottom, put it back on the hinge.)
3.4 Set the door outside-up on a non-scratching surface.
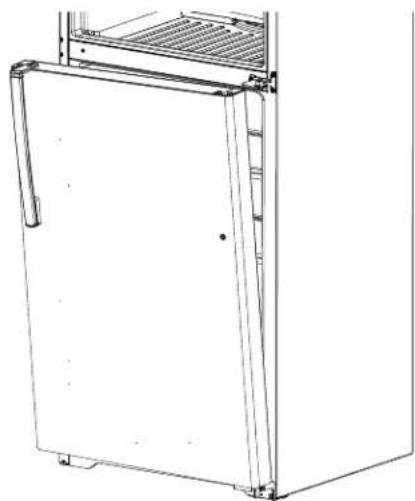
natural_image
Line drawing of a refrigerator with lid and side door (no text or symbols)
REVERSING THE HARDWARE
4.1 Interchange the hinge and screws at top right with screws at top left of cabinet. Do not tighten screws on hinge side.
NOTE: Some hinges have 4 holes. Which holes you use for installing depends on which side you install the hinge.
The outer edge of the hinge should be parallel to the edge of the case for correct installation.
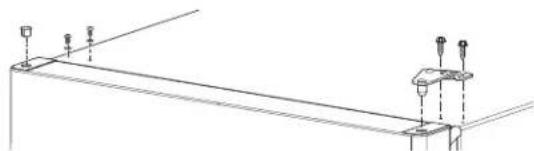
natural_image
Pure technical line drawing of a structural beam with support points and no text or symbols4.2 Remove the three screws holding the center hinge to the cabinet.
4.3 Transfer the three screws from the opposite side of the cabinet to the screw holes vacated by the center hinge removal.
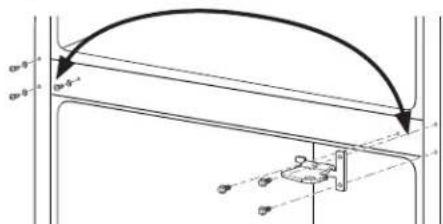
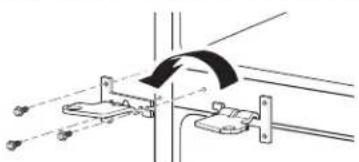
4.4 Reattach the center hinge with all three screws on the left side of the cabinet.
NOTE: The center hinge must be turned over as shown when mounted on the left side.
natural_image
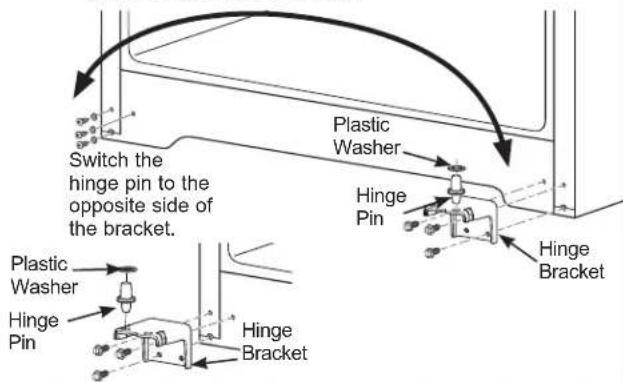
Mechanical assembly diagram showing a clamping mechanism with no text or symbols4.5 Remove the screws holding the bottom hinge to the cabinet. Move the bottom hinge from the right to left side of the cabinet. Switch the hinge pin to the opposite side of the hinge and reinsert the screws.
REVERSING THE DOOR SWING (Cont.)

REVERSING THE DOOR HANDLES
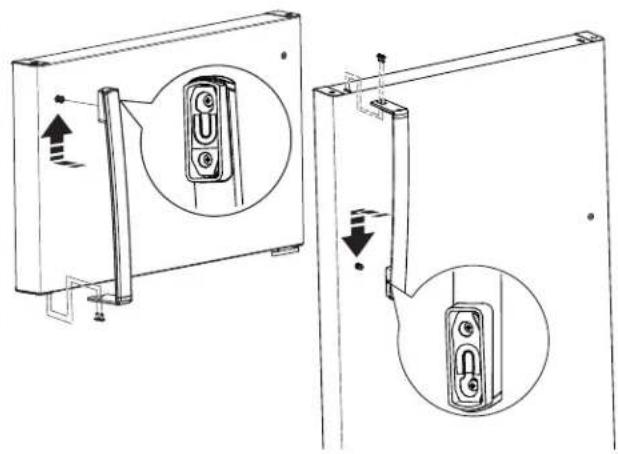
5.1. Remove handle screws from the top of fresh food door. Remove handle screws from the bottom of freezer door.
5.2. Remove door handle on fresh food door by sliding the handle up off of the fastener (Plastic Handle) or plastic bushing (Stainless Steel Handle). Remove door handle on freezer door by sliding the handle down off of the fastener (Plastic Handle) or plastic bushing (Stainless Steel Handle).
5.3. Change places between the handle fastener or plastic bushing and plug button on door front.
5.4. Move the plug buttons on top and front of the door to fill the now vacant holes.
5.5. Transfer the door stop on the bottom of the door.
5.6. Attach handle to fresh food door by sliding handle down onto fastener (Plastic Handle) or plastic bushing (Stainless Steel handle) and with screws at top of handle.
5.7. Attach handle to freezer door by sliding handle up onto fastener (Plastic Handle) or plastic bushing (Stainless Steel handle) and with screws at bottom of handle.
5.8. Attach badge on freezer door opposite the handle.
natural_image
Technical line drawing showing two views of a wall-mounted device with internal components and directional arrows (no text or symbols)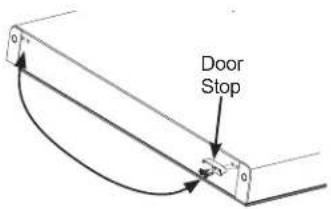

RE-HANGING THE DOORS
6.1 Re-hang the fresh food door
6.1.1 Lower the fresh food door onto the bottom hinge pin. Be sure the washer is in place on the pin.
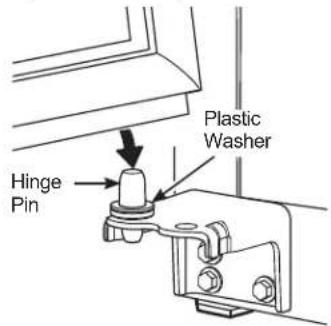
6.1.2 Tilt the door towards the cabinet. As the door is brought into position, align the socket in the door with the hole in the center hinge. Place the center hinge pin into the hole in the center hinge and tighten. Make sure the washer is on the top of the hinge pin.
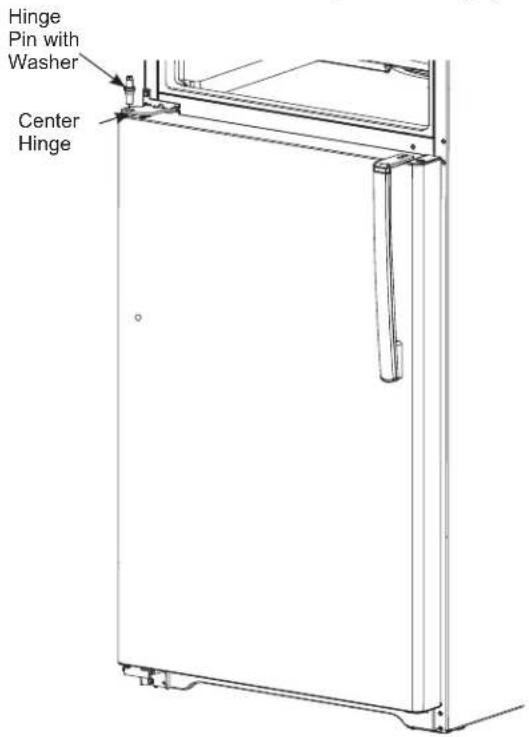
REVERSING THE DOOR SWING (Cont.)
6 RE-HANGING THE DOORS (Cont.)
6.2 Re-hang the freezer door
6.2.1 Lower the freezer door onto the center hinge pin. Be sure the washer is in place on the pin.
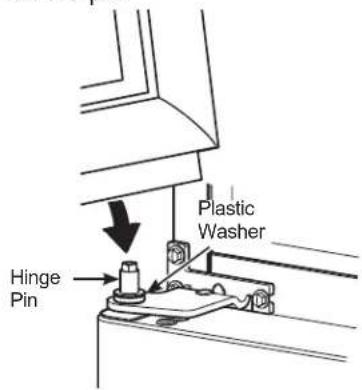
6.2.2 Tilt the door towards the cabinet, lifting the top hinge so the pin fits into the socket on the top of the door.
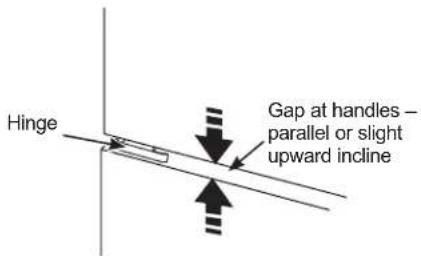
6.2.3 Support the freezer door using the styrofoam block shipped with the unit while tightening top hinge screws. The door will be slightly inclined up above the top of the cabinet and the gap between the doors is even across the front.
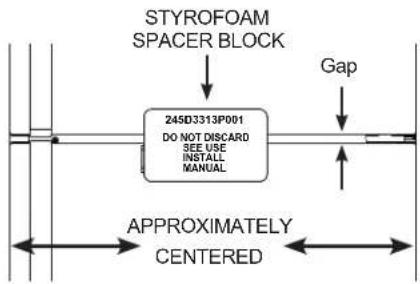
6.2.4 Tighten the top hinge screws. Do not over-tighten these screws. Tighten them until they are just snug, and then turn them another one-half turn.
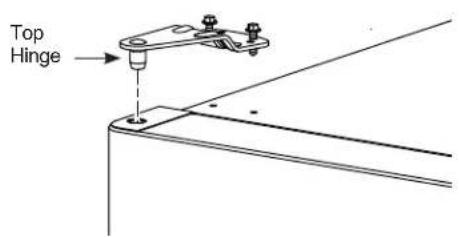
6.2.5 Remove styrofoam block and inspect gap. Repeat steps 6.2.3 and 6.2.4 until desired door alignment is achieved.
Newer refrigerators sound different from older refrigerators. Modern refrigerators have more features and use newer technology.
Do you hear what I hear? These sounds are normal.
| ■ The new high efficiency compressor may run faster and longer than your old refrigerator and you may hear a high-pitched hum or pulsating sound while it is operating.■ You may hear a whooshing sound when the doors close. This is due to pressure equalizing within the refrigerator. | HUMMM...WHOOSH... | 1 | ■ You may hear the fans spinning at high speeds.This happens when the refrigerator is first plugged in, when the doors are opened frequently or when a large amount of food is added to the refrigerator or freezer compartments.The fans are helping to maintain the correct temperatures. |
| CLICKS, POPS, CRACKS and CHIRPS■ You may hear cracking or popping sounds when the refrigerator is first plugged in. This happens as the refrigerator cools to the correct temperature.■ The compressor may cause a clicking or chirping sound when attempting to restart (this could take up to 5 minutes).■ Expansion and contraction of cooling coils during and after defrost can cause a cracking or popping sound.■ On models with an ice maker, after an ice making cycle, you may hear the ice cubes dropping into the ice bucket. | [AYDS] | WATER SOUNDS■ The flow of refrigerant through the freezer cooling coils may make a gurgling noise like boiling water.■ Water dropping on the defrost heater can cause a sizzling, popping or buzzing sound during the defrost cycle.■ A water dripping noise may occur during the defrost cycle as ice melts from the evaporator and flows into the drain pan.■ Closing the door may cause a gurgling sound due to pressure equalization. | |
Troubleshooting Tips... Before you call for service
Save time and money! Review the charts on the following pages first and you may not need to call for service. If needed, service can be scheduled by visiting us online bodewell.com/schedule-repair-service or calling 833-4BODEWELL
In Canada visit GEAppliances.ca or call 800.561.3344.
| Truth or Myth | ||
| Truth or Myth? Answer Explanation | ||
| The automatic ice maker in my refrigerator will produce ice when the refrigerator is plugged in to a power receptacle. | MYTH The | refrigerator must be connected to water, and the ice maker must be turned on. Make sure the ice maker is turned on, only after the water line is connected and water is turned on. The ice maker can be turned off by switching it to the OFF position.The freezer must be 15 degrees or colder before the icemaker will produce ice. Please allow at least 24 hours for the refrigerator to pull down and the unit's temperature to stabilize. |
| I will never see frost inside the freezer compartment. | MYTH Frost | inside the freezer typically indicates that the door is not properly sealed, or has been left open. If frost is found, clear the frost using a plastic spatula and towel, then check to ensure that no food packages or containers are preventing the freezer door from closing. To help reduce to the potential for frost please make sure there is proper clearance to the air supply and vents in the freezer to improve circulation. Always cover food before loading into the refrigerator, moisture from open containers can add to the frost load. |
| Refrigerator door handles can be easily tightened. | TRUE If | door handles are loose or have a gap, the handle can be adjusted with set screws located on the ends of the handles. |
| After starting the ice maker throw away 24 hours of ice production. | TRUE To | avoid issues with odor and taste the first batch of ice should be discarded |
| Door removal is always required for installation. | MYTH Doors | should only be removed when necessary to prevent damage from passage way or access to final location. If doors are removed please review Reversing the Door Swing section for re-hang procedure. |
| There is an adjustment to rear wheels. | MYTH Front | leveling legs are adjustable and should be used to balance the refrigerator.Leveling legs are used to make initial fresh food door adjustment. There should be approximately a 14 " fall from the front to back to ensure that the doors always close. |
| Any All-Purpose cleaner can be used to clean my refrigerator. | MYTH All- | purpose cleaners are not recommended for use on the refrigerator.Do not use wax, polish, ammonia, bleach, or other products containing chlorine on for any surfaces. Clean with a cloth dampened with soapy water. Dry with a soft cloth. The stainless steel doors can be cleaned with a commercially available stainless steel cleaner. Cleaners with oxalic acid such as Bar Keepers Friend Soft CleanserTMwill remove surface rust, tarnish and small blemishes. Use only a liquid cleanser free of grit and rub in the direction of the brush lines with a damp soft sponge. Do not use appliance wax or polish on the stainless steel. |
| Gaskets will last longer with regular cleaning and maintenance. | TRUE Clean | gaskets with warm soapy water. Make sure all folds are clean and dry after cleaning. Make sure flanges are clear of any grit or grime. After cleaning the door gaskets, apply paraffin wax or petroleum jelly to the door gaskets and hinges at the hinge side. This helps keep the gaskets from sticking and bending out of shape. |
| Doors may be shipped with protective film that has to be removed before use. | TRUE Smooth | finished doors (Stainless, Slate, Gloss Black and Gloss White, or Silver Metallic) will have a clear plastic film on the door that must be removed after install. |
Have more questions? For more information on your refrigerator or other GE appliances please visit geappliances.com/videos
Refrigerator Limited Warranty
For US Customers, all warranty service provided by our Factory Service Centers, or an authorized Customer Care® technician. To schedule service, on-line, 24 hours a day, visit us at bodewell.com/schedule-repair-service, or call 833-4BODEWELL. Please have serial number and model number available when calling for service.
In Canada, call 800.561.3344.
Servicing your appliance may require the use of the onboard data port for diagnostics. This gives a GE Appliances factory service technician the ability to quickly diagnose any issues with your appliance and helps GE Appliances improve its products by providing GE Appliances with information on your appliance. If you do not want your appliance data to be sent to GE Appliances, please advise your technician not to submit the data to GE Appliances at the time of service.
For the Period of: GE Appliances Will Replace
| One YearFrom the date of the original purchase | Any part of the refrigerator which fails due to a defect in materials or workmanship.During the limited one-year warranty, GE Appliances will also provide, free of charge, all labor and related service to replace the defective part. |
| Thirty Days(Water filter, if included) From the original purchase date of refrigerator | Any part of the water filter cartridge which fails due to a defect in materials or workmanship.During this limited thirty-day warranty, GE Appliances will also provide, free of charge, a replacement water filter cartridge. |
What is Not Covered:
■ Service trips to your home to teach you how to use the product.
■ Improper installation, delivery or maintenance.
■ Failure of the product if it is abused, misused, or used for other than the intended purpose or used commercially.
■ Loss of food due to spoilage.
■ Replacement of house fuses or resetting of circuit breakers.
■ Damage caused after delivery.
■ Replacement of the water filter cartridge, if included, due to water pressure that is outside the specified operating range or due to excessive sediment in the water supply.
■ Replacement of the light bulbs, if included, or water filter
cartridge, if included, other than as noted above.
■ Damage to the product caused by accident, fire, floods or acts of God.
■ Incidental or consequential damage caused by possible defects with this appliance.
■ Product not accessible to provide required service.
■ Damage caused by a non-GE Brand water filter.
■ Damage to finish, such as surface rust, tarnish, or small blemishes not reported within 48 hours of delivery.
■ Products which are not defective, broken, or which are working as described in the owner's manual.
■ Damage caused by running the icemaker with no water supply to unit.
EXCLUSION OF IMPLIED WARRANTIES—Your sole and exclusive remedy is product repair as provided in this Limited Warranty. Any implied warranties, including the implied warranties of merchantability or fitness for a particular purpose, are limited to one year or the shortest period allowed by law.
For US Customers: This limited warranty is extended to the original purchaser and any succeeding owner for products purchased for home use within the USA. If the product is located in an area where service by a GE Appliances Authorized Servicer is not available, you may be responsible for a trip charge or you may be required to bring the product to an Authorized GE Appliances Service location for service. In Alaska, the limited warranty excludes the cost of shipping or service calls to your home. Some states do not allow the exclusion or limitation of incidental or consequential damages. This limited warranty gives you specific legal rights, and you may also have other rights which vary from state to state. To know what your legal rights are, consult your local or state consumer affairs office or your state's Attorney General.
Warrantor US: GE Appliances, a Haier company, Louisville, KY 40225
In Canada (including the province of Québec):
This limited warranty is extended to the original purchaser and any succeeding owner for products purchased in Canada including Québec for home use within Canada including Québec. If the product is located in an area where service by a GE Appliances Authorized Servicer is not available, you may be responsible for a trip charge or you may be required to bring the product to an Authorized GE Appliances Service location.
Some provinces including Québec do not allow the exclusion or limitation of incidental or consequential damages. This limited warranty gives you specific legal rights, and you may also have other rights which vary from province to province including Québec. To know what your legal rights are, consult your local or provincial consumer affairs office.
For Québec consumers only - Notice on the warranty of availability of spare parts, repair services and information necessary for repair or maintenance (s. 39 of the Consumer Protection Act):
Please be advised that MC Commercial Inc. ("MC Commercial") does not guarantee, within the meaning of section 39 of the Consumer Protection Act, CQLR, c. P-40.1 and sections 79.18 to 79.20 of the Regulation respecting the application of the Consumer Protection Act, CQLR, c P-40.1, r. 3, the availability of replacement parts, repair services, or the information necessary for the maintenance or repair of goods manufactured, imported, advertised, or sold by MC Commercial.
Please note that MC Commercial Inc. continues to offer the manufacturer's limited warranty as stated in the Owner's Manual or Quick Guide, and that this limited warranty is distinct from the statutory warranty of availability provided for under section 39 of the Consumer Protection Act.
Warrantor: MC Commercial Inc., Burlington, ON, L7L 6B2
Consumer Support
GE Appliances Website
Have a question or need assistance with your appliance? Try the GE Appliances Website 24 hours a day, any day of the year! You can also shop for more great GE Appliances products and take advantage of all our on-line support services designed for your convenience. In the US: GEAppliances.com In Canada: GEAppliances.ca
Register Your Appliance
Register your new appliance on-line at your convenience! Timely product registration will allow for enhanced communication and prompt service under the terms of your warranty, should the need arise. You may also mail in the pre-printed registration card included in the packing material.
In the US: GEAppliances.com/register
In Canada: Prodsupport.mabe.ca/crm/Products/ProductRegistration.aspx
Schedule Service
Expert GE Appliances repair service is only one step away from your door. Get on-line and schedule your service at your convenience any day of the year. In the US: bodewell.com/schedule-repair-service or call 833-4BODEWELL during normal business hours.
In Canada: GEAppliances.ca/en/support/service-request or call 800.561.3344
Extended Warranties
Purchase a GE Appliances extended warranty and learn about special discounts that are available while your warranty is still in effect. You can purchase it on-line anytime. GE Appliances Services will still be there after your warranty expires.
In the US: bodewellcareplan.com
or call 800.626.2224 during normal business hours.
In Canada: GEAppliances.ca/en/support/purchase-extended-warranty or call 800.290.9029
Remote Connectivity
For assistance with wireless network connectivity (for models with remote enable), visit our website at GEAppliances.com/connect or call 800.220.6899 in the US only.
Parts and Accessories
Individuals qualified to service their own appliances can have parts or accessories sent directly to their homes (VISA, MasterCard and Discover cards are accepted). Order on-line today 24 hours every day.
In the US: GEApplianceparts.com or by phone at 877.959.8688 during normal business hours.
Instructions contained in this manual cover procedures to be performed by any user. Other servicing generally should be referred to qualified service personnel. Caution must be exercised, since improper servicing may cause unsafe operation.
Customers in Canada should consult the yellow pages for the nearest Mabe service center, visit our website at GEAppliances.ca/en/products/parts-filters-accessories or call 800.661.1616.
Contact Us
If you are not satisfied with the service you receive from GE Appliances, contact us on our Website with all the details including your phone number, or write to:
In the US: General Manager, Customer Relations | GE Appliances, Appliance Park | Louisville, KY 40225
GEAppliances.com/contact
In Canada: Director, Consumer Relations, MC Commercial Inc. | Suite 300, 5420 North Service Road | Burlington, Ontario L7L 6C7
GEAppliances.ca/en/contact-us
MESURES DE SÉCURITÉ....3
AU CONSOMMATEUR....22
Models 16, 17, 18, 19, 22
FRANÇAIS
NOUS VOUS REMERCIONS D'ACCUEILLIR GE APPLIANCES CHEZ VOUS
natural_image
Architectural line drawing of a structural framework with vertical columns and horizontal beams (no text or symbols)natural_image
Technical line drawing of two 3D enclosure units with internal components and a magnified inset showing part 2 (no text or symbols)natural_image
Line drawing of a rectangular container with a lid, no text or symbols presentnatural_image
Line drawing of a two-tiered storage unit with top and bottom compartments (no text or symbols)natural_image
Line drawing of hands using a tool to lift or lift a rectangular object (no text or symbols)natural_image
Line drawing of a house with a tiled roof and window, viewed from above (no text or symbols)natural_image
Simple line drawing of a container with liquid and a handle, no text or symbols presentnatural_image
Technical line drawing of a mechanical assembly with mounting bracket and rotation arrow (no text or symbols)4 FIXEZ LE ROBINET D'ARRÊT
natural_image
Technical diagram of a device with an inset showing a close-up of a U-shaped component (no text or symbols present)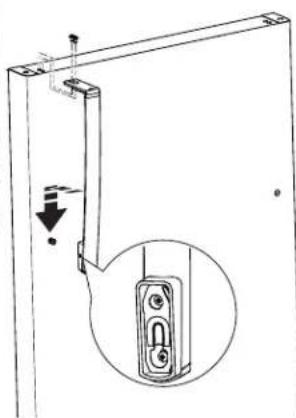
natural_image
Technical line drawing of a door frame with an inset view showing a button mechanism (no text or symbols)natural_image
Technical line drawing of a device with internal wiring and housing (no text or symbols)3 ÉCUSSON ET LE BOUCHON D'INSTALLATION \*
natural_image
Technical line drawing of a mechanical assembly with clamps and a screwdriver (no text or symbols)natural_image
Technical line drawing of a rectangular frame with a horizontal panel and side supports (no text or symbols)natural_image
Pure technical line drawing of a structural frame with no text or symbolsINVERSION DE L'OUVERTURE DES PORTES (SUITE)
AVERTISSEMENT
natural_image
Simple line drawing of a rectangular frame with vertical connectors (no text or symbols)natural_image
Line drawing of a refrigerator with lid and side panel (no text or symbols)natural_image
Pure technical line drawing of a mechanical or electrical assembly without any text, numbers, or symbolsnatural_image
Mechanical assembly diagram showing a clamp or bracket with mounting points and alignment lines (no text or symbols)natural_image
Technical line drawing showing two views of a device with internal components and mounting hardware (no text or symbols)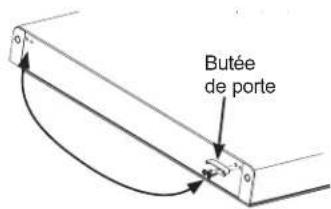
Garant : MC Commercial Inc., Burlington, ON, L7L 6B2
Au Canada : Prodsupport.mabe.ca/crm/Products/ProductRegistration.aspx
GEAppliances.com/contact
Au Canada : Director, Consumer Relations, MC Commercial Inc. | Suite 300, 5420 North Service Road | Burlington, Ontario L7L 6C7
Modelos 16, 17, 18, 19, 22
ESPAÑOL
GRACIAS POR HACER QUE GE APPLIANCES SEA PARTE DE SU HOGAR.
Control del Freezer
natural_image
Pure architectural or structural line drawing with vertical supports and horizontal beams, no text or symbols presentnatural_image
Technical line drawing of two 3D cabinet or enclosure units with internal components and a magnified inset showing part 2 (no text or symbols)natural_image
Technical line drawing of a mechanical assembly with no visible text or symbolsnatural_image
Line drawing of a two-part container or storage unit (no text or symbols)Cajón y Tapa
Retiro del Cajón
natural_image
Line drawing of a hand inserting a rectangular object into a container (no text or symbols)Retiro de la Tapa
natural_image
Line drawing of a birdhouse with a tiled roof and open window (no text or symbols)natural_image
Simple line drawing of a container with liquid and arrows indicating flow (no text or symbols)Replacing the Lights
natural_image
Technical line drawing of a mechanical assembly with mounting bracket and circular components (no text or symbols)sean tendráen
aturasea cionaráde
expuestaal
CÓMO INSTALAR LA TUBERÍA DEL AGUA (EN ALGUNOS MODELOS)
ANTES DE INICIAR
natural_image
Technical line drawing of a mechanical component with internal channels and a handle (no text or symbols)natural_image
Technical line drawing of a mechanical assembly with a screwdriver inserted into a housing (no text or symbols)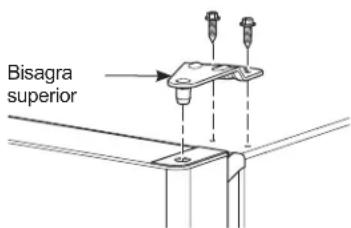
natural_image
Pure technical line drawing of a rectangular frame with rounded corners and mounting holes (no text or symbols)natural_image
Simple line drawing of a rectangular frame with vertical connectors (no text or symbols)natural_image
Line drawing of a refrigerator interior showing handle and side panel (no text or symbols)natural_image
Pure technical line drawing of a mechanical or electrical assembly without any text, numbers, or symbolsnatural_image
Technical line drawing of a mechanical clamp or bracket assembly (no text or symbols)natural_image
Technical line drawing showing two views of a wall-mounted device with internal components and mounting brackets (no text or symbols)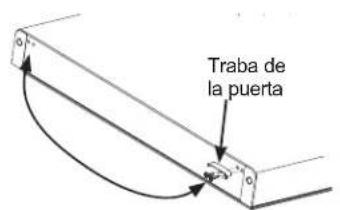
Garante US: GE Appliances, a Haier company Louisville, KY 40225
Warrantor Canada: MC Commercial Inc., Burlington, Ontario, ON L7L 6C7
- SAFETY INFORMATION......3
- USING THE REFRIGERATOR
- CARE AND CLEANING....9
- INSTALLATION INSTRUCTIONS
- TROUBLESHOOTING
- OWNER'S MANUAL & INSTALLATION INSTRUCTIONS
- ENGLISH/FRANÇAIS/ ESPAÑOL
- THANK YOU FOR MAKING GE APPLIANCES A PART OF YOUR HOME.
- IMPORTANT SAFETY INFORMATION READ ALL INSTRUCTIONS BEFORE USING THE APPLIANCE
- WARNING
- CAUTION
- RE OR EXPLOSION HAZARD
- Flammable Refrigerant
- READ AND SAVE THESE INSTRUCTIONS
- INSTALLATION
- CONNECTING ELECTRICITY
- LECTRICAL SHOCK HAZARD
- Do not, under any circumstances, cut or remove the third (ground) prong from the power cord. For personal safety, this appliance must be properly grounded.
- PROPER DISPOSAL OF YOUR OLD REFRIGERATOR
- SUFFOCATION AND ENTRAPMENT HAZARD
- Before You Throw Away Your Old Appliance
- Refrigerant and Foam Disposal:
- Temperature Control for locations between 55°F-110°F
- Garage Operation for locations between 38°F-54°F
- Sabbath Mode OU (Orthodox Union) and CRC (Central Rabbinical Congress)
- Fresh Food Compartment Shelves
- Full-Width Shelves
- Freezer Compartment Shelves
- Storage Drawers
- Snack Drawer
- Fruit and Vegetable Drawers
- Drawer and Cover
- Drawer Removal
- Cover Removal
- To replace:
- Automatic Icemaker (on some models)
- Cleaning the Outside
- Cleaning the Inside
- Moving the Refrigerator
- Replacing the Lights
- Preparing for Vacation
- Preparing to Move
- Installation Instructions Models 16, 17, 18, 19, & 22
- BEFORE YOU BEGIN
- WATER SUPPLY TO THE ICE MAKER (on some models)
- REFRIGERATOR LOCATION
- CLEARANCES
- INSTALLING THE WATER LINE (on some models)
- WHAT YOU WILL NEED
- WHAT YOU WILL NEED (Cont.)
- OR
- INSTALLING THE WATER LINE (Cont.)
- SHUT OFF THE MAIN WATER SUPPLY AND UNPLUG REFRIGERATOR
- CHOOSE THE VALVE LOCATION
- DRILL THE HOLE FOR THE VALVE
- FASTEN THE SHUTOFF VALVE
- FASTEN THE SHUTOFF VALVE (Cont.)
- ROUTE THE TUBING
- CONNECT THE TUBING TO THE VALVE
- FLUSH OUT THE TUBING
- CONNECT THE TUBING TO THE REFRIGERATOR
- NOTES:
- TURN THE WATER ON AT THE SHUTOFF VALVE
- INSTALLING THE REFRIGERATOR
- START THE ICE MAKER
- INSTALLING THE DOOR HANDLE
- 1A PLASTIC HANDLE
- 1B STAINLESS STEEL HANDLE
- HANDLE INSTALLATION
- For Stainless Steel Handles Only
- BADGE AND PLUG BUTTON INSTALLATION \*
- REVERSING THE DOOR SWING
- IMPORTANT NOTES:
- Lifting Hazard
- TOOLS REQUIRED
- BEFORE YOU START
- REMOVE THE FREEZER DOOR
- REVERSING THE DOOR SWING (Cont.)
- REMOVE THE FRESH FOOD DOOR
- REVERSING THE HARDWARE
- REVERSING THE DOOR HANDLES
- RE-HANGING THE DOORS
- RE-HANGING THE DOORS (Cont.)
- Troubleshooting Tips... Before you call for service
- Refrigerator Limited Warranty
- What is Not Covered:
- Consumer Support
- GE Appliances Website
- Register Your Appliance
- Schedule Service
- Extended Warranties
- Remote Connectivity
- Parts and Accessories
- Contact Us
- MESURES DE SÉCURITÉ....3
- AU CONSOMMATEUR....22
- FRANÇAIS
- NOUS VOUS REMERCIONS D'ACCUEILLIR GE APPLIANCES CHEZ VOUS
- FIXEZ LE ROBINET D'ARRÊT
- ÉCUSSON ET LE BOUCHON D'INSTALLATION \*
- INVERSION DE L'OUVERTURE DES PORTES (SUITE)
- AVERTISSEMENT
- GEAppliances.com/contact
- ESPAÑOL
- GRACIAS POR HACER QUE GE APPLIANCES SEA PARTE DE SU HOGAR.
- Cajón y Tapa
- Retiro del Cajón
- Retiro de la Tapa
- CÓMO INSTALAR LA TUBERÍA DEL AGUA (EN ALGUNOS MODELOS)
- ANTES DE INICIAR
Brand : GE
Model : GTE22JMNRES
Category : Freezer