GCV190 - Gardening Equipment Honda - Free user manual and instructions
Find the device manual for free GCV190 Honda in PDF.


| Product type | 4-stroke engine, overhead camshaft, single cylinder |
| Brand | Honda |
| Model | GCV190 |
| Category | Lawn and garden equipment |
| Dimensions (L × W × H) | 367 × 331 × 368 mm (recoil starter) / 367 × 354 × 368 mm (electric starter) |
| Dry weight | 12.3 kg (recoil starter) / 13.3 kg (electric starter) |
| Displacement | 187 cm³ (bore × stroke: 69 × 50 mm) |
| Fuel tank capacity | 0.91 L |
| Engine oil capacity | 0.50 L |
| Fuel consumption | 1.3 L/h at 3,000 rpm |
| Cooling system | Forced air |
| Ignition system | Transistorized magneto |
| PTO rotation | Counterclockwise |
| Recommended spark plug | NGK BPR6ES (pressure washer application) or BPR5ES (all other applications) |
| Spark plug gap | 0.7 to 0.8 mm |
| Valve clearance (cold) | Intake: 0.15 ± 0.04 mm / Exhaust: 0.20 ± 0.04 mm |
| Recommended engine oil | SAE 10W-30, API SJ or equivalent |
| Recommended fuel | Unleaded, research octane number ≥ 91 (E10 max) |
| Regular maintenance | Check oil and air filter before each use; change oil every 50 h; spark plug every 100 h |
| Safety | Quick engine stop (flywheel brake lever), carbon monoxide protection, outdoor use only |
| Warranty | Manufacturer warranty according to Honda conditions (see manual) |
Frequently Asked Questions - GCV190 Honda
User questions about GCV190 Honda
0 question about this device. Answer the ones you know or ask your own.
Ask a new question about this device
Download the instructions for your Gardening Equipment in PDF format for free! Find your manual GCV190 - Honda and take your electronic device back in hand. On this page are published all the documents necessary for the use of your device. GCV190 by Honda.
USER MANUAL GCV190 Honda
(Original instructions)
GCV140 • GCV160
GCV190
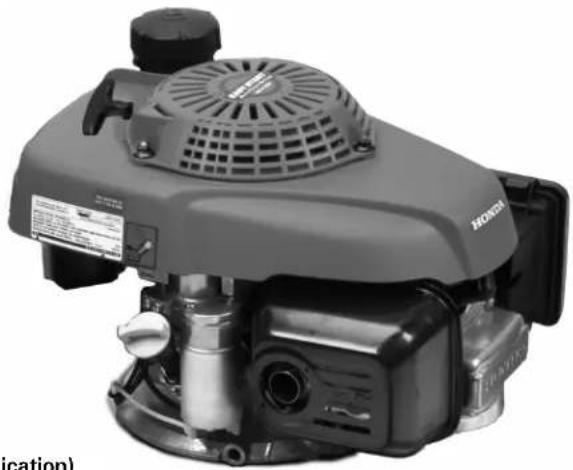
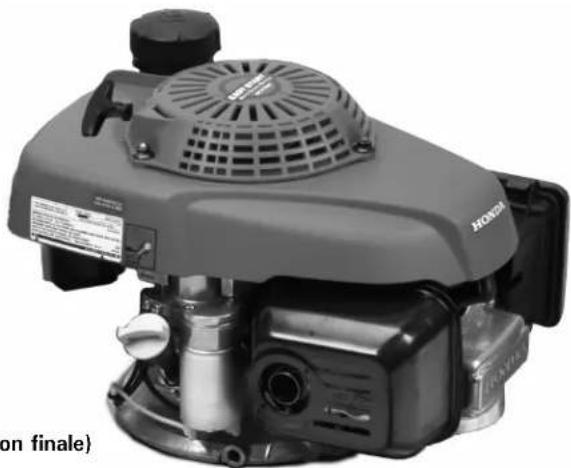
natural_image
Exterior view of a Honda grass lawn pump with visible blades and control panel (no text or symbols)(Appearance may differ in final application)
![Honda Motor Co., Ltd. [1] [3] [5] [4] [10]](/content/2026/05/875022/images/6cbceebaf6c063d317402e4a8fd1565a5dd9c801f1250dd32ff6a6350cc37b74.jpg)
![[2] (Applicable types) [6] [HONDA] [9] [8] [7]](/content/2026/05/875022/images/854b62fd371c1097912df13c402231a821058ed938ea3db6e5b9b410f1d48173.jpg)
COMPONENT LOCATION
| 1 Fuel filler cap 6 Spark plug |
| 2 Starter grip 7 Muffler |
| 3 Fuel tank 8 Starter motor (if equipped) |
| 4 Control location * 9 Oil filler cap/ dipstick |
| 5 Air cleaner 10 Engine serial number |
* The engine control area differs based on the engine type. Refer to the individual figures on pages 2 and 3 to determine your engine control type when reading the Operation section and other sections in this manual.
 | Read the owner's manual before operation.Lire le manuel de l'utilisateur avant l'utilisation.Lea el manual del propietario antes de la operación.Vor Inbetriebnahme die Bedienungsanleitung lesen.Leggere il manuale d'uso prima dia zionarlo.Lees het instructieboekje voordat u de motor gebruikt. |
 | The engine emits toxic carbon monoxide. Do not run in an enclosed area.Le moteur dégage du monoxyde de carbone qui est un gaz toxique. Ne jamais le faire fonctionner dans un endroit clos.El motor emite gas monóxido de carbono que es tóxico y venenoso. No lo tenga en marcha en un lugar cerrado.Im Abgas des Motors ist giftiges Kohlenmonoxid enthalten. Nicht in einem geschlossenem Bereich laufen lassen.Il motore rilascia monossido di carbonio che è un gas tossico velenoso. Non azionare in un luogo chiuso.De uitlaatgassen van de motor bevatten giftig koolmonoxidegas. Laat de motor niet draaien in een omsloten ruimte. |
 | Petrol is highly flammable and explosive. Turn engine off and let cool before refueling.L'essence est très inflammable et explosive. Avant de faire le plein de carburant, arrêter le moteur et le laisser se refroidir.La gasolina es muy inflamable y explosiva. Pare el motor y espere a que se enfrie antes de repostar.Benzin ist äußerst feuergefährlich und explosiv. Vor dem Tanken den Motor abstellen und abkühlen lassen.La benzina è estremamente infiammabile ed explosiva. Spegnere il motore e lasciarlo raffreddare prima di effettuare il rifornimento.Benzine is uiterst brandbaar en explosief. Zet de motor uit en laat deze afkoelen voordat u brandstof bijvult. |
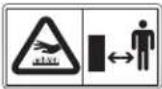 | Hot muffler can burn you. Stay away if engine has been running.Un silencieux chaud peut brûler. Ne pas s'en approcher lorsque le moteur vient de tourner.El silenciador caliente puede causarle quemaduras. No se acerque si el motor ha estado en marcha.An einem heißen Auspuff kann man sich verbrennen. Wenn der Motor in Betrieb war, ist Berührung zu vermeiden.La marmitta calda può provocare ustioni. Non avvicinarsi se il motore è stato in funzione.Een hete uitlaatdemper kan brandwonden veroorzaken. Blijf uit de buurt als de motor heeft gelopen. |
![1, 2 3 4 [3] [2] [1] [2] [3] N [1] [3] [1]](/content/2026/05/875022/images/f4e0cddef5e07b1259853f8fd207f2cc5c68ba795c100e208052c99fdc5e6128.jpg)
| ENType 1,2 | [1] Fuel Valve[2] Remote Choke/Throttle[3] Flywheel Brake | ENType 3 | [1] Fuel Valve[2] Automatic Return Choke[3] Flywheel Brake, Fixed Throttle | ENType 4 | [1] Fuel Valve[3] Flywheel BrakeAutomatic Choke, Fixed Throttle |
| FRType 1,2 | [1] Robinet d'essence[2] Levier de Starter/Papillon[3] Frein de Volant | FRType 3 | [1] Robinet d'essence[2] Starter À Retour Automatique[3] Frein de Volant, CarburateurPréréglé | FRType 4 | [1] Robinet d'essence[3] Frein de VolantStarter Automatique, CarburateurPréréglé |
| ESTipo 1,2 | [1] Valvula de combustible[2] Cebador/Aceleración Remota[3] Freno del Volante | ESTipo 3 | [1] Valvula de combustible[2] Retorno Automático Del Cebador[3] Freno del Volante, Aceleración Fija | ESTipo 4 | [1] Valvula de combustible[3] Freno del VolanteAutomático Cebador, Aceleración Fija |
| DETyp 1,2 | [1] Kraftstoffventil[2] Fernbedienungs-Choke/gasregelung[3] Schwungradbremse | DETyp 3 | [1] Kraftstoffventil[2] Automatischer Rückkehr Choke[3] Schwungradbremse, Feste Gas | DETyp 4 | [1] Kraftstoffventil[3] SchwungradbremseAutomatischer Choke, Feste Gas |
| ITTipo 1,2 | [1] Valvola Del Carburante[2] Starter/Farfalla Remota[3] Freno Su Volano | ITTipo 3 | [1] Valvola Del Carburante[2] Richiamo Automatico Della ValvolaDell'aria[3] Freno Su Volano, Farfalla Fissa | ITTipo 4 | [1] Valvola Del Carburante[3] Freno Su VolanoFarfalla Fissa, Starter Automatico |
| NLType 1,2 | [1] Brandstofklep[2] Choke/Gasklep op Afstand[3] Vliegwiel Rem | NLType 3 | [1] Brandstofklep[2] Automatische Choke Retour[3] Vliegwiel Rem, Vaste Gasklep | NLType 4 | [1] Brandstofklep[3] Vliegwiel RemAutomatisch Choke, Vaste Gasklep |
![5, 6 7 8, 9 [2] [1]](/content/2026/05/875022/images/219665bead62dc03d1cdabaed7a9f1471c087bc4f586a46499fb03d578cc4052.jpg)
![[2] [3] [1]](/content/2026/05/875022/images/94564560694054caabf53d7476a5952177c38265b25739b40a14eaf4eab23c44.jpg)
![[3] [2] [1] N](/content/2026/05/875022/images/aea8b9f65f1880aed863d303c412b178bf7a5fb7864f928fee815832aa5d007b.jpg)
| ENType 5,6 | [1] Fuel Valve[2] Remote Choke/Throttle, Blade Brake Clutch | ENType 7 | [1] Fuel Valve[2] Manual Choke[3] Manual Throttle | ENType 8,9 | [1] Fuel Valve[2] Manual Choke[3] Stop SwitchFlxed (Auto) Throttle |
| FRType 5,6 | [1] Robinet d'essence[2] Levier de Starter/Papillon, Frein-embrayage À Aubes | FRType 7 | [1] Robinet d'essence[2] Starter Manuel[3] Papillon Manuel | FRType 8,9 | [1] Robinet d'essence[2] Starter Manuel[3] Bouton d'Arret du Moteur Carburateur Préréglé (Auto) |
| ESTipo 5,6 | [1] Valvula de combustible[2] Cebador/Aceleración Remota, Freno de Cuchillas | ESTipo 7 | [1] Valvula de combustible[2] Cebador Manual[3] Aceleración Manual | ESTipo 8,9 | [1] Valvula de combustible[2] Cebador Manual[3] Interruptor de Para del Motor Aceleración Fija (Auto) |
| DETyp 5,6 | [1] Kraftstoffventil[2] Fernbediente Choke/Asregelung, Messerbremskupplung | DETyp 7 | [1] Kraftstoffventil[2] Manueller Choke[3] Manueller Gasregelung | DETyp 8,9 | [1] Kraftstoffventil[2] Manueller Choke[3] Motorabstellschalter Feste (Auto) Gas |
| ITTipo 5,6 | [1] Valvola Del Carburante[2] Starter/Farfalla Remota, Frizione Freno Su Lama | ITTipo 7 | [1] Valvola Del Carburante[2] Valvola Dell'Aria Manuale[3] Farfalla Manuale | ITTipo 8,9 | [1] Valvola Del Carburante[2] Valvola Dell'Aria Manuale[3] Interruttore Di Arresto Del Motore Farfalla Fissa (Automatico) |
| NLType 5,6 | [1] Brandstofklep[2] Choke/Gasklep op Afstand, Schoepremkoppeling | NLType 7 | [1] Brandstofklep[2] Handmatige Choke[3] Handmatige Gasklep | NLType 8,9 | [1] Brandstofklep[2] Handmatige Choke[3] Motorstopschakelaar Vaste (Automatisch) Gasklep |
![[1] Fuel valve ON ROBINET d'essence OUVERT Valvula de combustible ABIERTA Kraftstoffventil AUF Valvola Del Carburante ACCESO Brandstofklep AAN OFF FERMÉ CERRADA STOP SPENTO UIT](/content/2026/05/875022/images/0b242b54bd5c18b9d0085c029ce60dd7764776df52c705b1f442cc8c5d5c7520.jpg)
| F1[0.91 L] | F2 F3[0.50 L] | 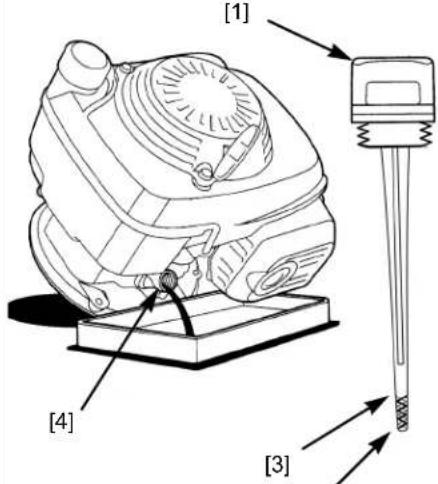 [2] [2] |
 |   | |
F4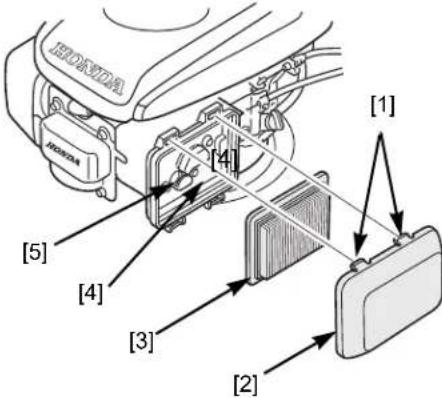 | F5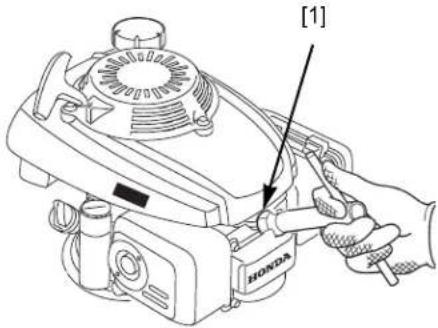 [0.70 ~ 0.80 mm][2] [0.70 ~ 0.80 mm][2] | F6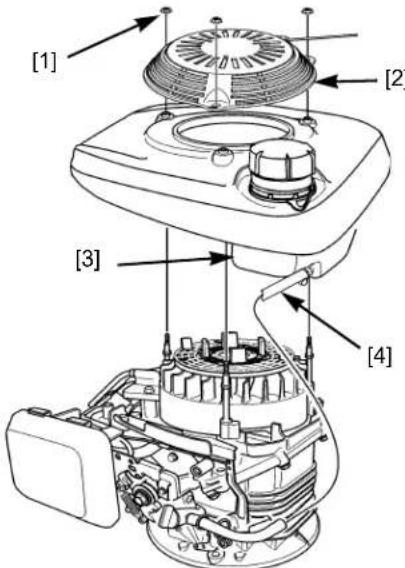 |
F7 F8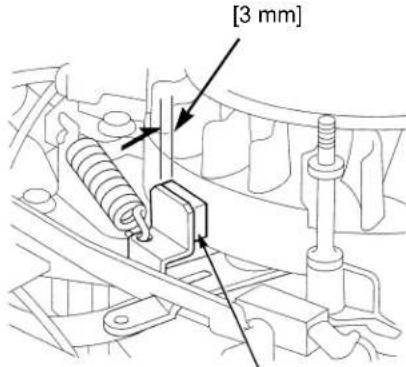 [5] [5] | 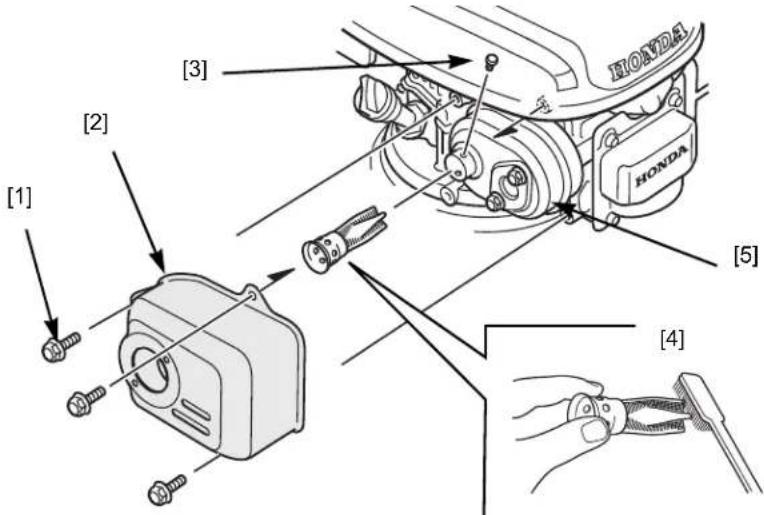 | |
INTRODUCTION
Thank you for purchasing a Honda engine. We want to help you get the best results from your new engine and operate it safely. This manual contains information on how to do that; please read it carefully before operating the engine. If a problem should arise, or if you have any questions about your engine, consult an authorized Honda servicing dealer.
All information in this publication is based on the latest product information available at the time of printing. American Honda Motor Co., Inc. reserves the right to make changes at any time without notice and without incurring any obligation. No part of this publication may be reproduced without written permission.
This manual should be considered a permanent part of the engine and should remain with the engine if resold.
Review the instructions provided with the equipment powered by this engine for any additional information regarding engine startup, shutdown, operation, adjustments, or any special maintenance instructions.
CONTENTS
SAFETY MESSAGES Page 5
BEFORE OPERATION CHECKS Page 5
OPERATION Page 6
SAFE OPERATING PRECAUTIONS Page 6
STARTING/STOPPING THE ENGINE (ALL TYPES)..... Page 6
SERVICING YOUR ENGINE.... Page 7
MAINTENANCE SAFETY Page 7
MAINTENANCE SCHEDULE Page 8
REFUELING Page 8
ENGINE OIL Page 8
AIR CLEANER Page 9
SPARK PLUG Page 9
FLYWHEEL BRAKE INSPECTION (if equipped) ..... Page 9
SPARK ARRESTER (if equipped). Page 10
STORING YOUR ENGINE ...... Page 10
TRANSPORTING Page 11
TAKING CARE OF UNEXPECTED PROBLEMS ...... Page 11
TECHNICAL INFORMATION ...... Page 11
CONSUMER INFORMATION Page 12
SAFETY MESSAGES
Your safety and the safety of others are very important. We have provided important safety messages in this manual and on the engine. Please read these messages carefully.
A safety message alerts you to potential hazards that could hurt you or others. Each safety message is preceded by a safety alert symbol ▲ and one of three words, DANGER, WARNING, or CAUTION.
These signal words mean:
DANGER
You WILL be KILLED or SERIOUSLY HURT if you don't follow instructions.
WARNING
You CAN be KILLED or SERIOUSLY HURT if you don't follow instructions.
CAUTION
You CAN be HURT if you don't follow instructions.
Each message tells you what the hazard is, what can happen, and what you can do to avoid or reduce injury.
DAMAGE PREVENTION MESSAGES
You will also see other important messages that are preceded by the word NOTICE.
This word means:
NOTICE
Your engine or other property can be damaged if you don't follow instructions.
The purpose of these messages is to help prevent damage to your engine, other property, or the environment.
SAFETY INFORMATION
- Understand the operation of all controls and learn how to stop the engine quickly in case of emergency. Make sure the operator receives adequate instruction before operating the equipment.
- Do not allow children to operate the engine. Keep children and pets away from the area of operation.
- Your engine's exhaust contains poisonous carbon monoxide. Do not run the engine without adequate ventilation, and never run the engine indoors.
- The engine and exhaust become very hot during operation. Keep the engine at least 1 meter away from buildings and other equipment during operation. Keep flammable materials away, and do not place anything on the engine while it is running.
The label shown on page 1 contains important safety information. Please read it carefully. See page 1.
This label is considered a permanent part of your engine. So if the label comes off or becomes hard to read, contact your dealer for a replacement.
For your safety, and to maximize the service life of your equipment, it is very important to take a few moments before you operate the engine to check its condition. Be sure to take care of any problem you find, or have your servicing dealer correct it, before you operate the engine.
WARNING
Improperly maintaining this engine, or failing to correct a problem before operation, could cause a malfunction in which you could be seriously injured.
Always perform a pre-operation inspection before each operation, and correct any problem.
Before beginning your preoperation checks, be sure the engine is level and the flywheel brake lever, throttle lever, or engine stop switch is in the STOP or OFF position.
Always check the following items before you start the engine:
- Fuel level (see page 8).
- Oil level (see page 9).
- Air cleaner (see page 9).
- General inspection: Check for fluid leaks and loose or damaged parts.
- Check the equipment powered by this engine.
Review the instructions provided with the equipment powered by this engine for any precautions and procedures that should be followed before engine startup.
OPERATION
SAFE OPERATING PRECAUTIONS
Before operating the engine for the first time, please review the SAFETY MESSAGES and the BEFORE OPERATION CHECKS page 5.
For your safety, do not operate the engine in an enclosed area such as a garage. Your engine's exhaust contains poisonous carbon monoxide gas that can collect rapidly in an enclosed area and cause illness or death.
WARNING
Exhaust contains poisonous carbon monoxide gas that can build up to dangerous levels in closed areas. Breathing carbon monoxide can cause unconsciousness or death. Never run the engine in a closed or even partially closed area where people may be present.
Review the instructions provided with the equipment powered by this engine for any safety precautions that should be observed with engine startup, shutdown, or operation.
Do not operate the engine on slopes greater than 20^ .
FREQUENCY OF USE
If your equipment will be used on an infrequent or intermittent basis (more than 4 weeks between usage), refer to the Fuel section of the STORAGE chapter (page 10) for additional information regarding fuel deterioration.
STARTING/STOPPING THE ENGINE (ALL TYPES)
See the figures on pages 2 and 3 to identify the type of control used on your equipment. Type specific starting and stopping information can be found after the general information shown below.
- Fuel valve ON: Turn the fuel valve [1] to the ON position before starting the engine.
- Manual choke (if equipped): Place the choke lever/rod [2] in the CHOKE position when starting a cold engine.
Move the choke lever/rod to the OFF position as soon as the engine fully warms up and runs smoothly without use of the choke, or for restarting a warm engine.
- Engine speed: For best engine performance, it is recommended the engine be operated with the throttle in the FAST (or high) position.
- Starter grip: Pull the starter grip lightly until resistance is felt, and then pull briskly.
NOTICE
Do not allow the starter grip to snap back against the engine. Return it gently to prevent damage to the starter.
- Restarting: To ensure easy restarting and maximum performance from the Auto Choke System™ types, allow the engine to run for at least three minutes after starting a cold engine before stopping the engine. This minimum run time will be longer if the temperature is below 21°C.
- Fuel valve OFF: After stopping the engine, turn the fuel valve [1] to the OFF position. If your equipment will not be used for 3 to 4 weeks, we recommend running the engine's carburetor out of fuel. You can do this by leaving the fuel valve OFF, restarting the engine, and running it out of fuel.
Type 1: Flywheel Brake, Remote Choke/Throttle
STARTING THE ENGINE
- Move the choke/throttle lever* [2] to the CHOKE position.
- Move the flywheel brake lever* [3] to the RUN position.
- Pull the starter grip lightly until resistance is felt; then pull briskly.
- Move the choke/throttle lever* [2] to the FAST position.
STOPPING THE ENGINE
- Move the choke/throttle lever* [2] to the SLOW position.
- Release the flywheel brake lever* [3] to stop the engine.
Type 2: Flywheel Brake, Remote Throttle, Automatic Choke
STARTING THE ENGINE
- Move the remote throttle lever* [2] to the FAST position.
- Move the flywheel brake lever* [3] to the RUN position.
- Pull the starter grip lightly until resistance is felt; then pull briskly. STOPPING THE ENGINE
- Move the remote throttle lever* [2] to the SLOW position.
- Release the flywheel brake lever* [3] to stop the engine.
Type 3: Flywheel Brake, Fixed Throttle, Automatic Return Choke
STARTING THE ENGINE
- Move the automatic return choke [2] to the CHOKE N position.
- Move the flywheel brake lever* [3] to the RUN position. The choke lever automatically begins moving to the OFF position when the flywheel brake lever is moved to the RUN position.
- Pull the starter grip lightly until resistance is felt; then pull briskly. The throttle is preset on this type.
STOPPING THE ENGINE Release the flywheel brake lever* [3] to stop the engine.
Type 4: Flywheel Brake, Automatic Choke, Fixed Throttle
STARTING THE ENGINE
- Move the flywheel brake lever* [3] to the RUN position.
- Pull the starter grip lightly until resistance is felt; then pull briskly.
STOPPING THE ENGINE Release the flywheel brake lever* [3] to stop the engine.
Type 5: Blade Brake Clutch, Remote Choke/Throttle
STARTING THE ENGINE
- Move the choke/throttle lever* [2] to the CHOKE position.
- Make sure the blade control lever* is disengaged.
- Pull the starter grip lightly until resistance is felt; then pull briskly.
- Move the choke/throttle* [2] to the FAST position as the engine warms, and then engage the blade control lever*.
STOPPING THE ENGINE
- Disengage the blade control lever*.
- Move the choke/throttle lever* [2] to the SLOW position, and then the STOP position.
* See the equipment manual for control location.
Type 6: Blade Brake Clutch, Automatic Choke, Remote Throttle
STARTING THE ENGINE
- Move the remote throttle lever* [2] to the FAST position.
- Make sure the blade control lever* is disengaged.
- Pull the starter grip lightly until resistance is felt; then pull briskly.
- Allow the engine to warm to operating temperature, and then engage the blade control lever*.
STOPPING THE ENGINE
- Disengage the blade control lever*.
- Move the remote throttle lever* [2] to the SLOW position, and then to the STOP position.
Type 7: Manual Choke, Manual Throttle
STARTING THE ENGINE
- Move the choke lever [2] to the CHOKE N position.
- Move the throttle control [3] to the FAST position.
- Pull the starter grip lightly until resistance is felt; then pull briskly.
- Move the choke lever [2] to the OFF || position as the engine warms.
STOPPING THE ENGINE
Move the throttle control [3] to the SLOW ♦ position, and then to the STOP ⚙ position.
Type 8: Manual Choke, Engine Stop Switch, Fixed Throttle
STARTING THE ENGINE
- Pull the choke rod [2] to the CHOKE position.
- Turn the engine stop switch [3] to the ON position.
- Pull the starter grip lightly until resistance is felt; then pull briskly.
- Move the choke rod to the OFF position as the engine warms. The engine speed is preset on this type.
STOPPING THE ENGINE
Turn the engine stop switch [3] to the OFF position.
Type 9: Manual Choke, Engine Stop Switch, Auto Throttle
STARTING THE ENGINE
- Pull the choke rod [2] to the CHOKE position.
- Turn the engine stop switch [3] to the ON position.
- Pull the starter grip lightly until resistance is felt; then pull briskly.
- Move the choke rod [2] to the OFF position as the engine warms. The auto throttle feature only functions when the engine is fully warm.
STOPPING THE ENGINE
- Remove the load from the engine so that the auto throttle returns the engine to idle.
- Turn the engine stop switch [3] to the OFF position.
* See the equipment manual for control location.
SERVICING YOUR ENGINE
THE IMPORTANCE OF MAINTENANCE
Good maintenance is essential for safe, economical, and trouble-free operation. It will also help reduce pollution.
WARNING
Improper maintenance, or failure to correct a problem before operation, can cause a malfunction in which you can be seriously hurt or killed.
Always follow the inspection and maintenance recommendations and schedules in this Owner's Manual.
To help you properly care for your engine, the following pages include a maintenance schedule, routine inspection procedures, and simple maintenance procedures using basic hand tools. Other service tasks that are more difficult, or require special tools, are best handled by professionals and are normally performed by a Honda technician or other qualified mechanic.
The maintenance schedule applies to normal operating conditions. If you operate your engine under severe conditions, such as sustained high-load or high-temperature operation, or use in unusually wet or dusty conditions, consult your servicing dealer for recommendations applicable to your individual needs and use.
Remember that an authorized Honda servicing dealer knows your engine best and is fully equipped to maintain and repair it.
To ensure the best quality and reliability, use only new Honda Genuine parts or their equivalents for repair and replacement.
MAINTENANCE SAFETY
Some of the most important safety precautions follow. However, we cannot warn you of every conceivable hazard that can arise in performing maintenance. Only you can decide whether or not you should perform a given task.
WARNING
Failure to properly follow maintenance instructions and precautions can cause you to be seriously hurt or killed.
Always follow the procedures and precautions in this Owner's Manual.
SAFETY PRECAUTIONS
-
Make sure the engine is off before you begin any maintenance or repairs. This will eliminate several potential hazards:
– Carbon monoxide poisoning from engine exhaust.
Be sure there is adequate ventilation whenever you operate the engine.
– Burns from hot parts.
Let the engine and exhaust system cool before touching.
– Injury from moving parts.
Do not run the engine unless instructed to do so. -
Read the instructions before you begin, and make sure you have the tools and skills required.
- To reduce the possibility of fire or explosion, be careful when working around petrol. Use only a nonflammable solvent, not petrol, to clean parts. Keep cigarettes, sparks, and flames away from all fuel related parts.
MAINTENANCE SCHEDULE
Perform at every indicated month/year or operating hour interval, whichever comes first. ^(1)
| Regular Service Period | Item | Page |
| Before each use | Check: Engine oil levelCheck: Air filter | page 9page 9 |
| First month or 5 hours | Change: Engine oil page 9 | |
| Every 3 months or 25 hours | Clean: Air filter (2) | page 9 |
| Every 6 months or 50 hours | Change: Engine oil (3)Clean: Air filter (2)Check: Flywheel brake pad (if equipped) | page 9page 9page 9 |
| Every year or 100 hours | 6 month items above plus:Check-adjust: Spark plugClean: Spark arrester (if equipped)(6)Check: Blade brake clutch (if equipped)Check-adjust: Idle speedClean: Fuel tank and filterCheck-adjust: Valve clearance | page 9page 10(5)(4)(4)(4) |
| Every 2 years or 200 hours | Yearly items above plus:Replace: Air filterReplace: Spark plug | page 9page 9 |
| Every 2 years Check: Fuel lines (replace if necessary) | (4) | |
(1) For commercial use, log hours of operation to determine proper maintenance intervals.
(2) Service more frequently when used in dusty areas.
(3) Change engine oil every 25 hours when used under heavy load or in high ambient temperatures.
(4) These items should be serviced by an authorized Honda servicing dealer, unless you have the proper tools and are mechanically proficient. Refer to the Honda shop manual for service procedures.
(5) See your equipment manual or Honda engine shop manual.
(6) In Europe and other countries where machinery directive 2006/42/EC is enforced, this cleaning should be done by your servicing dealer.
Failure to follow this maintenance schedule could result in non-warrantable failures.
REFUELING
This engine is certified to operate on unleaded petrol with a research octane rating of 91 or higher.
We recommend refueling after each use to minimize the air present in the fuel tank.
Refuel in a well-ventilated area with the engine stopped. If the engine has been running, allow it to cool first. Never refuel the engine inside a building where petrol fumes may reach flames or sparks.
You may use regular unleaded petrol containing no more than 10% ethanol (E10) or 5% methanol by volume. In addition, methanol must contain cosolvents and corrosion inhibitors. Use of fuels with content of ethanol or methanol greater than shown above may cause starting and/or performance problems. It may also damage metal, rubber, and plastic parts of the fuel system. In addition, ethanol is hygroscopic, which means it attracts and retains water in the fuel system.
Engine damage or performance problems that result from using a fuel with percentages of ethanol or methanol greater than shown above are not overed by warranty.
If your equipment will be used on an infrequent or intermittent basis (more than 4 weeks between usage), refer to the Fuel section of the STORAGE chapter (page 10) for additional information regarding fuel deterioration.
Never use stale or contaminated petrol or oil/petrol mixture. Avoid getting dirt or water in the fuel tank.
WARNING
Petrol is highly flammable and explosive, and you can be burned or seriously injured when refueling.
- Stop engine and let cool before refueling
- Keep heat, sparks, and flame away.
- Refuel only outdoors.
- Wipe up spills immediately.
Adding Fuel
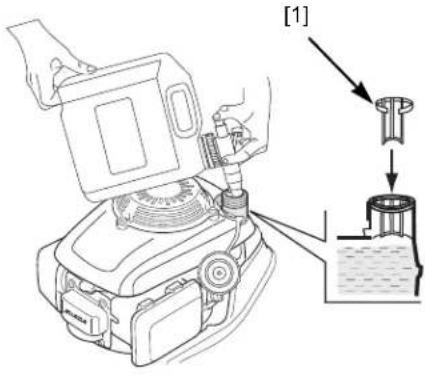
See F1 on page 4.
- Remove the fuel tank cap.
-
Add fuel to the bottom of the red fuel level gauge [1] in the neck of the fuel tank. Do not overfill. Wipe up spilled fuel before starting the engine.
-
Install the fuel tank cap and tighten it securely.
Move at least 10 feet (3 meters) away from the fueling source and site before starting the engine.
NOTICE
Fuel can damage paint and some types of plastic. Be careful not to spill fuel when filling your fuel tank. Damage caused by spilled fuel is not covered under your Distributor's Limited Warranty.
Fuel Storage Container
Store your petrol in a clean, plastic, sealed container designed for fuel storage. Close the vent (if equipped) when not in use, and store the container away from direct sunlight. If it takes more than 3 months to use the fuel in the container, we suggest adding a fuel stabilizer to the fuel when you fill the container. If you have some fuel left in the storage container at the end of the season, the U.S. Environmental Protection Agency (EPA) suggests adding the petrol to your vehicle's gas tank.
ENGINE OIL
Oil is a major factor affecting performance and service life. Use 4-stroke automotive detergent oil. Always change the oil in accordance with the maintenance schedule.
Recommended Oil
See F2 on page 4.
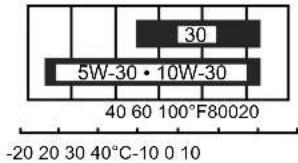
Use 4-stroke motor oil that meets or exceeds the requirements for API service category SJ or later. Always check the API service label on the oil container to be sure it includes the letters SJ or later.
SAE 10W-30 is recommended for general use. Other viscosities shown in the chart may be used when the average temperature in your area is within the indicated range.
Oil Level Check
See F2, F3 on page 4.
- Check the oil with the engine stopped and level.
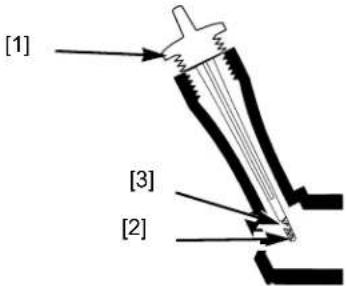
- Remove the oil filler cap/dipstick [1] and wipe it clean.
- Insert the oil filler cap/dipstick into the oil filler neck as shown, but do not screw it in, and then remove it to check the oil level.
- If the oil level is near or below the lower limit mark [2] on the dipstick, remove the oil filler cap/dipstick, and fill with the recommended oil to the upper limit mark [3]. Do not overfill.
- Reinstall the oil filler cap/dipstick.
Oil Change
See F3 on page 4.
Drain the engine oil when the engine is warm. Warm oil drains quickly and completely.
- Turn the fuel valve to the OFF position to reduce the possibility of fuel leakage.
- Place a suitable container next to the engine to catch the used oil.
- Remove the oil filler cap/dipstick [1] and drain the oil into the container by tipping the engine toward the oil filler neck [4].
Please dispose of used motor oil in a manner that is compatible with the environment. We suggest you take used oil in a sealed container to your local recycling center or service station for reclamation. Do not throw it in the trash, pour it on the ground, or pour it down a drain. - With the engine in a level position, fill to the upper limit mark [3] on the dipstick with the recommended oil.
NOTICE
Running the engine with a low oil level can cause engine damage.
- Reinstall the oil filler cap/dipstick securely.
AIR CLEANER
A properly maintained air filter will help prevent dirt from entering your engine. Dirt entering the carburetor can be drawn into small passages in the carburetor and cause premature engine wear. These small passages can become blocked, causing starting or running problems. You will need to clean the filter more frequently if you operate the engine in very dusty areas.
We recommend the use of a Honda Genuine air filter to ensure it seals and performs as designed. Using a non-Honda air filter can result in dirt bypassing the filter, causing damage to the engine or fuel system.
NOTICE
Operating the engine without a filter, or with damaged filter, will allow dirt to enter the engine, causing rapid engine wear. This type of damage is not covered under your Distributor's Limited Warranty.
Inspection
See F4 on page 4.
- Press the latch tabs [1] on the top of the air cleaner cover [2], and remove the cover. Check the filter [3] to be sure it is clean and in good condition.
- Reinstall the filter and air cleaner cover.
Cleaning
See F4 on page 4.
- Tap the filter several times on a hard surface to remove dirt, or blow compressed air not exceeding 207 kPa through the filter from the clean side that faces the engine. Never try to brush off dirt. Brushing will force dirt into the fibers.
- Wipe dirt from the air cleaner body [4] and cover using a moist rag. Be careful to prevent dirt from entering the air duct [5] that leads to the carburetor.
SPARK PLUG
See F5 on page 4.
Required Spark Plug:
NGK - BPR6ES Pressure washer applications
NGK - BPR5ES All other applications
The recommended spark plug is the correct heat range for normal engine operating temperatures.
NOTICE
Incorrect spark plugs can cause engine damage.
For good performance, the spark plug must be properly gapped and free of deposits.
- Disconnect the cap from the spark plug, and remove any dirt from the spark plug area.
- Use the proper size spark plug wrench [1] to remove the spark plug.
- Inspect the spark plug. Replace it if damaged, badly fouled, if the sealing washer [2] is in poor condition, or if the electrode is worn.
- Measure the electrode gap with a suitable gauge. The correct gap is 0.70 \~ 0.80 mm. If adjustment is needed, correct the gap by carefully bending the side electrode.
- Install the spark plug carefully, by hand, to avoid cross-threading.
- After the spark plug is seated, tighten with the proper size spark plug wrench to compress the washer.
When installing a new spark plug, tighten 1/2 turn after the spark plug seats to compress the washer.
When reinstalling the original spark plug, tighten 1/8 \~ 1/4 turn after the spark plug seats to compress the washer.
NOTICE
Properly tighten the spark plug. A loose spark plug can become very hot and can damage the engine. Overtightening the spark plug can damage the threads in the cylinder head.
- Attach the spark plug cap to the spark plug.
FLYWHEEL BRAKE INSPECTION (if equipped)
See F6, F7 on page 4.
- Remove the three flange nuts [1] from the recoil starter [2], and remove the recoil starter from the engine.
- Remove the fuel tank [3] from the engine without disconnecting the fuel tube [4]. If the fuel tank contains fuel, keep it level as you remove it and set it beside the engine in a level position.
- Check the brake shoe [5] thickness. If it is less than 3 mm, take the engine to your authorized Honda servicing dealer.
- Install the fuel tank and recoil starter, and tighten the three nuts securely.
SPARK ARRESTER (if equipped)
See F8 on page 4.
In Europe and other countries where machinery directive 2006/42/EC is enforced, this cleaning should be done by your servicing dealer.
The spark arrester must be serviced every 100 hours to keep it functioning as designed.
If the engine has been running, the muffler will be hot. Allow it to cool before servicing the spark arrester.
Removal
- Remove the three 6 mm bolts [1] from the muffler protector [2], and remove the muffler protector.
- Remove the special screw [3] from the spark arrester [4], and remove the spark arrester from the muffler [5].
Cleaning & Inspection
- Use a brush to remove carbon deposits from the spark arrester screen. Be careful not to damage the screen. Replace the spark arrester if it has breaks or holes.
- Install the spark arrester in the reverse order of removal.
STORING YOUR ENGINE
Proper storage preparation is essential for keeping your engine trouble-free and looking good. The following steps will help to keep rust and corrosion from impairing your engine's function and appearance, and will make the engine easier to start when you use it again.
Cleaning
If the engine has been running, allow it to cool for at least half an hour before cleaning. Clean all exterior surfaces, touch up any damaged paint, and coat other areas that may rust with a light film of oil.
NOTICE
Using a garden hose or pressure washing equipment can force water into the air cleaner or muffler opening. Water in the air cleaner will soak the air filter, and water that passes through the air filter or muffler can enter the cylinder, causing damage.
Fuel
NOTICE
Depending on the region where you operate your equipment, fuel formulations may deteriorate and oxidize rapidly. Fuel deterioration and oxidation can occur in as little as 30 days and may cause damage to the carburetor and/or fuel system. Please check with your servicing dealer for local storage recommendations.
The length of time that petrol can be left in your fuel tank and carburetor without causing functional problems will vary with such factors as petrol blend, your storage temperatures, and whether the fuel tank is partially or completely filled. The air in a partially filled fuel tank promotes fuel deterioration. Very warm storage temperatures accelerate fuel deterioration. Fuel problems may occur within a month of inactivity, or even less if the petrol was not fresh when you filled the fuel tank.
Petrol will oxidize and deteriorate in storage. Deteriorated petrol will cause hard starting, and it leaves gum deposits that can clog the small passages in the fuel system. If the petrol in your engine deteriorates during storage, you may need to have the carburetor and other fuel system components serviced or replaced.
If you keep a container of petrol for refueling, be sure that it contains only fresh petrol. If it takes more than 3 months to use the fuel in your storage container, we suggest adding a fuel stabilizer to the fuel when you fill the container.
Fuel system damage or engine performance problems resulting from neglected storage preparation are not covered under your engine warranty.
Short Term Storage (30 - 90 days)
If your equipment will not be used between 30 and 90 days, we recommend the following to prevent fuel-related problems:
- Add fuel stabilizer following the manufacturer's instructions.
When adding a fuel stabilizer, fill the fuel tank with fresh petrol. If only partially filled, air in the tank will promote fuel deterioration during storage.
Note:
-
All stabilizers have a shelf life and their performance will deteriorate over time.
– Fuel stabilizers will not reconstitute stale fuel. -
After adding a fuel stabilizer, run the engine outdoors for 10 minutes to be sure that treated petrol has replaced the untreated petrol in the carburetor.
- Turn the fuel valve to the OFF position.
- Continue to run the engine until it stops from the lack of fuel in the carburetor fuel bowl. Running time should be less than 3 minutes.
Long Term or Seasonal Storage (greater than 90 days)
Start the engine and allow it to run long enough to empty all the petrol from the entire fuel system (including the fuel tank). Do not allow petrol to remain in your engine for more than 90 days of inactivity.
Engine Oil
- Change the engine oil (see page 9).
- Remove the spark plug (see page 9).
- Pour 5 \~ 10 cc of clean engine oil into the cylinder.
- Pull the recoil starter several times to distribute the oil.
- Reinstall the spark plug.
Storage Precautions
If your engine will be stored with petrol in the fuel tank, it is important to reduce the hazard of petrol vapor ignition. Select a well-ventilated storage area away from any appliance that operates with a flame, such as a furnace, water heater, or clothes dryer. Also avoid any area with a spark-producing electric motor, or where power tools are operated.
If possible, avoid storage areas with high humidity, because that promotes rust and corrosion.
If there is petrol in the fuel tank, leave the fuel valve in the OFF position.
Keep the engine level in storage. Tilting can cause fuel or oil leakage.
With the engine and exhaust system cool, cover the engine to keep out dust. A hot engine and exhaust system can ignite or melt some materials. Do not use sheet plastic as a dust cover. A nonporous cover will trap moisture around the engine, promoting rust and corrosion.
Removal From Storage
Check your engine as described in the BEFORE OPERATION CHECKS section of this manual (see page 5).
If the fuel was drained during storage preparation, fill the tank with fresh petrol. If you keep a container of petrol for refueling, be sure it contains only fresh petrol. Petrol oxidizes and deteriorates over time, causing hard starting.
If the cylinder was coated with oil during storage preparation, the engine will smoke briefly at startup. This is normal.
TRANSPORTING
Keep the engine level when transporting to reduce the possibility of fuel leakage. Turn the fuel valve to the OFF position.
Review the instructions provided with the equipment powered by this engine for any procedures that should be followed for transporting.
TAKING CARE OF UNEXPECTED PROBLEMS
Engine will not start
| POSSIBLE CAUSE CORRECTION | |
| Fuel valve is OFF. Move the fuel valve lever to ON. | |
| Choke is OFF. Unless the engine is warm, move the choke/throttle lever, choke rod, or choke lever to the CHOKE position. | |
| Ignition switch or engine stop switch is OFF. | Move the flywheel brake lever to RUN position.Throttle lever to FAST position.Engine stop switch to ON. |
| Out of fuel. Refuel. | |
| Bad fuel; engine stored without treating petrol, or refueled with bad petrol. | Refuel with fresh petrol. |
| Spark plug faulty, fouled, or improperly gapped. | Adjust or replace the spark plug (page 9). |
| Spark plug wet with fuel (flooded engine). | Dry and reinstall the spark plug.Start the engine with the choke/throttle lever in the FAST position.Cvoke in the OFF position. |
| Fuel filter clogged, carburetor malfunction, ignition malfunction, valves stuck, etc. | Take the engine to an authorized Honda servicing dealer or refer to the shop manual to replace or repair faulty components as necessary. |
Engine lacks power
| POSSIBLE CAUSE CORRECTION | |
| Air filter clogged. Clean or replace the air filter (page 9). | |
| Bad fuel; engine stored without treating the petrol, of refueled with bad petrol. | Refuel with fresh petrol. |
| Fuel filter clogged, carburetor malfunction, ignition malfunction, valves stuck, etc. | Take the engine to an authorized Honda servicing dealer or refer to the shop manual to replace or repair faulty components as necessary. |
TECHNICAL INFORMATION
Serial Number and Type Location
See figure on page 1.
Record the engine serial number and type in the space below. You will need this information when ordering parts and when making technical or warranty inquiries.
| MODEL SERIAL NUMBER TYPE | ||
| GCV140,160,190 _ | ____-_____ | ____ |
| Date of purchase | ||
Carburetor Modifications for High Altitude Operation
At high altitude, the standard carburetor air-fuel mixture will be too rich. Performance will decrease, and fuel consumption will increase. A very rich mixture will also foul the spark plug and cause hard starting. Operation at an altitude that differs from that at which this engine was certified, for extended periods of time, may increase emissions.
High altitude performance can be improved by specific modifications to the carburetor. If you always operate your engine at altitudes above 1,500 meters, have your servicing dealer perform this carburetor modification. This engine, when operated at high altitude with the carburetor modifications for high altitude use, will meet each emission standard throughout its useful life.
Even with carburetor modification, engine horsepower will decrease about 3.5% for each 300-meter increase in altitude. The effect of altitude on horsepower will be greater than this if no carburetor modification is made.
NOTICE
When the carburetor has been modified for high altitude operation, the air-fuel mixture will be too lean for low altitude use. Operation at altitudes below 1,500 meters with a modified carburetor may cause the engine to overheat and result in serious engine damage. For use at low altitudes, have your servicing dealer return the carburetor to original factory specifications.
Specifications
GCV140
| TYPE RECOIL START | |
| Length x Width x Height 367 x 381 x 360 mm | |
| Dry weight | 9.8 kg |
| Engine type | 4-stroke, overhead cam, single cylinder |
| Displacement [Bore x Stroke] | 160 cm^3 [64 x 50 mm] |
| Oil capacity | 0.50 L |
| Fuel tank capacity | 0.91 L |
| Fuel consumption | 1.1 L/h at 3,000 rpm |
| Cooling system | Forced air |
| Ignition system | Transistorized magneto |
| PTO shaft rotation | Counterclockwise |
GCV160
| TYPE | RECOIL START | ELECTRIC START |
| Length x Width x Height | 367 x 331 x 360 mm | 367 x 354 x 360 mm |
| Dry weight | 9.8 kg | 11.6 kg |
| Engine type | 4-stroke, overhead cam, single cylinder | |
| Displacement [Bore x Stroke] | 160 cm^3 [64 x 50 mm] | |
| Oil capacity | 0.50 L | |
| Fuel tank capacity | 0.91 L | |
| Fuel consumption | 1.1 L/h at 3,000 rpm | |
| Cooling system | Forced air | |
| Ignition system | Transistorized magneto | |
| PTO shaft rotation | Counterclockwise | |
| Charging system: BBC types Flywheel brake types | 12 VDC, 0.15 A min. @ 2900 rpm | |
| 12 VDC, 0.20 A min. @ 2900 rpm | ||
GCV190
| TYPE RECOIL START ELECTRIC START | ||
| Length x Width x Height 367 x 33 | 1 x 368 mm 367 x 354 | x 368 mm |
| Dry weight 12.3 kg 13.3 kg | ||
| Engine type 4-stroke, overhead | cam, single cylinder | |
| Displacement [Bore x Stroke] 18 | 7 cm ^3 [69 x 50 mm] | |
| Oil capacity 0.50 L | ||
| Fuel tank capacity 0.91 L | ||
| Fuel consumption 1.3 L/h at 3,000 rpm | ||
| Cooling system | Forced air | |
| Ignition system | Transistorized magneto | |
| PTO shaft rotation | Counterclockwise | |
| Charging system: BC types | 12 VDC, 0.15 A min. at 2,900 rpm | |
| Flywheel brake types | 12 VDC, 0.20 A min. at 2,900 rpm | |
Quick Reference Information
| Fuel | Type | Unleaded petrol with a research octane rating of 91 or higher (page 8). |
| Engine Oil | Type | SAE 10W-30, API SJ or later, for general use. Refer to page 8.* Refill amount: 0.35 ~ 0.41 L |
| Carburetor | Idle Speed | 1,400 ± 150 rpm2,500 ± 150 rpm Auto throttle type |
| Spark plug | Type | BPR6ES (NGK) Pressure washer types BPR5ES (NGK) All other applications |
| Maintenance | Before each use | Check engine oil level. Refer to page 9.Check air filter. Refer to page 9. |
| First 5 hours | Change engine oil. Refer to page 9. | |
| Subsequent | Refer to the maintenance schedule on page 8. |
* Actual amount will vary due to residual oil remaining in the engine. Always use the dipstick to confirm the actual level (see page 9)
Wiring Diagrams
RECOIL STARTER (all types)
![BLACK [1] [2] [3] ENGINE SWITCH CONTACT RUN OPEN STOP CLOSE](/content/2026/05/875022/images/0e0155cf773baf424371f6affe2696da2da28ea8ae4a2803961aee309c421ad1.jpg)
ELECTRIC STARTER
(with flywheel brake)
flowchart
graph TD
    A["BLACK"] --> B["OFF ON"]
    B --> C["M"]
    C --> D["White"]
    D --> E["Supplyed by equipment manufacturer."]
    F["STOP"] --> G["ON"]
    H["OFF"] --> I["ON"]
    J["ON"] --> K["ON"]
    style A fill:#f9f,stroke:#333
    style B fill:#ccf,stroke:#333
    style C fill:#cfc,stroke:#333
    style D fill:#fcc,stroke:#333
    style E fill:#ffc,stroke:#333
    style F fill:#fff,stroke:#333
    style G fill:#fff,stroke:#333
    style H fill:#fff,stroke:#333
    style I fill:#fff,stroke:#333
    style J fill:#fff,stroke:#333
    style K fill:#fff,stroke:#333
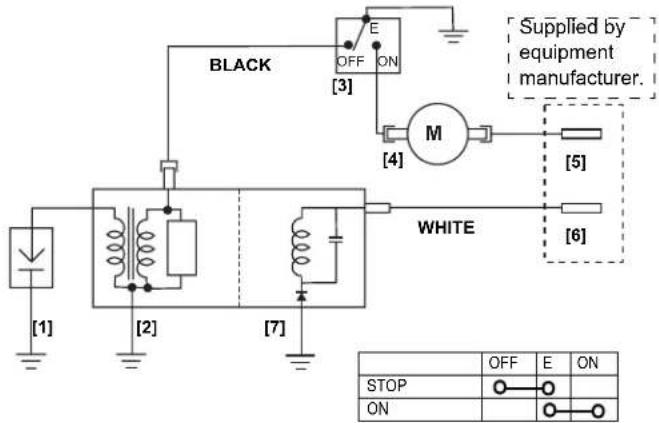
ELECTRIC STARTER
(with blade brake clutch)
Supplied by equipment manufacturer.
![BLACK [1] [2] [7] WHITE [3] [6] [5] M [4]](/content/2026/05/875022/images/61a6e13e20b284d1d1c0fa5c2f11da7143ec30b13d35fa1abf743236174ce330.jpg)
| [1] | SPARK PLUG | [5] | STARTER SWITCH |
| [2] | IGNITION COIL [6] BATTERY (+) | ||
| [3] | ENGINE STOP SWITCH | [7] | CHARGE COIL (if equipped) |
| [4] | STARTER MOTOR | ||
Tuneup
| ITEM | SPECIFICATION | MAINTENANCE |
| Spark plug gap | 0.7 ~ 0.8 mm Refer to page 9. | |
| Valve clearance (cold) | IN: 0.15 ± 0.04 mmEX: 0.20 ± 0.04 mm | See your authorized Honda dealer |
| Other specifications | No other adjustments needed. | |
CONSUMER INFORMATION
Honda Publications
These publications will give you additional information for maintaining and repairing your engine. You may order them from an authorized Honda engine servicing dealer.
| Shop Manual | This manual covers complete maintenance and overhaul procedures. It is intended to be used by a skilled technician. |
| Parts Catalog | This manual provides complete, illustrated parts lists. Available through your Honda dealer. |
Distributor/Dealer Locator Information
Visit our website: www.honda-engines-eu.com
Customer Service Information
Servicing dealership personnel are trained professionals. They should be able to answer any question you may have. If you encounter a problem that your dealer does not solve to your satisfaction, please discuss it with the dealership's management. The Service Manager, General Manager, or Owner can help. Almost all problems are solved in this way.
Honda Office
When you write or call, please provide this information:
- Equipment manufacturer's name and model number that the engine is mounted on
• Engine model, serial number, and type (see page 11)
• Name of dealer who sold the engine to you - Name, address, and contact person of the dealer who services your engine
- Date of purchase
- Your name, address, and telephone number
• A detailed description of the problem
HONDA
MANUEL DEL'UTILISATEUR
(Notice originale)
GCV140 • GCV160
GCV190
natural_image
Exterior view of a Honda grass lawn pump with visible blades and control panel (no text or symbols)EMPLACEMENT DES COMPOSANTS
INFORMATION AU CLIENT Page 22
MESSAGES DE SÉCURITÉ
INFORMATION AU CLIENT
Publications Honda
natural_image
Exterior view of a Honda grass lawn mower (no text or symbols visible)natural_image
Exterior view of a Honda grass lawn pump (no visible text or symbols)natural_image
Exterior view of a Honda grass lawn mower (no visible text or symbols)COMPONENT LOCATION
natural_image
Exterior view of a Honda grass lawn scrubber (no visible text or symbols)Zet de motorschakelaar [3] in de OFF (UIT) stand.
Type 9: Handmatige Choke, Automatisch Gasklep, Motorstopschakelaar
DE MOTOR STARTEN
| [1] | BOUGIE | [5] | STARTSCHAKELAAR |
| [2] | BOBINE | [6] | ACCU (+) |
| [3] | MOTORSTOPSCHAKELAAR | [7] | LAADSPOEL (INDIEN GEMONTEERD) |
| [4] | STARTMOTOR |
The Honda General Purpose Engine installed on this OEM product is covered by a Honda warranty, on the following assumptions.
- The warranty conditions conform to those for the general purpose engine established by Honda for each country.
- The warranty conditions apply to engine failures caused by any manufacturing or specification problem.
- The warranty does not apply to countries where there is no Honda distributor.
How to have your product repaired under warranty:
Bring your OEM product to the dealer who deals with Honda power products or the dealer who you purchased your product from, with the receipt you received at the time of purchase as evidence that your product is still under warranty. If the dealer judges that the engine needs to be repaired, warranty repair will be performed.
흔다 범용엔진에 대한 보증수리 안내
Revised: March 2009 (PWL53374-B)
Printed in U.S.A.
INFORMATIONS SUR LA GARANTIE INTERNATIONALE DES MOTEURS A USAGE GENERAL Honda
- INTRODUCTION
- CONTENTS
- SAFETY MESSAGES
- DANGER
- WARNING
- CAUTION
- DAMAGE PREVENTION MESSAGES
- NOTICE
- SAFETY INFORMATION
- OPERATION
- SAFE OPERATING PRECAUTIONS
- FREQUENCY OF USE
- STARTING/STOPPING THE ENGINE (ALL TYPES)
- Type 1: Flywheel Brake, Remote Choke/Throttle
- STARTING THE ENGINE
- STOPPING THE ENGINE
- Type 2: Flywheel Brake, Remote Throttle, Automatic Choke
- Type 3: Flywheel Brake, Fixed Throttle, Automatic Return Choke
- Type 4: Flywheel Brake, Automatic Choke, Fixed Throttle
- Type 5: Blade Brake Clutch, Remote Choke/Throttle
- Type 6: Blade Brake Clutch, Automatic Choke, Remote Throttle
- Type 7: Manual Choke, Manual Throttle
- Type 8: Manual Choke, Engine Stop Switch, Fixed Throttle
- Type 9: Manual Choke, Engine Stop Switch, Auto Throttle
- SERVICING YOUR ENGINE
- THE IMPORTANCE OF MAINTENANCE
- MAINTENANCE SAFETY
- SAFETY PRECAUTIONS
- MAINTENANCE SCHEDULE
- REFUELING
- Adding Fuel
- Fuel Storage Container
- ENGINE OIL
- Recommended Oil
- Oil Level Check
- Oil Change
- AIR CLEANER
- Inspection
- Cleaning
- SPARK PLUG
- Required Spark Plug:
- FLYWHEEL BRAKE INSPECTION (if equipped)
- SPARK ARRESTER (if equipped)
- Removal
- Cleaning & Inspection
- STORING YOUR ENGINE
- Fuel
- Short Term Storage (30 - 90 days)
- Long Term or Seasonal Storage (greater than 90 days)
- Storage Precautions
- Removal From Storage
- TRANSPORTING
- TAKING CARE OF UNEXPECTED PROBLEMS
- TECHNICAL INFORMATION
- Serial Number and Type Location
- Carburetor Modifications for High Altitude Operation
- Specifications
- Wiring Diagrams
- CONSUMER INFORMATION
- Honda Publications
- Distributor/Dealer Locator Information
- Customer Service Information
- Honda Office
- HONDA
- MANUEL DEL'UTILISATEUR
- MESSAGES DE SÉCURITÉ
- INFORMATION AU CLIENT
- Publications Honda
- Type 9: Handmatige Choke, Automatisch Gasklep, Motorstopschakelaar
- DE MOTOR STARTEN
- How to have your product repaired under warranty:
- 흔다 범용엔진에 대한 보증수리 안내
- INFORMATIONS SUR LA GARANTIE INTERNATIONALE DES MOTEURS A USAGE GENERAL Honda
Brand : Honda
Model : GCV190
Category : Gardening Equipment