HBO-S567LDTGC-IX - Oven Heinner - Free user manual and instructions
Find the device manual for free HBO-S567LDTGC-IX Heinner in PDF.


| Product Type | Built-in oven |
| Brand | Heinner |
| Model | HBO-S567LDTGC-IX |
| Volume | 56 L |
| Energy Class | A |
| Number of Functions | 7 (Multifunctional, Fan, Grill, Digital Timer, Touch Display, Oven Lamp) |
| Power Supply | 220-240 V ~ 50/60 Hz, 16 Amp fuse |
| Total Power | Approx. 3200 W |
| Heaters | Lower: 1200 W, Upper: 1000 W, Turbo: 1800 W, Small Grill: 1000 W, Big Grill: 2000 W |
| Temperature Range | 40 - 240 °C |
| Timer | Digital, with minute minder and auto-cooking (semi/full automatic) |
| Display | Touch display with digital time and symbols |
| Oven Lamp | 15-25 W (G9 or E14, 220-240 V AC) |
| Door Glass | Triple glazing with detachable inner glass |
| Installation Type | Under counter or in elevated cabinet |
| Dimensions (H x W x D) | 595 x 595 x 550 mm (approx.) |
| Weight | Approx. 30 kg |
| Accessories Included | Deep tray, standard tray, wire grill, telescopic rails, in tray wire grill |
| Cleaning Feature | Steam cleaning function |
| Safety Features | Child lock, automatic shut-off, cooling fan, overheat protection |
| Color/Material | Stainless steel (inox) |
Frequently Asked Questions - HBO-S567LDTGC-IX Heinner
User questions about HBO-S567LDTGC-IX Heinner
0 question about this device. Answer the ones you know or ask your own.
Ask a new question about this device
Download the instructions for your Oven in PDF format for free! Find your manual HBO-S567LDTGC-IX - Heinner and take your electronic device back in hand. On this page are published all the documents necessary for the use of your device. HBO-S567LDTGC-IX by Heinner.
USER MANUAL HBO-S567LDTGC-IX Heinner
natural_image
Technical line drawing of a heat exchanger or cooling unit with internal cooling fins and piping (no text or labels)Fig. 1
Figura 2
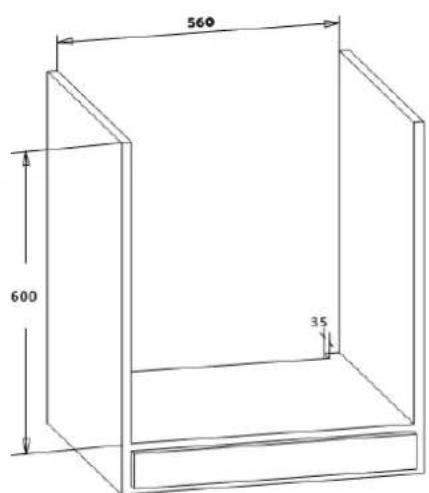
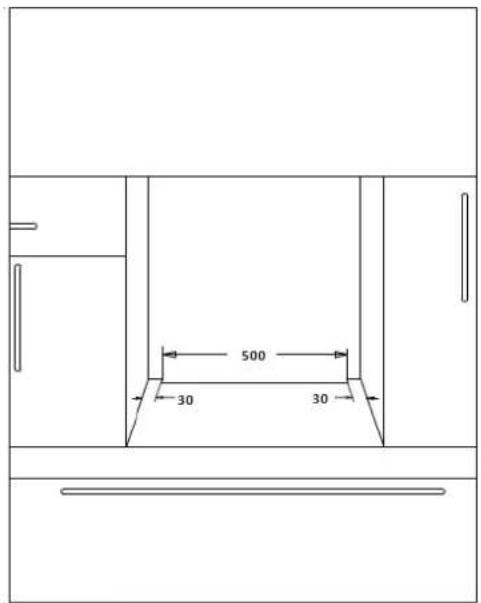
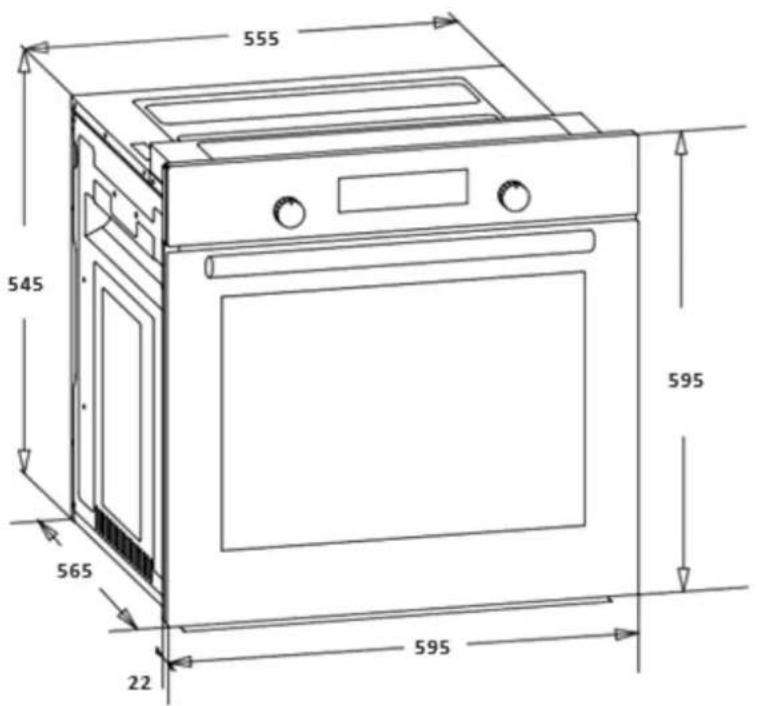
Figura 3
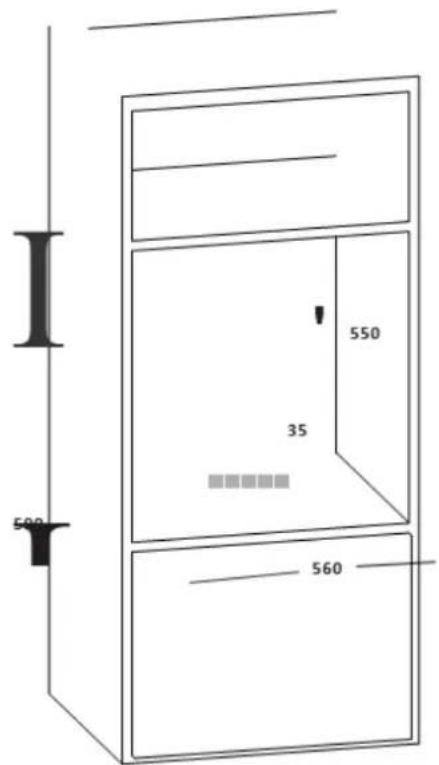
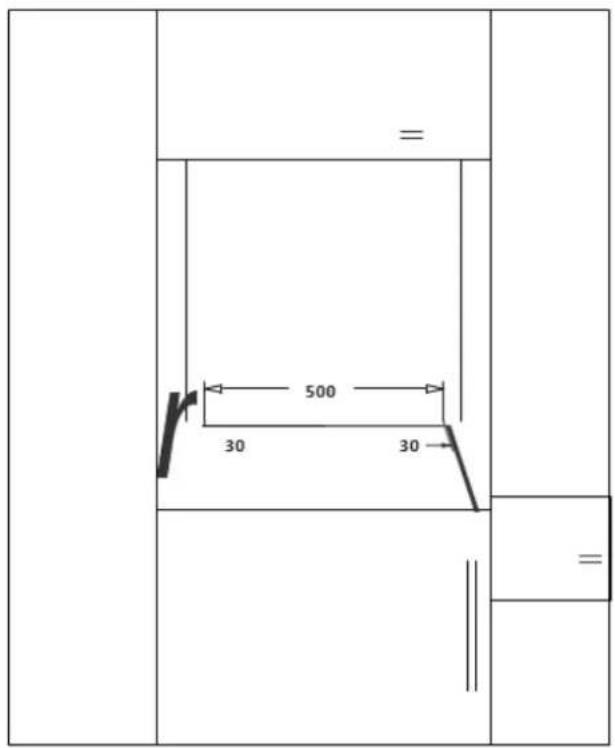
Figura 4
natural_image
Line drawing of a kitchen oven with a magnified inset showing a screw (no text or symbols)Figura 5
CONECTAREA LA SURSA DE ALIMENTARE ŞI SIGURANTA CONECTĂRII
natural_image
Hand pressing a button on a control panel (no text or symbols visible)natural_image
Simple line drawing of a hand pressing down on a mechanical component (no text or symbols)natural_image
Isometric line drawing of a square mechanical component with mounting holes (no text or symbols)Figura 13
natural_image
Isometric diagram of a square electronic component with a rectangular base and a side slot, showing no text or symbols.Figura 14
natural_image
Pure mechanical assembly diagram showing layered components with no text or symbolsFigura 15
MONTAREA UŞII CUPTORULUI
natural_image
Line drawing of an open oven or rack unit with a door open, showing internal compartments and ventilation ducts (no text or symbols)Figura 16
natural_image
Line drawing of an open oven with internal structure and ventilation slots (no text or symbols)Figura 17
natural_image
Technical line drawing of a mechanical component or bracket (no text or symbols)Figura 16.1
natural_image
Technical line drawing of a mechanical assembly or bracket (no text or symbols visible)Figura 16.2
natural_image
Technical line drawing of a structural joint or bracket (no text or symbols)Figura 17.1
natural_image
Technical line drawing of a door handle assembly (no text or symbols)Figura 17.2
natural_image
Line drawing of an oven with a lid and door, labeled as Figure 18 (no text or symbols on the diagram itself)- Built in ovens
- Energy class: A
• Volume: 62L / 56L / 56L
Thank you for purchasing this product!
I. INTRODUCTION
Please read the instructions carefully and keep the manual for future information.
This manual is designed to give all necessary instructions concerning installation, use and maintenance of the unit. In order to operate the unit correctly and safely, please read this instruction manual carefully before installation and use.
THIS APPLIANCE SHALL BE INSTALLED IN ACCORDANCE WITH THEREGULA TIONS FORCE AND ONLY USED IN A WELL-VENTILATED SPACE. READ THE INSTRUCTIONS BEFORE INSTALLING OR USING THIS APPLIANCE"
II. PACKAGE CONTENT

Built in oven
User manual
Warranty card
This user manual is available for the below models:
| Product code | Features |
| HBO-S624LTG-IX | Built in oven Heinner, volume: 62L, 4 functions, static, grill, timer, oven lamp, energy class: A, LOW E detachable glass, inox |
| HBO-S567LDTGC-IX | Built in oven Heinner, volume: 56L, multifunctional, 7 functions, fan, grill, digital timer, Touch display, oven lamp, energy class: A, LOW triple glass, detachable glass, inox |
| HBO-S569LDTGC-GBK | Built in oven Heinner, volume: 56L, multifunctional, 9 functions, fan, grill, digital timer, Touch display, oven lamp, energy class: A, LOW triple glass, detachable glass, black glass |
TECHNICAL SPECIFICATIONS
| SPECIFICATIONS | 60 cm Built in Oven | |||
| Lamp power | 15-25W | |||
| Thermostat | 40-240 / Max °C | |||
| Lower heater | 1200W | |||
| Upper heater | 1000W | |||
| Turbo heater | 1800W | |||
| Grill heater | Small grill | 1000W | Big grill | 2000W |
| Supply voltage | 220-240V 50/60Hz | |||
III. SAFETY INSTRUCTIONS
-
WARNING: To avoid electric shock, ensure that the appliance circuit is open before changing the lamp.
-
WARNING: All supply circuit connections must be disconnected before accessing terminals.
-
WARNING: The accessible parts may be hot during use of grid. Children must be kept away.
-
WARNING: Fire hazard; do not store materials on cooking surface.
-
WARNING: If the surface is cracked, open the appliance circuit to avoid risk of electric shock.
-
WARNING: Appliance and its accessible parts are hot during operation.
-
Setting conditions of this appliance are specified on the label.(Or on the data plate)
-
Accessible parts might be hot during use of grill. Small children should be kept away.
-
WARNING: Appliance is intended for cooking only. It should not be used for other purposes like heating a room.
-
There are additional protective tools avoiding contact with oven doors. This part must be attached when it's likely that there are children around.
-
Do not use steam cleaners to clean the appliance.
-
NEVER try to put out the fire with water. Only shut down the appliance circuit and then cover the flame with a cover or a fire blanket.
-
Hard and abrasive cleaners or hard metal scrapers should not be used to clean the oven glass door, as these can scratch the surface and cause breaking.
-
Ensure that door is fully closed after food is placed.
-
Children under 8 years of age should be kept away, if they cannot be monitored continuously.
-
Touching the heating elements should be avoided.
-
This appliance can be used by children over 8 years of age, people with physical, hearing or mental challenges or people with lack of experience or knowledge; as long as control is ensured or information is provided regarding the dangers.
-
The appliance hasn't been designed for operation with an external time or a separate remote control system.
-
This device has been designed for domestic use.
-
Cleaning and user maintenance can't be made by children without adult supervision.
-
Children must not play with the appliance. Cleaning and user maintenance shouldn't be made by children unless they are older than 8 years old and under adult supervision.
-
Make sure that children at and under 8 can't reach appliance and appliance cable.
-
Keep curtains, tissue paper or combustible (inflammable) materials away from appliance before starting to use it. Do not place inflammable or combustible materials in or on the appliance.
IV. INTRODUCTION OF THE APPLIANCE
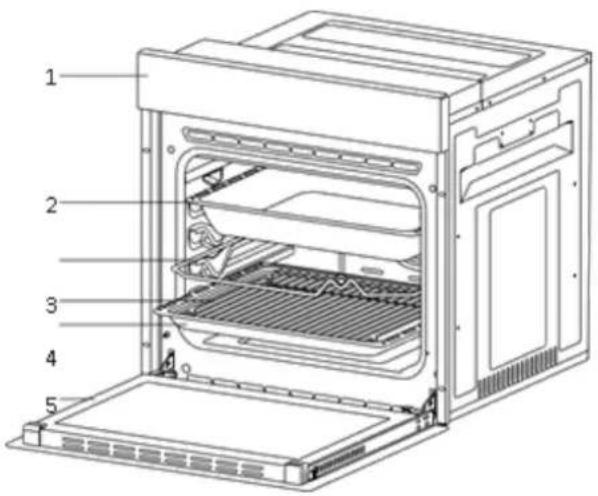
- Control panel
- Deep tray*
-
Roast chicken skewer
-
In tray wire grill
- Standard tray
- Oven door
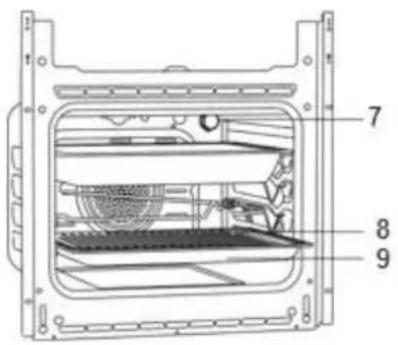
- Lamp
- In tray wire grill
- Standard tray
V. INSTALLATION OF APPLIANCE
Ensure that electrical installation is suitable for operationalising the appliance. If not, call an electrician and plumber to make necessary arrangements. Manufacturing firm can't be hold responsible for damages to arise due to operations by unauthorized people and product warranty becomes void.
WARNING: It is customer's responsibility to prepare the location the product shall be placed on and also have power utility prepared.
WARNING: The rules about electrical local standards must be adhered to during product installation.
WARNING: Check for any damage on the product before installing it. Do not have product installed if it's damaged. Damaged products pose danger for your safety.
IMPORTANT WARNINGS FOR INSTALLATION:
natural_image
Technical line drawing of a heat exchanger or cooling unit with cooling fins and piping (no text or labels)Fig. 1
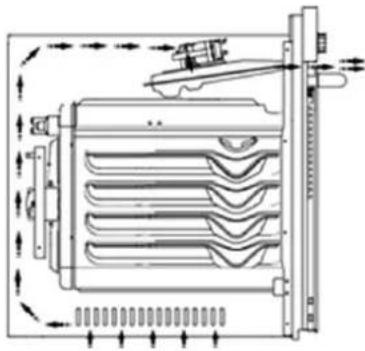
Cooling fan shall take extra steam out and prevent outer surfaces of appliance from overheating during operation of oven. This is a necessary condition for better appliance operation and better cooking. Cooling fan shall continue operation after cooking is finished. Fan shall automatically stop after cooling is completed. A clearance must be left behind the enclosure where you'll place the appliance for efficient and good operation. This clearance shouldn't be ignored as it's required for ventilation system of the appliance to operate.
Right place for installation
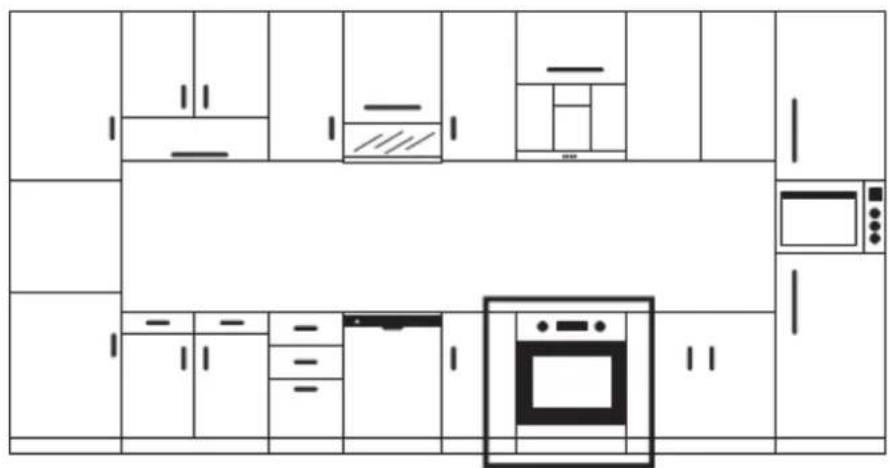
Product has been designed to be mounted to worktops procured from market. A safe distance must be left between the product and kitchen walls or furniture. See the drawing provided on the next page for proper distances. (values in mm).
- Used surfaces, synthetic laminates and adhesives must be heat resistant. (minimum 100°C).
• Kitchen cupboards must be level with product and secured.
If there is a drawer below the oven, a rack must be placed between oven and drawer.
WARNING: Do not install the product next to refrigerators or coolers. The heat emitted by the product increases the energy consumption of cooling devices.
WARNING: Do not use door and/or handle to carry or move the product.
60 cm Built-In Oven Installation and Mounting
Place of use for product must be located before starting installation.
Product mustn't be installed in places which are under the effect of strong air flow.
Carry the product with minimum two people. Do not drag the product so that floor isn't damaged. Remove all transportation materials inside and outside the product. Remove all materials and documents in the product.
Installation Under Counter
Cabin must match the dimensions provided in Figure 2.
A clearance must be provided at the rear part of the cabin as indicated
in the figure so that necessary ventilation can be achieved.
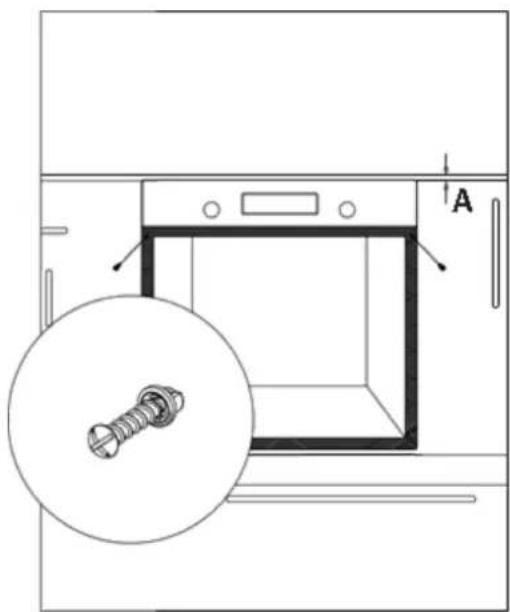
After mounting, the clearance between lower and upper part of the counter is indicated in Figure 5 with "A". It's for ventilation and shouldn't be covered.
Installation In An Elevated Cabinet
Cabin must match the dimensions provided in Figure 4.
The clearances with the dimensions indicated in the figure must be provided at the rear part of cabin, upper and lower sections so that necessary ventilation can be achieved.
Installation Requirements
Product dimensions are provided in the Figure 3.
Furniture surfaces for mounting and mounting materials to be used must have a minimum temperature resistance of 100 °C .
Mounting cabin must be secured and its floor must be plane for product not to tilt over. Cabin floor must have a minimum strength that would handle a load of 60 kg.
Placing and Securing the Oven
Place the oven into the cabin with two or more people. Ensure that oven's frame and front edge of the furniture match uniformly. Supply cord mustn't be under the oven squeeze in between oven and furniture or bend. Fix the oven to the furniture by using the screws provided with the product. Screws must be mounted as shown in Figure 5 by passing them through plastics attached to frame of the product. Screws mustn't be overtightened. Otherwise, screw sockets might be worn. Check that oven doesn't move after mounting. If oven isn't mounted in accordance with instructions, there is a risk of tilt over during operation.
VI. ELECTRICAL CONNECTION
Mounting place of the product must have appropriate electrical installation.
Network voltage must be compatible with the values provided on type label of product. Product connection must be made in accordance with local and national electrical requirements. Before starting the mounting disconnect network power. Do not connect the product to network until its mounting is completed.
natural_image
Line drawing of a kitchen interior layout with cabinets, ovens, and appliances (no text or symbols)Figure 2
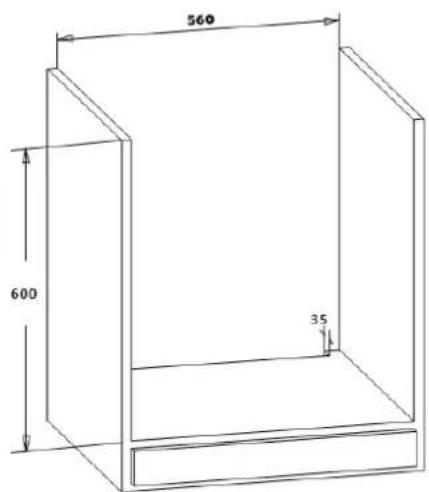
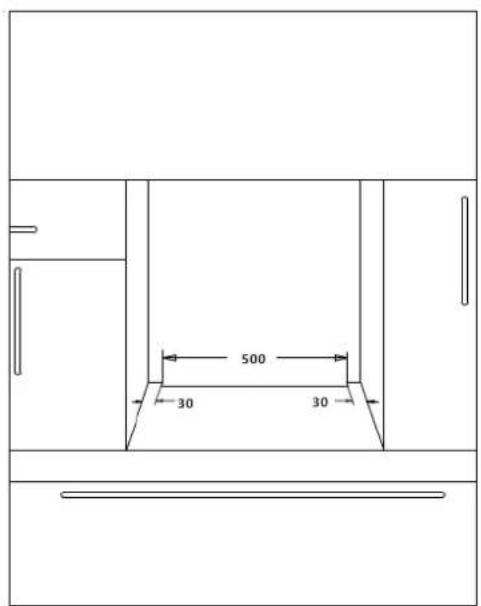
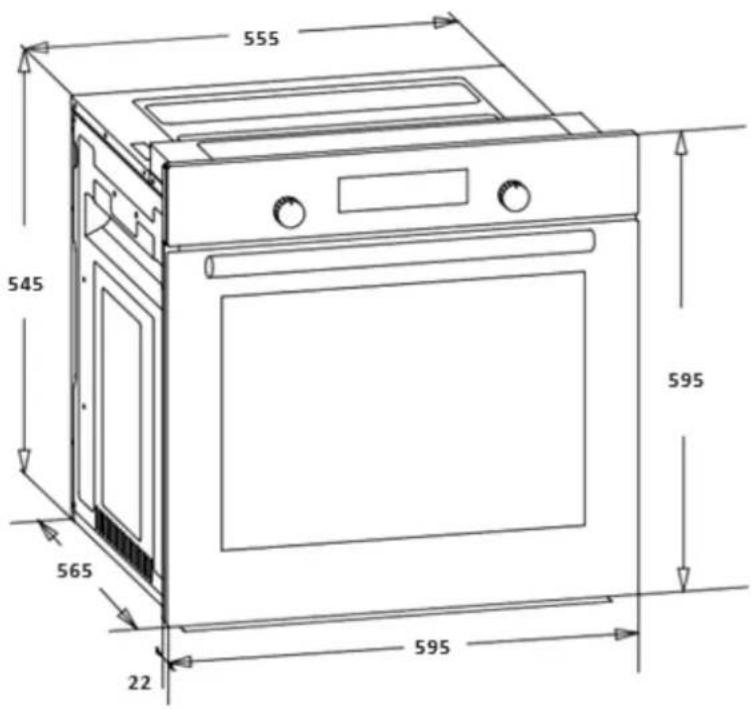
Figure 3
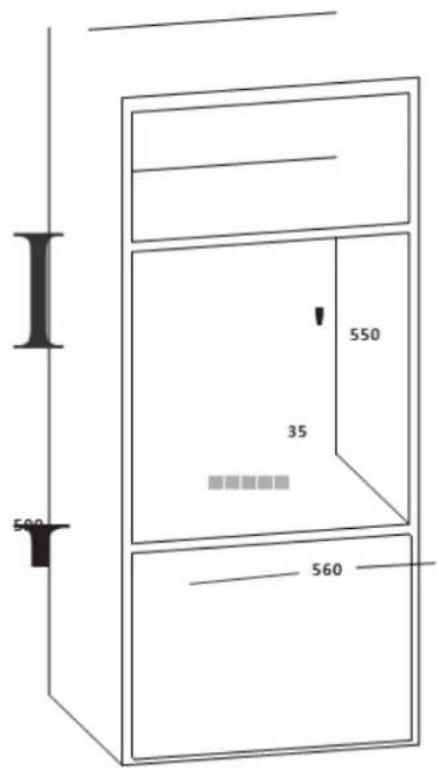
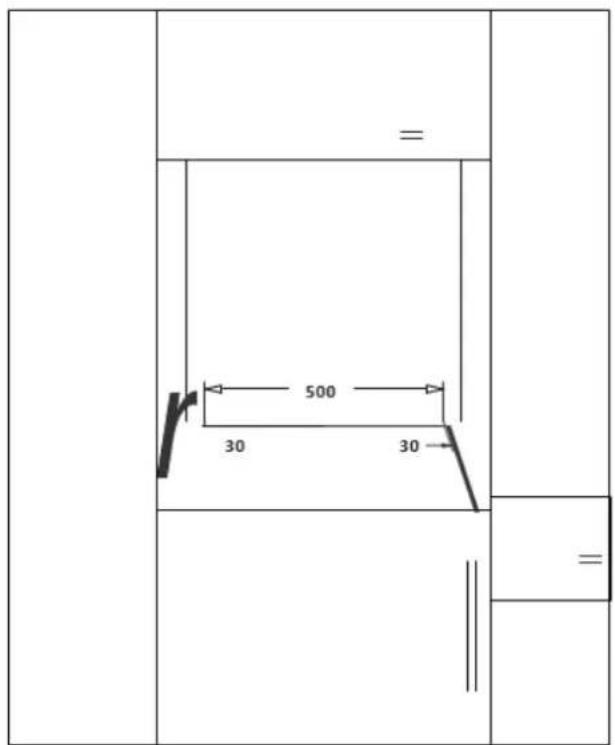
Figure 4
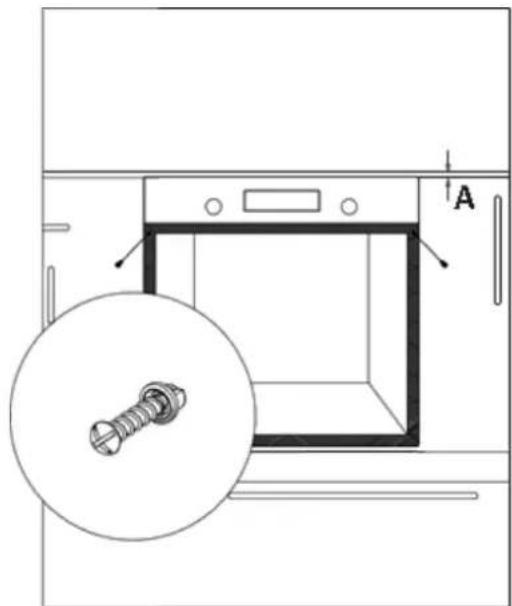
Figure 5
ELECTRICAL CONNECTION AND SAFETY
This oven must be installed and connected to its place correctly according to manufacturer instructions and by an authorized service.
Appliance must be installed in an oven enclosure providing high ventilation. Electrical connections of the appliance must be made only via sockets having earth system furnished in compliance with rules. Contact an authorized electrician if there is no socket complying with the earthed system at where appliance will be placed. Manufacturing company is by no means responsible for damage resulting from connection of non-earthed sockets to appliance. Plug of your oven must be earthed; ensure that socket for the plug is earthed. Plug must be located in a place that can be accessed after installation.
Your oven has been manufactured as 220-240 V 50/60 Hz. AC power supply compliant and requires a 16 Amp fuse. If your power network
is different that these indicated values, refer to an electrician or your authorized service.
When you need to replace the electrical fuse, please ensure that electrical connection is made as follows:
• Phase (to live terminal) brown cable
• Blue cable to neutral terminal
• Yellow-green cable to earth terminal
Oven disconnecting switches must be in an accessible place for final user while oven is in its place.
Power supply cable (plug in cable) mustn't touch hot parts of the appliance. If supply cord (plug in cable) is damaged, this cord must be replaced by the importer or its service agent or an equally competent personnel to prevent a hazardous situation.
VII. CONTROL PANEL
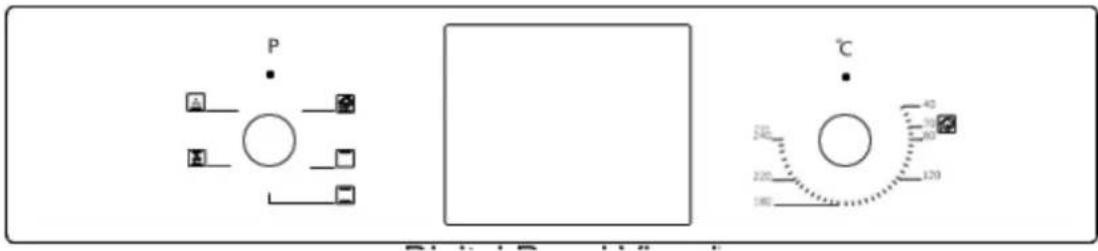
Digital panel visual
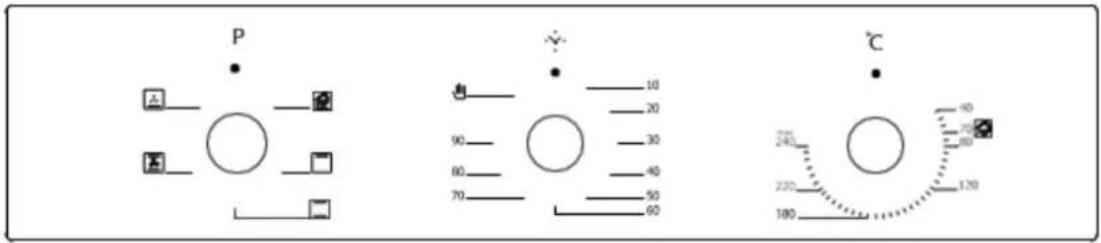
Mechanical panel visual
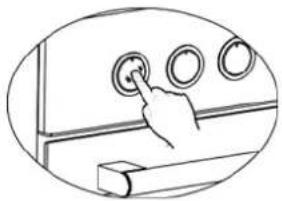
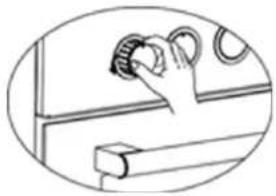
Adjustment can be made only when button is popped for models with pop-up button.
natural_image
Hand pressing a button on a control panel (no text or symbols visible)Figure 6
Make sure that button is popped by pressing on the button as shown in the figure at left side.
natural_image
Simple line drawing of a hand pressing down on a mechanical component (no text or symbols)Figure 7
You can make necessary adjustments by turning right or left when button is popped enough.
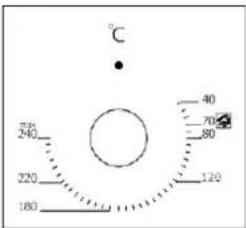
Figure 8
Thermostat Button: Helps to set cooking temperature of the food to be cooked in the oven. You can set the desired temperature by turning the button after placing the food into the oven. Check cooking table related to cooking temperatures of different foods.
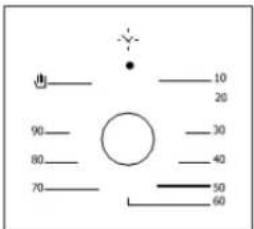
Figure 9
*Mechanical Timer Button: Helps to set time for the food to be cooked in the oven. Timer deenergizes the heaters when set time expires and warns you by ringing. See cooking table for cooking times. In case you do not want to use the timer in order to set the cooking time, for starting the oven, the timer must be positioned on the symbol!
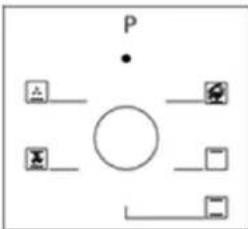
Figure 10
Program Button: Helps to set with which heaters the food placed in oven will be cooked. Heater program types in this button and their functions are stated below. Every model might not have all heater types and thus program types of these heaters.
XI. USING THE TIMER
Minus button
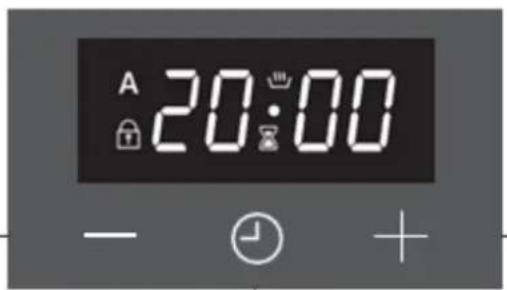
Plus button
Time of the day
(adjustement button)
SCREEN SYMBOLS
 | Oven Status IndicationOn: Cooking or ready for cooking.Off: No cooking. |
 | Minute Minder Status IndicationOn: Minute minder alarm active.Flashing: Minute minder adjustment mode, adjustment possible byorbuttons or current minute minder alarm completed.Off: Minute minder is not active. |
 | Child Lock IndicationOn: Child Lock is active.Off: Child Lock is inactive. |
 | Automatic cooking Status IndicationOn: Full or semi auto-cooking active.Flashing: Auto cooking completed or power on condition.Off: No auto cooking active. |
It is an electronic timing module enabling your food you have put in the oven to be ready for service at any time you like. The only thing you need to do is to programme the cooking time of the food and also the time when you would like your food to be ready. It is also possible to use a minute-programmed alarm clock independent from the oven. The case where the time clock is behind or ahead is not a malfunction. The oven time clock may be put back or ahead according to mains frequency as it runs directly with mains voltage. This is not a malfunction.
POWER ON
At power on, oven is inactive, time of day and symbols are flashing. The indicated time of day is not correct and has to be adjusted. Press activate the oven and proceed adjusting the time of day as below.
TIME OF DAY ADJUSTMENT
Time of Day adjustment is only possible when no cooking program is in progress. Press and simultaneously for 3 seconds to enter the adjustment mode and then the dot symbol in between hours and minutes digits will start to flash. Using either
- adjust the desired duration. The maximum adjustable duration is 23h 59 minutes. Adjustment mode will be abandoned within 6 seconds after the last button press or can be terminated immediately by pressing the 📋 button.
Note: Time of Day adjustment is also activated in first 7 seconds after power on.
SETTING THE MINUTE MINDER
With this function, you can adjust a duration in minutes. After the adjusted time has been elapsed, an alarm sound will be produced.
Press 📄 button once to enter the minute minder adjustment mode, symbol will start flashing on the screen. Using either ⭕ ,adjust the desired duration. The maximum adjustable duration is 10 hour.
Adjustment mode will be abandoned within 6 seconds after the last button press or can be terminated immediately by pressing the 📊 button.
CANCELLING THE ALARM BUZZER SOUND
Once the adjusted minute minder duration is elapsed, the buzzer alarm will start to sound, accompanied by the flashing symbol on the screen. Any button press will stop the alarm sound and this indication. If no button is pressed, the alarm sound will end automatically after 5 minutes, but the flashing symbol will go on.
SEMI AUTOMATIC COOKING
This cooking program is intended to start cooking immediately for a specified duration. After the oven is set to the desired function and Temperature via the oven knobs:
-
Press twice Ⓐ button, ⚠ symbol will flash on the screen. du'r and duration of cooking will show on the screen one after another.
-
Using o+ buttons, adjust the desired cooking duration.
-
After 6 seconds of the last button press or by pressing ⏻ twice, the adjustment is completed. ⚠ will be steady on the screen and the display shows the current time of day.
FULL AUTOMATIC COOKING
This cooking program is intended to perform a delayed cooking by programming the time of day, when the food should be ready. In other words, the oven will start cooking not immediately but will automatically calculate the time to start cooking.
-
Perform step 1 and 2 of the semi auto cooking as above. find (cooking time adjustment)
-
Press Ⓞ button oce again, ⚠ symbol will flash on the screen and time of cooking will show on the screen one after another.
-
Using + or -, adjust the desired end of cooking time. symbol will dissapear, but A symbol will be still flashing on the screen. This indicates that an automatic cooking is programmed but cooking has not started yet.
-
After 6 seconds of the last button press or by pressing ⏻, the adjustment will be completed, the display shows the current time of day.
AUTO COOKING END
After the automatic cooking has been completed, Ⓐ symbol will be flashing on the screen and the buzzer alarm will sound. Any button press will stop the alarm sound but the flashing symbol will go on till ⏻ button is pressed. The buzzer alarm will sound for 7 minutes if not stopped.
POWER INTERRUPTS
After any interrupt of mains power, your oven will be inactive after the power is restored, for safety reasons. After power on, the time of day digits and symbol will flash and the time of day has to be adjusted. (see:power on)
Note: The flashing symbol indicates that the oven is inactive and you have to enter the manual mode.
CHILD LOCK
This function is intended to prevent any unauthorized modification of the timer settings. This function will be active, within 30 seconds after the last button will appear. To deactive it, press the button for 3 seconds. will disappear.
PROGRAMMABLE OPTIONS
Alarm tone:
Pressing and holding the button for 3 seconds will result in the currently valid buzzer tone being produced. By pressing and buttons, you may scroll through 3 available buzzer tones. The last heard buzzer tone will be automatically recorded as the selected tone. After 6 seconds of the last button press or by pressing the adjustment is completed.
Brightness setting:
Pressing and holding the button for 3 seconds will result in the currently valid brightness setting being showed. By pressing and buttons, you may scroll through 8 available brightness setting. The last seen brightness setting will be automatically recorded as the selected setting. After 6 seconds of the last button press or by pressing, the adjustment is completed.
Note: Default settings are highest.
Note: Programmable options are nonvolatile and will be resident after any power failure.
VIII. PROGRAM TYPES
Heating program types in your appliance and important explanations of them are provided below for you can cook different foods appealing to your taste.
| [5x52] | Lower and Upper Heating Elements |  | Fan (defrost) |
 | Lower Heating Element and Fan |  | Turbo heater and Fan |
 | Grill and Roast Chicken |  | Lower – upper heating element and Fan |
| [DSYK] | Upper Heating Element and Fan |  | Grill and Fan |
 | Multifunctional Cooking |  | Grill |
| [5x8C] | Lower Heating Element |  | Upper Heating Element |
 | Small Grill and Fan |  | Steam Cleaning |
Lower heating element: Select this program towards end of cooking time if lower part of the food cooked will be roasted.
Upper heating element: Used for post heating or roasting very little pieces of foods.
Lower and upper heating elements: A program that can be used for cooking foods like cake, pizza, biscuit and cookie.
Lower heating element and fan: Use mostly for cooking foods like fruit cake.
Lower and upper heating element and fan: The program suitable for cooking foods like cakes, dried cakes, lasagne. Suitable for cooking meat dishes, as well.
Grill: Grill cooker is used for grilling meat like foods such as steak, sausage and fish. While grilling, tray should be placed in the lower rack and water must be placed in it.
Turbo heater and fan: Suitable for baking and roasting. Keep heat setting lower than "Lower and Upper Heater" program since heat is conveyed immediately via air flow.
Grill and fan: Suitable for cooking meat type foods. Do not forget to place a cooking tray in a lower rack inside the oven and a little water in it while grilling.
Multi Functional Cooking: Suitable for baking and roasting. Lower and upper heaters operate as well as quick transmission of heat via air flow. Suitable for cooking requiring single tray and intense heat.
Fan (defrost): For defrosting e.g. meat, poultry, bread etc. The fan causes the air to circulate around the dish.
Upper heating element and fan: Used for post heating or roastinf very little pieces of foods.
Small griling and fan: Suitable for cooking meat type foods. Do not forget to place a cooking tray in a lower rack inside the oven and a little water in it while grilling.
IX. USING THE APPLIANCE
COOKING RECOMMENDATIONS
You can find in the following table the information of food types which we tested and identified their cooking values in our labs. Cooking times can vary depending on the network voltage, quality of material to be cooked, quantity and temperature. Dishes to cook by using these values might not appeal to your taste. You can set various values for obtaining different tastes and results appealing to your taste by making tests.
WARNING: Oven must be preheated for 7-10 minutes before placing the food in it.
COOKING TABLE
| Food | Cooking Function | Cooking Temperature (°C) | Cooking Rack | Cooking Time (min.) |
| Cake | Static / Static+Fan | 170-180 | 2-3 | 35-45 |
| Small Cake | Static / Turbo+Fan | 170-180 | 2 | 25-30 |
| Pie | Static / Static+Fan | 180-200 | 2 | 35-45 |
| Pastry | Static | 180-190 | 2 | 20-25 |
| Cookie | Static | 170-180 | 2 | 20-25 |
| Apple Pie | Static / Turbo+Fan | 180-190 | 1 | 50-70 |
| Sponge cake | Static | 200/150* | 2 | 20-25 |
| Pizza | Static Fan | 180-200 | 3 | 20-30 |
| Lasagne | Static | 180-200 | 2-3 | 25-40 |
| Meringue | Static | 100 | 2 | 50 |
| Grilled Chicken** | Grill+Fan | 200-220 | 3 | 25-35 |
| Grilled Fish** | Grill+Fan | 200-220 | 3 | 25-35 |
| Calf Steak** | Grill+Fan | Max | 4 | 15-20 |
| Grilled Meatball** | Grill+Fan | Max | 4 | 20-25 |
* Do not preheat. First half of cooking time is recommended to be at 200℃ while the other half at 150℃.
** Food must be turned after half of the cooking time.
Here are the things you must do at first use of your oven after making its necessary connections as per instructions:
- Remove labels or accessories attached inside the oven. If any, take out the protective folio on front side of the appliance.
- Remove dust and package residues by wiping inside of the oven with a damp cloth Inside of oven must be empty. Plug the cable of appliance into the electrical socket.
- Set the thermostat button to the highest temperature (240 Max. °C) and run the oven for 30 minutes with its door closed. Meanwhile a slight smoke and smell might occur and that's a normal situation.
- Wipe inside of the oven with a slightly warm water with detergent after it becomes cold and then dry with a clean cloth. Now you can use your oven.
NORMAL USE OF THE OVEN
- Adjust thermostat button and temperature at which you want to cook the food to start cooking.
- You can set cooking time to any desired time by using the button at models with mechanical timer. Timer will de-energize heaters when time expired and provide warning beep as ringing.
- Timer turns the heaters off and provides audible signal when cooking time expires in line with the information entered in the models with digital timer.
- Cooling system of the appliance will continue to operate after cooking is completed. Do not cut the power of appliance in this situation which is required for appliance to cool down. System will shut down after cooling is completed.
REPLACING THE OVEN LAMP
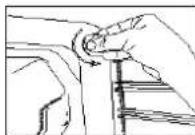
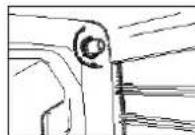
WARNING: To avoid electric shock, ensure that the appliance circuit is open before changing the lamp. (having circuit open means power is off) First disconnect the power of appliance and ensure that appliance is cold. Remove the glass protection by turning a indicated in the figure on the left side. If you have difficulty in turning, then using plastic gloves will help you in turning. Then remove the lamp by turning, install the new lamp with same specifications. Reinstall glass protection, plug the power cable of appliance into electrical socket and complete replacement. Now you can use your oven.
Type G9 Lamp assembly
220-240V, AC 15-25W
Type E14 Lamp assembly
220-240V, AC 15W
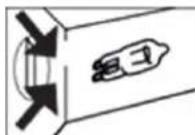
Figure 11
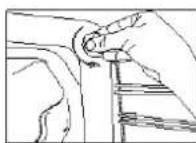
Figure 12
X. CLEANING AND MOUNTING OVEN DOOR
CLEANING OVEN GLASS
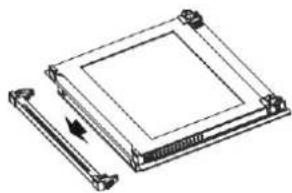
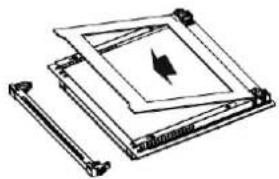
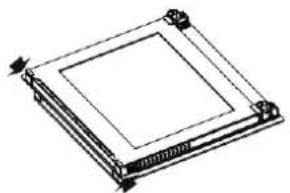
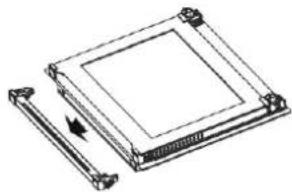
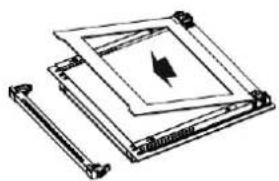
Lift by pressing on plastic latches on left and right side as shown in Figure 13 and pulling the profile toward yourself as in Figure 14. Glass is released after profile is removed as shown in Figure 15. Remove the released glass by pulling toward yourself carefully. Outer glass is fixed to oven door profile. You can perform glass cleaning easily after glasses are released. You can mount glasses back by performing the operations reversely after cleaning and maintenance are completed. Ensure that profile is seated properly in place.
natural_image
Isometric line drawing of a square mechanical component with mounting holes (no text or symbols)Figure 13
natural_image
Isometric line drawing of a square electronic component with a rectangular base and a side tab, showing no text or symbols.Figure 14
natural_image
Pure mechanical assembly diagram showing layered components with no text or symbolsFigure 15
MOUNTING OVEN DOOR
natural_image
Line drawing of an open oven or oven unit with a door open, showing internal structure and ventilation duct (no text or symbols)Figure 16
natural_image
Line drawing of an open oven with lid removed, showing internal structure and ventilation slots (no text or symbols)Figure 17
natural_image
Technical line drawing of a mechanical bracket or frame assembly (no text or symbols)Figure 16.1
natural_image
Technical line drawing of a mechanical assembly with no visible text or symbolsFigure 16.2
natural_image
Technical line drawing of a structural joint or bracket (no text or symbols)Figure 17.1
natural_image
Technical line drawing of a door handle assembly (no text or symbols)Figure 17.2
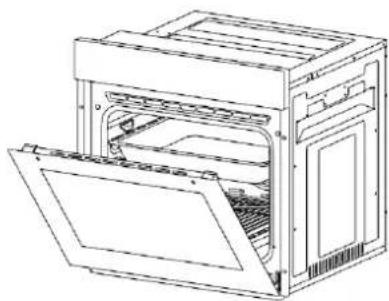
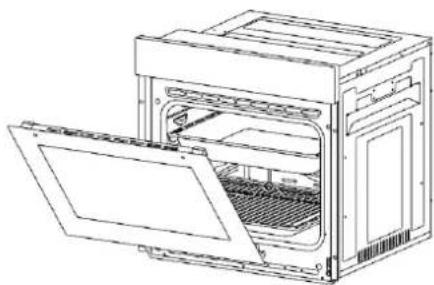
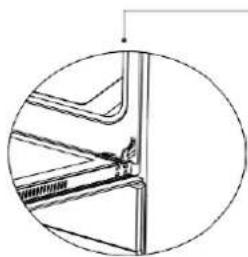
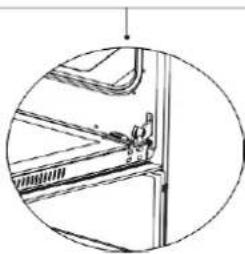
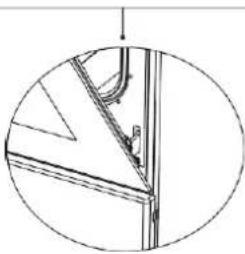
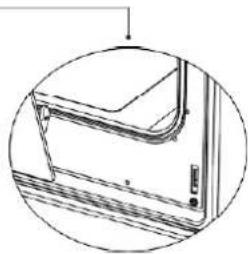
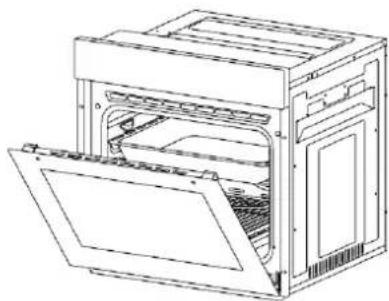
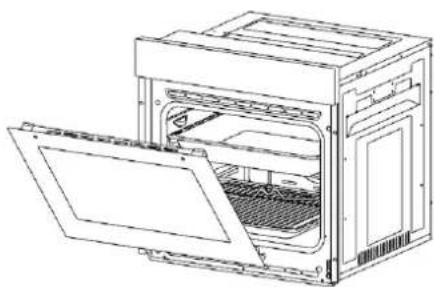
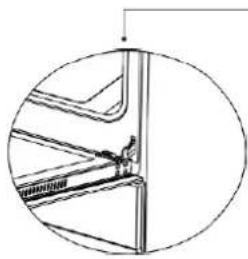
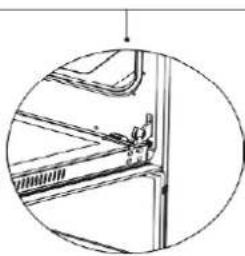
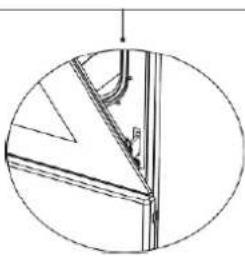
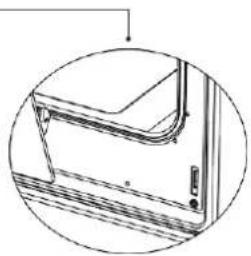
Open the door fully by pulling the oven door toward yourself. Then perform unlock operation by pulling the hinge lock upwards with the aid of screwdriver as indicated in Figure 16.1. Set the hinge lock to the widest angle as in Figure 16.2. Adjust both hinges connecting oven door to the oven to the same position. Later, close the opened oven door so that it will be in a position to contact with hinge lock as in Figure 17.1. For easier removal of oven door, when it comes close to closed position, hold the cover with two hands as in Figure 17.2 and pull upwards.
Reversely perform respectively what you did while opening door yto reinstall oven door back.
XI. MAINTENANCE AND CLEANING
- Remove the power plug from electrical socket.
- Do not clean inner parts, panel, trays and other parts of the product with hard tools such as bristle brush, wire wool or knife. Do not use abrasive, scratching materials or detergent.
- Rinse after wiping the parts at inner parts of the product with soapy cloth, then dry thoroughly with a soft cloth.
- Clean glass surfaces with special glass cleaning material.
- Do not clean your product with steam cleaners.
- Never use combustibles like acid, thinner and gas while cleaning your product.
- Do not wash any part of the product in dishwasher.
- "Use potassium stearate (soft soap) for dirt and stains.
You can perform cleaning with a soft textured cloth not to scratch surfaces according to the figures below.
STEAM CLEANING
natural_image
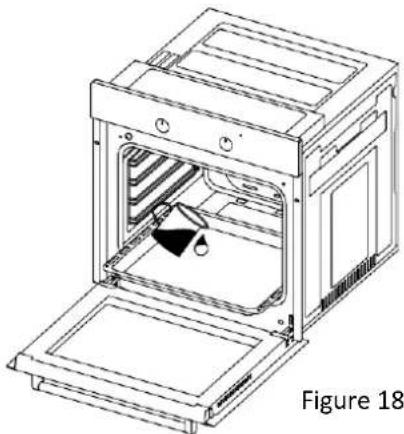
Line drawing of an oven with a lid and door, labeled as Figure 18 (no text or symbols on the diagram itself)It enables cleaning the soils softened thanks to the steam to be generated in the oven.
- Remove all the accessories in the oven.
- Pour a half litre of water into the tray and Place the tray at the bottom of the boiler.
- Set the switch to the steam cleaning mode
- Set the thermostat to 70^ C degrees and operate the oven for 30 minutes.
- After operating the oven for 30 minutes, open the oven door and wipe the inner surfaces with a wet cloth.
- Use dish-washing liquid, warm water and a soft cloth for stubborn dirt, then dry off the area you have just cleaned with a dry cloth.
XII. ACCESSORIES
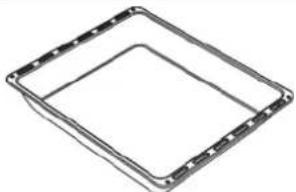 | Deep Tray *Used for pastry, big roasts, watery foods. It can also be used as collecting container if you roast directly on grill with cake, frozen foods and meat dishes. |
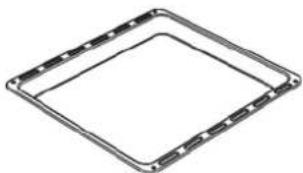 | TrayUsed for pastry (cookie, biscuit etc.), frozen foods. |
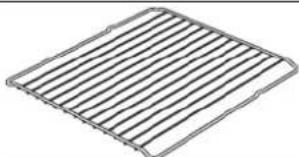 | Wire GrillUsed for roasting or placing foods to be baked, roasted and frozen into desired rack. |
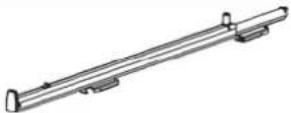 | Telescopic Rail*Trays and wire racks can be removed and installed easily thanks to telescopic rails. |
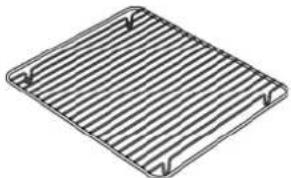 | In Tray Wire Grill *Foods to stick while cooking such as steak are placed on in tray grill.Thus contact of food with tray and sticking are prevented. |
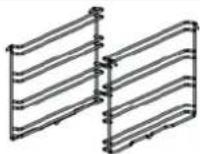 | Wire Racks*You can place deep tray and tray on lower and upper wire racks while cooking. |
TROUBLESHOOTING
You can solve the problems you can face with your product by checking the following points before calling the technical service.
If Oven Doesn't Work;
- Check if electrical cable of the oven is plugged.
- Safely check if there is power in the network.
- Check the fuses.
Check if electrical cable of the oven is damaged.

Environment friendly disposal
You can help protect the environment!
Please remember to respect the local regulations: hand in the non-working electrical equipment's to an appropriate waste disposal center.

HEINNER is a registered trademark of Network One Distribution SRL. Other brands and product names are trademarks or registered trademarks of their respective holders.
No part of the specifications may be reproduced in any form or by any means or used to make any derivative such as translation, transformation, or adaptation without permission from NETWORK ONE DISTRIBUTION.
Copyright © 2013 Network One Distribution. All rights reserved.
www.heinner.com, http://www.nod.ro

This product is in conformity with norms and standards of European Community.
Importer: Network One Distribution
Marcel Iancu Street, 3-5, Bucharest, Romania
Tel: +40 21 211 18 56, www.heinner.com, www.nod.ro
- CONECTAREA LA SURSA DE ALIMENTARE ŞI SIGURANTA CONECTĂRII
- Thank you for purchasing this product!
- INTRODUCTION
- PACKAGE CONTENT
- SAFETY INSTRUCTIONS
- INTRODUCTION OF THE APPLIANCE
- INSTALLATION OF APPLIANCE
- IMPORTANT WARNINGS FOR INSTALLATION:
- Right place for installation
- cm Built-In Oven Installation and Mounting
- Installation Under Counter
- Installation In An Elevated Cabinet
- Installation Requirements
- Placing and Securing the Oven
- ELECTRICAL CONNECTION
- ELECTRICAL CONNECTION AND SAFETY
- CONTROL PANEL
- USING THE TIMER
- POWER ON
- TIME OF DAY ADJUSTMENT
- SETTING THE MINUTE MINDER
- CANCELLING THE ALARM BUZZER SOUND
- SEMI AUTOMATIC COOKING
- FULL AUTOMATIC COOKING
- AUTO COOKING END
- POWER INTERRUPTS
- CHILD LOCK
- PROGRAMMABLE OPTIONS
- Brightness setting:
- PROGRAM TYPES
- USING THE APPLIANCE
- COOKING RECOMMENDATIONS
- NORMAL USE OF THE OVEN
- REPLACING THE OVEN LAMP
- CLEANING AND MOUNTING OVEN DOOR
- CLEANING OVEN GLASS
- MAINTENANCE AND CLEANING
- ACCESSORIES
- TROUBLESHOOTING
- If Oven Doesn't Work;
- Environment friendly disposal
Brand : Heinner
Model : HBO-S567LDTGC-IX
Category : Oven