
IOP 12654-92 W - Oven GRAM - Free user manual and instructions
Find the device manual for free IOP 12654-92 W GRAM in PDF.

| Product Type | Built-in Electric Oven |
| Brand | Gram |
| Model | IOP 12654-92 W |
| Dimensions (H x W x D) | 59.5 x 59.5 x 57.5 cm |
| Power Supply | 230 V ~ 50 Hz, single phase |
| Maximum Power Rating | 3.1 kW |
| Oven Capacity | Not specified (standard size for built-in ovens) |
| Energy Efficiency | Not specified (complies with ErP Directive 2009/125/EC) |
| Heating Functions | Top and bottom heat, convection (ring heater with fan), grill, combined grill + fan, defrosting, pyrolytic cleaning, independent oven lighting |
| Control Type | Retractable knobs and electronic touch sensors (programmer) |
| Display | Electronic programmer with time, timer, and temperature display |
| Timer | Up to 23h 59min, with semi-automatic and automatic operation |
| Meat Probe | Yes, with adjustable setpoint (30-99°C), default 80°C |
| Self-Cleaning | Pyrolytic cleaning (2-3 hours duration) |
| Oven Door | Removable, with inner glass panel for cleaning, safety lock during pyrolysis |
| Safety Features | Child safety warning, automatic door lock during pyrolysis, overheating protection |
| Accessories Included | Grill grate, baking tray, roasting tray, meat probe, telescopic runners (if equipped) |
| Cleaning and Maintenance | Hand wash with mild detergent; do not use abrasive cleaners; halogen bulb replacement (25W, 230V) |
| Installation | Y-type built-in; requires heat-resistant furniture; electrical connection via 3x1.5 mm² cable (1.5 m) |
| Compliance | CE, Low Voltage Directive 2006/95/EC, EMC 2004/108/EC, ErP 2009/125/EC |
| Warranty | Refer to manufacturer's terms (not specified in manual) |
Frequently Asked Questions - IOP 12654-92 W GRAM
User questions about IOP 12654-92 W GRAM
0 question about this device. Answer the ones you know or ask your own.
Ask a new question about this device
Download the instructions for your Oven in PDF format for free! Find your manual IOP 12654-92 W - GRAM and take your electronic device back in hand. On this page are published all the documents necessary for the use of your device. IOP 12654-92 W by GRAM.
USER MANUAL IOP 12654-92 W GRAM
natural_image
Front view of a standard open oven with control knobs and a digital display (no text or symbols visible)EN Instruction manual
The oven is exceptionally easy to use and extremely efficient. After reading the instruction manual, operating the oven will be easy.
Before being packaged and leaving the manufacturer, the oven was thoroughly checked with regard to safety and functionality.
Before using the appliance, please read the instruction manual carefully.
By following these instructions carefully you will be able to avoid any problems in using the appliance.
It is important to keep the instruction manual and store it in a safe place so that it can be consulted at any time.
It is necessary to follow the instructions in the manual carefully in order to avoid possible accidents.

Caution!
Do not use the oven until you have read this instruction manual.
The oven is intended for household use only.
The manufacturer reserves the right to introduce changes which do not affect the operation of the appliance.
TABLE OF CONTENTS
Safety instructions .... 4
Description of the appliance 8
Installation....10
Operation....12
Baking in the oven – practical hints ...... 20
Cleaning and maintenance 22
Technical data....30
Warning: The appliance and its accessible parts become hot during use. Care should be taken to avoid touching heating elements. Children less than 8 years of age shall be kept away unless continuously supervised.
This appliance can be used by children aged from 8 years and above and persons with reduced physical, sensory or mental capabilities or lack of experience and knowledge, if they have been given supervision or instruction concerning use of the appliance in a safe way and understand the hazards involved. Children shall not play with the appliance. Cleaning and user maintenance shall not be made by children without supervision.
During use the appliance becomes hot. Care should be taken to avoid touching heating elements inside the oven.
Accessible parts may become hot during use. Young children should be kept away.
Warning: Do not use harsh abrasive cleaners or sharp metal scrapers to clean the oven door glass since they can scratch the surface, which may result in shattering of the glass.
Warning: Ensure that the appliance is switched off before replacing the lamp to avoid the possibility of electric shock.
Use only original temperature probe supplied with the appliance
You should not use steam cleaning devices to clean the appliance.
- Ensure that small items of household equipment, including connection leads, do not touch the hot oven as the insulation material of this equipment is usually not resistant to high temperatures.
- Do not leave the oven unattended when frying. Oils and fats may catch fire due to overheating or boiling over.
- Do not put pans weighing over 15 kg on the opened door of the oven.
- Do not use harsh cleaning agents or sharp metal objects to clean the door as they can scratch the surface, which could then result in the glass cracking.
- Do not use the oven in the event of a technical fault. Any faults must be fixed by an appropriately qualified and authorised person.
- In the event of any incident caused by a technical fault, disconnect the power and report the fault to the service centre to be repaired.
- The rules and provisions contained in this instruction manual should be strictly observed. Do not allow anybody who is not familiar with the contents of this instruction manual to operate the oven.
- The appliance has been designed only for cooking. Any other use (for example for heating) does not comply with its operating profile and may cause danger.
Do not open the oven door unnecessarily often.
- Only use the oven when cooking larger dishes.
Meat of up to 1 kg can be prepared more economically in a pan on the cooker hob.
● Make use of residual heat from the oven.
If the cooking time is greater than 40 minutes switch off the oven 10 minutes before the end time.
Important! When using the timer, set appropriately shorter cooking times according to the dish being prepared.
● Make sure the oven door is properly closed.
Heat can leak through spillages on the door seals. Clean up any spillages immediately.
- Do not install the oven in the direct vicinity of refrigerators/freezers.
Otherwise energy consumption increases unnecessarily.

natural_image
Simple line drawing of a recycling symbol (three chasing arrows), no text or labels present.During transportation, protective packaging was used to protect the appliance against any damage. After unpacking, please dispose of all elements of packaging in a way that will not cause damage to the environment.
All materials used for packaging the appliance are environmentally friendly; they are 100% recyclable and are marked with the appropriate symbol.
Caution! During unpacking, the packaging materials (polythene bags, polystyrene pieces, etc.) should be kept out of reach of children.
Old appliances should not simply be disposed of with normal household waste, but should be delivered to a collection and recycling centre for electric and electronic equipment. A symbol shown on the product, the instruction manual or the packaging shows that it is suitable for recycling.
Materials used inside the appliance are recyclable and are labelled with information concerning this. By recycling materials or other parts from used devices you are making a significant contribution to the protection of our environment.
Information on appropriate disposal centres for used devices can be provided by your local authority.
DESCRIPTION OF THE APPLIANCE
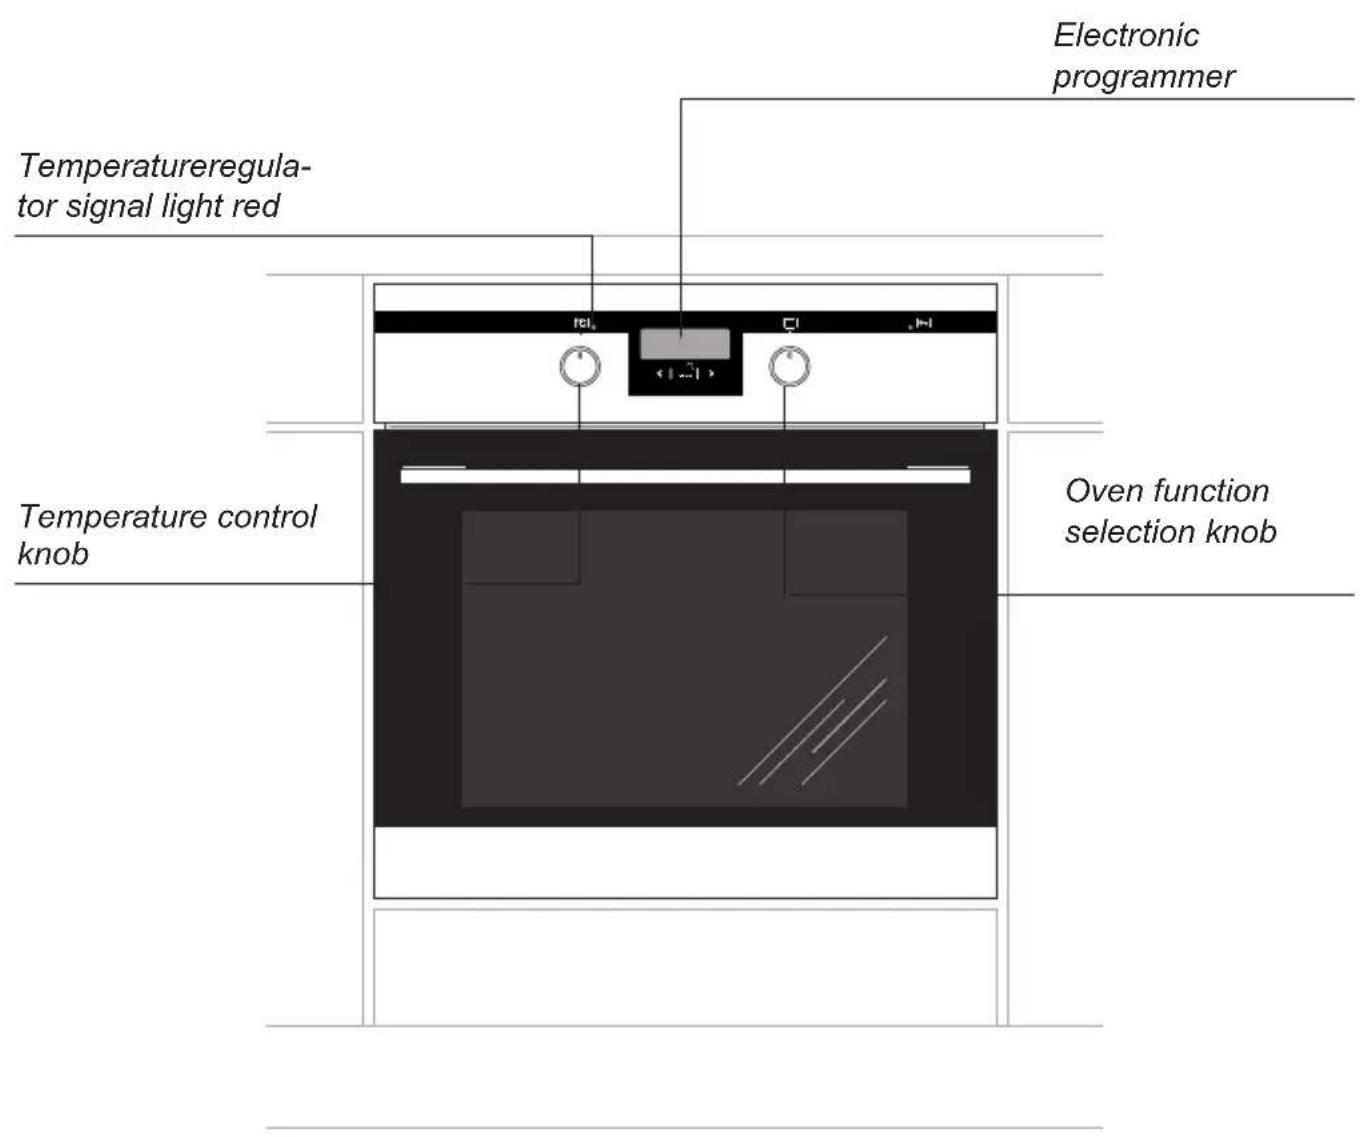
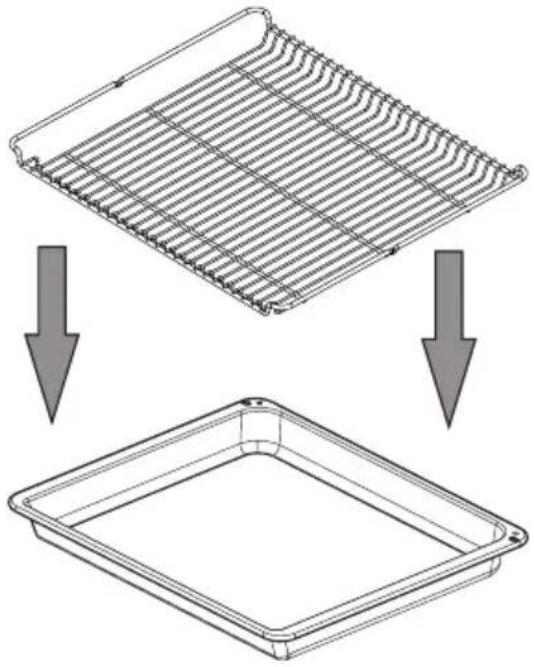
Oven fittings:
Grill grate (drying rack)
natural_image
Diagram showing two steps of a grid structure: top-down view and bottom-right view, both with downward arrows indicating direction (no text or symbols present)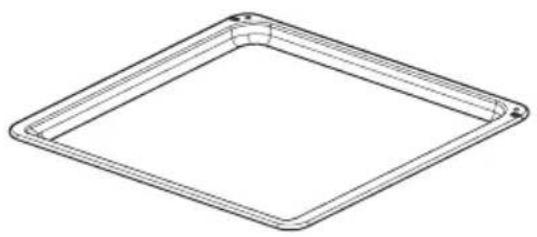
natural_image
Line drawing of a square frame with rounded corners and a small hole at the top (no text or symbols)Baking tray
natural_image
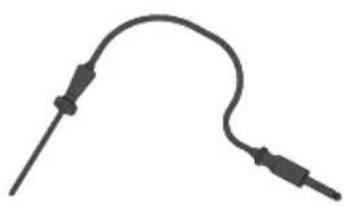
Simple line drawing of a medical or electrical device with two connectors (no text or symbols)Meat probe
natural_image
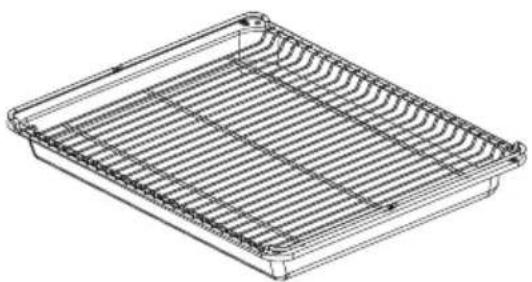
Isometric line drawing of a rectangular metal tray with grid pattern (no text or symbols)Roasting tray

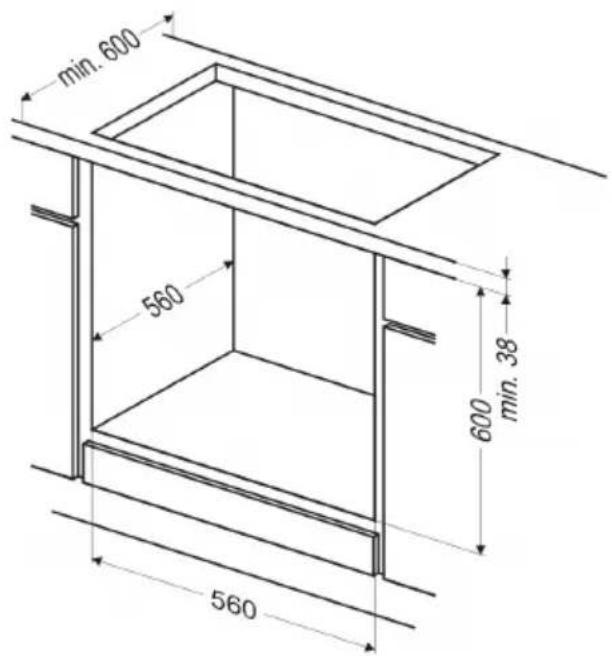
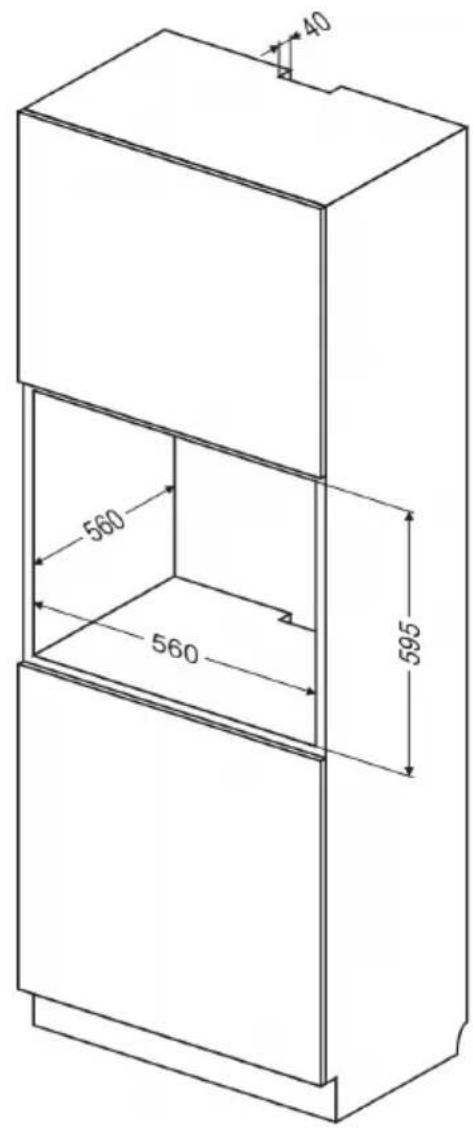
Installing the oven
- The kitchen area should be dry and aired and equipped with efficient ventilation. When installing the oven, easy access to all control elements should be ensured.
- This is a Y-type design built-in oven, which means that its back wall and one side wall can be placed next to a high piece of furniture or a wall. Coating or veneer used on fitted furniture must be applied with a heat-resistant adhesive (100°C). This prevents surface deformation or detachment of the coating.
- Hoods should be installed according to the manufacturer's instructions.
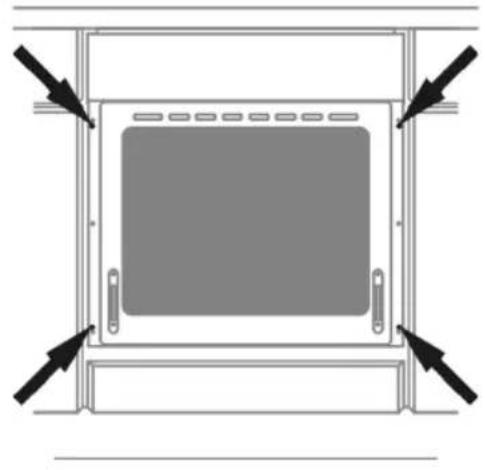
● Make an opening with the dimensions given in the diagram for the oven to be fitted.
● Make sure the mains plug is disconnected and then connect the oven to the mains supply. - Insert the oven completely into the opening without allowing the four screws in the places shown in the diagram to fall out.
natural_image
Diagram of a rectangular device with internal components and directional arrows indicating orientation (no text or symbols)Electrical connection
- The oven is manufactured to work with a one-phase alternating current (230V 1N\~50 Hz) and is equipped with a 3 x 1,5 mm² connection lead of 1.5 m length with a plug including a protection contact.
- A connection socket for electricity supply should be equipped with a protection pin and may not be located above the oven. After the oven is positioned, it is necessary to make the connection socket accessible to the user.
-
Before connecting the oven to the socket, check if:
-
the fuse and electricity supply are able to withstand the oven load,
- the electricity supply is equipped with an efficacious ground system which meets the requirements of current standards and provisions,
- the plug is within easy reach.
Important!
If the fixed power supply cable is damaged, it should be replaced at the manufacturer or at an authorized servicing outlet, or by a qualified person to avoid danger.
Before using the oven for the first time
- Remove packaging, clean the interior of the oven.
- Before using the oven, you have to clean your oven. Use a damp cloth with a mild detergent. Never use corrosive or abrasive cleaners.
- Switch on the ventilation in the room or open a window.
- Heat the oven (to a temperature of 250^ C, for approx. 30 min.), remove any stains and wash carefully.
The oven is equipped with a retractable knobs. In order to select a function do the following:
- Gently press and release a knob which will pop out,
- Turn the oven functions selection knob to the desired function.
Symbols printed around the knob indicate available oven functions.

natural_image
Diagram of a cylindrical device with a rotating arrow, no text or symbols presentImportant!
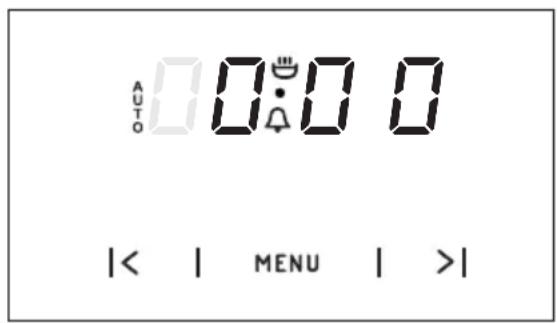
In ovens equipped with the electronic programmer Tts, the time "0.00" will start flashing in the display field upon connection to the power supply.
The programmer should be set with the current time. (See Electronic programmer). If the current time is not set operation of the oven is impossible.
The electronic programmer Tts is equipped with electronic sensors which are switched on by touching or pressing the sensor surface for at least one second.
Each sensor reaction is confirmed by the beep. Keep the sensor surface clean at all times.
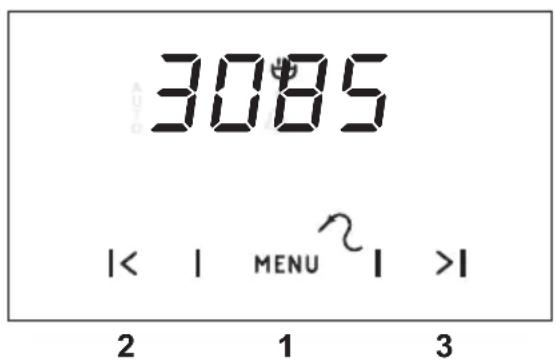
Electronic programmer

Touch sensors
1 - function selection button
2 - “-” sensor
3 - “+” sensor
The electronic programmer is equipped with electronic sensors which are switched on by touching or pressing the sensor surface for at least 2 seconds.
Each sensor reaction is confirmed by the beep.
Keep the sensor surface clean at all times.
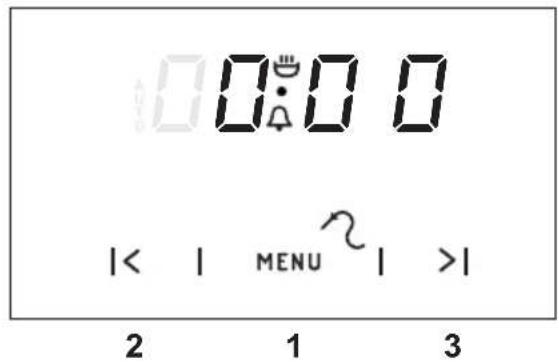
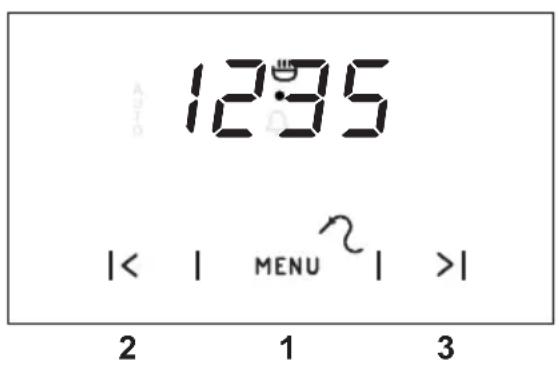
Setting the time
After connection to the mains or reconnection after a power cut the display shows flash 0.00

- Press sensor 1, then the display will show 🚗,
- set the time using sensors 3 and 2.
7 seconds after the time has been set the new data will be saved.
Caution!
If the correct time is not set then proper operation of the oven is not possible.
Timer
The timer can be activated at any time, regardless of the status of other functions. The timer can be set for from 1 minute to up to 23 hours and 59 minutes.
To set the timer you should:
- Press sensor 1, then the display will show flashing 🔊,
- set the timer using sensors 3 and 2.
The time set is shown on the display and the signal function 🔔 is on. - Press sensor 1, 2 or 3 in order to switch off the signal, the signal function will go out and the display will show the current time.
Caution!
If the alarm signal is not turned off manually, it will be turned off automatically after approx. 7 minutes.
Semi-automatic operation
If the oven is to be switched off at a given time, then you should:
- Set the oven function knob and the temperature regulator knob to the setting at which you want the oven to operate.
●Press sensor 1 until the display will show:
- Set the required time using sensors 3 and 2, within a range from 1 minute to 10 hours.
The set time will be introduced to the memory after approx. 7 seconds and the display will show AUTO function.
When the set time has passed the oven is switched off automatically, the alarm signal is activated and the signal function AUTO flashing again;
- Set the oven function knob and the temperature regulator knob to the switched-off position.
- Press sensor 1, 2 or 3 in order to switch off the signal; the signal function will go out and the display will show the current time.
Caution!
In ovens equipped with one control knob, the oven function knob is integrated with the temperature regulator knob.
Automatic operation
If the oven is to be switched on for a specified period of time and switched off at a fixed hour then you should set the operation time and the operation end time:
- Press sensor1 until the display will show:
- Set the required time using the sensors 3 and 2 within a range from 1 minute to 10 hours.
●Press sensor 1 until the display will show:
- Set the switch-off time (operation end time) using sensors 3 and 2, which is limited to a period of 23 hours and 59 minutes from the current time.
- Set the oven function knob and the temperature regulator knob to the setting at which you want the oven to operate.
The function AUTO is now on; the oven will start operating from the point when the difference between the set operation end time and the operation duration time occurs (e.g. the operation time is set to 1 hour, the operation end time is set to 14.00, so the oven will start working automatically at 13.00).
When the oven reaches the operation end time it will switch off automatically, the alarm will be activated and the function AUTO will start flashing again.
- Set the oven function knob and the temperature regulator knob to the switched-off position.
- Press sensor 1, 2 or 3 in order to switch off the alarm; the function AUTO will go out and the display will show the current time.
Cancel settings
Timer and automatic function settings may be cancelled at any time.
Cancel automatic function settings:
- press sensors 2 and 3 simultaneously,
Cancel timer settings:
- press sensor 1 to select timer settings,
- press sensors 2 and 3 again,
Change the timer beeps
The tone of the timer beeps may be changed as follows:
- press sensors 2 and 3 simultaneously,
- select "tone" function with the 1 sensor, the display panel will start to blink:
- with the 2 sensor press the appropriate sensors from 1 to 3 to select the option you wish.
Meat Probe
Adjustment and display range: 30°C till 99°C, Resolution: 1 Grad, Default set value: 80°C.
Meat probe is recognized automatically when temperature at meat probe is above 0^ C.
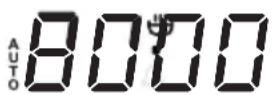
If meat probe is plugged in, the two digits on the left side show the actual temperature at the meat probe and the two digits at the right side show the set point value.
If the probe temperature is lower than the minimum setting temperature of 30 °C , the display reads "30". If the probe temperature is higher than the maximum setting temperature of 99 °C , the display reads the maximum setting temperature.
With plugging in the connector of the meat probe, the program is started and the nominal temperature is set to 80 °C. The value of the set temperature can be changed as long as the temperatures are displayed, but not when timer is still in start up mode.
The meat probe alarm can be reset by pressing any key.
An active meat probe program or a pending alarm can be reset by disconnecting the meat probe.
The use of temperature probe is recommended when cooking large portions of meat (at least 1 kg).
The use of temperature probe is not recommended when cooking poultry and meat with bones.
When not in use, disconnect the temperature probe from its socket and remove from oven chamber.
Important!
Use only original temperature probe supplied with the appliance.
Recommended probe temperature settings
| Type of meat Temperature [°C] | |
| Pork 85 - 90 | |
| Beef 80 - 85 | |
| Veal 75 - 80 | |
| Lamb 80 - 85 | |
| Venison 80 - 85 | |
Pyrolytic cleaning
Pyrolytic cleaning duration can be set from 2 to 3 hours.
- set the oven function selector knob in position
- using the < and > MENU sensors, set pyrolytic cleaning duration.
Important! Before starting the pyrolytic cleaning, please see "Cleaning and Maintenance."

Oven with automatic air circulation (including a fan and an ultra-fan heater)
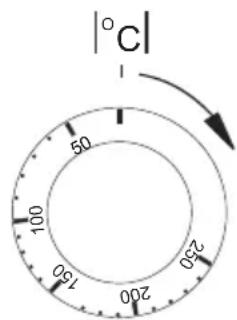
The oven can be heated up using the bottom and top heaters, the grill or the ultra-fan heater. Operation of the oven is controlled by the oven function knob – to set a required function you should turn the knob to the selected position, and the temperature regulator knob – to set a required function you should turn the knob to the selected position.
The oven is equipped with a retractable knobs. In order to select a function do the following:
- Gently press and release a knob which will pop out,
- Turn the oven functions selection knob to the desired function.
Symbols printed around the knob indicate available oven functions.
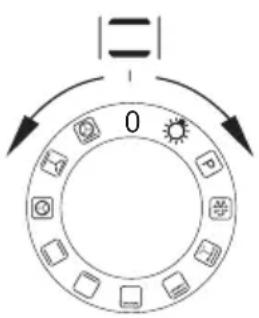
The oven can be switched off by setting both of these knobs to the position “●”/“0”.
Caution!
When selecting any heating function (switching a heater on etc.) the oven will only be switched on after the temperature has been set by the temperature regulator knob.

Oven is off

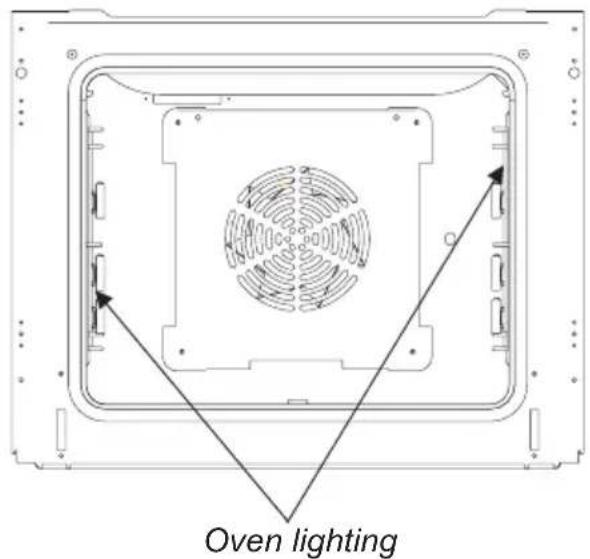
Independent oven lighting
Set the knob in this position to light up the oven interior.

Pyrolytic cleaning.
Oven pyrolytic self-cleaning. The oven heats up to a temperature of about 480^ C. Grilling or baking residue is burnt into an easy to remove ash that can be wiped off with a damp cloth.

Important!
Before starting the pyrolytic cleaning, please see "Cleaning and Maintenance."

Defrosting
Only fan is on and all heaters are off.

Fan and combined grill on
When the knob is turned to this position, the oven activates the combined grill and fan function. In practice, this function allows the grilling process to be speeded up and an improvement in the taste of the dish. You should only use the grill with the oven door shut.

Enhanced roaster (super roaster)
In this setting both roaster and top heater are on. This increases temperature in the top part of the oven's interior, which makes it suitable for browning and roasting of larger portions of food.

Roaster on.
Roasting is used for cooking of small portions of meat: steaks, schnitzel, fish, toasts, Frankfurter sausages, (thickness of roasted dish should not exceed 2-3 cm and should be turned over during roasting).

Bottom heater on
When the knob is set to this position the oven is heated using only the bottom heater. Baking of cakes from the bottom until done (moist cakes with fruit stuffing).

Top and bottom heaters on
Set the knob in this position for conventional baking. This setting is ideal for baking cakes, meat, fish, bread and pizza (it is necessary to preheat the oven and use a baking tray) on one oven level.

Convection with ring heating element
Setting the knob in this position allows the oven to be heated up by a heating element with air circulation forced by a rotating fan fitted in the central part of the back wall of the of and chamber. Lower baking temperatures than in the conventional oven can be used. Heating the oven up in this manner ensures uniform heat circulation around the dish being cooked in the oven.

Top heater, bottom heater and fan are on.
This knob setting is most suitable for baking cakes. Convection baking (recommended for baking).
When the functions have been selected but the temperature knob is set to zero only the fan will be on. With this function you can cool the dish or the oven chamber.

Convection with ring heating element and bottom heater on
With this setting the convection fan and bottom heater are on, which increases the temperature at the bottom of the cooked dish. Intense heat from the bottom, moist cakes, pizza.
Switching on the oven is indicated by red signal light, turning on. If the red light goes out, it means the oven has reached the set temperature. If a recipe recommends placing dishes in a warmed-up oven, this should be not done before the red light goes out for the first time. When baking, the red light will temporarily come on and go out (to maintain the temperature inside the oven).
Use of the grill
The grilling process operates through infrared rays emitted onto the dish by the incandescent grill heater.
In order to switch on the grill you need to:
- Set the oven knob to the position marked
grill ,
- Heat the oven for approx. 5 minutes (with the oven door shut).
- Insert a tray with a dish onto the appropriate cooking level; and if you are grilling on the grate insert a tray for dripping on the level immediately below (under the grate).
- Close the oven door.
For grilling with the function grill and combined grill the temperature must be set to 250^ C, but for the function fan and grill it must be set to a maximum of 190^ C.
Warning!
When using function grill it is recommended that the oven door is closed.
When the grill is in use accessible parts can become hot.
It is best to keep children away from the oven.
Baking
- we recommend using the baking trays which were provided with your oven;
- when using the ultra-fan function it is not necessary to initially heat up the oven chamber, for other types of heating you should warm up the oven chamber before the cake is inserted;
- before the cake is taken out of the oven, check if it is ready using a wooden stick (if the cake is ready the stick should come out dry and clean after being inserted into the cake);
● after switching off the oven it is advisable to leave the cake inside for about 5 min.; - temperatures for baking with the ultra-fan function are usually around 20 – 30 degrees lower than in normal baking (using top and bottom heaters);
● the baking parameters given in Table are approximate and can be corrected based on your own experience and cooking preferences; - if information given in recipe books is significantly different from the values included in this instruction manual, please apply the instructions from the manual.
Roasting meat
- cook meat weighing over 1 kg in the oven, but smaller pieces should be cooked on the gas burners.
- use heatproof ovenware for roasting, with handles that are also resistant to high temperatures;
- when roasting on the drying rack or the grate we recommend that you place a baking tray with a small amount of water on the lowest level of the oven;
- it is advisable to turn the meat over at least once during the roasting time and during roasting you should also baste the meat with its juices or with hot salty water – do not pour cold water over the meat.
BAKING IN THE OVEN – PRACTICAL HINTS
Oven with automatic air circulation (including a fan and an ultra-fan heater)
| Type of dish | Oven functions | Temperature Level Time°C | (°C) | in minutes |
 | 160 - 200 2 - 3 | 30 - 50 | ||
 | 160 - 180 2 - 3 | 20 - 40* | ||
 | 140 - 160 2 - 3 | 10 - 40* | ||
 | 200 - 230 1 - 3 | 10 - 20 | ||
 | 210 - 220 2 45 | - 60 | ||
 | 160 - 180 2 - 3 | 45 - 60 | ||
 | 190 2 - 3 60 | - 70 | ||
 | 230 - 250 4 14 | - 18 | ||
| [5STG] | 225 - 250 2 120 | - 150 | ||
 | 160 - 180 2 120 | - 160 | ||
 | 160 - 230 2 90 | - 120 | ||
 | 160 - 190 2 90 | - 120 | ||
 | 190 2 - 3 50 | - 60 | ||
 | 160 - 180 2 45 | - 60 | ||
 | 175 - 190 2 60 | - 70 | ||
 | 190 - 210 2 40 | - 50 | ||
 | 170 - 190 3 40 | - 50 |
* Baking smaller items
Caution!
The figures given in Tables are approximate and can be adapted based on your own experience and cooking preferences.
By ensuring proper cleaning and maintenance of your cooker you can have a significant influence on the continuing fault-free operation of your appliance.
Before you start cleaning, the cooker must be switched off and you should ensure that all knobs are set to the “●”/“0” position. Do not start cleaning until the cooker has completely cooled.
- The oven should be cleaned after every use. When cleaning the oven the lighting should be switched on to enable you to see the surfaces better.
- The oven chamber should only be washed with warm water and a small amount of washing-up liquid.
- After cleaning the oven chamber wipe it dry.
Caution!
Do not use cleaning products containing abrasive materials for the cleaning and maintenance of the glass front panel.
Important!
Do not use any abrasive agents, harsh detergents or abrasive objects for cleaning.
Only use warm water with a small addition of dishwashing liquid to clean the front of the appliance. Do not use washing powders or creams.
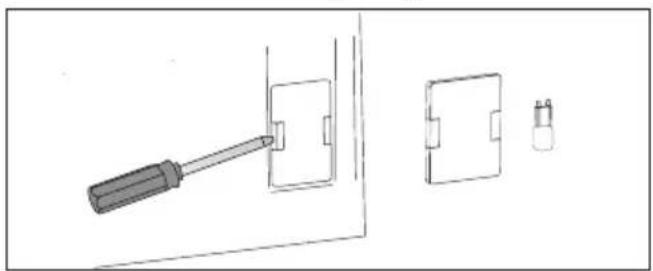
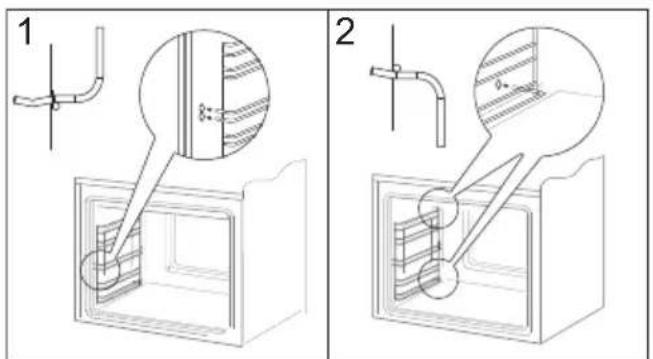
Replacing the halogen bulb in the oven
Before replacing the halogen bulb, make sure the appliance is disconnected from the electric mains to avoid a possible electric shock.
natural_image
Technical line drawing showing a screwdriver inserted into a component, with separate views of a plastic housing (no text or symbols)- Unplug the appliance
- Remove shelves and trays from the oven.
- If the oven has telescopic runners, remove them also.
- Use a flat screwdriver to pry the lamp cover loose, remove it, wash and carefully wipe it dry.
- Pull the halogen bulb out by sliding it down using a cloth or paper. If necessary, replace the halogen bulb with a new one.
- voltage 230V
- power 25W
- Replace the halogen bulb in its socket.
- Replace the lamp cover
CLEANING AND MAINTENANCE
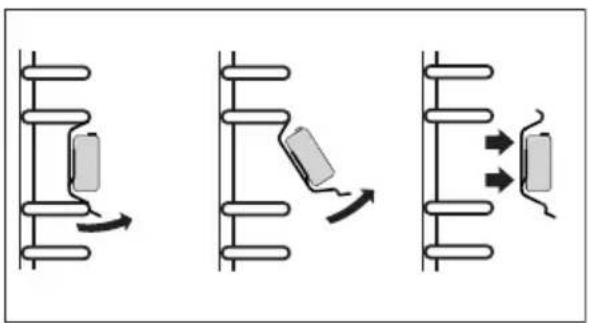
Wire shelf supports
Wire shelf supports are esay to remove for wasking. Pull the front catch, then tilt the support and remove from the rear catch.
Removing wire shelf supports
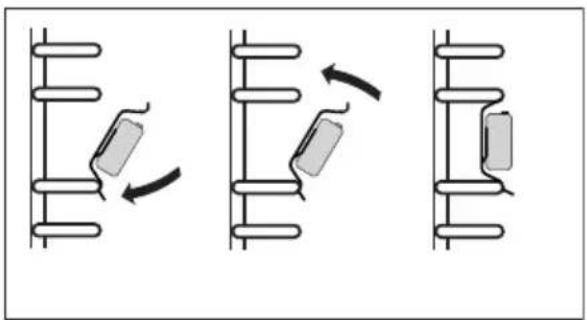
Telescopic runners
The telescopic runners should be removed and cleaned together with the wire shelf supports. Before you put the baking tray on the telescopic runners, they should be pulled out (if the oven is hot, pull out the telescopic runners by hooking the back edge of the baking tray on the bumpers in the front part of the telescopic runners) and then insert them together with the tray.
Important!
Do not wash telescopic runners in a dishwasher.
Installing wire shelf supports
natural_image
Three diagrams showing mechanical or electrical components with directional arrows, no text or symbols presentRemoving telescopic runners
natural_image
Three sequential diagrams showing mechanical or electrical components with arrows indicating motion (no text or symbols)Installing telescopic runners
Pyrolytic cleaning
Oven pyrolytic self-cleaning. The oven heats up to a temperature of about 480^ C. Grilling or baking residue is burnt into an easy to remove ash that can be wiped off with a damp cloth.
Before pyrolytic cleaning.
Important!
Remove all accessories from the oven (baking trays, drying grates, side racks, telescopic runners). Accessories left inside the oven will be irreversibly damaged during the pyrolysis cleaning.
- Remove stubborn stains from the oven chamber.
- Clean the outside of the oven with a damp cloth.
- Follow the instructions.
During the cleaning process.
- Do not leave the cloth near the hot oven.
- Do not use the hob.
- Do not turn on the oven lighting.
- The oven door is equipped with a lock, which prevents it from being opened during the cleaning process. Do not open the door so as not to interrupt the cleaning process.
Important!
During the pyrolytic oven cleaning process the oven chamber can reach a very high temperature. Consequently, the appliance outer surfaces can heat up more than usual, so keep children away at all times.
Some fumes can be emitted during the cleaning, so make sure the kitchen is well ventilated.
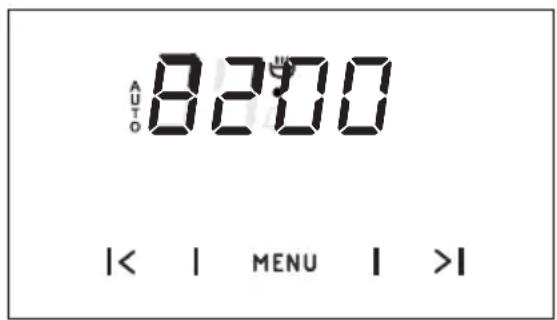
The pyrolytic cleaning process:
- Close the oven door.
- Set the function selector knob in position Pyrolytic Cleaning P
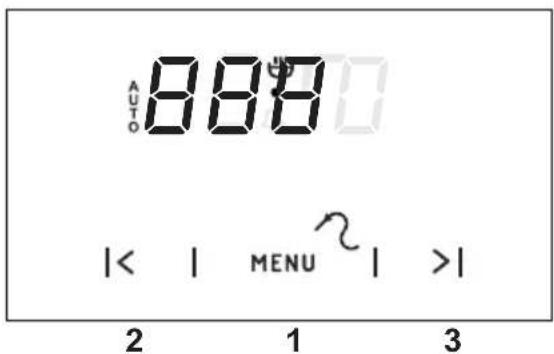
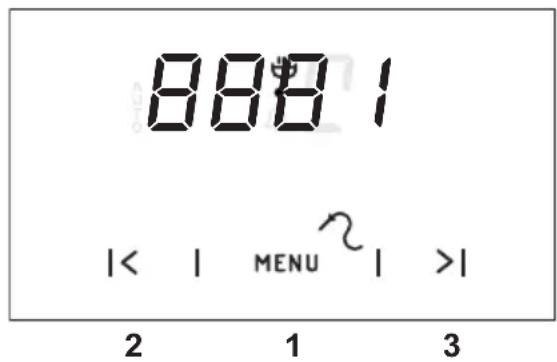
- Pyrolytic Cleaning duration (2:00) as well as „auto“ and „P“ symbols are shown on the display. Door lock indicator light comes on |0|
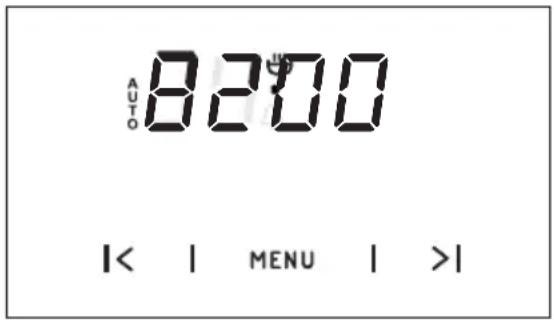
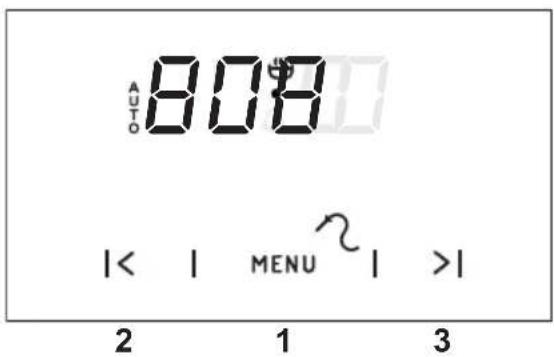
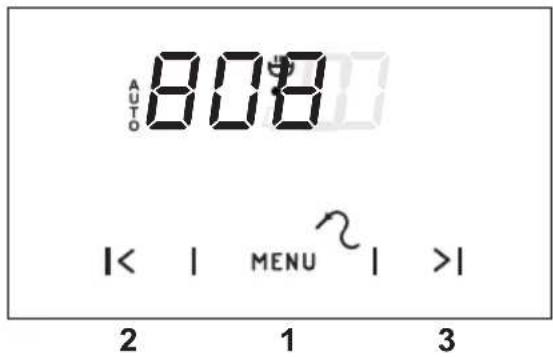
- Touch MENU for approx. 3-4 seconds until the display shows 0.00.
- Touch MENU again. The display will flash Pdur.

- Touch > or < sensors to select the Duration.
You can select 2.00 (2 hours, 120 minutes), 2.30 (2.5 hours, 150 minutes) or 3.00 (3 hours, 180 minutes). Once you have made your choice wait for the acoustic signal which confirms that Duration has been set.
- Pyrolytic cleaning process will start. Oven door will be locked.
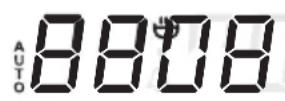
- "P0.00" is shown on the display when the pyrolytic cleaning is complete.

- The doors will be unlocked automatically when the oven chamber cools down. When the temperature inside the oven chamber cools down to 160°C, the door is unlocked and the door lock indicator |0 - n| light goes out.
- When door lock indicator light is off, set the function selector knob in position 0.
- When the door is unlocked and you turn off the oven, you can open the door and remove ash with a soft, damp cloth. Replace the side rail and other accessories. Your oven is ready for use.
Important!
When you start the pyrolytic cleaning process and inadvertently open the oven door, the process will stop and door lock indicator will be flashing. To restart the pyrolytic cleaning turn the selector knob to 0 and re-enter the desired settings.
Cancel the process
Pyrolytic cleaning is an automatic process that should not be interrupted.
If you need to stop the process, turn the selector knob to position 0.
Depending on the time when you interrupt the process (temperature in the oven chamber) the oven chamber will need to first cool down to 160^ C before the door is unlocked.
Open the door in emergency
If for some reason the door is not unlocked automatically, and the oven chamber has already cooled down, open the door as follows:
- set the function selector knob in position "Lighting",
- wait for 4 minutes;
- set the function selector knob in position 0 – the oven door should unlock within 10 minutes.
Note. The door will not unlock if the temperature inside the oven chamber is above 160^ C.
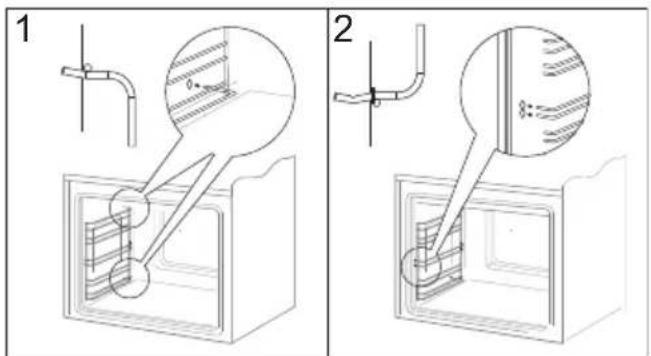
Door removal
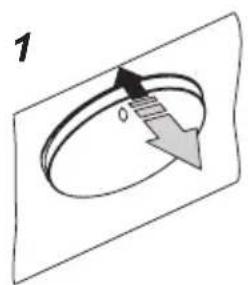
In order to obtain easier access to the oven chamber for cleaning, it is possible to remove the door. To do this, tilt the safety catch part of the hinge upwards (fig. A). Close the door lightly, lift and pull it out towards you. In order to fit the door back on to the cooker, do the inverse. When fitting, ensure that the notch of the hinge is correctly placed on the protrusion of the hinge holder. After the door is fitted to the oven, the safety catch should be carefully lowered down again. If the safety catch is not set it may cause damage to the hinge when closing the door.
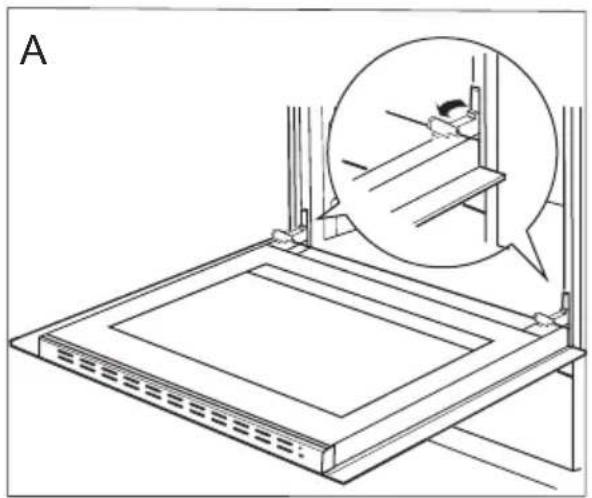
natural_image
Technical line drawing of a mechanical assembly with an inset showing a close-up of a component (no text or symbols present)Tilting the hinge safety catches
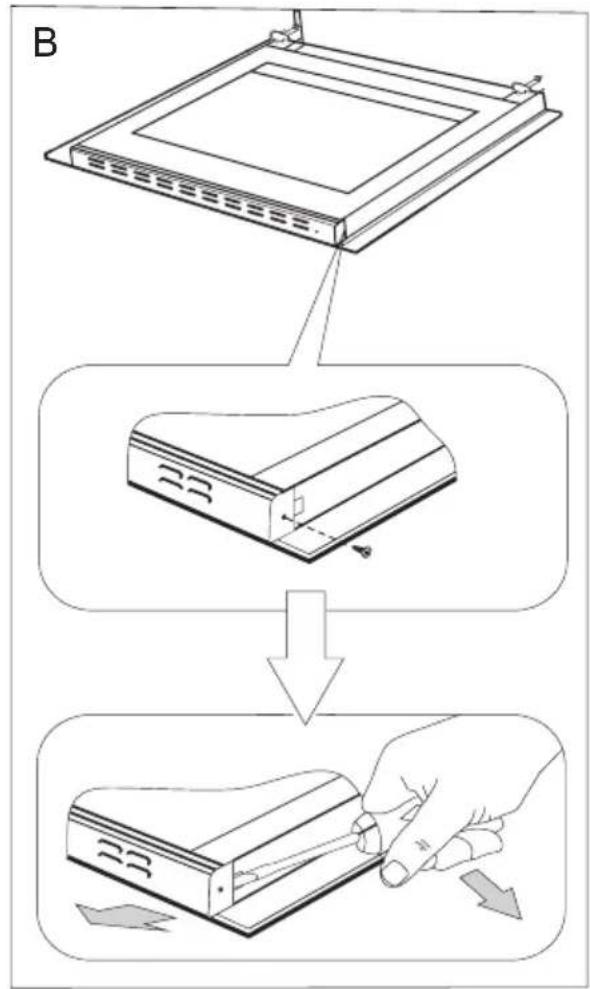
Removing the inner panel
- Using a cross-head screwdriver undo the screws in the upper door slat (fig. B).
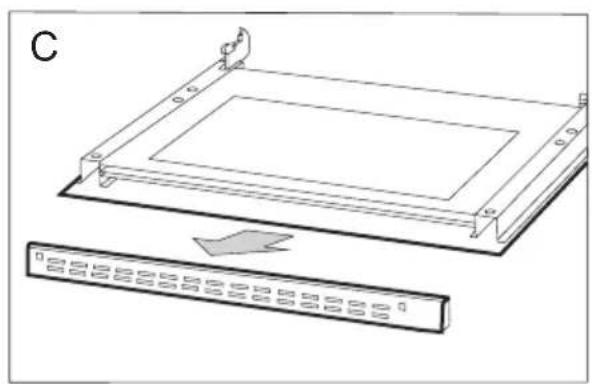
- Using a flat screwdriver remove the upper door slat, prying it gently on the sides (fig. B, C).
flowchart
graph TD
    A["Device with top panel"] --> B["Internal memory card"]
    B --> C["Internal memory card with internal structure"]
    C --> D["Internal memory card with internal structure and adjustment arrow"]
natural_image
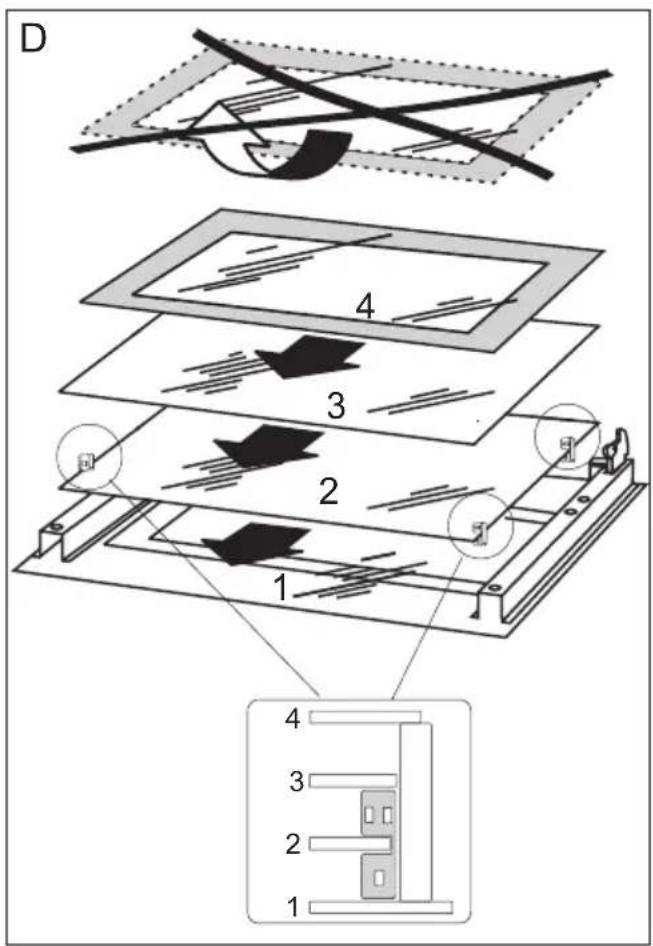
Technical line drawing of a rectangular electronic component with mounting flanges and a separate panel below showing internal structure (no text or symbols)- Pull the inner glass panel from its seat (in the lower section of the door).
Important! Risk of damage to glass panel mounting. Do not lift the glass panel up but pull it out.
Remove the inner panel (fig. D).
- Clean the panel with warm water with some cleaning agent added.
Carry out the same in reverse order to reassemble the inner glass panel. Its smooth surface shall be pointed upwards.
Removal of the internal glass panel
In the event of an emergency, you should:
- switch off all working units of the oven
- disconnect the mains plug
- some minor faults can be fixed by referring to the instructions given in the table below. Before calling the customer support centre or the Gram service centre check the following points that are presented in the table.
| PROBLEM REASON ACTION | ||
| 1. The appliance does not work. | Break in power supply. Check the household fuse box; if there is a blown fuse replace it with a new one. | |
| 2. The oven lighting does not work. | The bulb is loose or damaged. Tighten up or replace the blown bulb (see ‘Cleaning and Maintenance’). | |
Voltage rating 230V\~50 Hz
Power rating max. 3,1 kW
Oven dimensions H/W/D 59,5 / 59,5 / 57,5 cm
Complies with EU regulations EN 60335-1, EN 60335-2-6 standards
Certificate of compliance CE
The Manufacturer hereby declares that this product complies with the general requirements pursuant to the following European Directives:
● The Low Voltage Directive 2006/95/EC,
● Electromagnetic Compatibility Directive 2004/108/EC,
• ErP Directive 2009/125/EC,
and therefore the product has been marked with the CE symbol and the Declaration of Conformity has been issued to the manufacturer and is available to the competent authorities regulating the market.
NO:
SE:
FI:
Gram A/S Gram A/S Gram A/S
Tel.: 22 07 26 30
Tel.: 040 38 08 40 Tel.: 020 7756 350
www.gram.no www.gram.se www.gram.fi

Gram A/S
Gejlhavegård 2B
DK-6000 Kolding
+45 73 20 10 00
www.gram.dk
IO-CBI-0631 / 8072010
(12.2017 / v1)
- Caution!
- TABLE OF CONTENTS
- DESCRIPTION OF THE APPLIANCE
- Installing the oven
- Electrical connection
- Important!
- Before using the oven for the first time
- Electronic programmer
- Setting the time
- Timer
- Semi-automatic operation
- Automatic operation
- Cancel settings
- Change the timer beeps
- Meat Probe
- Recommended probe temperature settings
- Pyrolytic cleaning
- Oven with automatic air circulation (including a fan and an ultra-fan heater)
- Independent oven lighting
- Pyrolytic cleaning.
- Defrosting
- Fan and combined grill on
- Enhanced roaster (super roaster)
- Roaster on.
- Bottom heater on
- Top and bottom heaters on
- Convection with ring heating element
- Top heater, bottom heater and fan are on.
- Convection with ring heating element and bottom heater on
- Use of the grill
- Warning!
- Baking
- Roasting meat
- BAKING IN THE OVEN – PRACTICAL HINTS
- Replacing the halogen bulb in the oven
- CLEANING AND MAINTENANCE
- Wire shelf supports
- Telescopic runners
- During the cleaning process.
- The pyrolytic cleaning process:
- Cancel the process
- Open the door in emergency
- Door removal
- Removing the inner panel
- Certificate of compliance CE
- Gram A/S Gram A/S Gram A/S
Brand : GRAM
Model : IOP 12654-92 W
Category : Oven