
Harmony 895 - Remote control LOGITECH - Free user manual and instructions
Find the device manual for free Harmony 895 LOGITECH in PDF.


| Product Type | Universal remote control |
| Brand | Logitech |
| Model | Harmony 895 |
| Dimensions (approx.) | 200 x 50 x 25 mm |
| Weight (approx.) | 200 g |
| Power Supply | Rechargeable battery with base station |
| Main Functions | Internet-powered universal control, IR and RF (via extender), activity-based control, customizable display, tilt sensor, backlight, learning IR commands, teletext support, Z-Wave network |
| Care and Cleaning | Wipe with a soft, dry cloth. Do not use liquids or abrasive cleaners. |
| Safety | Keep away from water, extreme temperatures, and direct sunlight. Use only the provided charger. |
| Spare Parts and Repairability | Contact Logitech support for replacement parts or repair options. |
| General Information | Internet-powered universal remote compatible with most IR devices. Setup and customization via Logitech Harmony remote software. |
Frequently Asked Questions - Harmony 895 LOGITECH
User questions about Harmony 895 LOGITECH
0 question about this device. Answer the ones you know or ask your own.
Ask a new question about this device
Download the instructions for your Remote control in PDF format for free! Find your manual Harmony 895 - LOGITECH and take your electronic device back in hand. On this page are published all the documents necessary for the use of your device. Harmony 895 by LOGITECH.
USER MANUAL Harmony 895 LOGITECH
GETTING TO KNOW YOUR HARMONY REMOTE....2
BEGINNING THE SETUP PROCESS .... 3
USING YOUR HARMONY REMOTE 4
USING THE REMOTE WITH THE RF WIRELESS EXTENDER....4
Installing the RF Wireless Extender....4
Adding the RF Wireless Extender to the Z-Wave Network....5
USING THE GLOW BUTTON 5
RECHARGING THE BATTERY 5
USING THE TILT SENSOR....6
SELECTING AN ACTIVITY....6
VIEWING THE STATUS AND NAVIGATION BARS 7
DISPLAYING HELP ON YOUR HARMONY REMOTE 7
Types of Help Available 8
Using the Remote Assistant 8
CONTROLLING INDIVIDUAL DEVICES 8
USING SYSTEM OPTIONS 9
USING THE TELETEXT BUTTONS 9
CUSTOMIZING YOUR HARMONY REMOTE ....10
CUSTOMIZING THE DISPLAY ON THE HARMONY REMOTE 11
Adding your Favorite Channel Icons.... 11
Changing the Behavior of Buttons Within an Activity 12
Adding Custom-Labeled Buttons 12
CHANGING THE SETTINGS FOR YOUR HARMONY REMOTE 13
LEARNING INFRARED (IR) COMMANDS 13
Using the Infrared Sensor....14
Naming an Infrared Command 14
GETTING ADDITIONAL HELP .... 15
Finding Answers to Your Questions 15
Troubleshooting Your Harmony Remote 15
Introduction
Congratulations on the purchase of your Harmony remote! This User Manual will introduce you to the basic online setup process, customizations and main features of your Harmony remote, and instructions on using the remote with a Harmony RF Wireless Extender.
If in doubt about how to set up your Harmony remote, follow the information and instructions using the Logitech Harmony remote software (also referred to as Harmony remote software).
The Harmony remote is an Internet-powered universal remote control. Your Harmony remote can control most devices that understand infrared (IR) signals.
The configuration of your Harmony remote is simple:
- You will be prompted to answer questions about your entertainment devices to create your own personal Harmony remote configuration.
- Your answers will provide us with a description of the entertainment devices you want to control, how they are set up, and your preferences for controlling them.
- If one of your devices is not in the Harmony remote's database, the Harmony remote software will learn about your device and add it to your configuration.
- Once you have told us about your devices, you will then be guided through setting up Activities. Creating Activities is simple: you will be prompted to indicate the devices you use within an Activity and how you want to control specific features, such as the volume, within that Activity.
- An Activity is a set of commands the Harmony remote sends to your entertainment system to turn on the necessary devices.
- Once you have selected an Activity, you are in Activity mode, and the functionality of each button on your Harmony remote is automatically configured for that Activity.
- Additionally, the display buttons will give you access to other commands for that Activity, which cannot be set to the standard buttons.
Example
For the Watch Television Activity, the Harmony remote sends commands to your entertainment system to turn on the necessary devices so you can watch television. The remote will automatically be configured for the Activity based on the answers you selected during the online setup process for the Activity.
At the end of the setup process, you will have your own configuration loaded in your Harmony remote.
Use your Harmony remote software to:
- Customize any of your Harmony remote's features.
- Add more entertainment devices.
- Add more Activities.
Getting to Know Your Harmony Remote
Many of the Harmony remote's buttons are standard remote buttons. However, there are buttons and other hardware that may not be so familiar to you. The extra buttons and hardware give you access to the special features of the Harmony remote.

USB Connector: Connect one end of the USB cable to this connector and the other end to your computer so that you can download your configuration using the Harmony remote software.
OFF: Turns all devices off with one button press.
ACTIVITIES: Press Activities to view a list of Activities you have added. Press the display button next to the Activity you want and the Harmony remote will set up your entertainment system.
HELP: Asks you simple questions so that your Harmony remote can fix problems you are having within an Activity.
Display: Shows a list of your Activities and devices, help, infrared (IR) commands and any available listings.
Display Buttons: Use the buttons at the side of the display to select the corresponding command.
GLOW: Turns on and of the backlight on the Harmony remote.
PREV: Goes to previous television channel.
DEVICE: Lists all your devices on the display, and allows you to select and directly control any device.
MEDIA: In the Watch TV Activity, press this button to view your Favorite Channels on the display.
Left/Right Arrow: Allows you to view more options on the display.
Smart Buttons: While there is a default setting for the buttons in most Activities, you can customize these buttons to send different commands.
MENU: Gives you access to the menu system on a device, if you have a device with this feature.
EXIT: Exits from the Guide feature.
GUIDE: Gives you access to view program listings, if you have a device with this feature.
INFO: Gives you additional information on program listings, if you have a device with the Guide feature.
Infrared Learning Port: The Harmony remote uses this port to learn commands from your original remote.
Beginning the Setup Process
Once you have installed the Logitech Harmony remote software, connect your remote and you will be guided through a series of question-and-answer steps to complete each of the five main steps of the online setup process:
- Login Information: Create your login information.
- Check Connection: Ensures your computer and your Harmony remote are communicating properly.
- Set Up Devices: Helps you provide us with information about the devices in your personal home theater system.
- Set Up Activities: Helps you provide us with information about the way your devices work together to perform Activities (e.g. Watch Television Activity).
- Update Remote: Updates your remote with your personal settings.
Note: When using the Harmony remote software, click Help to view specific help for the step you are at.
Using Your Harmony Remote
This section provides you with information that will help you use your remote.
Using the Remote with the RF Wireless Extender
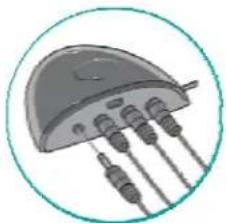
The Harmony RF Wireless Extender allows you to use the Harmony remote to control devices that are out of view (e.g. they are inside a cabinet).
Note: Update the RF Wireless Extender each time you make any changes to the configuration of your remote.
The RF Wireless Extender has four dual-head IR (infrared) emitters (one emitter can control two devices) that can be used to control up to eight devices that are out of extender's range.
natural_image
Illustration of a handheld electronic device with multiple leads and a dome-shaped top, enclosed in a circular frame (no text or symbols)Installing the RF Wireless Extender
The extender can be wall-mounted or installed inside the cabinet where you devices are located.
Wall-Mounted

Cabinet

natural_image
Illustration of a computer interface with three views: close-up, open screen, and close-up of a device with wires (no text or symbols visible)Adding the RF Wireless Extender to the Z-Wave Network
Anytime you update the remote, you must add the RF Wireless Extender to your Z-Wave network again. To add the extender to your Z-Wave network:
- Take your remote to the RF Wireless Extender you want to add. Make sure the extender is plugged into a power outlet.
- Press Add on the remote when you see a message reminding you to add an RF Wireless Extender to your network.
- Press Connect on the RF Wireless Extender. By pressing Connect you will add the extender to your Z-Wave network.
Anytime you update the RF Wireless Extender you must add the extender to your Z-Wave network again. To manually add the extender to your Z-Wave network:
- Take your remote to the RF Wireless Extender you updated. Make sure the extender is plugged into a power outlet.
- Press the display button next to System Options on the remote's display.
- Press Z-Wave Setup.
- Press Connect to RF Extender.
- Press Connect on the RF Wireless Extender and follow the instructions on the remote.
Using the Glow Button
Press the Glow button to light up or turn off the display backlight. To determine the length of time the backlight stays on:
- From Home in the Harmony software, click Remote Preferences.
- Click Settings.
Recharging the Battery
Place your remote in the base station to charge. While the remote's battery is charging:
• The display and its backlight, and the keypad backlight remain on.
Note: Press the GLOW button to turn the backlight off.
- The battery level icon in the status bar flashes when the battery is still charging or will display a full battery level when charging is complete.
When the battery is low, the display will flash a message to remind you to charge the battery.
Using the Tilt Sensor
Note: Whenever you pick up the remote from the base station, or replace it in the station, you will hear a beep.
When you pick up the remote slightly tilted, the display will automatically turn on and the keypad light up. To enable/disable these features:
-
From Home in the Harmony software, click Remote Preferences.
-
Click Settings.
Selecting an Activity
View the Activities you have added by pressing the Activities button. The display will then list the Activities you have added. Press the corresponding display button next to the Activity you want to start.

As a default, when you select an Activity, you will see a message on the remote's display reminding you to keep the remote pointed at your entertainment system while the Activity starts. This helps ensure that all infrared (IR) signals are properly sent.
To turn on/off the "Starting Activity" message:
- From Home in the Harmony software, click Remote Preferences.
- Click Settings.
Viewing the Status and Navigation Bars
The status bar provides users with important information such as:
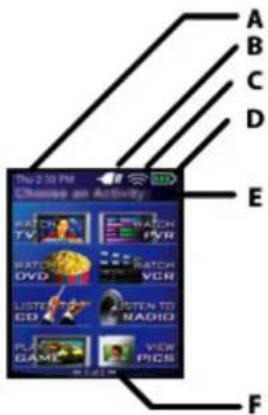
• A: Date and time
- To set the time-display format click Remote Preferences (from home in the Harmony software) and then click Settings.
• B: Indicator if the USB is attached
• C: Indicator when infrared (IR) commands are being sent to your devices
• D: Battery indicator (battery's power)
• E: Activity you are in (if applicable)
The navigation bar displays information such as:
• F: The number of screens available in a menu, and the screen currently displayed
Displaying Help on Your Harmony Remote
From time to time when you select an Activity, the Activity may not work. This can happen when the Harmony remote sends many infrared commands to set up all your devices for an Activity, but one or more devices are not receiving some commands. The Harmony remote is then "out of sync" with your devices (e.g. it thinks one of your devices is on, but it is turned off). Some of the reasons the Harmony remote can become "out of sync" with your system are:
- Someone walks between the Harmony remote and your entertainment system while an Activity is starting.
- You point your Harmony remote away from your system while an Activity is starting.
• There is an object blocking the line-of-sight between your Harmony remote and the system. - You are very far away from your entertainment system.
You will need to use the Help button on your Harmony remote to resynchronize the remote with your devices. Before resynchronizing, ensure the cause of the problem has been addressed.
Example
Remove all obstructions so that the entertainment devices can receive the infrared commands from the Harmony remote.
Note: If your devices are no longer responding consistently to your Harmony remote, but were doing so before, you may need to recharge the battery.
To resynchronize:
- Press the Help button.

- Answer the questions on the remote's display by selecting Yes or No. If you answer no to any question, the Harmony remote will resend the necessary command and ask you the same question again.
When you are done, the Harmony remote will be "in sync" with your devices again.
Types of Help Available
You can customize the Help button on your Harmony remote to provide one of the following types of help:
- Smart help
Asks questions about the devices that are on during a specific Activity.
- Full help
Asks questions about all the devices in your system.
Select Full help if you find devices aren't being controlled the way you want them to and the help on the remote is not asking you questions about these devices.
To select the type of help you want:
-
From Home in the Harmony software, click Remote Preferences.
-
Click Settings.
Using the Remote Assistant
Extra help is available from your remote by turning on the Remote Assistant.
To turn on/off this feature using the Harmony remote software:
-
From Home in the Harmony software, click Remote Preferences.
-
Click Settings.
While the Help button helps you solve device problems within an Activity, the Remote Assistant teaches you how to use your Harmony remote. The following is an example of the type of help the Remote Assistant offers:
Example
If any devices are not set up correctly, press "Help" now.
To temporarily turn on/off this feature via the Harmony remote:
- Press System Options on the remote.
Controlling Individual Devices
Press DEVICE to enter device mode. Device mode gives you access to all the possible commands for each device included in your Harmony remote configuration. To access device mode you do not need to be in an Activity. However, you should never need to use Device mode during normal use of your Harmony remote. This mode should only be used to send a specific command to a specific device.
You can eliminate the use of device mode by customizing your Activities.
Example
You can put commands on the display or customize specific buttons for the commands.
See Customizing Your Harmony Remote.
At any time, press DEVICE to switch into Device mode. Once in this mode, the Harmony remote will display a list of all the devices you have in your configuration. Select a device from the list and the Harmony remote will only control the device features for the device.
Example
If you choose Television as the device, the number, volume and channel buttons will all control your television.
Press DEVICE again to return to exit Device mode.
Using System Options
Press System Options on your Harmony remote to:
- Set the time and date.
- Turn the slide show on/off.
- Temporarily turn the Remote Assistant on/off (available only if you selected the option under Remote Preferences on home in the Harmony software—see Using the Remote Assistant.)
Using the Teletext Buttons
When you press any of the Teletext buttons, page 100 (the home page for Teletext) will appear on the television (it may take a few seconds for the page to appear). The Teletext page will completely replace the television picture, but sound will still be available. Each Teletext page has a unique 3-digit page number; all pages can be accessed by entering the 3-digit page number (using the numbered channel buttons on your Harmony remote).

natural_image
Close-up of a mechanical component with five colored circular buttons arranged in a curved pattern (no text or symbols visible)While Teletext is the default setting for these buttons in the Watch TV Activity, you can customize these buttons to send different commands in other Activities. See Changing the Behavior of Buttons Within an Activity.
Customizing Your Harmony Remote
All customization of your Harmony remote is done from Home in the Harmony remote software:
![Home Welcome Home Management Help Top-down Top-up Downlink Downlink Options Up/Downlink Downlink Options [ ] 请在下面的栏中选择“下一步”按钮。 [ ] 请在下面的栏中选择“下一步”按钮。](/content/2026/05/874136/images/887994f994388553769d56aa430a983ad3911470d8bab41fc72ebe8bf582982c.jpg)
Use the Harmony remote software to:
Troubleshoot
- Click Troubleshoot when your Harmony remote isn't controlling your system correctly.
view Activities
- Click Activities to add or delete Activities.
- Click an Activity icon to change the specific settings (e.g. the name of an Activity) for an Activity.
Example
To have more than one Activity of a given type (e.g. If you have both a cable converter and a satellite receiver, you can add a second Watch Television Activity) click Add an Activity. When you're done, rename the Activities to help you distinguish between them (e.g. For the Watch Television Activity you could rename one from "Watch Television" to "Watch Cable" and the other to "Watch Satellite".)
view Devices
- Click Devices to add or delete entertainment devices.
- Click a device icon to change the specific settings for a device you have already set up.
view Remote Preferences
- Click Remote Preferences to change the remote's settings.
Get Support
- Click Get Support to view a list of support tools and services we offer.
Update Remote
- Click Update Remote after you have made changes your configuration or settings. This will ensure you have the latest configuration and settings on your Harmony remote.
Customizing the Display on the Harmony Remote
This section provides information that will help you to customize the commands and options listed on the Harmony remote's display.
The Harmony remote comes with a set of defaults, which you can change to make the display look the way you want it to:
- Select or add your own backgrounds for the display.
- Add your icons for your favorite channels (you can upload your own icons up to a maximum of 160 KB (file size), and 24-bit .png, .bmp, .jpg, or .gif.)
- Select one of the default themes.
- A theme consists of a font style, background, layout, and icons (for Activities and Devices)—choose a theme that best suits you.
- Layout is the number of selections (4 or 8) displayed on the display
- Add your own slide show to the display.
- You can use the default backgrounds or your own background images to create your own slide show. The slide show displays while the remote is in the base station. See Using System Options for more information on turning the slide show on and off.
To make the Harmony remote's display look the way you want it to:
- From Home in the Harmony software, click Remote Preferences.
- Click an option to make your changes to the theme, background, or slide show.
Adding your Favorite Channel Icons
You can customize the display for your Favorite Channels menu by adding your own icons and setting an icon to appear next to one of your Favorite Channels.
To add your favorite channels and icons to the Harmony remote display:
- From Home in the Harmony software, click Activities
- Click an Activity.
You can change the Favorite Channel settings for these Activities:
- Watch Television
- Record to VCR
- Watch TiVo
- Watch PVR
- Watch ReplayTV
■ Listen to Satellite -
Watch My TV
-
Click Favorite Channels.
Changing the Behavior of Buttons Within an Activity
| (Bullies) | DVD | Stereo Receiver | |
| C& Puses | Volume Control | ||
| Mega | m | Mega | |
| Volume Up | m | VolumeUp | |
| Volume Down | m | VolumeDown | |
| Down Motion | Previous Touch | m | |
| Up Action | Head Touch | m | |
| Channel Down | Previous Touch | m | |
| Channel Up | HeadTouch | m | |
| Pier | m | m | |
| Up | m | m | |
| Down | m | m | |
| Left | m | m | |
| Right | m | m | |
| Off | m | m | |
| Midway | m | m | |
| Left | m | m | |
| Right | m | m | |
| Side | m | m |
When you select an Activity, the Harmony remote will:
- Turn on all the correct entertainment devices
- Set the device inputs correctly
- Set up the remote's buttons to control the Activity
Based on our knowledge of how each of your devices is controlled, the Harmony remote will make its best effort to match all the buttons you need to control an Activity.
However, there may be some commands you want to add to buttons or access via the display. Commands can be added to buttons quickly and easily by customizing any Activity to change the behavior of buttons.
To change the behavior of buttons:
- From Home in the Harmony software, click Activities.
- Click an Activity.
The Change Behavior of Buttons feature show you the:
- Buttons that have a command associated with them
• Device being controlled
• Command being sent to the device
To set a button to send a command to more than one device at a time:
- From Home in the Harmony software, click Activities.
- Click an Activity.
Adding Custom-Labeled Buttons
You can also add any number of custom-labeled buttons to an Activity.
To add custom-labeled buttons:
- From Home in the Harmony software, click Activities.
- Click an Activity.
| Custom | DVD | Stereo Receiver | |
| Button | |||
| Label | Cd Player | Volume Control | |
| Track- | NextTrack | ||
| Track- | PreviousTrack | ||
| More Custom Labels | |||
To add a custom-labeled button for an Activity:
- From Home in the Harmony software, click Activities.
- Click an Activity.
- Select Change the Behavior of Buttons.
- Under the Custom Button Label column, type the name for the button label you would like to appear on the display.
- Select a command from the drop-down list in the appropriate device column, next to the name of the button you want to set.
Custom-labeled buttons are displayed on the Harmony remote's display from left to right, top to bottom.
Add a custom-labeled button to send a command to more than one device at a time:
- From Home in the Harmony software, click Activities.
- Click an Activity.
- Select Change the Behavior of Buttons.
- Select a command from the drop-down list in each of the required device columns next to the name of the button you want to set.
- Add as many custom-labeled buttons as you like. Click More Custom Labels to add labels one at a time.
Changing the Settings for your Harmony Remote
From Home in the Harmony software, click Remote Preferences to change the remote's settings:
- Turn on/off Help on the remote/Remote Assistant (for additional information, see Displaying Help on Your Harmony Remote.)
- Set the backlight timing (for additional information, see Using the Tilt Sensor and Using the Glow Button.)
- Set the time-display format.
• Show/Hide the "Starting Activity" message (for additional information, see Selecting an Activity.) - Turn on/off the tilt sensor (for additional information, see Using the Tilt Sensor.)
Learning Infrared (IR) Commands
The Harmony remote can learn infrared commands from other remote controls, and should only be used in situations where the Harmony remote's infrared database does not already contain an infrared command you would like to use.
Determine the device you would like to send the infrared command to:
- From Home in the Harmony software, click Devices.
- Click a device.
- Select Learn infrared commands.
Using the Infrared Sensor
The Harmony remote has an infrared sensor at the end opposite to the USB connector. The Harmony remote uses this sensor to learn commands from original device remotes.

• A: Your original remote
• B: Distance between remotes: 5-10 cm (2"-5") apart
• C: Your Harmony remote
The following steps outline what happens when you press a button on your original remote control:
- The infrared sensor on the Harmony remote learns the infrared signal.
- The Harmony remote uploads it via the USB cable (and your computer's internet connection) to the Harmony database.
- The Harmony remote software will try to find a matching pattern for the infrared signal.
- If no pattern is found, the signal will be stored as-is in its original format.
- If a pattern is found, the Harmony remote software converts the signal into a format for convenient storage.
Either way, the signal is then available for you to assign to a button on your Harmony remote.
Naming an Infrared Command
When you teach an infrared command to the Harmony remote, give the command a name. This way you can refer to this command by name in various locations of the online setup process. It is best to use the default names listed on the Learn infrared commands step so that automatic button function assignments can be applied to your Harmony remote.
Example
If you teach the volume button infrared commands from your original remote control, name them "VolumeUp" and "VolumeDown" (i.e. with no space, and capitalization as shown). The remote software looks for commands with these names to automatically assign them to the volume up and down buttons on the Harmony remote.
Naming Conventions
When naming a command for which there is no default name on the Learn infrared commands feature, use the following naming conventions to make button assignment and sharing infrared commands easier:
- Do not use spaces or special characters such as /, & or * in the name.
- Capitalize the start of words (e.g. NextDisc, ModeDigital).
- Start the command name with its main function (e.g. VolumeRearUp, VolumeRearDown, VolumeFrontUp, VolumeFrontDown). This helps group related commands in lists.
- For infrared commands that select inputs (e.g. on a stereo receiver), start with the prefix "Input". Do not name the input based on what you have connected to your device, rather name it based on what it is called on the front of the device, or on the remote control (e.g. InputAux, InputVideo1, InputTape, InputDVD, InputVCR).
Getting Additional Help
The Harmony remote provides you with several features to assist you with:
• finding answers to your questions quickly and easily
- troubleshooting the setup and customization process
Finding Answers to Your Questions
The help you find answers to your questions quickly and easily, consult any of the following tools:
| Feature Description | |
| Search A support tool that enables you to | do a keyword search. |
| FAQs (Frequently-Asked Questions) A searchable list of customer questions, with answers provided by Harmony's support center. | |
| User Manual The User Manual explains the concept of your Harmony remote and provides information about setting up and using the remote. | |
| Help button | When running the Harmony remote software, click this button for help specific to the step you are at. |
Help button (remote) | Asks you simple questions so the Harmony remote can automatically fix problems you are having with an Activity. |
Troubleshooting Your Harmony Remote
In addition to the tools listed under Finding Answers to Your Questions, you can use the following tool to troubleshoot your Harmony remote:
| Feature Description | |
| Troubleshoot To be used when the Harmony remote is not controlling your system correctly. | |
If you cannot find the answer to your question(s) or troubleshoot your problem(s), contact your Harmony Support Team.


- USING YOUR HARMONY REMOTE 4
- CUSTOMIZING YOUR HARMONY REMOTE ....10
- GETTING ADDITIONAL HELP .... 15
- Introduction
- Example
- Getting to Know Your Harmony Remote
- Beginning the Setup Process
- Using Your Harmony Remote
- Using the Remote with the RF Wireless Extender
- Installing the RF Wireless Extender
- Cabinet
- Adding the RF Wireless Extender to the Z-Wave Network
- Using the Glow Button
- Recharging the Battery
- Using the Tilt Sensor
- Selecting an Activity
- Viewing the Status and Navigation Bars
- Displaying Help on Your Harmony Remote
- To resynchronize:
- Types of Help Available
- To select the type of help you want:
- Using the Remote Assistant
- To turn on/off this feature using the Harmony remote software:
- To temporarily turn on/off this feature via the Harmony remote:
- Controlling Individual Devices
- Using System Options
- Using the Teletext Buttons
- Customizing Your Harmony Remote
- Troubleshoot
- view Activities
- view Devices
- view Remote Preferences
- Get Support
- Update Remote
- Customizing the Display on the Harmony Remote
- To make the Harmony remote's display look the way you want it to:
- Adding your Favorite Channel Icons
- To add your favorite channels and icons to the Harmony remote display:
- Changing the Behavior of Buttons Within an Activity
- To change the behavior of buttons:
- To set a button to send a command to more than one device at a time:
- Adding Custom-Labeled Buttons
- To add custom-labeled buttons:
- To add a custom-labeled button for an Activity:
- Add a custom-labeled button to send a command to more than one device at a time:
- Changing the Settings for your Harmony Remote
- Learning Infrared (IR) Commands
- Using the Infrared Sensor
- Naming an Infrared Command
- Naming Conventions
- Getting Additional Help
- Finding Answers to Your Questions
- Troubleshooting Your Harmony Remote
Brand : LOGITECH
Model : Harmony 895
Category : Remote control