
Harmony Smart Control Add-on - Remote control LOGITECH - Free user manual and instructions
Find the device manual for free Harmony Smart Control Add-on LOGITECH in PDF.


| Product Type | Remote Control Add-on |
| Brand | Logitech |
| Model | Harmony Smart Control Add-on |
| Dimensions (L x W x H) | Approx. 150 x 50 x 20 mm |
| Weight | Approx. 150 g (including batteries) |
| Power Supply | 2 x AAA batteries (not included) |
| Wireless Technology | Infrared (IR), Bluetooth, and RF via Harmony Hub |
| Maximum Devices Supported | 15 devices (via hub) |
| Range | Up to 10 m (IR) / 30 m (RF with hub) |
| Display | No display |
| Button Layout | Backlit keys for activity control, navigation, volume, and channel |
| Main Functions | Control TV, set-top box, streaming devices, game consoles, and more; create one-touch activities; voice control via hub |
| Compatibility | Harmony Hub required; works with major brands |
| Care and Cleaning | Wipe with a soft, dry cloth; avoid solvents |
| Safety Precautions | Do not expose to moisture or extreme temperatures |
| Spare Parts | Batteries (AAA); replacement remote available from Logitech |
| Reparability | Not user-serviceable; contact Logitech support for repairs |
| Warranty | 1-year limited warranty |
| In the Box | Remote control, USB charging cable (if applicable), documentation |
Frequently Asked Questions - Harmony Smart Control Add-on LOGITECH
User questions about Harmony Smart Control Add-on LOGITECH
0 question about this device. Answer the ones you know or ask your own.
Ask a new question about this device
Download the instructions for your Remote control in PDF format for free! Find your manual Harmony Smart Control Add-on - LOGITECH and take your electronic device back in hand. On this page are published all the documents necessary for the use of your device. Harmony Smart Control Add-on by LOGITECH.
USER MANUAL Harmony Smart Control Add-on LOGITECH
Features of the remote control 7
Changing the battery 8
How your Harmony Smart Control works....8
Devices 8
Activities 9
Favorites 10
Harmony App 10
MyHarmony 10
Powering your system off 11
Interference with Harmony Smart Control 11
Adding more devices.... 18
Personalizing your remote 18
Using your Harmony Smart Control 19
Acvies....19
Switching between Acvies 20
Gesture control 20
Viewing current gesture commands....21
Customizing Acvity gestures.... 21
Acvity commands.... 21
Favorites....21
Devices 21
How to get the most out of your Harmony Smart Control 22
Important: use your Harmony Smart Control every me! 22
Adjust the power on delay....22
Posion the hub and set up hub assignments correctly for your setup.... 22
Use the Help funcon to put the remote back in sync with devices 22
Changing your Setup.... 23
Changing your setup with the Harmony App.... 23
Changing your setup with MyHarmony 23
Syncing your changes....24
Adding devices 24
Adding a device with the Harmony App 24
Adding a device with MyHarmony 24
Special devices 25
Adding an unknown device with MyHarmony.... 25
Deleng devices 26
Deleng devices with the Harmony App.... 26
Deleng devices with MyHarmony 27
Modifying device sengs 27
Modifying device sengs with the Harmony App.... 27
Modifying device sengs with MyHarmony 27
Adding Acvies....27
Logitech Harmony Smart Control
Adding Acvies with the Harmony App.... 27
Adding Acvies with MyHarmony 28
Viewing Acvity sengs 28
Viewing Acvity sengs with the Harmony App.... 28
Viewing Acvity sengs with MyHarmony 29
Changing Acvity sengs 29
Changing Acvity sengs with the Harmony App 29
Changing Acvity sengs with MyHarmony.... 29
Deleng Acvies 30
Deleng Acvies with the Harmony App.... 30
Deleng Acvies with MyHarmony 30
Changing your locaon or channel provider.... 31
Changing your locaon or channel provider with the Harmony App 31
Changing your locaon or channel provider with MyHarmony.... 31
Managing your Favorites.... 31
Managing your Favorites with the Harmony App.... 31
Managing your Favorites with MyHarmony 32
Advanced customizaon 33
Customizing Acvies with MyHarmony 33
Customizing buons to perform a sequence of commands with MyHarmony 34
Customizing Acvity buons with the Harmony App.... 35
Customizing buons and on-screen commands with MyHarmony 35
Acvies mode.... 35
Device mode.... 36
Changing hub assignments with MyHarmony 36
Upgrading your Harmony Smart Control rmware 36
Personalizing your Remote.... 36
Customizing Favorite Channel icons with MyHarmony 36
Remote Control Menus 37
Help 37
Connect to your Harmony.... 37
Edit 38
Devices menu....38
Sengs menu 38
Sync your Harmony 38
Set up new remote.... 38
Edit devices and advies 38
Devices 38
Acvies....39
Favorites....39
Remote 39
Account Info....39
Reset buon layout.... 39
Reset gesture mapping 39
Reset Favorites....40
Auto lock 40
Hapc feedback....40
Customer support 40
Privacy Policy....40
About 40
Troubleshoong....40
Setup problems....40
Wi-Fi problems....42
Add missing commands to your Harmony Smart Control 42
Hub is not syncing to the Harmony app....42
Devices do not respond to Harmony Smart Control.... 43
Support 43
Find answers to quesons online 43
Logitech Harmony remote knowledge base 43
Logitech Harmony remote user forum 43
Contact customer support: 43
Copyright 43
About this Manual
This manual contains both internal links to other parts of the manual and external links to other sources of informaon. Internal links appear like this and external links appear like this.
Illustraons in this manual were accurate at the me of publicaon.
Note: If you are upgrading from Harmony Touch, click here for setup instrucons of using this user manual
Terms used in this manual:
• Harmony App: the remote control app that runs on your smartphone or mobile device.
• Harmony Smart Control remote: the physical remote control that comes with Harmony Smart Control.
- MyHarmony: the account that saves all your setup informaon in the cloud. You can access your MyHarmony account either through the Harmony App, or on your computer through MyHarmony.
- Harmony Smart Control system: includes the Harmony Hub, the Harmony App, the Harmony Smart Control remote, and MyHarmony.
At a Glance
Features
The Harmony Smart Control system provides maximum exibility for controlling your home entertainment system.
Use the Harmony app on your smartphone to control your entertainment devices (TV, cable or satellite box, DVR, game console, etc.) and home automaon devices (IR controllable light bulbs, vacuum cleaners, motorized blinds, etc.). A Harmony Smart Control remote is provided as backup in case your smartphone is not available.
Switch between watching cable TV, watching your Roku, or playing a game with one touch. You can program your Acvies to be as simple and general as you want or as complicated and precise as you want. Whatever you like to do, one touch can take you from one Acvity to the next, powering o and on the right devices and adapting the remote control to send the right commands to the devices you're currently using.
The Harmony App will guide you through the setup process on your smartphone. Once your setup is saved in the MyHarmony cloud, you have the ability to turn any supported smartphone into a remote that funcons as a Harmony Smart Control remote.
For suggestions on how to optimize your Harmony and for unique setup solutions, please visit our Harmony user community forums for ideas (English only).
Supported devices
New user setup for the Harmony App is only supported for the iPhone 4s or newer, the new iPad, the iPad Mini, and Android phones. To run the Harmony App on an older iPhone, refer to Set up new remote for more informaon. Please visit our complete list of supported plaorms.
Find out if your mobile device is supported.
Know your Harmony Smart Control
Open your Harmony Smart Control box and familiarize yourself with the components.

- Harmony Hub
- Pair / Reset buon
- Micro USB power connector
- Mini blaster connector
- IR mini blaster
- AC/DC adapter
- Remote control
Features of the remote control

- O buon: Power o your current Acvity.
- Acvity buons: Select an Acvity.
- Audio/video controls: Perform standard AV funcons.
- Color coded navigaon buons: Perform cable, satellite or Blu-ray funcons
- Satellite/cable controls:
• DVR: Opens the record/ play menu.
• Guide: Opens satellite or cable program lisngs.
• Info: Provides program informaon.
- Exit: Leave a lisng or menu on your TV screen.
- Volume control
- Mute
- Numeric keypad
- Direconal controls: Navigate up, down, le and right in menus on your TV, DVR, game console or other media source.
- Menu: Display the menu on your TV, DVR, game console or other media source.
- Channel control; page up/down
- OK: Press to select an opon on your TV screen.
- Previous: Tune to the previous channel.
Changing the battery
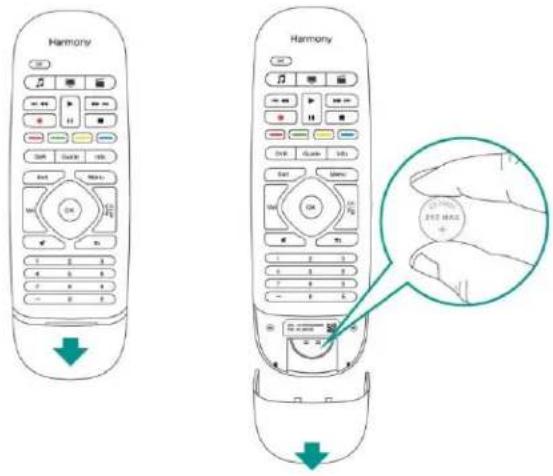
To change the baery, slide open the baery compartment as shown and replace the baery with a new 3 volt CR20321 lithium baery.
Whether you use the Harmony App or your Harmony Smart Control remote, the hub stores your setup informaon and communicates between your Harmony Smart Control system and your entertainment center devices. The hub communicates with other devices by Wi-Fi, IR (infrared), and Bluetooth signals, depending on the device.
An IR mini blaster extends the range of the Harmony Hub allowing you to control devices that are on other shelves or outside of your cabinet, such as a television.
How your Harmony Smart Control works
Devices
Devices are the components of your entertainment system. Examples of devices are:
• TV set
• Cable or satellite set top box
• Audio Visual (AV) receiver
- DVD player
• Game console
Gather the manufacturer and model number informaon for each of your devices and record it on the next page of this user guide. Also write down how devices are connected to one another and the input they must be on. For example, to watch a movie you might have your television set to input (or source) "HDMI 1" and your AV Receiver set to input "DVD". Having this informaon collected ahead of me will make setup much easier.

natural_image
Line drawing of a flat-screen monitor with blank screen (no text or symbols)TV Manufacturer
Model #
What's connected?
Device Input
Device Input
Device Input
Device Input
Device Input
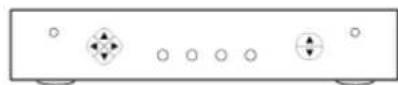
Cable/Satellite Box Manufacturer
Model #
DVD/Blu-ray Player Manufacturer

Model #
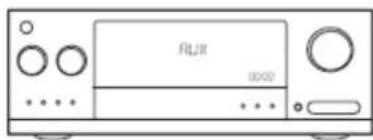
natural_image
Front view of a portable electronic device with control knobs and buttons (no visible text or symbols)AV Receiver Manufacturer
Model #
What's connected?
Device Input
Device Input
Device Input
Device Input
Device Input
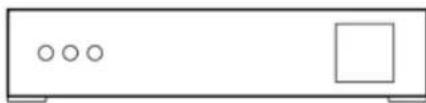
natural_image
Simple line drawing of a rectangular device with three small circles and a square on the right side (no text or symbols)Other Device Manufacturer
Model #
Activities
Acvies dene the way you use your remote controlled devices. Examples of Acvies are:
- Watch TV
- Listen to Music
- Watch a DVD
- Play a Game
To create an Acvity, you need to know some basic informaon about how your devices interact with each other in that Acvity. For example, to create a basic Watch TV Acvity, you need to know:
- Which devices you will use. In most cases, you need at least the following devices:
-
A TV set
• A video source, such as a cable or satellite set top box -
Which device is used to control the volume
- Which device is used to change channels
- Which input is used on the TV set to view the video source
Inputs determine how your devices are connected. For example, if your DVD player is connected to the Video 2 input on your TV, then the TV must be set to Video 2 to display the DVD's picture. More information is provided about inputs in the instructions for Adding a Watch TV Activity.
Favorites
The Favorites screen allows you to view your predened Favorite Channels and staon icons (where available). You can select up to 50 television channels to display on the Harmony App. Selectng a Favorite Channel will start your "Watch TV" Acvity, if it's not already started, and tune directly to that channel. Using the mobile device screen, you can add, remove and reorder your Favorite Channels. The Harmony App on your smartphone allows you to customize Favorite Channels unique to each smartphone.
Harmony App
The Harmony App communicates with the Harmony hub and mini blasters to send commands to your devices. The app also sets up and communicates with your MyHarmony account, which saves your conguraon informaon in the cloud so that once the Harmony App is set up, you can use the Harmony App on all the smartphones in your household to control the Harmony Smart Control system. In addition, the Harmony App can be customized on each smartphone so that each person can set up and save their own individual preferences.
MyHarmony
hp://myharmony.com is a website where you can access your Harmony Smart Control conguraon informaon and make changes to your setup if necessary. When seng up your Harmony Smart Control system for the rst me with the Harmony App, it sets up a MyHarmony account for you on MyHarmony. You can return to MyHarmony any me to change your conguraon, although you can make most changes with the Harmony App. There are minimum system requirements for using MyHarmony on your computer. The following operang system/browser combinaons are supported:
| Desktop Browser | Mac | PC* |
| Internet Explorer 8+ | × | |
| Chrome 16+ | × | |
| Firefox 11+ | × | × |
| Safari 5.1+ | × |
* Windows Vista and XP support 32 bit browsers
* Windows 7 and 8 support both 32 and 64 bit browsers
Powering your system off
You can power o your all of the devices for an Acvity from the Harmony App by tapping the ☐ on at the top of the screen and then tapping Power O. For example, in a Watch TV Acvity that uses a TV, Cable Box, and AV Receiver; pressing the O buon will power o all three devices at the same me. Note that this menu opon is only available while an Acvity is on.
The Harmony Smart Control system knows the current state of the devices it controls by remembering the last Acvity you selected. For example, if you switch from watching cable TV to watching a DVD, the Harmony Smart Control knows that it doesn't need to power the TV off and back on, it just leaves the TV turned on; and it knows that it does need to power o the cable box and power on the DVD player.
You will primarily want to use the Harmony App to control your devices, but alternatively you can use the Harmony Smart Control remote O buon to power o all of the devices for an Acvity with one touch.
Interference with Harmony Smart Control
You can confuse the Harmony Smart Control by using other remotes or manually controlling your devices. For example, if you select the Watch TV Acvity and then use your TV remote to turn o the TV, the next me you want to select an Acvity, the Harmony Smart Control will think that your TV is already powered on and will not turn it on. Other things that can confuse the Harmony Smart Control include inter-device communicaon that turns devices on or o, such as HDMI-CEC or SCART (in Europe). For more informaon about HDMI-CEC, see the FAQ.
If the Harmony Smart Control becomes confused, you can use the Help funcon in the Harmony App to bring the TV back in sync. For more informaon about the Help funcon, see the seconds Help and Troubleshoong.
Harmony Smart Control First Time Setup
The rst me you set up your Harmony Smart Control system, the Harmony App walks you through the setup process and stores your sengs in your personal account. Your sengs can be transmied to your Harmony Hub, your Harmony Smart Control remote, or any other supported mobile device. If anything ever happens to your smartphone, Harmony Hub, or remote control, you can use these saved sengs to set up a replacement system with ease.
Hardware setup
There are a few steps to seng up your Harmony Smart Control hardware:
- Connect your Harmony Hub to a power outlet.
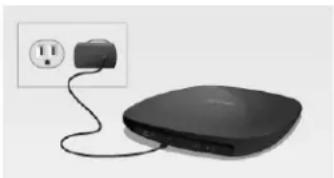
natural_image
Black electronic device connected to a cable with an outlet symbol (no text or labels visible)- Place the hub inside your entertainment system.
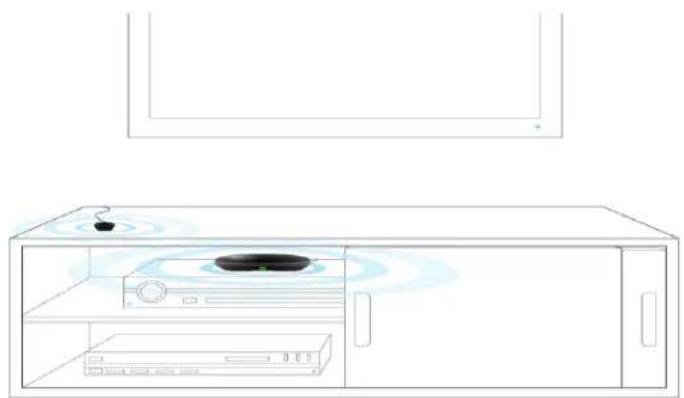
natural_image
Line drawing of a TV box with a mounted dish and a small pot, no text or symbols presentConnect the IR mini blaster to the port on the rear of the Harmony Hub.

- Place the mini blaster outside your cabinet or inside your cabinet on a dierent shelf from your hub. The Smart Control remote cannot send IR signals, so if you have the hub inside a closed cabinet, place the mini blaster outside the cabinet so that it can send IR signals to the television.
Now you're ready to program your system.
Download the Harmony App
Go to the app store for your device and search the phone apps for "Harmony Control". Although the Harmony App also can run on newer tablets.
Set up the Harmony App
Although the enre setup process is described in this secon, only selected screens from the Harmony App setup process are shown. Please read all the instrucons displayed on your Harmony App screen so that you understand what is happening during setup.
- Start with the Harmony Hub posioned as described in the Hardware setup secon,
- Your mobile device will need to be connected to your Wi-Fi network for the setup process. If it is not already connected, do that now.
- Open the Harmony App.
Harmony
- Tap Connue on the welcome screen. The opon to buy a Harmony Smart Control is also oered from the welcome screen.
- When prompted, tap Set Up Remote.
- Read the overview of the setup steps and tap Connue.
- Wait 30 seconds, then press the Pair / Reset buon on the back of the Harmony Hub to begin pairing the Harmony Hub with the Harmony App on your mobile device.
- Connue with the steps in the next secon, Connecng to Wi-Fi.
Connecting to Wi-Fi
Connecng your Harmony Hub to your Wi-Fi network has mulple advantages, such as enabling use of the Harmony app, providing Philips hue lighng control, and wirelessly syncing sengs between your remote and MyHarmony account.
Steps in this secon are part of the process of seng up the Harmony App, and the step numbers connue from the previous secon.
NOTE: Harmony Smart Control supports 2.4GHz 802.11 b/g/n wireless networks with WPA, WPA2-AES, and 64/128 bit WEP encrypon.
- Wait while the Harmony App searches for the hub, and then displays the Wi-Fi Setup screen.
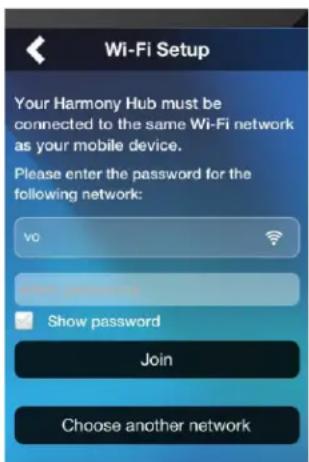
- Make sure that the Wi-Fi network shown is the same one that your mobile device is connected to.
a. If it is not the same network, tap Choose another network and follow the instrucons.
b. When the same network is shown, enter your password tap Join, and wait for the Hub to join the Wi-Fi network.
If you have problems connecng to the Wi-Fi, please refer to Wi-Fi problems.
- When prompted, enter a name for your Harmony Hub, tap Connue, and wait for the Harmony App to
connect to MyHarmony.
-
The step that you take next depends on whether you are a new user seng up your rst Harmony remote control, or if you already have an older Harmony remote control that you congured previously:
-
If you are a new user, skip to the secon, Creang a MyHarmony account.
- If you have already set up a Harmony remote control, connue with the steps in the next secon, Copying setup informaon from another Harmony remote.
Copying setup information from another Harmony remote
This secon is only for users who have already set up another Harmony remote control and want to import the sengs from that system to the Harmony Smart Control. If you do not have a previous Harmony remote, skip to the Creang a MyHarmony account secon below.
To emphasize that these steps are a departure from the normal ow for a new user, step numbers in this secon do not follow the sequence of the preceding and following seconds.
a. Tap Sign In.

b. Tap the Import buon. You will be asked to enter the ID and password for your previous account. When you do, the sengs will be copied and applied to your Harmony Smart Control account.
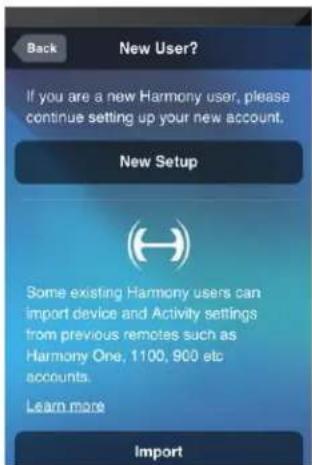
Once your sengs are copied, you will be able to add more devices or Acvies and modify your sengs.
c. Refer to the seconds below if you need assistance with adding devices, Acvies, or Favorites.
Creating a MyHarmony account
Steps in this secon are part of the process of seng up the Harmony App, and the step numbers connue from the Connecng to Wi-Fi secon above.

- Tap Create an account.
- Enter your account informaon and tap Create Account.
- Read and accept the terms of the Soware License Agreement.
- Tap New Setup.
- Read Important Tips #1 and #2, and then verify your hub connecons as described in the Harmony App.
- Connue with the steps in the next secon, Seng up devices to control.
Setting up devices to control
Steps in this secon are part of the process of seng up the Harmony App, and the step numbers connue from the previous secon.
Carefully enter the manufacturer or brand of your rst device followed by the model number. Harmony will automatically correct for common errors such as zeros or ones being confused for the letters '0' or '1' and will provide suggestions if the entered device cannot be found.
Serial numbers found on your devices should not be entered as they are unique and cannot be used to identify the device you have. It is important to enter manufacturer and model informaon correctly because not doing so may cause devices to change to the wrong input, miss commands, or not funcon at all during Acvies.
- Make sure you have your device informaon collected (as described in the Devices secon above).
- When prompted by the Harmony App, click Add my TV.
- Enter the manufacturer's name and model number for your TV and tap Add.
- Tap Power on to conrm that the Smart Control knows the right signal to send your TV.
- If the TV powered on, tap Yes; if it did not, tap No.
If you answer No, the Harmony App steps you through a series of diagnosc screens to help x the
problem. If the Harmony App is not able to x the problem, please refer to the Setup problems secon in Troubleshoong. You can proceed to the next step even if you are not able to x the problem at this me. You can x it later on MyHarmony, as described in Modifying device sengs with MyHarmony.
- When prompted, either tap Add to set up an AV Receiver / Home Theater or tap Skip, I don't have this device if you do not wish to set up that type of device. If you choose to add the device, provide the requested informaon as the Harmony App steps you through a process similar to the one you just completed for the TV.
- When prompted, either tap Add to set up a Cable / Satellite Receiver or tap Skip, I don't have this device if you do not wish to set up that type of device.
Adding a Watch TV Activity
Steps in this secon are part of the process of seng up the Harmony App or Harmony Smart Control system, and the step numbers connue from the previous secon.
- When prompted, select the devices you use to watch TV.
- Select the inputs to use to connect your TV to other devices.

- Conrm whether you are able to see and hear content on your TV by tapping Yes or No. If you answer Yes, you are nished with seng up your rst Acvity. If you tap No, you are stepped through a series of tests similar to those described in step 23 above.

- Follow the prompts to test your Watch TV acvity.
Setting up Favorites
Favorites allow you to quickly access your Favorite Channels. You can select up to 50 Favorite Channels for your Smart Control system.
Steps in this secon are part of the process of seng up the Harmony App, and the step numbers connue from the previous secon.
- When prompted, provide your locaon and zip / postal code and tap Search. The United States locaon is selected by default. To change the locaon, tap the down arrow and select another locaon from the list. To enter a zip code, tap the example zip code to bring up the keyboard that allows you to enter your zip code.
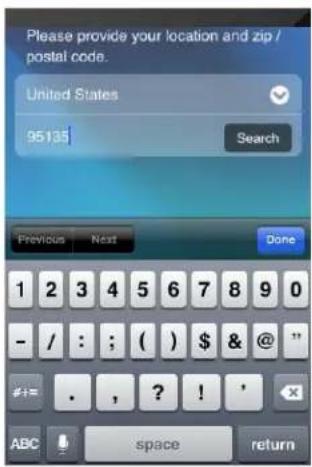
- Select a television service provider from the list associated with your zip / postal code and tap Next.
The next screen displays a lot of informaon that will help you select your Favorite TV staons:

-
Favorites counter: indicates how many Favorites you currently have selected.
-
Search box: searches for TV channels by name.
-
Unselect all buon: unselects all Favorites.
-
Star icons: indicate whether a channel is a Favorite. A gold star is a Favorite and a dark star is not.
-
List switch: allows you to choose whether to display all channels associated with the selected provider; HD channels only; or your currently selected Favorite Channels only.
-
Tap on the star next to channels that you want to select or unselect from your Favorites list. A gold star next to a channel means that it's one of your Favorites; a dark star next to a channel means that it is not a Favorite.
-
When you are sased with your Favorites list, tap Next.
Adding more devices
Next you are prompted to add any additional devices that you would like Harmony Smart Control to operate. You can add a total of eight devices. Aer you add each device, you are prompted to add an Acvity that corresponds to that device. The procedures for adding more devices and Acvies are very similar to the setup steps covered in the previous seconds. The Harmony App will step you through the process, requesng the informaon it needs. If you have any problems while adding devices or Acvies, refer to the Troubleshoong and Support seconds of this manual for more informaon.
Personalizing your remote
Next you are oered the opportunity to specify how your Smart Control remote operates. Note that the sengs described in this secon are congured with the Harmony App, but do not aect the behavior of the Harmony App. Because this sequence of steps is part of the initial setup of the Harmony App, and the step numbers connue from the previous secon.

- Review the buon assignments displayed on the Personalize Remote screen.
- If you would like to change any of the buon assignments, tap the buon whose assignment you would like to change, and select a new Acvity.
- When you are sased with your buon assignments, tap Next.
At this me the automated setup process is complete. If everything works correctly you can begin using you remote now. If you had any problems during setup, see Setup problems under Troubleshoong for more informaon.
Using your Harmony Smart Control
Aer compleng the rst me setup to add your devices, create Acvies, and choose your Favorite Channels, you are ready to use your remote. The following seconds describe how to access the features you will use most oen.
To begin using the Harmony app, open the app on your smartphone. The rst screen that the Harmony app displays is the Acvies screen that is described in the next secon.
Activities

Tap an Acvity to start it.
Your Harmony Smart Control will send all the commands to the necessary devices in your entertainment system. For example, to Watch TV, Harmony Smart Control will turn on your TV, turn on your cable set top box, turn on your AV receiver, set the input on your TV to HDMI 2, set the input on your AV receiver to HDMI 1.
Switching between Activities
While an Acvity is acve, selecng another Acvity will leave on or turn on necessary devices, turn o unnecessary devices, and select the correct inputs for each of the devices. For example, when switching from watching TV to watching a Blu-ray, Harmony Smart Control will leave your TV and AV receiver turned on, but will turn o your cable set top box and turn on your Blu-ray player. Depending on how your TV and AV receivers are set up, Harmony Smart Control may also change the inputs for those devices to the Blu-ray player.
TIP: You don't need to turn your system o in between switching Activities. Harmony Smart Control remembers what is on and o and switches between Acvies automacally.
NOTE: if you would like to keep a particular device on when switching to an Acvity that does not use it, this may be customized by signing into MyHarmony. For example: you may want to keep your Xbox powered on while you switch to Watch TV so you may return back to Play a Game without losing your game status. See the support arcle, Set Devices to Stay On.
To switch between Acvies:
- Tap the Home icon:

- Tap the Acvity you want to switch to.
Gesture control
Each Acvity allows you to control your devices using simple swipes and taps on the Harmony Smart Control screen. Twenty-two dierent gestures are supported. Each of the following eleven gestures can have two acons associated with it; one for a one-nger gesture and another for a two-nger gesture:
- Swipe up
- Swipe up and hold
- Swipe down
- Swipe up and hold
- Swipe le
- Swipe le and hold
- Swipe right
- Swipe right and hold
Tap - Double tap
- Long press

Each gesture performs a default command that depends on the current Acvity. When you use a gesture, the acon associated with that gesture appears on the screen and acvates.
Viewing current gesture commands
To see a list of commands associated with each gesture, tap the i in the upper right corner.
NOTE: Gestures are only available when an Acvity is acve.
Customizing Activity gestures
To change which commands are associated with each gesture:
- Tap the i in the upper right corner of the screen.
- Tap the icon in the upper right corner of the screen:
- Tap the gesture you want to change.
-
Tap the acon you want to take:
-
Map a command: to select a single command to associate with that gesture
-
Map a sequence: to select a sequence of commands to associate with that gesture
• Clear Gesture: disable the gesture -
Tap the device that you want the gesture to control.
- Tap the < as many mes as necessary to return to the Edit Gesture screen.
- Tap Done.
NOTE: If you would like to assign a sequence of commands to a gesture, you can do that in MyHarmony.
Activity commands
When your Acvity starts, all the buons on Harmony Smart Control are congured to control that Acvity. For example, the volume buon will control your AV receiver while the Play and Pause buons and the direconal navigaon will control your cable or satellite set top box. In addition, the screen on the remote is able to display all the available commands for each device that is parcipang in the current Acvity.
Favorites
Tap the ★ on at the boom of the Harmony Smart Control screen while the Watch TV Acvity is acve to see your Favorite Channels. Favorites are only acve while watching TV.
Swipe up and down on the screen to scroll your Favorites. Tap any Favorite to tune to that channel.
For informaon about adding, rearranging, and deleng Favorites, refer to Managing your Favorites with the Harmony App.
Devices
Your Harmony Smart Control is designed to control your devices as part of the Acvies that you set up on MyHarmony. Occasionally, you may need to access the full list of commands available for a parcular device.
Tap the icon, then tap Devices to enter device mode and see a list of all your devices. You can choose a device to see the complete list of commands for that device. At this me, the physical buons on the Harmony Smart Control
remote will also control the selected device.
CAUTION: Do not power o any devices while in device mode. The remote does not track state changes in device mode. You can adjust seings in device mode; just don't turn devices off or on. If you accidentally turn devices o or on in device mode, you can use the Help menu item in the Harmony app to bring your devices and your Harmony Smart Control system back in sync.
How to get the most out of your Harmony Smart Control
You can prevent some common problems if you follow the ps in this secon.
Important: use your Harmony Smart Control every time!
Always exclusively use your Harmony Smart Control or the Harmony App on your smartphone to control your devices. Do not use other remotes to control your devices, or manually turn them on or o or change inputs. Harmony is unable to track changes that it does not make and will connue to assume your devices are in the state that it has le them in.
Adjust the power on delay
If your TV does not go to the right input when starng an Acvity from an everything-o state, try increasing the power on delay for your television. This feature is accessible in your remote's Sengs menu and in your MyHarmony account. See the secon Modifying device sengs for more informaon.
Position the hub and set up hub assignments correctly for your setup
Tradional 'line of sight' required when operang most infrared remote controls is not required with Harmony Ulmate. The Harmony Hub and IR mini blaster send a strong infrared signal that can react o walls and other surfaces before reaching your devices.
Both the hub and IR mini blaster send strong IR signals and may control mulple devices within their range. Larger obstacles such as walls, bookshelves or doors may prevent the IR signals from reaching your devices. If this is the case, try repositioning your hub or IR mini blaster.
When used inside a cabinet, the hub or IR mini blaster can control all the devices within that cabinet. If your cabinet contains devices on mulple shelves that are isolated from one another, a hub or IR mini blaster may need to be posioned on each shelf. You can change which parts of the Smart Control system control each of your devices. For more informaon about hub assignments, see Changing hub assignments with MyHarmony.
Use the Help function to put the remote back in sync with devices
S intermittent Harmony becomes out of sync with your devices and confuses when they are on or o, or which input they are on. This occurs when there is an obstacle between the device and the IR transmiers in the hub, IR mini blaster, or remote; or if the devices are operated manually or by using their original remote control. Harmony Smart Control can run through a series of quesons to help identify the issue and correct it.
- Tap the icon.
- Select Help.
- Tap the Power or Input buon for the device that is out of sync.
NOTE: If you use the Help feature frequently when powering on your devices or switching between Acvies, then there may be changes that can be applied to correct this. The Help feature should not be necessary with a properly congured setup.
TIP: Before you use Help, make sure you take steps to address the problem: remove any obstacles from the line of sight between your remote and your system, and only use the Harmony Smart Control system when it is within range of your entertainment system.
Changing your Setup
Once you have completed the initial setup process on the Harmony App, you can make additional changes either directly from the Harmony App or on your computer with MyHarmony. Changes that you can make include:
• adding or removing devices
• creang, updang, or deleng Acvies
• managing Favorite Channels
• reordering screen commands
• changing the behavior of buons
MyHarmony also allows advanced conguraon changes such as:
- adjuasng a device's power sengs
- adjuusng a device's input sengs
• adjusng device delays
• ne tuning how Acvies control your devices when they start and stop
Each of the following seconds includes instrucons for both the Harmony App and MyHarmony.
Changing your setup with the Harmony App
To manage your remote setup with the Harmony App, access the Harmony App Menu by tapping this icon:
Changes made in the Harmony App automacally sync with MyHarmony and your Harmony Hub.
Changing your setup with MyHarmony
Using your web browser, go to hp://www.myharmony.com and click the Sign In buon in the upper right corner.
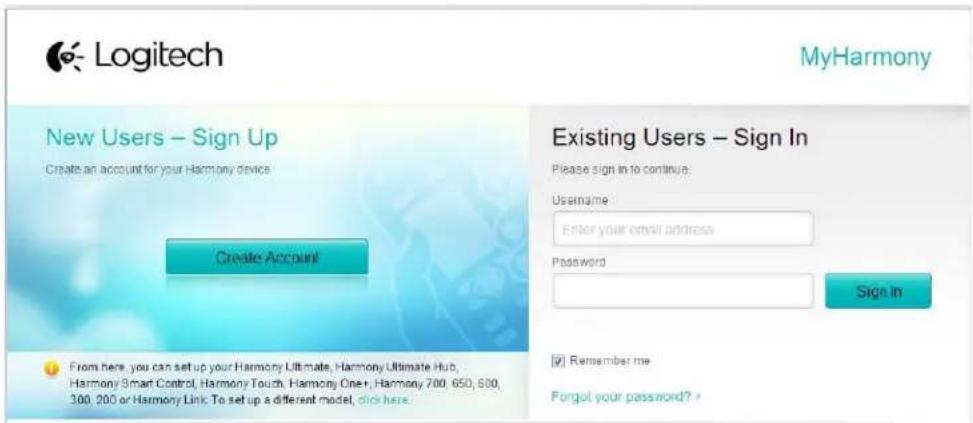
To manage your remote setup on MyHarmony:
- Click the Harmony Smart Control image.
- Make the desired changes, then sync your remote as described in the next secon.
Syncing your changes
Any changes made with the Harmony App will automatically sync with MyHarmony. Any changes made on MyHarmony must be manually synced with your remote:
- Tap the icon.
- Tap Sengs.
- Tap Sync Your Harmony.
- Tap Sync Now.
Adding devices
NOTE: Harmony will automatically correct for common errors such as zeros or ones being confused for the leers '0' or '1' and will provide suggestions if the entered device cannot be found.
NOTE: Serial numbers found on your devices should not be entered as they are unique and cannot be used to identify the device you have. It is important to enter manufacturer and model informaon correctly because not doing so may cause devices to change to the wrong input, send commands that do not work, or not funcon at all during Acvies.
NOTE: Aer adding a new device to your account, be sure to associate it with an Acvity.
Adding a device with the Harmony App
- Tap the con.
- Tap Sengs.
- Tap Edit Acvies and Devices.
- Tap Devices.
- Tap Add a Device.
- Enter the manufacturer name and model number.
- Tap Add.
- Follow any device-specific instrucons that appear on the Harmony App screen.
Adding a device with MyHarmony
- Select the Devices tab on the le hand side of the screen.

- Click Add Device. The Add Device page displays.
- Carefully enter the manufacturer or brand of your device.
- Carefully enter the model number.
- Click Add.
Special devices
Some types of devices require that you change or manipulate some aspect of them in order for them to be controlled by Harmony Smart Control. If you have an RF-only device, a device that understands mulple IR languages, or a device that does not accept IR input at all, you will be need of this during setup. Examples of these devices are:
- RF devices: some devices, such as DirecTV or Dish Network cable boxes, are controlled using RF (Radio Frequency) signals. If your device's original remote can operate from a dierent room, then it is likely using a RF signal. Some of these devices allow them to switch into an IR (infrared) mode that allows Harmony to control them.
- Mul-Code devices: some devices may be controlled using mulple dierent IR (infrared) signal versions. MyHarmony will use the most common version. If it does not work, it will then try other versions until the correct one is idened.
Bluetooth devices: Harmony Smart Control works with the PS3, Wii, and Wii U game consoles over Bluetooth. The Harmony remote will guide you through this process the rst me you use this device. Other Bluetooth capable devices such as television keyboards are not supported. For more informaon, see these arcs::
• Control Sony PlayStaon 3 with Harmony
• Control Nintendo Wii with Harmony
Adding an unknown device with MyHarmony
CAUTION: This process should only be used if you cannot find a match for your device.
NOTE: There is no equivalent secon in this guide for the Harmony App. Use MyHarmony to add unknown devices.
The database of devices on MyHarmony contains most available devices. In some rare cases you may need to add a device that is not listed in the database. Follow these steps to add an unknown device:
- If MyHarmony is unable to nd your device you will be prompted to double check the informaon entered. In some rare cases you may need to add a device that is not contained in the database. If your device is not found, select Yes, I'm sure that's it and click OK to proceed to teach MyHarmony about this new device.

- Click Select your device type to display a list of device types.

- Select the device type that best describes your device and click Next. Based on your selecon, another page displays to get more informaon about your device.

-
Check the box for each item that applies to your device. This will help setup determine which commands are appropriate for your device. Click Next.
-
Follow the instrucons to set up your device.
Deleting devices
CAUTION: Deleting a device will act any Acvity that uses that device and will have to be reviewed on MyHarmony before it can be used from your remote.
Deleting devices with the Harmony App
- Tap the con.
- Tap Sengs.
- Tap Edit Acvies and Devices.
- Tap Devices.
- Tap the device that you want to delete.
- Tap Delete.
- Conrm the deleon by tapping Delete on the conrmaon screen.
Deleting devices with MyHarmony
- Click the Devices tab on the le hand side of the screen.
- Select the device to delete.
- Click Delete This Device. The Delete Device conrmaon displays.
- Click Delete to remove the device from your list.
Modifying device settings
You can also modify the way your Harmony Smart Control will control each of your devices by changing:
Power sengs: if your device doesn't turn on or o correctly
- Input sengs: if your device doesn't show the right picture or play the right sound when you start an Acvity
• Device delay sengs: If your remote sends commands too quickly or too slowly to your device
- Device command repeats: if your remote sends too many or too few channel up or volume up commands when you press the buon once
Modifying device settings with the Harmony App
- Tap the icon.
- Tap Sengs.
- Tap Edit Acvies and Devices.
- Tap Devices.
- Tap Delay Sengs.
- Use the sliders to change the delay sengs as needed, or tap Restore if you previously changed the sengs and want to restore them to the default sengs.
- Tap Done.
Modifying device settings with MyHarmony
- Select the Devices tab on the le hand side of the screen.
- Click a device at the top of the page to select it.
- Click Change Device Sengs.
- Select the type of sengs you want to change and click Next.
- Follow the prompts to change your sengs and click Finish when you are done.
Adding Activities
Adding Activities with the Harmony App
- Tap the icon.
- Tap Sengs.
- Tap Edit Acvies and Devices.
- Tap Acvies.
- Tap Add Acvity.
- Select the type of Acvity to add. The choices available depend on the devices you have added. You can add more than one of each Acvity type.
- Select or deselect devices used by the Acvity. When the correct devices have check marks next to them, tap Next.
- Tap Power On to test the conguraon of the Acvity, or tap Not Now to skip the test.
- Choose the input for your Acvity and tap Next.
- To oponally change the Acvity name, tap Edit and enter a new name.
- Tap Next.
-
Oponally customize which Acvies are assigned to the buons of your Smart Control remote.
-
Tap Done.
Adding Activities with MyHarmony
- Select the Acvies tab on the le hand side of the screen.

-
Click Add Acvity.
-
Select the type of Acvity to add. The choices available depend on the devices you have added. You can add more than one of each Acvity type.
NOTE: Most Acvies t into one of the speci Acvity types oered. The Custom Acvity type is recommended only for home appliances. The Custom Acvity does not provide Favorite Channels or require roles for the device being added. Buon assignments may not correctly react what is expected for this Acvity, but can be changed as described in How to map buons to your remote.
-
Click Next.
-
Enter a name for the Acvity.
-
Click Upload Icon to choose an icon from your system or accept the displayed icon. This icon will also be used to represent your Acvity on your Harmony Smart Control.
-
Click Next. The list of devices available for this Acvity is displayed, with suggested devices checked.
-
Review the device list and clear any check boxes for unneeded devices.
-
Click the check the box for devices to add to this Acvity.
-
Click Next.
-
Answer any quesons about your Acvity that MyHarmony asks.
-
Choose the input(s) for your Acvity.
-
Review the sengs for your Acvity. The devices used are listed, along with the inputs and controls used.
-
The devices that are not used are also shown at the boom of the screen.
-
Click Done.
Viewing Activity settings
Viewing Activity settings with the Harmony App
-
Tap the ☐n.
-
Tap Sengs.
-
Tap Edit Acvies and Devices.
-
Tap Acvies.
- Tap the Acvity to view.
In addition to viewing the Acvity sengs, from this screen you can change the Acvity name or tap Fix Acvity to step through Acvity setup to x any problems you are having.
- When you are nished, tap Back as many mes as needed to return to the menu.
Viewing Activity settings with MyHarmony
- Click Acvies. Your list of Acvies displays.

- Select the Acvity to view.
- Click View your seings. The Acvity sengs page displays.
- Click Change to go to the Change Acvity Sengs page or click Close.
Changing Activity settings
Changing Activity settings with the Harmony App

- Tap the
- Tap Sengs.
- Tap Edit Acvies and Devices.
- Tap Acvies.
- Tap the Acvity to change.
- Tap Fix Acvity to step through Acvity setup to x any problems you are having. For more information about these sengs, see Adding a Watch TV Acvity.
- When you are nished, tap Back as many mes as needed to return to the menu.
Changing Activity settings with MyHarmony
- Click Acvies. Your list of Acvies displays.

- Select the Acvity to change sengs.
- Click Change your seings. The Rename Acvity page displays. This is the rst page in the process for changing the Acvity sengs.
- Follow the instrucons to change the remaining sengs for the selected Acvity.
Deleting Activities
Deleting Activities with the Harmony App
- Tap the en.
- Tap Sengs.
- Tap Edit Acvies and Devices.
- Tap Acvies.
- Tap the Acvity to delete.
-
Scroll down and tap Delete.
-
Conrm the deleon by tapping Delete on the conrmaon screen.
Deleting Activities with MyHarmony
- Click Acvies. Your list of Acvies displays.

- Select the Acvity to delete.
- Click Delete your Acvity. The Delete Acvity conrmaon displays.
- Click Delete to remove the Acvity from your list. Any changes made will be lost, such as Acvity customizaons and buon assignments.
Changing your location or channel provider
If you move or change your TV channel provider, you will need to change those sengs in your MyHarmony account. Harmony allows you to conjure one service provider and associate that to one primary Watch TV Acvity.
CAUTION: Selectcng a new provider will reset all previously configured Favorite Channels and only Favorite Channels will be reset!
Changing your location or channel provider with the Harmony App
- Tap the en.
- Tap Sengs.
- Tap Edit Acvies and Devices.
- Tap Favorites.
- Tap Edit.
- Tap Next.
- Enter your locaon and zip / postal code, then tap Search.
- Select you provider from the list. If you do not see your service provider, you may need to choose a neighboring zip / postal code.
Changing your location or channel provider with MyHarmony
- Select the Favorites tab from the le hand side of the screen.
- Click Edit Your Service Provider:

- Follow the same steps performed during your rst me setup to choose your locaon, TV provider and new Favorites.
Managing your Favorites
Managing your Favorites with the Harmony App
- Tap the ☐n.
- Tap Sengs.
- Tap Edit Acvies and Devices.
- Tap Favorites.
- Tap Edit.
-
Tap Next.
-
Conrm that your correct locaon, zip / postal code, and service provider are selected.
- Tap Next.
- To remove a Favorite, tap the gold star next to that channel.
- To add a Favorite, tap All (to see all channels) or HD (to see HD channels only) and tap the gray star next to that channel.
- When you are nished, tap Done.
Managing your Favorites with MyHarmony
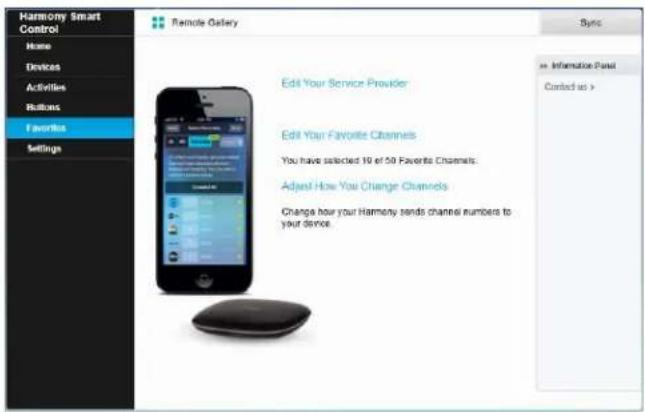
To add, modify or reorder your Favorites:
- Select the Favorites tab from the le hand side of the screen.
- Click Edit Your Favorite Channels. The Set up Favorites page displays. Current Favorites are shown with a gold star in the rst column.
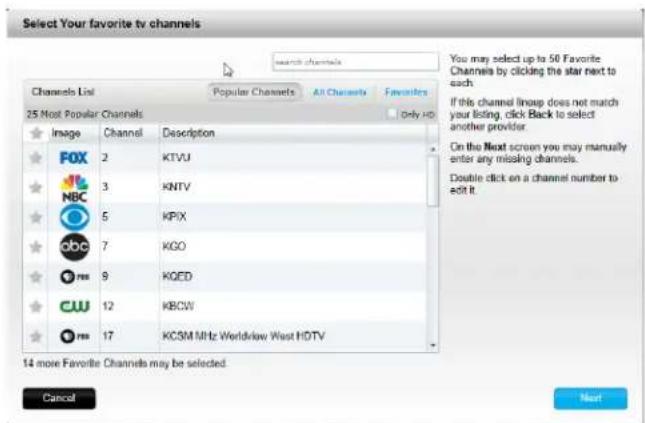
- To add or remove a channel from your Favorites, click the gold star beside that channel so it is highlighted or grayed out. If the channel you want to add is not in the list, or is missing the icon or channel number, you can add it on the next screen by clicking Next.

- On the Select Your Favorite TV Channels screen, you can drag and drop your current Favorites into the exact order you want them to appear on your Harmony Smart Control. Here you can also drag a Favorite to the trash can icon to remove it from your remote.
- To add a Favorite Channel that does not appear in the list on the previous screen, select Add a Favorite Channel to manually enter the name and number for that channel. Oponally, you can upload an icon for that channel from your computer's le system:
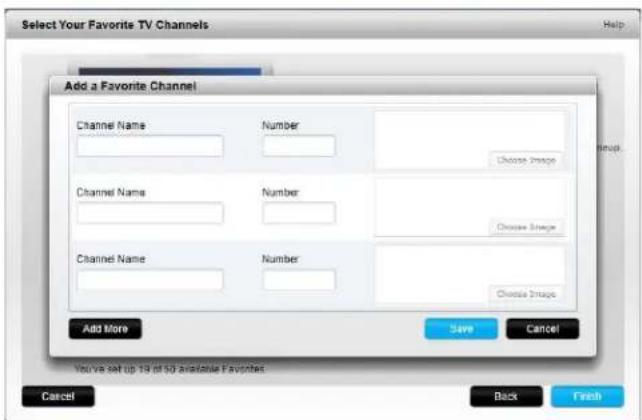
- To modify the name, number or icon for a Favorite Channel, select it and click the Modify a Favorite Channel link. Enter the channel name and channel number. You can also choose a channel icon from your computer le system. Click Browse to select an image le.
TIP: you can also add, remove or reorder your Favorites directly in the Harmony app.
Advanced customization
Customizing Activities with MyHarmony
You can add extra steps to an Acvity if you want to customize it further. For example, your Watch a Movie Acvity can be set up to automacally send the Play command to start your movie.
NOTE: There is no equivalent secon in this guide for the Harmony App. Use MyHarmony to add extra steps to an Acvity.
To add steps to an Acvity in your MyHarmony account:
- Click Acvies and select an Acvity to customize.

- Click Customize this Activity. The Customize: Acvity Sequence page displays. In this example, the
Watch TV Acvity is shown.

- Add steps or delays to your Acvity as desired.
Customizing buttons to perform a sequence of commands with MyHarmony
A buon sequence is a set of commands that can be grouped together and assigned to one buon on your remote, helping to automate certain tasks. Buon sequences are somemes referred to as macros.
NOTE: There is no equivalent secon in this guide for the Harmony App. Use MyHarmony to set up a buon sequence.
To create a buon sequence in your MyHarmony account:
- Click the Buons tab on the le hand side of the screen.
- Select an Acvity or device from the pull-down menu for the area of the remote you would like to create a sequence for—screen or buons, and click Go.
- Click the Sequences tab on the right side of the screen
- Click on Add Sequence. The Add Sequence page opens.
- Enter a name for your sequence. Try using a name for your sequence that will represent what you are
programming it to do.
- Add steps or delays to your sequence as desired.
- Click Save when nished. Your Sequence will appear in the list.
- Assign your buon sequence to a single buon as described in the next secon, Customizing Acvity buons.
Customizing Activity buttons with the Harmony App
NOTE: You can customize only the three Acvity buons at the top of the Smart Control remote using the Harmony App. Each buon can support two dierent advies: one with a short tap and one with a long press of the buon. With MyHarmony, you can customize any buon on the Smart Control remote. For more informaon about customizing your Smart Control remote buons, refer to Customizing buons and on-screen commands with MyHarmony.
- Tap the icon.
- Tap Sengs.
- Tap Edit Acvies and Devices.
- Tap Remote.
- Tap Customize.
There are two groups of sengs on this screen. The rst group controls the acons of the Acvity buons when using a short press of the buon; the second group controls the acons of the Acvity buons when pressing and holding the buon for a couple of seconds.
- Tap the buon to customize.
- Select an Acvity to associate with the buon.
- Tap Done.
Customizing buttons and on-screen commands with MyHarmony
Harmony allows you to customize the commands that each buon sends, or what commands appear in your Acvity list. These buon mappings may be unique for each of your Acvies. This allows each buon or screen to have dierent funcons based on context. For example, in your Watch a DVD Acvity, the yellow buon may perform the eject command, while in your Listen to Music Acvity this same yellow buon may be used to pull up your Favorite preset.
When customizing your Harmony remote you may nd that commands have slightly dierent names than those of your original remote. For example, Select, OK, and Enter oen perform the same acon, but may be named dierently based on the original manufacturer.
Activities mode
When you select an Acvity to map buons for, the buons only perform the assigned funcons while the acvity is in progress for which they were mapped. If you want to assign a buon funcon for all Acvies, you will need to do it for each individual Acvity.
How to map buons to your remote with MyHarmony
- Select the Buons tab on the le hand side of the screen.
- Select an Acvity for the area of the remote you would like to create a sequence for and click Go.
- Select a buon on the illustraon of the remote. You can scroll the illustraon to see buons at the boom of the remote.
- Hover over a command to assign to that buon and click on Long Press, Short Press, or Both to make the selecon.
5. Click OK.
NOTE: Each buon on your remote can be assigned more than one command. For example, the Fast Forward buon on the top of your remote can be set up so that quickly pressing it (short press) acvates the Fast Forward funcon and holding it (long press) acvates the Skip Forward funcon. You can also assign a sequence of commands instead of a single command, but you must use MyHarmony to assign command sequences to buons.
Device mode
It is recommended that you map buons while in Acvies mode so that you do not need to go into device mode to send commands to your device. Buons mapped in device mode will not carry over into any of your Acvies.
Changing hub assignments with MyHarmony
By default, IR signals are sent at the same me from the Harmony Hub and the IR mini blaster in order to control your equipment. This default works for the vast majority of conguraons. If you have an advanced set up such as mulple televisions or mulple set top boxes that are of the same manufacturer, then you may need to isolate signals to the IR mini blaster. To change this behavior:
- Select the Sengs tab on the le hand side of the screen.
- Click Hub Assignments.
-
Select the correct assignment for each device from the drop-down list for that device. Choose between:
-
Hub & mini blasters
- Hub only
- Mini blaster port 1
- Mini blaster port 2
4. Click Finish.
Upgrading your Harmony Smart Control firmware
When new rmware is available for Harmony Smart Control, the Harmony App displays a message ofifying you to sync your Harmony App with MyHarmony. In addition, when you manually sync your Harmony App with MyHarmony, it always checks for a rmware update and begins the update if needed.
Personalizing your Remote
Customizing Favorite Channel icons with MyHarmony
When you choose a Favorite Channel from the list of channels oered by your provider, a default icon for that channel is provided. To choose a dierent icon for a channel, follow these steps:
- Select the Favorites tab on the le had side of the screen.
- Click Edit Your Favorite Channels.
- Click Next.

- Click a channel icon. Use the scroll arrow to see more Favorites if the one you are looking for is not visible.
- Click Modify a Favorite Channel.

- Click Choose Image.
- Select an image and click Save. The icon for that channel is replaced with your image.
- Click Finish.
Remote Control Menus
The Eton on the Harmony App screen opens the menu for the remote. The following seconds describe the acons you can take using the menus on the remote. Almost anything you can set up using MyHarmony on your computer can also be set up on your smartphone. This second describes how to use the Harmony App to make changes. For a list of changes you must make in MyHarmony, visit the Changes that can't be made FAQ.
Help
If your remote becomes out of sync with your devices, tapping Help from the remote control menu causes the remote to aempt to x this. If the remote control is not able to solve your problem, refer to the Troubleshoong secon of this manual for additional assistance.
NOTE: If you are using the Help feature frequently when powering on your devices or switching between Acvies, then there may be changes that can be applied to correct this. The Help feature should not be necessary with a properly congured setup.
Connect to your Harmony
If you lose the Wi-Fi conneccon for the Hub or your smartphone, you can use this menu item to scan for your hub and connect to it. If you have other Harmony hubs in your network or household, you can also switch between them by using this menu item.
Edit
Edit lets you re-order the display of Acvies on the Harmony App by dragging and dropping them in a new locaon.
Devices menu
The Devices menu allows you to control individual devices with on-screen commands. All of your devices are listed, regardless of whether or not they are included in an Acvity. Tap a device on the list to see what opons are available for that device. You can tap any of those opons, or tap < to exit that menu.
CAUTION: The remote does not track state changes in device mode. Do not power off any devices or change inputs while in device mode. Also, changes made in device mode do not act the behavior of devices during your Acvies. It is recommended that you change device sengs in Acvies mode.
Settings menu
Aer compleng the rst me setup process, many sengs can be changed on the remote that let you personalize your Harmony Smart Control or aect how it controls your entertainment system.
To access the Sengs menu, tap the menu icon, then tap Sengs.
The following seconds describe how you can adjust sengs related to your remote, your Acvies and your devices.
Sync your Harmony
Iniates a sync of the Harmony App with your MyHarmony account.
Sengs made directly on your Harmony App automacally sync with your MyHarmony account if your Harmony is congured to use your home's Wi-Fi network.
Changes made from MyHarmony must be manually synced with the Harmony App and your Harmony Smart Control remote.
Set up new remote
Iniates the rst-me setup process described in Set up the Harmony App. The Harmony App is only supported for the iPhone 4s or newer, the new iPad, the iPad Mini, and Android phones. If you want to run the Harmony App on an older iPhone, you have to rst set it up on a supported device or on MyHarmony. Once setup is complete in MyHarmony, an older iPhone can use the Harmony App to control your devices.
Edit devices and activities
When you tap Edit devices and advies, the Harmony App connects to MyHarmony to make the changes both in the Harmony App and in your MyHarmony account. When you nish making changes, a sync with MyHarmony happens automatically.
Devices
- Add devices
- Delete devices
- Add missing commands from the original remote. You will need the original remote to teach the Harmony App
these commands.
- Fix delay sengs:
- Power on: The me your device needs to power on, warm up, and be ready to receive additional commands.
• Inter-key: The me your device needs before being ready to accept another command. - Inter-device: The me your remote waits between sending commands to dierent devices within the same Acvity.
- Input: The me your device needs to be ready to accept another command aer switching inputs.
Activities
- Add Acvies
- Delete Acvies
- Customize Acvity by adding steps to the start up and shut down of the acvity
• Change Acvity names and sengs - "Fix" acvity by doing one or more of the following:
• changing devices involved
- running a power on test
• changing input connecons
Favorites
- Edit channels in list
• Change service provider -
Change channel tuning sengs. If channel selecon on your original remote is done dierently when selecng channels by number, this will resolve the issue. Opons are:
-
numbers only
- numbers and "enter/select"
• always 2-digit numbers
• always 3-digit numbers
Remote
- Customize Acvity buons on the physical remote
• Pair the remote to the Harmony Hub.
Account Info
- Look up email ID
• Change name or locaon - Change password
Reset button layout
If you have made any changes to the buon layout for the Harmony remote, you can reset it to factory sengs here.
Reset gesture mapping
If you have made any changes to gesture mapping for the Harmony App, you can reset it to factory sengs here.
Reset Favorites
If you have made any changes to the Favorites list, you can reset it to the 25 most popular channels for your locaon here.
Auto lock
By default, your smartphone will stay awake while the Harmony App is running so that you have instant access to your remote control funcons. You can disable this here if you prefer your smartphone to go to sleep on its usual schedule.
Haptic feedback
In devices that support vibraon, the Harmony app gives tackle feedback when certain commands and gestures are used. You can turn this feature on or o here.
Customer support
Provides a link to view self-help arcles, FAQs, and support contact informaon. Can also send logs from Harmony Hub to Logitech for troublesomeong.
Privacy Policy
Displays the Logitech Harmony Privacy Policy.
About
- Email ID (for MyHarmony)
Hub Name
• Hub FW (rmware number) - Hub IP Address
- App Version
- Build Number
- Last Sync
Troubleshooting
Setup problems
Once you complete the setup process through MyHarmony, your Harmony Smart Control system should work properly to control your devices. Here are common troublesomeings. If you do not find the solutions to your problem here, the Harmony Smart Control online support arcs and user community can also help troubleshoot unique issues. Refer to Support for more information.
| Symptom | Possible Cause | Soluon | See Also |
| I tap an Acvity and one or more devices does not turn on | The Smart Control system is out of sync with your devices | Use Help or Edit devices and to restore synchronizaon. | Harmony Smart Control On-Remote Help |
| By default all devices are assigned to the hub and blaster. If one or more of your devices needs to be | Remove any physical obstrucons or reposion the mini blasters and try again. If that doesn’t solve the problem, use Help or Edit devices and to restore synchronizaon. | Harmony Smart Control On-Remote Help | |
| controlled by the remote you will need to assign it to remote | |||
| The inter-device delay me is too short | Set the inter-device delay me to a longer interval. Refer to Modifying device sengs with the Harmony App. | Harmony Smart Control doesn't switch between acvies without using the Help feature | |
| My devices turn on but the wrong input is selected | The power on delay me for your device is too short | Change the delay me using the Harmony App or with MyHarmony | Modifying device sengsHarmony Smart Control acvies do not work when rst powering on devices |
| The wrong device informaon is being applied | Make sure you entered the correct brand and model numbers for your devices. | ||
| The wrong input was selected for that Acvity during conguraon | Correct the input sengs using the Harmony App by following the steps in the Changing Acvity sengs with the Harmony App secon, or in MyHarmony by following the steps in Changing Acvity sengs with MyHarmony. | Changing the inputs of an acvity on the Harmony Smart Control | |
| Device is not changing channels properly | The inter-key delay me is too short | Change the delay me using your remote or with MyHarmony as described inHarmony Smart Control sends commands slowly in acvies | Modifying device sengs |
| Depending on the device, a dierent sequence of buons may be required to change channels | Fix the channel tuning sengs in the Harmony app: 1. Tap then. 2. Tap Sengs. 3. Tap Edit Acvies and Devices. 4. Tap Favorites. 5. Tap Channel Tuning. 6. Select the method for changing channels that is used by your original remote. | ||
| An Acvity works when I select it as the rst Acvity when I power on my system, but not when I select it while I'm using another Acvity | The inter-device delay me is too short or too long | Change the delay me using your remote or with MyHarmony as described inHarmony Smart Control doesn't switch between acvies without using the Help feature | Modifying device sengs |
| I want to add a new Acvity or change how an Acvity is dened | Go to MyHarmony and follow the steps for Adding Acvies or Changing Acvity sengs | ||
| The right devices turn on but the play/stop/other buons don’t operate the device. | Accurate device operaon informaon was not available for your device | Follow the steps for Customizing Acvity buons | |
| One or more devices does not respond to the Harmony system | There is a physical obstrucon between your remote and your hub | Remove any physical obstrucons or change how your hub assignments control your devices. | Changing hub assignments |
| There is electrical interference from Wi-Fi, Bluetooth, a microwave oven, a cordless telephone, or some other device. | Turn o power to possible sources of interference and try again. | ||
| The incorrect manufacturer or model number was entered for the device | Verify the manufacturer and model number to make sure it is correct in your Harmony setup. |
Wi-Fi problems
If you are having trouble geng your Harmony Smart Control to communicate with your Wi-Fi network, please read the Harmony Smart Control Not Able to Connect to Wi-Fi FAQ.
Add missing commands to your Harmony Smart Control
If your remote control buons are not working properly, you can teach funcons to the buons individually using MyHarmony. For more informaon, see Customizing buons and on-screen commands with MyHarmony.
Hub is not syncing to the Harmony app
If you cannot sync with the Hub, you may need to sync the Hub using MyHarmony.
- Ensure that you are not connecng the Harmony Hub to your computer through a USB hub. If you are, connect the cable directly to a computer USB port.
- Unplug the USB cable from your computer, and plug it in again. Unplug the USB cable from your Harmony device, and plug it in again.
- Completely close your browser, start your browser again, and return to MyHarmony.
- Plug the USB cable into a dierent USB port of your computer.
- Disable any an-virus, rewall, or pop-up blocker programs.
-
Restart your computer.
-
Try using a dierent computer to connect the Harmony device.
Devices do not respond to Harmony Smart Control
There are a number of reasons why Harmony Smart Control may not be able to control your devices aer setup. The latest informaon about solving this problem is available online in the support arcle Harmony Smart Control Acvity not working.
Support
Find answers to questions online
Answers to many of your quesons can be found either in Logitech's online knowledge base or in discussions in Logitech's user forums.
Logitech Harmony remote knowledge base
The knowledge base is a collecon of arcs when by our technical support group.
Visit our knowledgebase at hp://www.logitech.com/support/universal-remotes.
Logitech Harmony remote user forum
If your queson isn't answered in the knowledge base, Logitech's user forums are a valuable source of informaon. There our customers and our technical support sta discuss quesons posed by users like you.
Visit the Harmony Remote User Forums at hp://forums.logitech.com/t5/Harmony-Universal-Remotes/ct-p/harmony_remote_controls and search for "harmony team". You will see arcs posted by Harmony support team members in chronological order.
Contact customer support:
Click the Support link in MyHarmony for a list of links to all available support opons for your Harmony Smart Control remote control.
Copyright
© 2013 Logitech. All rights reserved. Logitech, the Logitech logo, and other Logitech marks are owned by Logitech and may be registered. All other trademarks are the property of their respective owners. Logitech assumes no responsibility for any errors that may appear in this manual. Informaon contained herein is subject to change without noce.



- Using your Harmony Smart Control 19
- Changing your Setup.... 23
- Logitech Harmony Smart Control
- About this Manual
- Terms used in this manual:
- At a Glance
- Features
- Supported devices
- Know your Harmony Smart Control
- Changing the battery
- How your Harmony Smart Control works
- Devices
- TV Manufacturer
- What's connected?
- Cable/Satellite Box Manufacturer
- DVD/Blu-ray Player Manufacturer
- AV Receiver Manufacturer
- Other Device Manufacturer
- Activities
- Favorites
- Harmony App
- MyHarmony
- Powering your system off
- Interference with Harmony Smart Control
- Harmony Smart Control First Time Setup
- Hardware setup
- Download the Harmony App
- Set up the Harmony App
- Harmony
- Connecting to Wi-Fi
- Copying setup information from another Harmony remote
- Creating a MyHarmony account
- Setting up devices to control
- Adding a Watch TV Activity
- Setting up Favorites
- Adding more devices
- Personalizing your remote
- Using your Harmony Smart Control
- Switching between Activities
- Gesture control
- Viewing current gesture commands
- Customizing Activity gestures
- Activity commands
- How to get the most out of your Harmony Smart Control
- Important: use your Harmony Smart Control every time!
- Adjust the power on delay
- Position the hub and set up hub assignments correctly for your setup
- Use the Help function to put the remote back in sync with devices
- Changing your Setup
- Changing your setup with the Harmony App
- Changing your setup with MyHarmony
- Syncing your changes
- Adding devices
- Adding a device with the Harmony App
- Adding a device with MyHarmony
- Special devices
- Adding an unknown device with MyHarmony
- Deleting devices
- Deleting devices with the Harmony App
- Deleting devices with MyHarmony
- Modifying device settings
- Modifying device settings with the Harmony App
- Modifying device settings with MyHarmony
- Adding Activities
- Adding Activities with the Harmony App
- Adding Activities with MyHarmony
- Viewing Activity settings
- Viewing Activity settings with the Harmony App
- Viewing Activity settings with MyHarmony
- Changing Activity settings
- Changing Activity settings with the Harmony App
- Changing Activity settings with MyHarmony
- Deleting Activities
- Deleting Activities with the Harmony App
- Deleting Activities with MyHarmony
- Changing your location or channel provider
- Changing your location or channel provider with the Harmony App
- Changing your location or channel provider with MyHarmony
- Managing your Favorites
- Managing your Favorites with the Harmony App
- Managing your Favorites with MyHarmony
- Advanced customization
- Customizing Activities with MyHarmony
- Customizing buttons to perform a sequence of commands with MyHarmony
- Customizing Activity buttons with the Harmony App
- Customizing buttons and on-screen commands with MyHarmony
- Activities mode
- How to map buons to your remote with MyHarmony
- Click OK.
- Device mode
- Changing hub assignments with MyHarmony
- Click Finish.
- Upgrading your Harmony Smart Control firmware
- Customizing Favorite Channel icons with MyHarmony
- Remote Control Menus
- Help
- Connect to your Harmony
- Edit
- Devices menu
- Settings menu
- Sync your Harmony
- Set up new remote
- Edit devices and activities
- Remote
- Account Info
- Reset button layout
- Reset gesture mapping
- Reset Favorites
- Auto lock
- Haptic feedback
- Customer support
- Privacy Policy
- About
- Troubleshooting
- Setup problems
- Wi-Fi problems
- Add missing commands to your Harmony Smart Control
- Hub is not syncing to the Harmony app
- Devices do not respond to Harmony Smart Control
- Support
- Find answers to questions online
- Logitech Harmony remote knowledge base
- Logitech Harmony remote user forum
- Contact customer support:
- Copyright
Brand : LOGITECH
Model : Harmony Smart Control Add-on
Category : Remote control