
Design Advanced 42823 - Bread maker Gastroback - Free user manual and instructions
Find the device manual for free Design Advanced 42823 Gastroback in PDF.


| Product Type | Bread Maker |
| Brand | Gastroback |
| Model | Design Advanced 42823 |
| Dimensions (H x W x D) | Approximately 35 x 30 x 25 cm |
| Weight | Approximately 5.6 kg |
| Power Input | 700-900 Watts |
| Power Supply | 220-240 V, 50/60 Hz |
| Bread Loaf Capacity | Up to 2 lb (907 g) |
| Programs | 12 automatic programs including basic, whole wheat, gluten-free, dough, jam, cake, and quick bread |
| Crust Control | Selectable light, medium, or dark crust |
| Timer | Programmable up to 13 hours delay start |
| Keep Warm | Automatic keep warm function up to 1 hour after baking |
| Display | LCD screen with timer and program indication |
| Viewing Window | Yes, transparent window for monitoring |
| Baking Pan | Non-stick coated, removable |
| Kneading Blade | Removable, non-stick, included (one or two blades depending on model) |
| Safety Features | Automatic shut-off, cool-touch handle, non-slip feet |
| Maintenance & Cleaning | Wipe exterior with damp cloth; hand wash non-stick pan and blade with mild detergent |
| Included Accessories | Measuring cup, measuring spoon, dough hook, user manual |
| Spare Parts Availability | Available from Gastroback service centers; includes baking pan and kneading blade |
| Country of Origin | China |
Frequently Asked Questions - Design Advanced 42823 Gastroback
User questions about Design Advanced 42823 Gastroback
0 question about this device. Answer the ones you know or ask your own.
Ask a new question about this device
Download the instructions for your Bread maker in PDF format for free! Find your manual Design Advanced 42823 - Gastroback and take your electronic device back in hand. On this page are published all the documents necessary for the use of your device. Design Advanced 42823 by Gastroback.
USER MANUAL Design Advanced 42823 Gastroback
natural_image
Exterior view of a stainless steel-colored GASTROBAC® watermelon bank with control panel and display (no readable text or symbols beyond branding)BEDIENUNGSANLEITUNG
Art.- Nr. 42823 »Design Brotbackautomat Advanced«

natural_image
Close-up of hands slicing a loaf of bread on parchment paper (no text or symbols visible)BROTE
KLASSISCHES FRANZÖSISCHES BROT
ZUTATEN
Brotmenge 1000 g 750 g 500 g
Wasser 340 ml 250 ml 170 ml
Salz 8 g 6 g 4 g
Öl 12 ml 9 ml 6 ml
Zucker 16 g 12 g 8 g
Brotmehl 540 g 400 g 270 g
Hefe 6 g 5 g 3 g
ZUBEREITUNG
natural_image
Close-up of sliced yellow cake with visible crust and golden topping, served on a white plate with fork and checkered napkin (no text or symbols)natural_image
Close-up of a glass cup filled with white creamy substance, no visible text or symbolsnatural_image
Two glass jars filled with red beverage and berries, surrounded by fresh fruits and blueberries on a tiled surface (no text or symbols visible)natural_image
Close-up of a pink ice cream with berries and mint leaves in a glass bowl (no text or symbols visible)natural_image
Exterior view of a stainless steel-colored food processor with control panel and digital display (no visible text or symbols on main body)OPERATING INSTRUCTIONS
Item No. 42823 » Design Automatic Bread Maker Advanced «

READ AND OBSERVE INSTRUCTIONS FOR USE! FOLLOW INSTRUCTIONS!
Model and attachments are subject to change!
Deutsch
English
www.gastroback.de

We attach a certain importance to your safety. Thus, we ask you to read all provided instructions and information in this booklet carefully and completely, before you start running the appliance. This will help you to know all functions and properties of your new appliance. We especially ask you to adhere strictly to the safety information mentioned in these instructions.
TABLE OF CONTENTS
Knowing Your »Design Automatic Bread Maker Advanced« 74 Important Safeguards 76
General Safety Instructions....76
Important Safeguards for Electrical Appliances 79
High Temperatures—Risks of Burns 80
Moving Parts—Risks of Injuries 81
Non-Stick Cooling 82
Technical Specifications....82
Properties of Your New Bread Maker 83
Environment 83
Functions of the Buttons 83
Programs of the Bread Maker 85
Program Phasos 87
Keep Warm Function 87
Memory Function 88
Programming Your Own Settings 88
Using the Timer 89
Locking the Control Panel 90
Tips for Best Results....91
Before First Use 94
Operation 95
Preparations....96
Starting the Baking Program....97
Special Introduction about Quick Bread....101
Applying Some Additional Baking Time 101
Making Jam 102
Using the Ice Bucket 103
Making Ice Cream....104
Meking Yoghurt 106
Solving Problems....107
Care and Cleaning 111
Storage 113
Notes for Disposal....114
Information and Service....114
Warranty 115
Recipes 116
DEAR CUSTOMER!
Your new GASTROBACK® »Design Automatic Bread Maker Advanced« will provide a series of delightful, freshly baked fragrant breads and cakes. To replenish your well-set breakfast table even jam and yoghurt can be made quite easily. As a special highlight, using the designated ice bucket (not included, separately available as accessory) the appliance can prepare even ice cream. Try some new recipes to your individual taste. For this, use the various pre-set programs or even set-up your own program. The »Design Automatic Bread Maker Advanced« will make your ideas come true without effort.
These instructions for use will inform you on the various functions and features, which make it easy to take pleasure in your new Bread Maker.
We hope that you will enjoy your new Bread Maker.
- Lid — including handle, viewing window, ventilation slits, and ingredients box; with a list of the available programs printed on top
- Viewing Window
- Ingredients Box — will release the ingredients automatically during the pre-programmed baking programs 1-9.
- Non-Stick Coated Kneading Paddle
Drive Shaft — put on the kneading paddle here - Operating elements
- Non-Stick Coated Bread Pan - with handle for easy installation and removal
- Stainless Steel Housing
- Heating Compartment
Coupling of the kneading works — for operation, the bread pan must be locked here tightly Heating Element (not visualized)
-
Non-slip Rubber Feet—for a stable stand on smooth surfaces
-
Power Cord
ACCESSORIES
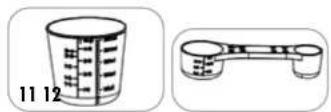
- Measuring cup
- Measuring spoon—wells for 5 ml (1 Teaspoon) and 15 ml (1 Tablespoon)
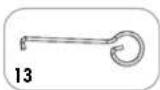
- Hook for removing the kneading paddle
OPERATING ELEMENTS
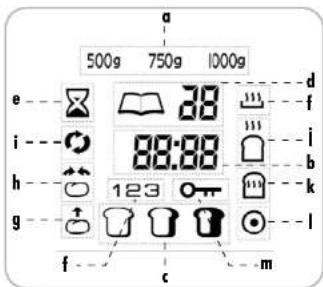
LCD screen showing the following information:
(a) Selected range of loaf weight: large (up to 1000 g, 2 lb), medium (approx. 750 g, 1.5 lb), or small (up to 500 g, 1.0 lb)
(b) Remaining time until completion in minutes
(c) Icon of the selected bread crust colour: light, medium, dark
(d) Selected program number
(e) Hourglass icon, if a delay time has been set
(f-l) Icon and number of the currently running program phase (stir/knead, rest/rise/ferment, heat, bake, keep warm, completion).
(m) Key icon, if the control panel is in locked mode.
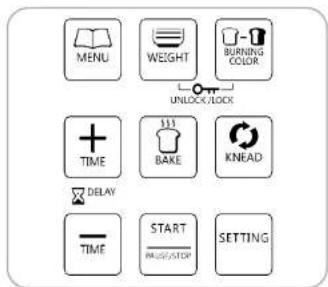
Buttons – only slightly touch with your finger. A beep sounds on every input.
- MENU — to select the desired baking program.
- WEIGHT — to set the desired loaf weight.
• BURNING COLOR — to set the desired browning. - +TIME and -TIME—for setting a time delay, or setting the processing time.
- BAKE—a short-cut to the Bake program (16).
• MIX—a short-cut to the Mix program (12). - START/STOP—starts, pauses, or cancels operation.
- SETTING – provides a short-cut to the Homemade program (17) and switches through the various program phases.

IMPORTANT SAFEGUARDS
Carefully read all instructions before operating this appliance and save for further reference. Do not attempt to use this appli-
ance for any other than the intended use, described in these instructions. Any other use, especially misuse, can cause severe injuries or damage by electric shock, moving parts, heat, coldness, or fire.
These instructions are an essential part of the appliance. Do not pass the appliance without this booklet to third parties.
Any operation, repair and technical maintenance of the appliance or any part of it other than described in these instructions may only be performed at an authorised service centre. Please contact your vendor.

GENERAL SAFETY INSTRUCTIONS
- This appliance can be used by children aged from 8 years and above and persons with reduced physical, sensory or mental capabilities or lack of experience and knowledge if they have been given supervision or instruction concerning use of the appliance in a safe way and understand the hazards involved. Children shall not play with the appliance. Cleaning and user maintenance shall not be made by children unless they are older than 8 and supervised.
- Keep the appliance and its cord out of reach of children less than 8 years.
- If the supply cord is damaged, it must be replaced by the manufacturer, its service agent or similarly qualified persons in order to avoid a hazard.
- The appliance is not intended to be operated by means of an external timer or separate remote-control system.
- This appliance is for household use only and NOT intended for use in moving vehicles. Do not operate or store the appliance in humid or wet areas or outdoors. Any use of accessories, attachments or spare parts that are not recommended by the manufacturer or damaged in any way may result in injuries to persons and/or damage.
- Check the entire appliance and its parts regularly for proper operation—especially the power cord (e.g. check for distortion, discolouration, cracks, corroded pins of the power plug). Do not operate the appliance, when the appliance or any part of it is likely to be
damaged, to avoid risk of fire, electric shock or any other injuries to persons and/or damage. The appliance or its parts are likely to be damaged, if the appliance has been subject to inadmissible strain (e.g. overheating, mechanical or electric shock), or if there are any cracks, excessively frayed or melted parts, or distortions (e.g. lid is broken or cracked), or if there is any kind of malfunction (e.g. motor gets stuck, liquid or dough running out, overheating, smoke coming out). If one of these cases occurs during operation, immediately unplug the appliance. Get in contact with an authorized service centre for examination and/or repair.
- Operate the appliance on a well accessible, stable, level, dry, and suitable large table or counter that is resistant against water, fat, and heat. The appliance will vibrate vigorously during motor operation and, despite the non-slip feet, could move around on the table or counter.
Thus it is crucial, to ensure a really stable stand on a level surface. The appliance may not wobble, tilt or slip on the table or counter. Additionally, keep an appropriate distance (at least 30 cm at each sides) to the edges of the working space and any other objects. During operation leave at least 1 m of free space above the appliance to avoid damage due to heat and condensate and for unhindered access. Do not operate the appliance under over hanging boards or drop lights. - Always keep the appliance and the table or counter clean and dry, and wipe off spilled liquids immediately. The rubber feet could leave stubborn stains on some surfaces. Thus, it is good advice to place the appliance on a heat-resistant mat or plate. However, do not place any clothes or tissue or other foreign objects under or on the appliance during operation, to avoid risk of fire, electric shock and overheating. Do not place the appliance or any hot parts of it (e.g. bread pan) over a power cord or on any surfaces sensitive to heat, fat, or moisture, or near the edge of the table or counter, or on wet or inclined surfaces.
- This appliance is NOT intended for use by persons (including children) with reduced physical, sensory or mental capabilities, or lack of experience and knowledge, unless they have been given supervision or instruction concerning the use of the appliance by a person responsible for their safety. Children must always be supervised to ensure that they do not play with the appliance or any part of it or the packa
ging. Always keep the appliance where it is dry, frost-free, and clean, and where young children cannot reach it. Do not leave the appliance or any part of it unattended, when in reach of young children.
- Do not place the appliance or any part of it in a range, or on or near hot surfaces (e.g. burner, heater or oven). Do not use the appliance or any parts of the appliance with any other device or for any other purpose (e.g. drying of foodstuffs or other materials). Exclusively use the appliance for processing food that is fit for consumption. Do not dry or store any food or foreign objects within the appliance. Before operation, always ensure that the appliance is assembled and connected completely and correctly according to the instructions in this booklet. Do not handle the appliance or any part of it with violence. The ventilation slits in the housing must always be unobstructed.
- The ice bucket, gear box, and stirring paddle may never be heated or touch hot surfaces (e.g. oven, burner, range) to avoid risk of burst, melting and distortion. Do not use the ice bucket, gear box, and stirring paddle with any program of the appliance other than the Ice Cream program! Do not bring the ice bucket in contact with hot surfaces or hot liquids. The coolant within the ice bucket would expand forcefully when heated, thus bursting the ice bucket and causing risk of severe injuries and damage. After cooling the ice bucket in the freezer, always protect your hands with gloves before touching the ice bucket. NEVER touch the ice bucket with wet skin, when it has been cooled in the freezer. Otherwise, your skin would immediately freeze solid to the ice bucket, causing severe frost-bites and injuries.
- Do not hold your hands or any foreign objects (e.g. clothes, cooking utensils) in the heating compartment or bread pan, with the appliance connected to the power supply. Do not use any hard, sharp or edged objects (e.g. knives, forks, metal scraper) with the appliance or any part of it.
-
Do not fill in more dough than 1000 g in total. Otherwise ingredients or dough may run out of the bread pan and reach the hot heating elements, causing overheating, fire and/or electric shock. Ensure that the exterior of the bread pan is completely clean and dry before placing it in the heating compartment. Always wipe off spilled liquids immediately. If liquids have run out or are spilled on the housing, immediately unplug the appliance and clean the appliance (see: "Care and Cleaning").
-
Always unplug the appliance, and wait until the motor comes to a standstill, before assembling or disassembling any parts (e.g. bread pan). Additionally leave the appliance cool down, before moving, or cleaning the appliance. Always unplug the appliance, when not in use. Always hold the housing at both sides near the bottom for moving the appliance. Do not hold the appliance at the lid, lid handle, bread pan handle, or power cord for moving the appliance. Do not place any hard and/or heavy foreign objects on or in the appliance or any part of it.
- Do not use any corrosive chemicals, abrasive cleaners, or cleaning pads (e.g. bleach, oven cleaner, metal scouring pads) for cleaning to avoid damage to the surfaces.
- Do not place the appliance, or any part of it, or power cord in an automatic dishwasher.
- Do not leave any food dry on the appliance. Always clean the appliance after each use to prevent accumulation of baked-on foods (see "Care and Cleaning"). Always keep the appliance and its parts, where it is clean.
IMPORTANT SAFEGUARDS FOR ELECTRICAL APPLIANCES
The appliance is heated electrically. Place the appliance near a suitable wall power socket to connect the appliance directly to a protected mains power supply with protective conductor (earth/ground) connected properly. Ensure that the voltage rating of your mains power supply corresponds to the voltage requirements of the appliance (220-240 V \~, 50/60 Hz, rated for at least 10 A) to avoid interference with other appliances.
The installation of a residual current operated circuit breaker (r.c.c.b.) with a maximum rated residual operating current of 30 mA in the supplying electrical circuit is strongly recommended. If in doubt, contact your electrician for further information.
In various foreign countries, the specifications for power supplies are subject to incompatible norms. Therefore it is possible that power supplies in foreign countries do not meet the requirements for safe operation of the appliance. Thus, before operating the appliance abroad, ensure that safe operation is possible.
- Do not use any desk top multi socket outlet, external timer, extension cord, or remote control systems.
- Always handle power cords with care. The pins of the power plug must be smooth and clean. Always completely unwind the power cord before use. Do not place the appliance on a power cord. Power cords may never be knotted, twisted, pulled, strained or squeezed. Do not let the plug or power cord hang over the edge of the table or counter. The power cord may not touch hot surfaces or sharp edges. Ensure that no one will pull the appliance by the power cord. Take care not to entangle in the power cord. Always grasp the plug to disconnect the power cord. Do not touch the appliance or power plug with wet hands when the appliance is connected to the power supply.
- DO NOT drip or spill any liquids on or in the housing, or oven compartment, or power cord. Always ensure that the exterior of the bread pan is clean and dry before placing the bread pan in the heating compartment. Otherwise liquid could run into the housing or on the heating element, causing risk of electric shock or fire. Do not immerse the appliance or power cord in water or other liquids. Do not pour or spill any liquids on/in the housing or power cord. Do not place the appliance on wet surfaces. When liquids overflowed or are spilled on the housing, heating element, or power cord, immediately unplug the appliance. Thereafter, clean the appliance and, leaving the lid open, let it dry for at least 1 day. See: "Care and Cleaning". Do not clean the appliance in an automatic dishwasher.
- The »Design Automatic Bread Maker Advanced« is designed for baking bread and cakes and making jam in a household environment. For this purpose, the appliance is heated electrically. Thus, improper handling could cause severe injuries and damage. Please keep this in mind to avoid scalds and damage.
- Except for the containing food, the lid, bread pan, and exterior of the appliance can get very hot during operation and thereafter. Additionally, hot steam could escape from the ventilation slits in the lid.

HIGH TEMPERATURES - RISK OF BURNS
- Do not touch the hot surfaces with any parts or your body or any heat-sensitive or moisture-sensitive objects during operation or while the appliance is still hot. Only touch the appliance and its parts at the handles and operating elements during operation and thereafter. Always protect your hands with oven gloves, when taking out the bread pan after operation. Beware of hot steam and condensate, when opening the lid.
- Do not move the appliance when still hot. Always leave the appliance cool down before moving or cleaning the appliance. Do not place the appliance or any part of it (e.g. bread pan) on heat-sensitive surfaces, when hot. Special caution must be used, when moving the bread pan, while it is containing hot liquids. Ensure to hold the bread pan level when it is filled with any hot, runny contents (e.g. jam) to avoid severe scalds and damage.
- You should keep the lid closed during operation. However, even with the lid properly closed, steam could escape from under the lid during operation and thereafter. This holds especially for the ventilation slits in the lid. Do not hold any parts of your body or any delicate objects over the appliance during operation. Condensate could accumulate under the lid and drip, when opening the lid. Beware of hot steam and condensate when opening the lid.
- DO NOT cook any high-proof alcoholic liquid or alcoholic foodstuffs (e.g. mulled wine, grog) within the appliance. Do not pour any alcoholic liquid on/in the appliance to avoid risk of explosion and fire.

MOVING PARTS - RISKS OF INJURIES
Always unplug the appliance when not in use and before removing the bread pan or ice bucket to avoid injuries due to the kneading works. Do not insert your hands, hair, clothes or any other objects (e.g. cooking utensils) into the bread pan or heating compartment with the appliance connected to the power supply. Always ensure that the bread pan or ice bucket is properly locked to the coupling of the kneading works, before-connecting the appliance to the power supply.

NON-STICK COATING
The bread pan and kneading paddle are provided with non-stick coatings. Even without using additional fat, food will not stick to the coated surfaces. Please adhere to the following precautions:
- Before first use, wipe the non-stick coatings of the bread pan and kneading paddle with a little butter or marge. Thereafter, there is no need to grease the bread pan for baking.
- Do not use the bread pan or kneading paddle, if the non-stick coating is scratched, cracked or detached due to overheating.
- Only use wooden or heat-resistant plastic cooking utensils with the appliance. Do not use hard or sharp objects for scratching, stirring, or cutting on the coatings. We will not be liable for damage to the non-stick coating, if metal utensils or similar objects have been used. Do not use any spray-on non-stick coatings or oven cleaners.
- The non-stick coatings minimise the effort of cleaning. Do not use abrasive scorers or abrasive cleaners for cleaning. Even stubborn residues can be removed via a soft sponge or soft nylon brush and warm dishwater.
TECHNICAL SPECIFICATIONS
| Modell: | Design Automatic Bread Maker Advanced |
| Item No.: | 42823 |
| Power supply: | 220-240V~, 50/60Hz |
| Maximum power consumption: | 500W |
| Length of power cord: | approx. 115cm |
| Weight (incl. bread pan): | approx. 5.75kg |
| Dimensions (WxDxH: | approx. 35.3 cm x 27.4 cm x 33.4 cm |
| Bread pan capacity: | max. 1000g |
| Ice bucket dimensions: | diameter = 14.2 cm; height: 12.0 cm |
| Ice bucket capacity: | max. 0.7 litres |
| Certification: |  |
PROPERTIES OF YOUR NEW BREAD MAKER
You can use the automatic Bread Maker to bake bread and cakes according to your taste. For this, you can use ready-to-use baking mixtures or create your own recipes. Also the Bread Maker can knead dough for noodles, pizza, or rolls. Additionally, you can make jam and ice. For these purposes, you can select among 17 different programs. See: "Programs of the Bread Maker". Additionally, you can use the timer function of your Bread Maker for a belated start of the baking programs 1-9. This way, your bread will be ultimately fresh, whenever you like. See: "Using the Timer".
IMPORTANT: Do not use the appliance for drying or storing food or any foreign objects.
ENVIRONMENT
The Bread Maker may work well in a wide range of temperature, but there may be changes in the sizes of the loafs produced depending on the ambient room temperature. We suggest that the room temperature should be within the range of +15°C and +34°C.
FUNCTIONS OF THE BUTTONS
Each time you touch a button, a signal sounds. The buttons need only to be touched slightly.
Use the buttons of the »Design Automatic Bread Maker Advanced« to operate the following functions:
| Button Function | |
| MENU | Selection of the desired program (default: 1). The program number is shown on top of the LCD screen. A list of the available programs is printed on the left side of the lid. Each time this button is touched, the appliance will switch to the next program number while sounding a beep. The appliance will cycle through the programs. After number 17, it will return to number 1 again. |
| START PAUSE STOP | This START/STOP button starts the selected program or pauses / cancels the currently running program or the warming function.For cancelling a program, keep your finger on the button until a signal sounds (approx. 3 seconds).NOTE: When cancelling a program, all settings are deleted. There is no way to continue the recently used program. Thus, only touch this button shortly, if you wish to pause operation and add further ingredients. Alternatively, unplug the appliance for no longer than 10 minutes. |
| BURNING COLOR | Selecting the desired colour of your bread: light, medium, or dark. Default: medium.Your choice is indicated via an icon on the bottom of the LCD screen.This setting is available for the programs 1-9. |
| WEIGHT | Use for setting the total amount of ingredients. Your choice is indicated on top of the LCD screen. The following settings are available:1000 g — for a total amount of up to 1000 g (1 kg).750 g — for a total amount of all ingredients between 500 g and 750 g (Default).500 g — for a total amount of all ingredients up to 500 g.Tip: With an amount not sufficient for the total amount of ingredients selected, your bread may not be done completely or too dry and dark. If it is not done, you can use the program Bake (16) for additional baking. See: "Applying Some Additional Baking Time".This button is active only for the programs 1-9. |
| +TIME and -TIME | Use these buttons to set up the time duration until completion.With the programs 1-9, 12, 14, and 17 you can set a delayed start of the selected program. In this case, the hourglass will flash on the LCD screen. The set time will include the processing time of the selected program. See: "Using the Timer"With the programs 11, 13, 15, and 16, you enter the processing time. In this case, the time flashes on the LCD screen. You must confirm your time setting via the START/STOP button, before making other settings or starting the program.With program 10 (Jam), time setting is not available and these buttons are inactive.In all cases, you select the time until your food is finished. Thus, the minimum and maximum time duration depends on the currently selected program.To use this function, first select the desired program (MENU) and, if applicable, the WEIGHT and degree of browning (BURNING COLOR). Then adjust the time.Tip: With your finger kept on the button, the time setting will run automatically until you remove your finger. |
| BAKE | This button will directly call the baking program 16. Simply touch this button on thereafter the START/ STOP button for selecting and starting program 16.IMPORTANT: Timer operation is not available with the Bake program 16. Instead, you may change the baking time via the +TIME and - TIME buttons. Default: 30 minutes. |
| MIX | This button is the direct way for selecting program 12 (Mix). Simply touch this button and the START/ STOP button for selecting and starting program 12. |
| SETTINGS Selects the Homemade program (17).With the Homemade program selected, this button switches through the various program phases of the Bread Maker to enable the input of your own program. The current phase and number is shown on the LCD screen. Use the +TIME and -TIME buttons to program the desired time duration for each phase.See: "Programming Your Own Settings"For additional information on the individual program phases, see "Program Phases" and "Programming Your Own Settings". | |
PROGRAMS OF THE BREAD MAKER
You select the desired program by touching the MENU button. The corresponding program number is shown on the LCD screen. The processing time depends on the selected program. See: "Program Phases".
| Nr. | Function To Use | For ... |
| 1 | Basic bread | For white and mixed breads mainly consisting of fine wheat and rye flour. The bread has a compact consistency. You can adjust the browning via the BURNING COLOR button. |
| 2 | French bread | For light breads made from fine flour. Special timing and temperature make the bread fluffy and produce a crispy crust. Not suitable for baking recipes requiring butter, marge or milk. |
| 3 | Whole wheat | For yeast breads with heavy varieties of flour, for example, containing a significant portion (50 % and more) of whole wheat flour. Breads with whole wheat flour are more nutritious, because the flour is milled from the entire wheat, including the bran and germ. This flour produces a brown to dark brown bread (with only whole wheat flour used). The breads are more flavourful and healthful. However, the bread will be more compact and heavy. |
| 4 | Sweet bread | For bread with additional ingredients (e.g. fruit juices, grated coconut, raisins, dried fruits, chocolate, or sugar) causing a high content of sugar, fat, and proteins. These ingredients produce a darker crust. Due to a longer phase of rising the bread will be light and airy. |
| 5 | Rice bread | When using rice flour, the kneaded mixture is more like a cake batter. After kneading, the dough is allowed to rise before baking. The crust is somewhat thinner and softer than that of a normal wheat flour bread. |
| 6 | Gluten free | The ingredients to create gluten free breads are unique. While this is a yeast bread, the dough is generally wetter and more like a batter. It is also crucial not to over-mix or over-knead gluten free dough. There is only one rise phase, and due to the high content of moisture, the baking time is increased. All ingredients must be added at the very beginning of the program cycle. |
| 7 | Quick bread | Kneading, rising and baking is performed in a very fast way. But the baked bread is usually small, rough and dense. |
| 8 | Fruit bread | This setting will bake the bread normally. Fill dry and not sticky fruits and nuts into the ingredients box that will automatically release the ingredients at the right time. However, fill wet, fresh and sticky ingredients (e.g. fresh fruits, candied orange peel) directly into the bread pan, as soon as the signal sounds. This way, the ingredients are baked evenly into the bread. |
| 9 | Cake | Kneading, rising and baking are programmed for making cake. However, soda and baking powder is used for rising.The WEIGHT button is not available with this program. |
| 10 | Jam This program is | designed for making homemade jams and chutneys. The paddle keeps the ingredients stirred automatically. They make a wonderful complement to freshly baked bread.With this program you cannot make any further settings. |
| 11 | Defrost Provides a warm environment for thawing food hygienically without cooking.You may adjust the processing time via the +TIME and -TIME buttons. No Timer operation is available.Additionally, the buttons WEIGHT and BURNING COLOR are inactive. | |
| 12 | Mix For preparing cake mixtures. In this program NO rising and NO baking is done.The buttons WEIGHT and BURNING COLOR are inactive. | |
| 13 | Khead For kneading of a somewhat heavier dough only. NO rising and NO baking is done. Used for making dough for pizzas, noodles, and rolls.You may adjust the processing time via the +TIME or -TIME buttons. No Timer operation is available.The buttons WEIGHT and BURNING COLOR are inactive. | |
| 14 | Dough For kneading and rising yeast dough WITHOUT baking. Remove the dough after processing. Use this program for making dough for bread rolls, pizza, steamed bread, etc.The buttons WEIGHT and BURNING COLOR are inactive. | |
| 15 | Ice Cream | Use this program exclusively for making ice cream in the ice bucket. See: "Making Ice Cream".Via the +TIME or -TIME buttons, you may select the processing time: 20, 25, or 30 minutes. No Timer is operation available. |
| 16 | Bake | For additional baking of bread that is too light or not baked through. In this program is no kneading or rising. For example, use this program for baking already prepared dough in portions of special shapes.You may adjust the processing time via the + TIME or - TIME buttons. No Timer operation is available. |
| 17 | Homemade | This place in memory is reserved for your own baking program. See: "Programming Your Own Settings" |
| 18 | Yoghurt Use this function to produce your own yoghurt. You simply need fresh milk and some living lactobacillus yoghurt. | |
In some programs (1-9) an acoustic signal sounds during running and the ingredients box will open automatically. If your recipe demands the addition of further ingredients (e.g. fruits or nuts), you should add dry and coarsely chopped foodstuffs into the ingredients box and flour or wet, sticky ingredients immediately after the signal is heard.
To prematurely cancel a program or the warming function hold the START/STOP button touched for 3 seconds, until one long acoustic signal is heard. To switch off the appliance, disconnect the appliance from the power supply.
PROGRAM DATA/PROGRAM PHASES
The table below shows the processing times for the individual program phases.
| 1. BASIC BREAD 2. FRENCH BREAD 3. WHOLE WHEAT 4. SWEET BREAD | ||||||||||||
| Weight (g) | 500 | 750 | 1000 | 500 | 750 | 1000 | 500 | 750 | 1000 | 500 | 750 | 1000 |
| Total duration (h) | 03:05 | 03:10 | 03:15 | 03:35 | 03:40 | 03:45 | 04:05 | 04:10 | 04:15 | 03:35 | 03:40 | 03:45 |
| Mix 1 | 10 min | 10 min | 7 min (5 min preheat) | 7 min | ||||||||
| Rest 1 | 3 min | 10 min | 8 min | 8 min | ||||||||
| Mix 2 | 5 min | 5 min | 10 min | 10 min | ||||||||
| Rest 2 | 10 min | 5 min | 10 min | 10 min | ||||||||
| Mix 3 | 20 min | 20 min | 10 min | 15 min | ||||||||
| Rest 3 | — | 15 min | 10 min | 15 min | ||||||||
| Mix 4 | — | 15 min | 10 min | 15 min | ||||||||
| Ferment 1 | 42 min | 40 min | 55 min | 40 min | ||||||||
| Exhaust | 50 sec | 50 sec | 50 sec | 1 min | ||||||||
| Ferment 2 | 40 min | — | — | — | ||||||||
| Exhaust | — | — | — | — | ||||||||
| Ferment 3 | — | 40 min | 65 min | 40 min | ||||||||
| Bake | 55 min | 60 min | 65 min | 55 min | 60 min | 65 min | 55 min | 60 min | 65 min | 55 min | 60 min | 65 min |
| Keep warm | 60 min | 60 min | 60 min | 60 min | 60 min | 60 min | 60 min | 60 min | 60 min | 60 min | 60 min | 60 min |
| Add dry furit time | 2 h12 min | 2 h17 min | 2 h22 min | 2 h40 min | 2 h45 min | 2 h50 min | 3 h50 min | 3 h55 min | 4 h | 2 h25 min | 2 h30 min | 2 h35 min |
| Max. Timer | 15 h | 15 h | 15 h | 15 h | ||||||||
- RICE BREAD 6. GLUTEN FREE BREAD 7. QUICK BREAD 8. FRUIT BREAD
| Weight (g) | 500 750 1000 500 750 1000 500 750 1000 | |||||||||||
| Total duration (h) | 03:00 | 02:55 | 02:50 | 03:05 | 03:10 | 03:15 | 02:20 | 02:15 | 02:10 | 03:05 | 03:10 | 03:15 |
| Mix 1 10 min | 10 min | 10 min | 10 min | |||||||||
| Rest 1 5 min | 20 min | 2 min | 3 min | |||||||||
| Mix 2 10 min | 5 min | 5 min | 5 min | |||||||||
| Rest 2 5 min | 10 min | 3 min | 10 min | |||||||||
| Mix 3 10 min | 5 min | 10 min | 20 min | |||||||||
| Rest 3 5 min | — — — | |||||||||||
| Mix 4 10 min | — — — | |||||||||||
| Ferment 1 | — 30 min — 42 min | |||||||||||
| Exhaust | — — — | 50 sec | ||||||||||
| Ferment 2 | — — 45 min 40 min | |||||||||||
| Exhaust | 60 sec | 50 sec | — | 50 sec | ||||||||
| Ferment 3 | 60 min | 50 min — — | ||||||||||
| Bake | 55 min | 60 min | 65 min | 55 min | 60 min | 65 min | 55 min | 60 min | 65 min | 55 min | 60 min | 65 min |
| Keep worm | 60 min | 60 min | 60 min | 60 min | 60 min | 60 min | 60 min | 60 min | 60 min | 60 min | 60 min | 60 min |
| Add dry furit time | 1 h50 min | 1 h55 min | 2 h | 2 h10 min | 2 h15 min | 2 h20 min | 1 h30 min | 1 h35 min | 1 h40 min | 2 h12 min | 2 h17 min | 2 h22 min |
| Max. Timer | 15 h | 15 h | 15 h | 15 h | ||||||||
At the end of the baking programs (1-9) the appliance automatically switches to a keep warm function for up to 60 minutes (1 hour). In this mode, the heating compartment is kept warm. Thus, the bread will not get moistened and soggy. You can cancel the keep warm function at any time by keeping the START/STOP button touched for more than 3 seconds until an acoustic signal sounds.
MEMORY FUNCTION
When being live again after a power failure of up to 10 minutes, the program will continue automatically from the same point. There is no need to touch the START/STOP button. However, if the power cut-off lasts for more than 10 minutes, the actual baking program will be cancelled completely.
Note:
After you have cancelled the baking process by pressing the START/STOP button at least 3 seconds, all previously entered settings will be lost. In this case, you must start the baking process again (see: "Tips for Best Results"). Thus, for short interruptions (e.g. for adding further ingredients or pushing down the ingredients back to the kneading paddle) it is best to unplug the appliance or touch the START/STOP button only shortly for pausing operation for 3 minutes at the maximum. However, please keep in mind that the appliance will re-assume operation automatically after 3 minutes.
Note:
If the program has not entered the rising phase at the moment the power supply cuts off for more than 10 minutes, you can start the program again, without filling in new ingredients. This way, in total, the dough will be kneaded for a somewhat longer time duration.
PROGRAMMING YOUR OWN SETTINGS
The program Homemade (17) is reserved for your own baking program. For each program phase, you can enter the desired time duration. To disable a program phase, simply enter the time duration 0:00. This way, you can put your own special baking ideas into practice. The program phases and default time durations are given above (see: "Program Phases").
Note:
Your settings will be deleted from memory, after disconnecting the appliance from power supply for more than 10 minutes. Thereafter, the defaults given in the table above will be active again.
- Touch the SETTING button to call the Homemade program. The program number 17 and the currently programmed total processing time will be shown on the LCD screen.
- Again touch the SETTING button to switch to the first program phase. The icon and number of the program phase will be shown with the pre-set time duration flashing.
- Use the +TIME and -TIME buttons to set the desired time duration.
- With the desired time duration flashing on the LCD screen, touch the SETTING button again to switch to the next program phase.
- Repeat steps 3 and 4 until you have programmed all program phases beginning with the first kneading phase up to the maximum keep warm time duration.
Tip:
When touching the START/STOP button during programming, the appliance will finish programming, showing the complete time duration of your program.
- After programming, you can start your Homemade program by touching the START/STOP button.
Tip:
As with most other programs of the Bread Maker, you can start your Homemade program belatedly. After completing programming, simply touch the +TIME or -TIME buttons to apply the desired time delay. The hourglass ☒ will flash on the LCD screen to indicate that the time delay function is active and the time duration until finishing the baking process is shown. See below: "Using the Timer".
USING THE TIMER
The timer function enables delayed baking. The shown time is always the time duration until completion for the currently active baking program. The maximum duration is 15 hours, indicated via 15:00. The minimum is the processing time of the currently selected baking program. With the timer active, the hourglass ☒ is shown on the LCD screen as an indicator for timer operation.
CAUTION: With the programs 11, 13, 15, and 16, the timer function is not available. However, via the +TIME and -TIME buttons, the processing time will be set (e.g. the baking time with program 16).
In contrast to this, the Timer setting for the programs 1–9, 12, 14, and 17 will NOT change the processing time of any program phase of the baking program. Instead, the baking program will be started belatedly. Thus, to avoid overheating of your ingredients, it is important to observe the hourglass icon on the LCD screen especially when using the Bake program (16).
Note:
However, if you have set the timer, you should put all the ingredients into the bread pan or ingredients box (coarsely chopped nuts, whole grain), before starting the program. In this case, however, fruits and nuts should always be cut into smaller pieces.
Note:
Do not use the timer function when working with quickly spoiling ingredients such as eggs, milk, cream or cheese. The quality of these ingredients will degrade, when not cooled.
- At first, select the program via the MENU button. Then adjust loaf size (WEIGHT button) and degree of browning (BURNING COLOR button), as these settings may affect the processing time. See: "Starting the Baking Process".
- Thereafter, use the +TIME and -TIME buttons to set the time duration until completion shown on the LCD screen. With the Timer active, the hourglass ✗ flashes on the LCD screen.
Tip:
The delay time is including the baking time of the chosen program. Thus, after the shown time elapsed, there is hot bread in the Bread Maker ready for being served after leaving it cool down for some minutes.
- Touch the START/STOP button to start operation. The hourglass icon and the dots of the time display will flash on the LCD screen and a count down will show the remaining time. You will have fresh bread at the desired time.
If you don't take out the bread immediately, the keep warm time of 1 hour starts. See: "Warming Function".
LOCKING THE CONTROL PANEL
You can disable the control panel to protect the bread maker from any unintended input.
Press the buttons WEIGHT and BURNING COLOR simultaneously to lock the control panel. A signal sounds on the key icon displayed on the LCD screen. Thereafter there will be no respond to touching any single button on the control panel.
IMPORTANT: By locking the control panel, you will disable even the START/STOP button!
To unlock the control panel, again press the buttons WEIGHT and BURNING COLOR simultaneously. The signal sounds and the key icon disappears. The control panel is ready for your input again.
TIPS FOR BEST RESULTS
For a successful baking process, please consider the following factors:
- Never use larger quantities than those specified in this booklet. Do not fill in more than 1000 g in total. Too much dough can rise out of the bread pan and drop onto the hot heating elements, thus causing risk of overheating, fire and electric shock.
- One important step of making good bread is to measure the ingredients precisely. Even small deviations from the quantities specified in the recipe may affect the baking results. You should measure out the correct amount from liquids (water, milk, oil) via measuring cups or measuring spoons. When measuring oil, the measuring vessel must be completely dry. Solid ingredients (flour, sugar, nuts, etc.) should be measured via kitchen scales to obtain the correct amounts.
- If you do not have kitchen scales at hand, you may use measuring cups and spoons even for solid ingredients. However, the measuring vessel should provide
an appropriate scale. This is crucial, as the weight of various solid ingredients differ in volume from the volume of water with the same weight. Spoon solid ingredients into the measuring vessel and level off the surface at the correct height. With most measuring vessels, do not tamper or heap the food in the measuring vessel. As this additional amount would influence the result considerably.
- Essential for good results is the order for putting the ingredients into the bread pan. Generally, you should first add all liquids, then sugar, salt, spices, and flavours. Thereafter, put flour on top of the liquids without stirring. Add yeast or baking powder/soda as the very last ingredient on top of the flour layer. Doing so, ensure that the yeast will not come in contact with salt and any liquids.
- During the baking programs 1-9, after kneading for a while, short acoustic signals will sound and the ingredients box will open automatically, emptying its content into the bread pan. However, some ingredients cannot be added via the ingredients box (very moist or sticky foodstuffs or powder). These ingredients must be added by opening the lid shortly, and pouring the ingredients directly into the bread pan.
- If fruits are added too soon, the flavour will evaporate during the mixing process. Thus, wait for the signal to add these ingredients.
- For several programs of the bread maker, you can set a delayed start of the program by using the timer (see: "Using the Timer"). If you have set the timer, you should put all the ingredients into the bread pan and/or ingredients box before starting the program. However, it is best to cut fruits and nuts into smaller pieces.
- Do NOT use the timer function, when working with perishable ingredients such as eggs, milk, cream or cheese. The quality of these ingredients will degrade, when not cooled.
- For preparing yeast dough, all ingredients should have room temperature (20 - 25 °C) to maintain an optimal rising result of the yeast.
- The bread will be kept warm for up to 1 hour after the end of the baking process. This prevents the bread from becoming too moist due to condensate. Take your bread out of the appliance during this warm-keeping period.
- Immediately rinse the bread pan with warm water after removing the bread. This prevents any food residues from accumulating on the drive shaft. Otherwise, the kneading paddle could stick to the drive shaft.
- If you remove the kneading paddle after the last kneading of the dough, the bread will remain intact, when you remove it from the bread pan.
- In the case of having cancelled a running baking program unintentionally (e.g. when adding further ingredients or removing the kneading paddle), you can finish
the already prepared dough choosing the programs Knead, Mix or Dough for further preparation and/or Bake (No. 16) for baking according to your recipe. See also: "Programs of the Bread Maker" for the required processes, or "Applying Some Additional Baking Time".
Bread Ingredients
| Bread flour Bread | Flour has a high content of gluten and a high ability to keep the size of the bread from collapsing after rise. As the gluten content is higher than the common flour, so it can be used for making bread with large size and better inner fibre. Bread flour is the most important ingredient for making bread. |
| Plain flour Flour that contains no baking powder. It is used for making Quick Bread. | |
| Whole-wheat flour | Whole-wheat flour is ground from grain. It contains wheat skin and gluten. Whole-wheat flour is heavier and more nutrient than common flour. The bread made by whole-wheat flour is usually small in size. Thus, many recipes usually combine whole-wheat flour and bread flour to achieve the best results. |
| Black wheat flour | Black wheat flour is also named as “rough flour”. It is a kind of high fibre flour and similar with whole-wheat flour. To obtain the large size after rising, it must be used in combination with a high proportion of bread flour. |
| Self-rising flour A type of flour that contains baking powder, it is used for making cakes. | |
| Corn flour and oatmeal flour | These types of flour are the additive ingredients of making rough bread, to enhance the flavour and texture. |
| Sugar | Sugar is very important to increase sweetness and colour of bread. And it is also considered as nourishment in the yeast bread. White sugar is largely used. Brown sugar, powder sugar or cotton sugar may be used by special requirements. |
| Yeast | The yeast will produce carbon dioxide. The carbon dioxide will expand the dough and make the inner fibre soft. However, the yeast needs carbohydrate in sugar and flour as nourishment. Use the following notes as a role of thumb:1 Tablespoonful dry yeast = 3 teaspoonful dry yeast = 15 ml;1 Teaspoonful dry yeast = 5 mlYeast must be stored in the refrigerator, as the fungus in it will be killed at high temperature.Before using, check the production date and storage life of your yeast. Store it back in the refrigerator as soon as possible after each use. Usually the failure of bread rising is caused by bad yeast.To check, whether your yeast is fresh and active, use the following ways:Pour 12 cup warm water (45 - 50 °C) into a measuring cup.Put 1 teaspoonful white sugar into the water and stir, Then sprinkle 2 teaspoonful yeast over the water.Place the measuring cup in a warm place for approx. 10 minutes. Do not stir the water.The froth should be up to 1 cup. Otherwise, the yeast is dead or inactive. |
| Salt | Salt is necessary to improve bread flavour and crust colour. But salt can also restrain yeast from rising. Never use too much salt in a recipe. Without salt, the bread will be larger. |
| Egg | Eggs can improve bread texture, make the bread more nourish and large in size. The egg must be stirred evenly without eggshell. |
| Fat, butter and vegetable oil | Fat makes bread soften and improve storage life. Butter should be melted and thereafter cooled down. Alternatively, cut butter or other solid fat into small pieces. |
| Baking powder | Baking powder is used for rising Ultra Fast Bread and cake, as it does not need any time for rising. It will produce carbon dioxide by a chemical process thus building bubbles in the dough and softening the texture of the bread. |
| Soda Soda is similar | with baking powder and can be used in combination with baking powder. |
| Water and other liquid | Water is an essential ingredient for making bread and cake. Generally, a water temperature between 20 °C and 25 °C is best. The water may be replaced with fresh milk or water mixed with 2 % milk powder. This may improve the bread flavour and crust colour. Some recipes may use juice for the purpose of improving bread flavour (e.g. juices of apples, oranges, lemon, and others). |
BEFORE FIRST USE
⚠ WARNING: DO NOT let young children play with the appliance, or any part of it, or the packaging!
The appliance may emit a little smoke and a characteristic smell, when you turn it on for the first time. This is normal and will stop soon. Ensure sufficient ventilation.
- Unpack the appliance and all accessories carefully. Check that no parts are damaged or missing. See: "Knowing Your »Design Automatic Bread Maker Advanced«".
- Carefully remove all shipping materials and promotional materials, but DO NOT remove any warning labels or the model label. Especially ensure that there are no foreign objects (e.g. packaging material) in the bread pan, heating compartment, or the coupling at the bottom of the bread pan.
⚠ WARNING: Always switch OFF (hold the START/STOP button touched until a beep sounds), unplug, and leave the appliance cool down, before cleaning. Do not immerse the housing or power cord in water or other liquids or spill any liquids on/in the housing or power cord. Do not place the housing or power cord in an automatic dishwasher. Always ensure that the exterior of the bread pan and the heating compartment are clean and completely dry before inserting the bread pan.
The ice bucket may never come in contact with any hot surfaces or hot
liquids and may never be heated. Otherwise, the ice bucket could burst, causing severe injuries and damage. For cleaning only use lukewarm dishwater.
- Before first use and after a longer period of storage, clean the appliance and its parts. See: "Care and Cleaning".
- Ensure that the exterior of the bread pan is completely dry and clean. Lock the bread pan left empty within the heating compartment (see: "Operation"). Select the Bake program (16) and let the appliance operate for approx. 10 minutes. While heating, a characteristic smell and a little smoke escaping from the appliance will be normal.
- Switch OFF the appliance, unplug, and leave the appliance cool down to room temperature. Thereafter clean the bread pan and heating compartment of the bread maker again (see: "Care and Cleaning").
- Put some butter or marge on a kitchen cloth and wipe the non-stick coatings of the bread pan and kneading paddle to prepare the non-stick coatings for use.
The appliance is ready for use now.
OPERATION
⚠ WARNING: Always ensure that the appliance and all its parts and accessories are out of reach of young children. Your new »Design Automatic Bread Maker Advanced« is intended for cooking edible food and is heated electrically. Thus, the heating elements, heating compartment, lid, and even the exterior will become very hot during operation.
During operation DO NOT place the appliance near any inflammable or explosive liquids or gases (e.g. spirit, propane gas cylinder or gas lighter). Additionally, do not place the appliance on heat-sensitive surfaces during operation, to avoid overheating and risk of fire and electric shock.
Always ensure not to spill any ingredients into the heating compartment. If ingredients reach the heating elements, a fire may be caused due to heating up on the heating elements.
Only place the appliance on a stable, dry, level, and clean surface. The appliance will vibrate vigorously during motor agitation and, despite the non-slip feet, could move around on the table or counter. Thus it is crucial, to ensure a really stable stand on a level surface. The appliance may not wobble, tilt or slip on the table or counter. Do not place the appliance on inclined surfaces where it can fall over and/or fall down. Additionally, keep an appropriate distance (at least 30 cm at each sides) to the edges of the working space and any other objects. Do not place any clothes or tissue or other foreign objects on or under the appliance during opera-
tion, to avoid risk of fire, overheating, or electric shock. Do not block the ventilation slots of the housing. During operation, the operating elements must be accessible all the time (see: "Knowing Your »Design Automatic Bread Maker Advanced«").
During operation leave at least 1 m of free space above the appliance to avoid damage due to heat and condensate and for unhindered access.
Before operation, always ensure that all parts are in proper working order (see: "General Safety Instructions"). Do not use any damaged or unsuitable parts to avoid risk of injuries and damage. Additionally ensure that the heating compartment and especially the heating elements are absolutely clean and dry. Even very small particles on the heating elements could overheat or short-circuit during operation, thus catching fire!
DO NOT fill more than the maximum total amount of 1000 g into the bread pan! Otherwise, the bread pan could overflow, with food running out onto the heating elements. Food and foreign objects on the heating elements will be burnt to charcoal during the baking process, thus causing risk of fire and electric shock via short-circuit.
Do not add powder (flour, powder sugar) or wet or very runny ingredients (e.g. some fresh fruits) into the ingredients box. Otherwise, powder or liquid could get onto the heating elements, causing risk of overheating, fire and electric shock!
PREPARATIONS
- Prepare your ingredients.
Measure all required amounts according to your recipe. Doing so, ensure to observe the maximum amount (for bread and cake: 1000 g including all ingredients). Check your recipe accordingly. When adding nuts, fruit or other bulk ingredients, you should cut, chop or purée these ingredients.
Tip:
You can use the supplied measuring cups.
- Place the appliance on a stable, level and heat-resistant surface with a distance of at least 30 cm to other objects and to the edge of the table or counter. Check, whether the appliance has a really stable stand and will not wobble or slip on the table or counter.
IMPORTANT: The bread pan is locked on the coupling of the kneading works. Do not use violence when attempting to insert or remove the bread pan to avoid dama-
ge. Always ensure that the appliance cooled down after the recent usage, before starting a new baking process.
3. Check that the exterior of the bread pan and the interior of the heating compartment are clean and dry and no ingredients are spilled into the heating compartment to avoid a burnt smell during operation and even risk of fire.
4. Open the lid, and place the bread pan into the appliance.
Place the bread pan on the coupling of the kneading works and turn it until it slips down. Then turn the bread pan clockwise a little to lock it on the coupling. When installed correctly, the walls of the bread pan lay parallel to the walls of the heating compartment and the bread pan will stand stable.
- Coat the drive shaft with a little marge or cooking oil. This will prevent the dough from sticking to the drive shaft and help to remove the kneading paddle after operation. Push the kneading paddle onto the drive shaft and turn it until it slips down.
⚠ WARNING: Always avoid spilling any ingredients onto the heating elements in the heating compartment. During the baking process, even small particles on the heating elements would carbonize, thus causing risk of fire and at least a burnt smell!
- Put the ingredients for your recipe in the correct order into the bread pan. In general: first add eggs and all liquids, then sugar, salt, spices and flavours. Then add the solid ingredients (flour, cake mixture). Add yeast, soda, or baking powder as the very last ingredients.
Note:
Ensure that yeast, soda or baking powder will not come in contact with any liquids and salt. It is good advice to make a gentle hollow on top of the flour to add these ingredients.
- Ensure that the inner flap of the ingredients box is closed. For this, slightly push the inner flap back into the lid. Close the lid gently.
IMPORTANT: Carefully dab wet ingredients dry before filling into the ingredients box. Do not fill in too large or sticky ingredients, as this may block the inner flap of the ingredients box. Always chop or cut your ingredients to small pieces, but do not fill in finely ground ingredients, or any powder, or any runny food. For adding this type of ingredients, pause operation when the signal sounds and add your ingredients by opening the lid. - The ingredients box is perfectly suited for adding granular ingredients like sesame, linseed or coarsely chopped nuts. The appliance will open the inner flap of the ingredients box to leave the content fall into the bread pan. Open the slider of the ingredients box to fill in your food. Thereafter, close the slider.
STARTING THE BAKING PROGRAM
IMPORTANT: Always leave the appliance cool down, before starting a new baking process. If the display is showing H:HH after starting a new program, the temperature in the heating compartment is too high. In this case, immediately unplug the appliance and open the lid until the appliance has reached ambient temperature.
- Prepare the appliance for operation according to the instructions above and close the lid (see: "Preparation").
- Insert the power plug into the wall power outlet. (See: "Important Safeguards for Electrical Appliances") An acoustic signal sounds and the LCD screen shows the program number 1 and the defaults of this baking program (operation time, colour and amount).
Tip:
The buttons respond even to slight touches. Simply tip on the buttons with your finger. A beep sounds with each entry. Names and numbers of the available programs are printed on the lid.
The buttons of the appliance are inactive, whenever the respective function is not available with the currently selected program, or while a program is running, or when the control panel is locked (see: "Locking the Control Panel"). Running programs must be terminated first using the START/STOP button, when you wish to make new entries.
- Select your desired program by slightly touching the MENU button. (See: "Programs of the Bread Maker") Each input is confirmed by an acoustic signal.
- Use the BURNING COLOR button to select the desired colour of your bread. The icon on the bottom of the LCD screen shows whether you have chosen light, medium, or dark.
- Use the WEIGHT button to select the used total amount of all ingredients according to your recipe: 500 g, 750 g, or 1000 g.
- Thereafter, if required, you can set the finishing time duration for the baking process via the timer function. You can enter a maximum delay of up to 15 hours. See: "Using the Timer"
IMPORTANT: If the display shows unusual information after the program has been started (H:HH or E:E0), then immediately unplug the appliance. See "Solving Problems" for further information.
7. With the desired settings on the LCD screen, start the baking program by touching the START/STOP button.
The dots of the program time and the icon of the actual operating phase will
flash. The program will automatically run various operations. During operation, only the START/STOP button is active. You can watch the process via the window in the lid of your Bread Maker. Occasionally, during various program phases, condensate could accumulate on the window.
Tip:
The appliance lid can be opened during kneading, for example, to add further ingredients. For this, you should pause operation (see: "Functions of the Buttons"). Use this way for adding powder and wet or sticky ingredients. However, you should avoid opening the lid during operation, if possible. This holds especially during the baking process, because the bread could collapse.
- You can pause operation at any time by shortly touching the START/STOP button. The program time will flash on the LCD screen. The appliance will re-assume operation after 3 minutes automatically.
Additionally, you can cancel operation at any time. For this, hold your finger on the START/STOP button for approx. 3 seconds, until a beep sounds. Any running program will be cancelled immediately and the current settings are deleted.

CAUTION - MOVING PARTS!
Do NOT remove the bread pan or grasp into the bread pan or insert any objects (e.g. cooking utensils) into the bread pan with the appliance live, to avoid injuries and damage due to the kneading works.
- If you remove the kneading paddle after the last kneading of the dough, the bread will remain intact after baking. However, the appliance will make some brakes between the kneading phases. You may take out the kneading paddle during the third ferment/rise phase, indicated by the ferment icon and the phase number 2.
a. Unplug the appliance.
Note:
When interrupting the power supply for no longer than approx. 10 minutes, the current baking program is NOT terminated but will be continued as soon as you plug in the power plug again (see: "Memory Function").
b. Open the lid, unlock the bread pan and take it out. With floured hands you can take out the dough and remove the kneading paddle. Ensure that no dough will get onto the exterior of the bread pan.
c. Replace and lock the bread pan containing the dough and close the appliance lid.
d. Re-connect the appliance to the power supply. The baking program will be continued.
⚠ WARNING - High Temperature: Risk of Burns!
Hot air and condensate could escape at the ventilation slits in the lid. Do not hold your hands, arms or face directly over the appliance during operation. The heating compartment and all parts within (e.g. bread pan and bread) will get very hot during operation. Protect your hands with oven gloves when attempting to take out the bread pan while the appliance is still hot. Even the exterior of the appliance will get hot during operation. Only touch the appliance by the operation elements and handles.
- You can terminate the baking program and warming function at any time by keeping the START/STOP button pressed for 3 seconds until a beep sounds.
Once the baking program has been completed, 10 beeps sound and the LCD screen shows 0:00. The appliance automatically switches to the warming function for 60 minutes at the maximum. (See: "Warming Function"). Thereafter, the appliance switches OFF completely and the interior cools down.
Tip:
You should avoid leaving the bread in the bread pan after the appliance has been switched OFF. When the appliance cools down, the bread could become moist due to condensate.
- Open the lid and check the consistency of the bread. If the bread is not done or too light, you can use the Bake program (16) to bake the bread for some additional minutes. See: "Applying Some Additional Baking Time".
⚠ WARNING: Before taking out the bread, unplug the appliance. The appliance should never be plugged in, when not in use!
Do not touch any parts in the interior of the appliance with unprotected hands, while the appliance is still hot. Always protect your hands with pot holders or oven gloves, when opening the lid and taking out the hot bread pan after baking. Beware of hot steam coming out from under the lid, when opening the lid. Do not place the hot bread pan on surfaces sensitive to heat and moisture to avoid damage.
-
Unplug the Bread Maker. Then protect your hands with oven gloves. Open the lid of the Bread Maker. Doing so, keep in mind that hot steam could escape from under the lid. Take out the bread pan. For this, turn the bread pan counterclockwise until you can easily lift it up by the handle.
-
Place the hot bread pan on a surface resistant to heat and moisture and leave the bread pan cool down before removing the bread.
IMPORTANT: Do not use any hard or sharp-edged objects, because this may lead to scratches on the non-stick coating. Do not cut the bread in the bread pan to avoid damage to the non-stick coating. Always take the bread out of the bread pan, before cutting it into slices.
- Use a soft plastic spatula to gently loosen the sides of the bread from the bread pan. Over a grid, carefully turn the bread pan upside down. If necessary, shake gently until the bread slides out of the bread pan.
- Immediately rinse the bread pan with warm water, after removing the bread. This is important, because it prevents residues of dough from sticking to the drive shaft.
- Leave the bread cool down for 15 to 30 minutes before slicing and eating. If required, take the kneading paddle out of the bread before cutting. For this, use the supplied hook. Doing so, keep in mind that the bread is hot!
Tip:
We recommend to cut freshly baked bread using an electric cutter or serrated cutter. When using a kitchen knife, the bread may be squeezed.
Tip:
You may store remainders of home-made bread in sealed plastic bags or containers for approx. 3 days on room temperature. In the refrigerator you may store bread for 10 days at the most. Generally, storage time is no longer than that for bread in market.
SPECIAL INTRODUCTION ABOUT QUICK BREAD
Quick Breads are made with baking powder and soda that are activated by moisture and heat. For perfect quick breads, it is essential that all liquids are placed on the bottom of the bread pan with dry ingredients on top. During the initial mixing of quick bread batters, dry ingredients may accumulate in the corners of the bread pan. Thus it will be necessary to help the kneading process with mixing to avoid the build-up of flour clumps. For this, use a rubber spatula.
APPLYING SOME ADDITIONAL BAKING TIME
If the bread has not reached the desired consistency or browning or you have unintentionally cancelled the baking program untimely, you may apply some additional baking time of up to 1½ hours. For this, leave the bread in the Bread Maker and close the lid.
Tip:
To complete baking bread and cakes, you may need only some minutes of additional baking time. For this, start program 16 (Bake) immediately after the baking process finished. After the desired baking time, cancel the Bake program manually by holding the START/STOP button pressed for approx. 3 seconds until the signal sounds.
Note:
Before making any new entries, you must cancel any running program including the warming function. For this hold the START/STOP button pressed for approx. 3 seconds until a signal sounds.
- Touch the BAKE button to select the Bake program (16).
The pre-set baking time (30 minutes) is shown on the LCD screen. - Using the buttons +TIME and/or -TIME select the desired baking time.
You can select baking times from 10 minutes to 1 12 hour (1:30) in steps of 5 minutes. - With the desired baking time flashing on the LCD screen, shortly touch the START/STOP button to confirm your choice.
IMPORTANT: The baking time will flash on the LCD screen and the other buttons will be locked, after pressing +TIME or -TIME. You must confirm your choice via the START/STOP button, before you can make any other settings or start the program. - Press the START/STOP button to start the program. The Bread Maker will heat the heating compartment for the selected duration. Thereafter a signal sounds and the Bread Maker switches to the warming function automatically.
MAKING JAM
Using the Jam program (10), you can make delicious jams and chutneys.
⚠ WARNING: Do not overfill the bread pan, as the jam could splash and overflow. Splashes on the heating elements could catch fire. Always fill in the puréed fruits at first. Then add the gelling sugar.
- Prepare your ingredients. Wash the fruits and remove all inedible parts (e.g. skins, stalks, seeds). Then purée the fruits and weight the fruit purée on a kitchen scale.
- Mount the kneading paddle on the drive shaft within the bread pan.
- Carefully pour the puréed fruits into the bread pan.
Tip:
When using fruits with only low content of fruit acids (e.g. strawberries, peaches, sweet cherries), you should add a little citric acid or a tablespoonful of lemon juice to assist the gelling process.
-
Then weight out the gelling sugar according to the instructions on the packet. Pour the gelling sugar on top of the fruit purée.
-
Ensure that the exterior of the bread pan is completely dry and clean. Then place the bread pan into the heating compartment of the Bread Maker and turn it clockwise to lock it. Close the lid of the Bread Maker.
-
Connect the Bread Maker to the power supply and touch the MENU button several times to select the Jam program (10). You cannot make any further settings with this program.
⚠ WARNING: The interior of the appliance as well as the bread pan and its content are very hot after operation. Even the exterior of the appliance will be hot. During operation and thereafter only touch the appliance by the handles and operating elements. Protect your hands with oven gloves, when taking out the hot bread pan. Be careful, when pouring the hot content to the bread pan.
-
Touch the START/STOP button to start the program. Wait, until the program finished and the acoustic signal sounds.
-
Protect your hands with oven gloves and open the lid of the appliance by the handle. Turn the bread pan counter-clockwise to unlock it. Then take the bread pan out of the appliance.
-
Carefully pour the jam into heat-resistant containers. Leave the jam cool down before consumption.
Tip:
Depending to the type of fruits, the gelling process may take several hours.
USING THE ICE BUCKET
⚠ WARNING: The ice bucket is filled with a cooling agent and is intended for usage in a refrigerator or freezer and may never be heated. Do not use the ice bucket, gear box, and stirring paddle with any program of the appliance other than the Ice Cream program 151 Do not bring the ice bucket, gear box, and stirring paddle in contact with hot surfaces or hot liquids. Do not use the ice bucket in combination with any heating program of the bread maker. The coolant within the ice bucket would expand forcefully
when heated, thus bursting the ice bucket and causing risk of severe injuries and damage. Additionally, the plastic parts of the ice bucket, gearbox and stirring paddle are sensitive to heat and will get distorted and damaged when heated.
When taking the ice bucket out of the freezer, please keep in mind, that it will be extremely cold. Protect your hands with gloves. Under no circumstances touch the ice bucket with wet hands, when it has been in the freezer. Your skin would freeze immediately on the cold surfaces, causing severe burns and injuries.
The coolant within the ice bucket can maintain a low temperature for several hours. For this, pre-cool the ice bucket in the freezer for several hours (over night). Always place the ice bucket on a level surface in an upright position into the freezer with the freezing temperature not below -18 °C. Additionally, do not position the ice bucket upside down or tilted, or directly on delicate frozen food in the freezer.
Tip:
The ice bucket is ready for usage, when the coolant within will not gurgle, while shaking the ice bucket (after 16 hours of cooling at the maximum).
You can use the ice bucket in various ways:
- Keep your drinks and beverages (e.g. wine, lemonade) cold for several hours.
- Store ice cubes or crushed ice for various hours.
- Additionally, using the Ice Cream program (15) of the »Design Automatic Bread Maker Advanced«, you can prepare ice cream.
Tip:
Place the ice bucket in the freezer overnight and use it through the day.
MAKING ICE CREAM
How to Prepare the Ingredients
IMPORTANT: The volume of all ingredients should not exceed half of the maximum volume of the ice bucket (approx. 300-350 ml) to avoid overflow due to ice cream expansion while stirring. Adapt your recipe accordingly.
- Egg yolk may be added to make your ice cream somewhat softer and smoother. Beat the egg yolk with sugar until it is creamy. Use granulated sugar, as this type is easily dissolved.
- Heat the milk in a pot until it slightly boils. Then, slowly scoop the milk into the
beaten egg yolk while stirring vigorously. However, do not pour the heated milk into the egg yolk all at once, to avoid that the egg yolk will set and get lumpy.
- Heat the mixture until it slightly boils. Then leave the mixture cool down to room temperature. Place the mixture in the refrigerator until the mixture is chilled to approx. 5 °C.
- Pour the chilled cream in a pre-cooled container and whip the cream until it is slightly creamy. Then mix cream and the cold milk mixture.
- To make your individual ice cream, mix the ice cream mixture with pureed ripe fruits, juices, finely chopped, roasted nuts or almonds, vanilla, nougat cream, molten chocolate, or instant coffee dissolved in a little milk. Add further flavour to taste.
- Before freezing in the ice bucket, chill the mixture in the refrigerator to at least +5^ .
HOW TO FREEZE THE ICE CREAM
- The ice bucket should have been in the freezer for up to 16 hours in an upright position. Do not place the ice bucket upside down or lay or tilt it. Ensure that the temperature of the freezer is sufficiently low (at least -18^ ). The ice bucket is cooled sufficiently, when you do not hear any gurgle while shaking it.
- The ingredients should be prepared according to your recipe and the instructions above and cooled in the refrigerator to approx. +5 °C.
- Place the gearbox with the black drive wheel upwards into the heating compartment of the »Design Automatic Bread Maker Advanced«. Turn the gearbox clockwise to lock it in the heating compartment. The gearbox must stand stable and may not tilt or wobble.
- Protect your hands with gloves and take the ice bucket out of the freezer. Place the ice bucket onto the gearbox and turn it clockwise to lock it safely onto the gearbox. Push the stirring paddle onto the drive shaft in the centre of the ice bucket.
- Connect the Bread Maker to the power supply and select the Ice Cream program (15) via the MENU button.
- Using the +TIME and -TIME buttons, select the desired stirring time according to your recipe. The time shown on the LCD screen will flash. You can select 20, 25 or 30 minutes. Touch the START/STOP button to confirm your choice.
- Touch the START/STOP button again shortly to start the program.
IMPORTANT: Do not fill in hot ingredients. All ingredients should be at refrigerator temperature, when filled into the ice bucket.
- As soon as the stirring paddle is rotating, shortly stir your pre-cooled ice mixture
and slowly fill it into the ice bucket. Thereafter close the lid of the Bread Maker and wait until the acoustic signal sounds.
- Unplug the Bread Maker and open the lid. Protect your hands with gloves and turn the ice bucket clockwise to unlock it. Then take the ice bucket out of the heating compartment.
IMPORTANT: Do not use any hard or sharp-edged objects for taking out your ice cream. Do not use violence. Use a soft plastic spatula or plastic spoon.
- Using a plastic spoon, take your ice cream out of the ice bucket. Clean the ice bucket after each usage (see: "Care and Cleaning").
Tip:
The ice cream is soft. If you wish it somewhat harder, place the ice cream into the freezer for 12 hour before consumption. You may store ice cream for approx. 1 week in an air-tight container in the freezer.
MAKING YOGHURT
The YOGHURT program (number 18) can be used to prepare your own yoghurt. For this, only fresh milk and a small amount of living lactobacillus yoghurt is necessary.
- Pour approx. 1 litre pure milk and 100 ml of living lactobacillus yoghurt into the bread pan. Stir the mixture evenly.
Tip:
You should add all other ingredients (e.g. sugar, juices, flavours) after preparing the pure yoghurt.
WARNING: Always ensure to select the YOGHURT program. With any other program but program 18 YOGHURT, the milk could overflow and reach the heating elements, causing risk of fire and electric shock.
- Close the lid of the appliance. Use the MENU button to select program 18 Yoghurt. Ensure, not to select any other program!
- Using the buttons +TIME and -TIME select the desired processing time from 8 to 12 hours. Each time you press a TIME button, the processing time is changed by 30 minutes.
As a default, 8 hours are programmed. However, in general, the yoghurt will become creamier using a long processing time.
-
Shortly touch the START/STOP button to start the program. An acoustic signal sounds as soon as the program has been completed.
-
Leave your homemade yoghurt cool down. Then pour off the liquid (whey).
Tip:
You should keep the whey that accumulated on the yoghurt, as with some sugar and/or fruit juice to taste, you will get an refreshing drink.
- Store your yoghurt in the refrigerator.
SOLVING PROBLEMS
If any problems occur during operation, you will find solutions in this section. Further information on processing your food is given in section "Tips for Best Results".
| Problem Possible Reason The Solution | ||
| Smoke is escaping from the ventilation slot. | Residues from the production process evaporate from the heating elements. | This is normal. Before first use, let the bread maker run the Bake program (16) for 10 minutes, while the bread pan is left empty. See: “Before First Use”. |
| Some ingredients are spilled on the heating elements. | Unplug and leave the appliance cool down. Then clean the heating compartment and exterior of the bread pan thoroughly (see: “Care and Cleaning”). Let dry naturally for approx. 12 hour with the lid open. Strictly avoid spilling of any food into the heating compartment. | |
| The ingredients in the ingredients box have been too wet or too finely ground. Thus powder or moisture has been spilled into the heating compartment. | Unplug and leave the appliance cool down. Then clean the heating compartment and exterior of the bread pan thoroughly (see: “Care and Cleaning”). Let dry naturally for approx. 12 hour with the lid open. The ingredients box is intended for coarsely chopped and dry ingredients. Always fill wet and finely ground ingredients directly into the bread pan. | |
| The bottom crust of the bread is too hard and/or too thick. | The bread has been left in the bread pan for too long with the keep warm function active. | After baking an acoustic signal sounds. This is the best moment to take the bread out of the bread maker. |
| It is very difficult to get the bread out of the bread pan. | The kneading paddle sticks to the drive shaft. | After taking the bread out, pour hot water into the bread pan and soak for 10 minutes. Then clean the bread pan and kneading paddle thoroughly. Before next use, grease the drive shaft using some cooking oil or marge. This will help to remove the kneading paddle after baking. |
| Problem Possible Reason The Solution | ||
| The ingredients are not mixed evenly; the bread is baked badly. | Wrong program selected. | Select an appropriate program (see: "Programs of the Bread Maker"). |
| You have opened the lid several times during operation. | Avoid opening the lid during the last rising phase and during baking (see: "Program Phases"). | |
| The dough is too thick. | Add some additional liquid to your recipe. However, ensure not to fill in more than 1000 g in total. | |
| The mechanical resistance is too high, and the kneading paddle cannot rotate and stir adequately. | Turn the kneading paddle manually. Can you move it with only little resistance? Let the appliance run a kneading process with empty bread pan. Is the kneading paddle moving freely? If not, call the GASTROBACK® customer care centre, Tel.: (+49)4165 2225-0. | |
| The kneading paddle does not move, even with the motor running. | Kneading paddle and/or bread pan are not installed properly. | Make sure that the kneading paddle and bread pan are positioned properly (see: "Preparations"). |
| The dough is too thick and/or too large. | Check your recipe for the correct weight of the ingredients. Add a little more liquid. However, ensure not to fill in more than 1000 g in total. | |
| The bread is moist and too soft. | If the bread cools down in the Bread Maker, it could become moist due to condensate. | Take out the baked bread in time. Store your bread for instance in a bread bin. |
| Dough overflows the bread pan. | The amount of liquid and yeast is too high, making the dough runny. | Immediately unplug the appliance. Leave the appliance cool down and clean the heating compartment and exterior of the bread pan (see: "Care and Cleaning"). Reduce the amount of liquid to make the dough thick. Do not fill in more than 1000 g in total. |
| Too much dough. | ||
| The bread pushes against the lid during baking. | Too much dough. Do not fill in more than 1000 g in total. | |
| Too much yeast or room temperature is too high. | Check your recipe. Do not operate the appliance when the room temperature is above 34 °C. | |
| The bread is too small or has not risen. | No / not enough yeast. | Check the amount of yeast. |
| Poor activity of the yeast. | Do not use yeast, that has been stored for too long. The water must be lukewarm but above 15 °C. Ensure that the yeast will not come in contact with salt. | |
| Problem Possible Reason The Solution | ||
| You have selected a program intended for yeast bread to bake a dough made with baking powder and/or soda. | Select an appropriate program. See: “Programs of the Bread Maker” | |
| The bread collapses during the baking process. | The flour used cannot support the dough rising. | Use bread flour or a sufficient baking mixture. |
| The yeast activity is too high or the rising temperature is too high. | The rising temperature of yeast should be approx. 20 °C. | |
| Excessive water makes the dough too wet. | Check your recipe and reduce the amount of water. | |
| The bread is too dense Too much flour or not enough water. | Reduce flour or increase water. | |
| Too much fruit ingredients or too much whole wheat flour. | ||
| The centre of the bread is hollow. | Excessive water or yeast, or no salt. | Reduce the amount of water or yeast. Probably add a little salt. |
| Water temperature is too high. | The water should be lukewarm at the maximum. | |
| The crust is too thick and dark, when making cakes or food with high sugar content. | Different recipes and ingredients have great effect on making bread, and the browning will always be affected by excessive sugar. | If the crust is too dark for a recipe with high sugar content, cancel the baking program (touch START/STOP button) approx. 5 - 10 minutes ahead of the finishing time. Leave the bread/cake for approx. 20 minutes in the heating compartment with the lid closed, before taking your bread/cake out. |
| The power fails while a program is running. | In case of power failure for up to 10 minutes, the bread maker will run the last implemented program until completion, as soon as being live again.On power failure for more than 10 minutes, you must re-start. | |
| Raisins, chocolate pellets, fruits and similar ingredients get crushed in the appliance. | To avoid the chopping of ingredients such as fruit, add these to the dough only after the signal sounds. | |
| Problem Possible Reason The Solution | ||
| You cannot activate the timer function. The hour-glass icon is not shown and/or the TIME buttons are inactive. | You have selected a program not intended for timer operation. The timer function is not available with some programs. | If suitable for your recipe, select another program.Please keep in mind: with some programs, you select the processing time via the TIME buttons. This is crucial especially for the Bake program (16)! |
| The appliance is live, but the buttons on the control panel are inactive. There is no respond to your entries. | The control panel is locked. | The LCD screen displays the key icon, if the control panel is locked. With the key icon shown, simultaneously press the buttons WEIGHT and BURNING COLOR to unlock the control panel. |
| You have selected the Jam program. | With the Jam program (10) there are no further entries possible. Only the buttons MENU and START/STOP are active. | |
| The time flashes on the LCD screen. The appliance does not respond to your input. | The running program is paused. | Touch the START/STOP button to continue operation. Alternatively, after approx. 3 minutes the appliance re-assumes operation automatically. |
| The appliance is in time-setting mode. | With some programs (11, 13, 15, and 16) you can set the processing time using the +TIME and -TIME buttons, indicated via flashing time. Set the desired time, then shortly press START/STOP to confirm. See: “Programs of the Bread Maker”. | |
| Unusual information is shown on the screen. | ||
| H:HH (after starting the program) | The temperature within the heating compartment is too high. | Immediately touch the START/STOP button to stop the program, and unplug the appliance. Then open the lid and let the Bread Maker cool down completely before using it again. |
| E:E0 (after starting the program) | The temperature probe failed. | Send the appliance to an authorized service centre for repair. |
CARE AND CLEANING
⚠ WARNING: Always ensure that the appliance is out of reach of young children.
Always switch OFF the appliance (holding the START/STOP button touched until a beep sounds), then unplug the appliance, and wait until the appliance cooled down (at least 20 minutes), before moving or cleaning the appliance. Do not attempt to move the appliance during operation.
The surfaces of the bread pan and kneading paddle have a non-stick coating. Do not scratch or cut on the non-stick coatings. Do not use any abrasive cleaners or corrosive chemicals (e.g. bleach, oven cleaner or grill cleaner) for cleaning the appliance
or any parts of it, to avoid damage to the surfaces. Do not use any hard or sharpedged objects for cleaning any surfaces of the appliance.
Ensure to protect the housing against splashing water and moisture. Do not immerse the housing, or power cord in water or any other liquid, to avoid hazards due to electric shock and damage. Do not spill or drip any liquids on the housing or power cord, or in the heating compartment to avoid risk of fire and electric shock. Do not use violence!
Do not clean the appliance or any part or accessories of the appliance in an automatic dishwasher.
- Unplug the appliance and with the lid open, leave the appliance cool down to room temperature (at least 20 minutes).
- To unlock the bread pan, turn it counter-clockwise. Then lift it out of the heating compartment.
IMPORTANT: Only use warm dishwater for cleaning the appliance. Handle the parts of the appliance with care to avoid damage. This holds especially for the inner flap of the ingredients box, the white silicone seal on the bottom of the heating compartment and the heating elements.
- Clean the heating compartment using a wet cloth or a slightly wet soft sponge. Ensure to remove all crumbs and splashes. However, ensure not to damage the white silicone seal and heating elements in the bottom of the heating compartment. Additionally, no fluffs or other particles may remain on the heating elements.
- Wipe the lid and the interior of the ingredients box carefully with a wet cloth. Ensure not to damage the hinges of the inner flap of the ingredients box. If required, use a small soft brush to clean the interior of the ingredients box.
- Wipe the exterior of the appliance and power cord with a soft damp cloth. Thereafter, wipe the appliance dry with a soft cloth.
- Take the kneading paddle out of the bread pan by simply pulling it upwards. If the kneading paddle sticks to the drive shaft and is hard to remove, fill the bread pan with hot dishwater for approx. 30 minutes. Then try again. If required, use the provided hook to lift the kneading paddle out of the bread pan.
- Clean all surfaces of the bread pan and the kneading paddle using warm dishwater and a soft brush or cloth. Especially the drive shaft protruding from the bottom of the bread pan interior needs thorough cleaning. It must be smooth and shiny. Otherwise, the kneading paddle could stick to the drive shaft after next operation.
Tip:
Ensure that the opening in the kneading paddle is completely clean and smooth. Residues within the opening would stick to the drive shaft, thus making it quite difficult to remove the kneading paddle from the drive shaft after operation.
- After cleaning, hold the kneading paddle and bread pan up to the light to check, whether the opening in the kneading paddle and the drive shaft are clean. If there are any residues, you should soak kneading paddle and bread pan for some minutes in hot dishwater. Thereafter clean thoroughly, using a soft cloth.
- Dry all parts thoroughly. Thereafter leave the appliance (with the lid open) and the parts dry naturally for 12 hour, where they are out of reach of young children.
Tip:
It is good advice to reassemble the appliance after cleaning. This way, you protect the parts from damage, loss, and dust.
IMPORTANT: Before reassembling the appliance, always ensure that the parts of the appliance are clean and completely dry. This is crucial especially for the heating compartment and exterior of the bread pan. Otherwise, moisture could get onto the heating elements and cause risk of overheating and electric shock.
- Push the kneading paddle onto the drive shaft in the bread pan.
- Turn the bread pan within the heating compartment until it settles down on the coupling of the kneading works. Then turn the bread pan clockwise to lock it onto the coupling.
Tip:
If you cannot push the bread pan down completely, turn the drive shaft/kneading paddle a little, then try again.
- Close the lid.
CLEANING THE ICE BUCKET
⚠ WARNING: Do not heat the ice bucket or bring the ice bucket, gear box, and stirring paddle in contact with hot surfaces or hot liquids. The coolant within the ice bucket would expand forcefully when heated, thus bursting the ice bucket and causing risk of severe injuries and damage. Additionally, the plastic parts of the ice bucket, gearbox and stirring paddle are not heat-resistant and will get distorted and damaged when heated.
The ice bucket may be extremely cold, when in use. Always protect your hands with gloves, when touching the ice bucket to avoid severe frost-bites.
Do not use violence. For operation, the ice bucket and gearbox are lock within the heating compartment of the Bread Maker.
- Protect your hands with gloves, before touching the ice bucket. To unlock the ice bucket within the Bread Maker, turn the ice bucket counter-clockwise, then lift it out of the heating compartment. Empty the ice bucket completely. Turn the gearbox of the ice bucket counter-clockwise, then take it out of the heating compartment. Pull the stirring paddle out of the ice bucket.
- Wash the ice bucket, stirring paddle, and gearbox in lukewarm dishwater, using a soft nylon brush or a soft cloth.
- Dry the parts thoroughly. Then leave dry naturally, where the parts are out of reach of young children.
IMPORTANT NOTE!
DO NOT CLEAN THE BREAD PAN IN THE DISHWASHER!
STORAGE
⚠ WARNING: Young children must be supervised that they do not play with the appliance or any part of it. When the appliance is not in use, always unplug the appliance and leave the appliance cool down completely. Always clean the appliance and all its parts before storing to avoid accumulation of dried-on food (see: "Care and Cleaning"). Do not hold the appliance by the power cord or lid for moving it.
Ensure to store the appliance where it is clean, dry and safe from inadmissible strain (frost, direct sunlight, mechanical or electric shock, heat, moisture) and where it is out of reach of young children. Do not place any hard or heavy objects on or in the appliance or any part of it.
Always handle power cords with special care. The power cord may never be knotted, twisted, pulled, strained, or squeezed. Do not let the power cord or power plug hang over the edge of the table or counter.
For storage, grasp the appliance at the bottom of the housing and place the appliance on a clean and stable surface, where it cannot fall. Wind the power cord loosely around the appliance.
Do not use any parts or accessories of the appliance for any other purpose than
operating the appliance. It is good advice to store the parts and accessories of the appliance with the appliance. For this, reassemble the appliance after cleaning (see: "Care and Cleaning") and close the lid, thus protecting all parts against damage, loss, and dust.
NOTES FOR DISPOSAL

Dispose of the appliance and packaging must be effected in accordance with the corresponding local regulations and requirements for electrical appliances and packaging. Please contact your local disposal company.
Do not dispose of electrical appliances as unsorted municipal waste. Use separate collection facilities. Contact your local government for information regarding the collection systems available. If electrical appliances are disposed of in landfills, dumps, or refuse incineration, hazardous substances can leak into the groundwater or can be emitted into air, poisoning flora and fauna for years, thus getting into the food chain and damaging your health and well-being. When replacing old appliances with new once, the retailer is legally obligated to take back your old appliance for disposal at least for free of charge.
INFORMATION AND SERVICE
Please check www.gastroback.de for further information. For technical support, please contact GASTROBACK® Customer Care Center by phone: +49 (0)4165/22 25-0 or e-mail info@gastroback.de.
WARRANTY
We guarantee that all our products are free of defects at the time of purchase. Any demonstrable manufacturing or material defects will be to the exclusion of any further claim and within 2 years after purchasing the appliance free of charge repaired or substituted. There is no Warranty claim of the purchaser if the damage or defect of the appliance is caused by inappropriate treatment, over loading or installation mistakes. The Warranty claim expires if there is any technical interference of a third party without a written agreement. The purchaser has to present the sales slip in assertion-of-claim and has to bear all charges of costs and risk of the transport.
Note:
Customers from Germany and Austria: For repair and service, please send GASTROBACK® products to the following address: GASTROBACK GmbH, Gewerbestr. 20, D-21279 Hollenstedt, Germany.
Customers from other countries: Please contact your dealer.
Please agree that we cannot bear the charge of receipt. Submission of appliances: Please ensure packing the appliance ready for shipment without accessories. Add the sales slip and a short fault description. The processing time after receipt of the defective appliance will be approx. 2 weeks; we will inform you automatically. After the warranty period, please send defective appliances to the given address. You will get a free quotation and, thereafter, can decide, whether we shall repair the appliance to the costs possibly accrued, send back the defective appliance for free of charge, or dispose of the appliance for free of charge.
The appliance is intended for household use only and NOT suited for commercial usage. Do not attempt to use this appliance in any other way or for any other purpose than the intended use, described in these instructions. Any other use is regarded as unintended use or misuse, and can cause severe injuries or damage. There is no warranty claim of the purchaser if any injuries or damages are caused by unintended use.
RECIPES
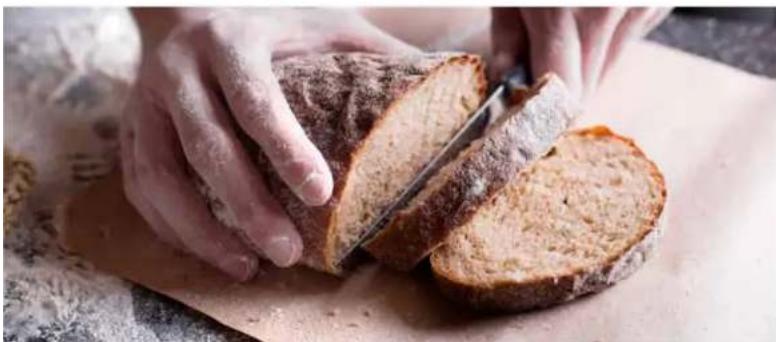
natural_image
Close-up of hands slicing a whole bread with visible crust and flour, on a wooden cutting board (no text or symbols)BREAD
NOTE: For getting used to your new bread maker, it is good advice to use a ready-to-use bread mixture for your first try. Simply follow the instructions given on the pack. This way, you can try out the method for taking out the kneading paddle before baking (during the second Rise phase). When being familiar with the baking cycle, you will easily be successful with your own individual bread and cake recipes.
BASIC WHITE BREAD
INGREDIENTS
Loaf size 1000 g 750 g 500 g
Water 320 ml 250 ml 160 ml
Salt 6 g 5 g 3 g
Oil 24 ml 18 ml 12 ml
Sugar 24 g 18 g 12 g
Milk powder 15 g 12 g 6 g
Bread flour 520 g 400 g 260 g
Yeast 6 g 4 g 3 g
PREPARATION
Fill the ingredients into the bread pan in the stated order. Refine cooking oil is recommend.
Select program 1 Basic Bread.
SESAME BREAD
INGREDIENTS
Loaf size 1000 g 750 g 500 g
Water 320 ml 250 ml 160 ml
Salt 8 g 6 g 4 g
Oil 36 ml 24 ml 18 ml
Sugar 24 g 18 g 12 g
Milk powder 24 g 18 g 12 g
Bread flour 520 g 400 g 260 g
Yeast 6 g 4 g 3 g
Sesame seeds 30 g 22 g 15 g
PREPARATION
Fill the ingredients into the bread pan in the stated order. Refine cooking oil is recommend.
Add sesame into the bread pan when the beeper sounds during the kneading process. Alternatively, you may fill sesame seeds into the ingredients box before starting the program.
Select program 1 Basic Bread.
WALNUT OR PINESEED BREAD
INGREDIENTS
Loaf size 1000 g 750 g 500 g
Water 280 ml 230 ml 140 ml
Egg 2 1 1
Salt 6 g 5 g 3 g
Oil 36 ml 24 ml 18 ml
Sugar 24 g 18 g 12 g
Milk powder 24 g 18 g 12 g
Bread flour 500 g 400 g 250 g
Yeast 6 g 4 g 3 g
Walnuts or pine- 60g 45 g 30 g
seeds
PREPARATION
Fill the ingredients into the bread pan in the stated order. Refine cooking oil is recommend.
Coarsely chop walnuts and/or pineseeds and add into the bread pan when the bee-per sounds during the kneading process. Alternatively, you may fill chopped walnuts and pineseeds into the ingredients box before starting the program.
Select program 1 Basic Bread.
CLASSIC FRENCH BREAD
INGREDIENTS
Loaf size 1000 g 750 g 500 g
Water 340 ml 250 ml 170 ml
Salt 8 g 6 g 4 g
Oil 12 ml 9 ml 6 ml
Sugar 16 g 12 g 8 g
Bread flour 540 g 400 g 270 g
Yeast 6 g 5 g 3 g
PREPARATION
Fill the ingredients into the bread pan in the stated order. Refine cooking oil is recommend.
Select program 2 French Bread.
CORN BREAD
INGREDIENTS
Loaf size 1000 g 750 g 500 g
Water 320 ml 240 ml 160 ml
Salt 6 g 5 g 3 g
Oil 24 ml 18 ml 12 ml
Sugar 16 g 12 g 8 g
Milk powder 16 g 12 g 8 g
Bread flour 400 g 300 g 200 g
Yeast 6 g 4 g 3 g
Corn flour 120 g 100 g 60 g
PREPARATION
Fill the ingredients into the bread pan in the stated order. Refine cooking oil is recommend.
Select program 2 French Bread.
SODA BREAD
INGREDIENTS
Loaf size 1000 g 750 g 500 g
Milk + 1 egg 305 ml 250 ml 160 ml
Salt 5 g 4 g 3 g
Butter 45 g 36 g 24 g
Sugar 95 g 75 g 50 g
Corn flour 170 g 130 g 90 g
All-purpose flour 340 g 260 g 180 g
Baking powder 10 g 7 g 5 g
Baking soda 10 g 7 g 5 g
PREPARATION
Fill the ingredients into the bread pan in the stated order.
Select program 7 Quick Bread.
WHOLE WHEAT BREAD
INGREDIENTS
Loaf size 1000 g 750 g 500 g
Water 340 ml 250 ml 170 ml
Salt 10 g 8 g 5 g
Oil 24 ml 18 ml 12 ml
Milk powder 18 g 13 g 9 g
Brown sugar 24 g 18 g 12 g
Bread flour 200 g 150 g 100 g
Whole wheat 360 g 250 g 180 g
Yeast 8 g 5 g 4 g
PREPARATION
Fill the ingredients into the bread pan in the stated order. Refine cooking oil is recommend.
Select program 3 Whole Wheat.
SWEET BREAD
INGREDIENTS
Loaf size 1000 g 750 g 500 g
Water 280 ml 220 ml 140 ml
Egg 2 1 1
Salt 8 g 6 g 4 g
Oil 36 ml 24 ml 18 ml
Milk powder 12 g 9 g 6 g
Sugar 80 g 55 g 40 g
Bread flour 500 g 380 g 250 g
Yeast 6 g 4 g 3 g
PREPARATION
Fill the ingredients into the bread pan in the stated order. Refine cooking oil is recommend.
The corresponding amount of fresh milk can be used instead of water and milk powder.
Select program 4 Sweet Bread.
CUSHAW BREAD
INGREDIENTS
Loaf size 1000 g 750 g 500 g
Water 100 ml 80 ml 50 ml
Salt 6 g 5 g 3 g
Cushaw / pumpkin 300 g 210 g 150 g
Oil 30 ml 27 ml 15 ml
Milk powder 20 g 18 g 10 g
Sugar 48 g 40 g 24 g
Bread flour 380 g 300 g 190 g
Yeast 8 g 5 g 4 g
PREPARATION
Cut the pumpkin into 12 cm pieces. Steam the pumpkin (approx. 20 minutes), drain the water out after cooling down, than mash finely.
Thereafter, fill the ingredients into the bread pan in the stated order. Refine cooking oil is recommend.
Select program 4 Sweet Bread.
COFFEE BREAD
INGREDIENTS
Loaf size 1000 g 750 g 500 g
Water 240 ml 200 ml 120 ml
Egg 2 1 1
Salt 6 g 4 g 3 g
Oil 26 ml 20 ml 13 ml
Milk powder 10 g 8 g 5 g
Sugar 50 g 40 g 25 g
Instant coffee pow- 3 small portions 2 small protions 1 12 small portions
der
Bread flour 400 g 300 g 200 g
Yeast 6 g 5 g 3 g
PREPARATION
Fill the ingredients into the bread pan in the stated order.
The eggs may be stirred with water to get a somewhat lighter consistency.
Select program 4 Sweet Bread.
GREEN BREAD
INGREDIENTS
Loaf size 1000 g 750 g 500 g
Water 260 ml 200 ml 130 ml
Egg 2 1 1
Salt 6 g 7 g 3 g
Oil 40 ml 30 ml 20 ml
Milk powder 16 g 13 g 8 g
Sugar 50 g 40 g 25 g
Lettuce should be chopped and mashed with a food processor.
Fill the ingredients into the bread pan in the stated order.
Select program 4 Sweet Bread.
BANANA BREAD
INGREDIENTS
Loaf size 1000 g 750 g 500 g
Water 250 ml 230 ml 130 ml
Egg 2 1 1
Salt 7 g 6 g 4 g
Milk powder 65 g 60 g 35 g
Sugar 50 g 40 g 25 g
Bread flour 450 g 400 g 230 g
Yeast 7 g 5 g 4 g
Banane 110 g 80 g 55 g
Butter 30 g 36 g 20 g
PREPARATION
Except of the butter, fill the ingredients into the bread pan in the stated order. Cut the banana into pieces, add it after other ingredients, before starting the program. To produce a better loaf, add the butter 10 minutes after the kneading process begins.
Select program 4 Sweet Bread.
COCONUT BREAD
INGREDIENTS
| Loaf size | 1000 g | 750 g | 500 g |
| Water | 280 ml | 220 ml | 140 ml |
| Egg | 2 | 1 | 1 |
| Salt | 6 g | 5 g | 4 g |
| Oil | 36 ml | 27 ml | 18 ml |
| Milk powder | 60 g | 45 g | 30 g |
| Sugar | 50 g | 40 g | 25 g |
| Bread flour | 460 g | 360 g | 230 g |
| Yeast | 5 g | 5 g | 4 g |
| Desiccated coconut | 60 g | 45 g | 30 g |
Fill the ingredients into the bread pan in the stated order.
Add the coconut when the beeper sounds during the kneading process. Alternatively, you may place the coconut into the ingredients box before starting the program. Select program 4 Sweet Bread.
natural_image
Close-up of sliced cake with yellow glaze and orange topping, served on a white plate with fork (no text or symbols visible)NOTE: Avoid keeping the cake warm within the bread maker. Switch off the bread maker as soon as the baking cycle is complete and the series of 10 beeps sounds. Leave the cake cool down for approx. 14 hour with the lid closed and the slider of the ingredients box open. Thereafter, take the bread pan out of the appliance and leave the cake cool down within the bread pan for another 14 hour. This way, you prevent that the cake will collapse. Turn out the cake onto a cake rack and leave it cool down completely, before covering it with icing or chocolate or filling it.
GINGERBREAD
INGREDIENTS
1 eggs
100 ml milk
15 g marge
12 pack vanilla sugar
70 - 80 g sugar
40 g rye flour type 1150
120 g wheat flour type 405
20 g cacao
10 g spice mixture for gingerbread
1 pack baking powder, sifted
Glaze: 2 pieces cooking chocolate
PREPARATION
Apart from the chocolate, fill the ingredients into the bread pan in the stated order. Start program 9 Cake.
With the baking cycle complete, switch off the appliance (pressing the CANCEL button) and leave the cake within the appliance for approx. 1/4 hour with the lid closed and the slider of the ingredients box open.
Take out the bread pan and leave the cake cool down for another 14 hour within the bread pan. Turn out the cake onto a cake rack and leave it cool down completely. Cover the gingerbread with melted chocolate.
Tip: You can prepare your own creation of gingerbread spice from cardamom, coriander, cinnamon, clove, aniseed, star anise, fennel, nutmeg, allspice and, possibly, some pepper.
ORANGE CAKE
1 egg
100 ml milk
15 g marge
½ pack vanilla sugar
1 vial orange flavour
70 - 80 g sugar
180 g wheat flour type 405
1 pack baking powder, sifted
Glaze: 2 tablespoon icing sugar, some orange juice
PREPARATION
Apart from icing sugar and orange juice, fill the ingredients into the bread pan in the stated order. Start program 9 Cake.
When the baking cycle is complete, switch off the appliance (pressing the CANCEL button) and leave the cake within the appliance for approx. 14 hour with the lid closed and the slider of the ingredients box open. Take out the bread pan and leave the cake cool down for another 14 hour within the bread pan. Turn out the cake onto a cake rack and leave it cool down completely.
Mix icing sugar and some drops of orange juice to get a thick syrup and cover the cake with this icing.
YEAST CAKE
INGREDIENTS
100 g butter
100 g sugar
5 eggs
250 g self-rising flour
1 vial vanilla flavour
25 ml lemon juice
4 g yeast
PREPARATION
Mix eggs, sugar and butter in a mixer and process to a frothy consistency. In portions, add a self-rising flour and mix manually.
At least, add all other ingredients and mix thoroughly.
Wipe the interior of the bread pan with a little oil. Then, add the dough.
Select program 9 Cake.
DOUGH
YEAST DOUGH
INGREDIENTS
260 ml water
400 g bread flour
5 g yeast
PREPARATION
Fill the ingredients into the bread pan. Water, flour and yeast are the main ingredients, all others are optional. However, do not fill in more than 1000 g in total.
Select program 14 Dough.
PASTA DOUGH
INGREDIENTS
260 ml water
400 g flour
PREPARATION
Fill the ingredients into the bread pan. Water and flour are the main ingredients, all others are optional. However, do not fill in more than 1000 g in total.
Select program 14 Dough.
YOGHURT
natural_image
Close-up of a glass bowl containing white creamy substance (no text or symbols visible)NOTE: For preparing your own yoghurt, living lactobacillus is essential. In most cases, this is obtained from ripe yoghurt. Alternatively, you may use dried yoghurt lactobacillus powder that may be used even for preparing soya yoghurt. When using dried lactobacillus, follow the instructions given on the pack. Additionally, ripe yoghurt obtained from dried lactobacillus powder may be used for initiating a new yoghurt preparation.
NOTE: Typically, your own yoghurt will be runny and is perfectly suited for drinking. If you wish to get a somewhat thicker quality, use some gelatin to taste.
While preparing yoghurt, always some whey will separate. Do not discard the whey. It will be a refreshing, thirst-quenching drink (see: "Whey Drink").
NOUGAT DRINKING YOGHURT
INGREDIENTS
1 litre low-fat milk
ca. 100 ml pure living lactobacillus yoghurt
ca. 100 g hazelnut nougat cream
PREPARATION
Thoroughly mix milk and yoghurt and pour the mixture into the bread pan.
Place the bread pan into the bread maker and close the lid of the appliance. Select program 18 Yoghurt. Ensure, not to select any other program!
After completion of the yoghurt cycle, pour the yoghurt into a sufficiently high, narrow container, preferably with a pouring spout. Cover the container and let the yoghurt rest for some additional time at room temperature until the whey accumulated on top of the yoghurt.
Carefully pour off the whey. You can use it for preparing a delightful drink (see: "Whey Drink").
Whisk hazelnut nougat cream into the yoghurt. Chill yoghurt and whey in the refrigerator.
Divide up the yoghurt into 4-6 drinking glasses.
WHEY DRINK
INGREDIENTS
1 cup (approx. 200 ml) whey
1 tablespoon lemon juice
Sugar to taste
PREPARATION
Pour off the whey derived from yoghurt preparation into a sufficiently large drinking glass.
Add lemon juice and Sugar to taste. Stir thoroughly to dissolve the sugar.
TIP: Instead of lemon juice you may try several other fruit juices to create your own whey drink.

natural_image
Two glass jars filled with red and dark beverage, surrounded by berries and a striped straw (no text or symbols)NOTE: Classical preparation of jam uses gelling sugar containing pectin. Depending on the content of sugar (at least 45 %, gelling sugar type 1:1), these jams may be stored without cooling up to ½ year in an airtight container. For preparing jam in the bread maker, an alternative method with corn starch is used. This method is described in the following recipes. However, these jams are perishable. The liquid separates easily. Thus, these jams should be stored in the refrigerator in an airtight container up to 1 week.
TIP: The following recipes are given as an example. To meet your individual taste, you may try other types of fruit or fruit mixtures.
STRAWBERRY JAM
INGREDIENTS
900 g fresh strawberries
540 g sugar
30 g starch flour
15 ml lemon juice
PREPARATION
Wash the strawberries and remove the leaves. Cut the strawberries into small pieces or purée them. Then fill all ingredients in the bread pan.
Select program 10 Jam.
ORANGE JAM
INGREDIENTS
900 g oranges
540 g sugar
30 g starch flour
15 ml lemon juice
PREPARATION
Peel the oranges and remove the seeds. Cut the oranges into thin slices. Then fill all ingredients in the bread pan.
Select program 10 Jam.
ICE CREAM

natural_image
Close-up of a glass dessert with red berries, a mint leaf, and a chocolate berry in the background (no text or symbols visible)NOTE: When program 15 Ice Cream is complete, typically the ice cream will have the consistency of whipped ice cream. If you wish it more solid you should fill the ice cream into an airtight container and place it in the freezer for at least 12 hour.
BASIC RECIPE FOR VANILLA ICE CREAM
Amount: approx. 300 ml
INGREDIENTS
200 ml cream
50 ml milk
pulp of 1/2 vanilla pod or 1/2 teaspoon vanilla extract
2 egg yolks
40 g caster sugar
PREPARATION
The ice bucket should have been in the freezer for up to 16 hours in an upright position. The ice bucket is cooled sufficiently, when you do not hear any gurgle while shaking it.
Whip egg yolk and sugar until it is creamy.
Place milk and vanilla into a medium heavy-based saucepan. Heat on medium heat until the mixture just starts to simmer. Whip the milk mixture in small portions into
the egg mixture.
Pour the mixture into a clean pot. While stirring continuously using a wooden spoon, heat on low heat until the mixture has thickened and coats the back of the spoon. Leave the mixture cool down, then refrigerate to +5 °C.
Whip the chilled cream in a chilled bowl until it is stiff. Then combine the egg mixture and whipped cream.
Install the gearbox in the bread maker. Then protect your hands with gloves and take the ice bucket out of the freezer. Fix the ice bucket on the gearbox. Push the stirring paddle onto the drive shaft in the centre of the ice bucket (see: "Using the Ice Bucket").
Select program 15 Ice Cream and adjust the stirring time to 25 minutes. Start the program.
As soon as the stirring paddle is rotating, shortly stir your pre-cooled ice mixture. Then slowly fill it into the ice bucket. Thereafter close the lid of the bread maker and wait until the acoustic signal sounds.
Protect your hands with gloves and take the ice bucket out of the bread maker. Using a plastic spoon, fill the ice cream in an air-tight container and place it in the freezer until it has the desired consistency. You may store the ice cream for approx. 1 week in the freezer.
QUICK VANILLA ICE CREAM
Amount: approx. 300 ml
INGREDIENTS
100 ml cream
120 ml whole milk
75 ml sweetened condensed milk
12 teaspoon vanilla extract
PREPARATION
The ice bucket should have been in the freezer for up to 16 hours in an upright position. The ice bucket is cooled sufficiently, when you do not hear any gurgle while shaking it.
Mix milks and vanilla extract in a large jug and chill the mixture in the refrigerator. Whip the chilled cream in a chilled bowl until it is stiff. Then combine the milk mixture and whipped cream. Refrigerate the mixture to +5 °C.
Install the gearbox in the bread maker. Then protect your hands with gloves and take the ice bucket out of the freezer. Fix the ice bucket on the gearbox. Push the stirring paddle onto the drive shaft in the centre of the ice bucket (see: "Using the Ice Bucket").
Select program 15 Ice Cream and adjust the stirring time to 25 minutes. Start the program.
As soon as the stirring paddle is rotating, shortly stir the pre-cooled ice mixture. Then slowly fill it into the ice bucket. Thereafter close the lid of the bread maker and wait until the acoustic signal sounds.
Protect your hands with gloves and take the ice bucket out of the bread maker. Using a plastic spoon, fill the ice cream in an air-tight container and place it in the freezer until it has the desired consistency. You may store the ice cream for approx. 3 days in the freezer.
CHOCOLATE ICE CREAM
Amount: approx. 350 ml
INGREDIENTS
200 ml cream
25 ml milk
75 g dark chocolate, chopped
2 egg yolks
30 g caster sugar
PREPARATION
The ice bucket should have been in the freezer for up to 16 hours in an upright position. The ice bucket is cooled sufficiently, when you do not hear any gurgle while shaking it.
Whip egg yolk and sugar until it is creamy.
Place milk and chocolate into a medium heavy-based saucepan. Heat on low heat until mixture just starts to simmer. Whip the chocolate mixture in small portions into the egg mixture.
Pour the mixture into a clean pot. While stirring continuously using a wooden spoon, heat on low heat until the mixture has thickened and coats the back of the spoon. Leave the mixture cool down, then refrigerate to +5 °C.
Whip the chilled cream in a chilled bowl until it is stiff. Then combine the egg mixture and whipped cream.
Install the gearbox in the bread maker. Then protect your hands with gloves and take the ice bucket out of the freezer. Fix the ice bucket on the gearbox. Push the stirring paddle onto the drive shaft in the centre of the ice bucket (see: "Using the Ice Bucket").
Select program 15 Ice Cream and adjust the stirring time to 30 minutes. Start the program.
As soon as the stirring paddle is rotating, shortly stir your pre-cooled ice mixture. Then slowly fill it into the ice bucket. Thereafter close the lid of the bread maker and wait until the acoustic signal sounds.
Protect your hands with gloves and take the ice bucket out of the bread maker.
Using a plastic spoon, fill the ice cream in an air-tight container and place it in the freezer until it has the desired consistency. You may store the ice cream for approx. 1 week in the freezer.
HAZELNUT NOUGAT GELATO
Amount: approx. 350 ml
INGREDIENTS
150 ml milk
75 g hazelnut nougat cream
14 teaspoon vanilla extract
2 egg yolks
75 g caster sugar
2 tablespoons roasted hazelnuts, finely chopped
PREPARATION
The ice bucket should have been in the freezer for up to 16 hours in an upright position. The ice bucket is cooled sufficiently, when you do not hear any gurgle while shaking it.
Whip egg yolk and sugar until it is creamy.
Place milk, vanilla extract, and hazelnut nougat cream into a medium heavy-based saucepan. Heat on medium heat until the mixture just starts to simmer. Whip the cream mixture in small portions into the egg mixture.
Pour the mixture into a clean pot. While stirring continuously using a wooden spoon, heat on low heat until the mixture has thickened and coats the back of the spoon. Leave the mixture cool down, then refrigerate to +5 °C.
Install the gearbox in the bread maker. Then protect your hands with gloves and take the ice bucket out of the freezer. Fix the ice bucket on the gearbox. Push the stirring paddle onto the drive shaft in the centre of the ice bucket (see: "Using the Ice Bucket").
Select program 15 Ice Cream and adjust the stirring time to 30 minutes. Start the program.
As soon as the stirring paddle is rotating, shortly stir the pre-cooled ice mixture. Then slowly fill it into the ice bucket. Thereafter close the lid of the bread maker and wait until the acoustic signal sounds.
Protect your hands with gloves and take the ice bucket out of the bread maker.
Using a plastic spoon, fill the ice cream in an air-tight container and place it in the freezer until it has the desired consistency. You may store the ice cream for approx. 1 week in the freezer.
FROZEN STRAWBERRY YOGHURT
Amount: approx. 340 ml
Tip: You can prepare the yoghurt for this recipe via program 18 Yoghurt.
INGREDIENTS
150 g fresh strawberries
150 g pure yoghurt
40 g caster sugar
PREPARATION
The ice bucket should have been in the freezer for up to 16 hours in an upright position. The ice bucket is cooled sufficiently, when you do not hear any gurgle while shaking it.
Wash the strawberries and remove the leaves. Purée the strawberries.
Mix puréed strawberries, sugar and yoghurt. Leave the mixture cool down, then refrigerate to +5 °C.
Install the gearbox in the bread maker. Then protect your hands with gloves and take the ice bucket out of the freezer. Fix the ice bucket on the gearbox. Push the stirring paddle onto the drive shaft in the centre of the ice bucket (see: "Using the Ice Bucket").
Select program 15 Ice Cream and adjust the stirring time to 25 minutes. Start the program.
As soon as the stirring paddle is rotating, shortly stir your pre-cooled ice mixture. Then slowly fill it into the ice bucket. Thereafter close the lid of the bread maker and wait until the acoustic signal sounds.
Protect your hands with gloves and take the ice bucket out of the bread maker.
Using a plastic spoon, fill the ice cream in an air-tight container and place it in the freezer until it has the desired consistency. You may store the ice cream for approx. 1 week in the freezer.
LEMON SORBET
Amount: approx. 300 ml
INGREDIENTS
75 g caster sugar
150 ml water
75 ml fresh lemon juice
1 small egg white
PREPARATION
The ice bucket should have been in the freezer for up to 16 hours in an upright position. The ice bucket is cooled sufficiently, when you do not hear any gurgle while shaking it.
Place water, lemon juice and sugar into a medium heavy-based saucepan. Heat until the sugar is dissolved. Cook on low heat for approx. 2 minutes. Leave the syrup cool down, then refrigerate to +5 °C.
Whip the chilled egg white to get a white cream. Then combine the water mixture and whipped egg white.
Install the gearbox in the bread maker. Then protect your hands with gloves and take the ice bucket out of the freezer. Fix the ice bucket on the gearbox. Push the stirring paddle onto the drive shaft in the centre of the ice bucket (see: "Using the Ice Bucket").
Select program 15 Ice Cream and adjust the stirring time to 25 minutes. Start the program.
As soon as the stirring paddle is rotating, shortly stir your prepared ice mixture. Then slowly fill it into the ice bucket. Thereafter close the lid of the bread maker and wait until the acoustic signal sounds.
Protect your hands with gloves and take the ice bucket out of the bread maker.
Using a plastic spoon, fill the ice cream in an air-tight container and place it in the freezer until it has the desired consistency. You may store the ice cream for approx. 1 week in the freezer.

More recipes below: www.gastroback.de/en
GASTROBACK®
GASTROBACK GmbH
Gewerbestraße 20 • 21279 Hollenstedt / Germany Telefon +49 (0) 4165 / 2225-0 • Telefax +49 (0) 4165 / 2225-29 info@gastroback.de • www.gastroback.de
- BEDIENUNGSANLEITUNG
- BROTE
- KLASSISCHES FRANZÖSISCHES BROT
- ZUTATEN
- Brotmenge 1000 g 750 g 500 g
- ZUBEREITUNG
- TABLE OF CONTENTS
- DEAR CUSTOMER!
- LCD screen showing the following information:
- Buttons – only slightly touch with your finger. A beep sounds on every input.
- IMPORTANT SAFEGUARDS
- GENERAL SAFETY INSTRUCTIONS
- IMPORTANT SAFEGUARDS FOR ELECTRICAL APPLIANCES
- HIGH TEMPERATURES - RISK OF BURNS
- MOVING PARTS - RISKS OF INJURIES
- NON-STICK COATING
- PROPERTIES OF YOUR NEW BREAD MAKER
- ENVIRONMENT
- FUNCTIONS OF THE BUTTONS
- PROGRAMS OF THE BREAD MAKER
- PROGRAM DATA/PROGRAM PHASES
- MEMORY FUNCTION
- Note:
- PROGRAMMING YOUR OWN SETTINGS
- Tip:
- USING THE TIMER
- LOCKING THE CONTROL PANEL
- TIPS FOR BEST RESULTS
- BEFORE FIRST USE
- OPERATION
- PREPARATIONS
- STARTING THE BAKING PROGRAM
- CAUTION - MOVING PARTS!
- ⚠ WARNING - High Temperature: Risk of Burns!
- SPECIAL INTRODUCTION ABOUT QUICK BREAD
- APPLYING SOME ADDITIONAL BAKING TIME
- MAKING JAM
- USING THE ICE BUCKET
- MAKING ICE CREAM
- How to Prepare the Ingredients
- HOW TO FREEZE THE ICE CREAM
- MAKING YOGHURT
- SOLVING PROBLEMS
- CARE AND CLEANING
- Do not clean the appliance or any part or accessories of the appliance in an automatic dishwasher.
- CLEANING THE ICE BUCKET
- IMPORTANT NOTE!
- DO NOT CLEAN THE BREAD PAN IN THE DISHWASHER!
- STORAGE
- NOTES FOR DISPOSAL
- INFORMATION AND SERVICE
- WARRANTY
- RECIPES
- BREAD
- BASIC WHITE BREAD
- SESAME BREAD
- WALNUT OR PINESEED BREAD
- CLASSIC FRENCH BREAD
- INGREDIENTS
- PREPARATION
- CORN BREAD
- SODA BREAD
- WHOLE WHEAT BREAD
- SWEET BREAD
- CUSHAW BREAD
- COFFEE BREAD
- GREEN BREAD
- BANANA BREAD
- COCONUT BREAD
- GINGERBREAD
- ORANGE CAKE
- YEAST CAKE
- DOUGH
- YEAST DOUGH
- PASTA DOUGH
- NOUGAT DRINKING YOGHURT
- WHEY DRINK
- STRAWBERRY JAM
- ORANGE JAM
- BASIC RECIPE FOR VANILLA ICE CREAM
- QUICK VANILLA ICE CREAM
- CHOCOLATE ICE CREAM
- HAZELNUT NOUGAT GELATO
- FROZEN STRAWBERRY YOGHURT
- LEMON SORBET
- GASTROBACK GmbH
Brand : Gastroback
Model : Design Advanced 42823
Category : Bread maker