RSM1007 - Jigsaw Ferm - Free user manual and instructions
Find the device manual for free RSM1007 Ferm in PDF.


| Product Type | Jigsaw |
| Brand | Ferm |
| Model | RSM1007 |
| Voltage | 230-240 V~ |
| Frequency | 50 Hz |
| Power Input | 500 W |
| No Load Speed | 300-3400/min |
| Saw Stroke | 15 mm |
| Weight | 2.2 kg |
| Sound Pressure Level (Lpa) | 185.0 dB(A) |
| Sound Power Level (Lwa) | 98.0 dB(A) |
| Vibration Level | 11.133 m/s² |
| Max Cutting Capacity in Wood | 110 mm |
| Max Cutting Capacity in Plastic Pipe | 125 mm |
| Max Cutting Capacity in Steel | 3 mm |
| Speed Control | Variable speed wheel (1-6) |
| Safety Features | Safety switch and lock-off trigger |
| Blade Type | T-shank (fits sawblade holder) |
| Included Accessories | 2 saw blades (wood and metal), Allen key |
| Double Insulation | Yes |
| Class | II |
| Recommended Maintenance | Clean with soft damp cloth; do not use solvents |
Frequently Asked Questions - RSM1007 Ferm
User questions about RSM1007 Ferm
0 question about this device. Answer the ones you know or ask your own.
Ask a new question about this device
Download the instructions for your Jigsaw in PDF format for free! Find your manual RSM1007 - Ferm and take your electronic device back in hand. On this page are published all the documents necessary for the use of your device. RSM1007 by Ferm.
USER MANUAL RSM1007 Ferm
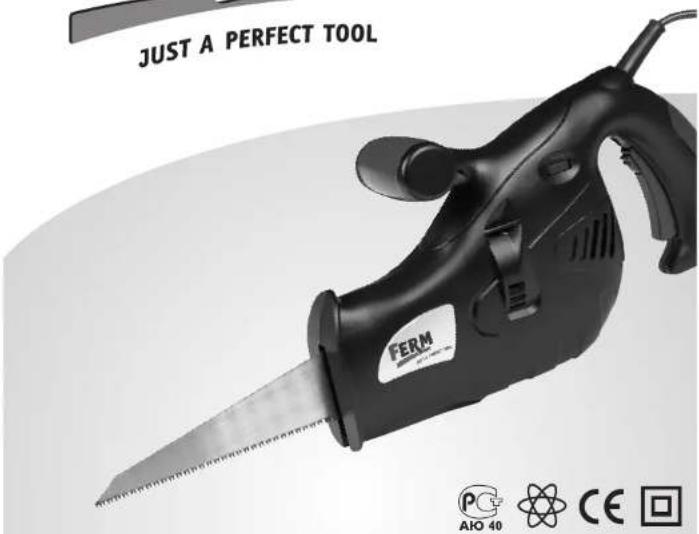
FERM® JUST A PERFECT TO
Art.nr. RSM1007
FRS-500
UK
USERS MANUAL 3
NL


natural_image
Illustration of a hand using a tool to adjust or install a mechanical component (no text or symbols visible)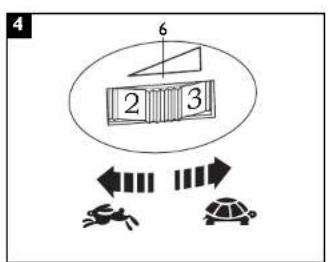
flowchart
graph TD
    A["Top Step"] --> B["Step 2"]
    B --> C["Step 3"]
    C --> D["Step 6"]
    D --> E["Bottom Step"]
    E --> F["Step 4"]
    F --> G["Step 5"]
    G --> H["Step 6"]
natural_image
Technical line drawing of a mechanical device with labeled parts (no text or symbols present)EXPLODED VIEW
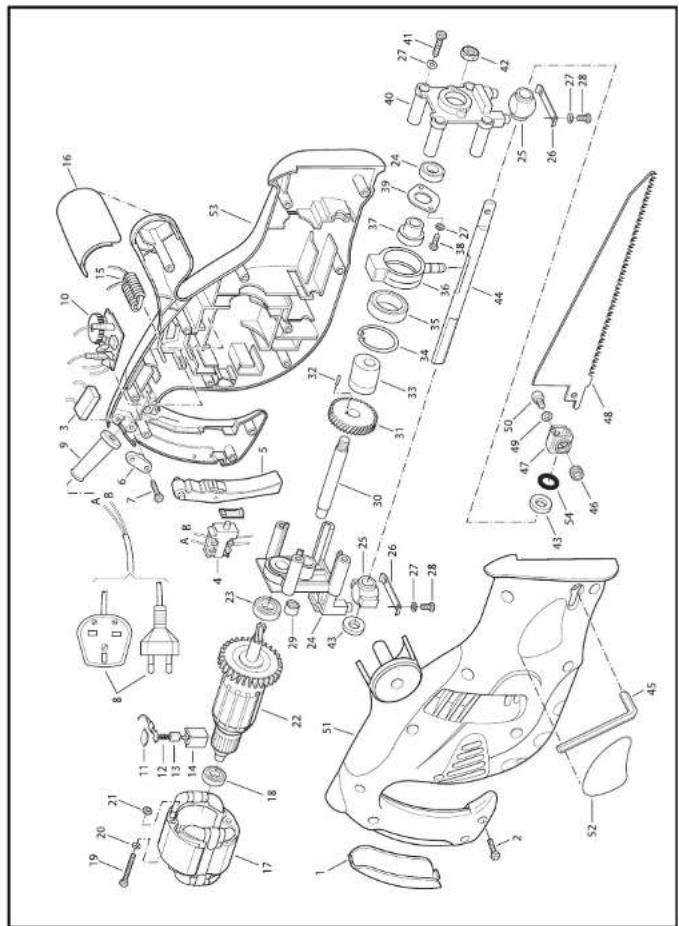
SPARE PARTS LIST FRS-500
REF NR DESCRIPTION FERM NR
| 4 | SWITCH | 408530 | ||
| 5 | SWITCH | CAP | 408531 | |
| 14 | BRUSH | HOLDER | 408532 | |
| 12+13 | CARBON BRUSH SET (2 PCS) | 408533 | ||
| 11 | BRUSH | CAP | 408534 | |
| 46+47+49+50 | SAWBLADE CLAMP | 408535 | ||
GB
SAFETY INFORMATION
Warning! Always read the instruction for electrical products carefully before use. It will help you understand your product more easily and avoid unnecessary risks.
Keep this instruction manual in a safe place for future use.
• Do not use power tools in the rain or wet environments.
- Do not use power tools where there is a risk of fire or explosion - i.e.near flammable liquids or gases.
• Do not allow children into the area where you are working.
- Do not let children or other people touch electrical power tools.
- Avoid body contact with grounded (earthed) surfaces (e.g. pipes, radiators, appliances).
- Do not leave the power tool unattended and always disconnect from the power supply after use. Store in a dry place well out of reach of children.
• Always use safety glasses and a dust mask when cutting or drilling through materials.
- Do not carry a power tool by the cord or pull on the cord and keep it away from heat, water, oil and sharp objects.
- Wear the right clothes - not loose fitting and ensure garments cannot come into contact with moving parts.
- If you have long hair, tie it back safely to avoid tangling it in moving parts.
- Do not use power tools when you are tired or have been drinking alcohol.
- Wear non-slip shoes, especially if working outdoors.
- When working outdoors and you have no other option than to use an extension cable, ensure it is suitable for outdoor use and fitted with the correctly rate fuse.
• Where possible, secure your work piece firmly in a clamp or a vice to permit the use of two hands.
• Do not overreach while working - you may lose your balance.
- You must switch off your tool at the tool's on/off switch and at the power supply.
- Never change a blade, disk or any other attachment without first turning off the on/off switch on the tool and removing the plug from the power supply.
• We strongly recommend the use of a residual current device (RCD) at the power source when using power tools.
- Only use spare parts and attachments supplied by Ferm.Use of attachments other than those supplied or recommended by Ferm will invalidate your guarantee and could be dangerous.
ABOVE ALL - BE CAREFUL!
Mains Plug Replacement
If you in any doubt whatsoever regarding removing the old plug and reconnecting a new one, you should contact a competent electrician to do it for you.
• Disconnect the plug from the electric socket.
- Cut off the old plug and dispose of it safely. Under no circumstances should anyone be able to find and use a plug with exposed wires.
• Only fit an approved plug with the correctly rated fuse.
- Attach the cores (wires) to their respective terminals.
BROWN - L (Live)
BLUE - N (Neutral)
Ensure the outer cable (sheath) is firmly clamped in place to avoid strain on the wires at the terminals.
Maintenance
Remove the saw from the power supply.
Carry out a visual inspection before and after you use the saw. If it appears to be damaged or parts are worn have the saw repaired by a qualified person. If the blade is worn or damaged you must purchase a new blade. Using an old worn blade can be dangerous and hard work!
When the time comes to replace your saw, dispose of it safely through a recycling facility.

Risk of material damage and/or physical injury.

Risk of an electric shock.

In accordance with the safety regulations of applicable European guidelines.

Class II machine – Double insulation – An earthed plug is not necessary.

The number of revolutions of the machine can be adjusted electronically.

Read the instructions.

Wear safety goggles.

Use a hearing protection aid.
GB
This power tool is double insulated. All the external parts are insulated from the mains power supply. This makes it unnecessary for this power tool to be earthed.

TECHNICAL DATA
Voltage | 230-240 V\~
Frequency | 50 Hz
Power input | 500 W
No load speed | 300-3400/min
Saw stroke | 15 mm
Weight | 2.2 kg
Lpa (sound pressure)
Lwa (sound power)
Vibration 11.133 m/s²
May saw capacity in wood
Max saw capacity in plastic pipe
Max. saw capacity in steel
185.0 dB(A)
98.0 dB(A)
11.133 m/s
11.155
110 mm Q125 m
0125 mm
3 mm
FEATURES
I Upper grip
2 Handle
3 On/off switch
- Safety switch
4 Safety switch
5 S a wblade holder and release opening
6 Speed regulation wheel
7 Blade for sawing wood
8 Blade for sawing metal
6 blade for saving metal 9. I is saw/blade for saw
7 J Ing saw/blade for sawing curves
TOAllen key
Fitting a Blade
- Remove the saw from the power supply.
- Loosen blade retention bolt (5) using the allen key supplied (dia.2). Do not completely unscrew. Fit the blade as shown and fully retighten the blade retention bolt.
Warning!
When turning the allen key to remove a blade, be very careful not to catch your hand or fingers on the blade as the bolt suddenly loosens under force (Best hand position shown dia.3).
Before use
- Make sure the items you want to cut are free from other obstacles, cables, furniture etc.
• Always cut with the blade edge facing away from you - never towards you! - Never cut items close to your body.
Using the saw
Your saw has a variable speed wheel 1 - 6 (6).
Move the dial from I (slow) up to your preferred speed. Only alter the speed setting when the motor has stopped (dia.4).
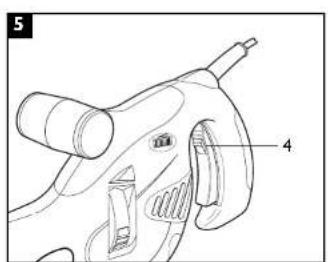
To operate the motor press the safety switch (4) down and depress the trigger (dia.5). Use the top grip (1) to guide the cutting action.
You can move the saw backward and forward if required but do not force it.
To stop the saw, simply take your finger off the trigger.
The smaller blade supplied is used to cut thin gauge metal (max.3mm) such as aluminium or copper. This blade is attached in exactly the same way. Do not force the blade when cutting through metal.
Cleaning
Remove the saw from the power supply.
Use only a soft slightly damp cloth to clean your saw.
Do not use general household cleaners as they may damage the plastic casing.
Do not use petrol, paint thinners, or any other chemicals.
Do not use the saw if it has been exposed to water or any other liquids.
EC Declaration of Conformity
We declare under our sole responsibility that this product conforms with the following standards or standardised documents:
98/37/CEE,73/23/CEE,93/68/CEE,89/336/CEE
in accordance with regulations:
It is our policy to continuously improve our products and we therefore reserve the right to change the product specification without prior notice.
Ferm BV, Zwolle, The Netherlands

DK
TEKNISKE DATA
98/37/CEE,73/23/CEE, 93/68/CEE,89/336/CEE,93/68/CEE
98/37/CEE,73/23/CEE,93/68/CEE,89/336/CEE
98/37/CEE,73/23/CEE,93/68/CEE,89/336/CEE,93/68/CEE
Brand : Ferm
Model : RSM1007
Category : Jigsaw