
MCT1825 - Lawn mower McGregor - Free user manual and instructions
Find the device manual for free MCT1825 McGregor in PDF.


| Product Type | Lawn Mower |
| Brand | McGregor |
| Model | MCT1825 |
| Power Source | Electric Corded |
| Power Output | 1200 W |
| Cutting Width | 36 cm |
| Cutting Height Adjustment | 3 positions (25-70 mm) |
| Grass Box Capacity | 40 L |
| Weight | 12.5 kg |
| Dimensions (L x W x H) | 70 x 36 x 30 cm |
| Safety Features | Safety switch, blade brake |
| Handle Type | Foldable for storage |
| Wheel Type | 4 plastic wheels |
| Maintenance | Clean after use, sharpen blade regularly |
| Recommended Grass Height | Maximum 5 cm before cutting |
| Certifications | CE, RoHS |
| Package Contents | Mower, grass box, manual, warranty card |
Frequently Asked Questions - MCT1825 McGregor
User questions about MCT1825 McGregor
0 question about this device. Answer the ones you know or ask your own.
Ask a new question about this device
Download the instructions for your Lawn mower in PDF format for free! Find your manual MCT1825 - McGregor and take your electronic device back in hand. On this page are published all the documents necessary for the use of your device. MCT1825 by McGregor.
USER MANUAL MCT1825 McGregor
natural_image
Green and black metal detector with a handle and base, isolated on white background (no text or symbols visible)
McGregor 18V 25CM LI-ION
CORDLESS GRASS TRIMMER
4669148(Model: MCEGTI825)
VI: 10/24
CAUTION Read the instructions before using the machine
These instructions contain important information that will help you get the best from your grass trimmer, ensuring it is assembled correctly and safely. If you need help or have damaged or missing parts, call the Customer Helpline on 0345 605 2062
AFTER SALES SUPPORT
0345 605 2062
SAN NO.: O3218ABBAO31
Contents
Safety information ....2
Intended use 4
Parts list 17
Assembly 18
Preparation....24
Operation 25
Maintenance 28
Technical data 31
Trouble shooting ....33
Guarantee 35
Produced in China for Argos Limited, London, EC1N 2HT, UK.
Argos (N.I.) Ltd, Forestside Shopping Centre, Upper Galwally, Belfast, BT8 6FX, UK.
https://bit.ly/Coreservice-McGregor

Safety Information
Important - Please read these instructions fully before operating or maintaining

Read the instruction manual before use.

Conforms to relevant EU regulatory requirements.

Conforms to relevant UK regulatory requirements.

Wear ear protection.

Wear eye protection.

Wear dust mark.
Keep other people out of working area during operation. A distance of at least 15 m must be observed.
Warning! Cutting device continues to rotate after the motor is switched off.

Keep bystanders away.

Disconnect the battery pack before any repair or maintenance.

Do not expose to rain.

Safety Information
Important - Please read these instructions fully before starting assembly
Warning Symbols

Guaranteed sound power level
Warning symbols on the battery

Do not throw into water.

Do not throw on fire.

Do not subject the battery to strong sunlight over long periods of time. Do not leave on a heater (max.45°C).

Batteries contain Li-ion. Do not dispose of waste batteries in domestic waste. Contact local authority to find out how to dispose of batteries.
Warning symbols on the charger

The charger is for indoor use only.

Double isolation. (Only for charger)

Protective 3.15A limited with B0Q-SP06-20ZB.

Read the instruction manual
- - + Pole orientation.

WEEE symbol. Waste electrical products should not be disposed of with household waste. Please recycle where facilities exist. Check with your local authority or local store for recycling guidelines.

Safety Information
Introduction
Thank you for purchasing a McGregor grass trimmer. We hope you are completely satisfied with your new product and hope you will enjoy using this tool for many years.
Your Grass Trimmer has been designed for trimming light foliage and is intend for domestic use only.
Intended Use
This Li-ion cordless grass trimmer is intended for cutting weed, grass or similar soft vegetation in areas that are hard to reach, e.g. under bushes, on slopes and edges. It may not be used to work on unusual thick, dry or wet grass, e.g. pasture grass, or to shred leaves. For safety reasons it is essential to read the entire instruction manual before first operation and to observe all the instructions therein.
This product is intended for private domestic use only, not for any commercial trade use. It must not be used for any purposes other than those described.
Safety Warning

WARNING Read all safety warnings, instructions, illustrations and specifications provided with this power tool. Failure to follow all instructions listed below may result in electric shock, fire and/or serious injury.
Save all warnings and instructions for future reference.
The term "power tool" in the warnings refers to your mains-operated (corded) power tool or battery-operated (cordless) power tool.

Safety Information
Important - Please read these instructions fully before starting assembly
Work area safety
- Keep work area clean and well lit. Cluttered or dark areas invite accidents.
- Do not operate power tools in explosive atmospheres, such as in the presence of flammable liquids, gases or dust. Power tools create sparks which may ignite the dust or fumes.
- Keep children and bystanders away while operating a power tool. Distractions can cause you to lose control.
Electrical safety
- Power tool plugs must match the outlet. Never modify the plug in any way. Do not use any adapter plugs with earthed (grounded) power tools.
Unmodified plugs and matching outlets will reduce risk of electric shock. - Avoid body contact with earthed or grounded surfaces, such as pipes, radiators, ranges and refrigerators. There is an increased risk of electric shock if your body is earthed or grounded.
- Do not expose power tools to rain or wet conditions. Water entering a power tool will increase the risk of electric shock.
- Do not abuse the cord. Never use the cord for carrying, pulling or unplugging the power tool. Keep cord away from heat, oil, sharp edges or moving parts. Damaged or entangled cords increase the risk of electric shock.
- When operating a power tool outdoors, use an extension cord suitable for outdoor use. Use of a cord suitable for outdoor use reduces the risk of electric shock.

Safety Information
Important - Please read these instructions fully before starting assembly
Electrical safety
- If operating a power tool in a damp location is unavoidable, use a residual current device (RCD) protected supply. Use of an RCD reduces the risk of electric shock.
Personal safety
- Stay alert, watch what you are doing and use common sense when operating a power tool. Do not use a power tool while you are tired or under the influence of drugs, alcohol or medication. A moment of inattention while operating power tools may result in serious personal injury.
- Use personal protective equipment. Always wear eye protection. Protective equipment such as a dust mask, non-skid safety shoes, hard hat or hearing protection used for appropriate conditions will reduce personal injuries.
- Prevent unintentional starting. Ensure the switch is in the off-position before connecting to power source and/or battery pack, picking up or carrying the tool. Carrying power tools with your finger on the switch or energising power tools that have the switch on invites accidents.
- Remove any adjusting key or wrench before turning the power tool on. A wrench or a key left attached to a rotating part of the power tool may result in personal injury.
- Do not overreach. Keep proper footing and balance at all times. This enables better control of the power tool in unexpected situations
- Dress properly. Do not wear loose clothing or jewellery. Keep your hair and clothing away from moving parts. Loose clothes, jewellery or long hair can

Safety Information
Important - Please read these instructions fully before starting assembly
General Power Tool Safety Warnings
- be caught in moving parts.
- If devices are provided for the connection of dust extraction and collection facilities, ensure these are connected and properly used. Use of dust collection can reduce dust-related hazards.
- Do not let familiarity gained from frequent use of tools allow you to become complacent and ignore tool safety principles. A careless action can cause severe injury within a fraction of a second.
Power tool use and care
- Do not force the power tool. Use the correct power tool for your application. The correct power tool will do the job better and safer at the rate for which it was designed.
- Do not use the power tool if the switch does not turn it on and off. Any power tool that cannot be controlled with the switch is dangerous and must be repaired.
- Disconnect the plug from the power source and/or remove the battery pack, if detachable, from the power tool before making any adjustments, changing accessories, or storing power tools. Such preventive safety measures reduce the risk of starting the power tool accidentally.
- Store idle power tools out of the reach of children and do not allow persons unfamiliar with the power tool or these instructions to operate the power tool. Power tools are dangerous in the hands of untrained users.
- Maintain power tools and accessories. Check for misalignment or binding of moving parts, breakage of parts and any other condition that may affect the power tool's operation. If damaged, have the power
Important - Please read these instructions fully before starting assembly
Power tool use and care
tool repaired before use. Many accidents are caused by poorly maintained power tools.
- Keep cutting tools sharp and clean. Properly maintained cutting tools with sharp cutting edges are less likely to bind and are easier to control.
- Use the power tool, accessories and tool bits etc. in accordance with these instructions, taking into account the working conditions and the work to be performed. Use of the power tool for operations different from those intended could result in a hazardous situation.
- Keep handles and grasping surfaces dry, clean and free from oil and grease. Slippery handles and grasping surfaces do not allow for safe handling and control of the tool in unexpected situations.
Battery tool use and care
- Recharge only with the charger specified by the manufacturer. A charger that is suitable for one type of battery pack may create a risk of fire when used with another battery pack.
- Use power tools only with specifically designated battery packs. Use of any other battery packs may create a risk of injury and fire.
- When battery pack is not in use, keep it away from other metal objects, like paper clips, coins, keys, nails, screws or other small metal objects, that can make a connection from one terminal to another. Shorting the battery terminals together may cause burns or a fire.
- Under abusive conditions, liquid may be ejected from the battery; avoid contact. If contact accidentally occurs, flush with water. If liquid contacts eyes, additionally seek medical help. Liquid ejected from the battery may cause irritation or burns.
Important - Please read these instructions fully before starting assembly
Battery tool use and care
- Do not use a battery pack or tool that is damaged or modified. Damaged or modified batteries may exhibit unpredictable behaviour resulting in fire, explosion or risk of injury.
- Do not expose a battery pack or tool to fire or excessive temperature. Exposure to fire or temperature above 130°C may cause explosion.
- Follow all charging instructions and do not charge the battery pack or tool outside the temperature range specified in the instructions. Charging improperly or at temperatures outside the specified range may damage the battery and increase the risk of fire.
Safety warnings for battery packs
- Keep the battery pack clean and dry. Wipe the battery pack terminals with a clean, dry cloth if they become dirty.
- Do not subject the battery pack to mechanical shock.
- Do not expose the battery pack to heat or fire. Avoid storing in direct sunlight.
- Do not keep the battery pack on charge when it is not in use.
- Remove the battery from the equipment when it is not in use.
- Keep the battery pack out of the reach of children.
- In the event of battery leakage, do not allow the liquid to come into contact with the skin or eyes. If contact has been made, wash the affected area with copious amounts of water and seek medical advice.
- The battery pack needs to be charged before use. Always refer to this instruction manual and use the correct charging procedure.
Important - Please read these instructions fully before starting assembly
Safety warnings for battery packs
- After extended periods of storage, it may be necessary to charge and discharge the battery pack several times to obtain maximum performance.
- The battery pack gives its best performance when it is operated at normal room temperature (20°C ± 5°C).
- When discharging several battery packs, keep battery packs of different electrochemical systems separate from each other.
- Retain the original product literature for future reference.
- Do not dismantle, open or shred cells or battery packs.
- Dispose of safely in an environmentally-friendly manner. Not with domestic, household waste.
Safety warnings for charger
- Before charging, ensure your charger matches the local AC supply.
- Do not use in damp or wet conditions.
- Do not open or probe the charger.
- The charger is intended for indoor use only.
- Only use your charger to charge batteries of the type supplied with your power tool. Other batteries could explode, causing personal injury and property damage.
- Only two battery packs are allowed to be charged continuously, in order to prevent overheating of the charger. It is necessary to allow the charger to cool down before charging another battery.
- When charging is complete, unplug the charger from the mains socket and remove the battery pack from the charger. Do not leave the battery pack in the charger.

Safety Information
Important - Please read these instructions fully before starting assembly
Safety warnings for charger
- Never carry the charger by its cord or pull the cord to disconnect from the socket. Keep the cord away from heat, oil and sharp edges.
- Never attempt to charge non-rechargeable batteries.
- The cord of the charger is not changeable; do not continue to use it, if the cord is damaged.
Service
- Have your power tool serviced by a qualified repair person using only identical replacement parts.
This will ensure that the safety of the power tool is maintained. - Never service damaged battery packs. Service of battery packs should only be performed by the manufacturer or authorized service providers.
Important - Please read these instructions fully before starting assembly
Cordless Grass Trimmer Safety Warnings
ELECTRICALLY POWERED GRASS TRIMMER SAFETY WARNINGS
IMPORTANT
READ CAREFULLY BEFORE USE
KEEP FOR FUTURE REFERENCE

WARNING! When using the product the safety rules must be followed. For your own safety and that of bystanders please read these instructions before operating the product. Please keep the instructions safe for later use.
Training
- Read the instructions carefully. Be familiar with the controls and the proper use of the product.
- Never allow people unfamiliar with these instructions or children to use the product. Local regulations can restrict the age of the operator.
- Keep in mind that the operator or user is responsible for accidents or hazards occurring to other people or their property.
Preparation
- Never operate the product while people, especially children, or pets are nearby.
- Wear eye protection and stout shoes at all times while operating the product
- Before use, always visually inspect the machine for damaged, missing or misplaced guards or shields.
Important - Please read these instructions fully before starting assembly
Operation
- Use the product only in daylight or good artificial light.
- Never operate the product with damaged guards or shields or without guards or shields in place.
- Keep hands and feet away from the cutting attachment at all times and especially when switching on the motor.
- Before use check the controls and proper use of the product.
- Before using the product and after any impact, check for signs of wear or damage and repair as necessary.
• Always disconnect the product from the power supply (i.e. remove the plug from the power supply or the battery pack) - whenever leaving the product unattended;
- before clearing a blockage;
- before checking, cleaning or working on the product
- after striking a foreign object;
- whenever the product starts vibrating abnormally.
• Take care against injury to feet and hands from the cutting attachment.
• Always ensure that the air vents are kept clear of debris.
• Take care against injury from any device fitted for trimming the filament line length, if applicable. After extending new cutter line always return the product to its normal operating position before switching on. - Never fit metal cutting elements.
- Never replace non-metallic cutting means with
Additional safety instructions for grass trimmers
metallic cutting means.
- Never use replacement parts or accessories not provided or recommended by the manufacturer.
- Avoid using the product in bad weather conditions especially when there is a risk of lightning.
- Do not expose the product to rain.
- Never allow children, persons with reduced physical, sensory or mental capabilities or lack of experience and knowledge or people unfamiliar with these instructions to use the machine, local regulations may restrict the age of the operator;
- Children should be supervised to ensure that they do not play with the product.
- Warning! The cutting elements continue to rotate after the product is switched off.
Maintenance and storage
- Disconnect the product from the power supply (i.e. remove the plug from the power supply or the battery pack) and check for damage after use.
- Disconnect the product from the power supply (i.e. remove the plug from the power supply or the battery pack) before carrying out maintenance or cleaning work.
- Use only the manufacturer's recommended replacement parts and accessories.
- Inspect and maintain the product regularly. Have the product repaired only by an authorised service centre or similar qualified specialist.
- When not in use, store the product out of the reach of children.
Important - Please read these instructions fully before starting assembly
Vibration and noise reduction
To reduce the impact of noise and vibration emission, limit the time of operation, use low-vibration and low-noise operating modes as well as wear personal protective equipment.
Take the following points into account to minimize the vibration and noise exposure risks:
- Only use the product as intended by its design and these instructions.
- Ensure that the product is in good condition and well maintained.
- Use correct cutting device for the product and ensure they in good condition.
- Keep tight grip on the handles/gripping surface.
- Maintain this product in accordance with these instructions and keep it well lubricated (where appropriate).
- Plan your work schedule to spread any high vibration tool use across a longer period of time.
Emergency
Familiarise yourself with the use of this product by means of this instruction manual. Memorise the safety directions and follow them to the letter. This will help to prevent risks and hazards.
- Always be alert when using this product, so that you can recognise and handle risks early. Fast intervention can prevent serious injury and damage to property.
- Switch off and disconnect from the power supply if there is any malfunction. Have the product checked by a qualified specialist and repaired, if necessary, before you put it into operation again.
Important - Please read these instructions fully before starting assembly
Residual risks
Even if you are operating this product in accordance with all the safety requirements, potential risks of injury and damage remain. The following dangers can arise in connection with the structure and design of this product:
- Health defects resulting from vibration emission if the product is being used over long periods of time or not adequately managed and properly maintained.
- Injuries and damage to property due to broken application tools or the sudden impact of hidden objects during use.
- Danger of injury and property damage caused by flying objects.

WARNING! This product produces an electromagnetic field during operation! This field may under some circumstances interfere with active or passive medical implants! To reduce the risk of serious or fatal injury, we recommend persons with medical implants to consult their doctor and the medical implant manufacturer before operating this product!
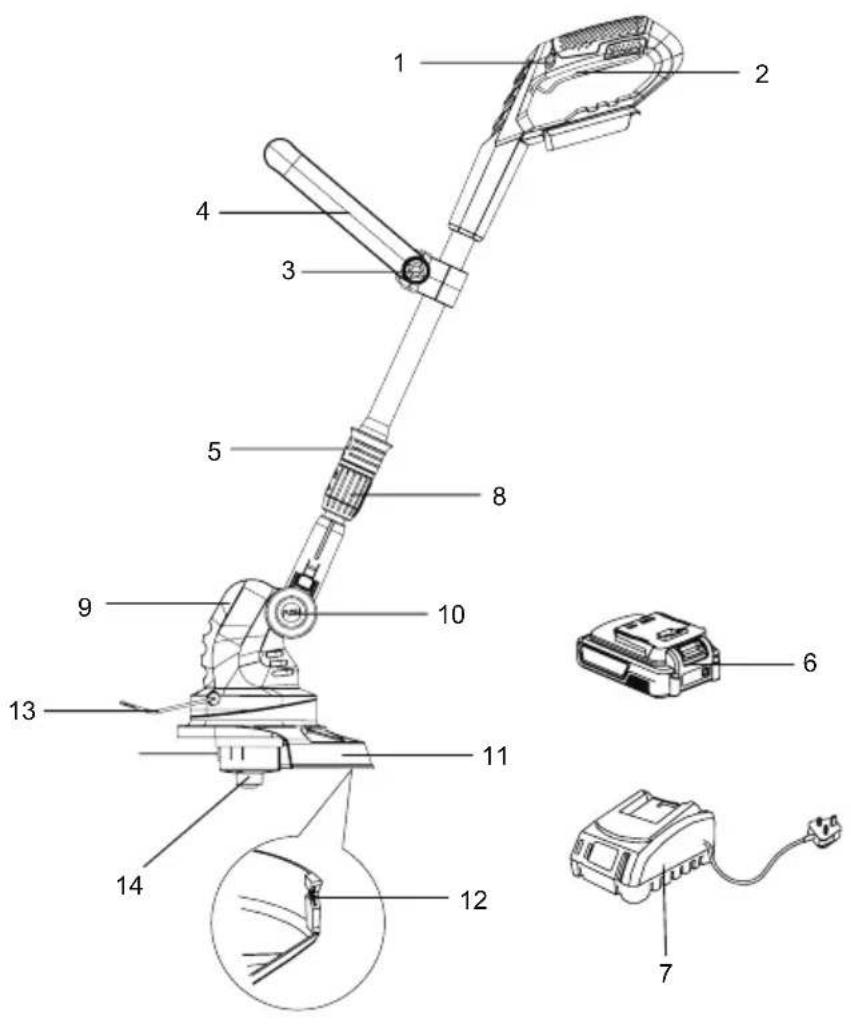
Part List
Parts Description
- Safety lock-off button
- Main switch
- Lock button (front handle)
- Front handle
- Lock button (angle adjustment)
- Battery pack
-
Charger
-
Telescopic knob
- Motor housing
- Cutting angle adjustment button
- Protection guard
- Line blade
- Plant guard
- Spool head
Assembly
Preparing to assemble the grass trimmer

NOTE: Before using the tool, read the instruction manual carefully.
Checking battery capacity

WARNING!
The charger and battery pack are specifically designed to work together so do not attempt to use any other devices. Never insert or allow metallic objects into your charger or battery pack connections; an electrical failure and hazard will occur.
The battery needs to be charged before first use and whenever it fails to produce sufficient power on jobs that were easily done before.
- Press the battery capacity level button to check the charging level of the battery pack. The battery capacity will be shown on the battery charging level indicators.

| Battery capacity | |
| ●○○ [ ] | ≤ 35% and need to be charged |
| ●●○ [ ] | 35-65% |
| ●●● [ ] | ≥ 65% |
Assembly
Charging the battery
- Connect the charger to a power supply. The red LED will illuminate.
- Slide the battery pack into the charger fully, the red indicator is on and the green indicator is flashing means the battery is in charging.
- Complete charging, the red LED is off and the green LED is on.
- Once the battery is fully charged, disconnect the charger from the mains and remove the battery pack from the charger.

| LED Light on Charger (Red & Green) | Charger Status |
 | Stand by |
 | In charging |
 | Battery pack is fully charged |
 (2 times/second) (2 times/second) | Battery pack faulty |
 time/second) time/second) | Battery pack overheat |

Attention! It can not be charged immediately after using the machine. The battery pack should be cooled for a period of time.

Note: Charging time varies from different battery pack capacities.
Charging procedure
Important charging notes
Longest life and best performance can be obtained if the battery pack is charged when the air temperature is between 18-24°C. Do not charge the battery pack in a very low or very high air temperature. This is important and will prevent serious damage to the battery pack.
- When using your tool continuously, the batteries in your battery pack will become hot. You should let a hot battery pack cool down for approximately 30 minutes before attempting to recharge.
- The charger and battery pack may become warm to touch while charging. This is a normal condition, and does not indicate a problem.
-
Use the charger in normal room temperatures whenever possible. To prevent overheating, do not cover the charger and do not charge battery packs in direct sunlight or near heat sources.
-
If the battery pack does not charge properly:
(1). Check the main socket by plugging in a lamp or other appliance.
(2). Move the charger and battery pack to a location where the surrounding air temperature is approximately 18-24^ C.
(3). If charging problems persist, take or send the tool, battery pack and charger to your local service center.
-
The battery pack should be recharged when it fails to produce sufficient power on jobs which were easily done previously. DO NOT CONTINUE to use under these conditions. Follow the charging procedure. You may also charge a partially used pack whenever you desire with no adverse effect on the battery pack.
-
Under certain conditions, with the charger plugged in to the power supply, the exposed charging contacts inside the charger can be shorted by foreign material. Foreign materials of a conductive nature such as, but no limited to, steel wool, aluminum foil, or any buildup of metallic particles should be kept away from charger cavities. Always unplug the charger from the power supply when there is no battery pack in the cavity. Unplug charger before attempting to clean.
-
Do not immerse charger in water or any other liquid.
Assembly

WARING!
Don't allow any liquid to get inside charger. Electric shock may result. To facilitate the cooling of the battery pack after use, avoid placing the charger or battery pack in a warm environment such as in a metal shed, or an uninsulated trailer.

CAUTION!
Never attempt to open the battery pack for any reason. If the plastic housing of the battery pack breaks or cracks, return to a service center for recycling. Do not put it into further use.
Install the guard
- Remove two screws from the motor housing.
- Slide the guard over the motor housing.
- Re-insert two screws into the guard and tighten.
- Place the two ends of the plant guard into two holes on both sides on the motor housing.

natural_image
Technical line drawing of a mechanical component with downward arrows indicating assembly or force (no text or symbols)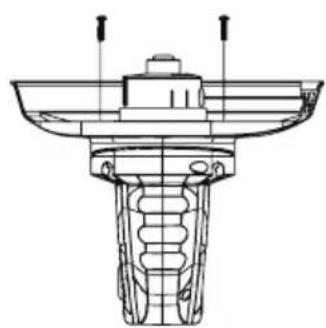
natural_image
Technical line drawing of a mechanical component with no visible text or symbolsAssembly

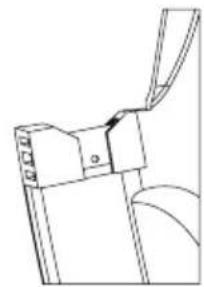
WARING!
Take care to have a look at the yellow warning label and rip off before use.
Take great care when doing this as there is a very sharp line blade (12) on the guard.

natural_image
Pure technical line drawing of a mechanical component without any text, numbers, or symbolsAssemble the front handle
Put the front handle (4) into the clamp (a) and align the mounting holes with holes on the clamp. Insert the bolt (b) through the mounting holes and tighten the front handle lock button (3)

Assembly
Remove or install the battery pack

WARING!
Always release the On/Off trigger before insertion or removal of the battery pack.
Remove the battery pack. Depress the button (A) on end of the battery pack, and then remove the pack (B) from the tool.
Install the battery pack. Align the ribs on both side of the battery pack with the slots in the housing and slip it into place. Always insert it all the way until it locks in place with a click sound. If not, it may accidentally fall out of the tool, causing injury to you or someone around you.

Preparation
Checking the trimming line
Before starting the grass trimmer for the first time, check that the nylon lines touch or pass over the wire cutting blade. If they are not long enough:
- Take off the battery pack from machine.
- Press the spool button
- Pull more nylon wire to lengthen.


natural_image
Technical line drawing of a microscope with no visible text or symbolsSetting the cutting angle
The angle of the handle can be set to 4 different working positions.
Push the cutting angle adjustment button (10) with one hand and move the handle up and down to the desired position. Release the button to lock the handle in the set position.

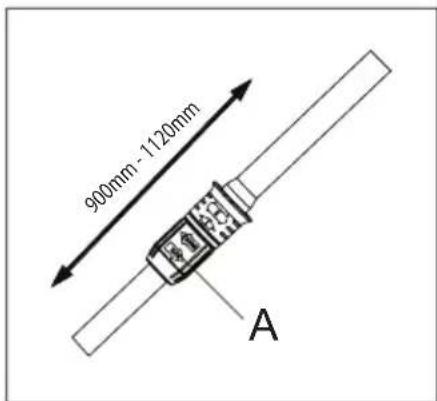
Telescopic handle
Turn the telescopic knob (A) aligning the "UNLOCK" direction and extend upper part of handle to desired handle length. Then turn the telescopic knob (A) aligning the "LOCK" direction and tighten.
Telescopic tube adjustable length: from 900 mm to 1120 mm
Operation
Install the battery pack. Switch the trimmer on. Press and hold the safety lockoff button (C) and then press the trigger (D) on the handle. Release the safety lock-off button (C).

The lengthened nylon line will be cut to size automatically by the wire cutting blade once the grass trimmer is turned on.
During use, the nylon line will become shortened or worn. To automatically lengthen or advance the nylon cutting line, tap the spool button lightly on ground (while the unit is running).
These operations should be repeated a few times before starting work to make sure that everything is functioning properly and to familiarize you with the grass trimmer. Start off slowly, when you have gained experience, you will be able to use the grass trimmer to its full potential.
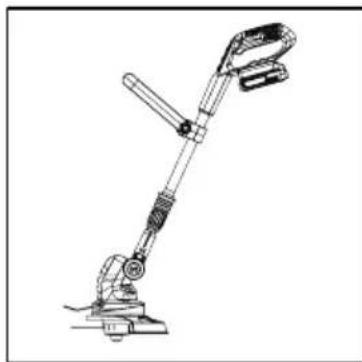
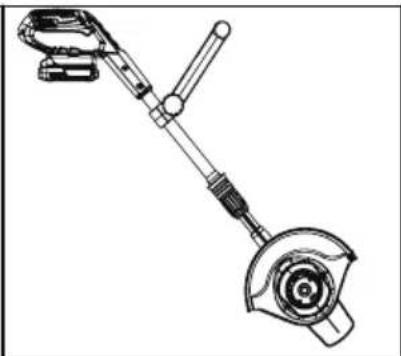
Trimming
- Set the cutting angle to 0 degree (see instructions below).
- To change the angle of the head from trimming to edgingmode, pull back the lock button angle adjustment (5) and rotate the softgrip handle (A) rotate the lower tube at -90, 0 and 90 degree.

Operation
Trimming
natural_image
Line drawing of a handheld vacuum cleaner with lever and base mount (no text or symbols)Trimming

natural_image
Line drawing of a mechanical device with lever and handle (no text or symbols)Reaching
natural_image
Technical line drawing of a mechanical device with lever and base mount (no text or symbols)Edging
Plant Guard

natural_image
Line drawing of a microscope with a spherical lens and base mount (no text or symbols)

natural_image
Line drawing of a microscope with no visible text or symbolsPut down the plant guard when using it.
Operation
Cutting guide

WARNING!
Always wear eye protection. Never lean over the trimmer head. Rocks or debris can bounce or be thrown into eyes and face and cause blindness or other serious injury.
When operating the unit, check for the following:
Wear eye protection and protective clothing.
Hold front handle with one hand and front handle with the other hand. Keep unit below waist level. Work only from your right to your left to ensure debris is thrown away from you.
Without bending over, keep line near and parallel to the ground (vertical when edging with the line facing away from you). The guard should face you, protecting you from debris. Do not switch the machine on with the cutting head on or near material to be cut.
Ensure the cutting line is at full speed before contacting grass.
- Let the trimmer run for a few seconds to cut the line.
- Use the trimmer at an angle of approximately 15 degree to the working area.
- Swing the trimmer head from side to side.
- If the grass is very long, cut in stages rather than trying to cut in one go. Do not overload your trimmer, take small cuts, this will keep the machine operating at high speed and improve the cutting efficiency.

natural_image
Illustration of two robotic arms with cross marks, one on grass and the other on a surface (no text or symbols)
natural_image
Illustration showing a person using a broom and a foot with a spray gun, both without any text or symbols.Maintenance and Storage
Exchange the spool

WARNING!
Before replacing the spool, always switch off the machine and take off the battery pack!
RISK OF INJURY! Cutting elements continue to rotate after the motor is switched off. Do not try to stop the cutting device (nylon blade) with your hands. Always let it come to a stop by itself.
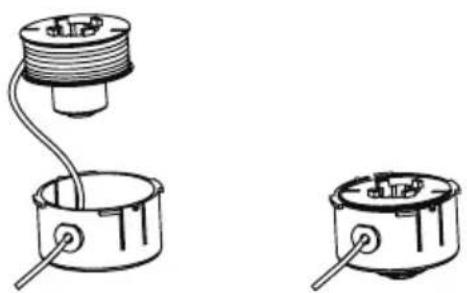
- Remove the spool assembly from the trimmer. To do so, hold and press the parts on the two sides of the spool housing as per below first image shows. Hold the base of the spool assembly with the other hand. Then turning the spool housing anti-clockwise to unlock it. The spool will now been removed easily.
Note: There is a spring inside the head that could easily be lost. Ensure that it is put in a safe place.

- Choose either OPTION 1 or OPTION 2 below for spool or line replacement.
Option 1: accessory replacement spool
Insert the line from the replacement spool through the eyelet in the spool carrier and slide the spool into it.
natural_image
Technical line drawings of two mechanical components with threaded ends and mounting holes (no text or symbols)Maintenance
Making sure to insert the spring, assemble the spool and spool carrier back onto the trimmer. To do so, push the head on and turn it clockwise until it locks.
Note: When push down the spool carrier, make sure the ribs on the carrier to be on the sides and avoid the ribs on the base. Refer to the third image.

natural_image
Three-step mechanical assembly diagram showing hand positioning, disassembly, and mounting mechanism (no text or labels)Replace the spool
To test if the line is advancing properly, push the button with your thumbs while pulling the wire with your fingers. The line should advance freely.
Option 2: replacing line
Attention! Please use diameter 1.6mm line.
Line for your trimmer is available at extra cost from your local dealer or the customer support service:
- Insert one end of the line into the hole in the spool about 3 mm.
- Thight and evenly wind the line onto the spool in the direction of the arrow on the spool, until the line builds up to the notches in the spool rim. Do not overfill spool. The spool holds about 6.5 ~m of line.


natural_image
Pure mechanical diagram showing a shaft and housing assembly with a downward arrow indicating motion (no text or symbols)Maintenance and Storage
Clean and storage
- After use, remove the battery pack from the trimmer;
- When not in use store the machine out of the reach of children;
-
Use only manufacturer recommended replacement parts and accessories;
-
To clean the tool, remove battery pack and use only mild soap and a damp cloth to clean the tool. Do not immerse tool in water or squirt it with a hose. Do not allow any liquid to get inside it. Do not clean with a pressure washer.
Consumable parts
| Part No Part Name | |
| ABBA031001 Screw | |
| ABBA031002 Blade | |
| ABBA031003 Protection cover | |
| ABBA031004 Reel cover | |
| ABBA031005 Reel cap | |
| ABBA031006 Wire | |
| ABBA031007 Nylon rope | |
| ABBA031008 Setting out spring | |
| ABBA031009 Wire reel rack |
Technical Data
Technical Data Table
| Model No. MCEGT1825 | |
| Voltage 18V | --- |
| No load speed 8000/min | |
| Cutting width 25cm | |
| Line diameter 1.6mm | |
| Line length 6.5m | |
| Telescopic tube adjustable length from 900 mm to 1120 mm | |
| A weighted sound pressure level 80dB(A) K=1.18dB(A) | |
| Measured sound power level 87.09dB(A) K=1.47dB(A) | |
| Guaranteed sound power level 96 dB(A) | |
| Typical weighted vibration Max.3.92m/s | ^2 K=1.5m/s ^2 |
| Battery pack | |
| Model | B0P-SP07-20ZM |
| Voltage 18V | --- |
| Battery type | Lithium-Ion |
| Battery capacity | 2.0Ah |
| Fully charging time | 1Hour |
| Charger | |
| Model | B0Q-SP06-20ZB |
| Input | 220-240V~, 50/60Hz 65W |
| Output | 20V---2.4A |
| Insulation protection class | II |
Noise and vibration

WARNING!
The sound values have been determined according to noise test code given in EN50636-2-91.
The sound intensity level for the operator may exceed 80dB(A) and ear protection measures are necessary.
The declared vibration value has been measured in accordance with a standard test method and may be used for comparing one product with another. The declared vibration value may also be used in a preliminary assessment of exposure.
Technical Data
Noise and vibration data

WARNING!
Depending on the actual use of the product the vibration values can differ from the declared total! Adopt proper measures to protect yourself against vibration exposures! Take the whole work process including times the product is running under no load or switched off into consideration!
Proper measures include among others regular maintenance and care of the product and cutting attachments, keeping hands warm, periodical breaks and proper planning of work processes!
Troubleshooting
| Problem Possible Cause Solution | ||
| Trimmer runs slowly. 1. Spool stuck.2. Line too short. | 1. Clean the spool carefully.2. Check the line does not protrude more than 9cm from the spool housing. If it does, cut it off so that it just reaches the line blade. | |
| Trimmer not cutting properly. | 1. Cutting head damaged.2. Cutting line too short. | 1. Replace with a new spool.2. Replace with new line. |
| Trimmer will not operate. 1. | Battery not attached in position.2. Battery low. | 1. Put the battery in position firmly.2. Charge the battery. |
| Battery can not be charged. | 1. Battery not attached in the charger in position.2. Battery or charger faulty. | 1. Insert the battery into the charger in position firmly.2. Contact the service centre for further assistance. |
Recycling and Disposal
Recycling and disposal

The product comes in a package that protects it against damage during shipping. Keep the packaging until you are sure that all parts have been delivered and the product is functioning properly. Recycle the packaging afterwards.
Old products are potentially recyclable and do not, therefore, belong in your household waste. You are requested to assist us and our contribution to saving resources and protecting the environment by handing this product at an equipped collection centre.
Getting Help
Customer Helpline 0345 605 2062
Our dedicated UK based customer service centre is open 7 days a week to assist you with assembly, parts queries and technical support. We are open during office hours. Our experts are here to get you back enjoying your garden in no time.
Calling our service does not affect your statutory rights.
UK/N.I. 0345 605 2062
Dear Customer,
In the unlikely event that your device develops a fault, please contact our customer service department on the following telephone number shown below (0345 605 2062).
- These guarantee terms cover additional guarantee rights and do not affect your statutory warranty rights.
Claims must be accompanied by Proof of Purchase. This must be in the form of a sales receipt or bank statement and must show that the product has been purchased within 2 years prior to the claim, from the retailer that it was originally sold to. - Our guarantee covers problems caused by material or manufacturing defects, and will result in the repair of these defects or replacement of the device with a like for like or similar article. Please note that our devices have not been designed for use in commercial, trade or industrial applications. Consequently, the guarantee is invalidated if the equipment is used in commercial, trade or industrial applications or for other equivalent activities.
- The guarantee is valid for a period of 2 year starting from the purchase date of the device. Guarantee claims should be submitted before the end of the guarantee period within two weeks of the defect being noticed. No guarantee claims will be accepted after the end of the guarantee period. The original guarantee period remains applicable to the device even if repairs are carried out or parts are replaced. In such cases, the work performed or parts fitted will not result in an extension of the guarantee period, and no new guarantee will become active for the work performed or parts fitted. This also applies when an on-site Service is used.
- Please keep your sales receipt in a safe place. If the defect is covered by our guarantee your device will either be repaired under the terms of guarantee or we will send you a replacement device. This device may be re-conditioned or Like for like replacement.


- McGregor 18V 25CM LI-ION
- CORDLESS GRASS TRIMMER
- CAUTION Read the instructions before using the machine
- Contents
- Safety Information
- Warning Symbols
- Warning symbols on the battery
- Warning symbols on the charger
- Introduction
- Intended Use
- Safety Warning
- Save all warnings and instructions for future reference.
- Work area safety
- Electrical safety
- Personal safety
- General Power Tool Safety Warnings
- Power tool use and care
- Battery tool use and care
- Safety warnings for battery packs
- Safety warnings for charger
- Service
- Cordless Grass Trimmer Safety Warnings
- ELECTRICALLY POWERED GRASS TRIMMER SAFETY WARNINGS
- IMPORTANT
- READ CAREFULLY BEFORE USE
- KEEP FOR FUTURE REFERENCE
- Training
- Preparation
- Operation
- Additional safety instructions for grass trimmers
- Maintenance and storage
- Vibration and noise reduction
- Emergency
- Residual risks
- Part List
- Parts Description
- Assembly
- Preparing to assemble the grass trimmer
- Checking battery capacity
- WARNING!
- Charging the battery
- Charging procedure
- Important charging notes
- WARING!
- CAUTION!
- Install the guard
- Assemble the front handle
- Remove or install the battery pack
- Checking the trimming line
- Setting the cutting angle
- Telescopic handle
- Trimming
- Plant Guard
- Cutting guide
- Exchange the spool
- Option 1: accessory replacement spool
- Maintenance
- Replace the spool
- Option 2: replacing line
- Clean and storage
- Technical Data
- Noise and vibration
- Noise and vibration data
- Troubleshooting
- Recycling and Disposal
- Getting Help
- Customer Helpline 0345 605 2062
- Dear Customer,
Brand : McGregor
Model : MCT1825
Category : Lawn mower