
MEH1430A - Lawn mower McGregor - Free user manual and instructions
Find the device manual for free MEH1430A McGregor in PDF.


| Product Type | Lawn Mower |
| Brand | McGregor |
| Model | MEH1430A |
| Power Source | Electric (Mains) |
| Motor Power | 1400 W |
| Cutting Width | 38 cm |
| Cutting Height | 25 - 75 mm (5 positions) |
| Grass Box Capacity | 40 L |
| Handle Type | Foldable |
| Weight | 12.5 kg |
| Dimensions (L x W x H) | 65 x 45 x 35 cm |
| Safety Features | Safety switch, blade brake |
| Maintenance | Regular blade sharpening and cleaning |
| Spare Parts Availability | Replacement blades and belts available |
| Repairability | Modular design for easy repair |
| Warranty | 2 years |
Frequently Asked Questions - MEH1430A McGregor
User questions about MEH1430A McGregor
0 question about this device. Answer the ones you know or ask your own.
Ask a new question about this device
Download the instructions for your Lawn mower in PDF format for free! Find your manual MEH1430A - McGregor and take your electronic device back in hand. On this page are published all the documents necessary for the use of your device. MEH1430A by McGregor.
USER MANUAL MEH1430A McGregor
McGregor 170OW
Electric Hover Mower
449O582 (Model: MCEHMI73O)
Version no. Apr 2025
Important - Please read these instructions fully before starting assembly
These instructions contain important information that will help you get the best from your mower, ensuring it is assembled correctly and safely. If you need help or have damaged or missing parts, call the After Sales Support on 0345 605 2063
AFTER SALES SUPPORT
0345 605 2063
Contents
Safety Information....3
Warning Symbols 3
General Power Tool Safety Warnings.... 5
Lawnmower Safety Warnings.... 14
Intended Use 17
In the Box 18
Parts 18
Assembly.... 19
Step 1 - Handle assembly ...... 19
Preparation 21
Step 1 - Connection to the power supply .... 21
Step 2 - Adjusting the cutting height 22
Step 3 - Blade maintenance .... 23
Step 4 - Empty grass collection box 24
Operation 25
Step 1 - Switching ON/OFF 25
Step 2 - Mowing direction ...... 26
Step 3 - Cleaning 26
Maintenance....27
Maintenance 27
Mowing advice....27
Storage 28
Transportation....28
Technical Data 29
Technical Data Table....29
Part List 29
Recycling and disposal 30
Troubleshooting 31
General Troubleshooting 31
Getting Help 32
After Sales Support.... 32
Guarantee 32
Produced in China for Argos Limited. London, EC1M 6HA, UK.
Argos (N.I.) Ltd, Forestside Shopping Centre, Upper Galwally, Belfast, BT8 6FX, UK.
argos.co.uk/help/contact-us

Safety Information
Important - Please read these instructions fully before starting assembly
Warning Symbols
The following warning symbols appear throughout this manual and indicate the appropriate safety measures you should take when assembling and operating the mower.

Take extra care, beware of hazards.

Read the instructions before use.

Wear eye protection.

Wear ear protection.

Do not use the machine in the rain or leave it outdoors when it is raining.

Pay attention that bystanders are not injured by objects thrown out from the machine.

Keep bystanders a safe distance away from the machine.

Disconnect the plug from the power outlet immediately if cable is damaged or cut, or before performing any maintenance work.

Beware of sharp blades. Wait until all moving parts have stopped completely before touching them. The blade may continue to rotate after the machine is switched off, a rotating blade can cause injury.

Warning! Beware of electric shocks.

Keep the mains supply cord away from the cutting blade.

Safety Information
Important - Please read these instructions fully before starting assembly
Warning Symbols (continued)

Noise level specification Lwa in dB.
Protection class II.
CE The product complies with the applicable European directives and an evaluation method of conformity for these directives was followed.
UK The product confirms to relevant UK regulatory CA requirements.

Do not dispose of electrical equipment in domestic waste.

Safety Information
Important - Please read these instructions fully before starting assembly
General power tool safety warnings

WARNING! Read all safety warnings, instructions, illustrations and specifications provided with this power tool. Failure to follow all instructions listed below may result in electric shock, fire and/or serious injury.
Save all warnings and instructions for future reference.
The term “power tool” in the warnings refers to your mains-operated (corded) power tool or battery-operated (cordless) power tool.
1) Work area safety
a) Keep work area clean and well lit. Cluttered or dark areas invite accidents.
b) Do not operate power tools in explosive atmospheres, such as in the presence of flammable liquids, gases or dust. Power tools create sparks which may ignite the dust or fumes.
c) Keep children and bystanders away while operating a power tool. Distractions can cause you to lose control.
d) When the mower is running ensure that no person or pet, particularly children and animals, is in the immediate vicinity of the lawn mower. Ensure that you keep everybody at least 10 meters away from the mower when it is working.
2) Electrical safety
a) Power tool plugs must match the outlet. Never modify the plug in any way. Do not use any adapter plugs with earthed (grounded) power tools.
Unmodified plugs and matching outlets will reduce risk of electric shock.

Safety Information
Important - Please read these instructions fully before starting assembly
General power tool safety warnings (continued)
b) Avoid body contact with earthed or grounded surfaces, such as pipes, radiators, ranges and refrigerators. There is an increased risk of electric shock if your body is earthed or grounded.
c) Do not operate the lawnmower in rain or wet conditions. This may increase the risk of electric shock.
d) Do not abuse the cord. Never use the cord for carrying, pulling or unplugging the power tool. Keep cord away from heat, oil, sharp edges or moving parts. Damaged or entangled cords increase the risk of electric shock.
e) When operating a power tool outdoors, use an extension cord suitable for outdoor use. Use of a cord suitable for outdoor use reduces the risk of electric shock.
f) If operating a power tool in a damp location is unavoidable, use a residual current device (RCD) protected supply. Use of an RCD reduces the risk of electric shock.
3) Personal safety
a) Stay alert, watch what you are doing and use common sense when operating a power tool. Do not use a power tool while you are tired or under the influence of drugs, alcohol or medication. A moment of inattention while operating power tools may result in serious personal injury.
b) Use personal protective equipment. Always wear eye protection. Protective equipment such as a dust mask, non-skid safety shoes, hard hat or hearing protection used for appropriate conditions will reduce personal injuries.
c) Prevent unintentional starting. Ensure the switch is in the off-position before connecting to power source and/or battery pack, picking up or carrying the tool. Carrying power tools with your finger on the switch or energising power tools that have the switch on invites accidents.
d) Remove any adjusting key or wrench before turning the power tool on. A wrench or a key left attached to a rotating part of the power tool may result in personal injury.
e) Do not overreach. Keep proper footing and balance at all times. This enables better control of the power tool in unexpected situations.
f) Dress properly. Do not wear loose clothing or jewellery. Keep your hair and clothing away from moving parts. Loose clothes, jewellery or long hair can be caught in moving parts.
g) If devices are provided for the connection of dust extraction and collection facilities, ensure these are connected and properly used. Use of dust collection can reduce dust-related hazards.
h) Do not let familiarity gained from frequent use of tools allow you to become complacent and ignore tool safety principles. A careless action can cause severe injury within a fraction of a second.

Safety Information
Important - Please read these instructions fully before starting assembly
General power tool safety warnings (continued)
i) Never lift the lawn mower when you start the motor.
j) Before you lift the lawn mower to transport it, switch off the motor, disconnect the mains lead and wait until the blade has come to a complete standstill.
k) Never lift or carry the mower whilst the motor is running.
I) Follow the instructions to fit or remove the blade and wear protective gloves.
m) Never reach towards rotating parts with your hands or feet. Always keep away from the discharge chute.
n) If the lawn mower begins to vibrate abnormally, switch it off immediately, disconnect the plug immediately and check it carefully. Ensure that all the knobs, bolts and screws are tight and that the mower is in a safe condition for use.
o) Never use the mower when you are tired.
p) When you start the motor, the lawn mower should not be tilted unless the grass is particularly long. In this case only tilt it up as far as is really necessary and only raise the side that is furthest away from the user.
q) Before you attach or empty the grass collection box, switch off the motor and wait until the blade has come to a complete standstill.
r) Make sure you keep your feet at a safe distance from the mower blade at all times! Do not stand near the grass ejection chute if the grass collection box is not fitted.
s) The safety distance from the moving blade produced by the push handle must be maintained at all times.
t) If you use the mower on a small incline, mow across the slope (not in an up and down direction). Always be sure of your footing on slopes.
u) Be particularly careful when changing direction with the mower whilst working on a slope.
v) Do not use the lawn mower on gradients of over 15 degree.
w) Ensure that you have safe footing at all times whilst working with the mower.
x) Always wear strong, anti-slip footwear and long trousers when using the mower. Never mow in bare feet or in open-toed sandals.
4) Power tool use and care
a) Do not force the power tool. Use the correct power tool for your application. The correct power tool will do the job better and safer at the rate for which it was designed.
b) Do not use the power tool if the switch does not turn it on and off. Any power tool that cannot be controlled with the switch is dangerous and must be repaired.
c) Disconnect the plug from the power source and/or remove the battery pack, if detachable, from the power tool before making any adjustments, changing accessories, or storing power tools. Such preventive safety measures reduce the risk of starting the power tool accidentally.

Safety Information
Important - Please read these instructions fully before starting assembly
General power tool safety warnings (continued)
d) Store idle power tools out of the reach of children and do not allow persons unfamiliar with the power tool or these instructions to operate the power tool. Power tools are dangerous in the hands of untrained users.
e) Maintain power tools and accessories. Check for misalignment or binding of moving parts, breakage of parts and any other condition that may affect the power tool's operation. If damaged, have the power tool repaired before use.
Many accidents are caused by poorly maintained power tools.
f) Keep cutting tools sharp and clean. Properly maintained cutting tools with sharp cutting edges are less likely to bind and are easier to control.
g) Use the power tool, accessories and tool bits etc. in accordance with these instructions, taking into account the working conditions and the work to be performed. Use of the power tool for operations different from those intended could result in a hazardous situation.
h) Keep handles and grasping surfaces dry, clean and free from oil and grease. Slippery handles and grasping surfaces do not allow for safe handling and control of the tool in unexpected situations.
i) This appliance is not intended for use by persons (including children) with reduced physical, sensory or mental capabilities, or lack of experience and knowledge, unless they have been given supervision or instruction concerning use of the appliance by a person responsible for their safety

Safety Information
Important - Please read these instructions fully before starting assembly
General power tool safety warnings (continued)
Children should be supervised to ensure that they do not play with the appliance.
j) Ensure that all the guards are securely fitted and in good working order.
k) Check the grass collection box at regular intervals for signs of wear and to ensure that it is always in perfect working order.
I) Before each use, inspect the mower to check the cutting blade, fastening bolts and the entire cutting unit for any signs of wear or damage. To prevent imbalance or vibration, worn or damaged cutting blades and fastening bolts must always be replaced in full.
m) The user remains responsible for any injury to third parties within the working area of the lawn mower whilst the lawnmower is being used.
n) Only work in good daylight or appropriate and adequate artificial light.
o) Never run the mower in enclosed or poorly ventilated rooms or if there are inflammable or explosive fluids, vapours or gases nearby.
p) Switch off the mower if it has to be pushed over surfaces other than grass, and when moving the mower to and from the area you wish to mow.
q) Carefully actuate the starter switch in accordance with the instructions.
r) Do not switch the mower on and off frequently over a short period of time, and in particular do not play with the ON/OFF switch.

Safety Information
Important - Please read these instructions fully before starting assembly
General power tool safety warnings (continued)
s) Do not touch the cutting blade until the machine has been disconnected from the mains and the cutting blade has reached a complete standstill.
t) Keep the lawn mower in a dry place which is inaccessible to children at all times.
u) Do not leave the mower out in the rain. The lawn must not be wet or very damp.
v) Be particularly careful when you change the direction of the mower or pull it towards you. Avoid pulling it towards you while the blade is moving.
w) Only push the mower at a normal walking pace.
x) Always use the lawn mower with the grass collection box correctly fitted.
y) Check the site on which you intend to use the lawn mower and remove all objects that may be caught or thrown up by the mower. Foreign bodies must be removed before you start mowing. Keep an eye on the power cable and keep it away from the cutting blade at all times.
z) Ensure that you do not push the mower over areas that might damage or snare the power cable.
5) Operating and maintenance safety

CAUTION! Read all safety requirements and instructions.
Any errors made in following the safety requirements and instruction may result in an electric shock, fire and serious injury. Keep all safety regulations and instructions in a safe place for future use.
a) Do not use the lawnmower if the cords are damaged or worn.
b) Do not connect a damaged cord to the mains supply or touch a damaged cord before it is disconnected from the mains supply. A damaged cord could allow parts to become live and cause a risk of electrocution.
c) Do not attempt to touch the blades before the machine is disconnected from the supply and the blades have come to a complete stop.
d) Keep extension cords away from the blade. The blade can cause damage to cords and lead to contact with live parts.
e) Disconnect from the mains supply (i.e. remove the plug from the mains socket)
- Whenever leaving the machine unattended.
- Before cleaning a blockage.
- After striking a foreign object.
- Whenever the machine starts vibrating abnormally.
6) Service
a) Have your power tool serviced by a qualified repair person using only identical replacement parts. This will ensure that the safety of the power tool is maintained.
b) This tool is manufactured in accordance with the relevant safety regulations. To avoid danger, electrical appliances must only be repaired by qualified technicians. Call our after sales support on 0345 605 2063 for advice.

Safety Information
Important - Please read these instructions fully before starting assembly
Lawnmower safety warnings
a) Do not use the lawnmower in bad weather conditions, especially when there is a risk of lightning. This decreases the risk of being struck by lightning.
b) Thoroughly inspect the area for wildlife where the lawnmower is to be used. Wildlife may be injured by the lawnmower during operation.
c) Thoroughly inspect the area where the lawnmower is to be used and remove all stones, sticks, wires, and other foreign objects. Thrown objects can cause personal injury.
d) Before using the lawnmower, always visually inspect to see that the blade and the blade assembly are not worn or damaged. Worn or damaged parts increase the risk of injury.
e) Before use, check the supply cord and any extension cord for signs of damage or aging. Do not use the lawnmower if the cord is damaged or worn. If the cord is damaged or worn during use, switch off the lawnmower and do not touch the cord before disconnecting it from the supply. A damaged supply cord or extension cord may result in electric shock, fire and/or serious injury.
f) Check the grass catcher frequently for wear or deterioration. A worn or damaged grass catcher may increase the risk of personal injury.
g) Keep guards in place. Guards must be in working order and be properly mounted. A guard that is loose, damaged, or is not functioning correctly may result in personal injury.

Safety Information
Important - Please read these instructions fully before starting assembly
Lawnmower safety warnings (continued)
h) Keep all cooling air inlets clear of debris. Blocked air inlets and debris may result in overheating or risk of fire.
i) While operating the lawnmower, always wear non-slip and protective footwear. Do not operate the lawnmower when barefoot or wearing open sandals. This reduces the chance of injury to the feet from contact with the moving blade.
j) While operating the lawnmower, always wear long trousers. Exposed skin increases the likelihood of injury from thrown objects.
k) Do not operate the lawnmower in wet grass. Walk, never run. This reduces the risk of slipping and falling which may result in personal injury.
I) Do not operate the lawnmower on excessively steep slopes. This reduces the risk of loss of control, slipping and falling which may result in personal injury.
m) When working on slopes, always be sure of your footing, always work across the face of slopes, never up or down and exercise extreme caution when changing direction. This reduces the risk of loss of control, slipping and falling which may result in personal injury.
n) Use extreme caution when reversing or pulling the lawnmower towards you. Always be aware of your surroundings. This reduces the risk of tripping during operation.
o) Keep the supply cord away from the cutting blades. A damaged supply cord may result in electric shock, fire and/or serious injury.
Important - Please read these instructions fully before starting assembly
Lawnmower safety warnings (continued)
p) Switch off and remove plug from mains if the cord is entangled or damaged. Entangled or damaged cords can increase the risk of electric shock.
q) Do not touch blades and other hazardous moving parts while they are still in motion. This reduces the risk of injury from moving parts.
r) When clearing jammed material or cleaning the lawnmower, make sure all power switches are off and the power cord is disconnected. Unexpected operation of the lawnmower may result in serious personal injury.

Note! Only supply power to the equipment through circuit protected by an RCD with a maximum trip current of 30 mA.
- Use only plugs or connectors approved for outdoor usage.
- Extension cables must comply to H07RN-F requirements as described in DIN 57 282/VDE 0282 and must have a minimum cross-section of 1.5 mm2. The plug must have an earth and any connection must also be earthed and splashproof. Before use, check the cables for signs of damage and ageing. Never use the mower if the cables are not in perfect condition (this also applies to the supply cable on the mower). If the cable is damaged whilst the mower is working, disconnect the mains plug from the power supply immediately and then check the extent of the damage.

Safety Information
Important - Please read these instructions fully before starting assembly
Lawnmower safety warnings (continued)
- In areas where the mains supply is weak or bearing a high load, this mower may cause further voltage fluctuations as it starts. In extreme cases, this can cause damage to other equipment working from the same supply. In this case we recommend to temporarily switch off any unneeded equipment or connect it to a different circuit.
Intended Use
This lawnmower is designed for domestic use only:
- This lawnmower is intended for mowing lawns in domestic and hobby gardens.
- This product is not to be used in wet weather conditions and may not be used to mow wet or unusually high grass.
- This product is intended for private domestic use only, not for any commercial trade use. It must not be used for any purposes other than those described. Any use of the machine that deviates from its intended use will invalidate the warranty.
It must not be used for any purposes other than those described. Any use of the machine that deviates from its intended use and is not included in these instructions, is considered unauthorised use and relieves the manufacturer from his or her legal liability. This includes the use of unapproved accessories and replacement parts.
In the Box
Parts
1 Switch box
2 On/Off switch lever
3 Upper handle
4 Wing Knob
5 Lower handle
6 Grass box
7 Safety lock-off button
8 Cable strain relief hook
9 Cable clamp
10 Spanner
11 Grass box lid
12 Deck
13 Screw x2
14 Spacer x3 (one spacer is pre-assembled, two spacers are attached on the spanner)
15 Wheel

Assembly
Step 1 - Handle Assembly
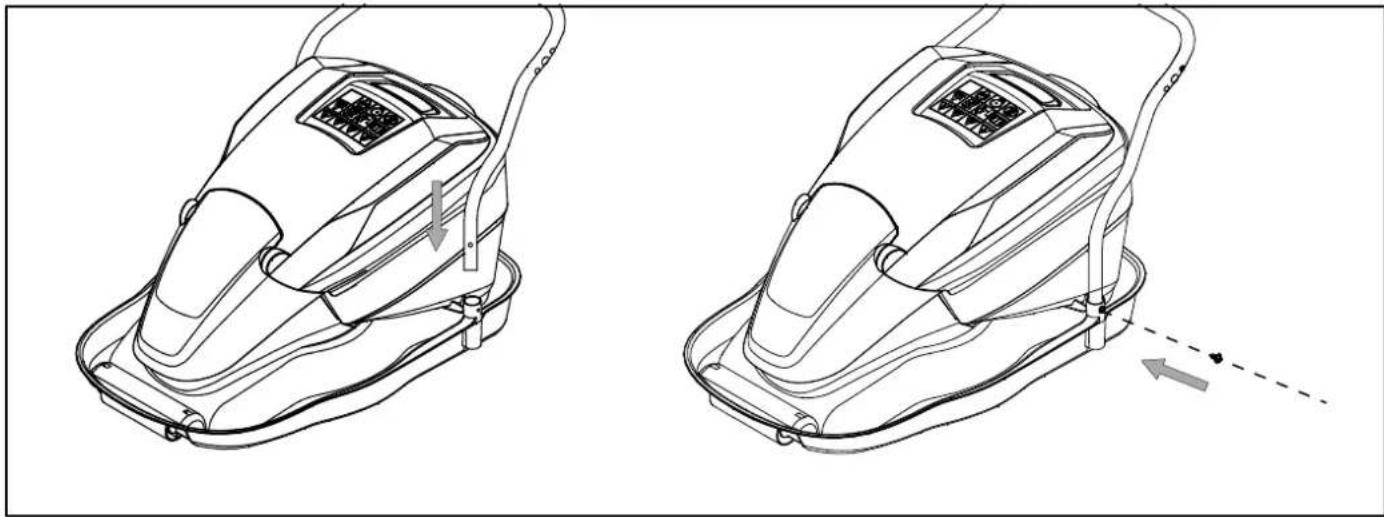
- Insert the lower handle into the slot on the mower deck.
- Fasten in position with the 2 screws provided.
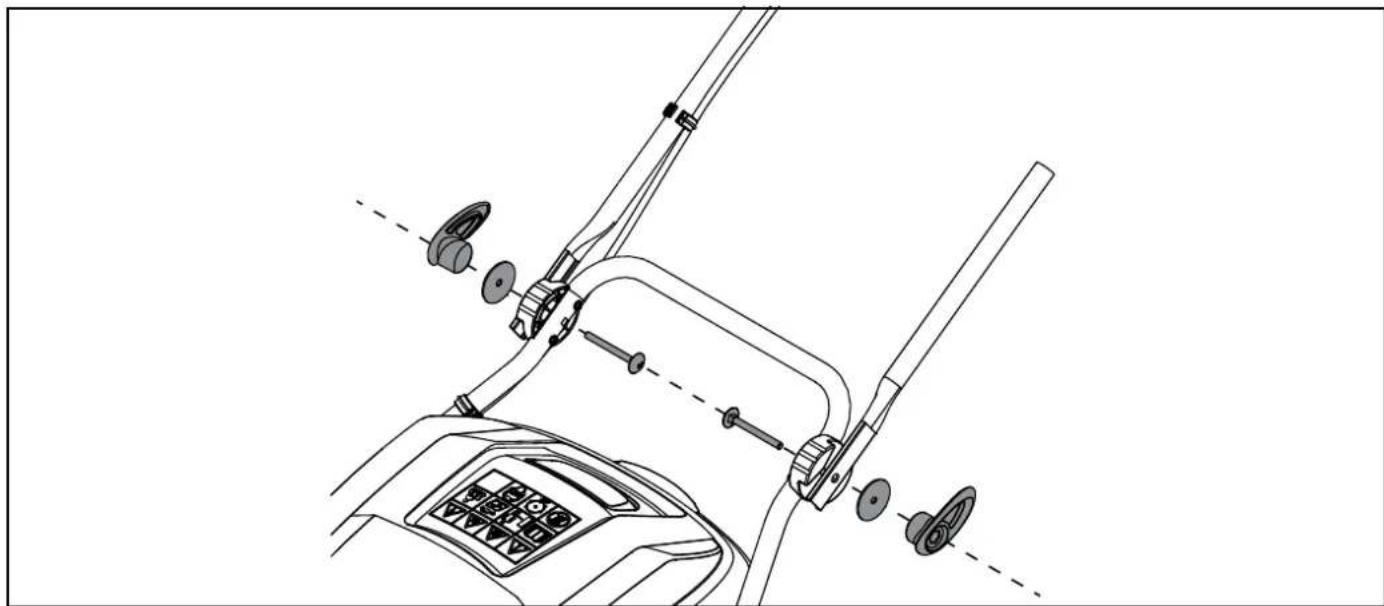
- Attach the upper handle to the lower handle tubes using bolts and wingknobs provided.
- Once fitted correctly the upper handles should still move up and down. This freedom of movement allows the hover mower to float correctly on the uneven surfaces of a lawn. Do not over tighten these wingknobs.
Assembly
Step 1 - Handle Assembly (continued)

- Ensure that the cables clamps are used to fix the cable to the handle.
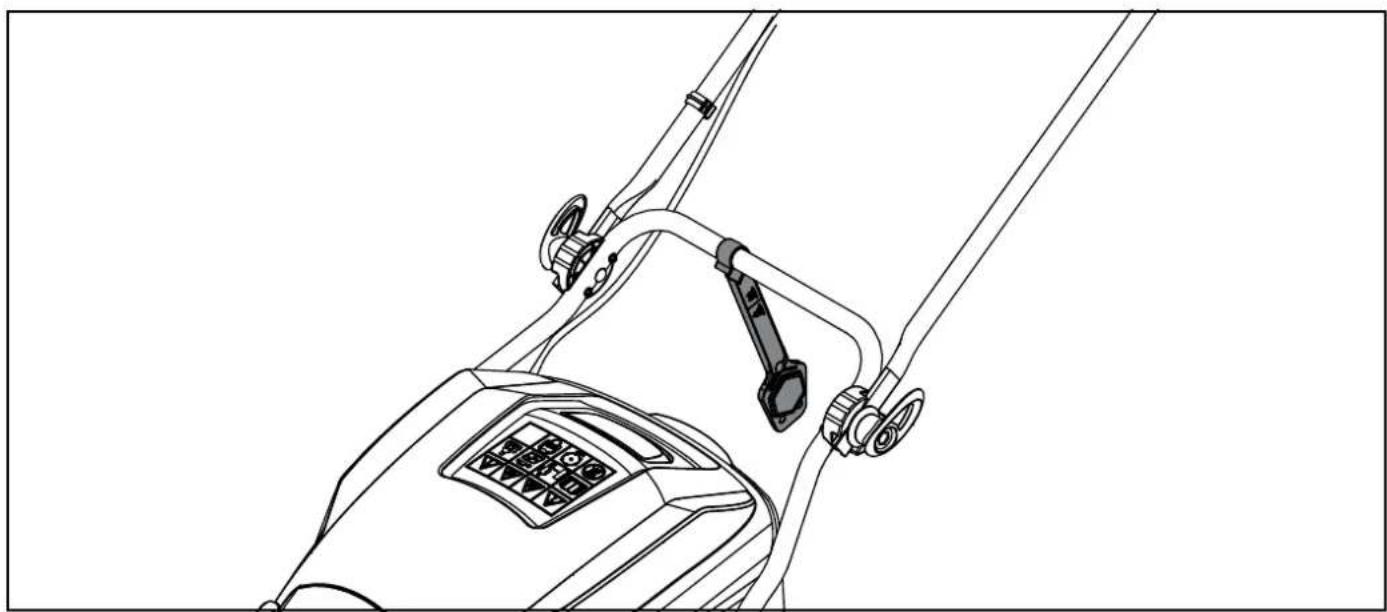
- The adjustment spanner can be easily stored on the lower handle cross bar as illustrated.
Preparation
Step 1 - Connection to the power supply

- Hook the power cable through the cable strain-relief hook on the switch box.
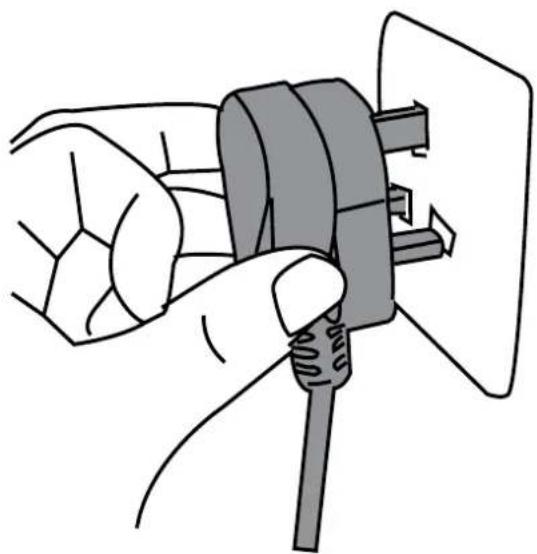
- Connect the plug to the main power outlet.
Preparation
Step 2 - Adjusting the cutting height
1

2

3

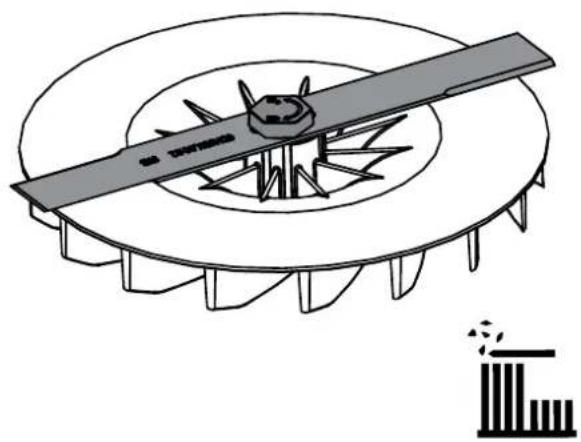

IMPORTANT! Ensure the power cord is disconnected from the mains supply and wait until the cutting head has stopped rotating before adjusting the cutting height.
- The machine comes with one spacer pre-fitted.
- There are 4 different cutting heights. Adding spacers reduces the cutting height, removing spacers increases cutting height
- Disconnect from the main electricity supply and wait until impeller and the blade bolt have stopped rotating.
- Turn your product upside down.
• To remove the blade and adjust the number of spacers, use the spanner provided to remove the blade bolt. The spacers and blade can now be removed, and the number of spacers adjusted. - Spacers that are not being used can be stored on the spanner to prevent loss.
- Refit the blade as described in Blade Maintenance.
When removing a spacer from its storage location on the spanner, gently twist it as you remove it. When you replace a spacer back into the storage location on the spanner, just push it firmly into position and ensure it is secure.
Step 2 - Adjusting the cutting height (continued)
| Cutting position Cutting height | |
| 1 (No spacer) 33mm | |
| 2 (1 spacer, pre-assembled) 26mm | |
| 3 (2 spacers) 19mm | |
| 4 (3 spacers) 12mm |

Step 3 - Blade Maintenance
Always switch the product off, disconnect it from power supply and let the product cool down before performing any inspection, maintenance and cleaning work.
Removing the blade and impeller. Always use protective gloves.
- To remove the blade bolt, hold the blade firmly and with the spanner provided loosen the blade bolt.
- Remove the blade bolt, blade, spacer and impeller.
- Inspect for damage and clean as necessary.
Renew your metal blade after 50 hours mowing or 2 years, whichever is sooner, regardless of condition. If the blade is cracked or damaged replace it with a new one. Never use a blade bolt if the insulated head is damaged, cracked or missing.
Fitting the blade and impeller. Always use protective gloves.
- Ensure the impeller is located correctly.
- Place the required amount of spacers onto the fan ensuring the pegs have located into the holes
- Ensure the pegs have located into the holes on the blade and that the blade is positioned correctly.
- Place the blade bolt through the centre hole of the blade.
- Tighten down clockwise by hand.
- Hold the blade firmly and tighten the blade bolt with the spanner provided.
Preparation
Step 4 - Empty grass collection box


IMPORTANT! Ensure the power cord is disconnected from the mains supply and wait until the cutting head has stopped rotating before emptying the grass collection box
- Lift the grass box lid.
- Lift the grass box out of the mower deck and empty contents.
- Failure to fit the grass box and lid correctly will cause poor collection of grass clippings.
Do not remove grass cuttings in the hover mower casing or on the cutter by hand. Instead use suitable tools such as a soft brush. To ensure excellent hover performance and powerful grass collection, regularly brush clean the vents under the grass box which allow air into the hover fan (impeller). The grass box should be cleaned after use. This will ensure the air is able to flow freely through it.
Only fit the grass box when the motor is switched off and the blade is not moving. Lift open the grass box lid and position the grass box correctly. Ensure it fits snug against the body of the mower and that the lid closes completely on to the grass box before starting. It is important the grass box is fitted correctly to vacuum the grass clippings.
Operation
Step 1 - Switching ON/OFF
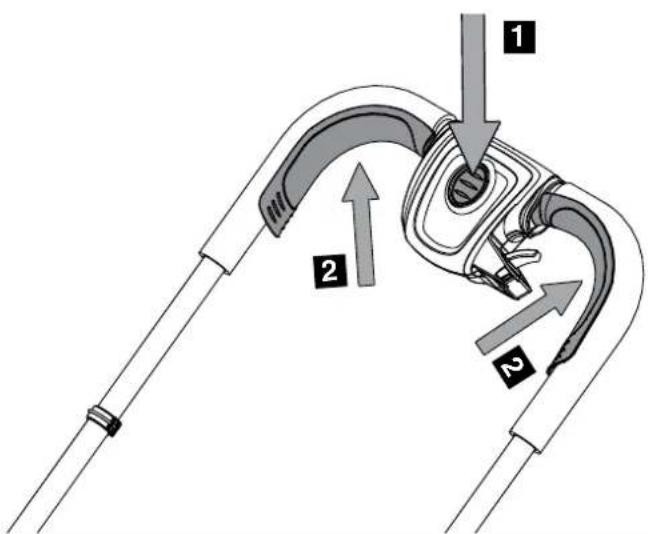
- Press and hold the safety lock-off button (1).
- Pull either switch lever (2) towards the handle and hold in position during operation.

• To turn off, release the switch lever (2).
Operation
Step 2 - Mowing direction
![graph TD A["Car"] --> B{Traffic Flow} B --> C["Tree"] C --> D["Downward Arrow"] D --> E["Upward Arrow"] E --> F["Downward Arrow"] F --> G["Upward Arrow"] G --> H["Downward Arrow"]](/content/2026/05/873113/images/032a363771543db538d8e4b1f342facc39459067fbba9f60c00778fba72d0c01.jpg)
- To avoid cutting the mains cable, it is advised to mow away from the plug socket following the arrows and avoid twisting the power cord.
- Verify that the lawn is free of stones, sticks, wires, and other objects that could damage the hover mower.
- When cutting thick grass, reduce walking speed in order to maintain a high blade speed for a more effective cut and better hover lift.
- Never cut off more than half of the total length of the grass for a healthy lawn. If it is roughly 6cm long, the grass should not be shorter than 3cm once mowed.
- Do not cut wet grass because it tends to stick to the underbody of the hover mower, preventing the proper discharge of grass clippings.
Step 3 - Cleaning
- Keep all safety devices, air vents and the motor housing free of dirt and dust. Wipe the equipment with a soft brush or blow it with compressed air at low pressure after usage.
- Clean the mower regularly with a clean, dry cloth. Do not use cleaning agents or solvents; these may damage plastic components.
- Ensure that no water can seep into the device.
NOTE:
Wear suitable personal protective equipment (PPE), such as a dust mask, when using the machine.
Maintenance
Maintenance

WARNING!
Always switch the product off, disconnect it from the power supply and let the product cool down before performing inspection, maintenance and cleaning work!
- Keep the underbody and cutting blade clean and free of debris. Remove clippings from the discharge chute.
- Check all nuts and bolts periodically for tightness before operation. After prolonged use, especially in sandy soil conditions, the cutting blade will become worn and lose some of its original shape. The cutting efficiency will be reduced and the cutting blade should be replaced.
- Lubricate the cutting blade after each use to prolong the life span of the cutting blade and product. Apply light machine oil along the edge of the cutting blade.
Mowing advice
We recommend that you mow in overlapping lines. Only mow with a sharp blade so that the blades of grass do not fray. This can cause grass to turn yellow. To achieve a good cut, guide the mower in lines that are as straight as possible. These lines should always overlap by a few centimeters so that you do not leave any uncut strips.
How often you need to mow your lawn depends on how fast the grass is growing. During the main growth period, mow more frequently. If the grass is longer than usual, cut it in 2 or more stages. This will cause less stress to both the machine and the grass. Never cut the grass by more than half its height.
Keep the under side of the lawnmower casing clean and remove all grass deposits from it. Regularly check to ensure there are no deposits blocking airflow or stopping rotation of the front wheel. Deposits make it more difficult to start the mower and also adversely affect the mowing quality and grass collection. Switch off the motor before you carry out any inspections of the blade. Remember that the blade will continue to turn for a few seconds after the motor has been switched off. Never attempt to stop the blade.
Check regularly that the blade is correctly secured, in good condition and sharp. If not, sharpen or replace the blade.
If the moving blade strikes an object, stop the mower and wait until the blade has come to a complete standstill. Then check the condition of the blade and the blade mounting. If they are damaged, they must be replaced.
Place the mains lead in loops on the ground near the wall socket. Mow away from the socket and cable and ensure that the mains lead is always on the section of lawn that you have already mowed so that you do not run over the mains lead with the machine.
Maintenance
Storage

- Switch the product off and disconnect from the power supply.
- Clean the product as described above.
- To reduce storage space, the upper handle can be folded down, unscrew the wing nuts by approximately 6 revolutions.
Transportation
- Switch the product off and disconnect from power supply.
- Protect the product from any heavy impact or strong vibrations which may occur during transportation in vehicles.
- Secure the product to prevent it from slipping or falling over.
Technical Data Table
| Model MCEHM1730 | |
| Voltage 220-240V~50Hz | |
| Power input 1700W | |
| No load speed 4300/min | |
| Cutting width 30cm | |
| Cutting height adjustment 12 mm, 19 mm, 26 mm, 33 mm, 4 levels | |
| Volume of grass box 20litres | |
| Wheel size 38mm | |
| Measured sound pressure level LpA | 65.83 dB(A) |
| Measured sound power level LWA | 85.83 dB(A) K=0.73 dB(A) |
| Guaranteed sound power level LWA | 96 dB(A) |
| Vibration at the handlebars ahv ≤ 2.5m/s2 | |
| Insulation class II | [68Y] |
| Degree of protection against water | IPX4 |
| Cable length 10m | |
| Net weight | 8.1kg |
The sound values have been determined according to noise test code given in EN 60335-2-77, using the basic standards EN ISO 11201 and EN ISO 3744. The sound intensity level for the operator may exceed 80 dB(A) and ear protection measures are necessary.
The declared vibration value has been measured in accordance with a standard test method (according to EN 60335-2-77) and may be used for comparing one product with another. The declared vibration value may also be used in a preliminary assessment of exposure.

WARNING! Depending on the actual use of the product the vibration values can differ from the declared total! Adopt proper measures to protect yourself against vibration exposures! Take the whole work process including times the product is running under no load or switched off into consideration!
Proper measures include, among others, regular maintenance and care of the product and cutting attachments, keeping hands warm, periodical breaks and proper planning of work processes!
Part List
| Part number | Accessories |
| 111231103 | Blade |
| 111231108 | Wing knobs |
| 111019106 | Blade Spacer |
Technical Data
Recycling and disposal

Recycle unwanted materials instead of disposing of them as waste. All tools, hoses and packaging should be sorted, taken to the local recycling centre and disposed of in an environmentally safe way.
Recycle rather than dispose of unwanted material in landfill whenever possible. The machine must be delivered in rigid packaging to avoid damage during transportation. The packaging and the machine itself are manufactured from recyclable materials and should be disposed of accordingly.
Only dispose of electrical/battery iteams in separate collection schemes, which cater for the recovery and recycling of materials contained within. Your cooperation is vital to ensure the success of these schemes and for the protection of the environment.
Recycle packaging where facilities exist.
When this symbol is marked on a product or battery, it means that it should not be disposed of with your general household waste. Some chemicals contained within electrical/electronic products or batteries can be harmful to health.

WARNING! Only perform the steps described within these instructions! All further inspection, maintenance and repair work must be performed by a qualified specialist.
Gloves and appropriate protective clothing must be worn when performing these instructions. Always turn off the machine and remove the plug before making any adjustment.
The following table provides solutions to common problems encountered with the mower.
| Fault Possible Cause Solution | ||
| Lawnmower does not start No | power at mains socket. Check the fuse, switch, socket, cable, wire and have any repairs carried out by a qualified electrician. | |
| Defective on/off switch. Repair by a qualified technician required. | ||
| Motor starts and stops immediately | Airflow to the impeller is blocked by grass. | Disconnect from mains. and clean the deck and the impeller. |
| Poor collection Cut grass length | too long. Raise the cutting height. | |
| Grassbox fitted incorrectly. Fit the grassbox correctly. | ||
| Mowing in side to side movements. | The mower collects at the rear as users walk forward in straight lines. | |
| Excessive vibration Blade damaged. | Replace blade. | |
| Blade fitted incorrectly. Fit the blade correctly. | ||
| Impeller Damaged. Replace Impeller. | ||
| Mower motor runs but blade does not rotate | Belt damaged Contact After Sales Support | |
Getting Help
After Sales Support
Our dedicated UK based customer helpline can assist you with assembly, parts queries and technical support.
Our experts are here to get you back enjoying your garden in no time.
Calling our service does not affect your statutory rights.
After sales helpline number: 0345 605 2063
Guarantee
Dear Customer,
In the unlikely event that your device develops a fault, please contact our Customer helpline on the telephone number shown below.
- These guarantee terms cover additional guarantee rights and do not affect your statutory warranty rights. Claims must be accompanied by Proof of Purchase. This must be in the form of a Sales receipt or Bank statement and must show that the product has been purchased within 2 years prior to the claim, from the retailer that it was originally sold to.
- Our guarantee covers problems caused by material or manufacturing defects. Please note that our devices have not been designed for use in commercial, trade or industrial applications. Consequently, the guarantee is invalidated if the equipment is used in commercial, trade or industrial applications or for other equivalent activities.
- The following are also excluded from our guarantee :
A. Faults due to accidents, customer misuse or unauthorized repairs.
B. Failure due to lack of routine maintenance.
C. Failure as a result of not using the equipment in accordance with the manual and safety instructions.
D. Accidental damage or wear to any cables, the drive belt, the impeller or the blade.
-
The guarantee is valid for a period of 2 years starting from the purchase date of the device. Guarantee claims should be submitted before the end of the guarantee period within two weeks of the defect being noticed. No guarantee claims will be accepted after the end of the guarantee period. The original guarantee period remains applicable to the device even if repairs are carried out or parts are replaced. In such cases, the work performed or parts fitted will not result in an extension of the guarantee period, and no new guarantee will become active for the work performed or parts fitted. This also applies when an on-site Service is used.
-
Please keep your sales receipt in a safe place.


- CONTENTS
- SAFETY INFORMATION....3
- IN THE BOX 18
- ASSEMBLY.... 19
- PREPARATION 21
- OPERATION 25
- MAINTENANCE....27
- TECHNICAL DATA 29
- TROUBLESHOOTING 31
- GETTING HELP 32
- SAFETY INFORMATION
- IMPORTANT - PLEASE READ THESE INSTRUCTIONS FULLY BEFORE STARTING ASSEMBLY
- WARNING SYMBOLS
- GENERAL POWER TOOL SAFETY WARNINGS (CONTINUED)
- LAWNMOWER SAFETY WARNINGS
- LAWNMOWER SAFETY WARNINGS (CONTINUED)
- INTENDED USE
- IN THE BOX
- PARTS
- ASSEMBLY
- STEP 1 - HANDLE ASSEMBLY
- PREPARATION
- STEP 1 - CONNECTION TO THE POWER SUPPLY
- STEP 2 - ADJUSTING THE CUTTING HEIGHT
- STEP 3 - BLADE MAINTENANCE
- STEP 4 - EMPTY GRASS COLLECTION BOX
- OPERATION
- STEP 1 - SWITCHING ON/OFF
- STEP 2 - MOWING DIRECTION
- STEP 3 - CLEANING
- NOTE
- MAINTENANCE
- WARNING
- MOWING ADVICE
- STORAGE
- TRANSPORTATION
- TECHNICAL DATA TABLE
- TECHNICAL DATA
- RECYCLING AND DISPOSAL
- GETTING HELP
- AFTER SALES SUPPORT
- GUARANTEE
Brand : McGregor
Model : MEH1430A
Category : Lawn mower