
MET3525 - Lawn mower McGregor - Free user manual and instructions
Find the device manual for free MET3525 McGregor in PDF.


| Product Type | Electric Grass Trimmer |
| Brand | McGregor |
| Model | MET3525 (MCEGT3525) |
| Rated Voltage | 220-240 V ~ 50 Hz |
| Rated Power | 350 W |
| Motor Speed | 10000/min |
| Cutting Width | 25 cm |
| Cutting Line Diameter | 1.6 mm |
| Line Feed Type | Automatic |
| Line Length (per spool) | 4.3 m each (2 lines) |
| Power Cable Length | 8 m |
| Net Weight | 2.6 kg |
| Sound Pressure Level (LpA) | 80.9 dB(A), K=3 dB(A) |
| Sound Power Level (LWA) (measured) | 91.1 dB(A), K=2.11 dB(A) |
| Guaranteed Sound Power Level | 96 dB(A) |
| Vibration Level (rear handle) | 3.191 m/s², K=1.5 m/s² |
| Insulation Class | II (Double insulated) |
| Adjustable Shaft | Telescopic, 0-221 mm extension |
| Handle Adjustment | Front handle rotatable and lockable |
| Operating Modes | Trimming, In-line edging, Vertical edging, Reach mode |
| Safety Features | Safety guard with line cutter, plant guard, switch lock-off button |
| Spool Part Number | 121091102 |
| Intended Use | Domestic lawn trimming only |
Frequently Asked Questions - MET3525 McGregor
User questions about MET3525 McGregor
0 question about this device. Answer the ones you know or ask your own.
Ask a new question about this device
Download the instructions for your Lawn mower in PDF format for free! Find your manual MET3525 - McGregor and take your electronic device back in hand. On this page are published all the documents necessary for the use of your device. MET3525 by McGregor.
USER MANUAL MET3525 McGregor
natural_image
Green handheld medical or laboratory device with articulated arms and a long handle, labeled 'McGregor 35' at bottom (no other text or symbols visible)McGregor 35OW
Grass Trimmer
4499882 (Model: MCEGT3525)
Version no. Apr 2025
Important - Please read these instructions fully before starting assembly
These instructions contain important information that will help you get the best from your trimmer, ensuring it is assembled correctly and safely. If you need help or have damaged or missing parts, call the After Sales Support on 0345 605 2063
AFTER SALES SUPPORT
0345 605 2063
Contents
Safety Information.... 3
Warning Symbols 3
Personal Safety 5
Operational Safety....7
Maintenance and Storage Safety 8
Intended Use 9
In the Box 10
Parts 10
Assembly....11
Unpacking....11
Fitting the safety guard....11
Plant guard 12
Adjusting the front handle....12
Preparation 13
Front handle 13
Adjusting the telescopic shaft 13
Adjusting to trimming and edging modes.... 14
Connection to the power supply 16
Operation 17
Switching on/off 17
Safety guard 17
Advancing the cutting line.... 18
Trimming....19
WARNING! 20
Tips 20
Edging 21
Maintenance....22
Replacing the spool 22
Winding the line 23
Storage 23
Transportation....24
After use 24
Recycling and disposal 24
Technical Data 25
Technical Data Table 25
Part List 25
Troubleshooting 26
General Troubleshooting 26
Getting Help 27
After Sales Support 27
Guarantee....27
Produced in China for Argos Limited. London, EC1M 6HA, UK.
Argos (N.I.) Ltd, Forestside Shopping Centre, Upper Galwally, Belfast, BT8 6FX, UK.
argos.co.uk/help/contact-us

Safety Information
Important - Please read these instructions fully before starting assembly
Warnings Symbols
The following warning symbols appear throughout this instruction manual and indicate the appropriate safety measures you should take when assembling and operating the trimmer.

Read operator's manual.

Wear eye protection.

Wear hearing protection.

Do not expose to rain.

Keep bystanders away.

Disconnect the mains plug if the cord becomes damaged or entangled.

Noise level specification Lwa in dB.
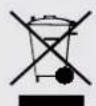
Do not dispose of electrical equipment in domestic waste.

Protection class II (Double insulation).

The product complies with the applicable European directives and an evaluation method of conformity for these directives was followed.

The product conforms to relevant UK regulatory requirements.

IMPORTANT! When using this equipment, the following safety precautions must be followed to avoid injuries and damage.
- Read all operating instructions carefully and comply with them. It is important to understand these instructions and to acquaint yourself with the machine, its correct usage and all safety requirements.
- Keep this manual in a safe place so that the information is available at all times.
- If you give the equipment to any other person, give them these operating instructions as well.
- We accept no liability for damage or accidents which result from non-compliance with these instructions.
Work Area
- Only work in good daylight or appropriate and adequate artificial light.
- Do not operate machine in explosive atmospheres, such as in the presence of flammable liquids, gases, or dust. Power tools create sparks which may ignite the dust or fumes.
- Keep children and bystanders away while operating the trimmer. Distractions can cause you to lose control.
- Stay alert, watch what you are doing and use common sense when operating a trimmer. Do not use a grass trimmer while you are tired or under the influence of drugs, alcohol, or medication. A moment of inattention while operating the appliance may result in serious personal injury.
Important - Please read these instructions fully before starting assembly
Personal Safety
- Use protective safety equipment where appropriate. Always wear eye and hearing protection. The use of non-slip safety shoes will reduce personal injuries.
- Avoid accidental starting. Ensure the switch is in the off-position before plugging in. Carrying tools with your finger on the switch invites accidents.
- Ensure you always have proper footing and balance. This will provide better control of the machine in unexpected situations.
- Do not wear loose clothing or jewellery. They can be caught in moving parts. Use of safety gloves and substantial footwear is recommended when working outdoors.
- Do not use the machine for applications that are beyond its capacity. Use the correct machine for your application. The correct appliance will do the job better and more safely at the rate for which it was designed.
- Do not use the machine if the switch does not turn it ON and OFF. Any tool that cannot be controlled with the switch are dangerous and must be repaired.
- Disconnect the plug from the power source before making any adjustments, changing accessories, or storing tools. Such preventive safety measures reduce the risk of starting the trimmer accidentally.
-
Store the machine out of the reach of children. Do not allow people unfamiliar with the trimmer or these instructions to operate the machine.
-
Always maintain the grass trimmer in good working order. Check for misalignment or binding of moving parts, breakage of parts, or other conditions that would affect its operation. If damaged, have the machine repaired before use.
- Keep cutting tools sharp and clean. Properly maintained cutting attachments with sharp cutting edges are less likely to bind and are easier to control.
- Only use the tool, accessories, and attachments as described in these instructions. Using the tool for operations it is not intended for could cause damage to the tool and hazardous situations. Always consider the working conditions and the work to be performed.
• We recommend that only parts and accessories made for this machine by the manufacturer are used. Failure to do so can result in personal injury. - When starting up and when the machine is in operation, keep the cutting section away from all parts of the operators body, especially the hands and feet.
- This appliance can be used by children aged from 8 years and above and persons with reduced physical, sensory or mental capabilities or lack of experience and knowledge if they have been given supervision or instruction concerning use of the appliance in a safe way and understand the hazards involved.
- Children shall not play with the appliance. Cleaning and user maintenance shall not be made by children without supervision.

Safety Information
Important - Please read these instructions fully before starting assembly
Operational Safety
- The user remains responsible for any injury to third parties within the working area whilst the trimmer is being used.
- Do not expose the appliance to rain. Do not use the appliance in damp or wet conditions.
- Be sure that the appliance is switched off before connecting it to the mains supply.
- Stay alert at all times. Watch carefully what you are doing. Use common sense.
- Do not operate the appliance when you are tired.
- If the appliance begins to vibrate abnormally, switch it off and remove the plug from the socket. Allow rotating parts to stop and inspect the appliance for damage and loose parts.
- Never pull the cord to disconnect the plug from the socket. Keep the cord away from heat, oil and sharp edges.
- If the mains cable becomes damaged during use, switch the appliance off and disconnect the plug from the mains immediately. Do not touch the mains cable before disconnecting from the power outlet.
- Remember that the operator maybe held responsible for the accidents or hazards occurring to other people or their property.
Important - Please read these instructions fully before starting assembly
Maintenance And Storage Safety
- Switch off, remove the plug from the power outlet and ensure that all moving parts have stopped completely before leaving the appliance unattended and before changing, cleaning or inspecting any parts.
- When not in use, the appliance should be stored in a safe, dry place. Children should not have access to stored appliances.
- Before each use, inspect the trimmer for damaged or defective parts. Check for misalignment and seizure of moving or broken parts, damage to guards and switches or any other conditions that may affect its operation.
- Do not use the appliance if any part is damaged or defective. Do not use the appliance if the switch does not turn it on and off.
- Never use the appliance when any guard or housing elements are damaged or not in place.
- Ensure that the appliance will operate properly and perform its intended function.
- Damaged parts on the trimmer must be replaced by a qualified person.
- Before use, check the mains cable for signs of damage, ageing or wear.
- Do not use the appliance if the mains cable is damaged or defective.
- If the mains cable is damaged or defective it must immediately be repaired by a qualified person to avoid any further hazard.
- Never attempt to remove or replace any parts other than those specified in this manual.

Safety Information
Important - Please read these instructions fully before starting assembly
Recommendation
The machine should be supplied via a residual current device (RCD) with a tripping current of not more than 30 mA.
Intended use
This grass trimmer is designed for domestic use only:
- This trimmer is intended for trimming lawn grass in domestic gardens.
- This product is not to be used in wet weather conditions and may not be used to trim wet or unusually high grass.
- This product is intended for private domestic use only, and not for any commercial trade use.
It must not be used for any purposes other than those described. Any use of the machine that deviates from its intended use and is not included in these instructions is considered unauthorized use and relieves the manufacturer from his or her legal liability.
In the Box
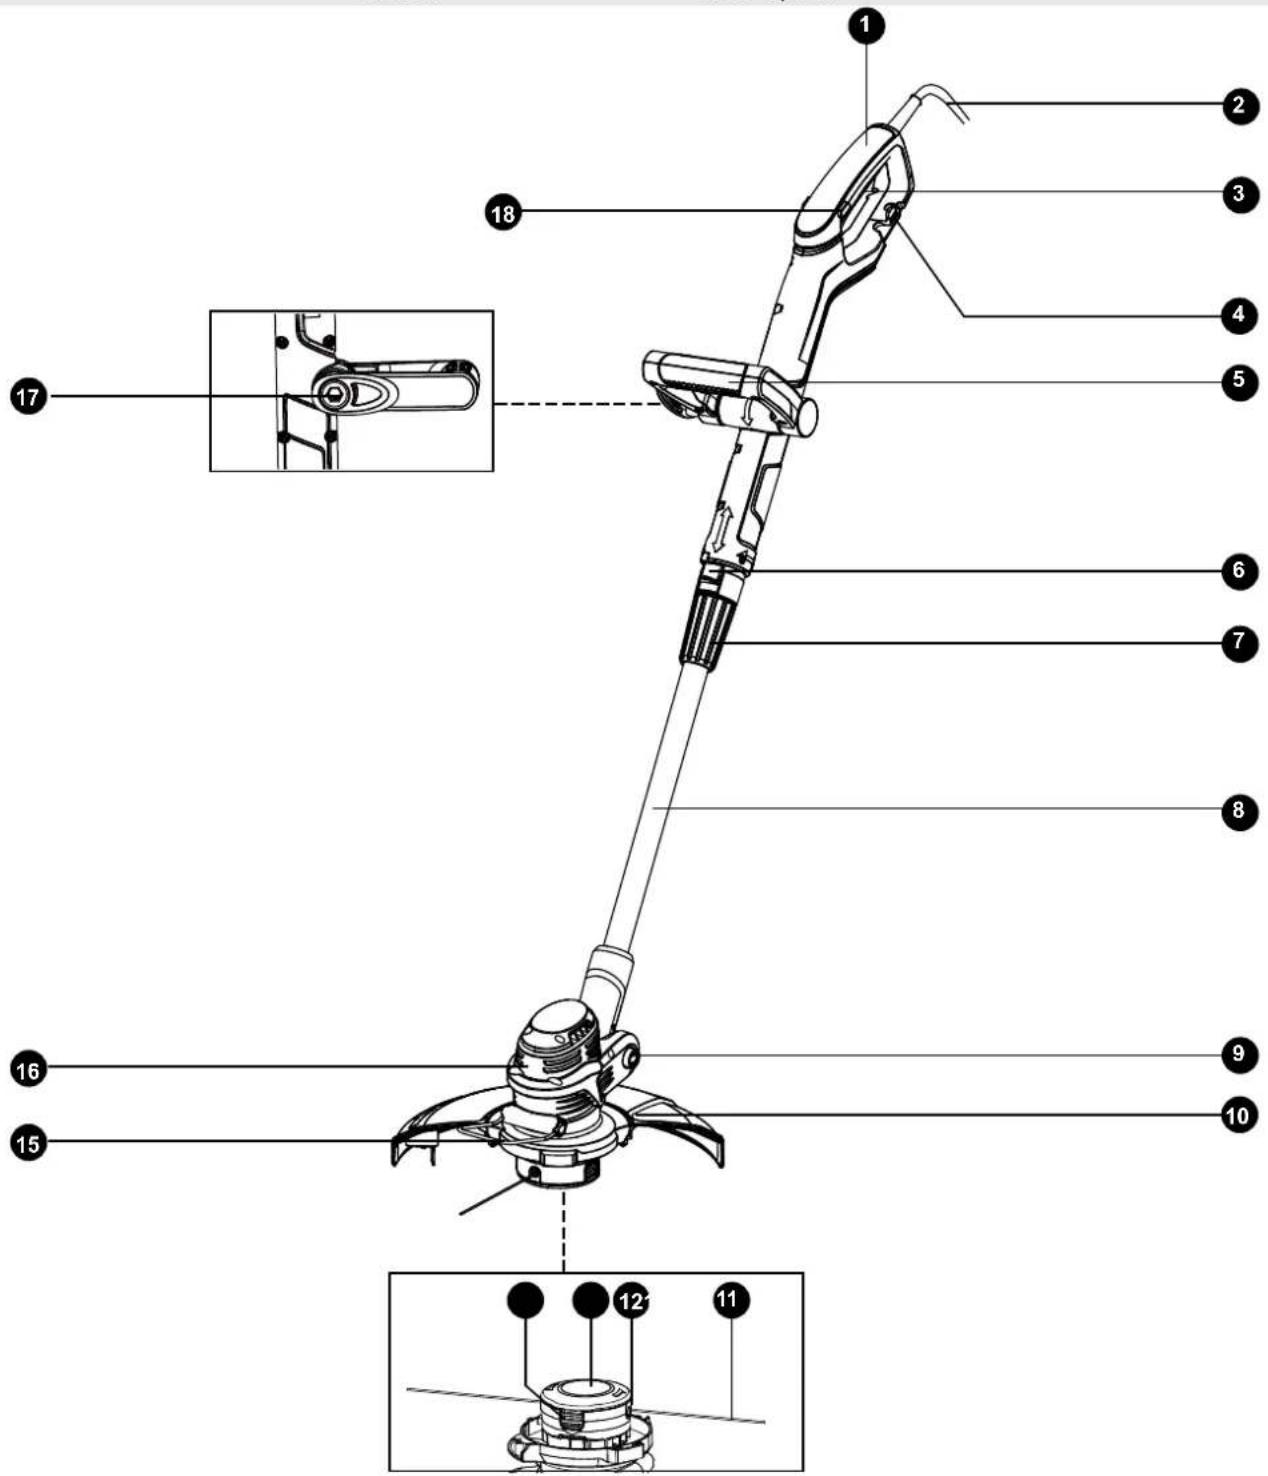
Parts
1 Main Handle
2 Mains Cable
3 ON/OFF Switch
4 Cable Strain Relief Hook
5 Front Handle
6 Main Handle Rotary Button
7 Telescopic Shaft Locking Collar
8 Telescopic Shaft
9 Head Adjustment Button
10 Safety Guard with Line Cutting Blade
11 Cutting Line
12 Line Release Button
13 Trimmer Head with Line Spool
14 Locking Tabs
15 Plant Guard
16 Motor Housing
17 Locking Knob
18 Switch Lock-off Button
Assembly
Unpacking
- Unpack all parts and lay them on a flat, stable surface.
- Remove all packing materials.
- Make sure the delivery contents are complete and free of any damage. If you find that parts are missing or show damage do not use the product but contact after sales support. Using an incomplete or damaged product represents a hazard to people and property.
- Ensure that you have all the accessories and tools needed for assembly and operation. This also includes suitable personal protective equipment.

WARNING! The product must be fully assembled before operation. Do not use a product that is only partly assembled or assembled with damaged parts. Follow the assembly instructions step-by-step and the pictures provided as a visual guide to easily assemble the product. Do not connect the product to power supply before it is completely assembled.
NOTE: Take care of small parts that are removed during assembly or when making adjustments. Keep them secure to avoid loss.
Fitting the safety guard
- Align the safety guard with the trimming head as shown.
- Secure the guard with the mounting screws (pre-installed on the safety guard) and tighten with a Phillips screwdriver (not supplied) safely.

natural_image
Technical line drawing of a mechanical fan assembly before and after assembly (no text or symbols)
WARNING! Never use the grass trimmer unless the safety guard is properly fitted.

WARNING! The line cutting blade on the safety guard is sharp. When fitting the guard avoid contact with the blade. Failure to avoid contact can result in serious personal injury.
Assembly
Plant guard
- Set the plant guard in the working position.
- If the plant guard is no longer required, it can be pushed up again (park position).
1

natural_image
Technical line drawing of a mechanical device with a rotating arrow indicating rotation (no text or symbols)2

natural_image
Technical line drawing of a mechanical power tool with no visible text or symbolsAdjusting the front handle
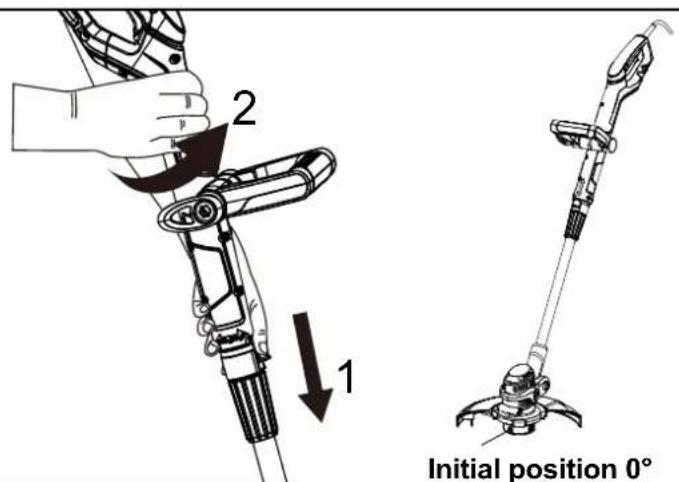
NOTE: The main handle is set in 90° position by default. When use this grass trimmer for first time, adjust the main handle to 0° position:
- Push down the main handle rotary button and hold it in position.
- Turn the main handle section to adjust to 0^ marking.
- Loosen the locking knob anti-clockwise.
- Adjust the front handle to required position.
- Tighten the knob clockwise to fix the front handle.
1
2

natural_image
Mechanical device diagram showing a lever mechanism with rotating arrows and lock components (no text or symbols)
WARNING! Never use the grass trimmer without the front handle properly adjusted.
Preparation
Front handle

natural_image
Mechanical linkage diagram showing a curved arm joint with rotational motion arrows (no text or symbols)The front handle can be set to various positions. Set the handle in such a manner that the trimmer head is slightly tilting forwards when in the working position.
- Loosen the locking knob.
- Move the front handle to desired position.
- Tighten the locking knob clockwise to fix the front handle.
Adjusting the telescopic shaft
1

2
natural_image
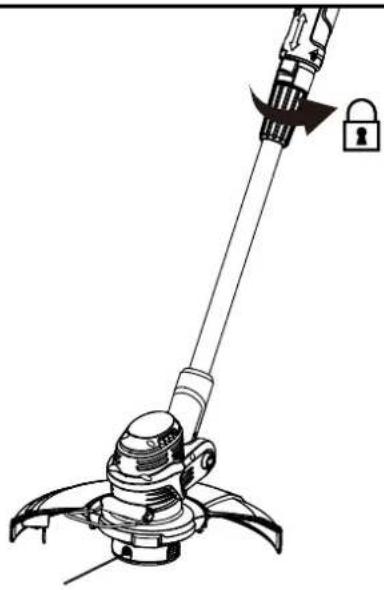
Diagram of a manual tool with a lock and lever mechanism (no text or symbols)Adjust the length of the telescopic shaft to suit your height.
- Loosen the locking collar in a clockwise direction.
- Pull the telescopic shaft to the desired length.
- Tighten the locking collar in an anti-clockwise direction.
Preparation
Adjusting to trimming and edging modes
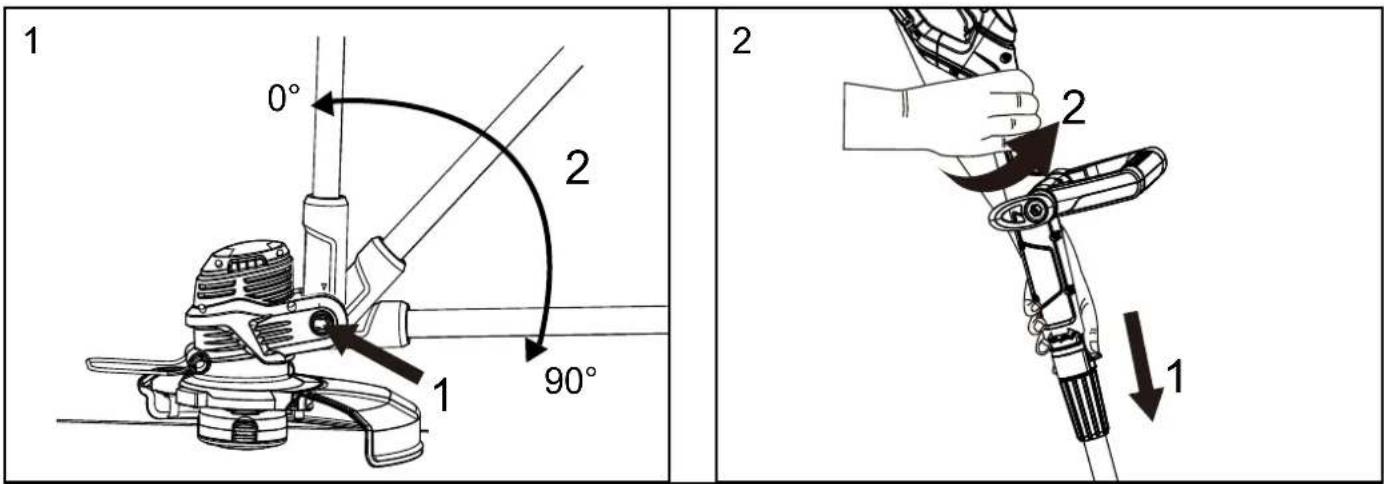
The trimmer head angle is adjusted by pressing the head adjustment button and moving the trimmer head to the desired angle. There are 7 snap-in positions between 0° and 90°. See figure 1.
The trimmer head position is changed by pressing down the main handle rotary button and twisting the main handle section to 0^ , 90^ or 180^ . See figure 2.
Setup for grass trimming:
- Adjust the shaft length and set the trimmer head to an angle suitable for the height of the user.
- Push down the main handle rotary button and hold it in position.
- Turn the main handle section to adjust to 0^ marking.

Preparation
Adjusting to trimming and edging modes (continued)
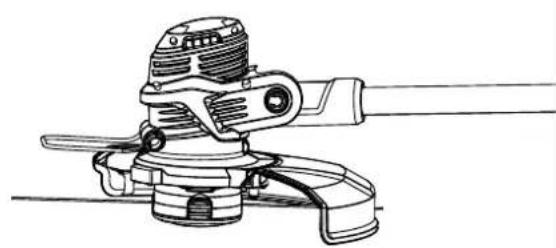
Set up for in-line edging:
- Push the button in the trimmer head and set the angle to 90^ .
- Push down the main handle rotary button and hold it in position.
- Turn the main handle section to adjust to 90^ marking.
1
natural_image
Technical line drawing of a mechanical tool or device with no visible text or symbols2

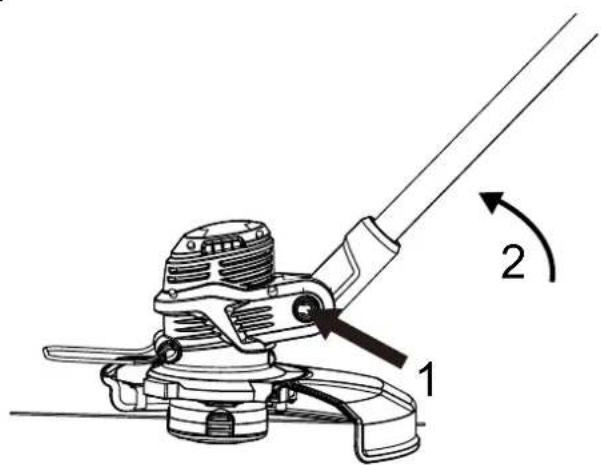
Set up for vertical edging:
- Push the button in the trimmer head and set the angle to 45^ .
- Push down the main handle rotary button and hold it in position.
- Turn the main handle section to adjust to 180^ marking.
1
2

natural_image
Line drawing of a person using a handheld tool to lift a motor (no text or symbols)Vertical edging 180°

WARNING!
Always ensure that the main handle rotary button snaps into place! Only adjust to indicated angles. Never adjust to any other intermediate position!
Preparation
Adjusting to trimming and edging modes (continued)
Set Up for Reach Mode:
- Push the button in the trimmer head and set the angle to 90^
- Use the trimmer in this horizontal position to reach under obstacles such as furniture and trampolines.

natural_image
Line drawing of a mechanical tool or device with no visible text, numbers, or symbols
natural_image
Line drawing of a mechanical tool with a base and lever assembly (no text or symbols)Connection to the power supply

natural_image
Technical line drawing of a mechanical device with articulated joints and a handle (no text or symbols)
natural_image
Line drawing of a hand holding a tool with a screw and mechanical component (no text or symbols)- Make sure the ON/OFF switch is in its off position
- Hook the mains cable through the cable strain relief hook.
- Connect the plug to the power outlet.
Operation
Switching on/off

WARNING!
To operate the grass trimmer, wear suitable clothing, eye and ear protection.
Prior to every use, check that the grass trimmer is operative. Do not block the ON/OFF switch or the switch lock-off button. The switch and the button must reliably turn off the motor when you release the switch.

NOTE: Maintain a firm stance and hold the grass trimmer well with both hands and away from your body. Before turning on, check that it will not touch any objects.
- Press the switch lock-off button on either side and hold it in position. Press the ON/OFF switch to operate. Once started release the switch lock-off button.
- To switch off, release the ON/OFF switch.

WARNING!
After turning off the grass trimmer, the trimmer head will continue to rotate for some time. Allow the trimmer head to come to a complete standstill. Keep hands and feet well away. Risk of injury!
Safety guard

WARNING!
The line cutting blade on the safety guard is delivered with a protective covering. Ensure this is removed before first use. Beware of sharp edges.
The device is fitted with a safety guard to protect the operator against thrown objects during operation. Ensure this is always fitted.
Operation
Advancing the cutting line
This grass trimmer features a line auto-feed system that ensures the cutting lines are automatically lengthened by operating the ON/OFF switch.
Switch on to reach full speed and then switch off, wait until the trimmer head has completely stopped and then switch on again. By doing this, the spool rotates and more line is released.
Repeat operating the ON/OFF switch until the line reaches the blade on the guard.
NOTE: If the trimmer does not come to a complete stop, the line may not extend. Switching on and off frequently may result in over-consumption of line.

WARNING!
The excess line that is cut off may hit the user or other objects. Keep hands and feet well away.
When no line end is visible:
Check if there is still line remaining on the spool and follow the instructions below to adjust the line length manually. If the spool is empty, replace the line spool (see Replacing the Spool instructions in the Maintenance section).
Adjusting the line length manually:
Switch off and unplug the trimmer. Press the line release button, pull the end of the cutting line out and release line release button. Avoid releasing very long length of the cutting line.

natural_image
Technical line drawing of a mechanical device with no visible text or symbolsOperation
Trimming
1
natural_image
Line drawing of a person using a tool to clean or sweep a surface, with a 30° angle indicator (no text or symbols on the diagram itself)
- Ensure the protective covering is removed from the line cutting blade protection before use. Ensure you wear gloves when removing this covering.
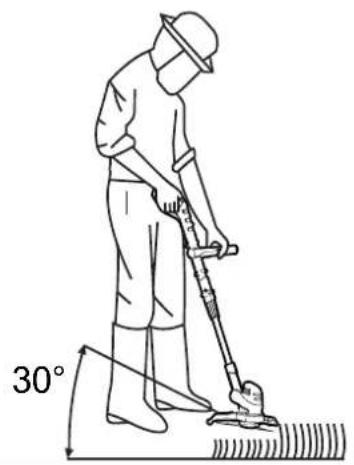
- Adjust the trimmer head into the correct position for the trimming operation and make sure the handle is rotated to the 0^ position.
- Hold the grass trimmer firmly, keeping your balance with feet slightly apart.
- Hold the trimmer head just above the ground at an angle of approximately 30^ . Avoid pressing it against the ground as this can cause damage to the lawn and product.
- Move the product slowly from side to side in a swinging motion.
- Ensure the trimmer head remains clean and free from debris that may cause it to jam.
NOTE: Let the trimmer head do the work. Let it work at its own pace, never press it into the area to be cut.
Operation
WARNING!
1
natural_image
Diagram of a mechanical device with intersecting diagonal lines, no text or symbols present2

natural_image
Technical line drawing of a mechanical tool or brush (no text or symbols present)• Always fit the guard before using the product.
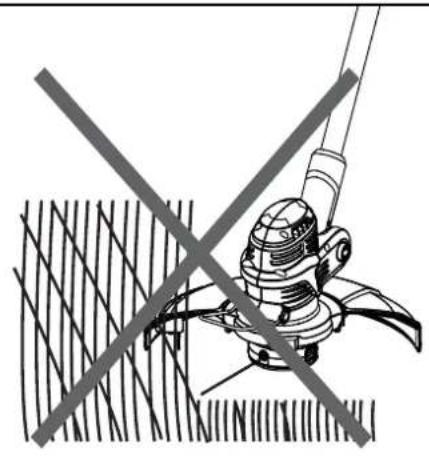
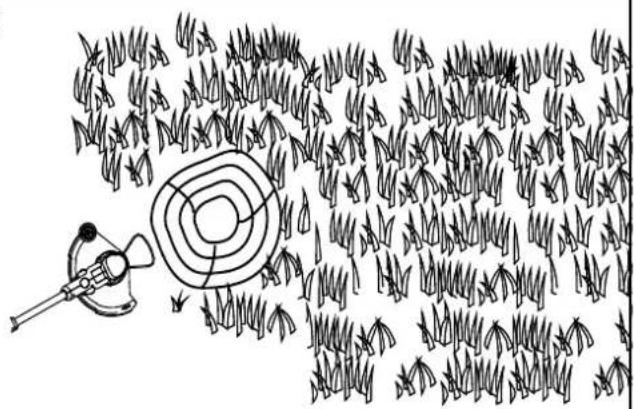
- When cutting longer or high grass, cut this down in 2 to 3 stages.
- DO NOT cut long grass in one cut, as this will damage your grass trimmer, and make your warranty invalid.
Tips
1
natural_image
Illustration of a spray gun spraying over a field with grass (no text or symbols)
natural_image
Illustration of a grassy field with roses and a small manual tool in use, no text or symbols present3

natural_image
Diagram of a mechanical tool interacting with grassy terrain, showing no text or symbolsOperation
Tips (continued)
- For best results, do not cut wet grass because it tends to stick to the trimmer head and guard, prevents proper discharge of grass trimmings, and could cause you to slip and fall.
- Do not allow the spool cover to drag on the ground or other surfaces.
- Pay special attention when performing the work close to trees and bushes. The cutting line could damage sensitive bark, and damage fence posts.
- Regularly remove clippings and dirt from around the spool and guard. Ensure the product is switched off.
- Do not move the product too fast as this will result in ineffective cutting and possible damage.
- Carefully manoeuvre the product around objects, such as trees and bushes, ensuring it does not come into contact with them. Use the plant guard to ensure that the cutting line does not come into contact with sensitive plants.
- Use the plant guard to avoid bringing the cutting line into contact with hard objects such as walls and curbs which will excessively wear the line.
- Wait until the product has come to a complete stop before placing it down.
NOTE: The cutting line will wear faster if the cutting is done along pathways or other abrasive surfaces or for tackling heavier weeds.
Edging
- Set the trimmer head position to either in-line or vertical edging mode as shown in section Adjusting To Trimming and Edging Modes.
- Align the trimmer safety guard with the edge of the lawn.
- Follow the lawn edge slowly and carefully to avoid scalping the edge.
NOTE:
Wear suitable personal protective equipment (PPE), such as a dust mask, when using the machine.
Maintenance
Replacing the spool
1

natural_image
Technical line drawing of a mechanical assembly with no visible text or symbols2
natural_image
Technical diagram of a mechanical assembly with a downward arrow indicating motion (no text or symbols present)NOTE: Before replacing the spool, make sure the mains plug is disconnected from the unit.
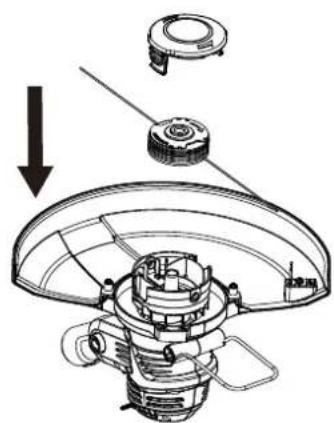
- Turn over the trimmer so that the trimming head is facing upwards.
- Press together both locking tabs on the spool cover and remove the cover.
- Remove the old spool from the spool housing.
- Clean out any dirt or grass residue.
- Put the new spool with the smooth side facing upward in the spool housing, thread the lines into the guide holes. Ensure that the line ends do not slip out of the spool slots. Ensure the line is not held in the side groove on the spool before replacing the spool cover
- Replace the spool cover. Ensure that the locking tabs of the spool cover are accurately inserted in the corresponding recesses of the trimmer head. Ensure you hear them 'click' in place.
- Keep the line release button pressed and pull out the line end far enough so that it protrudes over the line cutting blade.
Maintenance
Winding the line
1

natural_image
Simple line drawing of a mechanical or electrical component with three horizontal plates and a curved wire (no text or symbols)2

natural_image
Diagram of a mechanical component with a rotating arrow indicating rotation (no text or symbols present)NOTE: Self-winding is not recommended. If the line is not wound properly it can cause the trimmer feed system to malfunction. For this reason, users are strongly urged to purchase the pre-wound spool.
Should you wish to wind the line yourself, the instructions are provided below:
- Cut 2 cutting lines with the same length for winding, approximately 4.3 ~m long for each. Use only 1.6 ~mm diameter monofilament line.
- Insert the cutting lines into each of the two anchor holes. One anchor hole is in the inside upper section of the spool as shown, and the other is in the lower section of the spool.
- Wind the lines following the directional arrow on the spool housing and hook the two ends into the side grooves. Make sure to wind the line on neatly and in layers. Do not criss-cross.
Storage
- Clean the grass trimmer prior to storage.
- Store the product and its accessories in a dry, frost-free place.
• Always store the product in a place that is inaccessible to children. The ideal storage temperature is between 10^ C and 30^ C.
• After each use, check the trimmer thoroughly for any damage. Clean the safety guard and cutting line with a soft, dry brush. - Do not stand the trimmer on its safety guard. Suspend it by its upper handle in such a manner that the safety guard does not come into contact with other objects. This is because the safety guard could become deformed, thereby changing its dimensions and its safety properties.
Maintenance
Transportation
- Switch the product off and disconnect the plug before transporting it anywhere.
- Protect the product against scratching and secure it to avoid damage from impact.
After use
- Switch the product off, disconnect the power and let it cool down.
- Check, clean and store the product as described above.
Recycling and disposal
- The product comes in a package that protects it against damage during shipping. Keep the packaging until you are sure that all parts have been delivered and the product is functioning properly. Recycle the packaging afterwards.
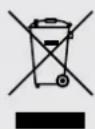
- Old products are potentially recyclable and do not, therefore, belong in your household rubbish. You are requested to assist us and our contribution to saving resources and protecting the environment by handing in this product at an equipped collection centre (if there is one available).
Technical Data Table
| Model MCEGT3525 | |
| Rated voltage 220-240V~ 50Hz | |
| Rated power 350W | |
| Motor speed | 10000/min |
| Cutting width 25cm | |
| Cutting line dia. 1.6mm | |
| Cable length 8m | |
| Line feed type Automatic | |
| Line length 4.3m*2 | |
| Measured sound pressure level (LpA) 80.9 dB(A), K=3dB(A) | |
| Measured sound power level (LWA) | 91.1dB(A), K=2.11dB(A) |
| Guaranteed sound power level (LWA) | 96dB(A) |
| Vibration at the rear handle (an) | 3,191m/s2 (rear handle), K=1,5m/s2 |
| Net weight | 2.6kg |
| Insulation class | II/ ☑ |
Part List
| PART NUMBER ACCESSORIES | |
| 121091102 Spool |
Measured sound pressure level L_pA : 80.9dB(A), K=3dB(A)
Measured sound power level L_WA : 91.1dB(A), K=2.11dB(A)
Guaranteed sound power level L_WA : 96dB(A)
The sound values have been determined according to noise test code given in EN50636-2-91, using the basic standards EN ISO 11201 and EN ISO 3744.
The sound intensity level for the operator may exceed 80dB(A) and ear protection measures are necessary.
The declared vibration value has been measured in accordance with a standard test method (according to EN 50636-2-91) and may be used for comparing one product with another. The declared vibration value may also be used in a preliminary assessment of exposure.

WARNING! Depending on the actual use of the product the vibration values can differ from the declared total! Adopt proper measures to protect yourself against vibration exposures! Take the whole work process including times the product is running under no load or switched off into consideration!
Proper measures include, among others, regular maintenance and care of the product and cutting attachments, keeping hands warm, periodical breaks and proper planning of work processes!
Troubleshooting
Suspected malfunctions are often due to causes that the user can fix themselves.
Therefore, check the product using this section. In most cases the problem can be solved quickly.
WARNING!
Only perform the steps described within these instructions! All further inspection, maintenance and repair work must be performed by a qualified specialist if you cannot solve the problem yourself!
Gloves and appropriate protective clothing must be worn when performing these operations. When inspecting the machine always unplug the machine from the power outlet.
Problem Possible Cause Solution
| Trimmer does not start. Not connected to power supply. | Connect to power supply. | |
| Power cord or plug is defective. | Check by a qualified person or contact the after sales helpline. | |
| Other electrical defect to the product. | Check by a qualified person or contact the after sales helpline. | |
| Trimmer does not reach full power. | Power source (e.g., generator) has too low voltage. | Connect to another power source. |
| Air vents are blocked. Clean the air vents. | ||
| Unsatisfactory cutting performance. | Cutting line spool worn or empty. | Replace cutting line spool or rewind new nylon cutting line on to spool. |
Getting Help
After Sales Support
Our dedicated UK based customer helpline is open to assist you with assembly, parts queries and technical support. We are open during office hours. Our experts are here to get you back enjoying your garden in no time. Calling our service does not affect your statutory rights.
After sales helpline number: 0345 605 2063
Guarantee
Dear Customer,
In the unlikely event that your device develops a fault, please contact our Customer service department on the telephone number shown below.
- These guarantee terms cover additional guarantee rights and do not affect your statutory warranty rights. Claims must be accompanied by Proof of Purchase. This must be in the form of a Sales receipt or Bank statement and must show that the product has been purchased within 2 years prior to the claim, from the retailer that it was originally sold to.
- Our guarantee covers problems caused by material or manufacturing defects. Please note that our devices have not been designed for use in commercial, trade or industrial applications. Consequently, the guarantee is invalidated if the equipment is used in commercial, trade or industrial applications or for other equivalent activities.
- The following are also excluded from our guarantee :
A. Faults due to accidents, customer misuse or unauthorized repairs
B. Failure due to lack of routine maintenance.
C. Failure as a result of not using the equipment in accordance with the manual and safety instructions.
D. Accidental damage or wear to cables or blade.
-
The guarantee is valid for a period of 2 years starting from the purchase date of the device. Guarantee claims should be submitted before the end of the guarantee period within two weeks of the defect being noticed. No guarantee claims will be accepted after the end of the guarantee period. The original guarantee period remains applicable to the device even if repairs are carried out or parts are replaced. In such cases, the work performed or parts fitted will not result in an extension of the guarantee period, and no new guarantee will become active for the work performed or parts fitted.
-
Please keep your sales receipt in a safe place.


- Contents
- Safety Information.... 3
- In the Box 10
- Assembly....11
- Preparation 13
- Operation 17
- Maintenance....22
- Technical Data 25
- Troubleshooting 26
- Getting Help 27
- Safety Information
- Work Area
- Important - Please read these instructions fully before starting assembly
- Personal Safety
- Operational Safety
- Maintenance And Storage Safety
- Recommendation
- Intended use
- In the Box
- Parts
- Assembly
- Unpacking
- Fitting the safety guard
- Plant guard
- Adjusting the front handle
- Preparation
- Front handle
- Adjusting the telescopic shaft
- Adjusting to trimming and edging modes
- Setup for grass trimming:
- Adjusting to trimming and edging modes (continued)
- Set up for in-line edging:
- Set up for vertical edging:
- WARNING!
- Set Up for Reach Mode:
- Connection to the power supply
- Operation
- Switching on/off
- Safety guard
- Advancing the cutting line
- When no line end is visible:
- Adjusting the line length manually:
- Trimming
- Tips
- Tips (continued)
- Edging
- NOTE:
- Maintenance
- Replacing the spool
- Winding the line
- Storage
- Transportation
- After use
- Recycling and disposal
- Technical Data Table
- Part List
- Troubleshooting
- Getting Help
- After Sales Support
- Guarantee
- Dear Customer,
Brand : McGregor
Model : MET3525
Category : Lawn mower