PKWK43 - Water dispenser Nutrichef - Free user manual and instructions
Find the device manual for free PKWK43 Nutrichef in PDF.


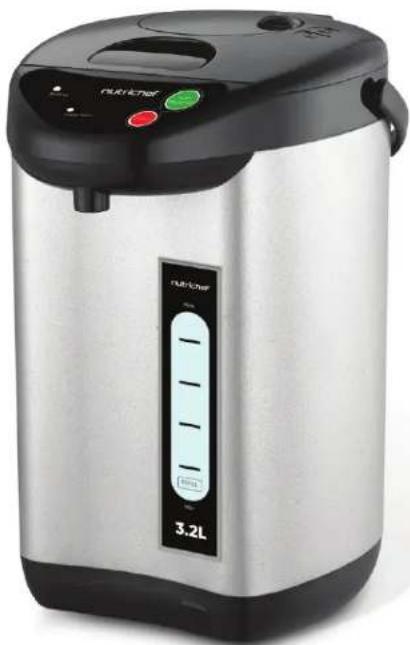
| Product Type | Hot Water Dispenser / Electric Kettle |
| Brand | Nutrichef |
| Model | PKWK43 |
| Power | 730 Watts |
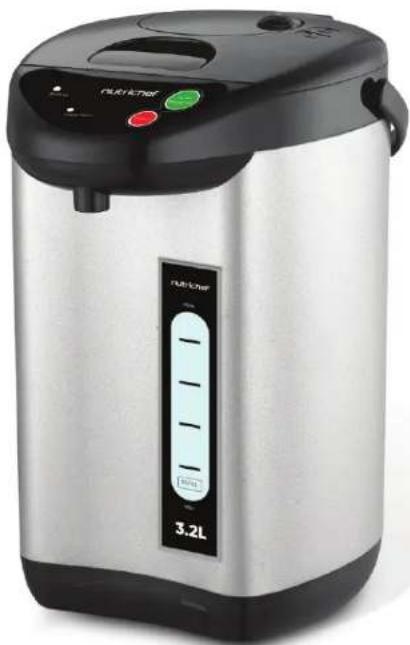
| Capacity | 3.38 quarts (3.2 liters) |
| Voltage | 120 V |
| Dimensions (L x W x H) | 27.44 x 20.1 x 37.34 cm |
| Cord Length | 1.49 m (4.9 feet) |
| Exterior Material | Polypropylene (PP) |
| Interior Material | Food-grade stainless steel |
| Main Functions | Rapid boiling, keep warm, dispensing by button and cup switch |
| Safety | Automatic shut-off after boiling, child safety lid lock, overheat protection (shuts off if tank empty) |
| Indicator Lights | LED for boiling and keep warm |
| Insulation | Vacuum insulation for prolonged heat retention |
| Cleaning and Maintenance | Wipe with a damp cloth; descaling with lemon (boil for 1 hour) |
| Package Contents | Water dispenser, power cord |
| Repairability | Spare parts not listed; contact customer service |
| General Information | Indoor domestic use; do not immerse; do not use outdoors |
Frequently Asked Questions - PKWK43 Nutrichef
User questions about PKWK43 Nutrichef
0 question about this device. Answer the ones you know or ask your own.
Ask a new question about this device
Download the instructions for your Water dispenser in PDF format for free! Find your manual PKWK43 - Nutrichef and take your electronic device back in hand. On this page are published all the documents necessary for the use of your device. PKWK43 by Nutrichef.
USER MANUAL PKWK43 Nutrichef
Questions or Comments?
We are here to help!
Phone: 1.718.535.1800
nutrichefkitchen.com/ContactUs
nutrichef™
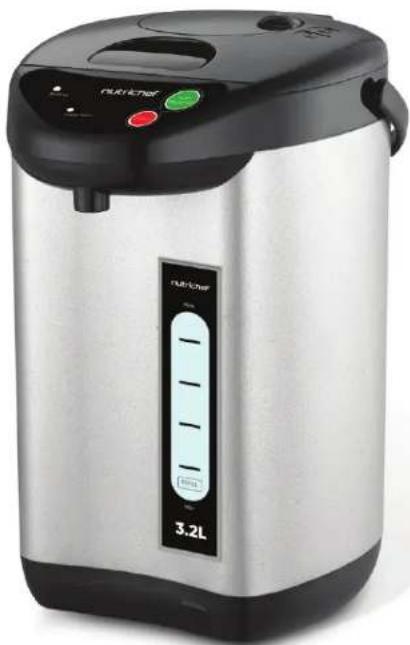
natural_image
Exterior view of a stainless steel water heater with control panel and digital display (no visible text or symbols)

PKWK43 - PKWK43.5
Electric Water Boiler & Warmer
USER GUIDE
About NutriChef
A mission born out of need
NutriChef was created on the principle that healthy home cooking should be attainable to all, regardless of skill level and economic status. Starting in 2014, we noticed the disconnect in our lives and in the lives of those around us. We were so busy, always rushing forward, and our health and personal lives suffered. We needed to find some way to slow down and put our health first, all without sacrificing convenience or taste. Could we somehow create healthier versions of our favorite foods, easily in our own kitchens? The answer was a resounding yes, and NutriChef was born.
We create products that make life a little easier and a little healthier
Our brand was created out of a desire to provide an alternative to fast food convenience and reintroduce people to home cooking. A healthy home-cooked meal is what brings families and friends together. We believe strongly in the value of simple pleasures. An evening spent cooking and sharing a meal of wholesome, nourishing foods is a memory in the making.
We believe a moment shared is priceless
Today, we have built upon our original mission and now in addition offer products that make the art of entertaining a simpler one. Entertaining and hosting family and friends are one of the great joys of life. Why waste a moment stuck in the kitchen? We offer products that free you up to socialize, while never sacrificing quality or taste.
natural_image
Simple line drawings of kitchen utensils: a frying pan, a rolling pin, and a door (no text or symbols)
natural_image
Line drawings of three kitchen utensils: a thermos, a cooking pot, and a cooking pot (no text or symbols)
natural_image
Simple line drawings of kitchen utensils including a plate, fork, knife, and knife (no text or symbols)
natural_image
Line drawings of three cooking pots: a lid, a pot with lid, and a mug (no text or symbols)TABLE OF CONTENTS
FEATURES AND TECHNICAL SPECS 4
SAFETY 5
TO KNOW YOUR THERMO POT 6
USING THE THERMO POT FOR THE FIRST TIME 7
OPERATING THE APPLIANCE 7
CLEANING AND MAINTENANCE 9
HAZARDS 10
IMPORTANT GUIDELINES 10
DIRECTION TO DISPOSE OF THE PRODUCT 10
REGISTER PRODUCT 11
Initial Use Odor Warning
Your new appliance may produce a burnt plastic-like smell during initial use due to protective coatings. This odor is temporary and will vanish after a few uses. Use in well-ventilated areas.
IMPORTANT SAFETY INSTRUCTIONS READ CAREFULLY AND KEEP FOR FUTURE REFERENCE
California Prop 65 Warning
WARNING:
This product can expose you to chemicals, which is known to the state of California to cause cancer birth defects and other reproductive harm. Do not ingest.
For more info go to: www.P65warnings.ca.gov
Features:
• Electric Water Boiler & Warmer
• Hot Pot Kettle with Quick Heating
• Simple Electric Plug-in Design
- Button-Activated Boil & Dispense Functions
• Food Grade Stainless Steel Inner Pot
• Easy-to-Clean & Easy-to-Refill
• Vacuum Insulation Keeps Water Warm, Longer
• LED Indicator Lights
• Simple Children Safety Lock-On Lid
• Compact Kitchen Counter Top Design
What's In The Box:
• Electric Water Boiler
• Power Cord
Technical Specs:
• Heating Element Power: 730 Watt
• Kettle Capacity: 3.38 Quart
• Construction Material: PP
• Power Cord Length: 4.9' ft.
• Power: 120V
- Dimensions (L x W x H):
10.8" x 7.9" x 14.7"-inches / 27.44 x 20.1 x 37.34 - centimeter
SAFETY
Read this PKWK43 - PKWK43.5 instruction manual carefully before operating the appliance and keep it for future reference.
- Never immerse the appliance in water or any other liquids, nor rinse it under the tap.
- Check if the voltage indicated on the appliance corresponds to the local mains voltage before you connect the appliance.
- Do not use the appliance if the plug, the power cord, or the appliance itself is damaged.
- If the power cord is damaged, it must be replaced by the manufacturer or its service agent or similarly qualified persons to avoid hazards.
- Keep the power cord out of reach of children. Do not let the power cord hang over the edge of the table or worktop on which the appliance stands.
- Wait until the appliance has cooled down before cleaning, removing, or replacing the lid.
- Take extreme care when removing the appliance if it contains hot water.
- This appliance is not intended to be used by persons (including children) with reduced physical, sensory, or mental capabilities, or lack of experience and knowledge unless they have been given supervision or instruction concerning the use of the appliance by a person responsible for their safety.
- Children should be supervised to ensure that they do not play with the appliance.
- Always use the appliance on a flat, stable, and heat-resistant surface to prevent the power cord from coming into contact with hot surfaces.
- Unplug the appliance before cleaning and when problems occur during dispensing.
- Never overfill water into the water tank as it may cause splashing. Refer to the "full" water level mark in the water tank.
- Keep hands or any part of your body away from the water outlet for a second or two right after you press the dispense button as hot water emitted from the water outlet may splash.
- This appliance is for boiling water only.
- This appliance is for domestic use only.
- Do not use the appliance outdoors.
- Warning: Never open the lid when water is boiling!
TO KNOW YOUR THERMO POT
Main Parts Diagram
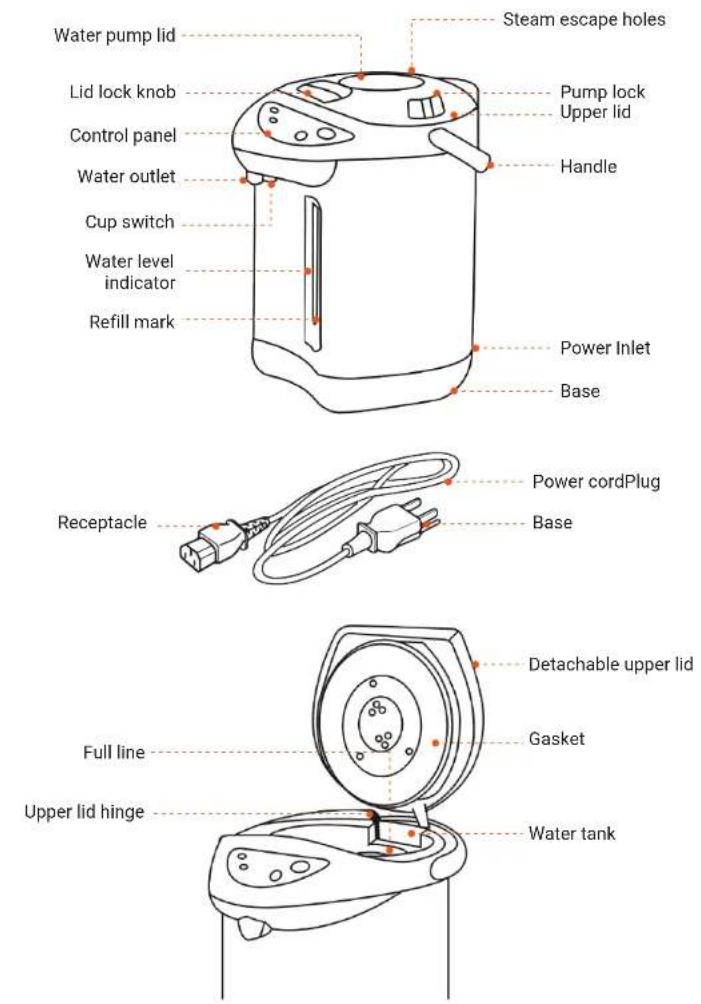
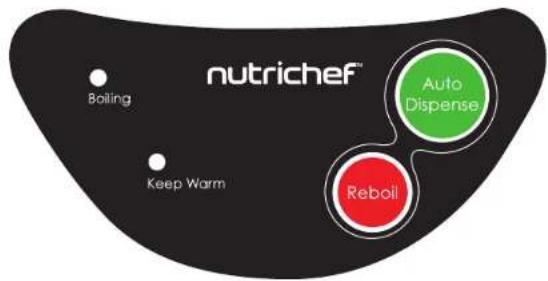
Control Panel
USING THE THERMO POT FOR THE FIRST TIME
- Wash and rinse the water tank with water.
- Fill the water up to the full mark.
- Boil once and discard the water by pumping it out.
REMOVE AND ATTACH THE LID
Detach Lid
Place the handle towards the rear side of the thermo pot.
Then open the lid by pulling up the lid opening lever (caution: be careful of the steam from the steam vent). Position the lid at a 45-degree angle and pull out the lid from the hinge holder by pressing the hinge lock.
Note: Never remove the lid while the water is boiling.
Attach Lid
Place the handle towards the rear side of the thermo pot.
Press the hinge lock, at the same time insert the shaft of the hinge of the lid into the hinge holder. Ensure that the lid is attached properly and close the lid until it clicks.
OPERATING THE APPLIANCE
To open the lid and boil water:
Pull the lid opening lever up to open the lid and fill water into the water tank. Always fill water above the minimum water level mark and below the maximum water level mark. Refer to the water level mark in the water tank.
To close the lid:
Close the lid by pressing down until it clicks. Do not close the lid by force.
Connect the Power Cord to the Hot Water Dispenser:
Insert the receptacle into the power inlet.
Then, insert the plug into the wall outlet.
WARNING: Do not power on the appliance if the water tank is empty.
Connect the plug to the power inlet horizontally.
-
"Boiling" indicator light will be on during the boiling process.
-
It will switch to "Keep Warm" automatically after the water is boiled.
- Do not open the lid or dispense water while the water is boiling.
- Do not contact any parts of your body to the steam vent.
- Do not place cloth or any other items to cover the steam vent.
Boiling
○ Keep Warm
○ Boiling
- Keep Warm
Pouring hot water:
-
Note: The hot water may not dispense smoothly right after boiling.
-
Press on the "DISPENSE" button to dispense hot water.
-
CAUTION: Always keep hands or any parts of your body away from the water outlet for a second or two right after you press the dispense button.
- Do not press the dispense button when the inner water reservoir is empty.
- You cannot dispense hot water by pressing the dispense button, or cup switch if the thermo pot is unplugged.
Refill water:
When water reaches the "refill water" line, add water for automatic re-boil.
- Do not add water above the maximum water level mark.
- Boil water below the refill mark may cause malfunction.
To re-boil water under keep warm mode:
- It takes about 3 minutes to re-boil water (with a full water tank).
- Before re-boiling the water, make sure the water level is above the refill mark.
- When adding water into the water tank, be careful of the hot steam from the steam vent and water tank.
- Once the re-boil button is pressed, the boiling process will begin and you cannot reset any button until it turns to keep warm mode.
- Do not press the re-boil button continuously (after the re-boiling process) as it may cause malfunction.
CLEANING AND MAINTENANCE
- Always allow the appliance to cool down before cleaning.
- Remember to unplug the plug from the wall socket and power inlet.
- Open the lid and pour out the remaining water in the water tank.
- Wipe the lid and body with a damp cloth.
- Never immerse any part of the thermo pot in water.
- Never splash water on the control panel.
-
Do not use abrasive materials to clean the appliance.
-
Discoloration of the water tank and white floating objects in the water tank:
-
Red rust-like spots, milky or black discoloration, and white floating objects are caused by minerals in the water and are not caused by discoloration or deterioration of the water tank itself. Although this is not a hygiene problem, you are advisable to clean the water tank periodically.
- Cut a lemon into four pieces and wrap the lemon in the cloth then put in the water tank.
- Pour water up to the full level mark in the water tank.
- Boil the water and then retain the heat for about one hour.
- Pour out the water and use a nylon brush to clean the water tank.
-
To remove the smell of the lemon, you can boil the water again and dispose of the water.
-
Stainless steel water reservoir
-
Wash the water tank with a sponge and then rinse with clean water. IMPORTANT: Do not use the following to clean the container.
- Dish soap (causes an unpleasant odor)
Scrubbing powder or scrubbing brushes (it will damage the container and lid.)
• Benzene (causes damage to the plastic of the lid)
HAZARDS
- Do not immerse the thermo pot, power cord, or plug in water or other liquids to prevent electric shock.
- Do not place the thermo pot on unstable surfaces.
- Fill the water tank with tap water (do not fill with milk or any other liquids).
- Do not fill the thermo pot with water above the full mark inside the water tank or lower than the minimum level to avoid damage to the appliance.
- Do not place the thermo pot on or near a hot surface.
IMPORTANT GUIDELINES
WARNING: THIS APPLIANCE MUST BE EARTHED
The wires in this main are colored in accordance with the following code:
Green and Yellow: Earth
Blue: Neutral
Brown: Live
If the colors above do not match those terminals identified on the plug, connect as follows:
- The wire with the color of green and yellow must be connected to the terminal marked "E" or by the earth symbol, green color or green and yellow color.
- The wire with the color of blue must be connected to the terminal marked N or black color.
- The wire with the color of brown must be connected to terminal marked L or red color. (If terminals of plug are unmarked or if any doubt, kindly consult a qualified electrician for assistance)
Direction to dispose of the product
This marking indicates that this product should not be disposed of with other household wastes throughout the nation. To prevent possible harm to the environment or human health from uncontrolled waste disposal, recycle if responsibly to promote the sustainable reuse of material resources. To return your used device, please use the return and collection systems or contact the retailer where the product was purchased.
They can take this product for environmentally safe recycling.
natural_image
Line drawings of various kitchen utensils including kitchen pan, oven, microwave, and kitchen utensil (no text or labels)Register Product
Thank you for choosing Nutrichef. By registering your product, you ensure that you receive the full benefits of our exclusive warranty and personalized customer support.
Complete the form to access expert support and to keep your Nutrichef purchase in perfect condition.
nutrichef™

nutrichefkitchen.com/ContactUs
nutrichef™
natural_image
Exterior view of a stainless steel water heater with digital display (no visible text or symbols)
SPA
PKWK43 - PKWK43.5
USANDO LA OLLA TÉRMICA POR PRIMERA VEZ

nutrichefkitchen.com/register
nutrichef™

nutrichefkitchen.com/ContactUs
nutrichef™
natural_image
Exterior view of a stainless steel water heater with control panel and digital display (no visible text or symbols)
nutrichefkitchen.com
PKWK43 - PKWK43.5
natural_image
Collection of kitchen utensils and kitchenware icons including frying pan, rolling pin, thermos, pot, toaster, and cup (no text or labels)
natural_image
Simple line drawings of kitchen utensils including a plate, fork, knife, and knife (no text or symbols)
natural_image
Line drawings of three cooking pots: a lid, a side pot with lid, and a mug (no text or symbols)TABLE DES MATIÈRES
CARACTÉRISTIQUES ET SPÉCIFICATIONS TECHNIQUES 4
SÉCURITÉ 5
CONNAÎTRE VOTRE THERMOS 6
UTILISER LE THERMOS POUR LA PREMIÈRE FOIS 7
UTILISATION DE L'APPAREIL 7
NETTOYAGE ET ENTRETIEN 9
RISQUES 10
DIRECTIVES IMPORTANTES 10
INSTRUCTIONS POUR LA MISE AU REBUT DU PRODUIT 10
ENREGISTRER LE PRODUIT 11
UTILISATION DU THERMOS POUR LA PREMIÈRE FOIS
natural_image
Line drawings of various kitchen utensils including kitchenware, appliances, and kitchen tools (no text or labels)- nutrichef™
- About NutriChef
- A mission born out of need
- We create products that make life a little easier and a little healthier
- We believe a moment shared is priceless
- TABLE OF CONTENTS
- Initial Use Odor Warning
- IMPORTANT SAFETY INSTRUCTIONS READ CAREFULLY AND KEEP FOR FUTURE REFERENCE
- California Prop 65 Warning
- WARNING:
- Features:
- What's In The Box:
- Technical Specs:
- SAFETY
- USING THE THERMO POT FOR THE FIRST TIME
- REMOVE AND ATTACH THE LID
- Detach Lid
- Attach Lid
- OPERATING THE APPLIANCE
- To open the lid and boil water:
- To close the lid:
- Connect the Power Cord to the Hot Water Dispenser:
- Pouring hot water:
- Refill water:
- To re-boil water under keep warm mode:
- CLEANING AND MAINTENANCE
- HAZARDS
- IMPORTANT GUIDELINES
- WARNING: THIS APPLIANCE MUST BE EARTHED
- Direction to dispose of the product
- Register Product
- USANDO LA OLLA TÉRMICA POR PRIMERA VEZ
- TABLE DES MATIÈRES
- UTILISATION DU THERMOS POUR LA PREMIÈRE FOIS
Brand : Nutrichef
Model : PKWK43
Category : Water dispenser