
SSW 400 A2 - Hand blender SILVERCREST - Free user manual and instructions
Find the device manual for free SSW 400 A2 SILVERCREST in PDF.



| Product Type | Hand Blender (Immersion Blender) |
| Brand | SilverCrest |
| Model | SSW 400 A2 |
| Power Supply | 220-240 V ~, 50/60 Hz |
| Rated Power | 400 W |
| Protection Class | II |
| Speed Control | Variable, from MIN to MAX |
| Start Button | Push-button (requires continuous pressing) |
| Blender Foot Material | Stainless steel |
| Attachments Included | Multifunction blade, meat and vegetable blade, whisking disc, beating disc |
| Accessories Included | Tool for removing attachments, storage box |
| Maximum Operating Time | 1 minute, then 2 minutes cool-down |
| Hanger | Yes, for storage |
| Dishwasher Safe Parts | Attachments (blades and discs) only |
| Safety Features | Safety lock (blender foot must be properly attached); automatic shutdown if overheated |
| Warranty | 3 years |
| Intended Use | Domestic household only, for processing food in small quantities |
| Weight (approx.) | 0.8 kg (excluding accessories) |
| Dimensions (approx.) | Height: 38 cm, Width: 6 cm (hand element) |
Frequently Asked Questions - SSW 400 A2 SILVERCREST
User questions about SSW 400 A2 SILVERCREST
0 question about this device. Answer the ones you know or ask your own.
Ask a new question about this device
Download the instructions for your Hand blender in PDF format for free! Find your manual SSW 400 A2 - SILVERCREST and take your electronic device back in hand. On this page are published all the documents necessary for the use of your device. SSW 400 A2 by SILVERCREST.
USER MANUAL SSW 400 A2 SILVERCREST

HAND BLENDER SSW 400 A2
GB IE NI
HAND BLENDER
Operating instructions
DE AT CH
STABMIXER
Bedienungsanleitung
IAN 289473

GB IE NI
Before reading, unfold the page containing the illustrations and familiarise yourself with all functions of the device.
DE AT CH
GB/IE/NI Operating instructions Page 1
Disposal of the packaging 3
Description of appliance/attachments 4
Technical data 4
Safety information .... 5
The attachments 7
Fitting/removing the attachments 8
Assembling the hand blender 10
Holding the appliance .... 10
Operation 11
Cleaning 13
Storage 14
Disposal of the appliance 14
Cream of vegetable soup 17
Pumpkin soup 18
Jam 19
Chocolate crème 20
Mayonnaise 20
Introduction
Congratulations on the purchase of your new appliance.
You have selected a high-quality product. The operating instructions are part of this product. They contain important information about safety, use and disposal. Before using the product, please familiarise yourself with all operating and safety instructions. Use the product only as described and for the range of applications specified. Please also pass these operating instructions on to any future owner.
Copyright
This documentation is protected by copyright.
Any copying or reproduction, including in the form of extracts, or any reproduction of images (even in a modified state), is permitted only with the written authorisation of the manufacturer.
Proper use
This appliance is intended exclusively for processing foodstuffs in small quantities. It is intended exclusively for use in domestic households. The appliance is not intended for commercial use.
WARNING
Danger if not used as intended!
Failure to use the appliance for its intended purpose and/or any other type of use can be hazardous.
▶ Use the appliance only for its intended purpose. ▶ Observe the procedures described in these operating instructions.
NOTE
▶ Using the appliance incorrectly or for purposes other than those for which it is intended can be hazardous. Use the appliance only for its intended purpose. Observe the procedures described in these operating instructions. Claims of any kind for damages resulting from misuse, improper repairs, unauthorised modifications or the use of unauthorised spare parts are excluded. The operator bears sole liability.
Package contents
This appliance is supplied with the following components as standard:
- Hand Blender
- Storage box 13
- Multifunction blade ⑧, meat and vegetable blade ⑨, beating disc ⑪, whisking disc ⑩, tool ⑫
- Operating instructions
1) Remove all parts of the appliance and the operating instructions from the box. 2) Remove all packaging material. 3) Clean all parts of the appliance as described in the section "Cleaning".
NOTE
▶ Check the package for completeness and signs of visible damage.
▶ If the delivery is incomplete or damage has occurred as a result of defective packaging or during transport, contact the Service hotline (see section Service).
Disposal of the packaging
The packaging protects the appliance from damage during transport. The packaging materials have been selected for aspects of environmental friendliness and disposal, and they are therefore recyclable.

Returning the packaging to the material cycle conserves raw materials and reduces the amount of waste that is generated. Dispose of packaging materials that are no longer needed in accordance with applicable local regulations.
NOTE
If possible, keep the original packaging during the warranty period so that the appliance can be packed properly for returning in the event of a warranty claim.
Description of appliance/attachments
Illustration A (hand blender):
① Hanger ② Speed control ③ Scale ④ Start button ⑤ Hand element ⑥ Blender foot ⑦ Drive shaft
Figure B (attachments):
⑧ Multifunction blade ⑨ Meat and vegetable blade ⑩ Whisking disc ⑪ Beating disc
Figure C (accessories):
⑫ Tool ⑬ Storage box
Technical data
| Mains voltage 220 - 240 V | ~ (alternating current), 50/60 Hz |
| Rated power 400 W | |
| Protection class | II |
 | All parts of this appliance that come into contact with food are food-safe. |
We recommend that you allow the hand blender to cool off for 2 minutes after 1 minute of operation. If you exceed this operating time, the appliance can overheat and be damaged!
Safety information
RISK OF ELECTRIC SHOCK
- Connect the appliance only to correctly installed mains power sockets that supply a current rating of 220–240 V ~, 50/60 Hz. In event of operating malfunctions and before cleaning the appliance, remove the power plug from the mains power socket.
- Do not expose the appliance to moisture and do not use it outdoors. If any liquid gets into the housing, disconnect the appliance from the mains power socket immediately and have it repaired by a qualified technician. ▶ Always pull on the plug to disconnect the appliance from the mains; never pull on the power cable itself. ▶ Do not kink or crush the power cable, and route the cable so that it cannot be stepped on or tripped over.
- Arrange for defective power plugs and/or cables to be replaced as soon as possible by a qualified technician or by our Customer Service Department to avoid the risk of injury. This appliance may be used by persons with limited physical, sensory or mental capabilities or lack of experience and knowledge, provided that they are under supervision or have been told how to use the appliance safely and are aware of the potential risks. The appliance and its connecting cable must be kept away from children.
- Do not attempt to open the hand blender's motor casing. This can lead to risks and also invalidates the warranty.

Never immerse the motor unit of the blender in liquids, or allow liquids to get into the motor unit housing.
⚠ WARNING! RISK OF INJURY!
Before changing any accessories or attachments that move during operation, the appliance must be switched off and disconnected from mains power. ▶ Disconnect the appliance from the mains power supply...
- when the appliance is unsupervised, - when you are cleaning the appliance, - when you are assembling or dismantling it.
This appliance should not be used by children. ▶ Children must not play with the appliance. The appliance and its connecting cable must be kept away from children. The blades are extremely sharp! Handle them with great care. - Handle the extremely sharp blades/attachments with caution as they can cause injuries. ▶ Clean the appliance very carefully. The blades are extremely sharp! The appliance should always be disconnected from the mains when unattended and before assembly, disassembly or cleaning. ▶ Risk of injury if appliance is misused!
The attachments
Depending on the task at hand, choose the appropriate attachment:
| Attachment Use | ||
| Multifunction blade 8 |  | Shredding • chopping • pureeing soft vegetables • straining- shredding / chopping raw / cooked vegetables- chopping cooked meat- pureeing soups and sauces- pureeing baby food |
| Meat and vegetable blade 9 |  | Shredding • chopping • pureeing hard vegetables- chopping fibrous / hard vegetables- chopping delicate / tender meats (e.g. liver)- chopping fish- pureeing hard, cooked vegetables (e.g. carrots) |
| Whisking disc 10 | 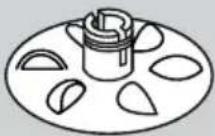 | Whisking • stirring • emulsifying- stirring batters (e.g. pancake batter)- emulsifying salad dressings- stirring crêmes |
| Beating disc 11 |  | Beating • whipping- whipping cream- beating egg white into meringue- whipping shakes / mousses- whipping sauces |
Fitting/removing the attachments
WARNING! RISK OF INJURY!
▶ Do not insert the plug into the mains power socket until the appliance is fully assembled. Take great care when handling the attachments ⑧ ⑨ ⑩ ⑪! They are very sharp!
1) To fit an attachment ⑧ ⑨ ⑩ ⑪ onto the drive shaft ⑦, push the shaft of the attachment ⑧ ⑨ ⑩ ⑪ onto the drive shaft ⑦ on the blender foot ⑥. The two bulges on the drive shaft ⑦ should grip into the recesses on the shaft of the attachment ⑧ ⑨ ⑩ ⑪:

2) Then push the attachment firmly onto the drive shaft ⑦ so that the attachment ⑧ ⑨ ⑩ ⑪ until you hear and feel it click into place.
NOTE
The beating disc ⑪ is fitted onto the shaft at an angle. This is not a manufacturing error, but designed to whip air into liquids.
To remove an attachment ⑧ ⑨ ⑩ ⑪, you need the tool ⑫.
1) Push the tool ⑫ through one of the recesses on the lower end of the blender foot ⑥:

2) Use the tool 12 to grip onto the shaft of the attachment 8 9 10 11.
3) Direct the blender foot ⑥ slightly away from you and carefully lever the attachment ⑧ ⑨ ⑩ ⑪ off the drive shaft ⑦.

Assembling the hand blender
WARNING! RISK OF INJURY!
▶ Do not insert the plug into the mains power socket until the appliance is fully assembled. The attachments ⑧ ⑨ ⑩ ⑪ are very sharp! Handle them with great care.
NOTE
Before first use, clean all parts as described in the chapter "Cleaning".
Attach the blender foot ⑥ to the hand element ⑤ so that the marking points to the ⏻ symbol on the hand element ⑤. Turn the blender foot ⑥ until the marking on the blender foot ⑥ points to the 🔊 symbol on the hand element ⑤.
Holding the appliance
Hold the appliance as shown during operation.

Operation
WARNING! RISK OF INJURY!
The foods being processed may not be too hot! Splashing contents could scald the user.
CAUTION - PROPERTY DAMAGE!
▶ We recommend that you allow the hand blender to cool off for 2 minutes after 1 minute of operation. If you exceed this operating time, the appliance can overheat and be damaged!
Once you have assembled the appliance as required:
1) Insert the plug into the mains power socket. 2) Set the desired speed level using the speed control ②. Turn the speed control ② towards MAX on the scale ③ if you want to increase the speed; turn the speed control ② towards MIN if you want to decrease the speed.
- For chopping, pureeing and shredding, you should select a medium to high speed, depending on the hardness of the food. - For emulsifying, whisking and stirring, start at a low speed and slowly increase the speed to maximum, depending on the consistency. - For beating and whipping, select a high speed setting.
3) Hold the appliance vertically in the food container.
4) Press and hold down the start button ⏻ 4. Depending on the type and quantity of food being processed, move the appliance slowly up and down and from left to right. Keep an eye on progress.
5) As soon as you are satisfied with result, release the start button ⏻ 4. Do not remove the blender foot ⑥ from the container until the motor has come to a complete standstill.
NOTE
If you hear unusual noises during operation, e.g. squeaking or suchlike, apply a small amount of neutral cooking oil to the drive shaft ⑦ of the hand mixer:
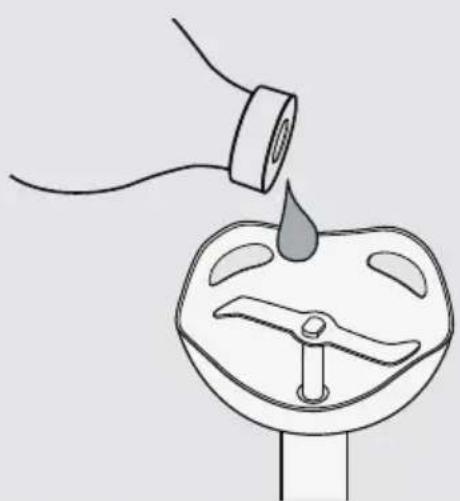
6) When you are finished processing the food, pull out the plug from the mains power socket.
NOTE
▶ You can buy a chopper attachment to fit this appliance in the online shop at www.kompernass.com. You can use this to chop herbs, onions or similar.
Cleaning
⚠ WARNING – RISK OF ELECTRIC SHOCK!
▶ Always remove the plug from the mains power socket before cleaning the appliance.
You must never immerse the hand element ⑤ in water when cleaning it or hold it under running water.
WARNING - RISK OF INJURY!
There is a risk of injury when handling the attachments 8, 9, 10, 11. Keep the attachments 8, 9, 10, 11 out of the reach of children.
CAUTION - PROPERTY DAMAGE!
▶ Do not clean the parts of your hand blender in the dishwasher (except for the attachments ⑧ ⑨ ⑩ ⑪) as they could be damaged. ▶ Do not use aggressive, chemical or abrasive cleaning agents! They could irreparably damage the surface!
1) Remove the power plug from the socket. 2) Clean the hand element ⑤ with a moist cloth. Ensure that no water gets into the openings of the hand element ⑤. For stubborn dirt, add a little mild detergent to the cloth. Wipe off any washing-up liquid residue with a damp cloth. 3) Clean the blender foot ⑥, the attachments ⑧ ⑨ ⑩ ⑪ and the tool ⑫ thoroughly in soapy water and then rinse off the soap with clear water. 4) Dry everything with a dry cloth and ensure that the appliance is completely dry before using it again. 5) Wipe the storage box ⑬ with a damp cloth.
NOTE

The attachments ⑧ ⑨ ⑩ ⑪ are dishwasher-safe.
Storage
Place the cleaned and dry attachments in the storage box 13:

■ You can hang the appliance up by the hanger ①.
■ Store the appliance in a clean and dry location.
Disposal of the appliance

Never dispose of the appliance in your normal domestic waste. This product is subject to the provisions of European Directive 2012/19/EU.
Dispose of the appliance through an approved disposal facility or your municipal waste facility. Please comply with all applicable regulations. Please contact your waste disposal facility if you are in any doubt.
This appliance has a 3-year warranty valid from the date of purchase. If this product has any faults, you, the buyer, have certain statutory rights. Your statutory rights are not restricted in any way by the warranty described below.
Warranty conditions
The validity period of the warranty starts from the date of purchase. Please keep your original receipt in a safe place. This document will be required as proof of purchase.
If any material or production fault occurs within three years of the date of purchase of the product, we will either repair or replace the product for you at our discretion. This warranty service is dependent on you presenting the defective appliance and the proof of purchase (receipt) and a short written description of the fault and its time of occurrence.
If the defect is covered by the warranty, your product will either be repaired or replaced by us. The repair or replacement of a product does not signify the beginning of a new warranty period.
Warranty period and statutory claims for defects
The warranty period is not prolonged by repairs effected under the warranty. This also applies to replaced and repaired components. Any damage and defects present at the time of purchase must be reported immediately after unpacking. Repairs carried out after expiry of the warranty period shall be subject to a fee.
Scope of the warranty
This appliance has been manufactured in accordance with strict quality guidelines and inspected meticulously prior to delivery.
The warranty covers material faults or production faults. The warranty does not extend to product parts subject to normal wear and tear or fragile parts such as switches, batteries, baking moulds or parts made of glass.
The warranty does not apply if the product has been damaged, improperly used or improperly maintained. The directions in the operating instructions for the product regarding proper use of the product are to be strictly followed. Uses and actions that are discouraged in the operating instructions or which are warned against must be avoided.
This product is intended solely for private use and not for commercial purposes. The warranty shall be deemed void in cases of misuse or improper handling, use of force and modifications / repairs which have not been carried out by one of our authorised Service centres.
Warranty claim procedure
To ensure quick processing of your case, please observe the following instructions:
■ Please have the till receipt and the item number (e.g. IAN 12345) available as proof of purchase.
■ You will find the item number on the type plate, an engraving on the front page of the instructions (bottom left), or as a sticker on the rear or bottom of the appliance.
If functional or other defects occur, please contact the service department listed either by telephone or by e-mail.
You can return a defective product to us free of charge to the service address that will be provided to you. Ensure that you enclose the proof of purchase (till receipt) and information about what the defect is and when it occurred.

You can download these instructions along with many other manuals, product videos and software on www.lidl-service.com.
Service
GB Service Great Britain
Tel.: 0871 5000 720 (£ 0.10/Min.)
E-Mail: kompernass@lidl.co.uk
IE Service Ireland
Tel.: 1890 930 034
(0,08 EUR/Min., (peak))
(0,06 EUR/Min., (off peak))
E-Mail: kompernass@lidl.ie
IAN 289473
Importer
Please note that the following address is not the service address. Please use the service address provided in the operating instructions.
KOMPERNASS HANDELS GMBH
BURGSTRASSE 21
DE-44867 BOCHUM
GERMANY
www.kompernass.com
Recipes
Whipped cream
Ingredients
200 ml cream
Preparation
1) Pour the cream into a high-sided, unbreakable container.
2) Use the beating disc ⑪ to whip the cream for about 1 minute. Keep an eye on the cream during whipping. Depending on fat content, temperature and other factors, the whipping time can vary.
Cream of vegetable soup
2-4 people
Ingredients
■ 2-3 tbsp. cooking oil 200 g onion ■ 200 g potatoes (floury potatoes are most suitable) 200 g carrots ■ 350-400 ml vegetable stock (fresh or instant) Salt, pepper, nutmeg 5 g parsley
Preparation
1) Peel and finely chop the onions. Wash, peel and slice the carrots. Peel and dice the potatoes into approx. 2 cm cubes.
2) Heat the oil in a pan, sauté the onions until they become glassy. Add the carrots and potatoes and sauté them all together. Add stock until the vegetables are covered and simmer everything for about 10–15 minutes until they are soft. Add stock occasionally as required to keep the vegetables covered.
3) Wash the parsley, shake it dry and remove the stalks. Tear up the parsley and add it to the soup. Puree everything with the meat and vegetable blade ⑨ for about 1 minute. Season with salt, pepper and nutmeg to taste.
Pumpkin soup
4 people
Ingredients
■ 1 medium-sized onion ■ 2 garlic cloves ■ 10-20 g fresh ginger ■ 3 tbsp. rapeseed oil ■ 400 g pumpkin (preferably Hokkaido pumpkin as the skin softens during cooking and it does not need to be peeled) ■ 250-300 ml coconut milk ■ 250-500 ml vegetable stock ■ The juice of 1/2 an orange ■ A little dry white wine ■ 1 tsp. sugar Salt, pepper
Preparation
1) Peel and dice the onions and garlic. Peel and finely chop the ginger. Sauté the onion and ginger in hot oil. After 2 minutes, add the garlic.
2) Clean the pumpkin thoroughly in warm water using a vegetable brush, then cut it into 2-3 cm cubes. (If you use a different variety instead of Hokkaido, you need to peel the pumpkin). Add the pumpkin cubes to the onions and ginger and sauté them. Add half the coconut milk and as much vegetable stock as necessary to cover the pumpkin. Simmer with the lid on for about 20-25 minutes until the food is soft. Mix everything with the meat and vegetable blade ⑨ to a smooth consistency. Add coconut milk as required to give the soup a smooth, soft and creamy consistency.
3) Add orange juice, white wine, sugar, salt and pepper to taste to give the soup a sweet and sour/salty note alongside the spicy taste.
Jam
Ingredients
■ 250 g strawberries or other fruit (fresh or frozen) ■ 1 pack of jam sugar (approx. 125 g) that does not require boiling ■ A splash of lemon juice ■ The pulp of one vanilla pod
Preparation
1) Wash and clean the strawberries. Remove the leaves. Put them in a sieve to shake off any excess water and to prevent the jam from becoming too runny. Cut up larger strawberries. 2) Weigh off 250 g of strawberries and add them to a suitable mixing bowl. 3) Add a splash of lemon juice. 4) If required, scrape out the pulp from a vanilla pod and add this. 5) Add the contents of the pack of jam sugar and then mix thoroughly with the multifunction blade ⑧ for about 45–60 seconds. If there are still any lumps, leave it to stand for 2 minutes and then puree again for 60 seconds. 6) Enjoy the jam straight away or pour it into a glass jar with a screw cap and seal it firmly.
Chocolate cream
For 4 people
Ingredients
■ 350 g whipping cream ■ 200 g of plain chocolate (> 60% cocoa content) ■ 1/2 vanilla pod (pulp)
Preparation
1) Bring the cream to the boil, crumble and add the chocolate and melt it at a low heat. Scrape out the pulp of a vanilla pod and stir it into the mix. 2) Allow to cool and set in the refrigerator. 3) Before serving, stir until creamy with the beating disc ⑪.
Tip: Add fresh fruit for a special dessert.
Mayonnaise
Ingredients
■ 200 ml neutral vegetable oil, e.g. rapeseed oil ■ 1 egg (yolk and egg white) ■ 10 g of mild vinegar or lemon juice ■ Salt and pepper to taste
Preparation
1) Add the egg and lemon juice to the mixing bowl, hold the whisking disc ⑩ in the mixture and start the appliance. 2) Add the oil in an even, thin stream (within about 1 minute) so that the oil binds to the other ingredients. 3) Afterwards, season with salt and pepper.
Introduction 22
Copyright 22
Operation
KOMPERNASS HANDELS GMBH
BURGSTRASSE 21
DE-44867 BOCHUM
GERMANY
www.kompernass.com
Recipes
Whipping cream
Ingredients
200 ml cream
Preparation
KOMPERNASS HANDELS GMBH
BURGSTRASSE 21
DE-44867 BOCHUM
GERMANY
www.kompernass.com
- HAND BLENDER SSW 400 A
- GB IE NI
- DE AT CH
- INTRODUCTION
- COPYRIGHT
- PROPER USE
- WARNING
- DANGER IF NOT USED AS INTENDED
- NOTE
- PACKAGE CONTENTS
- DISPOSAL OF THE PACKAGING
- DESCRIPTION OF APPLIANCE/ATTACHMENTS
- TECHNICAL DATA
- SAFETY INFORMATION
- RISK OF ELECTRIC SHOCK
- ⚠ WARNING! RISK OF INJURY
- THE ATTACHMENTS
- FITTING/REMOVING THE ATTACHMENTS
- WARNING! RISK OF INJURY
- ASSEMBLING THE HAND BLENDER
- HOLDING THE APPLIANCE
- OPERATION
- CAUTION - PROPERTY DAMAGE
- CLEANING
- ⚠ WARNING – RISK OF ELECTRIC SHOCK
- WARNING - RISK OF INJURY
- STORAGE
- DISPOSAL OF THE APPLIANCE
- WARRANTY CONDITIONS
- WARRANTY PERIOD AND STATUTORY CLAIMS FOR DEFECTS
- SCOPE OF THE WARRANTY
- WARRANTY CLAIM PROCEDURE
- SERVICE
- IMPORTER
- RECIPES
- WHIPPED CREAM
- INGREDIENTS
- PREPARATION
- CREAM OF VEGETABLE SOUP
- PEOPLE
- PUMPKIN SOUP
- JAM
- CHOCOLATE CREAM
- MAYONNAISE
- WHIPPING CREAM
Brand : SILVERCREST
Model : SSW 400 A2
Category : Hand blender