
50DSW289B - Television VOX - Free user manual and instructions
Find the device manual for free 50DSW289B VOX in PDF.


| Product Type | 50-inch LED Television |
| Display Size | 50 inches (127 cm) |
| Dimensions (with stand) | 220 x 1134 x 723 mm (DxLxH) |
| Dimensions (without stand) | 60/90 x 1134 x 666 mm (DxLxH) |
| Power Consumption | 75 W (typical) |
| Operating Voltage | 220-240 V AC, 50 Hz |
| Audio Output Power | 2 x 8 W (10% THD) |
| Digital Reception | DVB-T2/C (terrestrial and cable) |
| Analog Reception | PAL BG/I/DK, SECAM BG/DK |
| Number of Preset Channels | 1000 |
| Input Connectors | HDMI (x3), USB (x2), SCART, VGA, YPbPr, CI slot, Ethernet (LAN), Antenna (RF) |
| Output Connectors | Headphone (3.5 mm), SPDIF (optical), Audio Line Out |
| Wireless Connectivity | Built-in Wi-Fi 802.11 a/b/g/n, Bluetooth (for remote), Wake-on-LAN/Wireless LAN |
| Multimedia Playback | USB: video, music, photo; supports FAT32 and NTFS |
| PVR (Recording) | USB recording, timeshift, instant recording; requires USB HDD |
| Smart Features | Internet Portal, Web Browser, HbbTV, Audio Video Sharing, FollowMe TV (streaming to mobile), Smart Center app |
| Accessories Included | Remote control, 2 x AAA batteries, instruction book, stand |
| Safety Features | Child lock, automatic standby after 8 hours, auto power off on no signal, parental controls, V-lock |
| Environmental Protection | Energy saving modes (Min/Med/Max/Auto/Off), Screen Off option, standby LED can be disabled |
| Repair and Spare Parts | No user-serviceable parts; refer to qualified service personnel. Spare parts available through authorized service centers. |
Frequently Asked Questions - 50DSW289B VOX
User questions about 50DSW289B VOX
0 question about this device. Answer the ones you know or ask your own.
Ask a new question about this device
Download the instructions for your Television in PDF format for free! Find your manual 50DSW289B - VOX and take your electronic device back in hand. On this page are published all the documents necessary for the use of your device. 50DSW289B by VOX.
USER MANUAL 50DSW289B VOX
natural_image
Abstract circular graphic with diagonal white stripes on a glossy gray background (no text or symbols)VOX
ELECTRONICS
OPERATING INSTRUCTIONS FOR TV УПУТСТВО ЗА УПОТРЕБУ ТЕЛЕВИЗОРА UPUTSTVA О RADU TELEVIZORA ΕΓΧΕΙΡΙΔΙΟ ΧΡΗΣΤΗ ΕΙΡΙΔ
LED 50DSW289B
Do not place any heat sources such as electric heaters, radiators, etc. near the TV set.
- Do not place the TV on the floor and inclined surfaces. - To avoid danger of suffocation, keep plastic bags out of the reach of the babies, children and domestic animals.
Carefully attach the stand to the TV. If the stand is
provided with screws, tighten the screws firmly
prevent the TV from tilting. Do not over-tighten the
screws and mount the stand rubbers properly.
Do not dispose of the batteries in fire or with
hazardo
Warning: Batteries must not be exposed to excessive heat such as sunshine, fire or the like.
| Serious injury or death risk | |
| Dangerous voltage risk | |
| Important maintenance component |
Markings on the Product
The following symbols are used on the product as a marker for restrictions and precautions and safety instructions. Each explanation shall be considered where the product bears related marking only. Note such information for security reasons.
Class II Equipment: This appliance is designed in such a way that it does not require a safety connection to electrical earth.
Class II Equipment With Functional Earthing: This appliance is designed in such a way that it does not require a safety connection to electrical earth, the earth
connection is used for functional purposes.
Protective Earth Connection: The marked terminal is intended for connection of the protective earthing conductor associated with the supply wiring. Hazardous Live Terminal: The marked terminal(s) is/are hazardous live under normal operating conditions.
Caution, See Operating Instructions: The marked area(s) contain(s) user replaceable coin or button cell batteries.
Class 1 Laser Product:

Safety Information

TO REDUCE THE RISK OF ELECTRIC SHOCK DO NOT REMOVE COVER (OR BACK). NO USER-SERVICEABLE PARTS INSIDE. REFER SERVICING TO QUALIFIED SERVICE PERSONNEL
In extreme weather (storms, lightning) and long inactivity periods (going on holiday) disconnect the TV set from the mains.
The mains plug is used to disconnect TV set from the mains and therefore it must remain readily operable. If the TV set is not disconnected electrically from the mains, the device will still draw power for all situations even if the TV is in standby mode or switched off. Note: Follow the on screen instructions for operating the related features.
IMPORTANT - Please read these instructions fully before installing or operating

WARNING: Never let people (including children) with reduced physical, sensory or mental capabilities or lack of experience and / or knowledge use electrical devices unsupervised. - Use this TV set at an altitude of less than 2000 meter above the sea level, in dry locations and in regions with moderate or tropical climates. - The TV set is intended for household and similar general use but may also be used in public places. - For ventilation purposes, leave at least 5cm of free space around the TV.
- The ventilation should not be impeded by covering or blocking the ventilation openings with items, such as newspapers, table-cloths, curtains, etc. - The power cord plug should be easily accessible. Do not place the TV, furniture, etc. on the power cord. A damaged power cord/plug can cause fire or give you an electric shock. Handle the power cord by the plug, do not unplug the TV by pulling the power cord. Never touch the power cord/plug with wet hands as this could cause a short circuit or electric shock. Never make a knot in the power cord or tie it with other cords. When damaged it must be replaced, this should only be done by qualified personnel.
- Do not expose the TV to dripping or splashing of liquids and do not place objects filled with liquids, such as vases, cups, etc. on or over the TV (e.g., on shelves above the unit). - Do not expose the TV to direct sunlight or do not place open flames such as lit candles on the top of or near the TV.
Contents
| Safety Information | 2 |
| Markings on the Product | 2 |
| Environmental Information | 4 |
| Features | 4 |
| Accessories Included | 4 |
| Standby Notifications | 4 |
| TV Control Switch & Operation | 5 |
| Inserting the Batteries into the Remote | 5 |
| Connect Power | 5 |
| Antenna Connection | 5 |
| License Notification | 6 |
| Remote Control | 8 |
| Connections | 9 |
| Switching On/Off | 10 |
| First Time Installation | 10 |
| Media Playback via USB Input | 10 |
| Recording a Programme | 11 |
| Timeshift Recording | 11 |
| Instant Recording | 11 |
| Watching Recorded Programmes | 11 |
| Recording Configuration | 11 |
| Media Browser Menu | 12 |
| FollowMe TV (if available) | 12 |
| CEC and CEC RC Passthrough | 12 |
| E-Manual (if available) | 12 |
| TV Menu Contents | 13 |
| General TV Operation | 17 |
| Using the Channel List | 17 |
| Configuring Parental Settings | 17 |
| Electronic Programme Guide (EPG) | 17 |
| Teletext Services | 18 |
| Software Upgrade | 18 |
| Troubleshooting & Tips | 19 |
| PC Input Typical Display Modes | 20 |
| AV and HDMI Signal Compatibility | 20 |
| Supported Video File Formats for USB Mode | 21 |
| Supported Picture File Formats for USB Mode | 21 |
| Supported Audio File Formats for USB Mode | 21 |
| Supported Subtitle File Formats for USB Mode | 22 |
| Supported DVI Resolutions | 23 |
| Connectivity | 24 |
| Using Audio Video Sharing Network Service | 26 |
| Internet Portal | 27 |
| Internet Browser | 27 |
| HBBTV System | 28 |
| Environmental InformationThis television is designed to be environment friendly.To reduce energy consumption, you can follow these steps:If you set theEnergy Savingto Minimum, Medium,Maximumor Autothe TV will reduce the energy consumption accordingly. If you like to set theBacklightto a fixed value set asCustomand adjust theBacklight(located under theEnergy Saving setting) manually using Left or Right buttons on the remote. Set asOffto turn this setting off.Note:AvailableEnergy Savingoptions may differ depending on the selectedModein theSystem>Picturemenu.TheEnergy Savingsettings can be found in theSystem>Picturemenu. Note that some picture settings will be unavailable to be changed.If pressed Right button whileAutooption is selected or Left button whileCustomoption is selected, "Screenwill be off in 15 seconds." message will be displayed on the screen. SelectProceedand pressOKto turn the screen off immediately. If you don't press any button, the screen will be off in 15 seconds. Press any button on the remote or on the TV to turn the screen on again.Note:Screen Offoption is not available if the Mode is set to Game.When the TV is not in use, please switch off or disconnect the TV from the mains plug. This will also reduce energy consumption.FeaturesRemote controlled colour TVFully integrated digital terrestrial/cable TV (DVB-T2/C)HDMI inputs to connect other devices with HDM socketsUSB inputOSD menu systemScart socket for external devices (such as DVD Players, PVR, video games, etc.)Stereo sound systemTeletextHeadphone connectionAutomatic programming systemManual tuningAutomatic power down after up to eight hours.Sleep timerChild lockAutomatic sound mute when no transmission.NTSC playbackAVL (Automatic Volume Limiting) | PLL (Frequency Search)PC inputGame Mode (Optional)Picture off functionProgramme recordingProgramme timeshiftingEthernet (LAN) for Internet connectivity and service802.11 a/b/g/n built in WIFI SupportAudio Video SharingHbbTVAccessories IncludedRemote ControlBatteries: 2 x AAAInstruction BookStandby NotificationsIf the TV does not receive any input signal (e.g. from an aerial or HDMI source) for 3 minutes, it will go into standby. When you next switch-on, the following message will be displayed: “TV switched to stand-by mode automatically because there was no signal for a long time.” Press OK to continue.If the TV is on and it isn't being operated for a while it will go into standby. When you next switch-on, the following message will be displayed. “TV switched to stand-by mode automatically because no operation was made for a long time.” Press OK to continue. |
English -4-
| WALL MOUNTING WARNINGSRead the instructions before mounting your TV on the wall.The wall mount kit is optional. You can obtain from your local dealer, if not supplied with your TV.Do not install the TV on a ceiling or on an inclined wall.Use the specified wall mounting screws and other accessories.Tighten the wall mounting screws firmly to prevent the TV from fall. Do not over-tighten the screws. |
| WARNINGApparatus connected to the protective earthing of the building installation through the MAINS connection or through other apparatus with a connection to protective earthing – and to a television distribution system using coaxial cable, may in some circumstances create a fire hazard.Connection to a television distribution system has therefore to be provided through a device providing electrical isolation below a certain frequency range (galvanic isolator, see EN 60728-11) |
| WARNINGDo not ingest the battery, Chemical Burn HazardThis product or the accessories supplied with the product may contain a coin/button cell battery. If the coin/button cell battery is swallowed, it can cause severe internal burns in just 2 hours and can lead to death.Keep new and used batteries away from children.If the battery compartment does not close securely, stop using the product and keep it away from children.If you think batteries might have been swallowed or placed inside any part of the body, seek immediate medical attention. |
| WARNINGNever place a television set in unstable or inclined locations. A television set may fall, causing serious personal injury or death. Many injuries, particularly to children, can be avoided by taking simple precautions such as:Using cabinets or stands recommended by the manufacturer of the television set.Only using furniture that can safely support the television set.Ensuring the television set is not overhanging the edge of the supporting furniture.Not placing the television set on tall furniture (for example, cupboards or bookcases) without anchoring both the furniture and the television set to a suitable support.Not standing the television set on cloth or other materials placed between the television and supporting furniture.Educating children about the dangers of climbing on furniture to reach the television set or its controls. If your existing television set is being retained and relocated, the same considerations as above should be applied. |
| Specification | |
| TV Broadcasting | PAL BG/I/DKSECAM BG/DK |
| Receiving Channels | VHF (BAND I/III) - UHF(BAND U) - HYPERBAND |
| Digital Reception | Fully integrated digital terrestrial-cable TV(DVB-T-C)(DVB-T2 compliant) |
| Number of Preset Channels | 1 000 |
| Channel Indicator On Screen Display | |
| RF Aerial Input 75 Ohm (unbalanced) | |
| Operating Voltage 220-240V AC, 50Hz. | |
| Audio German+Nicam Stereo | |
| Audio Output Power (WRMS.) (10% THD) | 2 x 8 |
| Power Consumption (W) 75 W | |
| TV Dimensions DxLxH(with foot) (mm) | 220 x 1134 x 723 |
| TV Dimensions DxLxH(without foot) (mm) | 60/90 x 1134 x 666 |
| Display 50° | |
| Operation temperature and operation humidity | 0°C up to 40°C, 85%humidity max |
License Notification The terms HDMI and HDMI High-Definition Multimedia Interface, and the HDMI Logo are trademarks or registered trademarks of HDMI Licensing Administrator, Inc. in the United States and other countries.
Manufactured under license from Dolby Laboratories. Dolby, Dolby Audio and the double-D symbol are trademarks of Dolby Laboratories. YouTube and the YouTube logo are trademarks of Google Inc.
This product contains technology subject to certain intellectual property rights of Microsoft. Use or distribution of this technology outside of this product is prohibited without the appropriate license(s) from Microsoft.
Content owners use Microsoft PlayReady™ content access technology to protect their intellectual property, including copyrighted content. This device uses PlayReady technology to access PlayReady-protected content and/or WMDRM-protected content. If the device fails to properly enforce restrictions on content where content varies may require Microsoft to recheck
the device's ability to consume PlayReady-protected content. Revocation should not affect unprotected content or content protected by other content access technologies. Content owners may require you to upgrade PlayReady to access their content. If you decline an upgrade, you will not be able to access content that requires the upgrade.
Information for Users on Disposal of Old Equipment and Batteries
[European Union only]
Equipment bearing these symbols should not be disposed as general household waste. You should look for appropriate recycling facilities and systems for the disposal of these products. Notice: The sign Pb below the symbol for batteries indicates
that this battery contains lead.
Changing Channels and Volume
You can change the channel and adjust the volume by using the Volume +/- and Programme +/- buttons on the remote.
Inserting the Batteries into the Remote
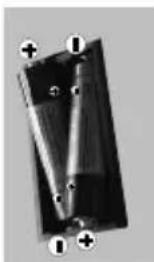
Remove the screw that secure the battery compartment cover on the back side of the remote control first. Lift the cover gently. Press and slide the cover to open. Insert two AAA batteries. Make sure the (+) and (-) signs match (observe correct polarity). Place the cover back on. Then screw the cover back on again.
natural_image
Pure electrical circuit lines without any symbolsConnect Power
IMPORTANT: The TV set is designed to operate on 220-240V AC, 50Hz socket. After unpacking, allow the TV set to reach the ambient room temperature before you connect the set to the mains. Plug the power cable to the mains socket outlet.
Antenna Connection
Connect the aerial or cable TV plug to the AERIAL INPUT (ANT) socket located on the back of the TV.

TV Control Switch & Operation
- Up direction
-
Down direction
-
Volume / Info / Sources List selection and Standby-On switch
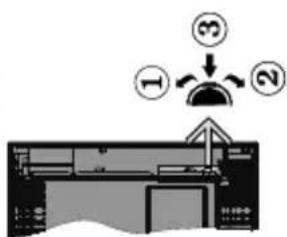
The Control button allows you to control the Volume / Programme / Source and Standby-On functions of the TV.
To change volume: Increase the volume by pushing the button up. Decrease the volume by pushing the button down.
To change channel: Press the middle of the button, the information banner will appear on the screen. Scroll through the stored channels by pushing the button up or down.
To change source: Press the middle of the button twice(for the second time in total), the source list will appear on the screen. Scroll through the available sources by pushing the button up or down.
To turn the TV off: Press the middle of the button down and hold it down for a few seconds, the TV will turn into standby mode.
Notes:
- If you turn the TV off, this circle starts again beginning with the volume setting. - Main menu OSD cannot be displayed via control button.
Operation with the Remote Control
Press the Menu button on your remote control to display main menu screen. Use the directional buttons to select a menu tab and press OK to enter. Use the directional buttons again to select or set an item. Press Return/Back or Menu button to quit a menu screen.
Input Selection
Once you have connected external systems to your TV, you can switch to different input sources. Press the Source button on your remote control consecutively to select the different sources.
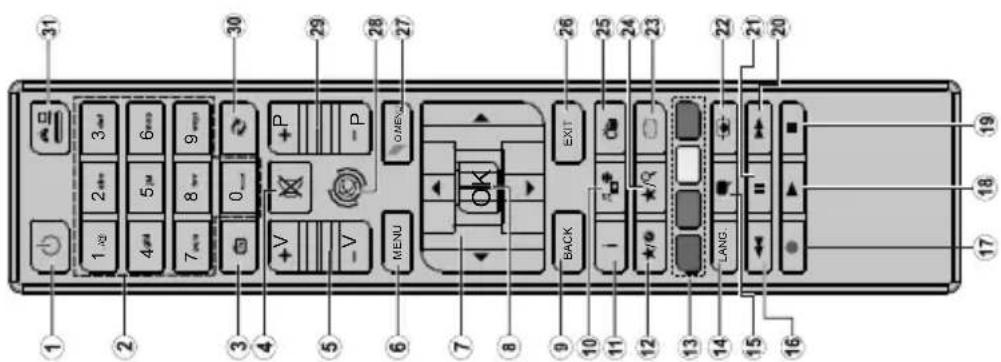
| 1. Standby: Switches On / Off the TV |
| 2. Numeric buttons: Switches the channel, enters a number or a letter in the text box on the screen. |
| 3. TV: Switches to TV Source |
| 4. Mute: Completely turns off the volume of the TV |
| 5. Volume +/- |
| 6. Menu: Displays TV menu |
| 7. Directional buttons: Helps navigate menus, content etc. and displays the subpages in TXT mode when pressed Right or Left |
| 8. OK: Confirms user selections, holds the page (in TXT mode), views channel list (DTV mode) |
| 9. Back/Return: Returns to previous screen, opens index page (in TXT mode) |
| 10. Media browser: Opens the media browsing screen |
| 11. Info: Displays information about on-screen content, shows hidden information (reveal - in TXT mode) |
| 12. My button 1 (*) |
| 13. Coloured Buttons: Follow the on-screen instructions for coloured button functions |
| 14. Language: Switches between sound modes (analogue TV), displays and changes audio/subtitle language (digital TV, where available) |
| 15. Subtitles: Turns subtitles on and off (where available) |
| 16. Rapid reverse: Moves frames backwards in media such as movies |
| 17. Record: Records programmes |
| 18. Play: Starts to play selected media |
| 19. Stop: Stops the media being played |
| 20. Rapid advance: Moves frames forward in media such as movies |
| 21. Pause: Pauses the media being played, starts timeshift recording |
| 22. Screen: Changes the aspect ratio of the screen |
| 23. Text: Displays teletext (where available), press again to superimpose the teletext over a normal broadcast picture (mix) |
| 24. My button 2 (*) |
| 25. EPG (Electronic programme guide): Displays the electronic programme guide |
| 26. Exit: Closes and exits from displayed menus or returns to previous screen |
| 27. Quick Menu: Displays a list of menus for quick access |
| 28. Internet: Opens the portal page, where you can reach many web based applications |
| 29. Programme +/- |
| 30. Swap: Quickly cycles between previous and current channels or sources |
| 31. Source: Shows all available broadcast and content sources |
These buttons may have default functions depending on the
by pressing on them for five seconds when on a desired source
or channel. A confirmation message will be displayed on the
screen. Now the selected MP BUTTON is associated with the selected function.
Note that if you perform First Time Installation, MY BUTTON 1&2 will return to their default function.
(\*) MY BUTTON 1 & MY BUTTON 2:
Wireless LAN Transmitter Specifications
| Frequency Ranges Max Output Power | |
| 2400 - 2483,5 MHz (CH1-CH13) < 100 mW | |
| 5150 - 5250 MHz (CH36 - CH48) < 200 mW | |
| 5250 - 5350 MHz (CH52 - CH64) < 200 mW | |
| 5470 - 5725 MHz (CH100 - CH140) | < 200 mW |
Country Restrictions
This device is intended for home and office use in all EU countries (and other countries following the relevant EU directive) without any limitation except for the countries mentioned below.
| Country Restriction | |
| Bulgaria | General authorization required for outdoor use and public service |
| France In-door | use only for 2454-2483.5 MHz |
| Italy | If used outside of own premises, general authorization is required |
| Greece | In-door use only for 5470 MHz to 5725 MHz band |
| Luxembourg | General authorization required for network and service supply(not for spectrum) |
| Norway | Radio transmission is prohibited for the geographical area within a radius of 20 km from the centre of Ny-Ålesund |
| Russian Federation | In-door use only |
The requirements for any country may change at any time. It's recommended that user checks with local authorities for the current status of their national regulations for both 2.4 GHz and 5 GHz wireless LAN's.
| Switching On/OffTo Switch the TV OnConnect the power cord to a power source such as a wall socket (220-240V AC, 50 Hz).To switch on the TV from standby mode either:Press the Standby button, Programme +/- or a numeric button on the remote control.Press the the middle of side function switch on the TV in.To Switch the TV OffPress the Standby button on the remote control or press the middle of the side function switch on the TV in and hold it down for a few seconds, the TV will switch into standby mode.To power down the TV completely, unplug the power cord from the mains socket.Note: When the TV is switched into standby mode, the standby LED can blink to indicate that features such as Standby Search, Over Air Download or Timer is active. The LED can also blink when you switch on the TV from standby mode.First Time InstallationWhen turned on for the first time, the language selection screen is displayed. Select the desired language and press OK.On the next screen, set your preferences using the directional buttons.Note: Depending on the Country selection you may be asked to set and confirm a PIN at this point. The selected PIN cannot be 0000. You have to enter it if you are asked to enter a PIN for any menu operation later.About Selecting Broadcast TypeDigital Aerial: If Digital Aerial broadcast search option is turned on, the TV will search for digital terrestrial broadcasts after other initial settings are completed.Digital Cable: If Digital Cable broadcast search option is turned on, the TV will search for digital cable broadcasts after other initial settings are completed. According to your other preferences a confirmation message may be displayed before starting to search. Select YES and press OK to proceed. To cancel operation, select NO and press OK. You can select Network or set values such as Frequency, Network ID and Search Step. When finished, press OK button.Note: Searching duration will change depending on the selected Search Step.Analogue: If Analogue broadcast search option is turned on, the TV will search for analogue broadcasts after other initial settings are completed.Additionally you can set a broadcast type as your favourite one. Priority will be given to the selected broadcast type during the search process and the | channels of it will be listed on the top of the Channel List. When finished, press OK to continue.You can activate Store Mode option at this point. This option will configure your TV's settings for store environment and depending on the TV model being used, the supported features of it may be displayed on the top of the screen as an info banner. This option is intended only for store use. It is recommended to select Home Mode for home use. This option will be available in System>Settings>More menu and can be turned off/on later.Press OK button on the remote control to continue and the Network/Internet Settings menu will be displayed, if you confirm the previously displayed message asking whether you want to do the network settings. Please refer to Connectivity section to configure a wired or a wireless connection. After the settings are completed press OK button to continue. To skip to the next step without doing anything select No and press the OK button when the message is displayed asking whether you want to do the network settings.After the initial settings are completed TV will start to search for available broadcasts of the selected broadcast types.After all the available stations are stored, scan results will be displayed. Press OK to continue. The Edit Channel List menu will be displayed next. You can edit the channel list according to your preferences or press the Menu button to quit and watch TV.While the search continues a message may appear, asking whether you want to sort channels according to the LCN(*) . Select Yes and press OK to confirm.(*) LCN is the Logical Channel Number system that organizes available broadcasts in accordance with a recognizable channel number sequence (if available).Note: Do not turn off the TV while initializing first time installation. Note that, some options may not be available depending on the country selection.Media Playback via USB InputYou can connect 2.5" and 3.5" inch (hdd with external power supply) external hard disk drives or USB memory stick to your TV by using the USB inputs of the TV.IMPORTANT! Back up the files on your storage devices before connecting them to the TV. Manufacturer will not be responsible for any file damage or data loss. Certain types of USB devices (e.g. MP3 Players) or USB hard disk drives/memory sticks may not be compatible with this TV. The TV supports FAT32 and NTFS disk formatting but recording will not be available with NTFS formatted disks.While formatting USB hard drives which have more than 1TB (Tera Byte) storage space you may experience some problems in the formatting process. Wait a little while before each plugging and unplugging as the player may still be reading files. Failure to do |
| Connector Type Cables Device | |||
| VGA Connection (back) | |||
| AUDIO IN | PC/YPbPr Audio Connection (back) | YPbPr/PC Audio Cable | |
| HDMI Connection (side&back) | |||
| SPDIF | SPDIF (Optical Out) Connection (back) | ||
| BACK AV | Back AV (Audio/Video) Connection (back) | AV Cable | |
| HEADPHONE | Headphone Connection (side) | ||
| YPBPR | YPbPr Video Connection (back) | PC to YPbPr Connection Cable | |
| USB Connection (side) | |||
| CI Connection (side) | |||
| LAN | Ethernet Connection (back) | LAN / Ethernet Cable | |
If you want to connect a device to the TV, make sure that both the TV and the device are turned off before making any connection. After the connection is done, you can turn on the units and use them.
| Recorded Programming | ||
| Recording Settings menu. Select a recorded item from the list (if previously recorded). Press the OK button to view the Play Options. Select an option then press OK button. | ||
| Start playback with the Play button and activate [IMAGE] | All files in the list will be continuously played in original order | |
| Start playback with the OK button and activate [IMAGE] | The same file will be played continuously (repeat) | |
| Start playback with the Play button and activate [IMAGE] | All files in the list will be played once in random order | |
| Start playback with the Play button and activate [IMAGE] | All files in the list will be continuously played in the same random order. | |
| FollowMe TV (if available)With your mobile device you can stream the current broadcast from your smart TV using the FollowMe TV feature. Install the appropriate Smart Center application to your mobile device. Start the application. For further information on using this feature refer to the instructions of the application you use. | ||
| Note: This application may not be compatible with all mobile devices. HD channels are not supported and both of the devices must be connected to the same network. | ||
| CEC and CEC RC PassthroughThis function allows to control the CEC-enabled devices, that are connected through HDMI ports by using the remote control of the TV. | ||
| The CEC option in the System>Settings>More menu should be set as Enabled at first. Press the Source button and select the HDMI input of the connected CEC device from the Sources List menu. When new CEC source device is connected, it will be listed in source menu with its own name instead of the connected HDMI ports name(such as DVD Player, Recorder 1 etc.). | ||
| The TV remote is automatically able to perform the main functions after the connected HDMI source has been selected. | ||
| To terminate this operation and control the TV via the remote again, press Quick Menu button on the | ||
TV Menu Contents
| System - Sound Menu Contents | |
| Volume Adjusts the volume level. | |
| Equalizer | Selects the equalizer mode. Custom settings can be made only when in User mode. |
| Balance Adjusts whether the sound comes from the left or right speaker. | |
| Headphone | Sets headphone volume.Please ensure before using headphones that the headphone volume is set to a low level, to prevent damage to your hearing. |
| Sound Mode | You can select a sound mode (If the viewed channel supports). |
| AVL (Automatic Volume Limiting) | Sets the sound to obtain fixed output level between programmes. |
| Headphone/Lineout | When you connect an external amplifier to your TV using the headphone jack, you can select this option as Lineout. If you have connected headphones to the TV, set this option as Headphone.Please ensure before using headphones that this menu item is set to Headphone. If it is set to Lineout, the output from the headphone socket will be set to maximum which could damage your hearing. |
| Dynamic Bass | Enables or disables the Dynamic Bass. |
| Surround sound | Surround sound mode can be changed as On or Off. |
| Digital Out | Sets digital out audio type. |
| System - Picture Menu Contents | |
| Mode | You can change the picture mode to suit your preference or requirements. Picture mode can be set to one of these options: Cinema, Game(optional), Sports, Dynamic and Natural. |
| Contrast Adjusts the light and dark values on the screen. | |
| Brightness Adjusts the brightness values on the screen. | |
| Sharpness Sets the sharpness value for the objects displayed on the screen. | |
| Colour Sets the colour value, adjusting the colours. | |
| Energy Saving | For setting the Energy Saving to Custom, Minimum, Medium, Maximum, Auto, Screen Off or Off.Note: Available options may differ depending on the selected Mode. |
| Backlight | This setting controls the backlight level. The backlight function will be inactive if the Energy Saving is set to an option other then Custom. |
| Advanced Settings | |
| Dynamic Contrast You can change the dynamic contrast ratio to desired value. | |
| Noise Reduction | If the signal is weak and the picture is noisy, use the Noise Reduction setting to reduce the amount of noise. |
| Colour Temp | Sets the desired colour temperature value. Cool, Normal, Warm and Custom options are available. |
| White Point | If the Colour Temp option is set as Custom, this setting will be available. Increase the 'warmth' or 'coolness' of the picture by pressing Left or Right buttons. |
| Picture Zoom Sets the desired image size format. | |
| Film Mode | Films are recorded at a different number of frames per second to normal television programmes. Turn this feature on when you are watching films to see the fast motion scenes clearly. |
| Skin Tone Skin tone can be changed between -5 and 5. | |
| Colour Shift Adjust the desired colour tone. | |
| HDMI Full Range | While watching from a HDMI source, this feature will be visible. You can use this feature to enhance blackness in the picture. |
| PC Position Appears only when the input source is set to VGA/PC. | |
| Autoposition Automatically optimizes the display. Press OK to optimize. | |
| H Position | This item shifts the image horizontally to the right hand side or left hand side of the screen. |
| V Position | This item shifts the image vertically towards the top or bottom of the screen. |
| Dot Clock | Dot Clock adjustments correct the interference that appear as vertical banding in dot intensive presentations like spreadsheets or paragraphs or text in smaller fonts. |
| Phase | Depending on the input source(computer etc.) you may see a hazy or noisy picture on the screen. You can use phase to get a clearer picture by trial and error. |
| Reset | Resets the picture settings to factory default settings (except Game mode). |
| While in VGA (PC) mode, some items in Picture menu will be unavailable. Instead, VGA mode settings will be added to the Picture Settings while in PC mode. | |
| Power Up Mode | This setting configures the power up mode preference. Last State and Standby options are available. | |
| Virtual Remote Enable | or disable the virtual remote feature. | |
| CEC | With this setting you can enable and disable CEC functionality completely. Press Left or Right button to enable or disable the feature. | |
| CEC Auto Power On | This function allows the connected HDMI-CEC compatible device to turn on the TV and switch to its input source automatically. Press Left or Right button to enable or disable the feature. | |
| Speakers | To hear the TV audio from the connected compatible audio device set as Amplifier. You can use the remote control of the TV to control the volume of the audio device. | |
| OSS | Displays Open Source Software license information. | |
| Installation Menu Contents | ||
| Automatic channel scan (Retune) | Displays automatic tuning options. Digital Aerial: Searches and stores aerial DVB stations. Digital Cable: Searches and stores cable DVB stations. Analogue: Searches and stores analogue stations. | |
| Manual channel scan | This feature can be used for direct broadcast entry. | |
| Network channel scan | Searches for the linked channels in the broadcast system. Digital Aerial: Searches for aerial network channels. Digital Cable: Searches for cable network channels. | |
| Analogue fine tune | You can use this setting for fine tuning analogue channels. This feature is not available if no analogue channels are stored. | |
| Installation Settings (Optional) | Displays installation settings menu. Standby Search(*) : Your TV will search for new or missing channels while in standby. Any new found broadcasts will be shown. Dynamic Channel Update(*) : If this option is set as Enabled, the changes on the broadcasts such as frequency, channel name, subtitle language etc., will be applied automatically while watching. (*) Availability depends on model. | |
| Clear Service List | Use this setting to clear channels stored. This setting is visible only when the Country option is set to Denmark, Sweden, Norway or Finland. | |
| Select Active Network | This setting allows you to select only the broadcasts within the selected network to be listed in the channel list. This feature is available only for the country option of Norway. | |
| First time installation | Deletes all stored channels and settings, resets TV to factory settings. | |
| System - Settings Menu Contents | |
| Conditional Access Controls conditional access modules when available. | |
| Language You may set a different language depending on the broadcaster and the country. | |
| Parental | Enter correct password to change parental settings. You can easily adjust Menu Lock, Maturity Lock, Child Lock or Guidance in this menu. You can also set a new PIN or change the Default CICAM PIN using the related options.Note: Some menu options may not be available depending on the country selection in the First Time Installation. Default PIN can be set to 0000 or 1234. If you have defined the PIN(is requested depending on the country selection) during the First Time Installation use the PIN that you have defined. |
| Timers | Sets sleep timer to turn off the TV after a certain time. Sets timers for selected programmes. |
| Date/Time Sets date and time. | |
| Sources Enables or disables selected source options. | |
| Network/Internet Settings | Displays network/internet settings. |
| Accessibility Displays accessibility options of the TV. | |
| Hard of Hearing Enables any special feature sent from the broadcaster. | |
| Audio Description A narration track will be played for the blind or visually impaired audience. Press OK to see all available Audio Description menu options. This feature is available only if the broadcaster supports it. | |
| More Displays other setting options of the TV. | |
| Menu Timeout Changes timeout duration for menu screens. | |
| Standby LED If set as Off, the standby LED will not light up when the TV is in standby mode. | |
| HBBTV (*) You can enable or disable this feature by setting it as On or Off. | |
| Software Upgrade Ensures that your TV has the latest firmware. Press OK to see the menu options. | |
| Application Version Displays current software version. | |
| Subtitle Mode This option is used to select which subtitle mode will be on the screen (DVB subtitle / Teletext subtitle) if both is available. Default value is DVB subtitle. This feature is available only for the country option of Norway. | |
| Auto TV OFF Sets the desired time for the TV to automatically go into standby mode when not being operated. | |
| Biss Key Biss is a satellite signal scrambling system that is used for some broadcasts. If you need to enter Biss key on a broadcast, you can use this setting. Highlight Biss Key and press OK to enter keys on the desired broadcast. | |
| Store Mode Select this mode for store display purposes. Whilst Store Mode is enabled, some items in the TV menu may not be available. | |
| Audio Video Sharing Audio Video Sharing feature allows you to share files stored on your smartphone or tablet pc. If you have a compatible smartphone or tablet pc and the appropriate software is installed, you can share/play photos on your TV. See instructions of your sharing software for more information. Audio Video Sharing mode will not be available with internet portal feature. | |
| General TV OperationUsing the Channel ListThe TV sorts all stored stations in the Channel List. You can edit this channel list, set favourites or set active stations to be listed by using the Channel List options. Press the OK button to open the Channel List. You can filter the listed channels by pressing the Blue button or open the Edit Channel List menu by pressing the Green button in order to make advanced changes in the current list.Managing the Favourite ListsYou can create four different lists of your favourite channels. Enter the Channel List in the main menu or press the Green button while the Channel List is displayed on the screen in order to open the Edit Channel List menu. Select the desired channel on the list. You can make multiple choices by pressing the Yellow button. Then press the OK button to open the Channel Edit Options menu and select Add/Remove Favourites option. Press the OK button again. Set the desired list option to On. The selected channel/s will be added to the list. In order to remove a channel or channels from a favourite list follow the same steps and set the desired list option to Off.You can use the Filter function in the Edit Channel List menu to filter the channels in the Channel list permanently according to your preferences. Using this Filter option, you can set one of your four favourite lists to be displayed every time the Channel list is opened. The filtering function in the Channel list menu will only filter the currently displayed Channel list in order to find a channel and tune in to it. These changes will not remain the next time the Channel list is opened if you don't save them. To save the changes on the list press the Red button after filtering while the Channel list is displayed on the screen.Configuring Parental SettingsThe Parental Settings menu options can be used to prohibit users from viewing of certain programmes, channels and using of menus. These settings are located in the System>Settings>Parental menu.To display parental lock menu options, a PIN number should be entered. After coding the correct PIN number, Parental Settings menu will be displayed.Menu Lock: This setting enables or disables access to all menus or installation menus of the TV.Maturity Lock: If this option is set, TV gets the maturity information from the broadcast and if this maturity level is disabled, disables access to the broadcast.Note: If the country option in the First Time Installation is set as France, Italy or Austria, Maturity Lock's value will be set to 18 as default. | Child Lock: If this option is set to ON, the TV can only be controlled by the remote control. In this case the control buttons on the TV will not work.Internet Lock: If this option is set to ON, the open browser application in the portal will be disabled. Set to OFF to release the application again.Set PIN: Defines a new PIN number.Default CICAM PIN: This option will appear as greyed out if no CI module is inserted into the CI slot of the TV. You can change the default PIN of the CI CAM using this option.Note: Default PIN can be set to 0000 or 1234. If you have defined the PIN(is requested depending on the selection) during the First Time Installation use the PIN that you have defined.Some options may not be available depending on the model and/or on the country selection in the First Time Installation.Electronic Programme Guide (EPG)Some channels send information about their broadcast schedules. Press the Epg button to view the Programme Guide menu.There are 3 different types of schedule layouts available, Timeline Schedule, List Schedule and Now/Next Schedule. To switch between them follow the instructions on the bottom of the screen.Timeline ScheduleZoom (Yellow button): Press the Yellow button to see events in a wider time interval.Filter (Blue button): Views filtering options.Select Genre (Subtitles button): Displays Select Genre menu. Using this feature, you can search the programme guide database in accordance with the genre. Info available in the programme guide will be searched and results matching your criteria will be highlighted.Options (OK button): Displays event options.Event Details (Info button): Displays detailed information about selected events.Next/Prev Day (Programme +/- buttons): Displays the events of previous or next day.Search (Text button): Displays Guide Search menu.Now (Swap button): Displays current event of the highlighted channel.Rec./Stop (Record button): The TV will start to record the selected event. You can press again to stop the recording.IMPORTANT: Connect a USB disk to your TV while the TV is switched off. You should then switch on the TV to enable the recording feature.Note: Switching to a different broadcast or source is not available during a recording. | Next/Prev Day (Programme +/- buttons): Displays the events of previous or next day.Event Details (Info button): Displays detailed information about selected events.Filter (Text button): Views filtering options.Next Time Slice (Green button): Displays the events of next time slice.Options (OK button): Displays event options.Rec./Stop (Record button): The TV will start to record the selected event. You can press again to stop the recording.IMPORTANT: Connect a USB disk to your TV while the TV is switched off. You should then switch on the TV to enable the recording feature.Note: Switching to a different broadcast or source is not available during a recording. | Now/Next ScheduleOptions (OK button): Displays event options.Event Details (Info button): Displays detailed information about selected events.Filter (Blue button): Views filtering options.Rec./Stop (Record button): The TV will start to record the selected events. You can press again to stop the recording.IMPORTANT: Connect a USB disk to your TV while the TV is switched off. You should then switch on the TV to enable the recording feature.Note: Switching to a different broadcast or source is not available during a recording.Event OptionsUse the directional buttons to highlight an event and press OK button to display Event Options menu. The following options are available.Select Channel: Using this option, you can switch to the selected channel.Record / Delete Rec. Timer: Select the Record option and press the OK button. If the event is going to be broadcast at a future time, it will be added to Timers list to be recorded. If the selected event is being broadcast at the moment, recording will start immediately.To cancel an already set recording, highlight that event and press the OK button and select the option Delete Rec. Timer. The recording will be cancelled.Set Timer on Event / Delete Timer on Event: After you have selected an event in the EPG menu, press the OK button. Select Set Timer on Event option and press the OK button. You can set a timer for future events. To cancel an already set timer, highlight that event and press the OK button. Then select Delete Timer on Event option. The timer will be cancelled.Notes: You cannot switch to any other channel or source while there is an active recording or timer on the current channel.It is not possible to set timer or record timer for two or more individual events at the same time interval.Teletext ServicesPress the Text button to enter. Press again to activate mix mode, which allows you to see the teletext page and the TV broadcast at the same time. Press once more to exit. If available, sections in the teletext pages will become colour-coded and can be selected by pressing the coloured buttons. Follow the instructions displayed on the screen.Software UpgradeYour TV is capable of finding and updating the firmware automatically via the broadcast signal or via Internet.Software upgrade search via user interfaceOn the main menu select System>Settings and then More. Navigate to Software upgrade and press the OK button. In Upgrade options menu select Scan for upgrade and press OK button to check for a new software upgrade. |
| AV and HDMI Signal Compatibility | |||
| Source Supported Signals Available | |||
| Back AV | PALO | ||
| SECAM O | |||
| NTSC4.43 | O | ||
| NTSC3.58 | O | ||
| YPbPr | 480i, 480p | 60Hz | O |
| 576i, 576p | 50Hz | O | |
| 720p | 50Hz,60Hz | O | |
| 1080i | 50Hz,60Hz | O | |
| HDMI | 480i, 480p | 60Hz | O |
| 576i, 576p | 50Hz | O | |
| 720p | 50Hz,60Hz | O | |
| 1080i | 50Hz,60Hz | O | |
| 1080p | 24Hz, 25Hz,30Hz, 50Hz,60Hz | O | |
| (X: Not Available, O: Available)In some cases a signal on the TV may not be displayed properly. The problem may be an inconsistency with standards from the source equipment (DVD, Set-top box, etc.). If you do experience such a problem please contact your dealer and also the manufacturer of the source equipment. | |||
| Typical Display Modes | |
| ving table is an illustration of some of theeo display modes. Your TV may not supportons. | |
| Index Resolution Frequency | |
| 1 | 640x480 60Hz |
| 2 | 4x480 75Hz |
| 3 | 4x600 56Hz |
| 4 | 4x600 60Hz |
| 5 | 4x600 72Hz |
| 6 | 4x600 75Hz |
| 7 | 4x768 60Hz |
| 8 | 4x768 70Hz |
| 9 | 4x768 75Hz |
| 10 | 52x864 75Hz |
| 11 | 60x768 60Hz |
| 12 | 60x768 60Hz |
| 13 | 60x960 60Hz |
| 14 | 60x1024 60Hz |
| 15 | 60x1024 75Hz |
| 16 | 60x1050 60Hz |
| 17 | 40x900 60Hz |
| 18 | 40x900 75Hz |
| 19 | 20x1080 60Hz |
- Check the AV cables and connections if you are trying to switch to the input source dedicated to the connected device. Recording unavailable To record a programme, you should first connect a USB disk to your TV while the TV is switched off. You should then switch on the TV to enable recording feature. If you cannot record, try switching off the TV and then re-inserting the USB device. USB is too slow If a "USB disk writing speed too slow to record" message is displayed on the screen while starting a recording, try restarting the recording. If you still get the same error, it is possible that your USB disk does not meet the speed requirements. Try connecting another USB disk.
If a new upgrade is found, it starts to download the upgrade. After the download is completed confirm the question asking about rebooting the TV by pressing the OK to continue with the reboot operation. 3 AM search and upgrade mode Your TV will search for new upgrades at 3:00 o'clock if Automatic scanning option in the Upgrade options menu is set to Enabled and if the TV is connected to an aerial signal or to Internet. If a new software is found and downloaded successfully, it will be installed at the next power on. Note: Do not unplug the power cord while led is blinking during the reboot process. If the TV fails to come on after the upgrade, unplug, wait for two minutes then plug it back in. Troubleshooting & Tips Tv will not turn on Make sure the power cord is plugged in securely to wall outlet. Check if batteries are exhausted. Press the Power button on the TV. Poor picture • Check if you have selected the correct TV system. • Low signal level can cause picture distortion. Please check antenna access. • Check if you have entered the correct channel frequency if you have done manual tuning. • The picture quality may degrade when two devices are connected to the TV at the same time. In such a case, disconnect one of the devices. No picture • This means your TV is not receiving any transmission. Make sure the correct source has been selected. • Is the antenna connected properly? • Is the antenna cable damaged? • Are suitable plugs used to connect the antenna? • If you are in doubt, consult your dealer. No sound • Check if the TV is muted. Press the Mute button or increase the volume to check. • Sound may be coming from only one speaker. Check the balance settings from Sound menu. Remote control - no operation • The batteries may be exhausted. Replace the batteries. Input sources - can not be selected • If you cannot select an input source, it is possible that no device is connected. If not;
Supported Subtitle File Formats for USB Mode
| External Subtitles | |
| Extension | Specification |
| .ssa | SubStation Alpha |
| .ass | Advanced SubStation Alpha |
| .srt | Subripper |
| .sub | Micro DVD / SubViewer |
| .sub + .idx VOBSub | |
| .txt | Micro DVD / TMPlayer / MPL2 |
| .mpl | MPL2 |
| .smi | Sami |
| .jss | JACOSUB |
| .ttml | TTML |
| .txt / .sub | DVDSUBTITLE |
| .lrc | - |
| Internal Subtitles | |
| Extension | Specification |
| .mkv VOBSub | |
| .mkv ASS / SSA / TEXT | |
| .dat, .mpg, .mpeg, .vob | DVD Subtitle |
| .mp4 DVD Subtitle, TEXT | |
Supported Video File Formats for USB Mode
| Extension Video Codec | Max. Resolution & Frame Rate & Bit | Rate |
| .mpg, .mpeg, .dat, .vob | MPEG1/2, H.264, VC1 | H.264: 1080Px2@30fps - 50Mbps, 1080P@60fps - 50Mbps Other: 1080P@60fps - 50Mbps |
| .ts, .trp, .m2ts | ||
| .avi MPEG1/2, MPEG4, H | 264, MJPEG | |
| .mp4, .m4a, .m4v, .mov, .qt, .3gp, .3g2, .3gpp | MPEG1/2, H.263, MPEG4, H.264 | |
| .mkv MPEG 1/2, MPEG4, | H.264 | |
| .flv Sorenson Sp, MPEG4, H.264 | ||
| .ogm, .ogg MPEG1/2, MPEG4 | ||
| .asf, .wmv MPEG4, WMV3, VC1 | ||
| .rm, .rmvb RV30, RV40 | ||
| .webm VP9, VP8 |
Supported Picture File Formats for USB Mode
| Extension Specification | Resolution (width x height) | |
| .jpg, .jpeg | Baseline 8192 x 8192 | |
| Progressive 3000 x 3000 | ||
| .bmp | RGB 1/4/8/16/24/32 bit | 8192 x 8192 |
| RLE 4/8 bit | ||
| .gif | 87a | |
| 89a (Only 1 picture at animation format) | ||
| .png | Grayscale, 24/32 bit per pixel | |
| Interlace format | ||
| Progressive | ||
| .tiff, .tif Tagged image file format | ||
| .webp | Lossy compression VP8 key frame version number support 0~3 | |
| Lossless compression | ||
Supported Audio File Formats for USB Mode
| Extension | Format |
| .mp3 .mp3 | |
| .ac3 .ac3 | |
| .aac .AAC | |
| .wma .WMA | |
| .amr .AMR-NB, .AMR-WB | |
| .wav . MPEG La, .AAC, .PCM | |
| .flac | . FLAC |
Supported DVI Resolutions
When connecting devices to your TV's connectors by using DVI converter cable(DVI to HDMI cable - not supplied), you can refer to the following resolution information.
| 56Hz 60Hz 66Hz 70Hz 72Hz 75Hz | ||||||
| 640x400 | ☑ | |||||
| 640x480 | ☑ | ☑ | ☑ | ☑ | ||
| 800x600 | ☑ | ☑ | ☑ | ☑ | ☑ | |
| 832x624 | ☑ | |||||
| 1024x768 | ☑ | ☑ | ☑ | ☑ | ☑ | |
| 1152x864 | ☑ | ☑ | ☑ | |||
| 1152x870 | ☑ | |||||
| 1280x768 | ☑ | ☑ | ||||
| 1360x768 | ☑ | |||||
| 1280x960 | ☑ | ☑ | ||||
| 1280x1024 | ☑ | ☑ | ||||
| 1400x1050 | ☑ | ☑ | ||||
| 1440x900 | ☑ | ☑ | ||||
| 1600x1200 | ☑ | |||||
| 1680x1050 | ☑ | |||||
| 1920x1080 | ☑ | |||||
- You must have a modem/router connected to an
- Connect your TV to your modem/router via an ethernet cable. There is a LAN port at the rear (back) of your TV.
- You must have a modem/router connected to an
active broadband connection. - Connect your TV to your modem/router via an ethernet cable. There is a LAN port at the rear (back) of your TV.
active broadband connection. IP and / or Manual DNS values. Select the related item
- You must have a modem/router connected to an active broadband connection. - Connect your TV to your modem/router via an ethernet cable. There is a LAN port at the rear (back) of your TV. please EOff or Right Button to change the routing from Automatic to Manual. Now you can enter the Manual IP and / or Manual DNS values. Select the related item in the drop down menu and enter the new values using the numeric buttons of the remote. Press the OK button to save settings when complete.
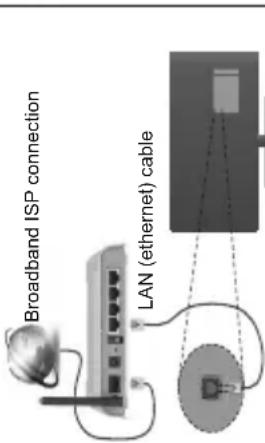
LAN input on the rear side of the TV
To configure wired settings please refer to the Network/Internet Settings section in the System>Settings Menu.
• You might be able to connect your TV to your LAN
depending on your network's configuration. In such a case, use an ethernet cable to connect your TV
a base, use an ethernet cable to connect your TV directly to the network wall outlet.
The Ground Truth image displays a single, solid horizontal line. According to Rule 2 (UNDERSCORE & LINE RULES), this is a stylistic or background line, not a placeholder underscore. Therefore, the OCR result must ignore it. The provided OCR content is "____", which consists of four underscores. This is an incorrect interpretation of the line as a placeholder, violating the rule that stylistic lines must be ignored. The OCR has hallucinated underscores where none should exist based on the GT's visual context. Hence, the OCR result is inconsistent with the Ground Truth.
network
wall socket
(2)
•
□
图 1
(
LAN input on the rear
side of the TV
Configuring Wired Device Settings
Network Type
The Network Type can be set
Wireless Device or Disable
active connection to the TV
Device if you are connecting
Internet Speed Test
Highlight Internet Speed Te
ton. TV will check the internet connec and display the result when complete.
Connectivity
Wired Connectivity
To Connect to a Wired Network
Wireless Connectivity
To Connect to a Wireless Network
The TV cannot connect to the networks with a hidden
SSID. To make your modem's SSID visible, you should
change your SSID settings via the modem's software.
To Connect to a wireless LAN, you should perform
the following steps:
• To configure your wireless settings please refer
to the Network/Internet Settings section in the
System>Settings Menu.
Broadband
ISP
connection
1
(
(1)
图
A Wireless-N router (IEEE 802.11a/b/g/n) with
simultaneous 2.4 and 5 GHz bands is designed to
increase bandwidth. These are optimized for smoother and faster. HD provides streaming files transfer
and faster HD video streaming, file transfer wireless gaming
- Wireless gaming. - The frequency and channel differ depending on
the in the area.
- The transmission speed differs depending on the distance and number of obstructions between the
transmission products, the configuration of these
products, the radio wave conditions, the line traffic
and the products that you use. The transmission may also be cut off or may get disconnected depending
also be cut off or may get disconnected depending on the radio wave conditions. DECT phones or any
on the radio wave conditions, D25-1 phone of any other WiFi 11b appliances. The standard values of
the transmission speed are the theoretical maximum
values for the wireless standards. They are not the
actual speeds of data transmission.
• The location where the transmission is most effective
differs depending on the usage environment.
| 56Hz 60Hz 66Hz 70Hz 72Hz 75Hz | ||||||
| 640x400 | ☑ | |||||
| 640x480 | ☑ | ☑ | ☑ | ☑ | ||
| 800x600 | ☑ | ☑ | ☑ | ☑ | ☑ | |
| 832x624 | ☑ | |||||
| 1024x768 | ☑ | ☑ | ☑ | ☑ | ☑ | |
| 1152x864 | ☑ | ☑ | ☑ | |||
| 1152x870 | ☑ | |||||
| 1280x768 | ☑ | ☑ | ||||
| 1360x768 | ☑ | |||||
| 1280x960 | ☑ | ☑ | ||||
| 1280x1024 | ☑ | ☑ | ||||
| 1400x1050 | ☑ | ☑ | ||||
| 1440x900 | ☑ | ☑ | ||||
| 1600x1200 | ☑ | |||||
| 1680x1050 | ☑ | |||||
| 1920x1080 | ☑ | |||||
| Connectivity TroubleshootingWireless Network Not AvailableEnsure that any firewalls of your network allow the TV wireless connection.Try searching for wireless networks again, using the Network/Internet Settings menu screen.If the wireless network does not function properly, try using the wired network in your home. Refer to the Wired Connectivity section for more information on the process.If the TV does not function using the wired connection, check the modem (router). If the router does not have a problem, check the internet connection of your modem.Connection is SlowSee the instruction book of your wireless modem to get information on the internal service area, connection speed, signal quality and other settings. You need to have a high speed connection for your modem.Disruption during playback or slow reactionsYou could try the following in such a case:Keep at least three meters distance from microwave ovens, mobile telephones, bluetooth devices or any other Wi-Fi compatible devices. Try changing the active channel on the WLAN router.Internet Connection Not Available / Audio Video Sharing Not WorkingIf the MAC address (a unique identifier number) of your PC or modem has been permanently registered, it is possible that your TV might not connect to the internet. In such a case, the MAC address is authenticated each time when you connect to the internet. This is a precaution against unauthorized access. Since your TV has its own MAC address, your internet service provider cannot validate the MAC address of your TV. For this reason, your TV cannot connect to the internet. Contact your internet service provider and request information on how to connect a different device, such as your TV, to the internet.It is also possible that the connection may not be available due to a firewall problem. If you think this causes your problem, contact your internet service provider. A firewall might be the reason of a connectivity and discovery problem while using the TV in Audio Video Sharing mode or while browsing via Audio Video Sharing feature.Invalid DomainEnsure that you have already logged on to your PC with an authorized username/password and also ensure that your domain is active, prior to sharing any files in your media server program on your PC. If the domain | Vic. Valid, this might cause problems while browsing files in Audio Video Sharing mode.Using Audio Video Sharing Network ServiceAudio Video Sharing feature uses a standard that eases the viewing process of digital electronics and makes them more convenient to use on a home network.This standard allows you to view and play photos, music and videos stored in the media server connected to your home network.1. Server Software InstallationThe Audio Video Sharing feature cannot be used if the server programme is not installed onto your PC or if the required media server software is not installed onto the companion device. Please prepare your PC with a proper server programme.2. Connect to a Wired or Wireless NetworkSee the Wired/Wireless Connectivity chapters for detailed configuration information.3. Play Shared Files via Media BrowserSelect Media Browser by using the directional buttons from the main menu and press OK. The media browser will then be displayed.Audio Video SharingSelect the desired media type on the main media browser menu and press OK. If sharing configurations are set properly, Device Selection screen will be displayed after selecting the desired media type. If available networks are found, they will be listed on this screen. Select media server or network that you want to connect to using the Up or Down buttons and press OK. If you want to refresh the device list, press the Green button. You can press Menu to exit.If you select the media type as Videos and choose a device from the selection menu. Then select the folder with video files in it on the next screen and all the available video files will be listed.To play other media types from this screen, you can go back to main Media Browser screen and select the media type as desired and then perform the network selection again. Or press the Blue button to switch to next media type quickly without changing the network. Refer to the Media Browser menu section for further information on file playback.If a problem occurs with the network, please switch your television off at the wall socket and back on again. Trick mode and jump are not supported with the Audio Video Sharing feature.PC/HDD/Media Player or any other devices that are compatible should be used with a wired connection for higher playback quality.Use a LAN connection for quicker file sharing between other devices like computers. |
| The Wireless feature of the TV supports 802.11 a,b,g & n type modems. It is highly recommended that you should use the IEEE 802.11n communication protocol in order to avoid any possible problems while watching videos.You must change your modem's SSID when there are any other modems around with the same SSID. You can encounter connection problems otherwise. Use a wired connection if you experience problems with a wireless connection.Configuring Wireless Device SettingsOpen the Network/Internet Settings menu and select Network Type as Wireless Device to start connection process.The TV will scan the wireless networks automatically. A list of available networks will be displayed. Please select your desired network from the list.Note: If the modem supports N mode, you should mode settings.If the selected network is protected with a password, please enter the correct key by using the virtual keyboard. You can use this keyboard via the directional buttons and the OK button on the remote control.Wait until the IP address is shown on the screen.This means that the connection is now established. To disconnect from a wireless network, highlight Network Type and press Left or Right buttons to set as Disabled.Highlight Internet Speed Test and press the OK button to check your internet connection speed. Highlight Advanced Settings and press the OK button to open the advanced setting menu. Use directional and numeric buttons to set. Press the OK button to save settings when complete.Other InformationThe status of the connection will be displayed as Connected or Not Connected and the current IP address, if a connection is established.Connecting to your mobile device via WiFiIf your mobile device has WiFi feature, you can connect it to your TV via a router, in order to access the content in your device. For this, your mobile device must have an appropriate sharing software.Connect to your router following the steps stated above in the Wireless Connectivity section.Afterwards, engage your mobile device with the router and then activate the sharing software on your mobile device. Then, select files that you want to share with your TV.If the connection is established correctly, you will be able to access the shared files from your mobile device via the Media Browser of your TV. | Enter the Media Browser menu and the playback device selection OSD will be displayed. Select your mobile device and press the OK button to continue.If available, you can download a virtual remote controller application from the server of your mobile device application provider.Note: This feature may not be supported on all mobile devices.Wake ONWake-on-LAN (WoL) and Wake-on-Wireless LAN (WoWLAN) are standards that allow a device to be turned on or woken up by a network message. The message is sent to the device by a program executed on a remote device connected to the same local area network, such as a smartphone.Your TV is WoL and WoWLAN compatible. To enable this feature set the Wake On option in the Network/Internet Settings menu as On. It is necessary that both the device, from which the network message will be sent to the TV, and the TV are connected to the same network. Wake On feature is only supported for Android OS devices and can only be used via YouTube and Netflix applications.In order to use this feature the TV and the remote device should be connected at least once while the TV is on. If the TV is powered off, the connection should be reestablished, the next time it is switched on. Otherwise this feature will be unavailable. This does not apply, when the TV is switched into the standby mode.Wireless DisplayWireless Display is a standard for streaming video and sound content by Wi-Fi Alliance. This feature provides the ability to use your TV as wireless display device.Using with mobile devicesThere are different standards which enable sharing of screens including graphical, video and audio content between your mobile device and TV.Plug the wireless USB dongle to TV first, if doesn't have internal WiFi feature.Then press the Source button on the remote and switch to Wireless Display source.A screen appears stating that the TV is ready for connection.Open the sharing application on your mobile device. These applications are named differently for each brand, please refer to the instruction manual of your mobile device for detailed information.Scan for devices. After you select your TV and connect, the screen of your device will be displayed on your TV.Note: This feature can be used only if the mobile device supports this feature. Scanning and connecting processes differ according to the programme you use. Android based |
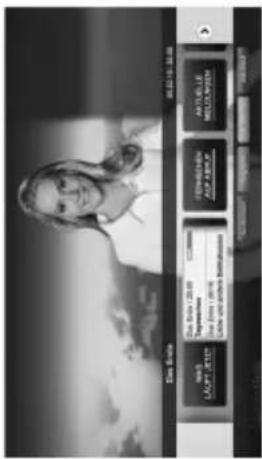
Figure b: EPG application, broadcast video is shown on the left bottom, can be terminated by pressing 0.
HbbTV applications use keys on the remote control to interact with the user. When an HbbTV application is launched, the control of some keys are owned by the application. For example, numeric channel selection may not work on a teletext application where the numbers indicate teletext pages.
HbbTV requires AV streaming capability for the platform. There are numerous applications providing VOD (video on demand) and catch-up TV services. The user can use play, pause, stop, forward, and rewind keys on the remote control to interact with the AV content.
Note: You can enable or disable this feature from the More menu in System>Settings menu.
HBBTV System
HbbTV (Hybrid Broadcast Broadband TV) is a new industry standard that seamlessly combines TV services delivered via broadcast with services delivered via broadband and also enables access
to Internet only services for consumers using connected TVs and set-top boxes. Services delivered through HbbTV include traditional broadcast TV channels, catch-up services, video-on-demand, EPG, interactive advertising, personalisation, voting, games, social networking and other multimedia applications.
HbbTV applications are available on channels where they are signalled by the broadcaster (currently various channels on Astra broadcast HbbTV applications). The broadcaster marks one application as "autostart" and this one is started by the platform automatically. The autostart applications
are generally launched with a small red button icon to notify the user that there is an HbbTV application on that channel. Press the red button to open the application page. After the page is displayed you can go back to the initial red button icon state by pressing the red button again. You can toggle between the red button icon mode and full UI mode
of the application via pressing red button. It should be noted that the red button switching capability is provided by the application and some application may behave differently. If you switch to another channel while an HbbTV application is active (either in red button icon mode or full UI mode), the following scenarios can occur. • The application can continue running.
- The application can be terminated. - The application can be terminated and another autostart red button application can be launched. HbbTV allows the applications to be retrieved both from broadband or broadcast. The broadcaster may enable both ways or one of them. If the platform does
not have an operational broadband connection, the platform can still launch applications transmitted on broadcast.
The autostart red button applications generally provide links to other applications. An example of this is shown below. The user then can switch to other applications by using the links provided. The applications should provide a way to terminate themselves, usually Exit button is used for this.
the page or press the Back/Return button. History, Tabs and Bookmarks options and the browser bar which contains previous/next buttons, the refresh button, the adress/search bar, the Speed Dial and the Opera buttons are available.
To add a desired website to the Speed Dial list for quick access, move the cursor to the top of the page or press the Back/Return button. The browser bar will appear. Highlight the Speed Dial - button and press the OK button. Then select Add to Speed Dial option and press the OK button. Fill in the blanks for Name and Address, highlight OK and press the OK button
to add. Whilst you are on the site you wish to add to the Speed Dial list, highlight the Opera-0 button and press the OK button. Then highlight Add to Speed Dial option in the submenu and press the OK button again. Name and Address will be filled automatically according to the site you are visiting. Highlight OK and
press the OK button to add. You can also use the Opera menu options to manage the browser. Highlight the Opera-0 button and press the OK button to see available page specific and general options.
There are various ways to search or visit websites using the web browser. Enter the address of a website(URL) into the search/address bar and highlight the Submit button on the virtual keyboard and press the OK button to visit the site.
Enter keyword/s into the search/address bar and highlight the Submit button on the virtual keyboard and press the OK button to start a search for the related websites. Highlight a Speed Dial thumbnail and press the OK button to visit the related website.
Your TV is compatible with USB mice. Plug your mouse or wireless mouse adaptor into the USB input of your TV for easier and quicker navigation. Some web pages include flash content. These are not supported by the browser. Your TV does not support any download processes from the internet via the browser. All sites on the internet might not be supported. According to the site; content problems may occur. In some circumstances video contents might not be able to be played.
Note: There may be some PC's which may not be able to utilize the Audio Video Sharing feature due to administrator and security settings (such as business PC's).
Internet Portal
HINT: A broadband internet connection is required for high quality viewing. You must set the country option accordingly in the First Time Installation for proper operation of the internet portal.
Portal feature adds your TV a feature that allows you to connect a server on the Internet and view the content provided by this server over your Internet connection. Portal feature allows you to view the music, video, clip or web content with defined short-cuts. Whether you can view this content without interruption depends on the connection speed provided by your internet service provider.
Press the Internet button on your remote control to open internet portal page. You will see icons of the available applications and services on the portal screen. Use the directional buttons on your remote to select the desired one. You may view the desired content by pressing OK after selecting. Press Back/Return button to return back to the previous screen.
Moreover, you can access some features using the short-cut feature defined for the coloured or numeric buttons of your remote. Press the Exit button to quit the Internet portal mode. PIP Window (depending on portal service) Current source content will be displayed in the PIP window, if you switch to portal mode while on any active source.
If you switch to portal mode while watching TV channels, current programme will be displayed in the PIP window.
Notes: Possible application dependent problems may be caused by the content service provider. Portal service content and the interface may be changed at any time without prior notice. Third party internet services may change, be discontinued or restricted at any time.
Internet Browser
To use the internet browser, enter the portal first. Then launch the Internet application on the portal. (*) The appearance of the internet browser logo may change In the initial screen of the browser, the thumbnails of the predefined (if any) links to web sites available will be displayed as Speed Dial options along with the Edit Speed Dial and the Add to Speed Dial options. To navigate the web browser, use the directional buttons on the remote or a connected mouse. To see the browser options bar, move the cursor to the top of
| Smart CenterSmart Center is a mobile application running on iOS and Android platforms. With your tablet or phone, you can easily stream your favourite live shows and programmes from your smart TV. Also; you can launch your portal applications, use your tablet as a remote control for your TV and share media files.Note: Being able to use all functions of this application depends on the features of your TV.Getting StartedTo use Smart Center features, connections have to be done properly. To get connected to your network wirelessly, plug in the Wi-Fi dongle to one of the USB ports if your TV doesn't have internal wifi feature. To be able to use internet based features, your modem/ router must be connected to the internet.IMPORTANT: Make sure the TV and mobile device are connected to the same network.For media sharing feature Audio Video Sharing option should be enabled(if available). Press the Menu button on the remote, select System>Settings>More menu and press OK. Highlight Audio Video Sharing and change as Enabled. Your TV is ready to connect to your mobile device now.Install the Smart Center application onto your mobile device.Start the smart center application. If all connections are configured properly, you will see your TV's name on your mobile device. If your TV's name doesn't appear on the list, wait a while and tap on the Refresh widget. Select your TV from the list.Mobile Device screenOn the main screen you can find tabs to access various features.The application retrieves actual channel list from TV first when it starts.MY CHANNELS: The programmes of first four channels from the channel list retrieved from the TV are shown. You can change the listed channels. Press on the channel thumbnail and hold. A list of channels will be displayed and you can choose your desired channel to be replaced.TV: You can watch content through the TV tab. In this mode you can navigate through the channel list retrieved from your TV and click on thumbnails to view the detail pages.RECORDINGS: You can view your active recordings(if available) and reminders through this tab. To delete any item, simply press on the delete icon found on each row.EPG: You can view the broadcast schedules of selected channel lists through this tab. You can also navigate through channels by pressing on the selected | channel on the EPG grid. Please note that updating / refreshing the EPG information may take a while depending on your network and web service quality.Note: Internet connection is required for WEB based EPG informations.PORTAL: This tab displays the Portal applications in scrollable view. Unless FollowMeTV (if available) is active, the selected application will be displayed on your TV screen.Note: Internet connection is required. This tab is enabled if a portal page is in use.SETTINGS: Configure the application to your liking. You can change;Auto-lock (Only in IOS): The screen of the device automatically turns off after a certain amount of time. Default is off, which means the screen will always stay on.Auto-enable FollowMeTV: FollowMeTV function (if available) will start automatically when this setting is enabled. Default is disabled.Auto-connection to TV: When enabled, your mobile device will automatically connect to last connected TV and skips the TV search screen.Change TV (Only in IOS): Shows the currently connected TV. You can press on this setting to go to the "TV search" screen and change to a different TV.Edit custom channel list: You can edit your custom channel list using this setting.Choose channel list source: You can choose the channel list source to be used in the application. The options are "TV List" and "Custom List". Additionally you can activate "Remember my choice" option to set the selected channel list source as a constant choice. In this case if the selected source is available it will be used in the application.Version No: Displays the current version of the application.Detail PageTo open detail page tap on a programme. On the detail page screen you can get detailed information of the programmes you select. There are "Details", "Cast&Crew" and "Videos" tabs to find on this page.DETALS: This tab provides summary and information about the selected programme. Also there are links to facebook and twitter pages of the programme selected.CAST&CREW: Shows all the people contributed to the current programme.VIDEOS: Provides videos on Youtube related to the selected programme.Note: For some functions an internet connection may be required. | FollowMe TV Feature (If available)Tap on the FOLLOW ME TV widget located at the bottom left of the screen of your mobile device to change the layout for FollowMe TV feature.Tap the play icon to start streaming of the content from the TV to your mobile device. Available if your device is in your routers operation range.Notes:Note that only digital(DVB-T/C/S) SD channels are supported. Multilanguage audio support and subtitle on/off features are not functional.The streaming performance may change depending on the quality of your connection.Media Share PageTo access the Media Share widget tap on the Up-arrow on the bottom left side of the screen.If the Media Share widget is pressed, a screen is displayed where you can select the media file type to share with your TV.Note: Not all image file formats are supported. This function will not work if Audio Video Sharing feature is not supported.Portal LauncherTo access the Portal Launcher( ) widget tap on the Up-arrow on the bottom left side of the screen. You can access the portal page by tapping on the Portal Launcher widget.Note: Internet connection is required. This function work if a portal page is not in use.Smart Remote FeatureYou can use your mobile device as a remote control for your TV once it has connected to the TV. To use smart remote's full features tap on the Up-arrow on the bottom left side of the screen. Voice RecognitionYou can tap on the Microphone( ) widget and manage your application, giving voice commands such as "Portal!", "Volume Up/Down!", "Programme Up/Down".Note: This feature is only for android based devices available.Keyboard PageThe keyboard page can be opened in two ways; by pressing the Keyboard( ) widget on the application screen or automatically by receiving a command from the TV.Requirements1. Smart TV2. Network connection3. Mobile Device based on Android or iOS platform (Android OS 4.0 or higher; IOS 6 or higher version) | 4. Smart Center app.(to be found on online application stores based on Android and iOS platforms)5. Router modem6. USB storage device in FAT32 format (required for PVR feature, if available)Notes:For Android devices, Normal(mdpi), Large(hdpi) and Extra Large(xhdpi) screen sizes are supported. Devices with 3" or smaller screen sizes are not supported.For iOS devices, all screen sizes are supported.User interface of the Smart Center application is subject to change according to version installed on your device.will not |
| Oprez | Ozbiljna povreda ili smrtonosni rizik |
| Opasnost od strujnog udara | Rizik od opasnog napona |
| Održavanje | Važna komponenta za održavanje |
| Sadržaj | |
| Bezbednosne informacije ......32 | Korišćenje mrežne usluge deljenja audio-video sadržaja......56 |
| Oznake na proizvodu......32 | Internet portal......57 |
| Informacije o Zaštiti Okoline ......34 | Internet pregledač......57 |
| Opcije ......34 | Sistem HBBTV......58 |
| Uključena Dodatna Oprema ......34 | |
| Obaveštenja o Režimu Pripravnosti ......34 | |
| Kontrolni Prekidač Televizora i Rukovanje ......34 | |
| Postavljanje baterija u daljinski upravljač ......35 | |
| Povezivanje napajanja ......35 | |
| Povezivanje antene ......35 | |
| Obaveštenje o licenciranju ......35 | |
| Specifikacije ......36 | |
| Daljinski Upravljač ......37 | |
| Veze ......38 | |
| Uključivanje/isključivanje ......39 | |
| Prva instalacija ......39 | |
| Reprodukcija preko USB ulaza ......39 | |
| Snimanje programa ......40 | |
| Snimanje sa vremenskim pomeranjem ......40 | |
| Instant snimanje ......40 | |
| Gledanje snimljenih programa ......40 | |
| Konfiguracija snimanja ......41 | |
| Meni Pregledač Medija ......41 | |
| FollowMe TV (opciono)(ako postoji) ......41 | |
| CEC i CEC RC Passthrough ......41 | |
| E uputstvo (opciono)(ako postoji) ......42 | |
| Opšte rukovanje televizorom ......47 | |
| Korišćenje Liste kanala ......47 | |
| Konfigurisanje Roditeljskih Postavki ......47 | |
| Elektronski vodič kroz programe (EPG) ......47 | |
| Usluge Teleteksta ......48 | |
| Ažuriranje Softvera ......48 | |
| Rešavanje problema i saveti ......48 | |
| PC-ulaz Tipični Režimi Prikazivanja ......50 | |
| Kompatibilnost AV i HDMI signala ......50 | |
| Podržani formati datoteka za USB režim ......51 | |
| Podržani formati datoteka slike za USB režim ......51 | |
| Podržani formati audio datoteka za USB režim ......51 | |
| Podržani formati datoteka titlova za USB režim ......52 | |
| Podržane DVI rezolucije ......53 | |
| UPOZORENJE | ||
| Nemojte gutati bateriju, opasnost od hemijskih opekotinaOvaj proizvod ili dodatna oprema isporučena sa ovim proizvodom može da sadrži dugmastu baterijuUkoliko se ta dugmasta baterija proguta, ona može izavati ozbiljne unutrašnje opekotine za samo 2 sata, što može dovesti do smrtnog ishoda.Držite nove i stare baterije van domašaja dece.Ukoliko se odeljak za bateriju ne zatvara bezbedno prestanite da koristite proizvod i držite ga van domašaja dece.Ukoliko mislite su baterije progtane ili da se one nalaze u bilo kom delu tela, odmah zatražite medicinsku pomoć. | UPOZORENJA ZA MONTAŽU NA ZIDPročitajte uputstva pre montiranja televizora na zid.Komplet za zidnu montažu je opcionalna oprema.Možete ga dobiti kod lokalnog prodavca ako nije isporučen uz vaš televizor.Nemojte postavljati televizor na plafon ili zid pod nagibom.Koristite navedene zavrtnjeve za montažu na zid i drugu dodatnu opremu.Čvrsto zategnite zavrtnjeve za montažu na zid da biste sprečili da televizor padne. Nemojte previše zalezati zavrtnjeve | Informacije o Zaštiti OkolineOvaj televizor je napravljen da bude bezbedan za okolinu. Da biste smanjili potrošnju energije, potrebno je da preduzmete sledeće korake:Ako podesite Uštedu Energije na Minimum, Srednje,Maksimum ili Automatski, TV će smanjiti potrošnju energije u skladu sa tim. Ako želite da ručno podesite Pozadinsko Osvetljenje na fiksnu vrednost podešenu kao Prilagođeno i podesite Pozadinsko osvetljenje (nalazi se u okviru postavke Ušteda energije)korišćenjem dugmadi za levo ili desno na daljinskom upravljaču. Podesite na Isključeno da biste isključili ovu postavku.Napomena: Dostupne opcije Uštede Energije mogu se razlikovati u zavisnosti od izabranog Režima Sistem>Slika.Imajte u vidu da se neke postavke slike ne mogu menjati.Ako je pritisnuto dugme za desno dok je bila izabrana opcija Automatski, ili levo dugme dok je izabrana opcija Prilagođeno, na ekranu će se pojaviti poruka "Ekran će se isključiti za 15 sekundi"Nastavi i pritisnite OK da odmah isključite ekran. Ako ne pritisnete ništa, ekran će se isključiti kroz 15 sekundi. Pritisnite bilo koje dugme na upravljaču ili televizoru da ponovo upalite ekran.Napomena: Opcija Ekran Isključen nije dostupna ako je Režim postavljen na Igra.Kada TV se ne koristi, molimo vas da ili isključite ga iz dovoda struje. Time ćete smanjiti potrošnju energije.OpcijeTV u boji sa daljinskim upravljanjemPotpuno integrisani digitalni zemaljski/kablovski TV (DVB-T2/C)HDMI ulazi za povezivanje drugih uređaja koji imaju HDMI utičniceUSB ulazSistem OSD menijaIma scart utičnicu za spoljne uređaje (kao što su DVD plejeri, PVR, uređaji za video igre, itd.).Sistem stereo zvukaTeletekstPriklučak za slušaliceAutomatski sistem programiranjaRučno traženje stanicaAutomatsko isključivanje nakon osam sati.Tajmer za isključivanjeBlokada za decuAutomatsko prigušivanje zvuka kada nema prenosnaNTSC reprodukcija |
| UPOZORENJE | ||
| Televizor nikada ne stavljajte na nestabilnu podlogu ili podlogu pod nagibom. Televizor može da padne i izazove ozbiljnu telesnu povredu ili smrt. Mnoge povrede, naročito povrede dece, se mogu ukoliko se preduzmu jednostavne mere opreza, kao što su:Koristite ormane ili stalke koje je proizvođač televizora.Koristite samo onaj nameštaj koji televizoru pruža siguran oslonac.Proverite da li televizor ne prelazi ivicu nameštaja na kome stoji.Ne stavljajte televizor na svaki komad visokog nameštaja (na primer, na kredence ili police za knjige), ukoliko taj komad nameštaja i televizor nisu pričvršćeni za odgovarajući oslonac.Ne postavljajte televizor na tkanine materijale postavljene između televizora i potpornog nameštaja.Upoznajte decu sa opasnostima sa kojima se suočavaju kada se penju na nameštaj da bi dohvatili televizor ili njegove kontrole. Ukoliko podupirete ili premešstate postojeći televizor, važe gore navedene mere. | UPOZORENJEUređaj koji je povezan na zaštitno uzemljenje u instalaciji objekta preko MREŽNOG napajanja ili preko nekog drugog uređaja koji je povezan na zaštitno uzemljenje - i na televizjski distributivni Sistem putem koaksijalnog kabla, u nekim uslovima može predstavljati opasnost od izbijanja požara. U tom slučaju, povezivanje na kablovski distributivni Sistem mora biti preko uređaja koji dostavlja električnu izolaciju ispod određenog raspona frekfencije (galvanski izolator, vidi EN 60728-11).druge | |
natural_image
Diagram of a conical device with two labeled terminals and light beams, no readable text or symbols present.Daljinski Upravljač
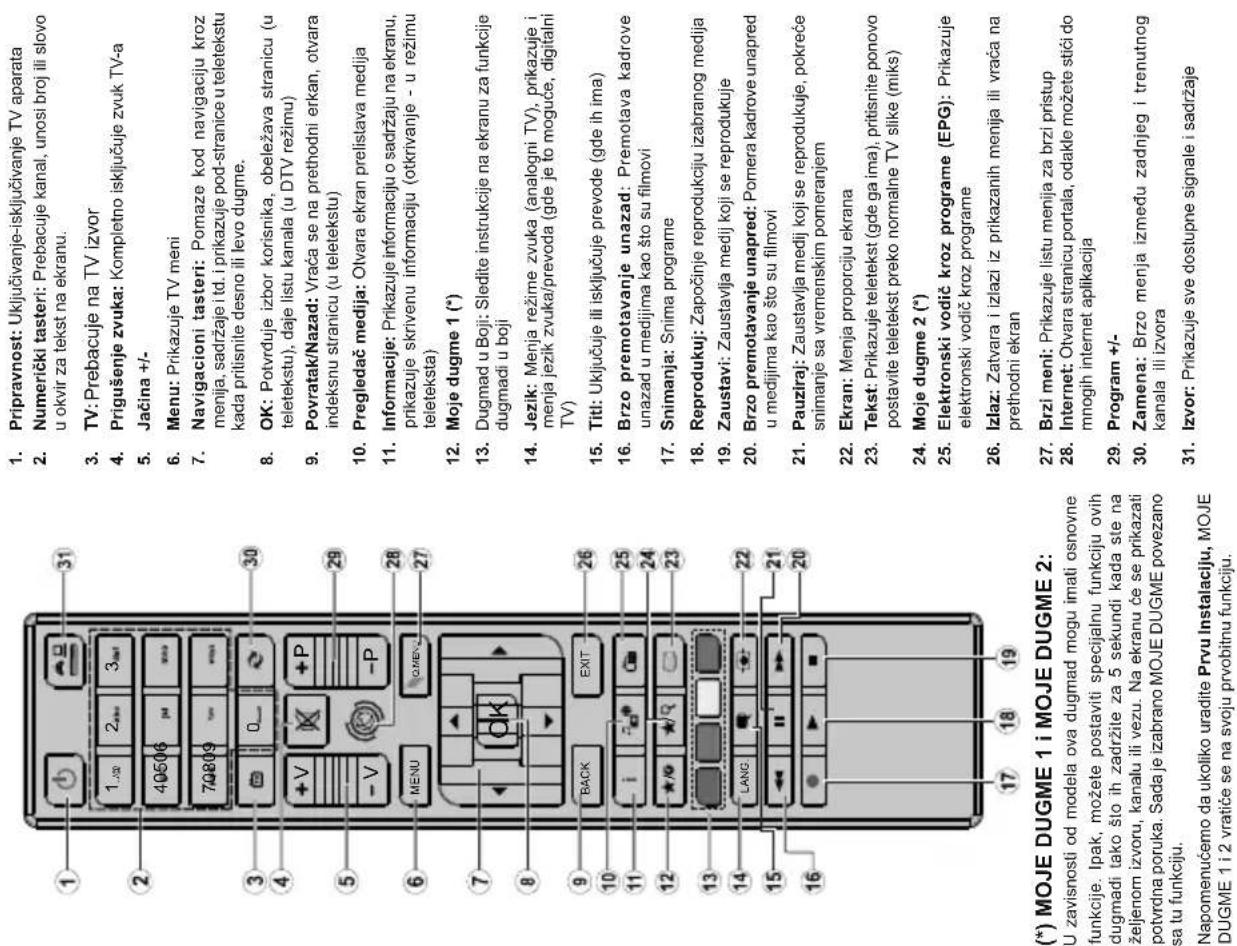
- Pripravnost: Uključivanje-isključivanje TV aparata
- Numerički tasteri: Prebacuje kanal, unosi broj ili slovo u okvir za tekst na ekranu.
- TV: Prebacuje na TV izvor
- Prigušenje zvuka: Kompletno isključuje zvuk TV-a
- Jačina +/--
- Menu: Prikazuje TV meni
- Navigacioni tasteri: Pomaze kod navigaciju kroz menija, sadržaje i td. i prikazuje pod-stranice u teletekstu kada prilisnite desno ili levo dugme.
- OK: Potvrđuje izbor korisnika, obeležava stranicu (u teletekstu), daje listu kanala (u DTV režimu)
- Povratak/Nazad: Vraća se na prethodni erkan, otvara indeksnu stranicu (u teletekstu)
- Pregledač medija: Olvara ekran prelistava medija
- Informacije: Prikazuje informaciju o sadržaju na ekranu, prikazuje skrivenu informaciju (otkrivanje - u režimu teleteksta)
- Moje dugme 1 (*)
- Dugmad u Boji: Sledite instrukcije na ekranu za funkcije dugmadi u boji
- Jezik: Menja režime zvuka (analogni TV), prikazuje i menja jezik zvuka/prevoda (gde je to moguće, digitalni TV)
- Titl: Uključuje ili isključuje prevode (gde ih ima)
- Brzo premotavanje unazad: Premotava kadrove unazad u medijima kao što su filmovi
- Snimanja: Snima programe
- Reprodukuj: Započinje reprodukciju izabranog medija
- Zaustavi: Zaustavlja medij koji se reprodukuje
- Brzo premotavanje unapred: Pomera kadrove unapred u medijima kao što su filmovi
- Pauziraj: Zaustavlja medij koji se reprodukuje, pokreće snimanje sa vremenskim pomeranjem
- Ekran: Menja proporciju ekrana
- Tekst: Prikazuje teletekst (gde ga ima), pritisnite ponovo postavite teletekst preko normalne TV slike (miks)
- Moje dugme 2 (*)
- Elektronski vodič kroz programe (EPG): Prikazuje elektronski vodič kroz programe
- Izlaz: Zatvara i izlazi iz prikazanih menija ili vraća na prethodni ekran
- Brzi meni: Prikazuje listu menija za brzi pristup
- Internet: Otvara stranicu portala, odakle možete stići do mnogih internet aplikacija
(\*) MOJE DUGME 1 i MOJE DUGME 2:
U zavisnosti od modela ova dugmad mogu imati osnovne
sa tu funkciju.
Napomenućemo da ukoliko uradite Prvu Instalaciju, MOJE
DUGME 1 i 2 vratice se na svoju prvobitnu funkciju.
-
Program 1
-
Program 4
- Zamena: Brzo menja između zadnjeg i trenutnog kanala ili izvora
Veze
| Pogledajte ilustracije na levoj strani. Možete da koristite kabl YPbPr na VGA da biste omogućili YPbPr signal preko VGA ulaza. Ne mogu se koristiti VGA i ZPbPr u isto vreme. Da biste omogućili PC/YPbPr audio signal, potrebno je da koristite audio ulaze na poledini sa YPbPr/PC audio kablom za audio vezu. Prilikom korišćenja kompleta za zidnu montažu (koji je dostupan kod drugih proizvođača na tržištu, ako nije isporučen), preporučujemo da priključite sve svoje kablove na zadnju stranu televizora pre nego što ga montirate na zid. Umetajte ili odvajajte CI modul samo kada je televizor ISKLJUČEN. Za detaljne informacije o podešavanju modula, pogledajte njegovo uputstvo za upotrebu. Svaki USB ulaz vašeg televizora podržava uređaje do 500 mA. Povezivanje uređaja sa jačinom struje većom od 500 mA može oštetiti vaš televizor. Kada povezujete opremu sa svojim televizorom preko HDMI kabela, kako bi se garantirala dovoljna imunost na parazitne radio smetnje, morate koristiti oklopljeni HDMI kabel za velike brzine (visoke kvalitete). |
| Konektor | Tip | Kablovi | Uređaj |
| VGA veza (nazad) | |||
| AUDIO ULAZ | YPbPr/PC audio kabl | ||
| HDMI veza (bočno i straga) | |||
| SPDIF | |||
| ZADNJI AV | AV kabl | ||
| SLUŠALICE | |||
| Povezivanje slušalica (sa strane) | |||
| YPBPR | Kabl za PC do YPbPr povezivanje | ||
| USB veza (sa strane) | |||
| Ci veza (sa strane) | |||
| LAN | LAN / Ethernet kabl | ||
Ukoliko želite da povežete uređaj na televizor, pre povezivanja morate proveriti da li su televizor i uređaj isključeni. Nakon povezivanja, možete uključiti uređaje i koristiti ih.

| Uključivanje/isključivanjeUključivanje televizoraPriklučite kabl za napajanje na strujni izvor, npr. zidnu utičnicu (220-240V AC, 50 Hz).Da biste uključili TV iz režima pripravnosti, uradite sledeće:• Pritisnite dugme Pripravnost. Program +/- ili neko numeričko dugme na daljinskom upravljaču.• Pritisnite središnji deo bočnog funkcionalnog prekidača na televizoru.Isključivanje televizoraPritisnite dugme Standby na daljinskom upravljaču ili pritisnite središnji deo funkcionalnog prekidača na televizoru i zadržite ga nekoliko sekundi, televizor će preći u režim pripravnosti.Da biste potpuno isključili televizor, izvucite kabl za napajanje iz utičnice.Napomena: Kada je televizor uključen u režimu pripravnosti, LED dioda za režim pripravnosti trepće kako bi ukazala da su aktivne funkcije kao što su Pretraživanje u režimu pripravnosti, Preuzimanje preko etra ili Tajmer. LED dioda takođe da trepće kada televizor uključujete iz režima pripravnosti.Prva instalacijaKada se prvi put uključi, pojavljuje se ekran za izbor jezika. Izaberite željeni jezik i pritisnite OK.Na sledećem ekranu podesite željene postavke koris-teći dugmad za smer.Napomena: Zavisno od izbora Zemlje može vam se zatražiti da postavite i potvrđite PIN. Izabrani PIN može biti 0000. PIN morate uneti kada se zatraži kasnije za neku operaciju menijima.O izboru tipa emisijeDigitalna antena: Ako je uključena opcija za traživanje Digitalna Antena, televizor će tražiti talne zemaljske emisije nakon obavljanja početnih podešavanja.Digitalni kabl: Ako je uključena opcija za pretraživanje Digitalna kablovská, televizor će tražiti digitalne kablovské emisije nakon obavljanja početnih podešavanja. U skladu sa vašim željama, na ekranu se može prikazati potvrđa poruura pre početka pretraživanja. Izaberite DA i pritisnite OK da biste nastavili. Da biste otkazali operaciju, izaberite NE i pritisnite OK. Možete da izaberete Mreža ili podesite vrednosti kao što su Frekvencija, ID mreže i Korak pretrage. Kada završite, pritisnite dugme OK.Napomena: Trajanje traženja će se promeniti u zavisnosti od izabranog Koraka Pretrage.Analogno: Ako je uključena opcija za pretraživanje Analogno, televizor će tražiti analogne emisije nakon obavljanja početnih podešavanja. | Pored toga, možete da podesite tip emisije kao omiljeni. Prioritet se daje izabranom tipu emisije tokom procesa pretraze, a njegovi kanali će biti navedeni na vrhu liste kanala. Kada završite, pritisnite dugme OK za nastavak.Sada možete aktivirati opciju Režim radnja. Ova opcija će konfigurisati vaš podešavanja vašeg televizora za okruženje prodavnice u zavisnosti od korišćenog modela, a podržane funkcije se mogu prikazati pri vrhu ekrana u obliku reklamne trake sa informacijama. Ova opcija je namenjena jedino za upotrebu u radnjama. Za kučnu upotrebu izaberite Kučni režim. Ova opcija biče dostupna u meniju Sistem>Postavke>Više i može se kasnije uključiti/isključiti.Pritisnite tipku OK na daljinskom upravljaču da biste nastavili i prikazače se meni Postavke mreže/interneta, ako potvrđite prethodno prikazanu poruku sa pitanjem da li želite da izvršite mrežne postavke.Pogledajte odeljak Povezivanje da biste konfigurisali bežičnu ili kablovsku vezu. Kada završite podešavanje, pritisnite dugme OK za nastavak. Da biste prešli na sljedeći korak bez bilo kakve operacije odaberite Ne i pritisnite tipku OK kada se prikaže poruka sa pitanjem da li želite da izvršite mrežne postavke.Nakon obavljanja početnih podešavanja, televizor će započeti pretragu dostupnih emisija za izabrane tipove emisija.Kada se memorišu sve stanice, na ekranu će se prikazati rezultati pretrage. Pritisnite OK za nastavak. Zatim će se prikazati meni Uređivanje liste kanala.Listu kanala možete da uredite kako želite ili pritisnite dogme Menu da biste završili i prešili na gledanje TV-a. U toku pretraze se može pojaviti poruka koja vas pita da li želite da sortirate kanale po LCN-u(*).Izaberite DA i pritisnite OK za potvrdu.(PEN je sistem Logičkog broja kanala koji organizuje drugupne emisije u skladu sa prepoznalljivim redosledom broja kanala (ako je dostupan).Napomena: Ne isključivati TV tokom Prve instalacije. Neke opcije su možda nedostupne u zavisnosti od izabrane zemlje.Reprodukcija preko USB ulazaSpoljašnje čvrste diskove (sa spoljašnim napajanjem) od 2.5 i 3.5 inča ili USB memorijske uređaje možete povezati na vaš TV preko USB ulaza.VAŽNO! Napravite rezervnu kopiju vaših podatka na uređajima pre nego šta ih povežete na TV. Proizvođač neće biti odgovoran ni za kakvo oštečenje datoteka ili gubitak podataka. Određeni tipovi USB uređaja (npr. MP3 plejeri) ili USB čvrsti diskovi/memorijski stikovi možda neće biti kompatibilni sa ovim televizorom. TV podržava FAT32 i NTFS formatiranje diska, ali snimanje je jedino moguće sa NTFS formatiranim diskovima. | Mogu nastati neke poteškoće tokom formatiranja USB memorjskih uređaja koji imaju više od 1 TB (terabajta) prostora.Sačekajte malo između svakog umetanja i vađenja USB uređaja jer plejer možda još čita podatke. To može dovesti do fizičkog oštečenja USB plejera, pa i samog USB uređaja. Ne izvlačite USB modul dok reprodukujete datoteku.Možete koristiti USB habove preko USB ulaza vašeg televizora. U ovakvim slučajevima preporučuju se USB habovi sa eksternim napajanjem.Preporučuje se da direktno koristite USB ulaze televizora ako povezujete USB čvrsti disk.Napomena: Kada gledate slike, meni Pregledača Medija može pokazati samo 1000 slika koje se nalaze na povezanom USB uređaju.Snimanje programaVAŽNO: Kada koristite novi USB disk, preporučuje se da prvo formatirate disk pomoću opcije Formatiraj disk u meniju Pregledač multimedija>Postavke>Postavke snimanja.Da biste snimili program, morate prvo da povežete USB disk sa televizorom kada je televizor isključen.Zatim treba da uključite televizor da biste omogučili funkciju snimanja.Da bi se moglo snimati, vaš USB disk mora da ima najmanje 2 GB slobodnog prostora i da je kompatibilan sa USB 2.0. Ako USB disk nije kompatibilan, pojavljuje se poruka o grešci.Za snimanje programa koji dugo traju, kao što su filmovi, preporučuje se korišćenje USB čvrstih diskova (HDD).Snimljeni programi čuvaju se na povezanom USB disku. Ako želite, možete ih sačuvati/kopiratačunaru, ali se oni ne mogu reprodukovati na računaru. Možete ih reprodukovati samo preko vašeg televizora.Po vreme tajmšiftinga se može pojaviti kašnjenje u sinhronizaciju govora. Snimanje radija nije podržano. Ova televizor može da snima programe u trajanju od ukupno deset sati.Snimljeni programi se dele na particije od 4GB.Ako je brzina upisivanja povezanog USB diska nedovoljna, snimanje se možda neće obaviti, a funkcija vremenskog pomeranja može biti nedostupna.Za snimanje HD programa se preporučuje korišćenje USB čvrstih diskova.Nemojte izvlačiti USB/HDD tokom snimanja. To može oštestiti disk.Ako se kabl za napajanje izvuče dok je neki tajmer za USB snimanje aktivan, on će biti otkazan.Dostupna je podrška za više particija. Najviše dve različite particije su podržane. Prva participija USB diska koristi se za PVR ready funkcije. Takođe, mora | biti formatiran kao primarna particija da bi se koristio za PVR ready funkcije.Neki paketi striminga mogu da ne budu snimljeni radi problema signala, pa nekad video se zaledi u toku prikaza.Dugmad za snimanje, reprodukovanje, pauziranje i prikazivanje (za dijalog plejliste) ne mogu se korisiti kada je teletekst uključen. Ukoliko snimanje počinje od tajmera dok je teletekst uključan, teletekst se automatski isključuje. Takođe, upotreba teleteksta se onemogućava kada je u toku snimanje ili reprodukcija.Snimanje sa vremenskim pomeranjemPritisnite dugme Pauziraj dok gledate emisiju da biste prebacili u režim vremenskog pomeranja. U režimu vremenskog pomeranja, program se pauzira i istovremeno snima na povezani USB disk.Ponovo pritisnite Reprodukuj da biste gledali puzirani program od trenutka zaustavljanja. Pritisnite dugme Zaustavi da biste zaustavili vremensko pomeranje i vratili na prenos uživo.Tajmšifting se ne može koristiti na radio stanicama.Nije moguće koristiti odliku "brzo natrag" tajmšiftinga pre napredovanja u snimku pomoći opcije brzo napred.Instant snimanjePritisnite Snimanje da biste počeli snimati događaj instantno dok gledate program. Možete ponovo pritisnuti dugme Snimanje na daljinskom upravljaču da biste snimili sledeći događaj nakon izbora sledećeg programa iz EPG-a. Pritisnite dugme Zaustavi da biste otkazali trenutno snimanje.Ne možete promeniti emisiju ili gledati Prelistaća medija toko snimanja. Tokom snimanja programa ili tokomavremenskog pomeranja, na ekranu se pojavljuje poruka upozorenja u slučaju da brzina vašeg USB uređaja nije dovoljna.Gledanje snimljenih programaIzaberite Snimke sa menija Prelistac medija. Izaberite snimak sa liste (ako je prethodno snimljen). Pritisnite dugme OK da prikažete Opcije reprodukcije. Izaberite opciju, a zatim pritisnite dugme OK.Napomena: Prikaz glavnog menija i stavke menija neće biti dostupni tokom reprodukcije.Pritisnite dugme Zaustavi da biste zaustavili reprodukciju i vratili se na Snimke.Sporo unapredAko pritisnete dugme Pauziraj dok gledate snimljene programe biče dostupna funkcija sporog premotavanja unapred. Možete koristiti dugme Brzo PremotavanjeUnapred za sporo premotavanje unapred. Uzastopnim pritiskanjem dugmeta Brzo Premotavanje Unapredma menja se brzina sporog premotavanja unapred. |
Konfiguracija snimanja
Odaberite stavku Postavke snimanja u meniju Pregledač multimedija>Postavke da biste konfigurisali postavke snimanja.
Formatiranje diska: Možete korisiti funkciju Formatiranje diska da biste formatirali povezani USB disk. Za korišćenje funkcije Formatiranje diska, potreban
je vaš PIN kod. Napomena: Fabrički PIN se može postaviti ili 1234. Ako se promeni PIN (traži se u zavis)
(izabrane zemlje) tokom Prve Instalacije, koristite PIN koji ste tada uneli.
CEC i CEC RC Passthrough
Ova funkcija omogućava da se uređaji sa CEC-om, povezani preko HDMI ulaza, upravljaju preko daljinskog upravljača televizora.
Opcija CEC u meniju Sistem>Postavke>Više u početku treba da bude podešena na Omogućeno. Pritisnite dugme Source i izaberite HDMI ulaz ti od novezanog CEC uređaja iz menija. Lista Izvor
The Ground Truth image displays a single, solid horizontal line. According to Rule 2 (UNDERSCORE & LINE RULES), this is a stylistic or background line, not a placeholder underscore. Therefore, the OCR result must ignore it. The provided OCR content is "____", which consists of four underscores. This is an incorrect interpretation of the line as a placeholder, violating the rule that stylistic lines must be ignored. The OCR has hallucinated underscores where none should exist based on the GT's visual context. Hence, the OCR result is inconsistent with the Ground Truth.
mrežna
zidna utičnica
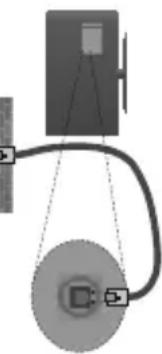
natural_image
Diagram showing a device connected to a monitor, with no visible text or symbolsCEC i CEC RC Passthrough 71
E-Priručnik (ako je dostupno)....71
Sadržaj TV menija 72
Onćenito o korištenju TV 76
Korištenje Liste kanala 76
Konstorsje Lists kandia 16 Konfiguriša reditelicko postevka 76
natural_image
Pure electrical circuit lines without any symbolsDaljinski Upravljač
natural_image
Pure diagram of a conical object with labeled points and polarity indicators (no text or symbols)Σύνδεση στο ρεύμα
m = 311
-
(1)
The Ground Truth image displays a single, solid horizontal line. According to Rule 2 (UNDERSCORE & LINE RULES), if the GT contains lines used for stylistic emphasis or as background elements (like ruled paper), the OCR result must ignore them. The OCR content provided is "____", which represents four underscores. This is incorrect because underscores are not equivalent to a solid line and are not permitted under the “Stylistic/Background Lines (Ignore)” rule. The OCR has hallucinated text (underscores) where none should exist, violating the rule to ignore stylistic lines. Therefore, the OCR result is inconsistent with the Ground Truth.
Σύνδεση στο ρεύ
ΣΗΜΑΝΤΙΚΟ: Η
240V AC. 50 Hz M
τηλεόραση να αποι
The Ground Truth image displays a single, solid horizontal line. According to Rule 2 (UNDERSCORE & LINE RULES), if the GT contains lines used for stylistic emphasis or as background elements (like ruled paper), the OCR result must ignore them. The provided OCR content is "____", which consists of four underscores. This is incorrect because underscores are not equivalent to a solid line and are not permitted under the “Stylistic/Background Lines (Ignore)” rule. Outputting underscores for a stylistic line violates the rule and constitutes an error. Therefore, the OCR result is inconsistent with the Ground Truth.
Γνωστοποιησης
Ori opori HDMI kai F Interface, koθύς κο
σήματα ή κατατεθέ
Licensing Administ
Αρερικής και οε αλ
The Ground Truth image displays a single, solid horizontal line. According to Rule 2 (UNDERSCORE & LINE RULES), if the GT contains lines used for stylistic emphasis or as background (like ruled paper), the OCR result must ignore them. The provided OCR content is "____", which consists of four underscores. This is incorrect because underscores are not equivalent to a solid line and are not permitted under the “Stylistic/Background Lines (Ignore)” rule. Outputting underscores for a stylistic line violates the rule and constitutes an error. Therefore, the OCR result is inconsistent with the Ground Truth.
THEO TO PLANKPO RETURN/Back 1|Menu.
m = 311
natural_image
Illustration of a monitor with wireless signal icons above it (no text or symbols)- VOX
- ELECTRONICS
- OPERATING INSTRUCTIONS FOR TV УПУТСТВО ЗА УПОТРЕБУ ТЕЛЕВИЗОРА UPUTSTVA О RADU TELEVIZORA ΕΓΧΕΙΡΙΔΙΟ ΧΡΗΣΤΗ ΕΙΡΙΔ
- Markings on the Product
- Safety Information
- Contents
- Changing Channels and Volume
- Inserting the Batteries into the Remote
- Connect Power
- Antenna Connection
- TV Control Switch & Operation
- Notes:
- Operation with the Remote Control
- Input Selection
- (\*) MY BUTTON 1 & MY BUTTON 2:
- Supported DVI Resolutions
- Configuring Wired Device Settings
- Connectivity
- Wired Connectivity
- To Connect to a Wired Network
- Wireless Connectivity
- To Connect to a Wireless Network
- HBBTV System
- Internet Portal
- Internet Browser
- Daljinski Upravljač
- (\*) MOJE DUGME 1 i MOJE DUGME 2:
- Konfiguracija snimanja
- CEC i CEC RC Passthrough
- Σύνδεση στο ρεύμα
Brand : VOX
Model : 50DSW289B
Category : Television