
55WOS315B - Television VOX - Free user manual and instructions
Find the device manual for free 55WOS315B VOX in PDF.


| Product Type | 4K Ultra HD LED Smart TV |
| Screen Size | 55 inches (139 cm) |
| Resolution | 3840 x 2160 pixels |
| Display Technology | LED (Direct LED) |
| Refresh Rate | 60 Hz |
| HDR Support | HDR10, HLG, Dolby Vision |
| Smart Platform | Android TV 11 |
| Processor | Quad-core |
| RAM / Storage | 2 GB / 16 GB |
| Connectivity | 3x HDMI 2.0, 2x USB 2.0, Ethernet, Wi-Fi 802.11ac, Bluetooth 5.0 |
| Audio Output | 2 x 10W speakers, Dolby Atmos |
| Power Consumption (Typical) | 120 W |
| Energy Class | A+ |
| Weight with Stand | 14.5 kg |
| Weight without Stand | 13.8 kg |
| Dimensions with Stand (WxHxD) | 1230 x 775 x 250 mm |
| Dimensions without Stand (WxHxD) | 1230 x 715 x 80 mm |
| VESA Mount | 300 x 200 mm |
| Remote Control | IR, includes batteries |
| Features | USB Recording, Parental Control, Sleep Timer, Electronic Program Guide |
| Cleaning | Wipe with soft dry cloth; do not use solvents |
| Safety | Auto shutdown after idle, VESA mount secure, ventilation keep clear |
| Spare Parts | Contact VOX support for remote, stand, power cord |
| Repairability Index | 5.5 / 10 |
Frequently Asked Questions - 55WOS315B VOX
User questions about 55WOS315B VOX
0 question about this device. Answer the ones you know or ask your own.
Ask a new question about this device
Download the instructions for your Television in PDF format for free! Find your manual 55WOS315B - VOX and take your electronic device back in hand. On this page are published all the documents necessary for the use of your device. 55WOS315B by VOX.
USER MANUAL 55WOS315B VOX
natural_image
Abstract circular design with diagonal white lines on dark background, no text or symbols presentVOX
ELECTRONICS
ENG
| OPERATING INSTRUCTIONS | UHD 43WOS315B |
| UHD 50WOS315B | |
| UHD 55WOS315B | |
| UHD 65WOS315B |
Important Safety Instructions and Maintenance
Important Safety Instructions

High Voltage Do not open

CAUTION
Risk of electronic shock, do not open. Do not attempt to service this product yourself as opening or removing covers may expose you to dangerous voltage or other hazards. Refer all servicing to qualified service personnel.
To reduce the risk of fire or electric shock, do not expose this product to rain or moisture.
The apparatus shall not be
exposed to dripping or splashing and no objects filled with liquids, such as vases, shall be placed on the apparatus.

The screen and cabinet get warm when the TV is in use. This is not a malfunction. In case of smoke, strange noise or strange smell from the unit:
- Turn off the power switch immediately;
- Disconnect the power plug from the power outlet;
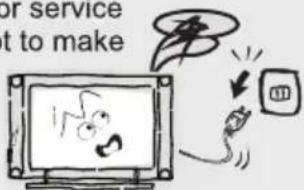
- Contact your dealer or service centre. Never attempt to make
repairs yourself because this could be dangerous.

natural_image
Cartoon illustration of two TVs connected by a cable, one showing a surprised face and the other with a surprised expression (no text or symbols)If the following problems occur:
Turn off the TV set and unplug the AC power cord immediately if any of the following problems occur. Ask your dealer or service centre to have it checked by qualified service personnel.
When:
- AC power cord is damaged.
- Poor fitting of AC power outlet.
- TV set is damaged by being dropped, hit or having something thrown at it.
- Any liquid or solid object falls through openings in the cabinet.
Never push objects of any kind into the set through the cabinet slots as they may touch dangerous voltage points or short-circuit parts that could result in a fire or electric shock. Never spill liquid of any kind on the set. Use special caution in households where children are present. The apparatus is not suitable for children under 3-year to operate.

natural_image
Cartoon illustration of a person sitting on a box watching a TV with a distressed face (no text or symbols present)Do not overload wall outlets, extension cords or adaptors beyond their capacity,
this can result in fire or electrical shock. Power-supply cords should be routed so that they are not likely to be walked on or pinched by items
placed upon or against them, paying particular attention to cords at plug end, adaptors and the point where they exit from the appliance. The mains plug is used as the disconnect device. It shall remain readily accessible and should not be obstructed during intended use. Make sure to plug the power
cord in until it is firmly inserted. When removing the power cord, make sure to hold the power plug when pulling the plug from the outlet, do not pull the plug out by the wire. NEVER touch the plug or power cord with wet hands. To disconnect the apparatus from the mains power, the plug must be pulled out from the mains socket, therefore make sure the mains plug is always easily accessible.

Do not push or scratch the front filter, or place any objects on top of the TV set. The image may be uneven or the screen may be damaged.
To avoid the fire, no naked flame source, such as lighted candles, should be placed on the apparatus.

natural_image
Cartoon illustration of a character sitting at a desk under a window, with no visible text or symbolsnatural_image
Cartoon illustration of two anthropomorphic computers with expressive faces, no text or symbols presentnatural_image
Cartoon illustration of a smiling computer monitor with eyes and a smile, resting on a flat surface (no text or symbols)Important Safety Instructions and Maintenance
Installation
When the TV being moved in from cold place, it needs some right time for dew inside unit evaporating fully before turn on the unit;
To prevent injury, this apparatus must be securely attached to the floor/wall in accordance with the installation instructions.
LED Screen
Although the LED screen is made with high precision technology and 99.99% or more of the pixels are effective, black dots may appear or bright points of light (red, blue or green) may appear constantly on the LED screen. This is a structural property of the LED screen and is not a malfunction. If the surface of the LED panel cracks, do not touch it until you have unplugged the AC power cord. Otherwise electric shock may result. Do not throw anything at the TV set. The LED panel may break from the impact and cause serious injury.
Precautions When Displaying a Still Image
A still image may cause permanent damage to the TV screen.
Do not display still images and partially still images on the LED panel for more than 2 hours as it can cause screen image retention. This image retention is also known as "screen burn". To avoid such image retention, reduce the degree of brightness and contrast of the screen when displaying a still image.
Watching the LED TV in 4:3 format for a long period of time may leave traces of borders displayed on the left, right and centre of the screen caused by the difference of light emission on the screen. Playing a DVD or a game console may cause a similar effect to the screen.
Damages caused by the above effect are not covered by the Warranty.
Displaying still images from Video games and PC for longer than a certain period of time may produce partial after-images. To prevent this effect, reduce the 'brightness' and 'contrast' when displaying still images.
Cleaning
Cleaning and handling the screen surface and cabinet. Disconnect the unit from the AC outlet before cleaning. To remove dust, wipe gently with a soft, lint free cloth. If required use a slightly damp cloth.

MAINS PLUG
Wipe the mains plug with a dry cloth at regular intervals. Moisture and dust may lead to fire or electrical shock.


Use care not to subject the TV's surfaces to detergent. (A liquid inside the TV could lead to product failure, fire or electrical shock.)
Use care not to subject surfaces to bug repellent, solvent, thinner, or other volatile substances as this may deteriorate the surface and finish of the cabinet.
Important Information
If a television is not positioned in a sufficiently stable location, it can be potentially hazardous due to falling. Many injuries, particularly to children, can be avoided by taking simple precautions such as:
- Using cabinets or stands recommended by the manufacturer of the television.
- Only using furniture that can safely support the television.
- Ensuring the television is not overhanging the edge os the supporting furniture.
- Not placing the television on tall furniture (for example, cupboards or bookcases) without anchoring both the furniture and the television to a suitable support.
- Not standing the televisions on cloth or other materials placed between the television and supporting furniture.
- Educating children about the dangers of climbing on furniture to reach the television or its controls.
- Keep small accessories out of reach of children so they are not mistakenly swallowed.
Table of Contents
INSTALLATION 6
Remote Lontrol 8
Getting Started with webOS TV 9
How to Operate 11
Enjoy Line TV 12
Enjoying Content Store 17
CONNECTING EXTERNAL DEVICES 18
SETTINGS 21
TROUBLESHOOTIN 36
INSTALLATION
Install the stand as described below, or if you want to mount it to a wall, please contact a professional installer.
Please ensure the TV is not plugged into the wall socket and furthermore we recommend to get another person to assist in the following task.
Attaching the stand
Step 1
Place a soft cushioned material on top of a flat surface to prevent damaging the screen panel. Then place the TV screen flat on top, with the screen side facing down, as illustrated on the right.
Step 2
Align the stand leg to the installation point, as illustrated below.
Step 3
Tighten the screws (supplied) with a screwdriver to affix the stand to the panel, as illustrated on the right.


CAUTION!
Do not apply excessive force as this may damage the screw holes.
INSTALLATION
Wall-Mounting Instructions
Please ensure the TV is not plugged into the wall socket and furthermore we recommend to get another person to assist in the following task.
• We recommend you use a professional installer as we assume no liability for any eventual damage to the product or injury to yourself if you mount the TV on your own.
UHD 43WOS315B BACK OF TV
UHD 50WOS315B BACK OF TV
UHD 55WOS315B BACK OF TV
VESA PATTERN: 200 x 200mm

UHD 65WOS315B BACK OF TV
VESA PATTERN: 300 x 200mm
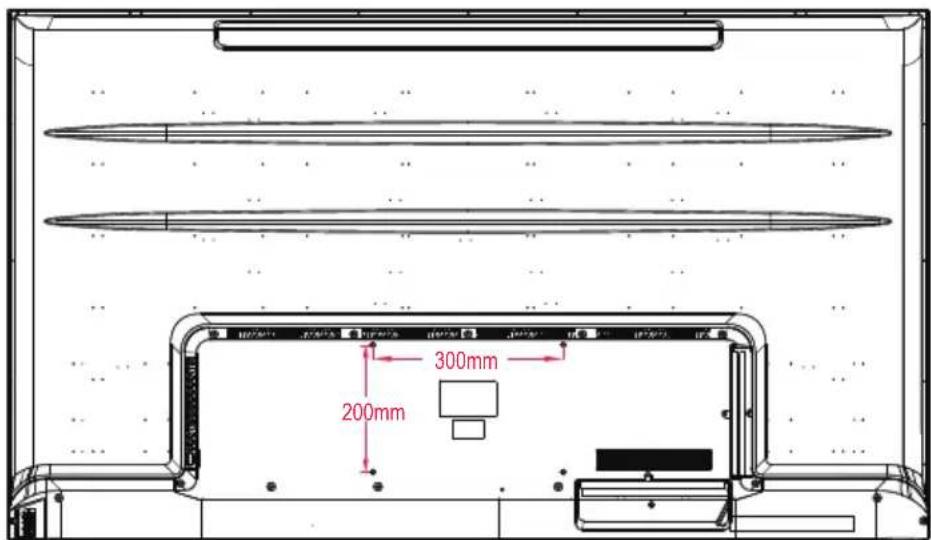
NOTE: If you are wall-mounting the TV, this should be done by a qualified installer.
REMOTE CONTROL
Using the Remote Control Button

| TV POWER ON/OFF | |
| STB POWER ON/OFF | |
| 1 | Number Key |
| 2 | Number Key |
| 3 | Number Key |
| 4 | Number Key |
| 5 | Number Key |
| 6 | Number Key |
| 7 | Number Key |
| 8 | Number Key |
| 9 | Number Key |
| - / ≡ LIST | Input/Channel List |
| QUICK ACCESS | Brief : Number Key / Hold : Quick Access |
| AD/SAP | Brief : Screen remote Call / Hold : Audio Description |
| Mute | |
| + 📋 | Volume UP |
| - 📋 | Volume Down |
| + ∧ | Channel UP |
| + ∨ | Channel Down |
| Voice recognition Call (Voice recognition activation roll) | |
| Home Menu Call | |
| Quick Settings Call | |
| Wheel (UP) | Page Scroll Up / Go to upper channel level |
| Wheel (OK) | Confirm |
| Wheel (DOWN) | Page Scroll Down / Go to lower channel level |
| ▲ | Focus Move Up |
| ◀ | Focus Move Left |
| ▶ | Focus Move Right |
| ▼ | Focus Move Down |
| ← | Historical Back |
| GUIDE | EPG Call |
| NETFLIX | NETFLIX APP Execution |
| Input Picker Call | |
| prime video | AMAZON APP Execution |
| (RED) | Color Key |
| (GREEN) | Color Key |
| (YELLOW) | Color Key |
| (BLUE) | Color Key |
| MOVIES | MOVIES Call |
| ▷ | Play |
| || | Pause |
□ : Launch Live Playback.
NETFLIX : go to Netflix.
prime video : go to prime video.
: Corresponds to various colour functions in the menu or teletext.
The marks and positions of the remote control buttons may vary depending on the model.
Getting Started with webOS TV
Home Tutorial
Using the Home Feature of the webOS TV
You can open the Home screen by pressing the 🔊 button on your remote control. You can combine frequently used apps on a single screen and use whichever you want at any time.

- Launch Search.
To see the details, click the Enjoying Content Store Content Search in User Guide.
- Move to the Home Dashboard.
You can select or control a device (mobile, external device, Home IoT Devices, etc.) connected to the TV.
For more information, see Connecting External Devices Using Home Dashboard in User Guide.
-
Move to the TV input you used recently.
-
Move to the recently used app.
Long-press the 📋 button on the remote control or focus on the Recents.
You can run or close a recently used app in the list provided in the Preview area at the top.
- You can run, move, and delete the apps installed on your TV.
Focus on each App area. It provides the Preview at the top.
You can check or run useful features of each app and recommended content on the Preview without entering into the app.
Some apps may not provide the Preview.
The home screen will be displayed automatically when the TV is turned on. If you don't want the home screen to be displayed, set Home Auto Launch of ⏻→⋮→General→Home Settings as Off.
The availability of and access to Contents and Services in device are subject to change at any time without prior notice.
Getting Started with webOS TV
Connecting to the Network
Connecting to the Network
If you configure settings for the network, you can use various services such as online contents and applications.
Setting a Wired Network

- Connect the LAN port of the TV and the router using a LAN cable.
The router should be connected to the Internet beforehand.
If the router supports DHCP, the TV is automatically connected to the network when you connect the TV to the network with a LAN cable.
If the Network Is Not Automatically Connected
-
Press the ⏻ button on the remote control.
-
Select Connection Network Connection Settings
Wired Connection (Ethernet).
To see the details, click the Settings Connection Network Connection Settings in User Guide
Setting a Wireless Network

natural_image
Illustration of a router connected to a wireless network icon with signal waves (no text or symbols)-
Turn on the power of the router connected to the Internet.
-
Press the Settings button on the remote control.
-
Select All Settings icon Connection Network Connection Settings Wi-Fi Connection.
-
When the network search is complete, the list of networks available for connection is shown.
-
Select a network to connect.
If your wireless LAN router is password protected, enter the password configured for the router.
To see the details, click the Settings Connection Network Connection Settings in User Guide.
How to Operate TV
Connecting to SIMPLINK (HDMI-CEC)
Using SIMPLINK
With a single remote control, you can easily manage various devices such as a soundbar or set-top box connected to a TV with HDMI.
Up to three devices can be connected and used simultaneously.
-
Connect the SIMPLINK HDMI Output port to the TV HDMI IN port with an HDMI cable.
-
Press the ⏻ button on the remote control.
-
Select Connection Device Connection Settings.
-
Set SIMPLINK (HDMI-CEC) to On.
-
Configure the Auto Power Sync settings to On or Off. (If Auto Power Sync is set to On, turning on a SIMPLINK-linked device will turn the TV on. When you turn off the TV, the device will also be turned off.)
-
Turn on the connected device. When the TV automatically connects to the device, the input will change.
If the device is not automatically connected to the TV, click the Input button.
This feature works only with devices with the SIMPLINK logo logo. Check for the SIMPLINK logo on the external device.
Use of any product other than those specified may cause problems during operation.
To use Simplink, you need to use a high-speed HDMI cable with CEC (Consumer Electronics Control) function. The High-Speed HDMI cable has the pin 13 for enabling information exchange between devices.
If you want to output sound to the external audio equipment connected through the HDMI cable, set SIMPLINK (HDMI-CEC) to On
Enjoy Live TV
Making the Most of Live Menu
Using Live Menu
You can use the relevant features with ease when watching TV broadcasts.
Press the LIST button on the remote control.
Or press the Wheel (OK) button on the remote control and select Programmes.

-
Programmes : View a list of broadcast content that is currently being broadcast.
-
Guide : You can view programmes and the schedule of each programmes.
To see the details, click the Enjoy Live TV Viewing Guide in User Guide.
3.TV Scheduler: You can enter the time and date of a programme to schedule watching or recording it at the set time.
To see the details, click the Enjoy Live TV Using TV Scheduler in User Guide.
- Recordings : You can check the recordings stored in the storage device and play the recordings.
To see the details, click the Enjoy Live TV Playing Recorded TV Programs in User Guide. The menu appears only if an external storage device is connected and the recorded video can be viewed.
The programmes displayed in Programme List are a configuration of programmes provided by the broadcast service provider. Therefore, if the broadcast service provider has changed its programme configuration without notice, the programmes displayed in Programme List may differ from the actual TV programmes.
Because programme information displayed in programme List includes information provided by external Electronic Programme Guide (EPG) providers, it may differ from the actual TV programmes.
You must complete the settings of the network, region, and auto-programme to receive normal live broadcast service.
The configurable items differ depending on model
Enjoy Live TV
Viewing Guide
Viewing TV Guide
You can view programmes and the schedule of each programmes.
Press the remote control's LIST button, and select the Guide tab on the left side of the screen.
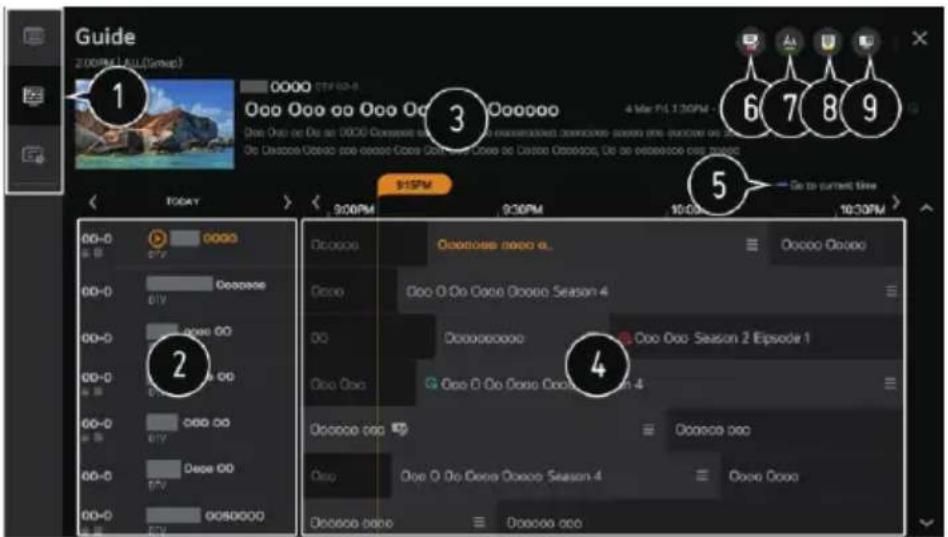
-
Click on each area, and you can move to the app.
-
You can view information on the programme and broadcaster.
-
You can view information about the programme you are currently watching as well as the focused programme information.
-
Select the See Details button or the title of the desired programme. You can view more information on the programme and perform Watch/Record (only available on certain models) or Reminder/Scheduled Recording (only available on certain models), etc.
-
You will be taken to the programme list for the current date and time.
-
Launch Programme Manager.
-
You can change the size of the programme list to adjust the number of programmes displayed on the screen.
-
Sets the filter.
-
You can turn on/off Mini TV.
Programme information is not displayed for programmes with no provided broadcast information.
Some models may not be supported.
The configurable items differ depending on model.
Enjoy Live TV
Checking Programme Info
Viewing Programme Information
During watch the Live broadcast, press the Wheel (OK) button. The Programme Banner
appears.
![No Signal Nine Digital. Signify the following signals on the signal: Isolation The Signal. ■ Please check if the Angel Cable has been prevalued property. [2] Press the [1] is your time to change to in Cen: I was](/content/2026/05/1090591/images/7e352e9748d9c609a4c3e2bc643a0c82856c9ca5b2c7d221d93d9abe8d649f4f.jpg)
Move to the Programmes.
To see the details, click the Enjoy Live TV Making the Most of Live Menu in User Guide. It displays the information about the programme you are watching. Select a programme banner to enter the detailed information pop-up to see the detailed programme information or run additional features related to the banner.
You can view broadcast information about other programmes using the Up/Down buttons. You can view broadcast information about the programme you are currently watching using the Left/Right buttons.
Press the Blue button on the remote control to move the banner's position.
The features can be controlled only within the detailed information pop-up.
It displays content related to Recording/Live Playback.
To see the details, click the Enjoy Live TV Live Playback in User Guide.
If the programme you are watching includes information such as Subtitle or Audio Language, you can set these features.
Subtitle : You can set Subtitle.
Audio language : You can set Audio Language.
Only available with digital broadcasts.
Multi Audio icon : You can set Multi Audio.
Only available with analogue broadcasts.
Available features may vary depending on the broadcast signal
Live Playback
Using Live Playback (Real-time Playback)
It is a function you can use to temporarily save the programme you are currently watching to a USB HDD, so you can play back any scenes you might miss while watching TV.
This function allows you to continue watching from where you were previously if you go out for a while.
- Input the USB HDD in the USB port.
- Press the Wheel (OK) button on your remote control.
- Press the Start Live Playback button at the bottom of the screen.
Enjoy Live TV
TELETEXT
To Use Teletext
Teletext is a free service provided by the TV station that offers text-based information about TV programmes, news and weather.
The teletext decoder of this TV can support the SIMPLE, TOP and FASTEXT systems.
Press the More Actions button on the remote control.
Select Teletext.
The TELETEXT window appears.
To view TV broadcasts and TELETEXT at the same time, press the More Actions button on the remote control and select Teletext.
Colour button
To select the preceding or following page.
Number button
Enters the page number to move to.
Programmes (Programmes) Up/Down Button
To select the preceding or following page.
Some models may not be supported.
Special Teletext Function
Press the More Actions button on the remote control.
Select Teletext Option.
Select the TELETEXT menu.
Index icon Index
Select each index page.
Time icon Time
When viewing a TV programme, select this menu to display the time at the top right hand corner of the screen. In the teletext mode, press this button to select a sub page number.
The sub page number is displayed at the bottom of the screen. To hold or change the sub page, press the Red/Green, Left/Right or Number buttons.
Hold
Stops the automatic page change which will occur if a teletext page consists of 2 or more sub pages. The number of sub pages and the sub page displayed is, usually, shown on the screen below the time. When this menu is selected the stop symbol is displayed at the top left-hand corner of the screen and the automatic page change is inactive.
Reveal
Select this menu to display concealed information, such as solutions to riddles or puzzles.
Enjoy Live TV
Update
Displays the TV picture on the screen while waiting for a new teletext page. The display will appear at the top left hand corner of the screen. When the updated page is available then display will change to the page number. Select this menu again to view the updated teletext page.
Language
Sets Teletext language.
In Digital Mode Only
To Set Teletext Language
Use the Teletext language function when two or more Teletext languages are broadcast.
Press the Settings button on the remote control.
Select All Settings icon General Language Primary Teletext Language/Secondary Teletext Language.
In Digital Mode Only
If Teletext data in a selected language is not broadcast, the default language will be displayed. If you select the wrong local country, teletext may not appear correctly on the screen and some problems may occur during teletext operation
HbbTV
Learn More about HbbTV
HbbTV (Hybrid Broadcast Broadband TV) is a new broadcasting standard that enables super-teletext type services, delivered by a broadcast TV programme, to be integrated or linked to online services delivered over broadband to a connected Smart TV. Consumers are therefore able to access various online services such as catch-up TV, Video on Demand (VOD), programme related applications and other rich information services in addition to traditional digital teletext services, all directly on to the TV in a seamless experience. HbbTV services can be activated in a number of ways, the most popular being pressing the Red. Users typically explore services with the traditional navigation keys (including the OK button and the Red, Green, Yellow, Blue). The current version of the HbbTV specification also includes support for “adaptive streaming” of video over a broadband connection thus guaranteeing the best possible image quality for the viewer. For more information about HbbTV, visit www.hbbtv.org Some models may not be supported.
To Use HbbTV
Settings All Settings icon Programmes HbbTV
Sets HbbTV to On.
Enjoy a wide variety of content from HbbTV enabled services.
Service features may be limited when the TV is not connected to the internet.
The functionality and quality of the HbbTV service may vary depending on the quality of your broadband connection.
HbbTV services are not guaranteed to be available for all programmes – only those that your
broadcaster choses to support.
ENJOYING CONTENT STORE
Returns to the previous screen.
Provides a list of content for the selected genre.
Enter a search term.
Exit the Search.
You must connect to the network to use the search feature.
Search results may vary depending on the programme, region, network settings, and whether you have agreed to the terms and conditions.
Watching Smart Device Screen on TV
To See the Mobile Device's Screen on the TV
Enable Screen Share mode on the mobile device.
Your TV will be displayed in the list of available devices.
Select your TV and request connection.
Select Accept in the connection request popup window.
After the connection is established, the TV will display the screen of the connected device.
When you connect Screen Share for the first time, a popup will appear which allows you to select
Decline, Accept or Block.
Decline : Do not connect the device. If you try to connect again, the popup will appear.
Accept : You can connect the device. No connection popup will appear from the second time.
Block : Do not connect the device. Even if you try to connect again, the popup will not appear and the connection will not work.
To cancel Block, go to ⚙→⋮ →Connection Mobile Connection Management
Screen Share.
It is recommended that you always update your device to be connected to your TV to the latest OS version for a reliable connection.
It is recommended that you connect the device to a 5 GHz router because the performance may be affected by your wireless environment.
The response rate may vary depending on the user's environment.
It differs from devices. For more information on the device you want to connect to, refer to its user guide.
If connection fails repeatedly, turn off the TV and the device you want to connect to, then turn them back on and try again.
CONNECTING EXTERNAL DEVICES
| 3gp3g2 | Video H.264/AVC, MPEG-4 | |
| Audio AAC, AMR-NB, AMR-WB | ||
| mkv | Video MPEG-2, MPEG-4, H.264/AVC, VP8, VP9, HEVC, AV1 | |
| Audio Dolby Digital, Dolby Digital Plus, AAC, PCM, MPEG-1 Layer I, II, MPEG-1 Layer III (MP3) | ||
| tstrptmts | Video H.264/AVC, MPEG-2, HEVC | |
| Audio MPEG-1 Layer I, II, MPEG-1 Layer III (MP3), Dolby Digital, Dolby Digital Plus, AAC, PCM, Dolby AC-4 | ||
| mpgmpegdat | Video MPEG-1, MPEG-2 | |
| Audio MPEG-1 Layer I, II, MPEG-1 Layer III (MP3) | ||
| vob | Video MPEG-1, MPEG-2 | |
| Audio Dolby Digital, MPEG-1 Layer I, II, DVD-LPCM | ||
| Dolby AC-4 : Some models may not be supported | ||
| Cautions for Video Playback | ||
| 1.Some user-created subtitles may not work properly. | ||
| 2.A video file and its subtitle file must be in the same folder. For subtitles to be displayed properly, make sure that the video file and the subtitle file have the same name. | ||
| 3.Subtitles on a Network Attached Storage (NAS) device may not be supported depending on the manufacturer and model. | ||
| 4Streams that include Global Motion Compensation (GMC) and Quarterpel Motion Estimation (Qpel) are not supported. | ||
| 5.ULTRA HD video (ULTRA HD models only) : 3840 × 2160, 4096 × 2160 | ||
| Some HEVC-encoded ULTRA HD videos other than the content officially provided by the manufacturer may not be played. | ||
| Some codecs can be supported after a software upgrade. | ||
| Extension | Codec | |
| mkv/mp4/ts | Video H.264/AVC, HEVC | |
| Audio Dolby Digital, Dolby Digital Plus, AAC | ||
Only Window Media Audio V7 and later are supported.
The AAC main profile is not supported.
Video files created by some encoders may not be played.
Video files in a different format than specified may not be played properly.
Video files stored on a USB storage device that does not support High Speed may not be played properly.
Listening to Music
Playing Music
- You can listen to music by using the Music app.
Press the HOME button on the remote control.
2.Run the Music app.
- Select your desired storage device.
You can select your desired songs from all of your storage devices and add them to My Playlist.
- Select your desired music content and enjoy it.
CONNECTING EXTERNAL DEVICES
-
Select the desired type of content list.
-
Select and delete the desired content.
You cannot delete files that are shared from other devices.
- Select content and add it to My Playlist.
4.You can copy content to a USB storage device.
Some models may not be supported.
5.Open the music player.
6.Launch Search

Using the Music Player
You can play music conveniently by selecting the music files saved in the Music app or by selecting the music player icon during content playback in apps such as Photo & Video
You can play music from the selected storage device.
You can set repeat playback and random playback.
The configurable items differ depending on model.
Screen Mode : You can turn the screen off while
listening to music or display the music player in full-screen mode.
Screen Off: You can listen to music with the screen turned off.
You can change the position of the music player.
You can minimize the music player.
This feature closes the music player.

natural_image
Tropical beach scene with rocky cliffs and turquoise water under a blue sky (no text or symbols visible)Lyrics are available for music files that provide them. In some music files, you can choose a lyric section and move the playback position. The lyrics feature is only supported on some devices. The lyrics may not be displayed in sync depending on the lyrics data in the music file. Reopen your music player by pressing the VOLUME key on your remote control. You may not be able to use the music player for some features.
Share Computer Content
Watch content saved in your PC on the TV
You can enjoy videos/music/photos stored on your PC on the TV when these devices are connected to the same network.
Browse the content on your PC to watch on TV (Windows 10)
Connect your TV and PC to the same network.
Right-click the file you want to play and select "Cast to Device"
Select the name of the TV you want to watch from the displayed list, and playback will start on that TV.
Even when multiple TVs or devices are connected, the selected file is only played through one device.
The playback rate may vary depending on the network connection.
To play on other operating systems or devices, refer to the manual of the operating system/device.
Browse and watch the content stored on the PC using the TV (Windows 10)
- Connect your TV and PC to the same network.
2.Open the "Start" menu on your PC screen, search for media streaming options" and then select the result that appears.
-
Select the "Turn on media streaming" button in the window that opens.
-
Allow all of the "media streaming options".
CONNECTING EXTERNAL DEVICES
-
Select "OK" to save the settings.
-
Select the connected PC in the Home Dashboard app on the TV, and then select and play the file you want.
To play on other operating systems or devices, refer to the manual of the operating system/device.
Matters That Require Attention of Content Share
Check your network settings if the content share option does not work properly.
May not work properly on a wireless network. It is recommended that you connect to a wired network.
May not work properly depending on the network environment.
If multiple TVs are connected to one device, the content may not be played properly depending upon server performance.
To watch a 1080p video through the content sharing function, a router using the 5 GHz frequency is required.
If you use the existing 2.4 GHz router, the video may be laggy or not play properly.
The Content Share function may not be supported for a router that does not support multi-cast. For more information, refer to the user guide that came with your router or contact the manufacturer.
Captions are only supported on some connected devices.
We recommend using the SmartShare PC software when viewing video subtitles.
When a subtitle file is added later, disable the shared folder and then enable it again.
The DRM files in the connected device will not play.
Even for the file format supported by the TV, the supported file format may differ depending on the connected device environment.
If there are too many folders or files in a folder, it may not work properly.
The information on the file imported from the connected device may not be displayed correctly.
Depending on the encoding, some streams may not play in content sharing mode.
Watching Computer Screen on TV
To See the PC Screen on the TV
Connect Wireless
Enable Screen Share mode on the PC. Your TV will be displayed in the list of available devices.
Select your TV and request connection.
After the connection is established, the TV will display the screen of the connected device.
It is recommended that you always update your device to be connected to your TV to the latest OS version for a reliable connection.
It is recommended that you use this function at close range.
Start Screen Share faster by having your mobile device or PC connected to the same network as the TV.
Though it can be connected without a wireless router, connecting your device to a 5 GHz router is recommended because the performance can be affected by the surrounding wireless environment.
The response rate may vary depending on the user's environment.
It's differ from Windows version. For more information on the device you want to connect to, refer to its user guide.
If connection fails repeatedly, turn off the TV and the device you want to connect to, then turn them back on and try again.
Connect wired
Connect the PC with TV by HDMI cable.
SETTINGS
Quick Settings
To Use Setting Function Quickly
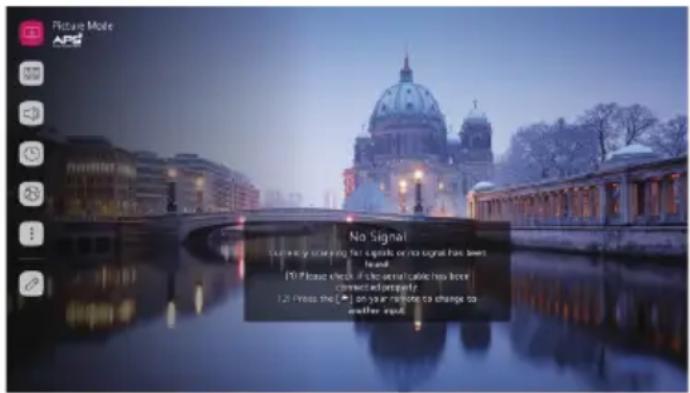
Set of light-weight controls quickly and simply such as Picture Mode, Sound Out, Sleep Timer and so on.
Press the ⏻ button on the remote control.
You can set Picture Mode.
You can set Sound Mode.
You can choose Sound Out.
You can set Sleep Timer.
Move to the Connection screen.
You can set more options.
You can add/delete the quick setting items or change their order.
After entering each item, press and hold the Wheel (OK) button on the remote control to go to the corresponding menu
Picture
Picture Mode
Selecting Picture Mode
→ : →Picture Picture Mode Settings → Picture Mode
Select the picture mode that is best suited to your viewing environment, preferences or video type.
Select a picture mode. By adjusting and setting each item in more detail based on the mode, your video is better optimised for its characteristics.
The configurable items differ depending on model.
When You Use Normal Signals
Vivid
Sharpens the image by increasing the contrast, brightness and sharpness.
Eco / APS
The Energy Saver feature changes settings on the TV to reduce power consumption.
The configurable items differ depending on model.
Cinema
Suitable picture for movies.
When You Use the HDR Signals
Vivid
Sharpens the image by increasing the contrast, brightness and sharpness.
Standard
In a normal viewing environment, it opens a screen that can properly show the expressiveness and brightness of HDR.
Cinema
Suitable picture for HDR video signal.
SETTINGS
Picture Mode Settings
Fine-Tuning Picture Mode
→ : →Picture Picture Mode Settings
This feature allows you to adjust the selected picture mode in detail.
Backlight
Controls the level of screen brightness by adjusting the backlight. The closer to 100, the brighter the screen.
Decrease the Backlight to reduce energy consumption.
If the Energy Saving is set to Maximum, you cannot adjust the Backlight.
In this case, navigate to → : →Picture→Energy Saving and set to Off or Minimum.
Contrast
Adjusts the contrast of the bright and dark areas of the picture. The closer to 100, the higher the contrast.
Brightness
Adjusts the overall screen brightness. The closer to 100, the brighter the screen.
You may use the Brightness settings particularly to set the dark part of the image.
Sharpness
Adjusts the sharpness of the image. The closer to 50, the sharper and clearer the image.
Colour
Tones down or up the colours displayed on the screen. The closer to 100, the deeper the colour.
Tint
Adjusts the colour balance between red and green displayed on the screen. The closer to Red 50, the more red the colour will be. The closer to Green 50, the more green the colour will be.
Colour Temperature
Adjusts the colour tone of the entire image. As you lower the level, you get a warmer tone, and as you raise it, you get a cooler tone.
The settings you specify only apply to the currently selected input mode.
To apply your current picture settings to all input modes, select Apply to all inputs.
Depending on the input signal or the selected picture mode, the available options may differ.
The configurable items differ depending on model.
Resetting Picture Mode
→ ⋮ →Picture Picture Mode Settings→Reset
If you want to reset the image settings to the factory defaults after configuring the image settings, select reset for each image mode.
Advanced Controls
Setting the Advanced Control Options
→: →Picture Picture Mode Settings→Advanced Controls.
Dynamic Contrast
Corrects the difference between the bright and dark sides of the screen for optimal results depending on the brightness of the picture.
SETTINGS
Dynamic Colour
Adjusts the Colour and saturation of the picture to make the image more Colourful and lively.
Gamma
Adjusts the medium brightness of the picture.
Select Low for a bright picture, select High1 or High2 for a dark picture or select Medium for medium brightness.
Live Theatre or Expert (Bright Room)/Expert (Dark Room) can be selected from 1.9/2.2/2.4/BT.1886.
High2/BT.1886 expresses the gradation in ITU-R BT.1886, which is an international standard.
Depending on the input signal or the selected picture mode, the available options may differ.
Picture Options
Setting Picture Options

→ ⋮ Picture→Picture Mode Settings→Picture Options
Noise Reduction
Removes small dots that stand out so as to make the image clean.
Black Level
Adjusts the brightness of the dark parts of images.
Select High for a bright screen or select Low for a dark screen.
This feature can be used while watching content through an external input.
Real Cinema
Optimise display for movies.
TruMotion
Suitable the image quality of fast-moving pictures.
Off : Turns off the TruMotion.
Cinema Clear : Adjusts the shaking of the motion on the screen to make it feel like you are in a movie theatre.
Natural : Sets images with a lot of motions to look natural and clear.
Smooth : Softens fast-moving pictures.
User : Sets TruMotion manually.
De-Judder : Adjusts juddering on the screen.
De-Blur : Reduces the blurring effects of motion.
Motion Pro : Make fast-moving pictures clearer using the light control.
The advanced settings can be changed only in User mode.
Depending on the input signal or the selected picture mode, the available options may differ.
The configurable items differ depending on model.
Aspect Ratio Settings
Setting the Screen Size

→ ⋮ →Picture→Aspect Ratio Settings→Aspect Ratio
You can change the screen size according to the type of content you are watching.
16:9
Displays an aspect ratio of 16:9.
Original
Changes the aspect ratio to 4:3 or 16:9 depending on the input video signal.
4:3
Displays an aspect ratio of 4:3.
Vertical Zoom
You can adjust the vertical dimension of the screen and align the screen vertically by using Adjust
Zoom Ratio and Adjust Screen Position.
4-Way Zoom
SETTINGS
You can adjust the horizontal/vertical/diagonal dimensions of the screen and align the screen horizontally/vertically by using Adjust Zoom Ratio and Adjust Screen Position.
The configurable items differ depending on model.
The picture may get distorted while zooming in or out.
Selecting a different screen size from the original size may cause the image to look different.
Depending on the combination of picture format and screen size, the edges may be hidden or shown in black, or both sides of the picture may flicker. Also, when selecting an item shown on the broadcast screen, the outline may not be aligned correctly.
Depending on the input signal, the available screen sizes may be different.
View Screen with Just Scan

→Picture→Aspect Ratio Settings→Just Scan
If you turn this feature On, you can view the content in the aspect ratio that is in the broadcast signal or content source. If the edge of the screen is not clean, please turn it Off.
If set to Auto, the feature switches between On or Off status depending on the information contained in the video signal.
The items that can be selected may vary depending on the current input.
Energy Saving
To Use Energy Saving Feature

→ ⋮ →Picture Energy Saving
Reduces power consumption by adjusting screen brightness.
Off
Turns off the Energy Saving mode.
Minimum / Medium / Maximum
Applies the pre-set Energy Saving mode.
Screen Off
Screen is turned off and only sound is played.
Press any button except the power and the volume buttons to turn the screen back on.
If you use Energy Saving function, brightness of your TV will be affected.
Eye Comfort Mode
To Use Eye Comfort Mode Feature

→ ⋮ → Picture → Additional Settings → Eye Comfort Mode
The colour temperature will be adjusted to reduce eye fatigue.
On : The colour temperature of your TV screen is adjusted.
Off : Turns off the Eye Comfort Mode.
Some models may not be supported.
HDMI ULTRA HD Deep Colour
Settings All Settings icon Picture Additional Settings HDMI ULTRA HD Deep Colour If you connect a device that supports HDMI ULTRA HD Deep Colour, you can enjoy a clearer image.
After connecting the playback device, set HDMI ULTRA HD Deep Colour to On.
If the connected device does not support this function, it may not work properly.
In that case, change the TV's HDMI ULTRA HD Deep Colour setting to Off.
Supported Display Resolution
On : Supports 4K@60 Hz (4:4:4, 4:2:2 and 4:2:0)
Off : Supports 4K@60 Hz (4:2:0)
SETTINGS
Sound Out
Setting Sound Out

→ : →Sound→Sound Out
When Instant Game Response is set to On, audio delays may occur if you set Sound Out to WiSA
Speakers/Optical/HDMI ARC.
Switch to Internal TV Speaker or change 📋→ : →Sound→Additional Settings→HDMI
Input Audio Format to PCM.
Internal TV Speaker
Audio is played through the TV's internal speakers.
Bluetooth
Wirelessly connect a Bluetooth audio device to enjoy TV sound more conveniently.
Refer to the user manual of the Bluetooth audio device for details on how to connect and use the device.
Press DEVICE LIST to view the connected devices or the devices that can be connected to connect any one of them.
Depending on the type of the Bluetooth device, the device may not connect correctly or an abnormal behavior may occur such as unsynchronized video and audio.
( The mobile-only headsets may not work. )
Sound may stutter or sound quality may be reduced if:
the Bluetooth device is too far from the TV;
there are obstacles between the Bluetooth device and the TV; or
used together with radio equipment such as a microwave oven or wireless LAN.
If you continue to experience problems, we recommend using a wired connection. (Optical digital, HDMI (ARC) port)
SETTINGS
AV Sync Adjustment
Adjusting AV Synchronization

→ ∴ →Sound→Additional Settings→AV Sync Adjustment
Adjusts the synchronization of the sound from the speaker that is working.
The closer to Greater than, the slower the audio output.
Bypass, Outputs the broadcast signals or the sound from external devices without any audio delay.
The audio may be output before the video because of the time the TV takes to process the video input.
Available options vary by Sound Out setting.
HDMI Input Audio Format
HDMI Input Audio Format

→ : →Sound→Additional Settings→HDMI Input Audio Format
You can set the audio format for each HDMI input. When the voice delivered through the HDMI port is not synchronized, set it to PCM.
Sound Sync
Sound Sync

→ ∴ →Sound→Additional Settings →Sound Sync
Connect the Sound Sync device to the optical digital input port and set Sound Out to Optical.
By setting this feature to On, you can adjust the volume of the connected Sound Sync device using a TV remote control.
If the auto-power feature of the sound bar that supports Sound Sync is set to On, the sound bar will be turned on or off together when the TV is turned on or off.
Digital Sound Out
Setting Digital Sound Out

→ ∴ →Sound→Additional Settings→Digital Sound Out
You can configure the Digital Sound Out settings.
This setting is only available when Settings All Settings icon Sound Sound Out is set to Optical/HDMI ARC.
When Pass Through is enabled, sound effects may not be output.
The codec output with a device may differ from input signals.
Dolby Atmos : Some models may not be supported.
Programmes
Auto Tuning
Automatically Setting Up Programme

→ ⋮ →Programmes→Programme Tuning →Auto Tuning
Automatically tunes the programmes.
Select Country where the TV is used. Programme settings change depending on the country you choose.
Initiate Auto Tuning.
Set Auto Tuning following screen instructions.
If Input Source is not connected properly, programme registration may not work.
Auto Tuning only finds programmes that are currently broadcasting.
If Safety is turned on, a pop-up window will appear asking for password.
SETTINGS
Manual Tuning
To Use Manual Programme Tuning

→Programmes→Programme Tuning (Programme Tuning & Settings)→Manual Tuning
This function is for manually searching and saving programmes.
For digital broadcasting, signal strength and signal quality can be checked.
Programme Manager
Edit Programmes
You can edit the selected programmes from all the stored programmes or add/delete them to/from the favourite programmes.
Edit All Programmes List

→Programmes→Programme Manager→Edit All Programmes
You can lock or unlock the selected programmes from all the stored programmes, or you can set them to be skipped when switching programmes.
-
Set the sorting option.
-
Lock/Unlock: Lock the selected programmes or unlock the locked programmes.
Skip / Restore : Set the selected programmes to be skipped when switching programmes, or disable the skipping option of the programmes previously set to be skipped.
Move : Move the selected programmes.
Edit Programme Numbers : Change the numbers of the selected programmes.
Delete : Delete the selected programmes.

Available features may vary depending on the broadcast signal.
For a model that supports satellite programmemes, you can manage the satellite programmes in Edit Satellite Programmes (Advanced).
Edit Favourite Programmes List

→ ⋮ →Programmes→Programme Manager→Edit Favourites
You can add/delete desired programmes to/from the favourite programmes, change their positions, etc
-
Select the desired programmes from the all programmes list and press the button to add them to the favourite programmes list.
-
Delete the selected programmes from the favourite programmes list.
3.Move : Select one or more programmes in the Preferred Programmes list, press the Move button, and then select the position to move it to. The selected programmes will move to the position you selected. Change Group Name :
Change the name of the favourite

programmes list. Sort by Programme : Sorts the list of favourite programmes by programme.
SETTINGS
Multi Feed
→ : →Programmes→Multi Feed
You can watch the desired angle on the TV through the broadcast that filmed from various angles. Some models may not be supported.
HbbTV
Learn More about HbbTV
HbbTV (Hybrid Broadcast Broadband TV) is a new broadcasting standard that enables super-teletext type services, delivered by a broadcast TV programme, to be integrated or linked to online services delivered over broadband to a connected Smart TV.
To see the details, click the Enjoy Live TV→HbbTV in User Guide.
Some models may not be supported.
Connection
TV Name
Setting the TV Name
→ ⋮ →Connection→TV Name
You can use the screen keyboard to set the name for the smart TV to be used on the network. Up to 25 characters can be entered in case of English alphabet.
Network Connection Settings
Network Connection Settings
→ : →Connection→Network Connection Settings
If you configure settings for the network, you can use various services such as online contents and applications.
Setting a Wired Network
Select Wired Connection (Ethernet).
If the router connected to the network supports the DHCP feature, connecting the TV and router by wire will automatically connects to the network. If the automatic setup is not supported, you can select Edit to manually set up the network connection.
Setting a Wireless Network
Select Wi-Fi Connection.
If you have set the TV up for a wireless network, you can check and connect to the available wireless Internet networks.
Add a hidden wireless network
If you input the name of network directly, you can add a wireless network.
Connect via WPS PBC.
If the wireless router you want to connect to has a Wi-Fi Protected Setup-Push Button Configuration (WPS-PBC) feature, you can easily connect to the wireless router by pressing the WPS-PBC button on the router. Press the wireless router's WPS-PBC button and then press the TV's [Connect] button.
SETTINGS
Connect via WPS PIN.
This is a method to connect to an access point using a Wi-Fi Protected Setup-Personal Identification Number (WPS-PIN). Select the access point you want to connect to. Enter the PIN displayed on the access point's Wi-Fi device.
Advanced Wi-Fi Settings
Once you connect to a wireless network, you can view connection information such as detailed IP address information. In addition, you can change the IP address and DNS server address you want to connect to by pressing the Edit button.
The IPv6 setup does not support Edit.
For more information on how to connect to the network, see Getting Started with webOS TV→Connecting to the Network in User Guide.
Mobile Connection Management

→Connection→Mobile Connection Management
You can set to use a smart device connected to the TV to control the TV or manage the connection history.
TV On With Mobile
If Turn on via Wi-Fi or Turn on via Bluetooth is set to On, you can turn on your TV using an application that supports TV On With Mobile.
The TV should be connected to a network.
The TV and the device to be used should be connected to the same network.
The Turn on via Wi-Fi feature must be used in an app on a smart device that supports the feature.
The Turn on via Bluetooth feature can only be used with certain LG Electronics smartphones.
The TV must be plugged in.
To connect for the first time, make sure the device to be used is ready to connect.
Some models may not be supported.
Screen Share
You can delete the connection history of the device that was connected to the TV through Screen Share.
Sound Share
You can delete the connection history of the smart device that was connected to the TV via Bluetooth.
SETTINGS
General
Language
Configuring Language Settings

→General→Language
You can choose the menu language displayed on the screen and the audio language of the digital broadcast.
Menu Language
You can select one of the menu languages to be displayed on the screen. The language for the speech recognition will be automatically set to the selected language for the menu.
The speech recognition is only applied to some models.
Audio Language
You can choose the language you want when watching a digital broadcasting programme, which includes multiple audio languages.
For programmes that do not support multiple languages, the default will be used.
Applies to Digital broadcasting.
Keyboard Languages
Select the language to use the on-screen keyboard.
To Set Teletext Language
Sets Teletext language.
To see the details, click the Enjoy Live TV TELETEXT in User Guide.
In Digital Mode Only
Location
Setting the Location

→ ⋮ →General→Location
You can change the location setting of your Smart TV.
Address Setting
You can set the Region and City of your TV.
Broadcast Country
You can set the broadcast country on your TV.
Service Area Postcode
This function is used to set the broadcast location of the TV by entering your postcode.
Services Country
If you don't set the Set Automatically, you can select the country manually.
You must set the country manually when you are not connected to the network.
The configurable items differ depending on model.
SETTINGS
Time


→General→Time
You can check the time or configure related settings.
Set Automatically
The TV time is automatically set to the time of digital broadcasting information sent from the broadcasting station or the time sent from the server.
Time / Date / Time Zone
You can manually set the time and date if the automatically set current time is incorrect.
If you set the time manually with the antenna connected, schedule information, programme guide, etc. may not function correctly.
Custom Time Zone
When select the Custom in Time Zone, Custom Time Zone menu is activated.
Timers
Sleep Timer
Sets the TV to turn off at a specified time.
If you do not want to use Sleep Timer, select Off.
Power On Timer
Set Power On Timer to On.
The TV is turned on and displays the set channel at the set time.
Time : Set the time at which to turn the TV on.
Timer Repeat : Set the day of the week. Set the option to None to operate the feature only once.
Input : Set an external input to display when the power is turned on.
Timer Programme : Set a channel to display when the power is turned on. This option can be set only when Input is set to TV.
Volume : Set audio volume to use when the power is turned on.
Power Off Timer
Set Power Off Timer to On.
The TV is turned off at the set time.
Time : Set the time at which to turn the TV off.
Timer Repeat : Set the day of the week. Set the option to None to operate the feature only once.
4 Hours Auto Power Off
If you do not press any button for 4 hours after the TV is turned on by a feature such as Power On Timer, the TV will be turned off automatically.
To ensure the TV does not automatically turn off, set 4 Hours Auto Power Off to Off.
Some models may not be supported.
To use Power On Timer/Power Off Timer, set the time correctly.
If Timer Repeat of Power On Timer/Power Off Timer is set to None
If the time set in the Power On Timer is passed while watching TV, the power will turn on automatically when it reaches the set time and the TV is turned off on the next day or later.
If the time set in the Power Off Timer is passed while TV is in standby, the power will turn off automatically when it reaches the set time while watching TV on the next day or later.
SETTINGS
TV Rating Locks
Enabling TV Rating Locks
This function operates according to information from the broadcasting station. Therefore if the signal has incorrect information, this function does not operate.
Prevents children from watching certain adult's TV programmes, according to the ratings limit set.
Enter a password to watch a blocked programme. Rating differs by country.
Press the Settings button on the remote control.
Select → ⋮ →General→Safety.
Set Safety to On.
Select TV Rating Locks.
Supported only in the digital mode.
Some models may not be supported.
The initial password is set as "0000".
Programme Locks
Enabling Programme Locks
Blocks the programmes that contain inappropriate contents for children. The programmes can be selected but the screen is blank and the audio is muted. To watch a locked programme, enter the password.
Press the ⚙ button on the remote control.
Select : →General→Safety.
Set Safety to On.
Select Programme Locks.
Select the Programmes to lock.
Select Lock / Unlock.
The initial password is set as "0000".
When France or Norway is selected for Country, the password is not "0000" and "1234" but "0413".
Application Locks
Enabling Application Locks
You can lock or unlock the application.
Press the Settings button on the remote control.
Select All Settings icon General Safety.
Set Safety to On.
Select the Application Locks.
Select the Applications to lock.
The initial password is set as "0000".
When France or Norway is selected for Country, the password is not "0000" and "1234" but "0413".
The lock function is not immediately available for the currently running application.
Reset Password
→ ⋮ →General→Safety→Reset Password
Set or change the password for the TV.
The initial password is set as "0000".
When France or Norway is selected for Country, the password is not "0000" and "1234" but "0413".
SETTINGS
Resetting a Lost Password
If you lose the password you set, you can reset it as follows:
- Press the Settings button on the remote control.
- Select All Settings icon General Safety.
- Press Programmes Up→Programmes Up→Programmes Down→Programmes Up on the remote control. The master password input window will appear.
4.Enter the numbers "0313" in the master password input window, then press Enter. The password will be reset.
Home Settings
ome Settings

→General→Home Settings
Home Auto Launch
You can set Home to launch automatically when turning on the TV.
Home Promotion
You can turn on or off the advertisements on the Home screen.
The configurable items differ depending on model.
Settings Help
To Use Settings Help
Settings All Settings icon General Additional Settings Settings Help
If you select the setting menus, you will see the hints of the settings. Turn on/off description box
in Settings.
![Connection TV Name [LG] webDSTV Network Connection Settings Device Connection Settings Mobile Connection Management Network Connection Set settings related to your video / Provision network](/content/2026/05/1090591/images/95c322fe136879b40037e72e30dd905e972208cdd70de6e557618922a37f2b28.jpg)
Menu Transparency
Setting up Menu Transparency

→General Additional Settings Menu Transparency
By setting this feature to On, you can make some of the menus (e.g. Live Menu, Search, etc.) transparent.
Screen Saver
Using the Screen Saver

→General→Additional Settings→Screen Saver
When the currently displayed app has not received any user input for an hour, it will be replaced by a Screen Saver.
Setting the Screen Saver feature to Off, maintains the same display for an extended period, which may compromises quality. The compromised screen may not be recoverable.
SETTINGS
Hard of Hearing
To Set Hard of Hearing
Press the ⏻ button on the remote control.
Select : Accessibility.
Set Subtitles to On.
Set Hard of Hearing to On.
A caption will be provided for the hearing-impaired.
When the Hard of Hearing is turned On, it will be prioritized over the general captions.
Some models may not be supported.
Subtitles
To Set Subtitle


View subtitles when the TV station provides subtitled programming.
Change Subtitles to On and select subtitle setting.
Some models may not be supported.
Applies to Digital broadcasting.
Support
Software Update


SETTINGS
You can check the details by selecting the desired item. If it supports shortcuts, you can launch the app. You can delete notifications. You can delete all notifications
Additional Settings


→Support Additional Settings
User Agreements
These are the terms and conditions for privacy for the use of Smart TV-related services. Legal Notice
It's a legal notice for services provided via TV.
Open Source Software Notice
You can view the instructions for each item.

Reset to Initial Settings
Restoring the Default Settings


→Support→Reset to Initial Settings
Return TV to its initial settings. This will revert all settings to their default values.
After reset, the TV will automatically turn off and on.
If Safety is set to On, you should type the password to Reset to Initial Settings.
Do not turn off the power during initialization.
We recommend that you reset the TV to Reset to Initial Settings before you sell it or transfer it to a third party.
TROUBLESHOOTING
Perform Check-up with the Quick Help
Perform Check-up with the Quick Help
When the TV malfunctions, you can get help to solve the problem.
Press Settings button on the remote control and select Support Quick Help.
You can also long-press the number 9 button of the remote control to run the Quick Help.
Troubleshooting Power/Remote Control Issues
Troubleshooting Power/Remote Control Issues
If you experience any of the problems below while using the product, please check the following:
There may be no problem with the product.
I cannot turn on the TV.
Please make sure your TV power plug is correctly connected to the outlet.
If you are using a multi-outlet, check if it is working properly. To check whether a power strip is working properly, plug the TV's power plug directly to a wall outlet and observe its operation.
Try to power on using the button on your TV set.
The power is on, but the screen comes on later.
This is because there is a noise-removal process to eliminate any possible noise that may appear during power-on. This does not mean the product is defective.
The pointer of Magic Remote is not appear in the screen.
Hold the remote control towards the TV and long-press GUIDE button until the instruction appears. The previously registered remote control is deregistered and then registered again.
Replace the batteries when you are prompted to do so on your TV screen. (Use alkaline batteries.)
If ⚙→⋮ →Accessibility Audio Guidance is set to On, the pointer of the Magic Remote does not appear. Set Audio Guidance to Off. (Some models may not be supported.)
TROUBLESHOOTING
I cannot turn the TV on with the remote control.
Please make sure your TV power plug is correctly connected to the outlet.
Replace the batteries in the remote control. (Use alkaline batteries.)
Check if there is an obstacle blocking the signal in front of the TV's remote control receiver. If there is an obstacle, such as a soundbar, in front of the receiver at the bottom of the TV, IR recognition may not work properly.
The power turns off suddenly.
Check whether the Power Off Timer, No Signal Auto Off or No Operation Auto Off is set.
The TV will be turned off automatically if you do not press any buttons for 4 hours even after the TV is turned on at the time set by Reminder or Power On Timer.
There is also a chance that the internal protection circuitry has activated because the internal temperature of the product has risen unusually or excessively
Troubleshooting Screen Issues
Troubleshooting Screen Issues
If you experience any of the problems below while using the product, please check the following:
There may be no problem with the product.
If you are using a set-top box, turn it off, and then turn it back on.
Make sure that the set-top box is correctly connected to your TV.
It says there is no signal on the screen.
Check whether the coaxial cable or the cable connected to the external device is properly connected to the TV.
Go to ☐ to choose the connected input.
Check if your external device, such as set-top box or Blu-ray player, is turned on.
I cannot see some programmes.
Start the → : →Programmes Programme Tuning (Programme Tuning & Settings)
Auto Tuning.
If you are using a set-top box, consult its supplier.
The screen shakes after the momentary appearance of vertical/horizontal lines and net pattern.
Connect wireless telephones, hairdryers, electrical drills, etc. to a different power outlet. The problem may be caused by high-frequency electronic devices such as another TV or strong electro-magnetic sources nearby.
Each programme has a different image quality.
Depending on the type of videos provided by the broadcasters, programmes may have different image qualities.
If you are using a set-top box, consult its supplier.
There is a difference in image quality from those seen at the store.
Depending on the type of video provided by the broadcasters, there may be a difference in image quality from those displayed at the store.
TROUBLESHOOTING
A digitally broadcasted programme stops or its screen is broken.
This happens when a signal is weak or reception is unstable. Adjust the antenna direction or check the cable connection.
→ ⋮ →Programmes Programme Tuning (Programme Tuning & Settings) Manual
Tuning
If the signal strength is too low in Manual Tuning, contact the broadcasting station or management office to have the signals checked.
If you are using a set-top box, consult its supplier.
When HDMI input is in use, a vertical solid line or colour blurring appears on the upper/lower/left/right edges of the screen.
→ →Picture Aspect Ratio Settings Just Scan
Set Just Scan to Off.
Just Scan shows you the original image as it is. If the signal is weak, the top/bottom/left/right sides of the screen may be snowy.
I don't see anything, or the image keeps flickering when I try to connect the HDMI cable.
Check whether your HDMI ^☒ cable is compliant with the specifications. You may experience flickering or a blank screen if the HDMI ^☒ cable is faulty (bent, broken).
Make sure that the cable is correctly connected to the port. Bad or loose contact may cause display problems on the screen.
If using a UHD set-top box, adjust ⏻→⋮ →Picture →Additional Settings →HDMI
ULTRA HD Deep Colour.
The screen looks too dim or dark.
→ : →Picture Picture Mode Settings Picture Mode
Switch Picture Mode to your desired picture mode. (Standard, Vivid, etc.)
This applies to the current input mode only.
→ ⋮ →Picture Energy Saving
Switch Energy Saving to either Off or Minimum.
→ ⋮ →Picture Additional Settings Eye Comfort Mode
Switch Eye Comfort Mode to Off.
The screen is in black and white or displaying strange colours.
Check the input mode or cable connection.
Go to 📄 to choose the connected input.
You may get a black and white screen if you have connected to the COMPONENT IN but selected the AV.
Go to 📄 and choose Component.
When you are connecting to the AV IN or COMPONENT IN, check to ensure each cable is matched with the corresponding colour connection. For component cables, make sure the video (red) cable and audio (red) cable are connected properly.
AV IN/COMPONENT IN ports are available in certain models only.
ULTRA HD video does not display.
With some HDMI cables, signals may not be received.
Change the settings of the connected device to the supported signal.

43WOS315B

50WOS315B

55WOS315B

65WOS315B
- VOX
- ELECTRONICS
- Important Safety Instructions and Maintenance
- Important Safety Instructions
- CAUTION
- Installation
- LED Screen
- Precautions When Displaying a Still Image
- Cleaning
- MAINS PLUG
- Important Information
- Table of Contents
- Attaching the stand
- Step 1
- Step 2
- Step 3
- CAUTION!
- Wall-Mounting Instructions
- REMOTE CONTROL
- Using the Remote Control Button
- Getting Started with webOS TV
- Home Tutorial
- Connecting to the Network
- How to Operate TV
- Connecting to SIMPLINK (HDMI-CEC)
- Using SIMPLINK
- Enjoy Live TV
- Making the Most of Live Menu
- Viewing Guide
- Checking Programme Info
- Live Playback
- TELETEXT
- Update
- Language
- HbbTV
- To Use HbbTV
- ENJOYING CONTENT STORE
- Watching Smart Device Screen on TV
- Listening to Music
- CONNECTING EXTERNAL DEVICES
- Share Computer Content
- Watching Computer Screen on TV
- Connect Wireless
- Connect wired
- SETTINGS
- Quick Settings
- Picture
- Dynamic Colour
- Picture Options
- Setting Picture Options
- AV Sync Adjustment
- HDMI Input Audio Format
- Sound Sync
- Digital Sound Out
- Programmes
- Manual Tuning
- Programme Manager
- Edit Favourite Programmes List
- Connection
- General
- TV Rating Locks
- Programme Locks
- Application Locks
- Reset Password
- Resetting a Lost Password
- Home Settings
- Settings Help
- Menu Transparency
- Screen Saver
- Support
- Additional Settings
- User Agreements
- Reset to Initial Settings
- TROUBLESHOOTING
- Perform Check-up with the Quick Help
- Troubleshooting Power/Remote Control Issues
- Troubleshooting Screen Issues
Brand : VOX
Model : 55WOS315B
Category : Television