
DH1 - Humidifier Thermex - Free user manual and instructions
Find the device manual for free DH1 Thermex in PDF.


| Product Type | Dehumidifier |
| Model | DH1 |
| Brand | Thermex |
| Operating Temperature Range | 5°C to 32°C |
| Humidity Settings | Continuous, 40%, 50%, 60%, 70% |
| Timer | Up to 15 hours (1, 2, 4, 8, 15H) with pre-set function |
| Water Tank Capacity | Not specified (estimated approx. 2-3 L) |
| Continuous Drainage | Yes, via spout for 11 mm inner diameter tube (tube not included) |
| Filters | Anti-dust filter (washable) and active carbon filter (replaceable, not washable) |
| Power Supply | As per rating label (standard mains socket) |
| Mobility | Fitted with castors |
| Clearance Required | At least 10 cm (4 inches) on each side |
| Safety Features | Automatic shut-off when water tank full, water full indicator, self-protection compressor stop |
| Maintenance | Clean body with soft cloth; clean anti-dust filter with vacuum or water; replace active carbon filter as needed |
| Accessories Included | Active carbon filter (installed) |
| Usage Precautions | Keep vertical, avoid soft surfaces, do not cover intake/outlet, do not use in temperatures below 5°C |
| Warranty | Not specified (refer to manufacturer) |
| Certification | EN 60335-2-40 |
Frequently Asked Questions - DH1 Thermex
User questions about DH1 Thermex
0 question about this device. Answer the ones you know or ask your own.
Ask a new question about this device
Download the instructions for your Humidifier in PDF format for free! Find your manual DH1 - Thermex and take your electronic device back in hand. On this page are published all the documents necessary for the use of your device. DH1 by Thermex.
USER MANUAL DH1 Thermex
Tilbehør
Aktivt kulfilter
natural_image
Pure grid pattern with no text, numbers, or symbolsBetjening
RENG∅RING AF APPARATET
1. ANTIST∅VFILTER
- The data marked with * may vary for technical reasons. For greater precision, please refer to the rating label placed on the product.
- Test condition for data in our rating label is as per safety regulation: EN 60335-2-40
How it works
This product is a dehumidifier. It controls relative humidity by passing the air through the unit, forcing the excess moisture to condensate over the cooling elements. Contact with this cold surface causes the moisture in the air to condense. This condensed water then drains safely into the water tank. The dried air then passes through the condenser where it is slightly warmed and re-enters the room at a slightly elevated temperature.
Where to position
Excess moisture will travel throughout your home, in the same way that cooking smells waft to every room in the house. For this reason, the dehumidifier should be positioned, so that it can draw this moist air towards it from all over the home. Alternatively, if you have a serious problem in one area you can begin by positioning the dehumidifier close to this area and later moving it to a more central point. When positioning the dehumidifier, ensure that it is placed on a level surface and that there is a minimum of 10 cm (4") of space on either side of the unit to allow for efficient airflow. This dehumidifier is fitted with castors for extra mobility, if you move the unit, it should first be switched off and the water tank emptied. We do not recommend the use of an extension lead, so please try to ensure that the unit is sufficiently close to a fixed mains socket. If it is necessary to use an extension lead, please ensure the diameter of the wires of the cable are at least 1 mm ^2 .
When the dehumidifier is in operation, outside doors and windows should be closed when necessary for most efficient use.
Caution!
- Always keep the unit in vertical position and on a firm flat surface at all times.
- Ensure that there is at least 300mm (1") between the sides of the appliance and any flammable, heating materials.
- Do not place on soft surfaces.
- Do not cover the appliance's intake or outlet grilles.
- For indoor use only.
- Not suitable for use in cabinet, closet, boats, caravans or similar locations.
- Leave the unit to stand for one hour before connecting to the mains supply after transport or when it has been tilted (e.g. during cleaning).
- Do not obstruct the air intakes and exhausts.
- The mains supply must conform to the specification shown on the rating plate at the back of the unit.
- Avoid overloading circuits, which is caused by using more electrical amps than your wiring can support. Overloading electrical wires can cause excessive heat and electrical fires.
- Avoid the appliance from splash.
- Examine the cord carefully. Make sure that it is not punctured or frayed. Inspect the plug to ensure that the prongs are secure and the plastic surrounding it is not cracked. Avoid running cords under carpets and other areas where you cannot regularly check their condition.
- Avoid over-twisting, -coiling, -pulling the power cord, never use nylon or iron wire to tie the power cord.
- Do not leave appliance when plugged in, unplug from outlet when not in use and before servicing. Connect to a grounded outlet only.
- If the supply cord is damaged, it must be replaced by an approved service representative or a similar qualified person in order to avoid a hazard.
- The appliance shall be installed in accordance with national wiring regulations.
- Never use the plug to start and stop the unit. Always use switch on the control panel.
- Before moving the unit, turn off all controls, then unplug and empty the water tank.
- Don't use bug sprays or other flammable cleaners on the unit.
- This appliance can be used by children aged from 8 years and above and persons with reduced physical, sensory or mental capabilities or lack of experience and knowledge if they have been given supervision or instruction concerning use of the appliance in a safe way and understand the hazards involved. Children shall not play with the appliance. Cleaning and user maintenance shall not be made by children without supervision.
- STAY ALERT! Watch what you are doing and use common sense. Do not use the appliance when you are tired, distracted or under the influence of drugs, alcohol or medication causing diminished control.
- Only a licensed professional is allowed to dismantle or modify the appliance.
- Suggest to send the appliance for professional maintenance periodically.
- THE MACHINE IS TO BE USED ONLY FOR ITS PRESCRIBED PURPOSE. ANY OTHER USE IS DEEMED TO BE A CASE OF MISUSE. THE USER/OPERATOR, NOT THE MANUFACTUER WILL BE LIABLE FOR ANY DAMAGE OR INJURIES OF ANY KIND CAUSED AS A RESULT OF THIS.
IMPORTANT!
Do not use this unit in temperatures lower than 5^ C, to prevent the possibility of a heavily ice up evaporating coil.
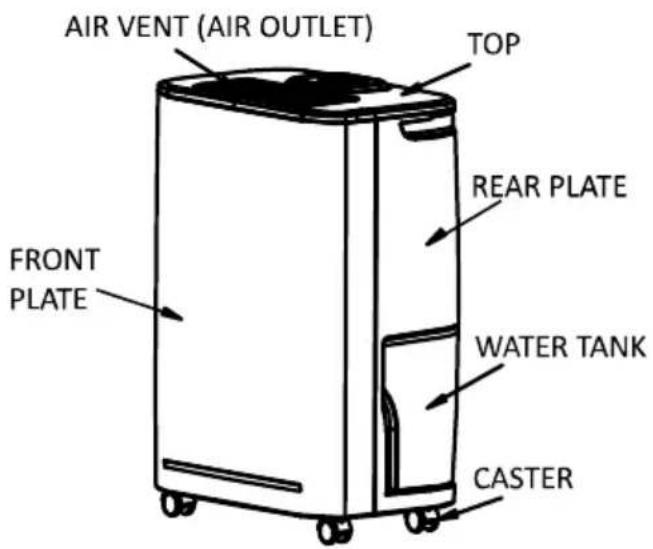
Accessories
Active carbon filter
natural_image
Pure grid pattern with no text, numbers, or symbolsOperation
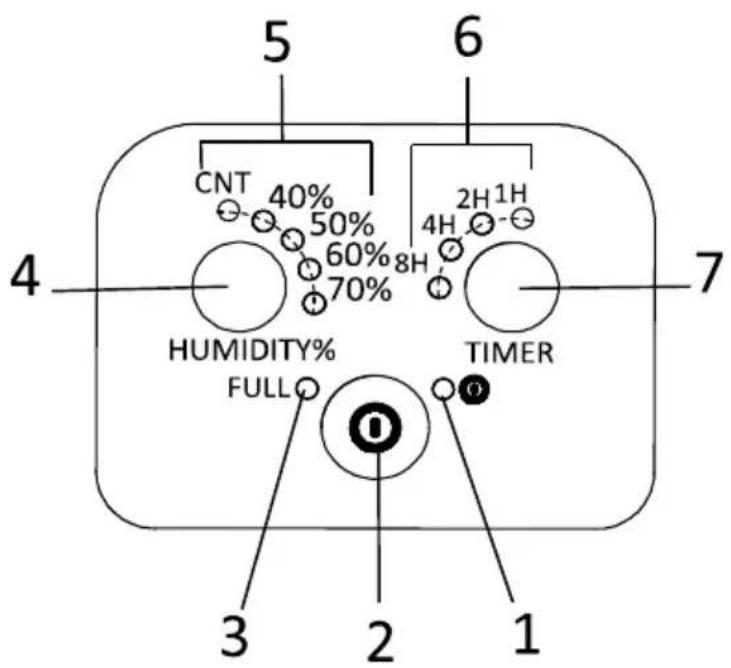
- Power indicator
- ON/OFF (power) button
- "Full Water" indicator
- Humidity setting button
- Working mode indicator (continuous working, humidity 40%, 50%, 60%, 70%)
- Timer operation indicator
- Timer button
Steps:
- Plug the unit into a correct mains socket. (refer to the rating label at the rear of the unit for correct voltage/frequency.)
- Press ON/OFF button to turn on the unit. The power indicator will light on and the compressor will start to work.
- Press humidity setting button to set the working model need: continuous working, humidity 40%/50%/60%/70%. The relative indicator will light on.
- Press TIMER button to set the operating hour need (1, 2, 4, 8H up to 15H) and the chosen indicators will be light on. When the set time has been reached, the compressor will stop working automatically.
- To turn off the unit, press ON/OFF button again.
-
Pre-setting function By pressing TIMER button but without turning on the other functions (including ON/OFF button), you can PRE-SET the time for the machine to work. For example, if you press the timer to 2H, the unit will work automatically after 2 hours.
-
When the water tank is full, the "Full Water" indicator will light on for alarm, the compressor will stop for self-protection
Drainage
While the water tank is full, the compressor will stop for self-protection and the water full indicator will turn red.
To move the water tank, pull it out squarely from the unit.
After emptying the water tank, place the water tank into space. Make sure it is properly positioned, in order for the 'water full' sign to go out and your dehumidifier is operating.
Please note, in case, the water tank has not been positioned well, the water full indicator will turn red.
Continuous drainage
When the dehumidifier is operated at very high humidity levels, the water tank will require more frequent drainage. In this situation, it may be more convenient to set the unit up for continuous drainage with the following procedures:
-
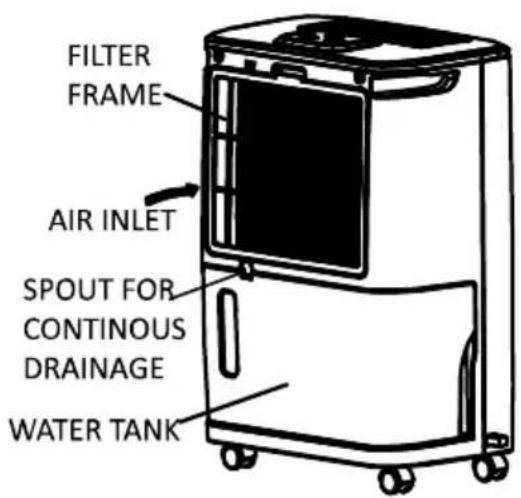
Connect the spout for continuous drainage with water tube of inner diameter: 11 mm. * Please note, the water tube is not supplied with the unit.
-
Ensure the water will always drain away freely and the tube will remain in right place.
Note! In very cold weather conditions, precautions should be taken to prevent the water tube from freeing.
Spout for continuous drainage
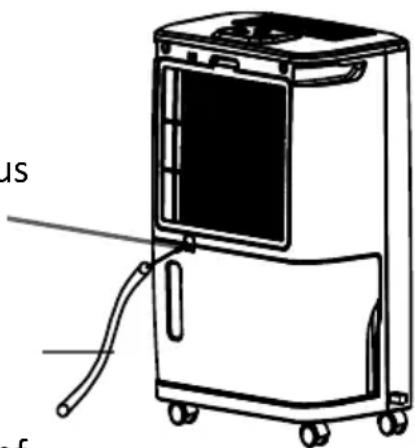
Water tube of inner diameter 11 mm
Maintenance
Always unplug the unit from the mains before carrying out any maintenance or cleaning of the unit.
CLEANING THE BODY
Use soft cloth to wipe the unit clean.
Don't ever use volatile chemicals, gasoline, detergents, chemically treated clothes, or other cleansing solutions. These all could possibly hurt the cabinet.
CLEANING THE FILTER
This dehumidifier is equipped with 2 filters
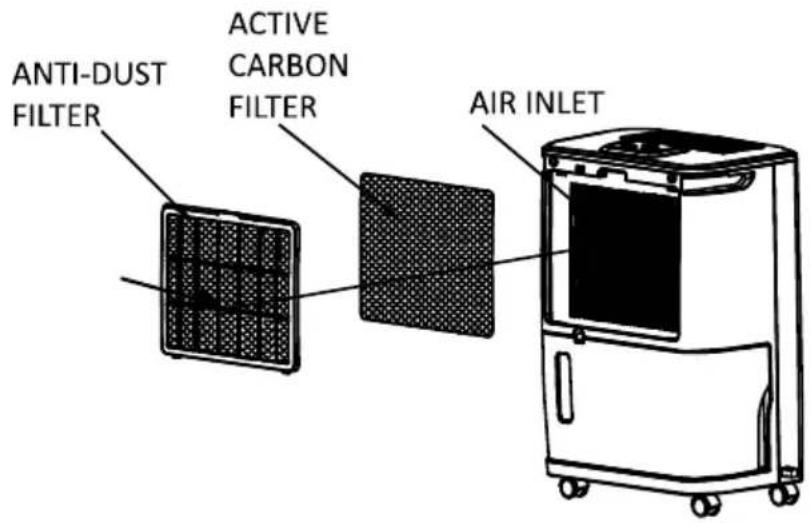
1. ANTI-DUST FILTER
● Extract the filter holder, remove the active carbon filter.
- Use a vacuum cleaner or tap the filter lightly for easy cleaning. If the filter is particularly dirty, use warm water with a small amount of medium strength.
● Make sure the filter is completely dry before replacing.
- Do not expose the filter to sunlight.
- ACTIVE CARBON FITLER (for capturing the particles of dust suspended in the air and preventing the production of bacteria.)
The active carbon filter placed under the anti-dust filter is not washable. Its life span is variable and depends on the ambient conditions where the unit is used. The filter should be checked periodically and replaced if necessary.
STORAGE
If not use the unit for an extended period of time. Please:
- Turing the unit off, unplug and tidy AC cord.
• Completely empty the water tank and wipe it clean.
• Cover the unit and store where it will not receive direct sunlight.
Trouble shooting
THE UNIT DOES NOT OPERATE:
• Is the unit plugged in?
• Is the house electricity on?
- Is the room temperature below 5^ C or above 32^ C? If so, then it is out of the working range of the unit.
- Ensure the ON/OFF switch is turned on.
- Check the water tank is positioned properly in the unit and it is not full.
• Make sure the air inlet and outlet are not obstructed.
THE UNIT SEEMS TO DO NOTHING:
• Is the filter dusty, contaminated?
• Is the air intake or outlet blocked up?
• Is the room humidity already quite low?
THE UNIT SEEMS TO DO LITTLE:
- Are too many windows or doors open?
- Is there something in the room producing lots of humidity?
THE UNIT IS TOO NOISY:
- Check whether the unit is sitting on a level surface.
THE UNIT IS LEAKING:
• Make sure the unit is in good shape.

bar
| Category | Value | |---|---| | Category 1 | 100 | | Category 2 | 100 | | Category 3 | 100 | | Category 4 | 100 | | Category 5 | 100 | | Category 6 | 100 | | Category 7 | 100 | | Category 8 | 100 | | Category 9 | 100 | | Category 10 | 100 | | Category 11 | 100 | | Category 12 | 100 | | Category 13 | 100 | | Category 14 | 100 | | Category 15 | 100 | | Category 16 | 100 | | Category 17 | 100 | | Category 18 | 100 | | Category 19 | 100 | | Category 20 | 100 | | Category 21 | 100 | | Category 22 | 100 | | Category 23 | 100 | | Category 24 | 100 | | Category 25 | 100 | | Category 26 | 100 | | Category 27 | 100 | | Category 28 | 100 | | Category 29 | 100 | | Category 30 | 100 | | Category 31 | 100 | | Category 32 | 100 | | Category 33 | 100 | | Category 34 | 100 | | Category 35 | 100 | | Category 36 | 100 | | Category 37 | 100 | | Category 38 | 100 | | Category 39 | 100 | | Category 40 | 100 | | Category 41 | 100 | | Category 42 | 100 | | Category 43 | 100 | | Category 44 | 100 | | Category 45 | 100 | | Category 46 | 100 | | Category 47 | 100 | | Category 48 | 100 | | Category 49 | 100 | | Category 50 | 100 | | Category 51 | 100 | | Category 52 | 100 | | Category 53 | 100 | | Category 54 | 100 | | Category 55 | 100 | | Category 56 | 100 | | Category 57 | 100 | | Category 58 | 100 | | Category 59 | 100 | | Category 60 | 100 | | Category 61 | 100 | | Category 62 | 100 | | Category 63 | 100 | | Category 64 | 100 | | Category 65 | 100 | | Category 66 | 100 | | Category 67 | 100 | | Category 68 | 100 | | Category 69 | 100 | | Category 70 | 100 | | Category 71 | 100 | | Category 72 | 100 | | Category 73 | 100 | | Category 74 | 100 | | Category 75 | 100 | | Category 76 | 100 | | Category 77 | 100 | | Category 78 | 100 | | Category 79 | 100 | | Category 80 | 100 | | Category 81 | 100 | | Category 82 | 100 | | Category 83 | 100 | | Category 84 | 100 | | Category 85 | 100 | | Category 86 | 100 | | Category 87 | 100 | | Category 88 | 100 | | Category 89 | 100 | | Category 90 | 100 | | Category 91 | 100 | | Category 92 | 100 | | Category 93 | 100 | | Category 94 | 100 | | Category 95 | 100 | | Category 96 | 100 | | Category 97 | 100 | | Category 98 | 100 | | Category 99 | 100 | | Total (Total) |THERMEX SCANDINAVIA A/S SERVICEAFD.:
- Tilbehør
- Betjening
- RENG∅RING AF APPARATET
- ANTIST∅VFILTER
- How it works
- Where to position
- Caution!
- IMPORTANT!
- Accessories
- Operation
- Steps:
- Drainage
- Continuous drainage
- Maintenance
- CLEANING THE BODY
- CLEANING THE FILTER
- ANTI-DUST FILTER
- STORAGE
- Trouble shooting
- THE UNIT DOES NOT OPERATE:
- THE UNIT SEEMS TO DO NOTHING:
- THE UNIT SEEMS TO DO LITTLE:
- THE UNIT IS TOO NOISY:
- THE UNIT IS LEAKING:
Brand : Thermex
Model : DH1
Category : Humidifier