LTL2488GSE - Refrigerator Logik - Free user manual and instructions
Find the device manual for free LTL2488GSE Logik in PDF.
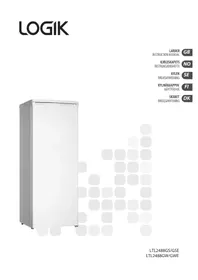


| Product Type | Larder Fridge |
| Model Number | LTL2488GSE |
| Gross Capacity | 244 liters |
| Dimensions (H x W x D) | 1402 x 545 x 570 mm |
| Weight | 41 kg |
| Rated Voltage | 230 V |
| Rated Frequency | 50 Hz |
| Input Current | 0.7 A |
| Input Power | 72 W |
| Refrigerant Type & Weight | R600a (32 g) |
| Temperature Control | Thermostat dial (1-7, 0 off) |
| Recommended Temperature | 0°C to 5°C |
| Door Reversibility | Yes (left or right opening) |
| Interior Light | Yes (10W SES bulb) |
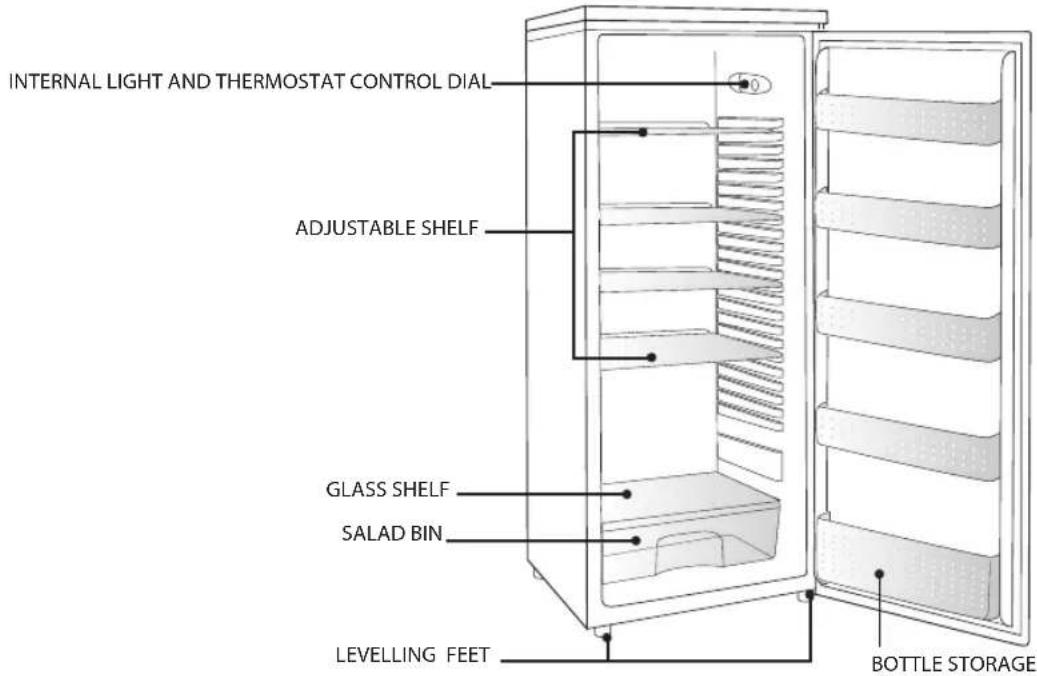
| Shelves | Adjustable glass shelves, salad bin, bottle storage |
| Leveling Feet | Yes (front, adjustable) |
| Cleaning | Weak bicarbonate solution, warm water, wax polish for exterior |
| Safety Features | Lock with key (keep out of reach); anti-tip? Not specified |
| Standby/Coolant Settling Time | 2 hours after moving before switching on |
| Environmental Class | Indoor domestic use only, ambient 16°C-32°C |
Frequently Asked Questions - LTL2488GSE Logik
User questions about LTL2488GSE Logik
0 question about this device. Answer the ones you know or ask your own.
Ask a new question about this device
Download the instructions for your Refrigerator in PDF format for free! Find your manual LTL2488GSE - Logik and take your electronic device back in hand. On this page are published all the documents necessary for the use of your device. LTL2488GSE by Logik.
USER MANUAL LTL2488GSE Logik
Contents
GB
Getting to know your New Larder 4
Before use 4
Installing 4
Location 4
Moving the appliance ....4
Leveling the Larder 4
Cleaning before use 4
Before plugging in YOU MUST 4
Before switching on! 4
Reverse the door swing 5
Getting Started 6
Switching on your new larder 6
Adjusting the temperature 6
Noises inside the new larder! 6
Is the New Larder cold enough? 5
Shopping for chilled foods 5
In Use 7
Tips for keeping food perfect in the larder .....7
Cleaning 7
Cleaning the outside of the larder 7
Cleaning the inside of the larder 7
Cleaning tips 7
Maintenance 8
Moving your new larder 8
Technical Specifications 9
Safety 34
Getting to know your New Larder
Before use
Please read these instructions carefully before using your new Logik appliance. The appliance is for indoor and domestic use only.
Installation
Location
When selecting a position for your appliance, you should make sure the floor is flat and firm, and the room is well ventilated with an average room temperature of between 16°C and 32°C. Locate the appliance away from direct sunlight and sources of heat (stove, heater, radiator, etc.). Direct sunlight may affect the acrylic coating, and heat sources may increase electrical consumption. Extreme cold ambient temperatures may also cause the appliance not to perform properly. This unit is not designed for use in a garage or any other outside installation. Avoid locating the appliance in moist areas. It must therefore be installed so that the appliance has at least 10 cm (2.5") of free space at the top and 2 cm (3/4") on the sides. The appliance door can open either to the right or the left, depending on whichever suits you. See page 4 if you want to reverse the door swing. Do not drape your appliance with any covering.
Moving the appliance
Position your appliance in front of its final operating position and gently slide the appliance into place. At least two people must be used to move the appliance.
Leveling the Larder
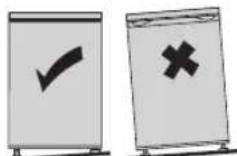
Remove the packaging support from the base of the appliance and replace it with the 2 leveling feet. Make sure the appliance is level. Use the leveling feet at the front. If the appliance is not level, the doors and magnetic seal alignments will be affected.
Cleaning before use
Wipe the inside of the appliance with a weak solution of bicarbonate soda. Then rinse with warm water using a damp sponge or cloth. Wash the baskets and shelves in warm soapy water and dry completely before replacing them in the larder. The external parts of the larder can be cleaned with wax polish. If you require more information, refer to cleaning on page 6.
Before plugging in YOU MUST
Check that you have a socket which is compatible with the plug supplied with the appliance. If not, please consult a qualified technician for assistance.
Before switching on!
DO NOT SWITCH ON UNTIL TWO HOURS AFTER MOVING THE LARDER.
The coolant fluid needs time to settle.
Reverse the door swing
- Ensure the appliance is unplugged and empty.
- Adjust the two leveling feet to their highest position.
- We recommend you have someone to assist you.
Tools required
- Phillips style screwdriver
- Flat bladed screwdriver
- Hexagonal Spanner
Note: Take the door off it is necessary to tilt the larder backward. You should rest the larder on something solid and place something under the rollers so that it will not slip during the door change process.
DO NOT lay the larder completely flat as this may damage the coolant system.
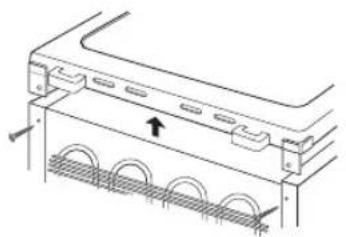
- Remove the screws at the rear of top cover and then take the top cover away.
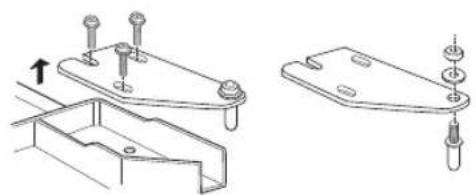
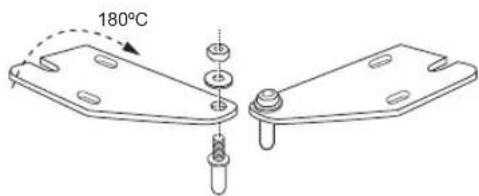
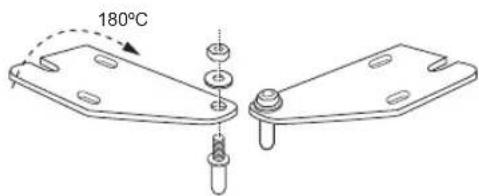
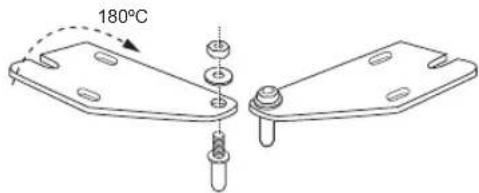
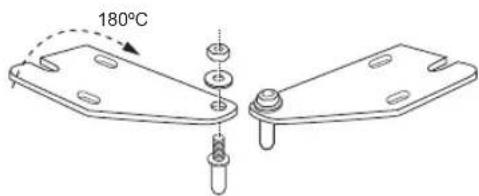
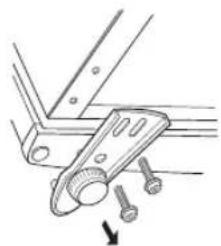
- Remove the screws and bracket from the topside and fit back to where the hinge bracket was located on the opposite side (right to left). A spanner may be required to loosen the bolts fin.
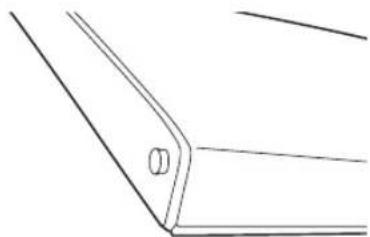
- Slide the door up and lift away from the appliance.
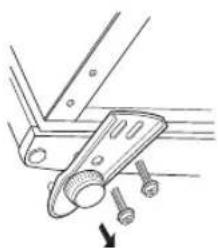
- Remove screws and hinge bracket and refit on opposite side.
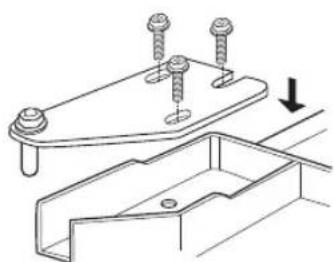
- Slide the larder door back on to the lower hinge. Making sure it's the right way up. Screw the hinge bracket into place on the new side.
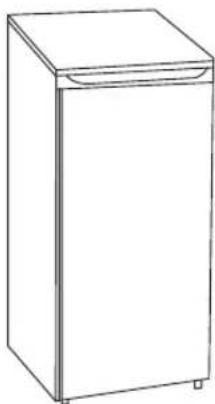
- Check that door is aligned horizontally and vertically and that the seals are closed on all sides before finally tightening the bottom hinge. Re-adjust the leveling feet.
Getting Started
Switching on your new larder
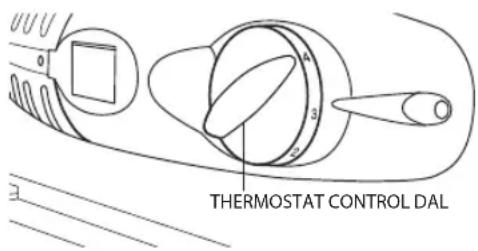
1 Before connecting the appliance to the mains supply make sure that the Thermostat Control Dial is set at position 0. This is located on the right inside of the cabinet. 2 Turn the thermostat knob clockwise to set it to the desired position, bear in mind that the higher the number, the colder the temperature. 3 To ensure the appliance is cool enough to sufficiently chill your food wait 24 hours before filling with food.
Adjusting the temperature
The internal temperature of your appliance is controlled by a thermostat. Position 7 makes the appliance coldest. Position 1 makes it the warmest and 0 turns the appliance off. The recommended setting for the appliance is between 1 and 4 for colder working environments (i.e., during winter) and 5-6 for hotter environments. The appliance may not operate correctly if it is in a particularly hot or cold room or if the door is opened often.
Noises inside the new larder!
If you have not owned an appliance before, you may notice that it makes some rather unusual noises. Most of these are perfectly normal, but you should be aware of them!
GURGLING, WHOOSHING
These noises are caused by the circulation of the refrigerant liquid in the cooling system. It has become more pronounced since the introduction of CFC-free gases. This is not a fault and will not affect the performance of your appliance.
HUMMING, PURRING OR PULSATING
This is the compressor motor working, as it pumps the refrigerant around the system.
Is the New Larder cold enough?
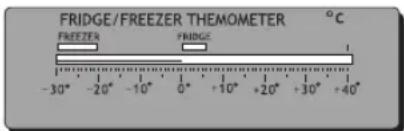
If you are at all concerned that your appliance is not being kept cold enough, or you occasionally wish to check the temperature, you can purchase a Fridge/Larder thermometer. These are available from most supermarkets and hardware shops. Place the thermometer in the coldest part of your appliance (located at the back for the larder, below the shelf), where it can be easily read. Leave overnight; the correct temperature should be between 0°C and 5°C.
See 'Adjusting the temperature'.
Shopping for chilled foods
Don't buy it in your lunch hour!
Unless you have an appliance at work to keep the food cold in the afternoon, leaving food in your car or at room temperature for a prolonged period of time could raise food temperature to dangerous level allowing harmful bacteria to grow.
Keep chilled foods together
Try to keep chilled food together whilst shopping and on the journey home as this will help to maintain the coldness of the food.
Use a cool bag
Special insulated bags can be bought from most supermarkets and hardware shops. These keep food cold for longer, but are only for getting chilled foods home, not storing it.
Unwrap as soon as you get home
Always unpack and place chilled foods in the appliance before storing dry food stuffs.
In Use
Tips for keeping food perfect in the larder
Take extra care with meat and fish
Cooked meats should always be stored on a shelf above raw meats to avoid bacterial transfer. Keep raw meats on a plate which is large enough to collect juices and cover it with ding film or foil.
Leave space around food
This allows cold air to circulate around the appliance, ensuring all parts of the appliance are kept cool.
Wrap up food!
To prevent transfer of flavours and drying out, food should be separately packed or covered. Fruit and vegetables need not be wrapped.
Pre-cooked food should be cooled properly
Always let pre-cooked food cool down before you put it in the appliance. This will stop the internal temperature of the appliance from rising.
Shut the door!
To prevent cold air escaping, try to limit the number of times you open the door. When returning from shopping, sort foods to be kept in your appliance while the door is closed and only open it to put food in or take food out.
NOTE: ALWAYS WRAP AND STORE RAW MEAT, POULTRY AND FISH ON THE LOWEST SHELF AT THE BOTTOM OF THE APPLIANCE AS THIS WILL STOP THEM DRIPPING ONTO OR TOUCHING OTHER FOODS. DO NOT STORE INFLAMMABLE GASES OR LIQUIDS IN THE APPLIANCE.
Cleaning
Cleaning the outside of the larder
Use standard furniture polish to clean the appliance exterior.
Make sure that the door is closed, preventing polish getting on the magnetic door seal or inside on to the food. Do not use harsh cleaners, scouring pads or solvents to clean any part of your appliance, as this may scratch the enamel.
Cleaning the inside of the larder
Make sure the larder has been turned off at the mains before cleaning. The inside of the larder can be cleaned with a weak solution of bicarbonate of soda. Rinse with a damp sponge and wipe dry. Reconnect to the mains supply.
Cleaning tips
Clean when food stocks are low.
NOTE: Do not use harsh cleaners, scouring pads or solvents to clean any part of your appliance.
Maintenance
Leveling the larder
Make sure the appliance is level. Use the rotating leveling feet at the front. If the appliance is not level, the doors and magnetic seal alignments will be affected and may cause your appliance to work incorrectly.
Do Not Turn on the for 2 hours
After the appliance has been placed, it needs to be left for 2 hours. This allows time for the coolant to settle.
Servicing
Repairs and maintenance of the appliance should only be performed by an authorized, qualified technician.
The larder is not working
- Check it is plugged in and switched on.
- Check that the fuse in the plug, has not blown.
- Plug in another appliance, such as lamp to see if the socket is working.
Condensation appears on the outside of the larder
This may be due to a change in the room temperature. Wipe off any residue of moisture. If the problem continues, call the customer service department.
Noises
You may hear some unusual noise from time to time. See 'Noise inside the appliance' on page 5. However, if your appliance begins to make noises you have not heard before, call the Customer Service Department.
Moving your new larder
Care when handling
Hold the appliance around its sides or base when moving it. Under no circumstance should it be lifted by holding the edges of the top surface.
Location
Do not place your appliance near a heat source, e.g. cooker, boiler or radiator. Also avoid direct sunlight in outbuildings or sun lounges.
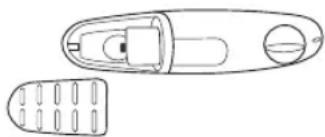
Changing the Internal Light
- Before carrying out the bulb replacement, always press and turn the thermostat control dial to Position 0, then disconnect the mains supply.
- Hold and unscrew the light bulb cover.
- Remove the plastic light bulb cover.
- Remove the old bulb by unscrewing in an anti-clockwise direction.
- Replace with a new bulb (10W SES). Please make sure that it is secure in the bulb cover.
- Refit the translucent light cover and reconnect your larder to the mains supply and switch on.
Technical Specifications
Model LTL2488GS/GSE/GW/GWE
Rated Voltage (V) 230
Rated Frequency (Hz) 50
Input Current (A) 0.7
Input Power (W) 72
Larder Volume 244
Refrigerant (weight) 32g
Weight and Dimensions are approximate. Because we continually strive to improve our products we may change specifications and designs without prior notice.
- Check that the door is adjusted horizontally and vertically and that the seals are tight on all sides before attaching the bottom hinge. Readjust the leveling feet.

Getting started
Turn on the refrigerator
Buy chilled food
Technical Specifications
Model LTL2488GS/GSE/GW/GWE
Rated voltage (V) 230
Rated frequency (Hz) 50
Input current (A) 0.7
Input power (W) 72
Refrigerator volume 244
Net capacity (liters)
(Cubic feet) 8.6
Weight (Kg) 41
Product dimensions h/w/d (mm) 1402 x 545 x 570
HUM, WHIR, OR VIBRATION
Technical Specifications
Model LTL2488GS/GSE/GW/GWE
Rated Voltage (V) 230
It is hazardous for anyone other than authorized service personnel to carry out servicing or repairs which involves the removal of covers.
To avoid the risk of an electric shock do not attempt to repair this appliance yourself. If the supply cord is damaged it must be replaced by the manufacturer, its service agent, or similarly qualified persons in order to avoid a hazard.
This appliance is not intended for use by persons (including children) with reduced sensory or mental capabilities, or lack of experience and knowledge unless they have been given supervision or instruction concerning the use of the appliance by a person responsible for their safety.
Children should be supervised to ensure that they do not play with the appliance.
Disposal
Old appliances still have some residual value. An environmentally friendly method of disposal will ensure that valuable raw materials can be recovered and used again. The refrigerant used in your appliance and insulation materials require special disposal procedures. Ensure that none of the pipes on the back of the appliance are damaged prior to disposal. Up to date information concerning options for disposing of your old appliance and packaging from the new one can be obtained from your local council office.
Locks
If your larder is fitted with a lock, to prevent children being entrapped keep the key out of the reach and not in the vicinity of the appliance.
If disposing of an old larder break off any old locks or latches as a safeguard.
Safety

WARNING!
This symbol on the product or in the instructions means that your electrical and electronic equipment should be disposed at the end of its life separately from your household waste. There are separate collection systems for recycling in the EU. For more information, please contact the local authority or your retailer where you purchased the product.
NO

- CONTENTS
- GETTING TO KNOW YOUR NEW LARDER
- BEFORE USE
- INSTALLATION
- LOCATION
- MOVING THE APPLIANCE
- LEVELING THE LARDER
- CLEANING BEFORE USE
- BEFORE PLUGGING IN YOU MUST
- BEFORE SWITCHING ON
- REVERSE THE DOOR SWING
- GETTING STARTED
- SWITCHING ON YOUR NEW LARDER
- ADJUSTING THE TEMPERATURE
- NOISES INSIDE THE NEW LARDER
- GURGLING, WHOOSHING
- HUMMING, PURRING OR PULSATING
- IS THE NEW LARDER COLD ENOUGH
- SHOPPING FOR CHILLED FOODS
- DON'T BUY IT IN YOUR LUNCH HOUR
- KEEP CHILLED FOODS TOGETHER
- USE A COOL BAG
- UNWRAP AS SOON AS YOU GET HOME
- IN USE
- TIPS FOR KEEPING FOOD PERFECT IN THE LARDER
- TAKE EXTRA CARE WITH MEAT AND FISH
- LEAVE SPACE AROUND FOOD
- WRAP UP FOOD
- PRE-COOKED FOOD SHOULD BE COOLED PROPERLY
- SHUT THE DOOR
- CLEANING
- CLEANING THE OUTSIDE OF THE LARDER
- CLEANING THE INSIDE OF THE LARDER
- CLEANING TIPS
- MAINTENANCE
- DO NOT TURN ON THE FOR 2 HOURS
- SERVICING
- THE LARDER IS NOT WORKING
- CONDENSATION APPEARS ON THE OUTSIDE OF THE LARDER
- NOISES
- MOVING YOUR NEW LARDER
- CARE WHEN HANDLING
- CHANGING THE INTERNAL LIGHT
- TECHNICAL SPECIFICATIONS
- TURN ON THE REFRIGERATOR
- BUY CHILLED FOOD
- HUM, WHIR, OR VIBRATION
- DISPOSAL
- LOCKS
- SAFETY
- WARNING
- NO
Brand : Logik
Model : LTL2488GSE
Category : Refrigerator