AFPV0316 - Computer Mouse ADX - Free user manual and instructions
Find the device manual for free AFPV0316 ADX in PDF.


| Type of product | Gaming mouse |
| Model | AFPV0316 |
| Dimensions (L x W x H) | 132 x 85 x 51 mm |
| Net weight (without weights) | 160 g |
| Adjustable weight | Up to 26.4 g (8 x 3.3 g metal weights) |
| Total weight with all weights | 186.4 g |
| Working voltage | DC 5 V |
| Resolution (DPI) | 800 – 16400 dpi (adjustable) |
| Number of buttons | 7 (left, right, scroll wheel, DPI up/down, fire button, numeric pad with 5 profiles) |
| Polling rate options | 125 Hz, 250 Hz, 500 Hz, 1000 Hz |
| Lighting | RGB LED with adjustable color, brightness, and blinking sequence |
| Software support | Customizable button mapping, macro recording, DPI and pointer speed adjustment |
| System requirements | Microsoft Windows 7/8/10, 1 USB port, CD-ROM for software installation |
| Included accessories | Main unit, rounded weight container, setup disc, instruction manual |
| Safety certifications | CE compliant |
| Maintenance | No user-serviceable parts; clean with dry cloth |
| Repairability | Not repairable by user; no spare parts available |
| Warranty | Standard manufacturer warranty (details in manual) |
Frequently Asked Questions - AFPV0316 ADX
User questions about AFPV0316 ADX
0 question about this device. Answer the ones you know or ask your own.
Ask a new question about this device
Download the instructions for your Computer Mouse in PDF format for free! Find your manual AFPV0316 - ADX and take your electronic device back in hand. On this page are published all the documents necessary for the use of your device. AFPV0316 by ADX.
USER MANUAL AFPV0316 ADX
Safety Warnings....6
Unpacking......8
Product Overview....9
Top View 9
Bottom View....10
System Requirements 10
Adjusting the Weight 11
Software Installation.... 11
User Interface.... 12
General Setting.... 13
DPI Setting 15
Light Setting 16
Hints and Tips.... 17
Specifications.... 17
NO Innhold
Lysinnstilling....26
Råd og tips 27
Spesifikasjoner 27
While the mouse is functioning, the laser beam is not visible to the naked eye. Avoid looking directly into the emitter hole while the mouse is active.
- Your product complies with CE rules.
- This product has no serviceable parts. Use of controls or adjustments of procedures other than the Instruction Manual may result in danger.
Thank you for purchasing your new product.
We recommend that you spend some time reading this instruction manual in order that you fully understand all the operational features it offers. You will also find some hints and tips to help you resolve any issues.
Read all the safety instructions carefully before use and keep this instruction manual for future reference.
GB
Unpacking
Remove all items from the packaging. Retain the packaging. If you dispose of it please do so according to local regulations.
The following items are included:

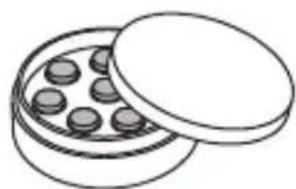
Main Unit Rounded Weight Container x 1

Setup Disc x 1 Instruction Manual
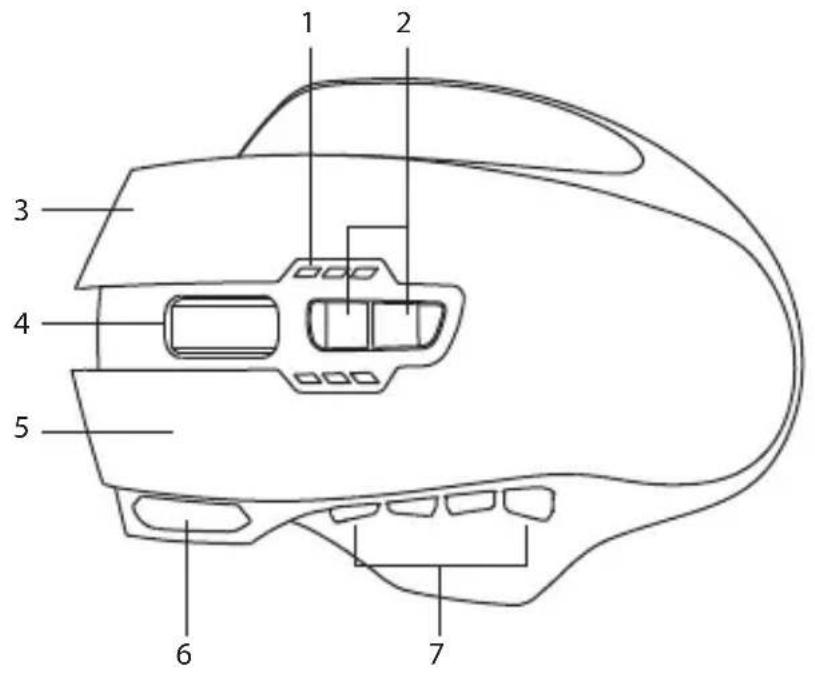
Top View

GB
- DPI LED
Indicate selected dpi.
- DPI Buttons
Select different dpi.
-
Right Button
-
Scroll Wheel
-
Left Button
-
Fire Button
Start fire continually
- Numeric Pad
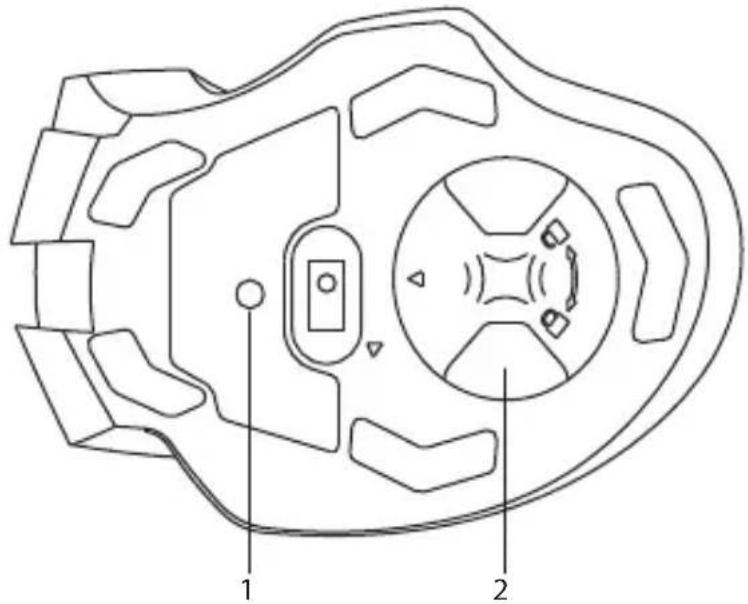
Bottom View
GB
1. Profile Button
Select profile 1-5.
2. Weight Compartment
System Requirements
Operating Systems: Microsoft® Windows® 7 / 8 / 10
Hardware: 1 available USB port CD rom for gaming software installation
Adjusting the Weight
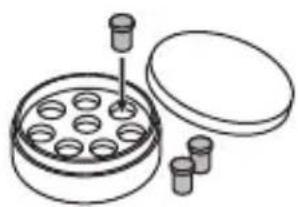
8 x 3.3 gram of metal weights are provided for you to select your ideal mouse weight up to 26.4 gram.
- Switch the weight cover to release weight box.

GB
- Adjust to the weight you want.

- Store the remaining weights in the rounded weight container.
Software Installation
-
Insert the provided Setup Disc into the computer's CD rom.
-
It will auto run the setup software, otherwise choose AFPV0316_Setup.exe from your CD drive.
-
Follow the installation instruction to complete the installation.
-
Choose AFPV0316 Conf i guration.exe from the desktop to start the software.
Choose AFPV0316 Configuration.exe from the desktop to start the software.

- Minimise the software
- Exit the software
- Setting options
- Export current profile
- Import existing profile
-
Select profile 1-5
-
Restore to default setting (All profiles)
- Save and exit the software
- Cancel setting and exit
- Save the current setting

Selecting profile 1-5 will load all desired setting of your choice.
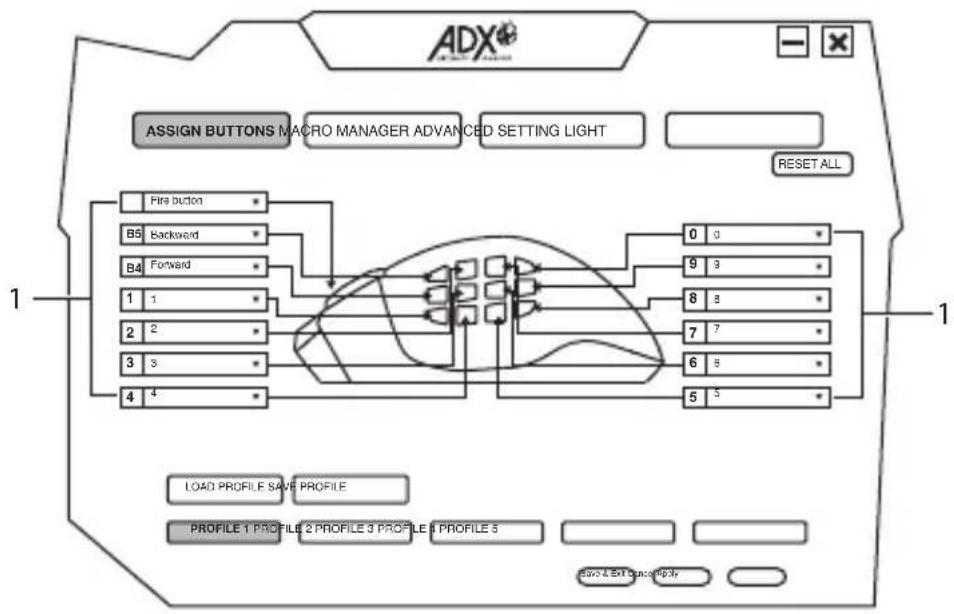
Select ASSIGN BUTTONS from the user interface.
GB
1. Customising the Buttons
Change the mouse button into desired functions from the function list.
Left click cannot be customised unless another left click is set.
Select MACRO MANAGER from the user interface.

- Start/Stop record
- Delay (1sec = 1000ms)
-
Loop
-
Create new macro
- Delete selected macro
Assigning Macro
By assigning a macro to a mouse button, you can execute complex combinations with ease.
a) Choose Create to create new macro profile.
b) Press Start record to start macro by pressing keyboard keys.
c) Press Stop record when finishing macro.
d) Choose a desired mouse button to apply MACRO from the function list.
e) Press the chosen mouse button to playback macro.

Macro function can only record keyboard keypress.
Select ADVANCED from the user interface.

GB
1. Pointer Speed
Adjust the speed of your mouse pointer.
2. Pointer Acceleration
Acceleration increases the cursor's movement speed depending on how quickly the mouse is moved.
3. Double-click
Adjust the double click response time.
4. Scroll Wheel
Adjust the scrolling speed.
5. Scroll for One Page
Scroll per vision page.
6. Sensitivity
Sensitivity (DPI) pertains to how much effort is needed to move the mouse pointer in any direction. The higher the DPI, the faster the mouse movement.
You may set different sensitivity values to each of the axis by selecting Enhance Advanced Sensitivity.
7. Polling Rate
The higher the polling rate, the more often the computer receives information about the status of your mouse, thus increasing the mouse pointer's reaction time.
You can select among 125Hz (8ms), 250Hz (4ms), 500Hz (2ms) and 1000Hz (1ms).
8. DPI Setting
Sensitivity (DPI) pertains to how much effort is needed to move the mouse pointer in any direction.
The higher the DPI, the faster the mouse movement.
GB
Light Setting
Select LIGHT from the user interface.

1. Colour
Select desired LED colour.
2. Brightness
Select brightness level.
3. Blinking Sequence
Select blinking sequence level.
Hints and Tips
- Make sure the USB plug is fully plugged into a USB port and the computer is on or try to use a different USB port.
- If the mouse is moving erratically, change the working surface which the mouse is operating on.
- If the software is not working properly, uninstall it and then reboot the computer. Re-install the software.
Specifications
GB
| Model AFPV0316 | |
| Working Voltage DC 5V | |
| Resolution 800 – 16400 dpi | |
| Dimension (L) x (W) x (H) 132 x 85 x 51 mm | |
| Net Weight 160g + (3.3g x 8) | |
Features and specifications are subject to change without prior notice.

The symbol on the product or its packaging indicates that this product must not be disposed of with your other household waste. Instead, it is your responsibility to dispose of your waste equipment by handing it over to a designated collection point for the recycling of waste electrical and electronic equipment. The
separate collection and recycling of your waste equipment at the time of disposal will help conserve natural resources and ensure that it is recycled in a manner that protects human health and the environment.
For more information about where you can drop off your waste for recycling, please contact your local authority, or where you purchased your product.
Windows is a registered trademark of Microsoft Corporation in the United States and other countries.
All trademarks are the property of their respective owners and all rights are acknowledged.
Takk for at du kjøpte ny produktet.


NO
1. Profil knapp
Velg profil 1–5.
2. Vektkammer
Systemkrav
Operativsystemer: Microsoft® Windows® 7 / 8 / 10
NO


Installationsskiva x 1 Instruktionsbok
Vy ovanifrån
- DPI-LED
indikera vald dpi.
- DPI knappar
Välj annan dpi.
1. ProfilProfil knapp
Välj profil 1-5.
2. Viktfack
Systemkrav
Operativsystem: Microsoft® Windows® 7 / 8 / 10
SE


1. Profili painike
Valitse profili 1-5.
2. Paino-osasto
FI
FI
Ohjelmistoasennus

1. Profil-knap
Vælg profil 1-5.
2. Vægtrum
DK
Systemkrav
Operativsystemer: Microsoft® Windows® 7 / 8 / 10
DK
Softwareinstallation
GB www.knowhow.com/knowledgebank
www.lefdal.com/support
www.elgiganten.se/support
- NO INNHOLD
- THANK YOU FOR PURCHASING YOUR NEW PRODUCT
- GB
- UNPACKING
- TOP VIEW
- BOTTOM VIEW
- PROFILE BUTTON
- WEIGHT COMPARTMENT
- SYSTEM REQUIREMENTS
- ADJUSTING THE WEIGHT
- SOFTWARE INSTALLATION
- CUSTOMISING THE BUTTONS
- ASSIGNING MACRO
- POINTER SPEED
- POINTER ACCELERATION
- DOUBLE-CLICK
- SCROLL WHEEL
- SCROLL FOR ONE PAGE
- SENSITIVITY
- POLLING RATE
- DPI SETTING
- LIGHT SETTING
- COLOUR
- BRIGHTNESS
- BLINKING SEQUENCE
- HINTS AND TIPS
- SPECIFICATIONS
- TAKK FOR AT DU KJØPTE NY PRODUKTET
- PROFIL KNAPP
- VEKTKAMMER
- SYSTEMKRAV
- VY OVANIFRÅN
- PROFILPROFIL KNAPP
- VIKTFACK
- PROFILI PAINIKE
- PAINO-OSASTO
- OHJELMISTOASENNUS
- PROFIL-KNAP
- VÆGTRUM
- DK
- SOFTWAREINSTALLATION
Brand : ADX
Model : AFPV0316
Category : Computer Mouse