STFBW19E - Fan Sandstrøm - Free user manual and instructions
Find the device manual for free STFBW19E Sandstrøm in PDF.


| Product Type | Pedestal Fan |
| Model | STFBW19E |
| Brand | Sandstrøm |
| Height (Max) | 135 cm |
| Base Diameter | 35 cm |
| Net Weight | 5.5 kg |
| Rated Power | 50 W |
| Voltage / Frequency | 220-240 V / 50 Hz |
| Number of Speed Settings | 3 |
| Oscillation | Yes, 90° wide |
| Timer | Up to 7.5 hours |
| Remote Control | Included |
| Blade Diameter | 40 cm |
| Height Adjustment | Manual, telescopic pole |
| Overheat Protection | Yes |
| Tip-Over Switch | Yes |
| Maintenance | Clean with damp cloth; avoid water on motor |
| Spare Parts Availability | Remote control, screws, grille |
| Noise Level | Approx. 45-55 dB (A) |
| Energy Efficiency Class | Class A (typical) |
Frequently Asked Questions - STFBW19E Sandstrøm
User questions about STFBW19E Sandstrøm
0 question about this device. Answer the ones you know or ask your own.
Ask a new question about this device
Download the instructions for your Fan in PDF format for free! Find your manual STFBW19E - Sandstrøm and take your electronic device back in hand. On this page are published all the documents necessary for the use of your device. STFBW19E by Sandstrøm.
USER MANUAL STFBW19E Sandstrøm
natural_image
Exterior view of a black and white electric fan tower (no visible text or symbols)GB Contents
Safety Warnings....4
Unpacking......9
Assembling Your Fan....10
Product Overview....12
Main Unit....12
Control Panel 12
Remote Control....12
Installing Batteries in the Remote Control ....13
How to Use Your Fan 14
Cleaning 14
Hints and Tips....14
Specifications....15
NO Innhold
Thank you for purchasing your new product.
We recommend that you spend some time reading this instruction manual in order that you fully understand all the operational features it offers. You will also find some hints and tips to help you resolve any issues.
Read all the safety instructions carefully before use and keep this instruction manual for future reference.
Unpacking
Remove all items from the packaging. Retain the packaging. If you dispose of it please do so according to local regulations.
The following items are included:
natural_image
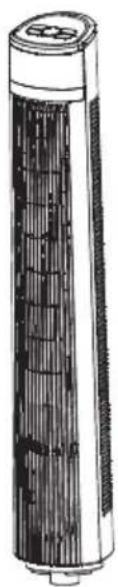
Illustration of a cylindrical industrial fan or filter unit with internal grid structure (no text or symbols)Tower Fan with Base Clip

Front Base
natural_image
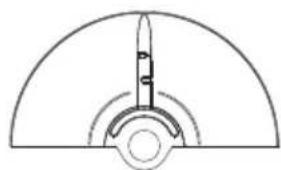
Pure diagram of a mechanical or electrical component with concentric arcs and central shaft (no text or symbols)Rear Base

natural_image
Simple line drawing of a remote control panel with six function buttons (no text or symbols)Remote Control (with AAA batteries x 2)

Instruction Manual

- Avoid using your fan in hazardous areas.
- Do not use your fan if it has not been fully assembled. Make sure that the base clip that hold the base parts and the main unit together are tightened securely.
-
Do not connect the unit to the mains until the assembly is finished.
-
Attach the rear base onto the front base.

- Turn the base upside down then turn the 2 interlocking keys to lock the front and rear base together.

- Unscrew the Base Clip from the bottom of the tower fan.

- Fix the bottom part of the tower fan into the base. Attach the base clip and secure it tightly.

natural_image
Diagram of a cable or wire connection with a plug and cable, no text or symbols present- Insert the mains cable into the grooves on the rear base.

GB
GB
Main Unit

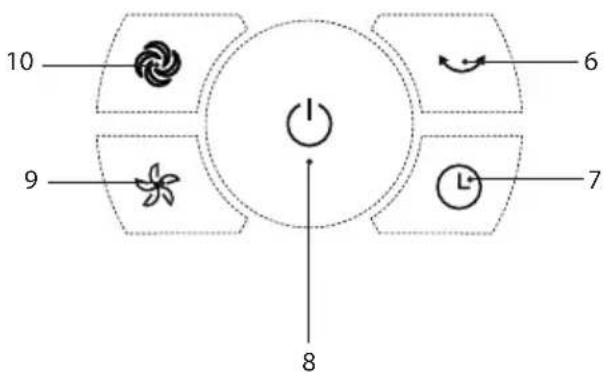
Control Panel
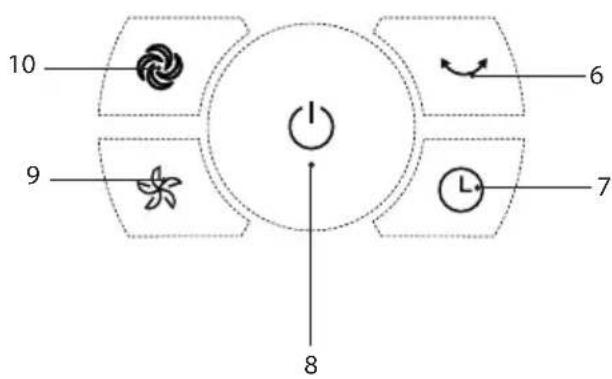
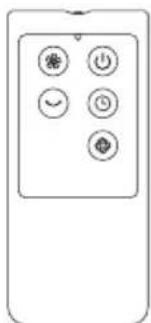
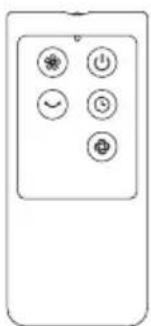
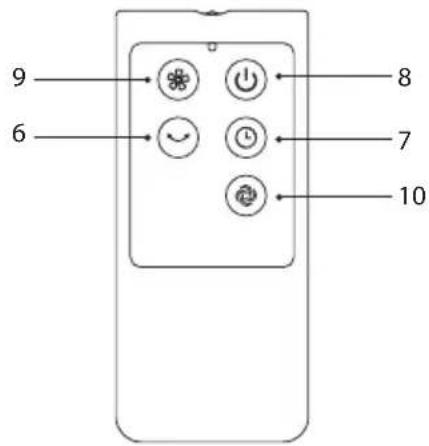
Remote Control
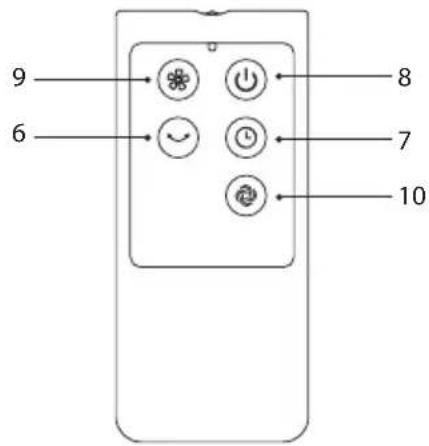
- Control Panel
- Display
- Rear Base
- Base Clip
- Front Base
- Swing Button
- Timer Button
- On/Off Button
- Speed Button
- Wind Mode Button
Installing Batteries in the Remote Control
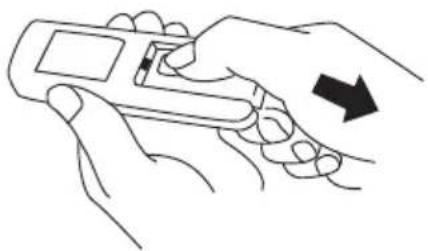
- Slide to open the battery compartment cover of the remote control.
- Insert two AAA size batteries. Make sure to match the (+) and (-) ends of the batteries with the (+) and (-) ends indicated in the battery compartment.
- Close the battery compartment cover.
natural_image
Line drawing of two hands holding a handheld device with an arrow indicating motion (no text or symbols)
GB

Handling the Batteries
- Improper or incorrect use of batteries may cause corrosion or battery leakage, which could cause fire, personal injury or damage to property.
- Only use the battery type indicated in this manual.
- When the batteries are exhausted, the remote control will not function. Replace both batteries at the same time with new ones.
- Do not install new batteries with used ones and do not mix different types of batteries.
- Do not dispose of used batteries as domestic waste. Dispose of them in accordance with local regulations.
Handling the Remote Control
- Do not drop or cause impact to the remote control.
- Do not spill water or any liquid on the remote control.
- Do not place the remote control on a wet object.
- Do not place the remote control under direct sunlight or near sources of excessive heat.
- Remove the battery from the remote control when not in use for a long period of time, as it could cause corrosion or battery leakage and may result in physical injury and/or property damage including fire.
How to Use Your Fan
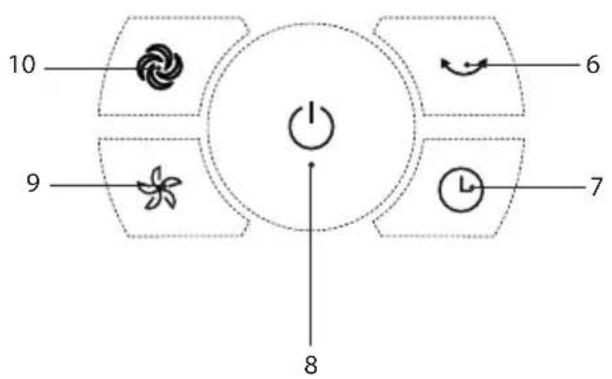
- Press the button to turn the tower fan on or off.
- Press the ✿ button repeatedly to adjust the fan speed (1 - Low, 2 - Medium, 3 - High). The speed number will be shown on the display.
- Press the 🎨 button repeatedly to select the wind mode: normal, natural (the fan speed will start slowly, then increase speed before returning to slow), sleep (the fan speed will automatically start fast, then slow down, before maintaining a steady speed).
- Press the Ⓛ button repeatedly to set the timer from 1 to 7 hours (press once to increase 1 hour).
- Press the √ button to allow or stop the fan from swinging left and right.
GB

When using the remote control, make sure it is pointed towards the fan.
Cleaning
Unplug the unit from the mains socket.
Use a slightly damp cloth to wipe the outer body of the unit. Never completely cover the unit with water or use chemicals or detergents as they could damage the unit.
To ensure adequate air circulation to the motor, keep vents at the rear of the motor free of dust. Do not disassemble the fan for cleaning.
Hints and Tips
| Problem Solution | |
| The force of air coming from the unit is weak. | Adjust the speed up to a higher setting. |
| The unit does not work. Check that the plug | is connected correctly and that the unit is turned on at the mains supply. |
| Other abnormal conditions. Disconnect the | fan from the wall and consult a repair specialist. |
Specifications
| Model STFBW19E | |
| Rated Voltage 220-240 V | |
| Rated Frequency 50 Hz | |
| Input Power 35 W | |
| Maximum Fan Flow Rate (F) 35.14 m | ^3 /min |
| Fan Power Input (P) 35.70 W | |
| Service Value (SV) 0.98 (m) | ^3 /min)/W |
| Standby Power Consumption (Psb) - | |
| Fan Sound Power Level (Lwa) 60.10 dB(A) | |
| Maximum Air Velocity (c) 3.66 meters/sec | |
| Measurement Standard for Service Value | EN ISO 5801:2008GB/T 13380:2007 |
Features and specifications are subject to change without prior notice.
GB
Takk
for at du kjøpte ny produktet.
natural_image
Illustration of a cylindrical industrial fan or filter unit with internal grid structure (no text or symbols)natural_image
Pure diagram of a mechanical or electrical component with concentric arcs and central shaft (no text or symbols)Bakre sokkel
natural_image
Simple line drawing of a remote control panel with five function buttons (no text or symbols)Fjernkontroll (med AAA batterier x 2)

Instruksjonsmanual

natural_image
Diagram of a cable or wire connection with a plug and a circular base, no text or symbols presentKontrollpanel

Fjernkontroll

- Kontrollpanel
- Skjerm
- Bakre sokkel
- Sokkelklemme
- Fremre sokkel
- Svinge-knapp
- Tidsur-knapp
- PÅ/AV-knapp
- Hastighet-knapp
- Vindmodusknapp
Sette batterier i fjernkontrollen
natural_image
Line drawing of two hands holding a handheld device with an arrow indicating motion (no text or symbols)

natural_image
Diagram of a cable or wire connection setup with a base, cable, and plug (no text or symbols)Kontrollpanel
Fjärrkontroll

- Kontrollpanel
- Display
- Bakre bas
- Basklämma
- Front bas
- Sväng-knapp
- Timer-knapp
- PÅ/AV-knapp
- Hastighetsknapp
- Vindlägesknapp
Installera batterier i fjärrkontrollen
natural_image
Illustration showing two-step electrical circuit tool manipulation: one being adjusted to a handheld device, the other using a power adapter (no text or symbols)
natural_image
Illustration of a cylindrical device with internal grid pattern and top cap (no text or symbols)natural_image
Pure diagram of a mechanical or electrical component with concentric arcs and central shaft (no text or symbols)Taka-alusta
natural_image
Simple line drawing of a remote control panel with five function buttons (no text or symbols)natural_image
Simple line drawing of a vertical pole with a cable and a small component below (no text or symbols)natural_image
Line drawing of two hands holding a handheld device with an arrow indicating motion (no text or symbols)

natural_image
Illustration of a cylindrical device with internal grid pattern and top cap (no text or symbols)natural_image
Pure diagram of a mechanical or electrical component with no text, numbers, or symbolsBagdel af fod

natural_image
Simple line drawing of a remote control panel with six function buttons (no text or symbols)Fjernbetjening (med AAA batterier x 2)

Brugervejledning
Samling af din ventilator

natural_image
Simple line drawing of a cylindrical object with a base and cable, no text or symbols presentKontrolpanel
Fjernbetjening
DK
natural_image
Line drawing of two hands holding a handheld device with an arrow indicating motion (no text or symbols)

The symbol on the product or its packaging indicates that this product must not be disposed of with your other household waste. Instead, it is your responsibility to dispose of your waste equipment by handing it over to a designated collection point for the recycling of waste electrical and electronic equipment. The separate
collection and recycling of your waste equipment at the time of disposal will help conserve natural resources and ensure that it is recycled in a manner that protects human health and the environment.
For more information about where you can drop off your waste for recycling, please contact your local authority, or where you purchased your product.
NO

- GB Contents
- NO Innhold
- Thank you for purchasing your new product.
- Unpacking
- Installing Batteries in the Remote Control
- Handling the Batteries
- Handling the Remote Control
- How to Use Your Fan
- Cleaning
- Hints and Tips
- Specifications
- Takk
- Sette batterier i fjernkontrollen
- Installera batterier i fjärrkontrollen
- Samling af din ventilator
- DK
- NO
Brand : Sandstrøm
Model : STFBW19E
Category : Fan