SJUGORE15E - Radio Sandstrøm - Free user manual and instructions
Find the device manual for free SJUGORE15E Sandstrøm in PDF.


| Product Type | Portable Radio (DAB/DAB+/FM) |
| Brand | Sandstrøm |
| Model | SJUGORE15E |
| Radio Bands | FM 87.5-108 MHz, DAB/DAB+ 174.928-239.200 MHz |
| Built-in Battery | 780 mAh, 3.7 V (rechargeable) |
| Power Supply | Mains adapter: AC 100-240V 50/60Hz, DC 5V 1000mA |
| Dimensions (W x D x H) | 53 mm x 21 mm x 87 mm |
| Net Weight | 88 g |
| Display | LCD screen |
| Preset Stations | Up to 4 presets (DAB and FM) |
| Audio Output | 3.5mm earphone socket |
| Water Resistance | Splash-proof (with jack cover closed) |
| Equaliser Settings | Treble and Bass adjustable (-3 to +3) |
| Time Sync | Automatic via DAB/FM signal (manual setting also available) |
| Brightness Settings | High, Medium, Low with timeout options |
| Scan Modes | Full scan, manual tuning (DAB), auto/scan (FM) |
| Lock Function | Button lock to prevent accidental presses |
| Volume Safety | Warning at high volume with confirmation |
| Language Support | Multiple languages (selectable) |
| Factory Reset | Yes (erases presets and stored stations) |
| Cleaning Instructions | Wipe with slightly moist, lint-free cloth; no alcohol or ammonia |
| Battery Charging Time | 12 hours for initial charge (automatic stop) |
Frequently Asked Questions - SJUGORE15E Sandstrøm
User questions about SJUGORE15E Sandstrøm
0 question about this device. Answer the ones you know or ask your own.
Ask a new question about this device
Download the instructions for your Radio in PDF format for free! Find your manual SJUGORE15E - Sandstrøm and take your electronic device back in hand. On this page are published all the documents necessary for the use of your device. SJUGORE15E by Sandstrøm.
USER MANUAL SJUGORE15E Sandstrøm
Safety Warnings....8
Unpacking....13
Product Overview....14
Front View....14
Left Side View 15
Top View 15
Important Information about Water Resistant Operation....16
Power Source 16
Using Earphones 17
Basic Operation 18
Powering ON/OFF 18
Adjusting the Volume....18
Language 18
Factory Reset 18
Software Version....18
DAB Operation....19
Full Scan....19
Manual Tuning 19
Station List....20
Storing Preset Stations....20
Recalling a Preset Stations....20
Viewing Station Information....20
Showing Signal Strength....21
FM Operation 22
Selecting FM Mode....22
Scan Setting 22
Audio Setting....22
Presetting Stations....23
Recalling Preset Stations ....23
Viewing Station Information....23
System setting 23
Setting Equaliser....23
Setting Time 24
Setting Brightness....24
Maintenance 24
Cleaning the Unit 24
Hints and Tips....25
Specification 26
Systeminnstillinger ....37
Stille inn equalizer....37
Stille inn tid....38
Stille inn brightness....38
Vedlikehold....39
Rengjøre enheten 39
Råd og tips 39
Spesifikasjoner 40
Softwareversion....75
DAB betjening....76
Fuld Scanning....76
Manuel indstilling 76
Stations Liste....77
- Read all the instructions carefully before using the unit and keep them for future reference.
- Retain the manual. If you pass the unit onto a third party make sure to include this manual.
- Check that the voltage marked on the rating label matches your mains voltage.
Damage
- Please inspect the unit for damage after unpacking.
- Do not continue to operate the unit if you are in any doubt about it working normally, or if it is damaged in any way - switch off, unplug from the mains socket and consult your dealer.
Location of Unit
- The unit must be placed on a flat stable surface and not subjected to vibrations.
- Do not place the unit on sloped or unstable surfaces as the unit may fall off or tip over.
- The mains socket must be located near the unit and should be easily accessible.
Temperature
- Avoid extreme degrees of temperature, either hot or cold. Place the unit well away from heat sources such as radiators or gas / electric fires.
- Avoid exposure to direct sunlight and other sources of heat.
Naked Flames
- Never place any type of candle or naked flame on the top of or near the unit.
Moisture
- To reduce the risk of fire, electric shock or product damage, do not expose this unit to rain, moisture, dripping or splashing while the jack cover is open. No objects filled with liquids, such as vases, should be placed on the unit. Do not operate the unit with wet hands, near water or other liquid.
- If you spill any liquid into the unit, it can cause serious damage. Switch it off at the mains immediately. Withdraw the mains plug and consult your dealer.
Ventilation
- To prevent the risk of electric shock or fire hazard due to overheating, ensure that curtains and other materials do not obstruct the ventilation vents.
- A minimum distance of 5cm around the unit should be maintained to allow for sufficient ventilation.
- Do not install or place this unit in a bookcase, built-in cabinet or in another confined space. Ensure the unit is well ventilated.
Safety
• Always disconnect the unit from the mains supply before connecting / disconnecting other devices or moving the unit.
- Unplug the unit from the mains socket during a lightning storm.
- In the interests of safety and to avoid unnecessary energy consumption, never leave the unit switched on while unattended for long periods of time, e.g. overnight, while on holiday or while out of the house. Switch it off and disconnect the mains plug from the mains socket.
Mains Adapter Cable
- Make sure the unit or unit stand is not resting on top of the mains adapter cable, as the weight of the unit may damage the cable and create a safety hazard.
Mains Adapter
- The mains adapter will continue to draw electricity from the mains supply when plugged in the mains socket. In the interests of safety and to avoid unnecessary energy consumption, never leave the adapter plugged in the mains socket while unattended for long periods of time. Disconnect the adapter from the power supply.

Use only power supplies listed in the user instructions.
Interference
- Do not place the unit on or near appliances which may cause electromagnetic interference. If you do, it may adversely affect the working performance of the unit, and cause a distorted sound.
Earphones
- Listening to loud sounds for prolonged periods of time may permanently damage your hearing.
- Before putting on earphones, turn the volume down then put the earphones on and slowly increase the volume until you reach a comfortable listening level.

Supervision
• Children should be supervised to ensure that they do not play with the unit.
- Never let anyone especially children push anything into the holes, slots or any other openings in the case - this could result in a fatal electric shock.

CAUTION RISK OF ELECTRIC SHOCK DO NOT OPEN


The lightning flash with arrowhead symbol, within an equilateral triangle, is intended to alert the user to the presence of uninsulated "dangerous voltage" within the unit's enclosure that may be of sufficient magnitude to constitute a risk of electric shock.

The exclamation point within an equilateral triangle is intended to alert the user to the presence of important operating and maintenance (servicing) instructions in the manual accompanying the unit.
Service
- To reduce the risk of electric shock, do not remove screws. The unit does not contain any user-serviceable parts. Please leave all maintenance work to qualified personnel.
- Do not open any fixed covers as this may expose dangerous voltages.
Maintenance
Thank you for purchasing your new product.
We recommend that you spend some time reading this instruction manual in order that you fully understand all the operational features it offers. You will also find some hints and tips to help you resolve any issues.
Read all the safety instructions carefully before use and keep this instruction manual for future reference.
Unpacking
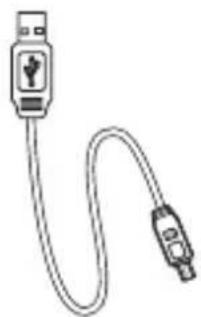
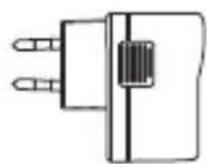
Remove all items from the packaging. Retain the packaging. If you dispose of it please do so according to local regulations.
The following items are included:

GB
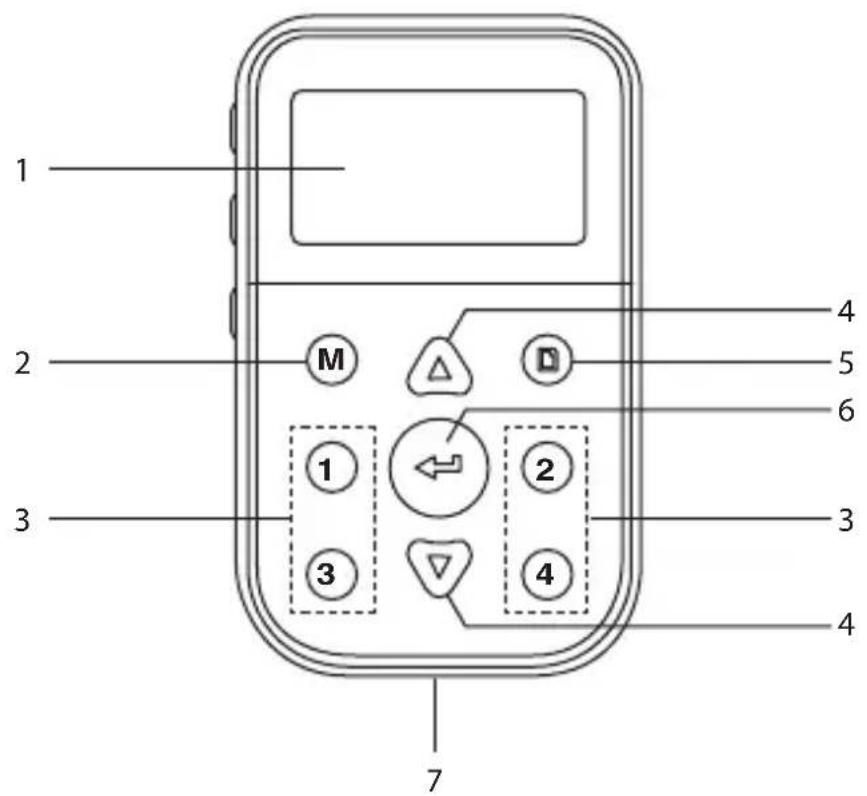
Front View

- Display
- M Mode Button
Press to switch between DAB and FM mode.
-
Presets 1-4 Buttons
-
Press and hold to store preset station.
-
Press to recall preset station.
-
Buttons
Press to upwards or downwards browse options.
- Menu Button
Press to display menu screen of DAB and FM mode.
- Button
Press to confirm a selection.
- 5V Socket
Left Side View
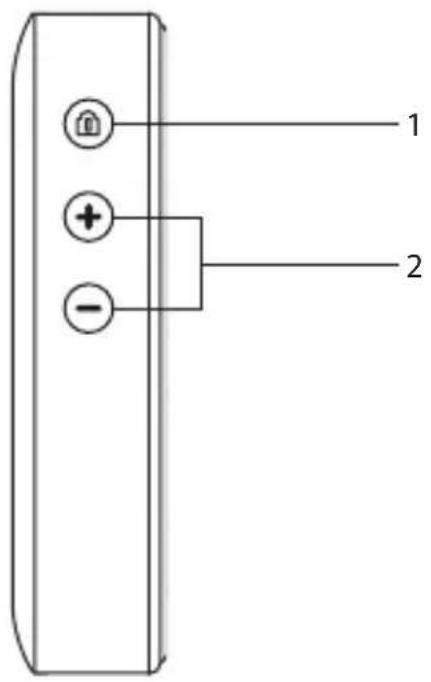
GB
1. Lock Button
Press to lock or unlock all the buttons.
2. VOL+/- Buttons
Press to increase or decrease the volume.
Top View

natural_image
Front view of a portable electronic device with two labeled ports (no text or symbols beyond labels)1. Button
- Press and hold to switch the unit on.
- Press to switch the unit off.
2. Earphone Socket
Important Information about Water Resistant Operation
For proper water resistant operation, make sure the plastic jack cover of the unit is completely flush with the unit by pressing along the entire edge of the cover until it is completely and securely in place.

The unit is splash proof rated. However, DO NOT immerse the unit in water. It may cause product failure.
- Make sure the jack cover and surrounding surfaces are completely dry before opening the jack cover to prevent moisture from damaging the internal electronics.
- Keep the jack cover free of dirt, sand, or other objects that can interfere with proper sealing. If for any reason the jack cover is not making a tight waterproof seal water may enter the unit.
- DO NOT clean unit with oily soaps or use chemicals or solvents. Clean with damp cloth.
Power Source
- This unit is designed to operate with the built-in battery.
- Connecting the unit to any other power source may cause damage to the unit. Unwind the mains adapter cable to its full length. Connect the end of the cable to the
5V Socket of the unit and the adapter plug. Then connect the mains adapter to the mains socket. Make sure the mains adapter is firmly inserted into the mains socket. It starts battery charging and the unit is now ready to use.
- Charge the internal battery for 12 hours before first time use. Do not overcharge the unit. The unit will automatically charge battery when unit connected to mains socket, and it will automatically stop charging once the battery fully charged. The charging indicator shows the charging status.

Using Earphones
Turn down the volume before connecting the earphones.
Slowly raise the volume with the earphones on until you reach your desired volume.
GB


- Long-term exposure to loud music may cause hearing damage. It is best to avoid extreme volume when using earphones, especially for extended periods of time.
• Using other headphones may affect performance of unit. Some headphones with integrated microphones may have low volume and affect reception.
- Before switching on the unit, make sure that the earphones are fully extended and completely inserted into the earphone socket for FM/DAB scanning.
GB
Powering ON/OFF
- Press and hold ⬆ to switch the unit on.
- Press again to switch the unit off.
Adjusting the Volume
- Adjust the volume to the desired level by pressing VOL+/—Buttons.

While continuously press the + volume and the unit reaches the volume safety cap, the display shows "Warning, unsafe volume! OK?". Press button to exit and then press + button if you still want to increase the volume.
Language
- Press ☐Menu button and then buttons repeatedly to select
.
Press button to confirm.
- Press buttons repeatedly to select the desired language.
Press button to confirm.
Factory Reset
- Press Menu button and then buttons repeatedly to select
.
Press button to confirm.
- Press ▲▼ buttons to select
. Press ← button to confirm.

After the factory reset, all the tuned stations, DAB/FM preset stations will be erased.
Software Version
- Press ☐ Menu button and then ▲▼ buttons repeatedly to select
.
Press button to confirm.
- Press ☐Menu to exit.
When you turn on the radio it will automatically search and store all the available stations. You may conduct an additional Full Scan to ensure all stations are picked up and stored. It is also recommended every few months to run a new scan to pick up any new DAB/DAB+ that may have begun broadcasting after your radio scanned last time. Make sure that the earphones are fully extended and completely inserted into the earphone socket for scanning.
- For initial use, your radio will conduct a full scan and store stations list in memory.
- Once the scanning is completed, the DAB/DAB+ stations will be displayed in alphanumeric order. The first station in the list will be selected.

- The DAB/DAB+ stations will be displayed and stored in alphanumeric order.
- If no DAB/DAB+ signal is found, it may be necessary for you to relocate your radio.

The clock will be updated automatically if you can receive DAB/FM signal in your location. In order to synchronize to the current local time, you must leave it on the DAB/FM station for a period of time.
Full Scan
This feature enables your radio to scan for all available stations in DAB mode. Press ☐ Menu. Press ▲▼ buttons to select
Manual Tuning
- Press ☐Menu to display the menu.
- Press Buttons to select
, then press button to confirm. - Press ▲▼ buttons to select between
or . Press ← button to confirm.
If
If
Station List
This feature enables you to select a station from available station list.
Press buttons to browse station list, and then press button to confirm. The selected station will broadcast.
Storing Preset Stations

This is the same for DAB/DAB+ and FM stations.
Your can store up to 4 of your favourite stations to thememory. This will enable you to access your favourite stations quickly and easily.
While a program is playing, press and hold one of presets buttons 1-4 until the display show "Preset # stored".
Recalling a Preset Stations

This is the same for DAB/DAB+ and FM stations.
Press one of presets buttons 1-4 to select the stored preset station you want to play.
Viewing Station Information
This feature enables you to select a station from available station list.
-
Press ☐ Menu button, and then press ▲▼ buttons to select
. Press ◀button to confirm. -
Press ▲▼ buttons to browse Scrolling text, Signal strength, Program Type, Ensemble, Frequency, Signal quality, Bitrate and Codec, Format, Time, and Date. Press ← button to confirm.
Showing Signal Strength
While you selected Signal strength, a signal bar with the strength of the current station will show on the display.
The indicator on the signal bar shows the minimum acceptable signal level.
GB


Stations with signal strength below the minimum signal level may not provide a steady stream of audio.
GB
Selecting FM Mode
- Press M Mode button repeatedly to select FM mode.
- For initial use, it will start at the beginning of the FM frequency range (87.50 MHz). Or it will play the last FM station you were listening to.
- To manually change the FM frequency, make sure no other order/system setting is going on. Press buttons to change the frequency by 0.05 MHz per step.
- To automatically scan, while FM frequency shows up, press ▲▼ buttons first and then press ◀button. Your radio will skip forwards or backwards until it reached the next available station.

The clock will be updated automatically if you can receive DAB/FM signal in your location. In order to synchronize to the current local time, you must leave it on the DAB/FM station for a period of time.
Scan Setting
By default, FM scans stop at any available station. This may result in a poor signal-to-noise ratio (hiss) from weak stations.
-
To change the scan settings to stop only at stations with good signal strength, press Menu button, and then press buttons to select
, press button to confirm. -
Press ▲▼ buttons to browse , and then press ← button to confirm.
Audio Setting
By default, all stereo stations are reproduced in stereo. For weak stations, this may result in a poor signal-to-noise ratio (hiss).
-
To play weak stations in mono, press ☐Menu button, and then press ▲buttons to select
-
Press ▲▼ buttons to browse
, and then press ←button to confirm.
The unit will automatically switch between stereo and mono when
GB
Presetting Stations
You can store up to 4 of your favourite FM stations to the memory. This will enable you to access your favourite stations quickly and easily.
- To store a preset, you must first be listening to the station that you would like to save. Press and hold the preset button number (1-4) to save your desired.
- The station will be stored and the screen will show "Preset # Stored".
Recalling Preset Stations
Once you have saved a station, you can recall it by pressing the preset Preset button 1-4.
Viewing Station Information
This feature enables you to select a station from available station list.
- Press ☐ Menu button, and then press ▲▼ buttons to select
. Press ◀button to confirm. - Press ▲▼ buttons to browse Radio text, Program Type, Ps, Audio info, and Time and Date. Press ← button to confirm.
System setting
Setting Equaliser
This feature enables you to set a sound equalization profile. The equalization setting will change the tone of the sound from your radio.
- Press ☐ Menu and then repeatedly to select
. Press ← to confirm. - Press ▲▼ buttons to browse through Treble and Bass, and then press ← to confirm.
- Press ▲▼ buttons set the level of Treble and Bass (-3 to +3), and then press ◀button to confirm.
Setting Time
- Press ☐ Menu and then ▲▼ to select
- Press ▲▼ to view options as below, and then press ← button to confirm.
| Set Time/date Manually set-up both time and date | |
| Auto update | Update from Any, Update from DAB, Update from FM or No update |
| Set 12/24 hour format Set 24 hour or Set 12 hour | |
| Set date format DD-MM-YYYY or MM-DD-YYYY | |
Setting Brightness
Press ☐ Menu button, and then press ▲▼ button to select
- Press ▲▼ button to select
, and then press ▲▼ button to confirm. Press ▲▼ button to select timeout through On, 10, 20, 30, 45, 60, 90, 120 and 180 sec, and then press ← button to confirm. - Press ▲▼ button to select brightness level through High, Medium and Low, and then press ◀button to confirm.
Maintenance
Cleaning the Unit

Ensure the unit is fully unplugged from the mains socket before cleaning.
• To clean the unit, wipe the case with a slightly moist, lint-free cloth.
- Do not use any cleaning fluids containing alcohol, ammonia or abrasives.
- Do not spray an aerosol at or near the unit.
If a problem does occur, it may often be due to something very minor. The following table contains various tips.
| Problem Solution | |
| No power • Ensure the mains adapter cable is connected securely.Ensure that the unit is fully charged.Make sure that the unit is switched on. | |
| No Sound Adjust the volume control, it may not be turned up. | |
| Static Sound Signal reception is too low. Adjust the aerial or move the unit to a stronger signal location. | |
| Sound is distorted Volume is too high. Adjust the volume control. | |
| Desired station not found Weak signal. Search manually. | |
| No stations found. Make sure that the earphones are fully extended and completely inserted into the earphone socket for FM/DAB scanning. | |
| No coverage in your area or poor reception | Adjust the position of the aerial. |
| The display is blank This may occur if the broadcaster changes the label of a service or removes a label while tuned. The unit will try to re-tune or perform a scan. |
GB
Specification
GB
Main Unit
| Model SJUGOBL15E / SJUGORE15E | |
| Radio Frequency FM 87.5 | - 108 MHzDAB/DAB+ 174.928 - 239.200 MHz |
| Battery 780 mAh, 3.7 V | |
| Dimensions 53 mm (W) × | 21 mm (D) × 87 mm (H) |
| Net weight 88 g | |
Mains Adapter
| Model GPE053B-050100-2 | |
| Manufacturer Golden Profit Electronics Ltd. | |
| Power Supply AC Input: 1 | 100-240 V, 50/60 HzDC Output: DC 5 V =1000 mA |
Features and specifications are subject to change without prior notice.
Takk for at du kjøpte ny produktet.
Hovedenhet

Strømadapter
natural_image
Line drawing of a USB cable with connector port (no text or symbols)Adapterstrømledning

natural_image
Simple line drawing of a cable and electrical plug (no text or symbols)∅retelefoner

Instruksjonsmanual
Sett fra forsiden
NO
- Skjerm
- M Mode-knapp
NO
1. Lock-knapp
natural_image
Front view of a portable electronic device with two buttons and a power switch, labeled with '3' on both sides (no additional text or symbols)1. -khapp
NO

Stille inn equalizer
Stille inn brightness
Huvudenhet

Nätadapter

natural_image
Line drawing of a USB cable with connector port (no text or symbols)Strömadapterkabel

natural_image
Simple line drawing of a cable and a connector (no text or symbols)Hörlurar

Instruktionsbok
Vy framifrån

- Display
- M Mode -knapp
natural_image
Line drawing of a device with labeled ports and buttons (no text or symbols beyond labels)1. -knapp
SE

Laite Verkkolaite

natural_image
Line drawing of a USB cable with connector port (no text or symbols)natural_image
Simple line drawing of a cable and two clamped electrical components (no text or symbols)Kuulokkeet

Käyttöopas
Näkymä edestä

1. Lock -painike
natural_image
Front view of a portable electronic device with two ports and control buttons (no text or symbols)1. -painike
FI

Hovedenheden

Strømadapter

natural_image
Line drawing of a USB cable with connector (no text or symbols)Adapterkabel

natural_image
Simple line drawing of a cable and electrical plug (no text or symbols)Hovedtelefoner
Brugervejledning
Set forfra

DK
- Skærm
- M Mode knap
natural_image
Front view of a portable electronic device with two ports and control buttons (no text or symbols)1. knap
DK

The symbol on the product or its packaging indicates that this product must not be disposed of with your other household waste. Instead, it is your responsibility to dispose of your waste equipment by handing it over to a
designated collection point for the recycling of waste electrical and electronic equipment. The separate collection and recycling of your waste equipment at the time of disposal will help conserve natural resources and ensure that it is recycled in a manner that protects human health and the environment.
For more information about where you can drop off your waste for recycling, please contact your local authority, or where you purchased your product.
All trademarks are the property of their respective owners and all rights are acknowledged.
NO

www.lefdal.com/support
SE www.elgiganten.se/support
- Safety Warnings....8
- Unpacking....13
- Product Overview....14
- Important Information about Water Resistant Operation....16
- Power Source 16
- Basic Operation 18
- DAB Operation....19
- FM Operation 22
- System setting 23
- Maintenance 24
- Hints and Tips....25
- Specification 26
- Systeminnstillinger ....37
- Vedlikehold....39
- Råd og tips 39
- Spesifikasjoner 40
- DAB betjening....76
- Damage
- Location of Unit
- Temperature
- Naked Flames
- Moisture
- Ventilation
- Safety
- Mains Adapter Cable
- Mains Adapter
- Interference
- Earphones
- Supervision
- Service
- Maintenance
- Thank you for purchasing your new product.
- Unpacking
- Front View
- Left Side View
- Lock Button
- VOL+/- Buttons
- Top View
- Button
- Earphone Socket
- Important Information about Water Resistant Operation
- Power Source
- Using Earphones
- GB
- Powering ON/OFF
- Adjusting the Volume
- Language
- Factory Reset
- Software Version
- Full Scan
- Manual Tuning
- Station List
- Storing Preset Stations
- Recalling a Preset Stations
- Viewing Station Information
- Showing Signal Strength
- Selecting FM Mode
- Scan Setting
- Audio Setting
- Presetting Stations
- Recalling Preset Stations
- System setting
- Setting Equaliser
- Setting Time
- Setting Brightness
- Cleaning the Unit
- Specification
- Takk for at du kjøpte ny produktet.
- Sett fra forsiden
- Lock-knapp
- -khapp
- Stille inn equalizer
- Stille inn brightness
- Vy framifrån
- -knapp
- Näkymä edestä
- Lock -painike
- -painike
- Set forfra
- knap
Brand : Sandstrøm
Model : SJUGORE15E
Category : Radio