32H3VSAT - Television XD - Free user manual and instructions
Find the device manual for free 32H3VSAT XD in PDF.


| Product Type | Colour Television with Remote Control |
| Brand | XD |
| Model | 32H3VSAT |
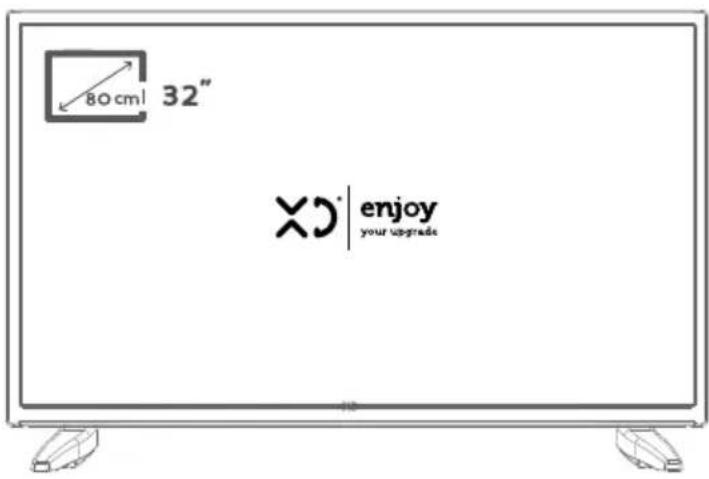
| Display Size (Diagonal) | 32 inches (80 cm) |
| Display Resolution | 1366 x 768 pixels |
| Energy Efficiency Class | A+ |
| On Mode Power Consumption | 31.0 W |
| Annual Energy Consumption | 45 kWh/annum |
| Standby Power Consumption | 0.50 W |
| Operating Voltage | 220-240V AC, 50 Hz |
| Audio Output Power (RMS) | 2 x 6 W |
| Sound System | Stereo, NICAM |
| TV Broadcasting Systems | PAL B/G D/K K I/I' |
| Digital Reception | DVB-T2/C/S2 HEVC H.265 |
| Number of Preset Channels | 8000 |
| RF Aerial Input | 75 Ohm (unbalanced) |
| Connections | HDMI (back & side), Side AV, SPDIF (Coaxial Out), Headphone, USB, CI Slot |
| USB Support | FAT32 and NTFS, Devices up to 500mA |
| Media Playback | Video, Audio, Picture, Subtitle (via USB) |
| Dimensions with Stand (DxWxH) | 197 x 732 x 480 mm |
| Dimensions without Stand (DxWxH) | 51/78 x 732 x 435 mm |
| VESA Wall Mount Pattern | 75 x 75 mm, Screw: M4, Length: 5-8 mm |
| Weight | Not specified (estimate ~5 kg) |
| Accessories Included | Remote Control, Instruction Book, Quick Start Guide |
| Features | Remote Control, Fully integrated digital, HDMI, USB, OSD Menu, Stereo Sound, Teletext, Headphone, Automatic Programming, Sleep Timer, Child Lock, AVL, Game Mode (optional), Picture Off |
Frequently Asked Questions - 32H3VSAT XD
User questions about 32H3VSAT XD
0 question about this device. Answer the ones you know or ask your own.
Ask a new question about this device
Download the instructions for your Television in PDF format for free! Find your manual 32H3VSAT - XD and take your electronic device back in hand. On this page are published all the documents necessary for the use of your device. 32H3VSAT by XD.
USER MANUAL 32H3VSAT XD
TELEVISORE A COLORI CON TELECOMANDO COLOUR TELEVISION WITH REMOTE CONTROL
Indicazioni
Collaborative revenue
• Collegamento curra
Experiences immacings off

(*) IL MIO PULSANTE PERSONALE 1 e 2:
In extreme weather (storms, lightning) and long inactivity periods (going on holiday) disconnect the TV set from the mains.
The mains plug is used to disconnect TV set from the mains and therefore it must remain readily operable. If the TV set is not disconnected electrically from the mains, the device will still draw power for all situations even if the TV is in standby mode or switched off. Note: Follow the on screen instructions for operating the related features.
IMPORTANT - Please read these instructions fully before installing or operating
WARNING: Never let people (including
children) with reduced physical, sensory or mental capabilities or lack of experience and / or
knowledge use electrical devices unsupervised.
Use this TV set at an altitude of less than 2000 meters above the sea level, in dry locations and in regions with moderate or tropical climates.
The TV set is intended for household and similar general use but may also be used in public places.
For ventilation purposes, leave at least 5cm of free space around the TV.
The ventilation should not be impeded by covering or blocking the ventilation openings with items,
such as newspapers, table-cloths, curtains, etc.
The power cord plug should be easily accessible. Do not place the TV, furniture, etc. on the power cord.
A damaged power cord/plug can cause fire or give you an electric shock. Handle the power cord by the
plug, do not unplug the TV by pulling the power cord. Never touch the power cord/plug with wet hands as this could cause a short circuit or electric shock.
Never make a knot in the power cord or tie it with other cords. When damaged it must be replaced,
this should only be done by qualified personnel. Do not expose the TV to dripping or splashing of liquids and do not place objects filled with liquids, such as vases, cups, etc. on or over the TV (e.g., on
shelves above the unit).
Do not expose the TV to direct sunlight or do not place open flames such as lit candles on the top of or near the TV.
Contents
Safety Information....1 Markings on the Product....2 EnvironmentallInformation....3 Features....3 AccessoriesIncluded....3 Standby Notifications....3 TV Control Button & Operation....4 Inserting the Batteries into the Remote....4 Connect Power....5
AntennaConnection....5 License Notification....5 Remote Control....6 Connections....7 SwitchingOn/Off....8 First Time Installation....8
Media Playback via USB Input ....9 Media Browser Menu ....9 CEC ....9
TV Menu Contents .... 10 General TV Operation .... 13 Using the Channel List .... 17
Using the Channel List ....13 Configuring Parental Settings ....13 Electronic Programme Guide (EPG) ....13
Teletext Services 14 Software Upgrade 14
Software Upgrade....14 Troubleshooting & Tips....14
AV and HDMI Signal Compatibility ....15 Supported File Formats for USB Mode ....16
Supported DVI Resolutions 17


| WALL MOUNTING WARNINGSRead the instructions before mounting your TV on the wall.The wall mount kit is optional. You can obtain from your local dealer, if not supplied with your TV.Do not install the TV on a ceiling or on an inclined wall.Use the specified wall mounting screws and other accessories.Tighten the wall mounting screws firmly to prevent the TV from fall. Do not over-tighten the screws. | FeaturesRemote controlled colour TVFully integrated digital terrestrial/cable/satellite TV (DVB-T-T2/C/S-S2/HEVC H.265)HDMI inputs to connect other devices with HDMI socketsUSB inputOSD menu systemStereo sound systemTeletextHeadphone connectionAutomatic programming systemManual tuningAutomatic power down after up to eight hours.Sleep timerChild lockAutomatic sound mute when no transmission.NTSC playbackAVL (Automatic Volume Limiting)PLL (Frequency Search)Game Mode (Optional)Picture off function |
| Environmental InformationThis television is designed to be environment friendly. To reduce energy consumption, you can follow these steps:If you set the Energy Saving to Minimum, Medium, Maximum or Auto the TV will reduce the energy consumption accordingly. If you like to set the Backlight to a fixed value set as Custom and adjust the Backlight (located under the Energy Saving setting) manually using Left or Right buttons on the remote. Set as Off to turn this setting off.Note: Available Energy Saving options may differ depending on the selected Mode in the System>Picture menu.The Energy Saving settings can be found in the System>Picture menu. Note that some picture settings will be unavailable to be changed.If pressed Right button while Auto option is selected or Left button while Custom option is selected, "Screen will be off in 15 seconds." message will be displayed on the screen. Select Proceed and press OK to turn the screen off immediately. If you don't press any button, the screen will be off in 15 seconds. Press any button on the remote or on the TV to turn the screen on again.Note: Screen Off option is not available if the Mode is set to Game.When the TV is not in use, please switch off or disconnect the TV from the mains plug. This will also reduce energy consumption. | Accessories IncludedRemote ControlInstruction BookQuick Start GuideStandby NotificationsIf the TV does not receive any input signal (e.g. from an aerial or HDMI source) for 3 minutes, it will go into standby. When you next switch-on, the following message will be displayed: "TV switched to stand-by mode automatically because there was no signal for a long time." Press OK to continue.If the TV is on and it isn't being operated for a while it will go into standby. When you next switch-on, the following message will be displayed. "TV switched to stand-by mode automatically because no operation was made for a long time." Press OK to continue. |
| Caution | Serious injury or death risk |
| Risk of electric shock | Dangerous voltage risk |
| Maintenance | Important maintenance component |
| Class II Equipment: This appliance is designed in such a way that it does not require a safety connection to electrical earth. | |
| Class II Equipment With Functional Earthing: This appliance is designed in such a way that it does not require a safety connection to electrical earth, the earth connection is used for functional purposes. | |
| Protective Earth Connection: The marked terminal is intended for connection of the protective earthing conductor associated with the supply wiring. | |
| Hazardous Live Terminal: The marked terminal(s) is/are hazardous live under normal operating conditions. | |
| Caution, See Operating Instructions: The marked area(s) contain(s) user replaceable coin or button cell batteries. | |
| Class 1 Laser Product: This product contains Class 1 laser source that is safe under reasonably foreseeable conditions of operation. | |
TV Control Button & Operation

Connect Power
2.1.2017年1月1日
To change source: Press the control button to
display the function options menu and then press the
button consecutively to move the focus to Coupon
button consecutively to move the focus to source
option. Press and hold the button for about 2 seconds
to activate this option. The icon colour of the option
to activate this option. The icon colour of the option
changes when activated. Then press the button once
again to display the sources list. Scroll through the
available sources by pressing the button. TV will
automatically switch to the highlighted course.
automatically switch to the highlighted source.
Note: Main menu OSD cannot be displayed via the control
button
Operating with the Control Button | Operation with the Remote Control
- Press the control button to display the function. Press the Menu button on your remote control to
options menu. I display main menu. Use the directional buttons and
m1 1 1 ...
- Then press the button consecutively to move the OK button to navigate and set. Press return/back
focus to the desired option if needed. I or Menu button to quit a menu screen.
Theorem 1.2. (Theorem 1.3) Let () be a finite field and let (x) be the set of all elements
- Press and hold the button for about 2 seconds to input selection
activate the selected option. The icon colour of the | Once you have connected external customs to
option changes when activated
your TV, you can switch to different input sources.
- Press the button once again to use the function orl Press the Source button on your remote control
enter the sub menu I consecutively to select the different sources
• To select another function option, you will need td Changing Channels and Volume
deactivate the last activated option first Press and | changing channels and volume
You can change the channel and adjust the volume by
Hold the button to deactivate it. The icon colour of | using the Programme 1/2 and Volume 1/2 buttons
the option changes when deactivated.
Inserting the Batteries into the Remote
function options menu will disappear | Remove the screw that secure the battery
To turn the TV off: Press the control button to I compartment cover on the back side of the remote
display the function options many, the focus will be. I control first. Lift the cover gently. Insert two size
1 AAA batteries. Make sure the (+) and (-) signs match
on the Standby option. Press and hold the button | (above correct color) Do not mix all and now
for about 2 seconds to activate this option. The icon | (see) to correct polarity, by the link via and now
colour of the option changes when activated. Then | batteries. Replace only with same or equivalent
I tune Place the cover back on. Then screw the cover
press the button once again to turn the TV off.
To turn on the TV: Press the control button, the TV I back off again.
will be on
Will you off,
To change volume: Press the control button to |
display the function options menu and then press the
display the function options that and then press the
button consecutively to move the focus to volume |
+ or Volume - option. Press and hold the button for |
about 2 seconds to activate the selected option. The
Three columns of the entire decrease when activated
Icon colour of the option changes when activated.
Then press the button to increase or decrease the
volume
To change channel: Press the control button to |
display the function options menu and then press |
the button oppositively to move the focus to
the button consecutively to move the focus to
License Notification
The terms HDMI and HDMI High Definition
The terms HDMI and HDMI high-Definition
Multimedia Interface, and the HDMI Logo are
trademarks or registered trademarks of HDMI
Licensing Administrator, Inc. in the United States
and other countries.
Manufactured under license from Dolby Laboratories.
Delby, Delby Audio and the double D symbol are
Dolby, Dolby Audio and the double-D symbol are
trademarks of Dolby Laboratories.
The "CLP" is a positive adjustment of CLP and UP.
The CI Plus Logo is a trademark of CI Plus LLP.
- α is a function of H, where the diagonal line is
Information for Users on Disposal of Old
Equipment and Batteries
(1) 1/2 (2) 1/2 (3) 1/2 (4) 1/2 (5) 1/2 (6) 1/2
[European Union only]
- 1. 2017年1月1日
Equipment bearing these symbols should not be
disposed as general household waste.
You should look for appropriate recycling facilities
and systems for the disposal of these products.
The following table is provided in the image.
Notice: The sign Pb below the symbol for batteries indicates
that this battery contains lead.
[Non-Text]
(1) AEG = 90 °
V
M M
W W
The image contains no text.




The Ground Truth image displays a single, solid horizontal line. According to Rule 2 (UNDERSCORE & LINE RULES), this is a stylistic or background line, not a placeholder underscore. Therefore, the OCR result must ignore it and output nothing or only meaningful text. The provided OCR content is "____", which consists of four underscores. This is an incorrect interpretation of the line as a placeholder, violating the rule that stylistic lines must be ignored. The OCR has hallucinated underscores where none should exist based on the GT's visual context. Hence, the OCR result is inconsistent with the Ground Truth.
IMPORTANT: The TV set is designed to operate on
in our data, we also need to operate on
220-240V AC, 50 Hz socket. After unpacking, allow
the TV set to reach the ambient room temperature
before you connect the set to the mains. Plug the
Before you connect the set to the mains. Hug the
power cable to the mains socket outlet.
•
Antenna Connection
-
-
-
-
-
-
-
-
-
-
-
-
-
-
-
-
-
-
-
-
-
-
-
-
-
-
-
-
-
-
-
-
-
-
-
-
-
-
-
-
-
-
-
-
-
-
-
-
-
-
-
-
-
-
-
-
-
-
-
-
-
-
-
-
-
-
-
-
-
-
-
-
-
-
-
-
-
-
-
-
-
-
-
-
-
-
-
-
-
- 99.
-
-
-
-
-
-
-
-
-
-
-
-
-
-
-
-
-
-
-
-
-
-
-
-
-
-
-
-
-
-
-
-
-
-
-
-
-
-
-
-
-
-
-
-
-
-
-
-
-
-
-
-
-
-
-
-
-
-
-
-
-
-
-
-
-
-
-
-
-
-
-
-
-
-
-
-
-
-
-
-
-
-
-
-
-
-
-
-
Connect the aerial or cable TV plug to the AERIAL
INPUT (ANT) socket or satellite plug to the SATELLITE
INPUT (LNR) socket located on the back of the TV
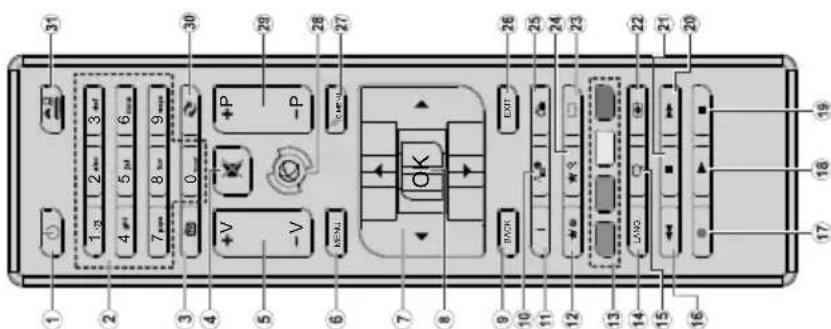
Remote Control
-
Standby: Switches On / Off the TV
-
Numeric buttons: Switches the channel, enters a number or a letter in the text box on the screen.
-
TV: Switches to TV Source
-
Mute: Completely turns of
-
Volume +/-
-
Menu: Displays TV menu
-
Directional buttons: Helps navigate menus, content
etc. and displays the subpages in TXT mode when
pressed right of left
- OK: confirms user selections, holds the page (in TXT mode), views channel list (DTV mode).
- Book/Return: Returns to previous screen opens index
page (in TXT mode)
-
Media browser: Opens the media browsing screen
-
Info: Displays information about on-screen content,
shows hidden information (reveal - in TXT mode)
-
My button 1 (")
-
Coloured Buttons: Follow the on-screen instructions for
coloured button functions
- Language: Switches between sound modes (analogue TV), displays and changes audio/subtitle language
(digital TV, where available)
-
Subtitles: Turns subtitles on and off (where available)
-
Rapid reverse: Moves frames backwards in media
such as movies
-
No function
-
Play: Starts to play selected media
-
Stop: Stops the media being played
-
Rapid advance: Moves frames forward in media such
as movies
- Pause: Pauses the media being played
-
Screen Changes the opportunity of the screen
-
Screen changes the aspect ratio of the screen
-
Text: Displays teletext (where available), press again to superimpose the teletext over a normal broadcast
picture (mix)
-
My button 2 (*)
-
EPG (Electronic programme guide): Displays the
electronic programme guide
- Exit: Closes and exits from displayed menus or returns
to previous screen
-
Quick menu: Displays a list of menus for quick access
-
No function
-
Programme 7
-
Swap: quickly cycles between previous and current channels or sources
-
Source: Shows all available broadcast and content
sources
Connections
See the illustrations on the
left side. When using the wall
mounting kit (available from a
third party in the market, if not
supplied, we recommend that you plug all your cables into the
back of the TV before mounting
on the wall. Insert or remove the
CI module only when the TV is
SWITCHED OFF. IT A CH MODULE is used, it may block the headphone
and Side AV inputs. In this case,
it is recommended to make the
headphone and the side AV connections before the CI modulo is
Invested. You should refer to the
module instruction manual for
details of the settings. The/Each
USB input of your TV supports devices up to 500mA. Connect-
ing devices that have current
value above 500mA may dam-
age your tv, when connecting equipment using a HDMI cable
to your TV, to guarantee suffi-
cient immunity against parasitic
frequency radiation, you have to
use a high speed shielded (high grade) HDMI cable with ferrites.
| Connector | Type | Cables | Device |
| HDMI Connection (back&side) | |||
| SIDE AV | Side AV (Audio/Video) Connection (side) | Side Audio/Video Audio/Video Cable Connection Cable | |
| SPDIF | SPDIF (Coaxial Out) Connection (side) | ||
| HEADPHONE | Headphone Connection (side) | ||
| USB Connection (side) | |||
| CI Connection (side) | CAM module | ||
If you want to connect a device to the TV, make sure that both the TV and the device are turned off before making any connection. After the connection is done, you can turn on the units and use them.

(*) MY BUTTON 1 & MY BUTTON 2:
These buttons may have default functions depending on
the model. However you can set a special function to these
buttons by pressing on them for five seconds when on a desired version attached. A confirmation pressor will be
desired source of channel. A confirmation message will be displayed on the screen. Now the selected MY BUTTON is
associated with the selected function.
Note that if you perform First Time Installation, MY
BUTTON 1&2 will return to their default function.
| Switching On/OffTo Switch the TV OnConnect the power cord to a power source such as a wall socket (220-240V AC, 50 Hz).To switch on the TV from standby mode either:Press the Standby button, Programme +/- or a numeric button on the remote control.Press the control button on the TV.To Switch the TV OffPress the Standby button on the remote control.Press the control button on the TV, the function options menu will be displayed. The focus will be on the Standby option. Press and hold the button for about 2 seconds to activate this option. The icon colour of the option will change. Then press the button once again, the TV will switch into standby mode.To power down the TV completely, unplug the power cord from the mains socket.Note: When the TV is switched into standby mode, the standby LED can blink to indicate that features such as Standby Search or Over Air Download is active. The LED can also blink when you switch on the TV from standby mode.First Time InstallationWhen turned on for the first time, the language selection screen is displayed. Select the desired language and press OK.On the next screen, set your preferences using the directional buttons.Note: Depending on the Country selection you may be asked to set and confirm a PIN at this point. The selected PIN cannot be 0000. You have to enter it if you are asked to enter a PIN for any menu operation later.About Selecting Broadcast TypeDigital Aerial: If Digital Aerial broadcast search option is turned on, the TV will search for digital terrestrial broadcasts after other initial settings are completed.Digital Cable: If Digital Cable broadcast search option is turned on, the TV will search for digital cable broadcasts after other initial settings are completed. According to your other preferences a confirmation message may be displayed before starting to search.Select YES and press OK to proceed. To cancel operation, select NO and press OK. You can select Network or set values such as Frequency, Network ID and Search Step. When finished, press OK button.Note: Searching duration will change depending on the selected Search Step.Satellite: If the research option Satellite is switch-on, TV will search for digital satellite channels after other initial settings are completed. | Before performing the satellite search, some settings should be made:If the type of installation is standard, you can select Antenna's Type on Direct, Single Satellite Cable or DiSeqC Switch using the button "◀ or ►Direct: If you have a single receiver and a direct parabola, select this type of antenna. Press OK button to continue. Select a satellite available on the next screen and press OK for the scan of the services.Single Satellite Cable: If you have multiple receivers and a single satellite cable, select this type of antenna. Press OK button to continue. Configure the settings by following the instructions on the next screen. Press OK to scan the devices.DiSeqC switch: In case you have a multiple LNB or multiple satellite dish and a DiSeqC switch, select this type of antenna. Press OK button to continue. It will be possible to set four DiSeqC options (if available) on the next screen. Press OK button to scan the first satellite in the list.If the installation type is Operator - Tivusat will be made a research for the channels on the Hot Bird 13 East satellite according to Tivusat order.It will be possible select Antenna's Type on Direct, Single Satellite Cable or DiSeqC Switch by using the◄ or ►buttons.Direct: If you have a single receiver and a direct parabola, select this type of antenna. Press OK button to continue. On the next screen will appear the Hot Bird (13.OE) satellite imposted, press OK for the scan of the services.Single Satellite Cable: If you have multiple receivers and a single satellite cable, select this type of antenna. Press OK button to continue. Configure the settings by following the instructions on the next screen. Press OK to scan the devices.DiSeqC switch: In case you have a multiple LNB or multiple satellite dish and a DiSeqC switch, select this type of antenna. Press OK button to continue. It will be possible to set four DiSeqC option (if available) on the next screen. Press OK button to scan the first satellite in the list.Analogue: If Analogue broadcast search option is turned on, the TV will search for analogue broadcasts after other initial settings are completed.Additionally you can set a broadcast type as your favourite one. Priority will be given to the selected broadcast type during the search process and the channels of it will be listed on the top of the Channel List. When finished, press OK to continue.You can activate Store Mode option at this point. This option will configure your TV's settings for store environment and depending on the TV model being used, the supported features of it may be displayed on the top of the screen as | an info banner. This option is intended only for store use. It is recommended to select Home Mode for home use. This option will be available in System>Settings>More menu and can be turned off/on later.Press OK button on the remote control to continue.After the initial settings are completed TV will start to search for available broadcasts of the selected broadcast types.After all the available stations are stored, scan results will be displayed. Press OK to continue. The Edit Channel List menu will be displayed next. You can edit the channel list according to your preferences or press the Menu button to quit and watch TV.While the search continues a message may appear, asking whether you want to sort channels according to the LCN(*) . Select Yes and press OK to confirm. (*) I.CN is the Logical Channel Number system that organizes available broadcasts in accordance with a recognizable channel number sequence (if available).Note: Do not turn off the TV while initializing first time installation. Note that, some options may not be available depending on the country selection.Media Playback via USB InputYou can connect 2.5" and 3.5" inch (hdd with external power supply) external hard disk drives or USB memory stick to your TV by using the USB inputs of the TV.IMPORTANTI Back up the files on your storage devices before connecting them to the TV. Manufacturer will not be responsible for any file damage or data loss. Certain types of USB devices (e.g. MPa Players) or USB hard disk drives/memory sticks may not be compatible with this TV. The TV supports FAT32 and NTFS disk formatting.Wait a little while before each plugging and unplugging as the player may still be reading files. Failure to do so may cause physical damage to the USB player and the USB device itself. Do not pull out your drive while playing a file.You can use USB hubs with your TV's USB inputs. External power supplied USB hubs are recommended in such a case.It is recommended to use the TV's USB input(s) directly, if you are going to connect a USB hard disk.Note: When viewing image files the Media Browser menu can only display 1000 image files stored on the connected USB device.Media Browser MenuYou can play photo, music, and movie files stored on a USB disk by connecting it to your TV. Connect a USB disk to one of the USB inputs located on the side of the TV. Pressing the Menu button while in the Media Browser mode will access the Picture, Sound and Settings menu options. Pressing the Menu button again will exit from this screen. You can set your Media Browser preferences by using the Settings Menu. | Loop/Shuffle Mode OperationStart playback with the Play button and activate 📄All files in the list will be continuously played in original order?Start playback with the OK button and activate 📄The same file will be played continuously (repeat)Start playback with the Play button and activate 📄All files in the list will be played once in random order.Start playback with the Play button and activate 📄All files in the list will be continuously played in the same random order.CECThis function allows to control the CEC-enabled devices, that are connected through HDMI ports by using the remote control of the TV.The CEC option in the System>Settings>More menu should be set as Enabled at first. Press the Source button and select the HDMI input of the connected CEC device from the Sources List menu. When new CEC source device is connected, it will be listed in source menu with its own name instead of the connected HDMI ports name(such as DVD Player, Recorder 1 etc.).The TV remote is automatically able to perform the main functions after the connected HDMI source has been selected.To terminate this operation and control the TV via the remote again, press and hold the "O-Zero" button on the remote control for 3 seconds. This feature can also be enabled or disabled under the System>Settings>More menu.The TV supports also ARC(Audio Return Channel) feature. This feature is an audio link meant to replace other cables between the TV and the audio system (A/V receiver or speaker system).When ARC is active, TV does not mute its other audio outputs automatically. So you need to decrease TV volume to zero manually, if you want to hear audio from connected audio device only (same as other optical or co-axial digital audio outputs). If you want to change connected device's volume level, you should select that device from the source list. In that case volume control keys are directed to connected audio device.Note: ARC is supported only via the HDMI2 input.System Audio ControlAllows an Audio Amplifier/Receiver to be used with the TV. The volume can be controlled using the remote control of the TV. To activate this feature set the Speakers option in the System>Settings>More menu as Amplifier. The TV speakers will be muted and the sound of the watched source will be provided from the connected sound system.Note: The audio device should support System Audio Control feature and CEC option should be set as Enabled. |
English · 9 ·
| System - Sound Menu Contents | |
| Volume | Adjusts the volume level. |
| Equalizer | Selects the equalizer mode. Custom settings can be made only when in User mode. |
| Balance | Adjusts whether the sound comes from the left or right speaker. |
| Headphone | Sets headphone volume.Please ensure before using headphones that the headphone volume is set to a low level, to prevent damage to your hearing. |
| Sound Mode | You can select a sound mode (If the viewed channel supports). |
| AVL (Automatic Volume Limiting) | Sets the sound to obtain fixed output level between programmes. |
| Headphone/Lineout | When you connect an external amplifier to your TV using the headphone jack, you can select this option as Lineout. If you have connected headphones to the TV, set this option as Headphone.Please ensure before using headphones that this menu item is set to Headphone. If it is set to Lineout, the output from the headphone socket will be set to maximum which could damage your hearing. |
| Dynamic Bass | Enables or disables the Dynamic Bass. |
| Digital Out | Sets digital out audio type. |
| System - Settings Menu Contents | ||
| Conditional Access | Controls conditional access modules when available. | |
| Language | You may set a different language depending on the broadcaster and the country. | |
| Parental | Enter correct password to change parental settings. You can easily adjust Menu Lock, Maturity Lock, Child Lock or Guidance in this menu. You can also set a new PIN or change the Default CICAM PIN using the related options.Note: Some menu options may not be available depending on the country selection in the First Time Installation. Default PIN can not be set to 0000. If you have defined the PIN (is requested depending on the country selection) during the First Time Installation use the PIN that you have defined. | |
| Timers | Sets sleep timer to turn off the TV after a certain time. Sets timers for selected programmes. | |
| Date/Time | Sets date and time. | |
| Sources | Enables or disables selected source options. | |
| Accessibility | Displays accessibility options of the TV. | |
| Hard of Hearing | Enables any special feature sent from the broadcaster. | |
| Audio Description | A norration track will be played for the blind or visually impaired audience. Press OK to see all available Audio Description menu options. This feature is available only if the broadcaster supports it. | |
| More | Displays other setting options of the TV. | |
| System - Picture Menu Contents | |
| Mode | You can change the picture mode to suit your preference or requirements. Picture mode can be set to one of these options: Cinema, Game(optional), Sports, Dynamic and Natural. |
| Contrast | Adjusts the light and dark values on the screen. |
| Brightness | Adjusts the brightness values on the screen. |
| Sharpness | Sets the sharpness value for the objects displayed on the screen. |
| Colour | Sets the colour value, adjusting the colors. |
| Energy Saving | For setting the Energy Saving to Custom, Minimum, Medium, Maximum, Auto, Screen Off or Off.Note: Available options may differ depending on the selected Mode. |
| Backlight | This setting controls the backlight level. The backlight function will be inactive if the Energy Saving is set to an option other then Custom. |
| Advanced Settings | |
| Dynamic Contrast | You can change the dynamic contrast ratio to desired value. |
| Noise Reduction | If the signal is weak and the picture is noisy, use the Noise Reduction setting to reduce the amount of noise. |
| Colour Temp | Sets the desired colour temperature value. Cool, Normal, Warm and Custom options are available. |
| White Point | If the Colour Temp option is set as Custom, this setting will be available. Increase the 'warmth' or 'coolness' of the picture by pressing Left or Right buttons. |
| Picture Zoom | Sets the desired image size format. |
| Film Mode | Films are recorded at a different number of frames per second to normal television programmes. Turn this feature on when you are watching films to see the fast motion scenes clearly. |
| Skin Tone | Skin tone can be changed between -5 and 5. |
| Colour Shift | Adjust the desired colour tone. |
| HDMI Full Range | While watching from a HDMI source, this feature will be visible. You can use this feature to enhance blackness in the picture. |
| Reset | Resets the picture settings to factory default settings (except Game Mode). |
| General TV OperationUsing the Channel ListThe TV sorts all stored stations in the Channel List. You can edit this channel list, set favourites or set active stations to be listed by using the Channel List options.Press the OK button to open the Channel List. You can filter the listed channels by pressing the Blue button or open the Edit Channel List menu by pressing the Green button in order to make advanced changes in the current list.Managing the Favourite ListsYou can create four different lists of your favourite channels. Enter the Channel List in the main menu or press the Green button while the Channel List is displayed on the screen in order to open the Edit Channel List menu. Select the desired channel on the list. You can make multiple choices by pressing the Yellow button. Then press the OK button to open the Channel Edit Options menu and select Add/Remove Favourites option. Press the OK button again. Set the desired list option to On. The selected channel/s will be added to the list. In order to remove a channel or channels from a favourite list follow the same steps and set the desired list option to Off.You can use the Filter function in the Edit Channel List menu to filter the channels in the Channel list permanently according to your preferences. Using this Filter option, you can set one of your four favourite lists to be displayed every time the Channel list is opened. The filtering function in the Channel list menu will only filter the currently displayed Channel list in order to find a channel and tune in to it. These changes will not remain the next time the Channel list is opened if you don't save them. To save the changes on the list press the Red button after filtering while the Channel list is displayed on the screen.Configuring Parental SettingsThe Parental Settings menu options can be used to prohibit users from viewing of certain programmes, channels and using of menus. These settings are located in the System>Settings>Parental menu.To display parental lock menu options, a PIN number should be entered. After coding the correct PIN number, Parental Settings menu will be displayed.Menu Lock: This setting enables or disables access to all menus or installation menus of the TV.Maturity Lock: If this option is set, TV gets the maturity information from the broadcast and if this maturity level is disabled, disables access to the broadcast.Note: If the country option in the First Time Installation is set as France, Italy or Austria, Maturity Lock's value will be set to 18 as default. | Child Lock: If this option is set to ON, the TV can only be controlled by the remote control. In this case the control buttons on the TV will not work.Set PIN: Defines a new PIN number.Default CICAM PIN: This option will appear as greyed out if no CI module is inserted into the CI slot of the TV. You can change the default PIN of the CI CAM using this option.Note: Default PIN can not be set to 0000. If you have defined the PIN(is requested depending on the country selection) during the First Time Installation use the PIN that you have defined. Some options may not be available depending on the country selection in the First Time Installation.Electronic Programme Guide (EPG)Some channels send information about their broadcast schedules. Press the Epg button to view the Programme Guide menu.There are 3 different types of schedule layouts available, Timeline Schedule, List Schedule and Now/Next Schedule. To switch between them follow the instructions on the bottom of the screen.Timeline ScheduleZoom (Yellow button): Press the Yellow button to see events in a wider time interval.Filter (Blue button): Views filtering options.Highlight Genre (Subtitles button): Displays Highlight Genre menu. Using this feature, you can search the programme guide database in accordance with the genre. Info available in the programme guide will be searched and results matching your criteria will be highlighted.Options (OK button): Displays event options.Event Details (Info button): Displays detailed information about selected events.Next/Prev Day (Programme +/- buttons): Displays the events of previous or next day.Search (Text button): Displays Guide Search menu.Now (Source button): Displays current event of the highlighted channel.List Schedule(*) (*) In this layout option, only the events of the highlighted channel will be listed.Prev. Time Slice (Red button): Displays the events of previous time slice.Next/Prev Day (Programme +/- buttons): Displays the events of previous or next day.Event Details (Info button): Displays detailed information about selected events.Filter (Text button): Views filtering options.Next Time Slice (Green button): Displays the events of next time slice.Options (OK button): Displays event options.Now/Next ScheduleOptions (OK button): Displays event options. |
| Menu Timeout | Changes timeout duration for menu screens. |
| Standby LED | If set as Off, the standby LED will not light up when the TV is in standby mode. |
| Software Upgrade | Ensures that your TV has the latest firmware. Press OK to see the menu options. |
| Application Version | Displays current software version. |
| Subtitle Mode | This option is used to select which subtitle mode will be on the screen (DVB subtitle / Teletext subtitle) if both is available. Default value is DVB subtitle. This feature is available only for the country option of Norway. |
| Auto TV OFF | Sets the desired time for the TV to automatically go into standby mode when not being operated. |
| Biss Key | Biss is a satellite signal scrambling system that is used for some broadcasts. If you need to enter Biss key on a broadcast, you can use this setting. Highlight Biss Key and press OK to enter keys on the desired broadcast. |
| Store Mode | Select this mode for store display purposes. Whilst Store Mode is enabled, some items in the TV menu may not be available. |
| Power Up Mode | This setting configures the power up mode preference. Last State and Standby options are available. |
| CEC | With this setting you can enable and disable CEC functionality completely. Press Left or Right button to enable or disable the feature. |
| CEC Auto Power On | This function allows the connected HDMI-CEC compatible device to turn on the TV and switch to its input source automatically. Press Left or Right button to enable or disable the feature. |
| Speakers | To hear the TV audio from the connected compatible audio device set as Amplifier. You can use the remote control of the TV to control the volume of the audio device. |
| OSS | Displays Open Source Software license information. |
| Installation Menu Contents | |
| Automatic channel scan (Retune) | Displays automatic tuning options. Digital Aerial: Searches and stores aerial DVB stations. Digital Cable: Searches and stores cable DVB stations. Analogue: Searches and stores analogue stations. |
| Manual Channel Scan | This feature can be used for direct broadcast entry. |
| Network Channel Scan | Searches for the linked channels in the broadcast system. Digital Aerial: Searches for aerial network channels. Digital Cable: Searches for cable network channels. |
| Analogue Fine Tune | You can use this setting for fine tuning analogue channels. This feature is not available if no analogue channels are stored. |
| Installation Settings (Optional) | Displays installation settings menu. Standby Search(*) : Your TV will search for new or missing channels while in standby. Any new found broadcasts will be shown. Dynamic Channel Update(*) : If this option is set as Enabled, the changes on the broadcasts such as frequency, channel name, subtitle language etc., will be applied automatically while watching. (*) Availability depends on model. |
| Clear Service List | Use this setting to clear channels stored. This setting is visible only when the Country option is set to Denmark, Sweden, Norway or Finland. |
| Select Active Network | This setting allows you to select only the broadcasts within the selected network to be listed in the channel list. This feature is available only for the country option of Norway. |
| First Time Installation | Deletes all stored channels and settings, resets TV to factory settings. |
English - 13 -
| AV and HDMI Signal Compatibility | |||
| Source Supported Signals Available | |||
| Side AV | PAL 50/60 O | ||
| NTSC 60 O | |||
| HDMI | 480I 60Hz O | ||
| 480P 60Hz O | |||
| 576I, 576P 50Hz O | |||
| 720P 50Hz,60Hz O | |||
| 1080I 50Hz,60Hz O | |||
| 1080P | 24Hz, 25Hz30Hz, 50Hz,60Hz | O | |
(X: Not Available, O: Available)
In some cases a signal on the TV may not be displayed properly. The problem may be an inconsistency with standards from the source equipment (DVD, Set-top box, etc.). If you do experience such a problem please contact your dealer and also the manufacturer of the source equipment.
| Event Details (Info button): Displays detailed information about selected events.Filter (Blue button): Views filtering options.Event OptionsUse the directional buttons to highlight an event and press OK button to display Event Options menu. The following options are available.Select Channel: Using this option, you can switch to the selected channel.Set Timer on Event / Delete Timer on Event: After you have selected an event in the EPG menu, press the OK button. Select Set Timer on Event option and press the OK button. You can set a timer for future events. To cancel an already set timer, highlight that event and press the OK button. Then select Delete Timer on Event option. The timer will be cancelled.Notes: You cannot switch to any other channel or source while there is an active timer on the current channel. It is not possible to set timer for two or more individual events at the same time interval.Teletext ServicesPress the Text button to enter. Press again to activate mix mode, which allows you to see the teletext page and the TV broadcast at the same time. Press once more to exit. If available, sections in the teletext pages will become colour-coded and can be selected by pressing the coloured buttons. Follow the instructions displayed on the screen.Digital TeletextPress the Text button to view digital teletext information. Operate it with the coloured buttons, cursor buttons and the OK button. The operation method may differ depending on the contents of the digital teletext. Follow the instructions displayed on the digital teletext screen. When the Text button is pressed again, the TV returns to television broadcast.Software UpgradeYour TV is capable of finding and updating the firmware automatically via the broadcast signal.Software upgrade search via user interfaceOn the main menu select System>Settings and then More. Navigate to Software upgrade and press the OK button. In Upgrade options menu select Scan for upgrade and press OK button to check for a new software upgrade.If a new upgrade is found, it starts to download the upgrade. After the download is completed | options menu is set to Enabled and if the TV is connected to an aerial signal. If a new software is found and downloaded successfully, it will be installed at the next power on.Note: Do not unplug the power cord while led is blinking during the reboot process. If the TV fails to come on after the upgrade, unplug, wait for two minutes then plug it back in.Troubleshooting & TipsTv will not turn onMake sure the power cord is plugged in securely to wall outlet. Check if batteries are exhausted. Press the Power button on the TV.Poor pictureCheck if you have selected the correct TV systemLow signal level can cause picture distortion. Please check antenna access.Check if you have entered the correct channel frequency if you have done manual tuning.The picture quality may degrade when two devices are connected to the TV at the same time. In such a case, disconnect one of the devices.No pictureThis means your TV is not receiving any transmission. Make sure the correct source has been selected.Is the antenna connected properly?Is the antenna cable damaged?Are suitable plugs used to connect the antenna?If you are in doubt, consult your dealer.No soundCheck if the TV is muted. Press the Mute button or increase the volume to check.Sound may be coming from only one speaker. Check the balance settings from Sound menu.Remote control - no operationThe batteries may be exhausted. Replace the batteries.Input sources - can not be selectedIf you cannot select an input source, it is possible that no device is connected. If not;Check the AV cables and connections if you are trying to switch to the input source dedicated to the connected device. |
Supported DVI Resolutions
When connecting devices to your TV's connectors by using DVI converter cable(DVI to HDMI cable - not supplied), you can refer to the following resolution information.
| 56Hz | 60Hz | 66Hz | 70Hz | 72Hz | 75Hz | |
| 640x400 | ☑ | |||||
| 640x480 | ☑ | ☑ | ☑ | ☑ | ||
| 800x600 | ☑ | ☑ | ☑ | ☑ | ☑ | |
| 832x624 | ☑ | |||||
| 1024x768 | ☑ | ☑ | ☑ | ☑ | ☑ | |
| 1152x864 | ☑ | ☑ | ☑ | |||
| 1152x870 | ☑ | |||||
| 1280x768 | ☑ | ☑ | ||||
| 1360x768 | ☑ | |||||
| 1280x960 | ☑ | ☑ | ||||
| 1280x1024 | ☑ | ☑ | ||||
| 1400x1050 | ☑ | ☑ | ||||
| 1440x900 | ☑ | ☑ | ||||
| 1600x1200 | ☑ | |||||
| 1680x1050 | ☑ | |||||
| 1920x1080 | ☑ |
| Supported File Formats for USB Mode | |||
| Media Extension Format Notes | |||
| Video | .mpg,.mpeg | MPEG1-2 MPEG1: 768 | 576 e 30P, MPEG2:1920x1080 e 30P |
| .vob MPEG2 | 1920x1080 e 30P | ||
| .mp4 MPEG4, Xvid,H.264 | |||
| .mkv H.264, | MPEG4,VC-1 | ||
| .avi MPEG2, | MPEG4,Xvid, H.264 | ||
| .flv H.264/V | P6/Sorenson | H.264/VP6:1920x1080 e 30PSorenson: 352x288 e 30P | |
| .mp4, .mov,.3gpp,.3gp, MPEGtransportstream,.ls,.lrp, .lp,.mkv | HEVC/H.265 1080Pe | 60fps - 50Mbps | |
| .3gp MPEG4, | H.264 1920x1080 e | 30P | |
| Audio | .mp3 MPEG | Layer 2/3 Layer2: | 32Kbps ~ 448Kbps (Bit rate) / 32kHz, 44.1kHz, 48kHz, 16kHz,22.05kHz, 24kHz (Sampling rate)Layer3: 32Kbps ~ 320Kbps (Bit rate) / 32kHz, 44.1kHz, 48kHz, 16kHz,22.05kHz, 24kHz, 8kHz, 11.025kHz, 12kHz (Sampling rate) |
| (worksonly withvideofiles) | AC3 32Kbps ~ 640Kbps (Bit rate) / 32kHz, 44.1kHz, 48kHz (Sampling rate)AAC 16Kbps ~ 576Kbps (Bit rate) / 48kHz, 44.1kHz, 32kHz, 24kHz, 22.05kHz,16kHz, 12kHz, 11.025kHz, 8kHz (Sampling rate)EAC332Kbps ~ 6Kbps (Bit rate) / 32kHz, 44.1kHz, 48kHz (Sampling rate)LPCMUnsigned 8bit PCM, Signed/Unsigned 16bit PCM (big / little endian), 24bitPCM (big endian), DVD LPCM 16/20/24bit (Bit rate)/ 6kHz, 8kHz, 11.025kHz, 12kHz, 16kHz, 22.05kHz, 24kHz, 32kHz, 44.1kHz,48kHz , 88.2kHz, 96kHz, 176.4kHz, 192kHz (Sampling rate)IMA ADPCM/M5-ADPCM384Kbps (Bit rate) / 8KHz ~ 48Khz (Sampling rate)LBR 32Kbps ~ 96Kbps (Bit rate) / 32kHz, 44.1kHz, 48kHz (Sampling rate) | ||
| Picture | .jpeg | Baseline Resolution(WxH): 17000x10000Progressive Resolution(WxH): 4000x4000 | |
| .bmp | - | Resolution(WxH): 5760x4096 | |
| Subtitle | .sub.,srt | - | - |
Information regarding EU countries (only)


The symbol indicates that the product must not be disposed of with the normal household wastes. Correct disposal of this product prevents any potentially negative impact on the environment and human health that could arise from any inappropriate handling of the product itself. To receive more detailed information regarding disposal of your unit, we recommend that you contact the competent public agencies, the waste collection service or the shop where you purchased the product.
Due to the continuous evolution of the products, the features and design of this model may change without notice
Manufacturer: VESTEL TICARET AS Organize Sanayi Bolgesi Manisa 45030 (Turchia)
Imported by:
GRUPPO INDUSTRIALE VESIT SPA
In conformity with applicable rules and regulations
ASSEMBLED IN TURKEY
| Specifiche Specification | ||||
| Trasmissione TV | PAL B/G D/K K I/I' | TV Broadcasting | PAL B/G D/K K I/I' | |
| Canali ricevibili | VHF (BAND I/III) - UHF (BAND U) - HYPERBAND | Receiving Channels | VHF (BAND I/III) - UHF (BAND U) - HYPERBAND | |
| Ricezione digitale | TV con decoder digitale terrestre/cavo/satellitare integrato (DVB-T-T2/C/S-S2/HEVC H.265) | Digital Reception | Fully integrated decoder terrestrial-cable-satellite (DVB-T2/C/S2 - HEVC - H.265) | |
| Numero dei canali memorizzabili | 8 000 | Number of Preset Channels | 8 000 | |
| Indicatore di canale | OSD | Channel Indicator | On Screen Display | |
| Ingresso antenna RF | 75 Ohm (non bilanciato) | RF Aerial Input | 75 Ohm (unbalanced) | |
| Tensione Operativa | 220-240V CA 50Hz | Operating Voltage | 220-240V AC, 50Hz. | |
| Audio | German•Nicam Stereo | Audio | German•Nicam Stereo | |
| Potenza Uscita Audio (WRMS.) (10% THD) | 2 x 6 | Audio Output Power (WRMS.) (10% THD) | 2 x 6 | |
| Consumo energetico (W) | 60 | Power Consumption (W) | 60 | |
| TV Dimensioni PxLxA (con piedistallo) (mm) | 197 x 732 x 480 | TV Dimensions DxLxH (with foot) (mm) | 197 x 732 x 480 | |
| TV Dimensioni PxLxA (senza piedistallo) (mm) | 51/78 x 732 x 435 | TV Dimensions DxLxH (without foot) (mm) | 51/78 x 732 x 435 | |
| Display | 32" | Display | 32" | |
| Temperatura di funzionamento e umidità | 0°C fino a 40°C, 85% umidità | Operation temperature and operation humidity | 0°C up to 40°C, 85% humidity max | |
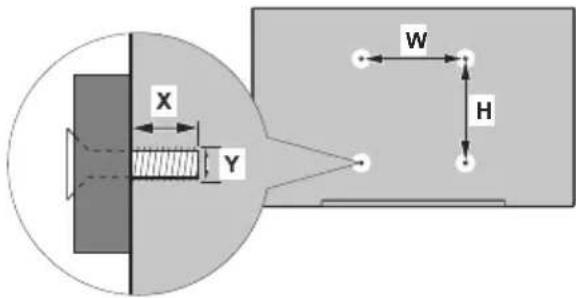
| A | VESA WALL MOUNT MEASUREMENTS | ||
| B | Hole Pattern Sizes (mm) | W | H |
| 75 | 75 | ||
| C | Screw Sizes | ||
| D | Length (X) | min. (mm) 5 | |
| max. (mm) | 8 | ||
| E | Thread (Y) | M4 | |
| A | Product Fiche | ||
| B | Commercial Brand:XD | ||
| C | Product No. | 10124856 | |
| D | Model No. | XD32H3VSAT | |
| E | Energy efficiency class | A+ | |
| F | Visible screen size (diagonal,approx.) (inch/cm) | 32 inches | 80 cm |
| G | On mode average power consumption (Watt) | 31,0 | |
| H | Annual energy consumption (kWh/annum) (*) | 45 | |
| I | Standby power consumption (Watt) | 0,50 | |
| J | Off mode power consumption (Watt) | N/A | |
| K | Display resolution (px) | 1366x768 | |
| A | B | C | D | E | F | ||
| English Product Fiche Commercial Brand P | Product No. Model No. Energy efficiency class Visible screen size (diagonal, approx.) (Inch/cm) | ||||||
| Deutsch | Produkt-Datenblatt Markenzeichen Produkt-Nr. Modell-Nr. Energieeffizienz klasse Sichtbare Bildschirmgröße (diagonal, ca) (Zoll /cm) | ||||||
| عربية قابس المッチ | العلاة التجنية: تيفروئكن رقم المッチ | رقم الموديل | نفقة فعلية الطاقة (ف galleries) (يوصابس) | ||||
| Български | Справочен лист с техническите данни | Търговска марка | Продукт No | Модел No | Клас на енергийна ефективност | Видим размер на екрана (диагонал прибл.) (инча /см | |
| čeština | Produktový list | Značka výrobce | Číslo produktu | Model č. | Energetická třída | Viditelná velikost obrazovky (ühlopříčka, přibl.) (p alců /cm) | |
| Dansk | Produktoplysningsskema | Varemærke | Produktnr. | Model nr. | Energieffektivitetsklasse | Synlig skærmstørrelse (diagonalt,ca.) (HK/cm) | |
| Suomi | Tuote fiche | Kaupallinen merkki | Tuote nro. | Malli nro. | Virran tehokkuusluokka | Nákyván kuvaruudun koko (diapnaalinen, n.) (tuumaa/cm) | |
| Français | Fiche du produit | Marque commerciale | Produit N° | Modèle N° | Classe d'efficacité énergétique | Taille d'écran visible (diagonale,approx.) (pouces/cm) | |
| Hrvatski | SAŽETAK PROIZVODA | Trgovačka marka | Br. proizvoda | Br. modela | Klasa energetske učinkovitosti | Vidljiva veličina ekrana (diagonalna, přibližno) (inča/cm) | |
| Nederlands | Productfiche | Commercieel merk. | Productnr. | Modelnr. | Energie efficiëntie klasse | Zichtbare schermgrootte (diapnaal, ca.) (inches/cm) | |
| Español | Ficha del Producto | Marca Comercial | No de Producto | No de Modelo | Clasificación Energética | Tamaño de pantalla visible (diapnal, aprox. χρ υρ adas/cm) | |
| Svenska | Produktspecifikation | Varumärke | Produktnr. | Modellnr. | Energiklass | Synlig skärmstorlek (diapnal, umefärip) (tum/cm | |
| Italiano | Scheda prodotto | Marchio commerciale | Numero prodotto | Numero modello | Classe di efficienza energetica | Dimensioni visibili dello schermo (diapnale, circa)(p ollici/cm | |
| Polski | KARTA PRODUKTU | Marka produktu | Nr produktu | Nr modelu | Klasa efektywności energetycznej | Widoczny obraz ekranu (przeletna,oko) (cal/cm) | |
| Magyar | Termékismertető adatlap | Kereskedelmi márka | Termékszám | Modellszám | Energiahatékonysági osztály | Látható képtartomány (diagonális,kb.) (inches/cm) | |
| Norsk | Produktinformasjon | Kommersiell merkevare | Produkt nr. | Modell nr. | Energieffektivitet klasse | Synlig skjermstørrelse (diagonal, ca.) (tommer/cm) | |
| Português | Ficha do produto | Marca Comercial | Produto N° | Modelo N° | Classificação eficiência energética | Tamanho ecrà visível (diagonal, aprox.) (polegadas/cm) | |
| Română | Fişă produs | Marcă comercială | Nr. Produs | Nr. Model | Clasa de eficiență energetică | Dimensiunea ecranului vizibil (diapnalá, ρ rox.) (inch/cm) | |
| Русский | Справочный листок технических данных изделия | Торговая марка | Номер изделия | Номер модели | Класс энергопотребления | Видимый размер экрана (по диагонали, Около) (дюймов/см) | |
| беларуская | Справочный листок технических данных изделия | Торговая марка | Номер изделия | Номер модели | Класс энергопотребления | Видимый размер экрана (по диагонали,Около) (дюймов/см) | |
| македонски | Технички податоци | Комерцијална марка | Производ бр. | Модел бр. | Класа на енергетска ефикасност | Големина на видлив екран (диагонала,околь) (инчи/cm) | |
| український | Технічні дані | Кормеційна марка | Артикул | Модель | Клас энергоспоживання | Видимий розмир екрана (диагональ, Приблизнол/д коймів/см) | |
| Srpski | Tehničke odlike | Komercijalna marka | Proizvod br. | Model br. | Klasa energetske efikasnosti | Veličina vidljivog ekrana (diagonala, tokom) (inča/cm) | |
| Slovenčina | Produktový list | Značka výrobcu | Číslo produktu | Model č. | Energetická trieda | Viditehná velkoš'obrazovky (uhlopříčka, zhruba) (palcov/cm) | |
| Slovensčina | Opis izdelka | Komercialna znamka | Št. Izdelka | Št. Modela | Razred energetske učinkovitosti | Vidna velikost zaslona (diagonala, přibl.) (ralcev/cm) | |
| Еллнікі | Делтію проївтоς | Емторіко σήμα | Ар. Проївтоς | Ар. Movtélou | Катуоріа евергесякіг ато́бооои́г | Орато мэуєвіб овівніг (діяу’єюс, тпр) (інтес/cm) | |
| Bosanski | Tehnički podaci | Komercijalna marka | Produkt br. | Model br. | Klasa energetske efikasnosti | Vidljiva veličina ekrana (diagonala, піблиžno, үніна/cm) | |
| لاوي | لاوي عُلَّد | لاوي عُلَّد | لاوي عُلَّد | لاوي عُلَّد | لاوي عُلَّد | (оуык) (діяу'єю, пібли'єю) (на дау'єю) | |
| Türkçe | Ürün fişi | Ticari Marka | Ürün No. | Model No. | Enerji verimiliği simfi | Görülen ekran boyutu (çapraz, yaklsk.) (inc/cm) | |
| Shqip | Tè dhēnal e produktit | Marka treglare | Nr. i produktit. | Nr. i modelit. | Klasa e eficiencès sè energjisë | Madhésia e ekranił té dukshëm (diagonal, afērisishī) (inc/cm) | |
| Lietuviu | Gaminio etiketé | Gamintojas | Gaminio Nr. | Modelio Nr. | Energetinio efektyvumo klasé | Matomas ekrano dydis (įstrižainė, a pprox) (coll/cm) | |
| Latvlešu | Produkta apraksts | Marka | Produkta nr. | Modela nr. | Energoefektivitätes klase | Ekrána izmërs (pa diognāli, apm‘ram) (collas/cm) | |
| Eesti | TOOTEKIRJELDUS | Tootja firma | Toote nr. | Mudeli nr. | Energiaklass | Vaadatava ekranai suurus (diagonala, umbes) (tolli/cm) | |
| فارمسی | مشخصات محصول | imarک تجاري | شماره محصول | شماره مشل | کروه کازایی اززی | انذاء صفحه قابل مشاهده (هندستا، ئفریت) (انیچ) (بستم متر) | |
| G | H | I | J | K | |||
| English On mode average power consumption (Watt) | Annual energy consumption (kWh/annum) | Standby power consumption (Watt) | Off mode power consumption (Watt) | Display resolution (px) | |||
| Deutsch | Durchschnittlicher Stromverbrauch im eingeschattem Zustand (Watt) | Jährlicher Energieverbrauch (kWh/Jahr) | Standby-Stromverbrauch (Watt) Stromverbrauch im ausgeschaltetem Zustand (Watt) | Standby-Auflösung (px) | Display-Auflösung (px) | ||
| Geï | (###) | ### | (###) | (###) | (###) | ||
| Български | Средна консумация на електроенергия зв включено състояние (Watt) | Годиша консумация на електроенергия (kWh/Годиша) | Консумация на електроенергия в режим на готовност (Watt) | Консумация на електроенергия в изключено състояние (Watt) | Разделителна способност на дисплея(пиксела) | ||
| čeština | Prüměma spotřeba elektrické energie v zap nutém režimu(Wattù) | Roční spotřeba energie (kWh/Roční) | Spotřeba elektrické energie v pohotovostním režimu(Wattù) | Spotřeba elektrické energie ve vypnutém režimu(Wattù) | Rozlišení displeje (px) | ||
| Dansk | Cennemsnitligt stromforbrug i taëndt tilstand (Watt) | Arligt energiforbrug (kWh/Arligt) | Strømforbrug (standby)(Watt) | Strømforbrug i slukkel tilstand (Watt) | Skærmoplesning (px) | ||
| Suomi | Päällä-tilan keskimääräinen virrankulutus (Wattia) | Vuositainen sähkönkulutu (kWh/Vuositainen) | Vakiovirran kulutus (Wattia) Pois-tilan | virrankulutus (Wattia) Näytön erottelukyky | (pikselia) | ||
| Français | Consommation énergétique moyenne en mode "marche" (Watt) | Consommation énergétique annuelle (kWh/annue) | Consommation d'énergie en veille (Watt) | Consommation d'énergie en mode "arrêt" (Watt) | Résolution de l'écran (px) | ||
| Hrvatski | Prosječna potrošnja el. energije kada je proizvod uklučen (Watta) | Godišnja potrošnja el. Energije (kWh/Godišn a) | Potrošnja el. energije u modu prabravnosti (Watta) | Potrošnja el. energije kada je proizvod iskl učen(Watta) | Rezolucija zaslona (piksela) | ||
| Nederlands | Aan-modus gemiddeld stroomverbruik (Watt) | Jaarlijs energieverbruik (kWh/Jaarliks) | Stand-by stroomverbruik (Watt) Uit-modus stroomverbruik (Watt) Schermresolutie (px) | ||||
| Español | Consumo eléctrico medio, en funcionamiento (Vatio) | Consumo eléctrico anual (kWh/anual) | Consumo en modo en espera (Vatio) | Consumo eléctrico modo apagado (Vatio) | Resolución de pantalla (px) | ||
| Svenska | Strömkonsumtion i PA-läge (Watt) Energikonsumtion per år (kWh/Arlig) | consumtion per år (kWh/Arlig) | Strömkonsumtion i viloläge (Watt) Strömkonsumtion i AV-läge (Watt) | skámmupplösning (pixlar) | |||
| Italiano | Consumo di corrente medio da accesa (Watt) | Consumo annuale di energia (kWh/annug) | Consumo di corrente in modalità standby (Watt) | Consumo di corrente da spenta (Watt) | risoluzione del display (px) | ||
| Polski | Średnie zużycie energii w trybie włczorym (Watów) | Roczne zużycie energii (kWh/Roczne) | Średnie zużycie energii w trybie opczkiwania (Watów) | Zuzycie energii w trybie wyłączonym (Watów) | Rozdzielczość obrazu (pikseli) | ||
| Magyar | Energiafogyasztás bekapcsolva haovoti üzemmödban (Watt) | Éves energiafogyasztás (kWh/Eves) | Energiafogyasztás standby üzemmödban (Watt) | Energiafogyasztás kikapcsolt üzemmödban (Watt) | Képernyőfelbontás (px) | ||
| Norsk | Pàmodus gjennomsnittlig strømforbruk (Watt) | Arlig strømforbruk (kWh/Arlig) | Hvillemodus strømforbruk (Watt) | Av-modus strømforbruk (Watt) | Skjermopplasning (piksel) | ||
| Português | Consumo energia em modo médio (Watt) | Consumo annual energia (kWh/anual) | Consumo energia em stand-by (Watt) | Consumo energia em modo alimenta giao (Wat) | Resolução do visor (pixel) | ||
| Română | Consum electric mediu in modul pornit (Wg) | Consum anual de energie (kWh/anual) | Consum electric in stare de repaus (Wg) | Consum electric in modul oprit (Wat) | Rezolutja ecranului (pixel) | ||
| Русский | Средний расход энергии в режиме работы(Bt) | Ежегодный расход энергии (вбтч/Год) | Расход энергии в режиме ожидания Вт | Расход энергии в выключенном режиме (Вт) | Разрешение экрана (пикселей) | ||
| беларуская | Средний расход энергии в режиме включения(batt) | Ежегодный расход энергии (kWh/гау авоё) | Расход энергии в режиме ожидания (батт) | Расход энергии в режиме включения (батт) | Разрешение экрана (пикселей) | ||
| македонски | Просечна потрошувачка кога е випичен | Годиша потрошувачка на енергия (kWh/Голишна) | Потрошувачка во мирување (вати) | Потрошувачка кога е исклучен (вати) | Резолуција на екран (пиксели) | ||
| український | Середня споживана потужність у робочомре ежими (Вт) | Середньорічна споживана потужність (kWh/Річне) | Споживана потужність у режими орікляння (Вт) | Споживана потужність у вимкненому стані (Вт) | Роздільна здатність екрана (пикселів) | ||
| Srpski | Prosečna potrošnja kada je uključeni (Vat) | Godišnja potrošnja energije (kWh/Godišn a) | Potrošnja tokom mirovanja (Vati) | Potrošnja kada je isključeni (Vati) | Rezolucija displeja (piks.) | ||
| Slovenčina | Priemerná spotreba elektrickej energie y zap nutom režime(Wattov) | Ročná spotreba energie (kWh/Ročná) | Spotreba elektrickej energie v pohotovostnom režime (Wattov) | Spotreba elektrickej energie vo vypnutom režime (Wattov) | Rozlišenie displeja (pixl.) | ||
| Slovenščina | Poraba elektricne energije v ровречнем načinu (Wattov) | Letna poraba energije (kWh/Letna) | Poraba energije v stanju pripavljenosti (Wattov) | Poraba energije načinu izklopa (Wattov) | Resolucija zaslona (piks.) | ||
| Еллінкикá | Ме́зн катаво́люшн ре́руматос алюроунівос(Watt) | Ет́йсяка катаю́люшн е́в́руеки (kWh/Ен ́як) | Катаю́люшн ре́руматос стінн аваюvn (Watt) | Катаю́люшн ре́руматос стінн аваюvn (Watt) | Аvváluon obóvnς (Пізел) | ||
| Bosanski | Prosjecna potrošnja kada je uključen (Watt) | Godišnja potrošnja energije (kWh/Godišn a) | Potrošnja tokom mirovanja (Watt) Potrošnja kada je isključen (Watt) | Potrošnja kada je isključen (Watt) | Rezolucija ekrana (piks.) | ||
| Түйкçe | (Akt)Moddi ortalamā güç tüketimi (Watt) | (Yillik enerji tüketimi (kWh/Yillik) | (Bokimun)Moddi ortalamā güç tüketimi (Watt) | (Bokimun)Moddi ortalamā güç tüketimi (Watt) | (Bokimun)Moddi ortalamā güç tüketimi (Watt) | ||
| Shqip | Konsumi mesatar i energijse si i ndezur (Watt) | Konsumi vjetor i energijse (kWh/vjetor) | Konsumi i energijse si ne gatishměri (Watt) | Konsumi i energijse si i fikur (Watt) | Kapali moddaki güç tüketimi (Watt) Ekran gözünürlığı (piks.) | ||
| Lietuvių | Vidutinės energijos sąnaudos ljungus (Vatal) | Metinės energijos sąnaudos (kWh/Metinės) | Energijos sąnaudos budėjimo režimu (Vatal) | Energijos sąnaudos išjungus (Vatal) | Ekranio skirlamoji geba (pikselių) | ||
| Latviešu | Energijas patērinš aktiva režima (Vati) | Gada energijas patērinš (kWh/gda adı) | Energijas patērinš gaidišanas režima (Vati) | Energijas patērinš izslegtā stavokli (Vati) | Displeja rezolúcija (pikseliem) | ||
| Eesti | Keskmine energiakulu töörežilim (Vatti) | Aastane energiakulu (kWh/aastane) | Energiakulu ooterežiimil (Vatti) | Energiakulu väljalilitatud olekus (Vatti) | Ekraani resolutsioon (piksilt) | ||
| کارمی | (مYZAN) πωση σροσή σροσή ρρόν δρόν ζρόν (ωατ) مYZAN πωση σροσή ρρόν δρόν δρόν ζρόν (ωατ) مYZAN πωση σροσή ρρόν δρόν δρόν ζρόν (ωατ) مYZAN πωση σροσή ρρόν δρόν δρόν ζρόν (ωατ) مYZAN πωση σροσή ζρόν δρόν δρόν ζρόν (ωατ) مYZAN πωση σροσή ρρόν δρόν δρόν ζρόν (ωατ) مYZAN πωση σροσή ρρόν δρόν δρόν ζρόν (ωατ) مYZAN πωση σ ρρόν δρόν δρόν ζρόν (ωατ) مYZAN πωση σ ρρόν δρόν δρόν ζρόν (ωατ) مYZAN πωση σ ρρόν δρόν δρόν ζρόν (ωατ) مYZAN πωση σ ρρόν δ ρόν δρόν δρόν ζρόν (ωατ) مYZAN πωση σ ρρόν δρόν δρόν ζρόν (ωατ) مYZAN πωση σ ρρόν δ ρόν δρόν δρόν ζρόν (ωατ) مYZAN πωση σ ρρό νδρόν δρόν δρόν ζρόν (ωατ) مYZAN πωση σ ρρό νδρόν δρόν δρόν ζρόν (ωατ) مYZAN πωση σ ρρό νδρόν δρόν δρόν ζρόν (ωατ) مYZAN πωση σ τρό νδρόν δρόν δρόν ζρόν (ωατ) مYZAN πωση σ τρό νδρόν δρόν δρόν ζρόν (ωατ) مYZAN πωση σ τρό νδρόν δρόν δρόν ζρόν (ωατ) مYZAN ποση σ τρό νδρόν δρόν δρόν ζρόν (ωατ) مYZAN ποση σ τρό νδρόν δρόν δρόν ζρόν (ωατ) مYZAN ποση σ τρό νδρόν δρόν δρόν ζρόν (ωατ). | ||||||
(*) English Energy consumption kWh per year, based on the power consumption of the television operating 4 hours per day for 365 days. The actual energy consumption will depend on how the television is used.
- TELEVISORE A COLORI CON TELECOMANDO COLOUR TELEVISION WITH REMOTE CONTROL
- INDICAZIONI
- (*) IL MIO PULSANTE PERSONALE 1 E 2
- IMPORTANT - PLEASE READ THESE INSTRUCTIONS FULLY BEFORE INSTALLING OR OPERATING
- CONTENTS
- TV CONTROL BUTTON & OPERATION
- CONNECT POWER
- OPERATING WITH THE CONTROL BUTTON | OPERATION WITH THE REMOTE CONTROL
- INSERTING THE BATTERIES INTO THE REMOTE
- LICENSE NOTIFICATION
- THE GROUND TRUTH IMAGE DISPLAYS A SINGLE, SOLID HORIZONTAL LINE. ACCORDING TO RULE 2 (UNDERSCORE & LINE RULES), THIS IS A STYLISTIC OR BACKGROUND LINE, NOT A PLACEHOLDER UNDERSCORE. THEREFORE, THE OCR RESULT MUST IGNORE IT AND OUTPUT NOTHING OR ONLY MEANINGFUL TEXT. THE PROVIDED OCR CONTENT IS "____", WHICH CONSISTS OF FOUR UNDERSCORES. THIS IS AN INCORRECT INTERPRETATION OF THE LINE AS A PLACEHOLDER, VIOLATING THE RULE THAT STYLISTIC LINES MUST BE IGNORED. THE OCR HAS HALLUCINATED UNDERSCORES WHERE NONE SHOULD EXIST BASED ON THE GT'S VISUAL CONTEXT. HENCE, THE OCR RESULT IS INCONSISTENT WITH THE GROUND TRUTH
- REMOTE CONTROL
- CONNECTIONS
- (*) MY BUTTON 1 & MY BUTTON 2
Brand : XD
Model : 32H3VSAT
Category : Television