
Alpha Drone - Drone Kaiser Baas - Free user manual and instructions
Find the device manual for free Alpha Drone Kaiser Baas in PDF.


| Product Type | Quadcopter Drone |
| Model | Alpha Drone |
| Brand | Kaiser Baas |
| Dimensions | 33.1 x 33.1 x 7.7 cm |
| Weight | 109 g |
| Channels | 4 |
| Drone Battery | 550 mAh Li-Po |
| Transmitter Battery | 6 x AA (not included) |
| Frequency | 2.4 GHz |
| Camera Resolution | 720p at 30 FPS |
| Photo Resolution | 2 MP |
| Video Format | AVI |
| Photo Format | JPG |
| Memory | Micro SD card (class 10, 32 GB or smaller recommended) |
| Flight Features | 360° flips, 4 sensitivity levels (25%, 50%, 75%, 100%), trimming fine-tuning, LED battery indicators |
| Safety | Comply with local aviation authority regulations; keep 5.5 km away from airfields; avoid water, extreme temperatures, and obstacles |
| Maintenance | Replace rotor blades one at a time, use soft brush to clean, do not open housing |
| Warranty | Void if tampered with or modified |
Frequently Asked Questions - Alpha Drone Kaiser Baas
User questions about Alpha Drone Kaiser Baas
0 question about this device. Answer the ones you know or ask your own.
Ask a new question about this device
Download the instructions for your Drone in PDF format for free! Find your manual Alpha Drone - Kaiser Baas and take your electronic device back in hand. On this page are published all the documents necessary for the use of your device. Alpha Drone by Kaiser Baas.
USER MANUAL Alpha Drone Kaiser Baas
natural_image
Top-down view of a black quadcopter drone with red propellers and control panels (no text or symbols visible)ALPHA | Drone
HD 720p Quadcopter
KAISER BAAS
Languages
English
Community

/kaiserbaas
Tech support:
e: helpdesk@kaiserbaas.com
w: www.kaiserbaas.com/support
p: Australia 1300 302 306
(business hours, AEST)
Contents
Pre-flight 6
Safety Precautions 6
Drone Battery Safety 7
Flight Equipment 8
Drone Schematics 9
Transmitter Feature Schematics 10
Transmitter Screen Schematics 12
Set up 13
Flight Planning 14
Flight Basics 16
360°Flip 20
Filming Basics 22
Flight Maintenance 23
Specifications 25
FAQ 26
Contact Us 27
Pre-flight
Connect the battery to the included USB battery charger to begin charging. Use this charging time to familiarise yourself with the operation and controls of your new drone.

natural_image
Illustration of a cable being inserted into a laptop keyboard (no text or symbols visible)Safety Precautions
Please read the included CASA flyer 'Flying with control'.
Learn and be aware of the laws and restrictions when flying your drone. Do not fly your Alpha Drone any closer than 5.5km to any airfield, or any closer than 30 metres to boats, buildings, people, or animals. Be aware of your surroundings and exercise caution when using your drone. For more information on this go to http://www.casa.gov.au/ within Australia, or your local aviation authority if you are outside of Australia. Do not attempt to open the housing of the Alpha Drone, battery, or the remote control, or attempt to modify it in any way. Any unauthorised tampering with the product will void the warranty and may affect the operation of your drone. Only charge the battery with the included cable. Do not leave your battery unattended whilst charging.
Keep both the Alpha Drone and the Transmitter away from water and other liquids. If water or other liquids come into contact with the Alpha Drone, battery, or Transmitter, do not operate. This product is not suitable for those 14 years and under.
Drone Battery Safety
Please do not leave the drone battery in direct sunlight or expose to extreme temperatures. Do not leave charging batteries unattended. Do not store batteries in any clothing pockets or on your person at any time. Do not bend, crush, scrape, or puncture battery. If a battery is damaged or misshapen, carefully dispose of the damaged unit immediately and correctly.
Warnings concerning the use of the battery
- Lithium Polymer batteries are extremely hazardous and liable to cause serious injuries to persons or property. The user accepts liability for the use of a Lithium Polymer battery. As the manufacturer and the distributor cannot ensure the battery is used correctly (charging, discharging, storage, etc.), they cannot be held liable for damages caused to persons or property.
- In the event of battery leakage, avoid the liquid coming into contact with skin and eyes. In case of contact with the skin, wash copiously with soap and water. In case of contact with the eyes, rinse copiously with cold water and consult a doctor. If you notice a suspicious smell or noise or observe smoke around the charger, disconnect it immediately.
• Non-compliance with the instructions below could result in gas being given off, fire, electric shock or an explosion.
Flight Equipment
Alpha Drone and Remote Control Transmitter not shown below.
A 4 X Rotor blade guards
B 4 X Spare rotor blades
C 1 X Drone battery
D 2 X Landing feet
E 1 X USB battery charger
F 1 X Screwdriver

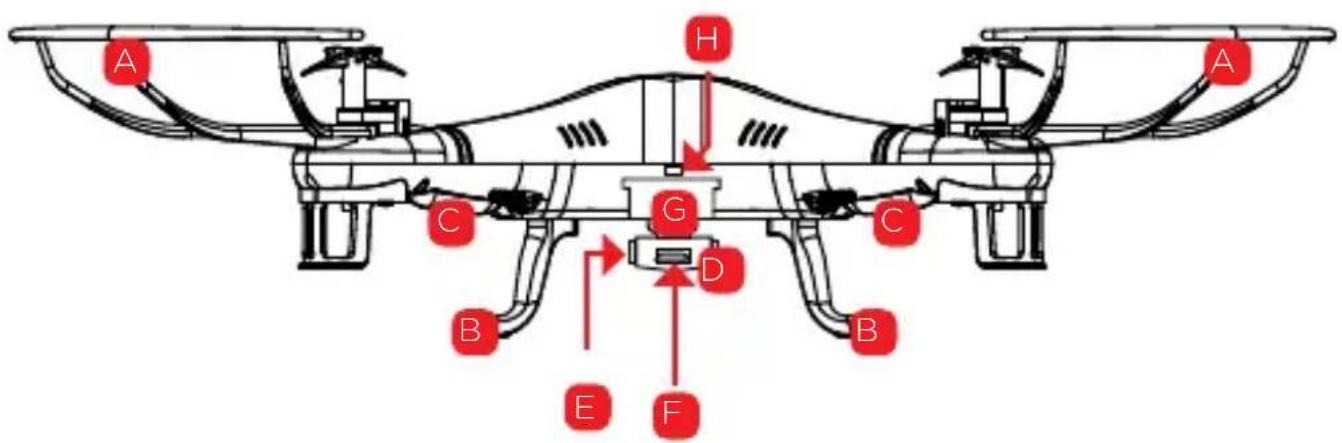
Drone Schematics
A Blades Guards
B Feet
C Lights
D Camera
E SD Card slot
F Micro USB plug
G Battery hatch
H Power switch
Rear Profile
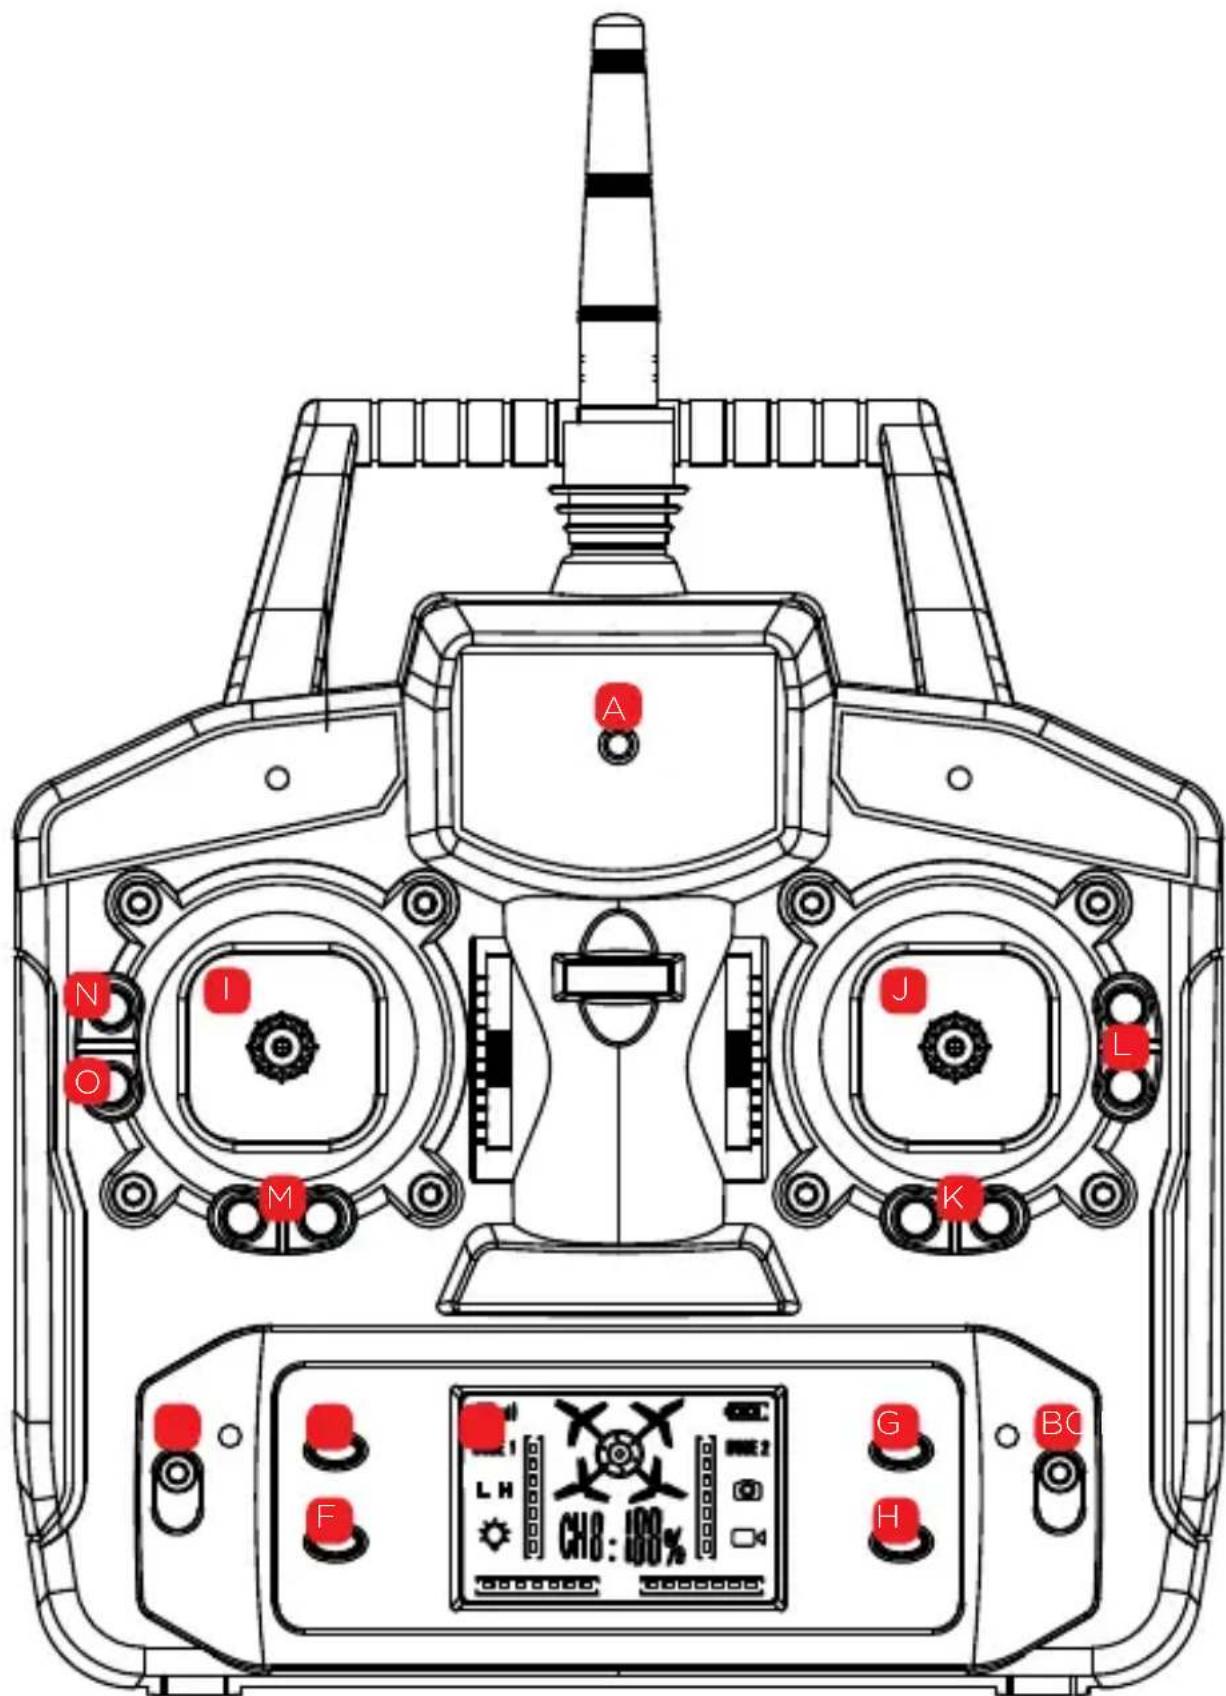
Transmitter Feature Schematics
A Indicator
B Power switch
C Mode switch
D LCD display
E Capture Photo
F Capture Video
G 360° flip
N Light control
○ Trimming reset
H High/Low sensitivity adjustments
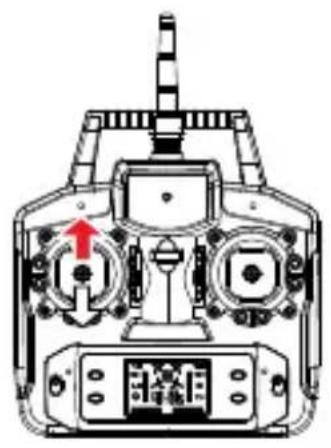
1 Left Stick (ascend, descend / rotate left, right)
J Right Stick (Pitch left, right / roll forward, back)
K Pitch fine-tuning (left, right)
L Roll fine-tuning (up, down)
M Rotate fine-tuning (left, right)
English
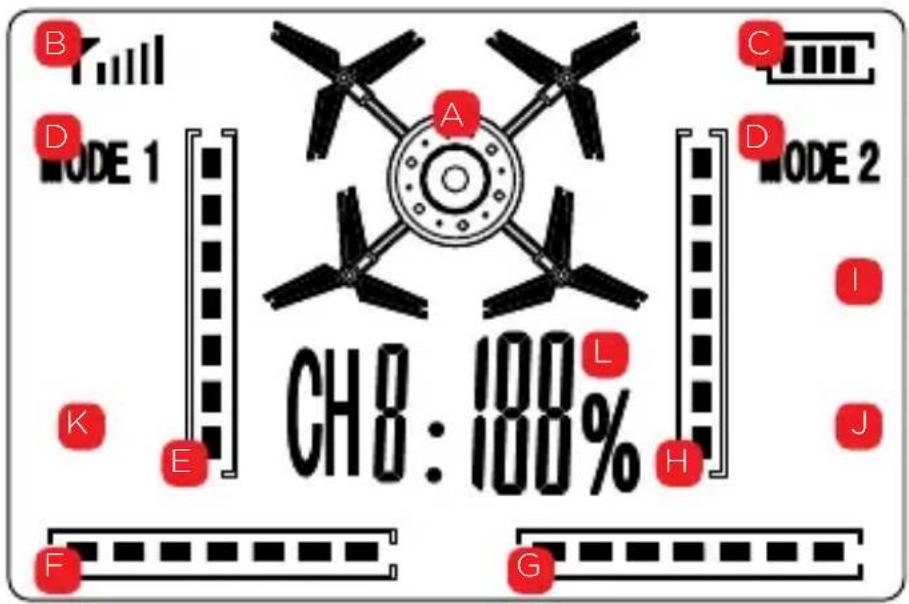
Transmitter Screen Schematics
A Drone diagram
B Signal strength
Remote battery level
D Mode
E Accelerator fine-tuning level
F Rotation fine-tuning level
G Pitch fine-tuning level
H Roll fine-tuning level
1 Photo indicator
J Video indicator
K Light indicator
Motor power level
Set up
Charging
Plug your USB charging cable into a powered USB port (wall adaptor not included). When connected correctly, the USB plug will glow red. Connect your battery to the USB charging cable. When charging correctly, the red light should turn off. The red light will turn back on once charging is complete (to avoid shortening battery life, do not remove the battery from charge until charge sequence is complete).
Initial Assembly
Alpha Drone Feet
Insert the feet into the guide holes on the underside of the Alpha Drone, in the allocated position. Push the Alpha Drones feet into the underside of the body until the feet are secure and flush against the body of the Alpha Drone.
Rotor blade guards
Insert rotor blade guards into guide holes in the allocated position. Use the included screwdriver to secure the propeller guards to the Alpha Drone, making sure not to over-tighten.
Camera
Ensure that the camera cable is connected to the Alpha Drone and insert the Micro SD card* into the allocated slot.
Battery
Slide the battery hatch out on the Alpha Drone and lift gently to open. With the Alpha Drone turned off, insert the battery into the opening with the cable end facing outward, ready for connection. Plug the battery cable into the socket, then close and lock the hatch by sliding gently back in place.
Transmitter
Using the provided screwdriver, unscrew the battery flap on the rear of the transmitter. Take care to place the removed screw in a safe place so it is not lost. Insert 6 x AA batteries (not included) into the transmitter and replace the battery flap. Replace the screw, making sure not to over tighten.

natural_image
Technical line drawing of a mechanical device with no visible text or symbols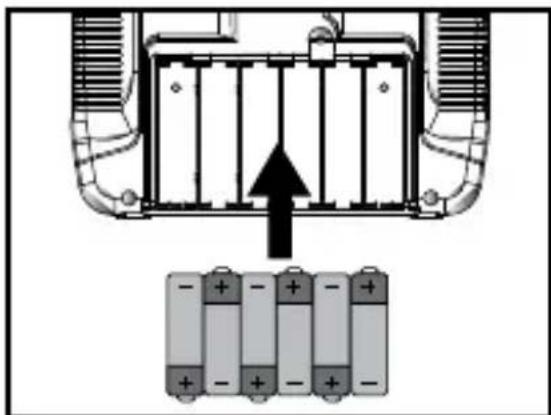
natural_image
Diagram showing a battery assembly with an arrow pointing to a stack of four batteries (no text or symbols present)
natural_image
Technical diagram of a mechanical device with internal components and no visible text or symbolsFlight Planning
Ensure that you are at least 5.5kms from any airfield and you are adhering to any regulations and laws laid out by your local aviation authority. Do a COMPLETE check of your surroundings, look for hazards above, in front and behind you. Be especially aware of things like power lines and nearby people and animals. If these hazards exist, DO NOT deploy your Alpha Drone and consider a new take-off location.
Take-off Preparation
Turn on the Remote Control and ensure that the left stick is in the down position.
Turn on your Alpha Drone and place it on stable ground. Ensure the Alpha Drone is facing away from you (black propeller blades and downwards facing white LED lights indicate the front of the drone).
Before you deploy your Alpha Drone, the downwards facing lights on the Alpha Drone should be constant. If they are flashing:
a. The remote control has not connected to the Alpha Drone, try turning the drone off and on again.
b. The battery in the Alpha Drone is low, remove the battery and connect it to the USB charger.
c. The left Stick is not in its lowest position. Move the left stick to the lowest point and wait 3 - 4 seconds for connection confirmation
Before you deploy your Alpha Drone, the red light on the remote control should be constant. If it is flashing:
a. The remote has not connected to the Alpha Drone, try turning the remote off and on again.
b. The batteries in the remote control are low, remove them and replace with a fresh 6 x AA batteries.
c. The left Stick is not in its lowest position. Move the left stick to the lowest point and wait 3 - 4 seconds for connection confirmation
Stand at least 2 meters away from your Alpha Drone before deployment.
Deploy!
Flight Basics
Manoeuvring
natural_image
Top-down schematic of a multi-rotor control device with no visible text or symbols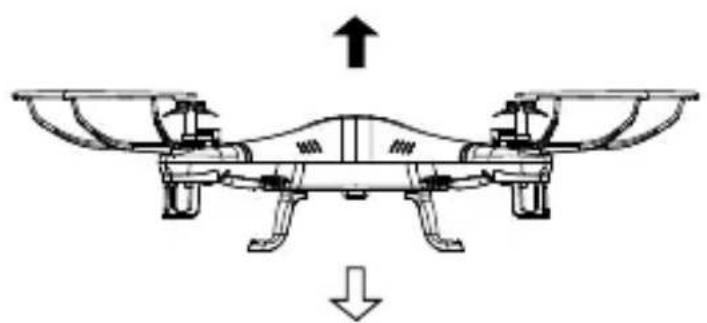
natural_image
Diagram of a drone with two wings and a central body, showing directional arrows (no text or symbols)Elevation/Decent

natural_image
Technical line drawing of a multi-rotor control device with no visible text or symbols
natural_image
Diagram of a four-blade helicopter with directional arrows indicating rotation (no text or labels)Yaw (Rotation)

natural_image
Top-down technical diagram of a multi-rotor control device with no visible text or symbols
natural_image
Diagram of a four-blade drone with propellers and directional arrows indicating motion (no text or symbols)Left/Right Roll (Tilt) Forward/Backward

natural_image
Technical line drawing of a mechanical control device with no visible text or symbols
natural_image
Diagram of two identical aircraft wings with directional arrows indicating movement (no text or symbols)Left/Right Pitch (Tilt)
Note: Yaw and Pitch can be swapped using the Mode switch. Now Yaw and Pitch are controlled by the opposite thumb stick.
Indicators
There are LED lights on the underside of the Alpha Drone that indicate when the Alpha Drone is operational (constant) or when the Alpha Drone is running low on battery (flashing). It is important to pay attention to the indicators to avoid an uncontrolled landing, potentially putting your drone and its surrounds at risk.
Modes
The Mode switch swaps the Yaw and Pitch controllability on the thumb sticks.
High/Low
There are four sensitivity levels for the Alpha Drone that can be cycled through by using the High/Low button on the Transmitter.
These sensitivity levels increase and decrease the overall responsiveness of the thumb sticks on the Transmitter.
The Alpha Drone will start up in the lowest sensitive level 25% responsiveness (advised level for learners). Pressing the High/Low button once will enter the medium sensitivity level 50% responsiveness. The Transmitter will beep twice and indicate the sensitivity on the Motor Power indicator. Pressing the High/Low button again the Transmitter will beep three times and show the high responsiveness setting of 75% on the Motor Power indicator.
Pressing the High/Low button a third time will assign the highest sensitivity level which will be indicated by four beeps and the Motor Power indicator displaying 100% responsiveness. The 100% Motor Power mode is for advanced pilots. This mode also enables 360° flips. Please refer to the 360° Flips section for further information.
Pressing the High/Low button again will return the sensitivity level to the lowest setting.
Trimming (fine tuning)
Control of the Alpha Drone can be trimmed using the fine-tuning buttons on the Transmitter. If the Alpha Drone is drifting off during a hover or other flight manoeuvre, these buttons are used to counter this drift. The calibration is displayed on the display screen of the transmitter. You will see the trimming levels displayed in the fine-tuning bars on the display which will show in which direction the drone controls have been trimmed. To reset all trimming and calibration, hold the Reset button for five seconds.
360°Flip
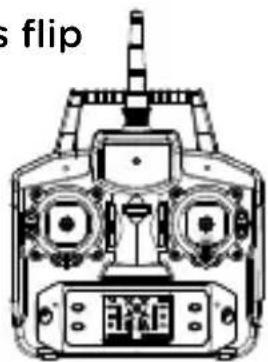
To perform a forward flip press the creatively named Flip button! The drone will launch forward and descend during the flip so make sure that the drone is at an adequate height before performing this manoeuvre.
Advanced Flip Mode
The Drone also features an advanced flip mode that will enable it to flip in all directions.
To use this feature please toggle the through the High/Low settings until you reach 100%; the Transmitter will emit 4 consecutive beeps.
The drone will emit a beeping sound while the throttle has power. This indicates that whilst in this mode the right stick will let you flip the drone in any direction.
The right control stick when pushed to its extreme in any direction will flip the drone. Please note the sensitivity is increased and this mode is for advanced pilots.
Ensure you have given the drone at least 5 metres of clearance.
To return back to normal flight mode, press the High/Low button toggle.
Left flip

natural_image
Front view of a multi-rotor control unit with visible motors and antenna (no text or symbols)
Right flip

natural_image
Technical line drawing of a multi-rotor control unit (no text or symbols)
Forward flip

natural_image
Top-down technical diagram of a multi-rotor control unit (no text or labels visible)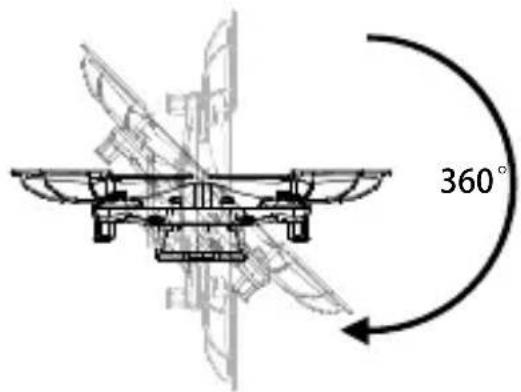
Backwards flip
natural_image
Top-down technical line drawing of a multi-rotor control unit (no text or symbols)
Filming Basics
Camera
The camera is controlled using the Video and Photo buttons on the Transmitter.
Always ensure you have a Micro SDcard* inserted when you want to capture photo and video content.
The LED lights on the camera will flash red and blue when no Micro SD card is present. Once a Micro SD card is inserted, the LED lights will shine a constant blue. If the LED light does not shine a constant blue, turn off the Alpha Drone, remove and re-insert the Micro SD card.
Taking photos:
When the photo function is triggered, the LED camera light will flash red when a photo is successfully taken. It will return to blue in between shots.
Shooting video:
When the video function is triggered, the LED camera light will flash red.
TIP
*For best results use a class 10 SDHC micro SD card (not included) 32GB or smaller.
Flight Maintenance
Try not to land your drone in sandy or wet areas where water and dust particles can damage the motors and camera components. Use a soft brush to remove any particles from the accessible surfaces of the drone. Do not attempt to open the housing of your Alpha Drone, as this will void your warranty and may impede the operation of your Alpha Drone.
To replace the rotor blades -
TIP
ONLY REPLACE ONE BLADE AT A TIME TO ENSURE ROTOR BLADES STAY IN THE CORRECT POSITION.
Rotor blades are marked A or B and are either red or black.
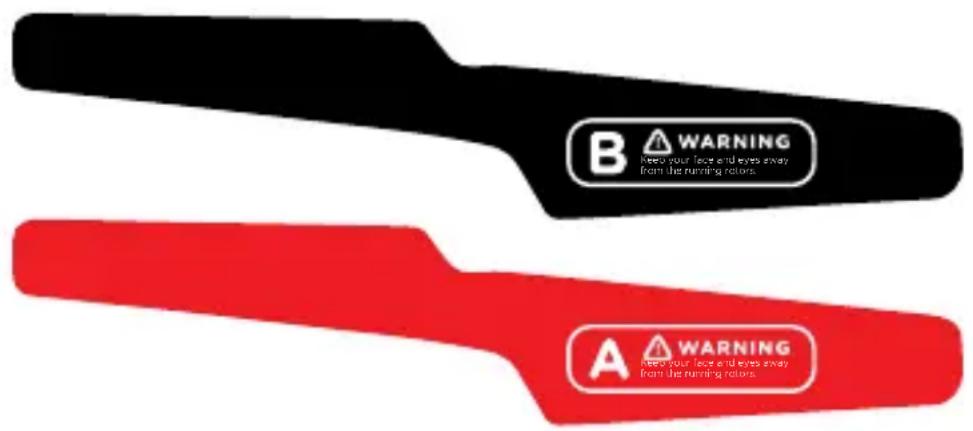
TIP
The drone will not work if the blades are in the wrong position.
Replacing Rotor Blades
- Identify the correct blade needed to replace the current blade. Place your finger gently on the motor cog to steady it.
- Using the screwdriver provided, remove the lock screw. Take care to place the removed screw in a safe place where it will not be lost.
- Keep your finger on the motor cog and gently slide the blade from the centre rod, ensure you are still holding the motor cog in place.
- Using the correct replacement blade, line up the pilot hole on the rotor blade and the hole on the side of the rod.
- Ensure that they are correctly aligned so that the lock screw can be replaced.
- Once aligned, replace the lock screw making sure not to overtighten.
- If the screw will not fasten correctly, remove it and ensure the hole in both the blade and rod are aligned and try again.
Specifications
| Dimensions: 33.1 X 33.1 X 7.7cm | |
| Weight: 109g | |
| Channels: 4 | |
| Battery: 550mAh | |
| Motors: 4 X 3.7V, 2.5-2.6A, 12000rpm | |
| Transmitter Battery: | 6 X AA (not included) |
| Screen: LCD Display | |
| Frequency: 2.4 Ghz | |
| Camera Resolution: | 720P 30FPS |
| Photo: 2MP | |
| Video format: AVI | |
| Photo format: JPG | |
| Memory: Micro SD card | |
FAQ
1 Q.) One of the motors is not spinning.
A.) Make sure that the white cogs on the underside of the motor housing are connected and moving properly. This may require gently pressing in the small cog attached to the motor to ensure that the cogs are aligned correctly.
2 Q.) I cannot attach a USB cable to the camera.
A.) To transfer videos and photos to a computer, please use the Micro SD card reader included.
3 Q.) The Alpha Drone/Transmitter LEDs keep flashing.
A.) The battery in the Alpha Drone or the Transmitter is running low. In either case it is advisable to switch off both devices and restart with fresh/charged batteries.
4 Q.) The drone will not hover in one place.
A.) Try trimming your Alpha Drone using the fine-tuning buttons to counter any instability (Note: The Alpha Drone will become slightly less stable when running low on battery)
5 Q.) What is the word?
A.) The Bird. The Bird is the word.
6 Q.) Footage is jumpy/grainy.
A.) Kaiser Baas recommends that a class 10 SDHC micro SD card, with a capacity of 32GB or lower, is used to capture footage.
Contact Us
Having trouble getting your Drone up?
Please contact us. No question too big or small and we are more than happy to help.
Please visit:
www.kaiserbaas.com/support
Or email:
helpdesk@kaiserbaas.com
For further information please visit:
www.kaiserbaas.com
Tech support:
e: helpdesk@kaiserbaas.com
w: www.kaiserbaas.com/support
p: Australia 1300 302 306
(business hours, AEST)

natural_image
Illustration of a crossed screwdriver and wrench (no text or symbols)
natural_image
Abstract black and white geometric shape resembling a stylized letter K (no text or symbols)KAISER® BAAS


- Languages
- Community
- Contents
- Pre-flight
- Safety Precautions
- Drone Battery Safety
- Warnings concerning the use of the battery
- Flight Equipment
- Drone Schematics
- Rear Profile
- Transmitter Feature Schematics
- Transmitter Screen Schematics
- Set up
- Charging
- Initial Assembly
- Alpha Drone Feet
- Rotor blade guards
- Camera
- Battery
- Transmitter
- Flight Planning
- Take-off Preparation
- Flight Basics
- Manoeuvring
- Indicators
- Modes
- High/Low
- Trimming (fine tuning)
- 360°Flip
- Advanced Flip Mode
- Filming Basics
- Taking photos:
- Shooting video:
- TIP
- Flight Maintenance
- Replacing Rotor Blades
- Specifications
- FAQ
- Contact Us
- KAISER® BAAS
Brand : Kaiser Baas
Model : Alpha Drone
Category : Drone