WP1510 - Weather Station Proove - Free user manual and instructions
Find the device manual for free WP1510 Proove in PDF.


| Product Type | Wireless Rain Gauge with Indoor Thermometer |
| Brand | Proove |
| Model | WP1510 |
| Indoor Temperature Display | Yes |
| Indoor Temperature Range | 0°C to +60°C (32°F to 140°F) |
| Temperature Resolution | 0.1°C |
| Rainfall Data Periods | 1 hour, 24 hours, week, total (since last reset) |
| Rainfall Unit Selection | mm or inch |
| Radio Controlled Time | DCF-77 signal (Germany) with manual time zone setting |
| Time Zone Adjustment | ±12 hours from GMT+1 |
| Calendar Display | Day, month, year |
| Time Format | 12 or 24 hour |
| Wireless Frequency | 433.9 MHz |
| Maximum Transmission Distance | 100 meters (open field) |
| Remote Sensor Water Resistance | IPX3 |
| Remote Sensor Measuring Interval | 48 seconds |
| Base Station Power | 3 x AA alkaline batteries (1.5V) |
| Remote Sensor Power | 2 x AAA alkaline batteries (1.5V) |
| Battery Life | Minimum 12 months for both units |
| Mounting Options | Base station: wall hanging or free standing; rain sensor: screw mounting on flat surface |
Frequently Asked Questions - WP1510 Proove
User questions about WP1510 Proove
0 question about this device. Answer the ones you know or ask your own.
Ask a new question about this device
Download the instructions for your Weather Station in PDF format for free! Find your manual WP1510 - Proove and take your electronic device back in hand. On this page are published all the documents necessary for the use of your device. WP1510 by Proove.
USER MANUAL WP1510 Proove
This manual is part of this product and should be kept in a safe place for future reference. It contains important notes on setup and operation.
INTRODUCTION
Thank you for purchasing this Wireless Rain Gauge. Designed for everyday use, the weather station will prove to be an asset of great value for your personal use in the home or office. Please read this instruction manual thoroughly to fully understand the correct operation of your rain gauge and benefit from its unique feature.
PACKAGE CONTENTS
• 1x Weather station base unit
- 1x Rain Sensor
- Mounting Screws
• Instruction manual
FEATURE
1) Detail display of rainfall data in 1 hour, 24 hour, week and total since last reset (user selectable in inch or mm)
2) Radio controlled time and date with manual setting option
3) Calendar (day-month-year display)
4) Indoor temperature (°C or °F)
5) Time zone setting
6) 12 or 24 hour time mode
7) Wall hanging and free standing
INSTALLATION
Rain Gauge battery install
Note: Please note the polarity when inserting/replacing batteries in the unit, failure to do so may result in permanent damage. Use good quality Alkaline Batteries and avoid rechargeable batteries.
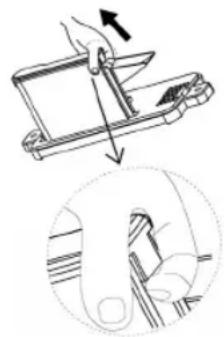
1) Remove rain gauge cover 2) Remove the battery cover 3) Observing the correct polarization
insert 2 "AAA" Alkaline Batteries into the compartment and replace the cover.


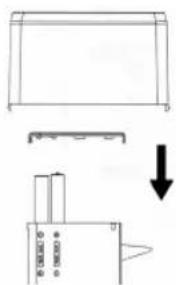
Note: When opening the battery cover make sure that the batteries do not spring free from the contacts since this will cause start and transmission problem.
[ENGLISH] USER MANUAL • ART.NR: WP1510
Indoor receiver battery installs
1) Insert batteries into the indoor receiver. When the base station is powered up, a short beep will sound and all LCD segments will light up for about 4 seconds before it enters into learning mode to learn the sensors security code. Every time the remote sensor is powered up (for example after a change of batteries), a random security code is transmitted and this code must be synchronized with the base station to receive weather data. Thus if battery change happened on remote sensor side, then the base station must be power up again to re-learn the transmitter.
2) Do not press any keys for 10 minutes
3) The receiver will start to search time signal. If there is no time signal found within 70 seconds, the unit will turn off the receiver. If there is time signal received, then the clock will have the radio controlled time icon flashing indicating that the clock is in the time reception progress. Normally within 10 minutes the clock should have the correct time displayed.
4) If no time reception is possible, then manually set the time. The clock will try to make radio controlled time reception every hour. When radio controlled time is received, the radio controlled time icon will be turned on.
5) If your time zone is not at UTC+1:00, then manually set the time zone so that your clock time will be updated correctly after radio controlled time is received.
6) If the clock can't have radio controlled time received after 24 hours, then try to put the clock in a place near window. The clock should not be placed on metal table or near monitor.
Note for Radio Controlled Time:
The time and date display is based on the signal provided by the highly accurate government operated atomic clock. The base station will continue to scan for the radio controlled time signal each day at 2:00, 8:00, 14:00 and 20:00 despite it being manually set. If reception has been unsuccessful, then the radio controlled time icon will not appear but reception will still be attempted continually. If reception has been successful, the received time and date will overwrite the manually set time and date.
Note:
Please participate in the preservation of the environment by properly disposing of all used-up batteries and accumulators at designated disposal points. Never dispose of batteries in a fire as this may cause explosion, risk of fire or leakage of dangerous chemicals and fumes
MOUNTING
Base Station
With one foldable legs at the back of the unit, the base station can be placed onto any flat surface or wall mounted at the desired location by the hanging holes at the back of the unit. It is important to check that the radio signal can be received before permanently mounting any of the units
Remote Sensor
Place the rain gauge in an appropriate location. The rain gauge has a range of 100 meters. Keep in mind that 100 meters RF reception distance is for condition in open air with no obstructions, and rain gauge transmitter sitting one meter above ground. Real-world transmission range will vary depending on what is in the path of the signal. Each obstruction (roof, walls, floors, ceilings, thick trees, etc.) will effectively cut signal range.
The rain gauge must be level to transmit correct readings. It is recommended to mount the rain gauge 1 meter or higher off of the ground. Screw the rain gauge down snugly in the holes provided.
[ENGLISH] USER MANUAL • ART.NR: WP1510
PROGRAM MODE
The base station has two keys for easy operation: RAIN key and SET key. There are two program modes available: Rain Mode and SETTING Mode.
The setting mode will return to normal display mode while key idle 30 seconds.
RAIN MODE
While in normal mode, press RAIN key, 1 hour rainfall record will be displayed. Press RAIN key again, 24 hour rainfall record will be displayed. Press RAIN key the third time, week rainfall record will be displayed. Press RAIN key the fourth time, TOTAL rainfall record will be displayed.
RESET RAIN DATA
Press RAIN key for approx 2 seconds at 1 hour rainfall mode, 1 hour rainfall record will be reset to o. Press RAIN key for approx 2 seconds at 24 hour rainfall mode, 1 hour and 24 hour rainfall record will be reset to o. Press RAIN key for approx 2 seconds at week rainfall mode, 1 hour, 24 hour and week rainfall record will be reset to o. Press RAIN key for approx 2 seconds at TOTAL rainfall mode, 1 hour, 24 hour, week and TOTAL rainfall record will be reset to o.
SETTING MODE
While in normal mode, press the SET key for 2 seconds to enter the following setting modes in the following order:
-
Time Zone Setting
-
The default time zone setting value is o based on Germany DCF time (GMT+1)
• Time zone option +/-12 hours - For countries not at the same time zone area of Germany, it is needed to set the correct time zone so that correct time can be displayed after radio controlled clock time is received successfully (i.e. Great Britain: -1 hour; Denmark, Norway and Sweden: No change necessary; Finland: +1 hour).
| Country Setting | |
| Great Britain - 1 hour | |
| Sweden, Norway & Denmark No change necessary | |
| Finland + 1 hour | |
- 12/24 hour format
- Manual time setting (hours/minutes)
- Calendar setting (in the order of year /month/ day) [after year setting, month and date position can be selected before month and date value to be set]
- Temperature display unit degree Celsius or Fahrenheit
- Rainfall unit mm or inch
In the above setting modes, press RAIN key or MIN/MAX key to change or scrolls the value. Hold the Rain key or MIN/MAX key for 3 second will increase/decrease digits in great steps. Press the SET key to accept the change and advance to the next setting mode. Continue to press the SET key to toggle through the setting mode until return to the normal Mode
[ENGLISH] USER MANUAL • ART.NR: WP1510
TROUBLESHOOTING
No signal from remote sensor
There can be many reasons for this, the following steps should help you troubleshoot this problem.
- Make sure that the batteries in the remote sensor are not depleted.
- Reduce the distance between transmitter and receiver
- Remove the batteries from the base station and the remote sensor and reset the weather station in the right order as described in section 2 of this manual.
- This problem could also be a result of radio interference in your neighborhood, try relocating the sensor and the base station
Remote sensor drops off intermittently
Possible interference from other sources, try relocating the sensor or the base station. Radio device operation on the same frequency can also cause interference.
Temperature is incorrect.
Check/ Replace the batteries. Also make sure that the remote sensor is not place near objects that can act as sources of heat or cold.
SPECIFICATIONS
Outdoor data
Transmission distance in open field: .... 100meter max.
Frequency: 433.9MHz +/-250kHz
Resolution: 0.1°C
Measuring interval remote sensor: ..... 48 sec
Water proof level: IPX3
Current: 15mA (HF transmitting), 10uA(Standby)
Indoor data
Pressure / temperature: 48 sec
Indoor temperature range:....o°C to +60°C
Resolution: 0.1°C
Power consumption
Base station: 3 x AA 1.5V LR6 Alkaline batteries
Remote sensor: 2 x AAA 1.5V LRo3 Alkaline batteries
Battery life: ...... Minimum 12 months for both sensor and base station
TRÅDLÖS REGNMÄTARE MED INNETERMOMETER


- INTRODUCTION
- PACKAGE CONTENTS
- FEATURE
- INSTALLATION
- [ENGLISH] USER MANUAL • ART.NR: WP1510
- INDOOR RECEIVER BATTERY INSTALLS
- NOTE FOR RADIO CONTROLLED TIME
- NOTE
- MOUNTING
- BASE STATION
- REMOTE SENSOR
- PROGRAM MODE
- RAIN MODE
- RESET RAIN DATA
- SETTING MODE
- TROUBLESHOOTING
- SPECIFICATIONS
- TRÅDLÖS REGNMÄTARE MED INNETERMOMETER
Brand : Proove
Model : WP1510
Category : Weather Station