
TE-2101 - Blender Clas Ohlson - Free user manual and instructions
Find the device manual for free TE-2101 Clas Ohlson in PDF.


| Product Type | Blender |
| Model | TE-2101 |
| Brand | Clas Ohlson |
| Power Rating | 350 W |
| Jug Capacity | 1.5 L |
| Speed Settings | 2 speeds + pulse |
| Blade Material | Stainless steel |
| Jug Material | Plastic (BPA-free) |
| Dimensions (W x D x H) | 16 x 16 x 38 cm |
| Weight | 1.8 kg |
| Power Cord Length | 1.0 m |
| Safety Features | Overheating protection, non-slip feet |
| Cleaning | Removable jug and lid (dishwasher safe) |
| Ice Crushing | Yes, with pulse function |
| Spare Parts Available | Replacement jug, blade unit, and lid |
| Warranty | 2 years |
Frequently Asked Questions - TE-2101 Clas Ohlson
User questions about TE-2101 Clas Ohlson
0 question about this device. Answer the ones you know or ask your own.
Ask a new question about this device
Download the instructions for your Blender in PDF format for free! Find your manual TE-2101 - Clas Ohlson and take your electronic device back in hand. On this page are published all the documents necessary for the use of your device. TE-2101 by Clas Ohlson.
USER MANUAL TE-2101 Clas Ohlson
natural_image
Line drawing of a blender with handle and spout (no text or symbols)Art.no
18-4590-1, -2, -3 TE-2101-UK
34-1643-1, -2, -3 TE-2101
Model
Ver. 20141103
Blender 2 Go
Art.no 18-4590-1, -2, -3 Model TE-2101-UK
34-1643-1, -2, -3 TE-2101
Please read the entire instruction manual before using the product and then save it for future reference. We reserve the right for any errors in text or images and any necessary changes made to technical data. In the event of technical problems or other queries, please contact our customer services.
Safety
- Never use the blender for longer than 1 minute at a time. Switch the blender off and let the motor cool down for a minute before using it again.
- Incorrect handling of this blender could result in personal injury.
- Great care should be exercised when handling and cleaning the blade and the beaker. The blade is very sharp.
- The blender should always be disconnected from the mains when it is not in use, when it is to be assembled/disassembled and when it is to be cleaned.
- The blender must not be used by children. Ensure that the blender and its mains lead are kept out of children's reach.
- The blender must only be used with the included motor unit.
- NOTE: Ensure that the blender is switched off before the beaker is removed from the motor unit.
- Wash the beaker, cutter blade, other chopping attachments and lid with warm soapy water.
-
Switch the blender off and disconnect it from the mains before removing the blade or any of the moving parts.
-
The blender may be used by persons with reduced physical, sensory or mental capability, lack of experience or knowledge which could jeopardise their safety, provided they have been instructed in the safe use of the blender and understand the hazards involved.
- Never let children play with the blender.
- Ensure that the blender is used with the correct voltage. Refer to the rating plate on the blender.
- Always remove the beaker from the motor unit before cleaning. The blade is extremely sharp and could cause serious personal injury if the blender were to start accidentally.
- To prevent electric shocks, the blender and its mains lead should always be kept dry.
- Never lay the mains lead over hot surfaces, sharp edges or corners.
- Always disconnect the blender from the power supply by holding and pulling the plug. Do not pull the mains lead.
- Make sure that all parts are correctly assembled and that the blender is switched off before it is connected to the power supply.
- Never operate the blender without food in the beaker.
- Never use the blender close to heat sources.
- Only use the provided accessories.
- Never use the blender for anything other than its intended use.
- The mains lead should be checked regularly. Never use the blender if the mains lead or plug is damaged.
- The mains lead must be changed if damaged. This is to prevent the risk of electric shock or fire and should only be carried out by the manufacturer, qualified service facility or qualified technician.
Buttons and functions
- Non-spill lid
- Beaker
- Blade
- Motor unit
- Blend button
- Mains lead
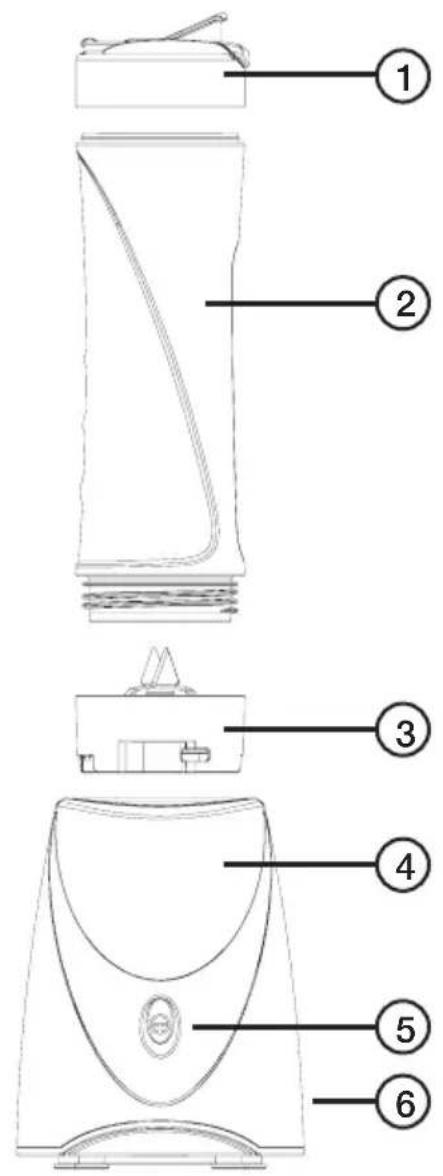
Getting started
Thoroughly clean all parts before using the blender for the first time. Refer to the Care and maintenance section.
Operating instructions
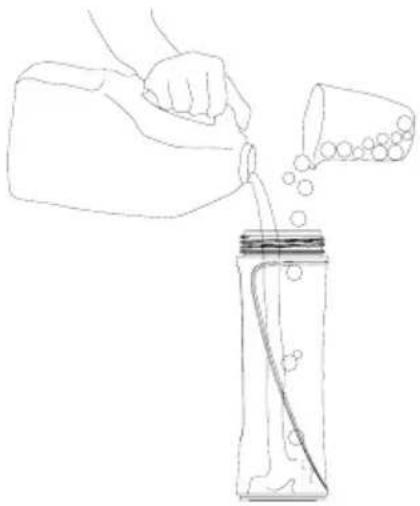
NOTE: Never fill the beaker with ingredients hotter than 80 °C.
natural_image
Line drawing of a hand pouring liquid from a bottle into a glass jar with bubbles (no text or symbols)- Place the beaker on a level surface and fill with ingredients. Never exceed the maximum level (500 ml).
natural_image
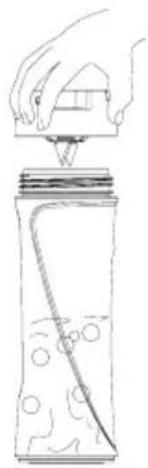
Hand pouring liquid into a bottle with bubbles, no text or symbols present- Screw the blade onto the top of the beaker.
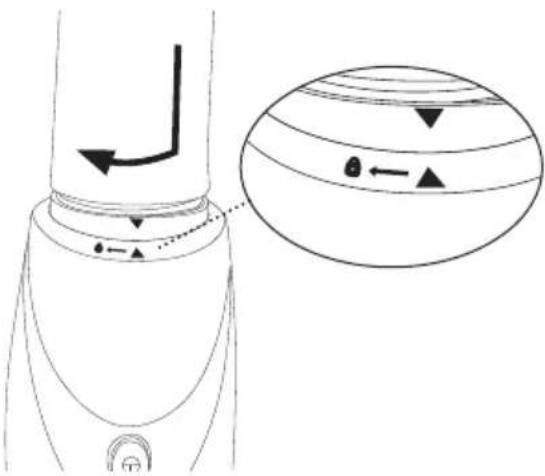
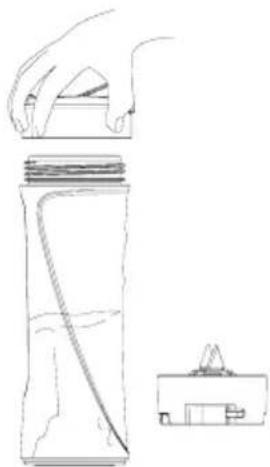
- Turn the beaker upside down and screw the blade attachment onto the motor unit.
natural_image
Line drawing of a hand holding a container with a handle, alongside a separate view of a small object (no text or symbols)- Depress the Blend button to start the blender. The blender will stop when the button is released. When you have finished blending, detach the beaker and blade assembly from the motor unit. Turn the beaker the right way up and unscrew the blade. You can now fit the non-spill lid onto the beaker.
Care and maintenance
- Always unplug the blender before cleaning it.
- Never immerse the motor unit into water. Clean it by wiping it with a soft damp cloth.
- Empty the beaker, fill it with water, place it onto the motor unit and press the Blend button briefly several times.
- Empty the beaker, wash it and dry it.
Disposal
This product should be disposed of in accordance with local regulations. If you are unsure how to proceed, contact your local council.
Specifications
Mains supply 220–240 V AC, 50 Hz
Wattage 250 W
Glass beaker 0.5 l
Max operating time 1 minute continuously, then the motor should be allowed to cool
Blender 2 Go
Art.nr 18-4590-1, -2, -3 Modell TE-2101-UK
34-1643-1, -2, -3 TE-2101
Att komma igång
natural_image
Line drawing of a hand pouring liquid from a container into a bottle filled with bubbles (no text or symbols)natural_image
Line drawing of a hand pouring liquid into a bottle with a submerged object (no text or symbols)natural_image
Line drawing of a hand holding a container with a handle, next to a small inset image of a device (no text or symbols)Kom i gang
natural_image
Line drawing of a hand pouring liquid from a bottle into a glass jar with bubbles (no text or symbols)natural_image
Line drawing of a hand pouring liquid into a bottle with a thermometer (no text or symbols)natural_image
Line drawing of a hand holding a container with a handle, alongside a separate diagram showing a mechanical component (no text or symbols)Käytön aloittaminen
natural_image
Line drawing of a hand pouring liquid from a container into a bottle (no text or symbols)natural_image
Line drawing of a hand pouring liquid into a bottle with a submerged object (no text or symbols)natural_image
Line drawing of a hand holding a container with a handle, alongside a separate view of a device (no text or symbols)Erste Schritte
natural_image
Line drawing of a hand pouring liquid from a bottle into a glass jar with bubbles (no text or symbols)natural_image
Line drawing of a hand pouring liquid into a bottle with a thermometer (no text or symbols)natural_image
Line drawing of a hand holding a container with a handle, next to a small container and a small bracket (no text or symbols)Postal 10 – 13 Market Place
Kingston Upon Thames
Surrey
KT1 1JZ
Deutschland
Brand : Clas Ohlson
Model : TE-2101
Category : Blender