
Nomad 06012 - Frying Pan Presto - Free user manual and instructions
Find the device manual for free Nomad 06012 Presto in PDF.


| Product Type | Slow Cooker |
| Brand | Presto |
| Model | Nomad 06012 |
| Capacity | 6 quarts (estimated) |
| Dimensions (approximate) | 16 x 10 x 12 inches |
| Weight (approximate) | 9 lbs |
| Power Consumption | 200W (estimated) |
| Voltage | 120 VAC |
| Cord Length | Short, approximately 2 feet |
| Material | Cool-touch plastic housing, glass cover, anodized aluminum cooking pot with nonstick finish |
| Temperature Settings | HIGH, LOW, WARM |
| Cooking Functions | Slow cooking |
| Special Features | Dry erase board and marker, removable utensil holder, locking lid, swing-up carrying handle, built-in cord storage, condensation collector |
| Cleaning Instructions | Removable cooking pot: dishwasher safe (may discolor); cover: hand wash with damp cloth, do not immerse; base: wipe with damp cloth; do not use abrasive cleaners |
| Safety Features | Polarized plug, cool-touch housing, locking lid, automatic shut-off when turned to OFF |
| Accessories Included | Removable cooking pot, cover, utensil holder with silicone cord, dry erase marker with eraser |
| Warranty | 1-year limited warranty |
| Intended Use | Household use only; not for commercial or vehicle use |
| Spare Parts and Repairability | Genuine Presto parts available; service via Presto Factory Service Department; do not attempt to repair yourself |
| Notable Certifications | UL Listed (implied from manual) |
Frequently Asked Questions - Nomad 06012 Presto
User questions about Nomad 06012 Presto
0 question about this device. Answer the ones you know or ask your own.
Ask a new question about this device
Download the instructions for your Frying Pan in PDF format for free! Find your manual Nomad 06012 - Presto and take your electronic device back in hand. On this page are published all the documents necessary for the use of your device. Nomad 06012 by Presto.
USER MANUAL Nomad 06012 Presto
- Ideal for slow-cooking foods and taking them on the road. Also great for buffets.
- Unique "picnic cooler-style" design with cool-touch housing and swing-up handle make carrying easy.
- Locking lid seals tight for spill-proof transportation.
- Dry erase board and marker for messages.
The stock number is the first five digits of the model number.
INSTRUCTIONS
©2020 National Presto Industries, Inc.
This is a Listed appliance. The following important safeguards are recommended by most portable appliance manufacturers.
IMPORTANT SAFEGUARDS
To reduce the risk of personal injury or property damage when using electrical appliances, basic safety precautions should always be followed, including the following:
- Read all instructions.
- Do not touch hot surfaces. Use handles or knobs.
- To protect against the risk of electrical shock, do not immerse cord, plug, or slow cooker base in water or other liquid.
- To avoid electrical shock, cook only in the provided cooking pot. Never exceed the MAX fill level.
-
Close supervision is necessary when any appliance is used by or near children.
-
WARNING! Spilled food can cause serious burns. Keep appliance and cord away from children. Never drape cord over edge of counter or table. Never plug cord into outlet below counter or use with an extension cord. Do not let cord touch hot surfaces.
- Unplug from outlet when not in use and before cleaning. Allow unit to cool before putting on or taking off parts and before cleaning the appliance.
- Do not operate any appliance with a damaged cord or plug or in the event the appliance malfunctions or is dropped or damaged in any manner. Return the appliance to the Presto Factory Service Department for examination, repair, or electrical or mechanical adjustment.
- The use of accessory attachments not recommended by the appliance manufacturer may cause injuries. Use only genuine Presto® accessories or replacement parts.
- Intended for countertop use only.
- Do not use outdoors.
- Do not place on or near a hot gas or electric burner or in a heated oven.
- Extreme caution must be used when moving an appliance containing hot oil or other hot liquids.
- To disconnect, turn control to OFF, then remove plug from wall outlet.
- Do not use the appliance for other than intended use.
SAVE THESE INSTRUCTIONS
THIS APPLIANCE IS FOR HOUSEHOLD USE ONLY.
Important Cord and Plug Information
This appliance has a polarized plug (one blade is wider than the other). To reduce the risk of electric shock, this plug is intended to fit into a polarized outlet only one way. If the plug does not fit fully into the outlet, reverse the plug. If it still does not fit, contact a qualified electrician. Do not attempt to modify the plug in any way.
A short power supply cord is provided to reduce the risk of becoming entangled in or tripping over a longer cord. DO NOT USE WITH AN EXTENSION CORD.
Connect the power supply cord to a 120VAC electrical outlet only. To avoid risk of draining vehicle battery or blowing a vehicle fuse, do not plug slow cooker into vehicle AC outlet.
Before First Use
- Remove all packing material and become familiar with the slow cooker (Fig. A).
- Read the instructions carefully before use.
- Clean the cover with a damp, soapy cloth. Do not immerse the cover in water. Wash the removable cooking pot and utensil holder in warm, soapy water. Rinse and dry thoroughly. (See below for instructions on removing the utensil holder from the cover.)
CAUTION! To avoid electrical shock, never pour water into the slow cooker base or immerse it or the power cord in water. Always be sure the cooking pot is completely dry before placing it back in the slow cooker base.
CAUTION! This appliance is not intended to melt wax, gels, plastics, glue, or other materials for making candles or for other hobbyist activities, or in any commercial or business application. Using this product for purposes different from those specified in this instruction manual may cause serious bodily injury or damage to the product.
Features of the Nomad® Slow Cooker
- Dry erase board and marker. Use to identify or describe the food in the slow cooker. Any markings made on the board can simply be removed with the craser on the marker cap. To extend the life of the marker, make sure the cap is always tightly closed.
Remove dry erase marker from the holder on the front of the slow cooker before cooking. If the marker is left in the holder during cooking, it may not write. Should this occur, position the marker flat on the counter and allow it to cool. Usually, after 2 to 3 hours, the marker will write again.

Always erase the board prior to storing the slow cooker. Remove ghosting or smudging with a commercially available whiteboard cleaner or rubbing alcohol. Be sure to use only dry erase markers on the board.
- Removable utensil holder. Easily lift from the cover and use as a spoon rest. When the utensil holder is removed, the viewing area to monitor cooking is enlarged.
To remove the utensil holder, first position the unit so the control is facing you. Next, move the carrying handle to the unlocked position, either toward the front or the back. Then, lift up on the right side of the utensil holder and remove it from the cover (Fig. B). If desired, remove the silicone cord before resting a utensil on the holder.
To reattach the silicone cord to the utensil holder, put the cord on top of the holder. Fit the cord under one set of tabs, twist the cord once, then stretch it and secure the cord under the other set of tabs (Fig. A).
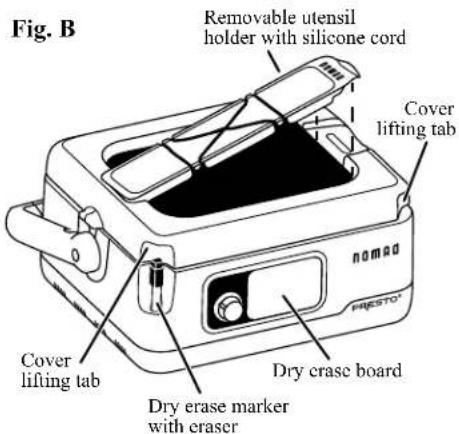
If carrying a serving utensil when traveling with the slow cooker, secure the utensil holder to the cover. Insert the large tab on the utensil holder, opposite the NOMAD ^ logo, into the slot on the left side of the cover frame. Firmly push down on the NOMAD ^ logo until the holder snaps into place. Position the utensil under the silicone cord (Fig. A, page 2).
- Convenient cord storage. After cooking, push the cord into the built-in cord storage port on the back of the unit, and then secure the cord end in the clip (Fig. C).
How to Use
- Place the slow cooker on a dry, level surface so the temperature control knob is facing out. Pull the cord out of the built-in cord storage port on the back of the unit (Fig. C).
- Lift the cover open and verify the cooking pot is in place. Also, be sure the condensation collector is in position (Fig. D).
CAUTION! To avoid electrical shock, never add water directly into the slow cooker base or cook without the removable cooking pot in place.
- Prepare food according to the recipe and place into the cooking pot. See the sample recipes on pages 5 and 6. For best results, fill the cooking pot at least half full. Do not fill above the MAX fill level indicated in the cooking pot (Fig. A, page 2).


The cooking pot features a nonstick finish. To help protect this surface, use heat-resistant nylon, plastic, or wooden utensils. Do not use metal utensils as they may scratch the nonstick finish.
- Plug the slow cooker into a 120VAC electrical outlet only and turn the temperature control knob to the desired setting (HIGH or LOW). The WARM setting is not to be used for cooking. Use the WARM setting only after food has been cooked.
NOTE: Initially you may notice condensation on the cover glass. As cooking continues, the condensation may subside or disappear altogether, even though the unit is still on. This is normal.
- Close the cover and position the handle so it is toward the back of the unit.
- Cook food for the time specified in the slow cooker recipe. However, if the quantity of a slow cooker recipe has been reduced so that it does not fill the cooker half full, check for doneness 1 to 2 hours earlier than stated in the recipe.
CAUTION! Steam may escape when opening the cover. To prevent burns, stand to one side of the unit and lift the cover open using one of the cover lifting tabs (Fig. B, page 2). Do not touch the glass window or cooking pot, as they will be hot.
NOTE: Avoid lifting the cover during cooking. This will cause significant heat loss, prolonging the cooking time.
- When cooking is complete, turn the temperature control to the WARM setting until ready to serve food.
If prepared food is not being served directly from the slow cooker, or if transporting food in the slow cooker, turn the temperature control to OFF and unplug from the electrical outlet.
CAUTION! To protect against the risk of electrical shock, do not allow condensation from the cover to drip into the base when the cooking pot is removed. Be sure to thoroughly dry the inside of the cover, including the gasket, before closing the cover.
Traveling with your Slow Cooker
• Always transport your slow cooker using the carrying handle. Lift the carrying handle to the vertical position to lock the cover securely in place and to prevent spills. Also, empty the condensation collector before traveling (Fig. D).
- IMPORTANT: Never fill above the MAX fill level indicated in the cooking pot (Fig. A, page 2).
- When transporting the slow cooker, push the cord into the built-in cord storage port on the back of the unit, and then secure the cord end in the clip (Fig. D).
CAUTION! The slow cooker is intended for household use only. It should not be used in vehicles. Electrical systems in vehicles vary. Although probably not an issue if the slow cooker were set to WARM, if set to either HIGH or LOW and plugged into a vehicle's charging port or outlet, it could drain the battery, blow a fuse, or even damage the vehicle's electrical system. Likewise, if the vehicle's windows are left open in the rain, the slow cooker may get wet, and it may no longer be safe to use.
Care and Cleaning
- Remove plug from wall outlet and allow slow cooker to cool completely before cleaning.
- Wash the removable cooking pot in warm water and a mild detergent. Rinse and dry thoroughly.
The cooking pot may be washed in the dishwasher; however, because it is made of anodized aluminum, the outside of the pot will discolor due to the caustic nature of the dishwashing detergent.
Do not use steel wool scouring pads or abrasive cleaners on any part of the slow cooker.
NOTICE: Always make sure the cooking pot is completely dry before placing it back into the slow cooker base. Placing a wet cooking pot into the slow cooker base may damage the unit and cause it to malfunction.
- Remove the utensil holder from the cover and detach the silicone cord. Wash the cord and holder in warm, soapy water.
- Remove the cover by lifting it to an upright position and then straight up off the cooker base. Do not immerse the cover in water or wash it in a dishwasher. Clean the cover, including the gasket, with a damp, soapy cloth. Be sure to also clean under the grommet in the glass window. If necessary, clean the center of the grommet with a Q-tip* cotton swab.
If you accidentally immerse the cover, you will need to dry the cover in a vertical position with the hinges resting on the counter. This will allow water to drain out. Once the cover is thoroughly dry, reattach it to the cooker base. Reattach the utensil holder.
- Wipe the slow cooker base with a soft, damp cloth to clean.
CAUTION! To avoid electrical shock, never immerse the slow cooker base in water or other liquid or wash it in a dishwasher.
- Pull the condensation collector out from the back of the slow cooker base (Fig. D, page 3). It collects condensation from the slow cooker cover when the cover is opened. Empty any moisture that has collected. Wash the collector and reinsert it into the slow cooker base.
- Push the cord into the port on the back of the unit for convenient storage. Secure the end of the cord in the clip (Fig. D, page 3).
- To prevent unpleasant odors from lingering, store the slow cooker with the carrying handle in the unlocked position and the cover detached. Place the cover on the slow cooker base so the hinges rest on the hinge slots (Fig. A, page 2). Another option is to place a folded dish cloth between the cover and base so the cover is slightly open.
Cover Care and Use Instructions
CAUTION! The glass in your cover may break for no apparent reason if you fail to follow these instructions. Broken glass can cause personal injury or property damage. Do not use cover if the glass is chipped or cracked. Handle cover carefully and avoid rough handling.
Do not handle hot cover with a wet towel or place hot cover on a cold or wet surface. Sudden extreme changes in temperature may cause glass to break. Allow cover to cool before cleaning. Do not scrape or gouge glass with hard or sharp utensils or clean with steel wool or abrasive powders which can scratch or weaken the glass.
Tips for Successful Slow Cooking
- Browning meat and sautéing aromatic ingredients, such as onions and garlic, in a skillet prior to slow cooking is worth the extra time. The flavor and appearance of the finished dish will be enhanced by this step. Additionally, browning will allow excess fat to be drained from the meat before placing it in the slow cooker.
Browning is also important, from a food safety standpoint, when slow cooking large pieces of meat. Browning will increase the temperature of the meat and destroy surface bacteria that are most likely to be present on large cuts of meat. - Avoid opening the cover during cooking. This will cause the temperature inside the slow cooker to drop as much as 15 degrees, resulting in longer cooking time. To view food without opening the cover, lightly tap the cover window to remove any condensation that may have formed.
- A slow cooker prevents the loss of the moisture that develops as the food cooks. Therefore, when converting a favorite recipe for slow cooking, reduce the liquid by 25 to 50 percent.
- Thaw frozen food before placing in the slow cooker.
- Vegetables such as carrots, celery, turnips, and potatoes cook slower than meat; therefore, put them on the bottom of the cooking pot.
- For uniform cooking, cut dense vegetables, such as carrots, potatoes, and turnips into similar-size pieces. Dense vegetables should be cut into smaller pieces than more tender vegetables.
-
Milk and other dairy products, seafood and fish, fresh herbs, and delicate vegetables do not hold up well under heat for long periods of time. These ingredients should be added 30 minutes to 1 hour before the end of cooking.
-
If the quantity of a slow cooker recipe has been reduced so that it does not fill the cooker half full, check for doneness 1 to 2 hours earlier than stated in the recipe.
- Test food doneness with an accurately calibrated food thermometer. Insert the thermometer into the thickest part of the meat, away from the bone. The safe internal temperature for poultry is 165^ and for beef, pork, and lamb, is 160^ .
Slow Cooking Recipes
Southwest Chicken Soup
| 4 boneless, skinless chicken breasts, cooked and shredded | 1 cup chopped onion |
| 1 red pepper, cut into 12 -inch pieces | |
| 2 cups vegetable broth | 1 jalapeño pepper, chopped |
| 1 can (28 ounces) enchilada sauce | 2 cloves garlic, minced |
| 1 can (16 ounces) pinto beans, drained | 1 tablespoon chili powder |
| 1 can (14 to 15 ounces) diced tomatoes | 1 teaspoon cumin |
| 1 cup fresh whole kernel corn | Avocado slices for serving |
| 1 can (4 ounces) chopped green chilies | Tortillas chips for serving |
Add chicken, broth, enchilada sauce, beans, tomatoes, corn, chilies, onion, peppers, garlic, chili powder, and cumin to cooking pot in slow cooker base. Close cover. Cook on LOW 6 to 8 hours or on HIGH 3 to 5 hours. Serve with avocado slices and tortilla chips.
12 servings (serving size: 1 cup)
NOTE: This recipe can be increased by 1½ times for use in the 8-quart slow cooker.
Firefighter's Chili
| 1 pound ground mild or hot Italian sausage | 4 cloves garlic, minced |
| 1 pound lean ground beef | 4 tablespoons chili powder* |
| 4 cans (14 to 15 ounces) diced tomatoes | 2 tablespoons honey |
| 2 cans (16 ounces) pinto beans, drained | 12 teaspoon dried red pepper flakes |
| 1 cup dry red wine | 12 teaspoon celery seed |
| 1 cup beef broth | 12 teaspoon hot sauce |
| 23 cup Worcestershire sauce | Salt and pepper |
| 23 cup chopped onion |
Brown sausage and ground beef in a large skillet, stirring to break up any large pieces. Drain off excess fat. Transfer meat mixture to cooking pot in slow cooker base. Add tomatoes, beans, wine, broth, Worcestershire sauce, onion, garlic, chili powder, honey, red pepper flakes, celery seed, and hot sauce. Close cover. Cook on LOW 8 to 10 hours or on HIGH 4 to 6 hours. Season to taste with salt and pepper.
14 servings (serving size: 1 cup)
NOTE: This recipe can be increased by 1½ times for use in the 8-quart slow cooker.
* The amount of chili powder can be increased, as desired, for spicier chili.
Baked Beans
| 4 cups dried great northern beans | 1 can (14 to 15 ounces) tomato sauce |
| 12 cups water | 14 cup plus 2 tablespoons molasses |
| ...... | 14 cup brown sugar |
| 1 large onion, chopped | 2 teaspoons dry mustard |
| 1 pound bacon, fried and crumbled |
Soak beans 8 hours to overnight in a large pot. Drain and cover beans with fresh water. Bring to a boil, reduce heat, and simmer for 30 minutes. Drain the beans, reserving 3½ cups of cooking water. Add onion, bacon, and drained beans to cooking pot in slow cooker base. Combine tomato sauce, molasses, brown sugar, and mustard in a small bowl; pour over beans. Add reserved cooking water. Close cover. Cook on HIGH 9 to 11 hours.
18 servings (serving size: 23 cup)
NOTE: This recipe can be doubled for use in the 8-quart slow cooker.
Italian Pot Roast
| 1 medium onion, chopped | 12 teaspoon salt |
| 3 to 4 carrots, cut into 12 -inch pieces | 14 teaspoon black pepper |
| 2 to 3 ribs celery, cut into 12 -inch pieces | 1 bay leaf |
| 4 ounces sliced mushrooms | 1 can (14 to 15 ounces) diced tomatoes |
| 1 tablespoon vegetable oil | 14 cup plus 2 tablespoons tomato paste |
| 1 3- to 4-pound blade or center cut chuck roast | 12 teaspoon dried basil |
Add onion, carrots, celery, and mushrooms to cooking pot in slow cooker base. Heat oil in a medium skillet over medium high heat. Sprinkle both sides of roast with salt and pepper. Brown roast on all sides. Place roast in cooking pot on top of vegetables. Place bay leaf on roast. In a small bowl, combine tomatoes, tomato paste, and basil; pour over roast. Close cover. Cook on LOW 8 to 10 hours or on HIGH 5 to 7 hours.
9–12 servings (serving size: 4 ounces)
NOTE: This recipe can be increased by 1½ times for use in the 8-quart slow cooker.
Stuffed Apples
| 14 cup plus 2 tablespoons golden raisins | 34 teaspoon ground cinnamon |
| 34 cup dry red wine | 6 cooking apples (Cortland, Empire, Golden Delicious) |
| 14 cup plus 2 tablespoons chopped nuts | |
| 3 tablespoons sugar | 2 tablespoons butter, divided into six pieces |
| 34 teaspoon grated orange rind |
Soak raisins in wine for at least 30 minutes. Drain, reserving the wine. Combine raisins, nuts, sugar, orange rind, and cinnamon. Core apples, cutting to but not through the bottoms. Pare top one-third of apples. Fill apple centers with raisin mixture. Place apples in cooking pot in slow cooker base. Top each with butter. Pour reserved wine over the apples. Close cover. Cook on LOW 2 to 3 hours. 6 servings
NOTE: Use this recipe as is for both 6- and 8-quart slow cookers.
Consumer Service Information
If you have any questions regarding the operation of your Presto® appliance or need parts for your appliance, contact us by any of these methods:
- Call 1-800-877-0441 weekdays 8:00 AM to 4:00 PM (Central Time)
- Email us through our website at www.GoPresto.com/contact
• Write: National Presto Industries, Inc.
Consumer Service Department
3925 North Hastings Way, Eau Claire, WI 54703-3703
Inquiries will be answered promptly by telephone, email, or letter. When emailing or writing, please include a phone number and a time when you can be reached during weekdays if possible.
When contacting the Consumer Service Department, please indicate the model and series numbers for the slow cooker. These numbers can be found on the bottom of the slow cooker.
Please record this information:
Model ____ Series ____ Date Purchased ____
The Presto Factory Service Department is equipped to service all Presto® appliances and supply genuine Presto® parts. Genuine Presto® replacement parts are manufactured to the same exacting quality standards as Presto® appliances and are engineered specifically to function properly with its appliances. Presto can only guarantee the quality and performance of genuine Presto® parts. “Look-alikes” might not be of the same quality or function in the same manner. To ensure that you are buying genuine Presto® replacement parts, look for the Presto® trademark.
Canton Sales and Storage Company
Presto Factory Service Department
555 Matthews Drive
Canton, MS 39046-3251
Product Registration
IMPORTANT: Please go online and register this product within ten days of purchase. Proper registration will serve as proof of purchase in the event your original receipt becomes misplaced or lost. Registration will not affect warranty coverage, but it may expedite the processing of warranty claims. The additional information requested will help us develop new products that best meet your needs and desires. To register your product, visit www.GoPresto.com/registration or simply scan this QR code. If you do not have computer access, call the Consumer Service Department at 1-800-877-0441.

Presto® Limited Warranty
(Applies only in the United States)
This quality Presto® appliance is designed and built to provide many years of satisfactory performance under normal household use. Presto pledges to the original owner that should there be any defects in material or workmanship during the first year after purchase, we will repair or replace it at our option. Our pledge does not apply to damage caused by shipping. Outside the United States, this limited warranty does not apply.
To obtain service under the warranty, please call our Consumer Service Department at 1-800-877-0441. If unable to resolve the problem, you will be instructed to send your Presto® appliance to the Presto Factory Service Department for a quality inspection; shipping costs will be your responsibility. When returning an appliance, please include your name, address, phone number, and the date you purchased the appliance as well as a description of the problem you are encountering with the appliance.
We want you to obtain maximum enjoyment from using this Presto® appliance and ask that you read and follow the instructions enclosed. Failure to follow instructions, damage caused by improper replacement parts, abuse, misuse, disassembly, alterations, or neglect will void this pledge. This warranty gives you specific legal rights, and you may also have other rights which vary from state to state. This is Presto's personal pledge to you and is being made in place of all other express warranties.
National Presto Industries, Inc.
Eau Claire, WI 54703-3703
Form 4010-143E


- INSTRUCTIONS
- IMPORTANT SAFEGUARDS
- SAVE THESE INSTRUCTIONS
- THIS APPLIANCE IS FOR HOUSEHOLD USE ONLY.
- Important Cord and Plug Information
- Before First Use
- Features of the Nomad® Slow Cooker
- How to Use
- Traveling with your Slow Cooker
- Care and Cleaning
- Cover Care and Use Instructions
- Tips for Successful Slow Cooking
- Slow Cooking Recipes
- Italian Pot Roast
- Stuffed Apples
- Consumer Service Information
- Product Registration
- Presto® Limited Warranty
- (Applies only in the United States)
Brand : Presto
Model : Nomad 06012
Category : Frying Pan