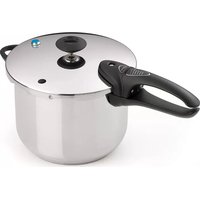
01365 - Frying Pan Presto - Free user manual and instructions
Find the device manual for free 01365 Presto in PDF.


| Product Type | Frying Pan |
| Brand | Presto |
| Model | 01365 |
| Material | Aluminum with non-stick coating |
| Diameter | 28 cm (11 inches) |
| Height | 5 cm (2 inches) |
| Weight | 0.8 kg (1.76 lbs) |
| Handle Type | Bakelite handle with silicone grip |
| Compatible Cooktops | Gas, electric, ceramic, induction (if ferrous base) |
| Oven Safe | Up to 180°C (356°F) with handle removed |
| Dishwasher Safe | Hand wash recommended to preserve non-stick coating |
| Main Functions | Frying, sautéing, searing, shallow frying |
| Care and Cleaning | Hand wash with soft sponge; avoid abrasive cleaners; dry immediately |
| Safety Features | Cool-touch handle; stable base; coating free of PFOA and lead |
| Spare Parts Available | Replacement handles and lids (sold separately) |
| Repair Information | Contact Presto customer service for authorized repair centers |
| Warranty | 2 years limited warranty |
| Included Accessories | Presto 01365 pan only; lid not included |
| Country of Origin | China |
Frequently Asked Questions - 01365 Presto
User questions about 01365 Presto
0 question about this device. Answer the ones you know or ask your own.
Ask a new question about this device
Download the instructions for your Frying Pan in PDF format for free! Find your manual 01365 - Presto and take your electronic device back in hand. On this page are published all the documents necessary for the use of your device. 01365 by Presto.
USER MANUAL 01365 Presto
6-Quart Stainless Steel Pressure Cooker Instructions and Recipes
©2013 National Presto Industries, Inc.

natural_image
Line drawing of a cooking pot with lid and handle, no text or symbols presentVisit us on the web at www.gopresto.com
This is a Listed appliance. The following Important Safeguards are recommended by most portable appliance manufacturers.
IMPORTANT SAFEGUARDS
To reduce the risk of personal injury or property damage, basic safety precautions should always be followed, including the following:
- Read all instructions.
- Be sure that handles are assembled and fastened properly before using this appliance (see pages 2 and 3). Cracked, broken, or charred handles should be replaced.
- Always check the vent pipe before use. Hold cover up to light and look through vent pipe to be certain it is clear.
- Always check the air vent/cover lock to be sure it moves freely before use.
- Do not fill pressure cooker over 13 full. For soup, grains, and dry beans and peas which expand during cooking, do not fill cooker over 12 full. Overfilling may cause a risk of clogging the vent pipe and developing excess pressure. See food preparation instructions.
- Do not pressure cook applesauce, cranberries, rhubarb, cereals, pastas, split peas, dried soup mixes, or any dry beans and peas which are not listed in the table on page 21. These foods tend to foam, froth, and sputter and may block the vent pipe, pressure relief valve, overpressure plug, and air vent/cover lock.
- This appliance cooks under pressure. WARNING! Improper use may result in scalding injury. Make certain pressure cooker is properly closed before operating; cover handle must be directly above the body handle. See the "HOW TO USE" section.
- Do not place the pressure cooker or attempt to pressure cook in a heated oven.
- Extreme caution must be used when moving a pressure cooker containing hot liquids. Do not touch hot surfaces. Use handles or knobs.
- Do not open pressure cooker until the unit has cooled and all internal pressure has been released, air vent/cover lock has dropped, and no steam escapes when the pressure regulator is removed. If the handles are difficult to push apart, this indicates that the cooker is still pressurized; do not force it open. Any pressure in the cooker can be hazardous. See the "HOW TO USE" section.
- To ensure safe operation and satisfactory performance, replace the overpressure plug every time you replace the sealing ring or sooner if it becomes hard, deformed, cracked, worn, or pitted. It is recommended that the sealing ring and overpressure plug be replaced at least every two years.
- Close supervision is necessary when the pressure cooker is used near children. It is not recommended that children use the pressure cooker.
- When normal operating pressure is reached, the pressure regulator will begin to rock. Gradually lower the heat to maintain a slow, steady rocking motion. If the pressure regulator is allowed to rock vigorously excess steam will escape, liquid will be evaporated, food may scorch, and the cooker may be damaged.
- WARNING! Do not use pressure cooker on an outdoor LP gas burner or gas range over 12,000 BTU's.
- Do not use this pressure cooker for other than intended use.
- Do not use this pressure cooker for pressure frying with oil.
SAVE THESE INSTRUCTIONS
THIS PRODUCT IS FOR HOUSEHOLD USE ONLY.
TABLE OF CONTENTS
| Important Safeguards | 1 | Seafood | 11 |
| Introduction | 2 | Poultry | 13 |
| Handle Installation | 2 | Meats | 15 |
| Getting Acquainted | 3 | Vegetables | 19 |
| How to Use | 4 | Dry Beans and Peas | 21 |
| Important Safety Information | 5 | Grains | 22 |
| Cleaning | 6 | Desserts | 23 |
| Care and Maintenance | 7 | Recipe Index | 25 |
| Helpful Hints | 7 | Service and Parts Information | 26 |
| Questions and Answers | 8 | Warranty | 26 |
| Soups and Stocks | 9 |
INTRODUCTION
Welcome to the world of pressure cooking. With your new Presto ^2 Pressure Cooker, you'll discover how fast and easy it is to prepare a wide variety of delicious foods, especially foods that emphasize good health and nutrition along with good taste.
The pressure cooker is perfect for the way we live and eat today. It's ideal for preparing many of the lighter foods that help keep us healthy and fit. It preserves flavors and nutrients, tenderizes meat and, best of all, it cooks foods three to ten times faster than ordinary cooking methods. And it's even possible to cook several foods in the pressure cooker at the same time without the flavors intermingling.
We have included recipes for some traditional family favorites that are especially well suited to the many advantages of pressure cooking. For your convenience, we have also provided nutritional information for all of the recipes in this book.
To help get started with your new pressure cooker, be sure to read the "GETTING ACQUAINTED" section on page 3.
HANDLE INSTALLATION
Tools Required: Phillips type screwdriver
NOTE: The pressure cooker handles can be found inside the pressure cooker body in individual plastic bags.
To Attach Body Handle to Cooker Body
- Locate bag containing long body handle. This is the long handle that has one screw hole. Take out handle and remove tape on handle which is holding screw in place. Remove screw from handle and set aside.
- For easier handle installation, position cooker body upside down so the bracket identified with the sticker "attach stick handle here" extends over edge of counter slightly. The model number is also on this side of the cooker.
- Position long body handle, with ▲ facing down, onto bracket which is under the model number and date code (Fig. A).
- Insert screw into handle hole, and using a Phillips type screwdriver, fasten handle to bracket until handle is securely affixed to the body.
NOTICE: Continuing to tighten handle, once it is secure, can result in stripping of screws or cracking of handles.
To Attach Helper Handle to Cooker Body
- Locate bag containing short helper handle. Take out handle and remove tape on handle which is holding screw in place. Remove screw from handle and set aside.
- With the pressure cooker body upside down on table or counter (Fig. A), position helper handle, with the tab side up, onto bracket under fill lines (Fig. A). Insert screw into
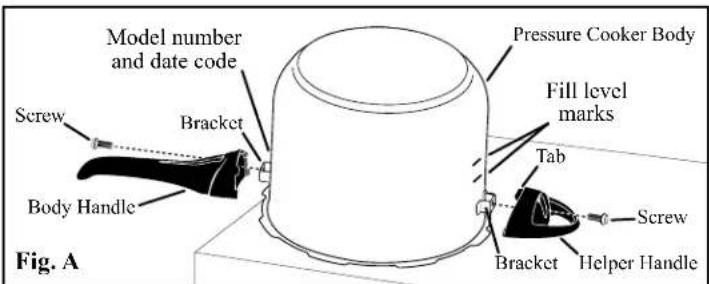
helper handle hole and, using a Phillips type screwdriver, fasten handle to bracket until handle is securely affixed to the body. When properly installed, handle should appear level with table or counter.
NOTICE: Continuing to tighten handle, once it is secure, can result in stripping of screws or cracking of handles.
To Attach Cover Handle to Cooker Cover
-
Locate bag containing cover handle. This handle has four holes, two of which contain screws. Take out handle and remove tape on handle which is holding the two screws in place. Remove screws from handle and set aside.
-
Place pressure cooker cover upside down on table or counter as shown in Fig. B, so vent pipe nut faces up.
-
Fit cover handle, with the menu guide facing down, onto cover handle mount so the air vent/cover lock stem fits through the top center hole of the cover handle (Fig. B).
-
Insert the screws into the two holes on both sides of the center hole. Using a Phillips type screwdriver, fasten cover handle to cover handle mount until handle is securely affixed to the cover.

NOTICE: Continuing to tighten handle, once it is secure, can result in stripping of screws or cracking of handles.
IMPORTANT: After placing cover on cooker body, check positioning of handles. Follow step 4 on page 4. When properly installed, the body handle and cover handle will line up with each other without interference.
GETTING ACQUAINTED
Your pressure cooker is like a saucepan with a very special cover that locks in place. Air is automatically exhausted and steam is sealed inside creating pressure within the unit. Under pressure, internal temperatures in the cooker are raised above the normal boiling point of water, causing foods to cook faster. At 15 pounds of pressure, a temperature of 250^ F (or 121^ C) is reached inside the pressure cooker. This higher temperature speeds cooking. The moist steam atmosphere also tenderizes meats naturally.
It is important to become familiar with the various parts of the pressure cooker (Fig. C) and to read the “HOW TO USE” section beginning on page 4 before using the unit for the first time.
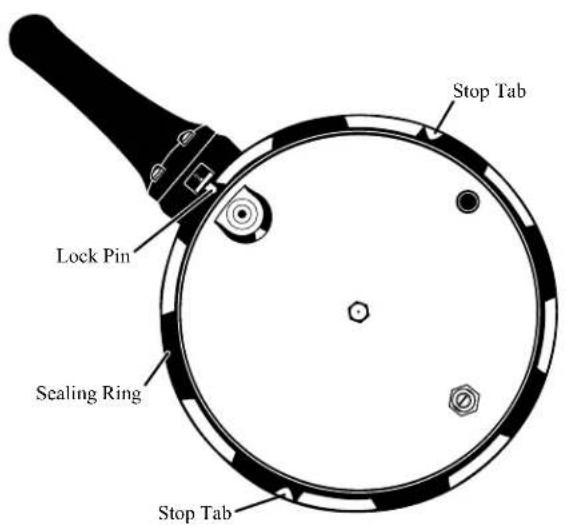
Before the first use, remove the sealing ring (Fig. D) by simply pulling it out of the inside rim of the cover.
Wash sealing ring, cover, body, and cooking rack (Fig. C) in hot, sudsy water to remove any packaging material and white manufacturing lubricant. Rinse all parts with warm water and dry. Then replace the sealing ring, being careful to fit it under the stop tabs and the lock pin (Fig. D) which are located on the inside rim of the cover.
Fig. C

Fig. D
HOW TO USE
To assure the very best results every time, carefully follow these step-by-step instructions for pressure cooking. You may find it helpful to refer back to Fig. C on page 3.
-
Prepare ingredients according to the directions in the pressure cooking recipe you have selected. If a larger quantity is desired, you may increase the ingredients by 12 . Be sure not to overfill the pressure cooker. See page 5 for guidance on filling.
Pour liquid into the cooker body, as specified in the recipe or timetable. This liquid is usually water. However, some recipes specify other liquids, such as wine. -
Place the cooking rack into the cooker, if called for in the recipe. See “HELPFUL HINTS” beginning on page 7 for guidance on when to use.
-
IMPORTANT: Look through the vent pipe to make certain that it is clear (Fig. E) before placing cover on cooker body. See safety information on pages 5 and 6. If blocked, clean as described in step 3 of "CLEANING" on page 6.
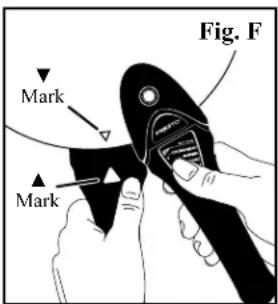
Holding the body handle with your left hand and the cover handle with your right hand, align the ▼ mark on the cover with the ▲ mark on the body handle and place the cover on the cooker body (Fig. F).
-
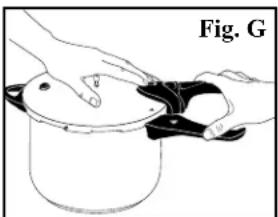
After placing the cover on the cooker body, place one hand on the center of the cover and apply a slight downward pressure. Place the thumb of your other hand on the side of the body handle and wrap your fingers around the cover handle (Fig. G). Then rotate the cover clockwise until the cover handle lines up with the body handle. The pressure cooker is completely closed when the cover handle is directly above the body handle (Fig. H).
-
Place the pressure regulator on the vent pipe (Fig. I). The pressure regulator will fit loosely on the vent pipe. It will not touch the top of the pressure cooker cover.
-
Position the pressure cooker on your stove. If your stove is electric coil or smooth top, use the largest element, making sure the element does not extend more than one inch out from the cooker bottom. Using a high heat setting, heat the pressure cooker until the pressure regulator attains a gentle rocking motion.
NOTE: The air vent/cover lock may move up and down a few times when cooking first begins as it automatically exhausts air from the pressure cooker. Steam will be noticeable. When pressure begins to build, it slides up, locking the cover on. Once the cooker has sealed, the air vent/cover lock will remain in the up position until pressure is released (Fig. J).
-
Cooking time begins when the pressure regulator begins to rock gently. Gradually lower the heat as necessary to maintain a slow, steady rocking motion and cook for the length of time indicated in the recipe or timetable. If the pressure regulator is allowed to rock vigorously, excess steam will escape. Therefore, too much liquid will evaporate and food may scorch. Never leave your pressure cooker unattended at high heat settings. It could boil dry, overheat, and cause damage to the pressure cooker.
-
When cooking time is complete, turn off burner. If using an electric stove, remove pressure cooker from burner. NOTICE: Lift pressure cooker to remove it from burner. Sliding cookware can leave scratches on stovetops.
-
Reduce pressure according to the recipe or timetable instructions. If the instructions say “Let the pressure drop of its own accord,” set the pressure cooker aside to cool until pressure is completely reduced. If the instructions state “Cool cooker at once,” cool the pressure cooker under a running water faucet (Fig. K), pour cold water over it, or place it in a pan of cold water (Fig. L) until pressure is completely reduced. NOTICE: Do not set hot cooker in a sink that is not heat resistant, as it could damage the sink. Pressure is completely reduced when the air vent/cover lock has dropped.
If the air vent/cover lock remains in its raised position, there is still pressure inside the pressure cooker. Continue to cool until the air vent/cover lock drops.
- After pressure has been completely reduced, i.e., the air vent/cover lock has dropped, remove the pressure regulator. Always remove the pressure regulator before opening the cover.

natural_image
Illustration of hands pressing a lid onto a cooking pot (no text or symbols)
natural_image
Diagram of a black object with curved lines and labeled 'Fig. H' (no text or symbols on the object itself)
natural_image
Illustration of hands using a pipette to handle a lid of a cooking pot, labeled Fig. I (no text or symbols on the diagram itself)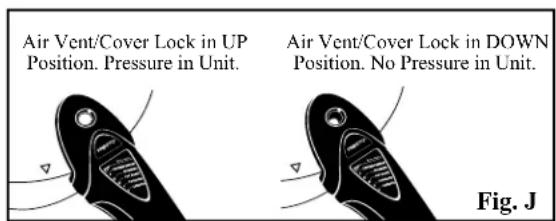

-
To open the cover, turn it counterclockwise until the ▼ mark on the cover aligns with the ▲ mark on the body handle. Then, lift the cover toward you to keep any steam away from you. If the cover turns hard, there still may be some pressure in the unit. Do not force the cover off. Continue to cool the pressure cooker until steam no longer is escaping from the vent pipe, the air vent/cover lock has dropped, and the cover turns easily.
-
Food is ready to serve.
IMPORTANT SAFETY INFORMATION
Cooking under pressure enables you to prepare food both quickly and deliciously. If used properly, your pressure cooker is one of the safest appliances in your kitchen. To ensure safe operation, make sure you always observe the following simple rules whenever you use the pressure cooker:
- Never overfill the pressure cooker. The pressure regulator is designed to maintain cooking pressure at a safe level. It relieves excess pressure through the vent pipe as it rocks back and forth. Many foods tend to expand when cooked. If the cooker is overfilled, expansion of food may cause the vent pipe to become blocked or clogged. In the event that the vent pipe becomes blocked, there are two backup safety devices which are intended to release excess pressure: the pressure relief valve and the overpressure plug. It is possible, however, to block them as well if the cooker is overfilled.

Do not fill the cooker more than 23 full when cooking most foods. When cooking foods that foam, froth, or expand, such as rice, grains, dry beans and peas, or foods that are mostly liquid, such as soups, never fill the cooker more than 12 full. For your convenience, both the 23 and 12 full levels are marked by indentations on the side of the pressure cooker body (Fig. M). The upper marking indicates the 23 full level and the lower the 12 full level. In addition, in each section of the recipes you will find instructions on the maximum fill level for each type of food. REMINDER: When cooking any food, do not let any portion extend above the maximum fill mark. When cooking rice, grains, dry beans and peas, soups, and stews, the cooker should never be more than 12 full.
-
Never pressure cook applesauce, cranberries, rhubarb, cereals, pastas, split peas, dried soup mixes, or dry beans and peas which are not listed in the table on page 21. These foods expand so much as a result of foaming and frothing that they should never be cooked under pressure.
-
Always add cooking liquid. If an empty pressure cooker is left on a hot burner or if a cooker boils dry and is left on a heated burner, the cooker will overheat excessively causing possible discoloration and/or damage to the cooker.
-
Always look through the vent pipe before using the cooker to make sure it is clear. If the vent pipe is blocked, it cannot function as it should and thus cannot relieve excess pressure. Pressure may then build to unsafe levels. To clean the vent pipe, see step 3 of “CLEANING” on page 6.
-
Always fully close the pressure cooker. The cooker is fully closed when the cover handle is directly above the body handle. Your pressure cooker has specially designed lugs on the cover and body which lock the cover in place when the cooker is fully closed. However, if the cooker is not fully closed, the lugs cannot lock the cover onto the body. It's possible that pressure could build inside the cooker and cause the cover to come off and result in bodily injury or property damage. Always be sure the cover handle is directly above the body handle (see page 4, Fig. H). Do not turn past handle alignment.
-
WARNING! Never open the cooker when it contains pressure. The air vent/cover lock provides a visual indication of pressure inside the cooker. When it is up, there is pressure. When it is down, there is no pressure in the cooker and it can be opened. If the pressure cooker is opened before all of the pressure is released, the contents of the cooker will erupt and could cause bodily injury or property damage.
-
Respond to a warning from the pressure relief valve. The pressure relief valve is a warning device that is designed to provide both visual (the cap lifts and steam comes out the sides) and audio (a fast, steady release of steam, often times accompanied by a continuous unpleasant sound) signals to indicate that the vent pipe has been blocked and is no longer regulating pressure and there is excessive pressure in the cooker. If you see and/or hear either of these signals, immediately turn off the burner. Do not move the cooker. Instead, allow pressure to drop of its own accord. When there is no pressure in the cooker (see page 5, #6), remove the pressure regulator from the cover, open the cooker, and clean the vent pipe (see step 3 of “CLEANING” on page 6).
NOTICE: Do not operate the cooker again until you have replaced the pressure relief valve. The high pressure which triggered the release may have contaminated the valve with food particles, which could prevent it from acting as a warning and a backup pressure relief valve if the vent pipe is plugged again.
Remember a plugged vent pipe is a result of user error.
- Never overfill the cooker (see page 5, #1).
-
Never cook the foods listed on page 5, #2 in a pressure cooker.
• Always follow the special procedures when cooking rice, grains, and dry beans and peas (see page 6, #11). -
Never tamper with the internal components of the pressure relief valve. The pressure relief valve is a very sensitive part and can be easily damaged. When replacing the pressure relief valve, the entire part must be replaced.
-
Replace the sealing ring if it becomes hard, deformed, cracked, worn, pitted, or soft and sticky. The sealing ring provides a pressure tight seal between the cover and stainless steel body. The sealing ring needs to be in good condition to function properly. WARNING! Failure to replace the sealing ring when it is hard, deformed, cracked, worn, pitted, or soft and sticky could result in bodily injury or property damage. It is recommended that the sealing ring be replaced every two years.
-
Replace the overpressure plug if it is hard, deformed, cracked, worn or pitted, or when replacing the sealing ring. The overpressure plug is designed to relieve excess pressure by releasing from the cooker cover in the event that both the vent pipe and pressure relief valve are blocked. The overpressure plug is made of rubber, and when new, is soft and pliable. Over time, depending on the frequency and type of use, rubber becomes hard and inflexible. When hard and inflexible, the overpressure plug loses its ability to act as a secondary pressure relief valve. It should be replaced immediately. It is recommended that the overpressure plug be replaced every two years.
Should the overpressure plug ever be forced out of the cover due to excess pressure while cooking, it is important to call the Test Kitchen at 1-800-368-2194. Do not attempt to use the released overpressure plug.
- Always follow special procedures found in the instruction book when pressure cooking rice, grains, and dry beans and peas. During cooking, dry beans and peas tend to froth and foam which can cause the vent pipe to become blocked. Therefore, dry beans and peas need to be soaked and cooked according to the instructions on page 21. Using this method will minimize foam during cooking. Like dry beans and peas, rice and grains tend to froth and foam during cooking; therefore, to contain foaming and frothing during the cooking period, rice and grains must be prepared in a bowl in the pressure cooker according to directions on page 22.
CLEANING
- All parts of your pressure cooker, including the sealing ring and pressure regulator, are fully immersible for easy cleaning. When washing the unit, however, the sealing ring should always be removed to allow easy cleaning of the inside rim of the cover. The sealing ring should be washed in hot, sudsy water after each use.
Your stainless steel pressure cooker may also be washed in an automatic dishwasher. When washing in a dishwasher, you must first remove the sealing ring from the cover as this part must be hand washed.
-
If food residue adheres to the pressure cooker body, clean with a stainless steel scouring pad, a nylon mesh pad, or a powdered cleanser without chlorine or bleach, such as Bar Keepers Friend* cleanser and polish or Cameo* copper, brass & porcelain cleaner. Do not use steel wool or cleaners with chlorine bleach.
-
To be sure the vent pipe is clear, hold the cover up to the light and look through the vent pipe. Clean it with a small brush or pipe cleaner if it is blocked or partially blocked (Fig. N). Also clean the vent pipe nut as shown.
-
Occasionally remove the air vent/cover lock in the pressure cooker cover handle for cleaning. To remove the air vent/cover lock, place your finger over the hole in the cover handle (Fig. N) and remove the white rubber gasket from the air vent/cover lock on the underside of the cover (Fig. O). Push the air vent/cover lock through the top of the cover and wash it and the gasket in hot, sudsy water. The metal shaft of the air vent/cover lock may be cleaned with a nylon mesh pad. Clean the hole in the cover handle with a small brush. After cleaning, reinsert the metal shaft of the air vent/cover lock from the top side of the cover down through the cover handle hole (Fig. P). Place a finger over the handle hole (to keep the air vent/cover lock from falling out) and turn the cover over. Wet the rubber gasket and push onto the end of the metal shaft until it snaps into the groove on the shaft.
-
The overpressure plug can also be removed for cleaning by pushing it out of its opening from the top of the cover. After cleaning, reinsert it by pushing the domed side of the plug, marked "TOP", into the opening from the underside of the cover, until the bottom edge is fully and evenly seated against the underside of the cover (Fig. Q). When the overpressure plug is properly installed, the word "TOP" will be visible on the overpressure plug when viewing the outside of the cover.
-
The pressure relief valve should not be disassembled for cleaning or repair. Clean the exposed surface of the valve when cleaning the underside of the cover.

* Bar Keepers Friend is a registered trademark of SerVaas Laboratories, Inc.; Cameo is a registered trademark of Church & Dwight Co., Inc. Presto is not affiliated with these companies.


- To bring out its luster, the outside surface of your stainless steel pressure cooker can be cleaned occasionally with a silver polish or any other fine, non-abrasive polish. Take care not to overheat your stainless steel pressure cooker. Very high heat can sometimes cause varicolored stains, called heat tints, in stainless steel. Heat tints can usually be removed by using a powdered cleanser without chlorine or bleach, such as Bar Keepers Friend* cleanser and polish.
CARE AND MAINTENANCE
- When not in use, store your pressure cooker in a dry place with the cover inverted on the body. If the cover is locked on, unpleasant odors may form inside the unit and the sealing ring could be damaged.
- As is the case of all cookware, avoid chopping or cutting food inside the cooker with a knife or other sharp utensil.
- If the body or cover handles become loose, tighten them with a screwdriver. NOTICE: Overtightening can result in stripping of screws or cracking of handles.
- Periodically check the vent pipe nut for looseness. Retighten, if necessary, using a 716 " wrench.
- Periodically check the pressure relief valve nut for looseness. Retighten, if necessary, using an ^11/16 " wrench.
- The sealing ring, overpressure plug, and rubber gasket of the air vent/cover lock may shrink, become hard, deformed, cracked, worn, or pitted with normal use. Exposure to high heat, such as a warm burner or oven top, will cause these parts to deteriorate rapidly. When this happens, replace the sealing ring, overpressure plug, and small rubber gasket of the air vent/cover lock. Replace the sealing ring and overpressure plug at least every two years.
Leakage between the cover and body is usually caused by shrinkage of the sealing ring after prolonged use. Replace the sealing ring. Whenever you replace the sealing ring, replace the overpressure plug also. - Each time you clean or use your pressure cooker, check to be sure the bottom has not been damaged. Nicks and scratches may leave sharp edges that can damage ceramic stovetops or other smooth surfaces. Lift pressure cooker to remove it from burner. Sliding cookware could leave scratches on stovetops.
- The formation of a small amount of moisture under the pressure regulator is normal when cooking first begins. It is the result of the temperature of the regulator being lower than the rest of the unit.
A small amount of steam or moisture may also be visible around the overpressure plug and air vent/cover lock as cooking begins. It should stop when pressure begins to build and the overpressure plug and air vent/cover lock seal. If leakage continues, clean or replace the overpressure plug and/or air vent/cover lock assembly. The pressure cooker will not seal if the gasket for the air vent/cover lock is cracked.
Do not operate your pressure cooker with continual leakage. If the preceding steps do not correct the problem, call the Consumer Service Department at 1-800-877-0441. If unable to resolve the problem, you may be asked to return the entire unit to the Presto Factory Service Department (see page 26). - If for any reason the pressure cooker cannot be opened, call the Consumer Service Department (Eau Claire, WI) at 1-800-877-0441. Any maintenance required for this product, other than normal household care and cleaning, should be performed by the Presto Factory Service Department (see page 26).
HELPFUL HINTS
- Your favorite recipes may be adjusted for cooking in the pressure cooker by following the general directions in this book for the particular type of food being cooked. Decrease the cooking time for your recipe by 23 since pressure cooking is much faster than ordinary cooking methods. For example, if your ordinary cooking method requires 45 minutes, in the pressure cooker the cooking time will be 15 minutes. Because there is very little evaporation, the amount of liquid used should be decreased. Use about 12 cup more liquid than you'll desire in your finished dish. But, remember, there must always be water or some other liquid in the pressure cooker to produce the necessary steam.
Use the cooking rack when it is desirable to cook foods out of the cooking liquid. When foods are pressure cooked out of the liquid, flavors will not intermingle. Therefore, it is possible to cook several foods at once, as long as they have similar cooking times. If it is desirable to blend flavors, do not use the cooking rack.
Many different cooking liquids can be used in a pressure cooker. Wine, beer, bouillon, fruit juices, and, of course, water all make excellent cooking liquids in the pressure cooker. - Beautiful desserts and side dishes can be prepared in the pressure cooker, using individual or small metal molds or glass custard cups, which are ovenproof. Fill molds 23 full to allow for expansion of food and fit them loosely into the pressure cooker on the cooking rack. Do not fill the pressure cooker over 23 full.
If a recipe says to cook “0” minutes, cook food only until the pressure regulator begins to rock. Then cool pressure cooker according to the recipe.
The pressure cooker is usually cooled at once for delicate foods such as custards and fresh vegetables. For other foods, like meats, soups, and grains, let the pressure drop of its own accord.
When pressure cooking at high altitudes, the cooking time needs to be increased 5% for every 1,000 feet above the first 2,000 feet. Following this rule, the times should be increased as follows:
3,000 ft. ... 5% 5,000 ft. ... 15% 7,000 ft. ... 25%
4,000 ft. ... 10% 6,000 ft. ... 20% 8,000 ft. ... 30%
Because pressure cooking times are increased at altitudes of 3,000 feet or above, an additional 12 cup cooking liquid will be needed.
If you have any questions on recipes, timetables, or the operation of your pressure cooker, call or write: Test Kitchen, National Presto Industries, Inc., 3925 North Hastings Way, Eau Claire, WI 54703-3703, phone 1-800-368-2194. You may also contact us at our website www.gopresto.com. When writing, please include a phone number and a time when you can be reached during weekdays, if possible. Written inquiries will be answered promptly by letter or telephone.
QUESTIONS & ANSWERS
Occasionally the cover is hard to open or close. What causes this? What should I do?
In order for pressure to build inside your pressure cooker, the unit has a special cover which provides an airtight fit. Because of this, you may find that on occasion the cover may be difficult to open or close. The following suggestions will help if this happens:
If the cover seems hard to close, press the palm of your hand on the center of the cover while moving the cover handle to the closed position with your other hand (see page 4, Fig. G).
If after browning meat or poultry the cover is difficult to close, it may be due to expansion of the pressure cooker body from heating. Remove the cover and allow the pressure cooker body to cool slightly and try again. Do not place the pressure cooker back on the burner until it is fully closed.
If necessary, to help make the cover easier to open and close, a very light coating of cooking oil may be applied to the scaling ring and to the underside of the lugs on the pressure cooker body (Fig. R). Use a pastry brush, a piece of cloth, or your fingertips and be sure to wipe off any excess oil.

What can be done if the food prepared in the pressure cooker has more liquid than desired?
With the cover removed, simmer to evaporate the excess liquid. Next time you prepare the same recipe, you may want to use less liquid.
How does one prevent overcooking?
Remember to begin timing as soon as the pressure regulator begins to rock gently. It is very important to accurately time the cooking period. A Presto ^® kitchen timer is very helpful for this purpose. Also be sure to follow the recipe instructions for cooling the pressure cooker.
What if the food is not completely done after the recommended cooking time?
Simply bring the cooker back up to pressure and cook the food a minute or two longer.
Can I use my pressure cooker on all types of ranges?
Your pressure cooker will work on gas, electric coil, and ceramic glass (smooth-top) ranges. In addition, current stainless steel pressure cookers will work on induction ranges.
When cooking first begins, is it normal for steam to escape and moisture to form on the cover and between the handles?
It is normal for steam to escape and a slight amount of moisture leakage to form on the cover and between the handles when cooking first begins. If leakage continues, the cover handle may not be properly aligned with the body handle and, therefore, the air vent/cover lock cannot engage.
My cooker is making a loud, unpleasant sound. The cap in the middle of the cover is also lifting up and emitting steam. What is causing this?
The pressure relief valve is a warning device that is designed to provide both visual (the cap lifts and steam comes out the sides) and audio (a fast, steady release of steam, often times accompanied by a continuous unpleasant sound) signals to indicate that the vent pipe has been blocked and is no longer regulating pressure. If you see and/or hear either of these signals, immediately turn off the burner. Do not move the cooker. Instead, allow pressure to drop of its own accord. When there is no pressure in the cooker (see page 5, #6), remove the pressure regulator from the cover, open the cooker, and clean the vent pipe (see step 3 of “CLEANING” on page 6).
NOTE: Do not operate the cooker again until you have replaced the pressure relief valve. The high pressure which triggered the release may have contaminated the valve with food particles, which could prevent it from acting as a warning and a backup pressure relief valve if the vent pipe is plugged again.
Remember a plugged vent pipe is a result of user error.
- Never overfill the cooker (see page 5, #1).
- Never cook the foods listed on page 5, #2 in a pressure cooker.
• Always follow the special procedures when cooking rice, grains, and dry beans and peas (see page 6, #11).
Is it normal for the air vent/cover lock to rise up partially and drop back down when cooking first begins?
It is possible that the air vent/cover lock will move up and down slightly when cooking first begins. Do not be concerned. The air vent/cover lock will remain in the up position once the cooker has sealed. However, if the air vent/cover lock continues to move up and down or rises partially, tap it lightly with the tip of a knife. If it does not rise once you have tapped it, the following may be occurring:
- The burner is not hot enough.
- The cooker is not fully closed (see page 4, #4).
- There is insufficient liquid to form steam.
- The gasket for the air vent/cover lock needs to be replaced (see step 6 of "CLEANING" on page 6).
SOUPS AND STOCKS
The pressure cooker is perfect for preparing delicious, nourishing soups and stocks in minutes instead of the hours taken by ordinary methods.
Stocks form the base for most great soups and sauces, and you can even substitute a stock for water in many recipes to add extra flavor. Traditionally, stocks are made by simmering bones and scraps for hours to extract all their flavor. With the pressure cooker, you can do the same thing in just minutes by following the simple directions on the following pages.
We've also included a few favorite soup recipes and, if you have a favorite recipe of your own, try it in the pressure cooker using one of the recipes in this book as your guide. If adding dry beans and peas, they must first be soaked according to directions on page 21. Do not pressure cook soups containing barley, rice, pastas, grains, split peas, dry beans and peas which are not listed in the table on page 21, and dried soup mixes because they have a tendency to foam, froth, and sputter and could block the vent pipe.
Cooked barley, rice, grains, pastas, dry beans and peas which are not listed in the table on page 21, and dried soup mixes should be added to the soup after pressure cooking.
FOR SOUPS AND STOCKS, DO NOT FILL PRESSURE COOKER OVER ½ FULL! OPERATING THE COOKER WITHOUT COOKING LIQUID OR ALLOWING THE COOKER TO BOIL DRY WILL DAMAGE THE COOKER.
CHICKEN SOUP
1½ pounds chicken, cut into serving pieces
4 cups water
12 cup sliced carrots
12 cup chopped onion
14 cup chopped celery
1 teaspoon salt
14 teaspoon black pepper
Place all ingredients in cooker. Close cover securely. Place pressure regulator on vent pipe and cook 12 minutes with pressure regulator rocking slowly. Let pressure drop of its own accord. Remove pieces of chicken from cooker and let cool. Remove meat from bones and return meat to cooker. Heat through.
Nutrition Information Per Serving: 4 servings 160 Calories, 8 g Fat, 54 mg Cholesterol
Delicious Soups From Chicken Soup...
Chicken Soup Stock: Strain Chicken Soup to make stock.
Chicken Noodle Soup: Bring soup to a boil. Add fine noodles and simmer, uncovered, 10 to 15 minutes. Salt and pepper to taste.
6 servings
Chicken Dumpling Soup: Mix together 1 beaten egg, 12 cup milk, and 12 teaspoon salt. Stir in 118 cups flour. Drop mixture from teaspoon into bubbling Chicken Soup in cooker. Simmer uncovered 6 minutes. 6 servings
Chicken Rice Soup: Add 1 cup cooked rice to Chicken Soup. Heat through. Salt and pepper to taste. 6 servings
BROWN BEEF SOUP
1½ pounds lean beef, cut into 1-inch cubes
4 cups water
12 cup chopped onion
12 cup sliced carrots
14 cup chopped celery
1 bay leaf
1 teaspoon parsley flakes
1 teaspoon salt
14 teaspoon black pepper
Place all ingredients in cooker. Close cover securely. Place pressure regulator on vent pipe and cook 12 minutes with pressure regulator rocking slowly. Let pressure drop of its own accord.
Nutrition Information Per Serving: 4 servings 295 Calories, 15 g Fat, 110 mg Cholesterol
Delicious Soups From Brown Beef Soup...
Brown Beef Soup Stock: Strain Brown Beef Soup to make stock.
Onion Soup: Heat 2 tablespoons vegetable oil in cooker over medium heat. Sauté 1½ cups thinly sliced onions. Add 6 cups Brown Beef Soup Stock to cooker. Season with ¼ teaspoon pepper. Close cover securely. Place pressure regulator on vent pipe and cook 2 minutes with pressure regulator rocking slowly. Let pressure drop of its own accord. Ladle into soup bowls. Top with Parmesan cheese. If desired, garnish with croutons or toasted French bread. 6 servings
Beef Tomato Soup: Add 2 cups tomato juice and 1 cup cooked rice to Brown Beef Soup. Heat through.
8 servings
BLACK BEAN SOUP
2 cups dry black beans
1 tablespoon olive or vegetable oil
1 cup chopped onion
3 cloves garlic, minced
1 to 2 jalapeño chilies, seeded, deveined, minced
1 tablespoon chili powder
1 12 teaspoons oregano
12 teaspoon allspice
4 cups chicken stock or broth
2 cups sliced carrots, 3/4 inch thick
1 tablespoon packed brown sugar
2 teaspoons white wine vinegar
● ● ● ● ● ● ●
1 cup loosely packed fresh cilantro, chopped
Salt to taste
Soak beans according to instructions on page 21. Heat oil in pressure cooker over medium heat. Sauté onion, garlic, chilies, chili powder, oregano, and allspice for 2 minutes. Stir in beans, chicken stock, carrots, brown sugar, and vinegar. Close cover securely. Place pressure regulator on vent pipe and cook 12 minutes with pressure regulator rocking slowly. Let pressure drop of its own accord. Remove 1 cup of bean mixture, place in blender and purée until smooth. Return to pressure cooker and stir in fresh cilantro.
Nutrition Information Per Serving: 8 servings 231 Calories, 3 g Fat, 0 mg Cholesterol
POTATO SOUP
1 tablespoon vegetable oil
1 cup finely chopped onions
12 cup finely sliced celery
3 cups chicken broth
4 cups peeled, diced potatoes
14 teaspoon white pepper
14 teaspoon basil
● ● ● ● ● ● ●
1 can (12 ounces) evaporated skim milk
Salt to taste
Heat oil in pressure cooker over medium heat. Sauté onion and celery until soft. Add broth, potatoes, pepper, and basil to pressure cooker. Close cover securely. Place pressure regulator on vent pipe and cook 5 minutes with pressure regulator rocking slowly. Let pressure drop of its own accord. Remove 2 cups of potato mixture; place in blender or food processor and process until smooth. Return to pressure cooker and stir in evaporated milk.
Nutrition Information Per Serving: 6 servings 160 Calories, 2 g Fat, 2 mg Cholesterol
SAFFRON FISH STEW
1 can (14½ ounces) chicken broth
14 cup dry white wine
4 new red potatoes, quartered
3 carrots, cut into 12 -inch chunks
1 medium onion, finely chopped
2 cloves garlic, minced
14 cup chopped parsley
1 bay leaf
Pinch of saffron threads or 14 teaspoon turmeric
● ● ● ● ● ●
1 pound firm fish (halibut, haddock, cod, pollack), fresh or thawed, cut into 8 pieces
1 small red pepper, cut into chunks
1 cup frozen peas, thawed
Place broth, wine, potatoes, carrots, onion, garlic, parsley, bay leaf, and saffron in pressure cooker. Close cover securely. Place pressure regulator on vent pipe and cook 2 minutes with pressure regulator rocking slowly. Cool cooker at once. Add fish, pepper, and peas.
Close cover securely. Place pressure regulator on vent pipe and cook 1 minute with pressure regulator rocking slowly. Cool cooker at once. Discard bay leaf.
Nutrition Information Per Serving:
8 servings
174 Calories, 1 g Fat, 40 mg Cholesterol
MINESTRONE
1 pound lean beef, cut into 1-inch cubes
5 cups water
1 can (14 to 15 ounces) diced tomatoes
12 cup chopped onion
1 cup sliced carrots
14 cup chopped celery
1 clove garlic, minced
2 tablespoons parsley flakes
1½ teaspoons basil
1 teaspoon salt
1 bay leaf
14 teaspoon black pepper
● ● ● ● ● ● ●
1 can (16 ounces) Great Northern beans
1 can (15 ounces) cut green beans, drained
2 ounces fine noodles
Place beef, water, tomatoes, onions, carrots, celery, garlic, parsley, basil, salt, bay leaf, and pepper in cooker. Close cover securely. Place pressure regulator on vent pipe and cook 10 minutes with pressure regulator rocking slowly. Let pressure drop of its own accord. Add Great Northern beans, green beans, and noodles. Simmer uncovered 10 minutes. Garnish with Parmesan cheese, if desired.
Nutrition Information Per Serving: 10 servings 234 Calories, 6 g Fat, 44 mg Cholesterol
1 12 pounds ground beef
1 can (8 ounces) tomato sauce
12 cup water
1 cup chopped onion
^3/_4 cup chopped green pepper
2 cloves garlic, minced
1 tablespoon chili powder
1 teaspoon salt
1 teaspoon ground cumin
12 teaspoon black pepper
12 teaspoon oregano
14 teaspoon cayenne pepper
● ● ● ● ● ● ●
1 can (15 ounces) kidney beans, drained and rinsed
Brown meat in cooker over medium heat. Add remaining ingredients except kidney beans. Close cover securely. Place pressure regulator on vent pipe and cook 5 minutes with pressure regulator rocking slowly. Let pressure drop of its own accord. Stir in kidney beans and heat through.
Nutrition Information Per Serving: 4 servings 432 Calories, 17 g Fat, 111 mg Cholesterol
SEAFOOD
Seafood is the basis of some of the healthiest and most nutritious meals you can make. It is an excellent source of protein, a good source of minerals, and one of the few sources of beneficial omega-3 fatty acids.
Steaming in the pressure cooker brings out the finest, fullest flavors of seafood. The cooking time required is directly related to the thickness of the seafood. To be safe, if the fish you are cooking seems thin for its weight or if it weighs less than the recipe specifies, reduce the cooking time. Overcooking tends to toughen seafood.
FOR FISH AND SEAFOOD, DO NOT FILL PRESSURE COOKER OVER ^2 / _3 FULL!
OPERATING THE COOKER WITHOUT COOKING LIQUID OR ALLOWING THE COOKER TO BOIL DRY WILL DAMAGE THE COOKER.
LEMON 'N DILL COD AND BROCCOLI
1 pound frozen cod fillets, 1 inch thick
Dill weed
Lemon pepper
Salt
1 cup water
2 cups broccoli, cut into bite size pieces
Cut fish into 4 pieces. Sprinkle with dill weed, lemon pepper, and salt. Pour water into cooker. Arrange fish and broccoli on rack in cooker. Close cover securely. Place pressure regulator on vent pipe and cook 2 minutes with pressure regulator rocking slowly. Cool cooker at once.
Nutrition Information Per Serving: 4 servings 103 Calories, 1 g Fat, 49 mg Cholesterol
"SCAMPI-STYLE" SHRIMP
1 pound raw shrimp, medium, peeled, deveined
3 tablespoons butter
2 tablespoons minced green onion
6 cloves garlic, minced
2 teaspoons lemon juice
14 teaspoon salt
1 cup water
● ● ● ● ● ● ●
2 tablespoons minced parsley
14 teaspoon grated lemon peel
Pat shrimp dry with paper towels. Melt butter in cooker over medium heat. Sauté onion and garlic until tender. Stir in lemon juice and salt. Cook until bubbly. Pour into metal bowl which will fit loosely in cooker. Stir in shrimp. Cover bowl firmly with aluminum foil. Pour water into cooker. Place bowl on rack in cooker. Close cover securely. Place pressure regulator on vent pipe and cook 3 minutes with pressure regulator rocking slowly. Cool cooker at once. Stir in parsley and lemon peel.
Nutrition Information Per Serving: 4 servings
205 Calories, 11 g Fat, 196 mg Cholesterol
SHRIMP JAMBALAYA
| 1 cup long grain white rice 112 cups water1 cup water ·s·s·s 1 can (14 to 15 ounces) stewed tomatoes 12 cup chicken broth 12 pound precooked ham, diced 12 cup chopped onion 12 cup chopped celery 12 cup chopped green pepper | 2 cloves garlic, minced1 bay leaf1 teaspoon basil 12 teaspoon thyme 12 teaspoon chili powder 14 teaspoon black pepper 14 teaspoon salt 14 teaspoon hot sauce ·s·s·s 1 pound precooked shrimp, peeled and deveined |
Combine rice and 1½ cups water in a metal bowl which will fit loosely in cooker. Cover bowl firmly with aluminum foil. Pour 1 cup water into cooker. Place bowl on rack in cooker. Close cover securely. Place pressure regulator on vent pipe and cook 5 minutes with pressure regulator rocking slowly. Let pressure drop of its own accord. Open cooker and set rice aside to steam. Remove rack and water.
Add remaining ingredients, except shrimp, to cooker; stir well. Close cover securely. Place pressure regulator on vent pipe and cook 3 minutes with pressure regulator rocking slowly. Cool cooker at once. Stir in shrimp; cook uncovered over medium heat until shrimp is heated through, 2 to 3 minutes. Serve over rice.
Nutrition Information Per Serving: 6 servings 252 Calories, 3 g Fat, 157 mg Cholesterol
SEAFOOD GUMBO
| 1 cup long grain white rice | 2 bay leaves |
| 112 cups water | 2 tablespoons parsley |
| 1 cup water | 1 teaspoon basil |
| ·s·s·s | 12 teaspoon thyme |
| 212 cups chicken broth | 14 teaspoon ground red pepper |
| 1 pound fresh shrimp, medium, peeled, deveined | 14 teaspoon salt |
| 1 pound sole fillets, cut into 2-inch pieces | ·s·s·s |
| 1 can (14 to 15 ounces) diced tomatoes | 14 cup cold water |
| 1 cup chopped onion | 2 tablespoons cornstarch |
| 34 cup chopped green pepper | 1 package (10 ounces) frozen sliced okra, thawed |
| 2 cloves garlic, minced |
Combine rice and 1½ cups water in a metal bowl which will fit loosely in cooker. Cover bowl firmly with aluminum foil. Pour 1 cup water into cooker. Place bowl on rack in cooker. Close cover securely. Place pressure regulator on vent pipe and cook 5 minutes with pressure regulator rocking slowly. Let pressure drop of its own accord. Open cooker and set rice aside to steam. Remove rack and water.
Add broth, shrimp, sole, tomatoes, onion, green pepper, garlic, bay leaves, parsley, basil, thyme, red pepper, and salt to cooker. Close cover securely. Place pressure regulator on vent pipe and cook 1 minute with pressure regulator rocking slowly. Cool cooker at once. Combine water and cornstarch. Stir into hot mixture. Heat until sauce thickens, stirring constantly. Stir in okra. Heat for 3 to 4 minutes. Discard bay leaf. Serve over rice.
Nutrition Information Per Serving: 9 servings 224 Calories, 2 g Fat, 101 mg Cholesterol
SALMON STEAKS MOUTARDE
| 4 small salmon steaks, 1 inch thick | 1 cup dry white wine or chicken broth |
| 4 tablespoons Dijon-style mustard | 1 bay leaf |
| 3 to 4 sprigs fresh thyme or 12 teaspoon dried thyme | · |
| 1 tablespoon olive or vegetable oil | 2 tablespoons Dijon-style mustard |
| 1 small onion, chopped | 1 tablespoon cornstarch |
| 1 clove garlic, minced |
Spread each steak with 1 tablespoon mustard. Press 1 thyme sprig into mustard on each steak or sprinkle with dried thyme. Heat oil in cooker over medium heat. Sauté onion and garlic until tender. Stir in wine and bay leaf. Place steaks on rack in cooker. Close cover securely. Place pressure regulator on vent pipe and cook 2 minutes with pressure regulator rocking slowly. Cool cooker at once. Carefully remove steaks and rack. Keep steaks warm. Discard bay leaf. Mix 2 tablespoons mustard with cornstarch. Stir into liquid in pressure cooker. Heat until sauce boils and thickens, stirring constantly. Serve sauce with salmon steaks.
Nutrition Information Per Serving: 4 servings 218 Calories, 9 g Fat, 20 mg Cholesterol
Variation: Substitute halibut for salmon steaks.
MARINATED TUNA
| 1 pound tuna steak, 1 inch thick 14 cup lemon juice2 tablespoons olive oil1 tablespoon soy sauce | 2 cloves garlic, minced1 teaspoon ginger 12 teaspoon black pepper 12 cup water |
Place tuna steaks in a shallow glass dish. Combine remaining ingredients except water; pour over tuna. Marinate for 30 minutes, turning fish once. Remove tuna from marinade and place tuna on rack in cooker. Pour marinade and water into cooker. Place pressure regulator on vent pipe and cook 2 minutes with pressure regulator rocking slowly. Cool cooker at once. Nutrition Information Per Serving: 4 servings 170 Calories, 6 g Fat, 52 mg Cholesterol
SEAFOOD TIMETABLE
Pour 1 cup water into cooker. Position rack in cooker. Place seafood on rack in cooker. Do not fill cooker over 13 full. Close cover securely. Place pressure regulator on vent pipe and cook according to the table. Cool cooker at once.
SEAFOOD (Fresh or thawed) COOKING TIME (Minutes)
| Crab Legs 0–1 | ||
| Fish Fillets 1 inch thick 2 | ||
| Salmon Fillets 1 inch thick 2 | ||
| Scallops Large 1 | ||
| Shrimp | Medium to Large (36 to 40 count) | 0–1 |
| Large (21 to 25 count) | 1 | |
| Tuna Fillets | 1 inch thick 2 | |
POULTRY
A host of great, light meals can evolve from chicken and other poultry when prepared in the pressure cooker. Be it a tender fillet with a delightful, light sauce or a savory casserole with a host of nutritious vegetables, you'll find the pressure cooker is perfect for preparing your favorites in a hurry.
Try the following recipes and enjoy tasty poultry in a variety of ways or prepare your own favorite poultry dishes. It's not necessary to brown poultry before pressure cooking, but you may do so if you like. Searing tends to seal in the natural juices, while cooking without browning lets the flavor of the various ingredients intermingle for some spectacular taste combinations. For crispier chicken, you may want to put the chicken under the broiler for a few minutes after pressure cooking.
FOR POULTRY, DO NOT FILL PRESSURE COOKER OVER 23 FULL!
NO PORTION OF THE POULTRY SHOULD EXTEND ABOVE THE 23 FULL MARK (SEE PAGE 5).
OPERATING THE COOKER WITHOUT COOKING LIQUID OR ALLOWING THE COOKER TO BOIL DRY WILL DAMAGE THE COOKER.
CHICKEN CACCIATORE
| 1 (3-pound) chicken, cut into serving pieces | 2 tablespoons minced parsley |
| 1 cup diced tomatoes | 1 teaspoon oregano |
| 13 cup white wine | 1 teaspoon salt |
| 112 cups sliced onions | 14 teaspoon black pepper |
| 12 cup chopped carrots | |
| 12 cup chopped celery | 1 can (6 ounces) tomato paste |
| 2 cloves garlic, minced |
Place all ingredients except tomato paste in pressure cooker. Close cover securely. Place pressure regulator on vent pipe and cook 8 minutes with pressure regulator rocking slowly. Cool cooker at once. Place chicken on warm platter. Stir tomato paste into sauce in cooker. Simmer until thickened. Pour over chicken.
Nutrition Information Per Serving: 6 servings
291 Calories, 14 g Fat, 90 mg Cholesterol
BAYOU BOUNTY CHICKEN
| 112 pounds chicken pieces | 2 cloves garlic, minced | |
| 1 | can (15 ounces) whole tomatoes, undrained, cut up | 12 tablespoon extra-spicy seasoning blend |
| 34 | cup chopped onion | |
| 13 | cup chopped green pepper | Hot cooked rice (see page 22) |
| 13 | cup chopped celery |
Add all ingredients except rice to pressure cooker. Close cover securely. Place pressure regulator on vent pipe and cook 8 minutes with pressure regulator rocking slowly. Let pressure drop of its own accord. Serve chicken and sauce over rice.
Nutrition Information Per Serving: 3 servings
394 Calories, 14 g Fat, 90 mg Cholesterol
CHICKEN BREASTS TARRAGON
| 1 | tablespoon vegetable oil | 1 | teaspoon tarragon |
| 4 | boneless, skinless chicken breast halves | 1 | teaspoon salt |
| 12 | cup white wine Worcestershire sauce | 14 | teaspoon black pepper |
| 12 | cup white wine | · · · · · · · · · · · · · · · · · · · · · · · · · · · · · · · · · · | |
| 14 | cup chopped onion | 14 | cup cold water |
| 14 | cup sliced celery | 1 | tablespoon cornstarch |
| 14 | cup sliced carrot | ||
Heat oil in cooker over medium heat. Brown chicken. Add remaining ingredients except water and cornstarch. Close cover securely. Place pressure regulator on vent pipe and cook 4 minutes with pressure regulator rocking slowly. Cool cooker at once. Remove chicken and keep warm. Combine water and cornstarch. Stir into sauce. Heat until sauce thickens, stirring constantly.
Nutrition Information Per Serving: 4 servings 219 Calories, 5 g Fat, 69 mg Cholesterol
CALIFORNIA CHICKEN
| 2 tablespoons vegetable oil | 12 cup chicken broth |
| 6 boneless, skinless chicken breast halves | 14 cup chopped parsley |
| 1 teaspoon rosemary | ······· |
| 3 cloves garlic, peeled and sliced | 12 lemon, thinly sliced |
| 12 cup white wine | Salt and pepper to taste |
Heat oil in cooker over medium heat. Brown chicken. Season chicken with rosemary. Cover chicken with garlic. Combine wine, broth, and parsley; pour over chicken. Close cover securely. Place pressure regulator on vent pipe and cook 4 minutes with pressure regulator rocking slowly. Cool cooker at once. Garnish chicken with lemon slices.
Nutrition Information Per Serving: 6 servings 191 Calories, 6 g Fat, 69 mg Cholesterol
HERBED CHICKEN
| 1 tablespoon vegetable oil | 1 teaspoon oregano |
| 1 cup chopped onion | 1 teaspoon basil |
| 1 tablespoon chopped garlic | ······· |
| 3 pounds chicken thighs, skinned | 1 can (4 ounces) sliced black olives |
| 1 cup chicken broth | 2 tablespoons cold water |
| 1 tablespoon chopped parsley | 2 tablespoons flour |
| 12 cup chopped celery leaves | Salt and pepper to taste |
Heat oil in cooker over medium heat. Sauté onion and garlic; remove. Brown chicken. Add onion, garlic, broth, parsley, celery leaves, oregano, and basil. Close cover securely. Place pressure regulator on vent pipe and cook 8 minutes with pressure regulator rocking slowly. Cool cooker at once. Remove chicken to a warm dish. Add olives to liquid and heat. Mix water with flour. Stir into hot broth. Heat until sauce thickens, stirring constantly. Pour sauce over chicken.
Nutrition Information Per Serving: 6 servings 250 Calories, 8 g Fat, 115 mg Cholesterol
SOY CHICKEN
| 4 | boneless, skinless chicken breast halves | 12 | onion, sliced |
| 12 | cup water | 12 | cup sliced celery |
| 14 | cup lite soy sauce | 3 | tablespoons brown sugar |
| 12 | cup sliced mushrooms |
Place all ingredients in cooker. Close cover securely. Place pressure regulator on vent pipe and cook 4 minutes with pressure regulator rocking slowly. Let pressure drop of its own accord.
Nutrition Information Per Serving: 4 servings 169 Calories, 2 g Fat, 69 mg Cholesterol
CHUTNEY CHICKEN
| 6 | boneless, skinless chicken breast halves | 1 | tablespoon brown sugar |
| 1 | can (14 to 15 ounces) diced tomatoes | 14 | teaspoon allspice |
| 1 | can (4 ounces) chopped green chilies | · · · · · · · · · · · · · · · · · · · · · · · · · · · · · · · · · · · · · · · · · · · · · · | |
| 12 | cup raisins | 14 | cup water |
| 13 | cup mango chutney | 1 | tablespoon cornstarch |
| 1 | tablespoon vinegar |
Place all ingredients except cornstarch and water in cooker. Close cover securely. Place pressure regulator on vent pipe and cook 4 minutes with pressure regulator rocking slowly. Let pressure drop of its own accord. Remove chicken and keep warm. Combine water and cornstarch. Stir into sauce. Heat until sauce thickens, stirring constantly.
Nutrition Information Per Serving: 6 servings 258 Calories, 3 g Fat, 73 mg Cholesterol
SWEET 'N SOUR CHICKEN
| 1 tablespoon vegetable oil | 2 tablespoons soy sauce |
| 1 (3-pound) chicken, skinned, cut into serving pieces | 1 tablespoon catsup |
| 1 can (8 ounces) pineapple chunks, undrained | 12 teaspoon Worcestershire sauce |
| 12 cup sliced celery | 14 teaspoon ground ginger |
| 1 green or red pepper, cut into chunks | ······ |
| 14 cup brown sugar | 2 tablespoons cold water |
| 12 cup vinegar | 2 tablespoons cornstarch |
Heat oil in cooker over medium heat. Brown chicken. Combine remaining ingredients except water and cornstarch; pour over chicken. Close cover securely. Place pressure regulator on vent pipe and cook 8 minutes with pressure regulator rocking slowly. Cool cooker at once. Remove chicken, pineapple, and vegetables to a warm platter. Mix water and cornstarch. Stir into hot liquid. Heat until sauce thickens, stirring constantly. Pour sauce over chicken, pineapple, and vegetables. Serve with steamed rice, if desired, see page 22. Nutrition Information Per Serving: 6 servings 333 Calories, 11 g Fat, 104 mg Cholesterol
CHICKEN AND DRESSING
| 212 cups cooked chicken, cut into bite size pieces | 14 cup chopped onion |
| 1 can ( 1012 ounces) cream of chicken soup | 2 chicken bouillon cubes |
| 112 cups seasoned bread crumbs | 2 cups hot water |
| 14 cup chopped celery | 112 cups water |
Place chicken in greased metal bowl which will fit loosely in the cooker. Cover chicken with chicken soup. Combine stuffing, celery, and onion; moisten with bouillon cubes dissolved in water. Spread over chicken soup. Cover bowl firmly with aluminum foil. Pour 1½ cups water into cooker. Place bowl on rack in cooker. Close cover securely. Place pressure regulator on vent pipe and cook 5 minutes with pressure regulator rocking slowly. Let pressure drop of its own accord.
Nutrition Information Per Serving: 6 servings 317 Calories, 13 g Fat, 109 mg Cholesterol
POULTRY TIMETABLE
It is not necessary to brown poultry before pressure cooking, but you may do so if you like. After browning, remove poultry from cooker and pour liquid into cooker. Place poultry on rack in cooker.
DO NOT FILL PRESSURE COOKER OVER 23 FULL!
NO PORTION OF THE POULTRY SHOULD EXTEND ABOVE THE ^2/_3 FULL MARK (SEE PAGE 5).
POULTRY CUPS OF LIQUID COOKING TIME (Minutes)
| Whole Chicken (2 12 to 3 pounds) | 1 | 13–15 |
| Chicken (cut into serving pieces) | 1 | 8 |
| Chicken Breast (boneless) | 1 | 3–4* |
| Turkey Breast (3 to 4 pounds) | 1 12 | 35 |
| *Cool cooker at once (see step 9 on page 4). | ||
MEATS
When it comes to creating juicy, tender, flavorful meat dishes, the pressure cooker has no equal. Even budget cuts of meat that usually require slow, moist-heat cooking will turn out succulent and savory in very little time in the pressure cooker.
An important step when preparing meat in the pressure cooker is to sear meat to a crispy brown on all sides to seal in natural juices. This can be done right in the pressure cooker. The following recipes were written for fresh or completely thawed meats. To cook frozen meats, thaw one half hour or more so that the surface of the meat will sear crispy brown. Then increase the cooking times given in the recipes. Frozen beef, veal, and lamb should be cooked 25 minutes per pound. Frozen pork should be cooked 30 minutes per pound.
Cooking time will vary depending on the size and thickness of the cut, the distribution of fat and bone, the grade and cut of the meat, and the degree of doneness desired.
After cooking, if gravy is desired, stir 1 to 2 tablespoons of flour or cornstarch into 14 cup cold water. Heat cooking liquid in pressure cooker and slowly pour in flour mixture, stirring to blend. Heat to boiling, stirring constantly for 1 minute or until thickened. Season with salt and pepper.
FOR MEAT, DO NOT FILL PRESSURE COOKER OVER ^2 / _3 FULL!
NO PORTION OF THE MEAT SHOULD EXTEND ABOVE THE ^2/_3 FULL MARK (SEE PAGE 5).
OPERATING THE COOKER WITHOUT COOKING LIQUID OR ALLOWING THE COOKER TO BOIL DRY WILL DAMAGE THE COOKER.
SPAGHETTI MEAT SAUCE
| 1 pound lean ground beef | 1 teaspoon parsley flakes |
| 1 can (14 to 15 ounces) diced tomatoes | 12 teaspoon oregano |
| 12 cup water | 12 teaspoon basil |
| 1 cup chopped onion | 14 teaspoon thyme |
| 12 cup chopped celery | 18 teaspoon red pepper |
| 12 cup diced green pepper | 3 drops hot pepper sauce |
| 1 clove garlic, minced | ·s·s·s |
| 2 teaspoons sugar | 1 can (6 ounces) tomato paste |
| 1 teaspoon salt |
Brown beef in cooker over medium heat. Stir in remaining ingredients except tomato paste. Close cover securely. Place the pressure regulator on vent pipe and cook 8 minutes with pressure regulator rocking slowly. Cool cooker at once. Stir in tomato paste and simmer, uncovered, to desired thickness. Serve sauce over spaghetti. Sprinkle with Parmesan cheese, if desired.
Nutrition Information Per Serving: 6 servings 229 Calories, 12 g Fat, 51 mg Cholesterol
PORCUPINE MEATBALLS
| 1 pound lean ground beef 13 cup uncooked long grain white rice2 tablespoons tomato paste1 teaspoon salt 14 teaspoon pepper 12 cup chopped onion | 14 cup sliced celery 14 cup chopped green pepper1 cup tomato sauce 12 cup water1 tablespoon sugar 12 teaspoon dry mustard |
Combine ground beef, rice, tomato paste, salt, and pepper; mix well. Form into 8 balls. Place meatballs in cooker. Add onion, celery, and green pepper. Combine tomato sauce, water, sugar, and mustard. Pour over meatballs. Close cover securely. Place pressure regulator on vent pipe and cook 12 minutes with pressure regulator rocking slowly. Cool cooker at once.
Nutrition Information Per Serving: 4 servings 350 Calories, 17 g Fat, 77 mg Cholesterol
BEEF POT ROAST
| 1 (3-pound) beef pot roast | Salt and pepper |
| 1 tablespoon vegetable oil | 1 small onion, chopped |
| 2 cups water | 1 bay leaf |
Heat oil in cooker over medium heat. Brown roast well on all sides; remove roast. Pour water into cooker. Place roast on rack in cooker. Season roast with salt, pepper, onions, and bay leaf. Close cover securely. Place pressure regulator on vent pipe and cook 45 minutes with pressure regulator rocking slowly. Let pressure drop of its own accord. Thicken gravy, if desired.
Nutrition Information Per Serving: 6 servings 297 Calories, 20 g Fat, 72 mg Cholesterol
BEEF STEW
| 1 pound lean beef, cut into 1-inch cubes | 1 cup diced tomatoes |
| 1 cup water | 1 teaspoon salt |
| 1 large onion, sliced | 14 teaspoon black pepper |
| ...... | ...... |
| 4 small potatoes, quartered | 14 cup cold water |
| 1 cup frozen green beans | 1 tablespoon flour |
| 1 cup sliced carrots |
Place beef, water, and onion in cooker. Close cover securely. Place pressure regulator on vent pipe and cook 8 minutes with pressure regulator rocking slowly. Cool cooker at once.
Add potatoes, green beans, carrots, tomatoes, salt, and pepper to cooker. Close cover securely. Place pressure regulator on vent pipe and cook 3 minutes with pressure regulator rocking slowly. Cool cooker at once.
Mix water and flour; stir into stew. Heat until stew thickens, stirring constantly.
Nutrition Information Per Serving: 4 servings 347 Calories, 7 g Fat, 73 mg Cholesterol
CORNED BEEF
| 3 pounds corned beef | 1 tablespoon garlic powder |
| 2 cups water | 1 bay leaf |
Pour water into cooker. Rub garlic powder into all surfaces of corned beef. Place corned beef on rack in cooker. Add bay leaf. Close cover securely. Place pressure regulator on vent pipe and cook 60 minutes with pressure regulator rocking slowly. Let pressure drop of its own accord.
NOTE: If seasoning packet is provided with corn beef, use packet and omit bay leaf.
Nutrition Information Per Serving: 6 servings 295 Calories, 18 g Fat, 103 mg Cholesterol
SWISS STEAK
2 pounds round steak, 1 inch thick
1 can (8 ounces) tomato sauce
12 cup water
1 cup chopped onion
12 cup chopped green pepper
12 cup sliced celery
12 teaspoon salt
14 teaspoon pepper
Place all ingredients in cooker. Close cover securely. Place pressure regulator on vent pipe and cook 18 minutes with pressure regulator rocking slowly. Cool cooker at once. Thicken sauce, if desired.
Nutrition Information Per Serving: 6 servings 251 Calories, 9 g Fat, 98 mg Cholesterol
STUFFED FLANK STEAK
1 tablespoon butter
12 cup chopped onion
12 cup chopped celery
1 clove garlic, minced
6 tablespoons beef broth, divided
1 cup bread crumbs
12 teaspoon salt
14 teaspoon marjoram
14 teaspoon thyme
1/8 teaspoon black pepper
1 pound flank steak, cut into 2 equal pieces
1 can (15 ounces) diced tomatoes, undrained
Heat butter in cooker over medium heat. Sauté onion, celery, and garlic. Mix in 2 tablespoons of the broth, bread crumbs, salt, marjoram, thyme, and pepper. Spread stuffing mixture on one steak; top with remaining steak. Secure with toothpicks or metal skewers. Place steak in cooker; stir in remaining 4 tablespoons broth and tomatoes. Close cover securely. Place pressure regulator on vent pipe and cook 18 minutes with pressure regulator rocking slowly. Let pressure drop of its own accord.
Nutrition Information Per Serving: 4 servings 237 Calories, 12 g Fat, 56 mg Cholesterol
STUFFED PORK CHOPS
2 tablespoons vegetable oil
4 1 inch thick boneless pork chops, with deep pocket cut in each
1 cup bran flakes, crushed
2 tablespoons water
12 teaspoon dried sage
1 12 cups water
Salt and pepper to taste
1 cup chopped onion
^3/_4 cup chopped celery
12 cup corn
Heat oil in cooker over medium heat. Brown pork chops. Remove from cooker. Sauté onions and celery in cooker. Stir in corn, bran flakes, 2 tablespoons water, and sage; remove from cooker. Stuff pork chops with mixture. Pour 1 12 cups water into cooker. Place pork chops on rack in cooker. Close cover securely. Place pressure regulator on vent pipe and cook 16 minutes with pressure regulator rocking slowly. Cool cooker at once.
Nutrition Information Per Serving: 4 servings 430 Calories, 20 g Fat, 133 mg Cholesterol
PORK ROAST
1 (3-pound) pork roast
1 tablespoon vegetable oil
2 cups water
Salt and pepper
1 onion, sliced
Heat oil in cooker over medium heat. Brown roast well on all sides. Remove roast from cooker. Pour water into cooker. Place roast on rack in cooker. Season with salt, pepper, and sliced onion. Close cover securely. Place pressure regulator on vent pipe and cook 55 minutes with pressure regulator rocking slowly. Let pressure drop of its own accord.
Nutrition Information Per Serving: 6 servings
483 Calories, 27 g Fat, 171 mg Cholesterol
APRICOT BARBECUE PORK ROAST
1 (3-pound) boneless rolled pork roast
12 cup catsup
12 cup teriyaki sauce
13 cup apricot preserves
14 cup cider vinegar
14 cup packed dark brown sugar
1 teaspoon crushed red pepper
1 teaspoon dry mustard
14 teaspoon black pepper
1 large onion, sliced
2 cups water
Place pork roast in a large plastic bag or glass dish. Combine catsup, teriyaki sauce, preserves, vinegar, brown sugar, red pepper, mustard, and pepper. Mix thoroughly and pour over pork. Refrigerate overnight. Remove pork; reserve marinade. Brown pork on all sides in pressure cooker over medium heat; remove.
Place cooking rack, half of sliced onion, and water in cooker. Place pork roast on rack in cooker and arrange remaining onion evenly on top of roast. Close cover securely. Place pressure regulator on vent pipe and cook 60 minutes with pressure regulator rocking slowly. Let pressure drop of its own accord. Place reserved marinade in saucepan and simmer until thickened, stirring occasionally. Remove roast and onions from pressure cooker. Add onions to thickened marinade and serve with sliced pork. Onions may be puréed before adding to sauce and served with rice, if desired.
Nutrition Information Per Serving: 8 servings 332 Calories, 13 g Fat, 77 mg Cholesterol
BARBECUE SPARERIBS
3 pounds spareribs, cut into serving pieces
1 cup water
• • • • • • •
1 cup catsup
12 cup water
12 cup vinegar
14 cup chopped onion
14 cup sugar
1 teaspoon salt
1 teaspoon chili powder
1 teaspoon celery seed
Place ribs and water in cooker. Close cover securely. Place pressure regulator on vent pipe and cook 5 minutes with pressure regulator rocking slowly. Cool cooker at once. Drain off liquid. Mix remaining ingredients; pour over ribs in cooker. Stir to coat ribs. Close cover securely. Place pressure regulator on vent pipe and cook 10 minutes with pressure regulator rocking slowly. Let pressure drop of its own accord. Remove ribs. Simmer sauce, uncovered, to desired thickness.
Nutrition Information Per Serving: 6 servings 427 Calories, 27 g Fat, 107 mg Cholesterol
LAMB STEW
| 1 | pound lamb stew meat, cut into 1-inch cubes |
| 1 | cup water |
| 1 | large onion, sliced |
| 1 | tablespoon Worcestershire sauce |
| 1 | large clove garlic, minced |
| ...... | |
| 4 | small potatoes, quartered |
| 1 | cup baby-cut carrots |
| 1 | teaspoon salt |
| 14 | teaspoon black pepper |
| ·s·s | |
| 14 | cup cold water |
| 1 | tablespoon flour |
Place lamb, water, onion, Worcestershire sauce, and garlic in cooker. Close cover securely. Place pressure regulator on vent pipe and cook 6 minutes with pressure regulator rocking slowly. Cool cooker at once.
Add potatoes, carrots, salt, and pepper. Close cover securely. Place pressure regulator on vent pipe and cook 3 minutes with pressure regulator rocking slowly. Cool cooker at once.
Mix water and flour thoroughly; stir into stew. Heat until stew thickens, stirring constantly.
Nutrition Information Per Serving: 4 servings 315 Calories, 6 g Fat, 74 mg Cholesterol
MEAT TIMETABLE
Brown meat well and remove from cooker. Pour liquid into cooker. Place meat on rack in cooker.
DO NOT FILL PRESSURE COOKER OVER 23 FULL!
NO PORTION OF THE MEAT SHOULD EXTEND ABOVE THE ^2 / _3 FULL MARK (SEE PAGE 5).
MEAT THICKNESS/QUANTITY CUPS OF LIQUID COOKING TIME (Minutes)
| Beef | |||
| Chuck Roast 3 pounds 2 | 45–50 | ||
| Corned Beef | 3 pounds 2 | 60 | |
| Rolled Rib Roast | 3 pounds | 112 | 30–35 |
| Round Steak | 1 inch thick | 1 | 18* |
| Round Steak | 12 inch thick | 1 | 10* |
| Short Ribs | 112 | 25 | |
| Ham | |||
| Picnic | 3 pounds | 112 | 30–35 |
| Slice | 3 pounds | 112 | 30–35 |
| Lamb | |||
| Chops | 1 inch thick | 1 | 12* |
| Chops | 12 inch thick | 1 | 5* |
| Leg of Lamb | 3 pounds 2 | 35–45 | |
| Pork | |||
| Butt Roast | 3 pounds 2 | 55 | |
| Chops | 1 inch thick | 1 | 15* |
| Chops | 12 inch thick | 1 | 8* |
| Loin Roast | 3 pounds 2 | 55 | |
| Steak | 1 inch thick | 1 | 12* |
| Steak | 12 inch thick | 1 | 5* |
| Vcal | |||
| Chops | 1 inch thick | 1 | 12* |
| Chops | 12 inch thick | 1 | 5* |
| Roast | 3 pounds 2 | 45–50 | |
| Steak | 1 inch thick | 1 | 10* |
*Cool cooker at once (see step 9 on page 4).
VEGETABLES
Vegetables have assumed new importance and prominence on the menu. Health-conscious cooks feature an abundance of vegetables on the family meal plan, while restaurants increasingly cater to a more “vegetable-conscious” clientele. Pressure cooking is the preferred method for preparing vegetables. Because of the fast cooking time and super-heated steam, vegetables retain most of their natural color, texture, flavor, and nutrients. And pressure cooking offers an additional health advantage; because so much more natural taste is retained, vegetables require much less salt and seasonings.
A garden variety of fresh or frozen vegetables can be cooked at the same time in the pressure cooker. By using the cooking rack to keep them out of the cooking liquid, each vegetable retains its own distinctive flavor and appearance. Just be sure that all vegetables cooked together require the same cooking time. It is important to accurately time the cooking period because vegetables cook very quickly in the pressure cooker. If you wish to blend the vegetable flavors, place them in the cooking liquid and omit the rack.
FOR FRESH AND FROZEN VEGETABLES, DO NOT FILL PRESSURE COOKER OVER ^2 / ^4 FULL! OPERATING THE COOKER WITHOUT COOKING LIQUID OR ALLOWING THE COOKER TO BOIL DRY WILL DAMAGE THE COOKER.
GARLIC MASHED POTATOES
2 pounds russet potatoes, peeled and diced
4 large cloves garlic
1 12 cups chicken broth
• • • • • • •
I tablespoon butter
Salt and pepper to taste
Place all ingredients except butter, salt, and pepper in cooker. Close cover securely. Place pressure regulator on vent pipe and cook 5 minutes with pressure regulator rocking slowly. Cool cooker at once. Allow potatoes, garlic, and broth to remain in cooker. Mash potatoes using a potato masher or hand mixer until desired consistency is reached. Add butter. Season with salt and pepper.
Nutrition Information Per Serving: 6 servings 127 Calories, 4 g Fat, 5 mg Cholesterol
MAPLE GLAZED SWEET POTATOES
3 sweet potatoes, peeled, cut into 1- to 1½-inch chunks
^3/_4 cup maple flavored syrup
12 cup water
I tablespoon melted butter
12 teaspoon salt
Place sweet potatoes in pressure cooker. Combine remaining ingredients and pour over potatoes. Close cover securely. Place pressure regulator on vent pipe and cook 5 minutes with pressure regulator rocking slowly. Cool cooker at once.
Nutrition Information Per Serving: 6 servings 125 Calories, 2 g Fat, 5 mg Cholesterol
GLAZED ROOT VEGETABLES
2 tablespoons butter
2 medium turnips, peeled, cut into eighths
8 ounces baby carrots
2 medium parsnips, peeled, sliced 12 inch thick
1 cup chicken broth
2 tablespoons sugar
2 teaspoons ground ginger
● ● ● ● ● ● ●
14 cup cold water, optional
1 tablespoon cornstarch, optional
Salt and pepper to taste
Heat butter in cooker over medium heat; add turnip wedges and carrots and sauté for 3 minutes. Add parsnips, chicken broth, ginger, and sugar. Close cover securely. Place pressure regulator on vent pipe and cook 1 minute with pressure regulator rocking slowly. Cool cooker at once. Combine water and cornstarch. Stir into sauce. Heat until sauce thickens, stirring constantly.
Nutrition Information Per Serving: 8 servings 77 Calories, 3 g Fat, 8 mg Cholesterol
ARTICHOKES 'N SAUCE
1 cup water
1 tablespoon vegetable oil
3 artichokes
Pour water and oil into cooker. Place artichokes on rack in cooker. Close cover securely. Place pressure regulator on vent pipe and cook 10 minutes with pressure regulator rocking slowly. Cool cooker at once. Serve with your choice of the following sauces.
Nutrition Information Per Serving: 3 servings 60 Calories, 0 g Fat, 0 mg Cholesterol
Garlic Sauce: Combine 14 cup melted butter and 2 cloves minced garlic. Serve warm.
Herb Yogurt: Combine 1 cup plain yogurt, 14 cup finely chopped carrots, 12 teaspoon dill weed, and 14 teaspoon salt. Serve chilled.
Italian Sauce: Combine 12 cup mayonnaise and 14 cup Italian style salad dressing. Serve chilled.
CABBAGE WITH APPLES
8 cups shredded cabbage
1 small onion, thinly sliced
1 small tart apple, peeled, cored, and chopped
12 cup chicken broth
2 tablespoons frozen apple juice concentrate, thawed
Salt and pepper to taste
Add all ingredients to cooker. Close cover securely. Place pressure regulator on vent pipe and cook 4 minutes with pressure regulator rocking slowly. Cool cooker at once.
Nutrition Information Per Serving: 6 servings 50 Calories, 0 g Fat, 0 mg Cholesterol
FRESH AND FROZEN VEGETABLE TIMETABLE
When using the vegetable timetables below, cook the vegetables the minimum amount of time indicated if you prefer your vegetables crisp. If you prefer your vegetables soft, cook them the maximum amount of time indicated.
TO PREVENT OVERCOOKING, COOL COOKER AT ONCE AFTER COOKING VEGETABLES, EXCEPT WHEN NOTED.
If the table says to cook "0" minutes, this means to cook food until the pressure regulator begins to rock, then cool cooker at once.
Quantity of vegetables does not change pressure cooking times. More mature vegetables may require longer pressure cooking times than given in table.
For fresh and frozen vegetables, pour liquid into cooker. Place vegetables on rack in cooker.
FOR FRESH AND FROZEN VEGETABLES, DO NOT FILL PRESSURE COOKER OVER ^2 /FULL!
FRESH VEGETABLE TIMETABLE
CUPS OF COOKING TIME
VEGETABLE HOW PREPARED LIQUID (Minutes)
| Artichoke Whole, 6 to 8 ounces 1 10 | |||
| Asparagus Stems cut into 1-inch pieces 1 0-1 | |||
| Beans (green, wax) | Whole or sliced | 1 1-3 | |
| Beets | Whole, 21⁄2-inch diameter | 11⁄2 | 15-16 |
| Broccoli | Flowercets | 1 0-2 | |
| Brussels Sprouts | Small, 1-inch diameter | 1 1-3 | |
| Cabbage (red, green) | Wedges, 2 inches thick | 1 3-5 | |
| Thinly sliced | 1 2-3 | ||
| Carrots | Baby cut | 1 3-5 | |
| 1⁄2-inch slices | 1 3-5 | ||
| Cauliflower | Flowercets | 1 0-2 | |
| Collards* | Leaves coarsely chopped, stems thinly sliced | 1 3-4 | |
| Corn-on-the-Cob | Whole, 21⁄2-inch diameter | 1 | 3 |
| Eggplant | Cubed, 1 to 11⁄2 inches thick | 1 2-3 | |
| Sliced, 1⁄2 inch thick | 1 | 2 | |
| Kale | Leaves coarsely chopped, stems thinly sliced | 1 1-2 | |
| Parsnips | Sliced, 1⁄2 inch thick | 1 0-2 | |
| Peas | Shelled | 1 0-2 | |
| Peppers Whole | 1 0-3 | ||
| Potatoes (sweet) | Sliced, 1 to 11⁄2 inches thick | 1 6-8 | |
| Sliced, 1⁄2 inch thick | 1 4-5 | ||
| Potatoes (white) | Whole, 21⁄2-inch diameter | 11⁄2 | 15 |
| Whole, 11⁄2-inch diameter | 1 10 | ||
| Sliced, 3⁄4 inch thick | 1 | 5 | |
| Sliced, 1⁄2 inch thick | 1 | 3 | |
| Rutabaga | Cubed or sliced, 1 inch thick | 1 | 3 |
| Spinach | Whole leaves | 1 | 0 |
| Squash, summer (yellow, zucchini) | Sliced, 1 inch thick | 1 | 1 |
| Squash, winter (acorn+) | Quartered | 1 12 | |
| Squash, winter (spaghetti+) | Halved | 1 12 | |
| Sliced, 1⁄4 to 1⁄2 inch thick | 1 0-1 | ||
| Swiss Chard | Whole leaves | 1 0-1 | |
| Turnips | Sliced or cubed, 3⁄4 inch thick | 1 3-5 | |
* Do not use rack; place in cooking liquid.
+ Let pressure drop of its own accord.
FROZEN VEGETABLE TIMETABLE
| VEGETABLE | CUPS OF LIQUID | COOKING TIME (MINS.) | VEGETABLE | CUPS OF LIQUID | COOKING TIME (MINS.) |
| Asparagus (cut, spears) | 1 | 2 | Corn-on-the-Cob | 1 | 2–3 |
| Beans (green, wax, french style) | 1 | 1–2 | Lima Beans | 1 | 1–2 |
| Broccoli | 1 | 1–2 | Mixed Vegetables | 1 | 1–2 |
| Brussels Sprouts | 1 | 2–3 | Peas | 1 | 1–2 |
| Cauliflower 1 | 1–2 | Peas and Carrots | 1 | 1–2 | |
| Corn (cut) | 1 | 1–2 | Spinach | 1 | 2–4 |
DRY BEANS AND PEAS
The pressure cooker is ideal for preparing dry beans and peas quickly. However, dry beans and peas have a tendency to froth and foam during cooking, which could cause the vent pipe to become blocked. Therefore, it is necessary to use the following cautions when pressure cooking dry beans and peas:
- Never fill the cooker over the 12 full line (this includes beans, ingredients, and water).
- Add 1 tablespoon vegetable oil for cooking.
- Allow pressure to drop of its own accord.
SOAKING BEANS AND PEAS
Soaking is strongly recommended for all beans and peas, except lentils and black-eyed peas, for even cooking and to remove water-soluble, gas-producing starches. Soaking can be done using the traditional or the quick-soak method.
Traditional Method: Clean and rinse beans; cover with three times as much water as beans. Soak 4 to 8 hours. Drain.
Quick Method: Clean and rinse beans; cover with three times as much water as beans. Bring beans to a boil and boil for 2 minutes.
Remove from heat, cover, and let stand for 1 to 2 hours. Drain.
COOKING BEANS AND PEAS
After soaking, rinse beans and remove any loose skins. Place beans in pressure cooker. Add fresh water to just cover the beans and add 1 tablespoon vegetable oil. Close cover securely. Place pressure regulator on vent pipe and cook according to the times in the table below. For more firm beans for salads and side dishes and when cooking less than 2 cups of beans or peas, use the shorter time. For soups and stews, use the longer time. After cooking is complete, allow pressure to drop of its own accord.
FOR DRY BEANS AND PEAS, DO NOT FILL PRESSURE COOKER OVER ½ FULL!
OPERATING THE COOKER WITHOUT COOKING LIQUID OR ALLOWING THE COOKER TO BOIL DRY WILL DAMAGE THE COOKER.
DRY BEANS AND PEAS TIMETABLE
Soak beans and peas, except lentils and black-eyed peas, according to the information above. Add 1 tablespoon vegetable oil to cooking liquid. DO NOT COOK SPLIT PEAS.
BEANS AND PEAS COOKING TIME (Minutes) BEANS AND PEAS COOKING TIME (Minutes)
| Adzuki 1–3 | Lima Beans (large)+ | 0–1 | |
| Anasazi 1–3 | Lima Beans (baby)+ | 1–3 | |
| Black Beans 2–4 | Navy Beans (pea) | 1–3 | |
| Black-Eyed Peas 2–4* | Peas (whole yellow, green) | 6–9 | |
| Chickpeas (garbanzo)+ 7–10 | Pinto Beans | 3–6 | |
| Great Northern Beans 2–5 | Red Beans | 3–6 | |
| Kidney Beans | 1–3 | Soybeans (beige) | 8–11 |
| Lentils (brown, green) | 3–5* |
* Cooking time is for unsoaked beans. + Add 12 to 1 teaspoon salt to soaking and cooking water to keep bean skins intact.
BAKED BEANS
| 2 | cups navy beans | 13 | cup brown sugar |
| 3 | cups water | 12 | teaspoon dry mustard |
| 14 | cup catsup | 14 | teaspoon black pepper |
| 14 | cup molasses | ...... | |
| 1 | 8-ounce slice uncooked ham, diced | Salt to taste | |
| 1 | medium onion, minced |
Soak beans according to instructions above. Add drained navy beans and remaining ingredients except salt to cooker. Close cover securely. Place pressure regulator on vent pipe and cook 35 minutes with pressure regulator rocking slowly. Let pressure drop of its own accord.
Nutrition Information Per Serving:
6 servings 264 Calories, 4 g Fat, 5 mg Cholesterol
LENTIL CURRY
| 1 | tablespoon vegetable oil | 12 | tablespoon curry powder |
| 34 | cup chopped onion | 12 | teaspoon ground ginger |
| 3 | cups water | ·s·s·s | |
| 1 | cup lentils | 12 | teaspoon salt |
| 12 | tablespoon coriander |
Heat oil in cooker over medium heat. Sauté onions. Add water, lentils, coriander, curry powder, and ginger. Close cover securely. Place pressure regulator on vent pipe and cook 3 minutes with pressure regulator rocking slowly. Let pressure drop of its own accord. Stir in salt.
Nutrition Information Per Serving:
4 servings 190 Calories, 2 g Fat, 0 mg Cholesterol
SAVORY WHITE BEANS
| 2 cups navy beans | 1 small bay leaf |
| 3 cups chicken broth | 12 teaspoon thyme |
| 1 cup chopped onion | 14 teaspoon rosemary |
| 1 cup sliced carrots | 14 teaspoon black pepper |
| 1 tablespoon minced garlic | ······· |
| 1 tablespoon vegetable oil | Salt to taste |
Soak beans according to instructions on page 21. Add all ingredients except salt to cooker. Close cover securely. Place pressure regulator on vent pipe and cook 2 minutes with pressure regulator rocking slowly. Let pressure drop of its own accord.
Nutrition Information Per Serving: 7 servings 254 Calories, 3 g Fat, 0 mg Cholesterol
GRAINS
Grains are an important, but often little recognized, part of a healthy diet. They contribute complex carbohydrates, soluble and insoluble fiber, and other nutrients. Yet with all these benefits, grains are low in fat. Grains can be prepared quickly and conveniently with the pressure cooker. With a pressure cooker it is not necessary to soak or simmer grains for several hours.
During cooking many grains tend to froth, foam, and sputter and could cause the vent pipe to become blocked. Therefore, to contain frothing and foaming during the cooking period, grains must be prepared in a bowl covered with aluminum foil in the pressure cooker. Preparing grains in a bowl also minimizes cleanup which can be difficult if the grains stick to the bottom of the cooker. The bowl can be metal, such as stainless steel, or oven-safe glass. If using glass, increase cooking time by 1 to 5 minutes depending on the length of the recommended cooking time.
FOR GRAINS, DO NOT FILL PRESSURE COOKER OVER ½ FULL!
OPERATING THE COOKER WITHOUT COOKING LIQUID OR ALLOWING THE COOKER TO BOIL DRY WILL DAMAGE THE COOKER.
GRAIN TIMETABLE
Combine the desired grain and the amount of water or broth indicated in the table below in a bowl which fits loosely in the pressure cooker. Cover bowl firmly with aluminum foil. Pour two cups water into cooker. Place bowl on cooking rack in cooker. Close cover securely. Place pressure regulator on vent pipe and cook for the time indicated in the table below with a very slow, steady flow of steam escaping from the pressure regulator. After pressure cooking, allow pressure to drop of its own accord. Using tongs or hot pads, carefully remove bowl from cooker. Remove foil. Before serving, separate the grains by lifting gently with a fork while steaming. It may be necessary to allow excess moisture to evaporate from some grains. If excessive moisture remains, drain before using grains.
FOR GRAINS, DO NOT FILL PRESSURE COOKER OVER ½ FULL!
| CUPS LIQUID COOKING TIME | CUPS LIQUID COOKING TIME | ||||
| GRAIN (1 Cup) | IN BOWL | (Minutes) | GRAIN (1 Cup) | IN BOWL | (Minutes) |
| Amaranth | 134 | 4–5 | Quinoa | 112 | 1 |
| Barley (hulled) | 212 | 25–28 | Rice (brown) | 112 | 10–12 |
| Barley (pearl) | 212 | 9–12 | Rice (white) | 112 | 5–8 |
| Buckwheat | 2 3–4 | Rice (wild) | 112 | 20–25 | |
| Bulgar | 112 | 2–3 | Ryc Berries | 112 | 20–25 |
| Millet | 2 | 9–10 | Spelt | 2 | 25–30 |
| Oats (whole groats) | 112 | 20–25 | Wheat Berries | 2 | 25–30 |
| Oats (steel cut) | 2 4–5 | ||||
SEASONED RICE PILAF
| 2 | tablespoons butter | 12 teaspoon salt |
| 1 | small onion, chopped | 12 teaspoon oregano |
| 2 | cups long grain white rice | 14 teaspoon pepper |
| 2 | cups chicken broth | 2 cups water |
| 134 cups water |
Heat butter in cooker over medium heat. Sauté onions until tender. Combine onion with rice, broth, 1 ^3/4 cup water, salt, oregano, and pepper in a metal bowl which will fit loosely in cooker. Cover bowl firmly with aluminum foil. Pour 2 cups water into cooker. Place bowl on rack in cooker. Close cover securely. Place pressure regulator on vent pipe and cook 5 minutes with pressure regulator rocking slowly. Let pressure drop of its own accord. Open cooker, remove foil, and set rice aside to steam.
Nutrition Information Per Serving:
8 servings 210 Calories, 4 g Fat, 8 mg Cholesterol
Variation: Grecian Rice Pilaf
After pressure has dropped of its own accord, combine rice, 34 cup peas, 12 cup sliced ripe olives, and 1 red pepper, coarsely chopped. Allow rice to steam uncovered 5 minutes.
WILD RICE WITH RAISINS AND PECANS
1 tablespoon vegetable oil
1 medium onion, finely chopped
1½ cups wild rice
2 cups beef broth
2 cups water
● ● ● ● ● ● ●
^3/_4 cup golden raisins
13 cup pecans, toasted
Heat oil in cooker over medium heat. Sauté onion. Combine onion with wild rice and beef broth in a metal bowl which fits loosely in cooker. Cover bowl firmly with aluminum foil. Pour water into cooker. Place bowl on rack in cooker. Close cover securely. Place pressure regulator on vent pipe and cook 25 minutes with pressure regulator rocking slowly. Let pressure drop of its own accord. Open cooker and remove aluminum foil; add raisins and allow to steam for 5 minutes. Remove bowl from cooker; stir in pecans.
Nutrition Information Per Serving: 8 servings 167 Calories, 5 g Fat, 0 mg Cholesterol
LEMON RICE
1 cup long grain rice
1½ cups chicken broth
2 teaspoons lemon juice
^3/_4 teaspoon salt
2 cups water
● ● ● ● ● ● ●
14 teaspoon grated lemon rind
Combine rice, chicken broth, lemon juice, and salt in a metal bowl which fits loosely in cooker. Cover bowl firmly with aluminum foil. Pour 2 cups water into cooker. Place bowl on rack in cooker. Close cover securely. Place pressure regulator on vent pipe and cook 5 minutes with pressure regulator rocking slowly. Let pressure drop of its own accord. Open cooker, remove foil, and set rice aside to steam for 5 minutes. Stir in lemon rind.
Nutrition Information Per Serving: 4 servings 183 Calories, 0 g Fat, 0 mg Cholesterol
RISOTTO WITH ARTICHOKE HEARTS AND SUN-DRIED TOMATOES
1 tablespoon olive oil
1 cup arborio rice
2 cloves garlic, minced
2 cups chicken broth
13 cup white wine
13 cup dried tomatoes, chopped
2 cups water
● ● ● ● ● ● ●
1 can (13 ^3/4 ounces) artichoke hearts, drained and coarsely chopped
14 cup grated Parmesan cheese
1½ tablespoons fresh thyme
or 1½ teaspoons dried thyme
Salt and pepper to taste
Heat oil in cooker over medium heat; add rice and stir for 2 minutes until coated and slightly translucent. Add garlic and cook for 1 minute. Combine rice, garlic, broth, wine, and tomatoes in a metal bowl which fits loosely in cooker. Cover bowl firmly with aluminum foil. Pour water into cooker. Place bowl on rack in cooker. Close cover securely. Place pressure regulator on vent pipe and cook 8 minutes with pressure regulator rocking slowly. Let pressure drop of its own accord. Open cooker and remove foil. Stir artichoke hearts, Parmesan cheese, and thyme into rice.
Nutrition Information Per Serving: 4 servings 220 Calories, 5 g Fat, 4 mg Cholesterol
DESSERTS
Desserts may be prepared in oven-safe custard cups or any metal mold which will fit loosely in the pressure cooker. Fill molds only 23 full to allow for expansion of food. Cover securely with aluminum foil shaped to the sides of the mold. Place the mold or custard cups on the cooking rack in the cooker. Up to six custard cups of dessert can be pressure cooked at a time. Place three custard cups on cooking rack. Then, stack the other three custard cups opposite the bottom three custard cups.
To test custards for doneness, insert a knife into the center. If the knife comes out clean, it is done. If not, it will be necessary to bring the cooker back up to pressure and cook the custard a minute or two longer.
Do not cook applesauce, cranberries, or rhubarb in the pressure cooker.
FOR DESSERTS, DO NOT FILL PRESSURE COOKER OVER ^2 / _3 FULL!
OPERATING THE COOKER WITHOUT COOKING LIQUID OR ALLOWING THE COOKER TO BOIL DRY WILL DAMAGE THE COOKER.
VANILLA CUSTARD
2 cups low-fat milk
2 eggs, slightly beaten
14 cup sugar
14 teaspoon salt
12 teaspoon vanilla
Nutmeg
1 cup water
Combine milk, eggs, sugar, salt, and vanilla. Pour into individual custard cups. Sprinkle nutmeg on custards. Cover each cup firmly with aluminum foil. Pour water into cooker. Place custard cups on rack in cooker. Close cover securely. Place pressure regulator on vent pipe and cook 5 minutes with pressure regulator rocking slowly. Cool cooker at once. Chill.
Nutrition Information Per Serving: 4 servings 137 Calories, 4 g Fat, 118 mg Cholesterol
PETITE PUMPKIN CUSTARDS
1 can (16 ounces) solid-pack pumpkin
14 teaspoon ground cloves
1 can (14 ounces) sweetened condensed milk
1 cup water
3 eggs, beaten
• • • • • • •
1 teaspoon ground cinnamon
Whipped cream, optional
1 teaspoon finely chopped candied ginger, optional
Mix pumpkin, milk, eggs, cinnamon, ginger, and cloves. Pour into individual custard cups. Cover each cup firmly with aluminum foil. Pour water into cooker. Place custard cups on rack in cooker. Close cover securely. Place pressure regulator on vent pipe and cook 10 minutes with pressure regulator rocking slowly. Cool cooker at once. Refrigerate until chilled. Serve with whipped cream, if desired. Nutrition Information Per Serving: 8 servings 207 Calories, 6 g Fat, 97 mg Cholesterol
RICE PUDDING
1 cup long grain white rice
1 12 cups water
1 cup water
● ● ● ● ● ● ●
1 cup whole milk
12 cup sugar
12 cup raisins
12 teaspoon cinnamon
Combine rice and 1½ cups water in a metal bowl which fits loosely in cooker. Cover bowl firmly with aluminum foil. Pour 1 cup water into cooker. Place bowl on rack in cooker. Close cover securely. Place pressure regulator on vent pipe and cook 10 minutes with pressure regulator rocking slowly. Cool cooker at once. Stir milk, sugar, raisins, and cinnamon into rice. Cover bowl firmly with aluminum foil. Place bowl on rack in cooker. Close cover securely. Place pressure regulator on vent pipe and cook 3 minutes with pressure regulator rocking slowly. Let pressure drop of its own accord.
Nutrition Information Per Serving: 6 servings 238 Calories, 2 g Fat, 24 mg Cholesterol
TAPIOCA PUDDING
2 cups low-fat milk
2 tablespoons quick cooking tapioca
2 eggs, slightly beaten
13 cup sugar
12 teaspoon vanilla
1 cup water
Scald milk and tapioca. Remove from heat and let stand 15 minutes. Combine eggs, sugar, and vanilla. Add milk and tapioca, stirring constantly. Pour into individual custard cups. Cover firmly with aluminum foil. Pour water into cooker. Place custard cups on rack in cooker. Place pressure regulator on vent pipe and cook 5 minutes with pressure regulator rocking slowly. Cool cooker at once. Chill. Nutrition Information Per Serving: 6 servings 113 Calories, 3 g Fat, 75 mg Cholesterol
STUFFED APPLES
14 cup golden raisins
12 cup dry red wine
14 cup chopped nuts
2 tablespoons sugar
12 teaspoon grated orange rind
12 teaspoon ground cinnamon
4 cooking apples
1 tablespoon butter
1 cup water
Soak raisins in wine for at least 30 minutes. Drain, reserving wine. Combine raisins, nuts, sugar, orange rind, and cinnamon. Core apples, cutting to but not through bottoms. Peel top one-third of apples. Place each apple on square of aluminum foil that is large enough to completely wrap apple. Fill centers with raisin mixture. Top each with one-fourth of the butter. Wrap foil around apple, pinching firmly together at top. Place reserved wine, water, and apples in cooker. Place pressure regulator on vent pipe and cook 10 minutes with pressure regulator rocking slowly. Cool cooker at once.
Nutrition Information Per Serving: 4 servings 224 Calories, 8 g Fat, 8 mg Cholesterol
OATMEAL APPLE CRISP
4 cups apples, peeled and sliced
1 tablespoon lemon juice
12 cup quick cooking oats
14 cup brown sugar
2 tablespoons flour
1 teaspoon cinnamon
2 tablespoons butter, softened
2 cups water
Sprinkle apples with lemon juice. Combine oats, brown sugar, flour, and cinnamon. Cut in butter until coarse meal forms. Place apples in a greased bowl that will loosely fit in cooker. Sprinkle oat mixture evenly over apples. Cover bowl firmly with aluminum foil. Pour water into cooker. Place bowl on rack in cooker. Close cover securely. Place pressure regulator on vent pipe and cook 20 minutes with pressure regulator rocking slowly. Cool cooker at once.
Nutrition Information Per Serving: 4 servings 209 Calories, 7 g Fat, 16 mg Cholesterol
CHEESECAKE
1 8-ounce package cream cheese
1 3-ounce package cream cheese
12 cup sugar
2 eggs
12 cup vanilla wafer crumbs
2½ cups water
Beat cream cheese until smooth. Add sugar and beat in eggs. Pour mixture into buttered custard cups. Top with vanilla wafer crumbs. Cover each cup firmly with aluminum foil. Pour water into cooker. Place custard cups on rack in cooker. Close cover securely. Place pressure regulator on vent pipe and cook 15 minutes with pressure regulator rocking slowly. Cool cooker at once. Cool cheesecake. Cut around inside of cups to loosen and invert onto serving dish. Chill. Top with one of the following sauces, if desired. Nutrition Information Per Serving: 6 servings 305 Calories, 23 g Fat, 157 mg Cholesterol
Caramel Sauce
Combine 14 cup soft cream cheese, 14 cup brown sugar, 1 tablespoon granulated sugar, and 14 teaspoon vanilla. Mix thoroughly. Spoon over cheesecake. Garnish with pecans. Refrigerate until serving.
Fruit Sauce
Spoon canned fruit pie filling of your choice over cheesecake. Refrigerate until serving.
RECIPE INDEX
DESSERTS 23
Cheesecake 25
Oatmeal Apple Crisp....24
Petite Pumpkin Custards....24
Rice Pudding....24
Stuffed Apples....24
Tapioca Pudding 24
Vanilla Custard 23
DRY BEANS AND PEAS....21
Baked Beans 21
Dry Beans and Peas Timetable 21
Lentil Curry....21
Savory White Beans 22
GRAINS....22
Grain Timetable 22
Grecian Rice Pilaf....22
Lemon Rice....23
Risotto with Artichoke Hearts and Sun-Dried Tomatoes ..... 23
Seasoned Rice Pilaf. 22
Wild Rice with Raisins and Pecans. 23
MEATS....15
Apricot Barbecue Pork Roast 17
Barbecue Spareribs....18
Beef Pot Roast....16
Beef Stew....16
Corned Beef 16
Lamb Stew 18
Meat Timetable....18
Porcupine Meatballs 16
Pork Roast....17
Spaghetti Meat Sauce 16
Stuffed Flank Steak....17
Stuffed Pork Chops....17
Swiss Steak....17
POULTRY....13
Bayou Bounty Chicken....13
California Chicken 14
Chicken Breasts Tarragon....14
Chicken and Dressing....15
POULTRY (continued)....13
Chutney Chicken....14
Herbed Chicken 14
Poultry Timetable 15
Soy Chicken 14
Sweet 'N Sour Chicken....15
SEAFOOD....11
Lemon 'N Dill Cod and Broccoli....11
Marinated Tuna....13
Salmon Steaks Moutarde 12
"Scampi Style" Shrimp....11
Seafood Gumbo 12
Seafood Timetable 13
Shrimp Jambalaya....12
SOUPS AND STOCKS....9
Beef Tomato Soup....10
Black Bean Soup....10
Brown Beef Soup 10
Brown Beef Soup Stock 10
Chicken Dumpling Soup....9
Chicken Noodle Soup....9
Chicken Rice Soup 9
Chicken Soup 9
Chicken Soup Stock 9
Minestrone 11
Onion Soup....10
Potato Soup....10
Saffron Fish Stew 10
Zesty Homemade Chili....11
VEGETABLES....19
Artichokes 'N Sauce....19
Cabbage with Apples 19
Fresh Vegetable Timetable 20
Frozen Vegetable Timetable 20
Garlic Mashed Potatoes 19
Glazed Root Vegetables 19
Maple Glazed Sweet Potatoes....19
SERVICE AND PARTS INFORMATION
If you have any questions regarding the operation of your Prestocooker or need parts for your cooker, contact us by any of these methods:
- Call 1-800-877-0441 weekdays 8:00 AM to 4:00 PM (Central Time)
- Email us through our website at www.gopresto.com/contact
• Write: National Presto Industries, Inc.
Consumer Service Department
3925 N. Hastings Way
Eau Claire, WI 54703-3703
When contacting the Consumer Service Department or when ordering replacement parts, please specify the model number and series code found stamped on the side of the cooker body. Please record this information:
Model Number ____ Series Code ____ Date Purchased ____
Inquiries will be answered promptly by telephone, email, or letter. When emailing or writing, please include a phone number and a time when you can be reached during weekdays, if possible.
Any maintenance required for this cooker, other than that described in the “CLEANING” and “CARE AND MAINTENANCE” sections of this instruction book (pages 6 and 7), should be performed by our Factory Service Department. NOTE: We do recommend that you call our Consumer Service Department at 1-800-877-0441 prior to sending your cooker in for repair. Be sure to indicate date of purchase and a description of the problem when sending a cooker for repair. Send cookers for repair to:
Canton Sales and Storage Company
Presto Factory Service Department
Attn: Repair
555 Matthews Drive
Canton, MS 39046-3251
The Presto Factory Service Department is equipped to service all PRESTO ^® appliances and supply genuine PRESTO ^® parts. Genuine PRESTO ^® replacement parts are manufactured to the same exacting quality standards as PRESTO ^® appliances and are engineered specifically to function properly with its appliances. Presto can only guarantee the quality and performance of genuine PRESTO ^® parts. “Look-alikes” might not be of the same quality or function in the same manner. To ensure that you are buying genuine PRESTO ^® replacement parts, look for the PRESTO ^® trademark.
Replacement parts are available at hardware stores and other retail outlets. Parts may also be ordered online at www.gopresto.com.
PRESTO® Limited Warranty
(Applies Only in the United States and Canada)
This quality PRESTO® appliance is designed and built to provide many years of satisfactory performance under normal household use. Presto pledges to the original owner that should there be any defects in material or workmanship during the first twelve (12) years after purchase, we will repair or replace it at our option. Our pledge does not apply to normal wear and tear including scratches, dulling of the polish, or staining; the repair or replacement of moving and/or perishable parts such as the scaling ring, overpressure plug, pressure relief valve, or air vent/cover lock gasket; or for any damage caused by shipping. Outside the United States and Canada, this limited warranty does not apply.
To obtain service under the warranty, please call our Consumer Service Department at 1-800-877-0441. If unable to resolve the problem, you will be instructed to send your PRESTO ^® appliance to the Presto Factory Service Department for a quality inspection; shipping costs will be your responsibility. When returning an appliance, please include your name, address, phone number, and the date you purchased the appliance as well as a description of the problem you are encountering with the appliance.
We want you to obtain maximum enjoyment from using this PREST® appliance and ask that you read and follow the enclosed instructions. Failure to follow instructions, damage caused by improper replacement parts, abuse, misuse (including overheating and boiling the unit dry), or neglect will void this pledge. This warranty gives you specific legal rights and you may also have other rights which vary from state to state. This is Presto's personal pledge to you and is being made in place of all other express warranties.
NATIONAL PRESTO INDUSTRIES, INC.
Eau Claire, Wisconsin 54703-3703


- 6-Quart Stainless Steel Pressure Cooker Instructions and Recipes
- IMPORTANT SAFEGUARDS
- SAVE THESE INSTRUCTIONS
- INTRODUCTION
- HANDLE INSTALLATION
- To Attach Body Handle to Cooker Body
- To Attach Helper Handle to Cooker Body
- To Attach Cover Handle to Cooker Cover
- GETTING ACQUAINTED
- HOW TO USE
- IMPORTANT SAFETY INFORMATION
- CLEANING
- CARE AND MAINTENANCE
- HELPFUL HINTS
- QUESTIONS & ANSWERS
- Occasionally the cover is hard to open or close. What causes this? What should I do?
- What can be done if the food prepared in the pressure cooker has more liquid than desired?
- How does one prevent overcooking?
- What if the food is not completely done after the recommended cooking time?
- Can I use my pressure cooker on all types of ranges?
- When cooking first begins, is it normal for steam to escape and moisture to form on the cover and between the handles?
- My cooker is making a loud, unpleasant sound. The cap in the middle of the cover is also lifting up and emitting steam. What is causing this?
- Is it normal for the air vent/cover lock to rise up partially and drop back down when cooking first begins?
- SOUPS AND STOCKS
- CHICKEN SOUP
- Delicious Soups From Chicken Soup...
- BROWN BEEF SOUP
- Delicious Soups From Brown Beef Soup...
- BLACK BEAN SOUP
- POTATO SOUP
- SAFFRON FISH STEW
- MINESTRONE
- SEAFOOD
- LEMON 'N DILL COD AND BROCCOLI
- "SCAMPI-STYLE" SHRIMP
- POULTRY
- POULTRY TIMETABLE
- MEATS
- SWISS STEAK
- STUFFED FLANK STEAK
- STUFFED PORK CHOPS
- PORK ROAST
- APRICOT BARBECUE PORK ROAST
- MEAT TIMETABLE
- VEGETABLES
- GARLIC MASHED POTATOES
- MAPLE GLAZED SWEET POTATOES
- GLAZED ROOT VEGETABLES
- ARTICHOKES 'N SAUCE
- CABBAGE WITH APPLES
- FRESH AND FROZEN VEGETABLE TIMETABLE
- TO PREVENT OVERCOOKING, COOL COOKER AT ONCE AFTER COOKING VEGETABLES, EXCEPT WHEN NOTED.
- FRESH VEGETABLE TIMETABLE
- DRY BEANS AND PEAS
- SOAKING BEANS AND PEAS
- COOKING BEANS AND PEAS
- DRY BEANS AND PEAS TIMETABLE
- GRAINS
- GRAIN TIMETABLE
- Variation: Grecian Rice Pilaf
- WILD RICE WITH RAISINS AND PECANS
- LEMON RICE
- RISOTTO WITH ARTICHOKE HEARTS AND SUN-DRIED TOMATOES
- DESSERTS
- VANILLA CUSTARD
- PETITE PUMPKIN CUSTARDS
- RICE PUDDING
- TAPIOCA PUDDING
- STUFFED APPLES
- OATMEAL APPLE CRISP
- CHEESECAKE
- Caramel Sauce
- Fruit Sauce
- RECIPE INDEX
- DESSERTS 23
- DRY BEANS AND PEAS....21
- GRAINS....22
- MEATS....15
- POULTRY....13
- POULTRY (continued)....13
- SEAFOOD....11
- SOUPS AND STOCKS....9
- VEGETABLES....19
- SERVICE AND PARTS INFORMATION
- PRESTO® Limited Warranty
- (Applies Only in the United States and Canada)
Brand : Presto
Model : 01365
Category : Frying Pan