S15ICE14E - Ice Maker Sandstrøm - Free user manual and instructions
Find the device manual for free S15ICE14E Sandstrøm in PDF.


| Product Type | Ice Cream Maker |
| Model | S15ICE14E |
| Brand | Sandstrøm |
| Capacity | 1.5 L |
| Dimensions (L x W x H) | 425 x 285 x 262 mm |
| Weight | 11.8 kg |
| Power Consumption | 150 W |
| Voltage / Frequency | 220-240 V / 50 Hz |
| Modes | Ice Cream, Cooling Only, Mixing Only |
| Timer Range | 5 to 60 minutes |
| Built-in Compressor | Yes (no pre-freezing required) |
| Display | LCD with time and mode indicators |
| Bowl Material | Removable bowl (non-stick coating) |
| Lid | Transparent lid with refill opening |
| Mixing Blade | Included, fits motor axis |
| Accessories | Ice cream spoon, instruction manual |
| Safety Features | Automatic standby after 10 min idle, pause function, grounded plug required |
| Cleaning | Unplug before cleaning; do not immerse in water; wipe with damp cloth |
| Warranty | Standard manufacturer warranty (check local regulations) |
Frequently Asked Questions - S15ICE14E Sandstrøm
User questions about S15ICE14E Sandstrøm
0 question about this device. Answer the ones you know or ask your own.
Ask a new question about this device
Download the instructions for your Ice Maker in PDF format for free! Find your manual S15ICE14E - Sandstrøm and take your electronic device back in hand. On this page are published all the documents necessary for the use of your device. S15ICE14E by Sandstrøm.
USER MANUAL S15ICE14E Sandstrøm
natural_image
Exterior view of a modern stainless steel microwave oven with digital display and control panel (no visible text or symbols)Contents
GB
Safety Warnings....5
Unpacking....11
Product Overview....12
Operation....13
Ice cream Recipes....14
Hints and Tips 17
Specifications....17
Innhold
NO
For your continued safety and to reduce the risk of injury or electric shock, please follow all the safety precautions listed below.
- Read all the instructions carefully before using this appliance and keep them for future reference.
- Retain the manual. If you pass the appliance on to a third party, make sure to include this manual.
- Make sure that your outlet voltage corresponds to the voltage stated on the rating label of the appliance.
- Unplug the appliance from the mains socket when not in use, or before cleaning any part of the appliance.
- Do not operate any appliance with a damaged mains cable or mains plug, or in an abnormal state. If the mains cable is damaged it must be replaced by the manufacturer, its service agent, or similarly qualified persons in order to avoid a hazard.
- Do not use an extension cable, it may result in fire, electrical shock and/or personal injuries.
- Do not let the mains cable hang over the edge of the table or counter, or touch hot surfaces.
- Ensure that the plug is easily accessible to enable disconnection from the mains supply.
- To disconnect, remove the mains plug from the mains socket. Never pull the mains cable to remove the mains plug from mains socket.
- Do not use mechanical devices or other means to accelerate the defrosting process, other than those recommended by the manufacturer.
- Do not use electrical appliances inside the food storage compartments of the unit, unless they are of the type recommended by the manufacturer.
- Do not immerse the appliance, mains cable or mains plug in water or other liquids.
- Keep ventilation openings in the unit enclosure clear of obstructions.
- Do not store volatile or flammable substances, such as aerosol cans with a flammable propellant, in the unit.
- Stand the appliance on a stable flat surface before use.
- Choose a location for your unit away from heat sources such as radiators or fires.
• Only use the appliance for its intended domestic use. - This appliance can be used by persons aged from 8 years and above and persons with reduced physical, sensory or mental capabilities, or lack of experience and knowledge if they have been given supervision or instructions concerning the use of the appliance in a safe way and understand the hazards involved. Children should not play with the appliance. Cleaning and user maintenance should not be made by children unless they are older than 8 years old and are supervised.
-
Keep the appliance and its cord out of reach of children less than 8 years old.
• This appliance is intended for indoor household use and similar applications such as:
– farm houses and by clients in hotels, motels and other residential type environment;
— bed and breakfast type environment;
– catering and similar non-retail applications.
• Children should be supervised to ensure that they do not play with the unit. -
Do not damage the refrigerant circuit (The refrigerant is a very environmental-friendly gas but is also combustible. Take care when transporting or moving the unit to ensure that the refrigeration circuit is not damaged. In the event of damage avoid naked flames or ignition sources and ventilate the room in which the unit is placed for a few minutes.)
- Make sure the unit is earthed properly during use. Use of any extension sockets must have an earth connection.
Sikkerhetsadvarsler
NO
Thank you for purchasing your new Sandstrøm Ice Cream Maker.
We recommend that you spend some time reading this instruction manual in order that you fully understand all the operational features it offers. You will also find some hints and tips to help you resolve any issues.
Read all the safety instructions carefully before use and keep this instruction manual for future reference.
GB
Unpacking
Remove all items from the packaging. Retain the packaging. If you dispose of it please do so according to local regulations.
The following items are included:
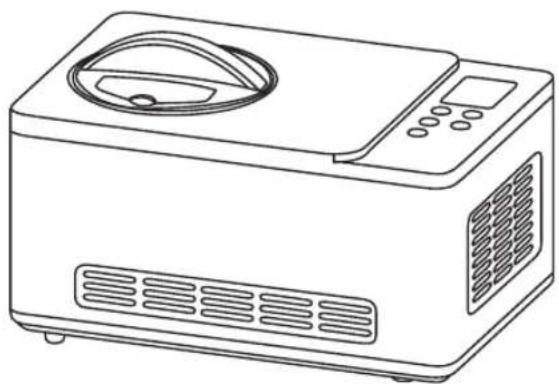
natural_image
Line drawing of a microwave oven with control panel and ventilation grille (no text or symbols)Main Unit
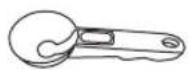
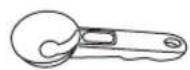
Ice-cream spoon
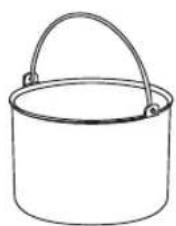
natural_image
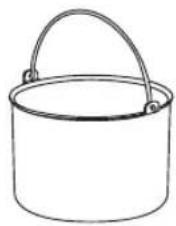
Simple line drawing of a bucket with a handle (no text or symbols)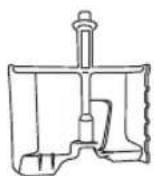
Mixing Blade
Instruction ManualRemovable Bowl
Product Overview
GB
- Transparent Lid
- Refill Lid
- Mixing Blade
- Removable Bowl
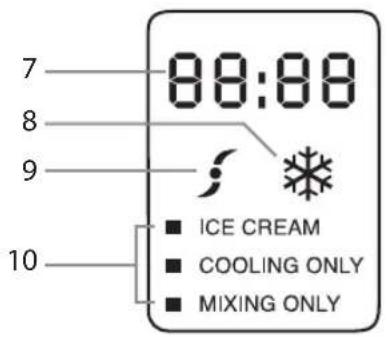
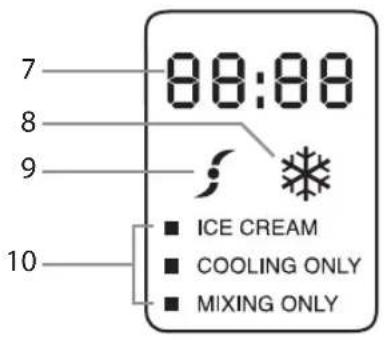
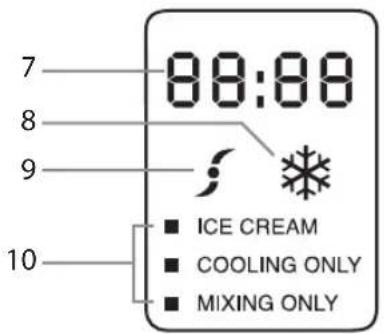
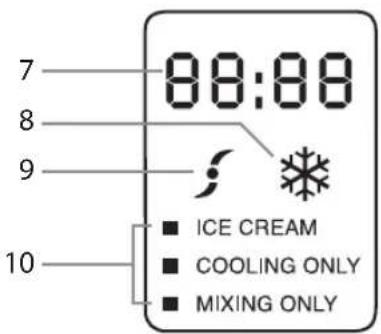
- LCD Display
- Buttons
- Time Display

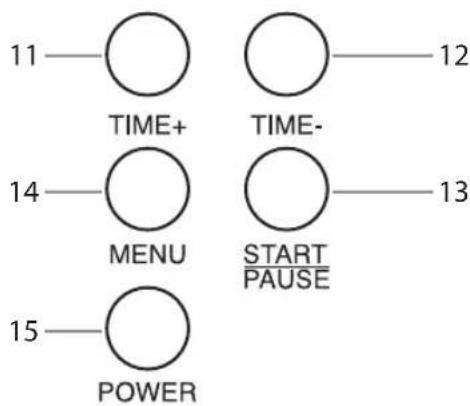
Control Panel
flowchart
graph TD
    A["11"] --> B["TIME+"]
    C["14"] --> D["MENU"]
    E["15"] --> F[" "]
POWER
- FREEZING icon
- MIXING icon
- Mode Display
-
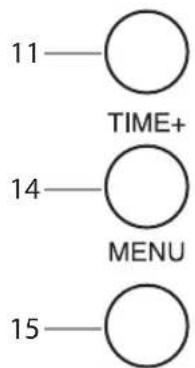
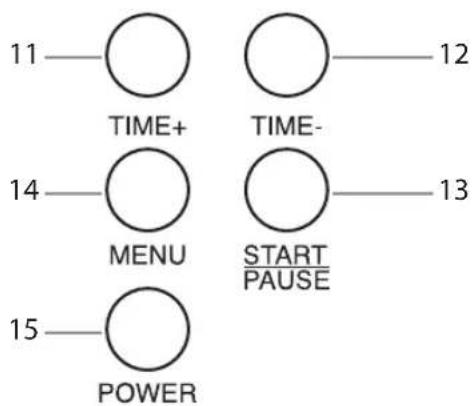
TIME+ Button
-
Press once to increase time by 1 minute.
-
Press and hold to increase time rapidly. Maximum time limit is 60 minutes.
-
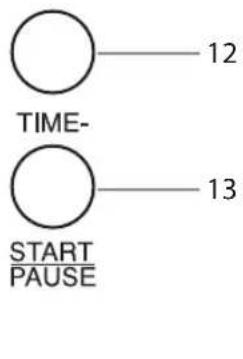
TIME- Button
-
Press once to decrease time by 1 minute.
-
Press and hold to decrease time rapidly. Minimum time limit is 5 minutes.
-
START/PAUSE Button
-
Press to start/pause operation.
-
During pause, both operation and time countdown will be paused. Press again to resume.
-
If the unit is paused for more than 3 minutes, the compressor will stop working. Press within 10 minutes to resume the compressor (there will be a few minutes delay to resume).
-
If the unit is paused for more than 10 minutes, it will return to standby. Press within 10 minutes to resume the unit.
-
MENU Button
-
Press this button repeatedly to choose ICE CREAM, COOLING ONLY or MIXING ONLY mode.
-
During operation, press and hold to re-enter setting mode.
-
POWER Button
-
During standby, press to enter setting mode.
- During operation, press to power off the unit.
Operation
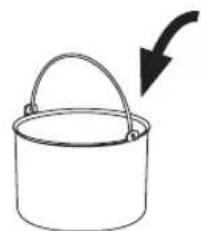
- Prepare ingredients from your own recipe or from the recipes here, and pour them into the removable bowl. You do not need to freeze the bowl for hours in a freezer in advance, as this unit has a built-in compressor that freezes the ingredients, thus ensuring the output of ice cream.
- Put the removable bowl into the unit and slightly turn around the bowl to fit it well with the fixed bowl.
- Place the mixing blade into the removable bowl and keep the bottom hole of the mixing blade fit well with the motor axis. Then put the transparent lid onto the unit and lock it anticlockwise.
- Press the POWER button to enter the setting mode.
- Press the MENU button to choose ICE CREAM, COOLING ONLY or MIXING ONLY mode.
- Press the TIME+ or TIME- button to choose the operation time.
- Press the START/PAUSE button to start.
- You can further add your favourite ingredients by opening the refill lid.
natural_image
Simple line drawing of a bucket with a handle and arrow indicating direction (no text or symbols)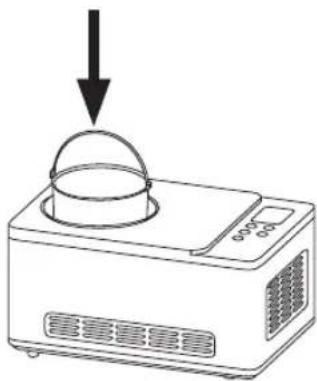
natural_image
Line drawing of a microwave oven with a dome-shaped lid and a downward arrow indicating motion (no text or symbols)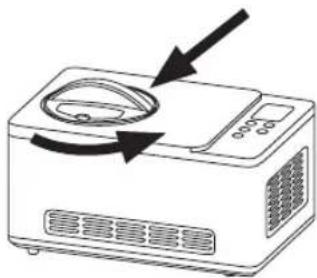
natural_image
Line drawing of a microwave oven with airflow arrows indicating direction (no text or symbols)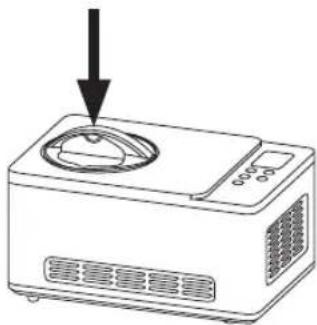
natural_image
Line drawing of a microwave oven with a circular vent and control panel (no text or symbols)
Make sure the power cord is unplugged.

Always place the unit upright on a flat surface in order that the built-in compressor can provide the best performance.
Ice Cream Recipes
Vanilla Ice Cream
Makes eight 1/2-cup servings.
- 1 cup whole milk • 1/2 cup granulated sugar
- 3/2 cup heavy cream, well chilled
-
1 – 2 teaspoons pure vanilla extract, to taste
-
Put the removable bowl into the unit. In the removable bowl, pour in the milk and granulated sugar. Place the mixing blade into the removable bowl, then close and lock the transparent lid. Press the MENU button and select MIXING ONLY mode, set the time to about 1 – 2 minutes.
-
Pour in the heavy cream and vanilla to taste.
- Press the MENU button and select ICE CREAM mode, set the time to about 30 – 40 minutes.
Nutritional analysis per serving
• Calories 239 (68% from fat)
• Carbohydrates 17g
- Protein 2g
• Fat 18g (Saturated fat 11g)
- Cholesterol 69mg
- Sodium 30mg
Variations
- Mint Chip
Omit the vanilla and replace with 1 to 1-1/2 teaspoons of pure peppermint extract (to taste). Chop 4-ounce of your favourite bittersweet or semi-sweet chocolate bar into tiny uneven pieces. Add the chopped chocolate during the last 5 minutes of mixing.
- Butter Pecan
Melt 1 stick of unsalted butter in a 10-inch skillet. Add 1 cup of roughly chopped pecans and 1 teaspoon of kosher salt. Cook over medium-low heat, stirring frequently until the pecans are lightly browned. Remove from the heat, strain (the butter will have a pecan flavor and may be reserved for another use). Allow the pecans to cool completely. Add the toasted buttered pecans during the last 5 minutes of mixing.
- Cookies & Cream
Add 3/4 cup of coarsely chopped cookies or your favourite candy (chocolate chip, Oreos, Mint Oreos, etc.) during the last 5 minutes of mixing.
Basic Chocolate Ice Cream
Makes eight 1/2-cup servings.
- 1 cup whole milk • 1/2 cup granulated sugar
- 1 cup heavy cream, well-chilled
- 1 teaspoon pure vanilla extract
-
240g or 8 ounces bittersweet or semi-sweet chocolate (your favourite) broken into 1/2-inch pieces
-
Heat the whole milk until it is just bubbling around the edges (this may be done on the stovetop or in a microwave).
- Put the removable bowl into the unit. In the removable bowl, pour in the sugar, chocolate and hot milk. Place the mixing blade into the removable bowl, then close and lock the transparent lid. Press the MENU button and select MIXING ONLY mode and set the time. Mix until well blended and smooth.
- Pour in the heavy cream and vanilla to taste.
- Press the MENU button and select ICE CREAM mode, set the time to about 50 – 60 minutes.
Nutritional analysis per serving
• Calories 370 (60% from fat) • Carbohydrates 34g) • Protein 3g
- Fat 25g (Saturated fat 11g)) • Cholesterol 65mg) • Sodium 31mg
Variations
• Chocolate Almond
Add 1/2 teaspoon of pure almond extract along with the vanilla. Add 1/2 - 3/4 cup of chopped toasted almonds or chopped chocolate-coated almonds during the last 5 – 10 minutes of freezing.
• Chocolate Cookie
Add 1/2 - 1 cup of chopped cookies during the last 5 minutes of freezing.
• Chocolate Fudge Brownie
Add 1/2 - 1 cup of chopped day old brownies during the last 5 minutes of freezing.
• Chocolate Marshmallow Swirl
When removing the ice cream to a container for freezing, layer it with dollops of your favourite chocolate sauce and scoops of marshmallow crème (fluff).
Fresh Strawberry Ice Cream
Makes eight 1/2-cup servings.
- 250g or 1 pint fresh ripe strawberries, stemmed and sliced
• 3/2 tablespoons freshly squeezed lemon juice
• 1/2 cup sugar, divided • 1 cup whole milk - 1 cup heavy cream
-
1 teaspoon pure vanilla extract
-
In a small bowl, combine the strawberries with the lemon juice and 1/3 cup of sugar; stir gently and allow the strawberries to macerate in the juices for 2 hours.
- Put the removable bowl into the unit. In the removable bowl, pour in the milk and granulated sugar. Place the mixing blade into the removable bowl, then close and lock the transparent lid. Press the MENU button and select MIXING ONLY mode and set the time to about 1 – 2 minutes.
- Pour in the heavy cream plus any accumulated juices from the strawberries and vanilla.
- Press the MENU button and select ICE CREAM mode, set the time to about 50 – 60 minutes.
- Add the sliced strawberries during the last 5 minutes of freezing.
This ice cream will have a “natural” appearance of very pale pink; if a deeper pink is desired, sparingly add drops of red food colouring until the desired color is achieved.
Nutritional analysis per serving
• Calories 222 (61% from fat) • Carbohydrates 20g • Protein 2g
- Fat 15g (Saturated fat 10g) • Cholesterol 57mg • Sodium 26mg
Fresh Lemon Sorbet
Makes eight 1/2-cup servings.
• 3/2 cup sugar • 3/2 cup water
• 1 cup freshly squeezed lemon juice
- 1 tablespoon finely chopped lemon zest (When zesting a lemon or lime, use a vegetable peeler to remove the coloured part of the citrus rind.)
- Combine the sugar and water in a medium saucepan and bring to boil over medium-high heat.
- Reduce heat to low and simmer without stirring until the sugar dissolves, about 3 – 5 minutes.
- Cool completely. This is called a simple syrup, and may be made ahead in larger quantities to have on hand for making fresh lemon sorbet. Keep refrigerated until ready to use.
- When cool, add the lemon juice and zest; stir to combine. Pour the mixture into the removable bowl.
- Put the removable bowl into the unit. Place the mixing blade into the removable bowl, then close and lock the transparent lid. Press the MENU button and select ICE CREAM mode, set the time to about 50 – 60 minutes.
Nutritional analysis per serving
• Calories 204 (0% from fat) • Carbohydrates 52g • Protein 19g
- Fat 0g (Saturated fat 0g) • Cholesterol 0mg • Sodium 2mg
Variation
• Fresh Pink Grapefruit Sorbet
Substitute 1-1/2 cups of freshly squeezed pink grapefruit juice for the lemon juice, and 1 tablespoon of finely chopped grapefruit zest for the lemon zest. Add 1/4 cup of Orgeat Syrup to the mixture (Orgeat Syrup is used for cocktails such as MaiTai or Scorpion and can be found with the drink mixers in most grocery stores).
Chocolate Frozen Yogurt
Makes eight 1/2-cup servings.
- 1 cup whole milk
- 180g or 6 ounces bittersweet or semisweet chocolate, chopped
- 2 cups low-fat vanilla yogurt
-
1/4 cup sugar
-
Put the removable bowl into the unit. In the removable bowl, pour in the milk and chocolate. Place the mixing blade into the removable bowl, then close and lock the transparent lid. Press the MENU button and select MIXING ONLY mode, set the time to about 1 - 2 minutes.
- Add the yogurt and sugar; select MIXING ONLY mode and set the time. Mix until smooth.
- Press the MENU button and select ICE CREAM mode, set the time to about 50 – 60 minutes.
Nutritional analysis per serving
• Calories 222 (31% from fat) • Carbohydrates 36g • Protein 3g
- Fat 8g (Saturated fat 64g) • Cholesterol 4mg • Sodium 46mg
Hints and Tips
- When the ice cream becomes harder, the mixing motor might be blocked.
- If the machine stays idle for 10 minutes after the ice cream making process is finished, the machine will run the COOLING mode (no mixing) for 10 minutes. If after 10 minutes of COOLING mode the machine is still idle, it will beep then enter into standby mode.
- Always remember to unplug from the mains socket when you serve the finished ice cream to avoid an electric shock.
- To avoid overflow and waste, please make sure that the ingredients do not exceed 60% of the capacity of the removable bowl (ice cream expands when being formed).
- Remove the finished ice cream into another container using a plastic scoop or a wooden spoon; do not use a metal scoop to avoid scratching the inside of the removable bowl.
Specifications
| Model Number S15ICE14E | |
| Capacity 1.5L | |
| Voltage 220V - 240V | |
| Frequency 50Hz | |
| Power Consumption 150W | |
| Unit Dimensions (L) x (W) x (H) 425 x 285 x 262mm | |
| Weight 11.8kg |
Takk for at du kjøpte en ny Sandstrøm iskremmaskin.
natural_image
Line drawing of a microwave oven with control panel and ventilation grille (no text or symbols)Hovedenhet

Iskremskje


BruksanvisningAvtakbar bolle Mikseblac
Produktoversikt
Kontrollpanel
flowchart
graph TD
    A["11"] --> B["TIME+"]
    C["12"] --> D["TIME-"]
    E["14"] --> F["MENU"]
    G["13"] --> H["START/PAUSE"]
    I["15"] --> J["POWER"]
- FROST-ikon
- MIKSING-ikon
- Modusvisning
- TID+-knapp
natural_image
Simple line drawing of a bucket with a handle and arrow indicating direction (no text or symbols)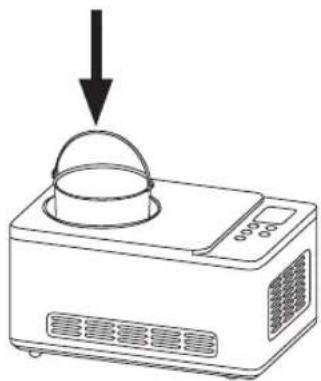
natural_image
Line drawing of a microwave oven with a dome-shaped lid and a downward arrow indicating motion (no text or symbols)
natural_image
Line drawing of a microwave oven with airflow arrows indicating direction (no text or symbols)
natural_image
Line drawing of a microwave oven with a circular vent and control panel, no text or symbols present
Pass på at strømledningen er koblet fra.

natural_image
Line drawing of a microwave oven with control panel and ventilation grille (no text or symbols)Huvudenhet

Glasskopa

natural_image
Simple line drawing of a bucket with a handle (no text or symbols)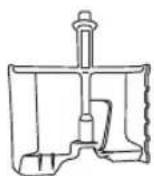

InstruktionsbokLöstagbar skål
Blandarbla
Produktöversikt
Kontrollpanelen


flowchart
graph TD
    A["11"] --> B["TIME+"]
    C["14"] --> D["MENU"]
    E["15"] --> F["POWER"]

natural_image
Simple line drawing of a bucket with a handle and arrow indicating direction (no text or symbols)
natural_image
Line drawing of a microwave oven with a dome-shaped lid and a downward arrow indicating motion (no text or symbols)
natural_image
Line drawing of a microwave oven with airflow arrows indicating direction (no text or symbols)
natural_image
Line drawing of a microwave oven with a circular vent and control panel (no text or symbols)
• Chocolate Fudge Brownie
• Chocolate Marshmallow Swirl
Chocolate Frozen Yogurt
natural_image
Line drawing of a microwave oven with control panel and ventilation grille (no text or symbols)Laite
jäätelölusikka

natural_image
Simple line drawing of a bucket with a handle (no text or symbols)
FI
Ohjauspaneeli
flowchart
graph TD
    A["11"] --> B["TIME+"]
    C["12"] --> D["TIME-"]
    E["14"] --> F["MENU"]
    G["13"] --> H["START/PAUSE"]
    I["15"] --> J["POWER"]
natural_image
Simple line drawing of a bucket with a handle and arrow indicating downward motion (no text or symbols)
natural_image
Line drawing of a microwave oven with a dome-shaped lid and a downward arrow indicating motion (no text or symbols)
natural_image
Line drawing of a microwave oven with airflow arrows indicating direction (no text or symbols)
natural_image
Line drawing of a microwave oven with a circular vent and control panel (no text or symbols)
natural_image
Line drawing of a microwave oven with control panel and ventilation grille (no text or symbols)Hovedenheden

Isske
natural_image
Simple line drawing of a bucket with handle (no text or symbols)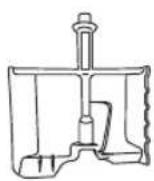

DK
Betjeningspanel


POWER
natural_image
Simple line drawing of a bucket with a handle and arrow indicating direction (no text or symbols)
natural_image
Line drawing of a microwave oven with a dome-shaped lid and a downward arrow indicating motion (no text or symbols)
natural_image
Line drawing of a microwave oven with airflow arrows indicating direction (no text or symbols)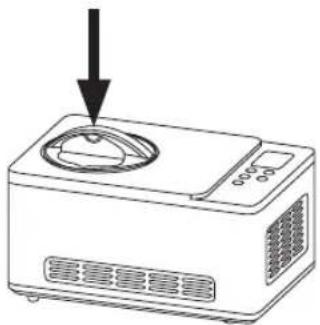
natural_image
Line drawing of a microwave oven with a downward arrow indicating airflow or cooling (no text or symbols)
The symbol on the product or its packaging indicates that this product must not be disposed of with your other household waste. Instead, it is your responsibility to dispose of your waste equipment by handing it over to a designated collection point for the recycling of waste electrical and electronic equipment. The separate collection and recycling of your waste equipment at the time of disposal will help conserve natural resources and ensure that it is recycled in a manner that protects human health and the environment. please contact your local authority, or where you purchased your product.
NO
[1]
SE
- Contents
- Innhold
- Sikkerhetsadvarsler
- Thank you for purchasing your new Sandstrøm Ice Cream Maker.
- Unpacking
- Product Overview
- GB
- Control Panel
- Operation
- Ice Cream Recipes
- Vanilla Ice Cream
- Nutritional analysis per serving
- Variations
- - Mint Chip
- - Butter Pecan
- - Cookies & Cream
- Basic Chocolate Ice Cream
- • Chocolate Almond
- • Chocolate Cookie
- • Chocolate Fudge Brownie
- • Chocolate Marshmallow Swirl
- Fresh Strawberry Ice Cream
- Fresh Lemon Sorbet
- Variation
- • Fresh Pink Grapefruit Sorbet
- Chocolate Frozen Yogurt
- Hints and Tips
- Takk for at du kjøpte en ny Sandstrøm iskremmaskin.
- Produktoversikt
- Kontrollpanel
- Produktöversikt
- Kontrollpanelen
- Ohjauspaneeli
- DK
- Betjeningspanel
- NO
- SE
Brand : Sandstrøm
Model : S15ICE14E
Category : Ice Maker