
TF-RS9200 - Digital decoder TELEFUNKEN - Free user manual and instructions
Find the device manual for free TF-RS9200 TELEFUNKEN in PDF.


| Product Type | Digital Satellite Decoder / Set-Top Box |
| Brand | Telefunken |
| Model | TF-RS9200 |
| Dimensions (W x H x D) | 110 x 82.20 x 22.60 mm |
| Weight | 0.29 kg |
| Power Supply | Input 100-240V~50Hz, Output 12V DC, Max 17W |
| Supported Satellite Standards | DVB-S / DVB-S2, MPEG2/HD, MPEG4 |
| Maximum Channel Capacity | 4000 TV and Radio Channels |
| Video Output | HDMI (576p, 720p, 1080i, 1080P), SCART (RGB/CVBS) |
| Audio Output | HDMI, Digital Optical (SPDIF), SCART |
| USB Port | USB 2.0 for media playback (video, photo, music) and disk formatting |
| Media Playback Support | .avi, .mpg, .mkv, .mp4, JPEG, MP3 |
| Electronic Programme Guide (EPG) | 7-Day EPG with current/next event info |
| Parental Control | Channel lock, menu lock, maturity rating (PIN configurable) |
| Antenna Connection | LNB input (13/18V, 300mA max), DiSEqC 1.0 support |
| Remote Control | IR, operating distance up to 7m, batteries 2x AAA |
| Auto Power Down | After less than 3 hours of inactivity (configurable) |
| Safety Features | LNB short circuit and overload protection, overheat protection |
| Maintenance and Cleaning | Wipe with a soft, dry cloth. Do not use liquids or sprays. |
| Spare Parts and Repairability | Not user-serviceable. Contact authorized service center for repairs. |
| Operating Temperature | 5°C to +40°C |
| Storage Temperature | -20°C to +70°C |
| Humidity | 25% to 75% relative humidity |
Frequently Asked Questions - TF-RS9200 TELEFUNKEN
User questions about TF-RS9200 TELEFUNKEN
0 question about this device. Answer the ones you know or ask your own.
Ask a new question about this device
Download the instructions for your Digital decoder in PDF format for free! Find your manual TF-RS9200 - TELEFUNKEN and take your electronic device back in hand. On this page are published all the documents necessary for the use of your device. TF-RS9200 by TELEFUNKEN.
USER MANUAL TF-RS9200 TELEFUNKEN
Markings on the Product.... 4
Overview of the Remote Control 5
Connections on the Set Top Box 6
Inserting Batteries in the Remote Control....7
Connection to the TV....7
LNB Connection 8
Power On-Off....8
USB Disk Connection 8
USB Disk Connection 8
Menu Interface / First Time Installation...... 9
Electronic Programme Guide (EPG) 10
Changing Channels 10
Adjusting the Volume....10
Volume Up / Down 10
Mute....10
On-Screen Information 10
Channel List....11
SETUP....12
Installation.... 12
Configuration 13
Language....16
Viewing Media Browser 16
Viewing USB Disk Contents 16
Timers....18
Remote Control 20
Digital Capabilites....20
Front Panel 20
Audio/Video & Data Input/Output 20
Introduction
- Thank you for choosing this product. This manual will guide you through the proper operation of your set top box.
- Before operating the set top box, please read this manual thoroughly. Please keep this manual in a safe place for future reference. Read the corresponding instructions of this handbook prior to the first use of the device, even if you are familiar with using electronic devices.
- Please keep this instruction book for future reference.
Features
• 4000 channels TV and Radio programs
• Media Browser (USB 2.0) Support
• DVB-S2/S Compliant
- HDMI Output (576p, 720p, 1080i, 1080P resolutions support)
- Channel lock
- Present/Next event information (7-DAY-EPG)
- Parental lock at menu
• Signal strength bar for transponders
• Multi language audio support
• Digital audio output (optic)
- Teletext function support (DVB)
- Resetting to factory settings option
- Selectable satellite configurations (Presets: ASTRA, HOTBIRD, EUTELSAT 16B, TURKSAT 2A/3A.etc plus user defined)
• Signal strength and signal quality bars for antenna adjustment
- Various channel search options:
• Automatic Satellite search for preset transponders
• Transponder search
- Network search
• Automatic search for newly added transponders
- FTA (Free- to- Air) search option for satellite and auto search modes
• Auto FEC (Forward Error Correction) search
• Auto PID correction (except user defined PIDs)
• Digital Decoding Properties:
- Video Out: PAL
• 32-bit OSD color, 960x540 pixels for UI
• System switching (TV/RADIO)
• LNB short circuit and overload protection
- IR remote control
Accessories
Remote Control
Batteries: 2 x AAA
Adapter
Instruction Book
Quick Start Guide

NOTE: You should check the accessories after chasing. Make sure that each accessory isuded.
Safety Precautions
Power Source
• Always use the provided AC adaptor.
- Operate only from the power source specified on the AC adaptor.
- The power adaptor may become hot during normal operation. This is not a malfunction.
- Please make sure that the adaptor is not covered while in operation. Leave a space of 15 cm (minimum) around the AC adaptor.
- The rating information and safety caution of the AC adaptor are provided on the adaptor.
WARNING: When the set is not in use for a long time disconnect from the power.
Power Cord
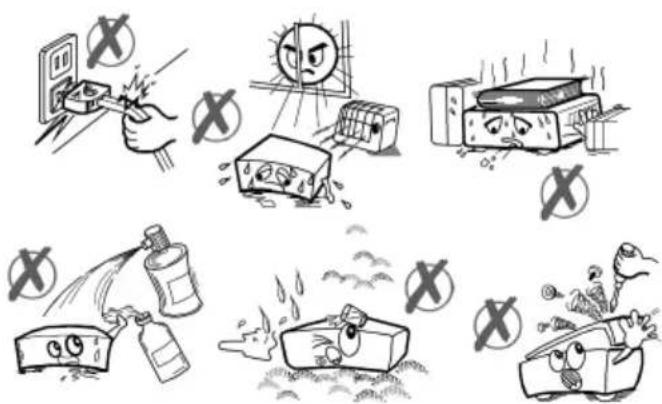
- Do not place the unit, a piece of furniture, etc., on the power cord, or pinch the cord.
- Handle the power cord by the plug. Do not pull out the plug by tugging the cord and never touch the power cord when your hands are wet as this could cause a short circuit or electric shock.
- Never make a knot in the cord or tie it with other cords. The power cords should be routed in such a way that they are not likely to be stepped on. A damaged power cord can cause fire or give you an electrical shock.
- Check the power cord once in a while. When you find it damaged, ask closest service agent for help.
- Please do not place the set in a place subject to direct sun light, excessive dust or mechanical shock or in a location near heat sources.
- The device should be placed on a solid and safe base.
- Do not place the apparatus on a soft surface such as a rug that might block the ventilation holes on the bottom.
- A location should not be selected such as a room with high humidity, as the condensation, arising in the kitchen for example, may cause malfunction or damage the device.
• Heating or other thermal radiation under the set also may cause malfunction or damage the device.
- The hot air, which arises during the operation should be ventilated with sufficient air circulation. Please do not put the device into closed areas and do not cover it.
- Please avoid contact of the device with water humidity. Do not put into operation near bath, swimming pools.
• Take care to provide good air circulation. Place the device in a location with adequate ventilation to prevent heat build-up in the device.
- Should any solid object or liquid fall into the cabinet, unplug the device and have it checked by qualified personnel before operating it any further.
- The device should not be exposed to dripping or splashing and no objects filled with liquids, such as vases, shall be placed on the device.
CAUTION
- Batteries shall not be exposed to excessive heat such as sunshine, fire or the like.
CE
Markings on the Product
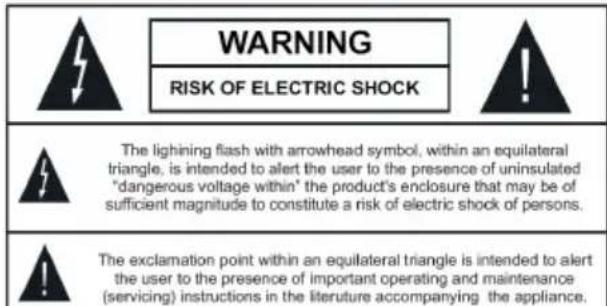
The following symbols are used on the product as a marker for restrictions and precautions and safety instructions. Each explanation shall be considered where the product bears related marking only. Note such information for security reasons.

Class II Equipment: This appliance is designed in such a way that it does not require a safety connection to electrical earth.

Class II Equipment With Functional
Earthing: This appliance is designed in such a way that it does not require a safety
connection to electrical earth, the earth connection is used for functional purposes.

Protective Earth Connection: The marked terminal is intended for connection of the protective earthing conductor associated with
the supply wiring.

Hazardous Live Terminal: The marked terminal(s) is/are hazardous live under normal operating conditions.

Caution, See Operating Instructions: The marked area(s) contain(s) user replaceable coin or button cell batteries.
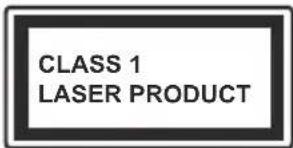
Class 1 Laser Product: This product contains Class 1 laser source that is safe under reasonably foreseeable conditions of
operation.
WARNING
Do not ingest the battery, Chemical Burn Hazard
(The accessories supplied with or) This product may contain a coin/button cell battery.
If the coin/button cell battery is swallowed, it can cause severe internal burns in just 2 hours and can lead to death.
Keep new and used batteries away from children.
If the battery compartment does not close securely, stop using the product and keep it away from children.
If you think batteries might have been swallowed or placed inside any part of the body, seek immediate medical attention.
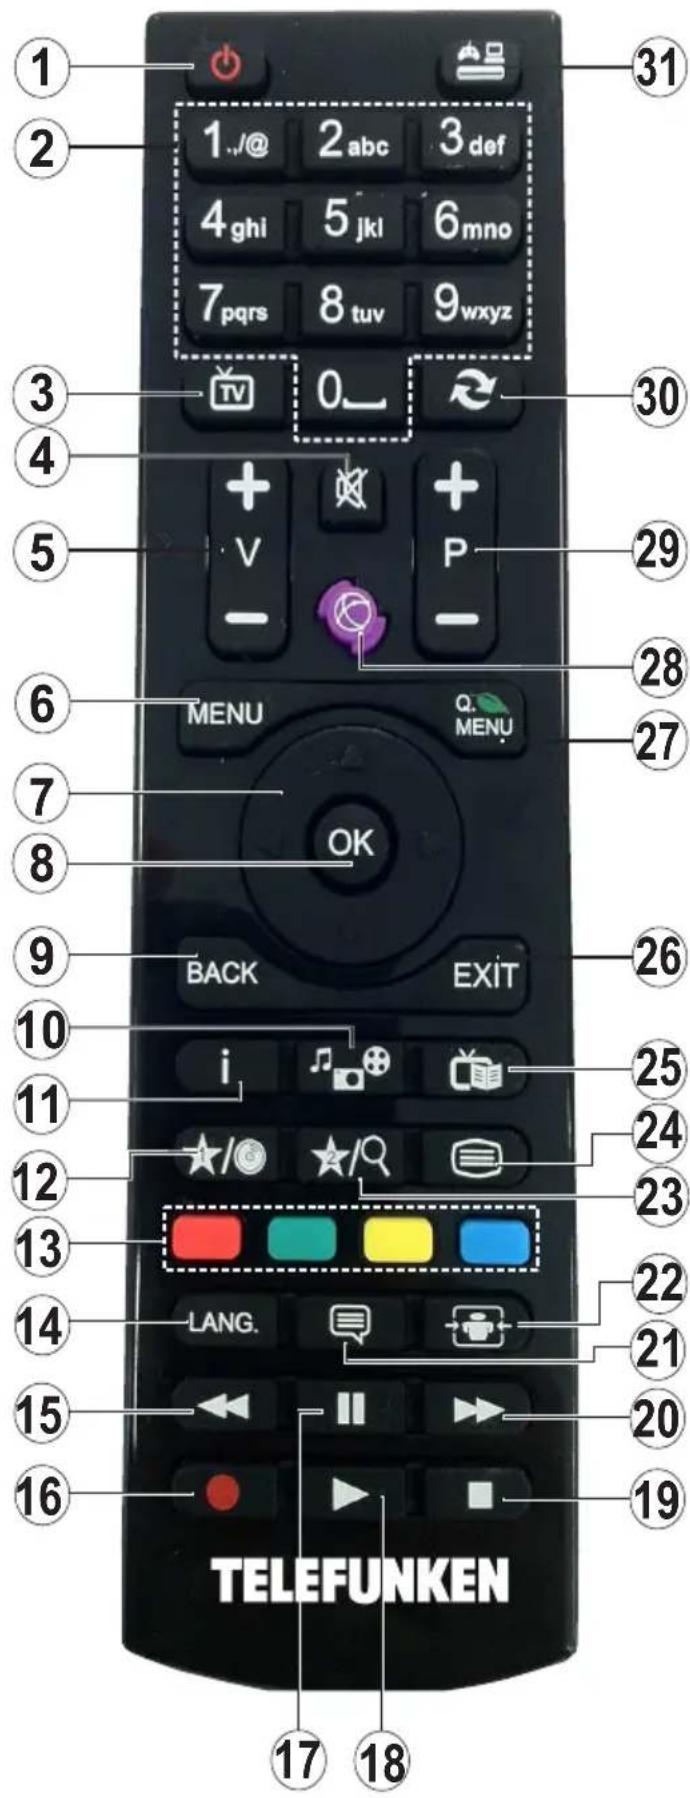
Overview of the Remote Control
1-Standby/On
2-Numeric buttons
3-Switches between TV and Radio mode
4-Mute
5-Volume Up / Down
6-Menu on-off
7-Navigation buttons (Up/Down/Left/Right)
8-OK/ confirm/ Opens channel list
9-Back
10-Media Browser
11-Pressing once opens the info banner. Pressing twice extends the info menu screen.
12-Displays a list of favourite channels
13-Coloured buttons
14-Displays the audio language setup menu
15-Fast backward
16-No Function
17-Pause
18-Play
19-Stop
20-Fast forward
21-Displays the subtitle setup menu (in DVB channels)
22-Wide
23-Options
24-Teletext
25-Electronic programme guide(in DVB channels)
26-Exit
27-Exit
28-No Function
29-Programme Up / Down
30-Previous programme
31-No Function
Connections on the Set Top Box
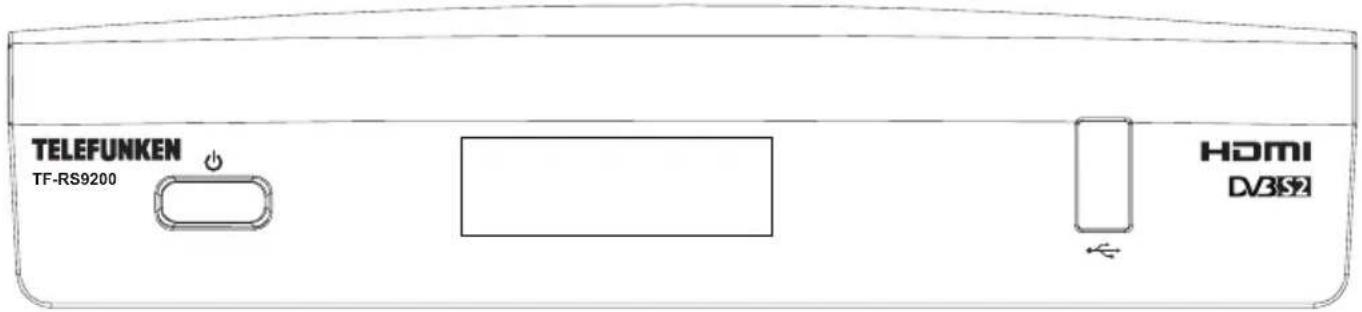
- On /off
- USB Input

- Power Cable Input: DC IN (12V) power connection.
- LNB Input: Connect satellite antenna cables.
- HDMI Output: You connect the box to your TV's HDMI input (if available) by using HDMI connection cable.
- SPDIF Audio Out: You can use this connector to output the digital audio to an external device. See your audio system instruction book for further information.
- SCART VIDEO OUTPUT : TV SCART connection.
Make sure that you connect all cables and connections before you plug the units adaptor into the mains supply. After you connect the unit to the mains supply, the LED light located on the front panel will be red (Standby mode).
Inserting Batteries in the Remote Control
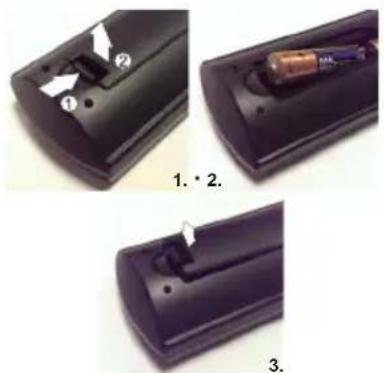
- Remove the battery cover located on the back of the remote control by gently pulling backwards from the indicated part.
- Insert two AAA/R3 (2 X 1.5Volt) or equivalent type batteries inside. Place the batteries in the correct direction observing the polarity symbols (+/-) and replace the battery cover.
- While using the remote control, you should direct it towards the front panel of the receiver. Remote range is approximately 7m/23ft.
- If your receiver no longer responds to the remote control, it is probable that the batteries are exhausted. If so you can still use the local buttons of the receiver. You can replace batteries after they are exhausted.
natural_image
Three-step illustration of a remote control device showing internal components and labeled parts (no text or symbols present)Note : Remove the batteries from the remote control when it is not to be used for a long period. Otherwise it can be damaged due to batteries leaking.
Connection to the TV
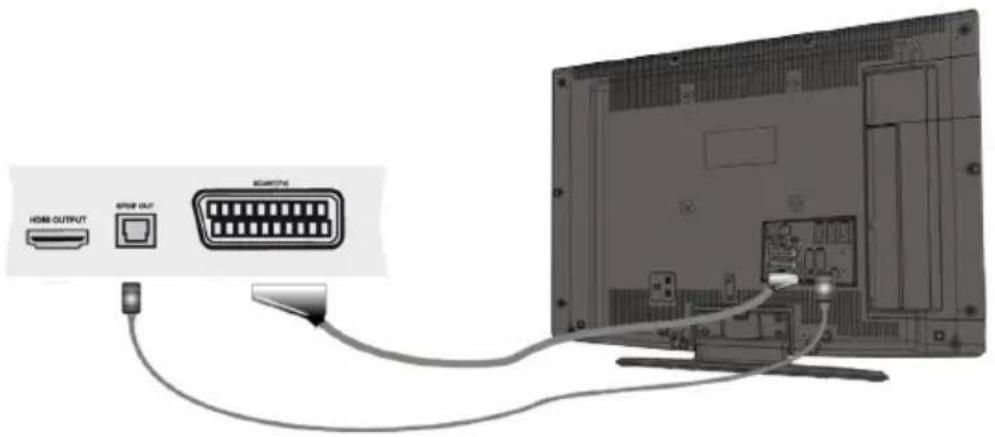
You can connect the set top box to your TV by using the scart socket or HDMI input. Use a scart or HDMI cable to connect the set top box to your TV. HDMI technology will provide you high quality picture performance. To get the best HD quality, TV connection via HDMI is advised.
The set top box gives RGB or CVBS output from scart or high definition quality from HDMI output.
Power Connection
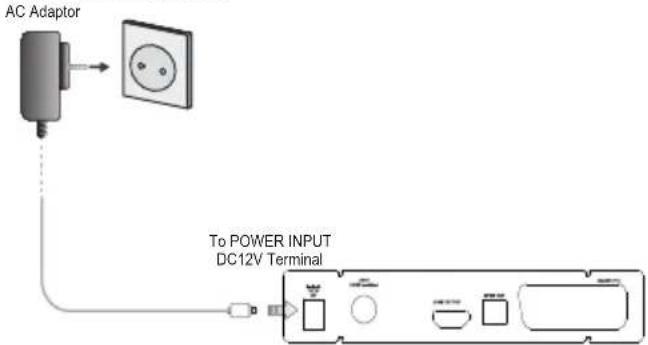
IMPORTANT: The set-top box is designed to operate on 12 V DC. For this, an adaptor is used which gives 12 V voltage. Connect this adaptor to a system that supplies 220-240V AC, 50Hz.
• After unpacking, allow the set-top box to reach the ambient room temperature before you connect the set to the mains.
flowchart
graph TD
    A["AC Adaptor"] --> B["DC12V Terminal"]
    B --> C["To POWER INPUT DC12V Terminal"]
LNB Connection
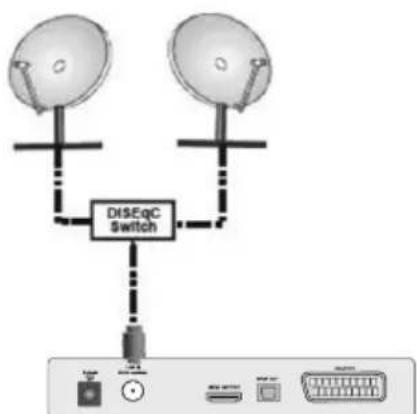
flowchart
graph TD
    A["Satellite 1"] --> C["Switch"]
    B["Satellite 2"] --> C["Switch"]
    C --> D["Device Interface"]
Note: If there is a problem with the LNB connection, a warning OSD will be displayed on the screen. Please check and fix LNB connection.
Power On-Off
Be sure that you put through all the cable connections. After plugging in the AC adaptor for the set-top-box to the mains supply, a red LED will be seen on the front panel (Standby mode). When the set-top-box is first powered up please wait for a while before activating the receiver since booting of software will take some time. Then, you can turn on your digital set-top box by pressing the standby button on the remote control. You will see that the LED on the front panel will change to green (Power on mode).
If the box is switched into the Standby mode using the Standby/On button on the remote, it won't be able to turned on again for a short time.
Auto Power Down:
This box will automatically be switched from active mode into standby mode, after less than three hours in active mode, following the last user interaction and/or a channel change with an alert message two minutes before going to standby mode. The Automatic power-down will be set as default and the user will be able to change Automatic power down to on or off in the menu
USB Disk Connection
- You can connect a USB hard disk drive or USB memory stick to your box by using the USB input. This feature allows you to play files stored in a USB drive.
- 2.5" and 3.5" inch (hdd with external power supply) external hard disk drives are supported.
IMPORTANT!
- You may back up your files before making any connections to the box in order to avoid any possible data loss. Note that manufacturer will not be responsible for any file damage or dataloss.
- It is possible that certain types of USB devices (e.g. MP3 Players) or USB hard disk drives/memory sticks may not be compatible with this device.
IMPORTANT: The device may not support all disk formats. If you connect a USB disk with an unsupported format, then you will be asked to format the content. See the section, "Format Disk" in
the following pages for more information on disk formatting. Note that ALL the data stored on the USB disk will be lost and then the disk format will be converted to FAT32 in such a case.
USB Disk Connection
- Plug your USB device to the USB input of the box.
Note: Plug or unplug your USB disk while the box is switched off.
Note: If you are going to connect a USB hard disk drive to the box, USB connection cable used between the disk drive and the box should have a USB logo and should be as short as possible.
Note: While formatting a USB hard disk that has 1TB (Tera Byte) or more file capacity, you can experience problems with the formatting process. In such a case, you should format the disk with your personal computer and the formatted disk type is recommended as FAT32.
CAUTION!
- Quickly plugging and unplugging USB devices, is a very hazardous operation. Especially, do not repeatedly quickly plug and unplug the drive. This may cause physical damage to the USB player and especially the USB device itself.
Menu Interface / First Time Installation
IMPORTANT: Ensure that the aerial is connected before switching on the set top box for the first time.
When the box is opened from stand-by mode and if there is no channel stored in the database, First Time Installation Menu window will be displayed on the screen. In the first menu screen, menu language will be asked:
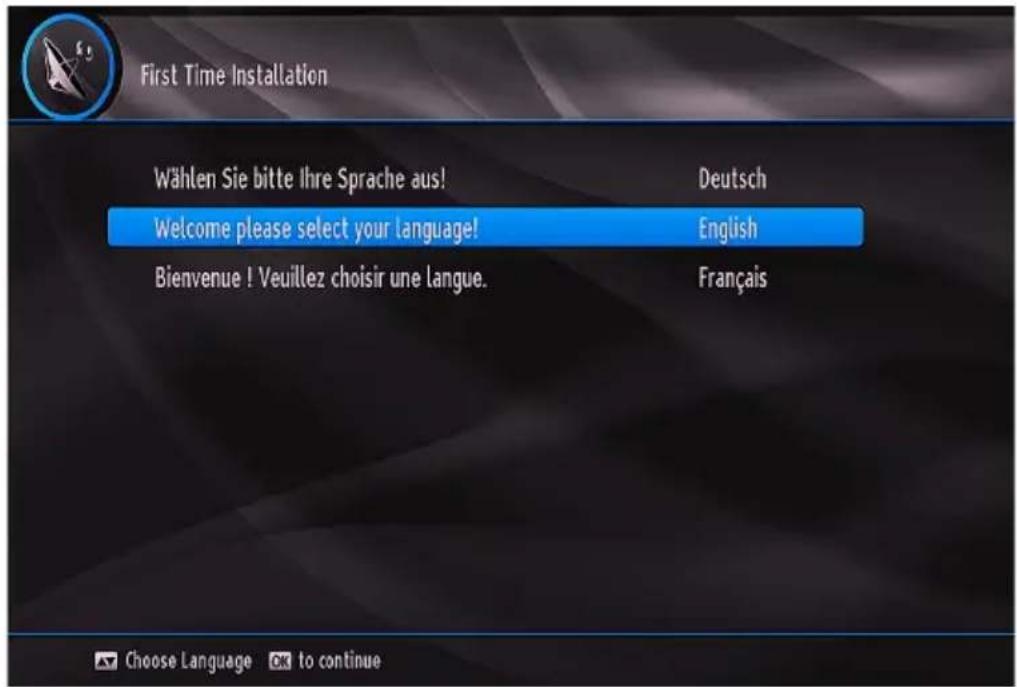
The appropriate operation language can be chosen by highlighting the desired language with “” and pressing OK. Then, Country, Time Zone Setting, TV type, Display Format and HD output resolution selections screen will be shown:
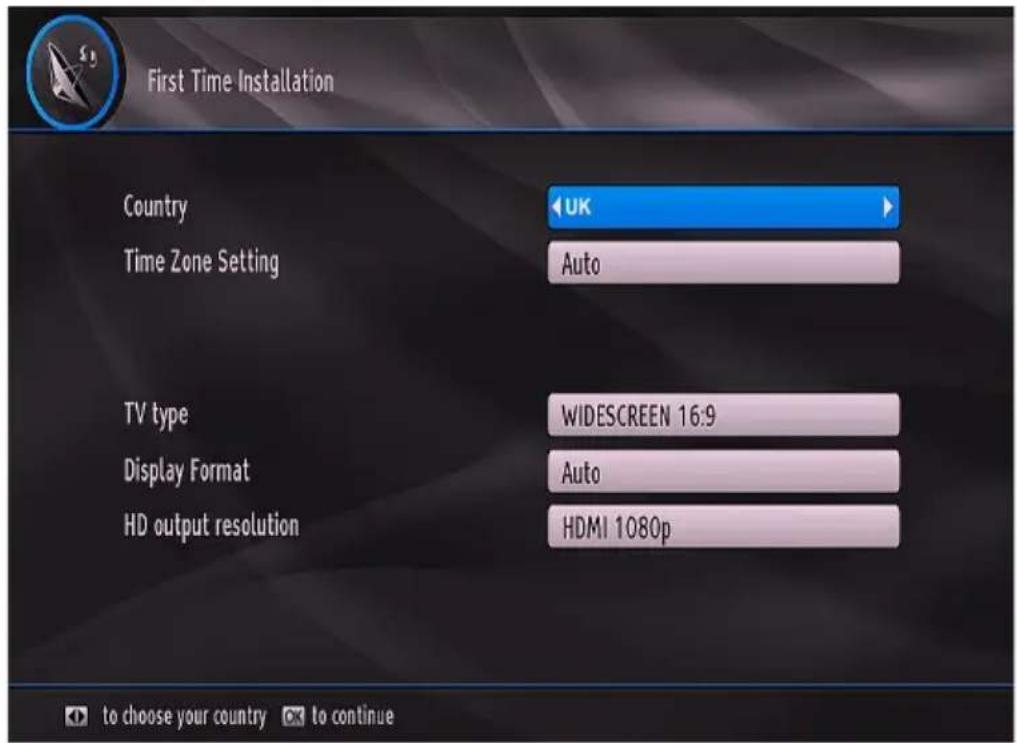
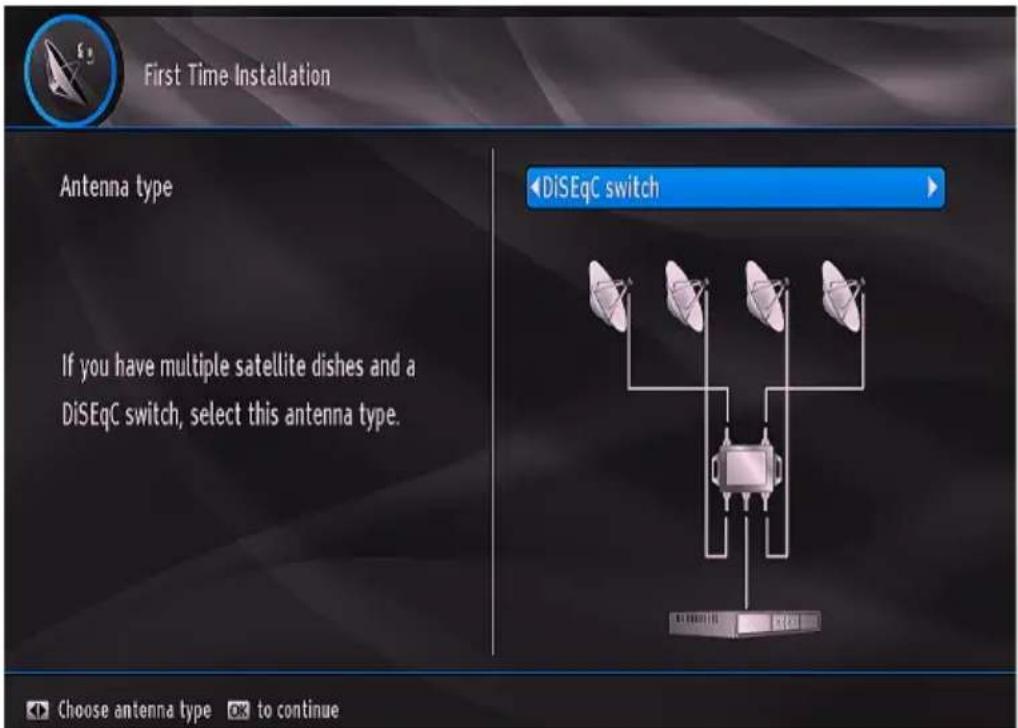
Do your selections using “◀”/▶” buttons and press OK to continue. After pressing the OK button, antenna type will be displayed. Please select your connection type using “◀”/▶” buttons and press OK to continue.
There are two types of antenna selection. You can select Antenna type, Direct or DiSEqC by using “◀”/▶” buttons.
Direct: If you have a single receiver and a direct satellite dish, select this antenna type. After selecting Direct, another menu screen will be displayed. Select an available satellite and press OK to scan for services.
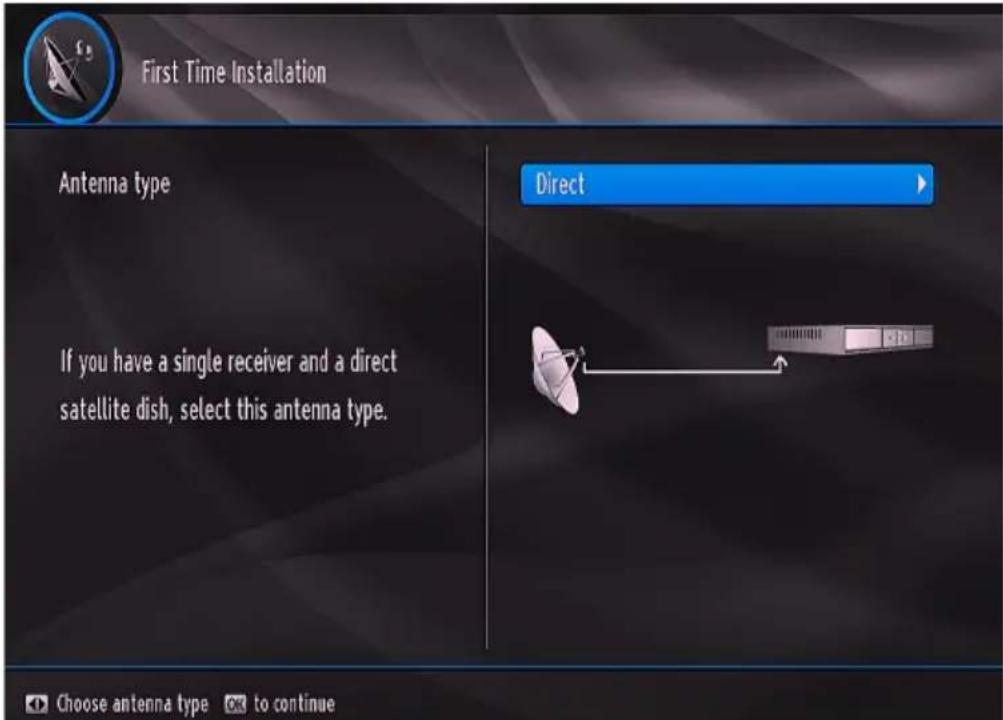
DiSEqC: If you have multiple satellite dishes and a DiSEqC switch, select this antenna type. After selecting DiSEqC switch, another menu screen will be displayed. You can set four DiSEqC options (if available).
A message will appear asking you whether to load the Pre-Programmed List or perform Regular Scan.
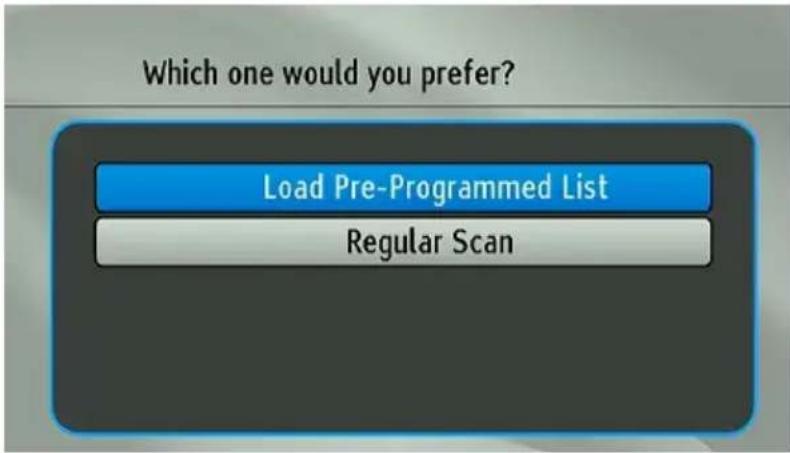
If you select to load Pre-Programmed List according to the selected satellite(s) a warning message may appear next, if any satellite(s) with preset list support is/are not selected. Preset list can not be loaded in this case, press the OK button to return to the satellite selection screen. After the selections are made Pre-Programmed List will be loaded and the results will be displayed in the end.
If you select to perform Regular Scan the box starts to scan services. The process of scanning will take a few minutes. You can follow the scanning process from the scroll bar. After the scanning, first time installation will be completed and scan results will be displayed on the screen.
Electronic Programme Guide (EPG)
You can view the electronic programme guide (EPG) to view information about available programmes.
- Press GUIDE button to view the EPG menu screen.
- Press "▼or " "▲buttons to navigate through channels.
- EPG menu displays available information on all channels.
- Please note that event information is updated automatically. If there are no event information data available for channels, EPG will be displayed with blanks.
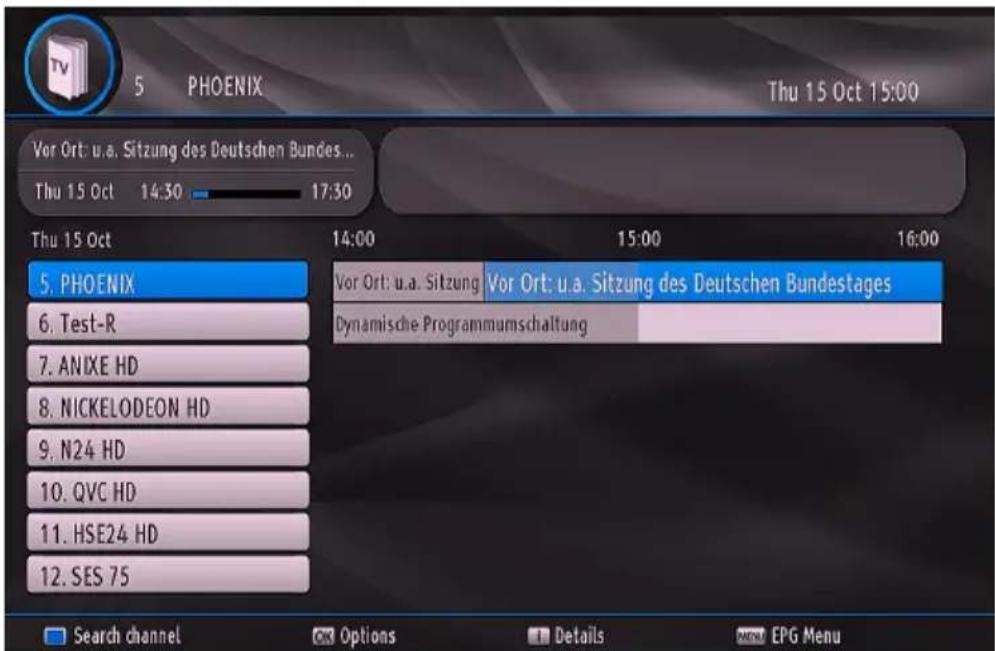
Search channel: Press Blue Button on the remote to select this option. A small menu will appear in which you can do some adjustments for channels.
Options: Press OK button to select this option. Event options will appear.
Details: Press Info button to select this option. A small menu will appear giving information about the selected programme.
EPG Menu: Press menu button to select this option. A menu giving information about the buttons' functions will appear.
▲ / ▼Move between channels (left pane) or programmes (right pane).
P + / P - : Shows the programmes of selected channel through the week.
Changing Channels
- You can change channels with the following methods.
- You can press the numeric buttons (0–9) to directly enter the channel number. You can press numeric buttons consecutively to enter two or more digits.
- Press the P+/P - buttons to move up or down to the next available channel.
Note: You can press OK button to display the channel list.
Adjusting the Volume
Volume Up / Down
- You can increase or decrease the volume by using V+ / V- buttons.

- The volume level selected will remain set, even when the receiver is turned off and on again, until you change volume again.
• The audio volume adjustment for the receiver is independent of the volume control on your TV set.
IMPORTANT: You should be careful that both volume controls are kept within reasonable levels so that when switching on, or when first turning on your TV set, the sound level is not too high.
Mute
- You can press "do mute the sound of your set top box. The sound will be muted once this button is pressed."

- To cancel mute, you can press "OK" button again or use the V +/- buttons.
On-Screen Information
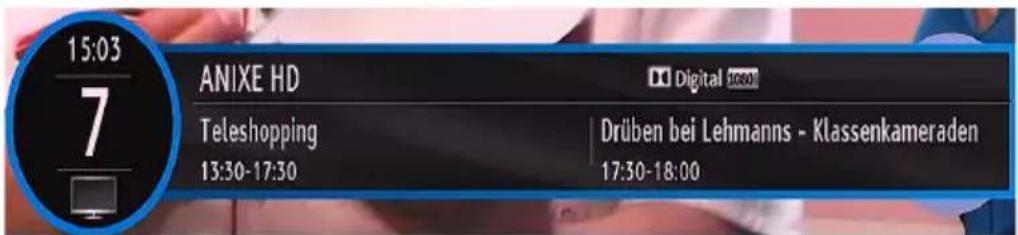
- You can press the INFO button to display on-screen information. Details of the station and current programme will be displayed on the information screen.
- The information screen will then display the current event name, next event name, starting and ending time, duration bar, programme mode and the channel number and name.
Menu System
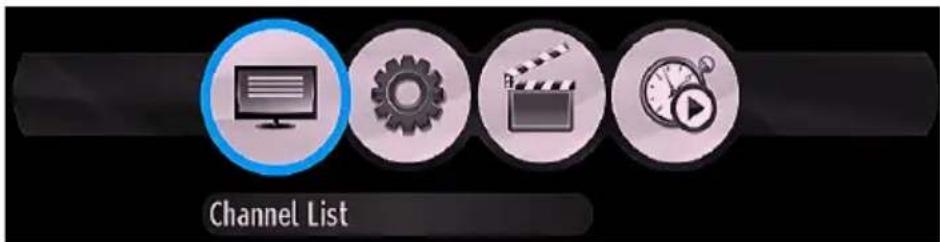
Main menu is accessed by pressing the MENU button on the remote control. Navigate with 🔊"/" keys among the menus and press OK to activate menus. In some sub-menus, press the BACK button to return to the previous menu, otherwise, use it to back from the menu. In all menus there is an Info banner at the bottom of the screen. These are functions that can be used in the current menu
Channel List
Using the “▼or” “▲button on the remote control, make sure that the first item, Channel List, is highlighted and press the OK button to display Channel List or you can press the OK button during watching programme and get to the Channel List directly.
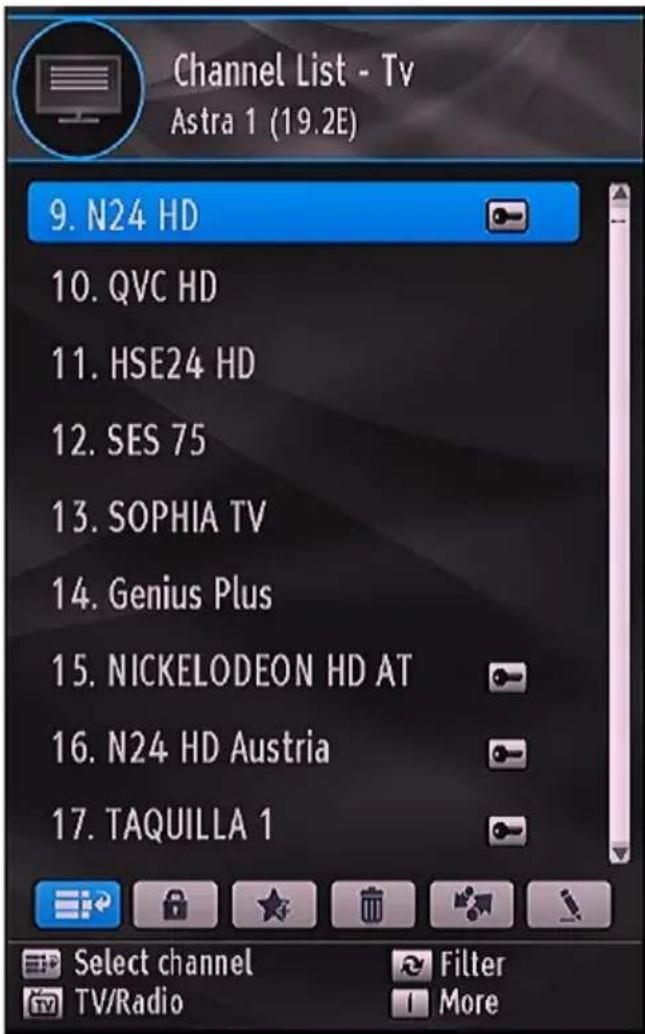
Navigating the Entire Channel List
Press “▼” or “▲” button for selecting the previous or next channel. You can press Red/Green buttons to move page up or page down.
To watch a specific channel, highlight it using “▼” or “▲” button and then press “OK” button, while the “Select” item on Channel List menu is highlighted by using “◀” or “▶” button.
Then the name and number of the selected channel will be displayed. Press 📊 button to activate Channel List filter function and use “▼ or “ ”▲ button to set desired option. Only filtered channels will be available and can be watched if you do not disable filter mode.
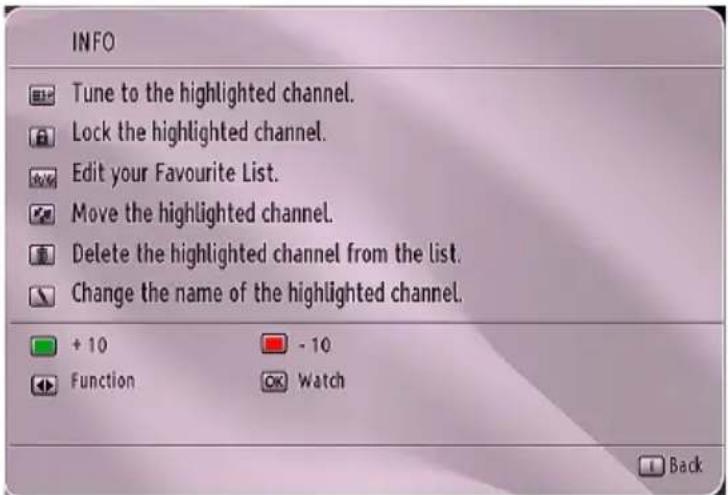
Press the Info(i) button to display information screen about available options.
Adding Locks to Channels
Channel locking provides a password-protected access to channels selected by parents. In order to lock a channel you should know the parental lock password (default value is set to 0000 in the factory and can only be changed from the Configuration menu).

Select the channel to be locked by highlighting it and select Lock option by pressing "◀" or "▶" button. Press OK button. Afterwards, a dialog OSD asking for the password will be displayed.
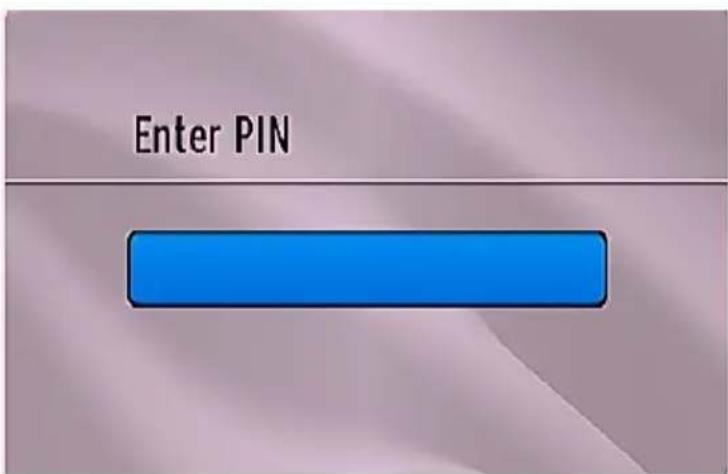
Enter the password by using the numeric buttons on the remote control. The lock icon "will be displayed next to the selected channel. Repeat the same operation to cancel the lock.
Setting Favourites
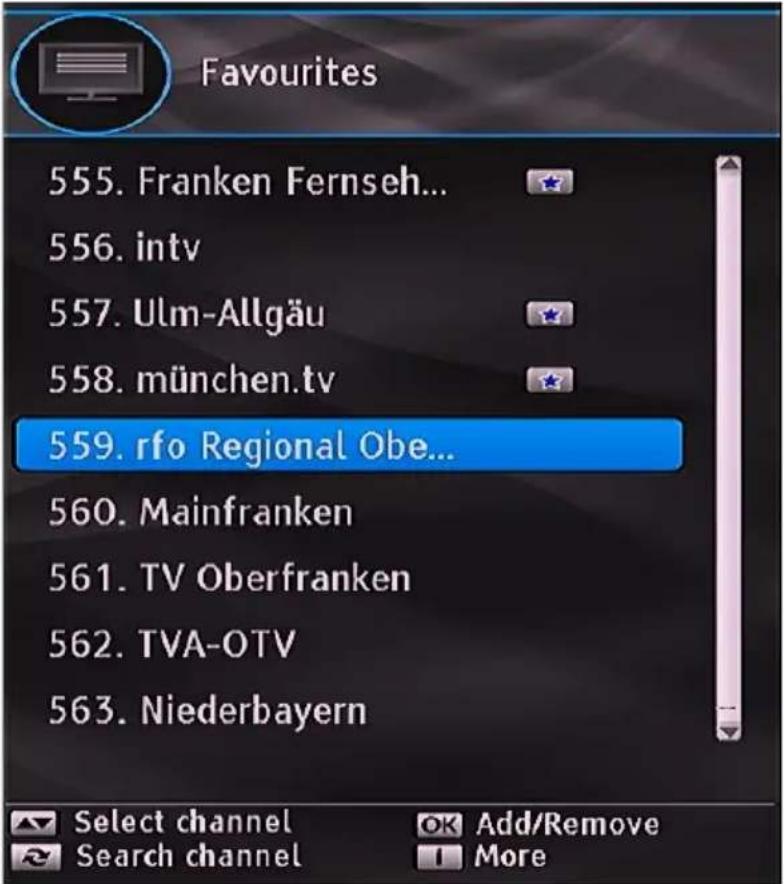
To set a favourite you should highlight the "Favourites" item at the bottom of the Channel List menu.

Then press "OK" button and Edit Favourite List menu appears on the screen.
Adding a Channel to a Favourites List
- By pressing “▼or” ▲buttons, highlight the channel that you want.
- By pressing "OK" button, the highlighted channel is selected as favourite channel.
- Favourite icon indicates that a channel is added to Favourite List.
Removing a Channel from Favourite List
- Highlight the channel that you want to remove from the favourite list and press OK button to remove. You can press "OK" button again to re-add a channel.
Deleting the Channels in the Channel List
- Press "▼or " "▲button to select the channel that should be deleted.
- Press "◀ or " " button to select the "Delete" item on Channel List menu.
- Press the OK button to delete the highlighted channel in the channel list. Then the message below appears on the screen:

- Press “◀” or “▶” button to highlight the desired option. Highlight YES and press OK to delete the selected channel. Highlight NO and press OK button to cancel.
Moving the channels in the channel list
- Press "▼or " "▲buttons to select the channel that should be moved.
- Press "◀ or " " buttons to select the "Move" item on Channel List menu.

- Enter the new channel number to move the selected channel.
Renaming Channels
To rename a specific channel, the channel must be highlighted by pressing ▼ or “▲” button. Then highlight Edit Name item by pressing “◀” or “▶” button as illustrated below. Press the OK button to activate the rename feature.

Now pressing “◀ or “ ” button moves to the previous/next character. Pressing “ ” or “ ” button toggles the current character, i.e., ‘b’ character becomes ‘a’ by▼” and ‘c’ by▲”. Pressing numeric buttons ‘0...9’ replaces the highlighted character with the characters printed above the button one by one as the button is pressed. Press the “MENU” button to cancel the editing or OK button to update the new name.
SETUP
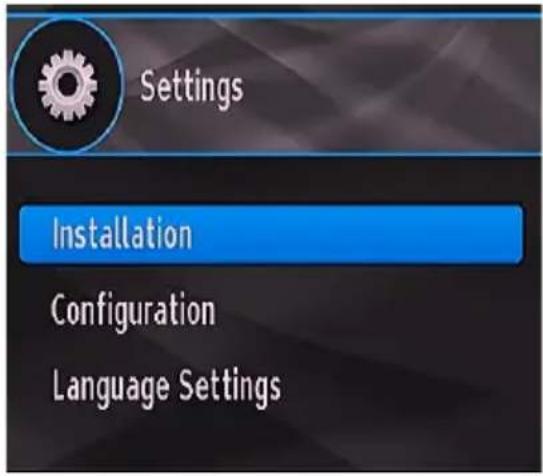
The adjustments in this menu are;
Installation
The Installation menu is mainly intended to help you for creating a channel. Select Installation from the Setup menu by pressing “▼ or “ ”▲buttons. This menu includes the following items:
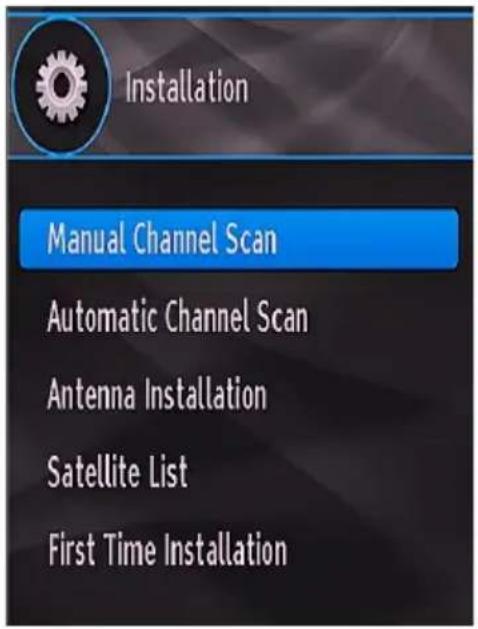
Manual channel scan
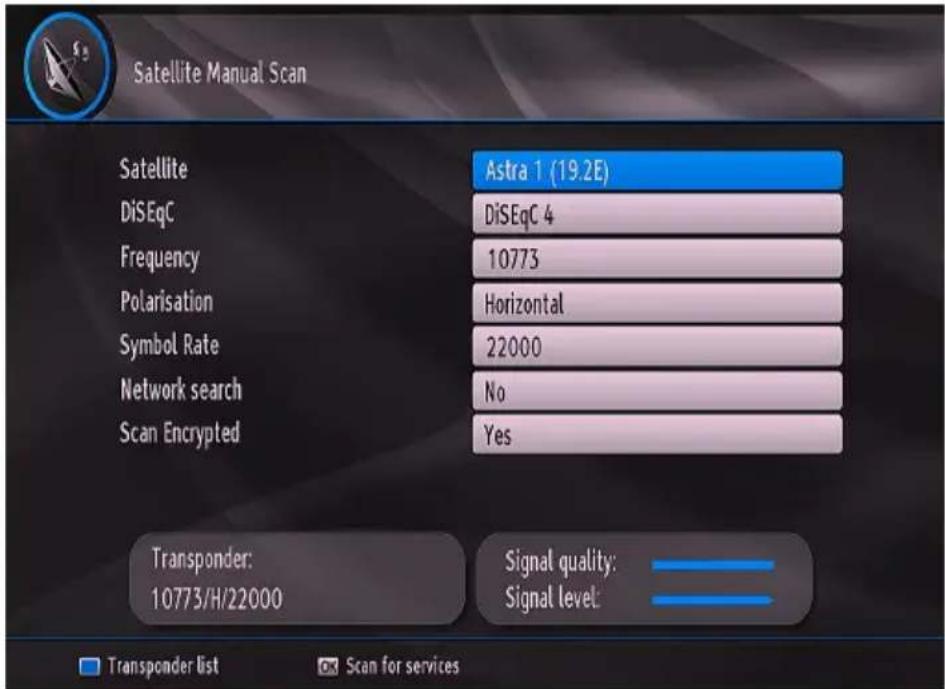
This menu will be acivated by using the “▼”/“▲” buttons in the Installation menu. By pressing the OK button, Menu items in manual search menu will be as the following:
- Satellite
- DiSEqC
3 Frequency. - Polarisation
- Symbol rate
- Network search
-
Scan Encrypted
-
Satellite Name, Polarization values and Network Search requirements are changed by toggling.
- Frequency and Symbol Rate are entered directly using "0, 1, 2..., 9" keys.
- As soon as entering transponder frequency, the signal level and quality will be reflected in the signal strength bars (Signal Level and Signal Quality bars) at the bottom of the menu. Signal Level bar shows the strength of the satellite signal. Signal Quality bar shows lock quality of the device for entered values.
- If Network Search item selected as YES, after tuning to that transponder, the parameters of other transponders will be collected from NIT (Network Information Table) and tuning will be performed for other transponders.
- By pressing OK button values are stored and after the search, if a new program is found, it will be added to the programme list. Found program's name is shown as 'Program'.
Automatic channel scan
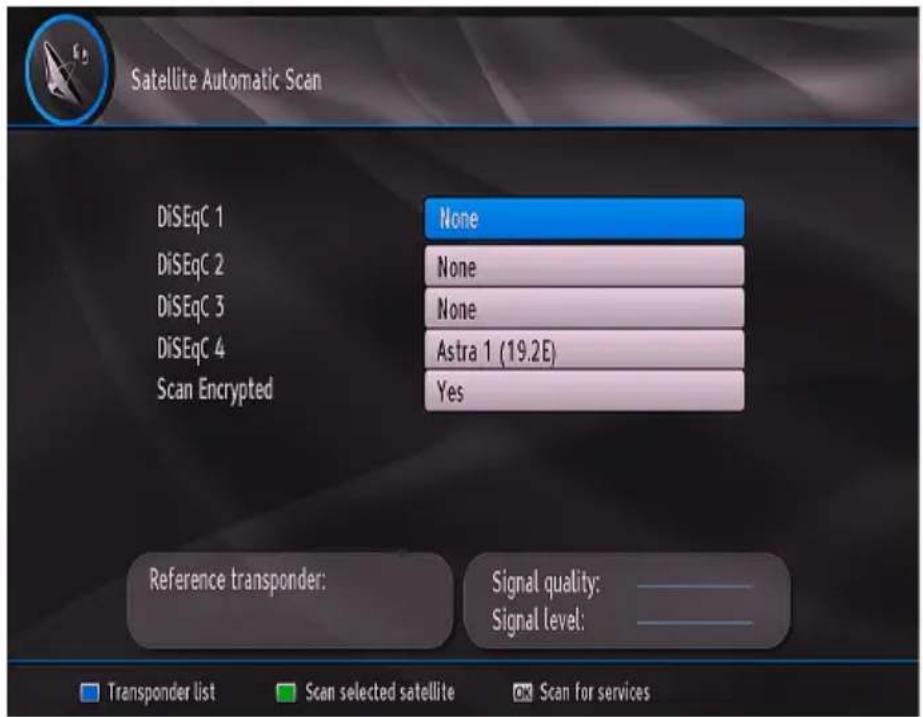
With this menu, you can search selected or all satellites. To do this, select "Automatic channel scan" in the Installation menu, by using the "▼"/"▲" buttons. If you press OK button, the "Automatic channel scan" menu will appear. Settings in this screen may vary in accordance with antenna type selection defined in first time installation. You can set satellite values as desired. Press GREEN button to scan selected satellite. Press BLUE button to view transponder list. You can use OK button to scan all satellites.
You can choose to load Pre-Programmed List or perform Regular Scan. Refer to the explanations in the Fist Time Installation section for more details.
Antenna Installation
Settings in this screen may vary in accordance with antenna type selection defined in first time installation. You can set satellite values as desired by using the navigation buttons.
Satellite List
Use “▼” or “▲” button to select Satellite List and then press OK button to see listed satellites on your set-top box. You can use Up/Down or RED/GREEN buttons to navigate in Satellite List menu. If you want to add a new satellite press YELLOW button and enter the details of the desired satellite. To delete a satellite in the list press BLUE button. A message will appear asking you whether to delete the selected satellite. Select Yes and press OK button to delete. To edit a satellite in the list press OK button and Edit Satellite screen will be displayed. You can change the name, orbital position and reference transponder for the selected satellite from this screen. Press the EXIT button on the remote control to exit.
First Time Installation
This section is same with initial installation part. Please refer to Menu interface/First time installation section for more information.
Configuration
You can configure the settings of your set-top box. Select Configuration from Setup menu and press "OK" to view this menu. Press the "EXIT" button on the remote control to exit.
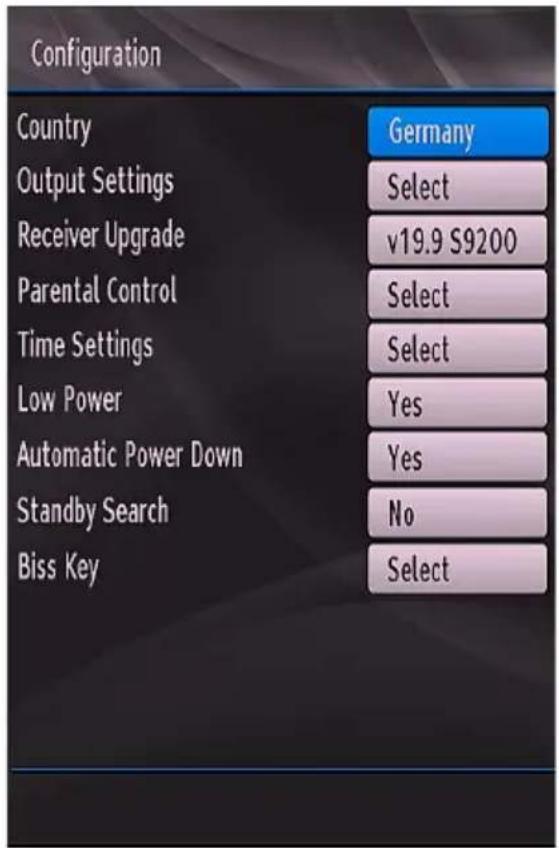
Country
Displays the current country, selected in the first time installation.
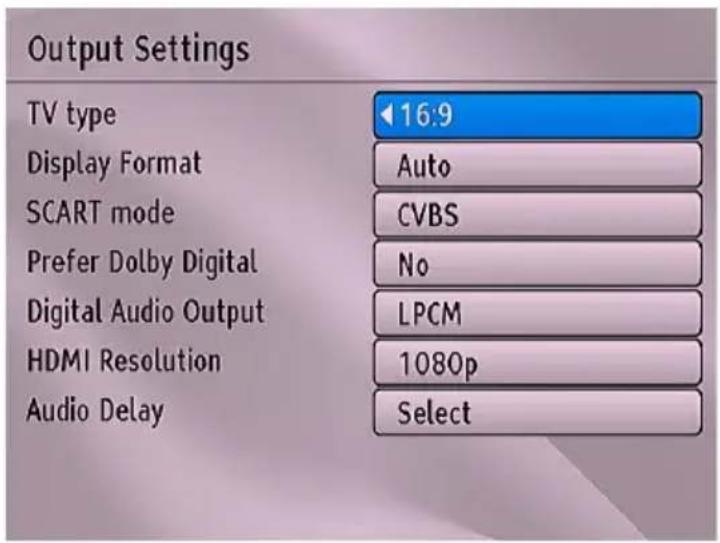
Output Settings
TV Type
Satellite channels can be broadcast in a widescreen format whose output can be different for normal and widescreen TV sets. This function enables to change the screen format of the TV connected, so that broadcasts are displayed correctly. Highlight the TV Type line in the Configuration menu and use the “ ”/▲ keys to select 4:3 if you have a standard TV set connected or 16:9 if it is a widescreen TV. This function duplicates the selection made at the time of first installation and can be used if you change TV sets.
Display Format
Use “▼ or “ ” button to select Display Format and then press “ ” or “ ” button to set this setting as Auto, Letter Box or Pan & Scan for 4:3 tv set and Auto, pillar box, zoom for 16:9 tv set.
Scart mode
The receiver can output RGB and CVBS signal from the TV SCART on the rear panel. Although the RGB format results in a better quality picture, not all equipment can cope with an RGB signal.
Prefer Dolby Digital
Use "▼ or " " button to select Dolby Digital and then press " " or " " button to set this setting as Yes or No.
Digital Audio Output
Use “▼” or “▲” button to select S/PDIF Output and then press “◀” or “▶” button to set this setting as LPCM or Dolby Digital.
HDMI Resolution
By pressing “/” on the remote control, you can change to HDMI resolution as 576P, 720P, 1080i or 1080P.
AUDIO Delay
First press OK and than by pressing “◀”/“▶” buttons on the remote control, you can set to Audio Delay to desired value. You can use this setting when there is a synchronization problem in the received broadcast. Press “◀or “ ” button to change the delay.
Note: This function will be available while using Optical Audio out only.
Receiver Upgrade
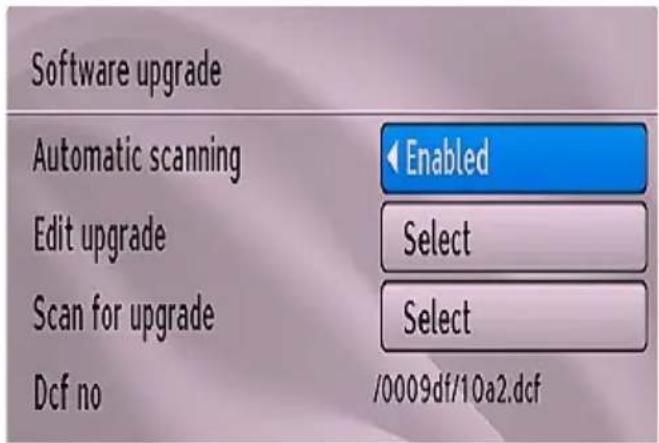
To ensure that your STB always has the most up to date information. Please ensure that after use it is set to its standby mode.
- Press Menu button and using the “▼”/▲” buttons to choose Setup and press the OK button.
- Highlight Configuration menu with “▼”/“▲” keys and pres OK.
- Use “▼”/“▲” buttons to choose “Receiver Upgrade” and press OK button.
- Using the “◀” button you can change “Automatic scanning” Enabled or Disabled.
- Highlight "Scan for upgrade" menu with "▼"/"▲" keys and press OK to commence upgrade.
- Highlight "Edit upgrade" menu with "▼"/"▲" keys and press OK to change upgrade options. Please enter your available satellite information and save all values all select reset and press OK to re enter.
Parental Control
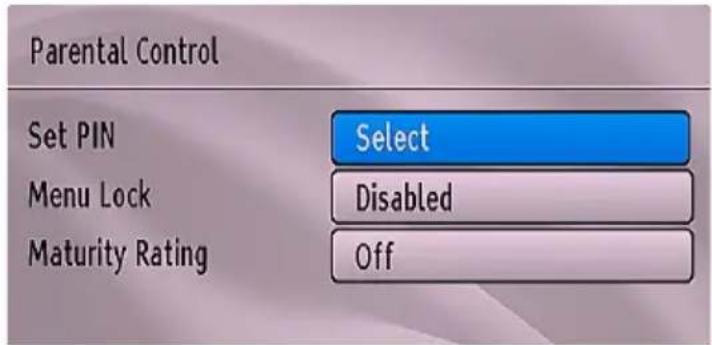
Highlight Parental Control and press "OK" to enter. To display Parental Control menu options, the PIN code should be entered. After entering the correct PIN Parental Control menu will be displayed.
Note: The factory default PIN is 0000.
Set Pin
The PIN code of the unit changed. Use “▼” ▲buttons to go to “Set PIN” option. Press OK to display the “Set PIN” window. Use numeric buttons to enter new pin number. You will need to input your new pin a second time for verification purposes. If both pin numbers are four digits long and the same, the pin code will be changed. The factory default pin number is 0000. If you change the pin number, make sure you write it down and keep it safe for future references.
Menu Lock
In menu lock you can set locking for All Menus, or the Installation Menu to restrict access to these menu's. If the menu lock is disabled, there will be free access to the menu system. Use ▼/“▲ buttons to go to Menu Lock option. Use “◀” ”buttons to choose Menu Lock Mode.
DISABLED : All menus are unlocked.
ALL MENUS : All Menus are accessible only with the correct lock key. So the user can't add, delete, rename, channels, can't set timers.
INSTALLATION : Installation menu is locked. So the user can't add channels. Changes will be updated after exiting 'Configuration Menu'.
Maturity Rating
If this option is set, TV gets the maturity information from the broadcast (if available) and if this maturity level is disabled a PIN code is required to watch the selected channel.
Time Settings
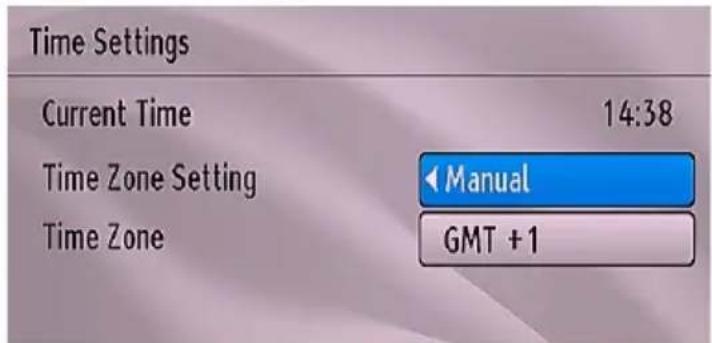
Highlight Time Settings and press OK button to enter. Time Zone Setting will be available and Current Time will be displayed. The time information is received with the broadcast signal if the Time Zone Setting is set to Auto. If you set to Manual and Time Zone settings will be enabled.
Select Time Zone and set using “◀” and “▶” buttons, Current Time will change according to the selected Time Zone value.
Low Power
Use "▼ or " "▲ button to select Low Power and then press " " or " " button to set this setting as Yes or No. To save energy, Low power option should be selected as Yes.
Automatic Power Down
Press “▼ or “ ” button to select Automatic Power Down. Use “ ” or “ ” button to set the Automatic Power Down to Yes or No. If you don’t use STB for a long time, the box will switch off.
Standby Search
If you change Standby Search to Off, this function will be unavailable. To use Standby search please make sure that you select Standby Search as On. If the Standby Search is set to On, when the TV is in standby mode, available broadcasts will be searched. If the TV locates any new or missing broadcasts, a menu screen will be displayed, asking you whether or not to execute these changes. Channel list will be updated and changed after this process. Please activate Standby Search setting in order to enable your TV for automatically updating the broadcast frequency of the broadcaster, broadcast definition and similar changes.
Biss Key
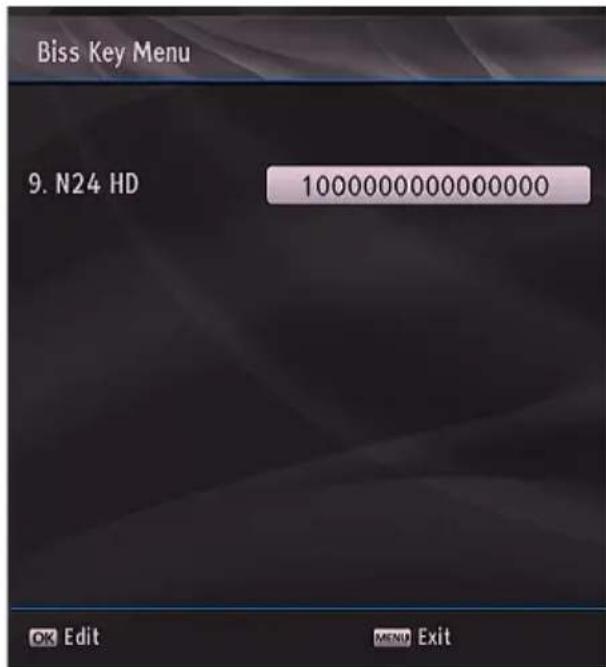
Biss is a satellite signal scrambling system that is used for some broadcasts. If you need to enter BISS key on a broadcast, you can use Biss Key setting located in the Other Settings menu. Highlight Biss Key and press OK to enter keys on the desired broadcast.
Channel List update
When you switch on/off the set top box, it scans channels automatically to update the channel list. To activate this select "Auto".
Language
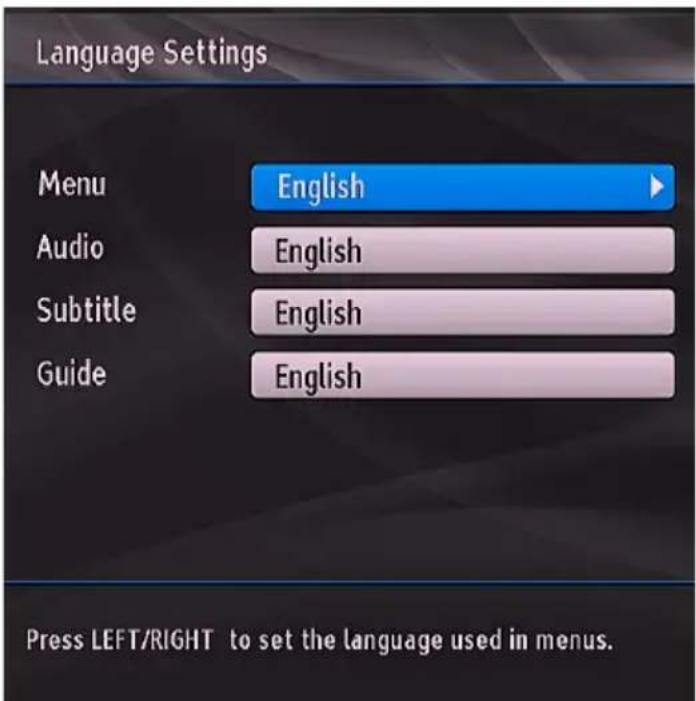
- Menu: shows the language of the system
Note: These settings will be used if available. Otherwise the current settings will be used. - Audio: by pressing “◀ or “ ” keys change the audio language.
- Subtitle: alter the subtitle language with “◀” or “▶” keys. The chosen language will be seen in subtitles.
- Guide: By pressing “◀ or ” buttons change the guide language
Viewing Media Browser
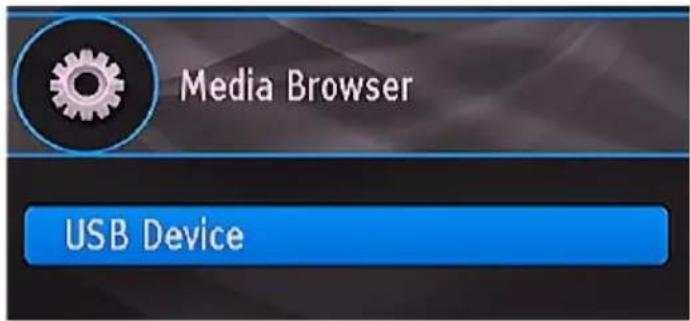
- To display Media Browser window, press either "MENU" button on the remote control and then select Media Browser by pressing "▼" or "▲" button. Press "OK" button to continue. Media Browser menu options will be displayed..
Viewing USB Disk Contents
- You can play music, video and picture files from a USB memory stick.
Note: Some USB compliant devices may not be supported.
Note: If the USB stick is not recognized after power off/on or First Time Installation, first, plug the USB device out and power off/on the STB set. Plug the USB device in again.
- Select USB Device by using “◀” or “▶” buttons from the Media Browser menu and press OK button and available file selection options will be displayed.
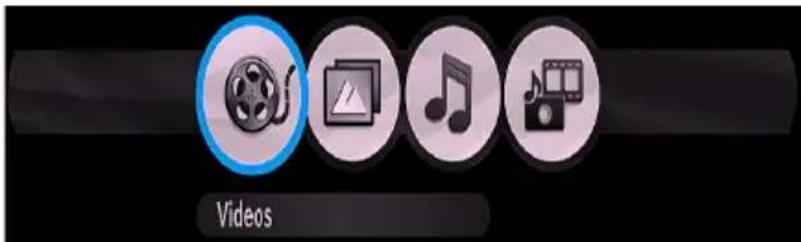
Note: Videos/Photos/Music options will filter the related files. If you select ALL option, ALL files in the connected disk will be displayed according to the folders.
Media Browser USB Playback
Playing Video Files
Select USB device option from the main media browser screen. Select VIDEOS option using the Up or Down buttons, press OK button and all available VIDEO files will be displayed:
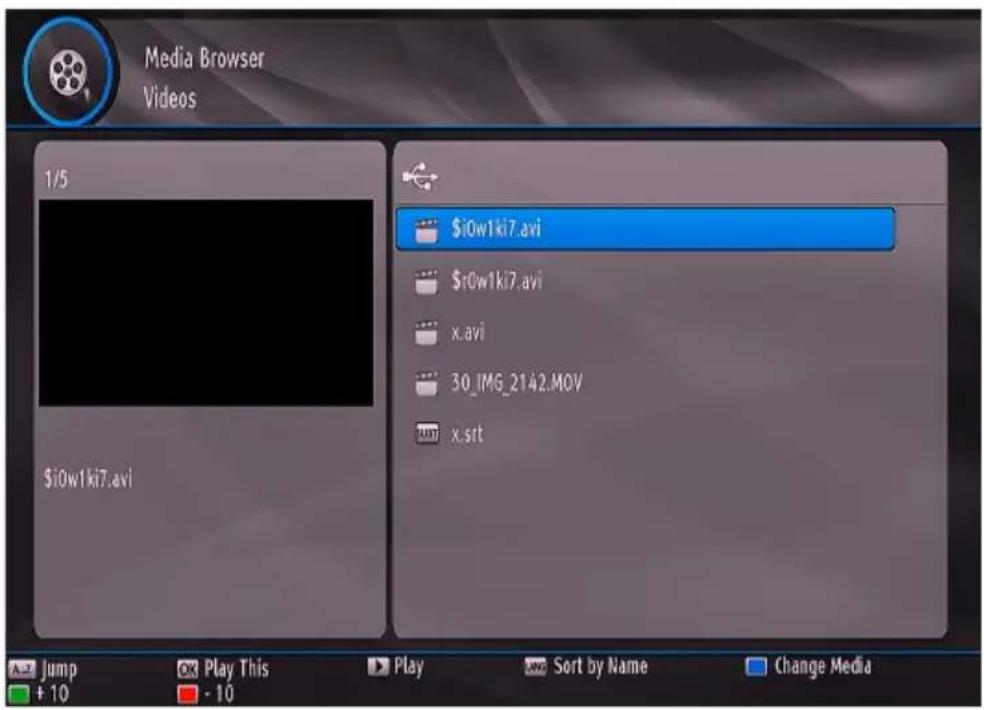
A..Z: Jumps to file.
OK : Play this.
▶ button: Play
LANG: Sorts files by name.
BLUE: Changes media type.
Green: To move up
Red: To move down
The following screen will be displayed during the playback:
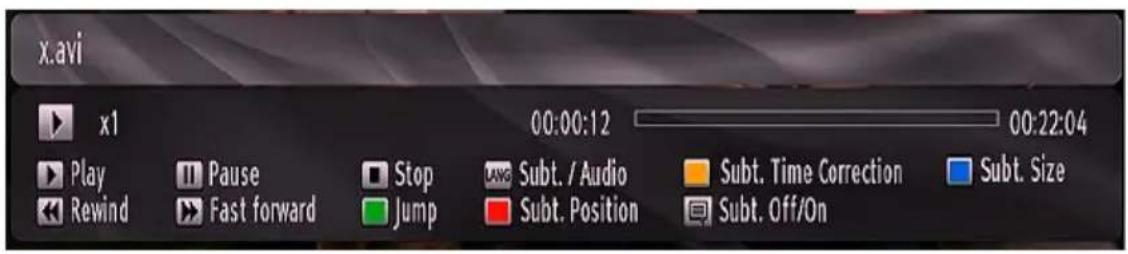
Play (▶ button): Play files / Pauses the playback.
Stop (■button): Stop the playing file.
LANG: Sets subtitle or audio.
YELLOW : Sets subtitle time correction.
BLUE: Sets subtitle size.
Rewind (button): Goes backward.
Fast Forward (button): Goes forward.
GREEN : Jumps to the selected time.
RED: Sets subtitle position on the screen.
SUBTITLE: Enables/disables subtitles.
EXIT : Exit video.
MENU: Go to the previous menu.
Supported video types: .avi / mpg / mkv / mp4
Viewing JPG Files
Select USB device option from the main media browser screen. Select PHOTOS option using the Up or Down buttons, press OK button and all available photo files will be displayed:
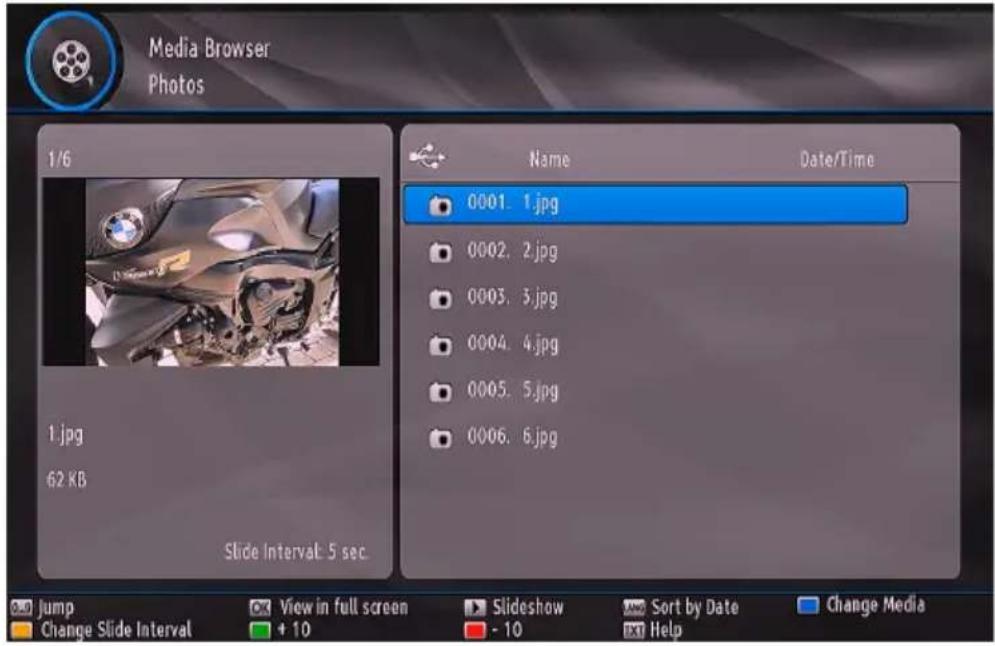
Jump (0...9 buttons) : jump to selected file using the numeric buttons.
OK : (OK button) views the selected picture in full screen.
Slideshow (▶ button): starts the slideshow with all pictures in the folder.
LANG: Sorts files by date.
BLUE: Changes media type.
YELLOW: Sets slideshow interval.
Green: To move up
Red: To move down
Slideshow Options
Select USB device option from the main media browser screen. Select PHOTOS option using the Up or Down buttons, press OK button and all available PHOTO files will be displayed. Press ▶ button to start slideshow.

▶ button : Play/Pause the slideshow.
■ button : Stop the playing file.
GREEN : Activates Loop/Shuffle mode.
Previous/Next (◀▶ buttons) : Jump to previous or next file of slideshow.
Rotate (▼ buttons) : Rotate the picture using up/down buttons.
Exit : Back to file list.
Info : Activates the operations bar.
Playing MP3 Files
Select USB device option from the main media browser screen. Select MUSIC option using the Up or Down buttons, press OK button and all available music files will be displayed:
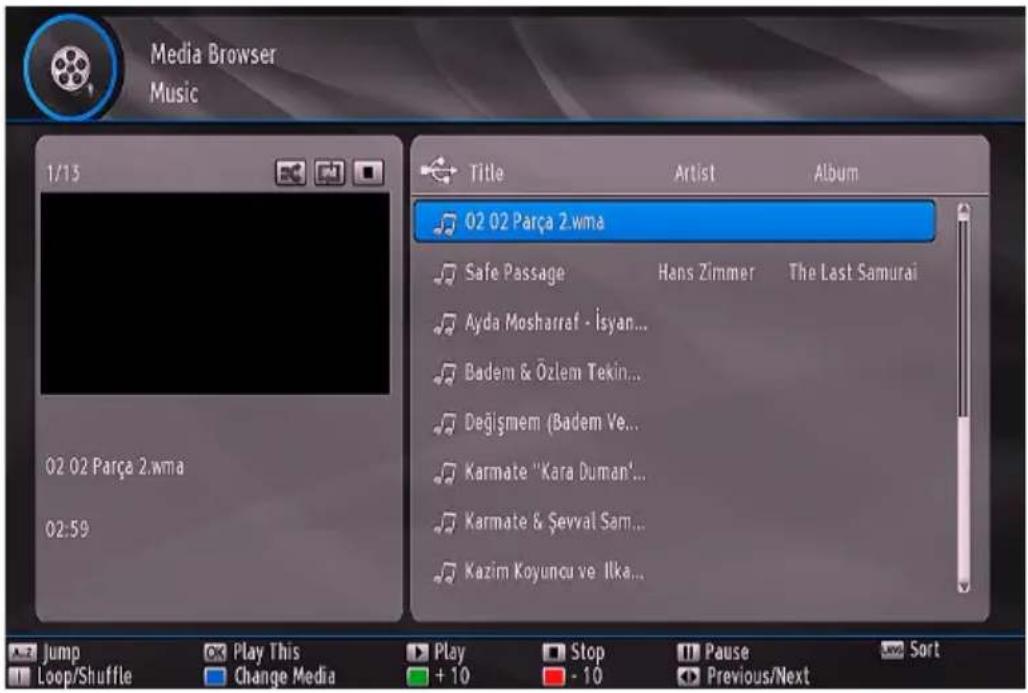
Jump (Numeric buttons) : Jumps to the selected file using the numeric buttons.
Play This (OK button): Plays the selected file.
Play/Pause (▶ button) : Plays all media files in the folder starting with the selected one / Pause playing file.
Stop (■button) : Stop the playing file.
LANG: Sorts files.
INFO: Activates loop/shuffle mode.
BLUE: Changes media type.
Green: To move up
Red: To move down
Previous/Next (◀buttons) : Jumps to previous or next file to play.
Displaying ALL Files
Select USB device option from the main media browser screen. Select ALL option using the Up or Down buttons and press OK button. All available files will be displayed.
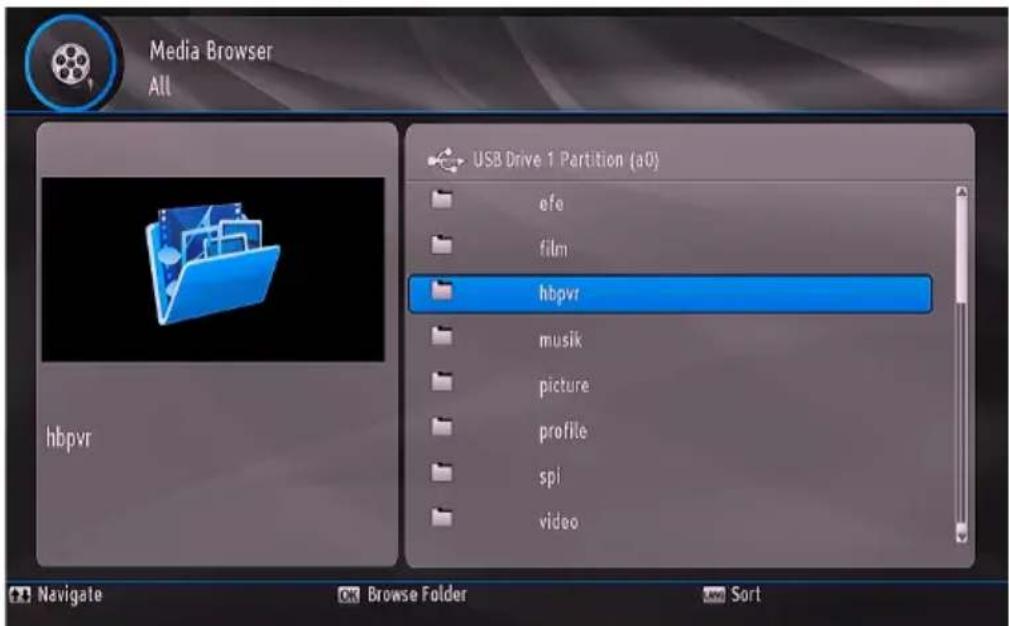
Timers
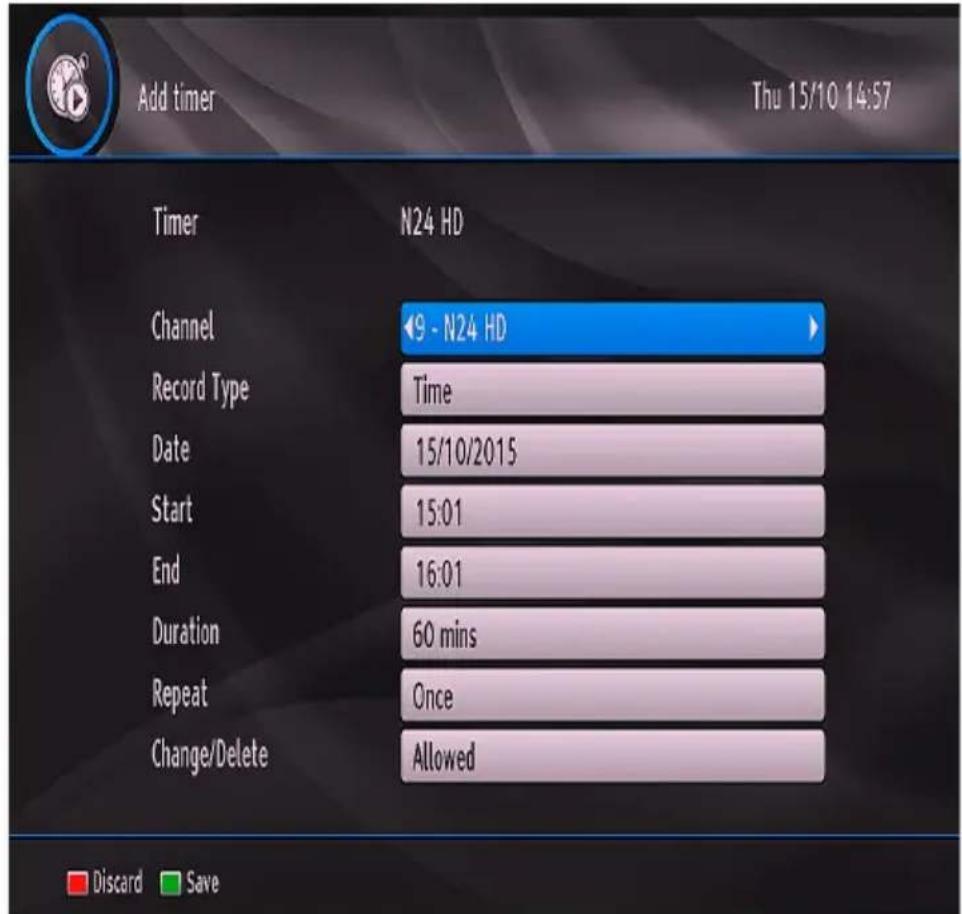
To display timers window, activate the item from the main menu. Select Timers from main menu and press OK button. To add a timer, press the YELLOW button on the remote control. Then, "Add Timer" window appears.
Channel: “◀ or ” keys will navigate the user through the TV or Radio list.
Record Type: This feature is unavailable to be set.
Date: Starting date is entered via the Left/Right and the numeric buttons.
Start: Starting time is entered via the Left/Right and the numeric buttons.
End: Ending time is entered via the Left/Right and the numeric buttons.
Duration: Duration between Start and End time.
Repeat: You can set a timer to be repeated as Once, Daily or Weekly.
Change/Delete: permits or prohibits any modifications for other users.
You can save the adjustments by pressing the GREEN key or cancel the process by pressing the RED button. You can edit the list via OK key and delete with the BLUE button.
Hint
Active Channels (Optional)
When the "TV/RADIO" button is pressed on the remote control the receiver changes mode (TV only, Radio only). When the mode is changed, receiver tunes to the first service on the selected mode.
Channel List (Red Button)
When the RED button is pressed whole program list is displayed. If the last watched/listened program is one of the favourite programs then the favourite list will be displayed.
Audio Mode Selection (Yellow Button)
- The YELLOW key (LRS) will toggle the sound mode. The mode is stereo as default. If you want to listen only the left or only the right speaker, sound mode can be changed with this key.
- On single sound channel modes, same sound channels will be switched to both left and right outputs. When the mode is changed, an appropriate OSD will be displayed for a while and this will be stored for this program for switching back to the requested audio mode next time.
Info / Help
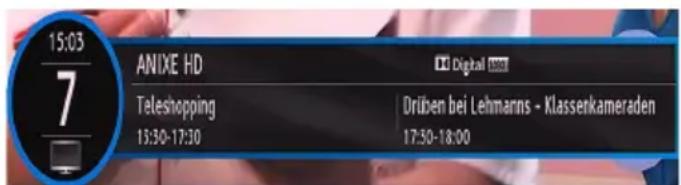
- When INFO key is pressed an information menu OSD will be displayed.
- Info bar gives information related to currently watched program. This info includes program number, program name, program mode (TV or Radio), transponder name, transponder frequency, favourites icon, (if the program is one of the favourite programs), scrambled/unscrambled channel, polarisation, audio mode, whether the program has teletext or not and short event description, broadcast resolution (i.e. 576i, 576p, 720p, 1080i or 1080P).
Language button (AUDIO)
The Lang button allows selecting another sound track of the present program. When the language button is pressed a menu will be displayed showing the number of possible audio languages for TV and tracks for radio programs available. You can navigate using “▼or” “” Buttons and select with OK button. If an audio language supports Dolby Digital output, “Dolby D” expression is seen at the end of the audio language name. If the program does not have multi audio, a pop-up message will be displayed.
EPG (Electronic Programme Guide)
Press the EPG (C) button to display the electronic program guide (EPG) where you can view the event information (start and end time for current and next events, program number, program name, event name of the programs in tuned transponder) and set timers for the events. For more information see the section, Electronic Programme Guide.
Favourite Programme (FAV.)
You can navigate within favourites by pressing the FAV (button (if available)). A program can be selected as a favourite from the program table menu.
Mute
When the MUTE button is pressed, mute symbol will be displayed on the screen. The mute symbol will stay until MUTE button is pressed again. The mute symbol will not be displayed on the screen if there is another menu displayed on the screen.
Subtitle
Some channels can be broadcast with subtitles displayed on-screen for the hard-of-hearing. This function selects the desired subtitle language and enables the automatic displaying of subtitles whenever subtitle information is available. Press the Subtitle 📄buton to activate the subtitle menu.
Previous Channel (P
You can display the last watched channel by using PTeletext ( TEXT)
Teletext ( TEXT)
You can use teletext with your receiver's remote control. By pressing TEXT button you can activate the Teletext broadcasting. You can use RED, GREEN, YELLOW and BLUE buttons in teletext menu. Press MENU to exit from Teletext.
Specifications
GENERAL
- Adaptor Input Voltage: 100-240V\~50 Hz
- Adaptor Output Voltage : 12V DC
- Input Frequency : 950 - 2150 MHz
• Maximum Power Consumption : 17W - Operating temperature: 5^ C - + 40^ C
- Storage temperature: -20^ + 70^
• Humidity : 25 to 75 % rel
• Physical Dimensions : 110 x 82,20 x 22,60 mm - Weight : 0,29 kg
HARDWARE CONFIGURATION
• Main Processor : M-STAR MSD7819
- Flash Memory : 16 Mbyte
- DDRAM : 128 Mbyte
Remote Control
Operating Distance: 7m Max.
Batteries : 2x1.5V (R-03/AAA)
Digital Capabilities
Transmission Standarts:
DVB-S, DVB-S2, MPEG2/HD, MPEG4
Demodulation:
QPSK, DVB-S 1-45Msym/s
QPSK, DVB-S2 1-45Msym/s
8PSK 1-45Msym/s
FEC Modes:
• QPSK, DVB-S 1/2, 2/3, 3/4, 5/6, 7/8.
• QPSK, DVB-S2 1/2, 3/5, 2/3, 3/4, 4/5, 5/6, 8/9, 9/10
• 8PSK 3/5, 2/3, 3/4, 4/5, 5/6, 8/9, 9/10.
Video:
- HD MPEG-4
- Aspect ratio; 4:3, 16:9
• Mpeg 1/2/4, H.264 ve VC-1
Audio:
• For all MPEG levels for layer I / II
- Sampling frequencies supported are 32 kHz, 44.1 kHz or 48 kHz.
- Output can be chosen as STEREO, LEFT or RIGHT only (on both outputs). This is useful for dual mono channels in order to select the correct sound track.
- Wide dynamic range (16-bit resolution)
• Mpeg-1, Mpeg-2 (Layer I/II), MP3, AC-3
LNB POWER SUPPLY
• Vertical : 13/14 Volt
• Horizontal : 17/18 Volt
• Max. Output Current: 300mA (Short-circuit protected)
• 22 kHz Tone : Frequency 22KHz ± 2 KHz
: Amplitude 0.6 Vpp ± 0.2 Vpp
USB POWER SUPPLY
5V @ 500mA max
Front Panel
Indicator
4 digit indicator is 7 segments.
Audio/Video & Data Input/Output
HDMI Output (Audio and Video)
Digital Audio Output (Audio)
Scart Output (Audio and Video)
Conformity Information
The satellite receiver complies with the following standards and norms:
In regard to the conformity with fundamental requirements and relevant regulations, this device complies with EMC Directive 2004/108/EC as well as with Directive 2006/95/EC for Low Voltage Equipment. Ecodesign requirements for energy-related products (Directive 2009/125/EC according to Implementing Regulation No. 642/2009).
EN 55013:2001+A1:2003+A2:2006
EN 55022:2010/AC:2011 – Class B
EN 61000-3-2:2006+A1:2009+A2:2009
EN 61000-3-3:2008
EN 5020:2007+A11:2011
EN 55024:2010
IEC60065:2001+A1:2005+A2:2010
EN60065:2002+A1:2006+A11:2008+A2:2010
+A12:2011

WARNING
This is a Class A product. Using this product in a domestic environment may lead to radio interferences. In such a case, the user might possibly need to take relevant measures.
Troubleshooting
| Problem | Possible Reasons What To Do | |
| The LED indicator does not glow. | Power Adaptor is not connected. | Check if the AC Adaptor is plugged into the power socket. |
| No picture or sound. No signal or weak | signal. | Check the aerial and video connections (Scart/HDMI). |
| The settings you have done in the menus have not been changed | The digital set-top box was unplugged without first going to standby. | Before unplugging your digital set-top box, wait for going to standby. |
| You see the on-screen error message related with LNB short- circuit protection mode. | The dish installation is not correct or cable connections have been made incorrect. | Check the connection.If the problem persist, please contact with the service for help. |
| The remote control is not working. | The set-top-box is in standby.Remote control is out of range.Batteries are exhausted. | Press the STANDBY button.Check that the remote control range is clear.Replace the batteries with new ones. |
| You have forgotten any channel lock code or password.. | When the password is forgotten, you can perform First Time Installation to set it back to its default value “0000”. | |
ENG
Following information is only for EU-member states:
The use of the symbol indicates that this product may not be treated as household waste. By ensuring this product is disposed of correctly, you will help prevent potential negative consequences for the environment and human health, which could otherwise be caused by inappropriate waste handling of this product. For more detailed information about recycling of this product, please contact your local city office, your household waste disposal service or the shop where you purchased the product.

TELEFUNKEN Licenses GmbH Bockenheimer Landstraße 101 D-60325 Frankfurt am Main
- Introduction
- Features
- Accessories
- Safety Precautions
- Power Source
- Power Cord
- CAUTION
- Markings on the Product
- WARNING
- Overview of the Remote Control
- Connections on the Set Top Box
- Inserting Batteries in the Remote Control
- Connection to the TV
- Power Connection
- LNB Connection
- Power On-Off
- Auto Power Down:
- USB Disk Connection
- IMPORTANT!
- CAUTION!
- Menu Interface / First Time Installation
- Electronic Programme Guide (EPG)
- Changing Channels
- Adjusting the Volume
- Volume Up / Down
- Mute
- On-Screen Information
- Menu System
- Channel List
- Navigating the Entire Channel List
- Adding Locks to Channels
- Setting Favourites
- Adding a Channel to a Favourites List
- Removing a Channel from Favourite List
- Deleting the Channels in the Channel List
- Moving the channels in the channel list
- Renaming Channels
- SETUP
- Installation
- Manual channel scan
- Automatic channel scan
- Antenna Installation
- Satellite List
- First Time Installation
- Configuration
- Country
- Output Settings
- TV Type
- Display Format
- Scart mode
- Prefer Dolby Digital
- Digital Audio Output
- HDMI Resolution
- AUDIO Delay
- Receiver Upgrade
- Parental Control
- Set Pin
- Menu Lock
- Maturity Rating
- Time Settings
- Low Power
- Automatic Power Down
- Standby Search
- Biss Key
- Channel List update
- Language
- Viewing Media Browser
- Viewing USB Disk Contents
- Media Browser USB Playback
- Playing Video Files
- Viewing JPG Files
- Slideshow Options
- Playing MP3 Files
- Displaying ALL Files
- Timers
- Hint
- Active Channels (Optional)
- Channel List (Red Button)
- Audio Mode Selection (Yellow Button)
- Language button (AUDIO)
- EPG (Electronic Programme Guide)
- Favourite Programme (FAV.)
- Subtitle
- Previous Channel (P You can display the last watched channel by using P
- Specifications
- GENERAL
- HARDWARE CONFIGURATION
- Remote Control
- Digital Capabilities
- Transmission Standarts:
- Demodulation:
- FEC Modes:
- Video:
- Audio:
- LNB POWER SUPPLY
- USB POWER SUPPLY
- Front Panel
- Indicator
- Audio/Video & Data Input/Output
- Conformity Information
- ENG
- Following information is only for EU-member states:
Brand : TELEFUNKEN
Model : TF-RS9200
Category : Digital decoder