
T160i - Cooker ASKO - Free user manual and instructions
Find the device manual for free T160i ASKO in PDF.


| Product Type | Freestanding Cooker |
| Brand | Asko |
| Model | T160i |
| Dimensions (H x W x D) | 85 x 60 x 60 cm |
| Weight | 68 kg |
| Power Supply | 230 V / 50 Hz |
| Total Power Consumption | 10.5 kW |
| Energy Class | A |
| Oven Capacity | 71 L |
| Oven Type | Multifunction with Fan |
| Cleaning Method | Enamel Easy-Clean |
| Hob Type | Gas |
| Number of Burners | 4 |
| Flame Failure Device | Yes |
| Temperature Range | 50 - 250 °C |
| Timer | Digital with Automatic Shut-off |
| Child Lock | Yes |
| Warranty | 2 Years |
| Installation Type | Freestanding |
| Spare Parts Availability | Original Asko Parts |
Frequently Asked Questions - T160i ASKO
User questions about T160i ASKO
0 question about this device. Answer the ones you know or ask your own.
Ask a new question about this device
Download the instructions for your Cooker in PDF format for free! Find your manual T160i - ASKO and take your electronic device back in hand. On this page are published all the documents necessary for the use of your device. T160i by ASKO.
USER MANUAL T160i ASKO
natural_image
Collage of cleaning and cleaning items including a washing machine, gloves, glasses, and tools (no visible text or symbols)ASKO
BUILT TO LAST LONGER
USE AND CARE GUIDE
T160i KERAMISK
FIG.1
flowchart
graph TD
    A["Plant"] --> B["Main Reactor"]
    B --> C1["Magnetic field"]
    B --> C2["Generator"]
    B --> C3["Archimedean spiral coil"]
    B --> C4["Magnetisk område"]
    B --> C5["Magneettikenttä"]
    B --> C6["Magnetisk område"]
    B --> C7["Elektromagnetiskt fält"]
    B --> D1["- Pan with ferromagnetic base"]
    B --> D2["- Gryde med jern-magnetisk bund"]
    B --> D3["- Magnetoituva keittoastia"]
    B --> D4["- Panne med jern-magnetisk bunn"]
    B --> D5["- Kastrull med magnetisk botten"]
    B --> E1["- Glass-ceramic cooker top"]
    B --> E2["- Glaskeramisk plade"]
    B --> E3["- Keraaminen liesi"]
    B --> E4["- Glasskeramisk topp"]
    B --> E5["- Glaskeramikhäll"]
    B --> F1["- Magnetic field"]
    B --> F2["- Magnetisk område"]
    B --> F3["- Magneettikenttä"]
    B --> F4["- Magnetisk område"]
    B --> F5["- Elektromagnetiskt fält"]
FIG.2
flowchart
graph TD
    B["B"] --> A["A"]
    F["F"] --> E["E"]
    C["C"] --> A["A"]
    D["D"] --> A["A"]
    A["A"] --> D["D"]
    style A fill:#f9f,stroke:#333
    style B fill:#ccf,stroke:#333
    style C fill:#cfc,stroke:#333
    style D fill:#fcc,stroke:#333
    style E fill:#ffc,stroke:#333
    style F fill:#cff,stroke:#333
    style G fill:#ffc,stroke:#333
    style H fill:#cfc,stroke:#333
    style I fill:#fcc,stroke:#333
    style J fill:#ffc,stroke:#333
    style K fill:#cfc,stroke:#333
    style L fill:#fcc,stroke:#333

- Selection of the cooking area
- Valg af kogezone
- Keittoalueiden valinta
- Valg av kokesone
- Val av kokzon

- Power intensifier (Booster)
- Kraftforstærker (Booster)
- Booster -toiminto
- Effektforsterker (Booster)
- Snabbökning av temperaturen (Booster)

- Timer
- Signalur/Timer
- Ajastin
- Timer
- Signalur/Timer

-Temperature adjustment keys
-Taster til regulering af temperaturen
-Lämmönsäätelynäppäimet
-Tast for regulering av temperatur
-Temperaturregleringsknappar/touchkontroller

natural_image
Technical line drawing of an electrical connector with labeled terminals (L and N), no readable text or symbols beyond labels380-415V 2N\~ H05V2V2-F 4G 2.5mm ^2
380-415V 3N\~ H05V2V2-F 5G 2.5mm ^2
220-240V 2\~ H05V2V2-F 3G 2.5mm²
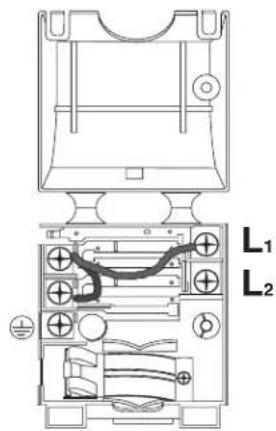
220-240V 3\~ H05V2V2-F 4G 2.5mm²
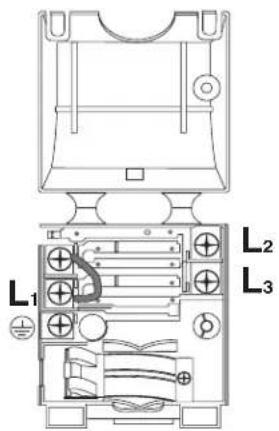
2i
FIG.4A
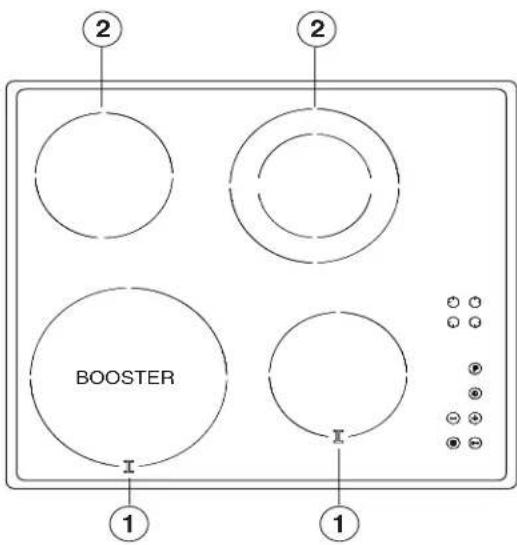
- Cooking by INDUCTION area
-
Cooking by RADIATION area
-
Kogezoner med induktion
-
Kogezoner med varmefordeling
-
INDUKTIO -keittoalueet
-
KERAAMISET -keittoalueet
-
Soner for koking ved INDUKSJON
-
Soner for koking ved STRÅLING
-
Induktions kokzon
- High Light-element
FIG.4B
220-240V 1N\~ H05V2V2-F 3G 2.5mm²
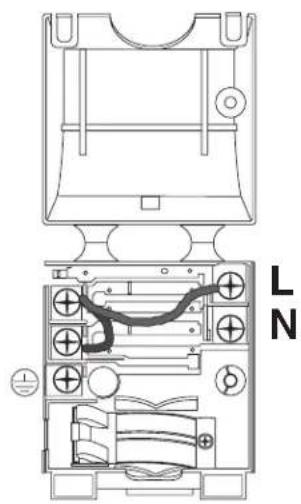
220-240V 2\~ H05V2V2-F 3G 2.5mm²
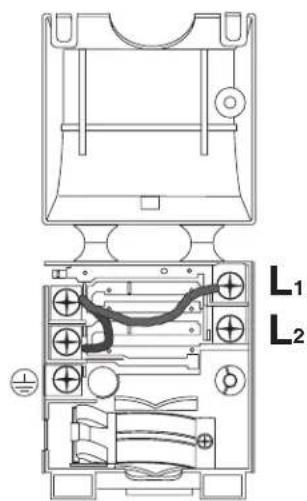
FIG.5
A
C
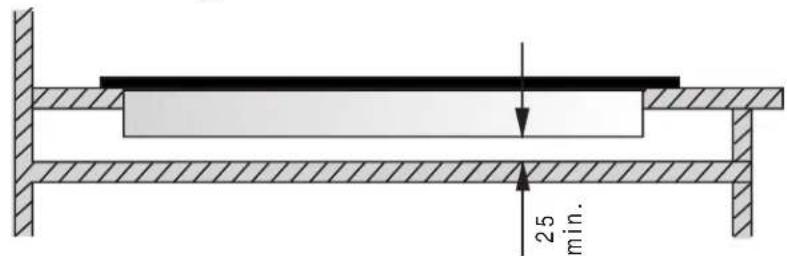
FIG.6
natural_image
Simple line drawing of a cooking pot with crossed lines indicating resistance or crossed panes (no text or symbols)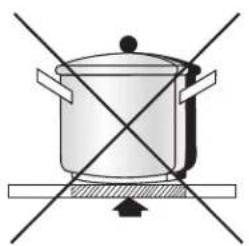
natural_image
Simple line drawing of a cooking pot with crossed lines indicating resistance or cooling (no text or symbols)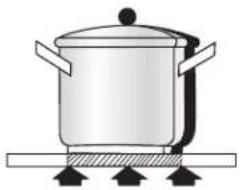
natural_image
Illustration of a cooking pot on a heating element (no text or symbols)FIG.7
natural_image
Illustration of a hand using a power tool to lift a curved object (no text or symbols present)GENERAL
Carefully read the contents of this leaflet since it provides important instructions regarding safety of installation, use and maintenance.
Keep the leaflet for possible future consultation. All the operations relating to installation (electrical connections) must be carried out by specialised personnel in conformity with the regulations in force.
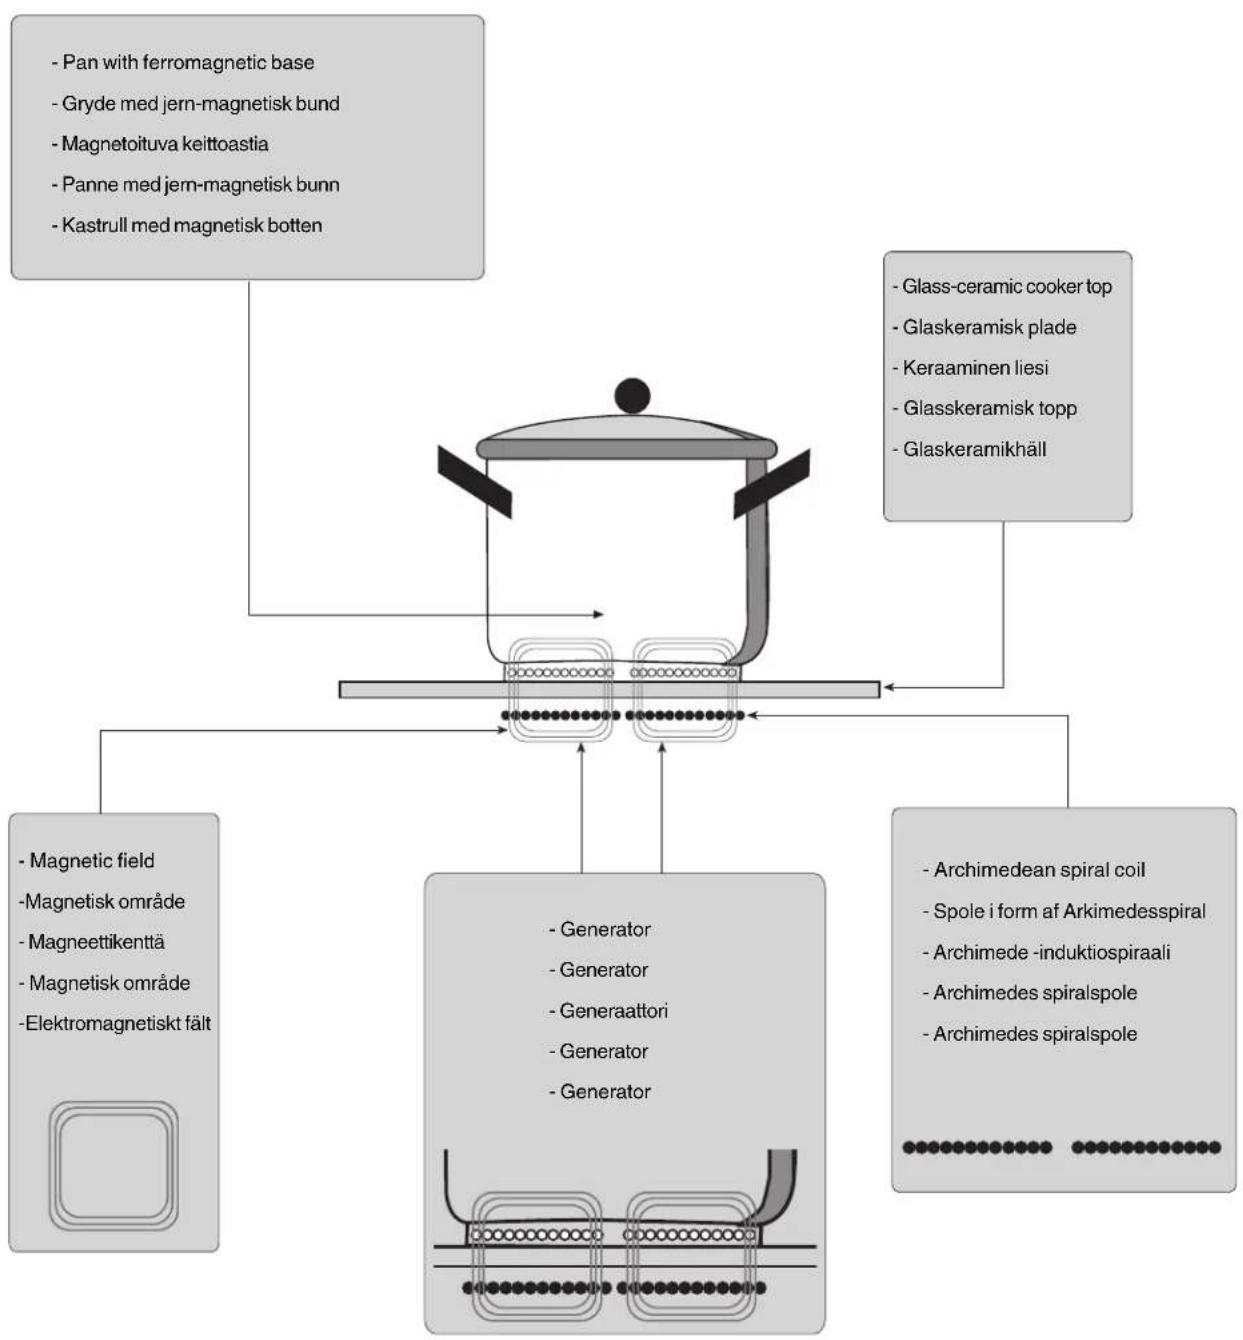
1.1 THE PRINCIPLE OF INDUCTION
The system of cooking by induction is based on the physical phenomenon of magnetic induction.
The fundamental feature of this system is direct transfer of heat energy from the generator to the pan without intermediate means (different from traditional cooker tops see fig.1).
1.2 ADVANTAGES
If you compare your electric cooker tops, with the induction cooker top, the result will be:
- Safer: low temperature on the glass surface
- Quicker: brief heating times.
- More precise: the top reacts immediately to your commands
- More efficient: 90% of the energy absorbed is transformed into heat.
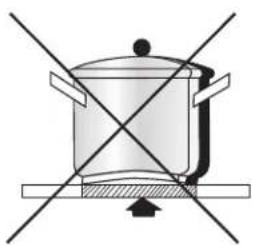
1.3 COOKING VESSELS fig.6
Cooking by induction uses magnetism to generate heat. The vessels must therefore contain iron.
Check if the vessel material is magnetic using a magnet. Important:
To prevent permanent damage to the cooker surface, do not use:
- vessels that do not have a completely flat base whose diameter is the same or slightly more than that of the heated area.
- metal vessels with enamelled bottoms
- Do not use vessels with a rough base to prevent scratching of the cooker top surface
SAFETY WARNINGS
This apparatus is not suitable for use by children or persons who need supervision.
Do not allow children to play with the apparatus. Before using the induction cooker top it is important to check that the apparatus is compatible with anyone who has a pacemaker and active surgical implants.
IMPORTANT
- metal objects such as knives, forks, spoons or lids must not be placed on the cooker surface as they can get hot.
- after use, switch the cooker off using the control device and do not rely on the pan detector.
- avoid liquid spilling, therefore to boil or heat liquids reduce the heat supply.
- do not leave the heating elements switched on with
empty vessels or without vessels.
- when you have finished cooking, switch off the relative resistance using the control indicated below.
- never use aluminium foil for cooking, or never place products wrapped in aluminium foil onto the cooking surface. The aluminium would melt and damage your apparatus irreversibly.
ATTENTION: If the surface is cracked, switch the apparatus off to prevent electric shocks
INSTALLATION INSTRUCTIONS
These instructions address specialised installers and serve as a guide for installation, adjustment and maintenance in conformity with the laws and regulations in force.
If a built-in oven or any other appliance that generates heat must be fitted directly under the glass-ceramic cooktop, THIS APPLIANCE (oven) AND THE GLASS-CERAMIC COOKTOP MUST BE SUITABLY INSULATED in such a way that the heat generated by the oven, measured on the bottom right of the cooktop, does not exceed 60°C. Failure to respect this precaution may determine improper functioning of the TOUCHCONTROL system.
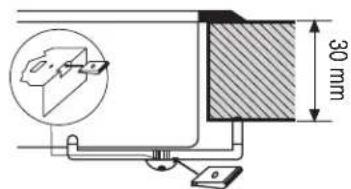
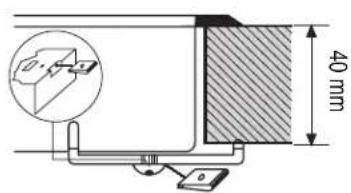
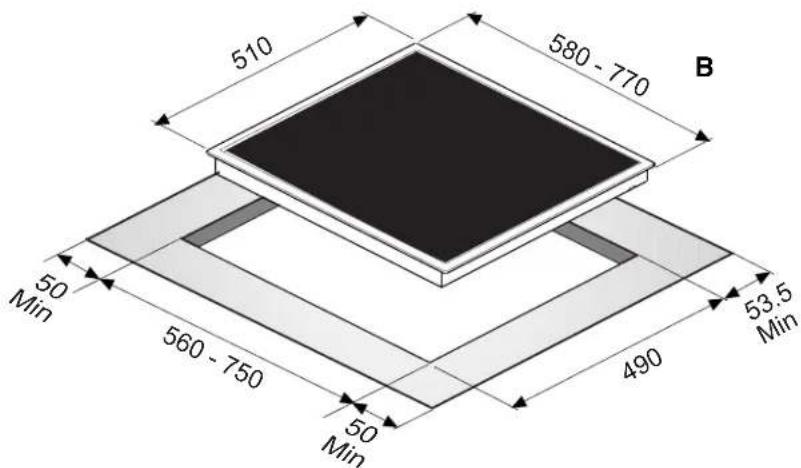
POSITIONING (Fig.5)
The domestic appliance is designed to be built into a worktop as illustrated in the specific figure. Apply sealant around the entire perimeter (cut-out dimensions Fig.5B).
Fix the domestic appliance on the worktop by means of the 4 brackets provided, taking the thickness of the worktop into account (Fig.5A). If the lower part of the appliance, after installation, is accessible via the lower part of the cabinet then it is necessary to mount a separator panel respecting the distances indicated (Fig.5C). If the appliance is installed with an oven underneath then the separator is not necessary.
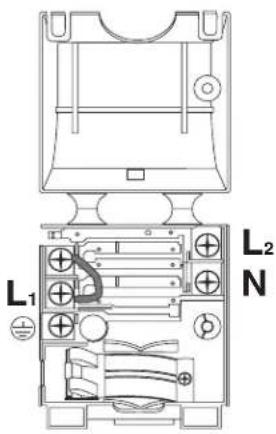
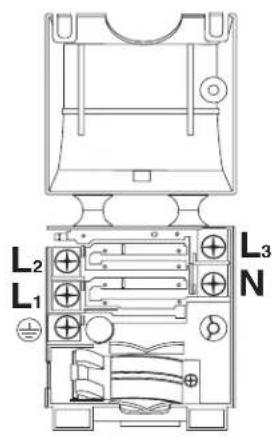
ELECTRICAL CONNECTIONS (Fig.3B - Fig.4B)
Before making the electrical connections, check that: - the ground cable is 2 cm longer than the other cables;
- the system ratings meet the ratings indicated on the identification plate fixed on the lower part of the worktop; - the system is fitted with efficient earthing compliant to the laws and regulations in force.
Earthing is obligatory by law.
If the domestic appliance is not fitted with a cable and/or relevant plug, use material suited to the absorption value indicated on the identification plate and the operating temperature. At no point must the cable reach a temperature 50^ C higher than room temperature.
If wishing to make a direct connection to the mains, an omnipolar switch must be interposed with a minimum opening of 3 mm between the contacts and suited to the load indicated on the plate and conform to the regula-
tions in force (the yellow/green ground conductor must not be interrupted by the switch). When the appliance has been installed, the omnipolar switch must be easily reachable.
USE AND MAINTENANCE
MAINTENANCE
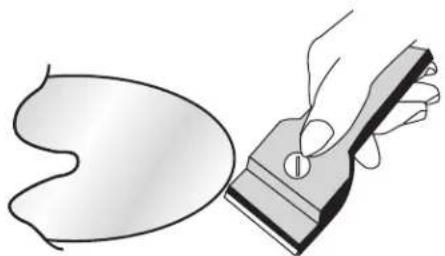
Remove any residues of food and drops of grease from the cooking surface using the special scraper supplied on request (Fig.7)
Clean the heated area as thoroughly as possible using SIDOL, STAHLFIX or similar products and a cloth/paper, then rinse with water and dry with a clean cloth.
Using the special scraper (optional) immediately remove any fragments of aluminium and plastic material that have unintentionally melted on the heated cooking area or residues of sugar or food with a high sugar content (Fig.7). In this way, any damage to the cooktop surface is prevented.
Under no circumstances use abrasive sponges or irritating chemical detergents such as oven sprays or stain removers.
USE (Fig.2)
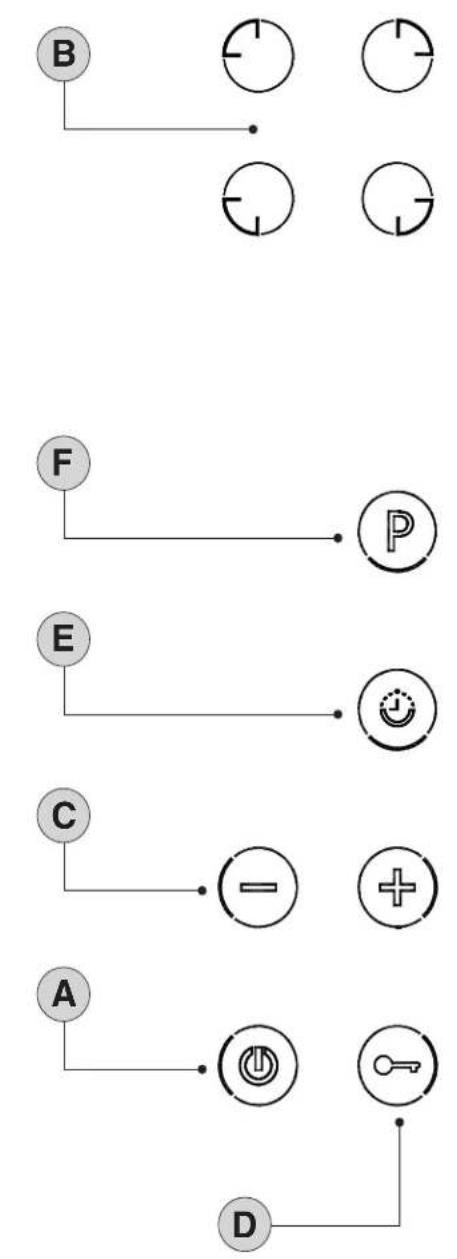
Press key A to switch the cooker top on.
Press one of the keys in section B corresponding to the cooking area you intend to use.
Select cooking power using the + / - keys in section C (number 9 on the display corresponds to the maximum temperature and 1 to the minimum).
You can disconnect the cooking area by pressing the symbols + and - at the same time.
To prevent use or cleaning of the cooker surface by children, it is possible to block all functions by pressing the D key.
If the small hotplate is equipped with an extended hot-plate ring then the second zone will activate when the corresponding knob P is touched and held for 3 seconds (fig. 2 F).
At this point the hotplate will be ignited and the temperature may be regulated using the - or + knobs.
Booster:
The appliance is supplied with a Booster (only in the cooking area indicated in fig.3A - 4A), on the basis of the model you own.
To activate the Booster, switch the interested cooking area on at any power level and press key P (fig. 2F). This allows to reach higher temperatures in a short time disbursing the maximum power possible. Once the function is activated a red LED and a P will appear on the display for ten minutes. After this time the cooking area will automatically return to power level 9.
If the Booster is activated at the same time in other parts of the cooking area, the power will be slightly lessened until the end of functioning.
Timer:
The timer can be used for any selected area.
Select the area where you want to use the timer and then, by pressing the E key, activate the timer and using + and - choose the cooking time.
Once cooking time is over, the timer switches off the area and deactivates the selection.
An acoustic signal can be heard for 30 seconds indicating the end of timer activation.
THE MANUFACTURER DECLINES ALL RESPONSIBILITY FOR EVENTUAL DAMAGES CAUSED BY BREACHING THE ABOVE WARNINGS.

Cooking advice
| Start of cooking | Cooking | End of cooking | |
| • Soup | |||
| Broth | 9 | 7 | 2 |
| Consommé | 9 | 7 | 2 |
| Creme | 7 | - | 7 |
| • Meat | |||
| Small pieces of meat | 7 | - | 5 |
| Large pieces of meat | 8 | 7 | 2/4 |
| Steak | 5/6 | - | - |
| • Fish | |||
| Cooking fish | 8 | 7 | 6 |
| • Potatoes | |||
| Boiled potatoes | 9 | 6 | 5 |
| Browned potatoes | 9 | 6 | 5 |
| Raw potatoes | 9 | 6 | 5 |
| Cooked potatoes | 9 | - | - |
| • Vegetables | |||
| Carrots/green beans | 9 | 6 | 3 |
| Boiled onions | 7 | - | 5 |
| Chick peas/beans | 9 | 6 | 2 |
| Chicory/spinach etc... | 9 | - | 3 |
| Defrosting of leafy vegetables | 5/6 | - | - |
| • Sauces | |||
| Béchamel | 7 | - | 7 |
| • Fried food | |||
| Chips | 9 | - | 9 |
| Crocchettes with frozen meat | 9 | - | 6 |
| Crocchettes with fresh meat | 9 | - | 7 |
Cooking advice
| Start of cooking | Cooking | End of cooking | |
| • Other | |||
| Rice | 9 | 6 | 2 |
| Pasta | 9 | 5 | 2 |
| Fried egg | 6 | - | 6 |
| Lard | 6 | - | - |
| Cooked pear | 9 | 6 | 2 |
| Apple purée | 7 | 6 | 2 |
| Melt butter | 6/7 | 3/5 | 3 |
| Boiled meat | 7 | 5 | 2 |
| Milk | 7 | - | - |
| Thick crêpes | 7 | - | 7 |
| Fine crêpes | 6 | - | 6 |
| Small crêpes | 5 | - | 5 |
- Do not set the cooker to maximum power (9) only to boil water.
Position (9) is too high to heat butter, milk or defrost your products.
Position (8) is the grill.
Position (8) is adept for heating and cooking meat.
- These indications depend, among other things, on the type of cooking vessel.
Adapt the settings as a consequence.
DANSK

GENERELT
1.3 BEHOLDERERE FOR KOKING fig.6
- USE AND CARE GUIDE
- T160i KERAMISK
- 2i
- GENERAL
- THE PRINCIPLE OF INDUCTION
- ADVANTAGES
- COOKING VESSELS fig.6
- SAFETY WARNINGS
- IMPORTANT
- INSTALLATION INSTRUCTIONS
- POSITIONING (Fig.5)
- ELECTRICAL CONNECTIONS (Fig.3B - Fig.4B)
- USE AND MAINTENANCE
- MAINTENANCE
- USE (Fig.2)
- Booster:
- Timer:
- Cooking advice
- DANSK
- GENERELT
- BEHOLDERERE FOR KOKING fig.6
Brand : ASKO
Model : T160i
Category : Cooker