XM-2VRSU734BT - Multimedia car stereo Xomax - Free user manual and instructions
Find the device manual for free XM-2VRSU734BT Xomax in PDF.


| Product Type | Multimedia Car Stereo |
| Model | XM-2VRSU734BT |
| Brand | Xomax |
| Installation Size | 2DIN (Double DIN) – approx. 178 x 100 mm front panel |
| Display | TFT LCD Touchscreen, 16:9 aspect ratio |
| Power Supply | 12V DC, 15A fuse |
| Maximum Power Output | 4 x 60 Watts |
| FM Tuner | Frequency 87.5-108 MHz, Sensitivity 10 dB, S/N 60 dB |
| AM Tuner | Frequency 522-1620 KHz, Sensitivity 32 dB |
| Bluetooth | Version 2.0 Class 2, Profiles: Hands-free, A2DP |
| USB Ports | 2 x USB Type A (front and rear), max 128 GB, FAT32 |
| SD Card Slot | MicroSD / MicroSDHC / MicroSDXC, max 128 GB, FAT32 |
| Supported Media | Audio (MP3, etc.), Video, Image |
| Rear View Camera | Optional, auto-switch on reverse gear |
| Steering Wheel Control | Yes (learnable) |
| Remote Control | Included (CR-2025 battery) |
| Maintenance | Clean with soft dry cloth; avoid alcohol/chemicals |
| Safety | Use only while stopped; professional installation recommended |
| Included Accessories | Car radio, stylus, remote control with battery, installation manual, mounting material, 2DIN cage, 2DIN trim, ISO cable |
| User Manual | Available in PDF on www.xomax.de |
Frequently Asked Questions - XM-2VRSU734BT Xomax
User questions about XM-2VRSU734BT Xomax
0 question about this device. Answer the ones you know or ask your own.
Ask a new question about this device
Download the instructions for your Multimedia car stereo in PDF format for free! Find your manual XM-2VRSU734BT - Xomax and take your electronic device back in hand. On this page are published all the documents necessary for the use of your device. XM-2VRSU734BT by Xomax.
USER MANUAL XM-2VRSU734BT Xomax

XOMAX
XM-2VRSU734BT
Thank you for purchasing one of our XOMAX products! We appreciate your confidence. Enjoy your brand new multimedia unit!

Please read the following manual carefully before you install and use the unit. Please save this manual in case you will need to clarify further possible questions regarding installation and usage of our product.
We are constantly trying to keep our online-library of user's manuals for our products up-to-date. In case you miss some information or if something should be unclear, please visit our homepage www.xomax.de for a current version of user's manual or contact our customer service.
Please note: Any alternations and changes of technical data or/and design due to technical update of some models need no advertisement.

We appreciate our environment, so to keep it safe and clean, we do not print our manuals on paper but provide our products with manuals in digital version created in *.pdf format.
You can find and download them anytime on our homepage www.xomax.de, view them on your mobile devices and print them for yourself if needed.
Manual's version
Version 1.0
Safety instructions and precautions 4
Specifications 6
Package content 7
Installation 8
Installation notes 8
Before the installation 8
Panel introduction 10
Remote control function 12
Connection schedule – Cinch multicore 14
ISO cable connections 15
Connection schedule - ISO plug 16
ISO plug configuration 17
Socket A (power supply) ......17
Socket B (loud speakers) .....17
ISO cable connections 18
ISO cable 18
Please note ....18
Startup operations 19
Usage of the remote control .....19
Replacement of the battery .....19
Unit on/off 20
Insert a micro SD card ......20
Insert a USB flash drive ......20
External input operation 20
Instructions 21
Entering the main interface .....21
Radio function operation ......21
EQ setting 21
Turn on/off the Long/Short-range ....22
Loudness on/off 22
Stereo on/off 22
PTY (Programme Type) ......22
TA (Receive traffic information) .....22
AF (Alternative Frequency) ......22
Band switching 22
Search/Store/Scan stations .....22
Multimedia function 23
SD/USB storage device....23
Music playing 23
Image playing 24
Video playing 24
Bluetooth function operation 25
Enter/exit 25
Pair/link 25
Dialing 25
Call records ......25
Phonebook 26
Pairing records 26
Incoming call displaying 26
Bluetooth music 27
Steering wheel setting 27
Calendar setting 27
Setup 28
General setting....28
Language setting 28
Audio setting 28
Video setting....29
Touch calibration 29
Rear view camera (optional) 30
Common information ....30
Connection 30
Start the rear view camera mode .....30
Common solutions 31
Recycling of an old unit 33
Recycling of the battery 33
Safety instructions and precautions

Handling by stop only
To avoid any accidents please don't handle the unit while you driving. Please stop and park the vehicle at safety place and handle the unit casually.

Installation
Please read the following manual carefully before you install the unit. We recommend you to let the technician install the unit in your vehicle.

Regular loudness
Please set the loudness of the unit to the appropriate level so you were still able to hear exterior noises especially traffic warning signals. Furthermore the higher loudness level can damage your hearing organs.

Repair of the unit
Do not open the unit. Do not try to repair the unit by yourself due to any emerging technical problems. While opening the unit by yourself exists the danger to be electrocuted. Do not use the unit any further since you detect any kind of technical problems. Leave all the repair opera-
tions to professional technicians.
Due to flawed warranty seal the warranty becomes invalid.

Power supply
Use the unit connected only to 12 Volt on-board power supply. The minus (-) should be connected with the ground (GND) (negative).
Due to the wrong grounding exists the danger of fire. In case of doubt please consult with professional technicians.

Replacement of fuses
While replacing the fuse please make sure that the new fuse has the same properties as the old one, especially the amperage.

Overheating
Do not occlude the vent holes to avoid the heat generation and accumulation in the unit. Otherwise exists the danger of fire.

Regular temperature
Please make sure that the temperature inside the vehicle amounts to not more than +60 C. If it's too hot inside the vehicle, do not turn the unit on until the inside temperature of the cabin descends.

Cleaning of the unit
Please keep the unit clean and remove the dust from it regularly. Please use for that a soft and dry cleaning rag.
Major soilings can be removed carefully with the wet cleaning rag. Do not use any chemical or alcohol-containing detergents to avoid the damage of the unit's varnish.

Handling the touchscreen
Do not press the touch keys or other symbols too hard – it may lead to image distortions, unit malfunctions and touchscreen damages.
Do not use any sharp articles to use the touchscreen. Please handle the touchscreen with your finger or with the appropriate stylus.

Moisture
To avoid the danger of fire or the electric shock do not put the unit in to the moist environment (e.g. adverse weather conditions, inappropriate wet cleaning etc.)
Specifications
Common data
Operating voltage 12V DC
Fuse 15 A
Installation size ...... 2DIN - (Double DIN)
Audio
Output power 4x 60 Watt
Aspect ratio (image) 16:9 standard
Typ ...... TFT LCD Touchscreen Display
FM-tuner
Frequency range 87.5 - 108 MHz
FM sensibility 10 dB
S/N ratio 60 dB
IF frequency 10.7 MHz
Stereo channel separation ..... 30 dB (1kHz)
AM-Radioempfänger
Frequency range 522 - 1620 KHz
AM sensibility 32 dB
IF frequency 465 KHz
USB1-port (front)
Plug type Typ A, USB
Max. supported volume 128 GB
File system ...... Fat32
USB2-port (back)
Plug type .... Typ A, USB
Max. supported volume 128 GB
File system Fat32
SD-card slot
Slot typ ...... MicroSD, MicroSDHC, MicroSDXC
Max. supported volume 128 GB
File system Fat32
Bluetooth
Version 2.0 Class 2
Profile ...... Freisprechen, A2DP
Frequency 2.4GHz Spektrum
Any alternations and changes of technical data or/and design due to technical update of some models need no advertisement. Errors expected.
Package content
Please check the accessories on completeness.
Please note: the package content may vary due to technical updates.
1
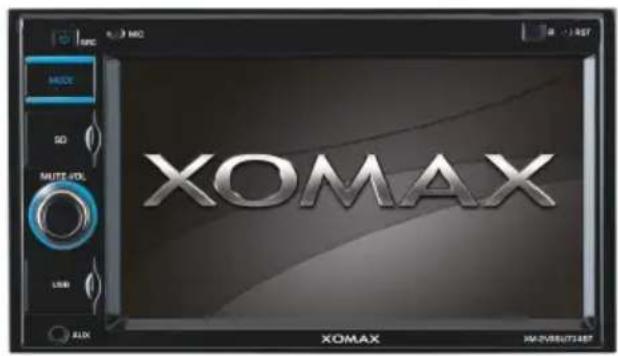
2
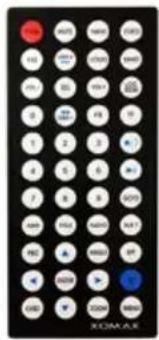
3
4
6

7
5


8
① car radio
② Stylus
③ remote control with battery
④ installation manual
⑤ mounting material
⑥ 2DIN cage
⑦ 2DIN trim
⑧ ISO cable
The images serve as example. Optically the may vary from the original.
Installation
Installation notes
Here you can find relevant installation notes and common information.
iThe detailed installation manual you can find on our homepage www.xomax.de.
The printed version of a common installation manual you can find in the package.
Before the installation
!WARNING!
Please read the following manual carefully before you install the unit.
Damages caused due to an inappropriate installation will not be covered by warranty.
If you do not want to risk your warranty entitlement, please let the technician install the unit in your vehicle.
»To avoid a short circuit please disconnect the vehicle battery before the installation. To do it properly please
read the manual of your vehicle.
»Make sure that your vehicle is equipped with a car radio slot of required size (2DIN)
»As may be the case you will need a suitable faceplate, adapter or other accessories. These could be provided from your local specialist supplier.
»The connection cables may not be cutted or short-circuited. Otherwise the warranty becomes invalid.
»Before the installation please make sure that your vehicle has the 12 Volt on-board power supply.
»The minus (-) should be connected with the ground (GND) (negative).
»Please tag the polarity of the available speakers before you disconnect the vehicle battery.
»A proper grounding of the unit's housing requires a clean ground connection. Thus the grounding area should be rust-, stain- and dust-free.
»Please ground the cable separately from other heavy current devices such as an amplifier etc.
»Please ensure that the colored cables are connected according to the wiring diagram. The wrong wiring may lead to malfunctions or even damages of the electric elements of the vehicle.
»Please note that the connection cables of this unit and of the other devices may have the same purpose
but the different color. For this reason while connecting this unit with the other devices please ensure that both of the cables in each case have the same purpose. To connect everything correctly please refer to the manuals of the both devices.
»Please ensure that the negative speaker cable is in each case connected with the negative speaker terminal of the ISO port. Do not ever connect the negative speaker cables with the vehicle body.
»This unit is designed and construed for connection with 4 speakers. Do not combine this unit with devices that are designed and construed for connection with 2 speakers.
»The speakers should feature the impedance of 4-8 Ohm and a sufficient wattage.
»Please ensure that the speakers you are connecting with the unit are intact. Damaged speakers can impair the unit.
»To avoid a short circuit please isolate all cable junctions and endings of the unused cables with the electrical tape.
»All the cables should be layed and fixated tidy and properly. The cables should not contact any movable or hot objects.
»If your vehicle doesn't have an "ACC" ignition position, please connect the red cable with the ignition switch. Otherwise the unit will not turn off automatically, causing the discharging of the vehicle battery.
»To avoid a rogue and hazardous short circuit do not lay the yellow cable through the engine bay in order to connect it with the vehicle battery.
»Do not ever connect speaker cables among one another. In case you do not want to connect all the 4 speakers with the unit please isolate the endings of unused cables with the electrical tape to prevent a short circuit.
»Do not ever connect the negative speaker cables with the vehicle body.
»To ensure a flawless performance of the unit the intergration angle should amount to +/- 30.

Panel introduction
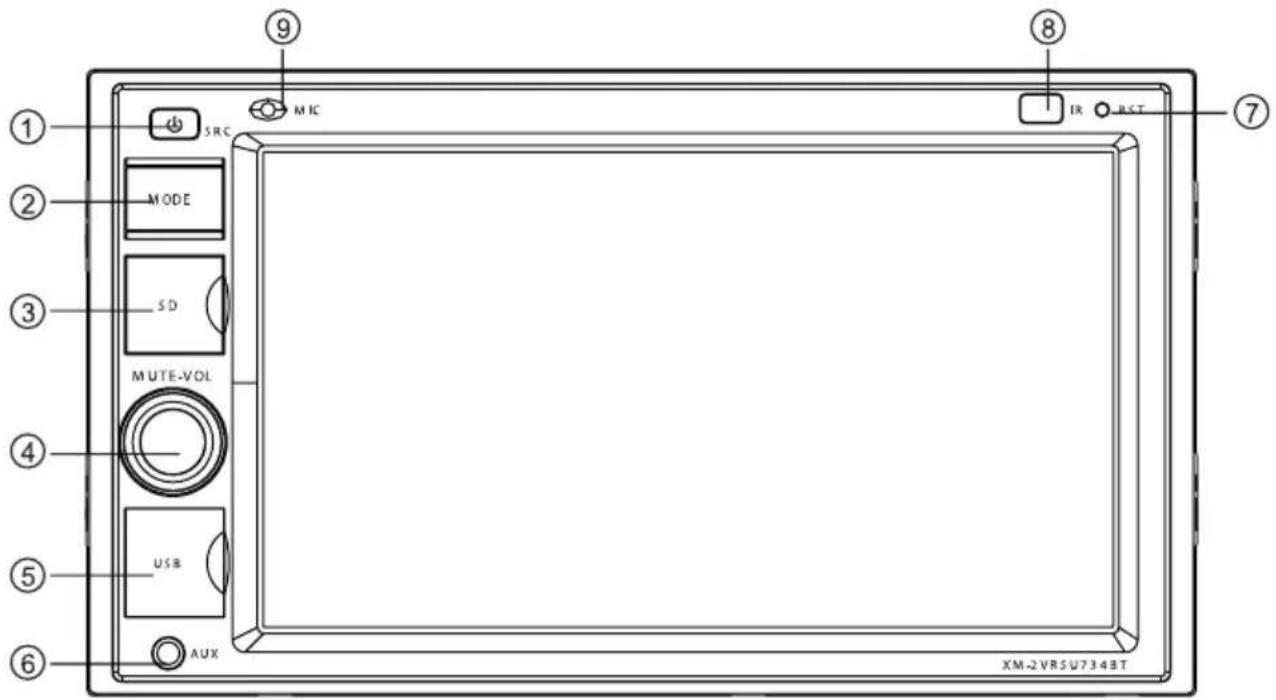
① ⏻ / MENU Power/Menu button
Press this button will turn on power, during working longer press this button will turn offpower,
on any mode, shortly press will return main menu.
② MODE Mode button
Press this button for a short moment to turn on power, Every button-press activates mode change as follows: [Radio], [SD], [AV-IN], [BT], [AUX], [USB1].
Note: When the device without connection to USB, SD the system will automatically skip these related working mode.
③ SD CARD microSD-card slot
Insert SD card so as to read audio/video files.
④ VOL/ MUTE Volume / mute on / off VOL Knopf drehen
Press this button to turn off volume output, press it again to restore the previous volume level.
Long press MUTE button to turn off TFT screen, and short press it so that TFT screen shall be re-lit.
Press this button to increase/reduce the volume.
⑤ USB USB slot
Insert USB removable device so as to read audio/video files.
Warning: You can only use either front or rear USB at a time. Never connect both front and rear USB at the same time! This could cause malfunctions.
⑥ AUX AUX input port
To input external audio.
Warning: You can only use either front or rear AUX at a time. Never connect both front and rear AUX at the same time.
⑦ RST Reset to default
Press this hole with a pointed tool, and the device shall restore to default settings after restarting.
⑧ IR Infrared receiver
To receive infrared signal from the remote control.
⑨ MIC Bluetooth microphone input port
Remote control function
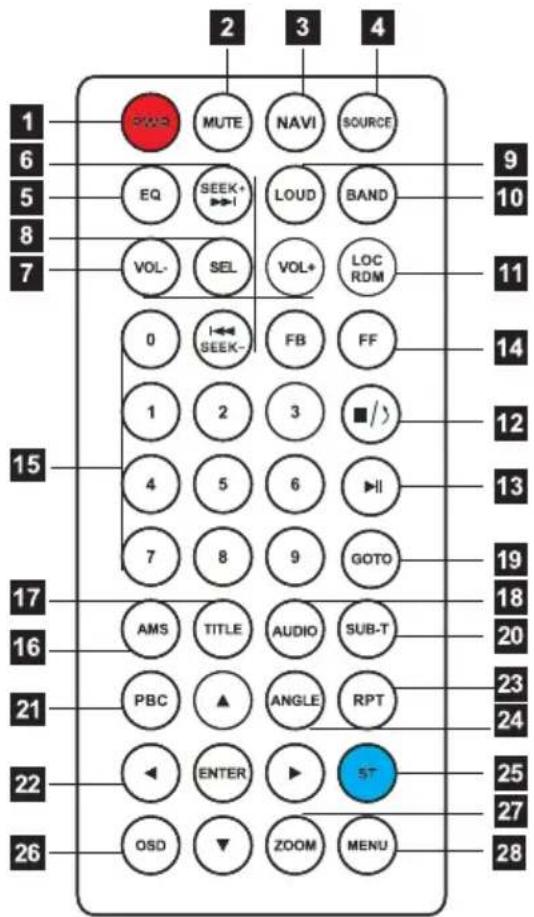
- PWR Press once to switch on, press again to switch off.
- MUTE Press once to turn off audio output, press again to resume volume level.
- NAVI unsupported.
- SOURCE Press this button change mode.
- EQ Press this button at the can switch between different modes.
- SEEK-/ Und SEEK+/▶▶ In normal playing of MP3/USB/SD songs, press this button to play previous song
or next song.
- VOL- / VOL+
Press this button to increase or decrease volume level.
- SEL Press this button to choose sound feature.
- LOUD Press this button to startup LOUD function.
- BAND In radio mode, press this button to choose band.
- LOC/RDM
In radio mode, press this button to switch between local and direction. In USB/SD mode, press this key to randomly play.
- ☐/↗ Press this button to stop playing, press again to continue playing.
- ▶▶▶ Press this button to switch between play and pause. In stop mode, press this button to play.
- FB / FF Press this button to fast forward/fast backward.
- 0-9 In Audio/Radio mode, press number button + enter button to choose desired song section/preset stations.
In Video mode, press GOTO button+ number button + enter button to choose desired song section/preset stations.
- AMS In radio mode, press this button to browse stored stations.
-
TITLE unsupported.
-
AUDIO unsupported.
- GOTO In playing mode, press this button with number button + enter button, you can choose songs/videos to play.
- SUB-T unsupported.
- PBC unsupported.
- ◀▶ ▲▼ When playing MP3/USB/SD, press these buttonsto choose playing menu.
- RPT In Audio mode, press this button to play repeatedly.
- ANGLE unsupported.
- ST In radio mode, press this button to choose stereo or mono station.
- OSD Press this button to show screen display, like playing time, title, etc.
- ZOOM unsupported.
- MENU Press button to back to the main menu.
Connection schedule - Cinch multicore
![graph TD A["loud speakers"] --> B["rear right"] A --> C["rear left"] B --> D["e.g. amplifier (optional)"] C --> D D --> E["rear view camera (optional)"] E --> F["CAM"] F --> G["V-OUT1"] F --> H["V-OUT2"] G --> I["external Display 2 (optional)"] H --> J["external Display1 (optional)"] I --> K["ANT"]…](/content/2026/05/867601/images/75f7ade19436877440e6fd714be0ca5964b77d376afc4e6d74b2426bc329d4fa.jpg)
external audio-/video source
e.g. DVB-T receiver (optional),
MP3- or video player (optional)
ISO cable connections
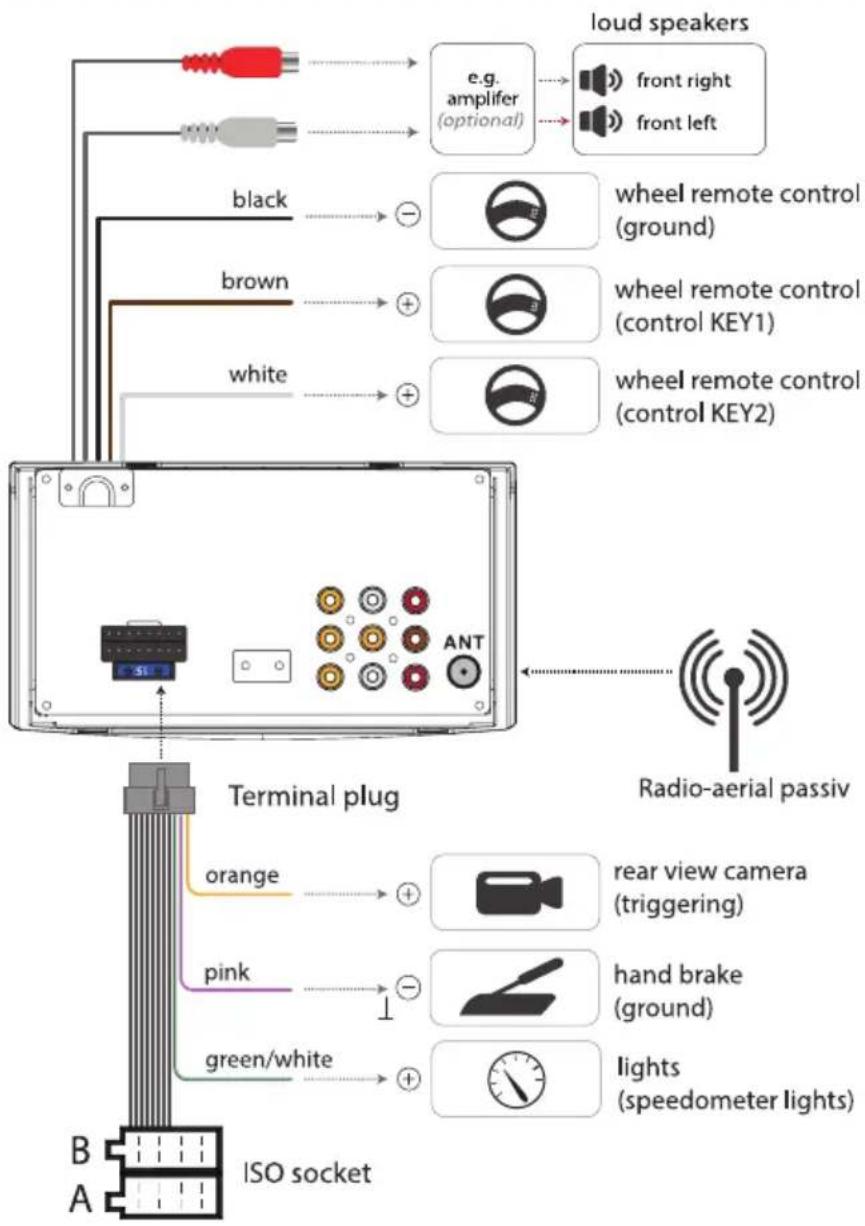
!We recommend you to let a professional technician install the unit in your vehicle.
Terminal plug
This plug connects the ISO cable with the unit.
ISO plug
This plug connects the ISO cable with the vehicle. The ISO cable as such serves as an extension cable for an eased connection of the unit to the vehicle provided that the vehicle has a standardized ISO plug with the appropriate pin assignment.
Connection schedule - ISO plug
![graph TD A["Audio Device"] --> B["ISO-cable"] B --> C["ISO-plug"] C --> D["radio-aerial active"] D --> E["Ground"] E --> F["12V"] G["loud Speakers"] --> H["rear left"] G --> I["front left"] G --> J["front right"] G --> K["rear right"] L["phantom power"] --> C M["ignition"] --> C N["permanent current…](/content/2026/05/867601/images/e4cb4970a06dd1b995f1551cd15f91fcfa33ae5ff82d24993aebc3435b8994c8.jpg)
ISO plug configuration
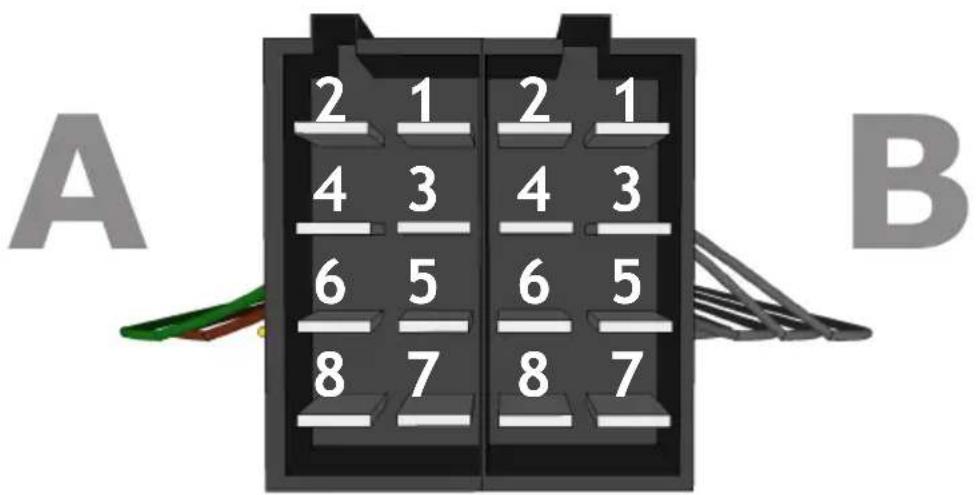
Socket A (power supply)
On the A side you can find the socket for power supply.
A1 - spare
A2 - spare
A3 - spare
A4 - +12V battery / steady plus (yello)*
A5 - (+) electric antenna (blue)
A6 - spare
A7 - +12Volt ignition plus (red)*
A8 - (-) minus / ground (black)
* - Some vehicle manufacturers use their own pin assignment. Especially the terminals A7 (ignition plus) and A4 (steady plus) are often interchanged. The incorrect connection in this case leads to following problem: the unit can not be turned on if the ignition is off and all the saved settings are lost as soon as the unit will be turned off. If these problems appear the connections A4 and A7 should be interchanged.
Socket B (loud speakers)
On the B side you can find the speakers terminals.
B1 - (+) rear right (violet)
B2 - (-) rear right (violet/black)
B3 - (+) front right (gray)
B4 - (-) front right (gray/black)
B5 - (+) front left (white)
B6 - (-) front left (white/black)
B7 - (+) rear left (green)
B8 - (-) rear left (green/black)
The terminals are coloured by pairs, in each case one (+) and one (-).
Though the design of ISO plug is standardized, it's pin assignment is not and may vary. Thus in case of mismatch of connections due to different pin assignments a simple plug'n'play connection may lead to grievous errors.
ISO cable connections

illustration similar
ISO cable
1. Terminal plug
This plug connects the ISO cable with the unit.
2. ISO plug
This plug connects the ISO cable with the vehicle. The ISO cable as such serves as an extension cable for an eased connection of the unit to the vehicle provided that the vehicle has a standardized ISO plug with the appropriate pin assignment.
Please note
»The multicore cable may vary depending on the current model. Though the configuration of the loud speakers- and power supply- cables (steady plus, ignition plus, ground) is consistent.
»Certain patches could be possibly found not only on the ISO interface (socket/plug), but immediately on the device, e.g. ports for the handbrake, rearview camera, steering wheel remote control etc.
»The ISO port may be already integrated in certain units. In this case an additional ISO cable becomes unnecessary.
!We recommend you to let a professional technician install the unit in your vehicle.
Startup operations
Usage of the remote control
Before the first usage please remove the isolation plate.

Aim the remote control at the IR receiver on the front operating panel.
The IR receiver should not be blocked.
As soon as the remote control does not work proper the battery should be replaced.
Do not expose the remote control to direct sunlight or air heater.
Replacement of the battery
The remote control is operated by CR-2025 Lithium battery.
As soon as the remote control does not work proper the battery should be replaced.
Replacement instructions:
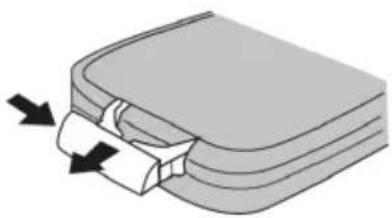
- Remove the battery compartment: push it to the left first, then pull it out.
- Remove the old battery and insert

the new one (CR-2025 Lithium).

- Insert the battery compartment back into the remote control till it clicks into place.
Unit on/off
Press the ⏻ button to turn the unit on.
If the unit is already on, keep the ⏻ button pressed for a couple of seconds to turn it down.
Insert a micro SD card
Insert a micro SD card into the slot with the label side up and the pin side down.

Make sure that the card is intact and dirt-free.
Insert a USB flash drive
Insert an USB flash drive proper into a USB plug.
Do not insert any heavy or big USB flash drives in order not to hit it accidentally - it could cause damages of the USB plug or USB flash drive.
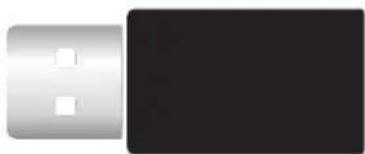
iMicro SD cards and USB flash drives should have following file-system format: Fat32. Other types will not be supported.
External input operation
The AUX and AV-IN input allows you to connect an external device of your choice and play the content stored there via AUX mode on unit's sound system. It could be an MP4-Player, Smartphone, Cellphone, Tablet, Video-Player, DVB-T Receiver etc.
The AV-IN port has 3 regular channel: Video (yellow), Audio Left (white or black) and Audio Right (red).
Respectively put video/audio input plugs of the unit into video/audio input jacks of external device, and then touch the icon main interface to enter AUX input interface.
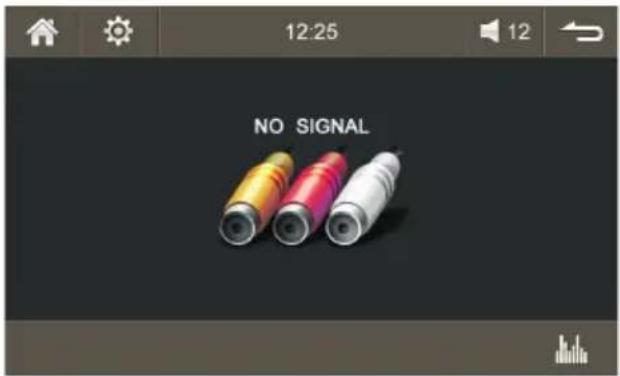
Click the icon to enter EQ setting interface. For detail function instruction, please refer the section "EQ setting".
Instructions
Entering the main interface
Under power-on status, press the button MENU on the panel to switch to the main interface.

Touch the icon or use the touch pen/finger gently sliding around the screen to switch to the main menu page.


Touch the function icons so as to access the corresponding function operations.
Radio function operation
Touch icon in the main interface to enter into the radio interface.
After touching the icon to enter main interface, then touch any other function icon, the radio mode will exit automatically.
Touch the icon to return to the upper interface.
Touch the icon to enter setting interface.
Touch the icon to show the current volume.
Touch the icon on radio interface to enter the interface below:


EQ setting
Touch the icon to set sound effect mode.
Turn on/off the Long/Short-range
Click icon, the search pattern in the local search (LOC) and remote search (DX) switch between.
LOC feature is turned on after the signal is strong enough only to listen to those in good condition and receiving radio station; DX enabled, you can receive remote weak radio signals.
Note: This function is available only when FM band is selected.
Loudness on/off
Click icon so as to turn on/off loudness function.
Stereo on/off
When receiving stereo signals, click icon to turn on/off stereo.

PTY (Programme Type)
Touch the button the screen displays program types, users can search station according to program type.
TA (Receive traffic information)
ON: When the traffic station is turned on, the radio will automatically search for traffic stations.
After a station is searched, screen displays "TP". Only when traffic information is broadcasted can it be
received, after traffic information is completed, the radio will automatically switch to the previous mode.
OFF: Repress [TA] button to close TA function. In other modes, traffic announcement will automatically switch to radio mode, after the traffic announcement is completed, it will automatically switch to the previous mode.
AF (Alternative Frequency)
Touch the button to turn the AF function on/off. AF function is turned on, when the received station signals become weak, the radio will automatically fine-tune to other frequencies.
When receiving an emergency announcing, the screen will display warning message.
Note: If the unit does not have RDS function, it has no PTY/TA/AF function.
Band switching
Touch the icon in radio interface to switch the bands among AM1, AM2, FM1, FM2 or FM3.
Search/Store/Scan stations
Short-press the icon on the radio interface to browse the pre-stored stations, long-press this button to search stations and store the strongest signal station on the screen.
Press the icon on the radio interface to search the next station.
Press the icon on the radio interface to search the previous station.
Multimedia function
SD/USB storage device
When connected with an external SD/USB storage device, the unit may play-back the music/image/video files in it.
Click the icon 📄/USB main menu to switch to current playing interface quickly.

Music playing
Play the music files in SD/USB device; Click the icon 📞SD/USB main menu to return to the previous file list page.
Click the icon to enter music playing interface.



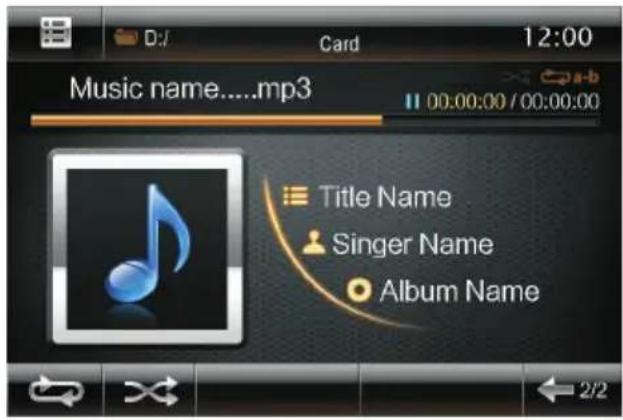
Touch the icon or -SP/USB music interface to enter the interface below:

Touch the two icons 📁 to preview the files upwards/downwards; Click the icon to play the current file.
Image playing
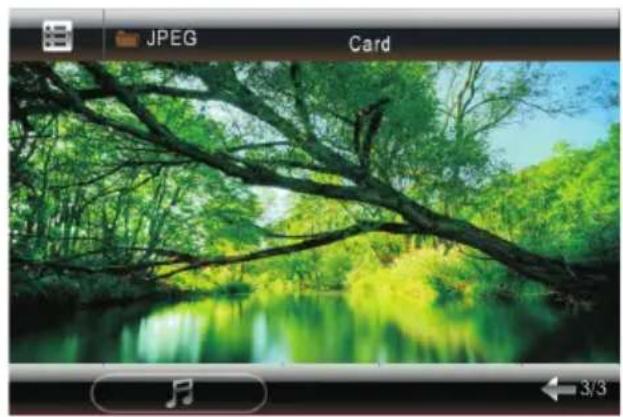
Click the icon in SD/USB main menu to enter image playing interface:





Touch this icon C to rotate the image.
Touch this icon switch special effects.
Under image-playing status, touch this icon 📊 enable MP3 music playing and retouch this icon to disable the music playing.
Video playing
Tap the icon in SD/USB main menu to enter video playing interface; for video playing function instruction.


Bluetooth function operation
Enter/exit
Touch icon in the main interface to enter the BT interface.
Touch icon to exit BT interface.
Touch icon to exit BT interface and enter the main interface.
Touch icon to exit BT interface and enter setting interface.

Pair/link
To use BT hand-free function, make connection first, i.e. match the host with the BT mobile phone.
Operation methods:
Set the host to be matching state, and open the BT of your mobile phone and use the mobile phone to search device, the mobile phone shall prompt to match password with the BT when it has searched the BT device.
Input BT password 0000 to the mobile phone and confirm. The mobile phone shall prompt whether authorize to this device, please select [Yes].
NOTE: Phone and BT shall automatically connect within 20 seconds. Under any working mode, the host shall convert to BT state if there is an incoming call. And the host shall restore to current mode after hanging up.
When the BT device matches with this device, the connection status shall display [LINK OK], otherwise, it shall display [NO LINK].
Dialing
You can dial on mobile phone directly or input phone number through the number buttons on the screen, click to delete if there is input error.
After input the phone number, click to make a call, and click to hang up the phone.
During talking, click the icon to switch voice output between car speaker and mobile.
Call records
Touch the icon 📋 BT interface to enter calling records interface.
Touch the icon to check the received phone numbers.
Touch the icon to check the dialed phone numbers.
Touch the icon to check the calling records upwards.
Touch the icon to check the calling records downwards.
Touch the icon to check the missed phone numbers.
Phonebook
Tap the icon in BT interface, the dialogue box "Sure to download records" will pop up on the screen.
Touch to download the phone numbers in your mobile to the phone book of the machine.
In BT phone book, touch the icon / to find a phone number upwards or downwards. Tap the first letter of a name via the keypad to search a phone number in your phone book quickly.

Touch the icon to delete all phone numbers downloaded in your phone book.
Pairing records
Touch the icon in BT interface to enter BT pairing interface and check all pairing records.
Touch the button to check the pairing records upwards.
Touch the button to check the pairing records downwards.
Touch the icon to search a mobile BT device.

Incoming call displaying
Under any mode, the system will switch to BT hands-free interface automatically when there is an incoming call, together with incoming-call music and incoming-call displaying to remind you to answer the call.
Bluetooth music
Touch the icon in Bluetooth interface to enter Bluetooth-Music interface.

Play/Pause

previous song

lext song

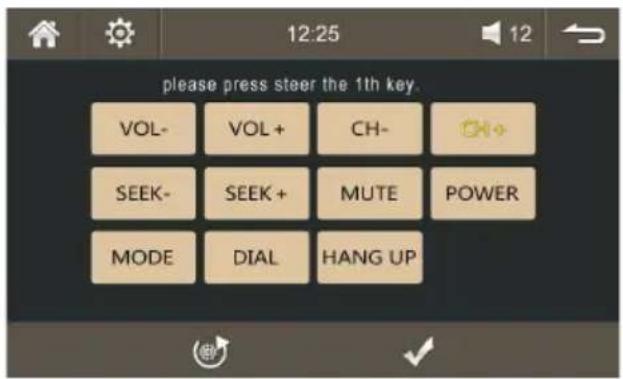
Steering wheel setting
Touch the icon 📄 main interface to enter learning steering wheel setting interface.
Touch the icon to resume the initial setting.
After setting, touch the icon finish the setting.

Calendar setting
Touch the icon in main interface to enter calendar setting interface.

Touch the icon < in> calendar interface to set Year, Month, Date.
Touch the numbers on calendar interface to set the date or week information.
Setup
Touch the icon in main interface to enter setting interface.
Touch the icon under any mode to switch to setting interface.
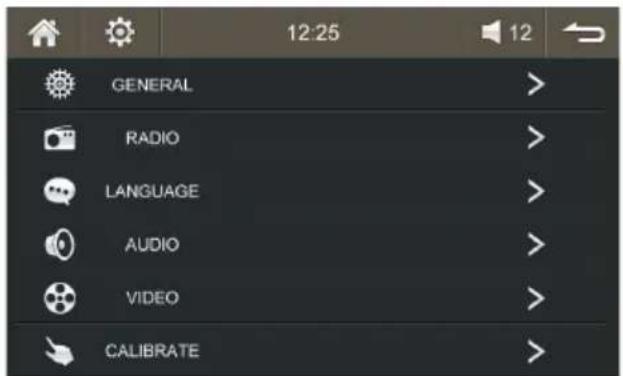
Touch the icon 📁 enter general setting interface.
Touch the icon to enter radio setting interface.
Touch the icon to enter language setting interface
Touch the icon 📄 set play mode switch.
Touch the icon to enter video setting interface.
Touch the icon to set screen calibration function.
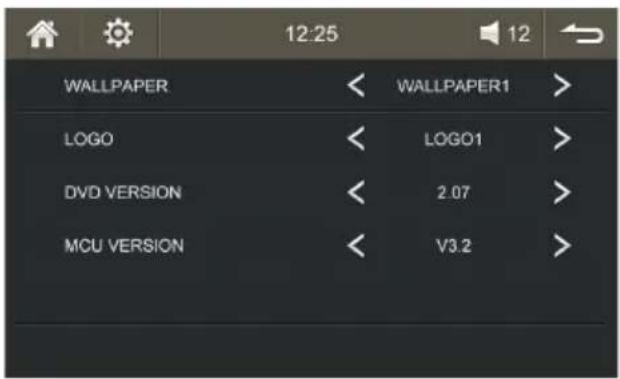
General setting
Click icon 📊 on setup interface to access general setting interface, as shown in below :
In "General setting" interface, you are
able to set your favorable wallpaper. Click the icon 📁 to preview upwards and downwards.
Language setting
During use, you can select your familiar language to display menu by language setup. Click icon or setup interface to access language setting interface, as shown in below:

In the languagebar ENGLISH need to set, touch the corresponding-gicon to select your familiar language.
Audio setting
Click the icon Ⓞ setting interface to enter audio setting interface, click
the icon to enter equalizer setting interface.
Drag the icon to implement relevant settings.
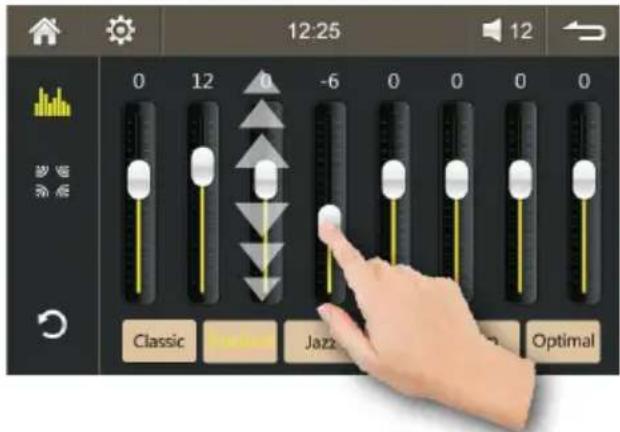
Touch the icon to enter sound effect relevant setting interface.

Touch the icon to return to the initial setting.
Video setting
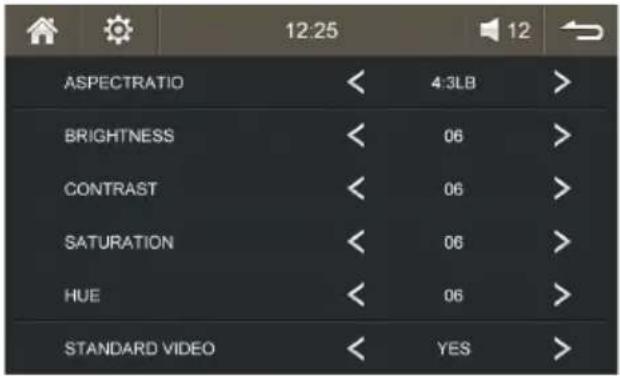
Click icon 📄 setup interface to access video setting interface, as shown in below:
In video setting interface, you may set the [ASPECT RATIO], [BRIGHTNESS], [CONTRAST], [SATURATION], [HUE] for the video.
Touch calibration
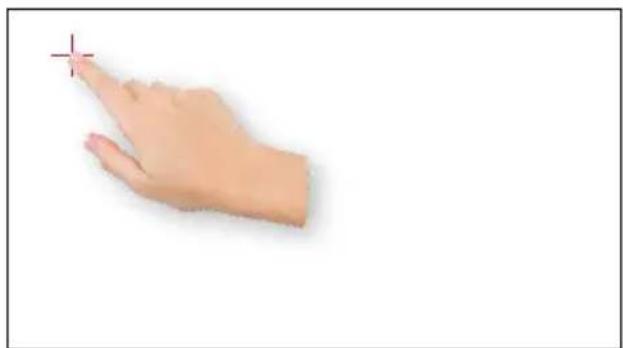
If touch calibration error occurs, you can adjust the touch coordinate by [Touch calibration].
Click the icon setting interface to enter "Calibrate" interface.
Use touch pen to click the center of "+" icon, and move along with center of "+" icon so as to calibrate the screen. It shall automatically save data and exit after screen calibration.
Please accurately click all positions on screen, or the accuracy of touch calibration shall be affected.
Rear view camera (optional)
Common information
A rear view camera is an optional accessory. Please inform yourself by your local specialist supplier about current models and their options and possibilities.
You can find compatible cameras on the homepage: www.carmediashop.de
All the cameras are equipped with video cinch output.
Rear view cameras are to be installed at the rear of the vehicle. They serve as a parking assist element and an auxiliary extension of the viewing angle while reversing.
! ! Please do not rely on the camera's picture only while reversing.
A rear view camera serves as an additional assistance, it can not sub- stitude your full attention driving.
Connection
The camera port CAM is located on the rear side of the unit.
The yellow cinch jack is the terminal for the incoming video signal from the camera. Plug the video cable of the camera into it.
The unit's cable as well as the camera itself has to be connected with the rear lights of the vehicle 12V) to ensure the correct functionality of the camera mode.
Start the rear view camera mode
If the camera was connected properly the unit switches automatically to the camera mode as soon as you shift the reverse gear. As soon as you shift any other gear the unit switches back to the previous mode.

Common solutions
The following advices are generally valid and refer to diverse car radios models with the similar characteristics. Please note that some articles may refer not to your model exactly and contain the description of features and functions that your model does not support.
| The description of the problem | The cause and the solution |
| The remote control is without function. | Solution 1:Please ensure that the battery film is removed. By delivery the battery is protected by a film which should be removed before usage.Solution 2:The battery could be empty. Please replace it if required.Solution 3:Please make sure that the infrared receiver (labelled with IR) on the control panel is not blocked.Note:You can test the functionality of the remote control as follows: please hold the IR transmitter towards a camera (e.g. a cell phone camera) and press any button on the remote control. If the remote control is operative you can see the infrared signal on the display of the used camera device. |
| The unit does not turn on. | This problem is in most cases caused due to a wrong connection of the ISO cable.Please review the pin assignments of the ISO cable and ISO plug. Pay attention to the proper connection of the ignition- and steady plus and correct the discrepancy if required.Note:Though the design of ISO plug is standardized, it's pin assignment is not and may vary. Thus in case of mismatch of connections due to different pin assignments a simple plug'n'play connection may lead to grievous errors. |
| Poor radio reception:The radio tuner finds nobroadcaster or therecep-tion is poor. | For problem-solving regarding the radio reception itis important to know the type of the antenna of yourvehicle.Here are the possible solutions for each type of theantenna:Type 1 – passive antenna:We recommend you to substitute the existing antenna bythe larger and therefore more efficient one.Shark fin or rod antennas (under 5 cm) are definitelyinsufficient.Type 2 – active antenna:The vehicle provides no current for the active antenna.In this case a phantom power is required, which providesthe active antenna with the external power supply.Type 3 – active antenna with diversity system:The unit provides no current for the active antenna andhas no diversity support. For this type of antenna isrequired the phantom power with an integrated diversitysystem.Note:A phantom power is not to be confused with an antennaamplifier which is far less efficient. |
| Radio stations are lost:As soon as the unit will beturned off all the storedstations and users settingswill be lost. | This problem is caused due to a wrong connection of theISO cable.Please interchange the cables for ignition plus and forsteady plus.Caution:If these wires have fuses the latter should be interch-anged as well. |
Recycling of an old unit
User information regarding recycling of electric and electronic devices (private households)

This symbol on products or in their manuals implies that electric and electronic devices at the end of their service life should be separated from the domestic waist.
Please hand these products for recycling at municipal collection points free of charge.
The proper disposal of these products contributes to environment protection. To find the nearest collection point or recycling yard please consult your municipal administration.
Recycling of the battery
According to the battery decree we make you aware of your obligation to dispose of empty batteries at municipal collection points.
Batteries that contain pollutants (e.g. Hg = mercury, Pb = lead, Cd = cadmium) are labelled with the symbol pictured above.
At our place you can free dispose of the empty batteries purchased at our store.
- XOMAX
- XM-2VRSU734BT
- SAFETY INSTRUCTIONS AND PRECAUTIONS 4
- SPECIFICATIONS 6
- PACKAGE CONTENT 7
- INSTALLATION 8
- PANEL INTRODUCTION 10
- REMOTE CONTROL FUNCTION 12
- CONNECTION SCHEDULE – CINCH MULTICORE 14
- ISO CABLE CONNECTIONS 15
- CONNECTION SCHEDULE - ISO PLUG 16
- ISO PLUG CONFIGURATION 17
- ISO CABLE CONNECTIONS 18
- STARTUP OPERATIONS 19
- EXTERNAL INPUT OPERATION 20
- INSTRUCTIONS 21
- MULTIMEDIA FUNCTION 23
- BLUETOOTH FUNCTION OPERATION 25
- STEERING WHEEL SETTING 27
- CALENDAR SETTING 27
- SETUP 28
- REAR VIEW CAMERA (OPTIONAL) 30
- COMMON SOLUTIONS 31
- RECYCLING OF AN OLD UNIT 33
- RECYCLING OF THE BATTERY 33
- SAFETY INSTRUCTIONS AND PRECAUTIONS
- HANDLING BY STOP ONLY
- INSTALLATION
- REGULAR LOUDNESS
- REPAIR OF THE UNIT
- POWER SUPPLY
- REPLACEMENT OF FUSES
- OVERHEATING
- REGULAR TEMPERATURE
- CLEANING OF THE UNIT
- HANDLING THE TOUCHSCREEN
- MOISTURE
- SPECIFICATIONS
- COMMON DATA
- AUDIO
- FM-TUNER
- AM-RADIOEMPFÄNGER
- USB1-PORT (FRONT)
- USB2-PORT (BACK)
- SD-CARD SLOT
- BLUETOOTH
- PACKAGE CONTENT
- INSTALLATION NOTES
- BEFORE THE INSTALLATION
- WARNING
- PANEL INTRODUCTION
- ① ⏻ / MENU POWER/MENU BUTTON
- ② MODE MODE BUTTON
- ③ SD CARD MICROSD-CARD SLOT
- ④ VOL/ MUTE VOLUME / MUTE ON / OFF VOL KNOPF DREHEN
- ⑤ USB USB SLOT
- REMOTE CONTROL FUNCTION
- CONNECTION SCHEDULE - CINCH MULTICORE
- ISO CABLE CONNECTIONS
- TERMINAL PLUG
- ISO PLUG
- ISO PLUG CONFIGURATION
- SOCKET A (POWER SUPPLY)
- SOCKET B (LOUD SPEAKERS)
- ISO CABLE
- PLEASE NOTE
- STARTUP OPERATIONS
- USAGE OF THE REMOTE CONTROL
- REPLACEMENT OF THE BATTERY
- REPLACEMENT INSTRUCTIONS
- UNIT ON/OFF
- INSERT A MICRO SD CARD
- INSERT A USB FLASH DRIVE
- EXTERNAL INPUT OPERATION
- INSTRUCTIONS
- ENTERING THE MAIN INTERFACE
- RADIO FUNCTION OPERATION
- EQ SETTING
- TURN ON/OFF THE LONG/SHORT-RANGE
- LOUDNESS ON/OFF
- STEREO ON/OFF
- PTY (PROGRAMME TYPE)
- TA (RECEIVE TRAFFIC INFORMATION)
- AF (ALTERNATIVE FREQUENCY)
- BAND SWITCHING
- SEARCH/STORE/SCAN STATIONS
- MULTIMEDIA FUNCTION
- SD/USB STORAGE DEVICE
- MUSIC PLAYING
- IMAGE PLAYING
- VIDEO PLAYING
- BLUETOOTH FUNCTION OPERATION
- ENTER/EXIT
- PAIR/LINK
- DIALING
- CALL RECORDS
- PHONEBOOK
- PAIRING RECORDS
- INCOMING CALL DISPLAYING
- BLUETOOTH MUSIC
- STEERING WHEEL SETTING
- CALENDAR SETTING
- SETUP
- GENERAL SETTING
- LANGUAGE SETTING
- AUDIO SETTING
- VIDEO SETTING
- TOUCH CALIBRATION
- REAR VIEW CAMERA (OPTIONAL)
- COMMON INFORMATION
- CONNECTION
- START THE REAR VIEW CAMERA MODE
- COMMON SOLUTIONS
- RECYCLING OF AN OLD UNIT
- RECYCLING OF THE BATTERY
Brand : Xomax
Model : XM-2VRSU734BT
Category : Multimedia car stereo