XM-2DTSBN6210 - Multimedia car stereo Xomax - Free user manual and instructions
Find the device manual for free XM-2DTSBN6210 Xomax in PDF.


| Product Type | DVD Multimedia Receiver with 6.2" Touch Screen Display |
| Model Number | XM-2DTSBN6210 |
| Brand | Xomax |
| Display Size | 6.2 inches TFT LCD |
| Dimensions (approx) | 178 x 100 x 150 mm (Double DIN) |
| Weight (approx) | 1.5 kg |
| Power Supply | 12 V DC (10.8-16 V range, negative ground) |
| Max Power Output | 4 x 60 W (impedance 4 ohms) |
| Supported Disc Formats | DVD-R/RW, DVD+R/RW, CD-R/RW, CD-DA, MP3, WMA, MP4, VCD, SVCD, JPEG, etc. |
| Radio Bands | FM (87.5-108 MHz) and AM (522-1620 kHz) with RDS |
| Bluetooth | Hands-free calling, phonebook, A2DP music streaming (PIN: 0000) |
| GPS Navigation | Built-in navigation software (SD card slot, map not included) |
| Rear Camera Input | Compatible (camera not included), auto-activates in reverse |
| Steering Wheel Control | Yes, programmable via system settings |
| USB / SD Card Slots | Front USB and SD/MMC slot for media playback |
| Audio/Video Outputs | Subwoofer pre-out, 2 video outputs, 1 video input, AUX input |
| Equalizer | Preset modes: Pop, Rock, Classic, Jazz, Off |
| Safety Features | Parking brake lock-out for video; volume limit for external awareness |
| Spare Parts Available | Replacement fuse (10A), CR2025 remote battery, mounting sleeve/keys |
| Repairability | Fuse replacement; reset button; professional installation recommended |
Frequently Asked Questions - XM-2DTSBN6210 Xomax
User questions about XM-2DTSBN6210 Xomax
0 question about this device. Answer the ones you know or ask your own.
Ask a new question about this device
Download the instructions for your Multimedia car stereo in PDF format for free! Find your manual XM-2DTSBN6210 - Xomax and take your electronic device back in hand. On this page are published all the documents necessary for the use of your device. XM-2DTSBN6210 by Xomax.
USER MANUAL XM-2DTSBN6210 Xomax
XM-2DTSBN6210
INSTALLATION/OWNER'S MANUAL
DVD Multimedia Receiver with 6.2" Touch Screen Display
XOMAX
Safety Notes:
The DVD video display of the in-dash unit will not operate while the vehicle is moving. This is a safety feature to prevent driver distraction. In-dash DVD video functions will only operate when vehicle is in Park and the parking brake is engaged. It is illegal in most states for the driver to view video while the vehicle is in motion.
Warning Statement 3
Safety Information/Precautions....4
Preparation/Mounting....5
Wiring Diagram 6
Remote Preparation....7
Control Locations 8
General Operation 9
AM/FM Tuner Operation 1
Multimedia player B
Disc: DVD/VCD Operation ...... B
CD/MP3/MP4/WMA/Multimedia Operation.
Pictures Operation....6
AUX in....6
Rear view lens/ Calculator/ Game Y
Bluetooth Operation 8
Setting Menu 2
GPS Navigation ...... Z
Troubleshooting 8
Systematic Parameter 3
Signs of Video and Audio 5
About CDs 5
WARNING
This unit has to be installed in a way that the screen is not visible. Upon installation of this Monitor/DVD player( "unit" ) into a vehicle, the driver of the vehicle must not operate this unit by watching videos or playing video games while driving. Failure to follow this instruction could lead to driver distraction which could result in serious injury or death to the vehicle's occupants or persons outside the vehicle and/or property damage.
Several states prohibit the installation of monitors/DVD players if the screen is visible from the driver's seat. If you reside in a jurisdiction which has enacted such a law, this unimust not be installed so that the screen is visible from the driver's seat. When installing this unit in the front console/dashboard, the unit must be positioned so that it is facing the front passenger seat only. Failure to follow this instruction could lead to driver distractionwhich could result in serious injury or death to the vehicle's occupants or persons outside the vehicle and/or property damage.
This unit is designed so that it may be operated only when the vehicle is in “Park” and the parking brake is fully engaged. To this end, this unit includes a parking brake lock-out feature which prohibits the unit from operating if the vehicle is not in “Park” and/or the parking brake is not fully engaged. When installing this unit, the installer must connect the parking brake detect wire (“Pink Lead”) to the parking brake mechanism in order to make the parking brake lock-out feature operable. DO NOT simply ground the parking brake detect wire to a metal portion of the vehicle. Failure to properly install the parking brake lock-out feature could lead to driver distraction which could result in serious injury or death to the driver’s occupants or persons outside the vehicle and/or property damage.
Once the parking brake lock-out feature is installed, the owner/user must not attempt to disrupt/neutralize the parking brake lock-out feature by (a) partially engaging the parking brake and/or (b) purchasing/using any device or unit designed to send necessary brakesignals to the unit. Failure to follow these instructions could lead to driver distraction which could result in serious injury or death to the driver's occupants or persons outside the vehicle and/or property damage.
When operating this unit, keep the unit's volume level low enough so that the vehicle's occupants can hear traffic-related sounds such as police and emergency vehicles. Failure to follow this instruction could lead to driver distraction which could result in serious injury or death to the vehicle's occupants or persons outside the vehicle and/or property damage.

Safety Information
Please read all instructions carefully before attempting to install or operate.
Due to its technical nature, it is highly recommended that your XM-2DTSB6210 is installed by a professional installer or an authorized dealer. This product is only for use in vehicles with 12VDC negative ground only.
To prevent damage or injury:
□ Make sure to ground the unit securely to the vehicle chassis ground.
☐ Do not remove the top or bottom covers of the unit.
☐ Do not install the unit in a spot exposed to direct sunlight or excessive heat or the possibility of water splashing.
- Do not subject the unit to excessive shock.
- When replacing a fuse, only use a new one with the prescribed rating. Using a fuse with the wrong rating may cause the unit to malfunction.
• To prevent short circuits when replacing a fuse, disconnect the wiring harness first.
- Use only the provided hardware and wire harness.
- You cannot view video while the vehicle is moving. Find a safe place to park and engage the parking brake.
• If you experience problems during installation, consult the seller
- If the unit malfunctions, reset the unit as
• To clean the monitor, wipe only with a dry silicone cloth or soft cloth. Do not use a stiff cloth, or volatile solvents such as paint thinner and alcohol. They can scratch the surface of the panel and/or remove the printing.
- When the temperature of the unit falls (as in winter), the liquid crystal inside the screen will become darker than usual. Normal brightness will return after using the monitor for a while.
- When extending the ignition, battery or ground cables, make sure to use automotive-grade cables or other cables with an area of 0.75mm (AWG 18) or more to prevent voltage drops.
- Do not touch the liquid crystal fluid if the LCD is damaged or broken. The liquid crystal fluid may be hazardous to your health or fatal. If the liquid crystal fluid from the LCD contacts your body or clothing, wash it off with soap immediately.
E-MARK Compliance
Concerning the adoption of uniform technical prescriptions for wheeled vehicles, equipment and parts which can be fitted and/or be used on wheeled vehicles and the conditions for reciprocal recognition of approvals granted on the basis of these prescriptions. Addendum 9: Regulation No. 10 Uniform provisions concerning the approval of vehicles with regard to electromagnetic compatibility Regulation No. 10 revision 04 series of amendments Corrigendum 1 to the Revision 4 – Date of entry into force: 06 March 2012
Warning: Changes or modifications to this unit not expressly approved by the party responsible for compliance could void the user's authority to operate the equipment.
Note: These limits are designed to provide reasonable protection against harmful interference in a residential installation. This equipment generates, uses and can radiate radio frequency energy and, if not installed and used in accordance with the instructions, may cause harmful interference to radio communications. However, there is no guarantee that interference will not occur in a particular installation. If this equipment does cause harmful interference to radio or television reception, which can be determined by turning the equipment off and on, the user is encouraged to try to correct the interference by one or more of the following measures.
- Reorient or relocate the receiving antenna.
- Increase the separation between the equipment and receiver.
- Connect the equipment into an outlet on a circuit different from that to which the receiver is connected.
- Consult the dealer or an experienced radio/TV technician for help.
Preparation
Before You Start
Getting Started
- Disconnect negative battery terminal. Consult a qualified technician for instructions.
- Avoid installing the unit where it would be subject to high temperatures, such as from direct sunlight, or where it would be subject to dust, dirt or excessive vibration.
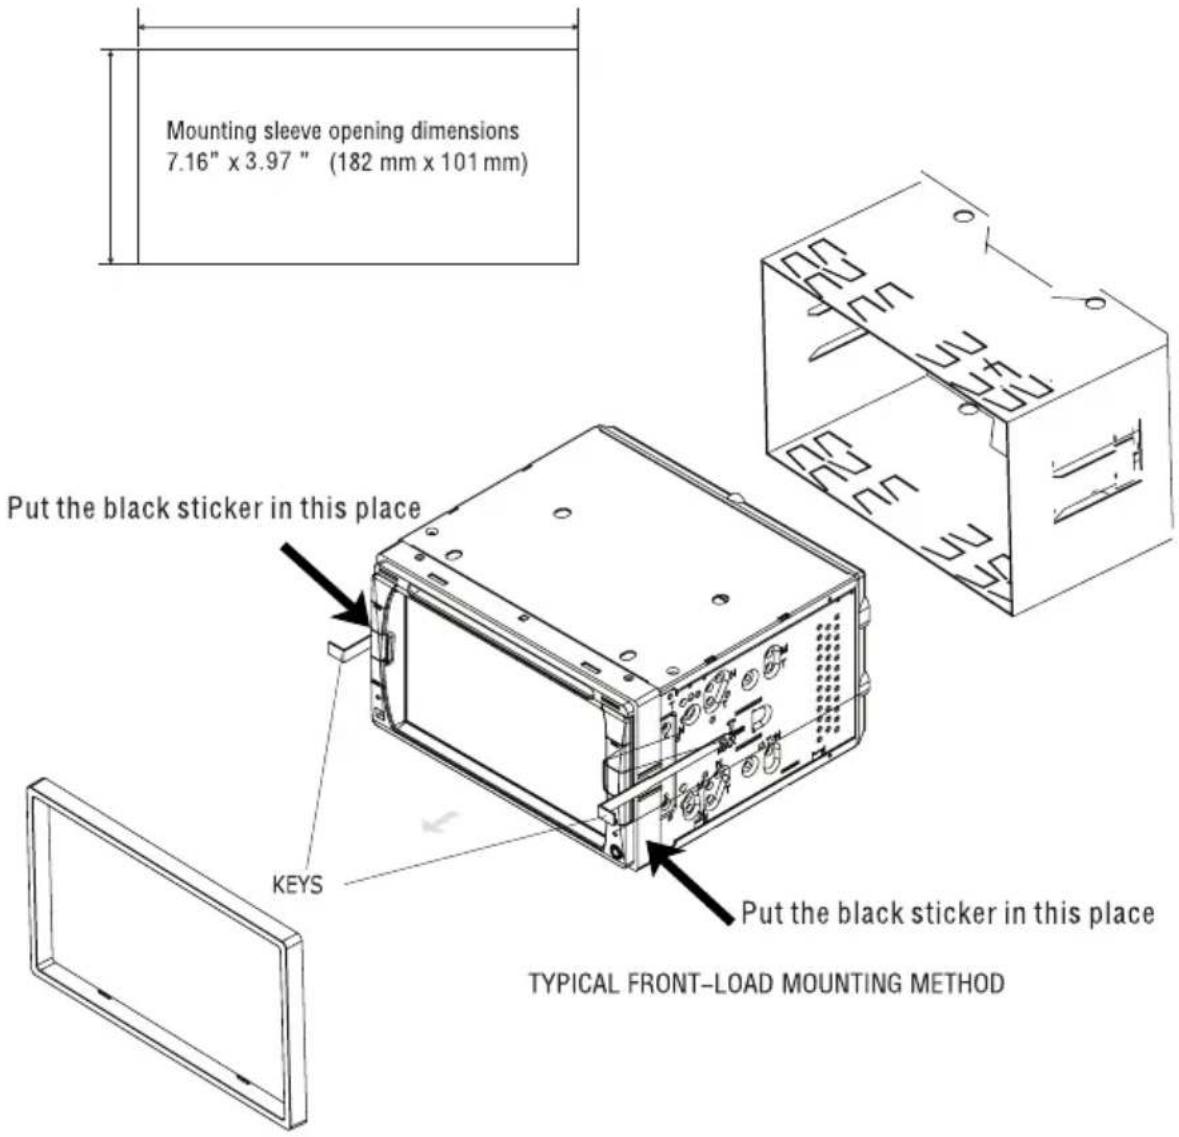
- Insert the supplied keys into the slots as shown, and slide the unit out of the mounting sleeve.
• Install mounting sleeve into opening, bending tabs to secure. - Connect wiring harness as shown on page 6. Consult a qualified technician if you are unsure.
- Certain vehicles may require an installation kit and/or wiring harness adapter (not included).
- Reconnect negative battery terminal, and test for correct operation.
- Snap trim ring into place (if required).
- Slide unit into mounting sleeve to secure.
Wiring Diagram - Inputs/Outputs
![graph TD A["GPS ANT"] --> B["RADIO ANT"] B --> C["SPEAKER FRONT R"] C --> D["POWER"] D --> E["SUBWOOFER OUTPUT"] F["VIDEO OUT1"] --> G["FL AUDIO OUTPUT"] H["VIDEO OUT2"] --> I["VIDEO OUT1"] J["VIDEO INPUT"] --> K["LEFT AUDIO INPUT"] L["RIGHT AUDIO INPUT"] --> M["RIGHT AUDIO INPUT"] N["FR AUDIO OUTPU…](/content/2026/05/789673/images/ea95ded45393871fc5773925b8da97079e35d2b08aea0867a8b961f32d04cac0.jpg)
Wiring Notes:
Subwoofer output
The Subwoofer preamp audio output (black jacket with green RCA) is active in all audio modes.
Rear camera input
The rear camera is not included in this device. This device supports the rear camera video input.
Steering wheel control
Connect SW KEY 1/SW KEY 2/SW GND
Note:
When replacing a fuse, make sure to use the correct type and amperage. Using an incorrect fuse could damage the unit.
Remote Control Preparation
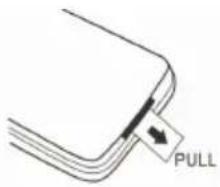
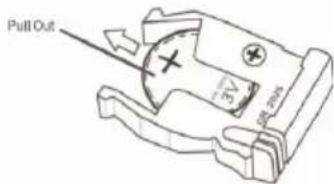
Remove battery insulation tape.
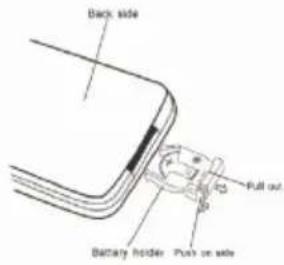
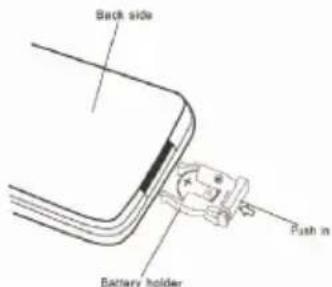
To insert or replace the battery, remove the battery holder.
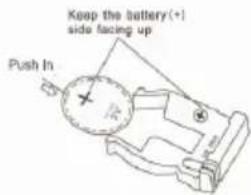
Remove the battery from the battery holder.
Install the new battery. Make sure to keep the (+) side up.
Insert the battery holder.
Notes:
- The remote control use\35 one 3 volt Lithium CR2025 battery. Remove the battery if the remote will not be used for a month or longer.
- Remove and dispose of battery properly.
- Do not store battey with metallic objects or materials.
Control Locations
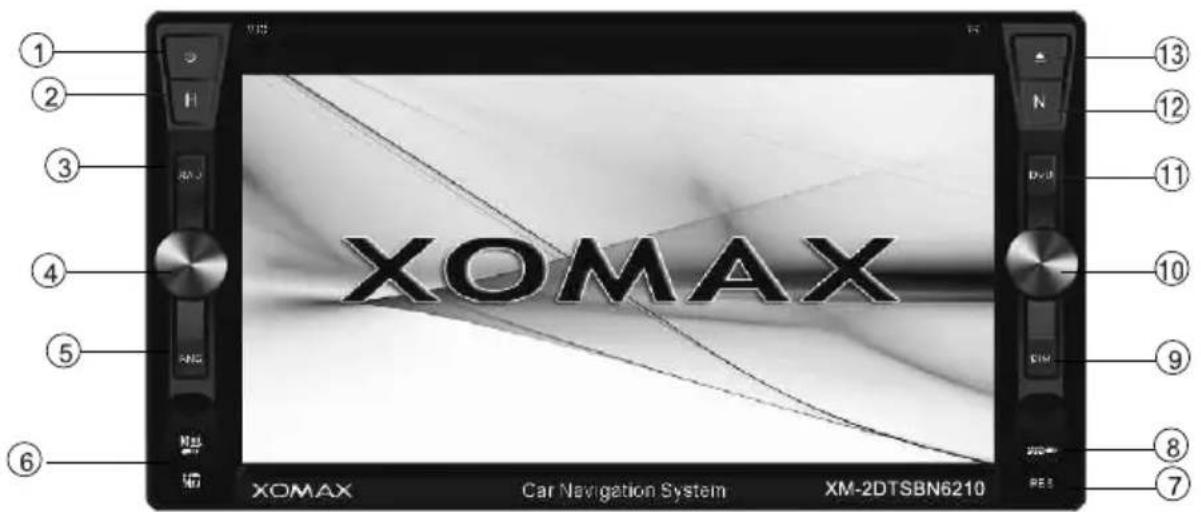
① Power on/off
② Main interface/ Mode
③ Radio, FM/AM switching
④ Volume Up/down or Mute
⑤ AMS
⑥ SD/Map card slot
⑦ Reset
⑧ USB
⑨ DIM
⑩ Select next or previous chapter/EQ Setting
⑪ DVD
⑫ Navigation
⑬ Eject
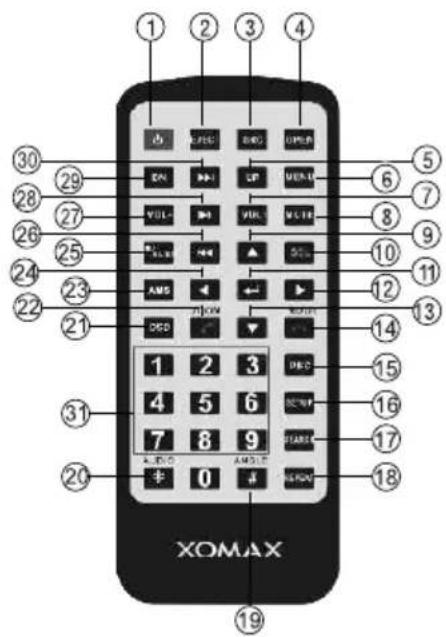
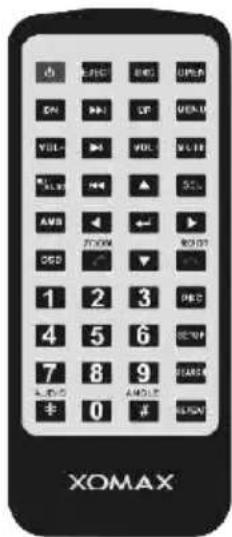
① Power on/off
② EJECT
③ SRC
④ OPEN
⑤ Screen angle up
⑥ MENU
⑦ VOL+
⑧ MUTE
⑨ 4-Way - UP
⑩ SEL
⑪ OK
⑫ 4-Way - Right
⑬ 4-Way - Down
⑭ ROOT or End of the call
⑮ PBC
⑯ SET UP
⑰ SEARCH
⑱ REPEAT
⑲ ANGLE
20 AUDIO
②1 OSD
②ZOOM or Make a call
②3 AMS
⑳ 4-Way - Left
②5 BAND or Stop
26 Select previous section
⑳ VOL-
28 Play/pause
⑲ Screen angle down
30 Select next section
③1 Number keys
General Operation
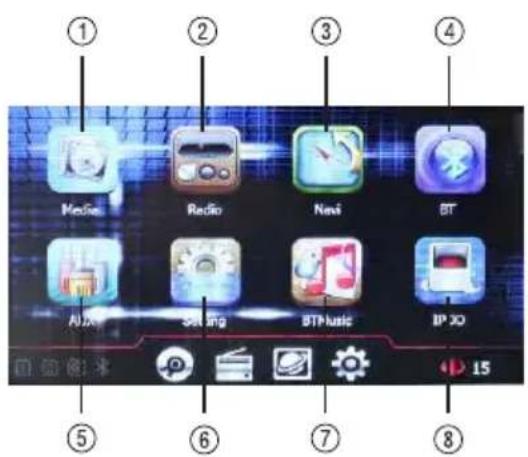
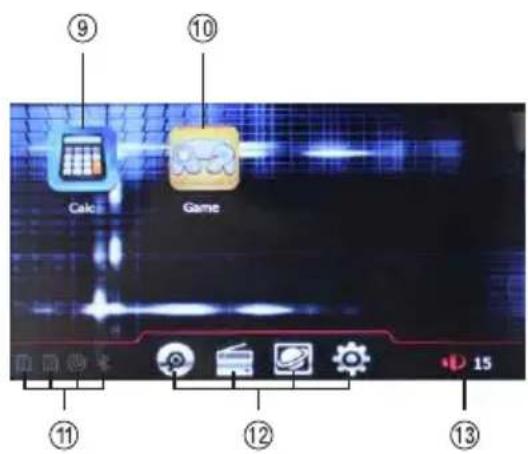
Profile of main interface
- Media: SD/USB/DVD
8.IPOD(not included in this device)
2.Radio
9.Calculator
3.GPS navigation
10.Game - Bluetooth
11.Connection status: SD. DVD, Bluetooth
5.AUX in - Shortcut key: DVD, Radio, Navigation, Setting
- Setting
13.Volume - Bluetooth Music
Note: If there is no any device connection, icons for DVD, USB, SD, IPOD and camera will be showed no device. Click is invalid in this case.
Radio
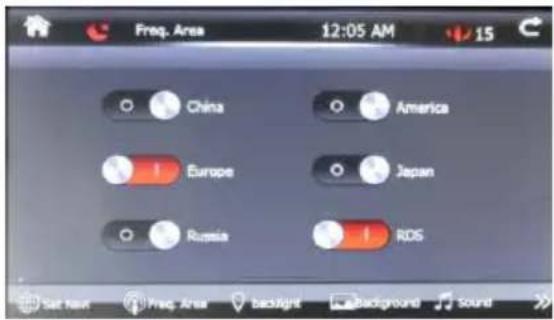
• Radio Region-Set the unit for one for the following regions: Europe, America, China, Russia, Japan, RDS(on/off)
Multimedia player
• Support lots of video and audio formats, support 1080P high resolution video
- Subwoofer-Turn the subwoofer output On or Off
• EQ-Sertting: Pop, Rock, Classic, Jazz or Off
Bluetooth
- Connect the bluetooth with mobile device, playing music, make a phone call, receive phone call, phonebook display
GPS Navigation
• GPS Navigation, guide your road
Time
- Slide the figures in the set time interface Select the desired time zone
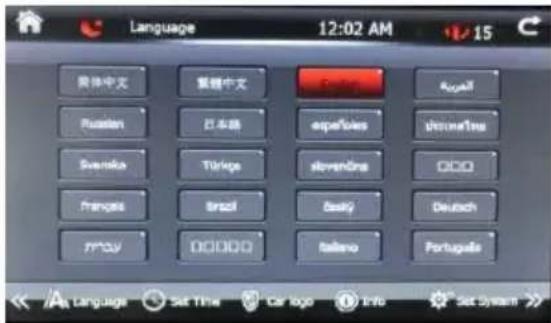
Language
• Language-Select desired language(English, Spanish, Deutsch, Russian, Portuguese, French, Chinese, etc.
Camera input
- Connect the camera with this device, can be auto detected brake signal when reversing.(Note: Camera is not included)
Car logo
- Preset car logo to match your car brand
Steering wheel control
- Set the function button on you steering wheel via the system learning setting
Calibration
- Calibration Press the enter of the “+” as the indicated on the screen to calibrate the touch screen
Power saving mode
- auto black set:3 minutes, 5 minutes,10 minutes, cancel, black now
AUX Input
- Connect an optional audio video source to the Aux input(Red / White / Yellow RCA connectors) Refer to page 6 for the details wiring diagram
Dual zone function
- While playing the radio/music/video, GPS navigation can work at the same time. Switch the mode by remote control SRC or touch H / N key in the panel or touch the icon in the main interface
AM/FM Tuner Operation
Radio interface RDS turn on function
Touch Radio icon in main interface or press mode key in panel/SRC key in remote controller to switch to radio mode.
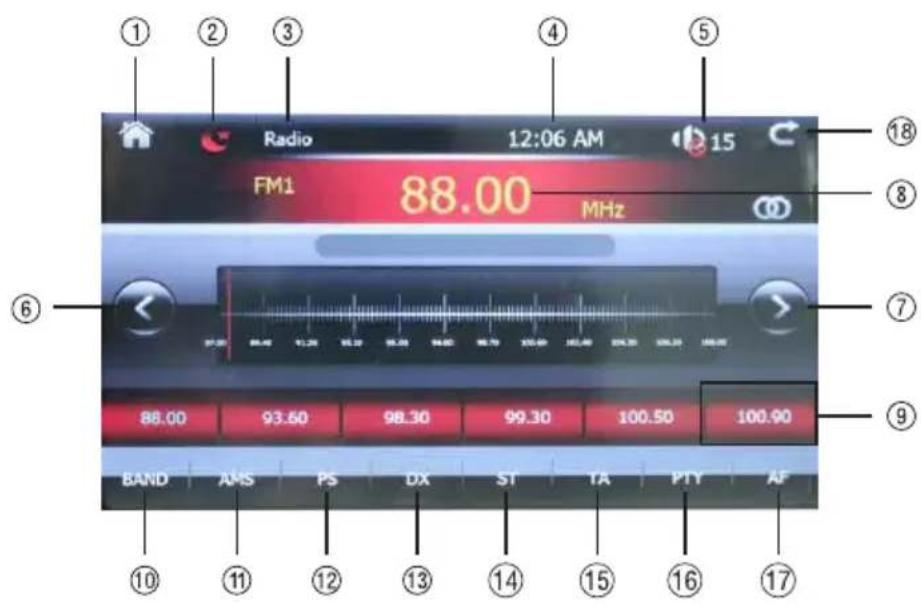
- Home page: touch the icon to access the main menu
- Power Saving Mode
Shut the screen display to saving power
- Current Source Indicator
Display source currently playing
- Clock Indicator
Show current time
5.Volume display
6. Tune Frequency-Down
Touch this icon will tune the radio to a lower frequency by one frequency step
- Tune Frequency-Up
Touch this icon will tune the radio to a higher frequency by one frequency step
- Information displaying
Show the temporary state information about frequency
- Information displaying bars
A. Short press to enter this current frequency, Long press the frequency, the new frequency show at the top information displaying bar will be stored in this bar
B. Preset Tuning
To select a desired station from the preset station list, touch any of the displayed station frequencies
10.Band
Touch this icon to switch radio band, from FM1, FM2, FM3, AM1, AM2
Under every band, 6 stations can be stored. Touch BAND key in radio interface
■/BAND key in the remote control to switch bands among FM and AM.
11.Automatically Searching station
Touch this icon to scan radio station automatically. The most recent stations are Press the AMS key in the remote control. the system will automatically search radio stored. station within full channels. The radio station with good signal or fine receiving state will be stored in the preset frequency directory.
12.Preset Scan
Touch this icon to scan the tunable presets band and play them for 5 seconds each.
13.LOC/DX Tuning Mode
LOC short-distance function/DX remote function) Local tuning lets you tune in radio stations with sufficiently strong signals for good reception. In areas that reception is poor, you can switch from local.
After starting LOC, the radio will search the radio stations with strong signal and fine receiving state. After the local searching function is activated, DX icon will become LOC icon. Return to distance tuning mode, by press the LOC button again. (Distance tuning is the default tuning mode.)
14.ST: Stereo for the frequency with stereo sound output
15.TA Function Turn on/off
Touch this icon to switch to current radio station under any mode if the system detects emergency traffic news.
16.Program Type
Touch this icon to select the program type.
17.AF Function Turn on/off
Touch this icon to turn on/off AF function (This function is aims at automatically optimizing frequency of current channel. If there is break of some frequency point or poor signal of broadcasting radio station, the system will automatically switch to another frequency point with strong signal of the same radio station.)
18. Return to previous mode
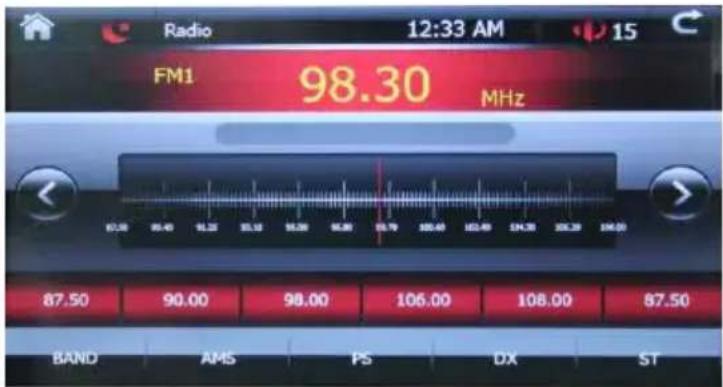
Radio interface RDS turn off function
• The TA, PTY, AF icons will not show in the menu.
Note: You can turn on/off the RDS function in the system setting menu: Freq Area.
Multimedia player
Click Media icon to enter media player: DVD, USB, SD
Click the desired media to player, and press the SRC key in the remote control to switch the playing mode.
Disc: DVD/VCD Operation
Note: Please use the standard and genuine discs and keep discs clean. Proper usage can assure normal service life of this system (this device only supports 12CM disc). Insert disc into disc inlet slightly, the disc will be suctioned into the device automatically. The system will automatically read disc and the screen will display directory menu contained in DVD disc. The user can directly click options in directory menu to perform play, language selection, voice selection, section selection and other disc operation.
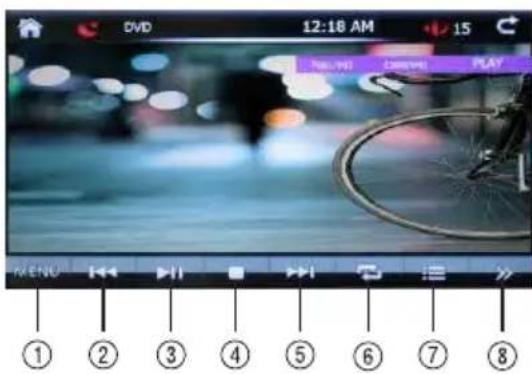
- Click the key to enter primary menu of the disc
- Click to select previous section(item)
3.Play/pause - Stop key: stop to play, click play key to start the playing.
- Click to select next section(item)
- Play mode (for each click, it will switch among repeat one, repeat all, repeat off and random)
- Title menu touch to access DVD title menu.
8.Page key(click the key to enter next function menu).
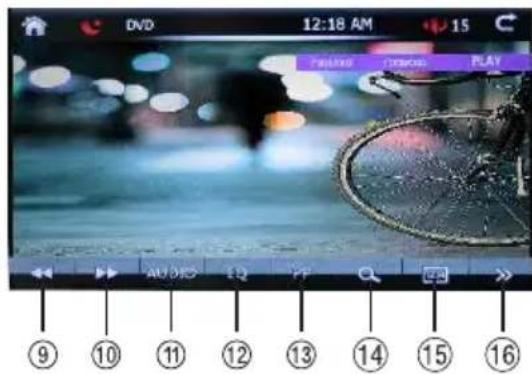
9.Fast reverse touch the speed from 2x to 4x, back to play.
10.Fast forward touch the ▶ speed from 2 x to 4x, back to play - Audio setting: stereo, mix, left channel, right channel
12.EQ setting: User, Field, Club, POP, Classic, Rock, Jazz
13.Picture adjustment: User, Bright, Soft, Color, Normal
14.Zoom:±25%, ±50%, ±75% - Click the key to enter the keyboard of searching and playing
- Sub-title mode touch to activate sub-titles on DVD's that have multiple sub-title languages. See below pictures.
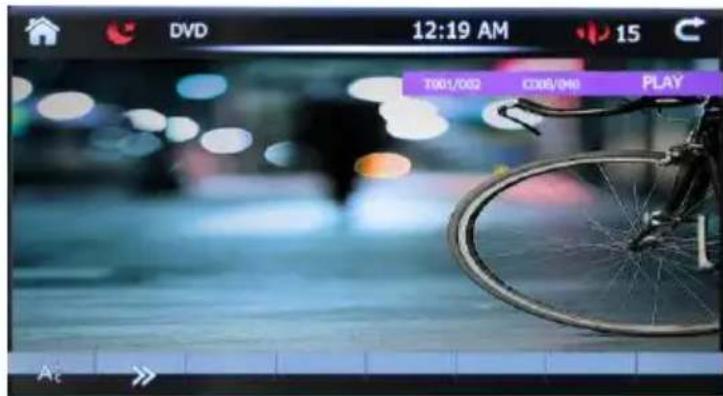
Note: Functions mentioned above can also be done through corresponding keys of the remote controller.
GO TO SEARCH
In DVD/VCD disc play, it can fast reach designated position for play with SEARCH function. Click 1234 key enter the interface shown as below.
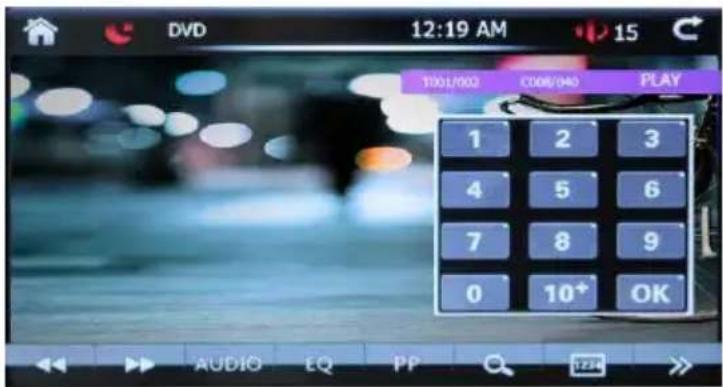
Click number in keyboard, click OK key for confirmation. After confirmation, the system will automatically turn to designated position of the disc for play.
CD/MP3/MP4/WMA Multimedia Operation
CD/MP3/MP4/WMA Multimedia Operation
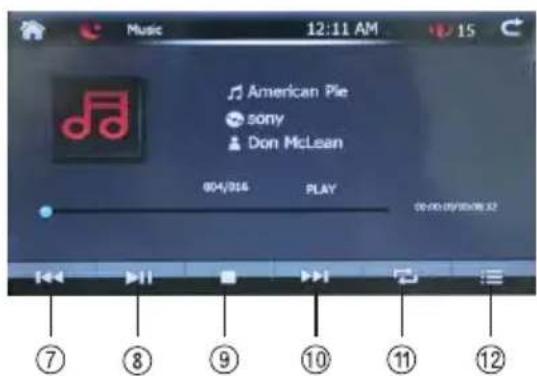
Insert the disc/USB/SD into disc inlet slightly. The system will automatically play CD/MP3/WMAdisc and the screen will display play interface shown .The system will automatically read disc/USB/SD information, and the user can directly click items displayed in the play interface for select and play.
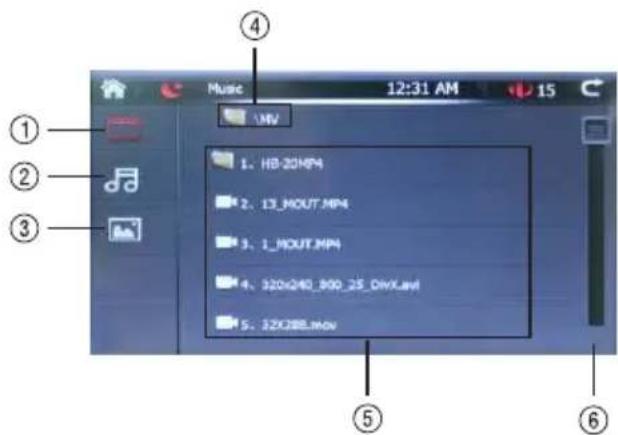
- Video format display
- Music format display
3.Pictures format display - The primary folder, click to enter subfolder or play
- The subfolder
6.Slider bar: slide the bar to see the following file - Click to select previous track
8.Play/pause key
- Stop key
10.Click to select next track
-
Play mode (for each click, it will switch among repeat one, repeat all, repeat off and random)
-
Back to the playing list or folder list
Pictures Operation
Play JPEG file
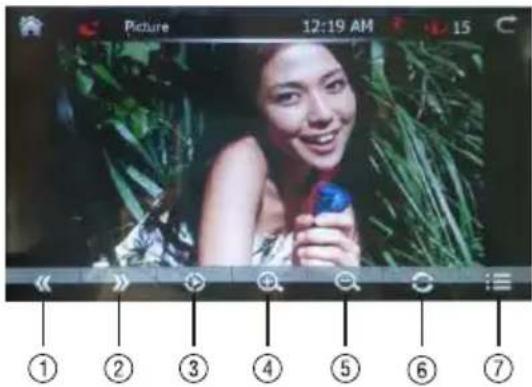
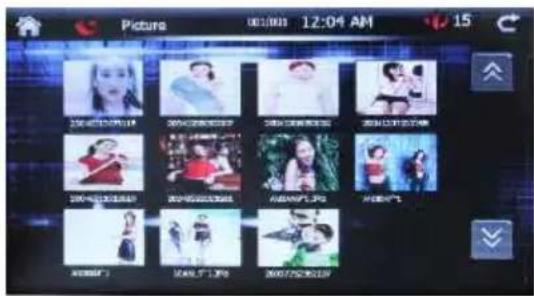
1.Previous picture
- Next picture
3.Play/pause: automatically play
4.Zoom in:+25%,+50%,+75%
5.Zoom out:+25%,+50%,+75%
-
Rotate picture (Click the key continuous, the picture will be rotated in 90 degrees, 180 degrees, 270 degrees and 0 degree in turn)
-
Preview the pictures
AUX in(Auxiliary device input)
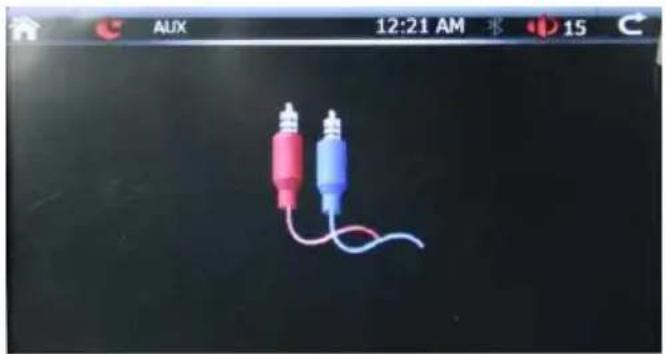
Click AUX in from the main interface SRC key in remote control to switch to AUX in Mode. AUX in enables external media sources to connect to the system, like camera, video games, walkman, external navigation box (controlled by remote controller)etc. No auxiliary device input shows at the below picture. Connect external devices through the 3.5mm auxiliary audio/video input. It can display the corresponding picture as the output video. Look at wiring diagram at the page 6.
Rear view Lens
Auto operation: After connect with reverse camera, it will auto-detected the reverse signal and show the reverse pictures. The system will swift to any mode to rear view lens mode automatically. When reverse is over, the system will come back to previous mode.
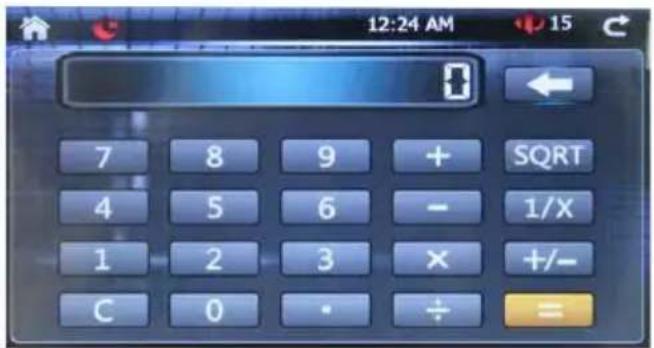
Calculator
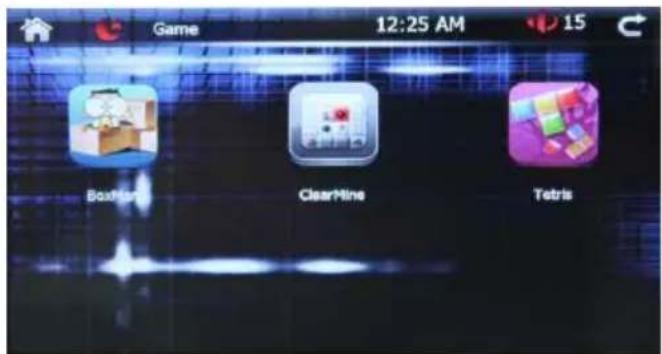
Game
Preset three games: Boxman, Clearmine, Tetris
Bluetooth Operation
1. Pairing
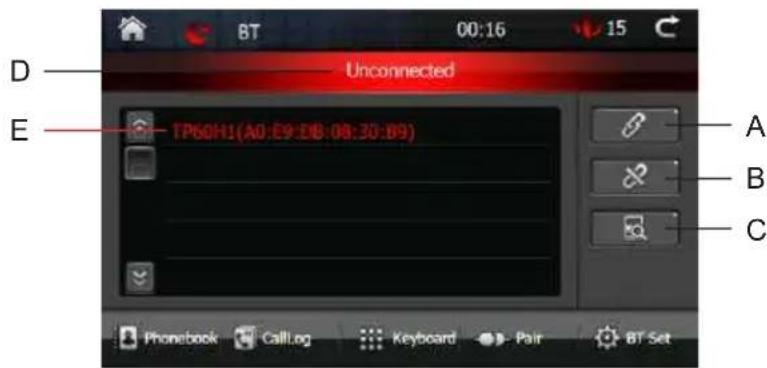
A. Pair key (click the key to connect or disconnect the paired Bluetooth of this device with the mobile device). Enter the default pass word: 0000 if necessary.
B.Disconnect pairing
C. Search Bluetooth device
D. Bluetooth connected states display.
E.Display Bluetooth devices list searched
Paring method:
Click the 🔒 key to search the Bluetooth device. Click the desired device name, then click 🔒 to paring. Touch the ✗ key to cancel the pairing. When waiting for pairing is displaying in Phone number display zone, pairing is on. While open the phone's Bluetooth device, and search for new pairing, When phone search out the device Bluetooth, that is the name of native Bluetooth device, select this device and connect it. Enter a default pass word: 0000, the phone will pair with the device automatically. When connected successfully, the name of the mobile device will be shown on the display zone.
2. Phonebook display
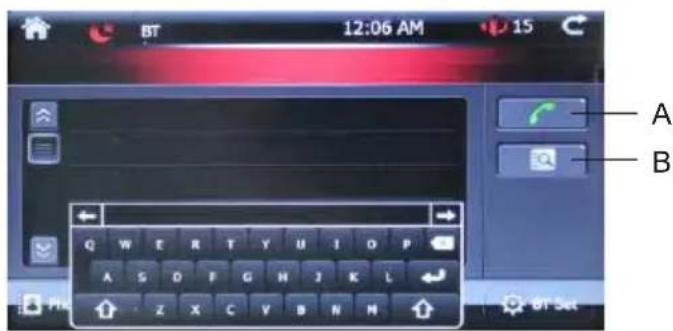
A. Dial the phone number
B. Press to download the phone book from the mobile at the first time. The second time this icon will become the searching key for searching the name in the phonebook.
3. Call log
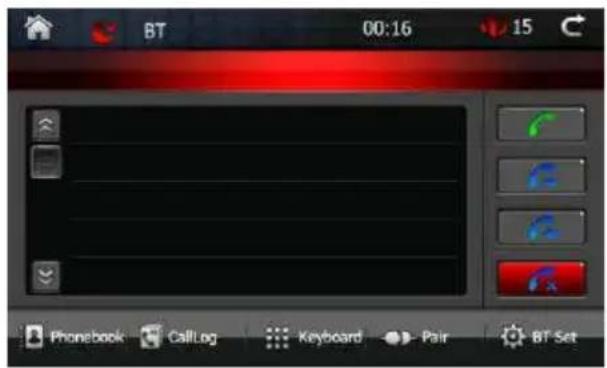
Dial call: Dial the desired phone number in the list.
Missed Calls: Press Missed Calls to retrieve the list of missed calls from the mobile device. Touch the desired number to call. Press the page up/down buttons to navigate through the pages.
Received Calls: Press Received calls to retrieve the list of received calls from the mobile device. Touch the desired number to call. Press the page slider button to navigate through the pages.
Dialed Calls: Press Dialed calls to retrieve the list of dialed calls from the mobile device. Touch the desired number to call. Press the slider button to navigate through the pages.
Note: During an incoming call, the audio is muted for the current music or radio. The incoming call screen will be displayed. Adjust the volume during the call using the volume control. Press the End icon on screen or the End button on the remote controller to end a call in progress or to reject an incoming call. Navigation voice guidance will work normally when using Bluetooth to make a hands-free phone call.
4. Dial and receive phone call
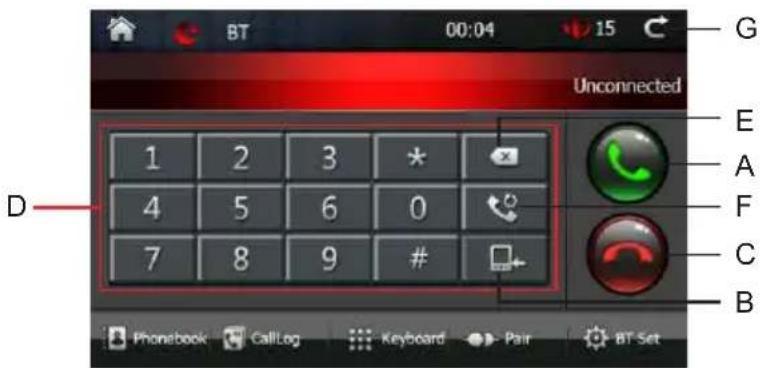
A. Dial/Receive a call
B. Sound switch key (click the key to switch the voice between vehicle speaker and mobile device)
C.End key
D. Keyboard
E.Delete
F.Redial key
G.Click to return menu list
5. Making a call
A. Enter the phone number by the number key in the Bluetooth interface. Click the ✗ key to clear error input one by one.. Enter the phone number, click

key to make a call, click 📄 to end a call.
B. Enter the phone number in the remote controller, press key in the remote controller, click to end a call.
C. While calling, users can click switch key to switch voice between vehicle speaker and the phone. Click this key to redial the present phone number.
6. Bluetooth Setting
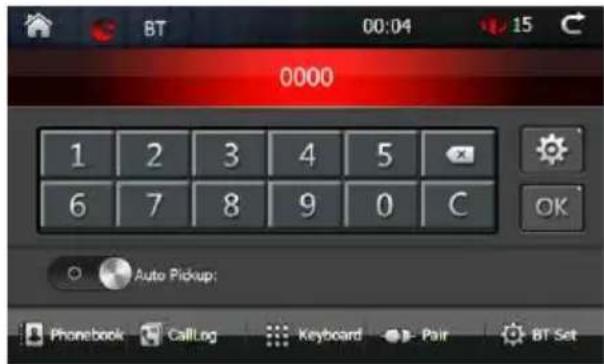
A. Auto pickup:
Set the type of answer phone call: Manual or Automatically.
(1)The device will answer a call automatically if the Auto pickup feature is turned on.
(2) Manual answer mode
The device will answer manually, click the 📞 key to answer a call, and click key to end a call.
B. Default password: 0000. Click the 🔒 to reset the paring password, then click OK to save the new password, and show the new password. Please enter the new password to pair the device.
7. Bluetooth music
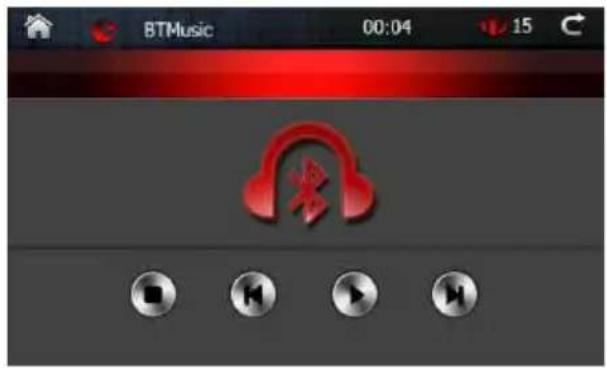
The phone must support A2DP agreement. Press BT Music icon in the main interface. Under the connected mode, click play keys in the Bluetooth interface to play different music formats restored in the phone. Due to different types of phones, music can be played either by choosing music player on the phone or click the play key in the Bluetooth interface.
Bluetooth Setup Menu Matrix
| Settings Default Options Function | |||
| Bluetooth On | Bluetooth is | standby when the device is turned on | |
| Device Not | Paired Device | Name | When connected, the current Bluetooth device name will be displayed. Press the device name todisplay a list of available devices that can be connected. |
| Connect | Auto | After connect with the same device one time, it will be auto connected next time. | |
| Auto pickup | Manual | Manual | You must press the Talk button to answer an incoming call |
| Auto | All incoming calls will be automatically answered | ||
Notes: Some Bluetooth approved devices may not communicate or work properly with this head unit, depending on the features or specifications of the device. During hands free operation, some noise may be heard when using a mobile device with this head unit, depending on the mobile device and or the communication environment. Some mobile will need to enter the pass word to pair with the device, please enter the pass word: 0000.
SETTING MENU
Click SETTING icon or SETUP key in remote control to enter system menu setting interface, including Language setting, video setting, system setting and so on. Users can set the modes according to their own preference.
Time setting
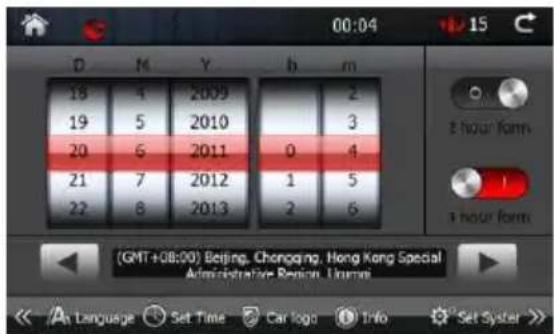
Set Frequency Area
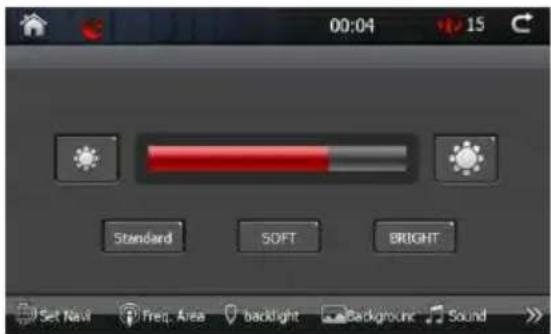
Backlight setting:
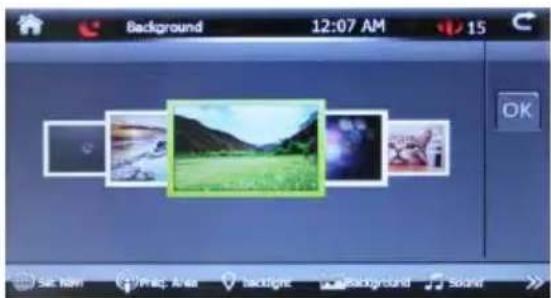
Background Setting
Select the picture you want, then click ok.
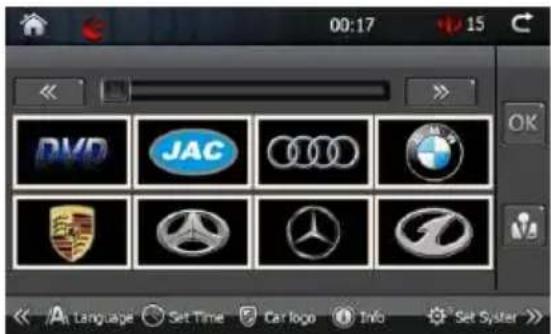
Car logo setting
Select the logo you want, then click ok.
Enter password: 0000, select the logo you want, then click ok.
Backlight setting:
Click the language you want, then back to main interface to save this setting. Please note that some languages will not show in the system.
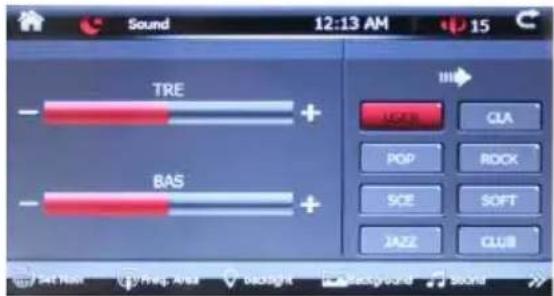
Sound Setting
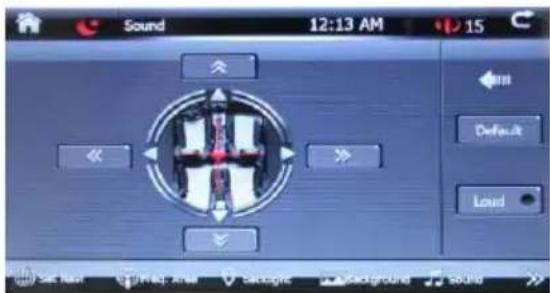
Select the desired style, then back to the main interface. Click the arrow to enter the speaker setting. you can adjust the speaker volume.
System information
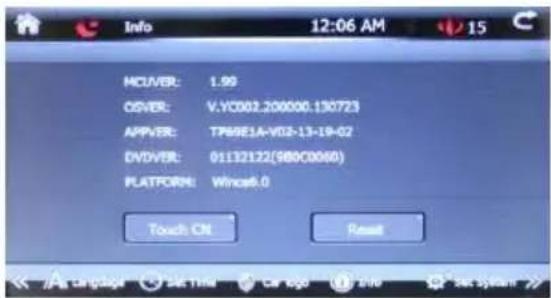
A. Touch CN: to calibration the touch panel Enter the following pictures, and press the icon:
![graph TD A["○"] --> B["②"] B --> C["○"] C --> D["③"] D --> E["○"] E --> F["④"] F --> G["○"] G --> H["⑤"] H --> I["○"] I --> J["⑥"] J --> K["○"] K --> L["⑦"] L --> M["○"] M --> N["⑧"] N --> O["○"] O --> P["⑨"] P --> Q["○"] Q --> R["⑩"] R --> S["○"] S --> T["⑪"] T --> U["○"] U --> V["⑫"] V --> W["○"]…](/content/2026/05/789673/images/babcff7a42133e6daa182b1125330b6618a9751822e76c1cc13555f483600d89.jpg)
B. Reset: Reset the device into factory setting.
System setting
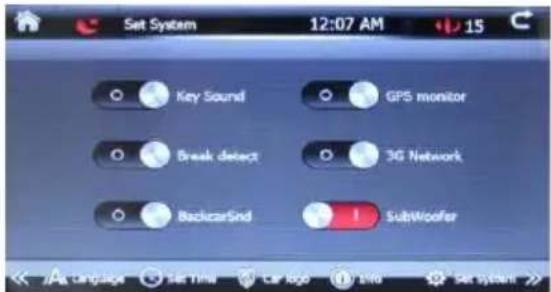
A.Key sound, turn on/off the key sound
B.Brake detect, turn of/off the brake signal input.
C. Back car sound
On: In the back car mode, the sound will not stop
Off: In the back car mode, the sound will stop.
D.GPS monitor
On: When the GPS monitor is on, you can hear the sound of DVD/USB/SD/RADIO while use the GPS navigation.
Off: In this mode, just can hear the navigation sound.
E.3G Internet (not included)
F.Subwoofer
Steering wheel setting

Connect the steering wheel control cable, and click the corresponding key to activate the function.
After entering into the steering wheel control interface, click "Mode [ - ] ", then push the steering wheel "mode" button in your car, it will come out a numerical value, then it is ok for the mode. Click "VOL- [- ]", then push the steering wheel "volume-" button in you car, it will come out a numerical value, then it is ok for VOL-,...Click other buttons accordingly, until all the numerical value come out.
Then the steering wheel function can be used.
Set Navigation
This device is with built-in SD memory card slot. The software or multimedia files can be stored in SD card and displayed in the device.
- Insert the SD memory card into the slot properly and push the card in. When hearing a click, it indicates that the card is inserted.
- When removing the SD memory card, please push the card, then it will automatically pop up.
- The device should be in OFF status when inserting/removing the SD card.
- When the SD card is played, please do not remove it to avoid data error or lost.
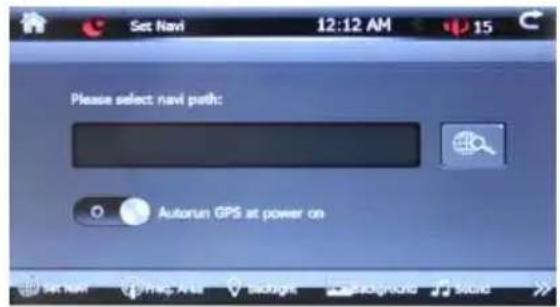
Navigation setting
Setting the navigation software path, click icon, then select the navigation process (usually a file with EXE extension) according to access path of navigation software.
Note: If this device is containing a map, and the path is been set. If it is loosing a path, please set again. If the SD card is removed and inserted, it should be set the path again.
GPS Navigation
Using Navigator
To start Navigator on the device, tap Start then Programs. Now tap on the Navigator icon.
Please note that operating your device while driving can be dangerous and we recommend that you prepare your journey in advance.
Now you will be presented with an overview map of the region you have installed.
Before you start navigating you must first set up your GPS.
To move from one screen to another or scroll down a list simply swipe the mouse or your finger scross the screen.
Connecting your GPS receiver
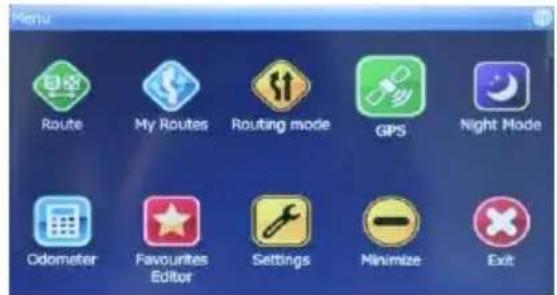
Tap the Settings button. Now you are in the settings menu.
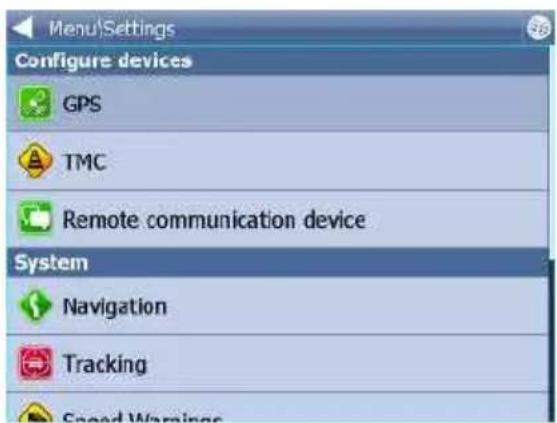
Tap the GPS button.
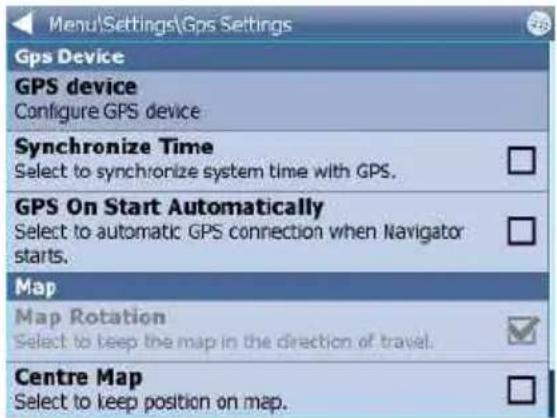
Now tap the Configuration button.
Connecting your GPS receiver
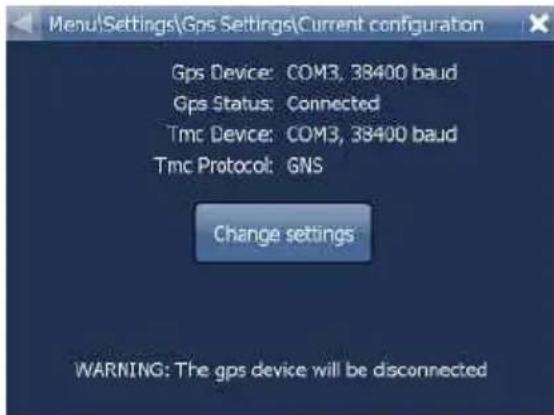
Navigator will now configure the GPS for you automatically.
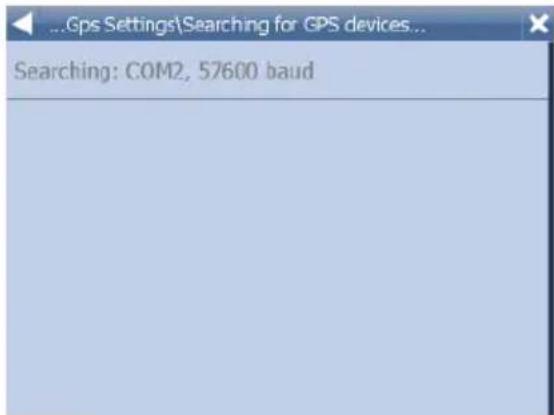
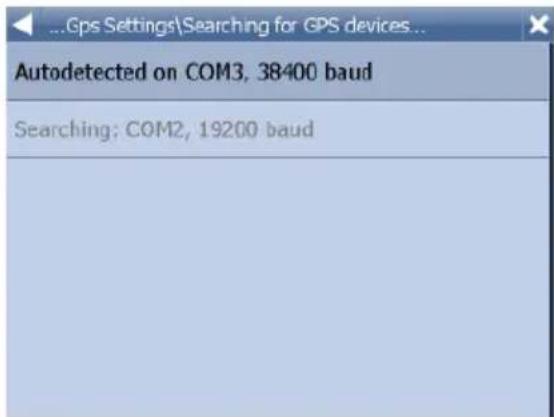
If auto-detection has been successful detected, click on the detected GPS. Now this device will be search at COM7,9600 baud.
Now you should see a GPS information window. If all is well you will see information about signal and position data coming from the receiver.
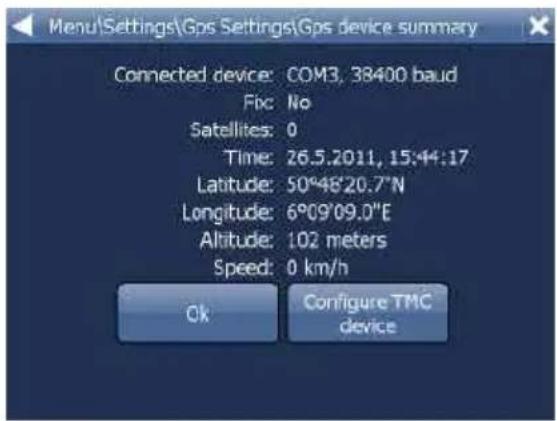
Please note that this device is without TMC.
Setting your destination
You can set a destination in several ways, from the map, from the search menu or from one of your favourites From the Map.
Tap the position on the map where you want to set your destination. The following menu will appear.
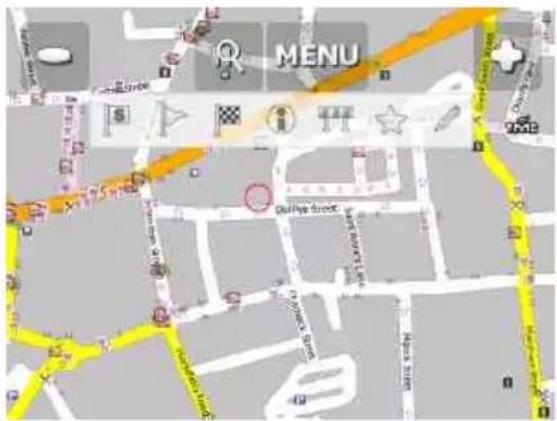
Select the destination icon From the Search menu. Select Find & Navigate from the Main Menu or Tap the search icon in map view.
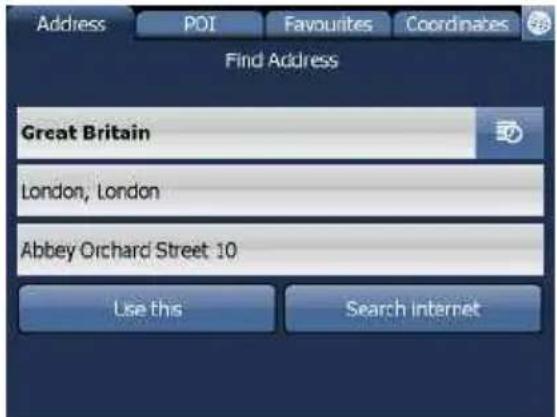
There are several database types to choose from: Address, POI (Points of Interest), Favourites and Nearest. To make a change to any detail tap the textbox it is in. If you have entered search text before, you may see it on the following screen. If you begin typing the old text will be overwritten. You can also set a destination from that last search performed or from imported data.
Address
If you know the street (and optionally the house number) tap Address. To see a history of previous searches click
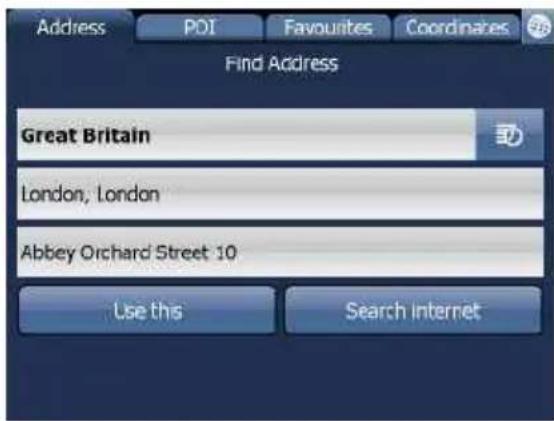
First select the country. You will now be prompted for the town or region name or postcode.
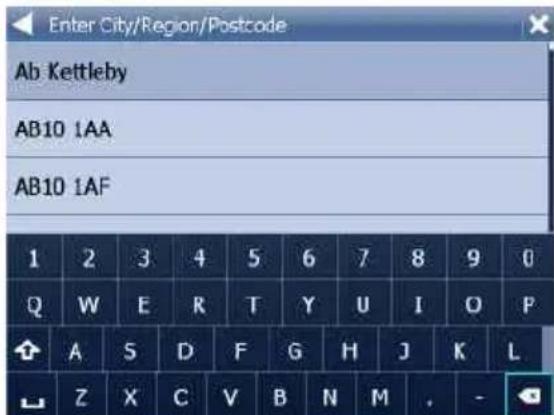
You can type using the on-screen keyboard. As you type Navigator will automatically search for nearest matches and list them underneath. Once you see your town in the list tap it.
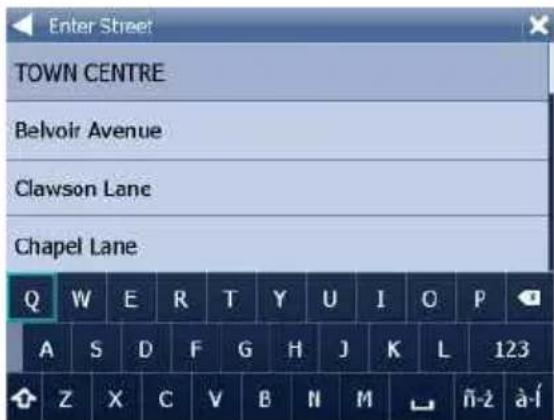
You must now type the street you are going to (or select TOWN CENTRE). Once you see your street in the list tap it.
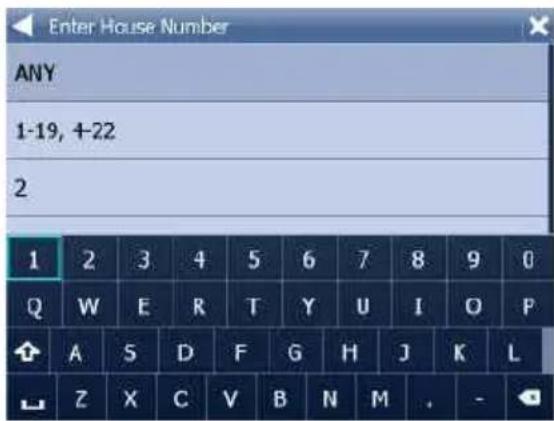
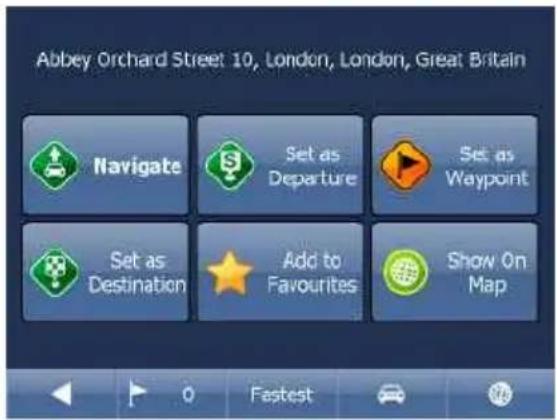
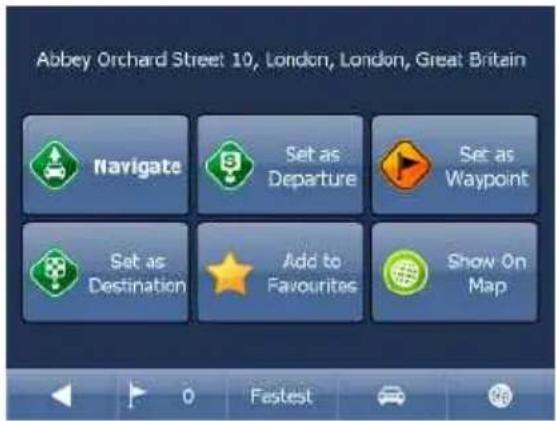
You will now be asked to select a house number from the ranges shown in the list. If you do not know the house number tap ANY. This will allow you to select a destination on the crossroad with another street. A list of all intersecting street will be shown. You will now be shown the following screen.
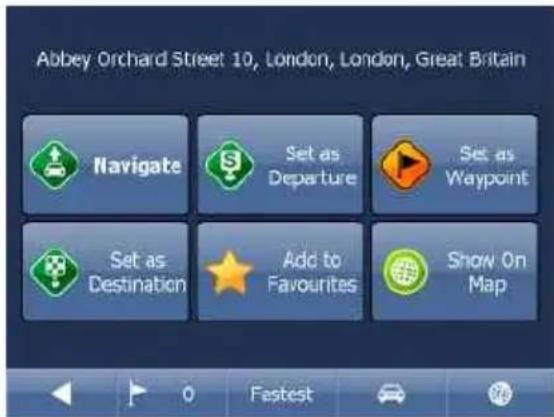
Now tap Navigate and your journey will be calculated. You have also the following options:
Set as Departure - Set the start of your journey (only necessary if you want to calculate a route without GPS)
Set as Waypoint - Add it as a stop along your journey
Set as Destination - Set the destination point without starting navigation immediately Add to Favourites - Add your selection to your favourites
Show on Map - Show the result on the map
In the bar at the bottom of the screen you can see some important routing parameters:
- the number of Waypoints on the journey
- Fastest the routing mode (fastest, shortest, cheapest)
- the car type selected.
You can change any of these parameters by clicking on them.
To restart your search simply click the left arrow.
POI
If you want to go to a point of interest tap the POI tab. To see a history of previous searches click
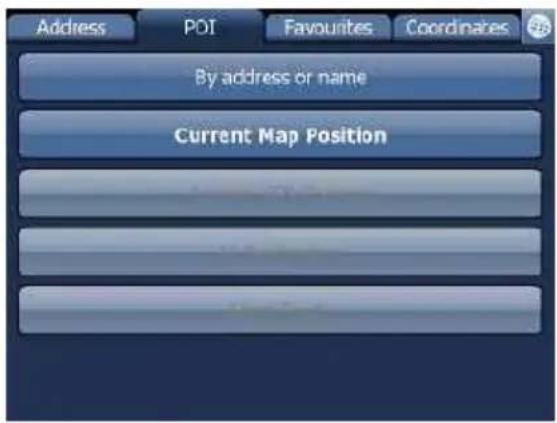
First select the country you want to search in.
Next select the town, region or postcode area. If you want to search the entire country select ANY.
Now you can select the POI type.
Points of interest are divided into six groups.
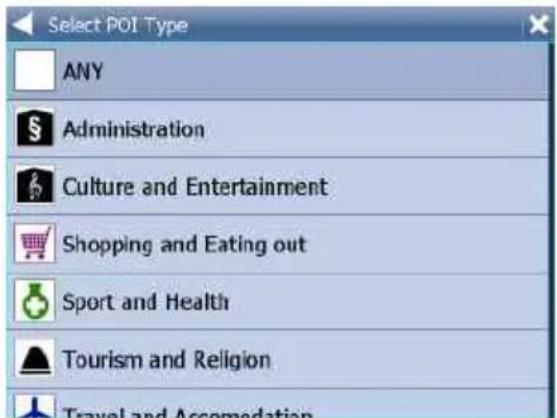
Now select the type of POI you are looking for. If you want to search through all points of interest tap ANY.
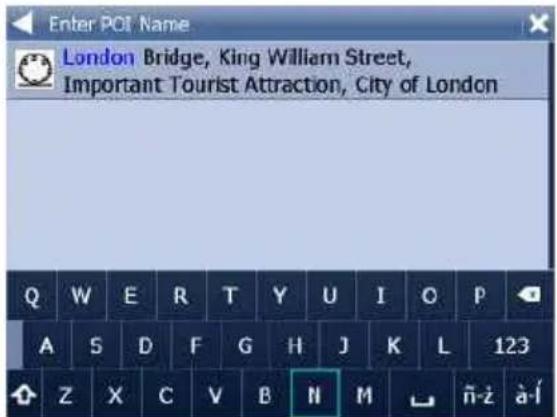
Now type the name of the POI you are looking for.
You can type using the on-screen keyboard. As you type Navigator will automatically search for nearest matches and list them underneath.
The icon to the right of the name tells you what type POI is listed.
Once you see your POI in the list tap it.
You will now be shown the following screen
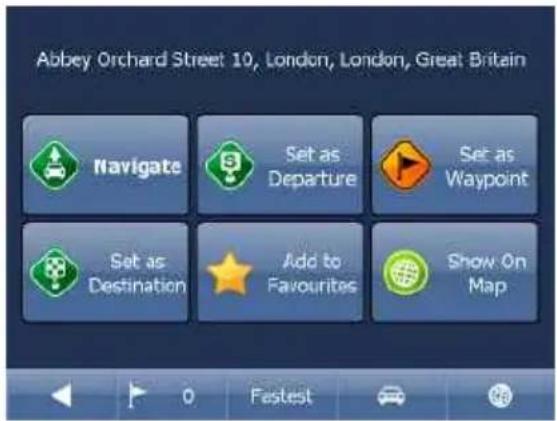
This page operation details, please look at page 31
Nearest
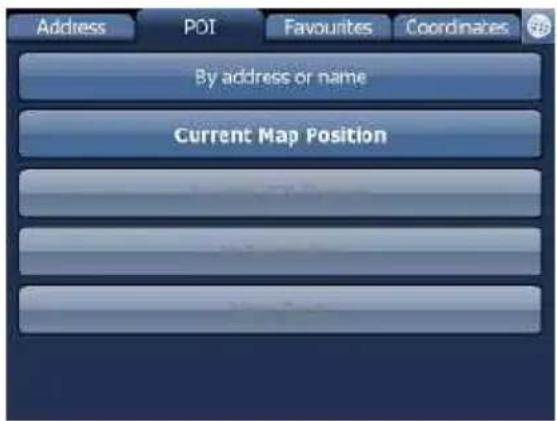
This is a location based search useful for finding closest points of interest to:
Current Map Position - nearest to the centre of the current map view
Current GPS Position - nearest you current position
At Destination - nearest to your navigation destination
Along Route - nearest points of interest along your route
Select one of the options.
Now you can select the POI type.
Points of interest are divided into six groups.
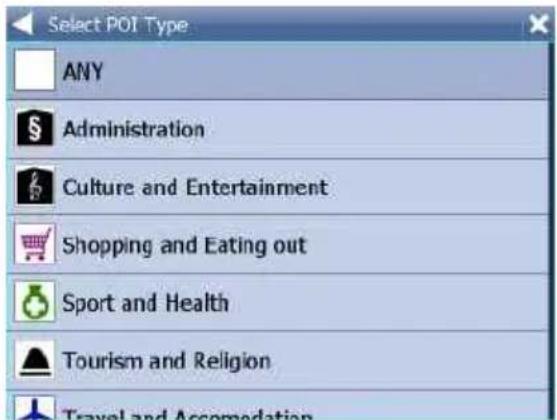
Now select the type of POI you are looking for. If you want to search through all points of interest tap ANY.
You will now see the location of the closest points of interest along with their direct distance.
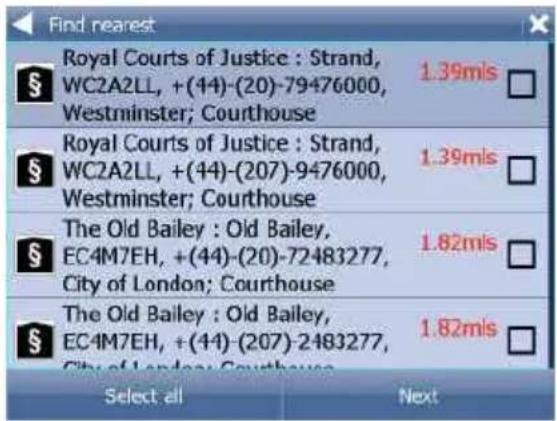
You will now be shown the following screen
indicates that the POI is along your route.
indicates that the POI does not lie on your route.
Select one or more POI's by using the checkboxes on the left.
This page operation details, please look at page 31
Favourites
Using favourites you can quickly access locations and set as navigation destinations.
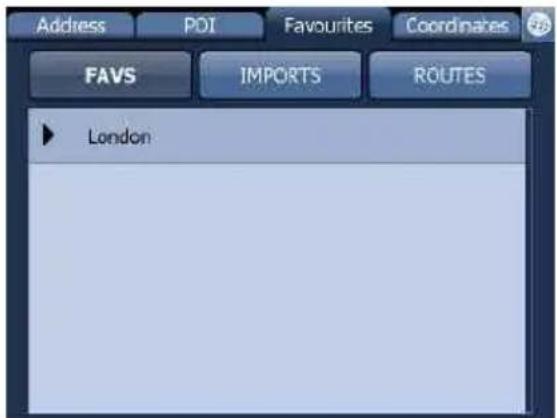
Tap on a favourite and you will be taken to the following screen. To expand a group tap on it.
This page operation details, please look at page 31
Navigating
You should now be in navigation mode. Your journey will be highlighted on the map. You will see something like
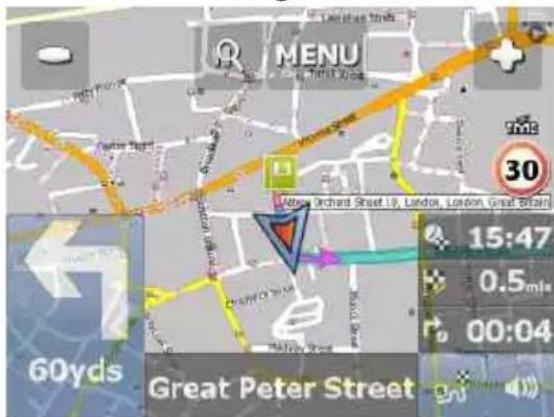
OR
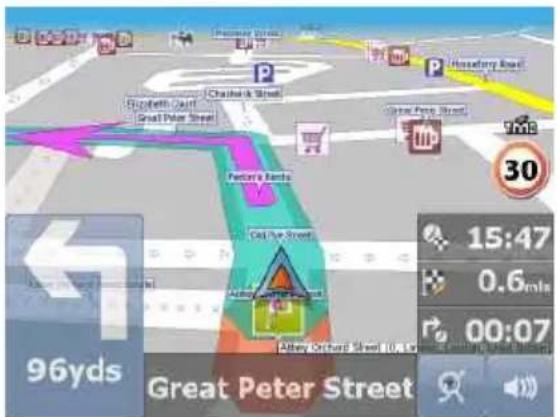
depending on whether you selected 2D or 3D mode.
Instructions about your next maneuver are displayed in the opaque bar at the bottom of the screen.
If you have added one or more waypoint to your journey you will see the following screen:
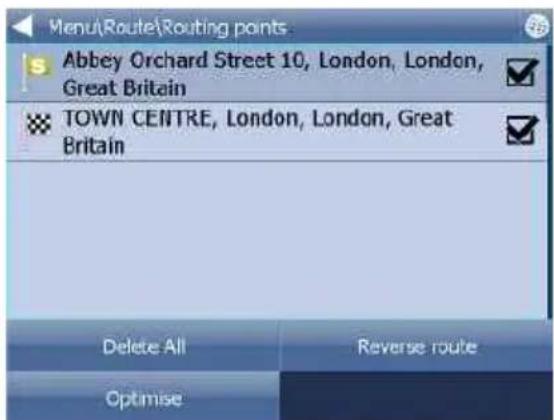
Here you can deselect waypoints that you no longer want to route through by using the checkboxes on the left of the screen.
To change the order of the waypoints simply drag them to e new position using your finger or mouse. On major roads navigator will often activate the lane assistant which helps you get in the right lane for the next manoeuvre.
Correct lanes are shown in green, others red with crosses.
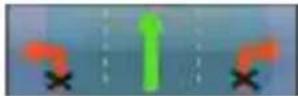
If you stray from your route Navigator will automatically recalculate your journey.
Tapping on the map screen reveals four hidden buttons - zoom in, menu, zoom out and in the bottom right of the map the route overview button.
Tap the route overview button to see the whole length of you journey. You can now operate the map without it centring on your GPS position. This is useful if you want to find other place on the map or find an alternative route.
To get back to navigation mode tap the route overview button again.
Points of interest are divided into six groups.
Tap the blue directional sign
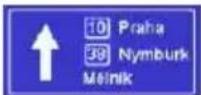
to shrink it to a couple of lines. To
expand it, tap it again.
To see the full itinerary of your route tap the manoeuvre arrow on the left of the screen. To see the itinerary you can go from Menu - Route - Itinerary.
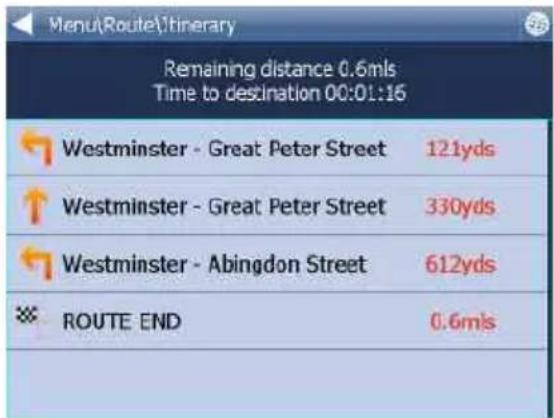
Here you can see driving instructions for the whole journey.
Tap to select any entry in the itinerary. Tap the right arrow to show the following menu
Here you can select to show the select link on the map, add it to favourites engine. Once a link is disabled it will not be used in future route calculations.
Tap on any navigation panel on the right of the screen to change what it displays. A screen with several option will appear.
Tap one to select it.
Here you can set what type of information you want to see in the navigation panel at the right of the screen as you drive.
Possibilities are:
DST - Distance to destination - how far away you are in km or miles
TTA - Time to destination - the approximate time left before you reach your
destination
ETA - Time in destination - the approximate time you will arrive at your destination
TTM - Time to maneuver - the approximate time before your next maneuver
ALT - Altitude, SPD - Speed, AZI - Course, SAT - Number of satellites,
GPS - Position, TIM - Time and DAT - Date give you data about your current position and the Satellite signal.
TTW - Time to the nearest waypoint - the approximate time left before you reach the nearest waypoint
DTW - Distance to the nearest waypoint - how far is the nearest waypoint
SPL - Speed limit - the speed limit on the current road
Note that the number of navigation panels that is displayed can be changed in navigation settings.
Using the map
When you start Navigator you will see a screen like this.
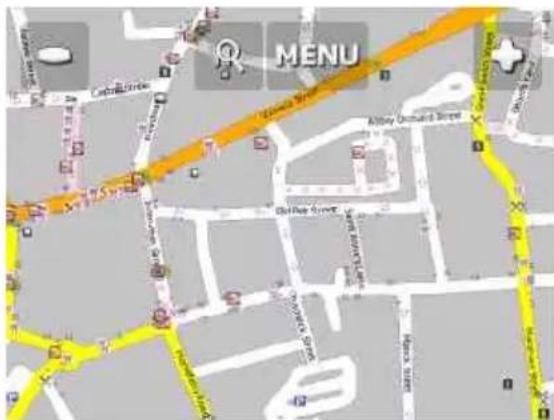
There are three buttons along the top of the screen

- zoom in

- access to the Navigator menu's
(searching, routing, settings etc.)

- zoom out
If you keep pressing a zoom button you will keep zooming continuously.
You can move the map by dragging it around.
If you have set a destination already then you can use the car icon in the bottom right corner of the map to start navigation.
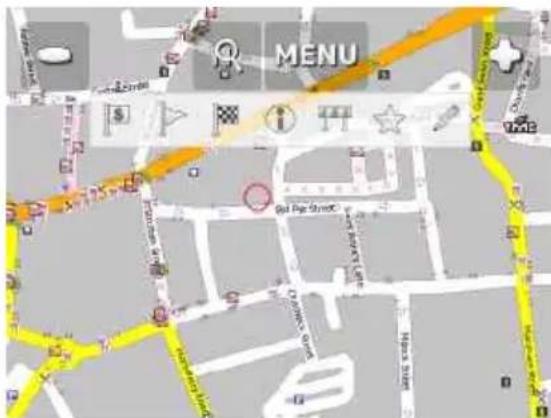
Tapping the map will reveal a choice of six functions
These functions relate to the circled point on the map.


[NO TEXT]
i
T
★
The image is too blurry to recognize any text content.
- set as start point
- set as waypoint. If you click on an existing waypoint the icon will show as 🎨. Select thisicon if you want to delete it.
- information about the map layers under the circled point
- block a road from routing (it will not be used by the routing engine during navigation). A block road is highlighted on the map in purple. To unblock it follows the same procedure but click the icon.
- add as favourite
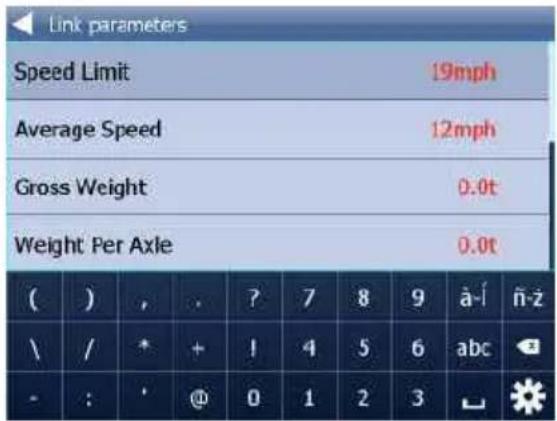
- edit routing parameters of the selected link, like average speed and maximum speed. In the Truck version you can additionally edit weight, and width limits and other large vehicle attributes. Changes are saved in a file called link_params.xml in C:\Documents and Settings[\user name]\Application data\Navigator\12.0. You can copy this file to make the same changes in other copies of the software.
When you tap on an object on the map and select the information icon details about it should appear as shown below.
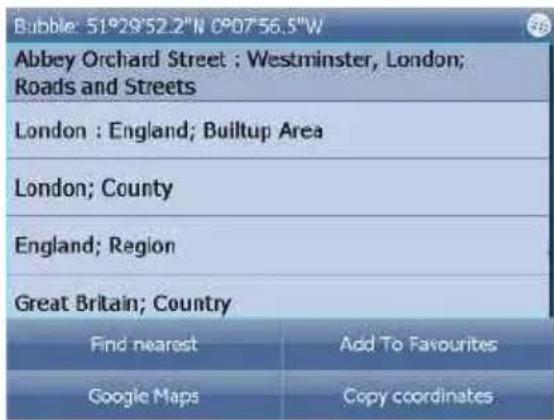
The dialog shows details of the object you clicked on. Because the map is made up of layers, you may have clicked over several objects. In this case there are four in the list. Tap the Find nearest icon to perform a search for the nearest Points of Interest. Tap the Add to Favourites icon to add the point to favorites. If you have a connection to the Internet you will additionally see the Google Maps button. Click it to see the locality on Google maps.
Tap the cross button to get back to the map.
Favourites
Use favorites to create your own database of favorite locations which you can quickly access and set as navigation destinations.
You can add a favorite in two ways, from the map or from the Find & Navigate menu.
Favourites can be organised into different groups to make them easier to browse. Before you start adding lots of favourites it would be sensible to add some groups.
From the Main menu 2 tap on Favourites Editor.
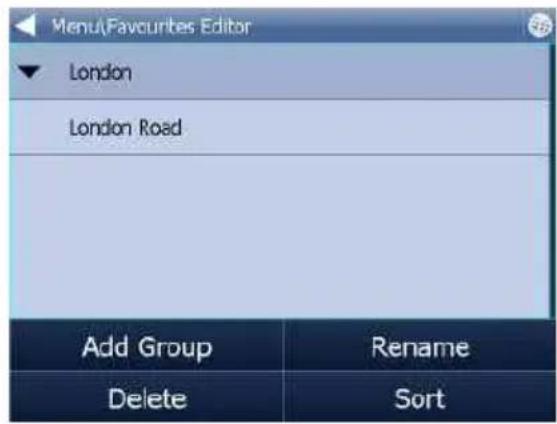
Tap Add Group.
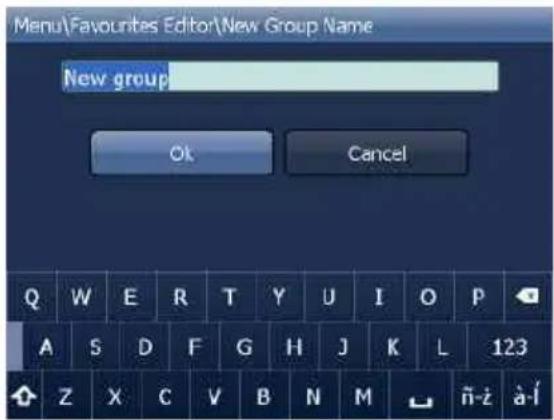
Type the group name, for example Personal. To type capital letters tap and hold on a key (on the soft keyboard) for 1 second. Tap Ok.
This will take you back to the Favourites dialog. Tap

Adding Favourites
Adding a favourite from the map
If you want to add a favourite from the map make sure you first move and zoom to the right place.
Tap on the point where you want to add the favourite.
Select the button from the toolbox that appears.
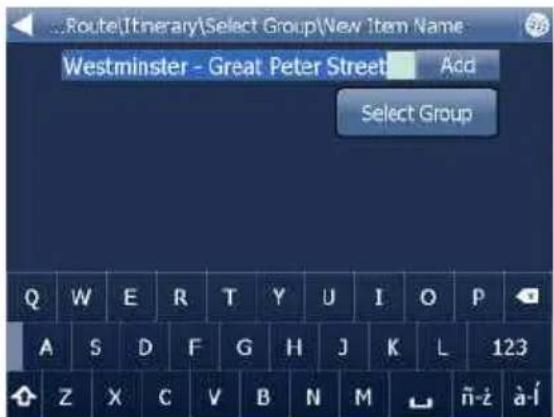
Now enter the name of the favourite.
Type a name for the favourite. If you want to add it to an existing group tap Select Group. A list of all available groups will appear below.
Tap Add to finish.
The favourite will be saved and you will be returned to the map.
Adding a favourite from the map
Once you have performed a search for an Address, POI (Points of Interest).
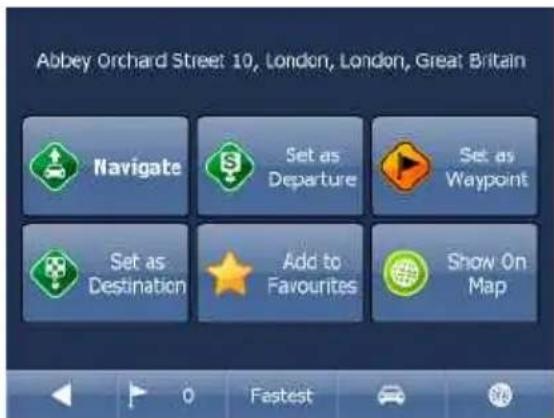
Now tap Add to Favorites.
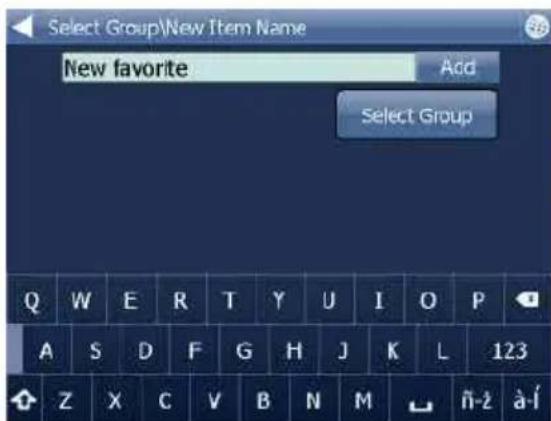
Now enter the name of the favourite.
Type a name for the favourite. If you want to add it to an existing group tap
Select Group. A list of all available groups will appear below.
Tap Add to finish.
You will be returned to the search result menu.
Adding Favourites
Using favourites you can quickly access locations and set as navigation destinations.
From the first menu tap Find & Navigate and then select the Favourites tab
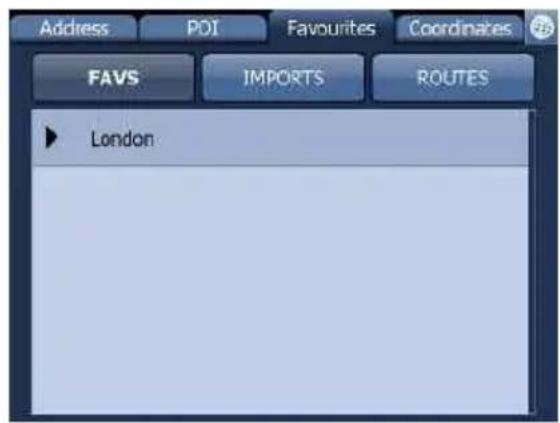
Tap on a favourite and you will be taken to the following screen. To expand a group tap on it.
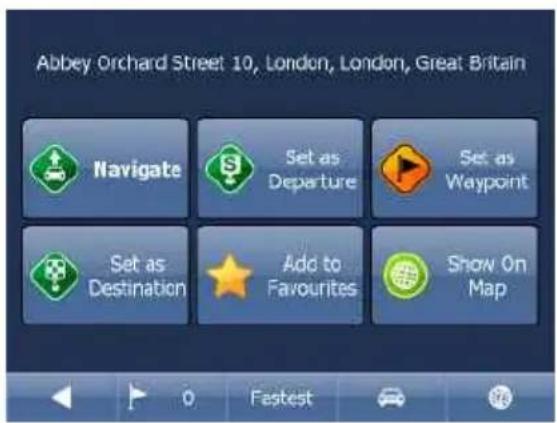
This page operation details, please look at page 31
Favourites Editor
From the Main menu tap Favourites Editor.
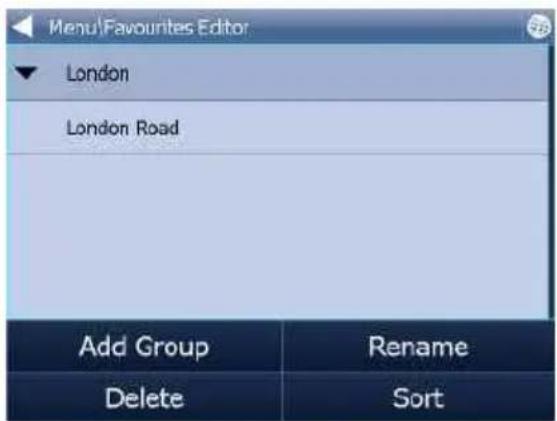
You can move favourites between groups by dragging them around.
There are three functions available.
Add Group - Add a new favourites group.
Rename - change the name of
Delete - delete the selected favourite or group.
Now tap Edit group.
Tap to exit back to the main menu.
Odometer
Odometer is a tool that lets you measure distances as you drive and further splits them between private and business mileages.
From the main menu tap Odometer.
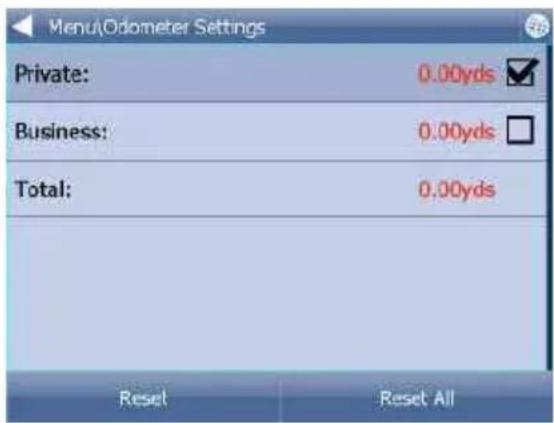
Here you can see the total distance traveled for both private and business journeys.
Select the check box next to the Private or Business items to toggle between the Private counter and Business counter. Note that you can only use one counter at a time, i.e. it is impossible to record a journey as both private and business.
To set either of the counters back to 0 select it and tap the Reset button at the bottom of the screen.
Tap to exit back to the map.
Routing
In Navigator it is possible to calculate routes without using Navigation.
You can set your routing points (departure, destination and waypoints) in the same way as setting your destination.
Review your route points by tapping on Route in Main menu.
Now tap Routing points.
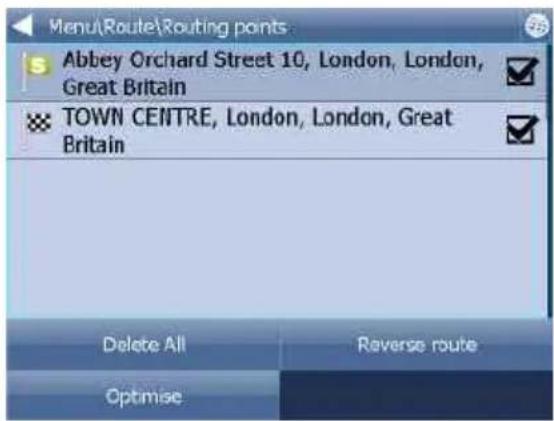
Delete all - deletes all waypoints in the list
Reverse route - reverse the order of the route points, plan a route back from the destination to the departure
Optimise - if you have selected more than one waypoint you Navigator will sort them to make your route faster
To change the order of the waypoints simply drag them to new position using your finger.
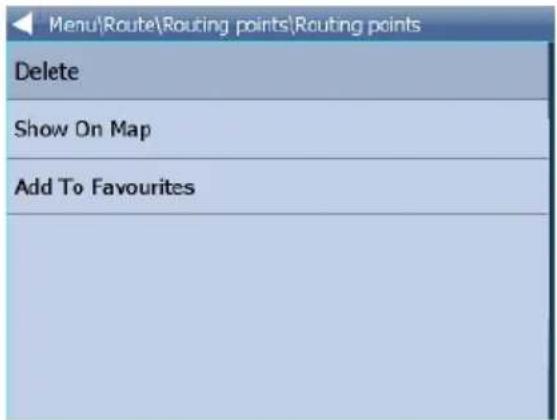
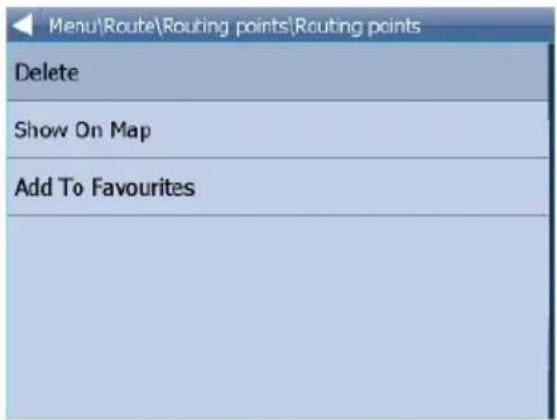
Tap a routing point to see another menu.
Delete - deletes the currently selected waypoint
Show on map - shows the currently selected waypoint on the map
Add To Favorites - saves the currently selected waypoint as a favourite Tap [] to exit back to the Routing menu.
Once you are satisfied with your routing points tap Calculate Route.
The route will be highlighted on the map. To review the itinerary tap Menu, then Route and then tap Itinerary.
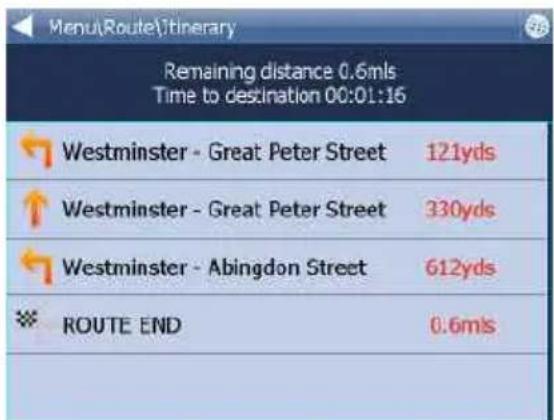
Here you can see driving instructions for the whole journey as well as the total distance.
You can perform actions on the junctions in the list by tapping on them.
This will bring up the following menu.
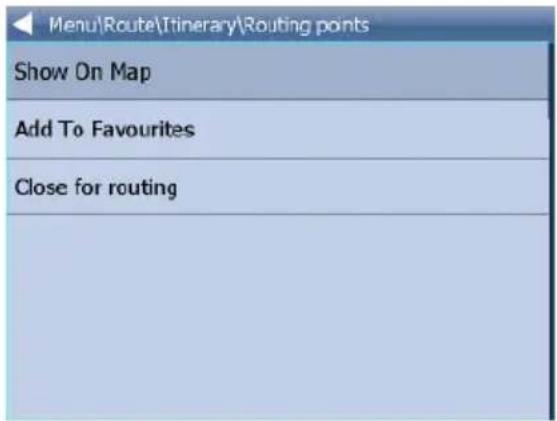
Show on map - show the manoeuvre in close up view on the map. Add to favourites - add the position to favourites. Close for routing - avoid this junction when calculating the route. If you close a manoeuvre from routing then you must recalculate the route by tapping Calculate Route in the Route. To permit a junction back again go to the Route menu and tap Disabled streets.
If you want to keep the itinerary of a route but want to de-highlight it from he map then go to Main menu, Route and tap Hide route.
Night mode
In Navigator it is possible to switch to a different map colour scheme for use at night. This mode is easier on the eyes when driving at night.
To switch between night and day mode go to Main Menu 1.
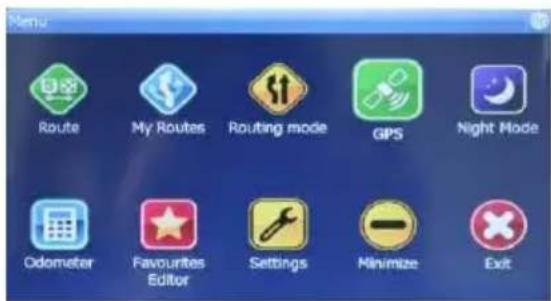
Tap the Day mode or Night mode icon.
Saving and Replaying your journeys
In Navigator it is possible to save your GPS journeys to file and replay them at a later date.
Saving your Journeys
To save your journey go to Odometer in Main Menu 1
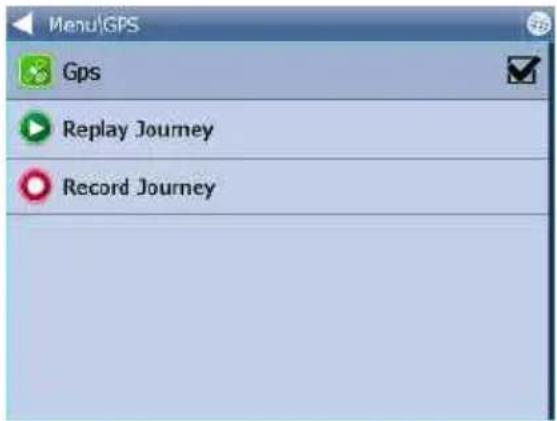
Now tap the Record Journey button. Select where to save the journey file, e.g. Storage card or Object Store
(Internal Memory)
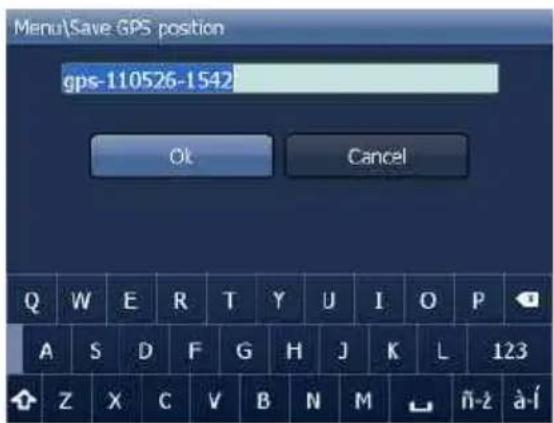
You are now asked to enter a name for the saved file. A name based on date and time is automatically suggested for you, but you can change it if you wish. Tap Ok.
The GPS data is now being saved to file. To stop recording tap the Stop journey saving button.
Replaying your Journeys
If you want to replay a journey from file simply tap the Replay Journey button in the Odometer dialog. A list of all available journey files will displayed
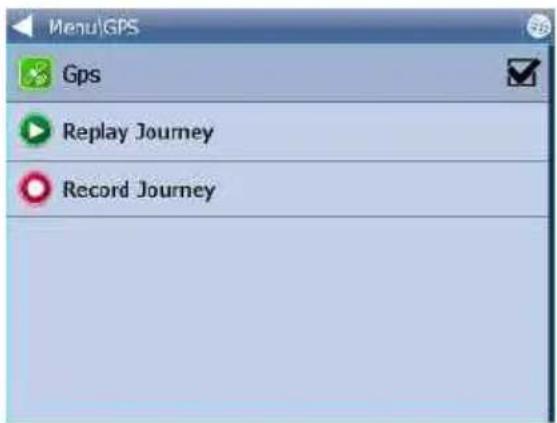
Select one by tapping on it and then tap Ok.
If you exit back to the map view you will see your journey replayed.
Settings
Tap the Settings Icon.
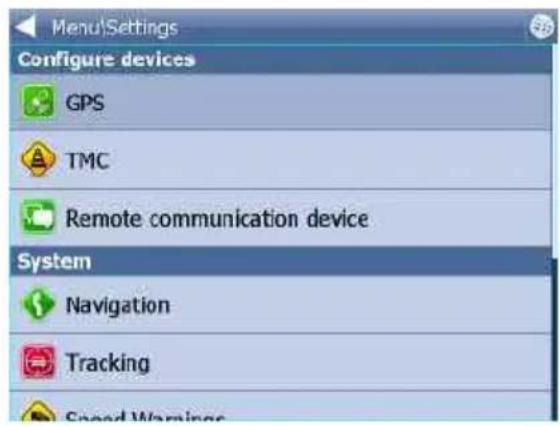
There are several options here GPS, Navigation, Tracking, Camera warnings, Product Key and TMC.
GPS
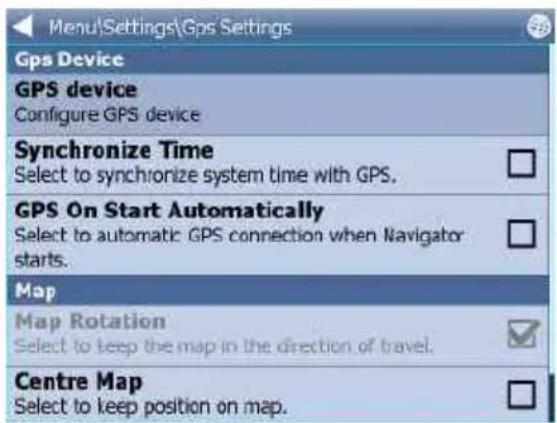
You can now configure how your journey will be displayed on the map.
Select Map Rotation Off to keep the map north up regardless of which direction you are driving in.
Select Map Rotation On to keep the map in the direction of travel (i.e. you will always be driving towards the top of the screen).
Select Centre Map Off to stop the map from automatically adjusting to your position. Select Centre Map On to keep your position on the screen at all times.
Note that in Navigation mode Rotate and Centre map are automatically enabled. When navigation is turned off these settings reset to the previous state.
Select GPS On Start to toggle automatic GPS connection when Navigator starts. Use the Synchronize Time option if you want to keep your system time updated from the GPS.
Selecting Lock on Target will add an arrow to the GPS icon which points (as a direct line) to your destination.
Navigation
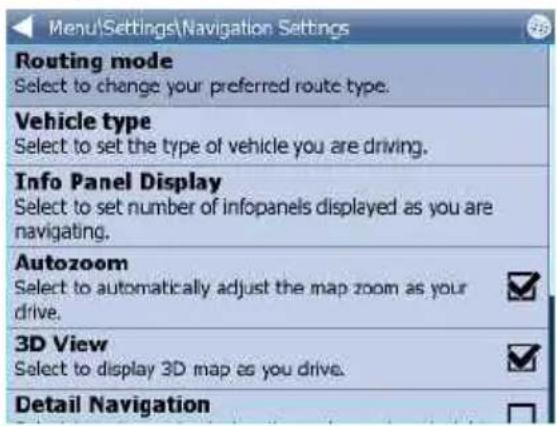
You are now in the Navigation Settings menu.
Tap Autozoom to toggle the Autozoom feature on or off. Autozoom will automatically adjust the map zoom as your drive, zooming out when between manoeuvres and zooming in as you approach the next junction.
Tap 3D View/Plane View to toggle between 3D and 2D maps as you drive.
Tap Routing mode to select your preferred route type.
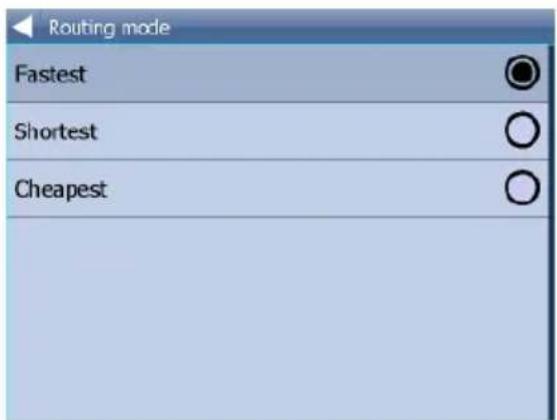
Fastest - this is the default route mode. It takes your to your destination in the quickest time.
Shortest - this mode calculates the route with the shortest travelling distance.
Cheapest - calculates the most petrol efficient route.
Tap Detail nav on/off to toggle detailed navigation. Detailed navigation gives you extra instructions when going straight along a road.
Tap Snap GPS on/off to enable or disable GPS snapping to the road as you are navigating. Snapping keeps you glued to the road and in the direction of your route at all times.
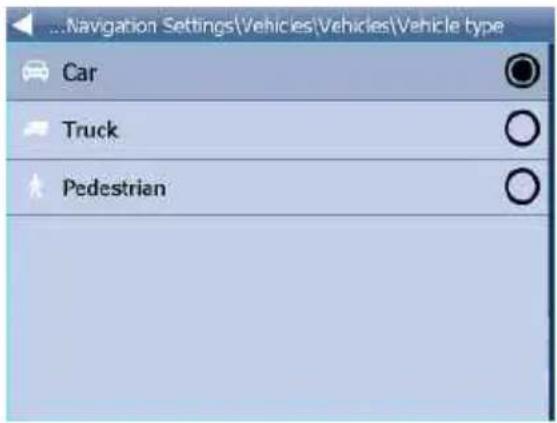
Tap Vehicle type to set the type of vehicle you are driving. In the standard version on Navigator you can change speeds of your vehicle. In the Truck version it Navigator takes into account restrictions such as narrow lanes, bridge heights, length of vehicle and so on. Select Pedestrian if you want to work out a route as you walk.
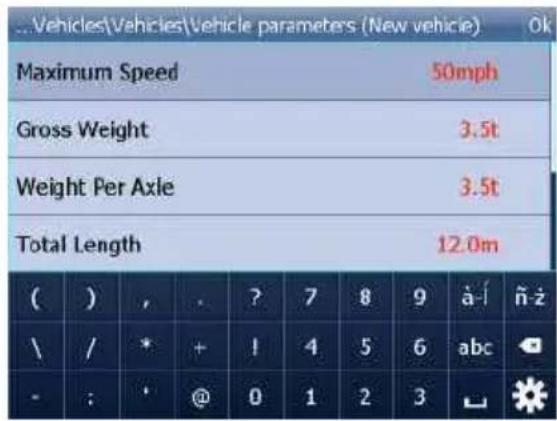
- Truck -In the standard version of navigator this only changes vehicle speed attributes. A more accurate truck mode is available in the Navigator Truck version where bridge heights, weight limits and vehicle lengths are taken into account. To define your own commercial vehicle click Add new. Now enter a name for your vehicle, the type and its dimensions and weight.
If you want to restrict certain road types from navigation for this particular vehicle you can do so here.
Please note that journeys may be considerably longer and occasionally impossible to complete.
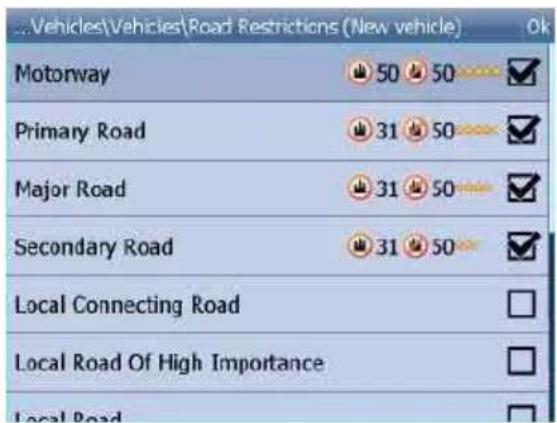
Clicking on the right-hand side of a row you can modify the average and maximum speeds of a class of road.
Toll Rd Allowed/Prohibited - if you prohibit toll roads, Navigator will work out journey avoiding tolls altogether. Please note that journeys may be considerably longer and occasionally impossible to complete
Charge Rd Allowed/Prohibited - if you prohibit charge roads, Navigator will work out journey avoiding roads where charges (mainly taxes) apply. Charge roads differ from tollroads in that you are often required to buy a display a special license to use them. An example is the Czech Republic where you must buy and display a special tax sticker to be able to use motorways - (you may use all other roads free of charge). Please note that journeys may be considerably longer and occasionally impossible to complete.
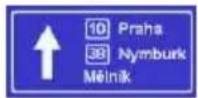
Congestion Charge Allowed/Prohibited - if you prohibit congestion charge areas, Navigator will work out journey avoiding roads where congestion charges apply (e.g. London). Please note that journeys may be considerably longer and occasionally impossible to complete. Show signposts - toggle blue directional signs on and off. These signs give information about directions to major towns, cities and roads.
Application
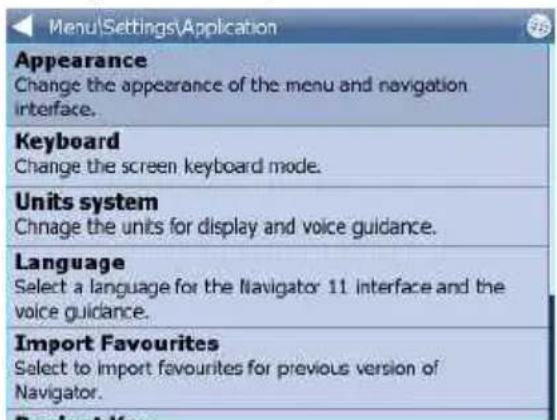
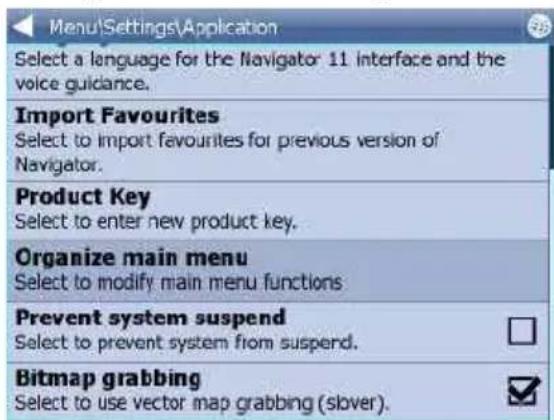
Here you can set preferences that affect the general use of Navigator.
Keyboard
In Navigator there are several on screen keyboard modes - the standard QWERTY/QWERTZ layout that is on your PC keyboard, an alphabetical layout ABCDEF as well as several international layouts.
This is purely a personal preference and you should select the layout that most suits you.
Here is what the different layouts look like.
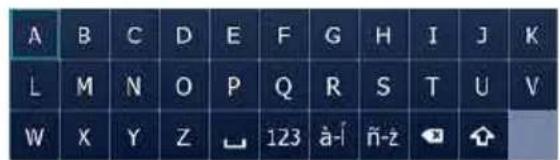
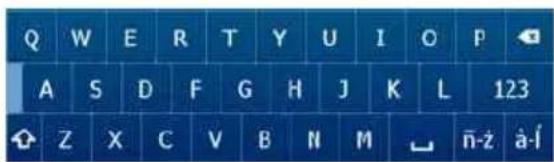
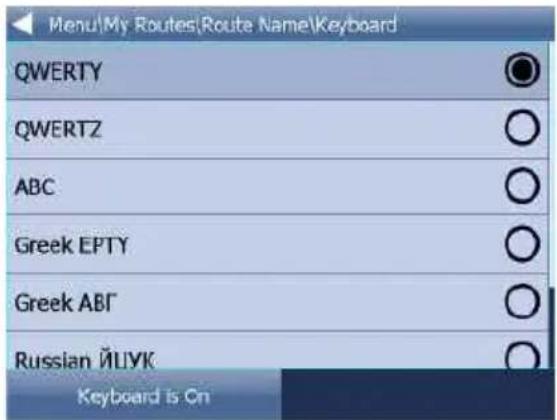
Keyboard On/Off - If you have a device with a hardware keyboard (like the HTC Universal, O2 Exec etc.) you may wish to use this setting not to display the on-screen keyboard.
Metric and Imperial units
Tap Metric Units to view distances and speeds in Km and meters. The voice guidance will automatically switch to using metric prompts (e.g. turn left in 500 metres).
Tap Imperial Units to view distances and speeds in Miles and yards. The voice guidance will automatically switch to using imperial prompts (e.g. turn left in 500 yards).
Language
This option lets you select a language for the Navigator interface and the voice guidance.
Note: You can only select the voice languages that you have installed. More may be available on the DVD.
Select Regions
Here you add and remove maps from your map.
Regions with a green tick will be shown on the map, those with a red cross will be closed.
Changes here require an application restart.
Please note that Pocket Navigator only sees regions that have been installed.
If a region is missing from the list please first install it as described here.
Map colour schemes
Change the map colours to a different scheme.
Select POI Types
Here you can select which Points of Interest are displayed on the map.
Product key
There may be times when you need to replace the Navigator product key.
For example, if you want to upgrade from a time limited version or if you want to enable vehicle tracking on your PDA.
Tap the Product key icon in Settings.
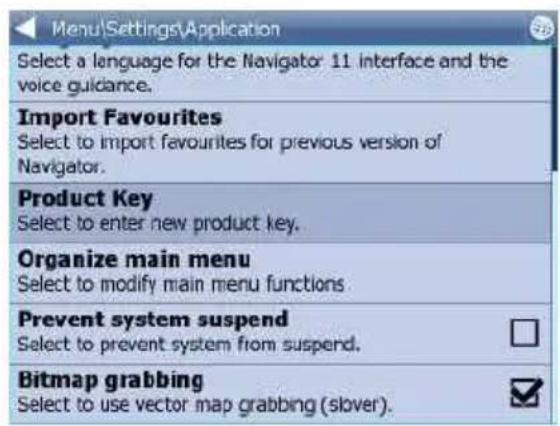
You will now be asked to confirm that you want to change your key. Tap Ok to proceed.
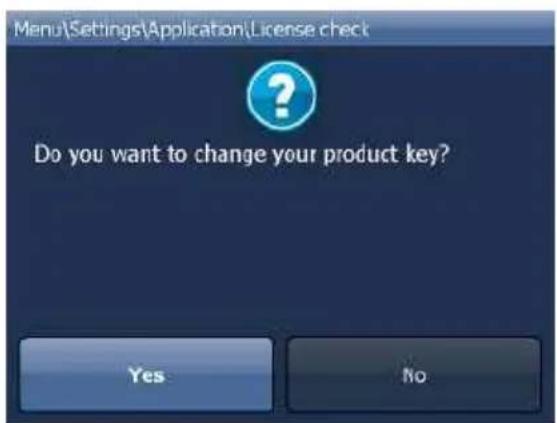
You will be asked for a new product key. The change will not take effect until the next time you start Navigator.
Tap Ok
Troubleshooting
| Phenomenon | Reasons | Solutions |
| Normal | ||
| Not operating | Fuse of machine power supply and auto vehicle battery is burnt,Volatge of power supply is overloadedAutomatic protection system avoids fault due to illegal operationWrong pin assignment ISO connector | Change for fuse of the cottect types;Adjust voltage;Reset the system by pressing the ResetkeyCheck the wiring diagram |
| Remote comtrol doesn’t work | Battery is out of power;Battery is not placed correctly | Change new battery;Reinstall battery |
| No or low sound | Disconnection;Volume setting is low volume;wrong connection of Silence;Loudspeaker fault;Volume balance setting biasEarthing in loudspeaker connection | Check the connecion;Increase the volume;Reconnection the silence wire complied with the installation instruction;Change for a new loudspeaker;Adjust the volume balance setting to middle place;Keep insulation of loudspeaker connection |
| Inferior quality of sound;Distortion of sound | Inferior disc is used;Loudspeaker does not match impedance of the machine;Loudspeaker opens circuit. | Use genuine discs;Change a loudspeaker;Check the connection of loudspeaker. |
| Machine reset by itself when it is shut down | Connection of ACC and B+ is not correct. | Check and reconnect ACC and B+ |
| Turnover screen | ||
| Turnover screen does not open automatically. | Auto Open of turnover screen setting is OFF. | Auto Open>>ON |
| No image | Connection of brake wire is not correct;Not brake state | Connect brake wire with cathode of power supply correctly;Keep brake state after car is placed safe. |
| Unstable output of images | DVD does not correspond with the present system video setting;Video signal line is not connected correctly. | Adjust system video setting;Check and make sure of the connectivity.Unsupported code |
| Images being stretched or compression | Inappropriate image proportion setting | Adjust image setting |
Systematic Parameter
| Trouble | Cause(s) | Solution(s) |
| Radio | ||
| Weak signal | Auto antenna does not reach out completelyLOC function is under working state | Connect auto antenna line correctly;Close LOC function. |
| Disc/Card Reading | ||
| Break-downduring playing | Disc is stained or scratched;Documents or records are damaged | Clean or replace the disk;Replace the disk or choose stored file |
| Wrong information is shown on the panel | The screen cannot display all the information. | |
| Error or not operating | Illegal operation | Hold the EJECT key for 5 seconds to reread the device. |
| Disc cannot enter | There is disc already in side the devic.Disc is not fully accepted. | Take out the disk inside the machine and replace a new discTransport the screws |
| the deviceDisc does not play | The disk level surpasser the level setting ofLock function;The area code of the disc isnot compatible;Disc is turned upside down. | Adjust the level setting of Lock feature;Use a compatible disk;Keep the side with sign up when insert the disk. |
| SD card readable by PCbut unreadable by thedevice | Due to compatibility reasons of SD cardbrand,not all of the SDcard can be readunder the system.Or you may wrongly useMMc card as SD card. | The present system mainly support the following SDCard brands:San Dick、KingMAX、Kingston、Panasonic、Apacer etc. |
| Nonrepeat and searchfunction while play VCD | PBC service is functioning | Shut down PBC service |
| Bluetooth | ||
| Can not be established | Bluetooth activated?Pairing pass word | Activated in the mobile phone.Enter pass word:0000 |
Specifications
Working voltage: direct current 12V
Working voltage range: 10.8V–16V
Maximum working electronic current: 10A
Installation angle: less than 30 degree tilted the front side and backside
DVD/CD Player
Compatible formats: DVD-R, DVD-RW
DVD-R, DVD-RW, DVD+R, DVD+RW, CD-R, CD
-RW, CD-DA, MP3, MP4, WMA, HDVD, SVCD, VCD, MPEG, JPEG
Audio SNR: 85dBA
Dynamic range: 95dB
Frequency response" 20HZ\~20kHz(+_3dB)
Digital audio sample:24bit
Electronic Stability Program(ESP):
DVD 2-3 Seconds
CD-DA 10 Seconds
MP3 100 Seconds
WMA 200 Seconds
Mechanical aseismatic: 10\~200Hz, X/Y/Z: 1.0G
Power output: 4X60W
impedance 4ohm
SNR: 70dBA
Frequency Response: 20Hz\~20kHz
Video
Standards: NTSC, PAL (Auto recognition)
Output: 1 Vp-p(75ohm)
Input: 1Vp-p(75ohm)
FM Radio
Frequency modulation: 87.5 MHz\~108.0MHz (Europe)
Flexibility (-30dB):10dBu
SNR(-50dB):15dBu
Frequent sound range: 30Hz\~15kHz (+3dB)
AM Radio
Frequency range: 522KHZ\~1620KHZ (Europe)
Sensitivity (SN=20dB):20dBu
Image rejection: 60dB
Frequency response:
50HZ\~2KHZ(+-3dB)
Display
Screen type: TFT
Response time: up=30 millisecond,
Down=50 millisecond
Angle range: depression angle=65°
elevation angle=40°
Left vision=65 right vision=65
Environment temperature
Operation temperature: -20\~+70°C
Maintenance temperature: -30\~80°C
Operating humidity:45%\~+80%℃
(relative humidity)
Maintenance humidity:30%\~90%
(relative humidity)
Signs of Video and Audio
| ICONS | Features (Dia.:12cm) | Duration |
| Single-sided, single-layered(DVD-5)Single-sided, double-layered(DVD-9)Double-sided, single-layered(DVD-10)Double-sided, double-layered(DVD-18) | (MPEG)133 min.242 min.266 min.484 min. | |
| Single sided, double-layered(VCD) | (MPEG2) 74 min. | |
| Single-sided, single-layered (VCD) | (CDDA) 74 min. |
Signs on DVD discs
| ICONS | IMPLICATION(s) |
 | The number of tracks recorded in the CD, and the maximum amount for one CD is 8 |
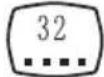 | Multi-language display |
 | The number of shooting angles (Max.:9) |
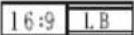 | Selected scenes proportion, “LB” indicates mailbox“PS” indicates camera scanning.Figure (left) indicates that the conversion of image of 16:9 to mailbox is feasible. |
 | Regional 1: U.S. Canada, East Pacific Island NationsRegional 2: Japan, Western Europe, Northern Europe,Egypt, South Africa, Middle East CountriesRegional 3: Taiwan, HongKong, South Korea, ThailandRegional 4: Australia, New Zealand, South-central Asia,South Pacific Island Nation/OceaniaRegional 5: Russia, Mongolia, India, Central Asia, EasternEurope, North Korea, North Africa, NorthwestAsian NationsRegional 6: China |
Usage of CDs
- Do not touch the recordable side of the CD when you hold it
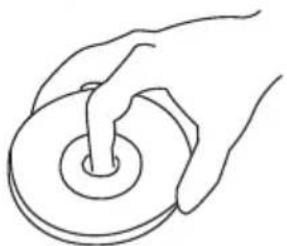
2.CD-R/RW/ DVD-R/RW&DVD+R/RW are more apt to be damaged than ordinary CD, please read the instructions on the package before you use them.
- Any tapes or pasters is not allowed on the CD. Do not use the CD with sunch adhesive materials on.
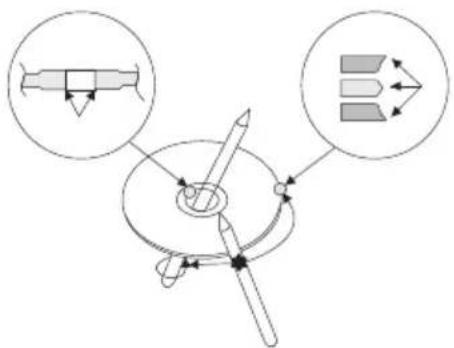
When you are using new CDs
If there's any burrs around the central hole or edge of the CD, please remove them with a ball pen before you sue it.
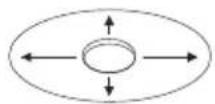
Maintenance of CDs
Clean the CD from the center to the edge.
How to draw out a CD
When you draw a CD out of the device, please do it horizontally.
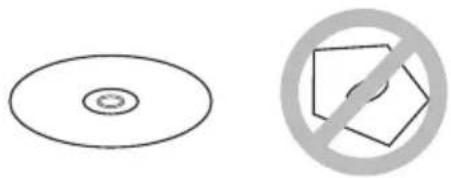
Unusable CDs
- Non round-shaped CDs/
2.CDs with recordable side colored and stained CDs
3.CD-R&CD-RW without having ultimate processes.
Storage of CDs
-
Keep CDs in the shade an away from high temperatures.
-
Keep CDs in case
- XM-2DTSBN6210
- INSTALLATION/OWNER'S MANUAL
- XOMAX
- WARNING
- SAFETY INFORMATION
- E-MARK COMPLIANCE
- PREPARATION
- BEFORE YOU START
- GETTING STARTED
- WIRING DIAGRAM - INPUTS/OUTPUTS
- REMOTE CONTROL PREPARATION
- NOTES
- CONTROL LOCATIONS
- GENERAL OPERATION
- PROFILE OF MAIN INTERFACE
- RADIO
- MULTIMEDIA PLAYER
- BLUETOOTH
- GPS NAVIGATION
- TIME
- LANGUAGE
- CAMERA INPUT
- CAR LOGO
- STEERING WHEEL CONTROL
- CALIBRATION
- POWER SAVING MODE
- AUX INPUT
- DUAL ZONE FUNCTION
- AM/FM TUNER OPERATION
- RADIO INTERFACE RDS TURN ON FUNCTION
- 10.BAND
- 11.AUTOMATICALLY SEARCHING STATION
- 12.PRESET SCAN
- 13.LOC/DX TUNING MODE
- 14.ST: STEREO FOR THE FREQUENCY WITH STEREO SOUND OUTPUT
- 15.TA FUNCTION TURN ON/OFF
- 16.PROGRAM TYPE
- 17.AF FUNCTION TURN ON/OFF
- RETURN TO PREVIOUS MODE
- RADIO INTERFACE RDS TURN OFF FUNCTION
- DISC: DVD/VCD OPERATION
- GO TO SEARCH
- CD/MP3/MP4/WMA MULTIMEDIA OPERATION
- PICTURES OPERATION
- PLAY JPEG FILE
- AUX IN(AUXILIARY DEVICE INPUT)
- REAR VIEW LENS
- CALCULATOR
- GAME
- BLUETOOTH OPERATION
- PAIRING
- PARING METHOD
- PHONEBOOK DISPLAY
- CALL LOG
- DIAL AND RECEIVE PHONE CALL
- MAKING A CALL
- BLUETOOTH SETTING
- BLUETOOTH MUSIC
- SETTING MENU
- TIME SETTING
- SET FREQUENCY AREA
- BACKLIGHT SETTING
- BACKGROUND SETTING
- CAR LOGO SETTING
- SOUND SETTING
- SYSTEM INFORMATION
- SYSTEM SETTING
- STEERING WHEEL SETTING
- SET NAVIGATION
- NAVIGATION SETTING
- USING NAVIGATOR
- CONNECTING YOUR GPS RECEIVER
- SETTING YOUR DESTINATION
- ADDRESS
- POI
- NEAREST
- FAVOURITES
- NAVIGATING
- USING THE MAP
- ADDING FAVOURITES
- ADDING A FAVOURITE FROM THE MAP
- FAVOURITES EDITOR
- ODOMETER
- ROUTING
- NIGHT MODE
- SAVING AND REPLAYING YOUR JOURNEYS
- SAVING YOUR JOURNEYS
- REPLAYING YOUR JOURNEYS
- SETTINGS
- NAVIGATION
- APPLICATION
- KEYBOARD
- METRIC AND IMPERIAL UNITS
- SELECT REGIONS
- MAP COLOUR SCHEMES
- SELECT POI TYPES
- PRODUCT KEY
- SPECIFICATIONS
- DVD/CD PLAYER
- VIDEO
- FM RADIO
- AM RADIO
- DISPLAY
- ENVIRONMENT TEMPERATURE
- SIGNS OF VIDEO AND AUDIO
- USAGE OF CDS
- WHEN YOU ARE USING NEW CDS
- MAINTENANCE OF CDS
- HOW TO DRAW OUT A CD
- UNUSABLE CDS
- STORAGE OF CDS
Brand : Xomax
Model : XM-2DTSBN6210
Category : Multimedia car stereo