16310093 - Fondue maker Melissa - Free user manual and instructions
Find the device manual for free 16310093 Melissa in PDF.


| Product Type | Fondue Maker |
| Brand | Melissa |
| Model | 16310093 |
| Power Supply | 1200 W, 220-240 V ~ 50/60 Hz |
| Dimensions (approx.) | 25 x 25 x 15 cm |
| Weight (approx.) | 1.5 kg |
| Material | Stainless steel pot, plastic base |
| Capacity | 1.5 liters |
| Temperature Control | Adjustable thermostat |
| Fondue Type | Cheese, chocolate, or oil fondue |
| Number of Forks | 6 color-coded forks |
| Safety Features | Thermal fuse, cool-touch handles |
| Cleaning | Hand wash only; pot and forks dishwasher safe |
| Maintenance | Clean after each use, dry thoroughly |
| Spare Parts | Replacement pot, forks, and heating element available |
| Repairability | Repairable by qualified technician |
| Warranty | 2 years (check local terms) |
Frequently Asked Questions - 16310093 Melissa
User questions about 16310093 Melissa
0 question about this device. Answer the ones you know or ask your own.
Ask a new question about this device
Download the instructions for your Fondue maker in PDF format for free! Find your manual 16310093 - Melissa and take your electronic device back in hand. On this page are published all the documents necessary for the use of your device. 16310093 by Melissa.
USER MANUAL 16310093 Melissa
natural_image
White medical or laboratory device with a black handle and two small colored markers on top (no text or symbols visible)16310093/ 16310109
DK Cupcake-bager 2
SE Muffinsmaskin 7
NO Cupcake-maskin....12
FI Muffinssipannu....17
UK Cupcake maker....22
OVERSIGT OVER APPARATETS DELE
F∅R F∅RSTE ANVENDELSE
OFTE STILTE SP∅RSMÅL
Hvis du har spørsmål om bruk av apparatet som du ikke finner svar på i denne bruksanvisningen, kan du ta en titt på nettsidene våre på www.adexi.eu.
ENNEN ENSIMMÄISTÄ KÄYTTÖKERTAA
To get the best out of your new appliance, please read this user guide carefully before using it for the first time. Take particular note of the safety precautions. We also recommend that you keep the instructions for future reference, so that you can remind yourself of the functions of your appliance.
SAFETY MEASURES
General
- Incorrect use of this appliance may cause personal injury and damage to the appliance.
- Use for the intended purpose only. The manufacturer is not responsible for any injury or damage resulting from incorrect use or handling (see also Guarantee Terms).
- For domestic use only. Not for outdoor or commercial use.
- For connection to 230 V, 50 Hz only.
- Do not immerse the appliance, cord or plug in water and make sure no water enters the appliance.
- Never touch the appliance, cord or plug with wet or damp hands.
- Do not expose the appliance to direct sunlight, high temperatures, humidity, dust or corrosive substances.
- Never leave the appliance unattended when it is switched on.
-
Never leave unattended when in use, and keep an eye on children in the vicinity of the appliance when it is being used. The appliance is not a toy.
-
The appliance is not to be used by persons with reduced sensitivity, physical or mental disabilities or persons who are unable to use the appliance, unless supervised or instructed by a person responsible for their safety.
- The appliance should be regularly emptied of mix remnants, as these could cause a fire.
- Use only accessories supplied with the appliance or those recommended by the manufacturer.
Use
- Always place the appliance on a dry, level, firm and heat-resistant surface, and well away from the edge of the worksurface.
- Always place the appliance at a safe distance from flammable objects such as curtains, tablecloths or similar.
- The appliance must not be placed or stored near other sources of heat.
- Do not cover.
- The surfaces become very hot during use. Do not touch the hot surfaces due to the danger of burns. Only touch the handles.
- Do not move the appliance whilst in use.
- Never use any metal utensil to remove the cupcakes, from the appliance as they could scratch the non-stick coating.
- Please note that the appliance will remain hot for a while after you switch it off. Always allow it to cool completely before you put it away or clean it.
Cord and plug
- Do not let the cord hang out over the edge of the work surface.
- Check that it is not possible to pull or trip over the cord of the appliance. Extension leads should not be used with this appliance.
- Keep the cord and appliance away from heat sources, hot objects and naked flames.
- Turn off and unplug the appliance as soon as you have finished using it, before cleaning it or if the appliance is not in use. Avoid pulling the cord when removing the plug from the socket. Instead, hold the plug.
- Ensure that the cord is fully extended.
- The cord must not be twisted or wound around the appliance.
- Check regularly that neither cord nor plug is damaged and do not use if they are, or if the appliance has been dropped or damaged in any other way.
- If either the appliance, cord or plug has been damaged, have the appliance inspected and if necessary repaired by an authorised repairer. Never try to repair the appliance yourself. Please contact the store where you bought the appliance for repairs under the guarantee. Unauthorised repairs or modifications to the appliance will invalidate the guarantee.
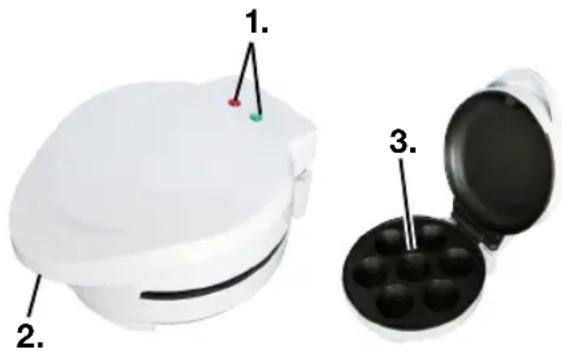
KEY TO THE MAIN COMPONENTS OF THE APPLIANCE
- Indicator light
- Handle
- Aluminium trays
PRIOR TO FIRST USE
- Remove all packaging and transport materials from the inside and outside of the appliance.
- Check that the appliance has no visible damage and that no parts are missing.
- Clean the appliance before using it (see the section “Cleaning” below).
• Completely unwind the cord. - The appliance is now ready for use.
USING THE APPLIANCE
- Prepare the mixture for use in the appliance. See the Recipe for cupcakes section.
- Open the appliance.
- Connect the appliance to mains electricity. The indicator lamp on the appliance will be lit and the aluminium trays will be heated.
- Pour the mixture into the aluminium trays until they are approx. half full.
-
Close the lid and ensure that it is locked.
-
The baking time is between 10 and 14 minutes. If, for example, chocolate pieces or cocoa are used in the mixture, the baking time will be extended. Check if the cupcakes are baked by inserting a fork or a knitting needle. If mixture sticks to the fork, the cakes are not ready yet.
- Avoid touching the hot surface when lifting the warm cupcakes from the aluminium trays. Place the cakes on a wire rack to cool.
- Remove the plug from the socket and allow the appliance to cool after use.
Caution!
- During preparation, the appliance's indicator lamp will repeatedly turn on and off. This indicates that the thermostat is working correctly and that the appliance is maintaining the optimum temperature.
- You may experience a small amount of smoke or odour the first few times the appliance is used. This is due to excess material from the manufacturing process being burnt off. This is completely normal, and the smoke/smell will soon disappear.
RECIPE FOR CUPCAKES (12-18 PCS)
Ingredients
175 g soft butter
200 g sugar
2 tsp vanilla sugar
3 eggs size M/L
350 g flour
12 tsp salt
1 12 tsp baking powder
150 ml milk
Preparation:
Mix together butter, sugar and vanilla sugar. Whisk the eggs one at a time. If the mixture separates, add a little bit of the flour. Fold in sieved flour, salt and baking powder and add the milk. Heat up the cupcake maker. Fill each hole approximately half full of mixture and close the cupcake maker. The baking time is approx. 5 min depending on the type of mixture. Check if the cupcakes are baked by inserting a fork or a knitting needle. If mixture sticks to the fork, the cakes are not ready yet.
Place the cakes on a wire rack to cool.
This is a base recipe that can be varied in any way you like. Eat as is, or add, for example, bananas, chocolate, berries or nuts.
Vanilla icing:
Ingredients:
250 g icing sugar
1 tsp vanilla sugar
75 g soft butter
2 tbsp milk
A couple of drops of food colouring if desired.
Mix together the butter with icing sugar and vanilla sugar and add milk.
Mix well until smooth and creamy.
The cupcake maker is also suitable for baking muffin/cupcake ready mixes.
STORAGE
- Ensure that the appliance is clean, dry and completely cool before storing it.
- Store the appliance in a clean and dry place, for instance in its box.
- The cord must not be twisted or wound around the appliance.
CLEANING
When cleaning the appliance, you should pay attention to the following:
- Remove the plug from the wall socket and allow the appliance to cool down before cleaning.
- Do not immerse the appliance, cord or plug in water and make sure no water enters the appliance.
- Clean the appliance by wiping it with a damp cloth. A little detergent can be added if the appliance is heavily soiled.
- The appliance is not dishwasher-safe.
-
Never use a scouring pad or any form of strong solvent or abrasive cleaning agent to clean the appliance, as those may damage the inside and outside surfaces of the appliance.
-
IMPORTANT! Allow to dry completely after cleaning. Do not use the appliance if it is damp.
- Always clean the appliance before putting it away if it is not to be used for a prolonged period.
FOR UNITED KINGDOM ONLY
Plug wiring:
This product is fitted with a BS 1363 13-amp plug. If you have to replace the fuse, only those that are ASTA or BSI approved to BS1362 and with a rated current of 13 amps should be used. If there is a fuse cover fitted, this cover must be refitted after changing the fuse.
If the fuse cover is lost or damaged, the plug must not be used. You must also check if the socket outlets in your home fit with the plug of the appliance. If the socket outlet in your home does not fit with the plug, the plug must be removed and disposed of safely as insertion of the plug into the socket is likely to cause electric hazard. A replacement plug should be wired according to following description.
Important
This appliance must be earthed. The wires in the cord set are coloured thus:
BLUE- Neutral, Brown-Live, Green& Yellow-earth (For detachable plug only)
As the colours of the wires in the mains lead of this appliance may not correspond with the coloured markings identifying the terminals in your plug, proceed as follows:
The wire that is coloured Green& Yellow must be connected to the terminal in the plug that is marked
The wire that is coloured blue must be connected to the terminal that is marked with the letter N or coloured black.
The wire that is couloured brown must be connected to the terminal that is marked with the letter L or coloured red.
INFORMATION ON DISPOSAL AND RECYCLING OF THIS PRODUCT
Please note that this Adexi product is marked with this symbol:

This means that this product must not be disposed of along with ordinary household waste, as electrical and electronic waste must be disposed of separately.
According to the WEEE directive, every member state must ensure correct collection, recovery, handling and recycling of electrical and electronic waste. Private households in the EU can take used equipment to special recycling stations free of charge. In some member states you can in certain cases return used equipment to the retailer from whom you purchased it, if you are purchasing new equipment. Contact your retailer, distributor or the municipal authorities for further information on what to do with electrical and electronic waste.
GUARANTEE TERMS
The guarantee does not apply:
- if the above instructions have not been followed
- if the appliance has been interfered with
- if the appliance has been mishandled, subjected to rough treatment, or has suffered any other form of damage
- if the appliance is faulty due to faults in the electricity supply.
Due to the constant development of our products in terms of function and design, we reserve the right to make changes to the product without prior warning.
FREQUENTLY ASKED QUESTIONS
If you have any questions regarding the use of the appliance and cannot find the answer in this user guide, please try our website at www.adexi.eu.
Go to the "Consumer Services" menu and click on "Frequently Asked Questions" to view the most frequently asked questions.
You can also see contact details on our website if you need to contact us for technical questions, repairs, accessories or spare parts.
IMPORTER
Adexi Group
www.adexi.eu
We cannot be held responsible for any printing errors.
DE
EINLEITUNG
VOR DEM ERSTMALIGEN GEBRAUCH

- OVERSIGT OVER APPARATETS DELE
- F∅R F∅RSTE ANVENDELSE
- OFTE STILTE SP∅RSMÅL
- ENNEN ENSIMMÄISTÄ KÄYTTÖKERTAA
- SAFETY MEASURES
- General
- Use
- Cord and plug
- KEY TO THE MAIN COMPONENTS OF THE APPLIANCE
- PRIOR TO FIRST USE
- USING THE APPLIANCE
- Caution!
- RECIPE FOR CUPCAKES (12-18 PCS)
- Preparation:
- Vanilla icing:
- STORAGE
- CLEANING
- FOR UNITED KINGDOM ONLY
- Plug wiring:
- Important
- BLUE- Neutral, Brown-Live, Green& Yellow-earth (For detachable plug only)
- INFORMATION ON DISPOSAL AND RECYCLING OF THIS PRODUCT
- GUARANTEE TERMS
- FREQUENTLY ASKED QUESTIONS
- IMPORTER
- DE
- EINLEITUNG
- VOR DEM ERSTMALIGEN GEBRAUCH
Brand : Melissa
Model : 16310093
Category : Fondue maker