TTG 2001 - Heating appliance TecLime - Free user manual and instructions
Find the device manual for free TTG 2001 TecLime in PDF.


| Product Type | Patio Heater (Terrace Heater) |
| Model | TecLime TTG 2001 |
| Heating Technology | Quartz tubes (3 tubes, Applight QN 411) |
| Power Supply | 230 V, 50 Hz, single phase |
| Power Consumption | 2000 W max (2.0 kW) |
| Heat Settings | 3 steps: 650 W (Low), 1350 W (Medium), 2000 W (High) |
| Control Type | Manual pull cord |
| Heater Head Dimensions (W x D x H) | 490 x 180 x 294 mm |
| Net Weight (with stand) | 9.8 kg |
| Net Weight (wall-mounted) | 1.9 kg |
| Height Adjustable (stand model) | Yes, from 180 to 210 cm |
| Ingress Protection (IP) Rating | IP X4 (splash-proof) |
| Mounting Options | Wall-mounted (bracket included) or stand (base included) |
| Heating Direction | Adjustable (head rotates 360°) |
| Minimum Clearances (stand model) | 1 m from walls, 30 cm from ceiling, 1.8 m above floor |
| Cleaning | Wipe with damp cloth and mild detergent; dust reflector and tubes with soft brush |
| Warranty | 24 months (excluding heating tubes) |
| Safety Features | Earthing required; do not cover; automatic cut-off not included (manual switch-off) |
| Disposal | Do not dispose with household waste; recycle at appropriate facilities |
| Intended Use | Outdoor dry weather use only; not for commercial or indoor use |
Frequently Asked Questions - TTG 2001 TecLime
User questions about TTG 2001 TecLime
0 question about this device. Answer the ones you know or ask your own.
Ask a new question about this device
Download the instructions for your Heating appliance in PDF format for free! Find your manual TTG 2001 - TecLime and take your electronic device back in hand. On this page are published all the documents necessary for the use of your device. TTG 2001 by TecLime.
USER MANUAL TTG 2001 TecLime
SAFETY PRECAUTIONS....8
MAIN COMPONENTS OF THE PATIO HEATER (for numbers see pictures) 9
POSITIONING THE PATIO HEATER 10
OPERATING THE PATIO HEATER....11
CLEANING....11
INFORMATION ON DISPOSAL AND RECYCLING OF THIS PRODUCT....11
WARRANTY PROVISIONS....11
TECHNICAL SPECIFICATIONS 12
FI....13
JOHDANTO 13
TÄRKEÄÄ 13
TURVAOHJEET 13
EN The features described in this manual are published with reservation to modifications.
ANVENDELSE AF TERRASSEVARMEREN
To get the best out of your new patio heater, please read these instructions carefully before using it for the first time. Take particular note of the safety precautions. We also recommend that you keep the instructions for future reference, so that you can remind yourself of the functions of the patio heater.
IMPORTANT
☐ The installation must be completely in accordance with local regulations, ordinances and standards.
Check the mains voltage. This device needs to be connected to an earthed socket 230 Volt/ 50 Hz/ single phase.
The device MUST always have an earthed connection. You may absolutely not connect the device if the power supply is not earthed.
☐ The plug must always be easily accessible when the device is connected.
Read these instructions carefully and follow the directions.
Before connecting the device, check that:
The connection voltage corresponds to that on the type plate.
☐ The socket and power supply are suitable for the device.
The plug on the cable fits the socket.
☐ The device is on a stable and flat surface.
Have the electrical installation checked by a recognized expert if you are not sure that everything is in order.
SAFETY PRECAUTIONS
The patio heater must only be used for the purpose for which it was originally designed. Do not use for drying of towels, clothes, or other materials/products/people/animals. The patio heater must not be used commercially and must not be used for the heating of building sites, in greenhouses, in barns, etc.
☐ The quartz tubes heating head is fragile, so the patio heater should therefore be used carefully. Avoid subjecting it to bangs and knocks.
☐ The patio heater should be set up or mounted in accordance with the instructions in section "Positioning of the patio heater" on the next page.
☐ The patio heater emits very intense heat. It is recommended that animals and people, in particular the elderly and babies, are not exposed to the direct heat of the patio heater.
☐ The patio heater must never be mounted or used in the vicinity of flammable objects, e.g. curtains, furniture, etc. It must not be set up or mounted close to wall sockets or in wet or damp environments (for example in bathrooms, swimming pools, etc.).
☐ The patio heater is only suitable for use in dry weather.
In order to reduce the risk of fire or electric shock, never use the patio heater together with an electronic timer or device which turns 'on' and 'off' the patio heater automatically.
☐ Do not cover the patio heater.
☐ Ensure that the cable does not get caught beneath the patio heater, behind shelves etc.
Do not run the cable under carpets etc. Place the cable so that it is not possible to trip over it, and avoid wrapping it around the stand (only models with base) or heater head.
☐ If use of an extension cable is required with the patio heater, then the extension cable should have a minimum rating of 10A and/or 2000W. Always make sure that extension cables are unrolled entirely.
☐ Do not immerse the patio heater in any form of liquid.
☐ Never insert your fingers, pencils or other objects through the grille. The grille will become hot during use and must not be touched until the patio heater has cooled down entirely.
Keep an eye on any children in the vicinity of the patio heater when it is in use. Children must not be allowed to use the patio heater unless supervised by an adult.
Switch off the patio heater before moving or cleaning the patio heater.
☐ Never try to repair the patio heater yourself.
☐ If the patio heater, cable or plug needs to be repaired, it should be taken to an authorized service centre. Unauthorized repairs or modifications to the appliance will invalidate the guarantee. Please contact the store where you bought the device for repairs under guarantee.
☐ Switch off the heater before leaving it unattended.
□ Always take the plug out of the socket when the device is not in use
MAIN COMPONENTS OF THE PATIO HEATER (for numbers see pictures)
- Heater housing
- Grille
- Function indicator
- Power cord
- Stand (only for model with base)
- Clip
- Mounting screw
Stand components (only for models with base)
a. Base
b. Stand, lower part
c. Washer and screw
d. Stand, middle part
e. Screws (x2)
f. Stand, upper part
g. Collar
h. Upper stand
A mounting wall bracket together with rawlplugs (only suitable for concrete, for other materials please use appropriate rawlplugs) and screws (not illustrated) is included with the wall-mounted model.

POSITIONING THE PATIO HEATER
Wall-mounted model (ATV-2001)
The heater head (1) should be at least 30cm from the ceiling, 50cm from any side wall, and at least 1.8m above the floor.
☐ The patio heater should be mounted on concrete. It can not be, without precautions, mounted on walls of wood or other materials (In such case, please ask advise of a construction professional). Mount the heater by using the included wall bracket, do not use other brackets or fittings.
The angled section of the bracket should face upwards.
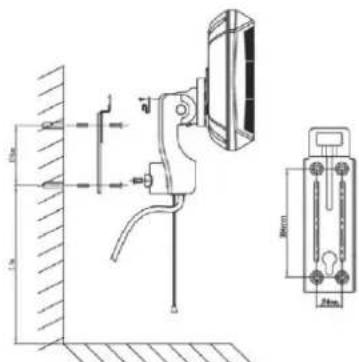
Mount the heater head on the wall bracket. The mounting bracket on the upper part of the rear of the heater head should hang in the angled part of the wall bracket. The mounting screws (7) should be placed in the holes at the bottom of the wall bracket and pressed down, until the heater head is firmly fixed.
Check that the patio heater is firmly fixed in place before using it.
Model with stand (ATG 2001)
☐ The patio heater should be sited at least 1m from the nearest wall. The heater head should be at least 30cm from the ceiling, and at least 1.8m above the floor. The patio heater should stand firmly on a horizontal floor.
Put the lower part of the stand (b) in the base (a), lay the base on its side, and fasten the stand to the underside of the base with the washer and screw (c).
7 Position the base correctly so that the stand is upright. Put the middle part of the stand (d) in the lower part, and fix it in place with one of the screws (e). In the same way, fix the upper part of the stand (f) in the middle part with a screw.
Put the upper stand (h) in the white socket on the upper end of the stand. Pass the collar (g) down over the upper stand and screw it firmly into place using the white socket.
Mount the heater head on top of the upper stand with the help of the mounting screws. Tighten all screws thoroughly.
Check that the patio heater is standing firmly in place before using it.
The cable may be secured in the cable holder on the stand.
• The upper stand can be rotated 360° so that the heating head can face in any direction.

☐ Push the power plug into the socket and switch the power on.
☐ Set the heater head at the desired angle.
☐ If the patio heater has a base, then the height of the heater head can be adjusted by loosening the collar and pulling the upper neck up and down.
By pulling the cord (picture 4): 1. you can switch the patio heater on, 2. select the different power settings and 3. switch the heater off. The current setting can be seen in the function indicator (picture 3):
| Indicator value | Meaning | Power |
| 0 | Switched off | 0 |
| L | Low power | 650 W |
| M | Medium power | 1350 W |
| H | High power | 2000 W |
☐ The patio heater will switch to the next setting each time you pull the cord.
☐ The patio heater is not thermostatically controlled and continues to emit heat until it is switched off. Always keep an eye on the patio heater while it is switched on.
☐ To switch off the patio heater, pull the cord repeatedly until the function indicator shows "0".
☐ Remove the plug from the wall socket when the patio heater is not in use.
CLEANING
□ Always switch off the heater at the wall socket and unplug it before cleaning the patio heater.
☐ Clean the patio heater using a damp cloth and, if necessary, a little mild detergent. Never use abrasive cleaning agents or solvents.
☐ After extended periods of use dust can pile up on the reflector and tubes behind the grille (2). The grille can be removed by loosening the four small screws on the reverse side of the heater head and carefully removing the grille. Dust can now be brushed off with a soft brush. Never use compressed air since this can result in damage to the quartz tubes or reflector. Replace the grille and check if it is secure.
INFORMATION ON DISPOSAL AND RECYCLING OF THIS PRODUCT
Waste of electrical products should not be disposed with household waste. Please recycle where facilities exist. Check with your local authority or retailer for recycling advice.
WARRANTY PROVISIONS
Your heater comes with a 24-month warranty starting on the date of purchase*. Within this period all defects in material or workmanship will be repaired without
any charge. The following provisions shall apply regarding this warranty:
- We expressly dismiss all other claims for damages, including consequential damages.
-
Any repairs or replacements of components within the term of warranty will not result in an extension of the term of warranty.
-
The warranty will no longer apply, when the heater has been modified, non-original parts have been used, or when it is repaired by third parties.
-
The warranty will not apply to parts that are subject to normal wear.
-
The warranty will only apply, when you present the original, dated proof of purchase, provided no changes have been made to it.
-
The warranty will not apply to damages caused by actions not in compliance with the Directions for Use.
-
Transportation costs and the risks involved during the transportation of the heater or heater components will always be the responsibility of the purchaser.
In order to avoid unnecessary costs, we recommend that you always read these 'Directions for Use' carefully first. In case they offer no solution, please take the heater to your dealer for repair.
* does not apply to heating tubes.
Due to the constant development of our products in terms of function and design, we deserve the right to make changes to the product without prior warning.
We cannot be held responsible for any printing errors.
TECHNICAL SPECIFICATIONS
| ATV-2001 | ATG-2001 | |
| Type of heating tubes | Quartz (Applight QN 411) | Quartz (Applight QN 411) |
| Quantity of heating tubes | 3 | 3 |
| Heating direction adjustable | Yes | Yes |
| Heating capacity. | 3 steps 650/1350/2000 W | 3 steps 650/1350/2000 W |
| Power consumption | 2.0 kW | 2.0 kW |
| Power supply | 230 V, 50 Hz, 1 ph | 230 V, 50 Hz, 1 ph |
| Current (nom) | 10 A | 10 A |
| Unit protection | IP X4 | IP X4 |
| Controls | manual | manual |
| Dimensions heater head (W x D x H) | 490 x 180 x 294 mm | 490 x 180 x 294 mm |
| Net weight | 1.9 kg | 9.8 kg |
| Height adjustable | No | Yes, adjustable from 180 to 210 cm |
| Wall mounted bracket included | Yes | No |
FI
JOHDANTO
TERASSILÄMMITTIMEN KÄYTTÖ
☐ Fest varmehodet til veggbraketten. Monteringsbraketten i den øvre delen av varmehodets bakside skal henge i den vinklede delen av veggbraketten. Monteringsskruene (7) skal plasseres i hullene nederst på veggbraketten, og skyves ned til varmehodet sitter godt fast.
BRUK AV TERRASSEVARMEREN
ANVÄNDA TERRASSVÄRMAREN
- ANVENDELSE AF TERRASSEVARMEREN
- IMPORTANT
- SAFETY PRECAUTIONS
- MAIN COMPONENTS OF THE PATIO HEATER (FOR NUMBERS SEE PICTURES)
- POSITIONING THE PATIO HEATER
- WALL-MOUNTED MODEL (ATV-2001)
- MODEL WITH STAND (ATG 2001)
- CLEANING
- INFORMATION ON DISPOSAL AND RECYCLING OF THIS PRODUCT
- WARRANTY PROVISIONS
- FI
- JOHDANTO
- TERASSILÄMMITTIMEN KÄYTTÖ
- BRUK AV TERRASSEVARMEREN
- ANVÄNDA TERRASSVÄRMAREN
Brand : TecLime
Model : TTG 2001
Category : Heating appliance