AND 1.0 - Action Camera Andersson - Free user manual and instructions
Find the device manual for free AND 1.0 Andersson in PDF.


| Product Type | Action Camera |
| Brand | Andersson |
| Model | AND 1.0 |
| Dimensions (approx.) | 60 x 40 x 30 mm |
| Weight (approx.) | 80 g |
| Power Source | Rechargeable Li-ion battery, 5V USB charging |
| Battery Capacity | 1050 mAh |
| Video Resolution | Up to 1080p Full HD at 30 fps |
| Photo Resolution | Up to 12 MP |
| Field of View | 170° wide angle lens |
| Waterproof Rating | IP68 with included housing (up to 30m) |
| Storage Media | MicroSD card up to 32 GB |
| Connectivity | Wi-Fi, Micro USB |
| Mounting | Standard tripod mount and adhesive mounts |
| Main Functions | Video recording, photo capture, time-lapse, loop recording |
| Care & Cleaning | Wipe with a dry cloth; avoid solvents; remove battery when not in use for long periods |
| Safety Precautions | Do not expose to extreme heat; use only original charger; keep away from children |
| Spare Parts & Repairability | Contact Andersson support for spare parts; device is not user-serviceable |
Frequently Asked Questions - AND 1.0 Andersson
User questions about AND 1.0 Andersson
0 question about this device. Answer the ones you know or ask your own.
Ask a new question about this device
Download the instructions for your Action Camera in PDF format for free! Find your manual AND 1.0 - Andersson and take your electronic device back in hand. On this page are published all the documents necessary for the use of your device. AND 1.0 by Andersson.
USER MANUAL AND 1.0 Andersson
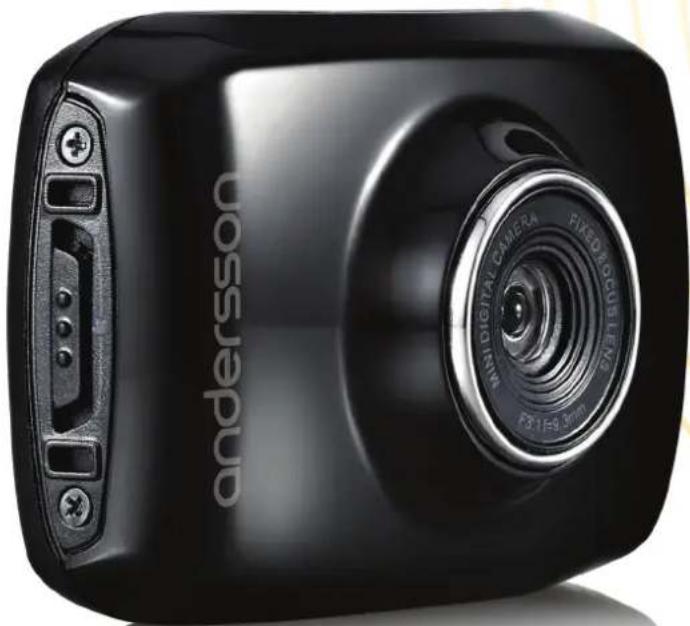
ANC 1.0 | Action camera
natural_image
Black and white photo of a black and white digital camera with visible lens and control buttons (no text or symbols on body)Copyright
This manual is the copyright of CI no 556520-4137. No part of this manual may be revised, copied or transmitted in any way without written permission from CI no 556520-4137.
Statement
This manual does not provide any warranty or related declarations. All information in this manual including the product specification, pictures and literatures is just for reference, CI no 556520-4137 reserves the rights to update contents of this manual without further notice.
Copyright
A NOTE ABOUT RECYCLING
This product's packaging materials are recyclable and can be reused. This product and the accessories packed together are the applicable product to the WEEE directive except batteries. Please dispose of any materials in accordance with your local recycling regulations. When discarding the unit, comply with your local rules or regulations. Batteries should never be thrown away or incinerated but disposed of in accordance with your local regulations concerning chemical wastes.



ANGÄENDE ÅTERVINNING
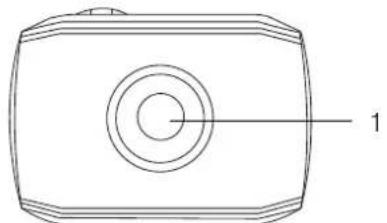
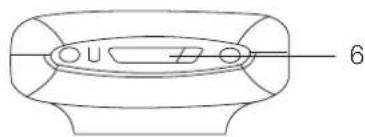
- Camera Lens
- Working Indicator
- Charging Indicator
- Microphone
- Display
- Mode Switch
- Wrist Strap
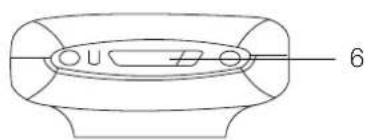
- Shutter Button
- ON/OFF
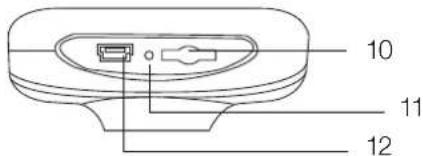
- SD Card Slot
- Reset Button
- USB Slot
Including:
→ USB Cable
→ Waterproof Case
→Helmet Mount (curved)
→ Helmet Mount (flat)
→ Helmet Belt
→ Bike Mount
→ Surfboard mount
→ User Manual
natural_image
Technical line drawing of a rectangular device with concentric circles and a labeled point '1' (no text or symbols beyond the label)
natural_image
Technical line drawing of a mechanical component with no visible text or symbols
natural_image
Technical line drawing of a mechanical component with internal features and a labeled section (7), no readable text or symbols present.

Operation
Charge The Battery:
→ Connect the camera to a computer with the USB cable. The charging indicator will light up (red) during the charging. When the charging is finished the charging indicator will turn off. It takes about 2-4 hours for the camera to be fully charged.
Use of Micro SD Card:
→ Push the Micro SD card into the card slot.
→ To take out the Micro SD card, gently press the end of the memory card inward and it will pop up.
Note: No built-in memory is available in this video camera.
Make sure to insert memory card before using.
Startup/Shutdown:
→ To turn on the camera, press the ON/OFF button for 3 seconds till the display turns on.
→ To turn off the camera, press the ON/OFF button. The camera has an automatic shutdown function, the default shutdown time is 5 minutes.
Function Modes:
→ Three different modes are available for this camera, i.e. picture taking mode, video recording mode and vehicle-mounted mode. Turn on the camera and then change the Mode switch to the desired mode.
→ Picture taking mode: Take still pictures.
→ Video recording mode: Record videos.
→ Vehicle-mounted mode: Record videos when the camera is mounted on a moving vehicle.
Indicator Light:
→ Busy light (blue): Lights when the camera is busy (when recording a video, taking photos, automatic shutdown).
→ Charging light (red): Lights when the camera needs to be charged.
Video Recording Mode:
→ Press the shutter button once or click on the center of the display to start recording. Press the shutter button again if you want to stop the recording.
→ The battery life during video recording mode is 90 minutes.
Icons During The Different Modes:
→ The 📄, 📋 or 🌐 mode icon indicates that the camera is in video recording mode or in picture taking mode or in vehicle mounted mode.
→ Click the icon to choose between 720P and VGA. Click the icon to choose the photo resolution.
→ The icon indicates that the memory card is inserted correctly.
→ Click the icon to zoom.
→ Click the icon to zoom out.
→ The icon is a visual shutter. Click on the screen to take a picture or to start recording.
→ The icon represents the battery level.
→ The icon represents the zoom level.
→ Click the ▶ icon to start playback mode.
→ Click the SET icon to set date and time, press the shutter button to confirm the settings.
Operation
Icons During Playback Mode:
→ The AVI icon represents that the current file is an AVI video file.
→ The 1/1 icon represents that there is one file in the current folder.
→ The icon indicates the current foldername.
→ Click the icon to go forward.
→ Click the icon to go backward.
→ Click the icon to delete the current file.
→ Click the ▶ icon to play the current file.
→ Click the 📁 icon to go back to the previous mode (photo taking mode or video recording mode)
→ Click the icon to pause the playback.
→ Click the ▶ icon to fast forward during playback.
→ Click the ↕ icon to fast backward during playback.
Vehicle Mode:
→ When the camera records during Vechicle Mode the files are divided into parts of 5 minutes. When the memory is full the camera automatically deletes the oldest files.
→ The recording starts automatically when the camera gets power from the car.
Move Files To a Computer:
→ Connect the camera to your computer via the USB cable.
→ The photos and videos are saved in the folder I:\DCIM\100MEDIA. The vehicle mounted videos are saved in the folder I:\DCIM\RECORDER.
Mounting the Helmet Mount:
- Insert the free end of the Helmet Belt through one of the slots in the base of the Helmet Mount.
- Thread the same end in to the helmet vent and then back up to the Helmet Mount through another vent. Then insert the belt through the other side of the Helmet mount. Then insert the belt back through the helmet vent.
- You should have now both ends of the belt inside the helmet. Take both ends of the Belt and pull to tighten and then attach together with the Velcro strap.
- Turn the Waterproof case (or mounting adapter) onto the 1/4-20 screw of the Helmet Mount until secured.
Mounting the Bar Mount:
- Turn the waterproof case (or mounting adapter) clockwise onto the screw of the handlebar mount.
- Turn the Locking Wheel until it is secure.
- Loosen the Bar Clamp Bolt until the screw can be pushed.
- After positioning the Bar Clamp where you want it, close the bottom half of the clamp and tighten the Bar Clamp Bolt.
- Loosen the Tilt Knob to adjust for the proper aiming angle, then tighten the knob.
Maintenance Safety Instructions
→ If dirt or stain is accumulated on the camera or on its lens, use a soft, clean and dry rag to wipe it away.
→ If the camera or its lens is stained with sand particles, blow them away gently. Do not use a cloth to wipe. This may scratch the surface of the camera or its lens.
→ Do not use solvents to clean the camera.
→ Do not expose the video camera or the lens to direct sunshine. The sensor may be damaged.
→ Make sure water or sand particles don't enter the video camera. Water, sand particles, dust or salt may damage the video camera.
→ Place the video camera in a cool, dry and well ventilated place. Do not place the video camera in a high temperature, moist or dusty place.
→ Do not touch the lens surface with your fingers.
Specifications
| Product name ANC 1.0 | |
| Dimensions 66 x 43 x | 27 mm |
| Weight 48g | |
| Display | 2,0 inch touch screen |
| Digital zooming x4 | |
| Image resolution 5M (2592×1944), 3M (2048×1536), 1M(1280×1024) | |
| Video resolution VGA: | 640x480 (60 frames/second), 720P:1280x720 (30 frames/second) |
| White balance Automatic | |
| Exposure Automatic | |
| File formats Image - JPEG | |
| Storage medium Micro | SD card (Supporting up to 32GB) |
| Power Supply Built-in | 3.7V rechargeable lithium Polymer |
Delar
natural_image
Technical line drawing of a rectangular device with concentric circles and a labeled point '1' (no text or symbols beyond the label)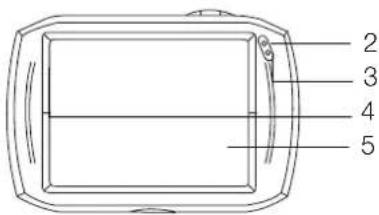
natural_image
Technical line drawing of a mechanical component with no visible text or symbols
natural_image
Technical line drawing of a mechanical component with internal features and a numbered label (7), no readable text or symbols present.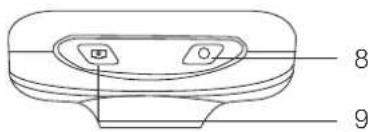
Användning
Ladda batteriet:
- Copyright
- Statement
- A NOTE ABOUT RECYCLING
- ANGÄENDE ÅTERVINNING
- Including:
- Operation
- Charge The Battery:
- Use of Micro SD Card:
- Startup/Shutdown:
- Function Modes:
- Indicator Light:
- Video Recording Mode:
- Icons During The Different Modes:
- Icons During Playback Mode:
- Vehicle Mode:
- Move Files To a Computer:
- Mounting the Helmet Mount:
- Mounting the Bar Mount:
- Maintenance Safety Instructions
- Delar
- Användning
- Ladda batteriet:
Brand : Andersson
Model : AND 1.0
Category : Action Camera