MAP 3.0 - Media player Andersson - Free user manual and instructions
Find the device manual for free MAP 3.0 Andersson in PDF.


| Product Type | Media Player |
| Brand | Andersson |
| Model | MAP 3.0 |
| Dimensions (approx.) | 12 x 8 x 3 cm |
| Weight (approx.) | 200 g |
| Power Supply | DC 5V, 2A |
| Video Output | HDMI 1.4 up to 4K@30fps |
| Audio Output | HDMI, Optical, RCA |
| Supported Video Formats | MP4, MKV, AVI, MOV, etc. |
| Supported Audio Formats | MP3, FLAC, WAV, AAC |
| Supported Image Formats | JPEG, PNG, BMP |
| Storage Expansion | USB 2.0, SD Card |
| Media Playback | From USB drive, SD card, or internal memory |
| Remote Control | Included with battery |
| Maintenance | Clean with soft dry cloth; avoid liquids |
| Safety | Keep away from water and heat sources |
| Spare Parts | Remote control available |
Frequently Asked Questions - MAP 3.0 Andersson
User questions about MAP 3.0 Andersson
0 question about this device. Answer the ones you know or ask your own.
Ask a new question about this device
Download the instructions for your Media player in PDF format for free! Find your manual MAP 3.0 - Andersson and take your electronic device back in hand. On this page are published all the documents necessary for the use of your device. MAP 3.0 by Andersson.
USER MANUAL MAP 3.0 Andersson
MAP 3.0 | Media player

natural_image
Black electronic device with digital display showing 'andersson' and time reading '00:00:00', no readable text beyond brandingUser Manual
English | Svenska | Norsk
Copyright
This manual is the copyright of CI no 556520-4137. No part of this manual may be revised, copied or transmitted in any way without written permission from CI no 556520-4137.
Statement
This manual does not provide any warranty or related declarations. All information in this manual including the product specification, pictures and literatures is just for reference, CI no 556520-4137 reserves the rights to update contents of this manual without further notice.
Copyright
A NOTE ABOUT RECYCLING
This product's packaging materials are recyclable and can be reused. This product and the accessories packed together are the applicable product to the WEEE directive except batteries. Please dispose of any materials in accordance with your local recycling regulations. When discarding the unit, comply with your local rules or regulations. Batteries should never be thrown away or incinerated but disposed of in accordance with your local regulations concerning chemical wastes.


ANGÄENDE ÅTERVINNING
Chapter 1: Safety instructions 4
Chapter 2: Product components 5
Chapter 3: Remote Control 6
Chapter 4: Connections 7
Chapter 5: First time use 8
Chapter 6: Changing System Settings 9
Chapter 7: Changing Audio Settings 10
Chapter 8: Changing Video Settings 11
Chapter 9: Network 12-13
Chapter 10: Miscellaneous 14
Chapter 11: Movie Library 15-16
Chapter 12: Music Library 17
Chapter 13: Photo Library 18
Chapter 14: File Manager 19-20
Chapter 15: Playlist Management 21
Chapter 16: Apps 22
Chapter 17: OI File Manager 23
Chapter 18: Web Management 24
Chapter 19: Specifications 25
Chapter 1: Safety instructions
When placing the adapter cable, make sure it will not get damaged or be subject to pressure.
To reduce the risk of electric shock, unplug the adapter first before cleaning it. Never connect the adapter to the player in a humid or dusty area. Do not let the player come into contact with water or other liquid.
If not properly shielded, almost all electronic devices will get radio interference. Under some conditions, your player might get interference.
If the player has a problem, you should take it to an appointed repair center and let the specialists do the repair. Never repair the player yourself as you might damage the player or endanger yourself or your data.
When you dispose of the player, be sure to dispose of it appropriately. Some countries may regulate disposal of electrical devices, please consult with your local authority.
All data stored in the player may be lost due to physical impact, electrical shock, power lost, HDD format etc.
Regularly backup the data in the hard disk so that it can be recovered in the event of data corruption or loss. Our company takes no responsibility for loss of data stored on the hard disk.
Chapter 2: Product components
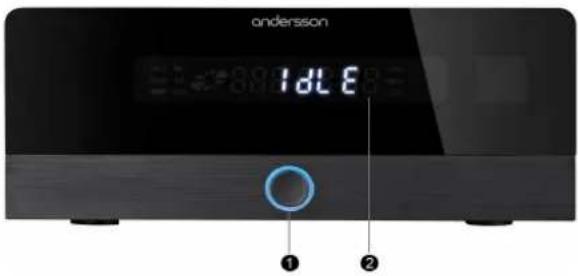
- Power button and indicator
- LED display screen

natural_image
Back panel of a computer monitor with labeled ports (no text or symbols visible)- Memory Card slot
- 4x USB HOST port
- 1x USB 3.0 PC

- Video/L/R OUT jack
- HDMI 1.4 jack
- S/PDIF Optical jack
- 1000M LAN socket
- DC-IN Jacket
- Reset hole
Chapter 3: Remote Control
- Power: Press to enter standby mode or wake up.
- Eject: Press to safely remove the USB device.
- Mute: Press to mute audio output and to resume.
- Audio: Press to select an audio track.
- TV mode: Press to switch between NTSC, PAL, 480P, 576P, 720P, 1080I, and 1080P.
- Setup: Press to enter the setup menu.
- Subtitle: Press to set subtitle options.
- 16:9: Press to switch between 16:9, 4:3, 16:10
- Numeric buttons: Press to enter channel numbers or numeric input when changing settings.
- Menu: Press to enable the option menu, where you can change the review mode of file manager and media library; press to display or hide the option menu during playback.
- Title: Press to go back to title.
- Home: Press to enter the home screen.
- Return: Press to return to the previous screen.
-
Navigational buttons: Press the arrow buttons to select menu options, and the OK button to confirm.
-
OK: Press OK button to confirm.
- Info: Press to display current status. During playback an on-screen display appears showing track number and time elapsed/remaining.
- Time seek: Press to jump to a specific point on a title. Specify the point using Title, Chapter and Time.
- VOL+/- : Press to increase or decrease player volume.
- Prev: Next: Press to view the previous/ next file and page up/down.
- REV: Press to fast rewind the current playback. Press repeatedly to select speeds.
- Stop: Press to stop playback.
- FWD: Press to fast forward the current playback. Press repeatedly to select speeds.
- Repeat: Press to set repeat option.
- Play/Pause: Press to begin playback or pause playback
- Slow: Press to play in slow motion. Press the PLAY button to resume regular playback.
- Zoom: Press to zoom the image (photo or video).
Chapter 4: Connections
Power connection
-
Connect the AC adaptor to the player's DC IN jack.
-
Plug in the AC adaptor to the power outlet.
USB 3.0 PC Connection
-
Make sure the player is powered on.
-
Connect the device to a PC with the USB 3.0 cable.
USB Mass Storage Device Connection
-
Make sure the player is powered on.
-
Plug in the USB stick or USB HDD to one of the USB ports of this player.
Connecting a Memory Card
Insert the memory card into the card slot properly.
TV connections
- A/V OUT
-
Plug in the 3 colour cable to the player's "video/L/R" jack.
-
Plug in the 3 color cable to the TV's A/V IN jack.
- HDMI OUT
Plug your HDMI cable to the player's and TV's HDMI jack.
Digital Audio Device connection
- Plug in the Toslink cable to the player's S/PDIF Optical jack (optical cable not supplied).
- Plug in the other end on to the digital audio device.
Connecting to the Internet
- LAN (Local Area Network)
- Connect a network cable to the player's RJ45 LAN socket.
- Connect the other end to a RJ45 LAN port on your router, switch or hub device.
- WLAN (Wireless LAN)
- Make sure the player is powered on.
- Plug the Wireless LAN USB Adapter (i.e. Wi-Fi USB Dongle) to the USB HOST port of the player.
Chapter 5: First time use
Power On / Off
- Power On
After connecting the DC IN jack, the indicator on the front panel will gradually turn to blue, and the LED display screen will turn white. The player will also enter the home screen.
- Power Off
Press the power button on the front panel, the player will turn off. The power indicator will turn to red. Unplug the power cord to cut off the power supply.
Menu language
The system language of this player can be set to English or other languages. Change the language in the setup menu, the selected language will take effect immediately.
HDD Format
- Access the menu via Setup->System-> Format menu.
- Select OK on the Warning page, press OK to confirm.
- Select Format, press OK, and the format will start.
The formatting procedure takes a few minutes. The format will remove all data stored. Please backup your data in advance!
Chapter 6: Changing System Settings
Use this menu to configure system settings.
- Menu Language
Select to choose the OSD (On-Screen Display) language.
- Text Encoding
Select to set the text encoding option (subtitle display).
- Time
Setting the player system time.
- R/RW Auto-Play
Select to turn on/off DVD auto-play.
- Screen Saver
- Timing
Select to change timing of screen saver.
- Options
Select to change screen saver picture.
- DLNA DMR
Digital Media Renderer, can play content received from a digital media controller (DMC), which will find content from a
digital media server (DMS)
- Device Name
Select to name DLNA DMR.
- Mini KBD Language
Select to change the language of the mini keyboard.
- Scan storage
Select to set the scan mode of media library.
- Resume Play
Select to turn on / off resume playback (auto-bookmarking) feature for movies.
- Format
Select to format your HDD.
- BD Menu
Select to turn on/off BD menu.
- Factory Default
Select to restore factory defaults.
Chapter 7: Changing Audio Settings
Use this menu to configure audio settings.
- Night Mode
Choose among Off / On / Comfort. If the option is turned on, the audio output volume will be decreased to make you more comfortable.
- HDMI Output
Choose among LPCM and RAW.
- SPDIF Output
Choose among LPCM and RAW.
- Surround Sound
Choose among Don't care, AC3 and TrueHD.
- Lip Sync
Choose among Lip sync (Auto), Lip sync (Manual) and Off.
Chapter 8: Changing Video Settings
Use this menu to configure video settings.
1. Aspect Ratio
- Pan Scan 4:3: Displays a wide picture on the entire screen and cuts off the redundant portions. Select when a standard 4:3 TV is connected.
- Letter Box 4:3: Displays a wide picture with two black borders on the top and bottom of 4:3 screen. Select when a standard 4:3 TV is connected.
- 16:9: Compresses to convert the whole image. Select when a 16:9 TV is connected.
- 16:10: Select when a 16:10 TV is connected.
2. TV SYSTEM
Select to adjust TV Type and video output resolution. This setting depends on your regional location. Includes:
- NTSC – United States, Canada, Japan, Mexico, the Philippines, South Korea, and Taiwan.
- PAL – Europe, Greenland, parts of Africa and South America, the Mideast, China, India, Australia, and Indonesia.
- HDMI Auto/ 480P/576P/720P 60Hz/ 1080i 50Hz/1080i 60Hz/1080P 50Hz/1080P 60Hz
3. Video Zoom
Adjust the video output size according to the size of TV screen. Press the Zoom button to Fit the screen size you have set during video playback.
4. 1080p 24Hz
Choose this option to enable or disable 1080P 24HZ support. A TV set with 1080P 24HZ (24P) mode is needed.
5. Deep Color
Help to perform more detailed level of color depth, make continuous color change smoother. You can get more vivid color effects. A TV set with deep color support is needed.
Chapter 9: Network
Use this menu to configure your local network settings.
- Wired Lan Setup
- DHCP IP (AUTO)
Select to obtain IP address automatically (DHCP must be enabled on your Router).
- FIX IP (MANUAL)
Select to manually input the IP Address, Subnet Mask, Default Gateway, and DNS Server IP Address.
- Wireless Setup
There are 3 modes for you to select, Infrastructure (AP), Peer to Peer (Ad Hoc) and WPS (AP) mode. Follow the prompting message on the screen and press OK to choose Infrastructure (AP), press Red button to choose Peer to Peer (Ad Hoc) or WPS (AP) mode.
This player can store up to three wireless network connections. Press OK to connect AP, press Return to cancel, press Zoom to rescan the AP's and press OK to choose Peer to Peer (Ad Hoc) or WPS (AP).
- Infrastructure (AP)
Infrastructure mode is used to connect computers with wireless network adapters. Please take the following steps to configure your wireless network.
Step 1. Scanning AP (Access Point) in your network.
Follow the prompting message on the screen and press the Zoom button to select Infrastructure (AP) mode and update the access points list, and all SSID will be displayed on the screen.
Step 2. Input WEP / WPA key.
Select one of the wireless networks from the AP list. Press OK and then input the encryption keys via the virtual keyboard. Press the navigational buttons to select, OK to input, FFWD to move cursor left, FRWD to move cursor right, Zoom to switch between uppercase and lowercase, Stop to delete a character, Green to change the language of the virtual keyboard, and OK to confirm and to start testing the connection.
The testing process will take a while, please be patient. If the test is ok, the network information (Profile Name, IP address, Subnet Mask, Gateway, etc.) will be displayed on the screen.
Chapter 9: Network
4. Peer to Peer (Ad Hoc)
Peer to Peer mode, which is also called Ad Hoc mode or computer-to-computer mode, is used to connect wireless clients directly together, without the need for a wireless router or access point.
Step 1. Specify your SSID name.
Step 2. Specify your host IP.
5. WPS (AP)
WPS, Wi-Fi Protected Setup, is used to connect a wireless router directly. In this mode, you just need to configure the parameters of your router that support WPS function. There are two modes for you to select, PBC mode and PIN mode.
6. PBC
First press the WPS button on the router or select the button mode in the configuration menu of the router, then select the PBC mode, the connection process will take a while.
7.PN
Input the pin code when you configure your router, then select the PIN mode, the connection process will take a while.
8. PPPOE Setup
Input the ADSL account and password in this menu. The system will obtain the IP address automatically from the server based on PPPOE protocol.
Step 1. Select the connection interface, wired or wireless.
Step 2. Press NEXT button to input your ADSL account.
Step 3. Press NEXT button to input your password and start to test the connection.
9. BT
Select to turn BitTorrent download to On/Off.
10. SAMBA
Select to turn NAS function to On/Off.
11. BT & Samba Security
Select to turn on/off configuring your desired login User Name and Password.
Chapter 10: Miscellaneous
Use this menu to adjust miscellaneous settings.
- Version Info
This tab shows you information about the software version installed and the material components of your player.
- Network Info
This tab shows you information about your network, MAC Address, IP address Gateway, Subnet.
- USB Upgrade
Select to update the firmware via a USB stick.
- Key Tone Volume
Select the key tone volume: Off, 1, 2, 3, 4, or 5.
- Weather city
Show the information about the showed weather city.
The Settings for weather city:
Step 1. Connect to internet via wire network or wireless network.
Step 2. Go to the "Premium Apps" menu on the User interface, find the application "Accu weather.com"
Step 3. Under the navigator "LOCATION/SETTINGS", select the option "Select Location", input the city name on text box for searching.
Chapter 11: Movie Library
Movie Library Options
In movie library, press the Menu button to display the option menu, the following functions are available through the option menu:
1. Search
Choose the Search option in the option menu, you can search for a media file by filter media library.
2. Review Mode
Choose a review mode among Thumbnails, List and Preview from the option menu.
3. All Movies
Choose to display all movie files stored in HDD, USB device and SD memory card in the media library.
4. Video Files
Sorting and Showing the Video files.
5. BD/DVD
Choose to display DVD IFO, BD MV and ISO files in the library.
6. Flash Animation
Choose to display .swf file format in media library.
7. Go to Folder
Choose to locate the file in file manager.
8. Sorting Mode
Choose to sort by Name, Size, Most Viewed or Recently Added from option menu.
Chapter 11: Movie Library
Movie Playback Control
You can access the following functions during playback:
Play: Start or resume the playback.
Pause: Pause the current playback.
Prev/Next: View the previous or next file/chapter.
FRWD/FFWD: Fast rewind or fast forward. Press repeatedly to select the speed.
Slow: Play back in slow motion.
Time seek: Jump to a specific point on a title. Specify the point using Title, Chapter and Time.
Menu: Display or hide the option menu during playback.
Stop: Stop playback.
VOL+/-: Increase/decrease the volume.
Audio: Select an audio track.
Subtitle: Select a subtitle and change the color/size/offset/text encoding of subtitle.
Repeat: Set the repeat option.
Zoom: Zoom in the image.
Info: View the media information.
Replay: Press to rewind 10 seconds of the current playback
Movie Playback Options
During movie playback, press Menu to display or hide the option menu at the side of the screen. You can also access functions such as audio track, subtitle and repeat mode through the Option Menu during video playback.
1. GOTO
Select to jump to a specific point on a title. Specify the point using Title, Chapter and Time.
2. Convert 2D to 3D
Select the showing type of 3D, including 3D simulation, 3D side By Side, 3D Top Bottom.
3. Video Setting
Select to adjust the value of Brightness, Contrast, Saturation and Hue.
Chapter 12: Music Library
Music Library Options
In music library, press the Menu button to display the option menu, the following functions are available through the option menu:
1. Quick-Search
Choose the Search option in the option menu, you can search by filter music library to locate the specific music.
2. Review Mode
Choose a review mode among Thumbnails, List and Preview from the option menu.
3. Filter options
- Choose Albums to search for music files by album.
- Choose Artists to search for music files by artist.
- Choose Genres to search for music files by genre.
- Choose Years to search for music files by year.
- Choose Playlists to search for playlists.
4. Go to Folder
Choose to locate the file in the file manager.
5. Sorting Mode
Sort your music by Name, Recently Added or Recently Played from the option menu.
Music Playback Control
You can access the following functions:
Play/Pause: Begin/Pause playback.
FRWD / FFWD: Fast rewind or fast forward. Press repeatedly to select the speed.
Prev / Next: View the previous or next movie.
Menu: Display or hide the option menu during playback.
VOL+/-: Increase/Decrease the volume.
Repeat: Set the repeat option.
Music Playback Options
During music playback, press the Menu button to display or hide the option menu at the side of the screen. Access the following functions through the Option menu during music playback.
1. Repeat Mode
Choose a repeat mode among Repeat off, Repeat one, Repeat all and Shuffle Loop from option menu.
Chapter 13: Photo Library
Photo Library Options
In photo library, press the Menu button to display the option menu, you can access the following functions:
- Review Mode
Choose a review mode among Thumbnails, List and Preview.
- Leaf Folder View
Choose to show all folders that included photo.
- Date View
Choose to view photo by date.
- Sorting Mode
Choose to sort by Name, Recently Added or Recently Played.
Photo Playback Control
You can access the following functions:
Prev / Next: View the previous or next photo.
Up / Down: Rotate a photo in any angle.
Menu: View the previous or next file/chapter.
Stop: Stop playback.
Zoom: Zoom in on the image.
Info: Display picture information
Photo Playback Options
During photo playback, press the Menu button to display or hide the option menu at the bottom of the screen. The following functions are available:
- Slide Timing
Select to choose the Interval and start a slideshow.
- Slide Transition
Select to choose the Transition effects.
- Repeat Mode
Choose a repeat mode among Repeat off, Repeat all and Shuffle Loop from option menu.
- Select Music
Select to turn on/off background music during slideshow.
- Video Setting
Select to adjust the value of Brightness, Contrast, Saturation and Hue.
Chapter 14: File Manager
The file manager allows you to browse and play music, photo and movie files stored in the internal HDD, external USB device, memory card and network.
File Manager Options
In file manager, press Menu to display the option menu and access the following functions:
1. Review Mode
Choose a review mode among Thumbnails, List and Preview from option menu.
2. Add to Favorites
Build a short-cut in the favorite menu, which makes it convenient to open the files directly.
3. Sort model
Sort files by name or date.
4. Filter options
- Choose All Media to display all the supported media files in current directory.
- Choose Movies to display all the the supported video files
in current directory.
- Choose Photos to display all the supported image files in the current directory.
- Choose Music to display all the supported audio files in the current directory.
A/V Streaming via Network
You can stream your media files shared on the home network. There are two ways to locate media files shared on your local network in the Network menu:
1. Browsing through workgroup
You can choose the workgroup which your PC belongs to from the workgroup list, find your PC name, and press the OK button to confirm. Then you can select and play the shared media files that you want to browse.
Note: Due to different network conditions, sometimes the workgroup might not be accessed or shown in the list. Then you need to use 'My Shortcuts' to browse shared files.
2. Browsing through 'My Shortcuts'
You can set 'Specific File Server IP' and access it from 'My
Chapter 14: File Manager
Shortcuts' in the menu. Select "My_Shortcuts" and press OK button. Press the RED button and a pop-up menu appears.
- Select Add to open a popup menu where you can input Label, Net User ID, Net Password, Domain, Host Name, and Specific File Server IP. Select OK to confirm, Cancel to cancel, and Simple/Detail to switch between simple and advanced options.
- Select the shortcut you added and press the OK button to confirm. Then you can select and play the shared media files on the destination computer.
A/V Streaming via UPnP-server
A built-in UPnP (Universal Plug and Play) client has been integrated on the system, which enables the player to autodetect UPnP Media Servers on the network to browse and stream media files from them.
Installing UPnP Media Server on your PC
There are a lot of free and commercial UPnP Media Server software, such as Windows Media Connect, Windows Media Player 11, XBMC Media Center (Linux/Mac/Windows), MediaTomb (Linux), etc. Please install one of them on your computer.
Sharing Media on your PC
The Media Sharing feature of Windows Media Player lets you enjoy the contents of your library anywhere in your home.
Step 1. Open Windows Media Player, click Organize -> Manage libearies to add or remove media files from the library. Step 2. Click Stream -> More streaming options, then you can allow or deny devices to access the media library. Click Allow to authorize your player.
Streaming Media on your Player
Step 1. Connect your player to the home network. Step 2. Visit File Manager -> UPnP menu on the player, select the UPnP-server, and press OK.
Note: Firewalls may prevent your player communicating with your computer. Please open manually and add your player to the 'trusted' list, or disable the firewall temporarily.
Chapter 15: Playlist Management
The playlist management allows you to browse and play music and photo files stored in the internal HDD, external USB device, memory card and network.
Music playlist
To create a playlist you can browse your music files via the file manager. Press the Green Button on one of your music files and select 'Multiple Select'. Add the files you wish, press the Green Button again and choose 'Save Playlist'.
Enter music library, press Menu and choose Playlists to show your music play-lists available on your external USB devices and internal HDD.
Photo Album
To create a photo album you can browse your photo files via the file manager. Press the Green Button on one of your photo files and select 'Multiple Select'. Add the files you wish, press the Green Button again and choose 'Save Photo Album'. Enter photo library, press Menu button and choose Albums to show your photo albums available on your external USB devices and internal HDD.
Copy Function under File Manager
Step 1. You can browse your photo, music and movie files via the file manager, select the file you want to copy, press Green button to enter file editing menu.
Step 2: Press Copy and Select destination, and then follow the prompt on screen to finish the copy process.
Favorites
In the menu, you could open directly files after you operate "add Favorite" from HDD or USB devices like the shortcut.
Chapter 16: Apps
Premium Apps
This feature is an additional function. All content and services provided through this feature are from third-party service providers, our company does not offer any content and services of this feature and therefore is not responsible for any content and services provided under this feature.
Our company is not responsible for any operational stability of the content and services, for example, if you cannot access a certain website for video streaming or news broadcast, or the content of a website has been changed etc, the third party service provider controls and is responsible for this.
We do not offer call center or inhouse service on functions that are related to Apps.
Android Apps
The device is double-system HD media player, apart from the Linux system, you also could access to the Android system via the "Android Apps" menu.
1. Settings
- Location & security
Set your typed password visible or invisible via clicking the column "Visible passwords".
- Applications
Show the application information about the current Android system.
- SD card & storage settings
- Setting the system Language
Select the option "Language & Keyboard", go into the language setting window. And choose one language among the language list, and press OK.
2. Browser
When the LAN network is connected, you can use the media player box for browsing the internet web-pages easily.
Chapter 17: OI File Manager
In the menu, you could install some APK applications which saved in USB or SD card, and you also could playback the media files directly.
- Install the application "OI file manager EULA"
When you open the new device, please directly install the application "OI file manager EULA" as below step:
Step 1. Click the icon "OI file manager" on Android user interface.
Step 2. Follow the instructions on the screen.
Install the application from USB disk or SD card
Step 1. Under the Android system, go into the menu "OI File manager". Choose the icon "mnt", and click "usbmounts" option, find the APK you want to install.
Step 2. Click the APK, and press "Install" until being finished automatically.
Uninstall APK on the Android system.
Step 1. Under the android System, go into the menu "Settings" and choose the option "Applications".
Step 2. Click the option "Manage applications", and choose and click the apk you want to uninstall
Step 3. Uninstall it as per the dialogue window.
Chapter 18: Web Management
Web Management
The player has its own web management that can also be used to view the content of your hard disk, adding torrent and more. To use this feature the Media player must be connected to the same network as your PC via Wired Ethernet Cable or Wireless USB Dongle, you can access the Web Management through your PC web browser.
Step 1. Go to the player Setup browse for Network and turn ON BT and Samba services.
Step 2. Check your player IP Address, Go to the player Setup select Misc.-->Network info.
Step 3. Browse for Network info then press OK, your IP Address will show.
Step 4. Open your computer web explorer and Key-in http://IPaddress (ex. http://192.xxx.xx.x/unicgi), after keying press enter and it will display the player Web Management.
Knowing more about Web Management
NAS (SAMBA-FILE TRANSMISSION)
In Neighbor Web, via SAMBA function you can edit files (delete, copy, rename) between internal HDD, USB device, SD card and network. Select "visit neighbour" to enter SAMBA menu.
BitTorrent
You can use the player Neighbour Web function to add a torrent file.
Step 1. Open a web browser from your PC and browse for any torrent sites.
Step 2. Select/Choose the file you wanted to download on the Torrent website and save it anywhere on your PC. The file must have (.torrent) as extension.
Step 3. On Neighbour Web select "BT Torrent Download" and "Add New torrent".
Step 4. Select choose and browse for the torrent file (.torrent) you previously saved. Click YES and it will add and download the torrent file.
After adding, the window will go back to the main BitTorrent page and you can see the added file is starting to download.
Please be aware that the downloading speed will depend on the Seeds, Peers and the speed of your service provider.
Chapter 19: Specifications
I/O interfaces supported:
- Gigabit Network
- 3.5" SATA HDD
- USB 3.0 Device port (compatible to USB 2.0)
- 2x USB 2.0 HOST port (compatible to USB 1.1)
- Memory Card slot (supports SD/MMC)
- Composite (CVBS) A/V jack
- Component Y/Pb/Pr jack
- HDMI V1.4 interface
- S/PDIF Optical jack
- DC-IN 12V 2A
Network feature:
- 10/100/1000Mbps Auto-Negotiation Ethernet
- 802.11b/g/n WLAN, up to 150M or 300Mbps (supported by optional WLAN USB Adapter)
File system supported:
Content formats supported:
- ASF/AVI/BD-ISO/DAT/DVD-ISO/FLV/IFO/MPG/MP4/M2TS/MKV/MOV/M4V/TP/TS/TRP/MMV/VOB/RM/RMVB.
- AAC/APE/LC-AAC/HE-AAC/MP2/MP3/FLAC/WAV/MS-ADPCM/OGG Vorbis/PCM/LPCM/ COOK/RA-Lossless/WMA Standard (DRM, and Advanced Profile not supported) - JPEG/HD JPEG/BMP/GIF/TIF/PNG
Video codecs supported:
- MPEG-1/MPEG-2/MPEG-4SP/ASP/AVC/H.264/x264/XviD/DivX/WMV9 (VC-1)/ RealNet-works (RM/RMVB) 8/9/10, up to 720p
Audio output supported:
- Pass-through & down-mix to stereo:
- Dolby Digital AC3 5.1,
- Dolby Digital Plus 5.1/7.1
- Dolby TrueHD 5.1/7.1
- DTS Digital Surround 5.1
- Core DTS 5.1 pass-through & down-mix to stereo:
- DTS-HD High Resolution 5.1/7.1
- DTS-HD Master Audio 5.1/7.1
- Multi-channel pass-through & down-mix to stereo:
- AAC 5.1/7.1
-FLAC5.1/7.1
natural_image
Back view of a black electronic device with four ports and a blue button, labeled 1, 2, and 3 (no text or symbols on the device itself)- WLAN (Wireless LAN)
4. Peer to Peer (Ad Hoc)
Installera programmet "OI file manager EULA"
- WLAN (Wireless LAN)
- Kontroller at spilleren er slått på.
- Koble den trådløse LAN USB adapteren (dvs. Wi-Fi USB dongle) til USB port på spilleren.
digital media server (DMS)
- Enhetsnavnet
Velg for å nevne DLNA DMR.
4. Peer to Peer (Ad Hoc)
Innstillinger for Weather City:
Slow: Spille i slow motion.
Installer programmet "OI filemanager EULA"
- Copyright
- Statement
- A NOTE ABOUT RECYCLING
- ANGÄENDE ÅTERVINNING
- Chapter 1: Safety instructions
- Chapter 2: Product components
- Chapter 3: Remote Control
- Chapter 4: Connections
- Power connection
- USB 3.0 PC Connection
- USB Mass Storage Device Connection
- Connecting a Memory Card
- TV connections
- Digital Audio Device connection
- Connecting to the Internet
- Chapter 5: First time use
- Power On / Off
- Menu language
- HDD Format
- Chapter 6: Changing System Settings
- Chapter 7: Changing Audio Settings
- Chapter 8: Changing Video Settings
- Aspect Ratio
- TV SYSTEM
- Video Zoom
- 1080p 24Hz
- Deep Color
- Chapter 9: Network
- Peer to Peer (Ad Hoc)
- WPS (AP)
- PBC
- 7.PN
- PPPOE Setup
- BT
- SAMBA
- BT & Samba Security
- Chapter 10: Miscellaneous
- Chapter 11: Movie Library
- Movie Library Options
- Search
- Review Mode
- All Movies
- Video Files
- BD/DVD
- Flash Animation
- Go to Folder
- Sorting Mode
- Movie Playback Control
- Movie Playback Options
- GOTO
- Convert 2D to 3D
- Video Setting
- Chapter 12: Music Library
- Music Library Options
- Quick-Search
- Filter options
- Go to Folder
- Sorting Mode
- Music Playback Control
- Music Playback Options
- Repeat Mode
- Chapter 13: Photo Library
- Photo Library Options
- Photo Playback Control
- Photo Playback Options
- Chapter 14: File Manager
- File Manager Options
- Review Mode
- Add to Favorites
- Sort model
- Filter options
- A/V Streaming via Network
- Browsing through workgroup
- Browsing through 'My Shortcuts'
- A/V Streaming via UPnP-server
- Installing UPnP Media Server on your PC
- Sharing Media on your PC
- Streaming Media on your Player
- Chapter 15: Playlist Management
- Music playlist
- Photo Album
- Copy Function under File Manager
- Favorites
- Chapter 16: Apps
- Premium Apps
- Android Apps
- Settings
- - Applications
- - SD card & storage settings
- Browser
- Chapter 17: OI File Manager
- Install the application from USB disk or SD card
- Uninstall APK on the Android system.
- Chapter 18: Web Management
- Web Management
- Knowing more about Web Management
- BitTorrent
- Chapter 19: Specifications
- I/O interfaces supported:
- Network feature:
- File system supported:
- Content formats supported:
- Video codecs supported:
- Audio output supported:
- - WLAN (Wireless LAN)
- Installera programmet "OI file manager EULA"
- Installer programmet "OI filemanager EULA"
Brand : Andersson
Model : MAP 3.0
Category : Media player