
WD-65734 - TV MITSUBISHI - Free user manual and instructions
Find the device manual for free WD-65734 MITSUBISHI in PDF.


| Brand | Mitsubishi |
| Model | WD-65734 |
| Product Type | DLP Projection Television |
| Display Technology | 1080p High-Definition DLP™ Display System |
| Screen Size | 65 inches (diagonal) |
| Aspect Ratio | 16:9 Widescreen |
| Resolution | 1920 x 1080p |
| Integrated Tuner | ATSC / QAM (HDTV and digital cable, non-scrambled) |
| Video Inputs | Component (Y Pb Pr), S-Video, Composite, HDMI (1.3), DVI (via adapter) |
| HDMI Inputs | 4 (Y and 734 series models include front HDMI) |
| Audio Outputs | Digital Audio Out (coaxial), Analog AVR Audio Output |
| NetCommand | IR Learning and HDMI-CEC control (Y and 734 series only) |
| Other Features | ChannelView™ channel listings, Sleep Timer, Favorites, Parental Lock, Easy Connect Auto Input Sensing |
| Lamp Type | Replacement lamp part number 915P061010 |
| Power Consumption (Typical) | Approximately 250W (estimated based on similar models) |
| Weight (approximate) | Heavy; requires two adults to lift |
| Cleaning Precautions | Do not use ammonia, bleach, alcohol, benzene, or thinners. Use soft, damp cloth. |
| Stand Compatibility | Mitsubishi MB-65PB (for WD-65734) |
| Warranty (Parts/Labor) | 1 year parts and labor (lamp 1 year, screen 30 days) |
| User Manual | Owner's Guide included (84 pages) |
Frequently Asked Questions - WD-65734 MITSUBISHI
User questions about WD-65734 MITSUBISHI
0 question about this device. Answer the ones you know or ask your own.
Ask a new question about this device
Download the instructions for your TV in PDF format for free! Find your manual WD-65734 - MITSUBISHI and take your electronic device back in hand. On this page are published all the documents necessary for the use of your device. WD-65734 by MITSUBISHI.
USER MANUAL WD-65734 MITSUBISHI
WD-57733, WD-65733, WD-73733
734 Series
WD-57734, WD-65734, WD-73734
OWNER'S GUIDE
- For questions:
- Visit our website at www.mitsubishi-tv.com.
- E-mail us at MDEAservice@mdea.com.
-
Call Consumer Relations at 800-332-2119.
-
For information on System Reset, please see the back cover.
- To order replacement or additional remote controls, lamp cartridges, or Owner's Guides, visit our website at www.mitsuparts.com or call 800-553-7278.
• Guidelines for setting up and using your new widescreen TV start on page 11.

x.v.Color

HIGH DEFINITION MULTIMEDIA INTERFACE

TEXAS INSTRUMENTS

For Your Records
Record the model number, serial number, and purchase date of your TV. The model and serial numbers are on the back of the TV. Refer to this page when requesting assistance with the TV.
MODEL NUMBER
SERIAL NUMBER ____
PURCHASE DATE ____
RETAILER NAME ____
LOCATION ____
CAUTION
RISK OF ELECTRIC SHOCK DO NOT OPEN

CAUTION: TO REDUCE THE RISK OF ELECTRIC SHOCK, DO NOT REMOVE COVER (OR BACK). NO USER SERVICEABLE PARTS INSIDE. REFER SERVICING TO QUALIFIED SERVICE PERSONNEL.
The lightning flash with arrowhead symbol within an equilateral triangle is intended to alert the user of the presence of uninsulated “dangerous voltage” within the product’s enclosure that may be of sufficient magnitude to constitute a risk of electric shock to persons.

The exclamation point within an equilateral triangle is intended to alert the user to the presence of important operating and maintenance (servicing) instructions in the literature accompanying the product.
WARNING: TO REDUCE THE RISK OF FIRE OR ELECTRIC SHOCK, DO NOT EXPOSE THIS APPLIANCE TO RAIN OR MOISTURE.
TV WEIGHT: This TV is heavy! Exercise extreme care when lifting or moving it. Lift or move the TV with a minimum of two adults. To prevent damage to the TV, avoid jarring or moving it while it is turned on. Always power off your TV, unplug the power cord, and disconnect all cables before moving it.
WARNING: This product contains chemicals known to the State of California to cause cancer and/or birth defects or other reproductive harm.
FCC Declaration of Conformity
Product: Projection Television Receiver
Models: WD-C657
WD-57733, WD-65733, WD-73733
WD-Y577, WD-Y657
WD-57734, WD-65734, WD-73734
Responsible Mitsubishi Digital Electronics
Party: America, Inc.
9351 Jeronimo Road
Irvine, CA 92618-1904
Telephone: (800) 332-2119
This device complies with Part 15 of the FCC Rules. Operation is subject to the following two conditions:
(1) This device may not cause harmful interference, and
(2) this device must accept any interference received, including interference that may cause undesired operation.
Note: This equipment has been tested and found to comply with the limits for a Class B digital device, pursuant to part 15 of the FCC Rules. These limits are designed to provide reasonable protection against harmful interference in a residential installation. This equipment generates, uses and can radiate radio frequency energy and, if not installed and used in accordance with the instructions, may cause harmful interference to radio communications. However, there is no guarantee that interference will not occur in a particular installation. If this equipment does cause harmful interference to radio or television reception, which can be determined by turning the equipment off and on, the user is encouraged to try to correct the interference by one or more of the following measures:
- Reorient or relocate the receiving antenna.
- Increase the separation between the equipment and the receiver.
- Connect the equipment into an outlet on a circuit different from that to which the receiver is connected.
- Consult the dealer or an experienced radio/TV technician for help.
Changes or modifications not expressly approved by Mitsubishi could cause harmful interference and would void the user's authority to operate this equipment.
Contents
Important Information About Your TV
General Warnings and Cautions, Notes on Installation and Operation....4
Important Safeguards 5
1 Television Overview
Package Contents 6
Special Features of Your TV 6
TV Front Panel....7
TV Back Panel....9
2 TV Setup
Guidelines for Setting Up and Using Your New Widescreen TV....11
Installing the Remote Control Batteries ..... 12
When You First Power On the TV 12
Initial TV Setup 12
Setting Up TV Inputs 13
Controlling A/V Receiver Sound Volume ..... 14
Using the TV with a Personal Computer ..... 15
3 TV Connections
Before you Begin 17
HDTV Cable Box or Satellite Receiver with Component Video 17
Standard Cable Box, Satellite Receiver, or Other Device with S-Video....18
HDMI Device (Cable Box, Satellite Receiver, DVD Player, or Other Device) 18
Wall Outlet Cable (no cable box) 19
Antenna with a Single Lead....19
Antennas with Separate UHF and VHF Leads ... 19
DVD Player with Component Video 20
DVI Video Device (Cable Box, Satellite Receiver, DVD Player, or Other Device) 20
VCR to an Antenna or Wall Outlet Cable ..... 21
VCR to a Cable Box (Audio & Video)....22
A/V Receiver (Sound System) 23
Older Cable Box. 23
Camcorder 24
4 TV Operation and Features
Choosing a Viewing Source. 25
Sleep Timer 25
Remote Control 26
ChannelView™ Channel Listings .....27
Status Display 28
FAV (Favorite Channels). 29
TV Signals and Display Formats 30
Viewing Camera Files 32 JPEG Photos and the USB Photo Port 32
Photos and Moving Video as Composite Video. 33
5 TV Menu Settings
Remote Control Keys for the TV Menu System .. 34
Main Menu.... 34
AV Menu 35
Video Menu 36
Audio Menu 37
Captions Menu. 38
Setup Menu.... 39
Inputs Menu. 43
Lock Menu.... 44 Setting or Resetting a Pass Code.... 44
Parent Menu 44
Other Menu (Alternate Rating System) ..... 44
Bypassing TV Locks 44
6 NetCommand
About NetCommand.... 47
IR Emitter Placement (NetCommand®)....48
Initial NetCommand Setup for Most Devices....49
Add or Remove Device Keys from NetCommand Control 49
NetCommand Specialized Device Keys ..... 50
Operating NetCommand-Controlled Devices ... 51
Set Up NetCommand Control of an A/V Receiver 53
Appendices
Appendix A: Specifications. 58
Appendix B: Bypassing the Parental Lock ..... 59
Appendix C: Lamp-Cartridge Replacement and Cleaning 61
Appendix D: Programming the Remote Control . 63
Appendix E: Troubleshooting .....71
Trademark and License Information ..... 77
Mitsubishi TV Software....78
Mitsubishi DLP™ Projection Television Limited
Warranty 79
Index 81
Important Information About Your TV
Installation Notes
Stand Requirement
CAUTION: Use these Mitsubishi TV models only with the Mitsubishi stand models shown here. Other stands can result in instability and possibly cause injury.
| TV Model Stand Model | |
| WD-57733 | MB-57PB |
| WD-Y577 | |
| WD-57734 | |
| WD-65733 | MB-65PB |
| WD-Y657 | |
| WD-65734 | |
| WD-C657 MB-65G | |
| WD-73733 | MB-73PB |
| WD-73734 | |
Custom cabinet installation must allow for proper air circulation around the television.
NOTE TO CATV SYSTEM INSTALLER: THIS
REMINDER IS PROVIDED TO CALL THE CATV SYSTEM INSTALLER'S ATTENTION TO ARTICLE 820-40 OF THE NEC THAT PROVIDES GUIDELINES FOR THE PROPER GROUNDING AND, IN PARTICULAR, SPECIFIES THAT THE CABLE GROUND SHALL BE CONNECTED TO THE GROUNDING SYSTEM OF THE BUILDING, AS CLOSE TO THE POINT OF CABLE ENTRY AS PRACTICAL.
Operating Notes
Internal Fans
Internal cooling fans maintain proper operating temperatures inside the TV. It is normal to hear the fans when you first turn on the TV, during quiet scenes while viewing the TV, and for a short time after turning off the TV.
Lamp Replacement
For lamp-replacement instructions, see Appendix C.
To Order a Replacement Lamp Under Warranty
Call (800) 553-7278. Please have model number, serial number, and TV purchase date available.
Important: All lamps replaced under warranty must be returned to Mitsubishi where they will be inspected for defect verification.
To Purchase a Replacement Lamp After Warranty
Visit our website at www.mitsuparts.com or call (800) 553-7278. Order new lamp part number 915P061010.
Cleaning Recommendations
Normally, light dusting with a dry, non-scratching duster will keep your TV clean. If cleaning beyond this is needed, please use the following guidelines:
First, turn off the TV and unplug the power cord from the power outlet.
Top and Sides of the TV
- Occasionally clean dust build-up from the air-intake grilles on the back and sides of the TV. Clean using a vacuum cleaner with a brush attachment.
- Gently wipe down your TV with a soft, non-abrasive cloth such as cotton flannel or a clean cloth diaper, lightly moistened with water. Dry with a second dry, soft, non-abrasive cloth.
- For oily dirt, add a few drops of mild liquid detergent, such as dishwashing detergent, to the water used to moisten the cloth. Rinse with a second cloth moistened only with water. Dry with a third dry, soft, non-abrasive cloth.
Screen
- Follow the instructions for the top and sides, wiping gently in an up and down motion.
- Clean the entire screen evenly, not just sections of the screen.
- Do not allow liquid to drip down the screen, as some liquid may enter the TV through the gap between the screen and screen frame.
- You may purchase Mitsubishi Screen Cleaner, part number CLEANER-VSS, by calling (800) 553-7278.
General Cleaning Precautions
- DO NOT allow liquid to enter the TV through the ventilation slots or any crevice.
- DO NOT use any strong or abrasive cleaners, as these can scratch the surfaces.
- DO NOT use any cleaners containing ammonia, bleach, alcohol, benzene, or thinners, as these can dull the surfaces.
- DO NOT spray liquids or cleaners directly on the TV's surfaces.
- DO NOT scrub or rub the TV harshly. Wipe it gently.
IMPORTANT
DO NOT use any kind of abrasive cleaner on the surface of the TV screen.
TV Software
Do not attempt to update the software of this TV with software or USB drives not provided by or authorized by Mitsubishi Digital Electronics America, Inc. Non-authorized software may damage the TV and will not be covered by the warranty.
Important Safeguards
Please read the following safeguards for your TV and retain for future reference. Always follow all warnings and instructions marked on the television.
- Read, Retain and Follow All Instructions. Read all safety and operating instructions before operating the TV. Retain the safety and operating instructions for future reference. Follow all operating and use instructions.
- Heed Warnings. Adhere to all warnings on the appliance and in the operating instructions.
- Cleaning. Unplug the TV from the wall outlet before cleaning. Do not use liquid, abrasive or aerosol cleaners. Cleaners can permanently damage the cabinet and screen. Use a lightly dampened cloth for cleaning.
- Attachments and Equipment. Never add any attachments and/or equipment without approval of the manufacturer as such additions may result in the risk of fire, electric shock or other personal injury.
- Water and Moisture. Do not use the TV where contact with or immersion in water is possible. Do not use near bath tubs, wash bowls, kitchen sinks, laundry tubs, in a wet basement, swimming pools, etc.
- Accessories. Do not place the TV on an unstable cart, stand, tripod, or table. The TV may fall, causing serious injury to a child, adult or pet and serious damage to the TV. Use only with a cart, stand, tripod, bracket or table recommended by the manufacturer, or sold with the TV. Any mounting of the TV should follow the manufacturer's instructions, and should use mounting accessories recommended by the manufacturer.
An appliance and cart combination should be moved with care. Quick stops, excessive force, and uneven surfaces may cause the appliance and cart combination to overturn.

- Ventilation. Slots and openings in the cabinet are provided for ventilation and to ensure reliable operation of the TV and to protect it from overheating. Do not block these openings or allow them to be obstructed by placing the TV on a bed, sofa, rug, or other similar surface. Nor should it be placed over a radiator or heat register. If the TV is to be placed in a rack or bookcase, ensure that there is adequate ventilation and that the manufacturer's instructions have been adhered to.
- Power Source. This TV should be operated only from the type of power source indicated on the marking label. If you are not sure of the type of power supplied to your home, consult your appliance dealer or local power company.
- Grounding or Polarization. This TV is equipped with a polarized alternating current line plug having one blade wider than the other. This plug will fit into the power outlet only one way. This is a safety feature. If you are unable to insert the plug fully into the outlet, try reversing the plug. If the plug should still fail to fit, contact your electrician to replace your obsolete outlet. Do not defeat the safety purpose of the polarized plug.
- Power-Cord Protection. Power-supply cords should be routed so that they are not likely to be walked on or pinched by items placed upon or against them, paying particular attention to cords at plugs, convenience receptacles, and the point where they exit from the TV.
- Lightning. For added protection for this TV during a lightning storm, or when it is left unattended and unused for long period of time, unplug it from the wall outlet and disconnect the antenna or cable system. This will prevent damage to the TV due to lightning and power-line surges.
- Power Lines. An outside antenna system should not be located in the vicinity of overhead power lines or other electric light or power circuits, or where it can fall into such power lines or circuits. When installing an outside antenna system, extreme care should be taken to keep from touching such power lines or circuits as contact with them might be fatal.
- Overloading. Do not overload wall outlets and extension cords as this can result in a risk of fire or electric shock.
- Object and Liquid Entry. Never push objects of any kind into this TV through openings as they may touch dangerous voltage points or short-out parts that could result in fire or electric shock. Never spill liquid of any kind on or into the TV.
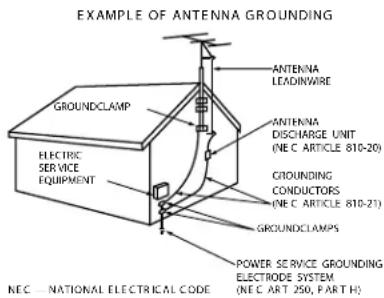
- Outdoor Antenna Grounding. If an outside antenna or cable system is connected to the TV, be sure the antenna or cable system is grounded so as to provide some protection against voltage surges and built-up static charges.
Article 810 of the National Electric Code, ANSI/NFPA No. 70-2002, provides information with respect to proper grounding of the mast and supporting structure, grounding of the lead in wire to an antenna discharge unit, size of grounding conductors, location of antenna discharge unit, connection to grounding electrodes, and requirements for the grounding electrode.
- Servicing. Do not attempt to service this TV yourself as opening or removing covers may expose you to dangerous voltage or other hazards. Refer all servicing to qualified service personnel.
- Damage Requiring Service. Unplug the TV from the wall outlet and refer servicing to qualified service personnel under the following conditions:
(a) When the power-supply cord or plug is damaged.
(b) If liquid has been spilled, or objects have fallen into the TV.
(c) If the TV has been exposed to rain or water.
(d) If the TV does not operate normally by following the operating instructions, adjust only those controls that are covered by the operating instructions as an improper adjustment of other controls may result in damage and will often require extensive work by a qualified technician to restore the TV to its normal operation.
(e) If the TV has been dropped or the cabinet has been damaged.
(f) When the TV exhibits a distinct change in performance - this indicates a need for service.
-
Replacement Parts. When replacement parts are required, be sure the service technician has used replacement parts specified by the manufacturer or have the same characteristics as the original part. Unauthorized substitutions may result in fire, electric shock or other hazards.
-
Safety Check. Upon completion of any service or repair to the TV, ask the service technician to perform safety checks to determine that the TV is in safe operating condition.
-
Heat. The product should be situated away from heat sources such as radiators, heat registers, stoves or other products (including amplifiers) that produce heat.
1
Television Overview
Package Contents
Please take a moment to review the following list of items to ensure that you have received everything.
- Remote Control
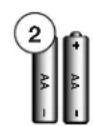
- Two AA Batteries
- Owner's Guide
- Quick Reference Guide
- Quick Connect Guide
- Product Registration Card
- Two-Ended IR Emitter (included with Y series and 734 models only)
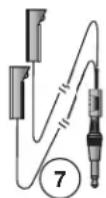
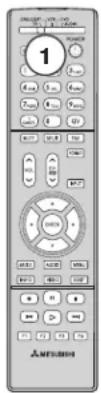
Special Features of Your TV
Your new high-definition widescreen television has many special features that make it the perfect center of your home entertainment system, including:
1080p High-Definition DLP™ Display System
Your Mitsubishi HDTV uses Texas Instruments Digital Light Processing™ technology for rear-projection TVs to create the picture you see on screen. All images are displayed at 1080p. The TV uses Plush 1080p to convert lower-resolution signals to 1080p for display. The TV can also accept 1080p original signals and maintain them at 1080p through all processing until displayed.
16:9 Widescreen Picture Format
Enjoy a full theatrical experience in the comfort of your home. View pictures as film directors intended them. Digital TV broadcasts, DVDs and newer video game consoles support this widescreen format.
Integrated HDTV Tuner
Your widescreen Mitsubishi HDTV has an internal HDTV tuner able to receive both over-the-air HDTV broadcasts (received via an antenna) and non-scrambled digital cable broadcasts, including non-scrambled HDTV cable programming.
High-Definition Video Inputs
◆ Component Video Inputs. Also called Y/Pb/Pr inputs, these inputs receive standard analog video formats of 480i, 480p, 720p, and 1080i high-definition signals. This provides a high level of flexibility when connecting DVD players/recorders, cable boxes, and satellite receivers.
HDMI 1.3 Inputs. These inputs accept digital 480i, 480p, 720p, 1080i, and 1080p video signals plus PCM digital stereo signals. The HDMI inputs can also accept a variety of PC signals and resolutions. Many computer signals are compatible with Deep Color and x.v.Color.
Used with an adapter, these inputs also accept compatible digital DVI video signals. HDMI inputs provide additional high-performance, high-definition connections for maximum flexibility in your choice of home theater products. The HDMI inputs are HDCP copy-protection compatible.
Easy Connect Auto Input Sensing
Easy Connect® automatically recognizes when you plug in an input and prompts you to assign a name to it. The TV ignores any unused inputs, so the result is an uncluttered Input Selection menu where you can easily find and select connected devices by name.
Home Theater Control
NetCommand ^® with IR Learning (Y series and 734 series models only)
Selected Mitsubishi HDTVs offer a new level of networking that seamlessly integrates selected older A/V products with new and future digital products. NetCommand supports IR (infrared) control of products such as VCRs, DVD players, cable boxes, and satellite receivers. NetCommand can “learn” remote control signals directly from many devices, allowing you to create a customized NetCommand-controlled home-theater system.
NetCommand for HDMI Devices (all models)
Some newer HDMI devices may be compatible with the TV's NetCommand for HDMI feature. Compatible devices can receive control signals through the HDMI connection. The TV's remote control may be able to operate some functions of these devices without any further setup.
TV Front Panel
Control Panel
Buttons on the front control panel duplicate commonly used keys on the remote control. The upper labels show control functions when no TV menus are displayed; the lower labels indicate functions when TV menus are displayed or when a special function has been activated. See chapter 4, "TV Operation and Features," for the functions of these buttons.
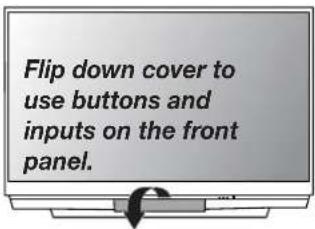
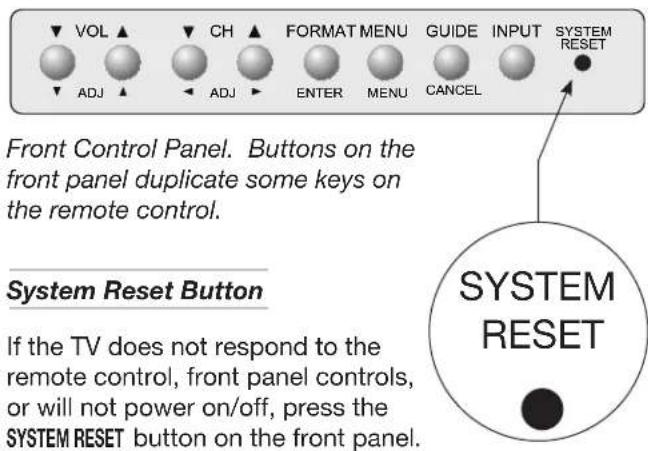
The green STATUS LED will flash quickly for about one minute. When the green STATUS LED stops flashing, you may turn on the TV. Recent setting changes you made before using SYSTEM RESET may be lost.
A/V Reset
If you wish to reset the A/V (Audio/Video) settings back to the factory defaults:
- To reset all settings at once, press GUIDE and FORMAT on the front panel at the same time.
- To reset the defaults for individual inputs, use the Reset selection on the AV menu.
Front Inputs
- INPUT 3 provides an easily accessible set of input jacks for a camcorder, game, or other audio/video device.
- A USB photo port is included for viewing JPEG images.
- A fourth HDMI input is also provided on Y and 734 series models.

Front inputs on C series model WD-C657
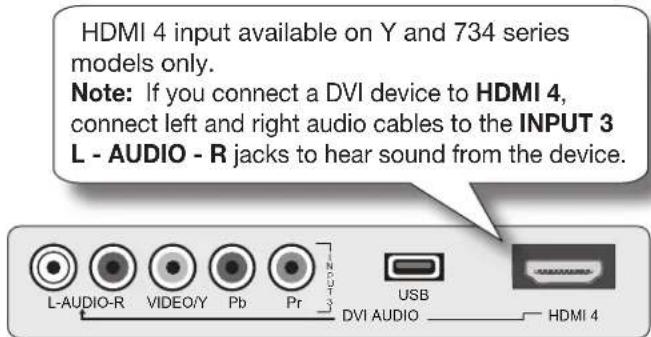
Component video inputs are offered on the front panel of Y series, 733 series, and 734 series models. When using a standard video device, connect the single (yellow) video cable to the VIDEO/Y jack.
Front Panel Indicators and Power Button
- POWER button. Turns TV on and off; works the same as the POWER key on the remote control.
- POWER/TIMER indicator. Lit when TV is powered on; flashes when TV is powered off and the auto-on TV Timer is set.
- STATUS indicator (off during normal TV operation); blinks rapidly when TV is first plugged into an AC outlet.
- LAMP indicator shows lamp condition (usually off during normal TV operation).
See the next page for more on front-panel indicators.
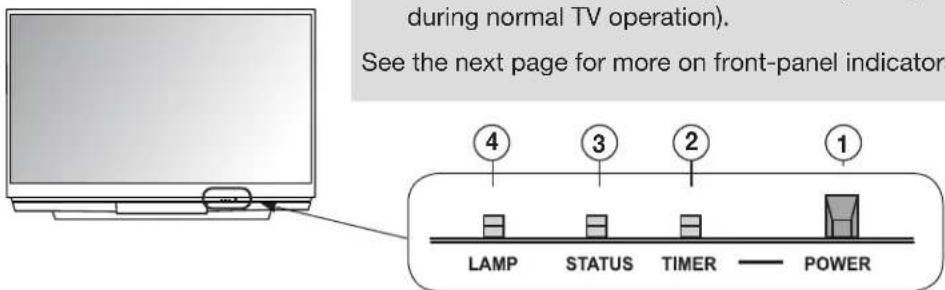
Indicator lights and POWER button
Front-Panel Indicators

Off

eady On

Blinking
Fast Blinking
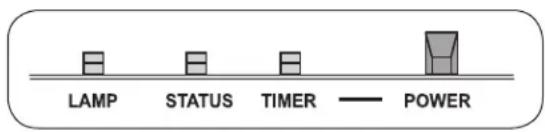
LAMP Indicator
LED Color TV Condition Additional Information
| None | Normal TV on or standby condition. Normal operation. | |
| Green | TV just powered off and lamp is cooling. | Starts to blink 30 seconds after turning off TV. TV can be turned on before blinking starts or after blinking stops, but not while the indicator is blinking. Normal operation. |
| Yellow | 1. Lamp access door is open or not secure. | TV will not operate until lamp access door is secure. See Appendix C for installation information. |
| 2. No lamp installed. | TV will not operate without a lamp. See Appendix C for installation information. | |
| Red | Lamp no longer illuminates and has reached the end of the lamp life. | Replace the lamp. The TV will not operate when the lamp no longer illuminates. See Appendix C for installation information. |
STATUS Indicator
LED Color TV Condition Additional Information
| None | ○ | Normal TV on or standby condition. | Normal operation. |
| Yellow | ○ | TV is too hot. | The TV will display a warning message and shut off if it overheats.Ambient room temperature may be too high. Turn off the TV and wait until the room temperature drops.Clear blocked air vents. Ensure at least a four-inch clearance on all sides of the TV.Clean the lamp-cartridge air filter. See Appendix C. |
| Red | ○ | TV may require service. | Turn off the TV and unplug the set from the AC power source.Wait one minute and then plug the set back in. See Appendix E.If the LED is still on, contact your dealer or a Mitsubishi Authorized Service Center. Go to www.mitsubishi-tv.com or call 1-800-332-2119 to receive Authorized Service Center information. |
TIMER Indicator
LED Color TV Condition Additional Information
| None | ○ | TV is powered off. | Normal operation. |
| Green | ◎ | TV is powered on. | Normal operation. |
| Green | ◎ | TV powered off, auto-on timer is set. | Normal operation. TV can be turned on at any time. |
| Green | ◎ | 1. TV just plugged into AC outlet. Wait approximately one minute for blinking to stop before 2. AC just restored after power failure. turning on. Normal operation.3. TV rebooting after System Reset used.4. TV rebooting after power fluctuation or receiving abnormal digital signals from a digital channel or digital device.5. You have begun the procedure to update software from an authorized flash memory device. | |
TV Back Panel
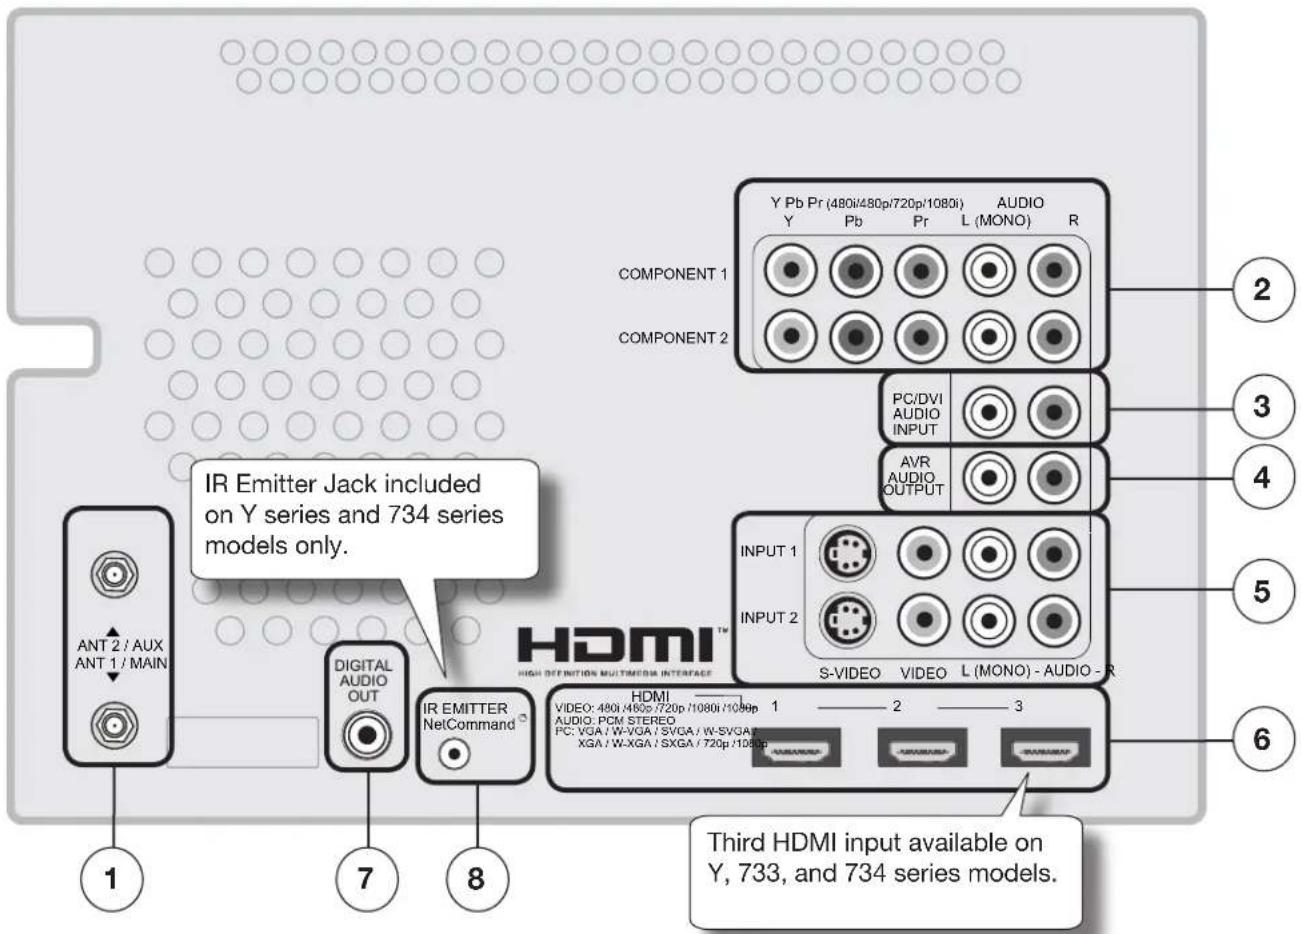
1. ANT 1/MAIN, ANT 2/AUX (Antenna)
If you are connecting an antenna or direct cable without a cable box, connect the main antenna or cable source to ANT 1/MAIN. Use ANT 2/AUX for a secondary source.
ANT 1/MAIN and ANT 2/AUX can each receive digital and analog over-the-air channels from a VHF/UHF antenna or non-scrambled digital/analog cable source.
2. COMPONENT Inputs (Audio and Video)
Y Pb Pr (480i/480p/720p/1080i)
Use these jacks to connect devices with component video outputs, such as DVD players, external HDTV receivers, or compatible video game systems. See Appendix A specifications for signal compatibility.
3. PC/DVI AUDIO INPUT
Use the PC/DVI AUDIO INPUT when connecting a DVI device to one of the TV's HDMI inputs using a DVI-to-HDMI cable. These jacks allow you to send left and right analog audio from your computer or other DVI device to the TV.
4. AVR AUDIO OUTPUT
Use AVR AUDIO OUTPUT to send analog audio of the program currently shown on the screen to an A/V surround sound receiver or stereo system. Digital audio from digital channels and HDMI devices is converted to analog audio by the TV. If using an analog A/V receiver or stereo system, this is the only audio connection needed between it and the TV.
TV Back Panel, continued
5. INPUT 1, 2 (Audio and Video)
INPUT 1 and 2 can be used to connect a VCR, Super VHS (S-VHS) VCR, DVD player, standard satellite receiver, or other A/V device to the TV. Each TV INPUT group consists of jacks for composite video, S-Video, and analog stereo audio. Note that when you connect to the S-video jack, the composite video jack is automatically disabled. INPUT 3 is a third set of composite video and stereo audio jacks located on the front of the TV for convenience.
6. HDMI™ Inputs
The HDMI 1.3 (High Definition Multimedia Interface) supports uncompressed standard and high-definition digital video formats and PCM digital stereo audio format.
Use the HDMI inputs to connect to EIA/CEA-861 HDMI compliant devices such as a high-definition receiver or DVD player. These inputs support 480i, 480p, 720p, 1080i, and 1080p video formats.
Mitsubishi recommends you use category 2 HDMI cables to connect HDMI 1.3 source devices. High-speed category 2 cables bring you the full benefits of Deep Color and x.v.Color.
These inputs can also accept digital DVI video inputs. To connect a DVI input, use an HDMI-to-DVI adapter or cable plus analog audio cables. Connect the analog audio cables to the PC/DVI AUDIO INPUT on the TV to receive left and right stereo audio from your DVI device.
The TV's HDMI inputs are compatible with many DVI-D and HDMI computer video signals. See chapter 2, "TV Setup" and Appendix A for additional information on PC compatibility.
These inputs are HDCP (High-Bandwidth Digital Copy Protection) compliant.
These inputs are Simplified for proper interoperability with other products certified by Simplay™.
HDMI Cable Categories
HDMI cables are available as Category 1 and Category 2 versions.
- Category 2 Cables. Newer, HDMI 1.3-compliant DVD players, video games, and set-top boxes require Category 2 cables. Use category 2 cables for these high-speed HD signals carrying extended color encodings (i.e., 30 or more bits, also called Deep Color). Category 2 cables are also suitable for standard HDTV signals.
- Category 1 Cables. Unmarked cables are category 1 cables and are suitable for standard HDTV signals.
7. DIGITAL AUDIO OUT
This output sends Dolby Digital or PCM digital audio to your digital A/V surround sound receiver. Analog audio from analog channels and devices is converted by the TV to PCM digital audio. If you have a digital A/V receiver, in most cases this is the only audio connection needed between the TV and your A/V receiver.
8. IR Emitter NetCommand®
Y series and 734 series models only
IR Emitters connected to this jack are used by the TV's NetCommand system to control external IR remote controlled analog devices such as cable boxes, VCRs, DVDs, satellite receivers and audio receivers.
2 TV Set-Up
Guidelines for Setting Up and Using Your New Widescreen TV
Getting Started
- Review the important safety, installation, and operating information at the beginning of this book.
-
Choose a location for your TV.
-
Allow at least four inches of space on all sides of the TV to help prevent overheating. Overheating may cause premature failure of the TV as well as shortened lamp life.
- Avoid locations where light may reflect off the screen.
-
See the stand requirements under "Important Information About Your TV."
-
Install the batteries in the remote control. See the following page. See chapter 4, "TV Operation and Features" for more on use of the remote control.
- Plug your TV into a power outlet. The TIMER indicator on the front of the TV will start blinking rapidly. After the TIMER indicator stops blinking, press the POWER key to power on the TV.
- When the Welcome screen appears the first time you power on the TV, select a language for TV menus. You can later change the language through the Setup menu.
-
Connect your audio/video (A/V) devices to the TV and perform initial setup.
-
See chapter 3, "TV Connections" for connection diagrams.
- See the following pages for initial TV setup and use of the Auto Input Sensing feature.
-
See chapter 6, “NetCommand,” to perform NetCommand IR “learning” for control of your home theater (available on Y series and 734 series models).
-
Mitsubishi recommends you perform a channel scan. See "Initial TV Setup" on the following pages.
-
You can now start watching TV or you can perform additional setup and customization through the TV menus.
TV Operation
-
Review chapter 4, "TV Operation and Features," for TV features including:
-
Input Selection (viewing source). Select a connected program source to watch, such as a VCR, DVD player, or antenna. Press INPUT on the remote control to select from icons for the TV inputs. See “Choosing a Viewing Source.”
- ChannelView. Press GUIDE to see channel listings for programs on ANT 1 and ANT 2.
-
Picture Formats. Press FORMAT to cycle through picture sizes and shapes to find the one best suited to the current program. See "TV Signals and Display Formats."
-
To understand use of the Input Selection menu with NetCommand-controlled devices, see "Using NetCommand" (Y and 734 series models).
- To view JPEG photo files on the TV, see "Viewing JPEG Picture Files."
Additional TV Setup
-
Review chapter 5, "TV Menu Settings," to customize TV operation. Press the MENU key to enter the menu system. Some examples of settings you may wish to change include:
-
FAV. Use an on-screen menu to create custom lists of your favorite channels. See Setup > Edit.
- Order. Rearrange the device icons in the Input Selection menu to put frequently used icons near the front. See the Inputs menu Order options.
- Name. Change the device names that appear in the Input Selection menu. See the Inputs menu Name options.
- Parental Locks. Restrict TV viewing by program rating, by channel, or by time of day. You can also disable the front-panel buttons if you have small children. See the Lock >
Parent menu, the Lock > Front Panel menu, and Setup > Edit > Lock.
- Video Settings. Change video adjustments to get the best picture for your viewing conditions. See "AV Menu."
Note: You may wish to change the Picture Mode from the default Brilliant to either Bright or Natural, which are suitable for most home viewing environments.
2. To program the remote control to operate A/V devices not under NetCommand control, see Appendix D, "Programming the Remote Control."
TV Care
- Lamp Cartridge. When the lamp cartridge needs replacement, replace the lamp yourself and save the cost of a service call. See Appendix C for instructions.
- General Cleaning. See the cleaning recommendations under "Important Information About Your TV."
Assistance
- For troubleshooting, service, and product support, see Appendix E.
- For warranty information, see the TV warranty in the back of this book.
Installing the Remote Control Batteries
- Remove the remote control's back cover by gently pressing in the tab and lifting off the cover.
- Load the batteries, making sure the polarities (+) and (-) are correct. For best results, insert the negative (-) end first.
- Snap the cover back in place.
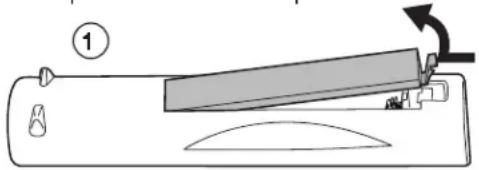
natural_image
Diagram of a mechanical device with a lever and adjustment mechanism, no text or symbols present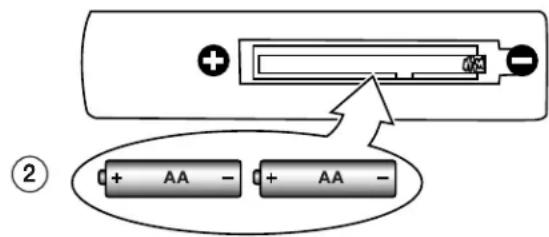
The remote control requires two AA alkaline batteries.
When You First Power On the TV
Choosing a Language for Menus
- Power on the TV for the first time.
- Press ▲to select either English or Spanish for all menus. You can later change the language selection through the Setup menu Language option.
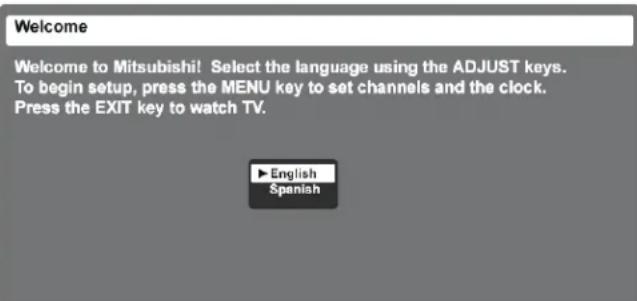
When you first power on the TV, the Welcome screen lets you change the menu language.
Initial TV Setup
Use the Setup menu for basic TV setup options.
- Press MENU to open the Main menu.
- Press ▶ highlight the Setup icon and display the Setup menu.
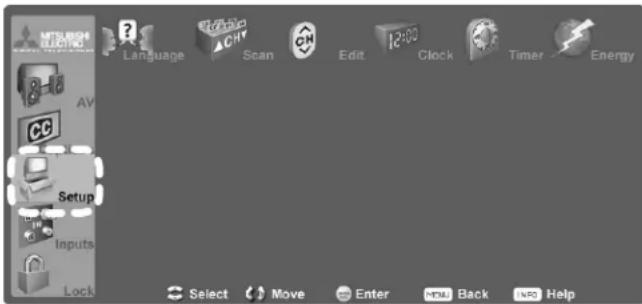
Setup menu highlighted in TV Main menu
Turning the TV On or Off
To turn the TV on or off, point the remote control at the front of the TV and press the POWER button. Alternatively, press the POWER button on the front panel of the TV.
If You Turn Off the TV by Mistake
- Press POWER again within about 30 seconds, while the lamp is still hot, to have the TV come back on immediately.
- If the LAMP indicator starts blinking (about 30 seconds after you shut off power), wait about one minute for the LAMP indicator to stop blinking and press POWER to turn the TV on again.
Initial TV Setup, continued
Change the Menu Language
Choose to display on-screen menus in either English or Spanish (Español).
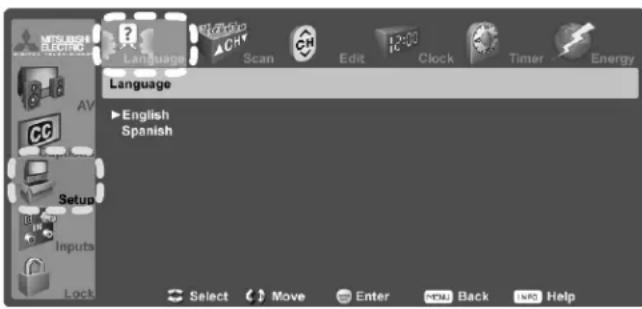
Select a menu language in the Setup menu.
- With the Setup menu displayed, press ▶ to highlight the Language icon.
- Press ▲to highlight either English or Spanish.
- Press MENU to return the highlight to the top row of icons.
Memorize Channels
For ANT 1/MAIN and ANT 2/AUX
To start channel memorization
- With the Setup menu displayed, press to highlight the Scan icon.
- Press ▲to highlight an input selection based on your connections:
| Input Condition | |
| Ant 1 AirAnt 2 Air | When connected to an indoor or outdoor antenna |
| Ant 1 CableAnt 2 Cable | When connected to direct cable (no cable box) |
- Press to highlight the on-screen START button.
- Press ENTER to start automatic channel memorization.
To stop channel memorization before completion, press CANCEL.
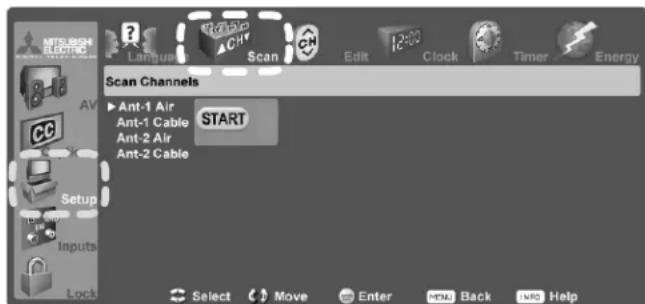
Start channel memorization from the Setup menu.
-
When memorization is complete you can:
-
Press MENU once to return to the top row of icons.
- Press MENU again to return to the Main menu.
- Press EXIT to watch TV.
After channels have been memorized:
- To tune to memorized channels, press CH ✗ √ while watching TV on the ANT 1 or ANT 2 inputs.
- Use the Setup > Edit menu for additional channel options, such as adding or deleting channels from memory, naming channels, and saving favorite channels in custom memory banks.
Additional TV Setup Using the Setup Menu
See chapter 5, "TV Menu Settings," to :
- Edit channel options
- Set the TV clock
- Set the TV Timer
- Select an Energy Mode to manage power use while the TV is off.
Setting Up TV Inputs
When You First Connect a Device
This TV's Easy Connect® Auto Input Sensing feature detects most connections automatically. When you first connect a device, the TV will:
a. detect the connected device
b. prompt you to identify the device type
c. prompt you to perform NetCommand set-up for the device, if available (Y series and 734 series only)
d. repeat these steps for any additional newly detected devices
The tables below clarify which connections trigger Auto Input Sensing.
Auto Detection Active
INPUT 1, 2, 3 video jacks
COMPONENT video jacks
HDMI *
DIGITAL AUDIO OUT
AVR AUDIO OUTPUT (analog)
USB (USB photo port on front)
No Auto Detection
ANT 1 and ANT 2
* If the device is powered off when connected, detection occurs when the device is next powered on.
Setting Up TV Inputs, continued
Note: For connection and setup of a personal computer, see the information later in this chapter.
- See chapter 3, "TV Connections," for recommendations on connecting your devices.
- Connect your devices to the TV, making note of which TV input is used for each device.
The TV and the devices can be either on or off when connecting.
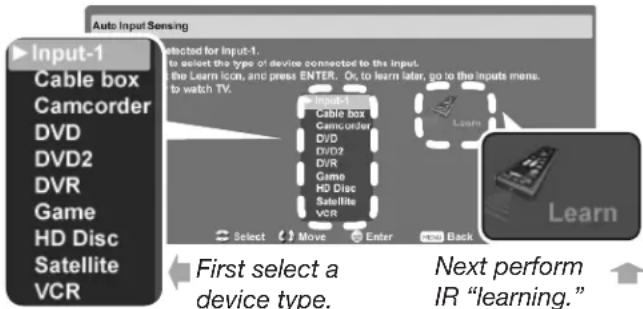
Auto Input Sensing screen for most device types. The Learn icon appears only on models with NetCommand.
- Power on the TV if not already on. When the TV detects a connection, the Auto Input Sensing screen opens.
- Most Device Types: Specify the device type and then, if desired, proceed directly to NetCommand setup if available.
a. In the Auto Input Sensing screen, press ▲
▼ to move through the device list to select the device type connected to the input. The device type you select here will appear in the Input Selection menu.
b. If NetCommand IR "learning" is available on your TV model, you can perform "learning" now or at a later time. To perform now, highlight the Learn icon and press ENTER. See chapter 6, "NetCommand" for more.
- A/V Receiver: The TV can detect audio connections on the DIGITAL AUDIO OUT jack and the right (red) analog AVR AUDIO OUTPUT jack.
Note for Analog A/V Receivers: When you disconnect an analog A/V receiver, manually change the Speakers setting to TV to hear sound from the TV speakers.
If NetCommand IR "learning" is available for your TV model, perform "learning" now or at a later time. To perform now, highlight the Learn icon in the Auto Output Sensing screen and press ENTER. See chapter 6, "NetCommand" for more.
- HDMI Devices Compatible with the TV's NetCommand for HDMI Feature: Compatible
HDMI devices are often recognized automatically by the TV. The TV's remote control may operate some device functions without further setup. You can add more control functions if desired. Program the TV's remote control or, in the case of a Y or 734 series TV, perform NetCommand IR "learning" to add functions.
4 Press EXIT to close the Auto Input Sensing screen. The TV will then display the Auto Input Sensing screen for the next connection it finds.
More About Auto Input Sensing
- Choose a different name for each input.
- Antenna inputs ( ANT 1/ANT 2) are never detected, although you can turn off unused antenna inputs in the Inputs > Name menu.
- You can change the device type at a later time using the Inputs > Name menu. Any “learned” NetCommand IR codes will be erased, however.
- If you wish to change devices on an HDMI input:
- Disconnect the HDMI device.
- Turn off the HDMI input in the Inputs > Name menu.
- Connect the new device and the Auto Input Sensing screen will display. If you want the device under NetCommand IR control, perform NetCommand "learning" for the new device.
Controlling A/V Receiver Sound Volume
Although the TV detects when you connect an A/V receiver, you must use one of the methods below to control sound volume from the A/V receiver.
With a Standard TV Setup
- Recommended Method: Program the TV's remote control for your A/V receiver and enable the Audio Lock feature. See Appendix D, "Programming the Remote Control."
- Program the TV's remote control for your A/V receiver and set the TV remote's slide switch to the AUDIO position to control volume. Set the switch back to the TV position to control the TV.
- Use the remote control that came with the A/V receiver.
With NetCommand Control of an A/V Receiver (Y and 734 series only)
- Set up NetCommand control of the A/V receiver's volume functions in the Inputs > AVR menu. The TV's remote will then automatically control A/V receiver volume. See chapter 6, "NetCommand."
- Use any of the methods described for the standard TV setup.
Using the TV with a Personal Computer
Connecting a Computer to the TV
Use one of the connection methods listed below based on your computer's video output.
| ComputerVideo Output | Video Connection | AudioConnection |
| Digital DVI | DVI-to-HDMI cableor an HDMI cablewith an HDMI-to-DVI adapter | Stereo audiocables |
| Note: If the computer's audio outputis a single mini jack, a mini audio-to-RCA-male “Y” adapter cable is also required. | ||
| HDMI | HDMI-to-HDMI cable | No additionalaudio connec-tion is required. |
IMPORTANT This TV accepts digital computer signals only.
- See the TV specifications in Appendix A to confirm that your computer signal is compatible with the TV.
- Connect the computer's digital signal output to one of the TV's HDMI jacks. See the connection diagrams for the method suited to your equipment.
-
Connect the computer's audio output using one of these options:
-
For digital DVI signals, connect analog left/right audio to the TV's PC/DVI AUDIO INPUT jack.
-
For HDMI signals, no additional audio connection is required.
-
Power on the TV and computer. The TV will detect the connection and display the Auto Input Sensing screen.
- In the Auto Input Sensing screen, press ▲ to highlight PC in the list of device types. You can change the type at a later time using the Inputs > Name menu.
- Press EXIT to close the Auto Input Sensing screen.
Note: If your computer provides digital audio output (coaxial or digital), you can connect it directly to a digital A/V receiver and bypass the TV.
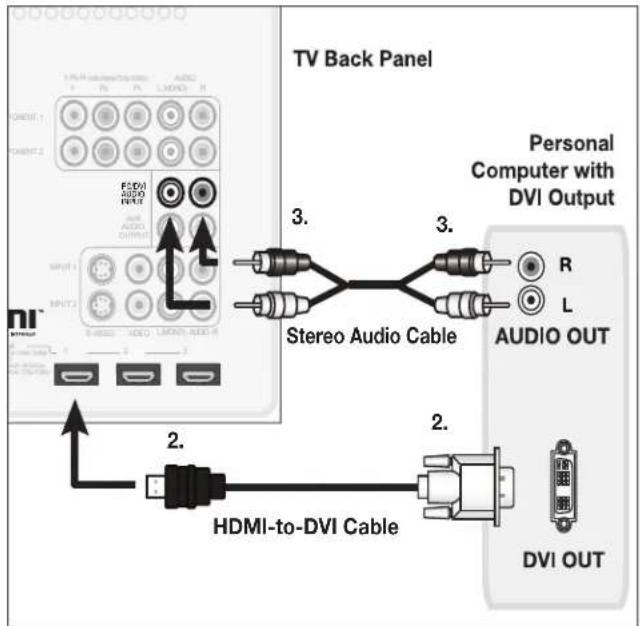
A DVI connection from a personal computer requires a separate audio connection.
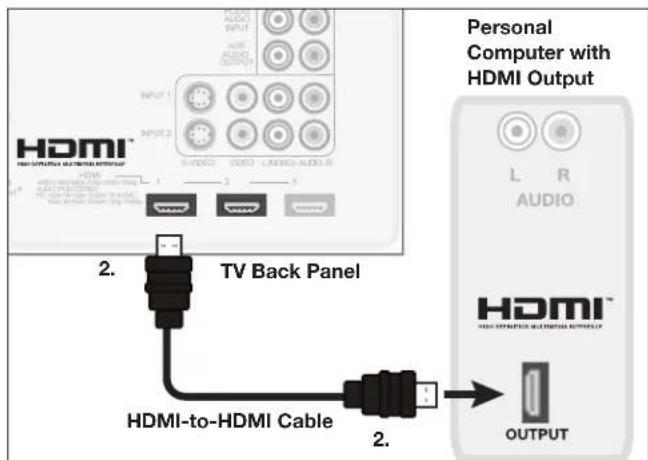
An HDMI-to-HDMI connection carries all video and audio on a single cable.
Using the TV with a Personal Computer
Computer Video Adjustments
- Power on the computer if it is not already on.
- Select PC from the Input Selection menu. To do this, press INPUT to open the Input Selection menu, move the highlight to the PC icon, and press ENTER.
- Working from the computer, change the resolution of the computer image. View the computer image on the TV and maximize the computer resolution while maintaining a suitable aspect ratio for the image.
- Perform TV video adjustments. Press VIDEO repeatedly to access video-adjustment options. The following additional adjustments are available for computer video:
Horiz Position (Horizontal Position). Manually adjust the horizontal position; overrides Auto Position.
Vert Position (Vertical Position). Manually adjust the vertical position; overrides Auto Position.
- Press FORMAT repeatedly to find the picture format best suited to the image. See the chart on this page showing how different computer resolutions are displayed on the TV.
Distortion in Computer Images
Computer images may show distortion when viewed on the TV, e.g., lines that should be straight may appear slightly curved.
Image Resolution
Your Mitsubishi TV can display resolutions from standard VGA (640 x 480) through 1920 x 1080 signals at a refresh rate of 60 Hz. The resolution of 1920 x 1080 is supported at refresh rates of 24, 30, and 60 Hz. See Appendix A in this book for more on compatible screen resolutions.
In most cases, the computer will select the best resolution match to display on the TV. You can override this setting if you wish. Refer to your computer operating system's instructions for information on changing the screen resolution.
You may need to restart the computer for changes to take effect.
Tip:
Set the computer's screen saver to display a pattern after several minutes of inactivity. This acts as a reminder that the TV is powered on and the lamp is in use. The lamp is in use whenever the TV is powered on, even if the screen appears dark.
Computer Display Formats
Press the FORMAT key repeatedly to cycle through the TV displays available for your computer's video signal.
| Computer Signal | As Displayed on TV Screen | |||
| Format | 4 X 3 Standard | 16 X 9 Standard | Zoom | |
| VGA640 X 480 | ||||
| WVGA848 X 480 | ||||
| SVGA800 X 600 | ||||
| WSVGA1064 X 600 | ||||
| Format Standard Zoom | ||
| XGA1024 X 768 | ||
| PC 720p1280 X 720 | ||
| WXGA1360 X 768 | ||
| SXGA1280 X 1024 | ||
| Format Standard Reduce | |||
| PC 1080p1920 X 1080 | 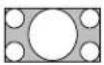 |  | 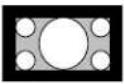 |
3
TV Connections
Before you Begin
Auto Input Sensing
The TV's Auto Input Sensing feature automatically recognizes most connections and prompts you to identify the type of device connected. See chapter 2, "TV Setup," for more on Auto Input Sensing.
Connection Types
Review the connection types available on your input devices and use inputs that will give the best video quality. For example, choose HDMI over component video, and choose component video over S-video or composite video.
Picture Quality
For best picture quality, route signals directly from the input device to the TV; avoid routing video signals through an A/V receiver, for example.
Sound Quality
For best surround sound audio quality, route audio signals from the input device directly to your A/V receiver or sound system whenever possible.
IMPORTANT
Accessory items such as cables, adapters, splitters, or combiners required for TV connections are not supplied with the TV. These items are available at many electronics stores.
HDTV Cable Box or Satellite Receiver with Component Video
If your cable box or satellite receiver has an HDMI output, use the connections for HDMI devices described later in this chapter.
Required: RCA component video cables, left/right analog stereo audio cables.
- Connect the cable from the outside cable or satellite service to CABLE IN or SATELLITE IN on the cable box or satellite receiver. See your device's owner's guide for instructions and cable compatibility.
- Connect RCA-type cables from the Y PB PR outputs on the HDTV cable box or satellite receiver to COMPONENT on the TV back panel, matching the colored green, blue, and red connections.
- Connect left (white) and right (red) audio cables from the HDTV cable box or satellite receiver to COMPONENT AUDIO L (MONO) and R on the TV back panel.
Note: To hear digital surround sound, connect the digital audio output from your cable box or satellite receiver directly to your digital A/V receiver.
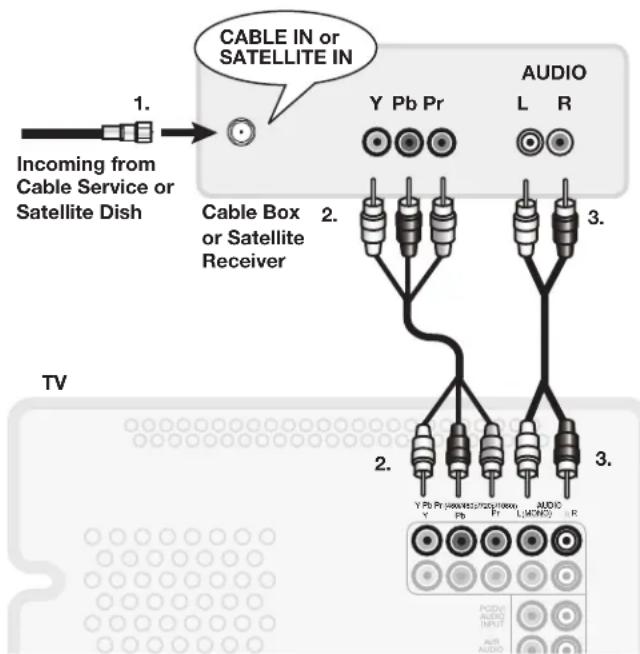
Figure 1. Connecting an external HDTV receiver with component video connections
Standard Cable Box, Satellite Receiver, or Other Device with S-Video
Required: S-Video cable and left/right analog stereo audio cables.
- Connect the cable from the outside cable or satellite service to CABLE IN or SATELLITE IN on the cable box or satellite receiver.
- Connect an S-Video cable from S-VIDEO OUT on the cable box or satellite receiver back panel to INPUT S-VIDEO on the TV back panel.
- Connect left (white) and right (red) audio cables from AUDIO OUT on the cable box or satellite receiver to INPUT AUDIO L (MONO) and R on the TV back panel.
Note: Refer to the cable box or satellite receiver Owner's Guide for cable or dish antenna connections to the receiver.
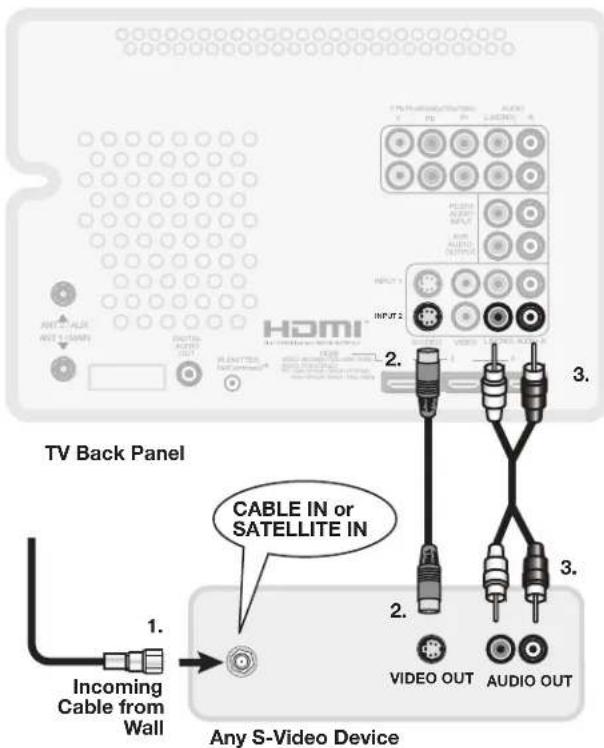
Figure 2. Connecting a device with S-Video
HDMI Device (Cable Box, Satellite Receiver, DVD Player, or Other Device
Required: HDMI-to-HDMI cable.
Connect an HDMI cable from the TV back panel to the HDMI device output. HDMI devices provide video and audio through the single cable.
Mitsubishi recommends you use category 2 HDMI cables to connect HDMI 1.3 source devices. High-speed category 2 cables bring you the full benefits of Deep Color and x.v.Color. See chapter 1, "TV Overview," for more on HDMI cable types.
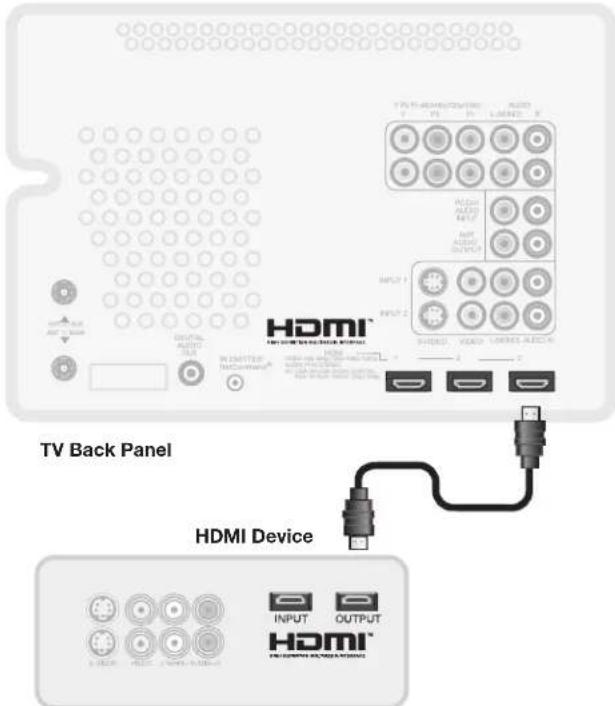
Figure 3. Connecting an HDMI device.
Note: HDMI inputs are Simplified for proper interoperability with other products certified by Simplay™.
IMPORTANT
HDMI and Audio Signals
- Digital Surround Sound: The TV's HDMI inputs can receive digital stereo audio signals only. To hear digital surround sound from an HDMI device, connect the device's digital audio output directly to your A/V receiver. See the Owner's Guides for those devices for instructions.
- A/V Receiver with HDMI. If your A/V receiver has an HDMI input, use the audio connections described in "A/V Receiver (Sound System)" instead.
Wall Outlet Cable (no cable box)
It is very important to connect the incoming cable for your primary viewing source to ANT 1/MAIN.
- Connect the primary incoming coaxial lead cable to ANT 1/MAIN on the TV back panel.
- For an optional secondary antenna source, connect an antenna (or cable) to ANT 2/AUX.
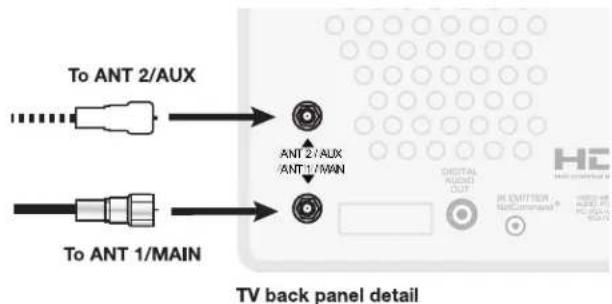
Figure 4. Wall Outlet Cable
Antennas with Separate UHF and VHF Leads
Required: UHF/VHF combiner
- Connect the UHF and VHF antenna leads to the UHF/VHF combiner.
- Push the combiner onto ANT 1/MAIN on the TV back panel.
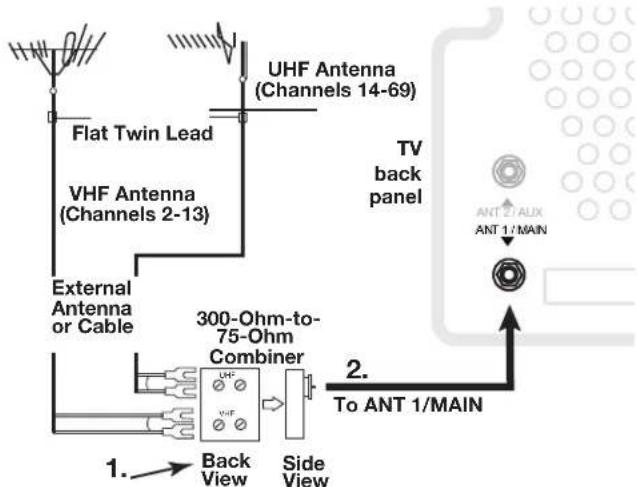
Figure 5. Connecting separate UHF and VHF Antennas
Mitsubishi strongly recommends you avoid using antennas with flat twin leads. Flat twin lead antenna wires are subject to interference which may adversely affect the performance of the TV. We recommend using coaxial antenna cable.
Antenna with a Single Lead
A. For an antenna with flat twin leads
Required: 300-ohm-to-75-ohm transformer.
A1. For an antenna with flat twin leads, connect the 300-ohm twin leads to the 300-ohm-to-75-ohm transformer.
A2. Push the 75-ohm side of the transformer onto ANT 1 on the TV back panel.
B. For cable or antenna with coaxial lead
Connect the coaxial lead directly to ANT 1 on the TV back panel.
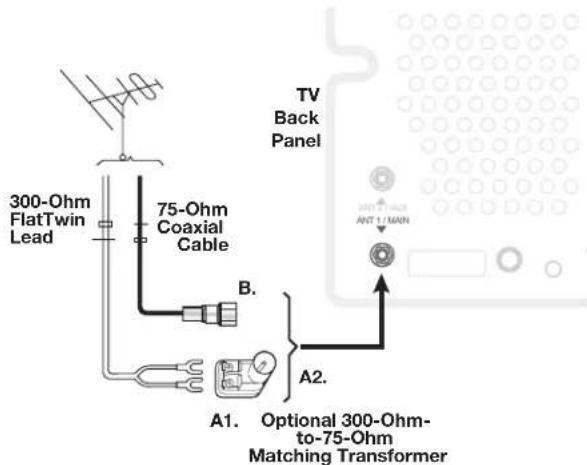
Figure 6. Connecting a Single Antenna Lead
DVD Player with Component Video
Component video cables and analog audio cables are required.
- Connect the component video cables from Y Pb Pr VIDEO OUT on the back of the DVD player to the COMPONENT jacks on the TV back panel, matching the green, blue, and red colored connections.
- Connect left (white) and right (red) stereo audio cables from AUDIO OUT on the back of the DVD player to COMPONENT AUDIO L (MONO) and AUDIO R on the TV back panel.
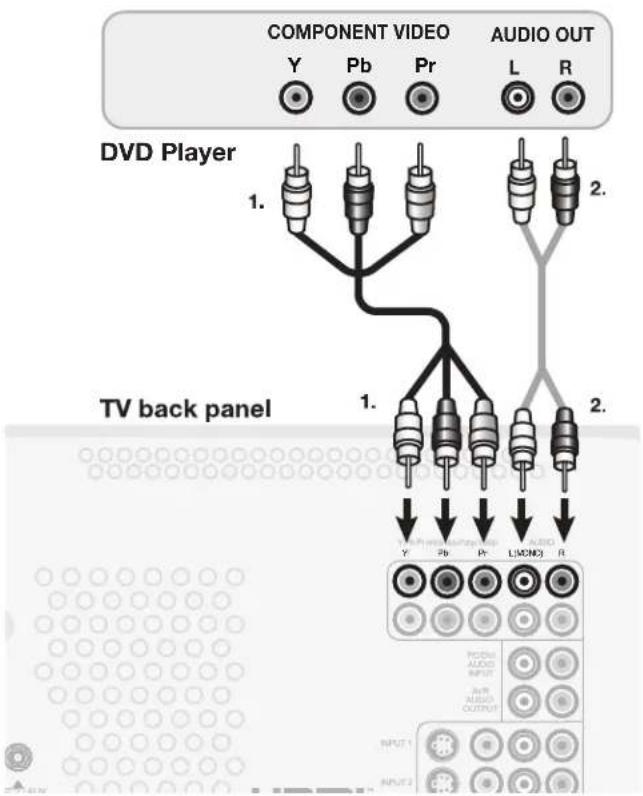
flowchart
graph TD
    A["COMPONENT VIDEO"] -->|Y| B["DVD Player"]
    A -->|Pb| C["TV back panel"]
    A -->|Pr| D["AUDIO OUT"]
    A -->|L| E["Output"]
    A -->|R| F["Output"]
    B --> G["Component Video 1."]
    C --> H["Component Video 2."]
    D --> I["Component Video 2."]
    G --> J["TV back panel"]
    H --> K["TV back panel"]
    I --> L["TV back panel"]
    J --> M["Input1"]
    K --> N["Input2"]
Figure 7. Connecting a DVD player with component video
IMPORTANT See Appendix A for component video signal compatibility information. For digital audio connections to your A/V receiver, see your DVD player and A/V receiver Owner's Guides.
DVI Video Device (Cable Box, Satellite Receiver, DVD Player, or Other Device)
Connect DVI devices (digital only) to the TV's HDMI input jacks.
Analog stereo audio cables and a DVI-to-HDMI cable or DVI/HDMI adapter and HDMI cable are required.
- Connect the DVI-to-HDMI cable (recommended) or HDMI cable with DVI/HDMI adapter from the DVI device's back panel to the TV's HDMI jack.
Note: If you are using a DVI/HDMI adapter, it is important to connect the adapter to the DVI device for best performance.
- Connect a set of audio cables from AUDIO OUT on the DVI device back panel to the PC/DVI AUDIO INPUT on the TV back panel. Connect the red cable to the R jack and the white cable to the L (MONO) jack.
Note: The HDMI connection supports copy protection (HDCP).
Some devices require connecting to an analog input first, in order to view on-screen menus and to select DVI as the output. Please review your equipment instructions for DVI connectivity and compatibility.
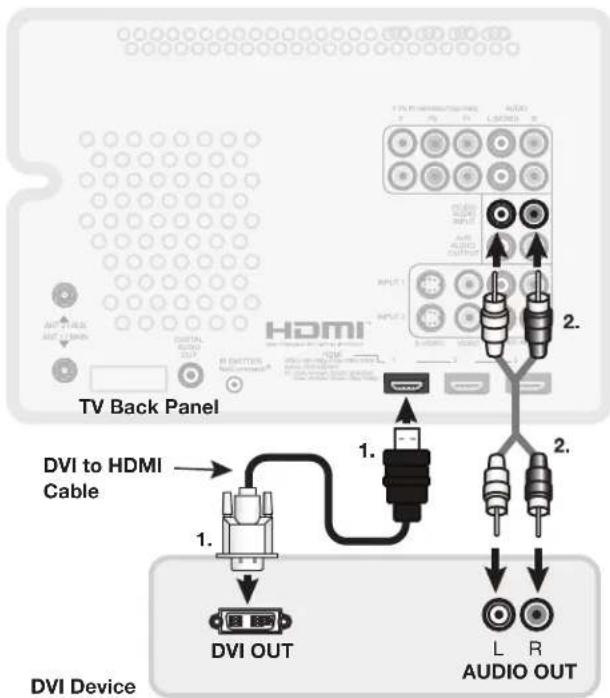
Figure 8. Connecting a digital DVI device
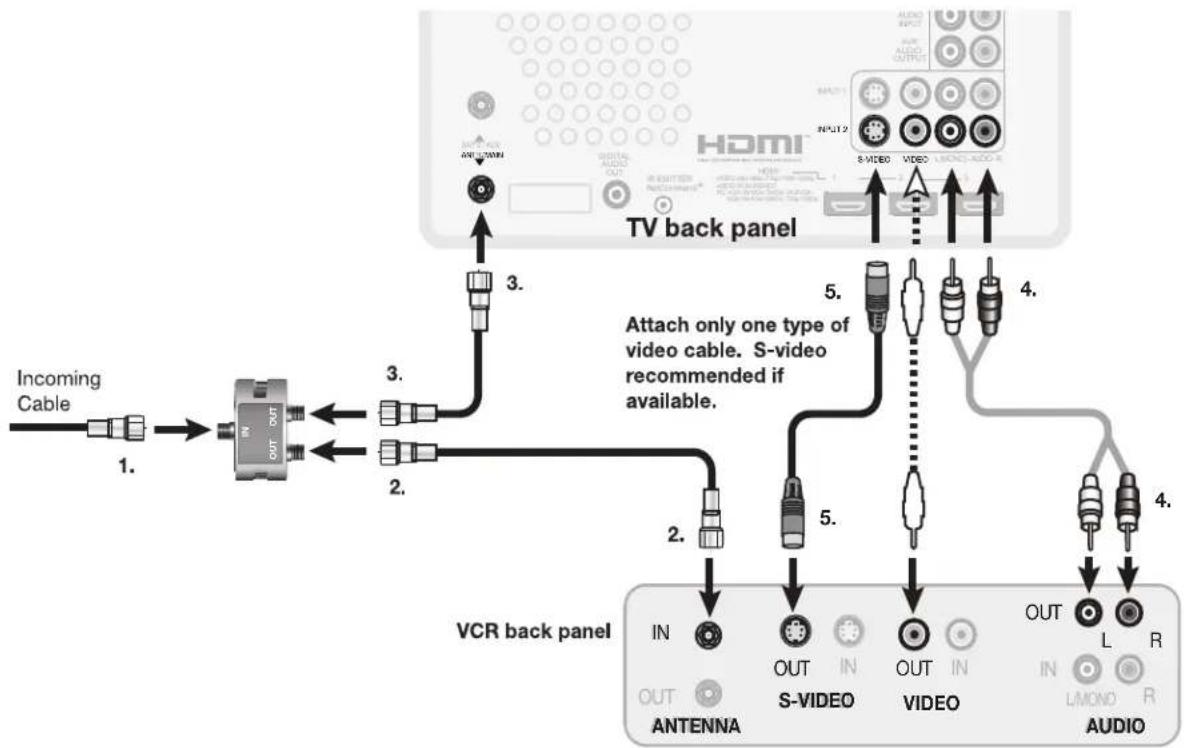
VCR to an Antenna or Wall Outlet Cable
Required: Two-way RF splitter, 3 coaxial cables, right and left analog audio cables, either S-video or video cable.
- Connect the incoming cable or antenna to IN on the RF splitter.
- Connect one coaxial cable from OUT on the RF splitter to ANTENNA IN on the VCR back panel.
-
Connect one coaxial cable from OUT on the RF splitter to ANT 1/MAIN on the TV back panel.
-
To use the TV speakers with the VCR, connect left (white) and right (red) audio cables from AUDIO OUT on the VCR to INPUT AUDIO L (MONO) and AUDIO R on the TV back panel. If your VCR is mono (non-stereo), connect only the white (left) cable.
- Connect either an S-Video or composite video cable from VIDEO OUT on the VCR back panel to INPUT VIDEO or S-VIDEO on the TV back panel. Connect only one type of video cable; S-Video is recommended, if available.
flowchart
graph TD
    A["Incoming Cable"] --> B["1."]
    B --> C["2."]
    C --> D["3."]
    D --> E["4."]
    E --> F["5."]
    F --> G["6."]
    G --> H["7."]
    H --> I["8."]
    I --> J["9."]
    J --> K["TV back panel"]
    K --> L["1."]
    L --> M["2."]
    M --> N["3."]
    N --> O["4."]
    O --> P["5."]
    P --> Q["6."]
    Q --> R["7."]
    R --> S["8."]
    S --> T["9."]
    T --> U["TV back panel"]
    U --> V["1."]
    V --> W["2."]
    W --> X["3."]
    X --> Y["4."]
    Y --> Z["5."]
    Z --> AA["6."]
    AA --> AB["7."]
    AB --> AC["8."]
    AC --> AD["9."]
    AD --> AE["TV back panel"]
    AE --> AF["1."]
    AF --> AG["2."]
    AG --> AH["3."]
    AH --> AI["4."]
    AI --> AJ["5."]
    AJ --> AK["6."]
    AK --> AL["7."]
    AL --> AM["8."]
    AM --> AN["9."]
    AN --> AO["TV back panel"]
    AO --> AP["1."]
    AP --> AQ["2."]
    AQ --> AR["3."]
    AR --> AS["4."]
    AS --> AT["5."]
    AT --> AU["6."]
    AU --> AV["7."]
    AV --> AW["8."]
    AW --> AX["9."]
Figure 9. Connecting a VCR to an Antenna or Wall Outlet Cable
VCR to a Cable Box (Audio & Video)
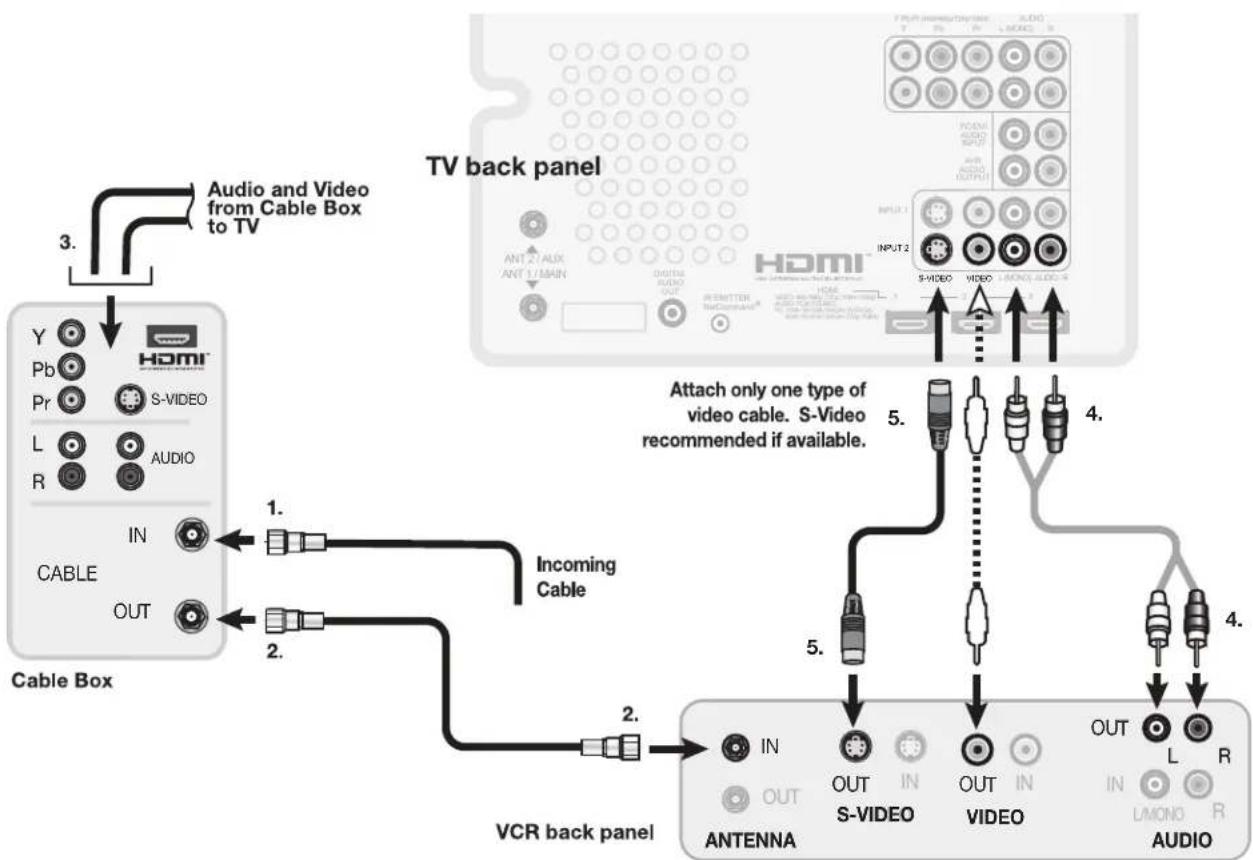
Required: Two coaxial cables, right and left audio cables, S-Video or composite video cable, plus cables required to connect the TV to the cable box.
- Connect the incoming coaxial cable to IN on the cable box.
- Connect one coaxial cable from OUT on the cable box to ANTENNA IN on the VCR back panel.
- Connect the cable box outputs to the TV as shown in one of the options listed below. This connection allows the TV to receive the best available signal directly from the cable box. See the referenced figures in this chapter, "TV Connections."
Figure 1: Component video output to the TV's COMPONENT Y Pb Pr jacks; analog stereo audio to the associated AUDIO jacks.
OR
Figure 2: S-Video output to the TV's INPUT S-VIDEO jack; analog stereo audio to the associated AUDIO jacks.
OR
Figure 3: HDMI output to the TV's HDMI jack.
-
To use the TV speakers with the VCR, connect left (white) and right (red) audio cables from AUDIO OUT on the VCR to INPUT AUDIO L (MONO) and AUDIO R on the TV back panel. If your VCR is mono (non-stereo), connect only the white (left) cable.
-
Connect either an S-Video or composite video cable from VIDEO OUT on the VCR back panel to INPUT VIDEO or INPUT S-VIDEO on the TV back panel. Connect only one type of video cable. S-Video is recommended, if available.
Note: When using this connection configuration with the connections used in step 3, it is possible to view live cable programs through the VCR Device. For best picture quality, however, always view live cable programs directly from the cable box device.
flowchart
graph TD
    A["Cable Box"] -->|1. IN| B["TV back panel"]
    A -->|2. OUT| B
    B -->|3. Audio and Video from Cable Box to TV| C["TV back panel"]
    C -->|4. S-VIDEO video received if available.| D["VCR back panel"]
    D -->|5. Attach only one type of video cable. S-Video recommended if available.| E["TV back panel"]
    E -->|6. Audio and Video from Cable Box to TV| F["TV back panel"]
    F -->|7. Audio and Video from Cable Box to TV| G["TV back panel"]
    G -->|8. Audio and Video from Cable Box to TV| H["TV back panel"]
    H -->|9. Audio and Video from Cable Box to TV| I["TV back panel"]
    I -->|10. Audio and Video from Cable Box to TV| J["TV back panel"]
    J -->|11. Audio and Video from Cable Box to TV| K["TV back panel"]
    K -->|12. Audio and Video from Cable Box to TV| L["TV back panel"]
    L -->|13. Audio and Video from Cable Box to TV| M["TV back panel"]
    M -->|14. Audio and Video from Cable Box to TV| N["TV back panel"]
    N -->|15. Audio and Video from Cable Box to TV| O["TV back panel"]
    O -->|16. Audio and Video from Cable Box to TV| P["TV back panel"]
    P -->|17. Audio and Video from Cable Box to TV| Q["TV back panel"]
    Q -->|18. Audio and Video from Cable Box to TV| R["TV back panel"]
    R -->|19. Audio and Video from Cable Box to TV| S["TV back panel"]
    S -->|20. Audio and Video from Cable Box to TV| T["TV back panel"]
    T -->|21. Audio and Video from Cable Box to TV| U["TV back panel"]
    U -->|22. Audio and Video from Cable Box to TV| V["TV back panel"]
    V -->|23. Audio and Video from Cable Box to TV| W["TV back panel"]
    W -->|24. Audio and Video from Cable Box to TV| X["TV back panel"]
    X -->|25. Audio and Video from Cable Box to TV| Y["TV back panel"]
    Y -->|26. Audio and Video from Cable Box to TV| Z["TV back panel"]
    Z -->|27. Audio and Video from Cable Box to TV| AA["TV back panel"]
    AA -->|28. Audio and Video from Cable Box to TV| AB["TV back panel"]
    AB -->|29. Audio and Video from Cable Box to TV| AC["TV back panel"]
    AC -->|30. Audio and Video from Cable Box to TV| AD["TV back panel"]
    AD -->|31. Audio and Video from Cable Box to TV| AE["TV back panel"]
    AE -->|32. Audio and Video from Cable Box to TV| AF["TV back panel"]
    AF -->|33. Audio and Video from Cable Box to TV| AG["TV back panel"]
    AG -->|34. Audio and Video from Cable Box to TV| AH["TV back panel"]
Figure 10. Connecting a VCR to a cable box
A/V Receiver (Sound System)
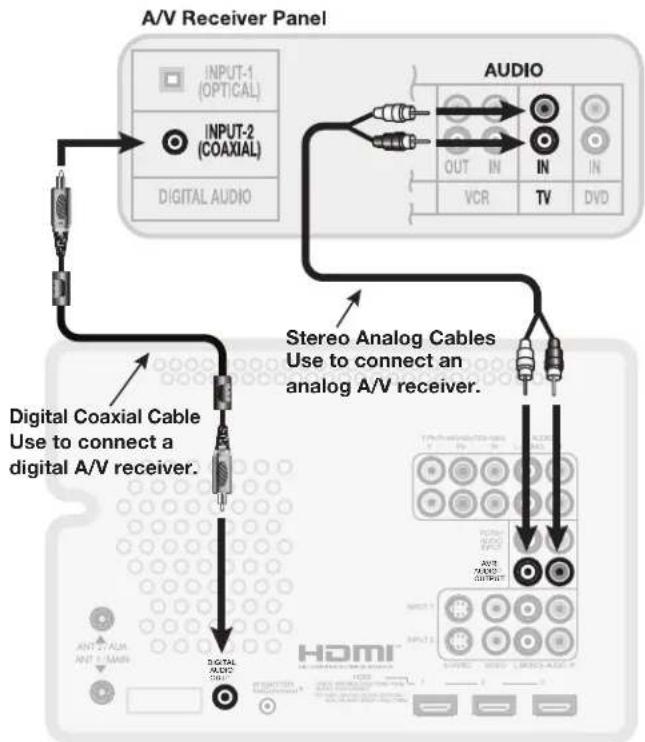
Most setups require either a digital audio cable or analog stereo audio cables.
The TV makes all audio available in digital and analog formats:
■ Analog audio coming into the TV is available as output in digital format on the DIGITAL AUDIO OUT jack.
■ Digital incoming audio is available as analog output on the AVR AUDIO OUTPUT/AUDIO L (MONO) and AUDIO R jacks.
Usually, only one of the following connections is required:
• To connect an analog A/V receiver
Connect left (white) and right (red) audio cables from AVR AUDIO OUTPUT/AUDIO L (MONO) and AUDIO R on the TV back panel to the TV AUDIO INPUT on the A/V receiver.
- To connect a digital A/V receiver with Dolby Digital surround sound and PCM audio support: Connect one end of the digital audio cable to DIGITAL AUDIO OUT on the back of the TV. Connect the other end to the COAXIAL DIGITAL INPUT on the back of the A/V receiver.
flowchart
graph TD
    A["Digital Coaxial Cable Use to connect a digital A/V receiver."] --> B["Digital Audio"]
    B --> C["Audio Output"]
    C --> D["Output: VCR, TV, DVD"]
    D --> E["Output: IN, OUT (OPTICAL)"]
    style A fill:#f9f,stroke:#333
    style B fill:#ccf,stroke:#333
    style C fill:#cfc,stroke:#333
    style D fill:#fcc,stroke:#333
Figure 11. Connecting the TV to an A/V receiver
Important
A/V Receivers with HDMI Inputs
If your A/V receiver has an HDMI input, use one of the audio connections described here instead of an HDMI connection.
Note:
- On rare occasions, an HDMI signal may be copy-restricted and cannot be output from the TV as a digital signal. To hear these copy-protected signals through the A/V receiver, use connections for analog A/V receivers.
- Check the A/V receiver's Owner's Guide for information concerning use of the digital input and switching between digital sound and analog stereo sound from the TV.
Older Cable Box
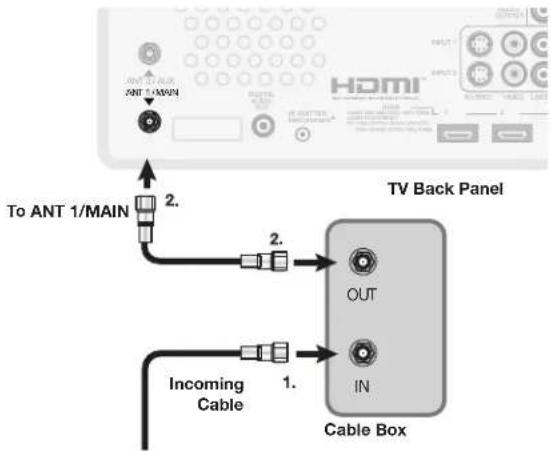
Required: One coaxial cable
Note: This connection is not recommended. The other connections described in this chapter provide better quality audio and video to the TV and allow NetCommand to work with the cable box.
- Connect the incoming cable to IN on cable box.
- Connect one coaxial cable from OUT on the cable box to ANT 1/MAIN on the TV back panel.
flowchart
graph TD
    A["To ANT 1/MAIN"] -->|2.| B["TV Back Panel"]
    B -->|2.| C["Cable Box"]
    C -->|1.| D["Incoming Cable"]
Figure 12. Connecting an older cable box
Camcorder
Inputs on the front of the TV offer the most convenient way to connect a camcorder. If your TV model does not have a front input matching the camcorder's output, use one of the matching jacks on the back of the TV.
Jacks on the TV front panel offer the most convenient way to connect a camcorder
natural_image
Illustration of a computer monitor with a scroll wheel and pointer, no text or symbols presentComposite Video Connection
Required: Analog stereo audio and composite video cables supplied with the camcorder.
- Connect a composite video cable from VIDEO OUT on the camcorder to INPUT 3/VIDEO or VIDEO/Y on the TV.
- Connect left (white) and right (red) audio cables from AUDIO OUT on the camcorder to INPUT 3/AUDIO L and AUDIO R on the TV.
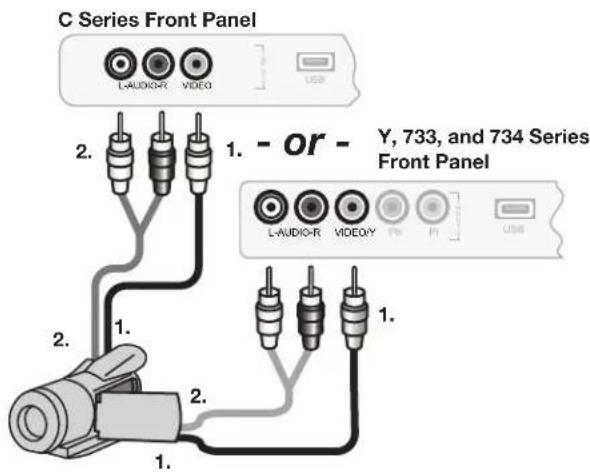
Figure 13. Composite video connections for a camcorder
Component Y Pb Pr Video Connection
Required: Analog stereo audio and component video cables supplied with the camcorder.
Note: Your model may have component video inputs on the front of the TV as shown in the diagram below. Otherwise, use a set of component video and audio jacks on the back of the TV.
- Connect component video cables from VIDEO OUT on the camcorder to one of the TV's sets of COMPONENT jacks.
- Connect left (white) and right (red) audio cables from AUDIO OUT on the camcorder to AUDIO L and AUDIO R on the TV.
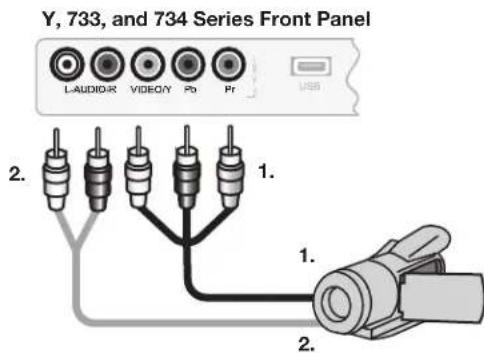
Figure 14. Component video connections for a camcorder
HDMI Connection
Required: HDMI cable supplied with the camcorder.
Connect the camcorder to the TV's HDMI jack.
Note: Your model may have an HDMI input on the front of the TV as shown in the diagram below. Otherwise, use an HDMI jacks on the back of the TV.
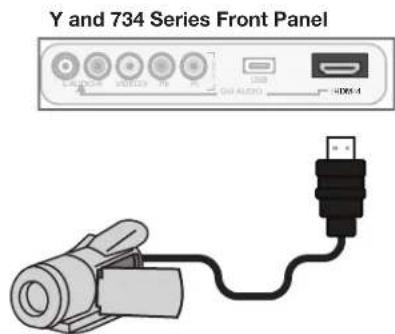
Figure 15. HDMI connection for a camcorder.
4
TV Operation and Features
Choosing a Viewing Source

Input Selection menu
Choose a viewing source from the Input Selection menu. The current TV input appears as a full-color icon in this menu.
- Press INPUT to display the Input Selection menu. If there are only two inputs to the TV, INPUT switches between them without displaying the menu.
- Highlight an input icon using ▲▼.◀▶
- Press ENTER to switch to the input and close the menu.
More About the Input Selection Menu
- To assign meaningful names to the icons, see the Inputs > Name menu in chapter 5, "TV Menu Settings."
- To rearrange the icons, see the Inputs > Order menu in chapter 5, "TV Menu Settings."
Sleep Timer
The Sleep Timer turns the TV off after the length of time you set.
Setting the Sleep Timer
- Press SLEEP on the remote control.
- Press SLEEP additional times to increase the time in 30-minute increments up to the maximum of 120 minutes.
- Press EXIT or wait five seconds without pressing any buttons for the message to disappear.
- Press SLEEP to view the time remaining before the sleep timer turns off the TV.
Cancelling the Sleep Timer
- Press SLEEP to display the on-screen message.
- Press SLEEP repeatedly until OFF is displayed.
Note: After five seconds of inactivity, the message box will disappear.
TV Tips
Turning the TV On or Off
To turn the TV on or off, point the remote control at the front of the TV and press the POWER button. Alternatively, press the POWER button on the front panel of the TV.
If You Turn Off the TV by Mistake
- Press POWER again within about 30 seconds, while the lamp is still hot, to have the TV come back on immediately.
- If the LAMP indicator starts blinking (about 30 seconds after you shut off power), wait about one minute for the LAMP indicator to stop blinking and press POWER to turn the TV on again.
Controlling Sound Volume
Press VOL ↗ to adjust the sound level. See also "Controlling A/V Receiver Sound Volume" in chapter 2, "TV Setup."
Changing Channels (antenna sources)
To change channels:
- Enter the channel number using the number keys on the remote control and press ENTER. For a two-part digital channel, such as 3-1, press 3 CANCEL 1 to enter a dash (separator).
- Press CH ✗ to change channels one channel at a time.
- Press and hold CH ↗ to move quickly through channels.
- Press QV (QuickView) to switch back to the previously tuned channel.
- Press GUIDE to display ChannelView channel listings, highlight a channel, and press ENTER.
- Use the FAV (Favorites) feature to set up lists of favorite channels and tune to them with the FAV key. See “Setup Menu” in chapter 5.
NOTE: Memorize channels to make finding channels easier. See the Setup > Scan menu.
Remote Control
- POWER: Turns TV power on and off.
- Slide Switch: Selects the A/V device to be controlled by the remote control. Set the slide switch to TV for operation of the TV and NetCommand-controlled devices. Control of additional devices requires programming (see Appendix D, "Programming the Remote Control."
- SLEEP: Sets the TV to turn off within 2 hours.
- Digits/Letters: Press digits for channel numbers, then press ENTER for faster tuning. Use numbers and the CANCEL key to enter digital sub-channel numbers. Use also for entering letters or names into menus. To select letters when naming channels, repeatedly press the associated number key. Press ENTER to set the letter. Special characters are available with the 1 and 0 keys:
| 1 | ! & blank space |
| 0 | / * - |
- -/CANCEL (SUB-CHANNEL/CANCEL): When entering digital channel numbers, adds a separator between main and sub-channel numbers. Clears FAV and some menu entries.
- QV (QuickView™): Switches between the current channel and the last channel viewed.
- MUTE: Turns TV sound on and off.
- SPLIT: Not used on this model.
-
FAV (Favorites): Scans through memorized lists of favorite channels. See "Setup Menu" in chapter 5, "TV Menu Settings," for more information.
-
VOL ∧ (Volume Up/Down): Changes sound level.
-
CH/PAGE ✗ (Channel or Page Up/Down): Scans up or down through memorized channels. Pages up and down through screens when used with ChannelView™.
-
FORMAT: Changes the shape and size of the TV picture.
-
INPUT: Displays the Input Selection menu from which you can select an input source to view, such as an antenna input (ANT 1/2) or a connected device.
-
▲▼ (Adjust Up/Down/Left/Right): Navigate menus and change settings.
-
ENTER: Selects a channel number or menu item.
-
AUDIO: Selects individual audio settings to adjust.
-
VIDEO: Selects individual video settings to adjust.
-
GUIDE: Displays or removes ChannelView™ channel listing for ANT 1 and ANT 2. Displays DVD disc or top menu for a NetCommand-controlled DVD player.
-
INFO: Displays an on-screen summary of the current device in use and any broadcast information avail-
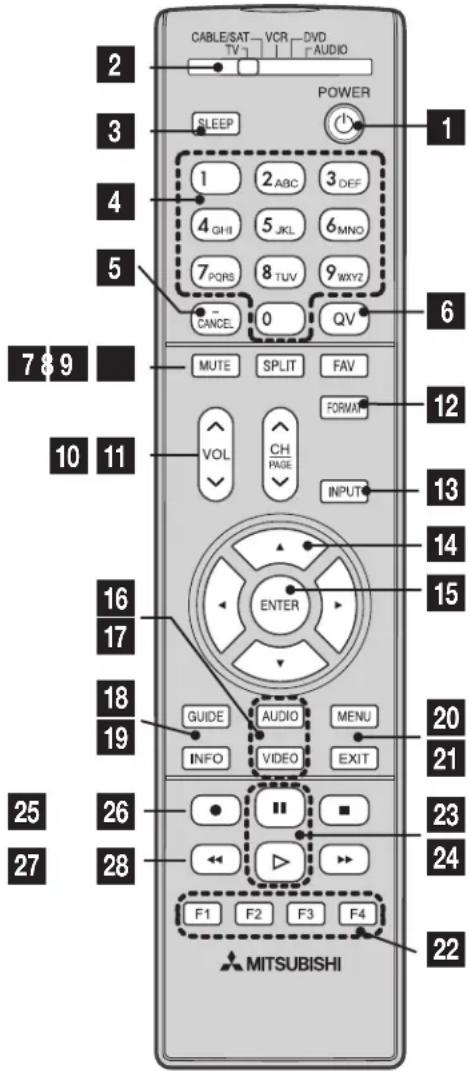
able, including current V-Chip ratings information. See chapter 4, "TV Operation and Features," for details.
-
MENU: Displays the main TV menu using the on-screen menu system. When a sub-menu is open, backs up one menu level.
-
EXIT: Closes TV on-screen menus/displays.
-
F1-F4
For devices under NetCommand control: Perform NetCommand "Learning" to assign your choice of functions to the F1–F4 keys.
For devices operating independently of NetCommand: The F1–F4 keys work like the A, B, C, D buttons on some cable boxes, satellite receivers, and DVD players. Program the remote control for your equipment and test the keys. See Appendix D, "Programming the Remote Control."
- ☐ PAUSE): Freezes a broadcast TV picture. See below for use with recordable media.
Remote Control, continued
Record/Playback Keys
Use any of these methods to enable the recording and playback commands:
- Program the remote control for your DVR, VCR, or DVD player/recorder and set the slide switch to VCR, DVD, CABLE/SAT, or AUDIO as appropriate.
- Y and 734 series TVs: Perform NetCommand IR "learning" for the device.
-
Check HDMI devices for compatibility with the TV's NetCommand for HDMI feature (see below).
-
(PAUSE): Pauses a VCR, DVR, or DVD. See above for use during TV viewing.
-
(PLAY): Plays a VCR, DVR, or DVD.
- (RECORD): Records with a VCR or DVR.
- (STOP): Stops play of a VCR, DVR, or DVD.
- (REVERSE): Rewinds a VCR. Reverse scans a DVR or DVD.
- (FORWARD): Fast forwards a VCR. Forward scans a DVR or DVD.
Note: To operate other audio/video devices:
- See Appendix D, "Programming the Remote Control."
- See chapter 6, "NetCommand," for NetCommand IR "Learning" of device keys.
- For HDMI devices compatible with the TV's NetCommand for HDMI feature, see below.
NetCommand for HDMI Devices
The TV's remote may operate some functions of compatible HDMI devices able to receive commands through the HDMI cable. Test your equipment with the TV's remote to find out which commands are supported. See below for commands that may be available, depending on the individual device.
Press PLAY on the device itself to:
- Turn on the TV if not already on
- Switch to the device (no need to display the Input Selection menu)
- Begin play of the device
VCR, DVD, and DVR functions that may be available:
| Record/Playback | Menu Navigation | Channel Tuning | Other |
| CH ∧ ∨ | GUIDE | ||
| ENTER | Digits 0-9, CANCEL | F1 (content) | |
| CANCEL (to cancel) | ENTER | MENU |
Low-Battery Indicator
If you press a key and the POWER key blinks five times, replace the remote control's batteries.
Resetting the Remote Control
If the slide switch is set to TV and the TV does not respond properly, reset the remote control.
- Press and hold POWER for several seconds until the button blinks twice and goes off.
- Release the POWER button.
- Press keys 0 0 9 3 5 and the POWER button will blink twice when you finish entering the code. While entering the code, pause for a moment between each key press to ensure it is recognized.
Care of the Remote Control
- Use only alkaline batteries.
- Be within 20 feet of the equipment.
- Do not press two or more buttons at the same time unless instructed to do so.
- Do not allow unit to get wet or become heated.
- Avoid dropping on hard surfaces.
- Do not use harsh chemicals to clean. Use only a soft, lightly moistened cloth.
- Do not mix old and new batteries.
ChannelView™ Channel Listings
ChannelView shows memorized channels on ANT 1 and ANT 2. It displays channel names and program information as sent by broadcasters or your local cable service provider and may be incomplete. No program information is displayed for analog channels. An analog channel name is displayed only if you assigned a name in the Setup > Edit menu.
To receive ChannelView updates, set the Energy Mode to Fast Power On and leave the TV powered off for a while each day.
Using ChannelView
| Feature Press Key | |
| See ChannelView listings from ANT 1 or ANT 2. | Press GUIDE. |
| Close ChannelView Press | GUIDE or EXIT. |
| Scan channels one by one. | Press and hold ▲or .▼ |
| Scan channels quickly. | Press and hold PAGE ^/∨. |
| Jump to listings for a specific channel. | 1. Enter the channel number (see numbers in upper left.2. Press ENTER. |
| See more of the program description. | Press INFO. |
| Move navigation to the program guide. | Press ▶ |
| Move navigation to the channel guide. | Press ◀ |
| Tune to the highlighted channel. | Press ENTER. |
Status Display
Press the INFO key to see the on-screen status display. The most common displays are shown here. Seldom or never do all the status indicators appear at the same time.
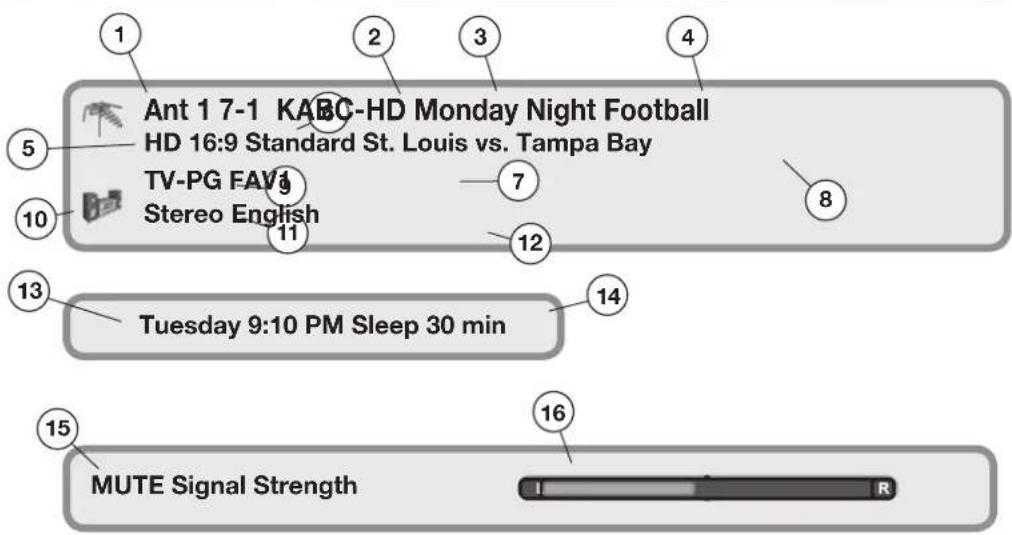
On-screen status display. Sample information shown for a digital program source.
| Analog Sources Digital Sources | ||
| 1. | Source antenna or input | Source antenna or input |
| 2. | Analog channel being received (antenna sources only) | Digital major and sub-channel numbers (antenna sources only) |
| 3. | Analog channel name (if named in the Setup > Edit menu); antenna sources only. | Digital Channel Name (if broadcast or if named in the Setup menu > Edit options; antenna sources only) |
| 4. | (Does not apply) | Program name (if broadcast; antenna sources only) |
| 5. | Signal Type Being Received. Possible:On antenna sources or INPUT 1/2: 480iOn component jacks: 480i, 480p, 720p, 1080i | Signal Type Being Received. Possible:On antenna sources: SD 4:3, SD 16:9, HDOn HDMI: 480i, 480p, 720p, 1080i, 1080p, all PC resolutions |
| 6. | Screen Format in use. Possible:Analog 480i /480p signals: Standard, Expand, Zoom, Stretch, Stretch Plus, Narrow720p/1080i signals: Standard, Wide Expand | Screen Format in Use. Possible:SD 4:3, 480i, or 480p: Standard, Expand, Zoom, Stretch, Stretch Plus, NarrowSD 16:9 or HD 16:9, 720p, or 1080i: Standard, Wide Expand1080p: Standard |
| 7. | Current FAV bank number of channel (antenna sources only) | Current FAV bank number of channel (antenna sources only) |
| 8. | (Does not apply) | Program description (if broadcast; antenna sources only)) |
| 9. | V-Chip rating (antenna sources or INPUT 1/2 only) | V-Chip rating (antenna sources or INPUT 1/2 only) |
| 10. | Audio Source. Possible:TV speakers, external sound system | Audio Source. Possible:TV speakers, external sound system |
| 11. | Listen To indicator: Stereo, Stereo SAP, SAP (antenna sources only)) | Stereo, Surround, Dual Mono (antenna sources only) |
| 12. | (Does not apply) | Current language (antenna sources only) |
| 13. | Day and time | Day and time |
| 14. | Sleep Timer remaining time | Sleep Timer remaining time |
| 15. | Mute indicator | Mute indicator |
| 16. | (Does not apply) | Signal strength indicator (antenna sources only) |
FAV (Favorite Channels)
Use the six Fav channel banks to store groups of your favorite channels from ANT 1 and ANT 2. You can set up a Fav channel bank for each of your favorite program types or set up a bank for each TV user.
You may prefer to perform FAV channel setup from a menu. See chapter 5, "TV Menu Settings," and the Setup > Edit options.
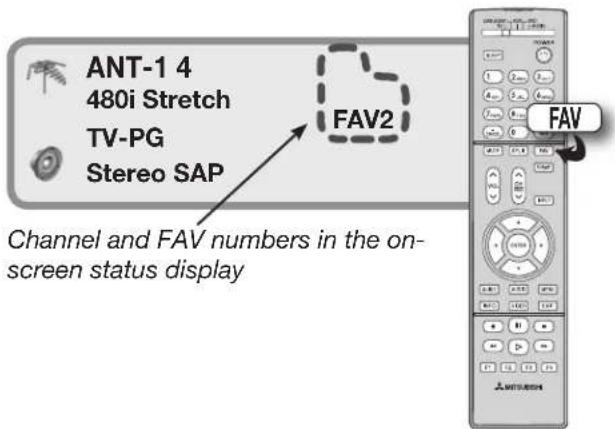
Using FAV Channels
| See the current FAV bank number Press INFO. | |
| View FAV banks | 1. Press the FAV key. Wait for the TV to tune to a channel in the current FAV bank.2. Press the e FAV key repeatedly to cycle through the channels available in the current FAV bank. |
| Change FAV banks | 1. Press the FAV key. Wait for the TV to tune to a channel in the current FAV bank.2. When tuning is complete and while the TV status display is still visible on screen, press the number key for the desired bank.Note:Wait for the channel change to finish before pressing the number key. Otherwise, the TV may ignore the FAV number. |
| If no FAV banks are set up The | FAV key switches to the previously tuned channel; works like the QV key. |
FAV Setup Using Only the Remote Control
| Add FAV channels 1. While watching TV, tune to the channel you want to add to the current FAV memory bank. See the instructions above if you need to change to a different FAV bank.2. Press and hold the FAV key for about 2 seconds. When FAV and the memory bank number appear under the channel number, the channel has been successfully added. | |
| Remove FAV channelsThis procedure removes the channel only from the selected bank and leaves the other banks unchanged. | 1. While watching TV, press the FAV key.2. While the TV status display is still visible on screen, press the number key for the memory bank.3. Press the FAV key repeatedly until you see the desired channel in the on-screen status display..4. While the channel number and FAV indicator (with correct bank number) are still displayed on the screen, press CANCEL. You must press CANCEL while the indicator is displayed. When the FAV indicator disappears after pressing CANCEL, the channel has been successfully removed. |
TV Signals and Display Formats
This is a widescreen TV, also known as a 16:9 TV. This shape reflects the new types of images available from HDTV and many DVDs. There are still many older style narrow-screen images (called 4:3 aspect ratio) you will encounter. While there is no perfect solution for displaying a squarish, narrower image on a wide screen, Mitsubishi offers several display formats from which you can choose.
Press FORMAT on the TV remote control to cycle through the available display formats. The last-used format for each device is used when you return to that device.
DVD Definitions
Anamorphic (or Enhanced for WideScreen TV)
These DVDs are recorded in a special way to properly show widescreen images on 16:9 TV sets using the Standard format mode. This is the recommended viewing choice.
Non-Anamorphic (or 4:3, 1:33:1, Letter Box, or Full Screen)
These DVDs are recorded for use with traditionally shaped, squarish TVs. They may be full screen (4:3 or 1:33:1) which crops movies to fit the narrow TV, or letter box, which adds black top and bottom bars.
This information may be listed on the DVD case. Some DVDs support both types of recordings.
Signal Definitions
480i Signals: Traditional analog interlaced signals from or through ANT-1 and 2, INPUT 1–3, COMPONENT and HDMI jacks.
480p Signals: Progressive-scan DVD signals on COMPONENT and HDMI jacks.
720p and 1080i Signals: High-definition signals received through COMPONENT and HDMI jacks. These signals are always 16:9 (widescreen).
SD 4:3: Standard-definition squarish-screen format signals from digital channels on ANT 1 and ANT 2.
SD 16:9: Standard-definition widescreen format signals from digital channels on ANT 1 and ANT 2.
HD: High-definition wide-screen format signals from digital channels on ANT 1 and ANT 2. These signals are always 16:9 (widescreen).
TV Display Format Definitions
Standard: This is the full-screen format. HDTV signals use this format. This format is useful for displaying Anamorphic DVDs that have 1.78:1 or 1.85:1 aspect ratios. Anamorphic DVDs that have a 2.35:1 aspect ratio are displayed with black bars at the top and bottom, but show the entire image correctly. Narrow (4:3) images are stretched evenly from side to side. Available for all signals.
Expand: This enlarges the picture to fill the screen, cropping off some of the image at the top and bottom. This is useful for reducing the letter box top and bottom bars of non-anamorphic DVD images. Available for 480i, 480p, and digital SD 4:3 signals only.
Zoom: This enlarges the picture, cropping off some of the image at each side and top and bottom. This is useful for removing or reducing the black top and bottom bars on anamorphic DVDs with a 2.35:1 aspect ratio. Available for 480i, 480p, and SD 4:3 signals only.
Stretch: This format stretches a narrow (4:3) image across the screen; there is less stretch in the center than at the sides, however. This allows the entire narrow image to be displayed across the screen with less distortion than is seen in the Standard format. Available for 480i, 480p, and SD 4:3 signals only.
Stretch Plus: Similar to stretch mode, but to minimize distortions on the side, the picture is expanded to crop off portions of the top and bottom. Except when displaying menus, press ▲ to adjust the position of the picture vertically. Available for 480i, 480p, and SD 4:3 signals only.
Narrow: This format displays narrow (4:3) images in their original shape, and adds stationary black side bars to fill the screen. Available for 480i, 480p, and SD 4:3 signals only.
Wide Expand: Enlarges the picture, cropping some of the image on both sides. This Expand format is useful to remove or reduce black side bars added to narrow images that are converted to 16:9 signals for digital broadcast. Available for 1080i, 720p, digital SD 16:9 and digital HD signals.
Note: All high-definition channels send widescreen (16:9) signals, but not all programming sent on these channels was created for this format. The broadcaster may stretch the image or add side bars to fill the widescreen area.
TV Display Formats
See descriptions on the preceding page.
| ORIGINAL SIGNALNon-anamorphic or SD 4:3 | ORIGINAL SIGNALAnamorphic DVD |
| TV DisplayStandard(not recommended, distorted) | TV DisplayStandard(recommended) |
| Expand(recommended for letterboxed) | Expand(not recommended, distorted)not available for HD, SD 16:9 or analog 720p, 1080i |
| Zoom(not recommended, distorted) | Zoom(not recommended for anamorphic 2.35:1)not available for HD, SD 16:9 or analog 720p, 1080i |
| Stretch(recommended for standard broadcast) | Stretch(not recommended, distorted)not available for HD, SD 16:9 or analog 720p, 1080i |
| Stretch Plus(recommended for standard broadcast) | Stretch Plus(not recommended, distorted)not available for HD, SD 16:9 or analog 720p, 1080i |
| Narrow | Narrow(not recommended, distorted)not available for HD, SD 16:9 or analog 720p, 1080i |
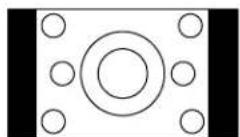
(with side bars in broadcast)
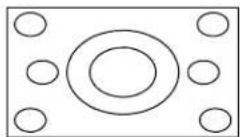
available only for digital SD 16:9, HD, analog 1080i or 720p
(recommended to remove side bars)
Viewing JPEG Picture Files
JPEG Photos and the USB Photo Port
- Connect your digital camera or USB drive to the USB Photo port on the front of the TV. If using a camera, power it on and set it to playback mode.
The USB Photo menu displays while files are still being read. Wait until you see the completion message on screen before continuing.
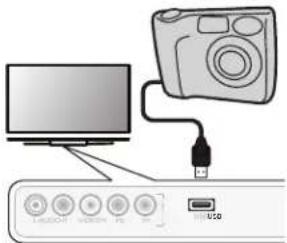
Note: Some manufacturers' devices may be incompatible with the TV. If the TV is unable to display your photos, you can:
- Try transferring files to a different USB device.
- Use the camera's composite video output as described later in this chapter.
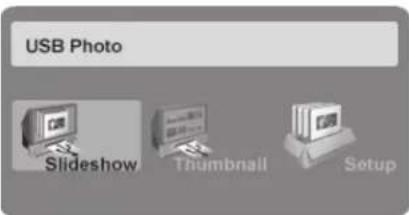
USB Photo menu
- After files have been read, you can do the following from the USB Photo menu:
USB Photo Menu Options
| Start slide show. With the Slideshow icon high-lighted, press ▶ or ENTER. | |
| Activate menu options. | Highlight an icon and press ENTER to:• start the slide show• display picture thumbnails• open the Media Setup submenu. |
| Display or close the Main menu. | Press MENU. |
| Display status for the file source. | Press INFO. |
| Select a different connected device | 1. Press INPUT.2. Highlight the icon for a different device.3. Press ENTER. |
| Clear status display or menu to show the USB Photo menu | Press EXIT. |
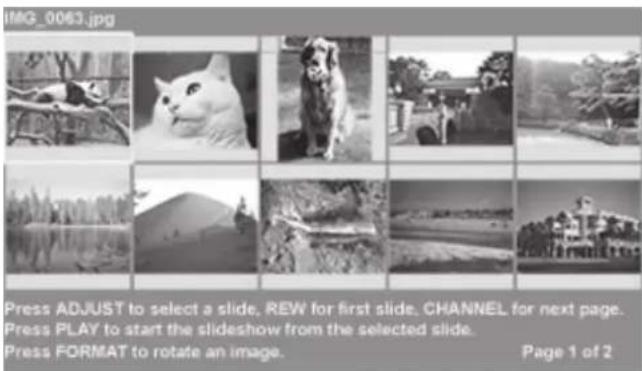
JPEG Thumbnail Menu
Use these keys while viewing JPEG thumbnail images:
Keys for the JPEG Thumbnail Menu
| ▲▼◀▶ Move the highlight from image to image. | |
| FORMAT Rotate the thumbnail clockwise in 90° increments | |
| ▷ or ENTER | Play the slide show starting with the high-lighted thumbnail. |
| ▶▶ | Highlight the last thumbnail on the current page. |
| ◀◀ | Highlight the first thumbnail on the current page. |
| CH/PAGE ∧/∨ | Display the next or previous page of thumbnails. |
| EXIT | Close the Thumbnail menu and display the USB Photo menu. |
| MENU | Close the Thumbnail menu and display the Main menu. |
| INPUT | Close the Thumbnail menu and display the Input Selection menu. |
Notes on Viewing JPEG Files
- Large files or high-capacity storage devices may take a long time to display. The screen will be blank while files are read.
- Use only one source device at a time.
IMPORTANT
Stop playback or change to a different TV input before disconnecting from the USB photo port.
Slide Show
Use these keys during the slide show:
| Keys for JPEG Picture Slide Show | |
| Begin or resume slide show playback | |
| Pause or resume playback while in automatic advance mode. | |
| Advance to the next slide. | |
| Go to the previous slide. | |
| FORMAT | Rotate the slide clockwise in 90° increments. |
| Stop slide show and display the USB Photo menu. | |
| INFO | Display status for the viewing device and current image. |
| INPUT | Display the Input Selection menu. |
| MENU | Display or remove the TV Main menu. |
Note: Always press ☐ STOP) to stop slide show play-back before disconnecting from the USB Photo port.
Media Setup Menu
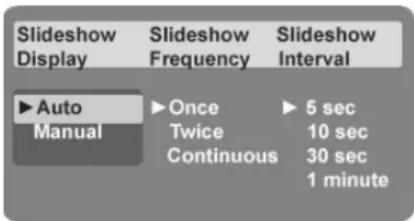
Media Setup menu
In the Media Setup menu you can adjust the slide show display, number of repetitions, or display interval.
- Select either Auto or Manual advance. During manual operation, press ☐ ENTER to advance to the next slide.
- For automatic advance, select the number of times (frequency) to play the complete slide show: Once, Twice, or Continuous.
- For automatic advance, select the time interval for display of each slide. The interval you select here is the minimum time between slides; actual time may be longer for larger files.
- Press EXIT to close the Media Setup menu and return to the USB Photo menu.
IMPORTANT
The TV can read JPEG files as created by the camera. If you edit a picture file on a computer and resave the image, the TV may be unable to read the resaved file.
USB Photo Menu Compatible Picture Files
- Still images recorded on digital cameras using the Exchangeable Image File Format, version 2.1 (EXIF 2.1) standard for digital still cameras and Design Rules for Camera File Systems version 1.0 (DCF 1.0)
- Some images opened and resaved on a computer may not play back or may not display in the thumbnail list. This happens if the files were resaved in an incompatible format.
- Full path file names can be no longer than 50 characters and must end in a .jpg extension. Not all 50 characters will display.
- Images on storage devices with a capacity of over 256 MB can take a longer initial time to display.
Photos and Moving Video as Composite Video
Connect the camera to the TV using a composite video cable if:
- You are unable to see images using the USB photo port.
• You wish to view moving video from the camera.
The TV's USB Photo menu will be unavailable and you must control the slide show through the camera. Display resolution is standard-definition (480i).
- Refer to the owner's manual supplied with the camera for instructions needed for this setup.
- Set the camera's output signal type to NTSC and put the camera into playback mode.
- With the camera still turned on, connect your digital camera's composite video cable (usually yellow) to the INPUT 3 VIDEO/Y jack on the front of the TV. To hear audio, connect the camera's audio output cable to the INPUT 3 L-AUDIO jack.
- When the Auto Input Sensing screen displays, press EXIT or assign the name Camcorder.
- Press INPUT to display the Input Selection menu.
- Highlight the icon for the camera input and press ENTER.
- If viewing photos, advance through the images manually or set the camera to advance automatically.
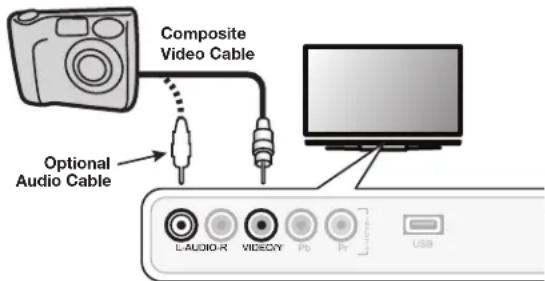
Camera connection using a composite video cable
5
TV Menu Settings
Main Menu
Press MENU on the remote control to open the Main menu.
Icon Menu Name and Description
| AV Menu | Customize picture and sound settings. 35 | ||
| Captions Menu | Turn closed captions on and off; customize caption displays. | 38 | |
| Setup Menu | Perform basic TV setup. Set language, scan (memorize) channels, set the TV clock, edit channel options, lock TV use by channel, set the Energy Mode, set the auto-on TV Timer. | 39 | |
| Inputs Menu | Assign names to TV inputs, change icon order in theInput Selectionmenu. For Y and 734 series models, perform NetCommand IR “learning.” | 43 | |
| Lock Menu | Restrict TV use by program ratings and by time of day. Disable the front-panel control buttons. Set a pass code. | 44 |
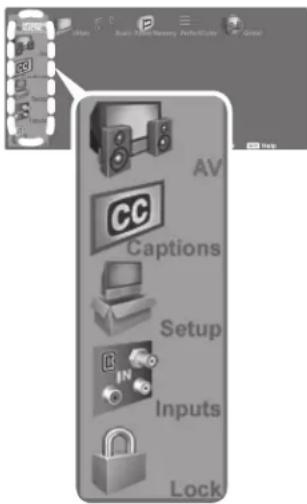
Remote Control Keys for the TV Menu System
The following keys help you use the menu system. Some keys are duplicated on the TV's front panel.
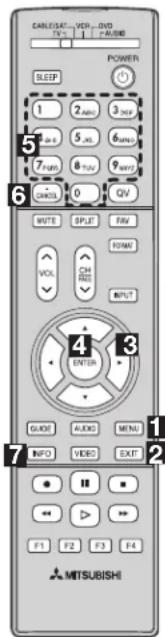
Key Function
| 1 | MENU | Display or close theMainmenu or move back one menu level. |
| 2 | EXIT | Close all menus and return to TV viewing. |
| 3 | (Ajust Left/Right Keys) | Move through screens to select menu options.Change settings.Scroll through lists. |
| (Adjust Up/Down Keys) | ||
| 4 | ENTER | Start an automatic function or check/uncheck a check box. When setting time, move from hour digits to minutes digits and from month to day to year digits. |
| 5 | Numbers Letters | Enter channel numbers.Enter custom names in some text boxes. |
| 6 | CANCEL | Clear a setting or stop an automatic function.Add a separator in a digital channel number. |
| 7 | INFO | Get context-sensitive help. |

AV Menu
An on-screen slider displays when making some audio and video adjustments. Numeric values represented on the slider range from 0 (minimum) to 63 (maximum), with 31 as the mid-point.
Note: The PerfecTint, SharpEdge, and Deep Field Imager video adjustments (marked §) are offered on 734 series models only.
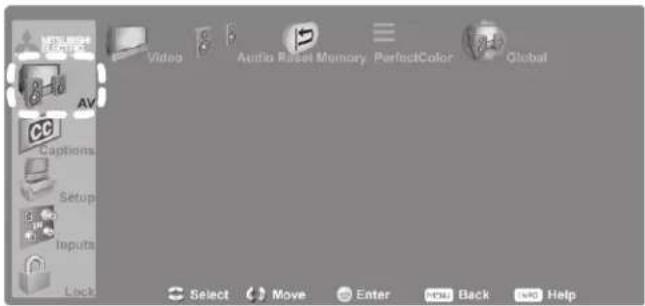
AV menu for audio and video adjustments
AV Menu Options

Video See the description of video adjustments later in this section.

Audio See the description of audio adjustments later in this section.

Reset
- To reset audio and video adjustments for the current input, highlight the Reset icon and press ENTER.
- Reset has no effect on settings for Balance, Listen To, Language, and Film Mode.

PerfectColor
PerfectColor Sliders
Adjust the saturation (intensity) of six colors for the current image source.
PerfectTint Sliders §
Adjust six hues for the current image source
Highlight the PerfectColor icon and press ENTER to display the PerfectColor menu. Settings are retained in memory independently for each TV input.
• To switch between PerfectColor and PerfecTint adjustments, highlight Adjust Mode and press ◀ ▶.
- Press ▲to move from one color bar to the next.
- Press ◀to change settings.
- Press CANCEL to restore default settings.
- Press MENU to return to the Main menu.

Global
Video Noise
High, Medium, Low, Off
Reduce minor noise (graininess) in the picture. Use Low with good-quality signals. Use High with poor-quality signals. Use Off to leave the picture unaltered. Saved by input
Video Mute On, Off On
displays a blue background when no signal is being received on the current INPUT, COMPONENT, or HDMI jack.
Film Mode (for 480i and 1080i signals only)
Auto, Off
In Auto, the TV automatically detects and applies film-decoding correction. Try the Off setting if images show too many jagged edges. Saved by input.
SharpEdge § On, Off Add special edge enhancements to make the image appear sharper. Saved by input.
Lamp Mode Standard, Bright
Standard is for most viewing conditions and may extend lamp life by using lower wattage. Use Bright in brightly lit rooms.

Video Menu
To make video adjustments:
• From the Video menu:
- Press ▲to highlight an option.
- Press ◀t▶ display the submenu and adjust.
- Press MENU to return to the AV menu.
- While watching TV: Press the VIDEO key repeatedly to display the video option you want to change.
Press ◀ to change settings.
Note: See chapter 2, "TV Setup," for additional adjustments available for images from a computer.
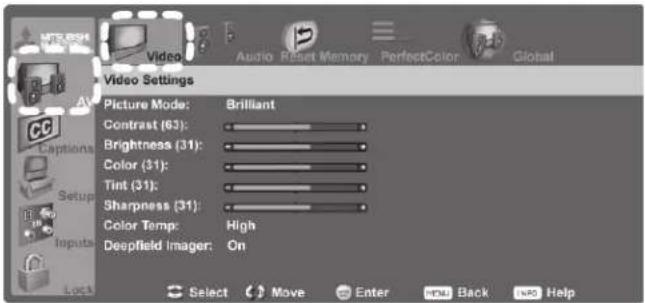
AV menu, Video options
| Video Menu Options | |||
| Picture Mode Brilliant | For use under strong light | Set the Picture Mode first before changing other video settings, as some are stored independently for each Picture Mode. Use Picture Modes to optimize the image for different conditions. | |
| Game Optimize picture and video processing for gaming consoles. Available only when the name of the input is Game. | |||
| Bright For most daytime viewing and x.v.Color sources | |||
| Natural For most nighttime viewing and x.v.Color sources | |||
| Contrast • Adjust the white-to-black level | |||
| Brightness | • Adjust overall picture brightness• Settings are stored independently for each Picture Mode. | ||
| Color | Adjust overall color intensity | ||
| Tint | Adjust the red-to-green ratio. | ||
| Sharpness | Adjust picture detail and clarity. | ||
| Color Temp | Adjust the white balance. Settings are stored independently for each Picture Mode. | ||
| High Give white images a cool cast. May provide the most realistic picture under bright lighting. | |||
| Low Give white images a warm cast. Natural/Color Temp at the low setting displays video at approximately the 6500K industry standard for NTSC pictures. | |||
| Deep Field Imager § | On | Black levels are dynamically enhanced in portions of the screen to provide strong contrast with detail over mixed screen content. | |
| Off | Contrast is adjusted uniformly across the entire screen. | ||
| Demo | Display a split picture to show on (right side) or off (left side). | ||


Audio Menu
To make audio adjustments:
• From the Audio menu:
- Press ▲to highlight an option
- Press ◀t▶ display the submenu and adjust.
- Press MENU to return to the AV menu.
- While watching TV: Press the AUDIO key repeatedly to display the audio option you want to change.
Press ◀ ▶ to change settings.
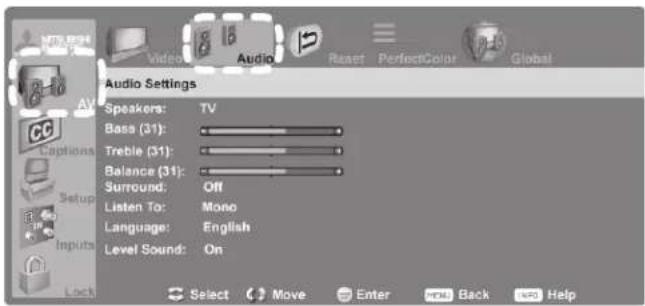
AV menu, Audio options
Audio Menu Options
| Speakers | The Speakers option displays if an A/V receiver connection has been detected. | |
| TV Turn on the internal TV speakers. | ||
| AV Receiver Turn off the TV speakers and hear sound only from a connected A/V receiver. | ||
| Bass Control volume level of low-pitched sound from the TV speakers. | ||
| Treble Control volume level of high-pitched sound from the TV speakers. | ||
| Balance | Control audio balance between the right and left TV speakers | |
| Surround | Off | No surround effects from the TV speakers (default) |
| Simulated Stereo | Create a simulated stereo effect through the TV speakers when watching a mon-aural (non-stereo) program. | |
| Surround Sound | Create a simulated surround effect through the TV speakers when watching a stereo program. | |
| Listen To(analog channels from ANT1/ANT2 only) | Stereo | Default setting. The TV plays stereo broadcasts in stereo and mono broadcasts in mono. The word Stereo is displayed when you tune to a channel broadcast-ing in stereo. |
| SAP(Second Audio Program) | Select an additional monaural sound track not audible during normal TV viewing. The SAP signal might be related to the program (such as a sound track in a foreign language), or it might be unrelated (such as a weather report). If an SAP signal is broadcast, the letters SAP are displayed when you tune to the channel | |
| Mono | Reduce background noise. Use when receiving a weak stereo audio signal. All audio is played as mono with this setting. | |
| Language(digital channels from ANT1/ANT2 only) | English French German Italian Portuguese Spanish Other | Select the current language for a digital program from an ANT input. Each digital program may include up to seven language choices or none at all. |
| Level Sound | On, Off | Reduce differences in sound volume between programming segments, such as the difference between regular broadcast programs and commercial segments. |

Captions Menu
Captions on Analog Channels
The TV can decode captions from ANT 1/ANT 2 and INPUT 1/INPUT 2. Broadcasters can send either standard closed captions or text service. Standard closed captions follow the dialogue of the program and display in a small section of the screen. Text-service closed captions often contain information such as weather or news and cover a large portion of the screen.
IMPORTANT
- Analog text-service options display a large black or gray box on the screen when no signal is being broadcast.
- The content of captions is determined by the broadcaster. If captions show strange characters, misspellings, or odd grammar, it is not a malfunction of the TV.
Captions on Digital Channels
The TV can decode captions from ANT 1/ANT 2 only. Broadcasters can send up to six different captioning selections or can send analog captions that match those sent by the analog station. A TV station may broadcast only one or two types of captions or none at all.
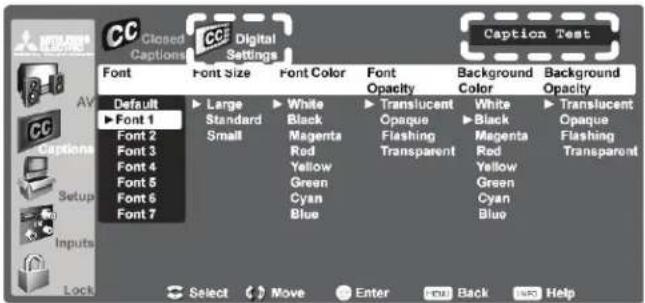
Digital Settings menu. Check the caption test area (upper right) to see how custom settings will look.
Captions Menu Options
| Closed Captions | Analog Captions | On if Mute CC 1-CC 4 Text 1-Text 4 Off | • On if Mute: Display analog closed captions signal CC 1 when audio from the TV speakers is muted. When watching TV, press MUTE to turn captions on/off.• CC 1-CC 4: Standard closed-caption signals• Text 1-Text 4: Text-service signals |
| Analog Background | Gray, Black Select either a gray or black text background to make analog closed captions easier to read. | ||
| Digital Captions | On if Mute Caption 1- Caption 6 Off | • On if Mute: Display digital closed caption signal Caption 1 when audio from the TV speakers is muted. When watching TV, press MUTE to turn closed captions on/off.• Caption 1-Caption 6: Caption signals sent by the broad-caster | |
| Digital Settings | Font | Default Font 1-Font 7 | Default changes settings to those selected by the caption provider, or, if none, to the TV's own caption defaults. Use Fonts 1 through 7 to give captions a custom appearance. |
| Font Size | Large Standard Small | Large is the recommended size. | |
| Font Color White, Black, Magenta, etc. Guidelines for setting digital captions: | |||
| Font Opacity Translucent, Opaque, Flashing, Transparent | • Use contrasting colors for captions and background.• Check readability of captions using the sample text in the upper right corner of the menu.• A white font on a black translucent background makes an easy-to-read combination. | ||
| Background Color | White, Black, Magenta, etc. | ||
| Background Opacity | Translucent, Opaque, Flashing, Transparent | ||

Setup Menu
Use the Setup menu to:
- Select English or Spanish for menus and on-screen text.
- Scan the channels available for the antenna or cable service connected to the ANT 1 or ANT 2 jacks.
- Edit channel options, including channel locking.
- Set the TV's internal clock.
- Set the TV Timer to turn on the TV automatically at a designated time.
- Set the energy mode for power consumption when the TV is powered off.
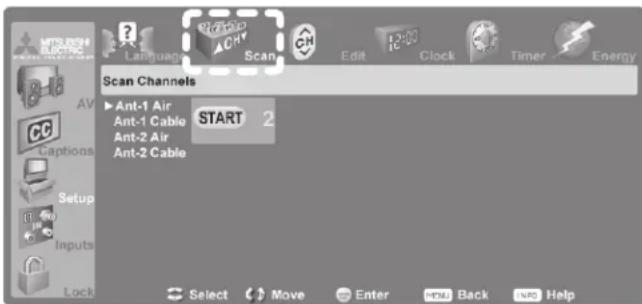
Setup menu, Scan option
Setup Menu Options
 Language Language | English Spanish | Display on-screen menus in either English or Spanish.Note:To listen to audio in other languages (when available), see the section on theAVmenu,Audiosubmenu, and refer to either Listen To > SAP (analog signal) or Language (digital signal). |
 Scan Scan | Ant-1 AirAnt-1 CableAnt-2 AirAnt-2 Cable | Scan memorizes broadcast channels to make them easier to find. To start channel memorization:1. Highlight one of the input selections based on your connection to ANT 1 or ANT 2:• Air when connected to an indoor or outdoor antenna.• Cable when connected to direct cable (no cable box)2. Press ▶ highlight START.3. Press ENTER to start channel memorization for the selected input. |
Notes on Scan and channel memorization:
- Channel memorization may take up to 15 minutes to complete.
- To stop channel memorization before completion, press CANCEL.
-
When watching TV, press CH ▲ to move through memorized channels.
• To add a digital channel that does not appear in the Edit menu without repeating channel memorization: -
Look up the physical channel number for the new digital channel. www.antennaweb.org can help you find the physical channel number.
- Tune to any channel on the ANT 1 or ANT 2 input your antenna is connected to.
- Use the number keys and CANCEL to enter the physical channel number followed by “-1” and ENTER. For example, for physical channel 36, press
3 6 CANCEL 1 ENTER.
The TV will search for a digital channel on the channel 36 frequency. When it finds the channel, it will:
a. Add the channel to memory.
b. Change the channel number to the virtual channel number sent by the broadcaster.
c. Add to memory any associated sub-channels.

Setup Menu, continued
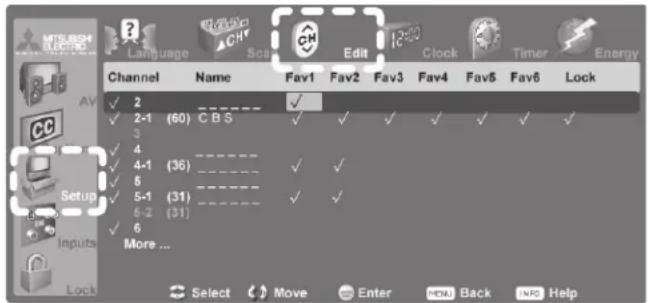
Virtual Channel Number (digital channels only)
A channel number sent by a local broadcaster to help identify their digital channel. Usually the virtual number is associated with the corresponding analog channel number. For example, a broadcaster may be associating digital channel 2-1 with their analog channel 2.
Physical Digital Channel Number
The channel number officially assigned to the actual broadcast frequency; shown on screen in parentheses.
Setup Menu Options
| Edit | Use the Edit menu to edit channel options when ANT 1 or ANT 2 is the current source,To highlight a channel number to edit:Press CH ↗ to jump to the next page of channel numbers. Press and hold CH ↗ to speed through pages.Press ▲▼ move through all channel numbers, one at a time. Press and hold to ▲▼ed through channel numbers.The TV tunes to the highlighted channel on release of CH ↗ ↗ . ▲▼ |
| Channel Channels marked with a check are in memory. To add or delete a channel from memory, highlight the channel number and press ENTER. To add a single digital channel not in the list, see the notes under Scan.Digital channels are listed by virtual channel number with the physical channel number shown in parentheses. | |
| Name Lets you assign a custom name up to six characters long to memorized channels.You can name analog channels and also name digital channels if broadcast without pre-assigned names.With the cursor in the Name field, press a number key repeatedly to cycle through the characters associated with the key.Press ENTER to set the letter and move to the next letter position. To delete the current character and move back one position, press CANCEL. | |
| Fav1-Fav6 Use the six Fav channel banks to store groups of your favorite channels. For example, you can set up a Fav channel bank for each of your favorite program types (e.g., sports, news, children's programs) or set up a bank for each TV user.Use ▲▼ to move the highlight through the Fav area of the screen.Press ENTER to insert a check mark to add the highlighted channel to one of the Fav banks.The same channel can be added to multiple FAV banksTo remove a channel from a Fav bank, highlight the check mark and press ENTER.To set up Fav channel banks without using this menu, see chapter 4, “TV Operation and Features.” | |
| Lock Lock channels so that a pass code is required to view them. When you rememorize channels, the lock settings are cleared.Highlight the Lock column and enter a pass code when prompted. If you previously set a pass code to open the main Lock menu, use the same pass code. See the description of the Main menu > Lock for more on pass codes.Press ENTER to insert a check mark to lock the highlighted channel.To unlock a channel, highlight the check mark and press ENTER. |

Setup Menu, continued
Use either the manual or auto method to set the clock. Set the clock if you wish to:
- Use the TV's Timer function.
- Maintain accurate ChannelView listings.
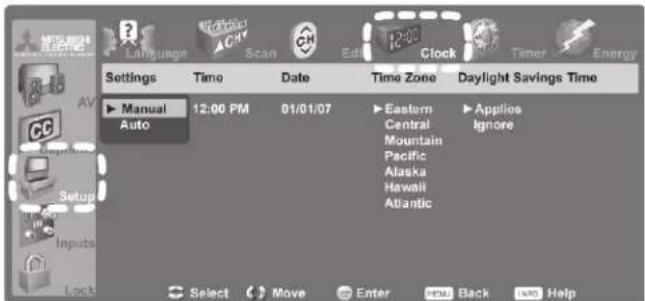
Setup menu, Clock options
Setup Menu Options

Clock
Settings Manual. To set the clock manually:
| 1. Select Manual. |
| 2. Set the time of day. |
| 3. Set the date. |
| 4. Select your time zone. |
| 5. Select either Applies or Ignore for Daylight Savings Time. |
Note: If using Manual, each time the time change occurs, you must open this menu and set the TV's clock ahead or back.
Auto. To set the clock automatically:
| 1. Select Auto. |
| 2. Select your time zone. |
| 3. Select either Applies or Ignore for Daylight Savings Time. |
| 4. After exiting the menus, tune the TV to a station carrying XDS data, typically a PBS station. |
Note:
| With the Auto setting, the TV's clock adjusts automatically to daylight savings time.The TV's clock will be reset if you tune to a channel sending incorrect time data. To prevent unwanted clock resets, first use the Auto method to set the clock from a channel sending the correct time, then change the method to Manual. |
| Time(Manualoption only) | 1. With the hour highlighted, press ▲repeatedly to change the hour and the AM/PM indicator. Press and hold to change the hour display quickly.2. Press ENTER to set the hour.3. With the minutes highlighted, press ▲tochange the minutes. Press and hold to change the minutes display quickly. |
| Date(Manualoption only) | 1 With the month highlighted, press ▲ to select. Press ENTER to set.2. With the day highlighted, press ▲ to select. Press ENTER to set.3. With the year highlighted, press ▲ to select the current year. |
| Time Zone | Eastern, Central, Mountain, Pacific, etc. | Required for both the Manual and Auto methods. |
| Daylight Savings Time | Applies Ignore | Required for both the Manual and Auto methods. Select the option for your area. |

Setup Menu, continued
Use the Timer to set a time for the TV to turn on automatically. Use this menu to set a day, time, input, and channel for the Timer. If the TV is already on at the requested time, the TV will automatically tune to the designated channel.
- The TV clock must be set before you can use the Timer feature.
- When the Timer turns on the TV, press any key on the remote control to keep it on. Otherwise, the TV will turn off after five minutes.
- The POWER/TIMER indicator flashes green when the TV is off to indicate the TV Timer has been set.
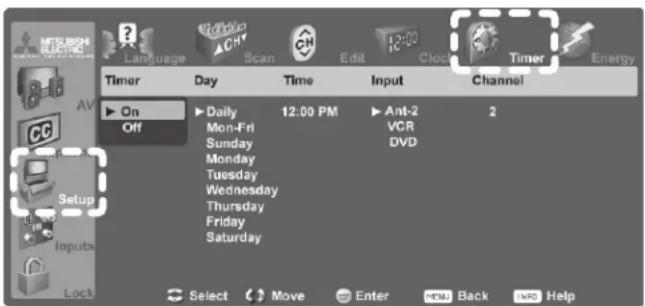
Setup menu, Timer options
Setup Menu Options
 Timer Timer | Timer On, Off | |
| Day | Daily, Mon-Fri, (every) Sunday, (every) Monday, (every) Tuesday, etc.Select the day or days of the week for the Timer to turn on the TV. | |
| Time To set the time for the TV to come on:1. With the hour highlighted, press ▲repeatedly to change the hour and the AM/PM indicator. Press and hold to change the hour display quickly.2. Press ENTER to highlight the minutes.3. Press ▲t▼ o change the minutes. Press and hold to change the minutes display quickly. | ||
| Input Ant-1, Ant-2, DVD, VCR, etc.Select the input you want displayed when the TV comes on. Choose from the defined and enabled inputs that appear in the Input Selection menu. | ||
| Channel | If the input is an antenna (ANT 1, ANT 2), press ▲repeatedly or press and hold to scroll quickly through the available channel numbers. | |
 Energy Energy | Use the Energy Mode option to select the level of power consumption while the TV is turned off. | |
| Energy Mode | Fast Power On The default setting. | |
| Low Power Uses less energy, but TV power-on takes longer and some TV features may be unavailable. | ||
| Keep this setting at Fast Power On if you need to:Have faster power on.Receive updates to ChannelView channel listings.Keep the TV Clock accurate for the TV Timer With the Low Power setting, you must reset the TV Clock if the TV is left turned off for over 48 hours. | ||

Inputs Menu
Note:
- NetCommand IR control of home-theater devices is available on Y series and 734 series models only.
- When you change an input name in the Name menu and then exit the Name menu:
■ The name is changed
■ The icon in the Input Selection menu is changed
■ Settings are changed to the defaults for the new device type.
- On models offering NetCommand control, all "learning" for the input is also erased.
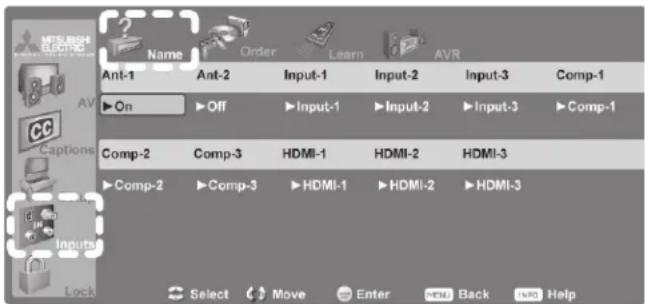
Change input names using the Inputs > Name menu.
Inputs Menu Options
 | Name | Cable Box,Camcorder,DVD, DVD2,DVR, Game,HD Disc,Satellite, VCR,PC,On/Off (ANT1/ ANT 2 only)Off (HDMIonly) | Assign or change names of inputs appearing in theInput Selectionmenu.Turn Ant-1 and Ant-2 On or Off.Turn unused HDMI inputsOff.Press ▶to move between inputs.Press ▶to select a name.If you change the name of an input after performing NetCommand“learning,” the IR codes you “learned” are erased.Note:When you disconnect an HDMI device, the icon remains in theInput Selectionmenu until you remove it. To remove an unwanted HDMI icon,selectOfffor the HDMI input. |
 | Order | Put frequently used icons at the start of theInput Selectionmenu.1. Press ▲▼to highlight the icon to move.2. Press ENTER to confirm the selection.3. Press ▲▼to drag the icon to the desired position.4. Press ENTER to set the new position. | |
 | Learn | Y series and 734 series onlyPerform initial set-up of NetCommand control of a device.Add or remove individual keys from NetCommand control of a device.See detailed instructions in chapter 6, “NetCommand.” | |
 | AVR | Y series and 734 series onlySet up NetCommand control of an A/V receiver. This set-up allows you to:Operate the A/V receiver’s power and volume functions with the TV’s remote control.Make the A/V receiver switch automatically to the correct audio input when you select a device in the TV’sInput Selectionmenu.See detailed instructions in chapter 6, “NetCommand.” | |

Lock Menu
TV locks available from the Lock menu are:
 | Parent | Lock by RatingsRestrict access to programming based on V-Chip rating signals sent by the broadcaster. |
 | Other | |
 | Time | Lock by TimeRestrict TV use by time of day. |
 | Front Panel | Lock Front PanelDisable the controls on the front of the TV. Use this option if small children in the home try to press front-panel buttons. |
Note: Channel Lock is an additional lock that blocks access to specific channels. Channel Lock is available under the Setup menu (Setup > Edit > Lock).
Setting or Resetting a Pass Code
Setting a Pass Code
You are prompted to enter a pass code whenever you select Lock on the Main menu. To set a pass code for the first time:
- Press MENU, highlight Lock, then press ▶ A screen prompting you for a pass code will display.
-
Input a four-digit pass code using the number keys on the remote control.
-
Press CANCEL to delete a number and move back one space.
-
Press MENU or EXIT to close the menu without setting a pass code.
-
Press ENTER to set the pass code.
Resetting a Pass Code
See the procedure in Appendix B.
Important Notes on Rating Locks
- Parent menu rating locks apply only to channels and signals received on ANT 1, ANT 2, INPUT 1, and INPUT 2.
- Other menu rating locks apply only to digital channels received on ANT 1 or ANT 2.
- When viewing a cable box, satellite receiver, or other device connected to the COMPONENT or HDMI inputs, check the device's menu for rating locks.
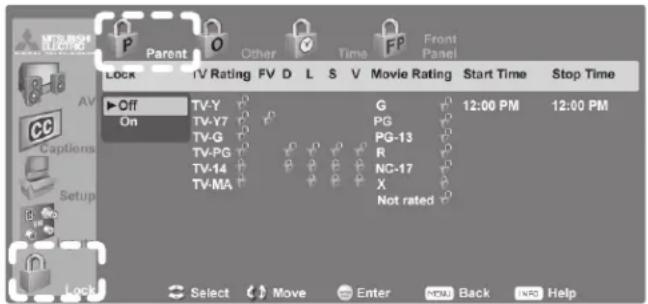
The Lock > Parent menu lets you set parental controls based on V-Chip technology.
Parent Menu
The TV comes from the factory with the rating locks turned off and with pre-set U.S. ratings TV-PG and movie rating PG. Turn on blocking for U.S. ratings to activate these rating restrictions. Use the Lock > Parent menu to change the level of blocking with U.S. ratings.
Any time you change the channel or device, it may take up to five seconds for the rating restrictions to take effect.
Other Menu (Alternate Rating System)
This TV can recognize new rating systems that may come into effect in the future. The Other menu allows you to block digital programming when such systems come into effect.
The first time you tune to a channel broadcasting an alternate rating system, the TV defaults to the most restrictive setting if the Lock menu > Other Lock option is set to On. Use this menu to change the allowed rating if you are unable to watch a program broadcast with an alternate system.
Bypassing TV Locks
If you try to watch a blocked program or channel or try to use the TV while it is locked by time, a notice appears prompting you for a pass code. To use the TV:
- Input your four-digit pass code and press ENTER.
- Change to a channel airing an allowed program or change to another device.
To reactivate the parent ratings lock or TV Lock by Time after using the pass code:
- Power the TV off and then on to reactivate both locks.
- Change to a different channel or device to reactivate only the parent ratings lock.

Lock Menu, continued

Parent Menu Options (U.S.-based rating system)
Option Name and Description
| Lock Off, On | Disables or enables program blocking based on V-Chip signals and the U.S. rating system. | ||
| TV Rating | TV-Y Youth. For children under 7. Highlight the rating | ||
| TV-Y7 Youth 7 and older. | level you wish to change and press ENTER to block it ( ) or allow it ( ) | ||
| TV-G General Audience. For the entire family. | |||
| TV-PG Parental Guidance. Parental Guidance recommended; may not be suitable for some children. | You can apply supplemental content blocking to the age-based ratings by using the TV content categories listed below. | ||
| TV-14 | Adolescent 14 and older. Not recommended for children under 14. | ||
| TV-MA Mature Audience. For adults only. | |||
| FV Fantasy Violence. Applies to TV-Y7 only. | TV Content Categories | ||
| D Sexual | Dialog. Applies in differing degrees to TV-PG and TV-14. | ||
| L | Adult Language. Applies in differing degrees to TV-PG, TV-14, and TV-MA. | ||
| S | Sexual Situations. Applies in differing degrees to TV-PG, TV-14, and TV-MA. | ||
| V | Violence (graphic or realistic). Applies in differing degrees to TV-PG, TV-14, and TV-MA. | ||
| Movie Rating | G | General Audience. Designed for the entire family to view. | |
| PG | Parental Guidance. Parental Guidance is recommended, may not be suitable for some children. | ||
| PG-13 | Parental Guidance, 13 and Older. Not recommended for children under the age of 13. | ||
| R | Restricted. Restricted in theaters to 17 years old and older unless accompanied by an adult. | ||
| NC-17 | No Children 17 or Under. Restricted in theaters to 18 years old and older. | ||
| X | Adult. Designed for and restricted in theaters to adult audiences only. | ||
| Not Rated The program has not been assigned an MPAA rating. | |||
| Start Time | Allows you to set the time of day for enforcement of rating restrictions. | ||
| 1. Highlight the hour digits for Start Time. | |||
| Stop Time | 2. Press ▲▼ repeatedly to change the hour and associated AM/PM indicator. You can also just press and hold to move quickly through the numbers. | ||
| 3. Press ENTER to highlight the minutes. | |||
| 4. With the minutes digits highlighted, press ▲▼ repeatedly to change the minutes. You can also just press and hold to move quickly through the numbers. | |||
| 5. Highlight the Stop Time digits and set the time as described above. | |||
| Note: To make rating restrictions active 24 hours a day, make Start Time and Stop Time the same. | |||

Lock Menu, continued

Other Menu Options (alternate rating system)
This TV can recognize new rating systems that may come into effect in the future. The Other option remains grayed out until the TV receives a signal using an alternate rating system. Such alternate rating systems will apply to digital programming only.
Option Name and Description
| Lock On, Off Enable or disable program blocking. | |
| System Name | The rating system available for the channel |
| Group | Rating groups available in the rating system shown on the screen. Rating groups are defined by the rating system in effect. |
| Rating | Rating restrictions available in the selected rating system and group. Highlight the rating and press ENTER to check (block) or uncheck (allow) rated content. |

Time
Block all use of the TV during the time period you specify. You must enter a pass code to use the TV when the time lock is in effect.
| Lock by Time | On, Off Enable or disable Lock by Time. |
| Lock Time, Unlock Time | To set the lock and unlock times:1. Highlight the hour digits for the Lock Time.2. Press ▲▼ repeatedly to change the hour and associated AM/PM indicator. To move quickly through the numbers, just press and hold.3. Press ENTER to set the hour and highlight the minutes.4. With the minutes highlighted, press ▲repeatedly to change the minutes. To move quickly through the numbers, just press and hold.5. Highlight the Unlock Time digits and set the time as described above.Note: T o make Lock by Time active 24 hours a day, make Start Time and Stop Time the same. |

Front Panel
| On, Off | On locks and Off unlocks the controls on the front of the TV. Use this option if small children may try to press TV buttons.If the remote control is unavailable, use the front-panel buttons to release the front panel lock by doing one of the following:If the TV is on, press and hold the MENU button for over eight seconds. A message will display to confirm release of the Front Panel Lock.If the TV is off:In Fast Power On Energy Mode, press and hold the MENU button on the front panel for over eight seconds. The TV will power on and release the lock.In Low Power Energy Mode, press POWER on the front panel to turn on the TV. With the TV on, press and hold MENU on the front panel for over eight seconds. |
6
NetCommand
About NetCommand
- NetCommand home-theater control is available on the following models:
Y series WD-Y577, WD-Y657
734 series WD-57734, WD-65734, WD-73734.
This chapter applies only to these models.
- NetCommand setup is optional.
- You can perform NetCommand setup when the TV first recognizes a device during Auto Input Sensing or at any convenient time afterward.
- NetCommand operates by sending remote control signals from the TV to your other devices via the IR emitters, telling the devices to play, record, change inputs, adjust volume, change channels and many more functions. All this is accomplished with the TV's remote control and the slide switch left in the TV position.
- The IR “Learning” feature of NetCommand allows the TV to learn the remote control signals for your A/V devices.
- You can choose the level of NetCommand control for your home theater.
- Standard Setup. Perform a standard setup if you want NetCommand to control only a few devices, such as the TV, a playback device (like a DVD player), and a cable box. With this setup, you can use the TV's remote control to operate these devices.
■ A/V Receiver Setup. Perform A/V receiver setup if you want NetCommand to:
• Control a surround sound A/V receiver.
- Automatically change audio input selections on an A/V receiver when you change inputs on the TV.
Important Note on NetCommand
Be sure to connect the IR emitter cable to the TV and properly place the emitters so that Netcommand can control your devices. See the explanation on the following page.
IR Emitter Placement (NetCommand®)
An IR emitter cable is included with the TV.
The NetCommand system uses emitters connected to the IR EMITTER jack to control other devices such as DVD players, cable boxes, satellite receivers, and VCRs.
- Connect the plug end of the supplied IR emitter cable to the IR EMITTER NetCommand® jack on the TV back panel.
- Run the cable for each of the emitter ends under, alongside, or over each device to be controlled so that the emitter end is in front of the area where the remote control sensor is located.
- Position the emitter end with the emitter bulb facing the remote control sensor. The bulb emits infrared light in a cone-shaped pattern. Place the bulb far enough from the sensor to allow the cone pattern to reach the sensor.
The IR sensor is usually behind the plastic window of the front display panel. It is sometimes visible with the aid of a flashlight and is normally a round or square cutout behind the plastic. If you cannot see the sensor and the device's Owner's Guide does not specify the location, you can find it by following these steps using the device's remote control:
a. Hold the device's remote about one-half inch from the front of the device. Starting from one end of the display window plastic, press the POWER button.
b. If the device does not respond, move the remote control one inch toward the center and try again.
c. Repeat this until the device responds.
d. Note this location and then start over from the other end of the display window plastic, repeating until the device responds again.
The remote control sensor is somewhere between these two positions. This is usually enough accuracy for placement of the IR emitters.
With some devices, the emitter works better facing downward from the top of the device. Experiment to find what works best.
- Secure the emitter ends in place using double-sided tape.
- Place any unused ends behind the devices to prevent stray signals from reaching the IR sensors.
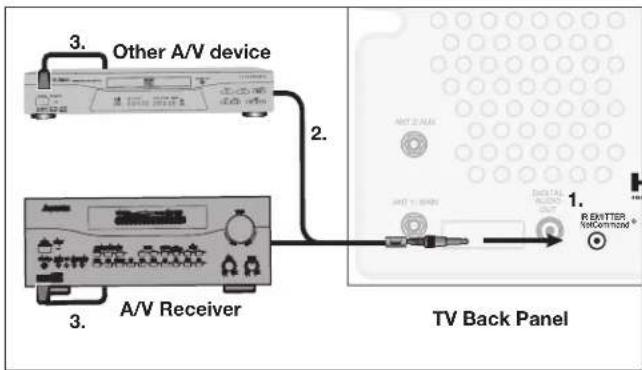
Connecting IR Emitter NetCommand
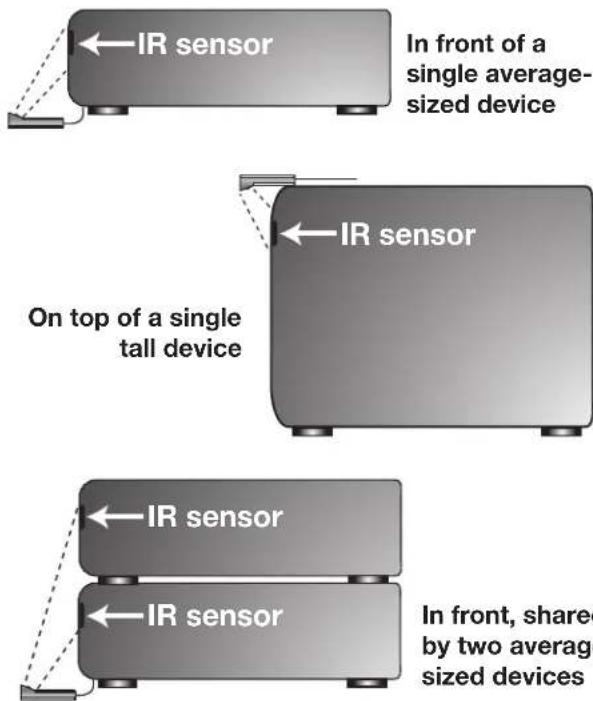
Place IR emitters so the signal can be "seen" by the IR sensor on each device.
IMPORTANT
Position IR emitters so that each device's sensor "sees" the signal from only one emitter. Otherwise, a device receiving signals from multiple sources (remote controls, IR emitters) may not respond at all.
Initial NetCommand Setup for Most Devices
To perform this procedure, you need:
- The remote controls for both the TV and the device you want to control.
- The IR emitter cable supplied with the TV.
Note: To set up an A/V receiver, see "Set Up NetCommand Control of an A/V Receiver" later in this chapter.
- Connect and position the IR emitters for the devices you wish to control. See "IR Emitter Placement" in this chapter.
- Set the TV's remote control slide switch to the TV position.
- Open the NetCommand Learn screen in one of two ways:
- If working from the Auto Input Sensing screen for the device, highlight the Learn icon and press ENTER to open the Learn screen for the device.
- If performing NetCommand setup at any time after the device has been recognized through Auto Input Sensing:
a. Press INPUT to open the Input Selection menu.
b. Highlight the desired input icon and press ENTER to switch to that input.
c. Press MENU, highlight Inputs, and highlight Learn to open the Learn screen for the device.
- The first function highlighted in the Learn screen is always Power On. Aim the TV's remote control at the TV and press ENTER to begin learning for that function.
- When the Power On text starts flashing, aim the device's remote control at the TV and press and hold the POWER key until a check mark appears next to Power On.
- If the text stops flashing before the check mark appears, repeat this step.
- To remove the key from NetCommand control, press the CANCEL key while the key name is highlighted.
- Press the ▲▼keys on the TV's remote control to highlight other keys on the list. Repeat steps 4 and 5 for each additional function you wish to control through NetCommand.
- If the device's remote control has keys that are not in the list, you can associate up to any four keys with the F1 through F4 keys.
For example, for a DVD player, assign the F1 and F2 keys to the DVD player's CHAPTER SKIP FORWARD and From the Auto Input Sensing screen, highlight the Learn icon and press ENTER to open the NetCommand Learn screen.
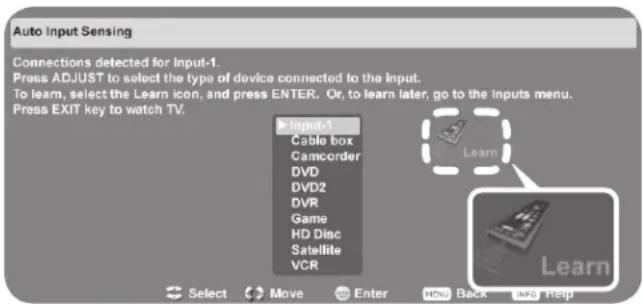
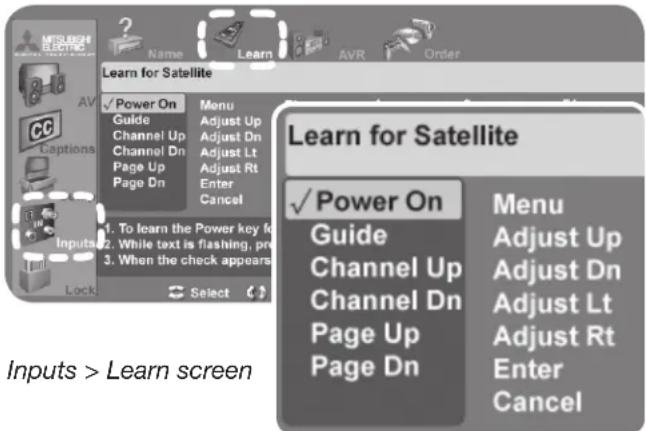
CHAPTER SKIP BACK keys. Perform NetCommand setup for the F keys the same as you did for the named keys.
- If the device has a separate POWER OFF key, press ▲▼◀▶ on the TV's remote to highlight Power Off. Repeat the earlier steps to "learn" the POWER OFF key. If the device has no POWER OFF key, skip this step.
- Press EXIT to finish NetCommand "learning" for the current device.
Add or Remove Device Keys from NetCommand Control
- Press INPUT to open the Input Selection menu and select the affected device.
-
Open the Inputs menu and highlight the Learn icon.
-
When the Learn screen displays:
-
To add keys: Continue as described earlier under "Initial NetCommand Setup for Most Device Types."
- To delete keys: Highlight the name of the key you wish to delete and press CANCEL on the TV's remote control to clear the check mark.
NetCommand Specialized Device Keys
Refer to this chart when "learning" device keys.
“Learn” some, all, or none of the keys used for each device type. The chart has space for you to write in functions you assign to the F1–F4 keys.
See the following page for more on keys marked in the "Special Operation Method" column.
| Key Name in Learning Screen | Function | Name on TV Remote Control | See Special Operation Method |
| Power On Power On or Power ON/OFF (toggle) | POWER | * | |
| Guide On Screen Program Guide or Disc Menus | GUIDE | * | |
| Channel Up Next Channel Higher | CH/PAGE^ | ||
| Channel Dn Next Channel Lower | CH/PAGE √ | ||
| Page Up Page Up in Guides | CH/PAGE^ | * | |
| Page Dn Page Down in Guides | CH/PAGE √ | * | |
| Menu Setup menu for device | MENU | * | |
| Adjust Up Adjust or arrow up | ▲ | ||
| Adjust Dn Adjust or arrow down | ▼ | ||
| Adjust Lt Adjust or arrow left | ◀ | ||
| Adjust Rt Adjust or arrow right | ▶ | ||
| Enter Enter or Select (menus) | ENTER | * | |
| Cancel Cancel or erase (menus) | -/CANCEL | * | |
| Play Start playback | ◎ | ||
| Stop Stop playback | ■ | ||
| Forward Fast Forward | ▶ | ||
| Rewind | Rewind/Fast Reverse | ◀ | |
| Pause | Pause playback | || | |
| Record | Start Recording | ● | |
| 1, 2, 3, 4, 5, 6, 7, 8, 9, 0 | Digit functions | 1, 2, 3, 4, 5, 6, 7, 8, 9, 0 | |
| Enter (digits) | Use after digits to directly access channels by number | ENTER | * |
| - (separator) | Add digital channel separator between main channel number and sub-channel number | -/CANCEL | * |
| Recall (QV) | Last Channel Recall | QV | |
| Info | On-screen status display or information display | INFO | May require two key-presses |
| F1 | ASSIGN YOUR | F1 | |
| F2 | CHOICE OF | F2 | |
| F3 | SPECIALIZED | F3 | |
| F4 | FUNCTIONS | F4 | |
| Power Off | Power Off | POWER | |
Operating NetCommand-Controlled Devices
To Control Most Device Types
As an example of NetCommand control, if you are watching your cable box and you wish to tune to the next channel higher, press CH/PAGE ∧NetCommand then sends the "learned" channel-up control signal to the cable box.
- With an IR emitter properly positioned in front of the device, use the Inputs > Learn screen to perform NetCommand setup for the device.
- When you wish to use the device, press INPUT to display the Input Selection menu.
- Press ▲▼to highlight the icon for the device.
- Press ENTER to switch the TV to the device. Note: if you have set up automatic input switching for the A/V receiver, the A/V receiver will automatically switch to the correct input for the device.
- To operate the device using the TV's remote control, set the slide switch to the TV position.
- Point the remote control at the TV (not the device) and press the key for the desired function.
To Control an A/V Receiver
Switching Audio to and from the A/V Receiver
- Press AUDIO.
- Press ▶ show the Speakers option.
- Press▶ to select either AV Receiver or TV.
Controlling A/V Receiver Power
- Press AUDIO.
- Press ▲ show the Speakers option.
- Press to select AV Receiver.
- Point the remote control at the TV (not the A/V receiver) and press POWER to power the A/V receiver on or off.
Controlling Other A/V Receiver Functions
With the A/V receiver powered on and selected, the TV's remote operates the volume and mute functions. Also, when you switch to a device in the Input Selection menu, the A/V receiver automatically switches to the correct audio input for the device.
Special Operation Methods
| Key Name in Learning Screen | Special Operation Description and Setup How to Use | |||
| Power On Manual Power On/OffUse for devices that have only one POWER key. | 1. Press INPUT to display the Input Selection menu.2. Press ▲▼t Highlight the icon for the device to be powered on or off.3. With the Input Selection menu still displayed, press POWER to send the power signal; you may need to press POWER twice.Note: If you press POWER without the Input Selection displayed, the TV will turn off.4. Press ENTER to switch the TV to the device. | |||
| Power OnPower Off | Automatic Power On/OffThis feature is only for devices that have separate POWER ON and POWER OFF keys on their original remote controls. If your device does not have a separate POWER OFF key, do not use the Power Off learning position; use only the Manual Power ON/OFF method described above.In the NetCommand Learn screen:a. “Learn” the Power On command in the Power On learning position.b. “Learn” the Power Off command in the Power Off learning position. | To Power On the Device1. Press INPUT to display the Input Selection menu.2. Press ▲▼t Highlight the icon for the device to be powered on or off.3. Press ENTER to switch the TV to the device and NetCommand will send the Power On command to the device.To Power Off the DeviceWhen you turn the TV off, the TV sends all learned Power Off commands to all devices. | ||
| Menu Displaying the Menu for a Device 1. While watching a device, press INPUT to display the Input Selection menu with the device icon highlighted.2. Press MENU to send the menu signal to the device. The Input Selection menu will automatically clear from the screen. | ||||
| Guide Displaying the Disc Menu (DVD or high-definition disc format)“Learn” the DISC MENU, TOP MENU, or other key as named on the original remote in the Guide learning position. | While watching the device, press GUIDE to display the disc menu. | |||
| Displaying the On-Screen Program Guide (cable box or satellite receiver)1. “Learn” the GUIDE key on the original remote in the Guide learning position.2. Learn the PAGE and PAGE keys of the original remote in the Page Up and Page Dn learning positions. | 1. While watching the device, press GUIDE to display the guide.2. Press CH/PAGE ↗ √ send the Page Up/Dn commands for the guide. | |||
| Page Up Page Dn | Using Page Up/DownIf the device’s original remote control has separate keys for Channel Up/Dn and Page Up/Dn, the TV remote control’s CH/PAGE ↗ key can work like the two separate keys.1. “Learn” CHANNEL ↗ iThe Channel Up/Dn positions.2. “Learn” PAGE ↗ iThe Page Up/Dn positions. | Inside the GuidePress CH/PAGE ↗ √ send the Page Up/Dn commands.Outside the GuidePress CH/PAGE ↗ √ send the Channel Up/Dn signal. | ||
| Enter Enter Functions (cable boxes, satellite receivers, etc)Some devices have two keys that have “enter” functions. One key is for menus and is often labelled SELECT or OK. A second key is for use with number keys for direct channel selection. NetCommand uses the same ENTER key for both operations. | ||||
| When ENTER has a menu or guide function or when the original remote control uses the same key for menus and channel selection:Learn the ENTER, SELECT, or OK key in the NetCommand Enter learning position. | 1. Press MENU or GUIDE to display the device’s menu or guide.2. Press ENTER within the menu and NetCommand will send the Enter signal for menus. | |||
| Enter (digits) | When ENTER is for channel changes, i.e., the original remote control has a separate ENTER key for this function):Learn the ENTER key for channel selection in the NetCommand Enter (digits) learning position.Use this learning position only if the original remote control has separate keys for Enter in menus and Enter for channel selection. | Press digit key(s) and then press ENTER.NetCommand will send the Enter signal for channel selection. | ||
| Cancel CANCEL as the Cancel or Exit Function“Learn” the Cancel or Exit function in the NetCommand Cancel learning position | 1. Press MENU or GUIDE to display the menu or guide.2. Press CANCEL and NetCommand will send the Cancel or Exit signal. | |||
| — (separator) | The symbol “—” can serve as the separator between a digital channel’s main and sub-channel digits, e.g., digital channel 12-1 (main channel is 12, sub-channel is 1).“Learn” the channel separator function in the NetCommand – (separator) learning position. | Press digit key(s) and press CANCEL. NetCommand will send the channel-separator signal. | ||
Setting Up NetCommand Control of an A/V Receiver
Perform this setup to:
- Operate the A/V receiver's power and volume functions with the TV's remote control.
- Enable the A/V receiver to switch automatically to the correct audio input when you select a device in the TV's Input Selection menu.
To set up control of an A/V receiver you need:
- The remote controls for both the TV and the A/V receiver.
- The IR emitter cable supplied with the TV.
Note: To set up control of other device types, see "Initial NetCommand Setup for Most Devices" earlier in this chapter.
Perform this setup using the Inputs > AVR screen, shown below.
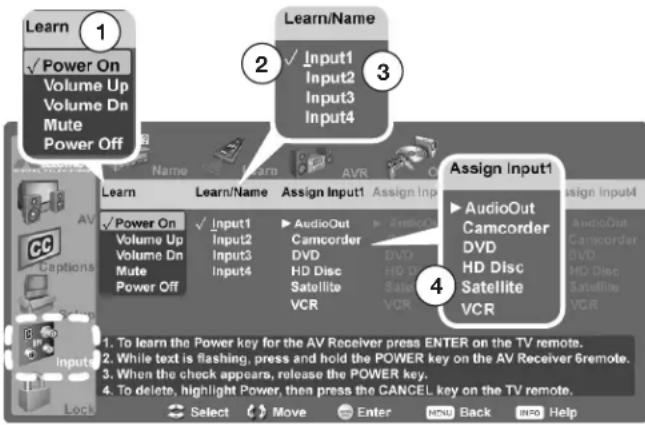
AVR screen overview
- Power and volume commands the TV can send to the A/V receiver when "learned"
- A check under Learn/Name means the TV has "learned" the command to switch the A/V receiver to the input.
- Input1 through Input4 are placeholder names for A/V receiver inputs. Use this screen to assign meaningful names, e.g., the name of the A/V receiver input.
- Match up devices connected to the TV inputs with audio inputs on the A/V receiver.
Setup to Control the A/V Receiver's Power and Volume Functions
- Connect your A/V receiver to the TV and any additional devices. See chapter 2, "TV Connections," for suggestions.
-
Connect the IR emitter cable to the TV and position the IR emitter where it can send signals to the A/V receiver.
-
Set the TV's remote control slide switch to the TV position.
- Open the AVR screen in one of two ways:
- If using the Auto Output Sensing screen for the A/V receiver, highlight the Learn icon and press ENTER to open the AVR screen.
- If performing NetCommand setup at any time after the A/V receiver has been recognized through Auto Input Sensing:
Press MENU, highlight Inputs, and highlight AVR to open the AVR screen.
- The first function highlighted in the AVR screen is always Power On. Aim the TV's remote control at the TV and press ENTER to begin learning for Power On.
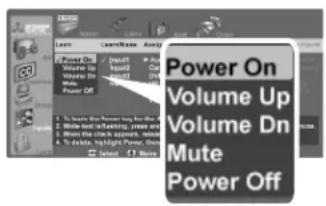
A/V Receiver (AVR) screen. Perform NetCommand IR "learning" for A/V receiver power and volume keys.
-
When the Power On text starts flashing, aim the A/V receiver's remote control at the TV and press and hold the POWER or POWER ON key until a check mark appears next to Power On.
-
If the text stops flashing before the check mark appears, repeat this step.
- To remove the key from NetCommand control, press the CANCEL key while the key name is highlighted.
By completing “learning” for the power key, NetCommand now operates the power function for the A/V receiver.
Point the TV's remote control at the TV to control the A/V receiver.
- Press the key on the TV's remote control to highlight other keys in the list. Repeat steps 5 and 6 for each additional function you wish to control through NetCommand.
- If the A/V receiver has a separate POWER OFF key, press ▼ on the TV's remote to highlight Power Off. Repeat steps 5 and 6 to "learn" the POWER OFF key.
- When finished "learning" the power and volume keys, either press EXIT to watch TV or proceed to the next section to continue NetCommand setup of the A/V receiver.
Setting Up NetCommand Control of an A/V Receiver, continued
Setup to Control Automatic Switching of A/V Receiver Audio Inputs
Two different setups are described here:
Setup 1: Automatic A/V Receiver Switching to TV Audio Input
Setup 2: Automatic A/V Receiver Switching for a device sending audio directly to the A/V receiver
• Audio Available from TV only: Use Setup 1.
Audio from ANT 1 and ANT 2 must be sent to the A/V receiver from the TV's DIGITAL AUDIO OUT or analog AVR AUDIO OUTPUT.
Use Setup 1 to make the A/V receiver switch to its designated TV audio input when viewing these sources.
• HDMI Digital Stereo Audio: Use Setup 1
Digital stereo audio from an HDMI connection is available both in digital format (from the TV's DIGITAL AUDIO OUT) jack and in analog format (from the TV's AVR AUDIO OUTPUT jack).
- Analog Stereo Audio: Use Setup 1.
Audio from sources with only analog stereo output (such as a VCR) can be sent either directly to the A/V receiver or through to the TV and then on to the A/V receiver.
Mitsubishi recommends you send audio through the TV as shown in the example. Setup 1 causes the A/V receiver to switch to its input designated for TV audio.
If you have a digital A/V receiver, the TV makes the audio available by converting analog audio to a digital output.
• Digital Surround Sound: Use Setup 2.
A device can send digital surround sound such as Dolby Digital or DTS directly to the A/V receiver, bypassing the TV entirely. The device might be a DVD player, cable box, or satellite receiver, and could have HDMI output. A DVD player is used in this example.
Your setup may include additional devices with digital surround sound connected directly to the A/V receiver. These devices might be a DVD player plus a cable box or satellite receiver.
Before You Begin
- Connect your A/V devices to the TV and connect your A/V receiver to the audio outputs on the TV and DVD player. See chapter 2, "TV Connections," for suggestions.
- Open the Inputs > AVR menu.
Note: The terms Input 1–Input 4 used in the AVR screen are temporary placeholder names. They refer to the A/V receiver inputs for which the TV can learn IR codes.
Setup 1: Automatic A/V Receiver Switching to Its TV Audio Input
Most devices are set up like the VCR in this example, in which analog audio from the device is sent through the TV.
Use this setup for:
- Sources providing only analog stereo output, such as a VCR
• Audio from ANT 1 and ANT 2
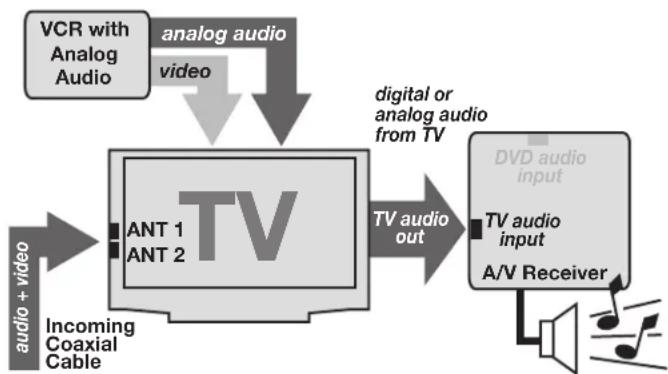
flowchart
graph TD
    A["VCR with Analog Audio"] --> B["Analog audio"]
    B --> C["video"]
    C --> D["TV"]
    D --> E["TV audio out"]
    E --> F["DVD audio input"]
    F --> G["TV audio input"]
    G --> H["A/V Receiver"]
    H --> I["Audio Cable"]
    D --> J["ANT 1 ANT 2"]
    J --> K["Incoming Coaxial Cable"]
    K --> L["Audio + video"]
Setup 1: A/V receiver audio from the TV's digital or analog audio output (DIGITAL AUDIO OUT or AVR AUDIO OUTPUT)
- Under Learn/Name, press ▲▼to highlight the area next to Input 1.
In this example, the IR code for the A/V receiver's TV Audio input will be "learned" as Input 1.
- Press ENTER on the TV's remote control.
- While the text Input1 is flashing, press and hold the TV INPUT key on the A/V receiver's remote control.
- When a check appears next to Input 1, release the TV INPUT key.
IMPORTANT
To hear audio sent from the TV to the A/V receiver, you must have:
• physically connected the TV to the A/V receiver
- selected the A/V receiver as the audio source.
Press AUDIO, then ▲ to show the Speakers option, then ▶ to select the A/V Receiver.
- “learned” the IR codes for the A/V receiver inputs
- chosen the correct input in the NetCommand A/V Receiver Learn screen
Setting Up NetCommand Control of an A/V Receiver, continued
- If the text stops flashing before the check mark appears, repeat this step.
-
To erase the IR code just "learned," press CANCEL while the name is highlighted.
-
Press ▶ highlight the name Input1. You can enter a custom name using the letters/numbers on the remote control. It is best to assign names to "learned" inputs that match the input names displayed on the A/V receiver. For this example, enter the custom name TV using these guidelines:
- To select a character, repeatedly press a number key on the remote control to cycle through the characters associated with the key. The following special characters are available by using the 1 and 0 keys:
1: ! & blank space 0: / * -
-
Press ENTER to set the character and move the highlight to the next character.
• To delete a character, highlight the character and press CANCEL.
• To highlight the first character, repeatedly press CANCEL. -
Press to move the highlight to the Assign column.
- Use ▲to highlight AudioOut (TV audio output). The triangular marker is always next to the assigned sound source.
- Press EXIT if finished or continue with setup for another TV source.
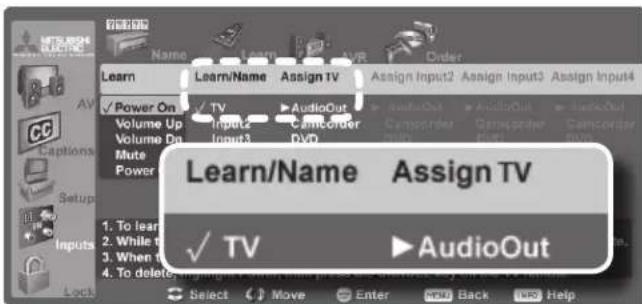
Completed NetCommand setup described for controlling A/V receiver switching to the A/V receiver's audio input labelled "TV."
Setup 2: Automatic A/V Receiver Switching for a Surround Sound Device
Use this setup to send digital surround sound directly from a device to an A/V receiver.
- Under Learn/Name, press ▲▼to highlight the area next to Input2.
IMPORTANT
All audio from what you are watching on the TV is always available as an output on both the TV's AVR AUDIO OUTPUT and DIGITAL AUDIO OUT jacks.
To use the digital surround sound capabilities of your A/V receiver however, you must connect your DVD player, satellite receiver, or cable box directly to the A/V receiver, as surround sound may not be available from the TV's audio output.
In this example, the IR code for the A/V receiver's DVD Audio input will be "learned" as Input 2.
- Press ENTER on the TV's remote control.
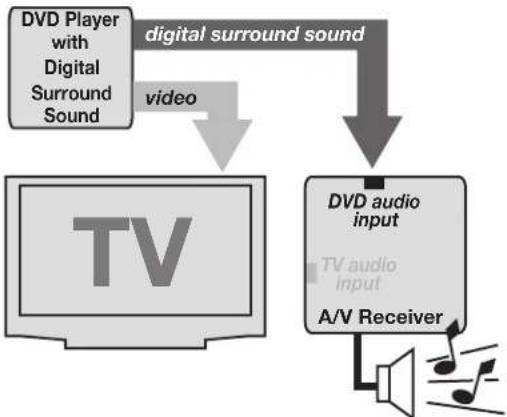
flowchart
graph TD
    A["DVD Player with Digital Surround Sound"] -->|video| B["TV"]
    C["DVD audio input"] --> B
    D["A/V Receiver"] --> B
    B --> E["Digital surround sound"]
Setup 2: A/V receiver audio from a device providing surround sound directly to the A/V receiver
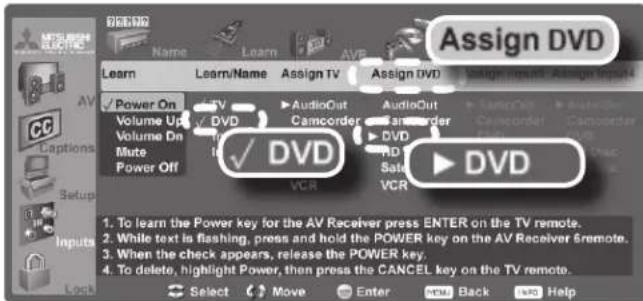
Completed NetCommand setup described for controlling A/V receiver switching to an A/V receiver input labelled "DVD."
- While the text Input2 is flashing, press and hold the DVD INPUT key on the A/V receiver's remote control.
-
When a check appears next to Input 2, release the DVD INPUT key.
-
If the text stops flashing before the check mark appears, repeat this step.
- To erase the IR code just "learned," press CANCEL while the name is highlighted.
Setting Up NetCommand Control of an A/V Receiver, continued
- Press to highlight the name Input2. Assign a custom name that matches the input name displayed on the A/V receiver. For this example, enter the custom name DVD using the guidelines given earlier.
- Press to move the highlight to the second Assign column.
- Use ▲to highlight DVD in the list of devices recognized by the TV. The triangular marker always shows the assigned sound source.
- Press EXIT if finished or continue for additional TV sources.
Appendices
Appendix A: Specifications .... 58
Appendix B: Bypassing the Parental Lock ..... 59
Appendix C: Lamp Cartridge Replacement and Cleaning ..... 61
Appendix D: Programming the Remote Control ..... 63
Appendix E: Troubleshooting ..... 71
Appendix A: Specifications
| Size, Weight, and Power Consumption | |||||
| Model | Dimensions (inches) | Weight (lbs.) | Power | ||
| Height Width Depth | |||||
| WD-C657 39.5 | 58.2 15.3 | 76 275 w | |||
| WD-57733 | 35 | 51.2 | 13.9 | 62 | 275 w |
| WD-65733 | 39.5 58.2 | 15.3 | 76 | 275 w | |
| WD-73733 | 43.6 | 65.2 | 17.5 | 108 | 275 w |
| WD-Y577 | 35 | 51.2 | 13.9 | 62 | 280 w |
| WD-Y657 39.5 | 58.2 15.3 | 76 280 w | |||
| WD-57734 | 35 | 51.2 | 13.9 | 62 | 280 w |
| WD-65734 | 39.5 58.2 | 15.3 | 76 280 w | ||
| WD-73734 | 43.6 | 65.2 | 17.5 | 108 | 280 w |
| Inputs | ||
| Type | Qty. | Input Specifications |
| Antenna/Cable input | 2 | RFF connector, 75-ohm |
| HDMI (digital video/audio) | EIA-861D standard for digital audio and video via HDMIHDMI standard connectorVideo: 60 Hz: 480i, 480p, 720p, 1080i24 Hz, 30 Hz, 60 Hz: 1080pAudio: PCM stereo | |
| WD-C657 | 2 | |
| WD-57733WD-65733WD-73733 | 3 | |
| WD-Y577WD-Y657WD-57734WD-65734WD-73734 | 4 | PC (digital signals only):VGA (640 x 480, 60 Hz)W-VGA (848 x 480, 60 Hz)SVGA (800 x 600, 60 Hz)W-SVGA (1064 x 600, 60 Hz)XGA (1024 x 768, 60 Hz)1280 x 720, 60 HzSXGA (1280 x 1024, 60 Hz)1920 x 1080 (60 Hz)WXGA (1360 x 768, 60 Hz)) |
| Composite Video | 3 NTSC 480i onlyVideo: RCA Pin Plug, 1.0 V p-p, 75 ohm | |
| S-Video | 2 | Four-Pin DIN PlugY: 1.0 Vp-p 75-ohmC: 0.286 Vp-p (burst signal), 75-ohm |
| Component Video (Y/Pr/Pb) | EIA-770.1 & EIA 770.2 480i, 480p,EIA 770.3 720p and 1080i (TV analog component video standards)RCA Pin PlugY: 1.0 Vp-p (includes sync), 75-ohmPr: 700 mV p-p, 75-ohmPb: 700 mV p-p, 75-ohm | |
| WD-C657 | 2 | |
| WD-57733WD-65733WD-73733WD-Y577WD-Y657WD-57734WD-65734WD-73734 | 3 | |
| USB Photo Port 1 | Can be used only for reading JPEG files. | |
| Audio Inputs | 6 pairs | Analog left and right audioRCA Pin Plug 500 mV (full scale), 43-k ohm |
| Outputs | ||
| Description Qty. Output Specifications | ||
| Audio Speakers 2 | 5.5" x 2.2" | |
| Analog Audio (Signal) | 1 pair | RCA Pin Plug, 500 mV rms ± 200 mV (full scale) for analog sources, 1.5 Vrms ± 0.5 Vrms (full scale) for digital sources. |
| Digital Audio Output | 1 | RCA Pin Plug, Signal Type Dolby Digital, PCM stereo |
| Image Technology Lamp | |
| DLP, 0.65" chip, 1920 x 1080 pixels with Smooth PictureTM | 180-watt VIP type |
| ChannelFrequencyReception | Over-the-Air: VHF 2–13, UHF 14–69Analog Cable: 1–125Digital Cable: 1–135 | |
| ChannelType* | Over the Air: | Analog NTSC, Digital ATSC with sub-channels (all 18 video formats) |
| Cable: | Analog NTSC (non-scrambled)Digital QAM 64 and 256 with sub-channels (non-scrambled) | |
| * Note for Digital Channels: The channel numbers displayed on screen are determined by the broadcaster or cable company and can vary from the standard frequency number. If there is no channel-number information provided by the broadcaster or cable company, the TV creates a channel number. The created channel number uses the frequency number as the main channel number and the program number as the sub-channel number. | ||
HDMI
The HDMI inputs are compliant with EIA-861D standards for standard, extended, and high-definition video; digital audio, and HDCP copy protection.
Appendix B: Bypassing the Parental Lock
IMPORTANT
Cut along the dotted line and file bypass instructions in a safe place for future reference.
Bypassing the Parental Lock
After you set the lock, you must use your pass code to view a locked program, view the locked TV, view a locked channel, cancel the lock, or enter the Lock menus.
If you forget your pass code, you can view the locked TV without entering your pass code. When you are prompted for your pass code, press the number 9 and QV keys on the TV remote control at the same time. This process temporarily unlocks the TV.
When entering the Lock menu, this process deletes your old pass code and prompts you to enter a new pass code.
- You can either enter a new pass code to open the Lock menu and make changes or press EXIT to close the menu.
- If any of the locks are turned on and you exit the menus when prompted for a new code, the old code and all lock settings are retained.
- If all locks are turned off and you exit the menus when prompted for a new code, then the previous code is erased.
IMPORTANT
When changing or deleting your pass code, you must use the remote control included with this TV. You cannot use a Mitsubishi remote control from another component or a "universal" remote.
This page intentionally left blank
Appendix C: Lamp-Cartridge Replacement and Cleaning
WARNING
THE ACCESS PANEL IS PROVIDED WITH AN INTERLOCK TO REDUCE THE RISK OF EXCESSIVE ULTRAVIOLET RADIATION. DO NOT DEFEAT ITS PURPOSE OR ATTEMPT TO SERVICE WITHOUT REMOVING PANEL COMPLETELY.
Touch lamp cartridge handle only. Do not touch lamp or lamp cartridge housing. Keep lamp cartridge horizontal during removal. Do not tilt as glass may come out and cause injury. Only replace lamp cartridge with the same part number 915P061010.
CAUTION: If the television is on, press POWER to turn it off. Unplug the television and allow it to cool for at least one hour before attempting to replace the lamp cartridge.
Lamp Life
The light source for this television is a lamp, which is part of a lamp cartridge assembly. The life of the lamp can vary, based on the lamp itself, the air temperature around the TV while it is operating, and your viewing patterns. Warmer air or poor ventilation shorten the lamp life, as does turning the television on and off frequently. Mitsubishi warrants the lamp for one (1) year from the date of original purchase at retail. It is likely that the lamp will last much longer than this.
To Order a New Lamp
To Receive a Replacement Lamp Under Warranty
Call (800) 553-7278. Please have model number, serial number, and TV purchase date available.
Important: All lamps replaced under warranty must be returned to Mitsubishi where they will be inspected for defect verification.
To Purchase a Replacement Lamp After Warranty
Visit our website at www.mitsuparts.com or call (800) 553-7278. Order the following:
Lamp Part Number 915P061010
WARNING
- Do not remove the lamp cartridge immediately after turning off the television. You may get burned because the lamp is very hot. Allow the television to cool for at least one hour before replacing the lamp cartridge.
- Do not remove the lamp cartridge except when replacing it. Careless treatment can result in injury or fire.
- Do not touch the lamp glass element. It may be very hot and break, causing injuries or burns.
- Be sure not to insert any metal or flammable object into the lamp cartridge opening, as it may cause fire or electrical shock. If a foreign object is inserted into the opening, unplug the AC cord of the TV and contact your dealer for service.
• Install the lamp cartridge securely. Failure to do so may cause a fire. - Do not touch the lamp glass elements. Oils from your fingers may cause premature lamp failure.
Hg = MERCURY
THE LAMP INSIDE THIS PRODUCT CONTAINS MERCURY AND MUST BE RECYCLED OR DISPOSED OF ACCORDING TO LOCAL, STATE OR FEDERAL LAWS. For disposal or recycling information, please contact your local authorities or the Electronic Industries Alliance at www.eiae.org
Appendix C: Lamp-Cartridge Replacement and Cleaning, continued
Lamp-Cartridge Replacement
Removing the Old Lamp Cartridge
- Turn off TV power and allow the lamp to cool for at least one hour before proceeding.
- After the lamp has cooled, remove the cover of the lamp compartment, located on the back of the TV. Refer to figures 1 and 2. Use a #2 (large) Phillips screwdriver to loosen the screw securing the cover. Keep the screw and cover for re-installation
- With a large Phillips or flat-blade screwdriver, loosen the two shiny screws securing the lamp cartridge until they disengage from the mating threads. These are captive screws and cannot be separated from the lamp cartridge.
- Fully open the bag supplied with the replacement lamp and set the opened bag aside.
- Gently grasp the handle of the lamp cartridge and pull the old cartridge straight out. See figure 3.
CAUTION: Do not tilt or rotate the cartridge, as small glass fragments may fall out.
- Without tilting or putting down the lamp cartridge, insert it into the opened bag. Close the bag while being careful not to let any glass particles fall out.
Installing the New Lamp Cartridge
- Do not touch the glass parts of the new lamp cartridge. Insert the new cartridge into the TV in the same orientation as the old cartridge. Push on the cartridge housing until it is fully seated.
- With either your fingers or the screwdriver, gently tighten the two shiny screws. If using a screwdriver, AVOID OVERTIGHTENING!
- Replace the plastic cover and retaining screws.
- WASH YOUR HANDS THOROUGHLY, AS THIS LAMP CONTAINS MERCURY.
Disposal of the Old Lamp Cartridge
Lamp under warranty: All lamps replaced under warranty must be returned to Mitsubishi. Use the return shipping label provided and send to Mitsubishi Digital Electronics, America, 1001 Cherry Drive, Suite 2, Braselton, GA 30517.
IMPORTANT: Lamps found to be without defect will be returned and charged back to the sender.
Lamp no longer under warranty: Contact your local authorities or the Electronic Industries Alliance at www.eiae.org for lamp-disposal or recycling instructions. Do not dispose of the old lamp with common trash.
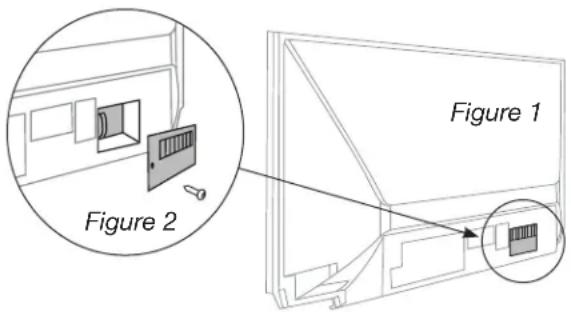
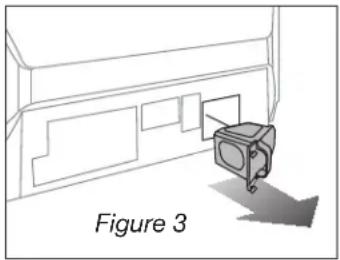
natural_image
Diagram showing a device mounted on a wall with a magnified inset view, labeled 'Figure 3' (no text or symbols on the diagram itself)Use only replacement lamp part number 915P061010.
Lamp-Cartridge Filter Cleaning
If the TV shuts off after displaying the message "TV will shut down in a few seconds. Please check if the air flow is blocked" and/or the STATUS LED is yellow, the air filter may need cleaning. The air filter is part of the lamp cartridge. Use the following procedure to clean the filter.
- Remove the lamp cartridge from the TV as described under "Removing the Old Lamp Cartridge." Do not tilt or rotate the cartridge. Do not touch the glass parts of the lamp cartridge.
- Holding the lamp cartridge horizontal (do not tilt or rotate), use a soft dry brush or vacuum cleaner to remove any dust that may be present on the mesh filter. Do not use liquids. See figure 4.
- Reinstall the lamp cartridge as described under "Installing the New Lamp Cartridge."
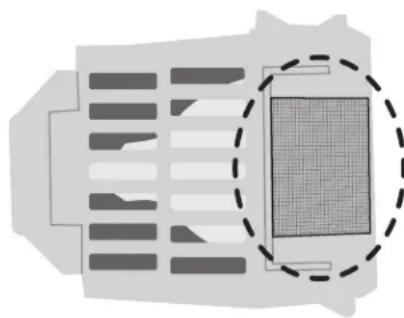
natural_image
Diagram of a mechanical or architectural component with internal channels and a highlighted grid pattern (no text or symbols)Figure 4
Keep lamp cartridge horizontal and remove dust from the mesh filter using a soft dry brush or vacuum cleaner.
Appendix D: Programming the Remote Control
This appendix explains programming the TV's remote control to operate other A/V devices. This is distinct from NetCommand control. The TV's remote control can operate other devices by three different methods:
- Remote Control Programming: You must move the slide switch to the position specific to the type of device.
- NetCommand® IR "learning" (Y and 734 series only): You can operate other devices with the slide switch in the TV position.
- NetCommand for HDMI devices (all TV models): You may be able to operate compatible HDMI devices with the slide switch in the TV position. See the device's Owner's Guide and the description in chapter 4, "TV Operation and Features."
Functions Available for Other A/V Devices
The TV's remote control can be programmed to operate other types and brands of A/V products. To use the remote when programmed, set the slide switch to the position labelled for the product type. The functions performed in each switch position can vary depending on the product. Not all functions work for all models. The most common functions available are listed on this page.
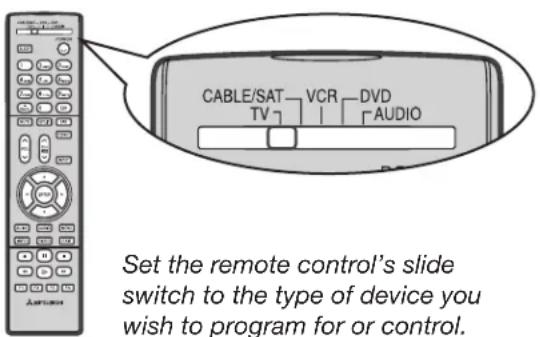
IMPORTANT
Some manufacturers may change their products or they may use more than one remote control system. The TV's remote control may be unable to operate your A/V equipment in these cases.
VCRs and DVRs
| CH ✗ √POWERSLEEP((▶ FAST FORWARD)((■ PAUSE)(▶ PLAY) | (● RECORD)(◀ REVERSE)(■ STOP)GUIDE (DVR only)MENU(DVR only)0-9 Number Buttons |
Mitsubishi VCRs are compatible with some additional buttons.
Cable Boxes and Satellite Receivers
| AUDIO (PAGE UP)CANCEL (on some models)CH ✗ √ENTER (on some models)GUIDE (on some models)POWER▲ ▼ (on some models)VIDEO (PAGE DOWN)QV (ENTER; for channels on some models) | 0-9 Number Buttons (on some models)F1-F4 (A, B, C, D keys on some models)The record/playback keys (on some models):(▶ FAST FORWARD)(■ PAUSE)(▶ PLAY)(● RECORD)(◀ REVERSE)(■ STOP) |
A/V Receivers
| MUTEPOWERSLEEPVOLUME0-9 Number Buttons | Direct Input Selection buttons: numbers,FAV and QV (on some Mitsubishi models) |
CD Players
| (not all functions for all models) | |
| SLEEPFAST FORWARDPAUSEPLAY) | (REVERSE)(STOP)0-9 Number Buttons |
DVD and Laser Disc Players
| (not all functions for all models) | |
| CANCEL (on some models)CH ∧ (for track skip on some models)ENTERMENUPOWERSLEEP▲ ▼(on some models) | FAST FORWARD)PAUSE)(PLAY)(RECORD)REVERSE)(STOP)0-9 Number Buttons(on some models) |
Appendix D: Programming the Remote Control, continued
Programming the Remote Control
- Move the slide switch at the top of the remote to the position for the product you want to control. Refer to the table below. Only one of each device type can be controlled in each slide-switch position.
| Switch Position Affected Device | |
| CABLE/SAT | Cable BoxDTV ReceiverSatellite Receiver |
| VCR | VCRDVRLaser Disc PlayerDVD Player/Recorder |
| DVD | DVD Player/RecorderDVRLaser Disc PlayerVCR |
| AUDIO | A/V ReceiverAudio AmplifierCD Player |
- Press and hold POWER on the remote control for several seconds until the button blinks twice and goes off.
- Release the POWER button.
-
Enter the first five-digit code listed for your equipment.
-
The POWER button blinks twice when you start to enter the code and then once for each additional keypress.
- The POWER button blinks twice when you finish entering a valid code.
-
Move the slide switch to another position if you need to start over or wish to exit programming mode.
-
Point the remote control at the equipment and press POWER. If the product has no power on/off function, press a different key, such as ▶ PLAY), ■ (STOP), VOL ↑ or MUTE.
-
If the equipment responds, the remote control is properly programmed to operate the equipment.
- If the equipment does not respond, repeat steps 2–4 with the next five-digit code listed for your equipment.
IMPORTANT
You may need to reprogram the remote control after changing the batteries.
- Once you have found the correct code, write it in the space below for future reference.
| Switch Position | Device Type Code | |
| CABLE/SAT | ||
| VCR | ||
| DVD | ||
| AUDIO | ||
Code Verification
To determine the code programmed for any position of the slide switch:
- Move the slide switch to the position you wish to verify.
- Press and hold POWER on the remote control for several seconds until the button blinks twice and goes off.
- Press keys 9 9 0
- Press 1 and count the blinks of the power button. Write down the number of blinks as the first digit of the code.
- Repeat step 4 for the second, third, fourth, and fifth digits of the code.
Audio Lock: Universal A/V Receiver Control
With Audio Lock active, the remote control operates the volume and mute functions of the A/V receiver in all positions of the slide switch. Activate Audio Lock if you normally use an A/V receiver with your TV and other A/V equipment.
- Program the AUDIO position for your A/V receiver as described earlier in this section.
- Move the slide switch to the AUDIO position.
- Press and hold POWER on the remote control for several seconds until the button blinks twice and goes off.
- Press keys 9 9 3 ENTER
The POWER button will blink twice to indicate Audio Lock is active.
To Reset the Remote Control to Operate Volume and Mute for the TV Speakers
- Press and hold POWER for several seconds until the button blinks twice and goes off.
- Press keys 9 9 3 VOL^.
The POWER button will blink four times to indicate Audio Lock has cleared.
Appendix D: Programming the Remote Control, continued
Programming Codes
Audio Amplifiers
| Brand | Code |
| Acurus | 30765 |
| Adcom | 31100, 30577 |
| Altec Lansing | 31742 |
| Aragon | 30765 |
| Bel Canto Design | 31583 |
| Bose | 30674 |
| Carver | 30892 |
| Classe | 31462, 31461 |
| Curtis Mathes | 30300 |
| Durabrand | 31561 |
| Elan | 30647 |
| GE | 30078 |
| Harman/Kardon | 30892 |
| JVC | 30331 |
| Klipsch | 30765 |
| Left Coast | 30892 |
| Lenoxx | 31561 |
| Lexicon | 31802 |
| Logitech | 31408 |
| Marantz | 30892 |
| Mark Levinson | 31483 |
| McIntosh | 30251 |
| Mondial | 30765 |
| Optimus | 30823, 30395, 30300 |
| Philips | 30892 |
| Pioneer | 30823, 30300, 30257, 30013 |
| Polk Audio | 30892 |
| RCA | 30823, 30300 |
| Realistic | 30395 |
| Sharp | 30226 |
| Sony | 30815 |
| Soundesign | 30078 |
| Technics | 30374, 30372 |
| Toshiba | 30353 |
| Victor | 30331 |
| Wards | 30078, 30013 |
| Yamaha | 30354 |
A/V Receivers
| Brand Code | |
| ADC | 30531 |
| Adcom | 31617, 31616 |
| Aiwa | 31641, 31405,31388, 31347, 31321,31243, 30189, 30121 |
| Akai | 31255 |
| Alco | 31390 |
| AMC | 31077 |
| Amplifier Technologies | 31584 |
| Anam | 31609, 31074 |
| Apex Digital | 31774, 31430, 31257 |
| Arcam | 31189 |
A/V Receivers
| Brand Code | |
| Atlantic Technology | 31487 |
| Audiophase | 31387 |
| Audiotronic | 31189 |
| Audiovox | 31627, 31390 |
| B & K | 30840, 30820, 30701 |
| Bel Canto Design | 31584 |
| BK | 30702 |
| Bose | 31253, 31229, 30639 |
| Brix | 31602 |
| Cambridge Soundworks | 31477 |
| Capetronic | 30531 |
| Carver | 31289, 31189, 30189, 30121 |
| Coby | 31263 |
| Curtis | 30797 |
| Delphi | 31414 |
| Denon | 31360, 31311, 31142, 30121, |
| Fisher | 31801, 31409 |
| Fosgate | 31487 |
| Glory Horse | 31263 |
| GPX | 31299 |
| Harman/Kardon | 31306, 31304, 31289, 30891, 30189, 30110 |
| Hitachi | 31801, 31273 |
| Integra | 31320, 31298, 30135 |
| JBL | 31306, 30110 |
| JVC | 31811, 31643, 31495, 31374, 31282, 31263, 31058 |
| Kenwood | 31570, 31569, 31313 |
| KLH | 31428, 31390 |
| Koss | 31497, 31366 |
| Linn | 30189 |
| Liquid Video | 31497 |
| Magnavox | 31514, 31269, 31189, 30531, 30189 |
| Marantz | 31289, 31269, 31189, 30200, 30189, |
| McIntosh | 31289 |
| Micromega | 31189 |
| Mitsubishi | 31957, 31922, 31921, 31920, 31393, 30176 |
| Myryad | 31189 |
| Nakamichi | 31555, 31313, 30097 |
| Onkyo | 31320, 31298, 30842, 30135 |
| Optimus | 31074, 31023, 30849, 30797, 30670, 30531 |
| Oritron | 31497, 31366 |
| Outlaw | 31487 |
A/V Receivers
| Brand Code | |
| Panasonic | 31764, 31763,31633, 31548,31518, 31509,31363, 31350,31316, 31308,31288, 30309 |
| Philips | 31368, 31365,31283, 31269,31268, 31266,31189, 30189 |
| Pioneer | 31384, 31343,31023, 30630,30531, 30150, 30014 |
| Polk Audio | 31414, 31289, 30189 |
| Proscan | 31254 |
| RadioShack | 31263 |
| RCA | 31609, 31511,31390, 31254,31074, 31023, 30531 |
| Rio | 31869 |
| Samsung | 31500, 31295 |
| Sansui | 31189, 30189 |
| Sanyo | 31801 |
| Sharp | 31386, 31361 |
| Sharper Image | 31416, 31411, 31410,31409, 31385,31263, 30797 |
| Sherwood | 31077 |
| Sirius | 31811, 31627, 31602 |
| Sonic Blue | 31869 |
| Sony | 31858, 31759,31758, 31658,31622, 31558,31529, 31503,31458, 31441,31406, 31382,31371, 31367, 31258,31131, 31058 |
| Soundesign | 30670 |
| Stereophonics | 31023 |
| Sunfire | 31313 |
| Sylvania | 30797 |
| Teac | 31528, 31390,31267, 31074 |
| Technics | 31633, 31518,31308, 30309 |
| Thorens | 31189 |
| Toshiba | 30135 |
| Venturer | 31390, 30849 |
| Wards | 30189, 30014 |
| XM | 31414, 31406 |
| Yamaha | 31375, 31331,31276, 31176, 30176 |
Appendix D: Programming the Remote Control, continued
Programming Codes, continued
| CD Players | |
| Brand Code | |
| Aiwa | 30157 |
| Akai | 30156 |
| Arcam | 30157 |
| Audio-Technica | 30170 |
| Burmester | 30420 |
| California Audio Labs | 30303, 30029 |
| Carver | 30437, 30299, 30179, 30157 |
| Classic | 31297 |
| Denon | 30873, 30034, 30003 |
| DKK | 30000 |
| DMX Electronics | 30157 |
| Emerson | 30305 |
| Fisher | 31325, 30179, 30174 |
| Garrard | 30420, 30393 |
| Gemini | 30625 |
| Genexxa | 30305, 30032 |
| GPX | 31296 |
| Harman/Kardon | 31202, 30173, 30157, 30083 |
| Hitachi | 30032 |
| Integra | 30101 |
| JVC | 31294, 30072 |
| Kenwood | 30826, 30681, 30626, 30190, 30037, 30028, |
| KLH | 31711, 31373, 31372, 31318 |
| Koss | 31317 |
| Krell | 30157 |
| LG | 31208 |
| Linn | 30157 |
| LXI | 30305 |
| Magnavox | 30305, 30157, 30038 |
| Marantz | 30626, 30435, 30180, 30157, 30038, 30029 |
| Mark Levinson | 31484 |
| McIntosh | 30660, 30290, 30256 |
| MCS | 30029 |
| MGA | 30083 |
| Miro | 30000 |
| Mission | 30157 |
| Mitsubishi | 30098, 30083 |
| MTC | 30625, 30420 |
| NAD | 30299, 30019 |
| Nikko | 30625, 30174, 30170 |
| NSM | 30157 |
| Onkyo | 31327, 30868, 30102, 30101 |
| CD Players | |
| Brand Code | |
| Optimus | 31075, 31063,30468, 30437,30420, 30305,30179, 30145,30087, 30037,30032, 30000 |
| Panasonic | 30752, 30388,30303, 30029 |
| Parasound | 30420 |
| Philips | 30626, 30274, 30157 |
| Pioneer | 31087, 31063,31062, 30551,30468, 30305,30032 |
| Polk Audio | 30157 |
| Proceed | 30420 |
| Proton | 30157 |
| QED | 30157 |
| Quad | 30157 |
| Quasar | 30029 |
| RadioShack | 31075 |
| RCA | 31062, 30764,30468, 30420,30305, 30179,30053, 30032 |
| Realistic | 30420, 30180, 30179 |
| Rotel | 30420, 30157 |
| SAE | 30157 |
| Sansui | 30305, 30157 |
| Sanyo | 30179, 30087 |
| Scott | 30305 |
| Sears | 30305 |
| Sharp | 30861, 30265,30180, 30037 |
| Sherwood | 31067, 30180 |
| Sonic Frontiers | 30157 |
| Sony | 31364, 30673,30605, 30604,30490, 30185,30100, 30000 |
| Soundesign | 30145 |
| Sugden | 30157 |
| Symphonic | 30305 |
| TAG McLaren | 30157 |
| Tascam | 30420 |
| TDK | 31208 |
| Teac | 30420, 30393,30378, 30180, 30174 |
| Technics | 30303, 30029 |
| Tivoli Audio | 31553 |
| Toshiba | 30299, 30019 |
| Victor | 30072 |
| Wards | 30157, 30053 |
| Yamaha | 31292, 30888,30490, 30261,30187, 30170,30036, |
| YBA | 30625 |
| Yorx | 30461 |
| Cable Boxes | |
| Brand | Code |
| ABC | 10017, 10014, 10013, 10011, 10008, 10007, 10003, 10001 |
| Allegro | 10315, 10153 |
| Americast | 10899 |
| Antronix | 10207, 10022 |
| Archer | 10797, 10207, 10153, 10022 |
| BBT | 10267 |
| Belcor | 10056 |
| Bell & Howell | 10014 |
| Bell South | 10899 |
| Cable Star | 10056 |
| Cabletenna | 10022 |
| Cableview | 10022 |
| Century | 10153 |
| Citizen | 10315, 10153 |
| Clearmaster | 10883 |
| ClearMax | 10883 |
| Colour Voice | 10031, 10025 |
| Comtronics | 10040 |
| Contec | 10019 |
| Coolmax | 10883 |
| Digeo | 11187 |
| Digi | 10637 |
| Director | 10476 |
| Dumont | 10637 |
| Eastern | 10002 |
| Emerson | 10797 |
| Everquest | 10040, 10015 |
| Focus | 10400 |
| Garrard | 10153 |
| GC Electronics | 10207, 10056 |
| Gemini | 10797, 10015 |
| General Instrument | 10810, 10476, 10276, 10011, 10003 |
| GoldStar | 10144, 10040 |
| Goodmind | 10797 |
| Hamlin | 10273, 10259, 10034, 10020, 10009 |
| Hitachi | 10011 |
| Hytex | 10007 |
| i3 Micro | 11602 |
| Jasco | 10315, 10153, 10015 |
| Jerrold | 10810, 10476, 10276, 10024, 10015, 10014, 10012, 10011, 10003 |
| Linsay | 10440 |
| Magnavox | 10027 |
| Memorex | 10000 |
| Motorola | 11376, 11254, 11187, 11106, 10810, 10476, 10276, 10014 |
| Movie Time | 10156, 10063 |
| Multitech | 10883 |
| Myrio | 11602 |
| Novaplex | 10618 |
| NSC | 10156, 10063 |
| Oak | 10019, 10007 |
Appendix D: Programming the Remote Control, continued
Programming Codes, continued
Cable Boxes
| Brand | Code |
| Optimus | 10021 |
| Pace | 11877, 10237, 10008 |
| Panasonic | 10107, 10021, 10000 |
| Panther | 10637 |
| Paragon | 10000 |
| Philips | 11305, 10317, 10153, 10031, 10027, 10025 |
| Pioneer | 11877, 10877, 10533, 10144, 10023 |
| Popular Mechanics | 10400 |
| Pulsar | 10000 |
| Quasar | 10000 |
| RadioShack | 10883, 10797, 10315, 10015 |
| RCA | 11256, 10021 |
| Realistic | 10207 |
| Recoton | 10400 |
| Regal | 10279, 10273, 10259, 10020 |
| Regency | 10002 |
| Rembrandt | 10011 |
| Runco | 10000 |
| Samsung | 10144, 10040 |
| Scientific Atlanta | 11877, 10877, 10477, 10017, 10008, |
| Seam | 10510 |
| Sejin | 11602 |
| Signal | 10040, 10015 |
| Signature | 10011 |
| SL Marx | 10040 |
| Sony | 11006 |
| Sprucer | 10021 |
| Starcom | 10015, 10003 |
| Stargate | 10797, 10040, 10015 |
| Starquest | 10015 |
| StarSight | 10422 |
| Supercable | 10276 |
| Supermax | 10883 |
| Sylvania | 10001 |
| Tandy | 10258 |
| TeleCaption | 10221 |
| Teleview | 10040 |
| Texscan | 10001 |
| TFC | 10310 |
| Thomson | 11256 |
| Timeless | 10418, 10040 |
| Tocom | 10013, 10012 |
| Torx | 10003 |
| Toshiba | 10000 |
| Tristar | 10883 |
| Tusa | 10015 |
| TV86 | 10063 |
| Unika | 10207, 10153, 10022 |
| United Artists | 10007 |
| Universal | 10207, 10191, 10153, 10056, 10022, |
| V2 | 10883 |
| Viewmaster | 10883 |
| Viewstar | 10258, 10063, 10027 |
Cable Boxes
| Brand | Code |
| Vision | 10883 |
| Vortex View | 10883 |
| Zenith | 10899, 10525, 10054, 10000 |
| Zentek | 10400 |
DVD Players/Recorders
| Brand Code | |
| Adcom | 21094 |
| Aiwa | 20641 |
| Akai | 21089, 20770 |
| Alco | 20790 |
| Allegro | 20869 |
| Amphion Media Works | 20872 |
| AMW | 20872 |
| Apex Digital | 21100, 21061, 21056, 21020, 21004, 20797, 20796, 20794, 20755, 20717, 20672 |
| Aspire Digital | 21407, 21168 |
| Audiologic | 20736 |
| Audiovox | 21072, 21041, 20790 |
| Axion | 21072 |
| B & K | 20662, 20655 |
| Bel Canto Design | 21571 |
| Blaupunkt | 20717 |
| Blue Parade | 20571 |
| Broksonic | 20695 |
| California Audio Labs | 20490 |
| CAVS | 21057 |
| Cinea | 20831 |
| CineVision | 20876, 20869, 20833 |
| Citizen | 21277 |
| Coby | 21351, 21177, 21165, 21107, 21086, 20852, 20778 |
| Craig | 20831 |
| Curtis Mathes | 21087 |
| CyberHome | 21129, 21117, 21024, 21023, 20874, 20816 |
| Daewoo | 21242, 21234, 21172, 21169, 20869, 20833, 20784, 20705 |
| Daytek | 20872 |
| Denon | 20634, 20490 |
| Desay | 21407 |
| Disney | 21270, 20675 |
| Dual | 21085, 21068 |
| Durabrand | 21127 |
| DVD2000 | 20521 |
| Emerson | 21268, 20675, 20591 |
| Enterprise | 20591 |
| Fisher | 20670 |
DVD Players/Recorders
| Brand Code | |
| Funai | 21334, 21268, 20675 |
| Gateway | 21158, 21077, 21073 |
| GE | 20815, 20717, 20522 |
| Go Video | 21730, 21304, 21158, 21144, 21099, 21075,21044, 20869, 20833, 20783, 20744, 20741, 20715 |
| Go Vision | 21072 |
| GoldStar | 20741 |
| GPX | 20769, 20699 |
| Gradiente | 20490 |
| Greenhill | 20717 |
| Grundig | 20539 |
| Harman/Kardon | 20702, 20582 |
| Hitachi | 20664, 20573 |
| Hiteker | 20672 |
| iLo | 21348 |
| Initial | 20717 |
| Integra | 20627, 20571 |
| Jaton | 21078 |
| JBL | 20702 |
| JSI | 21423 |
| JVC | 21275, 21164, 20867, 20623, 20558 |
| jWin | 21051, 21049 |
| Kawasaki | 20790 |
| Kenwood | 20737, 20682, 20534, 20490 |
| KLH | 21149, 21020, 20790, 20717 |
| Konka | 20721, 20711 |
| Koss | 21423, 20896, 20651 |
| Landel | 20826 |
| Lasonic | 21173, 20798 |
| Lecson | 21533 |
| Lenoxx | 21127 |
| LG | 20869, 20801, 20741, 20591 |
| LiteOn | 21440, 21416, 21158, 21058 |
| Loewe | 20511 |
| Magnavox | 20675, 20646, 20539, 20503 |
| Malata | 21159, 20782 |
| Marantz | 20539 |
| McIntosh | 21533, 21273 |
| Memorex | 21270, 20831, 20695 |
| Microsoft | 20522 |
| Mintek | 20839, 20717 |
| Mitsubishi | 21521, 20521 |
| Momitsu | 21082 |
| Myryad | 20894 |
| NAD | 20741, 20692, 20591 |
| Nakamichi | 21222 |
Appendix D: Programming the Remote Control, continued
Programming Codes, continued
| DVD Players/Recorders | |
| Brand Code | |
| NEC | 20785 |
| Nesa | 20717 |
| Next Base | 20826 |
| NexxTech | 21402 |
| Norcent | 21265, 21107, 21003, 20872 |
| Onkyo | 20792, 20627, 20503 |
| OptoMedia Elec-tronics | 20896 |
| Oritron | 20651 |
| Panasonic | 21762, 20703, 20632, 20503, 20490 |
| Philips | 21354, 21267, 20675, 20646, 20539, 20503, |
| PianoDisc | 21024 |
| Pioneer | 21571, 20632, 20631, 20571, 20525 |
| Polaroid | 21086, 21061, 21020 |
| Polk Audio | 20539 |
| Portland | 20770 |
| Princeton | 20674 |
| Proceed | 20672 |
| Proscan | 20522 |
| ProVision | 20778 |
| Qwestar | 20651 |
| RCA | 20822, 20790, 20717, 20571, 20522 |
| Rio | 20869 |
| RJTech | 21360 |
| Rotel | 21178, 20623 |
| Rowa | 20823 |
| Sampo | 20752, 20698 |
| Samsung | 21075, 21044, 20820, 20744, 20573, 20490 |
| Sansui | 20695 |
| Sanyo | 20873, 20695, 20670 |
| Sensory Science | 21158 |
| Sharp | 21256, 20752, 20675, 20630 |
| Sharper Image | 21117 |
| Sherwood | 21077, 21043, 20770, 20633 |
| Shinsonic | 20839, 20533 |
| Sigma Designs | 20674 |
| Sonic Blue | 21099, 20869 |
| Sony | 21533, 21431, 21033, 20864, 20533 |
| Sungale | 21074 |
| SVA | 21105, 20860 |
| Sylvania | 21268, 20675 |
| Symphonic | 21268, 20675 |
| TAG McLaren | 20894 |
| Teac | 20809, 20790 |
| Technics | 20703, 20490 |
| DVD Players/Recorders | |
| Brand Code | |
| Technosonic | 20730 |
| Techwood | 20692 |
| Terapin | 21031 |
| Theta Digital | 20571 |
| Toshiba | 21154, 20695, 20503 |
| Tredex | 20804, 20803, 20800, 20799 |
| Urban Concepts | 20503 |
| US Logic | 20839 |
| Venturer | 20790 |
| Vizio | 21226, 21064 |
| Vocopro | 21027 |
| Xbox | 20522 |
| Xwave | 21001 |
| Yamaha | 20545, 20539, 20490 |
| Yamakawa | 20872 |
| Zenith | 20869, 20741, 20591, 20503 |
| Zoece | 21265 |
| Laser Disc Players | |
| Brand | Code |
| Aiwa | 20203 |
| Carver | 20323, 20194, 20064 |
| Denon | 20243, 20241, 20172, 20059 |
| Disco Vision | 20023 |
| Funai | 20203 |
| Harman/Kardon | 20194 |
| Hitachi | 20023 |
| Kenwood | 20258 |
| Magnavox | 20243, 20241, 20217, 20194 |
| Marantz | 20194, 20064 |
| Mitsubishi | 20059 |
| NAD | 20059 |
| Optimus | 20059 |
| Panasonic | 20204 |
| Philips | 20194,20064 |
| Pioneer | 20059, 20023 |
| Polk Audio | 20194 |
| Quasar | 20204 |
| Realistic | 20203 |
| Samsung | 20323 |
| Sega | 20023 |
| Sony | 20270, 20201, 20193 |
| Technics | 20204 |
| Theta Digital | 20194 |
| Yamaha | 20451, 20217 |
| Satellite Receivers | |
| Brand Code | |
| AlphaStar | 10772 |
| Chaparral | 10216 |
| Crossdigital | 11109 |
| DirecTV | 11856, 11749, 11640, 11639, 11609, 11444, 11443, 11442, 11414, 11392, 11377, 11142, 11109, 11108, 11076, 10819, 10749, 10724, 10639, 10566, 10392, 10247, 10099 |
| Dish Network System | 11775, 11505, 11170, 11005, 10775, |
| Dishpro | 11775, 11505, 11005, 10775 |
| Echostar | 11775, 11505, 11170, 11005, 10775 |
| Expressvu | 11775, 10775 |
| GE | 10566, 10392 |
| General Instrument | 10869 |
| GOI | 11775, 10775 |
| Goodmans | 11246 |
| Hisense | 11535 |
| Hitachi | 11250, 10819 |
| HTS | 11775, 10775 |
| Hughes Network Systems | 11749, 11444, 11443, 11442, 11142, 10749 |
| iLo | 11535 |
| Jerrold | 10869 |
| JVC | 11775, 11170, 10775 |
| LG | 11414, 11226 |
| Magnavox | 10724, 10722 |
| Memorex | 10724 |
| Mitsubishi | 10749 |
| Motorola | 10869, 10856 |
| NEC | 11270 |
| Next Level | 10869 |
| Panasonic | 10701, 10247 |
| Paysat | 10724 |
| Philips | 11749, 11442, 11142, 11076, 10819, 10749, 10724, 10722, 10099 |
| Pioneer | 11442 |
| Proscan | 10566, 10392 |
| Proton | 11535 |
| RadioShack | 10869 |
| RCA | 11392, 10855, 10566, 10392, 10143, |
| Samsung | 11609, 11442, 11377, 11276, 11142, 11109, 11108 |
| Sanyo | 11219 |
| Sony | 11640, 11639, 10639 |
| Star Choice | 10869 |
| Tivo | 11444, 11443, 11442, 11142 |
Appendix D: Programming the Remote Control, continued
Programming Codes, continued
Satellite Receivers
| Brand Code | |
| Toshiba | 11749, 11285, 10819, 10790, 10749 |
| UltimateTV | 11640, 11392 |
| Uniden | 10724, 10722 |
| US Digital | 11535 |
| USDTV | 11535 |
| Voom | 10869 |
| Zenith | 11856 |
VCRs and DVRs
| Brand Code | |
| ABS | 21972 |
| Admiral | 20479, 20209, 20048 |
| Adventura | 20000 |
| Aiko | 20278 |
| Aiwa | 20307, 20124, 20037, 20000 |
| Akai | 20242, 20175, 20106, 20061, 20041 |
| Alienware | 21972 |
| America Action | 20278 |
| American High | 20035 |
| Asha | 20240 |
| Audiovox | 20278, 20037 |
| Beaumark | 20240 |
| Bell & Howell | 20104 |
| Broksonic | 20479, 20295, 20209, 20184, 20121, 20002 |
| Calix | 20037 |
| Canon | 20035 |
| Capehart | 20020 |
| Carver | 20081 |
| CCE | 20278, 20072 |
| Citizen | 20278, 20037 |
| Colt | 20072 |
| Craig | 20271, 20240, 20072, 20047, 20037 |
| Curtis Mathes | 20760, 20162, 20060, 20041, 20035 |
| Cybernex | 20240 |
| CyberPower | 21972 |
| Daewoo | 20637, 20561, 20278, 20045, 20020 |
| Daytron | 20020 |
| Dell | 21972 |
| Denon | 20042 |
| DirecTV | 20739 |
| Durabrand | 20039, 20038 |
| Dynatech | 20000 |
| Electrohome | 20043, 20037 |
| Electrophonic | 20037 |
| Emerex | 20032 |
VCRs and DVRs
| Brand Code | |
| Emerson | 21593, 20637, 20593, 20561, 20479, 20295, 20278, 20212, 20209, 20208, 20184, 20121, 20068, 20061, 20043, 20037, 20036, 20002, 20000 |
| Fisher | 20104, 20066, 20054, 20047 |
| Fuji | 20035, 20033 |
| Funai | 21593, 20593, 20000 |
| Garrard | 20000 |
| Gateway | 21972 |
| GE | 20761, 20760, 20240, 20202, 20060, 20035 |
| Go Video | 20643, 20526, 20432, 20240 |
| GoldStar | 20038, 20037 |
| Gradiente | 20000 |
| Harley Davidson | 20000 |
| Harman/Kardon | 20081, 20075, 20038 |
| Harwood | 20072, 20068 |
| Headquarter | 20046 |
| Hewlett Packard | 21972 |
| HI-Q | 20047 |
| Hitachi | 20105, 20089, 20042, 20041, 20000 |
| Howard Computers | 21972 |
| HP | 21972 |
| Hughes Network Systems | 20739, 20042 |
| Humax | 20739 |
| Hush | 21972 |
| iBUYPOWER | 21972 |
| Jensen | 20041 |
| JVC | 21162, 20067, 20041, 20008 |
| KEC | 20278, 20037 |
| Kenwood | 20067, 20041, 20038 |
| KLH | 20072 |
| Kodak | 20037, 20035 |
| LG | 21037 |
| Linksys | 21972 |
| Lloyd's | 20208, 20000 |
| Logik | 20072 |
| LXI | 20037 |
| Magnasonic | 20593 |
| Magnavox | 20593, 20563, 20149, 20110, 20081, 20039, 20035, 20000 |
| Magnin | 20240 |
| Marantz | 20081, 20035 |
VCRs and DVRs
| Brand Code | |
| Marta | 20037 |
| Matsushita | 21162, 20162, 20035 |
| Media Center PC | 21972 |
| MEI | 20035 |
| Memorex | 21262, 21162, 21037, 20479, 20307, 20240, 20209, 20162, 20104, 20048, 20047, 20046, 20039, 20037, 20035, 20000 |
| MGA | 20240, 20061, 20043 |
| MGN Technol-ogy | 20240 |
| Microsoft | 21972 |
| Mind | 21972 |
| Minolta | 20105, 20042 |
| Mitsubishi | 20443, 20242, 20214, 20173, 20075, 20067, 20061, 20043 |
| Motorola | 20048, 20035 |
| MTC | 20240, 20000 |
| Multitech | 20072, 20000 |
| NEC | 20104, 20067, 20041, 20040, 20038 |
| Nikko | 20037 |
| Nikon | 20034 |
| Niveus Media | 21972 |
| Noblex | 20240 |
| Northgate | 21972 |
| Olympus | 20035 |
| Onkyo | 20222 |
| Optimus | 21262, 21162, 21062, 21048, 20593, 20432, 20162, 20104, 20048, 20037 |
| Optionica | 20062 |
| Orion | 20479, 20295, 20209, 20184, 20002 |
| Panasonic | 21262, 21162, 21062, 20616, 20225, 20162, 20077, 20035 |
| Penney | 20240, 20054, 20042, 20040, 20038, 20037, 20035 |
| Pentax | 20105, 20042 |
| Philco | 20035 |
| Philips | 21181, 21081, 20739, 20618, 20110, 20081, 20062, 20035 |
| Pilot | 20037 |
Appendix D: Programming the Remote Control, continued
Programming Codes, continued
| VCRs and DVRs | |
| Brand Code | |
| Pioneer | 20067 |
| Polk Audio | 20081 |
| Portland | 20020 |
| Profitronic | 20240 |
| Proscan | 20761, 20760, 20202, 20060 |
| Protec | 20072 |
| Pulsar | 20039 |
| Quarter | 20046 |
| Quartz | 20046 |
| Quasar | 21162, 20162, 20077, 20035 |
| RadioShack | 21037, 20000 |
| Radix | 20037 |
| Randex | 20037 |
| RCA | 20880, 20761, 20760, 20240, 20202, 20149, 20106, 20105, 20077, 20060, 20042 |
| Realistic | 20104, 20066, 20062, 20048, 20047, 20046, 20037, 20035, 20000 |
| ReplayTV | 20616, 20614 |
| Ricavision | 21972 |
| Ricoh | 20034 |
| Runco | 20039 |
| Salora | 20075 |
| Samsung | 20739, 20240, 20045 |
| Samtron | 20643 |
| Sanky | 20048, 20039 |
| Sansui | 20479, 20271, 20209, 20067, 20041, 20000 |
| Sanyo | 20240, 20159, 20104, 20047, 20046 |
| Scott | 20212, 20210, 20184, 20121, 20045, 20043 |
| Sears | 20105, 20104, 20066, 20054, 20047, 20046, 20042, 20037, 20035, 20000 |
| Sharp | 20848, 20062, 20048 |
| Shintom | 20072 |
| Shogun | 20240 |
| Singer | 20072 |
| Sonic Blue | 20616, 20614 |
| Sony | 21972, 21032, 20636, 20035, 20034, 20033, 20032, 20000 |
| Stack 9 | 21972 |
| STS | 20042 |
| VCRs and DVRs | |
| Brand Code | |
| Sylvania | 21593, 20593, 20110, 20081, 20043, 20035, 20000 |
| Symphonic | 21593, 20593, 20000 |
| Systemax | 21972 |
| Tagar Systems | 21972 |
| Tatung | 20041 |
| Teac | 20041, 20000 |
| Technics | 20162, 20035 |
| Teknika | 20037, 20035, 20000 |
| Thomas | 20000 |
| Tivo | 21503, 20739, 20636, 20618 |
| TMK | 20240, 20208, 20036 |
| Toshiba | 21972, 21503, 21008, 20212, 20210, 20209, 20066, 20045, 20043 |
| Totevision | 20240, 20037 |
| Touch | 21972 |
| Unitech | 20240 |
| Vector | 20045 |
| Vector Research | 20040, 20038 |
| Video Concepts | 20061, 20045, 20040 |
| Videomagic | 20037 |
| Videosonic | 20240 |
| Viewsonic | 21972 |
| Villain | 20000 |
| Voodoo | 21972 |
| Wards | 20760, 20240, 20212, 20149, 20081, 20072, 20062, 20060, 20048, 20047, 20042, 20035, 20000 |
| WhiteWestinghouse | 20637, 20209, 20072 |
| XR-1000 | 20072, 20035, 20000 |
| Yamaha | 20038 |
| Zenith | 21139, 20637, 20479, 20209, 20039, 20034, 20033, 20000 |
| ZT Group | 21972 |
Appendix E: Troubleshooting
TV Reset Comparison Guide
You can resolve many common TV problems using the reset functions described in the following table. See also the additional troubleshooting suggestions later in this appendix.
IMPORTANT
Before you change sound or picture settings: If picture or sound settings seem wrong for a broadcast
channel (a channel from ANT 1, ANT 2, a cable box, or satellite receiver), first check other channels from the same input before changing settings. If most other channels from the same input seem correct, there is likely a problem with the broadcast rather than with the TV. Use care in this case, as changes you make to fix problems on individual channels also affect all other channels on the same input.
| Reset Name When to Use How to Use Resulting Action | |||
| FormatWhen the picture shape seems incorrect, use FORMAT to change the shape of the picture. | Press the FORMAT key to cycle through the available formats to find the best format for the current picture. | The last-used format for a signal type is memorized for each input. The next time the same input and the same signal type is viewed, the last-used format will be recalled. | |
| PerfectColorTMand PerfecTintTMReset(for the single input currently being watched) | When the color intensities seem out of balance, use the PerfectColor/PerfecTint reset to reset the color balances to the original factory settings. Both PerfectColor and PerfecTint and are reset at the same time. | 1. While viewing the input to be reset, press MENU to display the Main menu with the A/V icon highlighted.2. Use ▶ highlight PerfectColor and press ENTER to display the PerfectColor adjustment screen.3. Press CANCEL to reset the colors. | All PerfectColor/PerfecTint sliders are reset to the original center position. The PerfectColor/PerfecTint settings for other inputs remain unchanged.Note: PerfecTint sliders are available only on 734 series models. |
| A/V Memory Reset(for the single input currently being watched) | When audio and/or video settings for a single input seem incorrect, use A/V Memory Reset to return the input to the original factory settings. | 1. While viewing the input to be reset, press MENU to display the Main menu with the A/V icon highlighted.2. Use ▶ highlight the Reset icon and press ENTER to reset. | All Audio and Video settings for the individual input are reset except for the Listen To, Language, audio Balance, and Closed Caption settings. |
| A/V Reset(for all inputs) | To reset audio and video adjustments for all inputs to the original factory settings. | While viewing the TV, press the front panel buttons GUIDE and FORMAT at the same time. | All Audio and Video settings are returned to the original factory settings, including Listen To and Language, plus Closed Captions settings and Format settings . |
| Channel Memorization | To erase and re-memorize channels on ANT 1 or ANT 2. | 1. While viewing the TV, press MENU to display the Main menu.2. Press ▶ highlight the Setup icon.3. Press ▶ highlight the Scan icon.4. Press ▶ highlight the antenna input and reception mode, e.g. Ant 1 Air.5. Press ▶ highlight the Start button icon and press ENTER to start the memorization. | All previously memorized channels for the selected antenna input are erased and a new set of memorized channels is created. All custom settings for FAV, channel names, and channel locks are deleted. To add or delete individual channels, see Edit menu instructions in chapter 5, “TV Menu Settings.” |
| Lock Menu Pass Code | To change your Lock menu pass code | See the cutout page in Appendix B. | Allows a new code to be established. |
Appendix E: Troubleshooting, continued
| Reset Name When to Use How to Use Resulting Action | |||
| Front-Panel Lock Release | To re-enable the front-panel controls after activation of the Front-Panel Lock | ·When Energy Mode is set toFast Power On, press and hold theMENU button on the front panel for over eight seconds.·When Energy Mode is set toLow Power, press POWER on the front panel to turn on the TV. Press and hold theMENU button on the front panel for over eight seconds. | Allows the front panel to be unlocked if the remote control is misplaced. |
| System Reset If the | TV does not turn on or off, does not respond to the remote control or front panel buttons, or has audio but no video. | Press the SYSTEM RESET button on the front panel with a pointed object such as the point of pencil or end tip of a paperclip. | The TV will turn off and the green LED will flash quickly for about one minute. When the green LED stops flashing, you may turn on the TV. The changes you made most recently, before using SYSTEM RESET, may be lost. Changes you made previously, however, are not lost. |
| TV Reset IMPORTANT:Use this reset only if all other resets have been unsuccessful. | To reset all consumer-accessible settings and all memories to the original factory defaults.CAUTION:All owner-performed setups and adjustments will be erased. | 1. While viewing the TV, press MENU to display the TV Main menu.2. With theMainmenu displayed, press number keys 1 2 3 to display theResetmenu.3. READ THE ON-SCREEN WARNING AND INSTRUCTIONS.·If you do not wish to use this reset, press EXIT or MENU to back out.·If you do wish to use the reset, press ENTER to erase all memories and settings. | The TV will start the initialization process. The TV will then turn off and the front green LED will start flashing. When the LED stops flashing, you can turn the TV on again. The Parental Lock Pass code will remain unaffected, but all other memories and settings outlined in this Owner's Guide will need to be set again. |
Service and Support
Service
If you are unable to correct a problem with your TV, consult your Mitsubishi dealer or Mitsubishi Consumer Relations at (800) 332-2119.
- DO NOT adjust any controls other than those described in this Owner's Guide.
- DO NOT remove the protective back cover of your TV.
Support
- To order replacement or additional remote controls, lamp cartridges, or Owner's Guides,
visit our website at www.mitsuparts.com or call (800) 553-7278.
- For questions:
- Call Consumer Relations at 800-332-2119.
E-mail: MDEAservice@mdea.com
Website: www.mitsubishi-tv.com
Important
All lamps replaced under warranty must be returned to Mitsubishi where they will be inspected for defect verification.
Appendix E: Troubleshooting, continued
| General TV Operation | ||
| Symptom Remarks | ||
| 1. A | fan is running even while the TV is powered off. | The room is too warm. When the TV is off, internal components continue to draw power and must be cooled by the fan. |
| 2. T | The TV remote control does not work. • Check that the batteries are fresh and installed correctly.• Check that the slide switch on the remote is set to TV.• Be no more than 20 feet from the TV when using the remote control.• Program the remote control to operate the TV or other device.• Reset the remote control. | |
| 3. W | When I try to use the remote control, the POWER key blinks five times. | Replace the batteries. |
| 4. TV | does not respond to the remote control or to front panel control and TV will not power on or off. | Use the System Reset button. |
| 5. W | When a device is selected from the Input Selection menu, the screen is blue (no signal source). | Make sure the selected device is turned on.Begin play of the VCR. |
| 6. | You have forgotten your Lock menu pass code. | See Appendix B, Bypassing the Parental Lock. |
| 7. R | Rating restrictions are not working.Open the Parental Lock menu and:• Verify that the U.S. Ratings or Other Ratings setting is On.• Check the Lock Time/Unlock Time to check if rating restrictions are disabled.• Rating restrictions apply only to content on ANT 1 and ANT 2, INPUT 1–3. | |
| 8. O | n-screen displays appear each time you change a function. | Normal TV operation. |
| 9. A | warning message appeared on screen stating, “TV will shut down in a few seconds. Please check if the air flow is blocked.” | Room temperature has exceeded proper levels. Cool the room.The TV has overheated. Clear blocked air vents and ensure at least four inches of clearance on all sides of the TV.Clean the air filter on the lamp cartridge. |
| TV Channels | ||
| Symptom Remarks | ||
| 1. The TV takes several seconds to respond to channel changes. | It is normal for digital channels to take longer to tune in.Press ENTER after a entering channel number to avoid delays.Use a 4-digit number for an over-the-air digital channel.Use a 6-digit number for digital cable channels if your cable service is able to recognize 6-digit channel numbers. | |
| 2. You cannot access a channel. | Use number keys instead of CH / Be sure the channel you want to view is in memory. See Setup > Scan in chapter 5, “TV Menu Settings.”Check that the TV is switched to the correct device or antenna for that channel by pressing the INPUT button.Make sure Channel Lock is off.Make sure the Lock > Parent menu lock is set to off.If you cannot tune to a virtual digital channel even though the TV has already memorized digital channels, tune to the physical channel number used by the broadcaster. The virtual channel will then be automatically added to memory. | |
Appendix E: Troubleshooting, continued
| TV Channels | ||
| Symptom Remarks | ||
| 3. Name options are not available for some channels. | You can name only memorized analog channels and memorized digital channels not named by the broadcaster. | |
| 4. When ChannelViewTM list is displayed, information appears incomplete | • Available information is sent from the broadcaster or cable provider. No other data is available.• Make sure the TV clock is set correctly. | |
| TV Power On/Off | ||
| Symptom Remarks | ||
| 1. TV | V takes an excessively long time to power on. | When switched on, the TV needs time to boot up, just as a computer does. Also, the TV's lamp requires a few moments to heat up to full brightness.TV Energy Mode is set to Low Power. Change TV Energy Mode to Fast Power On in the Setup menu. |
| 2. You | cannot program the TV to turn on automatically (Timer function) | The TV may be locked.The clock may not be set.TV Energy Mode is set to Low Power. Change to Fast Power On in Setup menu. |
| 3. The TV will not turn on after being plugged in. | If light on front panel is blinking, wait for at least one minute for the light to turn off, then press POWER again. | |
| 4. TV | turned itself off and the light on the front panel started to blink. | Momentary power fluctuation caused the TV to turn off to prevent damage. Wait for the green light to stop flashing and turn the TV on again.If the TV does not stay on, use the System Reset button on the front panel. If this happens frequently, obtain an AC line power conditioner/surge protector.An unusual digital signal may have been received, triggering a protection circuit. Wait for the light to stop flashing and turn TV on. |
| 5. TV | turned itself off and the STATUS is a steady yellow. | The TV has overheated. Clear blocked air vents and ensure at least four inches of clearance on all sides of the TV.Clean the lamp-cartridge air filter. See Appendix C. |
| 6. TV | will not power off. Use the System Reset button. | |
| Picture | ||
| Symptom Remarks | ||
| 1. Picture does not look like a high-definition picture. | Not all signals are high-definition signals. To receive high-definition programming from your cable or satellite provider, you must subscribe to the provider's high-definition service. Some over-the-air broadcasts are in high-definition and can be received with a high-quality antenna suited to your location. | |
| 2. Picture has become dimmer. • The lamp is nearing the end of its life. Order a new lamp.See Appendix C for ordering information and replacement instructions.Adjust picture brightness and contrast to maximum levels.Change Lamp Mode from Standard to Bright. | ||
| 5. There is a large black or gray rectangle on the screen. | The TV's analog closed captioning has been set to “text” mode in the Captions menu. Turn off because there is no text information being broadcast. | |
| 6. You cannot view a picture when playing a VHS tape. | Check your VCR's owner's guide for further troubleshooting. | |
Appendix E: Troubleshooting, continued
| Picture | ||
| Symptom Remarks | ||
| 7. | VCR or DVD player's on-screen menus jitter up and down. | Possible cause: Many VCRs and DVD players provide on-screen menus at only half-resolution. These lower-resolution graphics may appear to jitter up and down when the TV converts them to high-definition graphics. |
| 8. | When viewing a stopped VCR, white lines are rolling on the screen. | Turn off video mute for the VCR.Begin playing the tape.Change the VCR input to the antenna input. |
| 9. | Screen is black.The PerfectColorTM color balance has been incorrectly set. Reset the PerfectColor balance. | |
| 10. | Picture from an HDMI input is noisy (poor quality). | Upgrade a Category 1 (unmarked) HDMI cable to a Category 2 HDMI cable. |
| 11. | The image from a computer appears distorted when viewed on the TV. | Normal TV operation. The TV does not correct distortion in the picture from a computer because the correction process may cause the edges of the image to be cut off. |
| Sound (see also NetCommand troubleshooting for A/V receiver setup) | ||
| Symptom Remarks | ||
| 1. | There is no sound even when the volume is turned up. | Check if the MUTE button is on.The TV's “Listen to:” setting may be set to SAP.Check that the Speakers option is set to TV to hear sound from the TV speakers.If using an A/V receiver, check that the Speakers option is set to AV Receiver to hear sound from the A/V receiver speakers.Perform a System Reset. |
| 2. | The sound does not match the screen picture. | The TV's Listen to: setting may be set to SAP.If using stereo or A/V receiver speakers, check their input selection in the Inputs > AVR menu.If using stereo or A/V receiver, check that DIGITAL AUDIO OUT and/or AVR AUDIO OUTPUT on TV's back panel is connected to the A/V receiver.NetCommand® is set up incorrectly for the A/V receiver. |
| Indicators | ||
| Symptom Remarks | ||
| 1. L | AMP indicator light is a constant red. Turn | the TV off for at least 2 minutes. Turn it back on. If light is still red, the lamp has failed. Replace it. See Appendix C for lamp replacement information. For questions, please call Mitsubishi Consumer relations at (800) 332-2119. |
| 2. L | AMP indicator light is a flashing yellow. Lamp | amp cover door is open or lamp cartridge is not secure. See Appendix C for lamp replacement information. |
| 3. STATUS | indicator light is a steady yellow. | Room temperature has exceeded proper levels. Cool the room.The TV has overheated. Clear blocked air vents and ensure at least four inches of clearance on all sides of the TV.Clean the air filter on the lamp cartridge. See Appendix C. |
Appendix E: Troubleshooting, continued
| Indicators | |
| Symptom Remarks | |
| 4. STATUS indicator light is a steady/flash-ing red. | Unplug set from AC power. Plug back in an wait one minute for blinking to stop.Press SYSTEM RESET button and wait for blinking to stop.If blinking continues, service is required. Contact your dealer or a Mitsubishi Authorized Service Center to arrange for a service evaluation. Listings of Mitsubishi Authorized Service locations can be obtained from our web site, www.mitsubishi-tv.com or by calling 1-800-332-2119. |
| NetCommand (Y and 734 series only) | ||
| Symptom Remarks | ||
| 1. C | Cannot see the menu from the A/V Receiver. | The A/V Receiver is not connected to any video input of the TV.To check the A/V Receiver menu, temporarily plug into an unused input of the TV, such as Input 3. Exit the Auto Input Sensing screen and select Input 3 from the Input Selection menu. Press MENU. |
| 2. N | NetCommand unable to learn specific device keys. | Device does not use IR format for remote control signal. ITT and RF formats cannot be learned.Room lighting may affect the signal. Have the remotes very close (6 inches or less) to the TV during Learning.If learning a Mitsubishi remote control, make sure slide switch is not set to TV position.Some, but not all, device key functions can be learned by NetCommand. For example, POWER and PLAY may be learned, but other functions may not.The signal from the remote control may not be strong enough. Insert fresh batteries and try Learning again. |
| 3. T | The A/V Receiver is the selected audio source but there is no sound. | Check to see if the A/V Receiver power is turned on.With the power turned on, redisplay the Input Selection menu and press ENTER to allow NetCommand to correctly select the A/V Receiver input.Incorrect setup in the Inputs > AVR menu. Check the device connection assigned in the AVR menu. |
| 4. T | There is no sound when I switch to the A/V receiver using the Speaker setting in the AV menu, even though I have physically connected the TV to the A/V receiver and learned IR codes for the receiver inputs. | Wrong input or no input was assigned in the AV Receiver Learn screen. All audio should go to the A/V receiver as audio output from the TV unless the device's audio is connected directly to the A/V receiver. See chapter 6, "NetCommand," and perform the procedure to select the correct A/V receiver input. |
| 5. T | There is no sound from the A/V receiver for my DVD player or other surround sound device even though I learned the IR code for the A/V receiver's DVD input or other input. | NetCommand A/V receiver setup for the DVD player or digital surround sound device or other device is not switching properly. See chapter 6, "NetCommand," and perform A/V receiver setup for a digital surround sound device. |
| 6. I' | 've selected my DVD player or other surround sound device in combination with the TV speakers but hear no sound from the TV speakers. | If you have only an audio connection from the device to the A/V receiver, a physical audio connection from the device to the TV is also required.Connect the left and right audio output from the device to the appropriate TV audio input. Now you can hear audio from the device through either the TV speakers or the A/V receiver.To switch audio sources, press AUDIO, press to show the Speakers option, then press to select AV Receiver or TV. |
| 7. I | "learned" the RECORD key for my VCR/DVR but when I pressed the RECORD key, the VCR/DVR did not record anything. | Check that the VCR or DVR is receiving a signal directly from your cable box or satellite receiver. |
Trademark and License Information
LICENSOR'S SUPPLIERS DO NOT MAKE OR PASS ON TO END USER OR ANY OTHER THIRD PARTY, ANY EXPRESS, IMPLIED OR STATUTORY WARRANTY OR REPRESENTATION ON BEHALF OF SUCH SUPPLIERS, INCLUDING, BUT NOT LIMITED TO THE IMPLIED WARRANTIES OF NON-INFRINGEMENT, TITLE, MERCHANTABILITY OR FITNESS FOR A PARTICULAR PURPOSE.
Digital Light Processing ^™ and DLP ^™ are registered trademarks of Texas Instruments.
Manufactured under license from Dolby Laboratories. Dolby is a trademark of Dolby Laboratories.
HDMI™ the HDMI logo and High-Definition Multimedia Interface are trademarks or registered trademarks of HDMI Licensing LLC.
This product incorporates copyright protection technology that is protected by U.S. patents and other intellectual property rights. Use of this copyright protection technology must be authorized by Macrovision, and is intended for home and other limited pay-per-view uses only unless otherwise authorized by Macrovision. Reverse engineering or disassembly prohibited.
This product includes technology owned by Microsoft Corporation and cannot be used or distributed without a license from Microsoft Licensing, Inc.
The Simplay and the words “Simplay™” and “Simplay HD™” are the trademarks of Silicon Image, Inc.
ChannelView™, ClearThought®, NetCommand®, PerfectColor™, PerfecTint™, QuickView™ are trademarks of Mitsubishi Digital Electronics America, Inc.
x.v.Color and the x.v.Color logo are trademarks of Sony Corporation.
Mitsubishi TV Software
END-USER LICENSE AGREEMENT FOR EMBEDDED SOFTWARE
IMPORTANT – READ CAREFULLY: This License Agreement is a legal agreement between you (either an individual or an entity) and Mitsubishi Digital Electronics America, Inc. (MDEA) for all software pre installed and/or provided along with this television (“Software”). By utilizing this television and Software, you agree to be bound by the terms of this License Agreement.
The Software is protected by United States copyright laws and international treaty provisions, as well as other intellectual property laws and treaties. The Software is licensed, not sold.
- LICENSE GRANT. MDEA grants you a non-exclusive, non-transferable, limited right and license to use one copy of the Software only with the Mitsubishi television model that included this owner's guide and owned by you.
2. RIGHTS AND LIMITATIONS.
Software Not for Resale. You may not resell or otherwise transfer for value the Software, except in conjunction with a sale of the TV that Software has been pre installed.
Prohibition on Reverse Engineering, Decompilation and Disassembly. The Software contains trade secrets or other proprietary material in its human perceivable form and to protect them, you may not reverse engineer, decompile, or disassemble, or otherwise reduce the Software to any human perceivable form, except to the extent that the foregoing restriction is expressly prohibited by applicable law.
Separation of Components. The Software is licensed as a single product. Its component parts may not be separated for use on more than one TV.
No Rental. You may not rent, lease, lend, or sublicense the Software.
Trademarks. This License Agreement does not grant you any rights to any trademarks of MDEA.
- VIOLATIONS. You understand that any use, copying or transfer of the Software, except as permitted pursuant to this License, may subject you to serious criminal and civil penalties including damages and an award to MDEA of attorneys' fees in connection with any violation of this License. You further understand that you may be held legally responsible for any copyright infringement or other violation of intellectual property rights that is caused, encouraged, or induced by your failure to abide by the terms of the License. This license is effective until terminated, and will terminate immediately without notice from MDEA or judicial resolution if you fail to comply with any provision of this License.
- COPYRIGHT. All title and intellectual property rights in and to the Software (including but not limited to any images, photographs, animations, video, audio, music, text, and "applets" incorporated into the Software), and any accompanying printed materials are owned by or licensed to MDEA. All title and intellectual property rights in and to the content which may be accessed through use of the Software is the property of the respective content owner and may be protected by applicable copyright or other intellectual property laws and treaties. This License Agreement grants you no rights to use such content, except that you own the media on which the Software is recorded, but MDEA and its licensors retain ownership of the Software itself. All rights not expressly granted are reserved by MDEA.
- EXPORT RESTRICTIONS. MDEA is licensing the Software for use within the United States. You agree that you will not export or re-export the Software. You specifically agree not to export or re-export the Software: (i) to any country to which the U.S. has embargoed or restricted the export of goods or services, which currently include, but are not necessarily limited to Cuba, Iran, Iraq, Libya, North Korea, Sudan, and Syria, or to any national of any such country, wherever located, who intends to transmit or transport the Software back to such country; (ii) to any person or entity who you know or have reason to know will utilize the Software in the design, development, or production of nuclear, chemical, or biological weapons; or (iii) to any person or entity who has been prohibited from participating in U.S. export transactions by any federal agency of the U.S. government. You warrant and represent that neither the BXA nor any other U.S. federal agency has suspended, revoked, or denied your export privileges.
- DISCLAIMER OF WARRANTY. EXCEPT AS OTHERWISE PROVIDED IN THIS LICENSE OR IN THE LIMITED WARRANTY APPLICABLE TO THE TV, MDEA MAKES NO OTHER WARRANTIES OF ANY KIND WHATSOEVER REGARDING THE SOFTWARE AND HEREBY EXPRESSLY DISCLAIMS ALL WARRANTIES OF ANY KIND WHATSOEVER, EXPRESS OR IMPLIED, WITH RESPECT TO THE SOFTWARE. ALL IMPLIED WARRANTIES, INCLUDING, WITHOUT LIMITATION, THE IMPLIED WARRANTIES OF MERCHANTABILITY AND FITNESS FOR A PARTICULAR PURPOSE ARE HEREBY EXPRESSLY DISCLAIMED BY MDEA. IN NO EVENT SHALL MDEA BE LIABLE TO YOU OR ANY THIRD PARTIES, IN CONTRACT, IN TORT OR OTHERWISE, FOR ANY DIRECT, INDIRECT, SPECIAL, INCIDENTAL OR CONSEQUENTIAL DAMAGES OF ANY KIND OR NATURE. BECAUSE SOME JURISDICTIONS DO NOT ALLOW THE EXCLUSION OR LIMITATION OF IMPLIED WARRANTIES, THE ABOVE LIMITATION MAY NOT APPLY TO YOU.
- LIMITATION OF LIABILITY. MDEA SHALL NOT, UNDER ANY CIRCUMSTANCES BE LIABLE TO YOU OR ANY THIRD PARTIES FOR ANY DAMAGES OF ANY NATURE, WHETHER INDIRECT, SPECIAL, INCIDENTAL, CONSEQUENTIAL OR OTHERWISE, INCLUDING, BUT NOT LIMITED TO, ANY CLAIMS FOR LOST PROFITS, LOSS OF GOOD WILL OR EXPENDITURES MADE OR COMMITTED FOR IN RELIANCE ON THE CONTINUATION OF THIS LICENSE. YOU AGREE THAT NEITHER MDEA'S BREACH OF THIS LICENSE NOR ITS FAILURE TO REPAIR A DEFECT, ERROR OR BUG SHALL CONSTITUTE A FAILURE OF THE ESSENTIAL PURPOSE OF THIS LICENSE. BECAUSE SOME JURISDICTIONS DO NOT ALLOW THE EXCLUSION OR LIMITATION OF LIABILITY FOR CONSEQUENTIAL OR INCIDENTAL DAMAGES, THE ABOVE LIMITATIONS MAY NOT APPLY TO YOU. MDEA's liability to you for direct damages for any cause whatsoever and regardless of the form of the action, will be limited to the money paid by you for the TV (based on fair market value of the TV) that caused the damages.
- GENERAL. This License Agreement will be governed by the laws of the State of California.
WARNING: This product contains chemicals known to the State of California to cause cancer and/or birth defects or other reproductive harm.
Mitsubishi DLP™ Projection Television Limited Warranty
MITSUBISHI DIGITAL ELECTRONICS AMERICA, INC. ("MDEA") warrants as follows to the original purchaser of this television from an authorized MITSUBISHI Audio/Video Dealer, should it prove defective by reason of against defects arising from improper workmanship and/or material:
a. Parts. The lenticular (i.e. front picture) screen is warranted against defects in materials and workmanship for a period of thirty (30) days from the date of the original purchase at retail. The lamp and all other parts (except any software incorporated into this television) are warranted for a period of one (1) year from the date of the original purchase at retail. We will repair or replace, at our option, any defective part without charge for the part. Parts used for replacement may be replaced with those of like kind and quality and may be new or remanufactured. Parts used for replacement are warranted for the remainder of the original warranty period.
b. Embedded Software. MDEA warrants that all software incorporated into this television set (the "Embedded Software") will perform in accordance with the functional description of Embedded Software in all material respects, but MDEA does not warrant that the Embedded Software is error-free. MDEA also does not warrant that the Embedded Software will be compatible under IEEE 1394 AV/C and HAVi software standards with products produced by any other manufacturer. The limited warranty contained in this section shall continue for a period of one (1) year from the date of the original purchase at retail. If, after prompt notice within the warranty period, MDEA determines that the Embedded Software has failed to perform in accordance with such functional description in all material respects and if such failure is not due to accident, misuse, modification or misapplication of the Embedded Software, then MDEA shall modify or replace the nonconforming Embedded Software at no charge to you, which at MDEA's sole discretion may be fulfilled by means of modification or replacement software contained on a replacement memory card for Customer installation. The foregoing shall be MDEA's sole obligation to you under this limited warranty. All rights under this limited warranty on the Embedded Software also subject to your acceptance of and compliance with the terms of the Software License Agreement applicable to this television, and this limited warranty on the Embedded Software shall be null and void if the Embedded Software is modified or changed in any manner except as specifically authorized by MDEA.
c. Labor. For thirty (30) days after the original purchase at retail, we will repair or replace, at our option, the lenticular screen if it proves defective. For certain items that are designed to be replaced by the consumer, including (but not limited to) some Embedded Software, the consumer is solely responsible for any replacement labor. For all other parts, we will provide the labor for a warranty repair by an authorized MITSUBISHI service center without charge for one (1) year from the original date of purchase at retail.
d. Notice. To obtain warranty service, you must notify an authorized MITSUBISHI service center of any defect within the applicable warranty time period.
e. This DLP Projection Television uses a single DLP chip to create the screen image. This technology creates the image using small dots, or picture elements (pixels). Your DLP Projection TV is manufactured to a high level of performance and quality, in fact, 99.99% perfect in the number of properly functioning pixels. As in other display technology, sometimes a pixel is continuously active, inactive or the incorrect color. Our standard is clear; MDEA warrants only that the percentage of properly functioning pixels will be not less than 99.99% of all pixels.
BEFORE REQUESTING SERVICE, please review the instruction booklet to insure proper installation and correct customer control adjustment. If the problem persists please arrange for warranty service.
1. TO OBTAIN WARRANTY SERVICE:
a. Contact your nearest authorized MITSUBISHI service center, whose name and address can be obtained from your MITSUBISHI dealer, by writing at the address provided below, calling MDEA at the 800-332-2119, or by using the support feature of our website at www.Mitsubishi-tv.com.
b. Warranty service will be provided in your home or, if required, at an authorized service shop, provided that your television is located within the geographic territory customarily covered by an authorized MITSUBISHI service center. If not, you must either deliver your television to an authorized service location at your own expense, or pay for any travel and/or transportation costs the service center may charge to and from your home. Actual service labor will be provided without charge.
c. Proof of purchase date from an authorized MITSUBISHI dealer is required when requesting warranty service. Present your sales receipt or other document which establishes proof and date of purchase. THE RETURN OF THE OWNER REGISTRATION CARD IS NOT A CONDITION OF COVERAGE UNDER THIS LIMITED WARRANTY. However, please return the Owner Registration Card so that we can contact you should a question of safety arise which could affect you.
d. To obtain a replacement lamp, order the lamp directly from the MDEA Parts Department at (800) 553-7278.
2. THIS LIMITED WARRANTY DOES NOT COVER:
a. Up to .01% pixel outages (small dot picture elements that are dark or incorrectly illuminated).
b. Damage to the lenticular screen or Fresnel lens, screen frame, cosmetic damage or to any other damage where such damage is caused by unauthorized modification, alteration, repairs to or service of the product by anyone other than an authorized MITSUBISHI service center; physical abuse to or misuse of the product (including any failure to carry out any maintenance as described in the Owner's Guide including air vent cleaning or any product damaged by excessive physical or electrical stress); any products that have had a serial number or any part thereof altered, defaced or removed; product use in any manner contrary to the Owner's Guide; freight damage; or any damage caused by acts of God or other factors beyond the reasonable control of MDEA, such as power surge damage caused by electrical system or lightning. This limited warranty also excludes service calls where no defect in the product covered under this warranty is found, service calls related to unsatisfactory audio or visual reception or signal unless caused by a defect in the product that is covered under this limited warranty, all costs, expenses or any other damages arising from product installation, or set-ups, any adjustments of user controls (including contrast, brightness, color, tint, fine tuning, sharpness), other adjustment necessary to prepare the unit for display or use, connection with any external audio receiver, antenna, cable or satellite systems, or service of products purchased or serviced outside the U.S.A. Please consult the operating instructions contained in the Owner's Guide furnished with the product for information regarding user controls.
3. ANY EXPRESS WARRANTY NOT PROVIDED HEREIN, AND ANY REMEDY WHICH, BUT FOR THIS PROVISION, MIGHT ARISE BY IMPLICATION OR OPERATION OF LAW, IS HEREBY EXCLUDED AND DISCLAIMED. THE IMPLIED WARRANTIES OF MERCHANTABILITY AND OF FITNESS FOR ANY PARTICULAR PURPOSE ARE EXPRESSLY LIMITED TO A TERM OF ONE YEAR.
4. UNDER NO CIRCUMSTANCES SHALL MDEA BE LIABLE TO PURCHASER OR ANY OTHER PERSON FOR ANY INCIDENTAL, SPECIAL OR CONSEQUENTIAL DAMAGES, WHETHER ARISING OUT OF BREACH OF WARRANTY, BREACH OF CONTRACT, OR OTHERWISE.
5. Some states do not allow limitations on how long an implied warranty lasts, or the exclusion or limitation of incidental, special, or consequential damages, so the above limitations or exclusions may not apply to you.
6. This limited warranty gives you specific legal rights, and you may also have other rights which vary from state to state.
7. In the event of any dispute under this limited warranty, jurisdiction and venue for resolving that dispute will be in the state where the television was purchased and the laws of such state will govern.

MITSUBISHI
MITSUBISHI DIGITAL ELECTRONICS AMERICA, INC.
9351 Jeronimo Road
Irvine, CA 92618-1904
Index
A
A/V Memory Reset 71
A/V Receiver
Adding NetCommand Control 53, 54, 55, 56
and the TV Speakers 37
and TV's Remote Control 53, 63
Audio Lock 64
Codes 65
Connecting 9, 10, 23, 54
Controlling Sound Volume 14
A/V Reset 7, 71
Adjust Keys (Up/Down/Left/Right) 26, 34
Air Filter 62
Anamorphic Picture Format 30
Antenna
Connecting 19
Antenna Inputs (ANT 1/MAIN, ANT 2/AUX) 9
Audio Lock 64
Audio Menu 37
Auto-off. See Sleep Timer
Auto-on. See Timer
Auto Input Sensing
Description 6
TV Setup 13
B
Back Panel (described) 9, 10
Batteries 12
Bright (Lamp Mode) 35
C
Cable Box
and TV's Remote Control 26, 63 Codes 66
Connecting 17, 18, 22, 23
Camcorder
Connecting (Analog) 24
Camera Files 32
Captions Menu 38
Channels. See also FAV
Changing 25
ChannelView™ Listings 27
Channel Lock 40
Digital Channel Numbers 58
Memorizing 13
Naming 40
Physical/Virtual Channel Numbers 40
Scan (description) 39
Status Display 28
Troubleshooting 73
Cleaning 4
Clock, Set Date and Time 41
Closed Captions 38
Color Adjustments 35, 36
Reset Color 35, 71
Component Inputs (Y Pb Pr) 9
Computer
and Display Formats 16, 58
Connecting 15
D
Date. See Clock
Defaults, Resetting 71
Digital Audio Out 10
Display Format Definitions 30
Dolby Digital 10, 23, 54, 58
DVD Player
and TV's Remote Control 27, 63 Codes 67
Connecting 20
DVI Device, Connecting 20
E
Energy Mode 42
F
F1–F4 Keys 26, 49
Fan Noise 4
Fast Power On 42
FAV (Favorite Channels) 29, 40
FORMAT Key 30, 31
Front Panel Lock 46
G
GUIDE Key 26, 63
ChannelView 27
H
HDMI
Changing Out an HDMI Device 14
Connecting an HDMI Device 18
Disconnecting and the Input Selection Menu 43
HDMI Cable Categories 10
HDMI Jack 10
NetCommand for HDMI Devices 6, 27, 63
HDTV Cable Box or Satellite Receiver
with Component Video, Connecting 17
HD (High-Definition) Signal) 30
|
INFO Key
ChannelView 27
in TV Menus 34
USB Photo Menu 32
Input Jacks (Standard Audio/Video)
10
Input Selection Menu
Choose Viewing Source 25
Icon Order 43
INPUT Key 26
IR (infrared) Emitter Placement
48
J
JPEG Photo Files 32
L
Lamp Cartridge Replacement 61
LAMP Indicator. See LED Indicator
Lights
Lamp Mode 35
Language
in Digital Programs 37
SAP (Second Audio Program) 37
Language Menu 39
Learn. See NetCommand®
LED Indicator Lights 8
Troubleshooting 75
Lock Menu. See Lock TV
Lock TV
Bypassing the Lock 59
Lock by Channel 40
Lock by Ratings 45
Lock by Time 46
Lock Front Panel 46
Preset V-Chip Blocking 44
Low Power (Energy Mode) 42
M
Media Setup Menu 33
Memorizing Channels 13
Add Single Channel to Memory
39, 40
Mute
MUTE key 26
Video Mute 35
N
NetCommand®
A/V Receiver Control 53
Compared to Programming the
Remote Control 63
Description 47
Initial Setup for Most Devices 49
NetCommand for HDMI Devices
6, 27, 63
Operating 51, 52
Specialized Device Keys 50
Troubleshooting 76
Noise, Video 35
P
Parent Menu 45
Pass Code
Resetting 59
Setting 44
PAUSE Key 26
PerfectColor 35
PerfectTint 35
Photo Viewing 33
Picture
AV Menu Controls 35
Format Displays 31
Picture Quality and Film Mode 35
Troubleshooting 74
Picture Mode 36
Power Consumption
Energy Mode 42
Specifications 58
Power On/Off 12, 25
Troubleshooting 74
Q
QV Key (QuickView™) 26
and FAV Key 29
R
Remote Control
Keys and Functions 26, 27
Programming Codes (reference chart) 65
Programming Instructions 64
Programming vs. NetCommand "Learning" 63
Reset 27
Reset
A/V Reset (all settings) 7
AV Menu Reset (by input) 35
Color 71
Pass Code 59
Remote Control 27
Remote Control Audio Lock 64
System Reset 7
TV Reset Comparison Guide 71
S
S-Video 10
Connecting an S-Video Device 18
Safeguards 5
SAP (second audio program) 28, 37
Satellite Receiver
and the Remote Control 63
Connecting 17, 18
SD (Standard-Definition Signal) 30
Service and Support 72
Signal Definitions 30
Sleep Timer 25
Sound
Audio Settings 37
Controlling A/V Receiver Volume 14, 53
Simulated Stereo 37
Troubleshooting 75
Turn TV Speakers On/Off 37
Speakers Option
Auto Input Sensing 14
In Audio Menu 37
Specifications, TV 58
Standard-Definition Signal 30
Standard (Lamp Mode) 35
Stand Part Numbers 4
Status Display 28
STATUS Indicator. See LED Indicator Lights
Stereo System. See A/V Receiver
Surround Sound 9, 10, 23, 55
Simulated 37
System Reset 7, 72
T
Time. See Clock
Timer
Sleep Timer (auto-off) 25
TV Timer (auto-on) 42
Time Zone. See Clock
Troubleshooting 71
V
V-Chip Ratings
Applying Restrictions 44
Definitions 45
In Status Display 28
VCR
Connecting 10, 21, 22
Troubleshooting 75
Video from a Digital Camera 33
Video Menu 36
Viewing Device. See Input Selection Menu
W
Wall Outlet Cable 19
X
x.v.Color 10, 18, 36
Website:
www.mitsubishi-tv.com
E-mail:
MDEAservice@mdea.com
For questions, call Consumer Relations at
800-332-2119
To order replacement or additional remote controls, lamp cartridges, or Owner's Guides
Visit our website www.mitsuparts.com
or call
800-553-7278
SYSTEM RESET
If the TV does not respond to the remote control, front panel controls, or will not power on/off, press the SYSTEM RESET button on the front panel.
The green LED will flash quickly for about one minute. When the green LED stops flashing, you may turn on the TV. Settings changes you made most recently, before using SYSTEM RESET, may be lost.

- Series
- OWNER'S GUIDE
- For Your Records
- CAUTION
- WARNING: TO REDUCE THE RISK OF FIRE OR ELECTRIC SHOCK, DO NOT EXPOSE THIS APPLIANCE TO RAIN OR MOISTURE.
- FCC Declaration of Conformity
- Contents
- Important Information About Your TV
- Television Overview
- TV Setup
- TV Connections
- TV Operation and Features
- TV Menu Settings
- NetCommand
- Appendices
- Trademark and License Information ..... 77
- Mitsubishi TV Software....78
- Mitsubishi DLP™ Projection Television Limited
- Index 81
- Installation Notes
- Stand Requirement
- NOTE TO CATV SYSTEM INSTALLER: THIS
- Operating Notes
- Internal Fans
- Lamp Replacement
- To Order a Replacement Lamp Under Warranty
- To Purchase a Replacement Lamp After Warranty
- Cleaning Recommendations
- Top and Sides of the TV
- Screen
- General Cleaning Precautions
- IMPORTANT
- TV Software
- Important Safeguards
- 1
- Television Overview
- Package Contents
- Special Features of Your TV
- 1080p High-Definition DLP™ Display System
- 16:9 Widescreen Picture Format
- Integrated HDTV Tuner
- High-Definition Video Inputs
- Easy Connect Auto Input Sensing
- Home Theater Control
- NetCommand ® with IR Learning (Y series and 734 series models only)
- NetCommand for HDMI Devices (all models)
- TV Front Panel
- Control Panel
- A/V Reset
- Front Inputs
- Front Panel Indicators and Power Button
- Front-Panel Indicators
- LAMP Indicator
- STATUS Indicator
- TIMER Indicator
- TV Back Panel
- ANT 1/MAIN, ANT 2/AUX (Antenna)
- COMPONENT Inputs (Audio and Video)
- Y Pb Pr (480i/480p/720p/1080i)
- PC/DVI AUDIO INPUT
- AVR AUDIO OUTPUT
- TV Back Panel, continued
- INPUT 1, 2 (Audio and Video)
- HDMI™ Inputs
- HDMI Cable Categories
- DIGITAL AUDIO OUT
- IR Emitter NetCommand®
- Y series and 734 series models only
- TV Set-Up
- Guidelines for Setting Up and Using Your New Widescreen TV
- Getting Started
- TV Operation
- Additional TV Setup
- TV Care
- Assistance
- Installing the Remote Control Batteries
- When You First Power On the TV
- Choosing a Language for Menus
- Initial TV Setup
- Turning the TV On or Off
- If You Turn Off the TV by Mistake
- Initial TV Setup, continued
- Change the Menu Language
- Memorize Channels
- For ANT 1/MAIN and ANT 2/AUX
- To start channel memorization
- Additional TV Setup Using the Setup Menu
- Setting Up TV Inputs
- When You First Connect a Device
- Auto Detection Active
- No Auto Detection
- Setting Up TV Inputs, continued
- More About Auto Input Sensing
- Controlling A/V Receiver Sound Volume
- With a Standard TV Setup
- With NetCommand Control of an A/V Receiver (Y and 734 series only)
- Using the TV with a Personal Computer
- Connecting a Computer to the TV
- IMPORTANT This TV accepts digital computer signals only.
- Computer Video Adjustments
- Distortion in Computer Images
- Image Resolution
- Tip:
- Computer Display Formats
- 3
- TV Connections
- Before you Begin
- Auto Input Sensing
- Connection Types
- Picture Quality
- Sound Quality
- HDTV Cable Box or Satellite Receiver with Component Video
- Standard Cable Box, Satellite Receiver, or Other Device with S-Video
- HDMI Device (Cable Box, Satellite Receiver, DVD Player, or Other Device
- HDMI and Audio Signals
- Wall Outlet Cable (no cable box)
- Antennas with Separate UHF and VHF Leads
- Antenna with a Single Lead
- For an antenna with flat twin leads
- For cable or antenna with coaxial lead
- DVD Player with Component Video
- DVI Video Device (Cable Box, Satellite Receiver, DVD Player, or Other Device)
- VCR to an Antenna or Wall Outlet Cable
- VCR to a Cable Box (Audio & Video)
- A/V Receiver (Sound System)
- Note:
- Older Cable Box
- Camcorder
- Composite Video Connection
- Component Y Pb Pr Video Connection
- HDMI Connection
- 4
- TV Operation and Features
- Choosing a Viewing Source
- More About the Input Selection Menu
- Sleep Timer
- Setting the Sleep Timer
- Cancelling the Sleep Timer
- TV Tips
- Controlling Sound Volume
- Changing Channels (antenna sources)
- Remote Control
- Remote Control, continued
- Record/Playback Keys
- NetCommand for HDMI Devices
- Low-Battery Indicator
- Resetting the Remote Control
- Care of the Remote Control
- ChannelView™ Channel Listings
- Status Display
- FAV (Favorite Channels)
- TV Signals and Display Formats
- DVD Definitions
- Anamorphic (or Enhanced for WideScreen TV)
- Non-Anamorphic (or 4:3, 1:33:1, Letter Box, or Full Screen)
- Signal Definitions
- TV Display Format Definitions
- TV Display Formats
- Viewing JPEG Picture Files
- JPEG Photos and the USB Photo Port
- Notes on Viewing JPEG Files
- Slide Show
- Media Setup Menu
- USB Photo Menu Compatible Picture Files
- Photos and Moving Video as Composite Video
- 5
- TV Menu Settings
- Main Menu
- Remote Control Keys for the TV Menu System
- AV Menu
- AV Menu Options
- Video Menu
- Audio Menu
- Captions Menu
- Captions on Analog Channels
- Captions on Digital Channels
- Setup Menu
- Notes on Scan and channel memorization:
- Setup Menu, continued
- Virtual Channel Number (digital channels only)
- Physical Digital Channel Number
- Inputs Menu
- Lock Menu
- Setting or Resetting a Pass Code
- Setting a Pass Code
- Resetting a Pass Code
- Important Notes on Rating Locks
- Parent Menu
- Other Menu (Alternate Rating System)
- Bypassing TV Locks
- Lock Menu, continued
- Parent Menu Options (U.S.-based rating system)
- Other Menu Options (alternate rating system)
- Time
- Front Panel
- 6
- NetCommand
- About NetCommand
- Important Note on NetCommand
- IR Emitter Placement (NetCommand®)
- Initial NetCommand Setup for Most Devices
- Add or Remove Device Keys from NetCommand Control
- NetCommand Specialized Device Keys
- Operating NetCommand-Controlled Devices
- To Control Most Device Types
- To Control an A/V Receiver
- Switching Audio to and from the A/V Receiver
- Controlling A/V Receiver Power
- Controlling Other A/V Receiver Functions
- Setting Up NetCommand Control of an A/V Receiver
- AVR screen overview
- Setup to Control the A/V Receiver's Power and Volume Functions
- By completing “learning” for the power key, NetCommand now operates the power function for the A/V receiver.
- Point the TV's remote control at the TV to control the A/V receiver.
- Setting Up NetCommand Control of an A/V Receiver, continued
- Setup to Control Automatic Switching of A/V Receiver Audio Inputs
- Setup 1: Automatic A/V Receiver Switching to Its TV Audio Input
- Setup 2: Automatic A/V Receiver Switching for a Surround Sound Device
- HDMI
- Appendix B: Bypassing the Parental Lock
- Bypassing the Parental Lock
- Appendix C: Lamp-Cartridge Replacement and Cleaning
- WARNING
- Lamp Life
- To Order a New Lamp
- To Receive a Replacement Lamp Under Warranty
- Lamp Part Number 915P061010
- Appendix C: Lamp-Cartridge Replacement and Cleaning, continued
- Lamp-Cartridge Replacement
- Removing the Old Lamp Cartridge
- Installing the New Lamp Cartridge
- Disposal of the Old Lamp Cartridge
- IMPORTANT: Lamps found to be without defect will be returned and charged back to the sender.
- Lamp-Cartridge Filter Cleaning
- Appendix D: Programming the Remote Control
- Functions Available for Other A/V Devices
- Appendix D: Programming the Remote Control, continued
- Programming the Remote Control
- Code Verification
- Audio Lock: Universal A/V Receiver Control
- To Reset the Remote Control to Operate Volume and Mute for the TV Speakers
- Programming Codes
- Programming Codes, continued
- Appendix E: Troubleshooting
- TV Reset Comparison Guide
- Appendix E: Troubleshooting, continued
- Service and Support
- Service
- Support
- Trademark and License Information
- Mitsubishi TV Software
- END-USER LICENSE AGREEMENT FOR EMBEDDED SOFTWARE
- RIGHTS AND LIMITATIONS.
- Mitsubishi DLP™ Projection Television Limited Warranty
- TO OBTAIN WARRANTY SERVICE:
- MITSUBISHI
- Index
- A
- B
- C
- D
- E
- F
- G
- H
- |
- J
- L
- M
- N
- P
- Q
- R
- S
- T
- V
- W
- X
- For questions, call Consumer Relations at
- 800-332-2119
- To order replacement or additional remote controls, lamp cartridges, or Owner's Guides
- Visit our website www.mitsuparts.com
- SYSTEM RESET
Brand : MITSUBISHI
Model : WD-65734
Category : TV