
LED39RT - Television Luxor - Free user manual and instructions
Find the device manual for free LED39RT Luxor in PDF.


| Product Type | LED TV |
| Brand | Luxor |
| Model | LED39RT |
| Screen Size (diagonal) | 39 inches (99 cm) |
| Display Resolution | 1920 x 1080 pixels |
| Energy Efficiency Class | A |
| On Mode Power Consumption | 59 W |
| Standby Power Consumption | 0.5 W |
| Off Mode Power Consumption | 0 W |
| Annual Energy Consumption | 86 kWh/annum |
| TV Broadcasting Systems | PAL/SECAM B/G D/K K' I/I' L/L' |
| Digital Reception | DVB-T MPEG2, DVB-T MPEG4 HD, DVB-C MPEG2, DVB-C MPEG4 HD |
| Number of Preset Channels | 1000 |
| RF Aerial Input | 75 Ohm (unbalanced) |
| Operating Voltage | 220-240V AC, 50 Hz |
| Audio Output Power | 2 x 8 W RMS (10% THD) |
| Panel Aspect Ratio | 16:9 |
| Connectivity | HDMI, SCART, USB, VGA (PC), YPbPr, Headphone, SPDIF, CI slot |
| Special Features | USB recording, timeshift, EPG, teletext, sleep timer, child lock, game mode, picture off |
| Power Save Mode | Eco, Picture Off, Disabled |
| Supported USB File Systems | FAT32, NTFS (recording not on NTFS) |
| Wall Mounting | Optional (VESA compatible) |
Frequently Asked Questions - LED39RT Luxor
User questions about LED39RT Luxor
0 question about this device. Answer the ones you know or ask your own.
Ask a new question about this device
Download the instructions for your Television in PDF format for free! Find your manual LED39RT - Luxor and take your electronic device back in hand. On this page are published all the documents necessary for the use of your device. LED39RT by Luxor.
USER MANUAL LED39RT Luxor
FARVE - TV MED FJERNETJENING COLOUR TELEVISION WITH REMOTE CONTROL FÄRG TV MED FJÄRRKONTROLL FARGE TV MED FJERNKONTROLL VÄRI - TV KAUKOSÄÄDÖLLÄ
Indhold
Reparationsinformation
TV-betjeningsknapper & betjening
![graph TD A[" "] --> B["①"] B --> C["②"] C --> D["③"] style A fill:#fff,stroke:#000 style B fill:#fff,stroke:#000 style C fill:#fff,stroke:#000 style D fill:#fff,stroke:#000](/content/2026/05/863299/images/d5c142dd33738683ee6d377b3f55a8eaa74565f068d904b403cb6e09d0e4644d.jpg)
1.Op
2. Ned
3. Program/Lydstyrke/AV/Standby-On knap
![graph LR A["Device with Interface"] --> B["Common Interface"] B --> C["CAM module"]](/content/2026/05/863299/images/fd2e8fd119b15d0d292504b1582c94871d84c16d6a99f5258ba06266e9778e3b.jpg)
Standbymeddelelser
Tilslut strøm & antenne/kabel
PAL/SECAM B/G D/K K' I/I' L/L'
DIGITAL MODTAGELSE
DVB-T MPEG2
DVB-T MPEG4 HD
German + Nicam Stereo
AUDIOUDGANGSEFFEKT ( WRMS. ) (10% THD) 2 x 8
STRÖMFORBRUG (W) 75 W (maks.)
PANEL 16:9
Licensmeddelelse
Fremstillet under licens fra Dolby Laboratories.
ANERKENDELSE AF VAREMÆRKER

DOLBY.
Safety Precautions 24
Environmental Information 26
Accessories included....26
TV - Features 27
Viewing the TV 27
TV Control button & Operation 28
Viewing remote control - TV 29
Using a Conditional Access Module....31
Standby Notifications....31
Installing the Batteries to the Remote.... 32
Connect Power & Antenna/Cable....32
Switching On/Off....32
First Time Installation.... 32
Media Playback via USB Input 34
Changing Image Size: Picture Formats......35
Using the Channel List 35
Quick Menu 35
Menu Features and Functions....36
Electronic Programme Guide (EPG) 40
Recording a Programme 40
Timeshift Recording 41
Instant Recording 41
Watching Recorded Programmes 41
Recording Configuration 41
Teletext 42
Software Upgrade 42
Troubleshooting & Tips 43
PC Typical Display Modes 44
Specifications 44
Licence Notifications.... 45
Supported File Formats for USB Media Browser .....46
Supported DVI Resolutions 47
Safety Precautions

Please read these instructions fully before installing or operating.
Preparation
Place the device on a solid even surface. For ventilation, leave a free space of at least 10 cm all around the set. To prevent any fault and unsafe situations, do not place any objects on top of the set. Use this device in moderate climates. Operation temperature and operation humidity: 5° C up to 45° C, 85% rel. humidity max. (not blocking ventilation openings).
Intended Use
This device is used to receive and display TV programmes. The different connection options make an additional expansion of the reception and display sources possible (various external devices). This device is only suitable for the operation in dry interiors. This appliance is intended solely for private domestic use and may not be used for industrial and commercial purposes. We exclude liability in principle, if the device is not used as intended, or unauthorized modifications have been made. To operate your TV in extreme ambient conditions may cause the damage of the device.

WARNING: Never let people (including dren) with physical, sensory or mentalities or lack of experience and / or knowledge supervised use electrical device!
Children may not recognize dangers right! The swallowing of batteries can be fatal. Keep batteries always out of reach of small children. If a battery is swallowed, immediately seek medical attention. Keep the packaging films out of reach of children. Risk of suffocation.
Power source
- The TV should be operated only from a 220-240 V AC, 50 Hz outlet.

Warning: Do not leave your TV in standby or ating mode when you leave your house.
Positioning the TV
- For ventilation, please leave a clear space of at least 10cm all around the TV.
- Do not block the ventilation openings.
- Do not place the TV on sloping or unstable surfaces, the TV may tip over.
- To prevent damage to the TV, do not place any objects on top of the TV.
- Only use the TV in moderate climates.
Power cord and plug
- The power cord plug should be easily accessible. In case of storms and lightning, when going on holiday, or when the TV is not used for a long period of time disconnect the power cord from the mains power socket.
- The mains plug is used to disconnect TV set from the mains and therefore it must remain readily operable.
- Do not place the TV, furniture, etc. on the power cord or pinch the cord.
- Handle the power cord by the plug, do not unplug the TV by pulling the power cord.
- Never touch the power cord/plug with wet hands as this could cause a short circuit or electric shock.
- Never make a knot in the power cord or tie it with other cords.
- Power cords should be placed in such a way that they are not likely to be stepped on or driven over.
- A damaged power cord/plug can cause fire or give you an electric shock. When damaged it must be replaced, this should only be done by qualified personnel.
Moisture and Water
- Do not use this TV in a humid or damp place (avoid bathrooms, the sink in the kitchen, and near the washing machine).
- Do not expose this TV to rain or water, as this may be dangerous.
- Do not place objects filled with liquids, such as flower vases, on top of the TV. Avoid from dripping or splashing.
- If any solid object or liquid falls into the cabinet, unplug the TV and have it checked by qualified personnel before operating it any further.
Ventilation
- The slots and openings on the TV set are intended for ventilation and to ensure reliable operation.
- To prevent overheating, these openings must not be blocked or covered in anyway.
Heat sources and Flames
- Do not expose the TV to direct sunlight or other heat sources.
- The TV should not be placed near to open flames and sources of intense heat such as an electric heater.
- Ensure that no open flame sources, such as lighted candles, are placed on top of the TV.

Headphone Volume
- Excessive sound pressure from earphones and headphones can cause hearing loss, please take care.

Wall Mounting (optional)
- To prevent injury, this TV must be securely attached to the wall in accordance with the installation instructions (if the option is available).
LCD Screen
- Occasionally, a few non-active pixels may appear on the screen as a fixed blue, green or red point. Please note that this does not affect the performance of your product.
- Take care not to scratch the screen with fingernails or other hard objects.
Cleaning
- Before cleaning, unplug the TV from the wall socket.
- Do not use liquid or aerosol cleaners. Only use a soft, dry cloth.
Environmental Information
This television is designed to consume less energy to save environment. You not only help to save the environment but also you can save money by reducing electricity bills thanks to the energy efficiency feature of this TV. To reduce energy consumption, you should take the following steps:
You can use Power Save Mode setting, located in the Picture Settings menu. If you set Power Save Mode as Eco, the TV will switch to energy-saving mode and luminance level of TV set will be decreased to optimum level. Note that some picture settings will be unavailable to be changed when the TV is in Power Save Mode.
Power Save Mode

If Picture Off is selected, "Screen will be off in 15 seconds." message will be displayed on the screen. Select PROCEED and press OK to continue. The screen will be off in 15 seconds. If you disable Power Save Mode, Picture mode will be automatically set to Dynamic.
When the TV is not in use, please switch off or disconnect the TV from the mains plug. This will also reduce energy consumption.
Disconnect power when going away for longer time.
It is highly recommended to activate Power Save Mode setting to reduce your annual power consumption. And also it is recommended to disconnect the TV from the mains plug to save energy more when you do not use.
Please helps us to save environment by following these steps.
Repair Information
Please refer all servicing to qualified personnel. Only qualified personnel must repair the TV. Please contact your local dealer, where you have purchased this TV for further information.
Accessories included
Remote Control
Batteries: 2 x AAA
Instruction Book
Side AV Connection Cable
TV - Features
- Remote controlled colour TV.
- Fully integrated digital/cable TV (DVB-T/C).
• DVB-T2 Compliant. - HDMI connectors for digital video and audio. This connection is also designed to accept high definition signals.
- USB input.
- Programme recording.
- Programme timeshifting.
• 1000 programmes. - OSD menu system.
- Scart socket for external devices (such as video, video games, audio set, etc.).
- Stereo sound system.
- Teletext, fastext, TOP text.
• Headphone connection.
• Automatic programming system. - Forward or backward manual tuning.
• Automatic power down after up to six hours. - Sleep timer.
- Child lock.
• Automatic sound mute when no transmission. - NTSC playback.
• AVL (Automatic Volume Limiting). - PLL (Frequency Search).
- PC input.
- Plug&Play for Windows 98, ME, 2000, XP, Vista, Windows 7.
• Game Mode (optional).
• Picture off function. - 100 HZ CMP
Viewing the TV
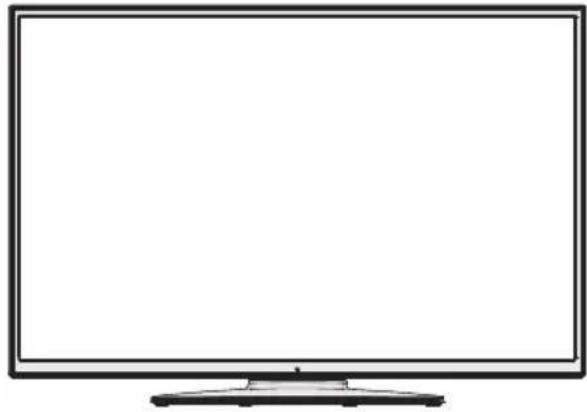
TV Control button & Operation
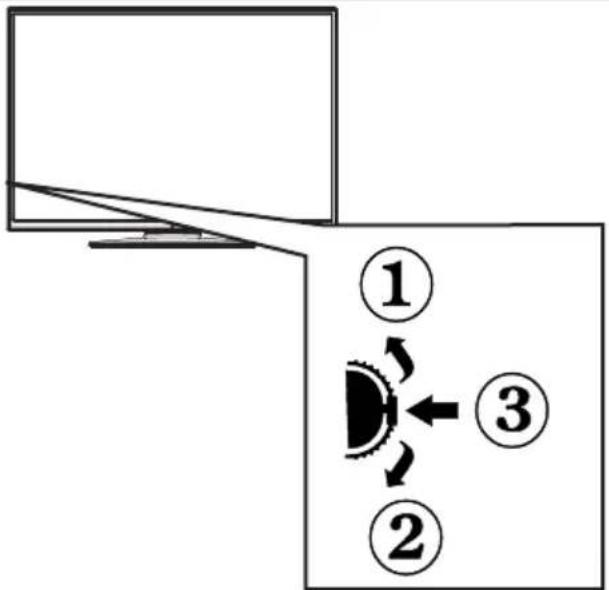
-
Up direction
-
Down direction
-
Programme/Volume / AV / Standby-On selection switch
The Control switch allows you to control the Volume/Programme/ Source and Standby-On functions of the TV.
To change volume: Increase the volume by pushing the button up. Decrease the volume by pushing the button down.
To change channel: Press the middle of the button, the channel information banner will appear on screen. Scroll through the stored channels by pushing the button up or down
To change source: Press the middle of the button twice, the source list will appear on screen. Scroll through the available sources by pushing the button up or down.
To turn the TV off: Press the middle of the button down and hold it down for a few seconds, the TV will turn into standby mode.

NOTE: You can move the switch, upward or downward to change the volume. If you want to change the channel, press the middle of the switch once (Position 3) and then move upward or downward. If you press the middle of the switch once more, the source OSD will be displayed. To select desired source, move the switch upward or downward and release. If you press the middle of the switch and hold for a few seconds, the TV will switch to standby mode. The Main menu OSD cannot be displayed via the control buttons on the TV.
Viewing remote control - TV
- Standby
- Channel list/ back to TV source
- Sleep timer
- Teletext
- Numeric buttons
- AV Source selection
- Green button
- Red button
- Mute
- Volume up/down
- Info/ reveal (in TXT mode)
- Menu on/off
- Navigation button
- Confirm/ Hold( in TXT mode)
- Return/Back/Index(in TXT mode)
- Subtitle on/off
- Language
- Play, stop, rapid reverse, rapid advance
- Pause(in media browser mode)/ Timeshift recording
- Programme recordings
- Electronic program guide
- Image size
- My button1 (*)
- My button 2 (**)
- Exit
- Navigation buttons
- Navigation buttons
- Navigation buttons
- Quick menu
- Programme up/down
- Blue button
- Yellow button
- Swap
- Media Browser
- No function

Using My button 1 (*)
Press MY BUTTON 1 for five seconds when on a desired source, channel or link, until the "MY BUTTON IS SET" message is displayed on the screen. This confirms that the selected MY BUTTON is now associated with the selected function.
Using My Button 2 (**)
Press MY BUTTON 2 for five seconds when on a desired source, channel or link, until the "MY BUTTON IS SET" message is displayed on the screen. This confirms that the selected MY BUTTON is now associated with the selected function.
Viewing the Connections
| Connector Type Cables Device | |||
 | Scart Connection (back) |  |  |
 | VGA Connection (back) |  |  |
SIDE AV | PC/YPbPr Audio Connection (side) |  Side Audio/Video Connection Cable (Supplied) PC Audio Cable (Not supplied) Side Audio/Video Connection Cable (Supplied) PC Audio Cable (Not supplied) |  |
 | HDMI Connection (back) |  |  |
 SPDIF SPDIF | SPDIF Connection (back) |  |  |
SIDE AV | Side AV Connection (side) |  AV Connection Cable (supplied) AV Connection Cable (supplied) |  |
HEADPHONE | Headphone Connection (side) |  |  |
 | YPbPr Video Connection (side) |  YPbPr Connection Cable YPbPr Connection Cable | [0406] |
 | USB Connection (side) | [XX02] |  |
 | CI Connection (side) |  |  |
NOTE: When connecting a device via the Side AV input, you must use the supplied connection cables to enable connection. See the illustrations above. | YPbPr can be used only when you connect a device that has a YPbPr output through the PC input with YPbPr to PC cable (YPbPr to PC cable is not supplied). When the connection is made, switch to YPbPr source. To enable PC audio, you will need to use PC/YPBPR AUDIO CONNECTION WHITE & RED inputs. | If an external device is connected via the SCART socket, the TV will automatically switch to AV mode. | When receiving DTV channels (Mpeg4 H.264) or while in Media Browser mode, output will not be available via the scart socket. | When using the wall mounting kit (optional), we recommend that you plug all your cables into the back of the TV before mounting on the wall. | Insert or remove the CI module only when the TV is SWITCHED OFF. You should refer to the module instruction manual for details of the settings. Insert the CAM and then the viewing card to the slot that is located in the terminal cover at the rear side of the TV. The module should be correctly inserted, it is impossible to insert fully if reversed. The CAM or the TV terminal may be damaged if the CAM is forcefully inserted. Each USB input of your TV supports devices up to 500mA. Connecting devices that have current value above 500mA may damage your TV.
Using a Conditional Access Module

IMPORTANT: Insert or remove the CI module only in the TV is SWITCHED OFF.
In order to watch certain digital channels, a conditional access module (CAM) can be necessary. This module must be inserted in the CI slot of your TV.
- Obtain the Conditional Access Module (CAM) and the viewing card by subscribing to a pay channel company, then insert those to the TV using the following procedure.
- Insert the CAM and then the viewing card to the slot that is located in the terminal cover at the rear side of the TV.
- The CAM should be correctly inserted, it is impossible to insert fully if reversed. The CAM or the TV terminal may be damaged if the CAM is forcefully inserted.
- Connect the TV to the mains supply, switch on and then wait for few moments until the card is activated.
- When no module is inserted, "No Common Interface module detected" message appears on the screen.
You can refer to the module instruction manual for details of the settings.
![graph TD A["Device with Interface"] --> B["Common InterACTIVE"] B --> C["CAM module"] style A fill:#f9f,stroke:#333 style C fill:#bbf,stroke:#333](/content/2026/05/863299/images/1dd73060b5407b8b88623179181b01d5a56fa641b55eca8f5d4502cb72815e48.jpg)
Standby Notifications
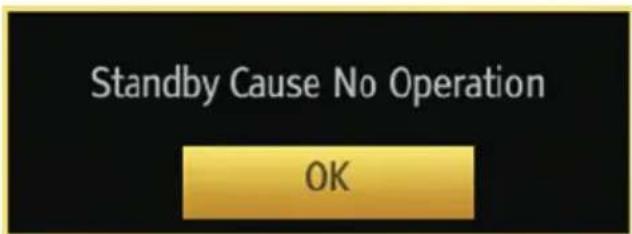
If the TV does not receive any input signal (e.g. From an aerial or HDMI source) for 5 minutes, the TV will go into standby. When you next switch-on the TV, the following message will be displayed:

When the Auto Tv Off timeout is reached, the following message will be displayed on the screen. Select YES to shut down the TV. Select NO to cancel. The TV will switch off as well, if you do not make a selection on this screen.

If the TV has been left on and not been operated for 4 hours, the TV will go into standby. When you next switch-on, the following message will be displayed:
Installing the Batteries to the Remote
- Lift the cover on the back of the remote upward gently.
- Install two AAA batteries. Make sure to match the + and - ends of the batteries in the battery compartment (observe the correct polarity.
- Replace the cover.

Connect Power & Antenna/Cable
IMPORTANT: The TV set is designed to operate on 220-240V AC, 50 Hz socket. After unpacking, allow the TV set to reach the ambient room temperature before you connect the set to the mains. Plug the power cable to the mains socket outlet.

Switching On/Off
To Switch the TV On
Connect the power cord to the 220-240V AC, 50Hz.
To switch on the TV from standby mode either:
Press the "○" button, P+ / P- or a numeric button on the remote control.
Press the control switch located on the left side of the TV. The TV will then switch on.
To Switch the TV Off
Press the "button" button on the remote control or press and hold the control switch on the TV until the TV shuts down, so the TV will switch to standby model (Depends on the model).
To power down the TV completely, unplug the power cord from the mains socket.
Note: When the TV is switched to standby mode, standby LED can blink to indicate that features such as Standby Search, Over Air Download or Timer is active. The LED can also blink when you switch on the TV from standby mode.
First Time Installation
When turned on for the first time, the "language selection" menu appears. The message "Welcome please select your language!" is displayed in all language options listed alphabetically.
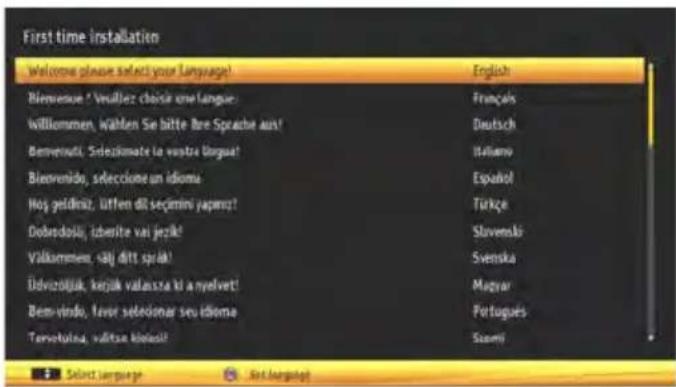
Press the “” or “” button to highlight the required language, press OK button to select. “First Time Installation” appears. Use “<” or “>” button to set the required country, and press “” button to select Search Type. Use “<” or “>” to set the desired search type. Available search types are Digital and analog, digital only and analog only. When set, press “” to select Teletext Language. Use “<” or “>” button to set the “Teletext Language” and select “Scan Encrypted” using “^” or “√” button. You can set Scan Encrypted as Yes if you want to scan coded stations.

Deafult PIN code can change depending on the selected country.
If you are asked to enter a PIN code for viewing a menu option, use one of the following codes: 4725, 0000 or 1234.
Press OK button on the remote control to continue and the following message will be displayed on the screen.

You can activate Store mode (Optional) option by using “<” or “>” button. If Store Mode is selected, Store mode (Optional) option will be available in other settings menu and your TV’s features will be illustrated on the top of the screen. A confirmation screen will be displayed after selecting the Store Mode. Select YES to proceed.

If Home Mode is selected, Store mode (optional) will not be available after the First Time Installation. Press OK button on the remote control to continue and the following message will be displayed on the screen.
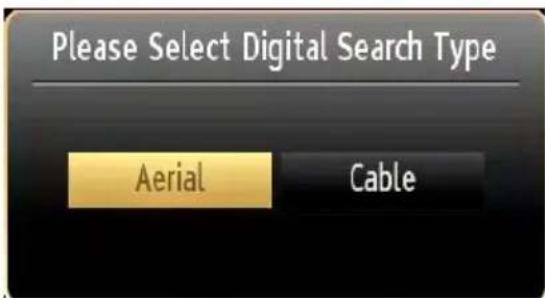
You must select a search type to search and store broadcasts from the desired source.
Aerial Installation
If you select AERIAL option from the Search Type screen, the television will search for digital terrestrial TV broadcasts.

NOTE: You can press MENU button to cancel.
After all the available stations are stored, Channel List will be displayed on the screen. If you like the sort channels, according to the LCN(*), please select "Yes" and then press OK.
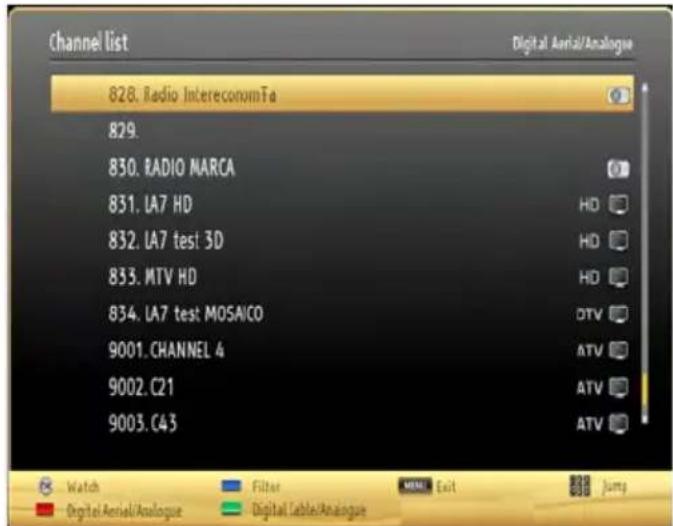
Press OK button to quit channel list and watch TV. (*) LCN is the Logical Channel Number system that organizes available broadcasts in accordance with a recognizable channel sequence.
Cable Installation
If you select CABLE option and press OK button on the remote control to continue, the following message will be displayed on the screen:

To continue please select YES and press OK. To cancel operation, select NO and press OK.

You can select frequency ranges from this screen. For highlighting lines you see, use “^” or “▼” button.
You can enter the frequency range manually by using the numeric buttons on the remote control.
Set Start and Stop Frequency as desired by using numeric buttons on the remote control.
After this operation, you can set Search Step as 8000 KHz or 1000 KHz.
If you select 1000 KHz, the TV will perform search process in a detailed way. Searching duration will thus increase accordingly. When finished, press OK button to start automatic search. The TV will search and store available broadcasts.
(*) Network option will not be available for UK.
Media Playback via USB Input
You can connect a USB hard disk drive or USB memory stick to your TV by using the USB inputs of the TV. This feature allows you to play files stored in a USB drive. 2.5" and 3.5" inch (hdd with external power supply) external hard disk drives are supported.
IMPORTANT! You should back up your files before making any connections to the TV set in order to avoid any possible data loss. Manufacturer will not be responsible for any file damage or data loss. It is possible that certain types of USB devices (e.g. MP3 Players) or USB hard disk drives/memory sticks may not be compatible with this TV. The TV supports FAT32 and NTFS disk formatting but recording will not be available with NTFS formatted disks. Note: While formatting a USB hard disk that has 1TB (Tera Byte) or more file capacity, you can experience problems with the formatting process.
Quickly plugging and unplugging USB devices, is a very hazardous operation. Do not repeatedly quickly plug and unplug the drive. This may cause physical damage to the USB player and USB device itself. Do not pull out USB module while playing a file.
You can use USB hubs with your TV's USB inputs. External power supplied USB hubs are recommended in such a case.
It is recommended to use the TV's USB input(s) directly, if you are going to connect a USB hard disk.
Media Browser Menu
You can play photo, music, and movie files stored on a USB disk by connecting it to your TV and using the Media Browser screen. To do this, perform the following: Connect a USB disk to one of the USB inputs located on the side of the TV.
You can connect two USB devices to your TV. If both USB devices include music, picture or video files, USB selection OSD will be displayed on the screen. The first USB device connected to the TV will be named as USB Drive1. Select a device by using “√” or “” button and press OK.
Press MENU button and select Media Browser tab by using Left/Right and OK buttons. Main media browser screen will be displayed. You can display the related content by selecting the Video, Music or Picture tab. Follow the button indications under each on screen menu for media playback features.
You can set your Media Browser preferences by using the Settings dialog.
Using MENU button in Media Browser Mode
Pressing MENU button in Media Browser mode displays the following menu screen:
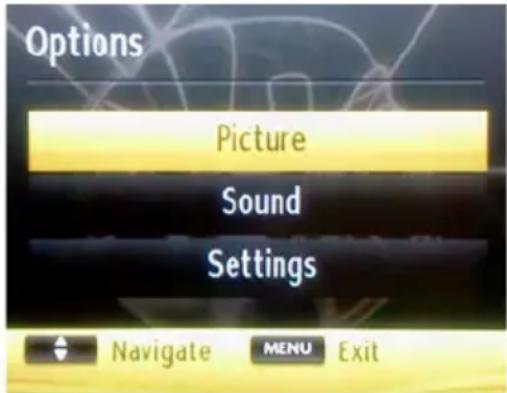
You can access Picture, Sound and Settings menu options using this screen. Press MENU again to exit from this screen.
Changing Image Size: Picture Formats
Programmes can be watched in different picture formats, depending on the transmission received. You can change the aspect ratio (image size) of the TV for viewing the picture in different zoom
modes. Press “” button repeatedly to change the image size. You can shift the screen up or down by using “” or “” buttons while in, 14:9 Zoom, Cinema or Subtitle.
Using the Channel List
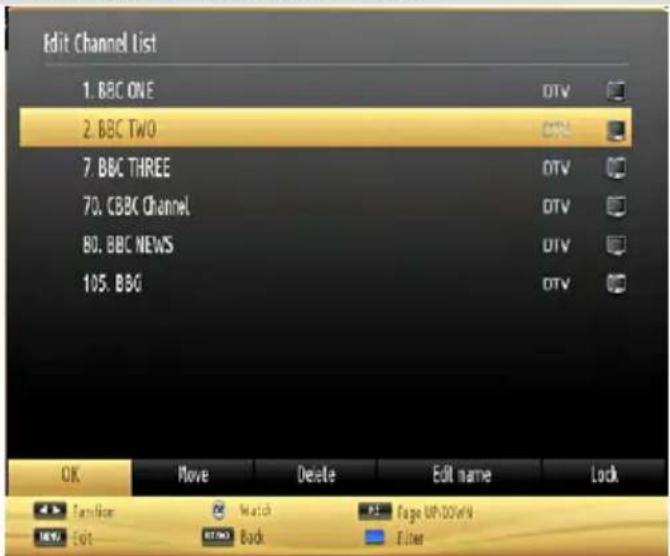
The TV sorts all stored stations in the Channel List. You can edit this channel list, set favourites or set active stations to be listed by using the Channel List options. Press MENU button to view main menu. Select Channel List item by using Left or Right button. Press OK to view menu contents. Select Edit Channel List to manage all stored channels. Use Up or Down and OK buttons to select Edit Channel List. Press Up or Down button to select the channel that will be processed. Press Left or Right button to select a function on Channel List menu. Use P+/P- buttons to move page up or down. Press MENU button to exit.
Sorting Channel List
You can select broadcasts to be listed in the channel list. To display specific types of broadcast, you should use Active channel list setting. Select Active channel list from the Channel list menu by using “” or “” button. Press OK button to continue. You can select a network type option from the list by using “<” or “>” and OK buttons.
Quick Menu
Quick Settings menu allows you to access some options quickly. This menu includes Power Save Mode, Picture Mode, Equalizer Settings, Favourites and Sleep Timer options. Press Q.MENU button on the remote control to view quick menu. See the following chapters for the details of the listed features.

Menu Features and Functions
| Picture Menu Contents | |
| Mode | For your viewing requirements, you can set the related mode option. Picture mode can be set to one of these options: Cinema,Game,Sports,Dynamic and Natural. |
| Contrast | Sets the lightness and darkness values of the screen. |
| Brightness Sets the brightness value for the screen. | |
| Sharpness Sets the sharpness value for the objects displayed on the screen. | |
| Colour | Sets the colour value, adjusting the colors. |
| Power Save Mode | To set Power Save Mode as Eco, Picture Off and Disabled. See the section, “Environmental Information” in this manual for further information on Power Save Mode. |
| Backlight (optional) | This setting controls the backlight level and it can be set to Auto, Maximum, Minimum and Eco Mode. Backlight function will be inactive if Power Save Mode is set to On. Backlight cannot be activated in VGA, Media Browser mode or while the picture mode is set to Game. |
| Noise Reduction | If the broadcast signal is weak and the picture is noisy, use Noise Reduction setting to reduce the noise amount. Noise Reduction can be set to one of these options: Low, Medium, High or Off. |
| Advanced Settings | |
| Dynamic Contrast | You can change contrast rate by using dynamic contrast function. Dynamic contrast can be set to one of these options: Low, Medium, High or Off. |
| Colour Temp Sets the desired colour tone. | |
| Picture Zoom | Sets the picture size to Auto,16:9, Subtitle,14:9, 14:9 Zoom, 4:3 or Cinema. Auto (Only available in Scart mode with SCART PIN8 high voltage/low voltage switching). |
| HDMI True Black | While watching from HDMI source, this feature will be visible in the Picture Settings menu. You can use this feature to enhance blackness in the picture. |
| Film Mode | Films are recorded at a different number of frames per second to normal television programmes. Turn this feature on when you are watching films to see the fast motion scenes clearly. |
| Skin Tone | Adjust the desired skin tone. |
| Colour Shift Adjust the desired colour tone. | |
| RGB Gain | Press OK button to edit RGB gain. You can configure the colour temperature values using the RGB Gain feature. |
| Reset | Resets the picture settings to factory default settings. |
| Autoposition (in PC mode) | Automatically optimizes the display. Press OK to optimize. |
| H Position (in PC mode) | This item shifts the image horizontally to right hand side or left hand side of the screen. |
| V Position (in PC mode) | This item shifts the image vertically towards the top or bottom of the screen. |
| Dot Clock (in PC mode) | Dot Clock adjustments correct the interference that appear as vertical banding in dot intensive presentations like spreadsheets or paragraphs or text in smaller fonts. |
| Phase (in PC mode) | Depending on the resolution and scan frequency that you input to the TV set, you may see a hazy or noisy picture on the screen. In such a case you can use this item to get a clear picture by trial and error method. |
| While in VGA (PC) mode, some items in Picture menu will be unavailable. Instead, VGA mode settings will be added to the Picture Settings while in PC mode. | |
Menu Features and Functions
| Sound Menu Contents | |
| Volume | Adjusts volume level. |
| Equalizer: | In equalizer menu, the preset can be changed to Music, Movie, Speech, Flat, Classic and User. Press the MENU button to return to the previous menu. Equalizer menu settings can be changed manually only when the Equalizer Mode is in User. |
| Balance This setting is used for emphasizing left or right speaker balance. | |
| Headphone Sets headphone volume. | |
| Sound Mode | You can select Mono, Stereo, Dual I or Dual II mode, only if the selected channel supports that mode. |
| AVL | Automatic Volume Limiting (AVL) function sets the sound to obtain fixed output level between programmes (For instance, volume level of advertisements tend to be louder than programmes). |
| Headphone/Lineout (Optional) | When you connect an external amplifier to your TV using the headphone jack, you can select this option as Lineout. If you have connected headphones to the TV, set this option as Headphone. |
| Dynamic Bass (Optional) | Enables or disables the Dynamic Bass. |
| Surround Sound (Optional) | Surround sound mode can be changed as On or Off. |
| Digital Out | Sets digital out audio type. |
| Install and Retune Menu Contents | |
| Automatic Channel Scan (Retune) | Displays automatic tuning options.Digital Aerial: Searches and stores aerial DVB stations.Digital Cable: Searches and stores cable DVB stations.Analogue: Searches and stores analogue stations.Digital Aerial & Analogue: Searches and stores aerial DVB and analogue stations.Digital Cable & Analogue: Searches and stores cable DVB and analogue stations. |
| Manual Channel Scan | This feature can be used for direct broadcast entry. |
| Network Channel Scan (Optional) | Searches for the linked channels in the broadcast system. |
| Analogue Fine Tune | You can use this setting for fine tuning analogue channels. This feature is not available if no analogue channels are stored. |
| First Time Installation | Deletes all stored channels and settings, resets TV to factory settings and starts first time installation. You can follow the instructions in the Initial Installation section for more information on this process. |
| Clear Service List (Optional) | (*) This setting is visible only when the Country option is set to Denmark, Sweden, Norway or Finland. Use this setting to clear channels stored. |
Menu Features and Functions
| Settings Menu Contents | |
| Conditional Access | Controls conditional access modules when available. |
| Language | Configures language settings. |
| Parental | Configures parental settings.Deafult PIN code can change depending on the selected country.If you are asked to enter a PIN code for viewing a menu option, use one of the following codes: 4725, 0000 or 1234. |
| Timers | Sets timers for selected programmes. |
| Recording Configuration | Displays recording configuration menu. |
| Date/Time | Sets date and time.Note:* The TV takes the time info via the broadcast. Correct time will be available on Date/Time Settings, if the time info is provided in the broadcast.If the TV is in no channel mode, Date/Time settings can be changed. However, if there is a channel preset, only “Time Settings Mode” can be changed and if this is set to Manual, Time Zone will be enabled.* If the TV is switched to standby mode and switched on later and there is no broadcast available, time information will not be updated. If there is a present broadcast; however, time information will be taken via the broadcast. In other words, time information will be available according to these priorities: The TV first looks for the time info in the broadcast, then to the user preference, and lastly to the teletext time information. |
| Sources | Enables or disables selected source options. |
| Network Settings (Optional) | Displays network settings. |
| Other Settings: Displays other setting options of the TV set: | |
| Menu Timeout | Changes timeout duration for menu screens. |
| Scan Encrypted | When this setting is on, search process will locate the encrypted channels as well. If it is set as Off, encrypted channels will not be located in automatic search or manual search. |
| Blue Background | Activates or deactivates blue background system when the signal is weak or absent. |
| Software Upgrade | To ensure that your TV always has the most update information, you can use this setting.In order for the proper operation, please ensure that the TV is set to standby mode. |
| Application Version | Displays application version. |
| Hard of Hearing | If the broadcaster enables any special signal concerning the audio, you can set this setting as On to receive such signals. |
| Audio Description | Audio description refers to an additional narration track for blind and visually impaired viewers of visual media, including television and movies. You can use this feature, only if the broadcaster supports that additional narration track. |
| Auto TV Off | You can set the timeout value of auto off feature.After the timeout value is reached and the Tv is not operated for selected time , the TV will go off. |
| Standby Search (optional) | If you change Standby Search to Off, this function will be unavailable. To use Standby search please make sure that you select Standby Search as On. If the Standby Search is set to On, when the TV is in standby mode, available broadcasts will be searched. If the TV locates any new or missing broadcasts, a menu screen will be displayed, asking you whether or not to execute these changes. Channel list will be updated and changed after this process. Please activate Standby Search setting in order to enable your TV for automatically updating the broadcast frequency of the broadcaster, broadcast definition and similar changes. |
Menu Features and Functions
| Other Settings: Displays other setting options of the TV set: | |
| Store Mode (optional) | If you are displaying the TV in a store, you can activate this mode. While Store Mode is enabled, some items in the TV menu may not be available to be set. |
| Power Up Mode | This setting configures the power up mode preference. Always On: The TV always switches on when main on/off button is pressed. / Standby: The TV always powers up in Standby mode. / Last State: The TV always switches on with the last selected channel/source. |
| Virtual Remote (optional) | Enables or disables the virtual remote feature. |
Electronic Programme Guide (EPG)
Some, but not all channels send information about the current and next programmes. Press the "button to view the EPG menu.
| 14:00 | 15:00 | 11:00 | |||
| 1. BBC ONE | BB Dick 'W' Dom Go Wild | Luckie Leonard | Copycats | Who Let the Dogs Ou | |
| 2. BBC TWO | Wanted Down Under | Hairy Bikers' Best of British | Flog It! | ||
| 3. ITV1 | Dickinson's Real Deal | Rosemary and Thyme | |||
| 4. Channel 4 | The Hi Countdown | Deal or No Deal: Banker's Birthday | |||
| 5. Channel 5 | Law & Ord By Appointment Only | ||||
| 6. ITV2 | The Jeremy Kyle Show | Planet's Funny | Britain's Got Talent | ||
| 7. BBC THREE | This Is BBC Three | ||||
| 9. BBC FOUR | This Is BBC Four | ||||
| 10. ITV3 | Murdej Murder, She Wrote | On the Buses | On the Bu | ||
| 11. Pick TV | The Biggest Loser USA | Nothing To Declare | Nothing To Declare | ||

Up/Down/Left/Right: Navigate EPG.
OK: Displays programme options.
INFO: Displays, in detail information on programme selected.
GREEN: Switches to List Schedule EPG.
YELLOW: Switches to Timeline Schedule EPG.
BLUE: displays filtering options.
(RECORD): the TV will start to record the selected programme. You can press again to stop the recording
IMPORTANT: To record a programme, you should first connect a USB disk to your TV while the TV is switched off. You should then switch on the TV to enable recording feature. Otherwise, recording feature will not be available.
Note: Switching to a different broadcast or source is not available during the recording.
Programme Options
In EPG menu, press the OK button to enter the Event Options menu.
Select Channel
In EPG menu, using this option, you can switch to the selected channel.
Record / Delete Record Timer
After you have selected a programme in EPG menu, press the OK button and and Options screen will be displayed. Select "Record" option and press the OK button. After this operation, a recording becomes set to the selected programme.
To cancel an already set recording, highlight that programme and press the OK button and select the option "Delete Rec. Timer". The recording will be cancelled.
Set Timer / Delete Timer
After you have selected a programme in EPG menu, press the OK button and and Options screen will be displayed. Select "Set Timer on Event" option and press OK button. You can set a timer for future programmes. To cancel an already set timer, highlight that programme and press the OK button. Then select "Delete Timer" option. The timer will be cancelled.
Note: It is not possible to record or set timer for two or more individual events at the same time interval.
Recording a Programme
IMPORTANT: When using a new USB hard disk drive, it is recommended that you first format the disk using your TV's "Format Disk" option.
To record a programme, you should first connect a USB disk to your TV while the TV is switched off. You should then switch on the TV to enable recording feature.
For using recording function, you should connect a USB disk or an external hard disk drive to the TV and connected USB disk should have at least 1 GB capacity and should have 2.0 speed compatibility. If the connected USB device does not support 2.0 speed, an error message will be displayed.
Note: Recorded programmes are saved into the connected USB disk. If desired, you can store/copy recordings on a computer; however, these files will not be available to be played on a computer. You can play the recordings only via your TV.
Note: Lip Sync delay may occur during the timeshifting. Radio record is not supported. The TV can record programmes up to ten hours.
Recorded programmes are split into 4GB partitions.
If the writing speed of the connected USB disk is not sufficient, recording may fail and timeshifting feaute may not be available.
Recordings of HD programmes can occupy bigger size on the USB disk depending on the broadcast's resolution. For this reason it is recommended to use USB hard disk drives for recording HD programmes.
Do not plug out the USB/HDD during the recording. This may harm the connected USB/HDD.
Multipartiton support is available. Maximum two different partitions are supported. If the disk have more than two partitions, crash may occur. First partition of the usb disk is used for PVR ready features. It also must be formatted as primary partition to be used for PVR ready features.
Some stream packets may not be recorded because of signal problems, so sometimes video may freezes during playback.
Record, Play, Pause, Display (for PlayListDialog) keys could not be used when teletext is ON. If a recording starts from timer when teletext is ON, teletext is
automatically turned off. Also teletext usage is disabled when there is ongoing recording or playback.
Timeshift Recording
Press (PAUSE) button while watching a broadcast for switching to timeshifting mode. In timeshifting mode, the programme is paused and simultaneously recorded to the connected USB disk. Press (PLAY) button again to watch the paused programme from the stopped moment. You will see the timeshift gap between the real and the timeshifted programme in the info bar.
Instant Recording
Press (RECORD) button to start recording an event instantly while watching a programme. You can press (RECORD) button on the remote control again to record the next event on the EPG. In this case, OSD will display the programmed events for recording. Press (STOP) button to cancel instant recording. Switching to a different broadcast or source; and viewing Media Browser are not available during the recording.
Watching Recorded Programmes
In the main menu, use “◀” or “▶” buttons to select Media Browser. Highlight Recordings Library item by using “◀” or “▶” button and press OK button to enter. Recordings Library will then be displayed. Select a recorded item from the list (if previously recorded) by using “◀”/▶” button. Press OK button to view Play Options. Select an option by using “◀”/▶” or OK buttons.

Available playback options:
- Play from start: Plays the recording from the beginning.
- Resume: Recommences the recordings.
- Play from offset: Specifies a playing point.
Note: Viewing main menu and menu items will not be available during the playback.
Press ■(STOP) button to stop a playback and return to return to Recordings Library.
Slow Forward
If you press ▪(PAUSE) button while watching recorded programmes, slow forward feature will be available. You can use ▶ button to slow forward. Pressing ▶ button consecutively will change slow forwarding speed.
Recordings Library
To view the list of recordings, select "Recordings Library" and press the OK button. Recordings Library will then be displayed with available recordings. All the recordings are kept in a list in the recordings library.
(Resume): Recommences the recordings.
RED button (Delete) : Erases the selected recording. GREEN button (Edit): Makes changes on the selected recording.
BLUE button (Sort): Changes the order of the recordings. You can select from a wide range of sorting options.
OK button: Activates play options menu:
INFO (Details): Displays the short extended programmes in detail.
Recording Configuration
Select Recording Configuration item in the Settings menu to configure recording settings.
Format Disk: You can use Format Disk feature for formatting the connected USB disk. IMPORTANT: Note that ALL the data stored on the USB disk will be lost and then the disk format will be converted to FAT32 if you activate this feature. If your USB disk malfunctions, you can try formatting the USB disk. In most cases formatting the USB disk will restore normal operation; however, ALL the data stored on the USB disk will be lost in such a case.
Note: If "USB is too slow" message is displayed on the screen while starting a recording, try restarting the recording. If you still get the same error, it is possible that your USB disk does not meet the speed requirements. Try connecting another USB disk..
Teletext
“Teletext / Mix: Activates teletext mode when pressed once. Press again to place the teletext screen over the programme (mix). Pressing again will quit the teletext mode.
"BACK" Index: Selects the teletext index page.
"I" Reveal: Shows hidden information (e.g. solutions of games).
"OK" Hold: Holds a text page when convenient. Press again to resume.
“<” / “> Subcode Pages: Selects subcode pages if available when the teletext is activated.
P+ / P- and numbers (0-9): Press to select a page.
Note: Most TV stations use code 100 for their index pages.
Your TV supports both FASTEXT and TOP text systems. When these systems are available, the pages are divided into groups or topics. When FASTEXT system is available, sections in a teletext page will become colour-coded and can be selected by pressing the coloured buttons. Press a coloured button that corresponds to with your needs. The coloured writings will appear, showing you which coloured buttons to use when TOP text transmission is present. Pressing “” or “” commands will request the next or previous page respectively.
Digital Teletext (for UK only)
- Press the "button. The digital teletext information appears. Operate it with the coloured buttons, cursor buttons and OK button.
The operation method may differ depending on the contents of the digital teletext. Follow the instructions displayed on digital teletext screen.
When the “☐” button is pressed again, the TV returns to television broadcasting.
Software Upgrade
Your TV is capable of finding and updating new software upgrades over broadcast channels. For broadcast channels search, TV looks the available channels stored in your settings. So before software upgrade search, it is advised to auto search and update all available channels.
1) Software upgrade search via user interface
- It is possible manually to check if there is a new software upgrade for your TV set.
- Simply navigate on your main menu. Choose Settings and select Other Settings menu. In Other Settings menu navigate on to the Software Upgrade item and press OK button to open Upgrade Options menu.
- In Upgrade Options menu select Scan for upgrade and press OK button.
- If a new upgrade is found, it starts to download the upgrade. A progress bar indicates the remaining download progress. When download completes with success a message is displayed for reboot to activate new software. Press OK to continue with the reboot operation.
2) 3.AM search and upgrade mode
- If Automatic scanning in Upgrade Options menu is enabled, TV wakes up at 03:00 and searches broadcast channels for new software upgrade. If new software is found and downloaded successfully, with next power up TV opens with new software version.
Note on reboot operation: Reboot is the last step in software upgrade operation if download of new software is finished successfully. During reboot TV makes final initialization. In reboot sequence panel power is closed and front led indicates the activity with blinking. Around 5 minutes later TV restarts with new software activated.
- If your TV fails to restart in 10 minutes, unplug power for 10 minutes and re-plug again. TV should open with new software safely. If you still can not get TV working, please kindly repeat unplug and plug sequence a few times more. If your set still can not operate, please call the service personnel to fix the problem for you.
Caution: While led is blinking during reboot do not unplug your TV's power. Doing this may cause your TV not to re-open again and can only be fixed by service personnel.
Troubleshooting & Tips
Image persistence - ghosting
Please note that ghosting may occur while displaying a persistent image (still or paused image). TVs' image persistence may disappear after a short time. Try turning off the TV for a while. To avoid this, do not leave the screen in still picture mode for extended periods.
No power
If your TV has no power, please check the power cord plug is connect to the mains power socket.
Poor picture
- Have you selected the correct TV system?
- Is your TV or house aerial located too close to a non-earthed audio equipment or neon lights, etc.?
- Mountains or high buildings can cause double pictures or ghost images. Sometimes you can improve the picture quality by changing the direction of the aerial. Is the picture or teletext unrecognisable?
- Check if you have entered the correct frequency.
- Please retune the channels.
- The picture quality may degrade when two devices are connected to the TV at the same time. In such a case, disconnect one of the devices.
No picture
- No Picture means that your TV is not receiving a transmission. Have you selected the correct button on the remote control? Try once more. Also make sure the correct input source has been selected.
- Is the aerial connected properly?
- Are the plugs connected tightly to the aerial socket?
- Is the aerial cable damaged?
- Are suitable plugs used to connect the aerial?
- If you are in doubt, consult your dealer.
No sound
- Has the TV been set to mute? To cancel mute, press the "OK" button, or increase the volume level.
- Sound is coming from only one speaker. Is the balance set to one extreme? See Sound Menu section.
Remote control - does not operate
Your TV no longer responds to the remote control. The batteries may be exhausted, if so you can still use the control buttons on the TV. (* Is only possible if they are not blocked by parental control.)
Input sources - can not be selected
- If you cannot select an input source, it is possible that no device is connected.
- Check the AV cables and connections if you have tried to connect a device.
Recording Unavailable
To record a programme, you should first connect a USB disk to your TV while the TV is switched off. You should then switch on the TV to enable recording feature. Otherwise, recording feature will not be available. If you cannot perform recording, try switching off the TV and then re-inserting the USB device while the TV is switched off.
USB Is too Slow
If “USB is too slow” message is displayed on the screen while starting a recording, try restarting the recording. If you still get the same error, it is possible that your USB disk does not meet the speed requirements. Try connecting another USB disk.
Information for Users on Disposal of Old Equipment and Batteries
[European Union only]
These symbols indicate that equipment with these symbols should not be disposed of as general household waste. If you want to dispose of the product or battery, please consider the collection systems or facilities for appropriate recycling.
Notice: The sign Pb below the symbol for batteries indicates that this battery contains lead.


PC Typical Display Modes
The following table is an illustration of some of the typical video display modes. Your TV may not support all resolutions. Your TV supports up to 1920x1200.
Index Resolution Frequency
| 1 | x400 70Hz | |
| 2 | x350 85Hz | |
| 3 | x400 85Hz | |
| 4 | x480 60Hz | |
| 5 | x480 66Hz | |
| 6 | x480 72Hz | |
| 7 | x480 75Hz | |
| 8 | x480 85Hz | |
| 9 | x600 56Hz | |
| 10 | 0x600 60Hz | |
| 11 | 0x600 70Hz | |
| 12 | 0x600 72Hz | |
| 13 | 0x600 75Hz | |
| 14 | 0x600 85Hz | |
| 15 | 2x624 75Hz | |
| 16 | 24x768 60Hz | |
| 17 | 24x768 66Hz | |
| 18 | 24x768 70Hz | |
| 19 | 24x768 72Hz | |
| 20 | 24x768 75Hz | |
| 21 | 24x768 85Hz | |
| 22 | 52x864 60Hz | |
| 23 | 52x864 70Hz | |
| 24 | 52x864 75Hz | |
| 25 | 52x864 85Hz | |
| 26 | 52x870 75Hz | |
| 27 | 80x768 60Hz | |
| 28 | 60x768 60Hz | |
| 29 | 80x768 75Hz | |
| 30 | 80x768 85Hz | |
| 31 | 80x960 60Hz | |
| 32 | 80x960 75Hz | |
| 33 | 80x960 85Hz | |
| 34 | 80x1024 60Hz | |
| 35 | 80x1024 75Hz | |
| 36 | 80x1024 85Hz |
| 37 | 00x1050 60Hz | |
| 38 | 00x1050 75Hz | |
| 39 | 00x1050 85Hz | |
| 40 | 40x900 60Hz | |
| 41 | 40x900 75Hz | |
| 42 | 00x1200 60Hz | |
| 43 | 30x1050 60Hz | |
| 44 | 20x1080 60Hz | |
| 45 | 20x1200 60Hz |
Specifications
TV BROADCASTING
PAL/SECAM B/G D/K K' I/I' L/L'
DIGITAL RECEPTION
DVB-T MPEG2
DVB-T MPEG4 HD
DVB-T MHEG-5 Engine (for UK only)
DVB-C MPEG2
DVB-C MPEG4 HD
RECEIVING CHANNELS
VHF (BAND I/III)
UHF (BAND U)
HYPERBAND
NUMBER OF PRESET CHANNELS
1000
CHANNEL INDICATOR
On Screen Display
RF AERIAL INPUT
75 Ohm (unbalanced)
OPERATING VOLTAGE
220-240V AC, 50 Hz
AUDIO
German + Nicam Stereo
AUDIO OUTPUT POWER (W RMS. ) (10% THD) 2 x 8
POWER CONSUMPTION (W) 75 W (max)
PANEL 16:9
Licence Notifications
Manufactured under license from Dolby Laboratories.
TRADEMARK ACKNOWLEDGMENT
DOLBY
DIGITAL PLUS and the double-D symbol are trademarks of Dolby Laboratories.
"HDMI, the HDMI logo and High-Definition Multimedia Interface are trademarks or registered trademarks of HDMI Licensing LLC."

HIGH DEFINITION MULTIMEDIA INTERFACE
Supported File Formats for USB Media Browser
| Media Extension Format Notes | ||||
| Movie | mpg, mpeg | Mpeg1,2 MPEG1/2 Layer 1/2/3, AAC/HEAAC, AC3/EAC3, LPCM/ADPCM | 1080P@ 30fps 50Mbit/sec | |
| dat, mpg, mpeg | MPEG2 ,H.264, VC1, AVS, MVC | MPEG1/2 Layer 1/2/3, AAC/HEAAC, AC3/EAC3, LPCM/ADPCM | H.264:1080Px2@25fps 1080P@ 50fps MVC: 1080P@ 24fps Other: 1080P@ 30fps" 50Mbit/sec | |
| .vob MPEG2 | MPEG1/2 Layer 1/2/3, AC3, | LPCM 1080P@ 30fps 50Mbit/ | sec | |
| .mkv MPEG | 1,2,4, XviD, H.264, VC1,WMV3, Motion JPEG | MPEG1/2 Layer 1/2/3, AAC/HEAAC, AC3/EAC3, LPCM | H.264:1080Px2@25fps 1080P@ 50fps Other:1080P@ 30fps 50Mbit/sec | |
| .mp4 .mov | MPEG1/2 Layer 3, AAC/HEAAC, | AC3/EAC3, LPCM/ADPCM | H.264: 1080Px2@25fps 1080P@ 50fps Other: 1080P@ 30fps 50Mbit/sec | |
| .avi MPEG1 | 2,4 Xvid H.264, VC1,WMV3, Sorenson H.263 Motion JPEG | MPEG1/2 Layer 1/2/3, AAC/HEAAC, AC3/EAC3, LPCM/ADPCM, WMA | H.264: 1080Px2@25fps 1080P@ 50fps Other: 1080P@ 30fps" 50Mbit/sec | |
| flv H.264, | Sorenson H.263 | MPEG1/2 Layer 3, AAC/HEAAC, LPCM/ADPCM | H.264: 1080Px2@25fps 1080P@ 50fps Other: 1080P@ 30fps" 50Mbit/sec | |
| 3gp,3g2 MPE | EG4, H.264 1920x1080 @ 30P | 20Mbit/sec | ||
| asf, wmv MPE | EG2,4, XviD, H.264, VC1,WMV3 | MPEG1/2 Layer 1/2/3, AAC/HEAAC, AC3/EAC3, LPCM, WMA | 1080P@ 30fps 50Mbit/sec | |
| Music | 3 | - | MPEG1 Layer 1/2/3 (MP3) | |
| .wav LPCM | ||||
| WMA/ASF WMA, WMA Pro | ||||
| .m4a/.aac AAC, HEAAC | ||||
| Photo | .jpg .jpeg | Baseline JPEG | MAX WxH = 14592x12288 Up to 8 MegaByte | |
| .png | Progressive JPEG | |||
| .bmp | non-interlace | |||
| .png | interlace | |||
| Subtitle | sub | - | - | |
| srt | - | - | ||
Supported DVI Resolutions
When connecting devices to your TV's connectors by using DVI converter cables (not supplied), you can refer to the following resolution information.
| 56Hz 60Hz | 66Hz 70Hz | 72Hz 75Hz | ||||
| 640x400 | ☑ | |||||
| 640x480 | ☑ ☑ | ☑ ☑ | ||||
| 800x600 | ☑ ☑ | ☑ ☑ ☑ | ||||
| 832x624 | ☑ | |||||
| 1024x768 | ☑ ☑ | ☑ ☑ ☑ | ||||
| 1152x864 | ☑ ☑ | ☑ | ||||
| 1152x870 | ☑ | |||||
| 1280x768 | ☑ | |||||
| 1360x768 | ☑ | ☑ | ||||
| 1280x960 | ☑ | ☑ | ||||
| 1280x1024 | ☑ | ☑ | ||||
| 1400x1050 | ☑ | ☑ | ||||
| 1440x900 | ☑ | ☑ | ||||
| 1600x1200 | ☑ | |||||
| 1680x1050 | ☑ | |||||
| 1920x1080 | ☑ | |||||
| 1920x1200 | ☑ | |||||
Innholdsfortegnelse
Sikkerhetshensyn 48
Stand by Påminnelser 55
Installering av Batterier på Fjernkontrollen ...... 56
TV Kontrollknapper & drift

Å bruke Min knapp 1
Stand by Påminnelser
OK: Viser program muligheter.
PAL/SECAM B/G D/K K' I/I' L/L'
DIGITAL MOTTAK
DVB-T MPEG2
DVB-T MPEG4 HD
DVB-T MHEG-5 Motor (Storbritannia bare)
DVB-C MPEG2
DVB-C MPEG4 HD
MOTTAR KANALER
VHF (BAND I/III)
UHF (BAND U)
HYPERBAND
ANTALL FORINNSTILTE KANALER
1000
KANAL INDIKATOR
På-Skjerm display
RF ANTENNE INNGANG
75 Ohm (ubalansert)
DRIFTSPENNING
220-240V AC, 50 Hz.
LYD
Tysk + Nicam Stereo
LYDUTGANGSKRAFT (W RMS ) (% 10 THD) 2 x 8
STR∅MFORBRUK (W) 75 W (maks)
PANEL 16:9
Lisens Påminnelser
Reparationsinformation
![graph TD A["Start"] --> B["Step 1"] B --> C["Step 2"] C --> D["Step 3"] D --> E["End"]](/content/2026/05/863299/images/dfcdda8d9a088c44fad6d9061f2f1547609a4adafa50fbc5e248d1634b9569ce.jpg)
Anslut ström & antenn/kabel
Ange timer/Ta bort timer
"BACK" Index: Selects the teletext index page.
"I" Reveal: Visar dold information (spellösningar till exempel).
PAL/SECAM B/G D/K K' I/I' L/L'
DIGITAL MOTTAGNING
DVB-T MPEG2
DVB-T MPEG2 HD
DVB-T MHEG-5 MOTOR (endast Storbritannien)
DVB-C MPEG2
DVB-C MPEG4 HD
DVB-T2 MPEG4 HD
MOTTAGNA KANALER
VHF (BAND I/III)
UHF (BAND U)
HYPERBAND
ANTAL FÖRINSTÄLLDA KANALER
1000
KANALINDIKATOR
OSD-system
RF ANTENNINGÅNG
75 ohm (obalanserad)
DRIFTSPÄNNING
220-240 V AC, 50 Hz.
LJUD
Kytke virta & antenni/kaapeli
PAL/SECAM B/G D/K K' I/I' L/L'
DIGITAALINEN VASTAANOTTO
DVB-T MPEG2
DVB-T MPEG4 HD
DVB-T2 MPEG2
DVB-T2 MPEG4 HD
DVB-T MHEG-5 Engine (vain Iso-Britannia)
DVB-C MPEG2
DVB-C MPEG4 HD
KANAVIEN VASTAANOTTO
VHF (BAND I/III)
UHF (BAND U)
HYPERBAND
ESIASETETTUJEN KANAVIEN MÄÄRÄ
1000
KANAVAILMAISIN
Ruutunäyttö
RF-ANTENNITULO
| A | Product Fiche | ||
| B | Comercial Brand: LUXOR | ||
| C | Product No. 10086921 | ||
| D | Model No. LED39RT | ||
| E | Energy efficiency class A | ||
| F | Visible screen size (diagonal, approx.) (inch/cm) | 39 inches 99 cm | |
| G | On mode average power consumption (Watt) | 59 | |
| H | Annual energy consumption (kWh/annum) | 86 | |
| I | Standby power consumption (Watt) | 0,5 | |
| J | Off mode power consumption (Watt) | 0 | |
| K | Display resolution (px) 1920 x 1080 | ||
| A B C D E F | ||||||
| English | Product Fiche Commercial Brand Product No. Model No. Energy efficiency class | Visible screen size (diagonal, approx.) (inch/cm) | ||||
| Deutsch | Produkt-Datenblatt | Markenzeichen | Produkt-Nr. | Modell-Nr. | Energieeffizienzklasse | Sichtbare Bildschirngröße (diagonal,ca.) (Zoll /cm) |
| عرابي | قابس المتتح | تلاامة التجارية: قيوينتكن | رقم المتتح | رقم الموديل | ت Falseة فعية الطاقة | حجم الشائ sine المربئية (أطرى) (أportى/اسما) |
| Български | Справочен лист с техническите данни | Търговска марка | Продукт No | Модел No | Клас на енергийна ефективност | Видим размер на екрана (диагонал,прибл.) (инча /см ) |
| čeština | Informační list | Značka výrobce | Číslo produktu | Model č. | Energetická třída | Viditelná velikost obrazovky (ühlopříčka,přibl.) (palců /cm) |
| Dansk | Produktoplysningskema | Varemærke | Produktnr. | Model nr. | Energieffektivitetsklasse | Synlig skærmstørrelse (diagonalt,ca.) (HK/cm) |
| Suomi | Tuote fiche | Kaupallinen merkki | Tuote nro. | Malli nro. | Virran tehokkuusluokka | Nakyvăn kuvaruudun koko (diagonaalinen,n.) (tuumaa/cm) |
| Français | Fiche du produit | Marque commerciale | Produit N° | Modèle N° | Classe d'efficacité énergétique | Taille d'écran visible (diagonale,approx) (pouces/cm) |
| Hrvatski | SAŽETAK PROIZVODA | Trgovačka marka | Br. proizvoda | Br. modela | Klasa energetske učinkovitosti | Vidljiva veličina ekrana (dijagonalna,približno) (inča/cm) |
| Nederlands | Productfiche | Commercieel merk. | Productnr. | Modelnr. | Energie efficiëntie klasse | Zichbare schermgrootle (diagonaal,ca.) (inches/cm) |
| Español | Ficha del Producto | Marca Comercial | N° de Producto | N° de Modelo | Clasificación Energética | Tamaño de pantalla visible (diagonal,aprox.) (pulgadas/cm) |
| Svenska | Produktspecifikation | Varumärke | Produktnr. | Modellnr. | Energiklass | Synlig skärmstorlek (diagonal,ungefärlig) (tum/cm) |
| Italiano | Scheda prodotto | Marchio commerciale | Numero prodotto | Numero modello | Classe di efficienza energetica | Dimensioni visibili dello schermo (diagonale,circa)(pollici/cm) |
| Polski | KARTA PRODUKTU | Marka produktu | Nr produktu | Nr modelu | Klasa efektywności energetycznej | Widoczny obraz ekranu (przekątna,około)(cali/cm) |
| Magyar | Termékismertető adatlap | Kereskedelmi márka | Termékszám | Modellszám | Energiahatékonysági osztály | Latható keptartomány (diagonális,kb.) (inches/cm) |
| Norsk | Produktinformasjon | Kommersiell merkevare | Produkt nr. | Modell nr. | Energieffektivitet klasse | Synlig skjermstørrelse (diagonal, ca.) (tommer/cm) |
| Português | Ficha do produto | Marca Comercial | Produto N° | Modelo N° | Classificação eficiência energética | Tamanho ecrà visivel (diagonal, aprox. (polegadas/cm) |
| Română | Fişă produs | Marcă comercială | Nr. Produs | Nr. Model | Clasa de eficiență energetică | Dimensiunea ecranului vizibil (diagonală, aprox.) (inch/cm) |
| Русский | Справочный листок технических данных изделия | Торовая марка | Номер изделия | Номер модели | Класс энергопотребления | Видимый размер экрана (по диагонали, Около) (дюймов/см) |
| беларуская | Справочный листок технических данных изделия | Торовая марка | Номер изделия | Номер модели | Класс энергопотребления | Видимый размер экрана (по диагонали,Около)(дюймов/см ) |
| македонски | Технички податоци | Комерцијална марка | Производ бр. | Модел бр. | Класа на енергетска ефикасност | Големина на видлив екран (дијагонала, околу) (инчи/см) |
| український | Технічнідані | Кормеційна марка | Артикул | Модель | Клас енергоспоживання | Видимий розмір екрана (диагональ, Приблизно) (дроймів/cm) |
| Srpski | Tehničke odlike | Komercijalna marka | Proizvod br. | Model br. | Klasa energetske efikasnosti | Veličina vdljivog ekran (diagonala, tokom) (inča/cm) |
| Slovenčina | Informačný list | Značka výrobcu | Číslo produktu | Model č. | Energetická trieda | Viditelná velikost'obrazovky (uhlopriečka, zhruba) (palcov/cm) |
| Slovenščina | Opis izdelka | Komercialna znamka | Št. Izdelka | Št. Modela | Razred energetske učinkovitosti | Vidna velikost zaslona (diagonala, pribl.) (palcev/cm) |
| Еллнік | Делтіо проϊόντος | Емторіко σήμα | Ар. Проϊόντος | Ар. Movtélou | Катногоріа еверүзи Oakı's απόδοσης | Оратó μέγεθος οθόνης (διαγώνιος, περ.) (ίντσες/cm) |
| Bosanski | Tehnički podaci | Komercijalna marka | Produkt br. | Model br. | Klasa energetske efikasnosti | Vidljiva veličina ekran (diagonala, približno.) (inča/cm) |
| ن脫 | الزام عُوْدَمِي | الزام عُوْدَمِي | الزام عُوْدَمِي | الزام عُوْدَمِي | الزام عُوْدَمِي | (أ) (у) (в) (в) (в) (в) (в) (в) (в) (в) (в) (в) (в) (в) (в) (в) (в) (в) (в) (в) (в) (в) (в) (в) (в) (в) (в) (в) (в) (в) (в) (в) (в) (в) (в) (в). |
| Türkçe | Ürün fişi | Ticari Marka | Ürün No. | Model No. | Enerji verimiliği sinti | Görülen ekran boyutu (çapraz, yakışk.) (inch/cm) |
| Shqip | Tê dhēnat e produktit | Marka tregtare | Nr. i produktit. | Nr. i modelit. | Klasa e eficiencès sê energjisê | Madhësia e ekranit tê dukshëm (diagonal, afërsisht) (inch/cm) |
| Lietuvių | Gaminio etiketė | Gamintojas | Gaminio Nr. | Modelio Nr. | Energetinio efektyvumo klasė | Matomas ekran o dydis (jstrižainė, approx.) (colių/cm) |
| Latviešu | Produkta apraksts | Marka | Produkta nr. | Modela nr. | Energoefektivitätes klase | Ekran a ızmers (pa diognai, apımcram) (collas/cm) |
| Eesti | TOOTEKIRJELDUS | Tootja firma | Toote nr. | Mudeli nr. | Energiaklass | Vaadatava ekraani suurus (diagonaal, umbes) (tolli/cm) |
| فارسی | مشخصات محصول | imarک تجاری | 朦اءه محصول | 朦اءه منّ | گروء کارابی ادرزی | لنازه صفحه قابل مشاهده (اهندسی کو嶺یا) (لانلى متر) |
| GHIJ | K | ||||
| English | On mode average power consumption (Watt) | Annual energy consumption (kWh/annum) | Standby power consumption (Watt) | Off mode power consumption (Watt) | Display resolution (px) |
| Deutsch | Durchschnittlicher Stromverbrauch im eingeschaltetem Zustand (Watt) | Jährlicher Energieverbrauch (kWh/Jahr) Standby-Stromverbrauch (Watt) | Stromverbrauch im ausgeschaltetem Zustand (Watt) Display-Auflösung (px) | ||
| عربية | (متوسط استهلاك المolation Estonia (عول牌) ) | (استهلاك المolation Estonia (كيل ورطلاك) ) | (استهلاك المolation Estonia (ي Justin Adventure (أرباح) ) | (استهلاك المolation Estonia (ي Justin Adventure (أرباح) ) | (ضويج الشاشة (كيل) ) |
| Български | Средна консумация на електроенергия във включено състояние(Watt) | Годишина консумация на електроенергия (kWh/Годишина) | Консумация на електроенергия в режим на готовност (Watt) | Консумация на електроенергия в изключено състояние (Watt) | Разделителна способност на дисплея(пиксела) |
| čeština | Prüměrná spotřeba elektrické energie v zapnutém režimu (Wattú) | Roční spotřeba energie (kWh/Roční) | Spotřeba elektrické energie v pohotovostním režimu (Wattú) | Spotřeba elektrické energie ve vypnutém režimu (Wattú) Rozlišení dispelje (px) | Peje (px) |
| Dansk | Gennemsnitligt stromforbrug i taëndt tilstand (Watt) | Árligt energiforbrug (kWh/Árligt) | Stromforbrug (standby)(Watt) | Stromforbrug i slukket tilstand (Watt) | Skæmopløsning (px) |
| Suomi | Păällă-tilan keskimărăinen virrankulutus (Wattia) | Vuosittainen sähkönkulutu (kWh/Vuosittainen) | Vakiovirran kulutus (Wattia) | Pois-tilan virrankulutus (Wattia) | Näytön erottelukyky (pikselia) |
| Français | Consommation énergétique moyenne en mode "marche" (Watt) | Consommation énergétique annuelle (kWh/annuel) | Consommation d'énergie en veille (Watt) | Consommation d'énergie en mode "arrêt" (Watt) | Résolution de l'écran (px) |
| Hrvatski | Prosječna potrošnja el. energije kada je proizvod uključen (Watta) | Godišnja potrošnja el. Energije (kWh/Godišnja) | Potrošnja el. energije u modu pripravnosti (Watta) | Potrošnja el. energije kada je proizvod isključen (Watta) | Rezolucija zaslona (piksela) |
| Nederlands | Aan-modus gemiddeld stroomverbruik (Watt) | Jaarlijks energieverbruik(kWh/Jaarlijks ) | Stand-by stroomverbruik (Watt) | Uit-modus stroomverbruik (Watt) | Schemresolutie (px) |
| Español | Consumo eléctrico medio, en funcionamiento (Vatio) | Consumo eléctrico anual (kWh/anual) Consumo en modo en espera (Vatio) | Consumo eléctrico modo apagado (Vatio) | Consumo eléctrico modo apagado (Vatio) | Resolución de pantalla (px) |
| Svenska | Strömkonsumtion i PÄ-läge (Watt) | Energikonsumtion per år (kWh/Árlig) | Strömkonsumtion i viloläge (Watt) | Strömkonsumtion i AV-läge (Watt) | Skärmupplösning (pixlar) |
| Italiano | Consumo di corrente medio da accesa (Watt) | Consumo annuale di energia (kWh/annuo) | Consumo di corrente in modalità standby (Watt) | Consumo di corrente da spenta (Watt) | Risoluzione del display (px) |
| Polski | Średnie zużycie energii w trybie włączonym (Watów) | Roczne zużycie energii (kWh/Roczne) | Średnie zużycie energii w trybie oczekiwania (Watów) | Zużycie energii w trybie włączonym (Watów) | Rozdzielczość obrazu (pikseli) |
| Magyar | Energiafogyasztás bekapcsolva hagyott üzemmodban (Watt) Éves energiafogyasztás | (kWh/Éves) | Energiafogyasztás standby üzemmodban (Watt) | Energiafogyasztás kikapcsolt üzemmodban (Watt) | Képernyőfelbontás (px) |
| Norsk | Pámodus gjennomsnittlig stromförbruk (Watt) | Árlig stromförbruk (kWh/Árlig) | Hvilemodus stromförbruk (Watt) | Av-modus stromförbruk (Watt) | Skjermopplösning (piksel) |
| Português | Consumo energia em modo médio (Watt) | Consumo annual energia (kWh/anual) Consumo energia em stand-by (Watt) | Consumo annual energia (kWh/anual) Consumo energia em stand-by (Watt) | Consumo energia em modo alimentação (Watt) | Resolução do visor (pixel) |
| Română | Consum electric mediu in modul pornit (Watji) | Consum anual de energie (kWh/anual) | Consum electric in stare de repaus (Watji) | Consum electric in modul oprit (Watji) | Rezolutja ecranului (pixel) |
| Русский | Средний расход энергии в режиме включения (ватт) | Ежегодный расход энергии (кВтч/Годовое) | Расход энергии в режиме ожидания (ватт) | Расход энергии в режиме выключения (ватт) | Разрешение экрана (пикселей) |
| беларуская | Средний расход энергии в режиме включения (ватт) | Ежегодный расход энергии (кWh/Градавое) | Расход энергии в режиме ожидания (ватт) | Расход энергии в режиме выключения (ватт) | Разрешение экрана (пикселей) |
| македонски | Просечна потрошувачка кога е вклучен | Годишина потрошувачка на енергіва (kWh/Годишина) | Потрошувачка во мирување (вати) | Потрошувачка кога е искупчен (вати) | Резопуција на екран (пиксели) |
| український | Середня споживана потужність у робочому режимі (Вт) | Середньорична споживана потужність (kWh/Pічне) | Споживана потужність у режимі очікування (Вт) | Споживана потужність у вимкненому стані (Вт) | Роздільна здатність экрана (пикселів) |
| Srpski | Prosečna potrošnja kada je uključeni (Vati) | Godišnja potrošnja energije (kWh/Godišnja) | Potrošnja tokom mirovanja (Vati) | Potrošnja kada je isključeni (Vati) | Rezolucija displeja (piks.) |
| Slovenčina | Priemerna spotreba elektrickej energie v zapnutom režime (Wattov) | Ročná spotreba energie (kWh/Ročná) | Spotreba elektrickej energie v pohotovostnom režime (Wattov) | Spotreba elektrickej energie vo vypnutom režime (Wattov) | Rezlišenie displeja (pixl.) |
| Slovenščina | Poraba električne energije v povprečnem načinu (Wattov) | Letna poraba energije (kWh/Letna) | Poraba energije v stanju pripravljenosti (Wattov) | Poraba energije načinu izklopa (Wattov) | Resolucija zaslona (piks.) |
| Еллініvik | Мёон катоювлюші резіматорів лесіропуляс (Watt) | Erțăcia катоювлюші евірвеців (kWh/Eтțăcia) | Катаювлюші резіматорів стітів оваповні (Watt) | Катаювлюші резіматорів стітів оваповні (Watt) | Авалиші обов'єнк (Піл'єл) |
| Bosanski | Prosječna potrošnja kada je uključen (Watt) | Godišnja potrošnja energije (kWh/Godišnja) | Potrošnja tokom mirovanja (Watt) | Potrošnja kada je isključen (Watt) | Rezolucija ekranа (piks.) |
| Түйүүүүүүүүүүүүүүүүүүүүүүүүүүүүүүүүүүүүүүүүүүүүүүүүүүүүүүүүүүүүүүүүүүүүүүүүүүүүүүүүүүүүүүүүүүүүүүүүүүүү | (подів 100%) (подів 100%) (подів 100%) (подів 100%) (подів 100%) (подів 100%) (подів 100%) (подів 100%) (подів 100%) (подів 100%) (подів 100%) (подів 100%) ( подів 100%) (подів 100%) (подів 100%) (подів 100%) (подів 100%) (подів 100%) (подів 100%) (подів 100%) (подів 100%) (подів 100%) (подів 100%) (поди 100%) (подів 100%) (подів 100%) (подів 100%) (подів 100%) (подів 100%) (подів 100%) (подів 100%) (подів 100%) (подів 100%) (подів 100%) (подів підіні) | ||||
| Türkçe | Açık moddaki ortalama güç tüketimi (Watt) | Yıllık enerji tüketimi (kWh/yıllık) | Bekleme durumunda enerji tüketimi (Watt) | Kapali moddaki güç tüketimi (Watt) | Ekran çözünürlügü (piks.) |
| Shqip | Konsumi mesatar і energijisë si i ndezur (Watt) | Konsumi vjetor і energijisë (kWh/Vjetor) | Konsumi і energijisë si në gatishmëri (Watt) | Konsumi і energijisë si i fikur (Watt) | Rezolucioni i ekranit (piks.) |
| Lietuviu | Vidutinës energijos sąnaudos jungus (Vatali) | Metinës energijos sąnaudos (kWh/Metinës) | Energijos sąnaudos budéjimo režimu (Vatali) | Energijos sąnaudos išjungus (Vatali) | Ekranо skiriamoji geba (pikseliu) |
| Latviešu | Energijas patériņš aktívă režimă (Vati) | Gada energijas patériņš (kWh/gada) | Energijas patériņš gaidīšanas režimă (Vati) | Energijas patériņš izslēgtā stāvokli (Vati) | Displeja rezolúcija (piksēliem) |
| Eesti | Keskmine energjakulu tõõrežilimil (Vatti) | Aastane energiakulu (kWh/aastane) | Energiakulu ooterežiimil (Vatti) | Energiakulu väljalūlitatud olekus (Vatti) | Ekraani resolutsion (pikslii) |
| قفرسي | (مYZAN متوسط مصرف برق د Mozنام (وان) (مYZAN متوسط مصرف برق د حالت فellation (وان) (مYZAN متوسط مصرف برق د حالت فellation (وان) (مYZAN متوسط مصرف برق د حالت فellation (وان) (مYZAN متوسط مصرف برق د حالت فellation (وان) (مYZAN متوسط مصرف برق د حالت فellation (وان) (مYZAN متوسط مصرف برق د حالت فtranslation (وان) (مYZAN متوسط مصرف برق د حالت فtranslation (وان) (مYZAN متوسط مصرف برق د حالت فtranslation (وان) (مYZAN متوسط مصرف برق د حالت فtranslation (وان) (مYZAN متوسط مصرف برق د حالت فtranslation (وان) (مYZAN متوسط مصرف برق د حالت فTranslation (وان) (مYZAN متوسط مصرف برق د حالت فTranslation (وان) (مYZAN متوسط مصرف برق د حالت فTranslation (وان) (مYZAN متوسط مصرف برق د حالت فTranslation (وان) (مYZAN متوسط مصرف برق د حالت فTranslation (وان) (مYZAN متوسط مصرف برق د حالت ف translation (وان) (مYZAN متوسط مصرف برق د حالت فTranslation (وان) (مYZAN متوسط مصرف برق د حالت فTranslation (وان) (مYZAN متوسط مصرف برق د حالت فTranslation (وان) (مYZAN متوسط مصرف برق د حالت فTranslation (وان) (مYZAN متوسط مصرف برق د حالت فTranslations (وان) (مYZAN متوسط مصرف برق د حالت فTranslations (وان) (مYZAN متوسط مصرف برق د حالت فTranslations (وان) (مYZAN متوسط مصرف برق د حالت فTranslations (وان) (مYZAN متوسط مصرف برق د حالت فTranslations (وان) (مYZAN متوسط مصرف برق د حالت فTranslation (وان) (مYZAN متوسط مصرف برق د حالت فTranslation (وان) (مYZAN متوسط مصرف برق د حالت فTranslation (وان) (مYZAN متوسط مصرف برق د حالت فTranslation (وان) (مYZAN متوسط مصرف برق د حالت ف translations (وان) (مYZAN متوسط مصرف برق د حالت فTranslation (وان) (مYZAN متوسط مصرف برق د حالت فTranslation (وان) (مYZAN متوسط مصرف برق د حالت فTranslation (وان) (مYZAN متوسط مصرف برق د حالت فTranslation (وان) (مYZAN متوسط مصرف برق د حالت ف譜論 (وان) (مYZAN متوسط مصرف برق د حالت ف譜論 (وان) (مYZAN متوسط مصرف برق د حالت ف譜論 (وان) (مYZAN متوسط مصرف برق د حالت ف譜論 (وان) (مYZAN متوسط مصرف برق د حالت ف譜論 (وان) (مYZAN متوسط м suffered) (кабыток) (кабыток) (кабыток) (кабыток) (кабыток) (кабыток) (кабыток) (кабыток) (кабыток) (кабыток) (кабыток) (кабыток) (кабыток) (кабыток) (кабыток) (кабыток) (кабыток) (кбайыток) (кабыток) (кабыток) (кабыток) (кабыток) (кабыток) (кабыток) (кабыток) (кабыток) (кабыток) (кабыток) (кабыток) (кабыток) (кабыток) (кабыток) (кабыток) (кабыток) | (подів 100%) (подів 100%) (подів 100%) (подів 100%) (подів 100%) (подів 100%) (подів 100%) (подів 100%) (подів 100%) (подів 100%) (подів 100% (подів 100% (подів 100% (подів 100% (подів 100% (подів 100% (подів 100% (подів 100% (подів 100% (подів 100% (подів 100% (подів 100% | |||

- INDHOLD
- REPARATIONSINFORMATION
- STANDBYMEDDELELSER
- TILSLUT STRØM & ANTENNE/KABEL
- DIGITAL MODTAGELSE
- LICENSMEDDELELSE
- ANERKENDELSE AF VAREMÆRKER
- DOLBY
- SAFETY PRECAUTIONS
- PLEASE READ THESE INSTRUCTIONS FULLY BEFORE INSTALLING OR OPERATING
- PREPARATION
- INTENDED USE
- WARNING: NEVER LET PEOPLE (INCLUDING DREN) WITH PHYSICAL, SENSORY OR MENTALITIES OR LACK OF EXPERIENCE AND / OR KNOWLEDGE SUPERVISED USE ELECTRICAL DEVICE
- POWER SOURCE
- POSITIONING THE TV
- POWER CORD AND PLUG
- MOISTURE AND WATER
- VENTILATION
- HEAT SOURCES AND FLAMES
- HEADPHONE VOLUME
- WALL MOUNTING (OPTIONAL)
- LCD SCREEN
- CLEANING
- ENVIRONMENTAL INFORMATION
- POWER SAVE MODE
- REPAIR INFORMATION
- ACCESSORIES INCLUDED
- TV - FEATURES
- TV CONTROL BUTTON & OPERATION
- VIEWING REMOTE CONTROL - TV
- USING MY BUTTON 1 (*)
- USING MY BUTTON 2 (**)
- VIEWING THE CONNECTIONS
- USING A CONDITIONAL ACCESS MODULE
- STANDBY NOTIFICATIONS
- INSTALLING THE BATTERIES TO THE REMOTE
- CONNECT POWER & ANTENNA/CABLE
- SWITCHING ON/OFF
- TO SWITCH THE TV ON
- TO SWITCH THE TV OFF
- TO POWER DOWN THE TV COMPLETELY, UNPLUG THE POWER CORD FROM THE MAINS SOCKET
- FIRST TIME INSTALLATION
- AERIAL INSTALLATION
- CABLE INSTALLATION
- MEDIA PLAYBACK VIA USB INPUT
- MEDIA BROWSER MENU
- USING MENU BUTTON IN MEDIA BROWSER MODE
- CHANGING IMAGE SIZE: PICTURE FORMATS
- SORTING CHANNEL LIST
- QUICK MENU
- ELECTRONIC PROGRAMME GUIDE (EPG)
- PROGRAMME OPTIONS
- SELECT CHANNEL
- RECORD / DELETE RECORD TIMER
- SET TIMER / DELETE TIMER
- RECORDING A PROGRAMME
- TIMESHIFT RECORDING
- INSTANT RECORDING
- WATCHING RECORDED PROGRAMMES
- SLOW FORWARD
- RECORDINGS LIBRARY
- RECORDING CONFIGURATION
- TELETEXT
- DIGITAL TELETEXT (FOR UK ONLY)
- SOFTWARE UPGRADE
- SOFTWARE UPGRADE SEARCH VIA USER INTERFACE
- 3.AM SEARCH AND UPGRADE MODE
- TROUBLESHOOTING & TIPS
- IMAGE PERSISTENCE - GHOSTING
- NO POWER
- POOR PICTURE
- NO PICTURE
- NO SOUND
- REMOTE CONTROL - DOES NOT OPERATE
- INPUT SOURCES - CAN NOT BE SELECTED
- RECORDING UNAVAILABLE
- USB IS TOO SLOW
- INFORMATION FOR USERS ON DISPOSAL OF OLD EQUIPMENT AND BATTERIES
- PC TYPICAL DISPLAY MODES
- SPECIFICATIONS
- TV BROADCASTING
- DIGITAL RECEPTION
- RECEIVING CHANNELS
- NUMBER OF PRESET CHANNELS
- CHANNEL INDICATOR
- RF AERIAL INPUT
- OPERATING VOLTAGE
- AUDIO
- LICENCE NOTIFICATIONS
- TRADEMARK ACKNOWLEDGMENT
- SUPPORTED DVI RESOLUTIONS
- INNHOLDSFORTEGNELSE
- TV KONTROLLKNAPPER & DRIFT
- Å BRUKE MIN KNAPP 1
- STAND BY PÅMINNELSER
- DIGITAL MOTTAK
- MOTTAR KANALER
- ANTALL FORINNSTILTE KANALER
- KANAL INDIKATOR
- RF ANTENNE INNGANG
- DRIFTSPENNING
- LYD
- LISENS PÅMINNELSER
- ANSLUT STRÖM & ANTENN/KABEL
- ANGE TIMER/TA BORT TIMER
- DIGITAL MOTTAGNING
- MOTTAGNA KANALER
- ANTAL FÖRINSTÄLLDA KANALER
- KANALINDIKATOR
- RF ANTENNINGÅNG
- DRIFTSPÄNNING
- LJUD
- KYTKE VIRTA & ANTENNI/KAAPELI
- DIGITAALINEN VASTAANOTTO
- KANAVIEN VASTAANOTTO
- ESIASETETTUJEN KANAVIEN MÄÄRÄ
- KANAVAILMAISIN
- RF-ANTENNITULO
Brand : Luxor
Model : LED39RT
Category : Television