
19FLX850VUD - Television Finlux - Free user manual and instructions
Find the device manual for free 19FLX850VUD Finlux in PDF.


| Product Type | 19-inch LCD TV with integrated DVD player |
| Brand | Finlux |
| Model | 19FLX850VUD |
| Screen Size | 19 inches (Wide Display) |
| Dimensions (with stand) | 155 x 457 x 365 mm (D x L x H) |
| Weight (with stand) | 5.75 kg |
| Dimensions (without stand) | 77 x 457 x 330 mm (D x L x H) |
| Weight (without stand) | 5.50 kg |
| Power Supply | 110-240V AC, 50/60 Hz (via AC adapter, 12V DC input) |
| Power Consumption (max) | 70 W |
| Standby Power Consumption | < 1 W |
| Tuner | DVB-T (MPEG2/MPEG4 HD) and Analogue (VHF/UHF) |
| Programme Memory | 200 analogue, 500 digital |
| Connections | HDMI (x1), SCART, VGA, Component (YPbPr), USB, RF, Audio Line Out, S/PDIF, Headphone |
| Audio Output | 2 x 2.5 W RMS (10% THD) |
| Sound System | Stereo (German+Nicam) |
| Special Features | Teletext, Sleep Timer, Child Lock, AVL, Game Mode, EPG, USB media playback (JPEG, MP3, video optional) |
| DVD Playback | Supports DVD, CD, MP3, JPEG, MPEG; Dolby Digital; parental control |
| Cleaning | Unplug before cleaning; use soft dry cloth; no liquid or aerosol cleaners |
| Safety | Do not expose to rain/moisture; ensure ventilation (10 cm clearance); do not place near heat sources; use only provided AC adapter |
| Repairability | Refer servicing to qualified personnel; use manufacturer specified replacement parts |
| Environmental | Dispose according to local regulations; contains mercury in LCD panel (cold cathode fluorescent lamp) |
Frequently Asked Questions - 19FLX850VUD Finlux
User questions about 19FLX850VUD Finlux
0 question about this device. Answer the ones you know or ask your own.
Ask a new question about this device
Download the instructions for your Television in PDF format for free! Find your manual 19FLX850VUD - Finlux and take your electronic device back in hand. On this page are published all the documents necessary for the use of your device. 19FLX850VUD by Finlux.
USER MANUAL 19FLX850VUD Finlux
natural_image
Black-and-white photo of a man and woman relaxing on a sofa in an office setting, with no visible text or symbols.bruksanvisning
owner's manual

Innholdsfortegnelse
Funksjoner....2
Tilbehør 2
Introduksjon....2
Forberedelse 2
USB-MINNEKOBLING....8
natural_image
Line drawing of a flat-screen computer monitor (no text or symbols)
Standby-knapp1.
TV/AV-knapp2.
Knapp for program opp/ned3.
natural_image
Top-down schematic of a computer monitor with front panel and screen (no text or symbols)
natural_image
Illustration of a flat-screen computer monitor with blank screen (no text or symbols)
Strømtilkobling
Norsk - 7 -
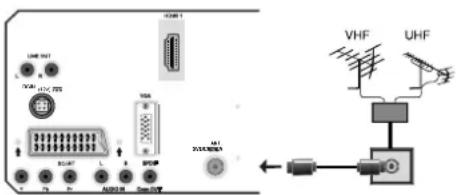
Antennetilkobling
- Koble antenne- eller kabel-TV-kabelen til ANTENNEINNGANGEN på baksiden av TV-en.
natural_image
Illustration of a computer mouse with a downward arrow indicating compression or disassembly (no text or symbols present)natural_image
Diagram showing transformation of a square with circular holes into a larger square with circles (no text or symbols)natural_image
Diagram showing transformation of a square with circular elements into a larger square (no text or symbols)Panorama
natural_image
Diagram showing transformation of a square with circular holes into a larger square (no text or symbols)natural_image
Diagram showing transformation of a square with internal circles to a larger square, both with circular holes (no text or symbols)Kino
natural_image
Diagram showing a square with a circle inside and a square with a circle inside, connected by an arrow (no text or symbols)Undertekst
Zoom
Dette alternativet zoomer bildet.

natural_image
Diagram showing transformation of a square with a circle inside, resulting in a square with circular cutouts (no text or symbols)PAL/SECAM B/G D/K K' I/I' L/L'
MOTTAK AV KANALER
VHF (BÅND I/III)
UHF (BÂND U)
Bruk dette apparatet i et moderat klima.
ANTALL FORHÅNDSINNSTILTE KANALER
200
KANALINDIKATOR
Visning på skjerm
RF-ANTENNEINNGANG
75 Ohm (ubalansert)
OPERASJONSSPENNING
110-240V AC, 50/60 Hz.
LYD
Tysk+Nicam Stereo
LYD UTGANGSSTR∅M (W _RMS ) (10% THD)
2×2.5
STRÖMFORBRUK (W)
70 W (maks)
< 1 W (Standby)
SKJERM
19" Wide Display
DIMENSJONER (mm)
DxLxH (med stativ): 155 x 457 x 365
Vekt (kg): 5.75
DxLxH (uten stativ): 77 x 457 x 330
Vekt (kg): 5.50
Sendestandarder:
DVB-T, MPEG2,DVB-T, MPEG4 HD
i. DEMODULERING
-Symbolrate: COFDM med 2K/8K FFT-modus.
-Modulering: 16-QAM - 64-QAM FEC for alle DVB-moduser (fi nnes automatisk)
ii. VIDEO
CLASS 1 LASER PRODUCT
natural_image
Illustration of a cat reacting to a CD on a computer monitor (no text or symbols present)TV-type
STANDARDINN STILLINGER
Features 42
Accessories 42
Introduction....42
Preparation 42
Safety Precautions 43
Power 43
Power Cord 43
Moisture and Water 43
Cleaning.... 43
Ventilation 43
Heat and Flames 43
Lightning 43
Replacement Parts 43
Servicing 43
Waste Disposal 43
Information for Users in European Union
Countries 43
Disconnecting the Device 44
Headphone Volume 44
Installation....44
LCD Screen 44
Warning 44
Overview of the Remote Control 45
LCD TV and Operating Buttons 46
Viewing the Connections- Back Connectors ..... 46
Viewing the Connections - Side Connectors ..... 47
Power Connection 47
Aerial Connection 48
Using Side USB Input 48
USB Memory Connection 48
Connecting the LCD TV to a PC 48
Connecting to a DVD Player.... 48
Using Side AV Connectors 49
Using Other Connectors 49
Connecting Other Equipment via Scart 49
Inserting Batteries in the Remote
Control Handset.... 49
Switching the TV On/Off 49
To Switch the TV On 49
To Switch the TV Off 50
Input Selection 50
Basic Operations 50
Operation with the Buttons on the TV 50
Operation with the Remote Control 50
Initial Settings 51
Electronic Programme Guide (EPG)....52
Programme Options.... 52
Analogue Teletext 53
Widescreen....53
Dijital TV Menu System 53
Channel List 53
Navigating the Entire Channel List 53
Moving the channels in the channel list 53
Deleting the Channels in the Channel List ..... 53
Renaming channels 54
Adding Locks to Channels 54
Setting Favourites 54
Program Guide 54
Timers....54
Common Interface 55
TV Setup 55
Setup 55
Configuration 55
Time Settings(**) 56
Language Settings 57
Language Settings 58
Installation....58
Video Playback (optional) 60
Analogue TV Menu System 61
Picture Menu....61
Sound Menu 61
Feature Menu 62
Install Menu 63
Install Menu in AV Modes 64
Program Table 64
Source Menu 65
PC Mode Menu System....65
PC Position Menu 65
Displaying TV Information 66
Mute Function 66
Picture Mode Selection.... 66
Freezing Picture 66
Zoom Modes....66
Teletext 67
Tips....68
Appendix A: PC Input Typical Display Modes ..... 69
Appendix B: AV and HDMI Signal Compatibility
(Input Signal Types) 69
Appendix D: Supported File Formats
for USB Mode 70
Specifications 71
Transmission Standards: 71
MOBIL TV INSTRUCTION MANUAL 72
English - 41 -
Features
- Remote controlled colour LCD TV.
- Fully integrated digital TV (DVB-T - MPEG2) (DVB-T-MPEG4).
- HDMI connectors for digital video and audio. This connection is also designed to accept high definition signals.
- USB input.
• 200 programmes from VHF, UHF(analogue).
• 500 programmes for digital mode (IDTV). - Integrated tuner TNT HD, MPEG 2 / MPEG 4 compatible.
- OSD menu system.
- Scart socket for external devices (such as video, video games, audio set, etc.).
• Stereo sound system. (German+Nicam) - Teletext, fastext, TOP text.
• Headphone connection.
• Automatic programming system. - Forward or backward manual tuning.
- Sleep timer.
- Child lock.
• Automatic sound mute when no transmission. - NTSC playback.
• AVL (Automatic Volume Limiting). - When no valid signal is detected, after 5 minutes the TV switches itself automatically to standby mode.
- PLL (Frequency Search).
- PC input.
- Plug&Play for Windows 98, ME, 2000, XP, Vista.
- Audio line out.
• Game Mode (optional)
Accessories

Introduction
Thank you for choosing this product. This manual will guide you for the proper operation of your TV. Before operating the TV, please read this manual thoroughly.
Please do keep this manual in a safe place for future references.
Preparation
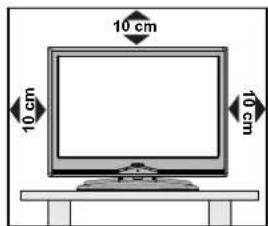
For ventilation, leave a free space of at least 10 cm all around the set. To prevent any fault and unsafe situations, please do not place any objects on top of the set.
Use this device in moderate climates.
Safety Precautions
Please read the following recommended safety precautions carefully for your safety.
Power
• Always use the provided AC adaptor.
- Operate only from the power source specified on the AC adaptor.
- The power adaptor may become hot during normal operation. This is not a malfunction.
- Please make sure that the adaptor is not covered while in operation. Leave a space of 15 cm (minimum) around the AC adaptor.
- The rating information and safety caution of the AC adaptor are provided on the adaptor.
WARNING: When the set is not in use for a long time, disconnect from the power.
Power Cord
Do not place the set, a piece of furniture, etc. on the power cord (mains lead) or pinch the cord. Handle the power cord by the plug. Do not unplug the appliance by pulling from the power cord and never touch the power cord with wet hands as this could cause a short circuit or electric shock. Never make a knot in the cord or tie it with other cords. The power cords should be placed in such a way that they are not likely to be stepped on. A damaged power cord can cause fire or give you an electric shock. When it is damaged and needs to be replaced, it should be done by qualified personnel.
Moisture and Water
Do not use this device in a humid and damp place (avoid the bathroom, the sink in the kitchen, and near the washing machine). Do not expose this device to rain or water, as this may be dangerous and do not place objects filled with liquids, such as flower vases, on top. Avoid from dripping or splashing.
If any solid object or liquid falls into the cabinet, unplug the TV and have it checked by qualified personnel before operating it any further.

Cleaning
Before cleaning, unplug the adaptor from the wall outlet. Do not use liquid or aerosol cleaners Use soft and dry cloth

Ventilation
The slots and openings on the TV set are intended for ventilation and to ensure reliable operation. To prevent overheating, these openings must not be blocked or covered in anyway.
Heat and Flames
The set should not be placed near to open flames and sources of intense heat such as an electric heater.
Ensure that no open ame sources, such as lighted candles, are placed on top of the TV. Batteries should not be exposed to excessive heat such as sunshine, fire or the like.

Lightning
In case of storm and lightning or when going on holiday, disconnect the power cord from the wall outlet.

Replacement Parts
When replacement parts are required, make sure that the service technician has used replacement parts, which are specified by the manufacturer or have the same specifications as the original one. Unauthorized substitutions may result in fire, electrical shock or other hazards.
Servicing
Please refer all servicing to qualified personnel. Do not remove the cover yourself as this may result in an electric shock.

Waste Disposal
Instructions for waste disposal:
- Packaging and packaging aids are recyclable and should principally be recycled. Packaging materials, such as foil bag, must be kept away from children.
- Batteries, including those which are heavy metal-free, should not be disposed of with household waste. Please dispose of used battery in an environment friendly manner. Find out about the legal regulations which apply in your area.
- Cold cathode fluorescent lamp in LCD PANEL contains a small amount of mercury; please follow the local laws or regulations for disposal.
Information for Users in European Union Countries
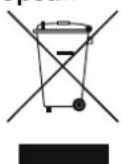
This symbol on the product or on its packaging means that your electrical and electronic device should be disposed at the end of its service life separately from your household wastes. There are separate collection systems for recycling in EU.
English - 43 -
For more information, please contact the local authority or the dealer where you purchased the product.
Disconnecting the Device
The mains plug is used to disconnect TV set from the mains and therefore it must remain readily operable.
Headphone Volume
Excessive sound pressure from earphones and headphones can cause hearing loss.

Installation
To prevent injury, this device must be securely attached to the wall in accordance with the installation instructions when mounted to the wall (if the option is available).
LCD Screen
The LCD panel is a very high technology product with about a million thin film transistors, giving you fine picture details. Occasionally, a few non-active pixels may appear on the screen as a fixed blue, green or red point. Please note that this does not affect the performance of your product.
Warning
Do not leave your TV in standby or operating mode when you leave your house.
Connection to a Television
Distribution System (Cable TV etc.) fromTuner
Device connected to the protective earthing of the building installation through the mains connection or through other apparatus with a connection to protective earthing - and to a television distribution system using coaxial cable, may in some circumstances create a fire hazard.
To ground the antenna system properly, be sure that the cable grounding is connected with the building's grounding system. Note that the connection should follow IEC 60364-7-707 and IEC 603646-5-548 standards which require that the grounding should be as close as possible to the cable connection.

Be sure to ground the connection properly.
Connect the ground terminal of the AC adaptor with the ground terminal provided at the power outlet using the enclosed power cord. If the provided plug does not fit your outlet, consult an electrician for replacement of the obsolete outlet.

Surely connect the ground wire
Overview of the Remote Control
Standby1.
Image size2.
Sleep timer3.
Numeric buttons4.
Return / Exit (in DTV mode) / Index page (in 5. TXT mode)
Cursor up / Page up (in TXT mode)6.
Cursor left7.
Programme up (Page down in DTV mode)8.
Programme down (Page up in DTV mode)9.
Mono-Stereo / Dual I-II / Current language (in 10. DTV mode) (*)
Previous Programme / Swap11.
Electronic programme guide (in DTV mode) 12.
Info / Reveal (in TXT mode)13.
Picture mode selection14.
Source selection15.
Red / Sound menu / Change channel list (in 16. DTV mode)
- Green / Picture / Subtitle on-off (in DTV mode) (*)
Yellow / Feature / Current language (in DTV 18. mode) (*)
-
Menu on-off
-
Blue / Install menu / Favourite mode (*) (in DTV mode)
-
OK / Channel list (in DTV mode) / Hold (in TXT mode)
-
Cursor right / Subpage (in TXT mode)
-
Cursor down / Page down (in TXT mode)
-
Volume up
-
Volume down
-
Mute
-
Teletext / Mix
-
Subtitle on-off (in DTV mode) / TXT Subtitle
-
FAV (*) (Favourite Selection) (in DTV mode)
Media Browser playback buttons. (in DTV 30. mode)
(*) Only for EU country options.
Note: Buttons that are not indicated with a number on the remote control illustration are not functional in TV mode.

English - 45 -

LCD TV and Operating Buttons

natural_image
Illustration of a flat-screen computer monitor with blank screen (no text or symbols)
Standby button1.
TV/AV button2.
Programme Up/Down buttons3.
Volume Up/Down buttons4.
Note: Press "→/→" + buttons at the same time to view main menu.

natural_image
Top-down schematic of a computer monitor with front panel and screen (no text or symbols)
natural_image
Illustration of a flat-screen computer monitor with blank screen (no text or symbols)Viewing the Connections- Back Connectors

SCART socket1. inputs or outputs for external devices.
Connect the SCART cable between SCART socket on TV and SCART socket on your external device (such as a decoder, a VCR or a DVD player).
Note: If an external device is connected via the SCART socket, the TV will automatically switch to AV mode.
Component Video Inputs (YPbPr)2. are used for connecting component video.
You can connect the component video and audio sockets with a device that has component output.
Connect the component video cables between the COMPONENT VIDEO INPUTS on on the TV and the component video outputs of your device. While connecting, be sure that the letters on your TV, "Y", "Pb", "Pr" correspond with your device's connectors.
- PC/YPbPr Audio Inputs are used for connecting audio signals of a PC or a device that connects to the TV via YPbPr.
Connect the PC audio cable between the AUDIO INPUTS on the TV and audio output of your PC to enable PC audio.
Connect the audio cable between AUDIO INPUTS on the TV and audio outputs of your device to enable component audio.
English - 46 -

S/PDIF Out4. outputs digital audio signals of the currently watched source.
Use an S/PDIF coaxial cable to transfer audio signals to a device that has S/PDIF input. You should also set SPDIF Out option in the Sound Menu as On.
RF Input5. connects to an antenna or a cable.
Note that if you use a decoder or a media recorder, you should connect the aerial cable through the device to the television with an appropriate antenna cable, as shown in the illustration in the following pages.

DC 12 V Input 6. is used for connecting the supplied power adaptor.
- Audio Line Outs output audio signals to an external device such as an optional sound system. To connect the external speakers to your TV, use AUDIO LINE OUTS of the TV with an audio cable. Note: Line out feature cannot be used while in HDMI source. You can use SPDIF instead.
PC Input8. is for connecting a personal computer to the TV set.
Connect the PC cable between the PC INPUT on the TV and the PC output on your PC.
HDMI 1:9. HDMI input
HDMI Inputs are for connecting a device that has an HDMI socket.
Your LCD Television is capable of displaying High Definition pictures from devices such as a High Definition Satellite Receiver or DVD Player. These devices must be connected via the HDMI sockets or Component Socket. These sockets can accept either 480i, 480p, 576p, 576i, 720p, 1080i, 1080p signals. No sound connection is needed for an HDMI to HDMI connection.
Viewing the Connections - Side Connectors
- CI Slot is used for inserting a CI card. A CI card allows you to view all the channels that you subscribe to. For more information, see "Conditional Access" section.
- USB Input (functional in DTV mode only)
- Headphone jack is used for connecting an external headphone to the system. Connect to the HEADPHONE jack to listen to the TV from headphones (optional).
- Video Input is used for connecting video signals of external devices. Connect the video cable between the VIDEO IN socket on the TV and the VIDEO OUT jack on your device.
- Audio Inputs are used for connecting audio signals of external devices. Connect the audio cable between the AUDIO INPUTS on the TV and the AUDIO OUTPUT jacks on your device.
Note: If you connect a device to the TV via the VIDEO INPUT, you should also connect your device with an audio cable to the AUDIO INPUTS of the TV to enable audio.

Power Connection
IMPORTANT: The TV set is designed to operate on 12 V DC. For this, an adaptor is used which gives 12 V voltage. Connect this adaptor to a system that supplies 110-240V AC,50/60Hz.
- After unpacking, allow the TV set to reach the ambient room temperature before you connect the set to the mains.

English - 47 -
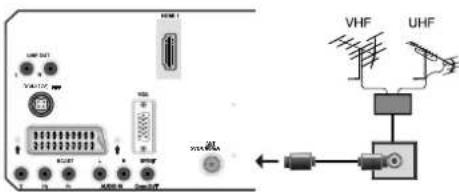
Aerial Connection
- Connect the aerial or cable TV plug to the AERIAL INPUT socket located at the rear of the TV.
Using Side USB Input
- You can connect USB devices to your TV by using the USB input of the TV. This feature allows you to display/play JPG, video (optional) and MP3 files stored in a USB stick.
- It is possible that certain types of USB devices (e.g. MP3 Players) may not be compatible with this TV.
- You may back up your files before making any connections to the TV set in order to avoid any possible data loss. Note that manufacturer will not be responsible for any file damage or data loss.
- Do not pull out USB module while playing a file.
CAUTION: Quickly plugging and unplugging USB devices, is a very hazardous operation. Especially, do not repeatedly quickly plug and unplug the drive. This may cause physical damage to the USB player and especially the USB device itself.
USB Memory Connection
- Plug your USB device to the USB input of the TV. IMPORTANT: The TV supports only FAT32 disk formatting. NTFS format is not supported.
Connecting the LCD TV to a PC
For displaying your computer's screen image on your LCD TV, you can connect your computer to the TV set.
- Power off both computer and display before making any connections.
- Use 15-pin D-sub display cable to connect a PC to the LCD TV.
- When the connection is made, switch to PC source. See "Input selection" section.
- Set the resolution that suits your viewing requirements. Resolution information can be found in the appendix parts.

flowchart
graph TD
    A["Audio Inputs"] --> B["PCaudioable (notsupplied) toAUDIOINPUTS entireTV"]
    C["PCInput"] --> D["PCRGBable (notsupplied) toPCInput"]
Connecting to a DVD Player
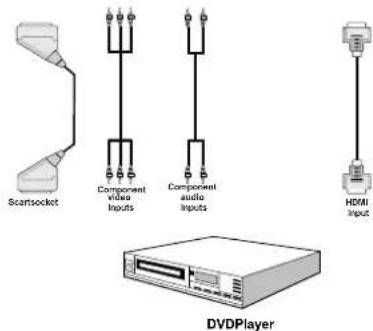
If you want to connect a DVD player to your LCD TV, you can use connectors of the TV set. DVD players may have different connectors. Please refer to your DVD player's instruction book for additional information. Power off both the TV and the device before making any connections.
Note: Cables shown in the illustration are not supplied.
- If your DVD player has an HDMI socket, you can connect via HDMI. When you connect to DVD player as illustrated below, switch to HDMI source. See, "Input Selection" section.
- Most DVD players are connected through COMPONENT SOCKETS. Use a component video cable to connect video input. For enabling audio, use a component audio cable as illustrated below. When the connection is made, switch to YPbPr source. See, "Input selection" section.
- You may also connect through the SCART socket. Use a SCART cable as shown below.
Note: These three methods of connection perform the same function but in different levels of quality. It is not necessary to connect by all three methods.
English - 48 -
Using Side AV Connectors
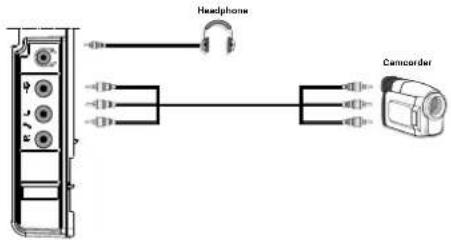
You can connect a range of optional equipment to your LCD TV. Possible connections are shown below. Note that cables shown in the illustration are not supplied.
- For connecting a camcorder, connect to the VIDEO IN socket and the AUDIO SOCKETS. For selecting the related source, see the section "Input selection" in the following parts.
• To listen the TV sound from headphones, connect to the HEADPHONE jack of theTV.
Using Other Connectors
You can connect a range of optional equipment to your LCD TV. Possible connections are shown below. Note that cables shown in the illustration are not supplied.
- To connect external speakers, use an audio cable. Do not reverse the AUDIO LEFT and AUDIO RIGHT jacks. Turn on the LCD TV and external speaker set after all connections are made. Refer to your speaker set's manual for further queries.
- For connecting a to a device that has SPDIF support, use an appropriate SPDIF cable to enable sound connection. You should also set SPDIF Out option in the Sound menu as On.

Connecting Other Equipment via Scart
Most devices support SCART connection. You can connect a; DVD recorder, a VCR or a decoder to your LCD TV by using the SCART socket. Note that cables shown in the illustration are not supplied.
Power off both the TV and the devices before making any connections.
For more information, refer to your device's own instruction book.

flowchart
graph TD
    Startbook["Startbook"] -->|Connection| DVDRecorder["DVDRecorder"]
    Startbook -->|Connection| VideoRecorder["VideoRecorder"]
    Startbook -->|Connection| Decoder["Decoder"]
Inserting Batteries in the Remote Control Handset
- Remove the battery cover located on the back of the handset by gently pulling backwards from the indicated part.
- Insert two AAA/R3 or equivalent type batteries inside. Place the batteries in the right directions and replace the battery cover.

natural_image
Diagram of a computer mouse with an arrow indicating a change or operation (no text or symbols present)Note: Remove the battery from remote control handset when it is not to be used for a long period. Otherwise it can be damaged due to any leakage of batteries.
Remote range is approximately 7m/23ft.
Switching the TV On/Off
To Switch the TV On
- Connect the power cord to the 110-240V AC 50/60 Hz.
- Press STANDBY switch. Then the standby LED lights up.
• To switch on the TV from standby mode either:
English - 49 -
- Press the "button, P+ / P- or a numeric button on the remote control.
- Press the -P/CH or P/CH+ button on the TV. The TV will then switch on.
Note: If you switch on your TV via PROGRAMME UP/DOWN buttons on the remote control or on the TV set, the programme that you were watching last will be reselected.
By either method the TV will switch on.
To Switch the TV Off
- Press the "button" on the remote control or press the STANDBY switch, so the TV will switch to standby mode.
• To power down the TV completely, unplug the power cord from the mains socket.
Note: When the TV is switched to standby mode, standby LED can blink to indicate that features such as Standby Search, Over Air Download or Timer is active.
Input Selection
Once you have connected external systems to your TV, you can switch to different input sources.
- Press SOURCE button on your remote control for directly changing sources.
or, - Select "Source" option from the main menu by using "◀" or "▶" button. Use then "▼" or "▲" button to highlight an input and press "■" button to select.
Note: You can mark desired source options by pressing the OK button. Therefore, when SOURCE button is pressed, only the marked source options will be available (except for the TV source).

Basic Operations
You can operate your TV using both the remote control and onset buttons.
Operation with the Buttons on the TV
Volume Setting
- Press "button to decrease volume or button to increase volume, so a volume level scale (slider) will be displayed on the screen.
Programme Selection
- Press "P/CH+" button to select the next programme or "P/CH -" button to select the previous programme.
Viewing Main Menu
- Press “+”/“-” buttons at the same time to view main menu. In the Main menu select sub-menu using “P/CH -” or “P/CH +” buttons and enter the sub-menu using “-” or “+” buttons + To learn the usage of the menus, refer to the menu system sections.
AV Mode
- Press the "TV/AV" button in the control panel on the TV to switch between AV modes.
Operation with the Remote Control
• The remote control of your TV is designed to control all the functions of the model you selected. The functions will be described in accordance with the menu system of your TV.
- Functions of the menu system are described in the following sections.
Volume Setting
- Press V+ button to increase the volume. Press V-button to decrease the volume. A volume level scale (slider) will be displayed on the screen.
Programme Selection (Previous or Next Programme)
- Press "P -" button to select the previous programme.
- Press "P+" button to select the next programme.
Programme Selection (Direct Access)
- Press numeric buttons on the remote control to select programmes between 0 and 9. The TV will switch to the selected programme. To select programmes between 10 - 499 (for IDTV) or 10-199 (for analogue), press the numeric buttons consecutively. The limit of the delay time is 3 seconds.
- Press directly the programme number to reselect single digit programmes.
Initial Settings
When the TV is turned on for the first time, the menu for the language selection appears on the screen. The message "Welcome please select your language!" is displayed in all language options sequentially in the OSD.
By pressing the "▼" or "▲buttons highlight the language you want to set and press OK button.
You can get information about the menu usage by pressing INFO button. Press INFO button again to exit the help menu.
After then, "First time installation" OSD will appear on the screen. By pressing "◀" or "▶" buttons, select the country you want to set and press OK button.

Note: Country selection will not be available for UK. Press OK to continue.
After then, the active antenna selection OSD appears on the screen:
By pressing “◀” or “▶” buttons, set active antenna mode as on or off.
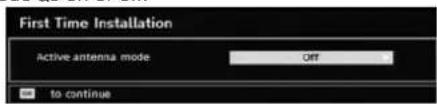
If an active antenna is connected to your TV, you can select this option as On. Antenna power should be "Off" when standard antenna is used instead of the active antenna. See "Configuration Menu" in the following sections for more information.
Press OK button on the remote control to continue and the following message will be displayed on the screen:
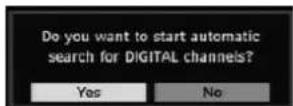
- To select the "Yes" or "No" option, highlight the item by using "◀or "▶buttons and press OK button.
The IDTV will automatically tune to the transmission channels, searching for digital terrestrial TV broadcasts and displaying the names of channels found. This process will take a few minutes. To cancel searching, you can press MENU button at any time during the process. The following OSD will be displayed during the automatic search:

After Automatic Search is completed, the following message will be displayed, asking for sorting option. If you select "YES", programme list will be sorted according to LCN (logical channel number). Select "NO" for using frequency sort. (This feature is available for only Germany, Austria and Italy country option)

After this operation, the following menu will appear on the screen, asking for analog channel search:
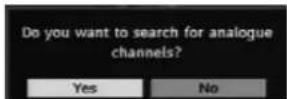
To search for analogue channels, select "Yes". TV switches to the analogue TV mode. A menu will be displayed to search for analogue channels.
Set Language item by pressing “◀” or “▶” button. Press “▼or ” “l button to highlight Country item and then use “◀or ” “to set. Press “ ” or “ ” button to highlight TXT. Language. Set TXT Language by using “◀or ” “l button. To cancel, press the BLUE button.
When finished, press OK or RED button to continue and the following OSD will be displayed:

After automatic tuning is finalized, a programme list will appear on the screen. In the programme list you will see the programme numbers and names assigned to the programmes.
If you do not accept the locations and/or the names of the programmes, you can change them in Program table. For details, see the section, "Program table".
General Operation
Press the "SOURCE" button on the remote control and select DTV/USB to switch the TV set to digital
English - 51 -
terrestrial television broadcasting..Information Banner
- Whenever you change the channel using the P + or P - button or numeric buttons, the TV displays the broadcast picture along with an information banner at the bottom of the screen. This will remain on the screen for approximately a few seconds.
- The information banner can also be displayed by pressing the INFO button at any time while watching the TV. Pressing INFO button again removes the banner.

If the selected channel is locked, you must enter the correct four digit key to view the channel. In this case, a dialog box asking for the lock key will be displayed:

Electronic Programme Guide (EPG)
Some, but not all, channels send information about the current and next events. Please note that event information is updated automatically. If there are no event information data available for channels, EPG will be displayed with blanks.
- Press EPG button to view the EPG menu.
- Press “▼” or “▲” buttons to navigate through channels.
- Press "◀" or "▶" buttons to navigate through the programme list.
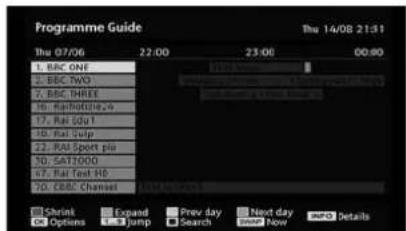
RED button (Shrink): makes the info boxes smaller.
GREEN button (Expand): makes the info boxes larger.
YELLOW button (Prev. Day): displays the programmes of previous day.
BLUE button (Next day): displays the programmes of the next day.
INFO (Details): displays the programmes in detail.
OK (View / Timer): shows the highlighted channel / sets the reminder for future programmes.
Numeric buttons (Jump): go to preferred channel directly via numeric buttons.
SWAP: Jump to current broadcast.
0 (SEARCH): activates "Guide Search" window

Press "0" button to view Guide Search menu. Using this feature, you can search the programme guide database in accordance with the genre selected or with name match.
Programme Options
In EPG menu, press the OK button to enter the "Programme Options" menu.

Using this option, you can switch to the selected channel.
Over Air Download
To ensure that your IDTV always has the most up-to-date information, please ensure that, after use, it is set to standby mode. At 3 A.M. each day, the IDTV automatically searches for any updates which may be broadcast and will download this to your IDTV automatically. This operation will normally take approximately 30 minutes.
Displaying Subtitles
With digital terrestrial broadcasting (DVB-T), some programmes are broadcast with subtitles.
Note: You can enable subtitles by pressing the (For UK**) or GREEN (for EU*) button.
Digital Teletext (For UK only\*\*)
- Press the TELETEXT (3) button.
• The digital teletext information appears. - Operate it with the coloured buttons, "▼" / "▲/""◀ / "▶" buttons and OK button.
The operation method may differ depending on the contents of the digital teletext.
Follow the instructions displayed on digital teletext screen.
- When "Press "OK" button or similar message appears on the screen, press the OK button.

- When the TELETEXT (1) button is pressed, the TV returns to television broadcasting.
- With digital terrestrial broadcasting (DVB-T), in addition to digital teletext broadcasting together with the normal broadcasting, there are also channels with just digital teletext broadcasting.
- The aspect ratio (picture shape) when watching a channel with just digital teletext broadcasting is the same as the aspect ratio of the picture viewed previously.
- When you press the TELETEXT (☒) button again, the digital teletext screen will be displayed.
Analogue Teletext
Use of teletext and its functions are identical to the analogue text system. Please do refer to the "TELETEXT" explanations.
Widescreen
Depending on the type of the broadcast being transmitted, programmes can be viewed in a number of formats. Press the SCREEN button repeatedly to change screen format.
When Auto is selected, the format being displayed is determined by the picture being broadcast.
PLEASE NOTE: Menu size changes depending on the chosen image size.
Dijital TV Menu System
- Press MENU button and DTV main menu will be displayed.

Channel List
Using "▼ or " " buttons on the remote control in main menu, make sure that the first item, Channel List, is highlighted and press the OK button to display the Channel List.
You can use following buttons for Move, Delete and Lock functions.
- Channel List is the place where the channels are managed.
YELLOW: Tags/untags the selected channel.
BLUE: Tags/untags all channels.
Navigating the Entire Channel List
- Press "▼or " "▲eys for selecting the previous or next channel.
- You can press ↑ or ↓ buttons to move page up or page down.
- To watch a specific channel, highlight it using ▼ or "▲buttons and then press OK button, while the "Select" item on Channel List menu is highlighted via "◀" or "▶" buttons.
Moving the channels in the channel list
- Press "▼or " " buttons to select the channel that will be moved.
- Press "◀" or "▶" buttons to select the "Move" item on Channel List menu and press OK to confirm.

Note: If you enter the same programme number of the channel that you want to move, “...services will be replaced. Do you want to continue?” OSD will be displayed. Press OK to confirm or select “No” to cancel.
Note: The following screen will be displayed when want to move or delete channels that are sorted by LCN (logical channel number) service.
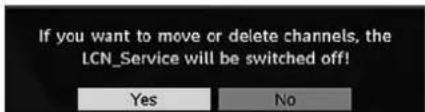
Select "YES" to continue. Select "NO" to cancel (LCN feature is available for only Germany, Austria, Switzerland and Italy country options).
Deleting the Channels in the Channel List
- Press "▼or " " buttons to select the channel that will be deleted.
- Press "◀" or "▶" buttons to select the "Delete" item on Channel List OSD.
English - 53 -

Press "OK" button to delete the highlighted channel in the channel list. Then the message below appears on the screen.

Renaming channels
To rename a specific channel, the channel must be highlighted via pressing "▼ or "▲ buttons and then highlight the "Edit Name" item by pressing "◀ or "▶" buttons. Press "OK" button to activate rename feature.
![Channel List Aerial 1. arte 2. Phoenix 3. Dan Erste 4. WDR Düsseldorf 5. ColorBar 10 6. CodeCA43 7. Code 16:9 8. BLUE/Left Light Edit Name [a]rte Select Move Delete Edit Name Lock Favourites MENU Cancel Enter Name OK Update](/content/2026/05/863298/images/06e9ec12f3140bfb0b10e9df0b712f68b8b0098a7dcfb812b2b338672eb27df2.jpg)
Now pressing "or" "buttons moves to the previous/next character. Pressing "or" "buttons toggles the current character, i.e., 'b' character becomes 'a' on and 'c' on . Pressing the numeric buttons '0...9' replaces the highlighted character with the characters printed above the key one by one as the button is pressed.
Press the MENU button to cancel the editing or OK button to save the new name.
Adding Locks to Channels
Channel Locking provides a password-protected access to channels selected by parents.
In order to lock a channel you should know the Parental Lock password (default value is set to 0000 in the factory and can only be changed from the Cons guration menu).
By pressing "▼" or "▲buttons, highlight the channel to be locked and select the "Lock" option by pressing "◀" or "▶" buttons. Then press the OK button and a password box is displayed:

Setting Favourites
To set a favourite you should highlight the "Favourites" item at the bottom of the Channel List menu. Then press OK button and Edit Favourite List menu appears on the screen.

Adding a Channel to a Favourites List
By pressing "▼or▼" buttons, highlight the channel that you want to add to the favourite list. By pressing OK button, the highlighted channel is added to Favourite List. F icon indicates that a channel is added to Favourite List.
Removing a Channel from a Favourite List
- Highlight the channel that you want to remove from the favourite list and press OK button to remove. You can press OK button again to re-adding a channel.
- To activate Favourites, go to the Configuration menu and select Favourite mode. Use “◀” or “▶” to set Favourite mode as on. To cancel Favourites, set Favourite Mode to Off.
Hint: Pressing INFO button can help you for displaying information in IDTV.
Program Guide
This section is same with the instructions given in the General Operations page. Please see Electronic Programme Guide (EPG) section in the General Operations part.
Timers

To display timers window, activate the item from the main menu. To add a timer, press the YELLOW button on the remote control. Then "Add Timer" window appears.
Channel: “◀” or “▶” keys will navigate the user through the TV or Radio list.
Date: Starting date is entered via the Left/Right or the numeric buttons.
Start: Starting time is entered via the Left/Right or the numeric buttons.
End: Ending time is entered via the Left/Right or the numeric buttons.
Duration: Displays the duration of the recording.
Duration item will be automatically displayed after the starting and ending times are entered.
Change / Delete: permits or prohibits any modifications for other users.
You can save the adjustments by pressing the GREEN key or cancel the process by pressing the RED button. You can edit the list via GREEN key and delete with the RED button.
Common Interface
Press MENU button to display the main menu and use the "▼or" "▲" buttons to highlight the "Common Interface" line and press OK button.
It is required to subscribe to a pay channel company to view the pay channels of the Digital Terrestrial broadcasting.
Obtain the Conditional Access Module (CAM) and the viewing card by subscribing to a pay channel company, then insert those to the Television using the following procedure.
- Switch off the TV and unplug from the mains.
- Insert the CAM, and then the viewing card to the slot.
• The CAM should be correctly inserted, it is impossible to insert fully if reversed. The CAM or the TV terminal may be damaged if the CAM is forcefully inserted.
- Connect the TV to the mains supply, switch on and then wait for few moments until the card is activated.
- Some CAMs may require the following set up. Please set the CAM by entering the DIGITAL TV menu, Common Interface then pressing OK button. (CAM set up menu is not displayed when it is not required.)
• To see the viewing contract information:
- Enter DIGITAL TV; press MENU button, then highlight Common Interface and press OK button.
- When no module is inserted, "No Common Interface module detected" message appears on the screen.
- Refer to the module instruction manual for details of the settings.
NOTE: Insert or remove the CI module only when the TV is in STANDBY mode or SWITCHED OFF.
TV Setup
You can use this item to display the TV functions.
The digital TV Setup menu screen is accessed from the main menu. Press the MENU button to display the main menu and use or buttons to highlight "TV Setup". Press OK button to display TV Setup menu screen.
You can find detailed information for all menu items in "Analogue TV Menu System" section.
Setup
The adjustments in this menu are given as the following:

Configuration
You can configure the settings of your TV. Select Configuration from Setup menu and press OK to view this menu. Press the RETURN button on the remote control to exit.
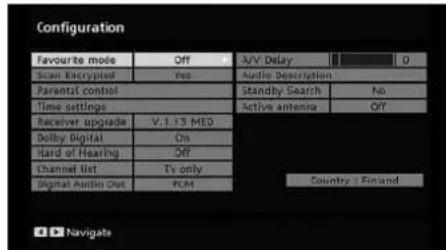
Favourite Mode
Use this function to enable or disable favourite mode. Press "◀or" ▶button to set this function as on or off.
Scan Encrypted
Scan Encrypted Channel feature will always be ON after performing first time installation. When this setting is on, search process will locate the encrypted channels as well. If it is set as OFF manually, encrypted channels will not be located while in automatic search or manual search. Use "▼" or "▲" button to select Scan Encrypted and then press "◀" or "▼" button to set this setting as On or Off.
Parental Control
• Some channels broadcast material which you do not want younger members of the family to watch. Any
English - 55 -

channel can be 'locked' so that it cannot be selected for viewing unless a four-digit PIN code is entered. In this way any channel not suitable for younger viewers can be prohibited.
- This function enables or disables the menu protection system and allows the PIN code to be changed.
- Use “▼” or “▲buttons to highlight Parental Control. Press OK button to enter Parental Control menu. A dialog box asking for the lock key is displayed:
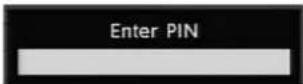
There is only one key which is set to "0000" initially. Enter lock key. If wrong lock key is entered, the "WRONG PIN" message will be displayed on the screen and the TV returns to the previous menu. If the PIN is correct, the Parental Control menu including following items will be displayed:
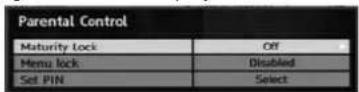
Maturity Lock (\*\*)
(**) If you set Country option as UK in the first time installation, Maturity Lock option will not be visible. When set, this option gets the maturity information from the broadcast and if this maturity level is disabled, the TV will not display the related video-audio.
Menu Lock
Use "◀ or "▶ buttons to set Menu Lock. Here, you can set/reset locking function for the main menu or the installation menu to restrict access. If the menu lock is disabled, there will be free access to the menu system.
Disabled: All menus are unlocked.
All Menus: All menus are accessible only with the correct lock key. So the user cannot add, delete, rename or move the channels and cannot set the timers.
Installation Menu: Installation menu is locked, so the user cannot add channels. Changes will be updated after exiting Configuration Menu.
Set PIN
Use "▼ or "▲" buttons to go to "Set PIN" option. Press OK to display the "Set PIN" window. Use numeric buttons to enter new pin number you will need to input your new pin a second time for verification purposes. The factory default pin number is 0000, if you change the pin number make sure you write it down and keep it safe.
Time Settings(\*\*)
(**): Time setting will not be available for UK.
In the configuration menu, highlight the Time Settings item by pressing "▼" or "▲buttons. Press OK and Time Settings sub menu will be displayed on the screen:
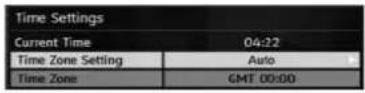
Use "▼or " " buttons to highlight the Time Zone Setting. Time Zone Setting is set using "◀or "▶ buttons. It can be set to AUTO or MANUAL. When AUTO is selected, Current Time and Time Zone options will not be available to be set.
If MANUAL option is selected as the Time Zone Setting, Time Zone can be altered:
- By pressing “▼” or “▲” buttons select Time Zone. Use “◀” or “▶” buttons to change the Time Zone between GMT-12 or GMT+12. Current Time on the top of the menu list will then change according to the selected Time Zone.
Receiver Upgrade
Over Air Download (OAD)
To ensure that your TV always has the most up to date information, use this setting. Please ensure that the TV is set to standby mode. The TV automatically powers up at 3.00 A.M. each day and searches for any new information which may be broadcast and will download this to your receiver automatically. This operation will normally take approximately 30 minutes. If you have an important recording to be carried out at 3.00 A.M. and you do not want to interrupt it, disable auto OAD search by performing the following:
- Press MENU button and using the "▼" or "▲buttons to choose Setup and press OK button.
- Highlight Configuration menu with ▼ or “▲keys and press OK.
- Use "▼" or "▲" buttons to choose "RECEIVER UPGRADE" and press OK button.
- Using the “◀” or “▶” button change “Automatic scanning” from Enabled to Disabled.

- Highlight "Scan for upgrade" menu with "▼or" ▲ "keys and pres OK to commence upgrade.

- After the search progress is completed, the message "Completed searching for upgrade. No new software
English - 56 -
was found" appears on the screen if no new software is found.
Dolby Digital
In the Configuration Menu, highlight the Dolby D item by pressing “▲” or “▼” buttons. Use the “◀” or “▶” buttons to set the Dolby Digital as On or Off. If the channel that you are watching supports Dolby Digital and Dolby Digital Plus, you can turn this setting on.
Hard of Hearing (\*)
Use "▼or " " ▲button to select Hard of Hearing and then press "◀ or " ▶button to set this setting as On or Off.
If the broadcaster enables any special signal concerning the audio, you can set this setting as On to receive such signals.
(*) Hard of Hearing function will not be available for UK.
Channel List
Use "▼or " " buttons to go to Channel List option. Use or buttons to toggle Channel List Mode. If you select "TV Only", with the "◀ or "▶ buttons, you navigate through only TV channels. If you select "Radio Only", with the "◀ or "▶ buttons, you navigate through only radio channels. If you select "Text Only", with the "◀ or "▶ buttons, you navigate through only text channels. If you choose "Show All" all channels can be navigated. To save the recent changes and exit; press the MENU button.
Digital Audio Out
Use this setting to define digital audio out signal type. Use "◀ or "▶ buttons to set Digital audio out as AC3 or PCM.
If your selected channel includes AC3 sound stream, you should connect your TV to external equipment by using Spdif out of your TV for enabling the sound output. If you have no external sound equipment, please select Digital Audio Out as "PCM" by using "◀" or "▶" button.
A/V Delay
You can use this setting when there is an AV synchronization problem in the received broadcast. Press "◀or "◀button to change the delay.
Audio Description (Optional)
Audio description refers to an additional narration track for blind and visually impaired viewers of visual media. You can use this feature, only if the broadcaster supports that additional narration track. Use "▼ or "▲" buttons to select an item. Then use "◀ or "▶ buttons to set.
Audio Description (Optional)
This function enables or disables the audio description feature by pressing the “◀” or “▶” buttons.
Preferred Language (Optional)
By pressing the “▼” or “▲buttons the preferred audio description language is being changed. This setting can be used, only if it is available.
Relative Volume (Optional)
Using this option, the Audio Description volume level can be increased or decreased relatively, according to the general volume.
Standby Search (\*)
(*) This setting is visible only when the Country option is set to Denmark, Sweden, Norway or Finland.
Use "▼" or "▲button to select Standby Search and then press "■or "▼" button to set this setting as On or Off. If you change Standby Search to Off, this function will be unavailable.
To use Standby search please make sure that you select Standby Search as On.
Active Antenna (\*)
Use "▼" or "▲buttons to highlight Active Antenna option. When antenna power option is set as On by pressing "◀or "▶button, +5V will be transmitted to the antenna output. This feature enables the use of active antenna.
Note: Antenna power should be "Off" when standard antenna is used instead of the active antenna.
Language Settings
In this menu the user can adjust the preferred language. Select "Language" item in the Setup menu and press OK button. Then language settings menu will be displayed.

You can set the desired language options by using "▼/" ▲" and "◀" "buttons.
Note: If the Country option is set to Denmark, Sweden, Norway or Finland, the Language Settings menu will function as described below:
English - 57 -
Language Settings
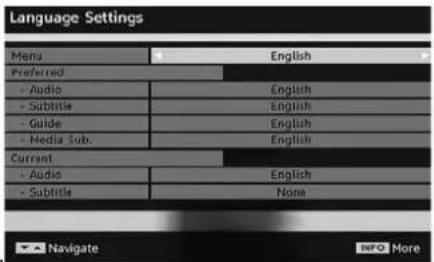
Use "▼ or " " buttons to highlight the menu item that will be adjusted and then press "◀ or " " button to set.
- Audio Language is used for selecting the soundtrack of a channels. Primary settings are the fi rst priority when multiple choices are available on a broadcast. Secondary settings are the alternatives when the fi rst options are not available.
- Guide Language: If the received EPG data includes the selected guide language, EPG data language will be changed accordingly.
- Teletext language sets the desired teletext language.
Media Subtitle: In order to display subtitles properly, use this setting to select a movie subtitle language. By pressing “◀” or “▶” button, select the desired language option.
Installation
The Installation menu is mainly intended to help you for creating a Channel Table in most efficient way. Select Installation from the main menu by pressing "▼" or "▲buttons.

Automatic Channel Scan
Automatic channel scan is started by pressing OK button while Automatic channel scan item is highlighted.
The following message appears on the screen:

Highlight Yes or No by using "◀" or "▶" buttons and press OK button to confirm.
If Yes is selected, automatic search starts.
Selecting No cancels automatic search.
After search is completed for digital channels, a message asking whether to search for analogue channels appears on the screen:
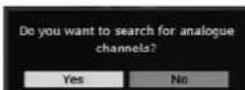
Highlight Yes and press OK button to search for analogue channels. The following menu appears on the screen for analogue channel search:

Set Language item by pressing "◀ or "▶ button. Press "▼ or " " button to highlight Country item and then use "◀ or " " to set. Press " " or " " button to highlight TXT Language. Select a region by using "◀ or "▶ button. When fi nished, press OK or RED button to continue. To cancel, press the BLUE button.

After APS is finalized, the programme table will appear on the screen. In the programme table you will see the programme numbers and names assigned to the programmes.
Manual Search
In Manual Search, the number of the multiplex is entered manually and only that multiplex is searched for the channels. For every valid channel number, signal level and signal quality are shown on the screen.
In both manual and auto search any existing channel in the database is not re-stored to avoid redundant duplicates of that channel.
Clear Service List (\*)
(*) This setting is visible only when the Country option is set to Denmark, Sweden, Norway or Finland.
Use this setting to clear channels stored. Press "▼" or "▲button to select Clear Service List and then press OK. The following OSD will be displayed on the screen:
English - 58 -

Press OK to cancel.
Select Yes by pressing "◀" or "▶" button and press OK to delete all of the channels.
First Time Installation
The user can use this item to load default settings, which were loaded to the receiver at the factory. To install factory settings, highlight "First Time Installation" menu item and press OK button, then you will be asked whether or not to delete the settings. Selecting "Yes" by pressing OK button while the "Yes" is highlighted, will delete the existing channel table.

After factory settings are loaded, "First Time Installation" menu will be displayed.
The menu which is displayed for language selection appears on the screen at first. By using "▼" or "▲" buttons, select the desired language option, and press OK button to activate.
After then, "First time installation" OSD will appear on the screen. By pressing "◀" or "▶" buttons, select the Country you want to set and press OK button (* only for EU countries).
Next, active antenna mode selection OSD will appear on the screen. Use “◀” or “▶” to set and press OK to continue. See the section, “Initial Settings” for more information.
After active antenna mode option is selected, a message asking for automatic search appears on the screen:
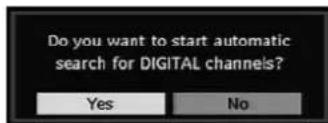
Highlight "Yes" item by pressing "◀or "▶buttons and press OK button to start installation. After search is completed for digital channels, a message asking whether to search for analogue channels appears on the screen. This process is same as described in Automatic Search section.
Media Browser (in DTV mode)
Whenever you plug a USB flash disk to your TV, the following message will be displayed on the screen:

Select YES or NO by pressing “◀” or “▶” button and “OK” button to continue.
You can also select Media Browser item from the main menu by using "▼" or "▲buttons. Press OK to view Media Browser contents.
You can play audio and photo files from a USB flash disk.
Note: Some USB compliant devices may not be supported.
Note: If you plug USB stick in analogue mode, the TV will automatically switch to digital TV mode.
Note: If the USB stick is not recognized after Power off/on or First Time Installation, first plug the USB device out and power off/on the TV set. Plug the USB device again.

Press OK to browse, "MENU" to quit.
Playing Audio Files:

Play This (OK) : Plays the selected file.
Play (▶): Play all media files in the folder starting with the selected one.
Pause/Resume (■ button): Pauses or resumes playback.
Stop (■ button) : Stop the playing file.
Previous/Next (◄◄): Jumps to previous or next file to play.
English - 59 -
Shuffle (INFO) : Plays the files randomly. If shuffle mode is enabled, previous/next functions will also jump to the tracks randomly.
Loop (BLUE) : Plays the selected file repeatedly.
Skip backyard / Skip forward (◀◀ / ▶Button)
Viewing JPEG Files

Jump (0...9) : jump to selected file using the numeric buttons.
OK : view the selected picture in full screen.
Play / Slideshow (▶ button) : start to slideshow with all pictures in the folder.
Slideshow Options
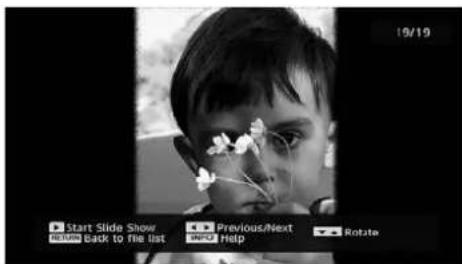
Pause (button) : Pause the slideshow.
Continue (▶ button) : Continue with the slideshow.
Previous/Next (◄/ ►: Jump to previous or next file of slideshow.
Rotate (▼ / ▲: Rotate the picture using up/down buttons.
RETURN : Back to fi le list.
Shuffle (RED) : Shows the files randomly and continuous in current folder and icon turns the highlighted icon. If during a slideshow the shuffle mode is enabled, the next pictures will be chosen randomly (If the loop function is not enabled, the slideshow will stop at the end. If the loop function is enabled, after the slideshow ends, it will start again and again).
Loop (BLUE) : Slideshow goes on continuously and icon turns the highlighted icon.
INFO : Activate the operations bar.
Video Playback (optional)
Play (▶ button) : Starts the video playback.
Stop (■ button) : Stops the video playback.
Pause (■ button) : Pause the video playback.
Rewind (◀◀ button) : Goes backward.
Forward (▶▶ button) : Goes forward.
Menu (MENU button) : Sets subtitle/Audio.
You can set subtitles by using OK button before starting the playback or by using MENU button during the playback. Press RETURN button to switch back to previous menu.

Analogue TV Menu System
Picture Menu
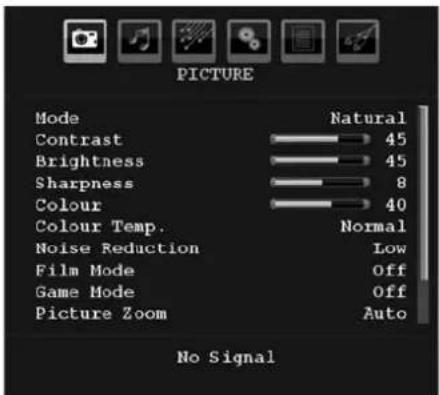
Mode
For your viewing requirements, you can set the related mode option.
Press “▼” or “▲ button to select Mode. Press “◀” or “▶ button to choose from one of these options: Cinema, Dynamic and Natural.
Brightness/Contrast/Colour/Sharpness/Hue
Press "▼or " " button to select the desired option. Press "◀or " " button to set the level.
Note: Hue option can only be visible when the TV receives an NTSC signal.
Colour Temp
Press "▼or"" button to select Colour Temp. Press "▼or"" to choose from one of these options: Cool, Normal and Warm.
Note:
- Setting Cool option gives white colours a slight blue stress.
- Setting Warm option gives white colours a slight red stress.
- For normal colours, select Normal option.
Noise Reduction
If the broadcast signal is weak and the picture is noisy, use Noise Reduction setting to reduce the noise amount.
Press “▼” or “▲button to select Noise Reduction. Press “◀” or “▼” to choose from one of these options: Low, Medium, High or Off.
Film Mode
Films are recorded at a different number of frames per second to normal television programmes.
Press "▼" or "▲button to select Film Mode.
Press "◀" or "▶" button to set this feature On or Off.
Turn this feature on when you are watching.
fi lms to see the fast motion scenes clearly.
Game Mode (optional)
Select Game Mode by pressing "▼or " "▲button.
Use "◀" or "▶" button to set Game Mode as On or Off. When Game Mode is set to On, specific game mode settings, which are optimized for better video quality, will be loaded.
Also; Picture Mode, Contrast, Brightness, Sharpness, Colour and Colour Temp settings will be invisible and disabled while Game Mode is on.
Note:
Picture mode selection button on the remote control will have no function while Game Mode is on.
Picture Zoom
Select Picture Zoom by pressing "▼" or "▲" button.
Use "◀" or "▶" buttons, to change picture zoom to Auto, 16:9, 4:3, Panoramic, 14:9, Cinema, Subtitle or Zoom.
Store
Press "▼ or " " button to select Store. Press " " ▶ or OK button to store the settings. "Stored..." will be displayed on the screen.
Reset
Press "▼ or " ▲button to select Reset. Press "◀" or "▶" or OK button to reset the picture modes to factory default settings.
Sound Menu
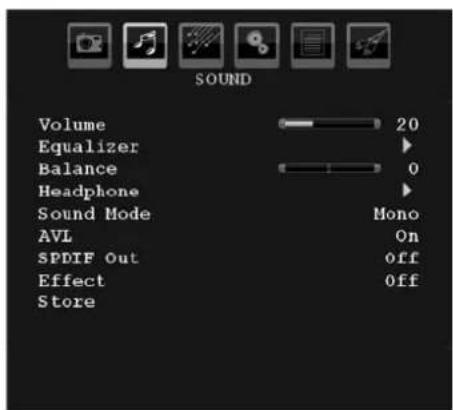
Volume
Press “▼” or “▲” button to select Volume. Press “◀” or “▶” button to change the level of the Volume.
English - 61 -
Equalizer
Press "▼or " " button to select Equalizer. Press " ▶" button to view equalizer menu.

Press "◀ or "▶ button to change the preset. In equalizer menu, the preset can be changed to Music, Movie, Speech, Flat, Classic and User.
Select the desired frequency by pressing "▼" or "▲ button and increase or decrease the frequency gain by pressing "◀or "▶button.
Press the "MENU" button to return to the previous menu.
Note: Equalizer menu settings can be changed only when the Equalizer Mode is in User.
Balance
This setting is used for emphasizing left or right speaker balance.
Press “▼” or “▲” button to select Balance. Press “◀” or “▶” button to change the level of the balance. Balance level can be adjusted between -32 and +32.
Headphone
Press "▼or " " button to select Headphone. Press "▼ button to view the headphone menu.
Note: Headphone will be disabled when SPDIF option is set to on.
Headphone sub-menu options are described below: Volume
Press “▼” or “▲button to select Volume. Press “▶” button to increase headphone volume level. Press “◀” button to decrease headphone volume level. Headphone volume level can be adjusted between 0 and 63.
Sound Mode (optional)
Press "▼or " " button to select Sound Mode. Using "◀" or "▶" button, you can select Mono, Stereo, Dual I
or Dual II mode, only if the selected channel supports that mode.
AVL
Automatic Volume Limiting (AVL) function adjusts the sound to obtain fixed output level between programmes (For instance, volume level of advertisements tend to be louder than programmes).
Press “▼” or “▲button to select AVL. Press “” or “▶” button to set the AVL as On or Off.
Spdif Out
Press "▼or " " button to select Spdif Out. Press "◀" or "▶" button to set the Spdif Out. as On or Off.
Note: If Spdif Out is set to On, headphone will be disabled.
Effect (optional)
If you are watching a mono broadcast, set Effect on to obtain a better sound effect which will be more stereolike. If the current sound system is stereo, switching this effect on will give a more spatial effect.
Press "▼" or "▲button to select Effect. Press "◀" or "▶button to set as On or Off.
Store
Press "▼ or " " button to select Store. Press " " ▶ or OK button to store the settings. "Stored..." will be displayed on the screen.
Feature Menu

Sleep Timer
Press "▼or " " button to select Sleep Timer. Use "◀or " " button to set the Sleep Timer.
The timer can be programmed between Off and 120 minutes in steps of 10 minutes.
If Sleep Timer is activated, at the end of the selected time, the TV goes automatically to standby mode.
Child Lock
Press "▼or " " Button to select Child Lock. - 62 -
Use "◀" or "▶" button to set the Child Lock On or Off. When On is selected, the TV can only be controlled by the remote control handset. In this case the control panel buttons will not work.
Hence, if one of those buttons is pressed, Child Lock On will be displayed on the screen when the menu screen is not visible.
Language
Press "▼or " " button to select Language. Use "◀" or "▶" button to select the Language.
Default Zoom
While zoom mode is set as AUTO, the TV will set the zoom mode in accordance with the signal of the broadcast. If there is no WSS or aspect ratio information, the TV will then use this setting to adopt. Press "For" Button to select Default Zoom. You can set Default Zoom to Panoramic, 16:9, 4:3 or 14:9 by pressing "For" Button.
Blue Background
If the signal is weak or absent, the TV will automatically change to a blue screen. To enable this, set Blue Background to On.
By pressing "▼" or "▲" button, select Blue Background. Press "◀" or "▶" button to set Blue Background as On or Off.
Menu Background
Press "▼or " " button to select Menu Background. You can set menu background level by pressing "◀" or "▶button.
Backlight
This setting controls the backlight level. Select Backlight by pressing "▼ or " " button. Press" ◀ " or "▼" button to set Backlight to Auto, Medium, Maximum or Minimum.
Menu Timeout
To set a specific display timeout for menu screens, set a value for this option.
Press "▼" or "▲button to select Menu Timeout. Use "◀or "▼" button to change menu timeout to 15 sec, 30 sec or 60 sec.
Teletext Language
Press "vor" button to select Teletext Language. Use "for" button to change Teletext Language to West, East, Turk/Gre, Cyrillic, Arabic or Persian.
Ext Out
Press "▼or " " button to select Ext Out. Use " " or "►" button to set the Ext Out as On or Off.
Note:
For copying from a DVD or VCR device, you should choose desired source from source menu and turn "On" to EXT Out from feature menu.
Ext Out should be On in order to use Timers function in the DTV mode.
HDMI PC Full Mode (optional)
If you want to view PC screen in HDMI mode by using external connection, HDMI PC FULL MODE option should be On to adjust the screen ratio correctly. This item might be inactive in some resolutions.
Note: If you connect an HDMI device and switch the TV to HDMI mode, this feature will be visible (except for 1080i/1080P resolution).
Full Mode (optional)
If you connect a device via HDMI connectors and set 1080i/1080P resolutions, Full Mode item will be visible. You can set Full Mode as 1:1 or Normal by using “◀ or “▶ If you select 1:1, screen ratio will be adjusted correctly. If you set Normal, screen ratio may expand.
Install Menu

Program
Press "▼or " "▲ button to select Program. Use " "◀ or ► button to select the program number. You can also enter a number using the numeric buttons on the remote control. There are 200 programme storage between 0 and 199.
Band
Band can be selected either C or S. Press "◀or " ▶" button to set Band.
Channel
Channel can be changed by "◀ or " ▶button or numeric buttons.
Colour System
Press "▼or " " button to select Colour System. Use "▼or " " button to change the colour system to PAL, PAL 60, SECAM or AUTO.
English - 63 -
Sound System
Press "▼ or " " button to select Sound System. Press "◀ or " " button to change the sound system to BG, DK, I, L or L'.
Fine Tune
Press "▼ or " "▲ button to select Fine Tune. Press "◀" or "▶" button to adjust the tuning.
Search
Press “▼ or “ ” button to select Search. Use “ ” ◀ or “▼” button to start programme searching. You can also enter the desired frequency using the numeric buttons while Search item is highlighted.
Store
Press "▼ or " " button to select Store. Press " " ▶ or OK button to store the settings. "Stored..." will be displayed on the screen.
Install Menu in AV Modes
The following screen appears in the install menu when the TV is in AV modes. Note that limited options will be available. Switch to TV mode for viewing complete version of the Install menu.

Colour System
Press "▼or " " button to select Colour System. Use "◀or " " button to change the colour system to PAL, SECAM, PAL60, AUTO, NTSC 4,43 or NTSC 3,58.
Store
Press "▼ or " ▲button to select Store Program. Press "▼" or OK button to store the settings. "Stored..." will be displayed on the screen.
Program Table
Select Program Table by pressing "▼" or "▲" button. Press "▶" to display Program Table:

By moving the cursor in four directions you can reach 20 programmes in the same page. You can scroll the pages up or down by pressing the navigation buttons to see all the programmes in TV mode (except for the AV modes). By cursor action, programme selection is done automatically.
Name
To change the name of a programme, select the programme and press the RED button.
The first letter of the selected name will be highlighted. Press “▼” or “▲” button to change that letter and “-” or “▶” button to select the other letters. By pressing the RED button, you can store the name.
Move
Select the programme which you want to move by navigation buttons. Press the GREEN button. By navigation buttons move the selected programme to the decided programme space and press the GREEN button again.
Delete
To delete a programme, press the YELLOW button. Pressing the YELLOW button again erases the selected programme from the programme list, and the following programmes shift one line up.
APS (Auto Programming System)
When you press the BLUE button for starting automatic tuning, Auto Programming System menu will appear on the screen:

English - 64 -
Country
Press "▼" or "▲button to select your country. If you want to exit from A.P.S. function, press the BLUE button.
When you press OK or RED button for starting automatic tuning, all stored programmes will be erased and the TV will search for available channels. During the search, the following OSD will be displayed:
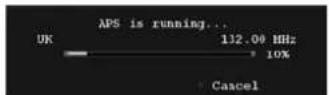
Whenever you press the BLUE button, APS function stops and Program Table appears on the screen. If you wait until the end of APS, Program Table will be displayed with the programmes found and located.
Source Menu
Press "▼ or " " button and select the sixth icon.
Then press "▶ or OK button. Source menu appears on the screen:

In source menu, highlight a source by pressing "▼ or "▲button and switch to that mode by pressing "▶" button. Source options are: TV, DTV/USB, DVD, EXT-1, FAV, HDMI, YPbPr and PC-VGA.
Note: Once you have connected optional equipment systems to your TV, you should select the required input to view pictures from that source.
PC Mode Menu System
See "Connecting the LCD TV to a PC" section for connecting a PC to the TV set.
For switching to PC source, press "SOURCE" button on your remote control and select PC input. You can also use "Source" menu to switch to PC mode.
Note that PC mode menu settings are available only while the TV is in PC source.
PC Position Menu
Select the first icon by pressing "◀" or "▶" button. PC Position menu appears on the screen:

Autoposition
If you shift the picture horizontally or vertically to an unwanted position, use this item to put the picture into correct place automatically. This setting therefore automatically optimizes the display.
Select Autoposition item by using "▼" or "▲buttons. Press OK or "◀" "▶button.
Warning: Please ensure auto adjustment is performed with a full screen image to ensure best results.
H (Horizontal) Position
This item shifts the image horizontally to right hand side or left hand side of the screen.
Select H Position item by using “▼” or “▲button. Use “◀or “ ” button to adjust the value.
V (Vertical) Position
This item shifts the image vertically towards the top or bottom of the screen.
Select V Position item by using "▼" or "▲" button. Use "◀" or "▼" button to adjust the value.
Phase
Depending on the resolution and scan frequency that you input to the TV set, you may see a hazy or noisy picture on the screen. In such a case you can use this item to get a clear picture by trial and error method.
Select Phase item by using “▼” or “▲buttons. Use “◀or “▶button to adjust the value.
Dot Clock
Dot Clock adjustments correct the interference that appear as vertical banding in dot intensive presentations like spreadsheets or paragraphs or text in smaller fonts.
Select Dot Clock item by using “▼” or “▲” buttons. Use “◀” or “▶” button to adjust the value.
English - 65 -
PC Picture Menu
For adjusting PC picture items, do the following:
Press "◀" or "▶" button to select the second icon. PC Picture menu appears on the screen.
Brightness, Contrast, Colour and Colour Temperature settings in this menu are identical to settings defined in TV picture menu under "Analogue TV Menu System".
Note: If you set Colour Temp as User, you can define R, G, B settings manually.
Sound, Feature and Source settings are identical to the settings explained in Analog TV menu system.
Displaying TV Information
Programme Number, Programme Name, Sound Indicator and Zoom Mode information is displayed on the screen when a new programme is entered or "INFO" button is pressed.
Mute Function
Press "button to disable sound. Mute indicator will be displayed in the upper side of the screen.
To cancel mute, there are two alternatives; the first one is pressing the "×" button and the second one is increasing the volume level.
Picture Mode Selection
By pressing PRESETS button, you can change Picture Mode settings in accordance with your viewing requirements. Available options are Dynamic, Natural and Cinema.
Note: This feature cannot be set while in PC mode.
Freezing Picture
You can freeze the picture on the screen by pressing the "OK" button on the remote control. Press the "OK" button to freeze picture. Press again to quit freeze mode (Note: Not available in "ATV" mode).
Zoom Modes
You can change the aspect ratio (image size) of the TV for viewing the picture in different zoom modes.
Press SCREEN button to directly change the zoom mode.
Available zoom modes are listed below.
Note:
In YPbPr and HDMI modes, while in 720p-1080i resolutions, only 16:9 mode is available.
Zoom mode cannot be changed while in PC mode.
Auto
When a WSS (Wide Screen Signalling) signal, which shows the aspect ratio of the picture, is included in the broadcast signal or the signal from an external
device, the TV automatically changes the ZOOM mode according to the WSS signal.
- When the AUTO mode does not function correctly due to poor WSS signal quality or when you want to change the ZOOM mode, change to another ZOOM mode manually.
16:9
This uniformly stretches the left and right sides of a normal picture (4:3 aspect ratio) to fill the wide TV screen.

natural_image
Diagram showing transformation of a square with a circle inside, resulting in a larger square with circles and dots (no text or symbols)- For 16:9 aspect ratio pictures that have been squeezed into a normal picture (4:3 aspect ratio), use the 16:9 mode to restore the picture to its original shape.
4:3
Use to view a normal picture (4:3 aspect ratio) as this is its original size.

natural_image
Diagram showing transformation of a square with circular elements into a larger square, no text or symbols presentPanoramic
This stretches the left and right sides of a normal picture (4:3 aspect ratio) to fill the screen, without making the picture appear unnatural.

natural_image
Diagram showing transformation of a square with circular holes into a larger square with circles (no text or symbols)The top and bottom of the picture are slightly cut off.
14:9
This zooms up the wide picture (14:9 aspect ratio) to the upper and lower limits of the screen.

natural_image
Diagram showing transformation of a square with a circle inside a larger square, both with circular holes (no text or symbols)Cinema
This zooms up the wide picture (16:9 aspect ratio) to the full screen.
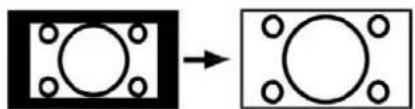
natural_image
Diagram showing transformation of a square frame with a circle inside, resulting in a square frame with circles on top (no text or symbols)Subtitle
This zooms up the wide picture (16:9 aspect ratio) with subtitles to the full screen.

Zoom
This option zooms to the picture.

natural_image
Diagram showing transformation of a square with a circle inside, resulting in a circular shape with corner brackets (no text or symbols)Note: You can shift to screen up or down by pressing "▼/ " " buttons while picture zoom is selected as panaromic, 14:9, Cinema or Subtitle.
Teletext
Teletext system transmits information such as news, sports and weather on your TV. Note that is the signal degrades, for example in poor/adverse weather conditions, some text errors may occur or the teletext mode may be aborted.
Teletext function buttons are listed below:

Teletext/Mix On-Off
Activates teletext mode when pressed once.
Pressing the button for the second time, activates teletext mix feature. Pressing again will quit the teletext mode.
"RETURN" Index
Selects the teletext index page.
"SCREEN" Expand
Press once to enlarge top half of the page, press again to enlarge the bottom half of the page. Press again to revert back to normal size.

Reveal
Shows hidden information (e.g. solutions of games).
"OK" Hold
Holds a text page when convenient. Press again to resume.
P+ / P- and numbers (0-9)
Press to select a page.
Note: Most TV stations use code 100 for their index pages.
Coloured Buttons
Your TV supports both FASTEXT and TOP text systems. When these systems are available, the pages are divided into groups or topics.
When FASTEXT system is available, sections in a teletext page will become colour-coded and can be selected by pressing the coloured buttons. Press a coloured button that corresponds to with your needs.
The coloured writings will appear, showing you which coloured buttons to use when TOP text transmission is present. Pressing P - or P + commands will request the next or previous page respectively.
TXT (Teletext) Subtitle
If you press SUBTITLE button, teletext subtitle information will be displayed on the bottom right part of the screen (if available). You can set the desired option by highlighting it using "▼" or "▲button and then by pressing OK button
English - 67 -
Tips
Screen Care
Clean the screen with a slightly damp, soft cloth. Do not use abrasive solvents as they may damage the coating layer of the TV screen.
For your safety, unplug the mains plug when cleaning the set. When moving the TV, hold it properly from the bottom part.
Image Persistence
Please note that ghosting may occur while displaying a persistent image. LCD TVs' image persistence may disappear after a short time. Try turning off the TV for a while.
To avoid this, do not leave the screen in still picture for extended periods.
No Power
If your TV system has no power, please check the main power cable and connection to the mains socket outlet.
Poor Picture
Have you selected the correct TV system? Is your TV set or house aerial located too close to a non-earthed audio equipment or neon lights, etc.?
Mountains or high buildings can cause double pictures or ghost images. Sometimes you can improve the picture quality by changing the direction of the aerial.
Is the picture or teletext unrecognisable? Check if you have entered the correct frequency. Please return the channels.
The picture quality may degrade when two peripherals are connected to the TV at the same time. In such a case, disconnect one of the peripherals.
No Picture
Is the aerial connected properly? Are the plugs connected tightly to the aerial socket? Is the aerial cable damaged? Are suitable plugs used to connect the aerial? If you are in doubt, consult your dealer.
No Picture means that your TV is not receiving a transmission. Have you selected the correct button on the remote control? Try once more.
Also make sure the correct input source has been selected.
Sound
You can not hear any sound. Did you perhaps interrupt the sound, pressing the button?
Sound is coming from only one of the speakers. Is the balance set to one extreme? See Sound Menu.
Remote Control
Your TV no longer responds to the remote control. Perhaps the batteries are exhausted. If so you can still use the local buttons at the bottom of the TV.
Input Sources
If you cannot select an input source, it is possible that no device is connected.
Check the AV cables and connections if you have tried to connect a device.
Appendix A: PC Input Typical Display Modes
The display has a maximum resolution of 1600 X 1200. The following table is an illustration of some of the typical video display modes.
Your TV may not support different resolutions. Supported resolution modes are listed below.
If you switch your PC to an unsupported mode, a warning OSD will appear on the screen.
| Index | Resolution Frequency | Standard | |||
| Hor | Ver | Ver (Hz) | Hor (KHz) | ||
| 1 640 | 480 | 60 31.5 VESA | |||
| 2 640 | 480 | 72 37.9 VESA | |||
| 3 640 | 480 | 75 37.5 VESA | |||
| 4 800 | 600 | 56 35.2 VESA | |||
| 5 800 | 600 | 60 37.9 VESA | |||
| 6 800 | 600 | 70 43.8 | |||
| 7 800 | 600 | 72 48.1 VESA | |||
| 8 800 | 600 | 75 46.9 VESA | |||
| 9 832 | 624 | 75 49.7 MAC | |||
| 10 10 | 24 768 | 60 48.4 VESA | |||
| 11 10 | 24 768 | 70 56.5 VESA | |||
| 12 10 | 24 768 | 72 57.7 | |||
| 13 10 | 24 768 | 75 60.0 | |||
| 14 11 | 52 864 | 70 64.2 VESA | |||
| 15 11 | 52 864 | 75 67.5 VESA | |||
| 16 11 | 52 870 | 75 68.9 MAC | |||
| 17 12 | 80 768 | 60 47.7 VESA | |||
| 18 13 | 80 768 | 60 47.7 | |||
| 19 12 | 80 960 | 60 60.0 VESA | |||
| 20 12 | 80 1024 | 60 64.0 VESA | |||
| 21 12 | 80 1024 | 75 80.0 VESA | |||
| 22 16 | 80 1200 | 60 75.0 VESA | |||
Appendix B: AV and HDMI Signal Compatibility (Input Signal Types)
| Source | Supported Signals | Available | |
| EXT-1(SCART) | PAL 50/60 O | ||
| NTSC 60 O | |||
| RGB 50 O | |||
| RGB 60 O | |||
| FAV | PAL 50/60 O | ||
| NTSC 60 O | |||
| YPbPr | 480I | 60Hz | O |
| 480P 60Hz | O | ||
| 576I | 50Hz | O | |
| 576P 50Hz | O | ||
| 720P 50Hz | O | ||
| 720P 60Hz | O | ||
| 1080I | 50Hz | O | |
| 1080I | 60Hz | O | |
| 1080P 50Hz | O | ||
| 1080P 60Hz | O | ||
| HDMI | 480I | 60Hz | O |
| 480P 60Hz | O | ||
| 576I | 50Hz | O | |
| 576P 50Hz | O | ||
| 720P 50Hz | O | ||
| 720P 60Hz | O | ||
| 1080I | 50Hz | O | |
| 1080I | 60Hz | O | |
| 1080P 50Hz | O | ||
| 1080P 60Hz | O | ||
| 1080P | 24 HZ | O | |
(X: Not Available, O: Available)
Note: In some cases a signal on the LCD TV may not be displayed properly. The problem may be an inconsistency with standards from the source equipment (DVD, Set-top box, etc.). If you do experience such a problem please contact your dealer and also the manufacturer of the source equipment.
English - 69 -
Appendix D: Supported File Formats for USB Mode
| Media | File Extension | Format Remarks | ||
| Video Audio (Maximum resolution/Bit rate etc.) | ||||
| Movie (optional) | .mpg/.dat/.vob | MPEG1 | MPEG Layer 1/2/3 | |
| MPEG2 MPEG2 | ||||
| .avi | XviD/3ivx | PCM/MP3 XviD Verson up to: 1.1.2 | ||
| MPEG4 PCM/MP3 | ||||
| MS ISO MPEG4 | PCM/MP3 Support SP and ASP | |||
| Music | --PCM Sample Rate: 8K ~ 48KHz | |||
| .mp3 - | MPEG 1/2 Layer 1/2/3 (MP3) | Sample Rate: 8K ~ 48KHz, Bit Rate: 32K~320Kbps | ||
| Photo.jpg | Baseline JPEG | WxH = 14592x12288, Up to 179 Mega-pixelSupport format: 444/440/422/420/Grayscale | ||
| Progressive JPEG | Up to 4 Mega-pixelSupport format: 444/440/422/420/Grayscale | |||
| External Subtitles (optional) | .srt | Support Text File Format, but do not supportPicture File Format | ||
| .smi | ||||
Note: Necessary bitrates for some video types are higher than USB limits. For this reason, some video types cannot be played.



Information for Users on Disposal of Old Equipment and Batteries
[European Union only]
These symbols indicate that equipment with these symbols should not be disposed of as general household waste. If you want to dispose of the product or battery, please consider the collection systems or facilities for appropriate recycling.
Notice: The sign Pb below the symbol for batteries indicates that this battery contains lead.
English - 70 -
Specifications
TV BROADCASTING
PAL/SECAM B/G D/K K' I/I' L/L'
RECEIVING CHANNELS
VHF (BAND I/III)
UHF (BAND U)
HYPERBAND
NUMBER OF PRESET CHANNELS
200
CHANNEL INDICATOR
On Screen Display
RF AERIAL INPUT
75 Ohm (unbalanced)
OPERATING VOLTAGE
110-240V AC, 50/60 Hz.
AUDIO
German+Nicam Stereo
AUDIO OUTPUT POWER (W _RMS. ) (10% THD)
2×2.5
POWER CONSUMPTION (W)
70 W (max)
< 1 W (Standby)
PANEL
19" wide display
DIMENSIONS (mm)
DxLxH (With foot): 155 x 457 x 365
Weight (Kg): 5.75
DxLxH (Without foot): 77 x 457 x 330
Weight (Kg): 5.50
Transmission Standards:
DVB-T, MPEG2,DVB-T, MPEG4 HD
i. DEMODULATION
-Symbol rate: COFDM with 2K/8K FFT mode.
-Modulation: 16-QAM - 64-QAM FEC for all DVB modes (automatically found)
ii. VIDEO
-H.264 (MPEG-4 part 10) main and high profi le level 4.1/MPEG-2 MP@HL video decoder.
-HD display multi format capable (1080i, 720p, 576p)
-CVBS analogue output.
iii. AUDIO
-MPEG-1 layer I/II, MPEG-2 layer II, AAC, HEAAC, AC3
-Sampling frequencies supported are 32, 44.1 & 48 kHz
English - 71 -

MOBIL TV INSTRUCTION MANUAL
Switching the TV On Using 12 Volt
- Connect the cigarette lighter plug cable to the cigarette lighter socket of your car or a cable with clips to the battery of car, making sure to observe the correct polarity.
- Plug the other side of 12 volt cable to DC 12 socket at the back of the TV. Then the standby LED lights up.
Press the "6" button, P+ / P- or a numeric button on the remote control or press the "button, -P/CH or P/CH+ button on the TV. The TV will then switch on.
Adjust for best picture through antenna position or set TV channels again if necessary.4.
Switching the TV Off
Press the "☐" button on the remote control or press the "Switch on the TV, so the TV will switch to standby mode.
Unplug cable connectors and power plugs.2.
ATTENTION: 12 V Input :

English - 72 -
Contents
Features 73
General Properties....73
Safety Information 74
Notes on Discs 74
On handling discs 74
On cleaning 74
Licence Notification 74
How to Watch a DVD 74
DVD Control Panel Buttons 75
Overview of the Remote Control 75
General Operation 76
General Playback 77
Basic Play 77
For your reference: 77
Notes on Playback: 77
Setup Menu Items 77
Video Setup Page 77
TV Type 77
Language Setup 77
OSD LANG 77
AUDIO 77
DISC MENU 77
SUBTITLE....77
Preferences 78
DEFAULT 78
DOWNMIX 78
PASSWORD (Change Password): 78
Troubleshooting....78
The picture quality is poor (DVD).... 78
Disc does not play 78
Wrong OSD language 78
Some functions (Angle, Zoom etc) do not work 78
No picture 78
No sound 78
Distorted sound....78
No response from remote control 79
If nothing works....79
Definition of Terms....79
Disc Types Compatible with This Unit 80
Supported File Formats 81
Specifications 81
Features
General Properties

- DVD / CD / CD-R / CD-RW / MP3 / JPEG / MPEG playback.
• NTSC/PAL playback (according to disc content)
• DIGITAL, LPCM audio via coaxial and optical digital audio outputs. (optional) - Multi-Audio (up to 8) support (According to disc content)
- Multi-Subtitle (up to 32) support (According to disc content)
- Multi-Angle (up to 9) support (According to disc content)
• 8 level parental control - Fast forward and rewind in 5 different speeds. (2x, 4x, 8x, 16x, 32x)
- Slow motion playback in 4 different speeds. (1/2x, 1/4x, 1/8x, 1/16x forward)
• Frame by frame forward playback. - Search Mode
- Repeat
• Coaxial audio output (optional)
• Copied disks may be incompatible.
Note
- This DVD player may not support some MP3 recordings due to differences in recording formats or disc type.
- Please read the owner's manual about MP3 playback.
- CD-R/CD-RW discs recorded by CD-DA method can be played. Some CD-R/CD-RW discs may be incompatible due to laser pick-up and disc design.
- DVD-R/RW discs recorded by DVD-Video method can be played. Some DVD-R/RW discs may be incompatible due to laser pick-up and disc design.
- Some discs may be incompatible with JPEG Viewer function due to different recording format or condition of the discs.
English - 73 -
Safety Information
CAUTION
DVD Player is a class 1 laser product. However this product uses a visible laser beam which could cause hazardous radiation exposure. Be sure to operate the player correctly as instructed.
CLASS 1 LASER PRODUCT
- Manufactured under license from Dolby Laboratories. "Dolby", and the double-D symbol are trademarks of Dolby Laboratories.
RISK OF ELECTRIC SHOCK
The lightning flash with arrowhead symbol, within an equilateral triangle, is intended to alert the user to the presence of uninsulated "dangerous voltage" within the product's enclosure that may be of suffi cient magnitude to constitute a risk of electric shock of persons.

The exclamation point within an equilateral triangle is intended to alert the user to the presence of important operating and maintenance (servicing) instructions in the literature accompanying the appliance.

Notes on Discs
On handling discs
- To keep the disc clean, handle the disc by its edge. Do not touch the surface.
- Do not stick paper or tape on the disc.
- If the disc is contaminated with any substance like glue remove before using it.

- Do not expose the disc to direct sunlight or heat sources such as hot air ducts, or leave it in a car parked in direct sunlight as the temperature can rise quickly and damage the disc.
• After playing, store the disc in its case.
On cleaning
- Before playing, clean the disc with a cleaning cloth. Wipe the disc from the center out.
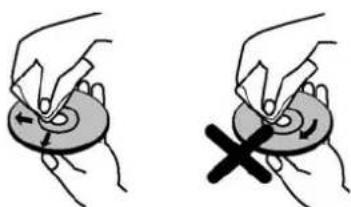
natural_image
Two hand-drawn diagrams showing a circular object being cut with a pencil, one with a cross mark and the other with a plus sign (no text or symbols)- Do not use solvents such as benzine, thinner, commercially available cleaners or anti-static spray intended for vinyl LPs.
Licence Notification
- This product incorporates copyright protection technology that is protected by method claims of certain U.S. patents and other intellectual property rights owned by Macrovision Corporation and other rights owners. Use of this copyright protection technology must be authorized by Macrovision Corporation, and is intended for home and other limited viewing uses only unless otherwise authorized by Macrovision Corporation. Reverse engineering or disassembly is prohibited.
How to Watch a DVD
When placing a disc into the loader, labeled side of the disc should be on the front:

natural_image
Illustration of a cartoon character falling from a computer monitor to a CD, with no visible text or symbols.When TV set is turned on, fi rst switch to DVD source by using the SOURCE button on the remote control. Press play on the remote control, or directly press play button at the front panel. If there is no disc inside the loader, place a DVD fi rst and press play.
English -74-
DVD Control Panel Buttons
A. Disc loader
B. Play / Pause
Plays/pauses the disc. When DVD menu (root menu) is active, this button functions as "button select" (selects the highlighted item in menu) if this is not prohibited by the disc.
C. Stop / Eject
Stop playing disc / Eject or Load the disc Note:
- You cannot eject the disc via the remote control.
- While playing a file, you should press STOP button three times to eject.

Overview of the Remote Control
Standby1.
Numeric buttons2.
Return back3.
Language selection (Set language)4.
Display time / DVD menu5.
Clear6.
Stop7.
No function8.
Rapid Reverse9.
Rapid advance10.
Info11.
Zoom12.
Repeat13.
- Root
- Menu
- Title
OK / Select17. - Navigation Buttons
- Subtitle
Angle20. - Search mode
- Play
- Pause
- Skip next
- Skip previous

English - 75 -
General Operation
You can operate DVD, movie CD, music or picture CD's content by using the proper buttons on your remote control. Below are main functions of commonly used remote control buttons.
| Buttons on the Remote Control | DVD Playback | Movie Playback | Picture Playback | Music Playback |
| ▶ | Play | Play | Play | Play |
| II | Pause | Pause | Pause | Pause |
| ■ | Stop | Stop | Stop | Stop |
| ◀/▶ | Skip backward/forward | Skip backward/forward | Previous / Next | Previous / Next |
| ◀/▶ | Shifts the zoomed picture left or right (if available). | |||
| ▼/▲ | Highlights a menu item. / Shifts the zoomed picture up or down (if available). | |||
| ◀/▶ | Rapid advance / Rapid reverse | |||
| ANGLE | Views the scene from different angles (if available). | Changes slide effect (depends on the content). | X | |
| C Clears digit (if available). | ||||
| DISPLAY | Displays time / Views main setup menu | |||
| INFO Time counter mode selection (during playback). Press repeatedly to switch between modes. | ||||
| LANG. Audio language. X X | ||||
| MENU | Displays TV menu. | |||
| OK / SELECT Enter / View / Play | ||||
| REPEAT | Displays repeat options. | |||
| RETURN | Returns back to the previous menu (if available). | |||
| ROOT | Goes back to the root folder (if available). | |||
| SEARCH MODE (*) | Direct selection of scenes or time. | Selects the desired file. | Selects the desired file. | |
| SUBTITLE Subtitle on-off. Press repeatedly to switch between subtitle options. | X | X | ||
| SWAP | Media source selection. | |||
| TITLE | Displays disc menu (if available). | Displays disc menu (if available). | X | X |
| ZOOM Zooms picture. Press repeatedly to switch between zoom options. | ||||
| Other Functions – Button Combinations(During playback) | |
| II + ▶ | Slow forward. |
| [ II + ▶] + ◀◀ ▶ | Sets slow forward speed. |
| ▶▶ + ▶▶ | Sets rapid advance speed. |
| ◀◀ + ◀◀ | Sets rapid reverse speed. |
| ■ + ■ | Confirms stop command. |
| II + ▶▶I | Press ▶▶I repeatedly to advance manually. |
(*) You can switch to title by pressing numeric keys directly. You need to press 0 and then digit key to switch one digit titles (example: to select 5, press 0 and 5.
English - 76 -
General Playback
Basic Play
Press on the power button1.
Please insert a disc to the loader.2.
The disc will be automatically loaded and play commences if the disc does not have any menus recorded on it.
A menu may appear on the TV screen after a few moments or the film may start immediately after the introduction of the Film Company. This behaviour depends on the disc content and may change.
Note: Step 3 and 4 is available only when a menu is recorded on the disc.
Press "▼" / "▲/ o the number button
(s) to select the preferred title.
Press SELECT.4.
Play of the selected items now starts. The played item may be a motion picture, a still picture or another submenu depending on the disc.
For your reference:
If an action corresponding to a button is prohibited the
"∅" symbol appears.
Notes on Playback:
No sound will be heard during Rapid advance 1. or Rapid reverse.
No sound will be heard during Slow motion play.2.
Reverse slow motion play is not available.3.
In some cases, the subtitle language is not 4. changed immediately to the selected one.
When the preferred language is not selected even 5 after pressing the button several times, it means that the language is not available on the disc.
When the player is restarted or the disc is 6. changed, the subtitle selection is automatically changed back to the initial settings.
If a language is selected, not supported by the 7. disc, the subtitle language will automatically be set to the disc's priority language.
Usually a circulation will happen while switching 8 to another language, that is you can cancel the subtitle by pressing this button a number of times until "Subtitle Off" appears on the screen.
-
When the power is turned on or the disc is removed, the language heard is the one selected at the initial settings. If this language is not recorded on the disc, only the available language on the disc will be heard.
-
Some DVDs may not contain root and/or title menus.
-
Reverse stepping is not available.
-
For your convenience:
If you attempt to enter a number greater than the total time of the current title, the time search box disappears and "Input Invalid" message appears on up-left corner of screen.
- Slide Show is disabled when the ZOOM mode is on.
Setup Menu Items
Video Setup Page

TV Type
TV Type is only available as 'PAL'. The TV set also supports NTSC signal; however, the signal will be converted to PAL when it appears on the screen.
Language Setup

OSD LANG
You can select the default OSD language of the player menus
AUDIO
You can select the default audio language if supported by the DVD disc.
DISC MENU
You can select the DVD's disc menu language among these languages. Disc menu appears in the selected language, if supported by the DVD disc.
SUBTITLE
You can select the default subtitle language if supported by the DVD disc.
English - 77 -
Preferences
DEFAULT
If you choose RESET and press SELECT, the factory-presets are loaded. Parental level and parental password does not change.
DOWNMIX
This mode can be selected when the digital audio output of the TV is used.
SURROUND: Surround sound output.
STEREO: Two channels stereo.
PARENTAL (Parental Level)

Playing some DVDs can be limited depending on the age of users. The "Parental Control" function allows playback limitation level to be set by the parent.
Parental Level can be adjusted to one of the eight levels. Level "8 ADULT" adjustment let you watch all of the DVD titles ignoring the DVD disc's parental level. You can watch the DVD discs, which has the same or lower parental level than the player's level only.
PASSWORD (Change Password):
Using this item you can change the current password.
To change the password you will be prompted to enter your old password. After you have entered your old password, you can now enter the new 4-digit password.
You can use C key to delete the incorrect entry.
Note: Factory preset of the password is "0000". You have to enter XXXX digital password every time you want to change the parental level. If you forget your password please contact technical service.

Troubleshooting
The picture quality is poor (DVD)
- Make sure the DVD disc surface is not damaged. (Scratch, fi ingerprint etc.)
- Clean the DVD disc and try again.
See instructions described in "Notes on Discs" to clean your disc properly.
- Ensure that the DVD disc is in the drawer with the label uppermost.
- A damp DVD disc or condensation may effect the equipment. Wait for 1 to 2 hours in Stand-by to dry the equipment.
Disc does not play
- No disc in the machine.
Place a disc into the loader.
- Disc incorrectly loaded.
Ensure that the DVD disc is in the drawer with the label uppermost.
- Wrong type of disc. The machine cannot play CD-ROMS etc.
• The region code of the DVD must match the player.
Wrong OSD language
- Select the language in the set-up menu.
- The language for the sound or subtitles on a DVD cannot be changed.
- Multilingual sound and/or subtitles not recorded on the DVD.
- Try to change the sound or subtitles using DVD's title menu. Some DVD's do not allow the user to change these settings without using the disc's menu
Some functions (Angle, Zoom etc) do not work
• These functions are not available on the DVD.
- Angle can only be changed when the angle symbol is displayed.
No picture
- Have you pressed the correct buttons on the remote control? Try once more.
No sound
- Check the volume is set to an audible level.
- Make sure you have not switched the sound off accidentally.
Distorted sound
- Check that the appropriate listening mode setting is correct.
English - 78 -
No response from remote control
- Make sure the remote control is in the correct mode.
- Check batteries are fitted correctly.
- Change the batteries.
If nothing works
If you have tried the above solutions and none seem to work, try switching your TV-DVD off and on again. If this does not work, contact your supplier or TV-DVD repair technician. Never attempt to repair a defective TV-DVD yourself.
Definition of Terms
Angle
Recorded onto some DVD discs are scenes, which have been simultaneously shot from a number of different angles (the same scene is shot from the front, from the left side, from the right side, etc.). With such discs, the ANGLE button can be used to view the scene from different angles.
Chapter Number
These numbers are recorded on DVD discs. A title is subdivided into many sections, each of which are numbered, and specific parts of video presentations can be searched quickly using these numbers.
DVD
This refers to a high-density optical disc on which high-quality pictures and sound have been recorded by means of digital signals. Incorporating a new video compression technology (MPEG II) and high-density recording technology. DVD enables aesthetically pleasing full-motion video to be recorded over long periods of time (for instance, a whole movie can be recorded).
DVD has a structure consisting of two 0.6-mm thin discs, which are adhered to each other. Since the thinner the disc, the higher the density at which the information can be recorded, a DVD disc has a greater capacity than a single 1.2 mm thick disc. Since the two thin discs are adhered to each other, there is the potential to achieve double-sided play sometime in the future for even longer duration play.
Subtitles
These are printed lines appearing at the bottom of the screen, which translate or transcribe the dialogue. They are recorded on the DVD discs.
Time Number
This indicates the playtime, which has elapsed from the start of a disc or a title. It can be used to find a specific scene quickly. (Not all discs permit the time search feature to be used. Availability is determined by the disc's manufacturer.)
Title Number
These numbers are recorded on DVD discs. When a disc contains two or more movies, these movies are numbered as title 1, title 2, etc.
Track Number
These numbers are assigned to the tracks, which are recorded on AudioCDs. They enable specific tracks to be located quickly.
Dolby Digital
Many movie theatres are equipped with 5.1 channel surround systems. This same type of technology is available to you in your home. To enjoy full 5.1-channel surround, your DVD player must be connected to an external Dolby Digital decoder via the digital outputs (either coaxial or optical).
Dolby Pro Logic
This is Dolby Laboratories' technology to decode Dolby Surround encoded programs actively. Dolby Surround programs have four channels of audio (Left, Center, Right and Surround) encoded into a standard 2-channel stereo signal. The rear channel is monaural.
LPCM
LPCM stands for Pulse Code Modulation and is digital audio.
MPEG
Short for Moving Picture Experts Group. This is an international standard for compression of moving images. On some DVDs digital audio has been compressed and recorded in this format.
English - 79 -
Disc Types Compatible with This Unit
| Disc Types (Logos) | Recording Types | Disc Size | Max. Playing Time | Characteristics |
| DVD[IMAGE] | Audio + Video | 12 cm | Single-sided: 240 min.Double-sided: 460 min. | DVD contains excellent sound and video due to Corby Digital and MPEG-2 System.Various screen and audio functions can be easily selected through the on screen menu. |
| 8 cm | Single-sided: 80 min.Double-sided: 160 min. | |||
| AUDIO-CD[IMAGE] | Audio | 12 cm | 74 min. | An LP is recorded as an analog signal with more distortion. CD is recorded as a Digital Signal with better audio quality, loss distortion and less deterioration of audio quality over time. |
| 8 cm | 20 min. | |||
| MP3-CD[IMAGE] | Audio (xxxx.mp3) | 12 cm | It depends on MP3 quality. | MP3 is recorded as a Digital Signal with better audio quality, loss distortion and less deterioration of audio quality over time. |
| 8 cm | ||||
| PICTURE-CD[IMAGE] | Video (still picture) | 12 cm | It depends on JPEG quality. | JPEG is recorded as a Digital Signal with better picture quality over time. |
| 8 cm |


English - 80 -
Supported File Formats
| Media | File Extension | Format Remarks | ||
| Video Audio (Maximum resolution/Bit rate etc.) | ||||
| Movie (optional) | .mpg/.dat/.vob | MPEG1 | MPEG Layer 1/2/3 | |
| MPEG2 M | PEG2 | |||
| .avi | XviD/ 3ivx PCM/MP3 XviD | Verson up to: 1.1.2 | ||
| MPEG4 P | CM/MP3 | |||
| MS ISO MPEG4 | PCM/MP3 Support SP and ASP | |||
| Music | -- PCM | Sample Rate: 8K ~ 48KHz | ||
| .mp3 - | MPEG 1/2 Layer 1/2/3 (MP3) | Sample Rate: 8K ~ 48KHz, Bit Rate: 64K~320Kbps | ||
| Photo | .jpg | Baseline JPEG | WxH = 8902x8902 up to 77Mega-pixelSupport format: 444/ 440/ 422/ 420/ Grayscale | |
| Progressive JPEG | Up to 4 Mega-pixelSupport format: 444/ 440/ 422/ 420/ Grayscale | |||
| External Subtitles (optional) | .srt | Support Text File Format, but do not support Picture File Format | ||
| .smi | ||||
| .sub | ||||
| .ssa | ||||
| .ass | ||||
Note: Necessary bitrates for some video types are higher than USB limits. For this reason, some video types cannot be played.
Specifications
| Types of Discs Supported | DVD: SS/SL 4.7" (DVD-5)SS/DL 4.7" (DVD-9)DS/SL 4.7" (DVD-10)DS/DL 4.7" (DVD-18) | CD-DACD-RCD-RWMP-3/JPEG |
| Video Type | MPEG-2 Video Standard Decoding (MPEG-1 supported)Full-Screen Video Display of 720 x 576 (PAL) & 720 x 480 (NTSC) pixels50 and 60 Hz frame refresh rates (PAL & NTSC)Digital bit-stream processing rate up to 108Mbits/secLine resolution more than 500 lines | |
| Audio Type | Dolby Digital DecodingMPEG Multichannel DecodingLPCM | |
| Audio Output | Digital Audio Outputs:IEC 958TOSLINKAnalog Outputs:24 bit /48, 44.1kHz down-sampling DAC | |
English - 81 -


- Innholdsfortegnelse
- Strømtilkobling
- Antennetilkobling
- Panorama
- Kino
- Undertekst
- Zoom
- MOTTAK AV KANALER
- ANTALL FORHÅNDSINNSTILTE KANALER
- KANALINDIKATOR
- RF-ANTENNEINNGANG
- OPERASJONSSPENNING
- LYD
- LYD UTGANGSSTR∅M (W _RMS ) (10% THD)
- STRÖMFORBRUK (W)
- SKJERM
- DIMENSJONER (mm)
- Sendestandarder:
- i. DEMODULERING
- ii. VIDEO
- CLASS 1 LASER PRODUCT
- TV-type
- STANDARDINN STILLINGER
- Features
- Introduction
- Preparation
- Safety Precautions
- Power
- Power Cord
- Moisture and Water
- Cleaning
- Ventilation
- Heat and Flames
- Lightning
- Replacement Parts
- Servicing
- Waste Disposal
- Information for Users in European Union Countries
- Disconnecting the Device
- Headphone Volume
- Installation
- LCD Screen
- Warning
- Connection to a Television
- Distribution System (Cable TV etc.) fromTuner
- Be sure to ground the connection properly.
- Overview of the Remote Control
- LCD TV and Operating Buttons
- Viewing the Connections- Back Connectors
- Viewing the Connections - Side Connectors
- Power Connection
- Aerial Connection
- Using Side USB Input
- USB Memory Connection
- Connecting the LCD TV to a PC
- Connecting to a DVD Player
- Using Side AV Connectors
- Using Other Connectors
- Connecting Other Equipment via Scart
- Inserting Batteries in the Remote Control Handset
- Switching the TV On/Off
- To Switch the TV On
- To Switch the TV Off
- Input Selection
- Basic Operations
- Operation with the Buttons on the TV
- Volume Setting
- Programme Selection
- Viewing Main Menu
- AV Mode
- Operation with the Remote Control
- Programme Selection (Previous or Next Programme)
- Programme Selection (Direct Access)
- Initial Settings
- General Operation
- Electronic Programme Guide (EPG)
- Programme Options
- Over Air Download
- Displaying Subtitles
- Digital Teletext (For UK only\*\*)
- Analogue Teletext
- Widescreen
- Dijital TV Menu System
- Channel List
- Navigating the Entire Channel List
- Moving the channels in the channel list
- Deleting the Channels in the Channel List
- Renaming channels
- Adding Locks to Channels
- Setting Favourites
- Adding a Channel to a Favourites List
- Removing a Channel from a Favourite List
- Program Guide
- Timers
- Common Interface
- TV Setup
- Setup
- Configuration
- Favourite Mode
- Scan Encrypted
- Parental Control
- Maturity Lock (\*\*)
- Menu Lock
- Set PIN
- Time Settings(\*\*)
- Receiver Upgrade
- Over Air Download (OAD)
- Dolby Digital
- Hard of Hearing (\*)
- Digital Audio Out
- A/V Delay
- Audio Description (Optional)
- Preferred Language (Optional)
- Relative Volume (Optional)
- Standby Search (\*)
- Active Antenna (\*)
- Language Settings
- Automatic Channel Scan
- Manual Search
- Clear Service List (\*)
- First Time Installation
- Media Browser (in DTV mode)
- Playing Audio Files:
- Viewing JPEG Files
- Slideshow Options
- Video Playback (optional)
- Analogue TV Menu System
- Picture Menu
- Mode
- Brightness/Contrast/Colour/Sharpness/Hue
- Colour Temp
- Note:
- Noise Reduction
- Film Mode
- Game Mode (optional)
- Picture Zoom
- Store
- Reset
- Sound Menu
- Volume
- Equalizer
- Balance
- Headphone
- Sound Mode (optional)
- AVL
- Spdif Out
- Effect (optional)
- Feature Menu
- Sleep Timer
- Child Lock
- Language
- Default Zoom
- Blue Background
- Menu Background
- Backlight
- Menu Timeout
- Teletext Language
- Ext Out
- HDMI PC Full Mode (optional)
- Full Mode (optional)
- Install Menu
- Program
- Band
- Channel
- Colour System
- Sound System
- Fine Tune
- Search
- Install Menu in AV Modes
- Program Table
- Name
- Move
- Delete
- APS (Auto Programming System)
- Country
- Source Menu
- PC Mode Menu System
- PC Position Menu
- Autoposition
- H (Horizontal) Position
- V (Vertical) Position
- Phase
- Dot Clock
- PC Picture Menu
- Displaying TV Information
- Mute Function
- Picture Mode Selection
- Freezing Picture
- Zoom Modes
- Auto
- 16:9
- 4:3
- Panoramic
- 14:9
- Cinema
- Subtitle
- Teletext
- Teletext/Mix On-Off
- "RETURN" Index
- "SCREEN" Expand
- Reveal
- "OK" Hold
- P+ / P- and numbers (0-9)
- Coloured Buttons
- TXT (Teletext) Subtitle
- Tips
- Screen Care
- Image Persistence
- No Power
- Poor Picture
- No Picture
- Sound
- Remote Control
- Input Sources
- Appendix A: PC Input Typical Display Modes
- (X: Not Available, O: Available)
- Information for Users on Disposal of Old Equipment and Batteries
- Specifications
- Transmission Standards:
- MOBIL TV INSTRUCTION MANUAL
- Switching the TV On Using 12 Volt
- Switching the TV Off
- Contents
- General Properties
- Note
- Safety Information
- CAUTION
- RISK OF ELECTRIC SHOCK
- Notes on Discs
- On handling discs
- On cleaning
- Licence Notification
- How to Watch a DVD
- DVD Control Panel Buttons
- Disc loader
- Play / Pause
- Stop / Eject
- General Playback
- Basic Play
- For your reference:
- Notes on Playback:
- Setup Menu Items
- Video Setup Page
- TV Type
- Language Setup
- OSD LANG
- AUDIO
- DISC MENU
- Preferences
- DEFAULT
- DOWNMIX
- SURROUND: Surround sound output.
- STEREO: Two channels stereo.
- PARENTAL (Parental Level)
- PASSWORD (Change Password):
- Troubleshooting
- The picture quality is poor (DVD)
- Disc does not play
- Wrong OSD language
- Some functions (Angle, Zoom etc) do not work
- No sound
- Distorted sound
- No response from remote control
- If nothing works
- Definition of Terms
- Angle
- Chapter Number
- DVD
- Subtitles
- Time Number
- Title Number
- Track Number
- Dolby Pro Logic
- LPCM
- MPEG
Brand : Finlux
Model : 19FLX850VUD
Category : Television