
AF-Q60RX - Air conditioner SHARP - Free user manual and instructions
Find the device manual for free AF-Q60RX SHARP in PDF.


| Product Type | Room Air Conditioner |
| Brand | Sharp |
| Model | AF-Q60RX |
| Power Requirements | 125V AC, 60Hz, 15A |
| Plug Type | 3-prong grounded plug |
| Cooling Modes | Cool, Auto Cool, Fan Only, Energy Save |
| Fan Speeds | Low, Medium, High |
| Temperature Range | 60°F (16°C) to 90°F (32°C) |
| Timer | Delay ON/OFF up to 24 hours (0.5 hr increments up to 10 hrs, then 1 hr increments) |
| Air Flow Direction | Horizontal louvers (up/down), vertical louvers (left/right) |
| Remote Control | Yes, operates up to 20 feet (6 meters), requires 2 AAA batteries |
| Filter | Washable, clean every 10 days |
| Energy Star | Yes |
| Warranty | 1 year parts and labor; 5 years sealed cooling system parts (labor not included) |
| Installation | Window mounting kit included for double/single hung sash windows; minimum window opening height 13 5/8" (346 mm) |
| Condensate Drainage | Automatic: water collected in base pan, drained outside via grooved channel |
| Compressor | Permanently lubricated, hermetically sealed |
| Fan Motor | Lifetime sealed, no oiling required |
| Dimensions (Approximate) | Width: 24 1/2" to 38 1/8" (622-968 mm); Height: min 13 5/8" (346 mm) |
Frequently Asked Questions - AF-Q60RX SHARP
User questions about AF-Q60RX SHARP
0 question about this device. Answer the ones you know or ask your own.
Ask a new question about this device
Download the instructions for your Air conditioner in PDF format for free! Find your manual AF-Q60RX - SHARP and take your electronic device back in hand. On this page are published all the documents necessary for the use of your device. AF-Q60RX by SHARP.
USER MANUAL AF-Q60RX SHARP
natural_image
Exterior view of a white industrial air conditioner unit with ventilation grilles and control panel (no visible text or symbols)
This INSTALLATION AND OPERATION MANUAL explains the proper use of your new Sharp Air Conditioner. Read these instructions carefully before installing or operating your air conditioner. The INSTALLATION AND OPERATION MANUAL should be kept in a safe place for handy reference.
AF-Q60RX
AF-Q80RX


CONTENTS
PAGE
FOR YOUR PROTECTION.... 2
CONSUMER LIMITED WARRANTY ..... 3
INSTALLATION INSTRUCTIONS
- CHECK WINDOW AREA 4
- LOCATION 4
- ACCESSORIES 5
● SUGGESTED TOOLS 5
● INSTALLATION 6
PRECAUTIONS
- CAUTION FOR USE 9
● GROUNDING INSTRUCTIONS ...... 9
• NOTES ON OPERATION 10 - ENERGY EFFICIENCY TIPS......10
HOW TO OPERATE
● PARTS NAMES 11
• TO TURN UNIT ON 12
● TO CHANGE TEMPERATURE SETTING 13
● TO ADJUST FAN SPEEDS 13
● TO USE AUTO COOL FEATURE ...... 13
● TO OPERATE ON FAN 14
● TO USE ENERGY SAVE FEATURE .... 14
- TIMER FEATURE 14
• TO TURN UNIT OFF 15
• TO CHANGE AIR FLOW DIRECTION .. 15
• USING THE REMOTE CONTROLLER. 16
CLEANING AND MAINTENANCE ..... 17
BEFORE CALLING FOR SERVICE ..... 18
- FAULT CODES 19
As an ENERGY STAR Partner, Sharp Electronics has determined that this product (AF-Q60RX, AF-Q80RX) meets the ENERGY STAR guidelines for energy efficient air conditioners. To meet these guidelines, air conditioners must be at least 10% more efficient than the minimum Federal standard.
FOR YOUR PROTECTION
To aid in answering questions if you call for service or for reporting loss or theft, please record below the model and serial number located on the right side of the unit.
| MODEL NUMBER |
| SERIAL NUMBER |
| DATE OF PURCHASE |
| Dealer Name |
| Address |
| City |
| State |
| Zip |
| Telephone |
TO PHONE: Dial 1-800-BE-SHARP (237-4277) for: SERVICE (for your nearest Sharp Authorized Servicer) PARTS (for your Authorized Parts Distributor) ACCESSORIES ADDITIONAL CUSTOMER INFORMATION
TO WRITE: For service problems, warranty information, missing items and other assistance: Sharp Electronics Corporation Customer Assistance Center 1300 Naperville Drive Romeoville, IL 60446-1091
Please provide the following information when you write or call: model number, serial number, date of purchase, your complete mailing address (including zip code), your daytime telephone number (including area code) and description of the problem.
CONSUMER LIMITED WARRANTY
CONSUMER LIMITED WARRANTY
SHARP ELECTRONICS CORPORATION warrants to the first consumer purchaser that this Sharp brand product (the "Product"), when shipped in its original container, will be free from defective workmanship and materials, and agrees that it will, at its option, either repair the defect or replace the defective Product or part thereof with a new or remanufactured equivalent at no charge to the purchaser for parts or labor for the period(s) set forth below.
This warranty does not apply to any appearance items of the Product nor to the additional excluded item(s) set forth below nor to any Product the exterior of which has been damaged or defaced, which has been subjected to improper voltage or other misuse, abnormal service or handling, or which has been altered or modified in design or construction.
In order to enforce the rights under this limited warranty, the purchaser should follow the steps set forth below and provide proof of purchase to the servicer.
The limited warranty described herein is in addition to whatever implied warranties may be granted to purchasers by law. ALL IMPLIED WARRANTIES INCLUDING THE WARRANTIES OF MERCHANTABILITY AND FITNESS FOR USE ARE LIMITED TO THE PERIOD(S) FROM THE DATE OF PURCHASE SET FORTH BELOW. Some states do not allow limitations on how long an implied warranty lasts, so the above limitation may not apply to you.
Neither the sales personnel of the seller nor any other person is authorized to make any warranties other than those described herein, or to extend the duration of any warranties beyond the time period described herein on behalf of Sharp.
The warranties described herein shall be the sole and exclusive warranties granted by Sharp and shall be the sole and exclusive remedy available to the purchaser. Correction of defects, in the manner and for the period of time described herein, shall constitute complete fulfillment of all liabilities and responsibilities of Sharp to the purchaser with respect to the Product, and shall constitute full satisfaction of all claims, whether based on contract, negligence, strict liability or otherwise. In no event shall Sharp be liable, or in any way responsible, for any damages or defects in the Product which were caused by repairs or attempted repairs performed by anyone other than an authorized servicer. Nor shall Sharp be liable or in any way responsible for any incidental or consequential economic or property damage. Some states do not allow the exclusion of incidental or consequential damages, so the above exclusion may not apply to you.
THIS WARRANTY GIVES YOU SPECIFIC LEGAL RIGHTS. YOU MAY ALSO HAVE OTHER RIGHTS WHICH VARY FROM STATE TO STATE.
Your Product Model Number & Description: AF-Q60RX, AF-Q80RX Room AirConditioner. Be sure to have this information available when you need service for your Product.
Warranty Period for this Product: One (1) year parts and labor from date of purchase. The warranty period continues for a total of five (5) years from date of purchase for the Sealed Cooling System parts; labor and service are not provided free of charge for this additional period.
Additional Item(s) Excluded From Warranty Coverage (If any): Appearance items of the Product, remote control, filter, or accessories, mounting kit, seals, or any printed materials. Product which has been used for rental and/or commercial purposes
From a Sharp Authorized Servicer located in the United States. To find the location of the nearest Sharp Authorized Servicer, call Sharp Toll Free at 1-800-BE-SHARP.
What to Do to Obtain Service: Contact your Sharp Authorized Servicer to obtain in-home service for this Product. The Servicer will come to your home, and if it is necessary to remove the Product, the Servicer will reinstall it. Be sure to have Proof of Purchase available.
TO OBTAIN SUPPLY, ACCESSORY OR PRODUCT INFORMATION, GO TO OUR WEBSITE AT www.sharpusa.com OR CALL 1-800-BE-SHARP.
SHARP®
SHARP ELECTRONICS CORPORATION
Sharp Plaza, Mahwah, New Jersey 07495-1163
INSTALLATION INSTRUCTIONS
Before beginning installation, read these instructions carefully.
Use the enclosed MOUNTING KIT for proper installation.
CHECK WINDOW AREA
The mounting kit is designed for wooden sill double or single hung sash-type windows.
| Mounting kit fully closed | Mounting kit fully opened |
24 ^1/_2 (622mm)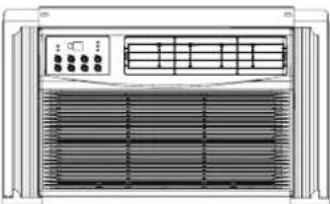 | 38 ^1/_8 (968mm) |
Window opening from stool to lower sash bottom must be 13^5/_8 " (346mm) or more.
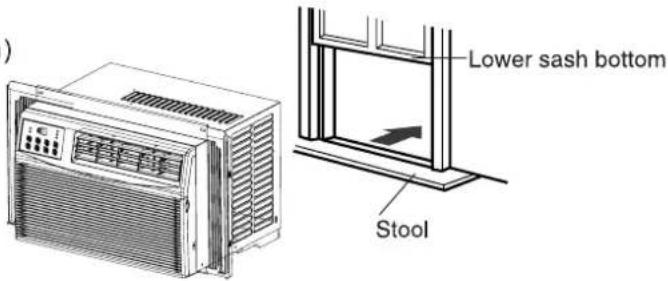
LOCATION
- The air conditioner should be installed in a solid window to minimize noise and vibration. For safe installation, repairs, replacement and secure positioning, make sure the window is solid and level.
- The room air conditioner must be installed in an area within reach of a properly rated grounded outlet.
- Use of extension cords of any kind is not recommended.
- Never place any obstacles around the air inlet.
INSTALLATION INSTRUCTIONS
ACCESSORIES
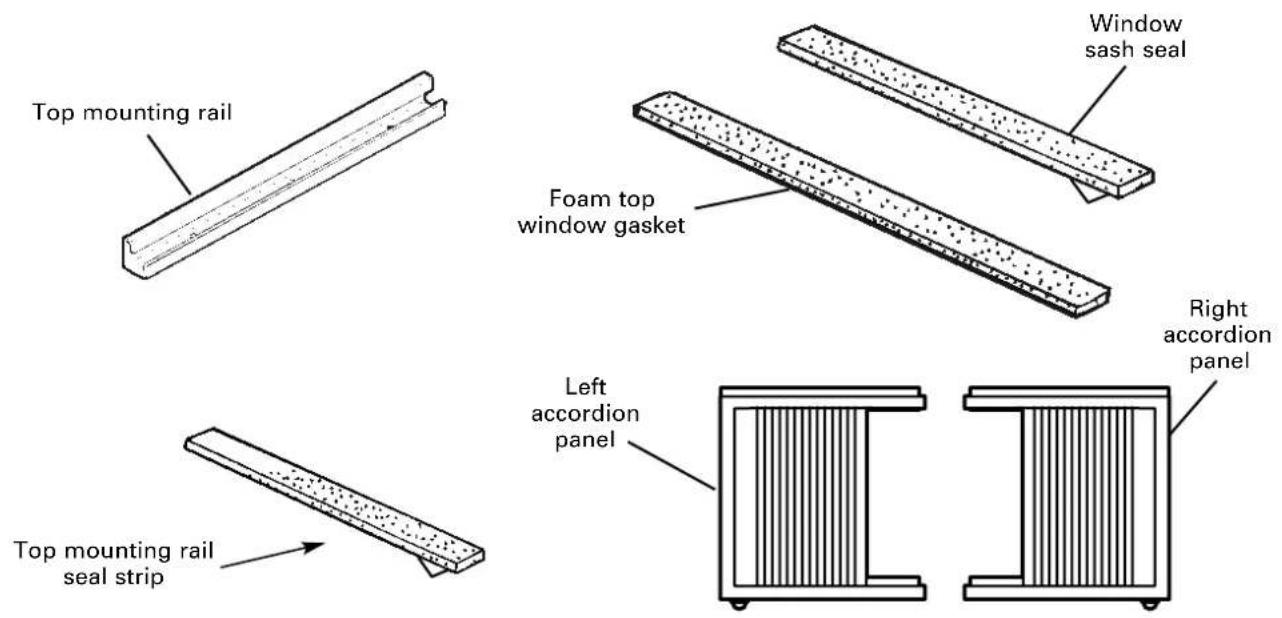
Type A (6)

Type B (3) Type C (5)


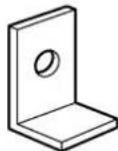
Window locking bracket (1)
Remote Control

SUGGESTED TOOLS
- Screw driver (medium size Phillips)
- Tape measure or ruler
- Knife or scissors
INSTALLATION
WARNING: Make sure the unit is turned off and unplugged before installing.
1 Cut the window sash foam seal (adhesive type) to the proper length and attach it to the underside of the window sash.

2 Remove the air conditioner from the case. Place the unit on floor, a bench or a table.
Use protective material to prevent damage to the surface.
A. Remove the backing from the top mounting rail seal strip and attach the seal strip to the bottom of the top mounting rail, along the front edge. See FIG 1.


FIG 1
B. Align the holes in the top rail with those in top of the unit as shown in FIG. 2A The higher flange should be toward the front of the air conditioner.

natural_image
Line drawing of an air conditioner unit with ventilation grilles and fan array (no text or symbols)FIG. 2A
C. Secure the top rail to the unit with 3 ^3/_8 " (9.5mm) Type B Screws as shown in FIG 2B.

natural_image
Line drawing of an air conditioning unit with control panel and ventilation slots (no text or symbols)FIG. 2B
INSTALLATION INSTRUCTIONS
NOTE: Top Rail and Sliding Panels at each side are offset to provide the proper pitch to the rear of the unit. This is necessary for proper condensed water utilization and drainage. If you are not using the Side Panels for any reason, this pitch to the rear must be maintained!
3 There is a Left and Right Window Filler Panel-be sure to use the proper panel for each side. When installed the flange for securing the panel to the window sill will be facing into the room.
A. Hold the Accordion Panel in one hand and gently pull back the panel beyond the ends of the frame. See FIG 3.

natural_image
Hands holding a white panel with striped pattern, labeled 'FIG.3' (no text on panel)B. Slide the left and right accordion panels into the top and bottom mounting rails. See FIG.4.

natural_image
Exterior view of a white industrial air conditioner unit with open lid and ventilation slots (no text or symbols visible)C. Attach the accordion panels to the case using 3 ^1/4 (6.5mm) type A screws on each side. FIG.5A, FIG.5B & FIG.11.

natural_image
Exterior view of a white industrial cabinet with cooling fins (no visible text or symbols)FIG.5A
FIG.5B

natural_image
Front view of a white air conditioner unit with ventilation grilles and control panel (no visible text or symbols)NOTE: If storm window blocks AC, see FIG.11
4 Keep a firm grip on the air conditioner, carefully place the unit into the window opening so the bottom of the air conditioner frame is against the window sill (FIG.6). Carefully close the window behind the top rail of the unit.
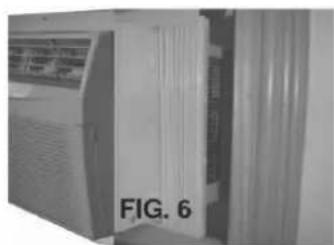
natural_image
Exterior view of a server rack unit labeled FIG. 6 (no other text or symbols visible)5 Extend the side panels out against the window frame (FIG.7).

natural_image
Close-up of a white air conditioner unit with ventilation grilles and a hand placed on the side (no visible text or symbols)6 Drive 34 " (19mm) Type C4ocking screws through frame holes into window sash (FIG.8A and FIG.8B).

natural_image
Close-up of a white heating element with heat sink and cooling fins, labeled FIG.8A (no text or symbols on the component itself)
SCREW SCREW
INSTALLATION INSTRUCTIONS
7 To secure lower sash in place, attach right angle window lock with 3/4" (19 mm) Type C screw as shown (FIG. 9).
FIG.9

natural_image
Close-up of a hand holding a metal tool near a window frame (no visible text or symbols)8 Cut foam seal and insert in the space between the upper and lower sashes (FIG.10).
FIG.10
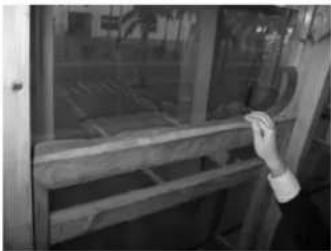
natural_image
Person adjusting a wooden shelf or panel with a hand visible (no text or symbols)If AC is Blocked by Storm Window
Add wood as shown in FIG.11, or remove storm window before air conditioner is installed.

If Storm Window Frame must remain, be sure the drain holes or slots are not caulked or painted shut. Accumulated Rain Water or Condensation must be allowed to drain out.
Removing AC From Window
* Turn AC off, and disconnect power cord.
* Remove sash seal from between windows, and unscrew safety lock.
* Remove screws installed through frame
* Close(slide) side panels into frame.
* Keeping a firm grip on air conditioner, raise sash and carefully "rock" air conditioner backward to drain any condensate water in base of unit. Be careful not to spill any remaining water while lifting unit from window. Store parts WITH air conditioner.
PRECAUTIONS
CAUTION FOR USE
IMPORTANT: Points to keep in mind when using your air conditioner.
• Install the air conditioner by following the installation instructions given in the previous section of this manual.
- Make sure the unit is the correct capacity for the area you want to cool.
- Do not modify any part of this product.
- Do not insert objects into any part of the unit.
- Push the AC power plug securely into the receptacle and make sure it is not loose.
- Use power circuit with a proper voltage rating.
Use a three-pronged grounded electrical outlet rated 125V, 60Hz, 15 amp or more, AC only as shown on right.
Use of an improper voltage rating power circuit can result in damage to the unit and possibly fire.
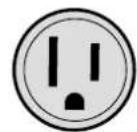
3-Pronged Grounding Receptacle 15 Amps. 125V.
• Always use a fuse with the proper amp rating.
Do not, under any circumstances, use wire, pins or other objects in place of the proper fuse.
- Use of extension cords of any kind is not recommended.
If you still elect to use an extension cord, it is absolutely necessary that it be a UL Listed 3-wire grounding type appliance extension cord rated 125 Volts, 15 amp or more.
- Ventilate the room periodically during use, especially if using gas appliances.
GROUNDING INSTRUCTIONS
WARNING: Improper use of the grounding plug can result in the risk of electric shock.
This appliance must be grounded. In the event of an electrical short circuit, grounding reduces the risk of electric shock by providing an escape wire for the electric current.
This appliance is equipped with a cord having a grounding wire with a grounding plug.
The plug must be plugged into an outlet that is properly installed and grounded.
WARNING: Do not under any circumstances cut or remove the round grounding prong from this plug.
If it is necessary to use an extension cord, use only a UL Listed 3-wire extension cord that has a 3-blade grounding plug, and a 3-slot receptacle that will accept the plug on the appliance.
The marked rating of the extension cord should be AC 125 Volt, 15 Amp or more.
Consult a qualified electrician or serviceman if the grounding instructions are not completely understood, or if doubt exists as to whether the appliance is properly grounded.
If a grounding adapter is used, make sure the receptacle box is fully grounded.
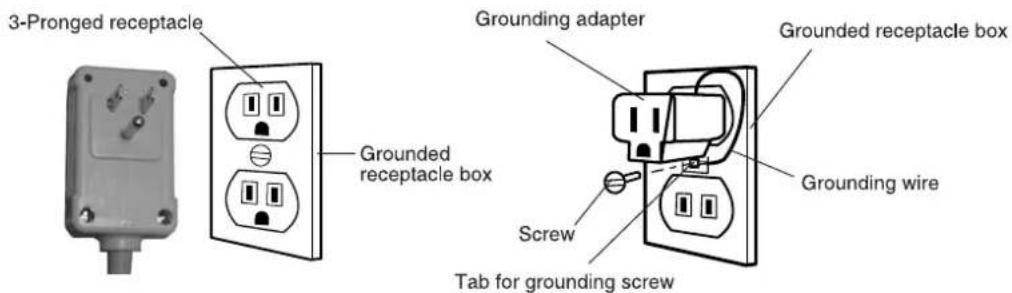
PRECAUTIONS
NOTES ON OPERATION
- Allow 3 minutes for the compressor to restart cooling.
If you turn the air conditioner off and immediately restart it, allow three minutes for the compressor to restart cooling. There is an electronic device in the unit that keeps the compressor off for three minutes
- When power failure occurs
This air conditioner has a memory function to store settings when a power failure occurs. After power recovery, the unit will automatically re-start in the same settings which were active before the power failure.
• Dehumidifying function
The air conditioner removes moisture from the air in your room.
• Cooling operation under low temperatures: Is your unit freezing up?
The unit operates on inside and outside temperatures. Freezing can occur when the temperature is set close to 64^ F and when there are low outside temperatures, especially during the night hours. At these conditions, a further temperature drop may cause the unit to freeze. Setting the unit to a higher temperature will prevent it from freezing.
ENERGY EFFICIENCY TIPS
- Setting the proper temperature.
For optimum energy efficiency, keep the difference between the inside and outside temperature within 10^(5^) . Do not keep the temperature setting any lower than is necessary for you to feel comfortable. Generally, 78^ to 80^(26^ to 27^) is a comfortable summer indoor temperature.
When you turn the unit on, do not set the temperature higher than the room temperature at start up as this will not allow the compressor to cycle and maintain a comfortable room temperature.
- Avoid direct sunlight.
Close blinds, drapes or shades to keep out direct sunlight during cooling operation.
- Keep the filter clean.
Keeping the filter clean greatly aids efficient operation. A dirty filter blocks the flow of air, making your air conditioner work harder and less efficiently. See page 17 on how to clean the filter.
- Turn off unnecessary lights.
Your air conditioner must remove the heat produced by your lights or other heat-producing appliances. Turn off lights or appliances that are not in use.
• Install your air conditioner in a shady location.
Direct sunlight on a window air conditioner increases its workload and will increase its operating cost.
- Don't let cool air escape.
Close windows and outside doors. Do not keep doors open and let hot air rush in. Improperly installed air conditioners and improperly weatherstripped doors and windows will let hot air in and the cool air out.
- Turn off air conditioner when no one is home.
Use only when necessary. The fewer hours a room air conditioner is used, the lower the operating cost.
HOW TO OPERATE
PARTS NAMES
UNIT

- Control panel
- Air outlet (Indoor Side)
- Vertical louvers
- Horizontal louvers
- Cabinet
- Air outlet (Outdoor Side)
- Air inlet (Outdoor Side)
- Air filter (Open the front panel to remove)
- Front panel
- Air inlet (Indoor side)
- Power cord
CONTROL PANEL
The display always shows the set temperature except when setting the Delay timer
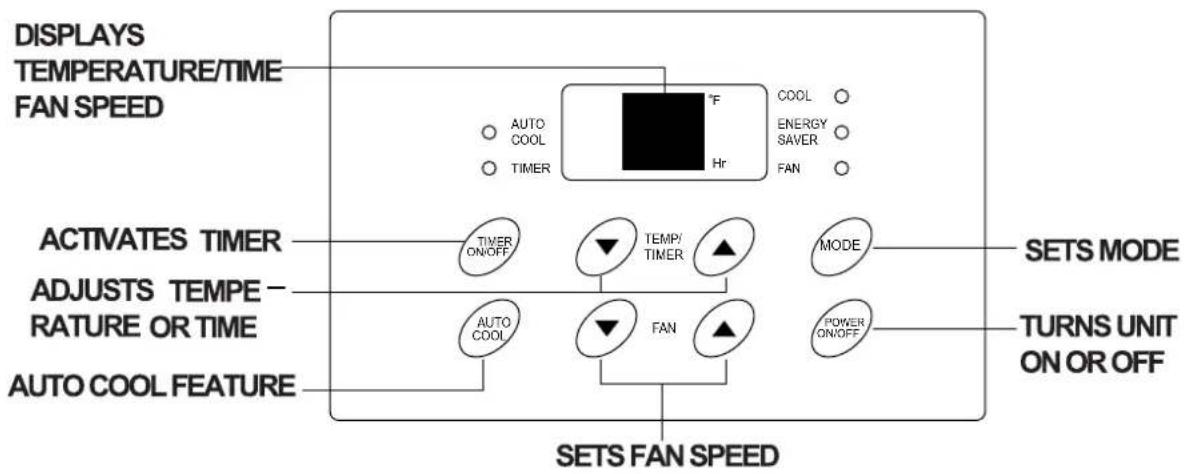
flowchart
graph TD
    A["DISPLAYS TEMPERATURE/TIME FAN SPEED"] --> B["COOL"]
    A --> C["ENERGY SAVER"]
    A --> D["FAN"]
    B --> E["TIMER ON/OFF"]
    C --> F["TIMP/TIMER"]
    D --> G["MODE"]
    H["ACTIVATES TIMER"] --> I["TIMER ON/OFF"]
    J["ADJUSTS TEMPERATURE OR TIME"] --> K["AUTO COOL"]
    L["AUTO COOL FEATURE"] --> M["FAN"]
    N["SETS MODE"] --> O["POWER ON/OFF"]
    P["TURNS UNIT ON OR OFF"] --> Q["MODE"]
    R["SETS FAN SPEED"] --> S["FAN"]
    T["ATC"] --> U["TIME ON/OFF"]
    V["ATC"] --> W["TIME ON/OFF"]
    X["ATC"] --> Y["TIME ON/OFF"]
    Z["ATC"] --> AA["TIME ON/OFF"]
Touch Pad
HOW TO OPERATE
Before you begin, thoroughly familiarize yourself with the control panel and remote as shown below and all its functions, then follow the symbol for the functions you desire. The unit can be controlled by the touch pad alone or with the remote.

flowchart
graph TD
    A["DISPLAYS TEMPERATURE/TIME FAN SPEED"] --> B["COOL"]
    A --> C["TIMER"]
    A --> D["COOL"]
    A --> E["TIMER"]
    A --> F["COOL"]
    G["ACTIVATES TIMER"] --> H["FUEL COOL"]
    I["ADJUSTS TEMPERATURE OR TIME"] --> J["FUEL COOL"]
    K["AUTO COOL FEATURE"] --> L["FUEL COOL"]
    M["SETS MODE"] --> N["MODE"]
    O["TONS UNIT ON OR OFF"] --> P["MODE"]
    Q["SETS FAN SPEED"] --> R["FUEL COOL"]
    S["COOL"] --> T["TIMER"]
    U["COOL"] --> V["TIMER"]
    W["COOL"] --> X["TIMER"]

Remote Control
NOTE: The following instructions represent the Touch Pad, the same instructions can be used for the Remote Control.
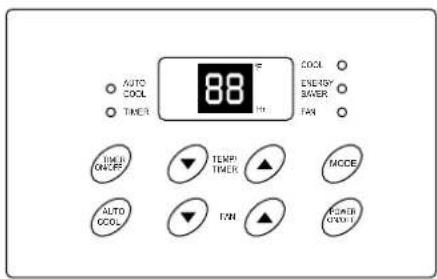
TO TURN UNIT ON:

YOU WILL SEE:
TO CHANGE TEMPERATURE SETTING:

YOU WILL SEE:

Note: Tap or hold either up( ▲ ) or down( ▼ ) button until the desired temperature is seen on the display. This temperature will be automatically maintained anywhere between 60°F (16°C) and 90°F (32°C). If you want the display to read the actual room temperature See "To Operate on Fan" section.
TO ADJUST FAN SPEEDS:

YOU WILL SEE:
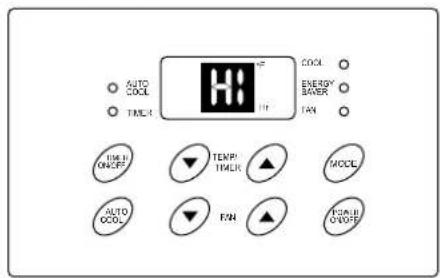
Press the Fan Faster button (▲) will increase the fan speed from Low (LO), to Medium (ME), to High (HI). The digital display will indicate your chosen speed. Press the Fan Slower button (▼) will decrease the fan speed from High (HI), to Medium (ME), to Low (LO). The digital display will indicate your chosen speed. After 5 seconds the display will revert back to the set temperature.
TO USE AUTO COOL :


Note: Fan starts at High Speed and adjusts to a slower speed as the room temperature dictates. For example if the room doesn't get too warm, it will stay at the slowest speed. If the room temperature rises quickly, such as a door being opened, it will automatically go to the highest speed. The fan speeds will re-adjust back to the slowest speed as the room returns to the original set temperature. Press either the fan slower (▼) or fan faster button (▲) to adjust the fan speed manually.
HOW TO OPERATE
TO OPERATE ON FAN:

YOU WILL SEE:

Note: Use this function only when cooling is not desired, such as for room air circulation. You can choose any fan speed you prefer.
During this function, the display will show the actual room temperature, not the set temperature as in the cooling mode.
TO USE THE ENERGY SAVE:

YOU WILL SEE:

Note: In this mode, the fan will continue to run for 3 minutes after the compressor shuts off. The fan then cycles on for 2 minutes at 10 minute intervals until the room temperature is above the set temperature, at which time the compressor turns back on and cooling starts.
TIMER:TIMER ON/OFF

YOU WILL SEE:

Note: For Timer Off, the unit must be in the On position.
Note: For Timer On, the unit must be in the Off position.
To adjust timer setting, tap or hold the UP arrow(▲) or the DOWN arrow(▼) to change delay timer at 0.5 hour increments, up to 10 hours, then at 1 hour increments up to 24 hours. The control will count down the time remaining until start (8, 7.5, 7, etc.). The Timer On mode automatically selects cooling with maximum Fan Speed. The temperature maintained will be the same as previously set. To change the set temperature, press "MODE" then Up or Down arrows until the desired temperature is indicated on the display. After 5 seconds, the control will automatically change the display back to the hours remaining until the unit will start/stop. Turning the unit "ON" or "OFF" at any time will cancel the Timer On/Off function.
The Timer On/Off Feature will work until the unit either starts or stops. Once that happens the above steps have to be repeated again.
TO TURN UNIT OFF:

TO CHANGE AIR FLOW DIRECTION
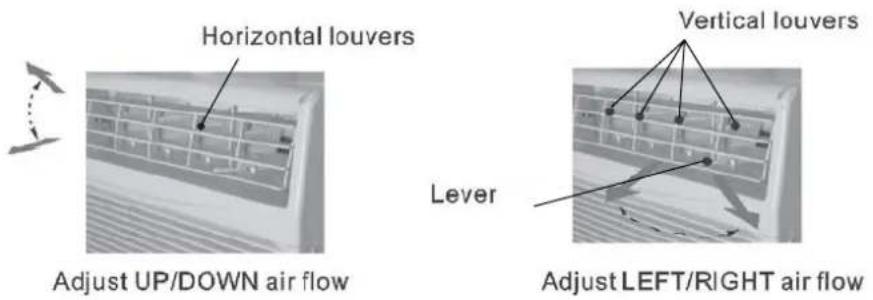
The horizontal louvers are used to adjust the UP/DOWN direction of air flow, and the vertical louvers are used to adjust the LEFT/RIGHT direction of air flow for uniform and efficient cooling of the room.
USING THE REMOTE CONTROL
INSTALLING BATTERIES
Use two size-AAA (R03) batteries.
1 Open the battery compartment cover.
2 Insert and slide the batteries into the compartment, making sure the ⊕ and ⊖ polarities are properly aligned.
3 Close the cover.

NOTES:
- The battery life is approximately one year with normal use.
- When you replace the batteries, always use two new ones of the same type.
- If the remote control does not operate normally after replacing the batteries, take out the batteries and replace them again after 30 seconds.
- If you will not be using the unit for a long time, remove the batteries from the remote control.
HOW TO USE THE REMOTE CONTROL
Point the remote control towards the unit's receiver window and press the desired button. A beep will sound when the unit receives the signal.
- Make sure no objects, such as curtains, block the receiver window.
- The remote control operates from up to 20 feet (6 meters) away.
- The beep will also sound when each pad on the control panel is touched.

natural_image
Exterior view of a portable air conditioner unit with a mobile phone attached (no visible text or symbols)CAUTION:
- Do not expose the receiver window to direct sunlight. This can adversely affect its operation. In such case, close the curtains to block the sunlight.
- Use of a fluorescent lamp in the same room may interfere with the transmission of the signal.
- The unit may be affected by signals emitted from the remote control of a television, VCR or other equipment used in the same room.
- Do not leave the remote control exposed to direct sunlight or near a heater. Protect the remote control from moisture and shock which can discolor or damage it.
CLEANING AND MAINTENANCE
CLEANING THE FILTER
If the filter is clogged with dust, the amount of air flow will be reduced, resulting in poor cooling performance. The filter should be cleaned every 10 days. At the beginning of every cooling season or after a long period of inactivity, clean the filter before starting the unit.
1 REMOVE THE FILTER
Open the front panel and get the filter out.
2 CLEAN THE FILTER
To remove dust from the filter, use a vacuum cleaner or wash it in clean water.
If the filter is very dirty, wash it with detergent and rinse carefully with clean water. Dry the filter with a soft cloth.
Do not expose the filter to heat or dry it in direct sunlight.
3 RE-INSTALL THE FILTER
Put the filter into its original position and close the front panel.
Never operate the unit without installing the filter. It may result in serious damage to the unit.
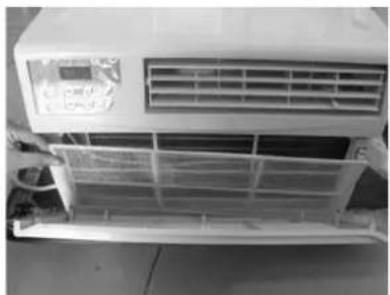
natural_image
Exterior view of a white air conditioner unit with ventilation grilles and cooling fins (no visible text or symbols)
natural_image
Illustration of a hand holding a grid-patterned panel above a tray with liquid, separated by a diagonal line (no text or symbols)CLEANING OF THE FRONT PANEL AND CABINET
To clean the front panel and cabinet, wipe with a soft, dry cloth or with a cloth moistened with a mild soap. Rinse carefully by wiping with a damp cloth and dry completely.
Avoid splashing the unit with water. Excess water can damage electrical insulation and result in danger.
Never use harsh chemicals or abrasive cleaners on any part of the unit. To avoid damage to the unit, do not use hot water (120°F / 50°C or more) when cleaning.
OILING OF THE COMPRESSOR AND FAN MOTOR IS UNNECESSARY
The compressor is permanently lubricated and is hermetically sealed. The fan motor is lifetime sealed and does not require oiling.
REMOVING THE AIR CONDITIONER
Before removing the air conditioner, operate the unit in the FAN mode with high fan speed on a dry day, for about half a day to thoroughly dry the water inside the air conditioner unit.
BEFORE CALLING FOR SERVICE
IF YOUR AIR CONDITIONER DOES NOT OPERATE PROPERLY, PLEASE CHECK THE FOLLOWING ITEMS BEFORE CALLING FOR SERVICE.
POWER PLUG CHECK
This air conditioner uses a fused power plug.
Always check the power plug before use.
1 Press the RESET button.
2 Insert the power plug into the wall socket.
3 Press the TEST button.
You will hear a CLICK if the circuit breaker is functioning correctly.
4 Press the RESET button until you hear another CLICK.
The circuit breaker is activated, power is supplied, and the air conditioner is now ready for use.
RESET TEST

Do not attempt to use the air conditioner if the above procedure is impossible, as it is malfunctioning.
Disconnect the power plug and request a service.
AIR CONDITIONER DOES NOT OPERATE AT ALL
• Is the unit plugged in or is the plug loose?
• Is the fuse blown or the circuit breaker tripped?
- Did you restart the unit within 3 minutes after a power failure? If the power was off for less than 3 minutes, and you restarted the air conditioner within 3 minutes, a protective device may cause the compressor to shut off, preventing cooling for about 5 minutes.
AIR CONDITIONER DOES NOT PROPERLY COOL
• Is the MODE set to fan only Mode?
Cooling will not take place in the fan only mode. Change the MODE setting.
• Is the filter clogged with dust?
A dirty filter can cause the cooling coils to freeze. If this happens, clean the filter and replace. Run the air conditioner on the MED FAN setting until all ice dissipates.
• Is the temperature set properly?
If your room is too warm, adjust the temperature setting lower.
- Is the window exposed to direct sunlight?
Close curtains or blinds to minimize solar energy heating the room.
- Are the windows or doors open?
Close all windows and doors for maximum cooling.
BEFORE CALLING FOR SERVICE
NOTE: WATER IN BOTTOM OF TRAY
- Water will collect in the bottom tray of the unit. This is normal. Water condenses on the evaporator coil at the front of the unit and is channeled to the rear where it is picked up by the condenser fan. The water is blown onto the condenser coil fins and this creates a "splashing" noise which is normal. If excess water builds up in this tray it will drain outside through a grooved channel in the tray.
SOUNDS
- The operating sound may seem rather loud for 2 to 3 minutes when the unit is first turned on. This is the sound of the compressor's start-up and is normal.
- A soft, swishing noise can be heard immediately after the unit is turned on or off, and also during operation. This is the sound of the refrigerant flowing inside the unit.
IF THE UNIT FAILS TO RECEIVE THE REMOTE CONTROL SIGNAL
- Check the remote control batteries. Replace if necessary.
- Try to send the signal again with the remote control pointed directly at the unit's receiver window.
- Check whether the remote control batteries are installed with the polarities properly aligned.
FAULT CODES:

If the display reads "AS",
a sensor has failed. Contact your
Authorized SHARP Service Center.
SHARP
SHARP ELECTRONICS CORPORATION
Sharp Plaza, Mahwah, New Jersey 07495-1163
SHARP CORPORATION
Osaka, Japan
Printed in China
66129902992
- CONTENTS
- PAGE
- PRECAUTIONS
- HOW TO OPERATE
- FOR YOUR PROTECTION
- CONSUMER LIMITED WARRANTY
- SHARP®
- SHARP ELECTRONICS CORPORATION
- INSTALLATION INSTRUCTIONS
- CHECK WINDOW AREA
- LOCATION
- ACCESSORIES
- SUGGESTED TOOLS
- INSTALLATION
- If AC is Blocked by Storm Window
- Removing AC From Window
- CAUTION FOR USE
- GROUNDING INSTRUCTIONS
- NOTES ON OPERATION
- ENERGY EFFICIENCY TIPS
- PARTS NAMES
- CONTROL PANEL
- Touch Pad
- TO CHANGE AIR FLOW DIRECTION
- USING THE REMOTE CONTROL
- INSTALLING BATTERIES
- NOTES:
- HOW TO USE THE REMOTE CONTROL
- CAUTION:
- CLEANING AND MAINTENANCE
- CLEANING THE FILTER
- REMOVE THE FILTER
- CLEAN THE FILTER
- RE-INSTALL THE FILTER
- CLEANING OF THE FRONT PANEL AND CABINET
- OILING OF THE COMPRESSOR AND FAN MOTOR IS UNNECESSARY
- REMOVING THE AIR CONDITIONER
- BEFORE CALLING FOR SERVICE
- POWER PLUG CHECK
- AIR CONDITIONER DOES NOT OPERATE AT ALL
- AIR CONDITIONER DOES NOT PROPERLY COOL
- NOTE: WATER IN BOTTOM OF TRAY
- SOUNDS
- IF THE UNIT FAILS TO RECEIVE THE REMOTE CONTROL SIGNAL
- SHARP
Brand : SHARP
Model : AF-Q60RX
Category : Air conditioner