
SRT 6780 - Satellite receiver STRONG - Free user manual and instructions
Find the device manual for free SRT 6780 STRONG in PDF.


| Product Type | Digital Satellite Receiver |
| Brand | STRONG |
| Model | SRT 6780 |
| Dimensions (W x H x D) | 252 mm x 42 mm x 138 mm |
| Weight | 1.3 kg |
| Power Supply | 12 V DC, 20 W max |
| Operating Temperature | 0°C to +40°C |
| Storage Temperature | -20°C to +60°C |
| Connectors | TV SCART, VCR SCART, RCA audio/video, S/PDIF coaxial, RF input (F-type female), RJ11 telephone line, DC input |
| Satellite Input | IEC 169-24 F-type female |
| DiSEqC Support | Yes (1.0/1.2) |
| LNB Compatibility | Universal, Customized, None |
| Smart Card Slot | Yes (front panel, for Viasat) |
| Teletext | Yes (via TEXT button) |
| Parental Control | Yes (PIN code, channel locking, decoder lock) |
| Favorite Lists | Yes (TV and Radio) |
| Electronic Program Guide (EPG) | Yes (Viasat portal) |
| Software Upgrade | Via satellite (automatic or manual) |
| Remote Control | Infrared, 2 x AAA batteries, SAT/DVD/TV modes |
| Audio Output | Stereo RCA, S/PDIF coaxial (Dolby Digital) |
| Video Output | CVBS, S-Video, RGB (via SCART and RCA) |
| Maintenance | Clean with dry soft cloth; avoid solvents; unplug during storms |
| Safety | Do not open; disconnect before connections; well-ventilated placement |
Frequently Asked Questions - SRT 6780 STRONG
User questions about SRT 6780 STRONG
0 question about this device. Answer the ones you know or ask your own.
Ask a new question about this device
Download the instructions for your Satellite receiver in PDF format for free! Find your manual SRT 6780 - STRONG and take your electronic device back in hand. On this page are published all the documents necessary for the use of your device. SRT 6780 by STRONG.
USER MANUAL SRT 6780 STRONG
Digital Satellite Receiver SRT 6780
User manual
Bruksanvisning
Bruksanvisning
natural_image
Illustration of a room setup with TV, air conditioner, and household appliances (no text or symbols)Summary
Precautions....2
Welcome to digital satellite TV! 3
Your remote control....4
Inserting the batteries....4
Remote control buttons: quick reference....5
Your set-up box ....6
Front panel 6
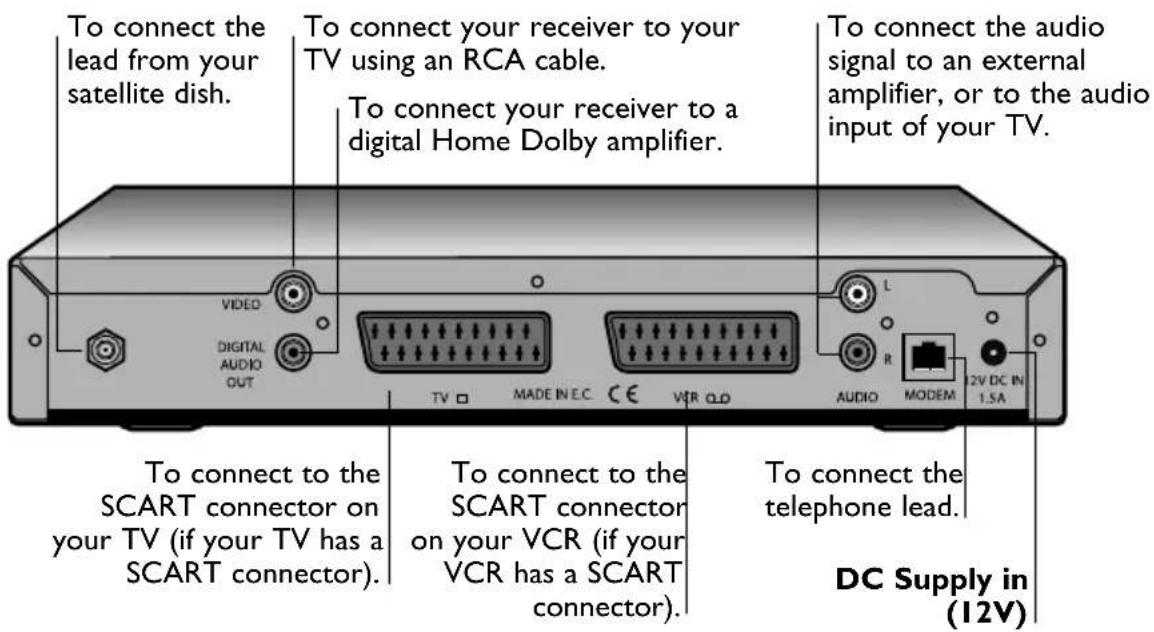
Rear panel connectors overview....6
Installation 7
Before you begin....7
What else do I need?......8
Connecting to other equipment....9
Connection method I: ToTV and VCR 9
Connection method 2: To TV only....10
Connecting to the telephone line....10
Inserting your smart card....11
Connecting to the mains supply ....II
Switching on for the first time....12
Checking the installation screens ....13
Choosing your language....13
Time menu....13
Antenna configuration menu....14
Checking the signal....15
Channels Search menu....16
Searching for channels....17
Day to day use....18
Decoder switch ON / Standby 18
Volume setting....18
TV channels access....18
Radio channels access....18
TV Banner / Extended Information....19
TV Miniguide....21
TV Channel list....22
Programm Guide 22
Extra information 23
Recording a digital satellite programme....23
Teletext access 23
Other settings....24
Displaying the Main Menu....24
Channels 24
Program Guide....24
Conditional Access....25
Preferences....26
Configuration....29
TV/VCR Configuration....31
Information....33
Solving problems....34
Specification 35
Precautions
Never open your set yourself. It could be dangerous and you risk electric shock or damaging the set. The opening of the box is protected by a warranty sticker on the rear panel. Any noticed damage will invalidate the warranty conditions of your equipment.
Installation - Ensure that the voltage from the mains in your room complies with that indicated on the back of your set (identification label, screen marking, etc.). Do not connect an AC or DC power supply other than that from the mains. Ensure that the electric plug is fully connected into the wall socket. Leave the mains socket accessible so that you can unplug the set quickly. Place the set horizontally, away from any source of heat (sunlight, radiator, fireplace, etc.) or from equipment which produces high magnetic or electrical fields (motors, non-insulated loud speakers, etc.). If you install your set in a cabinet, ensure that it has enough ventilation. Leave 7 to 10 cm around the set, as shown in the enclosed drawing. The openings on top and underneath the set are for ventilation purposes. They must not be obstructed.
Use - The set is designed for use in a dry place. If, under exceptional circumstances, you happen to use it outdoors, (e.g. on a balcony or in a tent), make absolutely certain that it is protected from humidity (dew, rain, splashes) and from heat. If the set has spent some time in a cold atmosphere, (after transport during winter), wait until the condensation has evaporated from the metal parts before connecting it. The set is intended to operate at an ambient temperature of less than 40^ Celsius and a maximum humidity level of 95%. It must not, under any circumstances, be used for industrial purposes, as it was designed for domestic use only.
In case of a storm - It is recommended that you unplug the set from the mains and from the socket connected to the outside aerial. As a general rule, it is preferable to unplug the set from the mains if you are away for a prolonged period. If you smell any suspicious odours or see smoke coming from the set, unplug the set immediately and have it checked by an approved technician.
Maintenance - Use a dry, clean, soft cloth with no cleaning, solvent or abrasive products, etc. The openings on top of and underneath the set are for ventilation purposes and must not be obstructed. Clean the ventilation grilles regularly. If an object or liquid gets into the set, unplug the set immediately and have it checked by an approved technician.

This symbol on your set guarantees that your product complies with the European directives 73/23/EEC and 89/336/EEC on safety and electromagnetic compatibility.

This symbol indicates “Dangerous voltage” in the set. It represents the risk of electric shock or bodily injury.
Note:
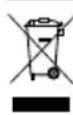
This product is designed and manufactured with high quality materials and components which can be recycled and reused.
This symbol means that electrical and electronic equipment, at their end-of-life, should be disposed of separately from your household waste.
Please, dispose of this equipment at your local community waste collection/recycling centre.
In the European Union there are separate collection systems for used electrical and electronic product.
Please, help us to conserve the environment we live in!
Welcome to digital satellite TV!
Thank you for choosing the STRONG set-top box. Please follow the instructions in this User Guide carefully to enjoy all the advantages of digital satelliteTV. We advise following the user instructions and recommendations supplied with your set-top box, especially for first-time use.
Your set-top box fully complies with international DVB (Digital Video Broadcasting) standards.
Updates to your set-top box
From time to time, your set-top box may be updated. These updates provide enhanced features; new screens and menus may become available. Although any new screens and menus may look a little different from those described in this User Guide, you should be able to use the same techniques (e.g. highlight and select) with them.
Your remote control
Inserting the batteries
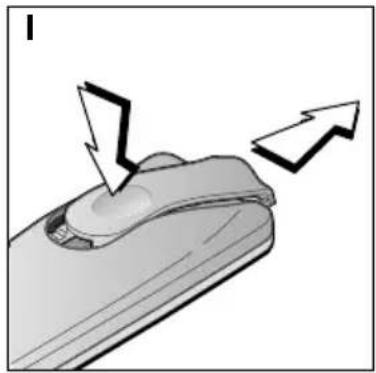
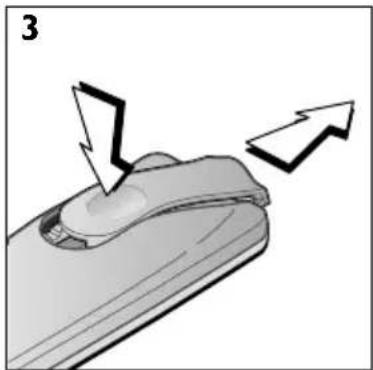
Before you can use your remote control, you must insert the two supplied AAA batteries as follows:
I. Remove the cover.
2. Insert the batteries according to this drawing. Observe the polarity (+/-).
3. Replace the cover.
natural_image
Illustration of a remote control device with directional arrows indicating movement (no text or symbols)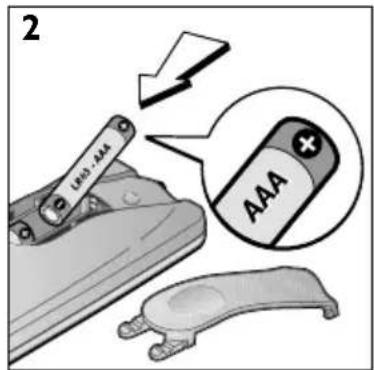
natural_image
Illustration of a computer mouse with an arrow indicating motion or force (no text or symbols present)- Don't leave flat batteries in your remote control.
- Replace both batteries at the same time.
- Dispose of flat batteries in an environmentally-friendly way.

Please respect the environment and prevailing regulations. Before you dispose of batteries or accumulators, ask your dealer whether they are subject to special recycling and if he accepts to take them back.
Remote control buttons: quick reference
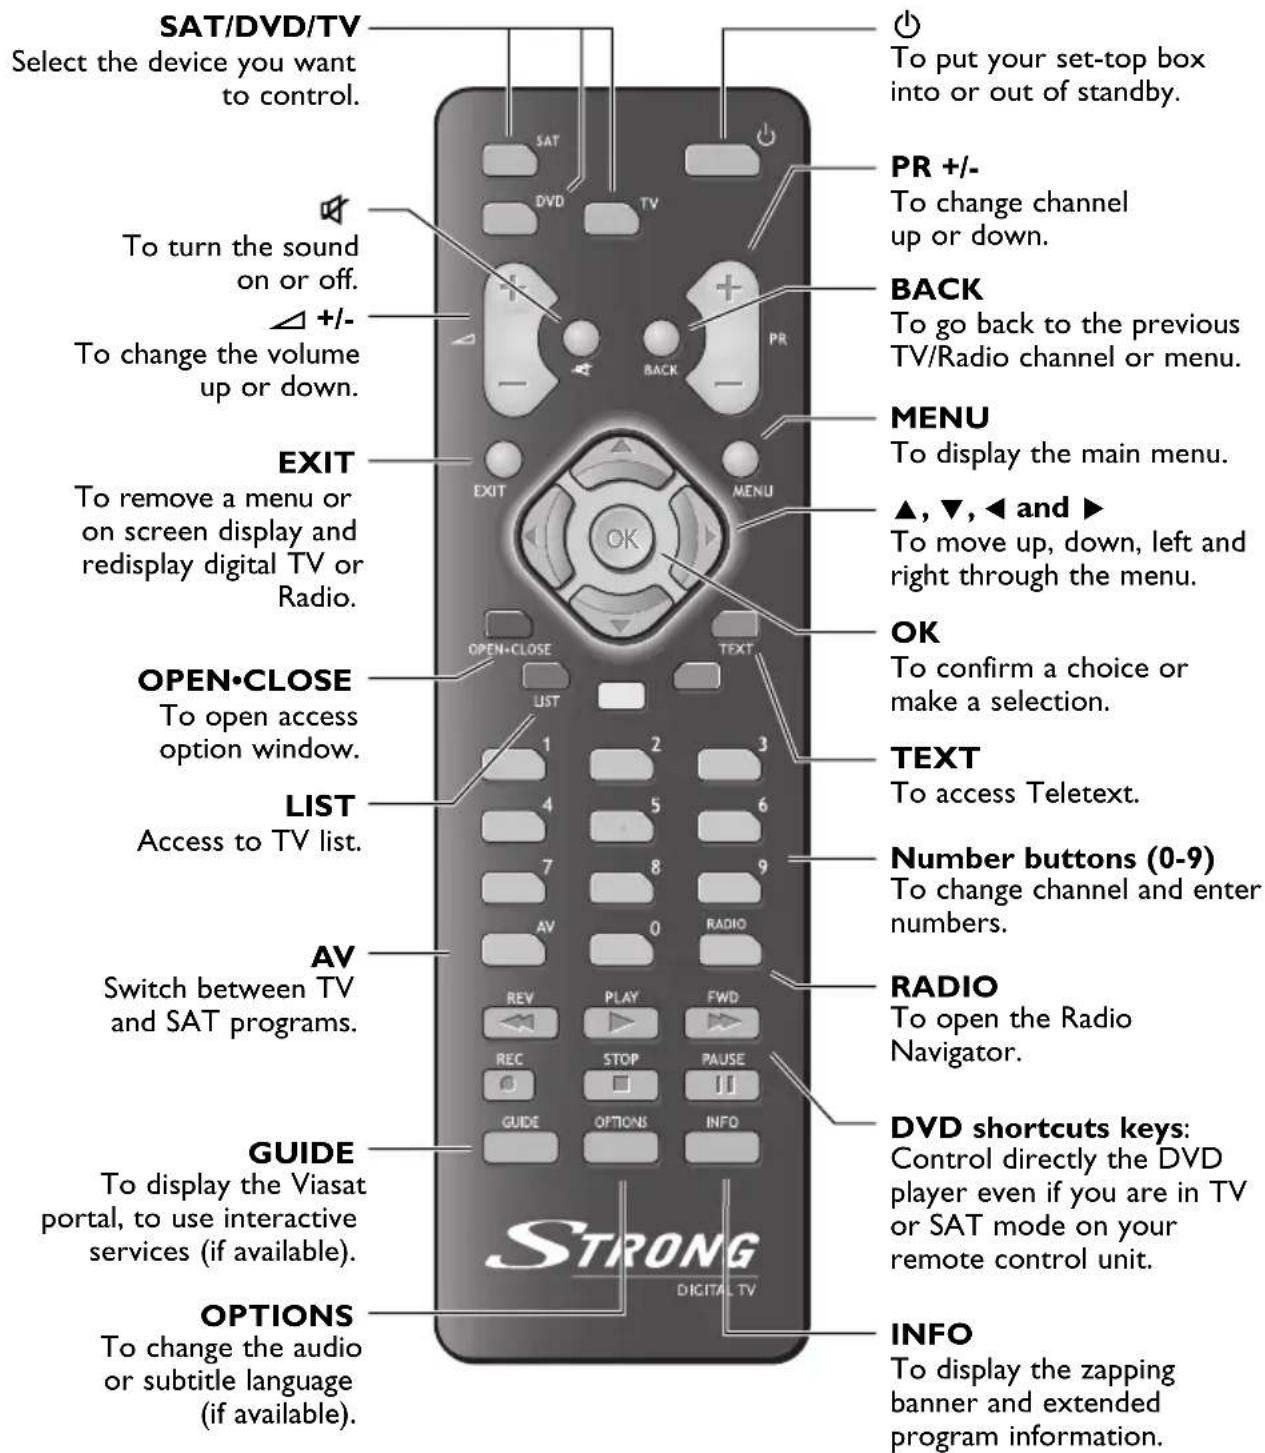
Note: Some of these buttons are described in more detail on the next page.
Your set-up box
Front panel
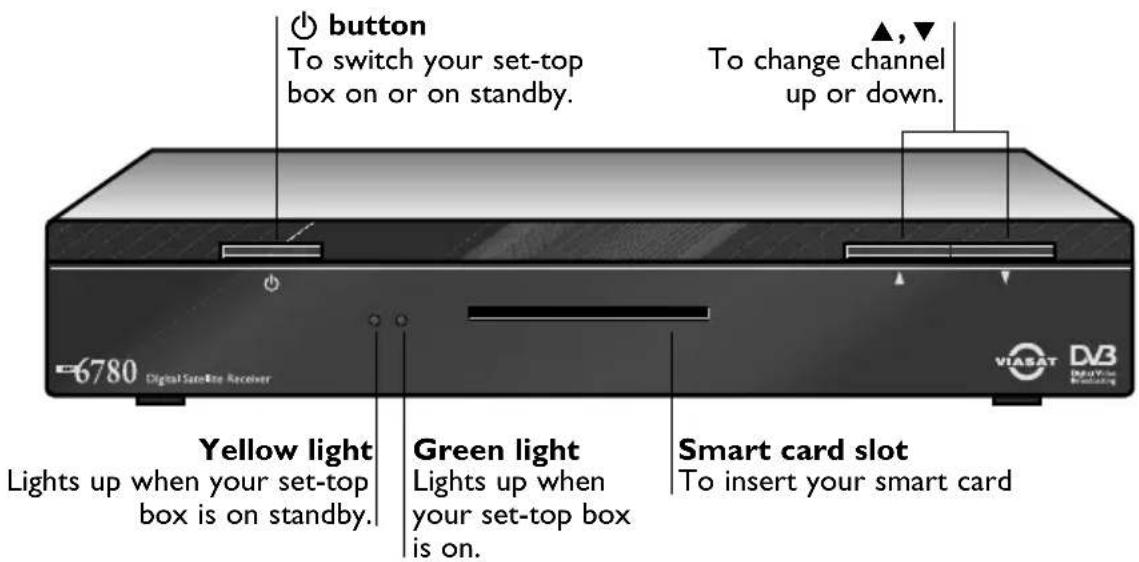
Rear panel connectors overview
Full details about connecting up and installing your set-top box begin on page 7.
WARNING
Always disconnect your set-top box from the DC supply before you connect it to (or disconnect it from) any other equipment.
Installation
To install your set-top box, follow the instructions from this page up to page 17.
Before you begin
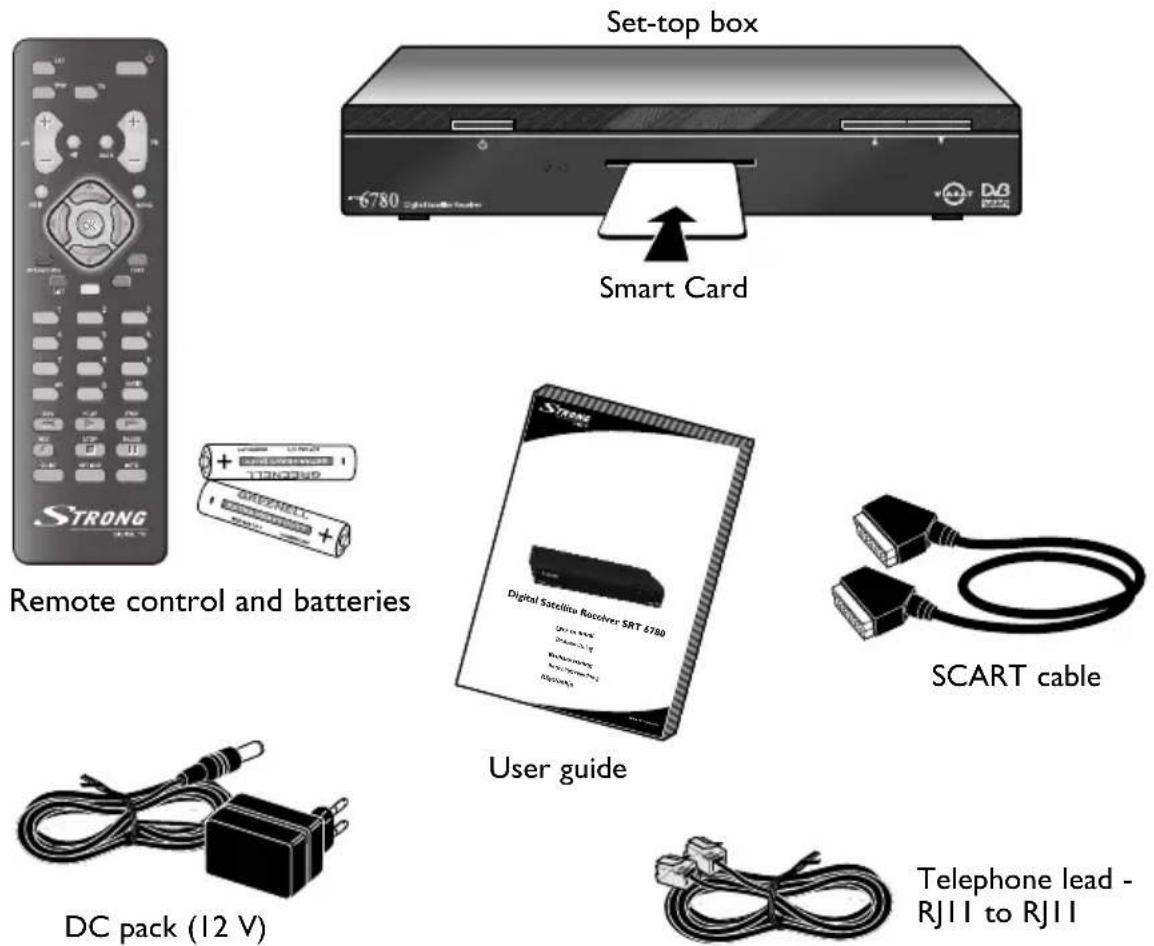
The supplied equipment
If you have not already done so, remove all the packaging.
You should have the following items:
- Set-top box (see page 6)
- Remote control and batteries (see page 4)
- User guide
- DC pack (12 V)
- SCART lead
• Telephone lead - RJII to RJII
- Telephone line (RJ11) adapter suitable for your location (see page 10).
What else do I need?
Smart card
If you wish to view premium services, you will need a smart card. This is available from your service provider, Viasat.
Satellite dish
You will also need a correctly-installed satellite dish, pointing at the correct satellite(s).
- If you are already a Viasat customer, and are using your satellite dish to tune to Viasat analogue channels, you should not need to make any adjustment to your dish, just go straight to page 9 to continue the installation.
- If you have a satellite dish but it is not pointing at the correct satellite(s), you will need to make adjustments. Please see the information supplied with your dish/LNB for details on how to do this, or seek professional advice.
- If you do not have a satellite dish installed, please ask your dealer to recommend a local dish-installation engineer.
Connecting to other equipment
Before you start, make sure that your TV, VCR and set-top box will be placed in a location that is conveniently located:
- near an easily-accessible mains wall socket;
• within reach of your TV-antenna and satellite-dish leads,
• within 10 metres of a telephone point. (If not, you will need an extension telephone lead.)
WARNING
Before you connect your set-top box to any other equipment, you must disconnect ALL the equipment from the mains supply.
Connection method I: ToTV and VCR
If you have a VCR and a TV with SCART connectors, you can connect up as shown in the diagram below.
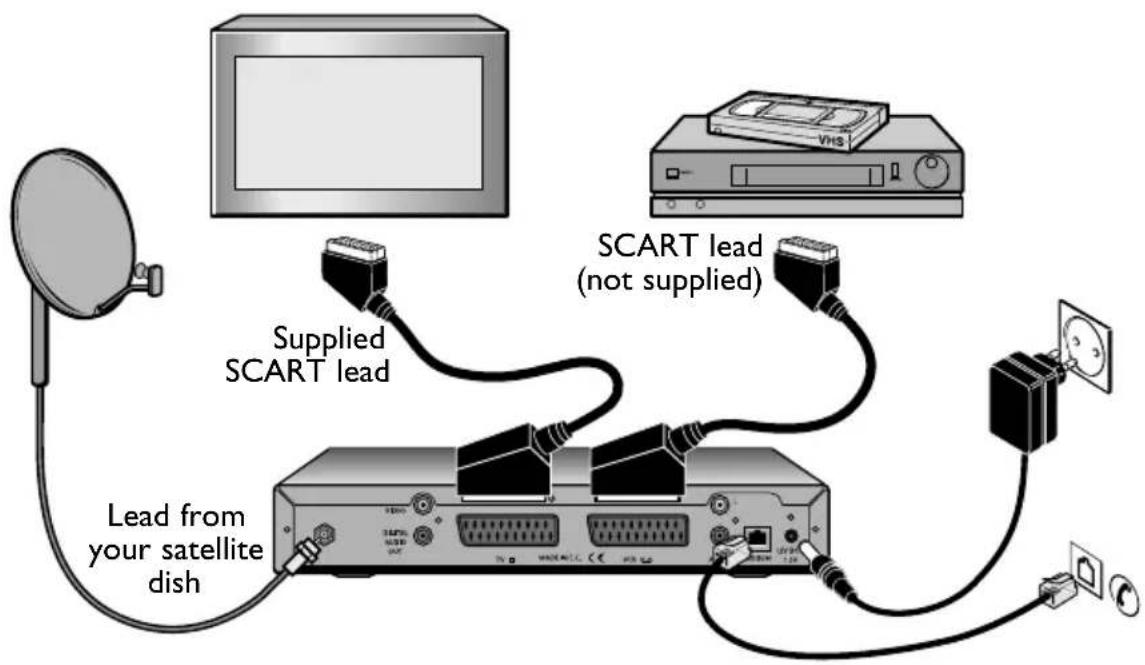
I. Use the supplied SCART lead to connect your set-top box to your TV's SCART input as shown.
2. Use a SCART lead (not supplied) to connect your set-top box to your VCR's SCART input as shown.
3. Connect the lead from your satellite dish to the satellite input connector on your set-top box as shown.
Connection method 2: To TV only
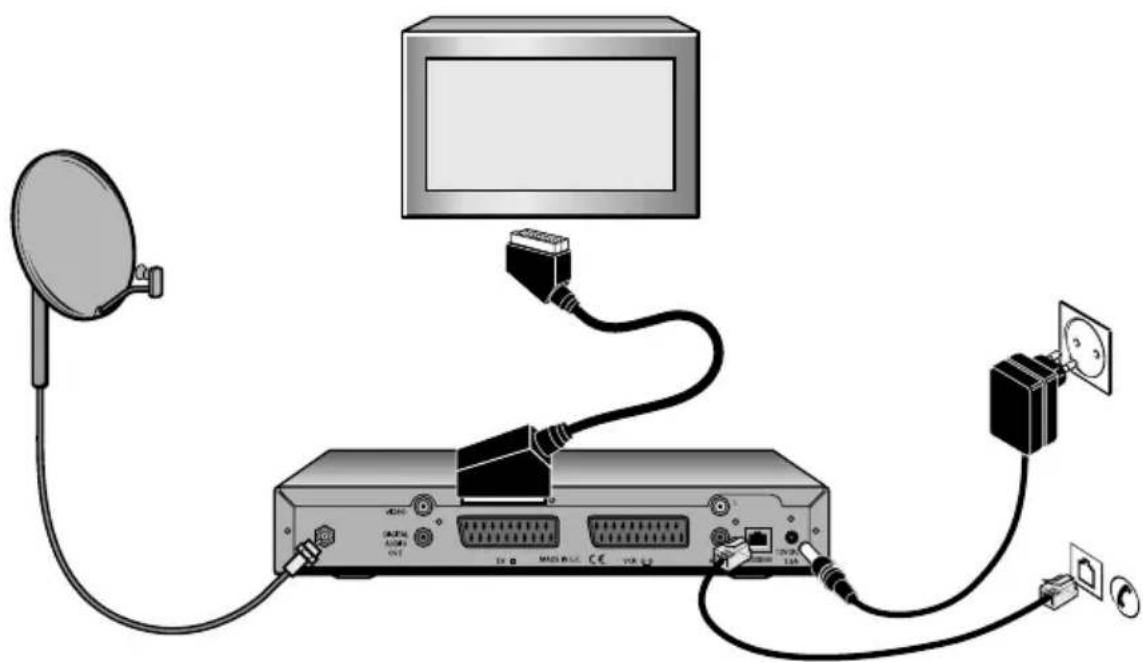
If you wish to connect your set-top box to a TV only, connect up as described below.
natural_image
Diagram of a network device with satellite dish, cable, and socket connected to monitor (no text or symbols)I. Use the supplied SCART lead to connect your set-top box to your TV.
- Connect the lead from your satelitte dish to the satellite input connector on your set-top box.
Connecting to the telephone line
Supplied with your set-top box are telephone line adapters suitable for your region: Adapter for Sweden, adapter for Denmark, adapter for Norway, Finland and Estonia.
If your telephone wall socket looks like the one shown right, you do not need an adapter, but you may need a splitter (not supplied) so that you can plug in both your set-top box and your telephone.


I. Remove your telephone connector from your telephone wall socket.
-
Choose the correct adapter for your location. If you are not sure which one to use, compare with your telephone connector.
-
Insert your telephone connector into the correct socket on your adapter.
-
Take the free end of your supplied telephone lead and insert it into the correct socket on the adapter, as shown right.
-
Insert the adapter into your telephone wall socket.
Inserting your smart card
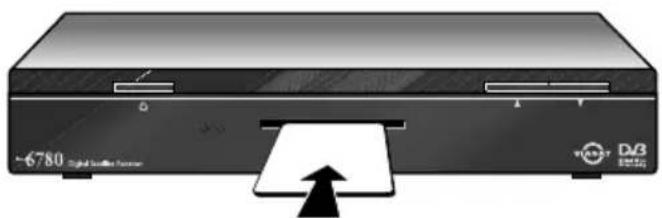
I. Take your smart card from its packaging (if you have not already done so) and hold it so that the picture is facing upwards, with the arrow pointing towards your set-top box, and the 'smart' patch is facing downwards and at the end away from you.
2. Insert the smart card into the smart card slot of the front panel of your set-top box. Insert it as far as it will go, without forcing it.
Taking care of your smart card
- Do not remove and re-insert your smart card unnecessarily.
- Do not bend your smart card; keep it away from children and pets.
- Do not put your smart card in liquids or use cleaning fluids on it.
natural_image
Illustration of a CD-ROM drive with an arrow pointing to the front panel (no text or symbols on the device itself)Connecting to the mains supply
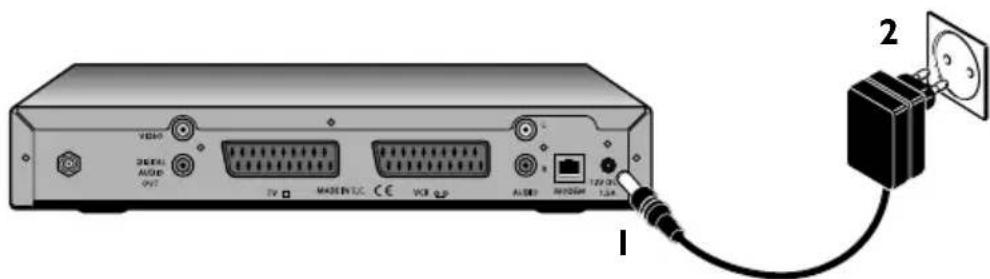
I. Once you have safely made all the other connections, connect the DC plug of the DC pack to the DC input on your decoder as shown in the diagram below.
2. Connect the mains plug of the DC pack to the mains wall socket
3. If there is a switch by the mains wall socket, switch it on.
4. Connect your other equipment to the mains supply.
WARNING
DO NOT connect the mains plug to the wall socket until you have made ALL the other connections.
Notes: Your set-top box operates with 12 V DC power supply.
The only way to disconnect your set-top box from the mains is to remove the AC adaptor from the mains wall socket. Your set-top box must therefore be installed near to the mains socket-outlet, which should be easily accessible.
Switching on for the first time
When you connect your set-top box to the mains, all the lights on the front panel will light up. After around 5 seconds, only the standby light remains light.
Press SAT key (decoder key) on your remote control to control your set-top box, then press ⏻ key to switch it on. The light turns green.
• Make sure your TV is switched on.
If the Language selection screen below displays, your TV is ready for digital satellite channels.
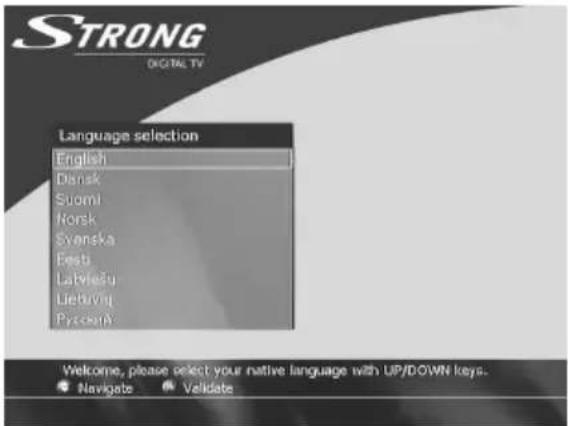
You can now continue the installation by turning to the section "Cheking the installation screens" on page 13.
If the Languages screen does not display...
If you have connected your set-top box to your TV via a SCART lead, as in methods I and 2, try selecting your TV's "AV input".
Checking the installation screens
For most installations, this is easy to do, if you follow these instructions. However, for some installations you may need to make additional settings - see the “Other settings” section starting on page 24.
Note: At any time during the first time installation process, you can return to previous screen by pressing BACK button.
Choosing your language
If you have completed the installation instructions up to this point, the following screen is displayed on your TV screen.
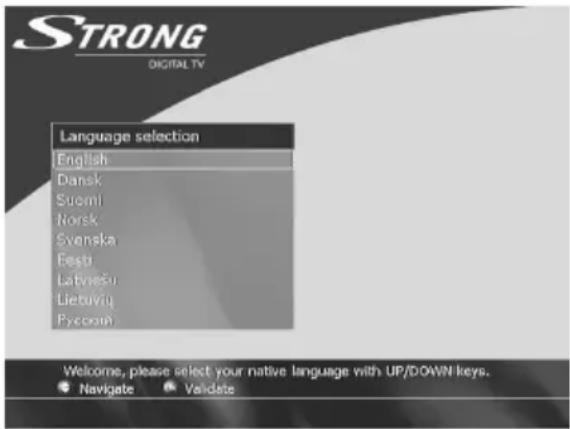
I. Take your remote control. If you have not already inserted the batteries, do so now (see page 4).
2. Press ▲ or ▼ key until the language you want is highlighted, then press OK.
A Welcome screen now displays.
Note: For Swedish, Norwich, Danish and Finnih, the Welcome screen appears in the selected language.
- To change the language, press BACK (then repeat step 2), or to confirm your choice press OK.
Time menu
Once you have confirmed the language, the Time menu is displayed.
Select your local time zone then press OK.
Antenna configuration menu
The Antenna configuration menu is displayed and Antenna Configuration field is selected.
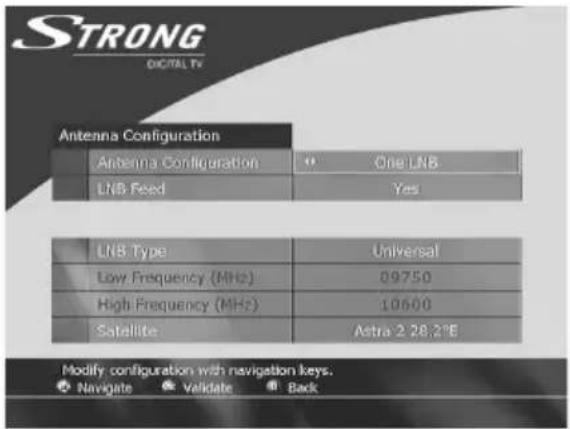
Depending on your antenna configuration, select:
- One LNB: if you have only one antenna.
- DiSEqC: if you have 2, 3 or 4 antennas connected to the set-top box through a DiSEqC switch.
- SMATV: if you are using a local network.
LNB feed
- Select Yes if your antenna configuration is One LNB. In this case, you will be able to receive update of your Conditional Access rights even in Standby mode.
- Select No if your antenna configuration is SMATV.
- Select Auto if you want an LNB feed only when the set-top box is on.
You will not be able to receive an update of your Conditional Access rights in Standby mode.
LNB index
(This field is only displayed if you have selected DiSEqC at the Antenna Configuration field).
According to the DiSEqC switch input where the antenna is connected select corresponding Index (from 1 to 4).
LNB type
(This field is not displayed if you have selected SMATV at the Antenna Configuration field).
According to your LNB, select Universal, Customized or None.
Low and High frequencies
(These fields are only displayed if you have selected Customized at the LNB type field). With digit keys, enter Low and Hight bands oscillator frequencies.
Satellite
(This field is not displayed if you have selected SMATV at the Antenna Configuration field or None at the LNB type field). Select the satellite on which one your antenna is pointed.
Checking the signal
Once antenna settings are set, the signal check screen is displayed. Use this screen to confirm that your set-top box is receiving a satellite signal.
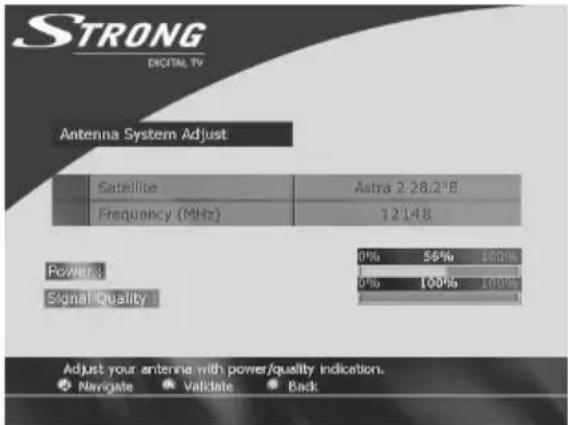
The details on the screen show the name of the satellite, together with bars showing the power and quality of the signal being received from this satellite.
If you have selected DiSEqC at the Antenna Configuration menu, you can select a satellite from its LNB index.
Your set-top box must receive both a signal strength and a signal quality of at least 60% in order to successfully find channels.
When you are satisfied that there is an adequate signal, press OK.
Note: If you press OK before you are ready, you can press BACK to redisplay the signal check screen.
Once you have confirmed the satellite signal strength, the Channels Search menu is displayed.
Channels Search menu
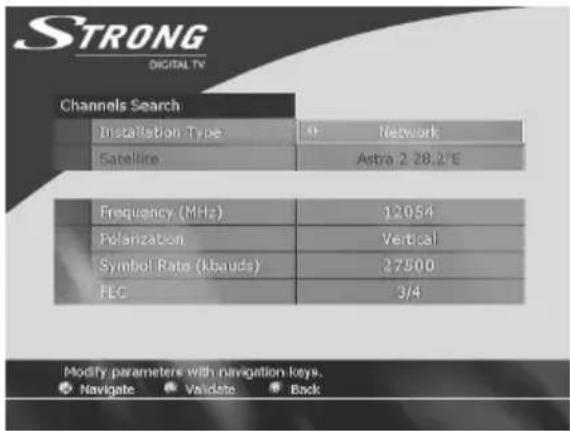
The default parameters allow you to install all the Viasat Channels.
If you want to do a specific installation, use a specialized satellite magazine to get the correct figures for following settings.
(frequency (MHz), Polarization, Symbol rate and FEC fields are not available if you select Fast scanning or Manual scanning at Installation Type field).
Installation type
Depending on the desired installation, select:
- Network: to install a pre-defined network,
- Bouquet: to install a pre-defined network,
- Transport: to install a pre-defined transponder,
- Fast scanning: to install a predefined list of frequencies on a dedicated satellite,
- Manual scanning: to scan all the frequencies on a dedicated satellite.
If you have selected SMATV at Antenna configuration menu, only Manual scanning is available.
Satellite
(This field can only be selected if you have selected DiSEqC at the Antenna
Configuration menu.)
Choose a satellite from its LNB index.
Frequency (MHz)
With digit buttons of your remote control enter the frequency of the desired transponder.
Polarization
According to the transponder polarity, select Vertical or Horizontal.
Symbol rate
With digit buttons of your remote control enter the correct symbol rate.
FEC
According to the selected transponder, select correct FEC.
Bouquet number
(This field is only available if you have selected Bouquet at Installation Type field). With digit buttons, enter the number of the desired bouquet.
If you have selected Manual scanning at Installation Type field, a new menu is displayed on which you can search for at least 6 Symbol rate on a satellite.
Select successively each field and enter the desired Symbol rate number.
Once Channels search menu is set, press OK to start searching.
Searching for channels
Once you have confirmed the channels search settings, the channel auto-search screen is displayed.
A progress screen confirm that the search is taking place.
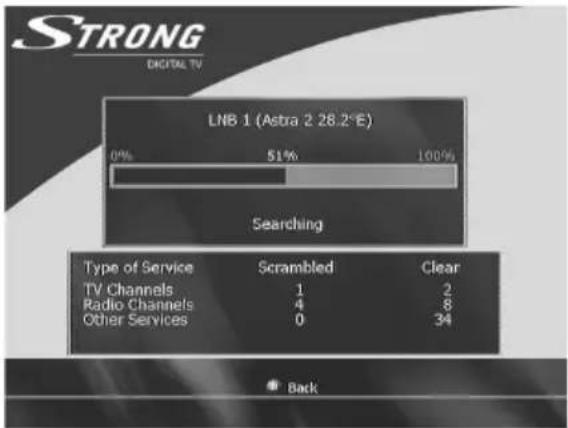
When the search is complete, a screen is displayed to tell you the number of TV, radio channels and other services that your set-top box has found.
You can return to previous screen by pressing the BACK button.
I. To confirm this channels and display the next screen press OK.
2. To watch TV channels press OK.
Day to day use
Decoder switch ON / Standby
Press ⏻ button on the remote control unit or on the front panel to switch ON / Standby your decoder.
Volume setting
Volume:
You can set the volume level with △+/- buttons.
Sound mute:
Press Button to mute the sound. Press it again to restore the sound.
TV channels access
TV Zapping:
- Press PR- button to access previous TV channel.
- Press PR+ button to access next TV channel.
TV channels direct selection:
The digit buttons of your remote control unit allows you to directly access to any TV channel number. Enter the channel number (4 digits maximum) of the desired service.
!If the requested TV channel number does not exist, the lower nearest one is selected.
Back to last TV channel:
Press BACK button to switch to the last TV channel.
Radio channels access
Direct Access:
Press RADIO key to open to the Radio services navigator.
From the menu:
Press MENU button on the remote control unit to access to the Main menu.
Select Channels, press OK and with ▲/▼ keys select Radio Channels.
Press OK to confirm.
Radio Zapping:
Press PR- / PR+ (or ▲/▼) keys to select the previous / next Radio channel in the list. The selected Radio channel is played.
The ◀ and ▶ buttons allow you to navigate through previous / next pages of the Radio list. The digit buttons of your remote control unit allows you to directly access to any Radio channel number. Enter the channel number (3 digits maximum) of the desired service.
!If the requested Radio channel number does not exist, the lower nearest one is selected.
!If you have defined Radio favorites lists, the name of the current Radio favorite list is displayed at the top left of the screen. The OPTIONS key allows you to change your current Radio favorite list.
Press EXIT to return to the last TV channel.
Zapping Banner / Extended Information banner
You can get two levels of information related to the current played event.
• TV banner basic channel information,
- Extended event description.
The Basic channel information is displayed through a Zapping Banner that is either shortly displayed after each Zapping or by pressing the INFO key.
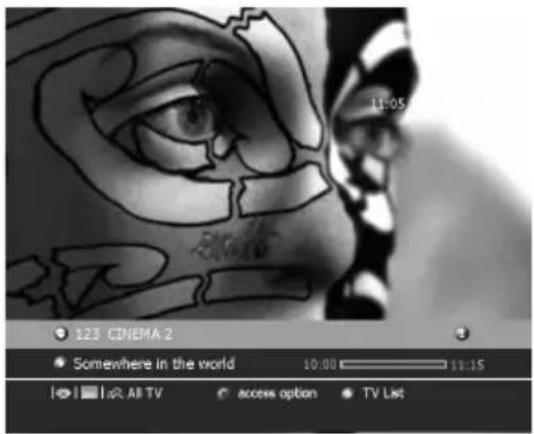
! You can adjust the display duration of the Zapping Banner in the Preferences Menu.
The Extended event description is displayed/erased by pressing again the INFO key while the TV Banner information is present.
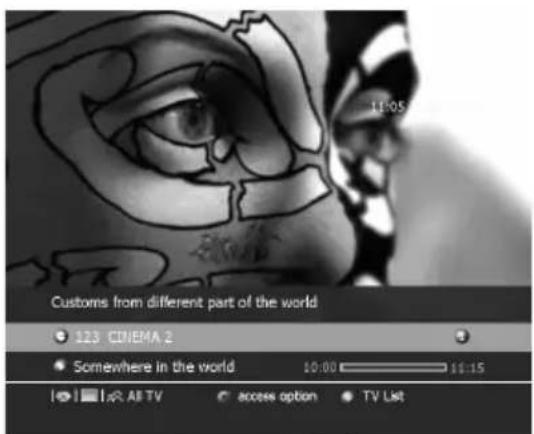
Whilst TV information is displayed:
Next / Present event information (If available):
Press ▶ key to display the next event information.
Press ◀ key to display the present event information.
Next / Previous TV channel information: (Virtual Zapping)
Press ▲ key to display the next service information.
Press ▼ key to display the previous service information.
Press OK key to watch the specified TV channel.
Access option:
Following icons may be displayed at the bottom line of the information banner.

Availability of another audio language.

Availability of another Subtitle language.

All TV Name of the current channels list.
If one of these icons is displayed, a option icon at the bottom of the information banner inform you that you can access the option screen.
Press OPTIONS button on the remote control, the Option screen is displayed.
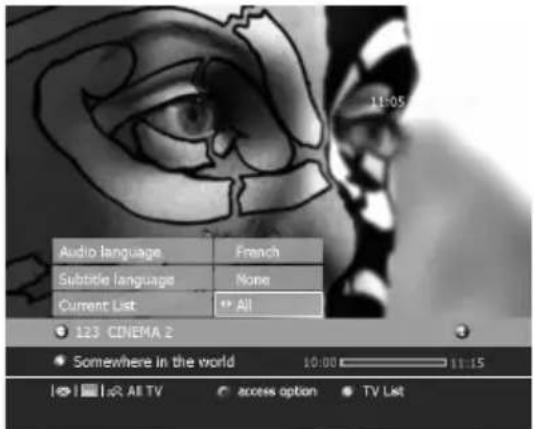
This screen allows you to change the favorite list (if created), to change the subtitles languages (if available), to change Audio languages (if available).
Select the desired field with ▼ / ▲ keys and set with ◀ / ▶ keys.
TV channel list or TV Miniguide:
Press GUIDE key to switch to the TV channels list.
Press GUIDE key more than 2 seconds to switch to the TV Miniguide.
Press the EXIT button to erase the displayed information.
TV Miniguide
The TV Miniguide allows you to display at the same time:
- the TV channel list,
- the corresponding TV channel information (if available),
- the corresponding live video in a small window.
Direct access from any TV channel:
Press GUIDE key more than 2 seconds.
From the menu:
Press MENU button on the remote control unit to access to the Main menu.
Select Channels, press OK and with ▲/▼ keys select TV Channels.
Press OK to confirm.
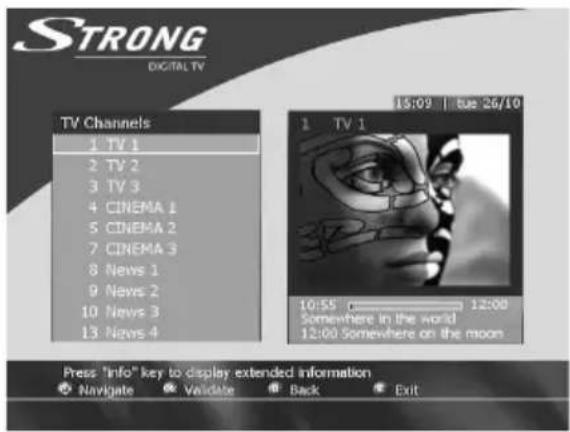
!If you have defined TV favorites lists, the name of the current TV favorite list is displayed at the top left of the screen. The OPTIONS key allows you to change your current TV favorite list.
Press PR- / PR+ (or ▲/▼) keys to select the previous / next TV channel in the list. The selected TV channel is displayed in the small window.
The ◀ and ▶ buttons allow you to navigate through previous / next pages.
Press OK on the remote control unit to display the full size video of the selected service on TV screen.
Press EXIT or BACK on the remote control unit to exit the TV Miniguide.
TV Channel list
Direct access from any TV channel:
Press the GUIDE key once to display the TV Channel list.
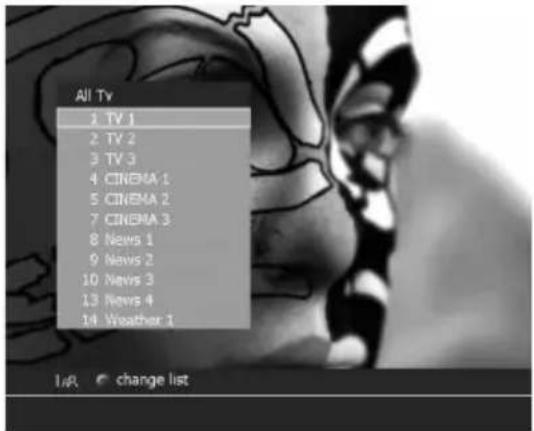
!Pressing the GUIDE key for more than 2 seconds gives access to the TV Miniguide.
Press ▲/▼ keys to select the previous / next TV channel in the list.
The ◀ and ▶ buttons allow you to navigate through previous / next pages.
Press OK on the remote control unit to display the selected channel on TV screen.
Press EXIT or BACK on the remote control unit to exit the TV Channel list.
Programm Guide
Press GUIDE key on the remote control or select Programme Guide field in the Main menu and press OK.
Once you have press OK, you enter the Viasat portal of applications.
Through this portal, you can access and navigate into the following applications:
- EPG (Electronic Program Guide),
- Weather forecast,
- Games,
- News,
- Music guide,
- Pay-Per-View (Ticket).
Extra information
Recording a digital satellite program
If you have aVCR you can use it to record satellite programs from your set-top box.
To record a satellite program:
I. Make sure your set-top box is switched on and tuned to the channel you wish to record.
2. Set your VCR correctly to record at the appropriate time, making sure your VCR is set to record its appropriate AV channel.
For further information about your VCR, refer to your VCR's User Guide.
Notes: Your VCR must be correctly connected to your set-top box. For further information, see page 9.
Some programs are copy-protected and may not play back correctly if you record them. While you are setting the recording up, you may wish to make sure your TV is switched to the AV channel that you use when you are watching videos, so you can check that the VCR is showing what you want to record.
Watching other channels while you are recording a digital satellite program
You can watch any terrestrial channel while you record digital satellite TV, by changing channel with your TV's remote control.
You can also watch any digital channel while you record a terrestrial channel.
However, you cannot watch one digital channel while you record a different digital channel. If you use your set-top box's remote control to change channel while you are recording, your VCR will record the channel change.
Teletext access
From a TV service which provide teletext magazine, press TEXT button on your remote control unit to display teletext magazine.
Using digit number buttons, you can key in a specific Teletext page.
You can navigate within the teletext pages using navigation keys.
▲ : Display the precedent Teletext page.
▼ : Display the next Teletext page.
The use of the colored buttons depend on the displayed Teletext.
!In default mode, the Teletext magazine hide the current video picture. The Teletext page can also be displayed in transparency mode to let you watch the video in background picture. This setting is enabled /disabled by pressing the BACK key as you are displaying the teletext magazine.
Press again TEXT button or EXIT button to exit from the Teletext magazine.
Other settings
Displaying the Main Menu
You need to display the Main Menu in order to perform other settings. You can also use the Main Menu to display the TV and Radio channel lists (see page 18).
To display the Main Menu:
I. Press MENU.
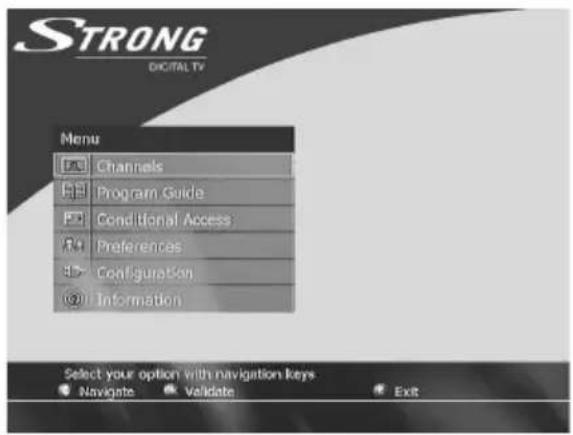
-
Press ▲ or ▼ to highlight the item you want, then press OK.
-
To remove the Main Menu, press EXIT.
Channels
Select Channels field and press OK.
Channels menu is displayed and TV Channels is highlighted.
Press OK to access the TV Miniguide.
Refer to Day-to-day use chapter, page 21 for more information on the TV Miniguide use.
Radio Channels
Select Radio Channels field and press OK.
Radio Channels list is displayed.
Refer to Day-to-day use chapter, page 18 for more information on the Radio Channels list use.
Program Guide
Select Program Guide field and press OK.
Once you have pressed OK, you enter the Viasat portal of applications if you are installed on the Viasat network, if not it displays the TV mini guide (see page 22).
Conditional Access
Select Conditional Access field in the Main menu and press OK. Conditional Access menu is displayed and Viasat is highlighted.
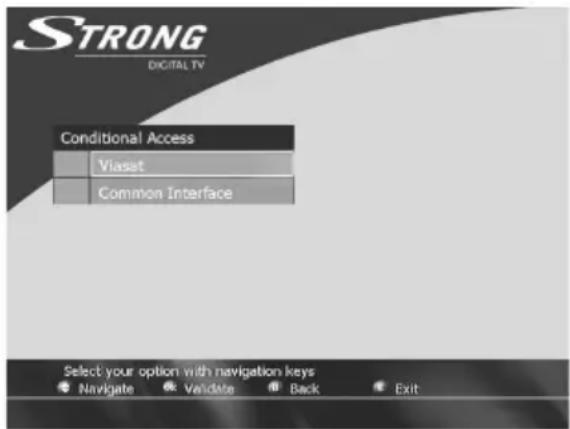
If the line Viasat is not selected, select it with ▲ / ▼ keys and press OK.
You can now navigate the menu which is provided by the embedded Viasat CAS module. (Subscription, User Limits, ...).
Press BACK to return to Conditional Access menu or press EXIT to exit the menu.
The Conditional Access menu displays the following options for consulting or settings parameters for:
- Subscriptions,
- User Limits,
- Smart Card PIN Code Modification.
Select the desired item with ▲ / ▼ keys and press OK on the remote control to display the associated sub-menu.
Subscriptions
Select this option to:
- Display the subscription right status.
User Limits
! To navigate into the following sub-menus, you are asked to enter your Smart Card PIN code. Default value of your Smart Card PiN code is 0000.
This feature allows you:
- To define a morality level to limit access to certain program categories. The choice Any program disables the parental rating lock (all programs are viewable without any PIN code).
For all other values, the Smart card PIN code will be required when the rating of the current event indicates that all viewers are at least as old as the selected rating.
- To set a purchases threshold in order to be informed afterward when the defined threshold will be exceeded.
Smart Card PIN Code Modification
This feature allows you to modify your Smart Card PIN Code.
Refer to page 28 for more explanations on how to change your PIN code.
Preferences
Select Preferences field and press OK.
Preferences menu is displayed and Languages field is highlighted.
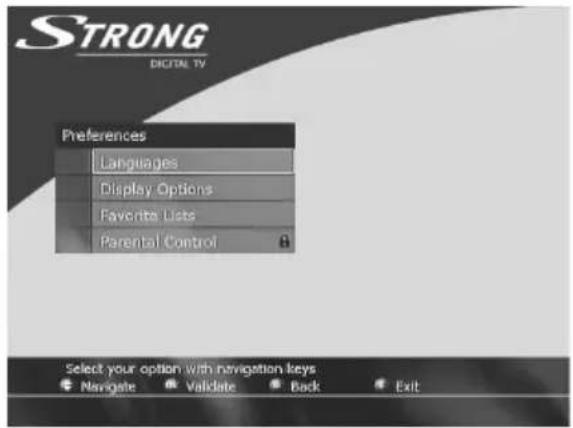
Languages
While Languages field is highlighted press OK, Languages menu is displayed.
This screen allows you to select the desired language for menus as well as for audio and subtitles if available.
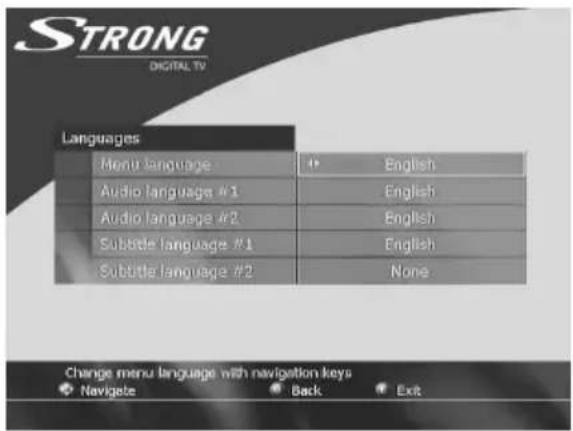
Select a line with ▲ / ▼ keys and select a language with ◀ / ▶ keys.
Press EXIT to confirm your choice and exit the menu or press BACK to return to Preferences menu.
Display options
Select Display Options field in the Preferences menu and press OK.
Display Options menu is displayed.
Banner Time-out (s): Define the display duration of the Zapping Banner after a zapping.
The allowed values are between 1 to 9 seconds.
With digit buttons enter the desired Banner Time out.
Press EXIT to exit the menu, or press BACK to return to Preferences menu.
Favorite Lists
Select Favorite Lists field in the Preferences menu and press OK.
Favorite Lists menu is displayed.
(This menu allows you to create a favorite list or to modify an existing one).
New list:
With ▲ / ▼ keys select the list you want to define and press OK.
List Definition screen is displayed.
- Press ◀ / ▶ keys to select a character field.
- Press ▲ / ▼ keys to modify the character.
Once the name of the list has been defined, press ◀ or ▶ key until Type field is highlighted. Then with ◀ or ▶ keys select if it is a Radio or a TV list. Once the type of the list is defined, press OK, the List Editing screen is displayed.
With ▲ / ▼ keys select a channel in the list and press OK to include it in your Favorite List, a tick is displayed behind the channel's name.
Repeat the previous step to select other channels.
Press EXIT to validate and exit the menu.
Existing one:
With ▲ / ▼ keys, select the already existing list you want to amend and press OK. Action field is selected.
Select what you want to do on the list.
- Modify: if you want to change the name of the list and add or delete TV channels from the list.
- Organize: if you want to organize the list.
- Delete: if you want to delete the whole list.
Parental Control
The Parental Control menu allows you to lock/unlock channels access rights. Select Parental Control field and press OK.
The receiver PIN code is requested to enter this menu.
Default value of the receiver PIN code is 0000.
With digit numbers keys of your remote control, enter the receiver PIN code.
Once the fourth digit is entered, Parental Control menu is displayed and Decoder Lock field is selected.
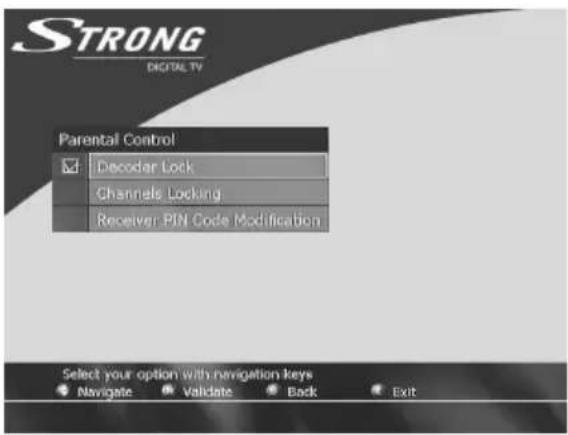
Tick the box with OK key if you want to lock the decoder.
To unlock the decoder, untick the box. This function enables you to watch all the channels even if they had been locked previously as long as the decoder is awake, it will be automatically relock at standby.
Channels Locking (This field is only selected if you have activated Decoder Lock field): Select Channels Locking field and press OK, Channels Locking list is displayed.
With ▲ / ▼ keys select the channels you want lock and press OK. A tick is displayed behind the channel name.
Press EXIT to confirm and exit the menu.
Receiver PIN Code modification: Select Receiver PIN Code Modification field and press OK.
Receiver PIN Code Modification screen is displayed.
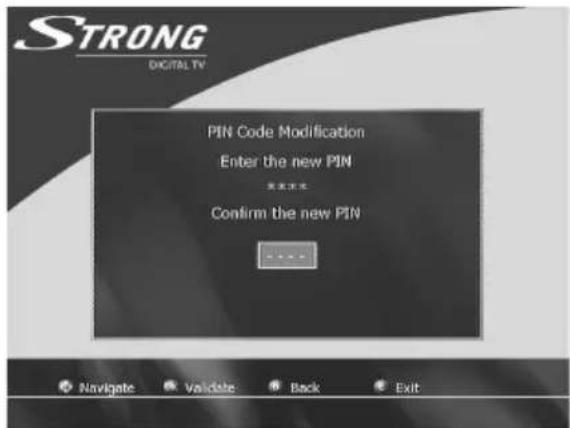
This menu allows you to modify the PIN code of your decoder.
With digit numbers keys of your remote control, enter the new receiver PIN code. With digit numbers keys, enter again the new Receiver PIN code for confirmation. Validate with OK, a screen inform you that the modification is completed.
Press EXIT to exit the menu or press BACK to return to Parental Control menu.
Configuration
This menu allows you to perform subsequent Channels Installation, to set TV /VCR settings to your personal preferences, to set your Local time zone, and to set your Modem configuration.
Select Configuration in the Main menu and press OK.
Configuration menu is displayed and Channels Installation field is highlighted.
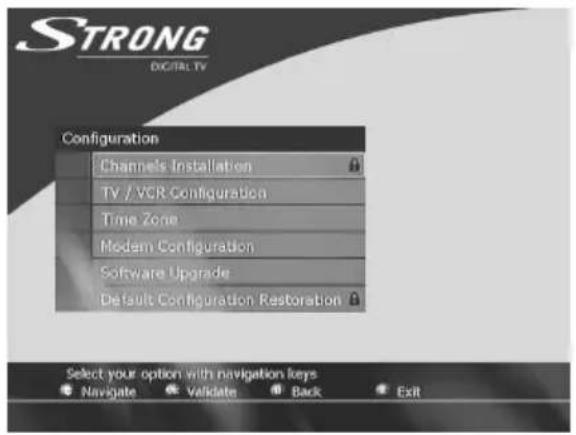
Press OK to access Channels Installation menu.
To access this menu, Receiver PIN code may be requested.
Channels Installation
Once you have accessed the menu, Antenna Configuration field is selected.
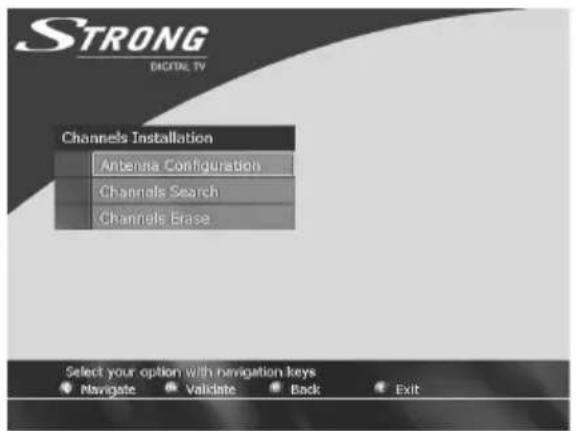
Press OK to access the menu.
Antenna Configuration menu is displayed.
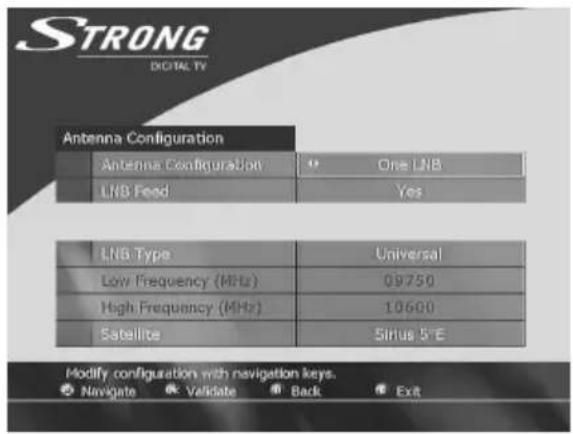
Refer to chapter First installation, page 14, for more information on this menu.
Channels search: select Channels Search field and press OK.
Channels Search menu is displayed.
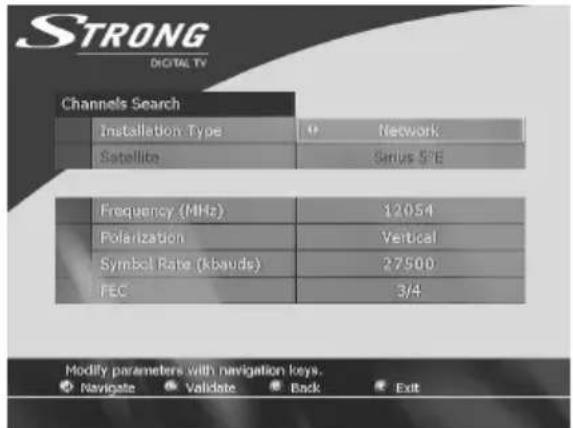
Refer to chapter First installation, page 16, for more information on this menu.
Channels erase: select Channels erase field and press OK.
Channels Erase screen is displayed.
Press OK if you want to erase the entire services list.
Caution: All memorized channels will be erased.
TV/VCR Configuration
This menu allows you to set TV /VCR settings to your personal preferences.
Select TV/VCR Configuration field in the Configuration menu and press OK, TV/VCR Configuration menu is displayed and TV Format field is selected.
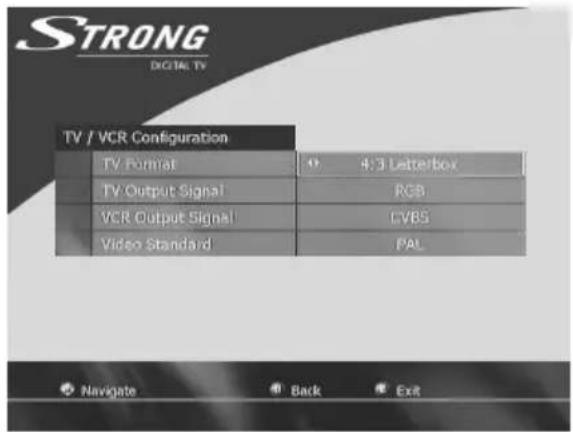
- TV Format: With ◀ / ▶ button set your TV format to 4/3 Letterbox, 16:9 or 4/3 Pan and Scan.
- TV Output signal: With ◀ / ▶ button set your TV mode to RGB, S-Video or CVBS.
- VCR Output signal: With ◀ / ▶ button set your TV mode to S-Video or CVBS.
- Video standard: With ◀ / ▶ button set your Video standard to SECAM or PAL.
Time Zone
Select Time Zone in the Configuration menu and press OK, Time Zone screen is displayed.
With ◀ / ▶ button, select your Local time zone.
Modem Configuration
This menu allows you to define the modem prefix (numbers to be automatically dialed before a phone number to access the public phone network).
Select Modem Configuration field in the Configuration menu and press OK, Modem Configuration screen is displayed.
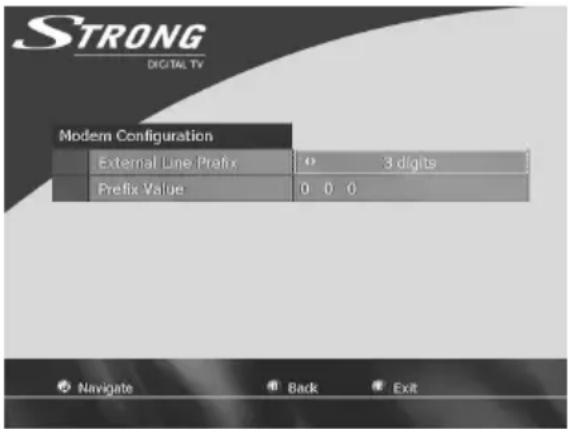
External line prefix: Select from 1 digit to 10 digits if a dialing prefix is needed, select Not required otherwise.
Prefix Value: With remote control digits buttons enter the prefix number needed.
Software Upgrade
This menu allows you to upgrade the software of your decoder from satellite.
Select Software Upgrade field in the Configuration menu and press OK, Software Upgrade screen is displayed.
You can either manually set the expected parameters, or activate the automatic software download.
With ◀ / ▶ button select.
• Automatic: Take all default values or last manual succeeded values.
- Manual: Take entered values from specific menu (see below).
Then press OK to validate.
If Automatic software update has been selected it will be launched immediately. If Manual software update has been selected, you will be asked to fill the following fields:
- Satellite,
- frequency (MHz),
- Polarization,
- Symbol Rate,
• FEC.
Once these parameters are set, press OK to validate and launch the software upgrade.
Default Configuration Restoration
This menu allows you to return to factory preset parameters.
To access this menu, Receiver PIN code is requested.
Select Default Configuration Restoration field in the Configuration menu and press OK, Default Configuration Restoration screen is displayed.
!Be cautious, if you press OK, ALL YOUR SETTINGS will be erased.
Press OK to return all parameters to default settings and return to Configuration menu.
Information
Select Information in the Main menu and press OK.
Information menu is displayed and Decoder Information field is highlighted.
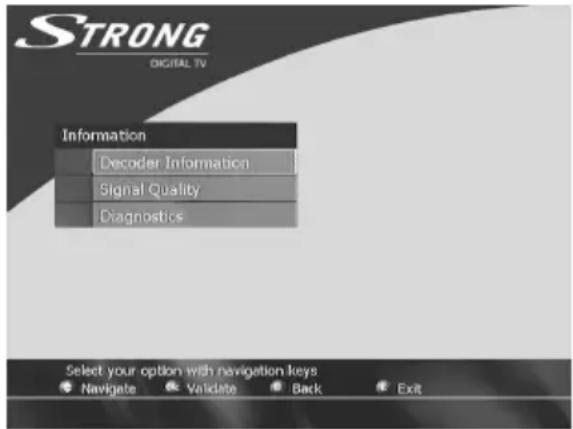
Press OK to access Decoder Information menu.
Decoder Information
This menu allows you to get information on your set-top box, (model name, firmware version, software version, serial number...).
! These data could be of interest for your Viasat customers care service.
Press BACK to return to Information menu or press EXIT to exit the menu.
Signal Quality
Select Signal Quality field in the Information menu and press OK, Signal Quality screen is displayed.
This menu allows you to check the quality of the satellite signal received by your set-top box.
Check that the signal is correct and press BACK to return to Information menu or press EXIT to exit the menu.
Solving problems
* Before you check connections between your equipment, make sure you disconnect all your equipment from the mains supply. When you have finished checking and making connections, safely reconnect all the equipment to the mains supply (see page 11).
| Problem | Possible cause | Suggested solution |
| Your set-top box doesn't seem to be working, and there are no lights on the front panel. | Your set-top box is not receiving power. | Make sure that the mains plug is properly plugged in and that the mains supply is switched on.Check that the mains wall socket has power (try plugging in a lamp). |
| Your set-top box doesn't seem to be working, and the front-panel standby light is red. | Your set-top box is switched off. | Press standby on the front panel, or ⏻ on your remote control. |
| Your set-top box doesn't seem to be working, and the front-panel standby light is green. | Your set-top box is not correctly connected to your other equipment, or your other equipment is not correctly set up. | Check that all the connections are properly made.Check that your TV is plugged into the mains and that it is switched on. |
| Your TV is not switched to show digital satellite channels. | If your set-top box is connected to your TV via a SCART lead, try selecting the appropriate AV channel on your TV. | |
| You can see on-screen interference | Your TV is not correctly tuned. | Check that your TV is correctly tuned to your set-top box.For further information, refer to your TV instruction book. |
| Your remote control isn't working. | Something is between the remote control and your set-top box. | Make sure you point your remote control directly at your set-top box and that nothing is between it and your set-top box. The ir receive light on your set-top box's front panel should flash each time you press a remote control button. If not press SAT key on your Remote control. |
| The batteries are flat or inserted the wrong way round. | Check the batteries and replace them if necessary. | |
| You've forgotten your PIN. | Call customer support for advice. | |
| The menus and banners are in a language you don't understand. | The menu language has been changed to a language you don't understand. | You can change the menu language as follows:1. From a digital satellite channel, press MENU.2. Press ▼, 3 times to highlight the Preferences item on the menu, then press OK.3. Press OK.The Preferences menu displays. The first, highlighted item is the language item, press OK.4. Press ▶ until your language displays.5. Press BACK. The menus should now be in your preferred language.6. Press EXIT to redisplay digital satellite TV. |
| Your decoder doesn't react when you press a key of the RCU (the Red led on the front panel doesn't blink). | Your RCU might be configured for DVD, VCR or TV devices. | Press SAT key on the RCU. |
Specification
Due to continued product improvement, this specification may change without notice.
General
Operating voltage: 12 V DC
Power consumption: 20 W (max.)
Weight: 1.3 kg
Dimensions (W x H x D): 252 mm x 42 mm x 138 mm
Operating temperature range: 0°C to +40°C
Storage temperature range: -20^ to +60^
Rear and side panel connectors
Input: DC
Telephone line: RJ11
Others: TV Scart, VCR Scart, Video cinch, audio cinch, Tuner RF, SPIDIF coaxial
Dish input: IEC 169-24 F-type female
www.strong.tv.com
- Digital Satellite Receiver SRT 6780
- Summary
- Precautions
- Note:
- Welcome to digital satellite TV!
- Updates to your set-top box
- Your remote control
- Inserting the batteries
- Remote control buttons: quick reference
- Your set-up box
- Front panel
- Rear panel connectors overview
- WARNING
- Installation
- Before you begin
- The supplied equipment
- What else do I need?
- Smart card
- Satellite dish
- Connecting to other equipment
- Connection method I: ToTV and VCR
- Connection method 2: To TV only
- Connecting to the telephone line
- Inserting your smart card
- Taking care of your smart card
- Connecting to the mains supply
- Switching on for the first time
- If the Languages screen does not display...
- Checking the installation screens
- Choosing your language
- Time menu
- Antenna configuration menu
- LNB feed
- LNB index
- LNB type
- Low and High frequencies
- Satellite
- Checking the signal
- Channels Search menu
- Installation type
- Frequency (MHz)
- Polarization
- Symbol rate
- FEC
- Bouquet number
- Searching for channels
- Day to day use
- Decoder switch ON / Standby
- Volume setting
- Volume:
- Sound mute:
- TV channels access
- TV Zapping:
- TV channels direct selection:
- Back to last TV channel:
- Radio channels access
- Direct Access:
- From the menu:
- Radio Zapping:
- Zapping Banner / Extended Information banner
- Whilst TV information is displayed:
- Access option:
- TV channel list or TV Miniguide:
- TV Miniguide
- TV Channel list
- Programm Guide
- Extra information
- Recording a digital satellite program
- Watching other channels while you are recording a digital satellite program
- Teletext access
- Other settings
- Displaying the Main Menu
- Channels
- Radio Channels
- Program Guide
- Conditional Access
- Subscriptions
- User Limits
- Smart Card PIN Code Modification
- Preferences
- Languages
- Display options
- Favorite Lists
- New list:
- Existing one:
- Parental Control
- Configuration
- Channels Installation
- TV/VCR Configuration
- Time Zone
- Modem Configuration
- Software Upgrade
- Default Configuration Restoration
- Information
- Decoder Information
- Signal Quality
- Solving problems
- Specification
- General
- Rear and side panel connectors
Brand : STRONG
Model : SRT 6780
Category : Satellite receiver