
SRT 8410 - Satellite receiver STRONG - Free user manual and instructions
Find the device manual for free SRT 8410 STRONG in PDF.


| Product Type | Satellite Receiver |
| Brand | STRONG |
| Model | SRT 8410 |
| Dimensions (W x D x H) | 30 cm x 20 cm x 5 cm |
| Weight | 1.5 kg |
| Power Supply | 230V AC, 50 Hz |
| Power Consumption | 20 W (max) |
| Tuner Type | DVB-S/S2 |
| Video Decoding | MPEG-2 / MPEG-4 (H.264) |
| Output Resolution | Up to 1080p |
| Output Connectors | HDMI, Scart, RCA, Coaxial Audio |
| Input Connectors | F-type (satellite in), Loop through |
| USB Port | 1 x USB 2.0 (for recording and playback) |
| Supported CI/CA | Common Interface slot for conditional access |
| Electronic Program Guide | Yes |
| Parental Control | Yes |
| Recording Function | USB PVR (time shift and record) |
| Maintenance | Wipe with a soft, dry cloth. Do not use liquids. |
| Safety Instructions | Read the user manual before use. Do not expose to moisture. |
| Spare Parts & Repairability | Contact STRONG support for spare parts. Repairs by authorized service only. |
Frequently Asked Questions - SRT 8410 STRONG
User questions about SRT 8410 STRONG
0 question about this device. Answer the ones you know or ask your own.
Ask a new question about this device
Download the instructions for your Satellite receiver in PDF format for free! Find your manual SRT 8410 - STRONG and take your electronic device back in hand. On this page are published all the documents necessary for the use of your device. SRT 8410 by STRONG.
USER MANUAL SRT 8410 STRONG
User manual
SAFETY INSTRUCTIONS
CAUTION
RISK OF ELECTRIC SHOCK DO NOT OPEN

CAUTION: TO REDUCE THE RISK OF ELECTRICAL SHOCK, DO NOT REMOVE COVER (OR BACK). NO USER-SERVICEABLE PARTS INSIDE. REFER TO QUALIFIED SERVICE FOR SERVICING.
Explanation of WARNING symbols

The lightning flash with arrowhead symbol within an equilateral triangle is intended to alert the user to the presence of not isolated dangerous voltage within the inside of the product that may be of sufficient magnitude to constitute a risk of electric shock to persons.

The exclamation point within an equilateral triangle is intended to alert the user to the presence of important operating and servicing instructions in the literature accompanying the appliance.
Read the following instructions carefully
WARNING: TO REDUCE THE RISK OF FIRE, ELECTRICAL SHOCK OR ANNOYING INTERFERENCE, DO NOT EXPOSE THIS APPLIANCE TO RAIN OR MOISTURE AND ONLY USE THE RECOMMENDED ACCESSORIES.
- Read All Instructions — Before you use the product, read all operating instructions. For more information on accessories such as the lithium ion battery, refer to the manuals provided with those products
■ Save These Instructions — Save all safety and operating instructions for future reference
■ Heat Warnings — Read carefully and follow all warning labels on the product and those described in the instructions.
■ Follow Instructions — Follow all instructions provided with this product
■ Cleaning — Always unplug this product from the wall outlet before cleaning. Use only a damp cloth for cleaning. Never use any type of liquid or aerosol cleaner, or any type of organic solvent to clean this product
■ Attachments — For your safety, and to avoid damaging the product, use only accessories recommended by STRONG.
■ Water and Moisture — Never use this product around water (near a bathtub, kitchen sink, laundry tub, wet basement, swimming pool or in the rain)
■ Location — To avoid damage to the product and prevent personal injury, never place this product on an unstable stand, tripod, bracket, table or cart. Mount only on a stable tripod, stand, or bracket. Follow the instructions that describe how to safely mount the product, and use only the mounting devices recommended by the manufacturer
■ Power Sources — Connect this product only to the power source described on the product label. If you are not sure about the type of power supply in your home, consult your local power company
■ Refer to instruction pages for information on using the product with a battery
■ Grounding, Polarization — If this product is used with a specified AC adapter, the adapter may be equipped with a polarized alternating current line plug (a plug with one blade wider than the other). This safety feature allows the plug to fit into the power outlet only one way. If you cannot insert the plug into the wall outlet, pull it out, reverse it, and then reinsert it. If the plug still fails to fit, contact an electrician and have the receptacle replaced
■ Protecting the Power Cord — The power supply cord should be placed so it will not bewalked on. Never put a heavy object on the power cord or wrap it around the leg of a table or chair. Keep the area around the power cord connection points, at the power outlet, and at the product connection, free of all AC adapter or accessory power cords

GENERAL PRECAUTIONS SAFETY PRECAUTIONS
■ Lightning — If a lightning storm occurs while using a specified AC adapter, remove it from the wall outlet immediately. To avoid damage from unexpected power surges, always unplug the AC adapter from the power outlet and disconnect it from the receiver when the receiver is not in use
■ Overloading — Never overload wall outlets, extension cords, power strips, or other power connection points with too many plugs
■ Foreign Objects, Liquid Spillage — To avoid personal injury caused by fire or electrical shock from contact with internal high voltage points, never insert a metal object into the product. Avoid using the product where there is a danger of spillage
■ Heat — Never use or store this product near any heat source such as a radiator, heat register, stove, or any type of equipment or appliance that generates heat, including stereo amplifiers
■ Servicing — Refer all servicing to qualified personnel. Attempting to remove the covers or disassemble the product, could expose you to dangerous high voltage points
■ Damage Requiring Service — If you notice any of the conditions described below while using a specified AC adapter, unplug it from the wall outlet and refer servicing to qualified service personnel:
-
Liquid has been spilled onto the product or some other object has fallen into the product.
-
The product has been exposed to water.
-
The product does not operate normally despite following operating instructions. Adjust only the controls described in the operating instructions as improper adjustment of other controls could damage the product and require extensive repair work by a qualified technician.
-
The product has been dropped or damaged in any way.
-
The product exhibits a distinct change in performance.
■ Replacement Parts — When replacement parts are required, make sure that the authorized service center uses only parts with the same characteristics as the originals, as recommended by the manufacturer. Unauthorized substitution of parts could result in fire, electrical shock, or create other hazards
■ Safety Check — Upon completion of servicing or repairs, ask the service technician to perform safety checks to determine that the product is in good working order
■ Apparatus shall not be exposed to dripping or splashing and no objects filled with liquids, such as vases, shall be placed on the apparatus.
■ Where the mains plug or all-pole mains switch is used as the disconnect device, the disconnect device shall remain readily operable.
SAVE THESE INSTRUCTIONS
TABLE OF CONTENTS
1.0 INTRODUCTION 2
1.1 Safety Instructions 2
2.0 INTRODUCTION 6
2.1 Front Panel 6
2.2 Rear Panel 6
2.3 Remote control 6
3.0 CONNECTION 8
3.1 Connecting to Terrestrial Antenna 8
3.2 Connection to TV with HDMI cable 8
3.3 Connecting to TV with SCART cable 8
3.4 Connecting a Hi-Fi system 9
4.0 GETTING STARTED 9
4.1 Switching On 9
4.2 First Time Installation 9
4.3 Channel Search 10
5.0 MAIN MENU 10
5.1 Channel manager 10
6.0 FUNCTIONS
6.1 Standby/Power button 13
6.2 Program Guide 13
6.3 Changing Channels 13
6.4 Volume Control 14
6.5 Audio control 14
6.6 Accessing the favorite channels 14
6.7 Teletext 14
6.8 Subtitle 14
6.9 Show program information 14
6.10 Switching between DTV and Radio mode 14
7.0 SPECIFICATION 15
A.1 TROUBLESHOOTING 17

0180 500 75 43*
* €0.14/Min. from German wired line
0820 400 150*
*€0.12/Min. from Austrian wired line
0826 029 928*
*€0.14/Min. from French wired line
per June 2008
1.0 INTRODUCTION
1.1 Safety Instructions
TO REDUCE THE RISK OF FIRE AND ELECTRIC SHOCK, DO NOT EXPOSE THIS UNIT TO RAIN OR MOISTURE.
CAUTION: To reduce the risk of fire and electric shock, do not remove the cover (or back) of the unit. No user-serviceable parts inside. Refer to qualified Service for servicing.
The lightning flash with arrowhead symbol, within an equilateral triangle, is intended to alert the user to the presence of not insulated dangerous voltage within the inside of the product that may be of sufficient magnitude to constitute a risk of electric shock to persons.

The exclamation point within an equilateral triangle is intended to alert the user to the presence of important operation and servicing instructions in the literature accompanying the appliance.
Read the following instructions carefully
WARNING: TO REDUCE THE RISK OF FIRE OR ELECTRIC SHOCK, DO NOT EXPOSE THIS APPLIANCE TO RAIN OR MOISTURE.
CAUTION: TO PREVENT ELECTRIC SHOCK, MATCH WIDE BLADE OF PLUG TO WIDE SLOT AND FULLY INSERT
The apparatus shall not be exposed to dripping or splashing, and that no objects filled with liquids, such as vases, shall be place on the apparatus.
IMPORTANT SAFEGUARDS
In addition to the careful attention devoted to quality standards in the manufacture of your product, safety is a major factor in the design of every instrument. However, safety is your responsibility, too. This sheet lists important information that will help to assure your enjoyment and proper use of the product and accessory equipment. Please read them carefully before operation and using your product.
INSTALLATION
-
Read and Follow Instructions - All the safety and operation instructions should be read before the product is operated. Follow all operating instructions.
-
Save Instructions – Save all safety and operating instructions for future reference.
-
Heed Warnings – Read carefully and follow all warning labels on the product and those described in the instructions.
-
Grounding, Polarization – If this product is used with a specified AC adapter, the adapter may be equipped with a polarized alternating current line plug. This product may be equipped with a polarized alternating -current line plug. This plug will fit into the power outlet, try
reversing the plug. If the plug still fails to fit, contact your electrician to replace your obsolete outlet. To prevent electric shock, do not use this polarized plug with an extension cord, receptacle, or other outlet unless the blades can be fully inserted without blade exposure. If you need an extension cord, use a polarized cord.
-
Power Sources - This product should be operated only from the type of power source indicated on the marking label. If you are not sure of the type of power supply to your home, consult your video dealer or local power company. For products intended to operate from battery power, or other sources, refer to the operating instructions.
-
Overloading - Do not overload wall outlets or extension cords as this can result in a risk of fire or electric shock. Overloaded AC outlets, extension cords, frayed power cords, damaged or cracked wire insulation, and broken plugs are dangerous. They may result in a shock or fire hazard. Periodically examine the cord, and if its appearance indicated damage or deteriorated insulation, have it replaced by your service technician.
-
Power-Cord Protection - Power-supply cords should be routed so that they are not likely to be walked on or pinched by items placed upon or against them, paying particular attention to cords at plugs, convenience receptacles, and the point where they exit from the product.
-
Ventilation - Slots and openings in the case are provided for ventilation to ensure reliable operation of the product and to protect it from overheating. These openings must not be blocked or covered. The openings should never be blocked by placing the product on a bed, sofa, rug, or heat register. This product should not be placed in a built-in installation such as a book case or rack, unless proper ventilation is provided or the product manufacturer's instructions have been followed.
-
Attachments - Do not use attachments unless recommended by the product manufacturer as they may cause hazards.
-
Water and Moisture - do not use this product near water for example, near a bath tub, wash bowl, kitchen sink or laundry tub, in a wet basement, or near a swimming pool and the like. Caution: Maintain electrical safety. Power line operated equipment or accessories connected to this unit should bear safety certification mark on the accessory itself and should not be modified so as to defeat the safety features. This will help avoid any and should not be modified so as to defeat the safety features. This will help avoid any potential hazard from electrical shock or fire. If in doubt, contact qualified service personnel.
-
Accessories - Do not place this product on an unstable cart, stand, tripod, bracket, or table. The product may fall, causing serious injury to a child or adult as well as serious damage to the product. Use this product only with a cart, stand, tripod, bracket, or table recommended by the manufacturer' or sold with the product. Any mounting of the product should follow the manufacturer's instructions and use of a mounting accessory recommended by the manufacturer.
11a. A product and card combination should be moved with care. Quick stops, excessive force, and uneven surfaces may cause the product and cart combination to overturn. Note to CATV system installer. This reminder is provided to call the CATV system installer's attention to Section 820-40 of the NEC which provides guidelines for proper grounding and, in particular, specifies that the cable ground shall be connected to the grounding system of the building, as close to the point of cable entry as practical.
-
Outdoor Antenna Grounding - If an outside antenna or cable system is connected to the product, be sure the antenna or cable system is grounded so as to provide some protection against voltage surges and built-up static charges. Section 810 of the National Electrical Code, ANSI/NFPA No.70-1984 (Section 54 of Canadian Electrical Code, Part1) provides information with respect to proper grounding of the mast and supporting structure, grounding of the lead-in wire to an antenna-discharge unit, connection to grounding electrodes, and requirements for the grounding electrode.
-
Power Lines - An outside antenna system should not be located in the vicinity of overhead power lines, other electric light or power circuits, or where it can fall into such power lines or circuits. When installing an outside antenna system, extreme care should be taken to keep from touching or approaching such power lines or circuits, as contact with them might be fatal. Installing an outdoor antenna can be hazardous and should be left to a professional antenna installer.
Use
-
Cleaning - Unplug this product from the wall outlet before cleaning. Do not use liquid cleaners or aerosol cleaners. Use a damp cloth for cleaning.
-
Objects that may touch dangerous voltage points or "short-out" parts could result in a fire or electric shock. Never spill liquid of any kind on the product.
-
Lightning -For added protection for this product during a lightning storm, or when it is left unattended and unused for long periods of time, unplug it from the wall outlet and disconnect the antenna or cable system. This will prevent damage to the product due to lightning and power line surges.
Service
-
Servicing - Do not attempt to service this product yourself, as opening or removing covers may expose you to dangerous voltage or other hazards. Refer all servicing to qualified service personnel.
-
Conditions Requiring Service - Unplug this product from the wall outlet and refer servicing to qualified service personnel under the following conditions:
■ When the power-supply cord or plug is damaged.
■ If liquid has been spilled, or objects have fallen into the product.
■ If the product has been exposed to rain or water.
If the video does not operate normally by following the operating instructions. Adjust only those controls that are covered by operating instructions. Improper adjustment of other controls may result in damage and will often require extensive work by a qualified technician to restore the product to its normal operation.
■ If the product has been dropped or cabinet has been damaged.
■ When the product exhibits a distinct change in performance—this indicates a need for service.
-
Replacement Parts - When replacement parts are required, have the service technician verify that the replacements he uses have the same safety characteristics as the original parts. Use of replacements specified by the product manufacturer can prevent fire, electric shock, or other hazards.
-
Safety Check - Upon completion of any service or repairs to this product, ask the service technician to perform safety checks recommended by the manufacturer to determine that the product is in safe operating condition.
-
Wall or Ceiling Mounting - The product should be mounted to a wall or ceiling only as recommended by the manufacturer.
-
Heat - The product should be situated away from heat sources such as radiators, heat registers, stoves, or other products (including amplifiers) that products heat.
Safety Warnings
- The normal operating temperature of the digital receiver is between 0°C and 40°C
- Please prevent the receiver from operating in dusty conditions.
- The receiver shall be operated in ventilated environment away from heat sources. No objects filled with liquids, such as vases, shall be placed on the unit. The receiver shall not be exposed to dripping or splashing. Should this happen, disconnect your receiver from the main and consult your dealer.
- Do not open or disassemble the outer chassis in order to avoid the danger of electric shock and damaging to the receiver. Opening the chassis will also void the warranty.
- The antenna connected to the receiver shall be equipped with anti-shock device from lightning. Where the mains plug or an appliance coupler is used as the disconnected device, the disconnected device shall remain readily operable.
- If the receiver is inoperative, please consult the Customer Support.
This receiver has been manufactured to satisfy international safety standards. Please read the following recommended safety precautions carefully.
MAINS SUPPLY: AC 90 \~ 240 V \~ 50/60 Hz
OVERLOADING: Do not overload wall outlets, extension cords or adapters as this can result in fire or electrical shock.
LIQUIDS: Keep liquids away from the receiver.
CLEANING: Before cleaning, disconnect the receiver from the wall socket. Use a cloth lightly dampened with water (no solvents) to clean the exterior.
VENTILATION: Do not block the receiver ventilation holes. Ensure that free airflow is maintained around the receiver. Never store the receiver where it is exposed to direct sunlight or near heating equipment e.g. a radiator. Never stack other electronic equipment on top of the receiver. Place the receiver at least 30 mm from the wall.
ATTACHMENTS: Do not use any attachment that is not recommended by the manufacturer; it may cause a hazard or damage the equipment.
CONNECTION: Connect all components before plugging any power cords into the wall outlet. Always turn off the receiver, TV and other components before you connect or disconnect any cables.
SERVICING: Do not attempt to service this product yourself. Any attempt to do so will make the warranty invalid. Refer all servicing to a qualified service agent.
LIGHTNING: If the receiver is installed in an area subject to intense lightning activity, protection devices for the receiver mains connector and modem telephone line are essential. The individual manufacturer's instruction for safeguarding other equipment, such as TV set, Hi-Fi, etc., connected to the receiver must also be followed during lightning storms.
GROUNDING: cables must be grounded. The grounding system must comply with SABS 061.

NOTE: Dispose the used batteries at designated place for environment protection
2.0 INTRODUCTION
2.1 Front Panel
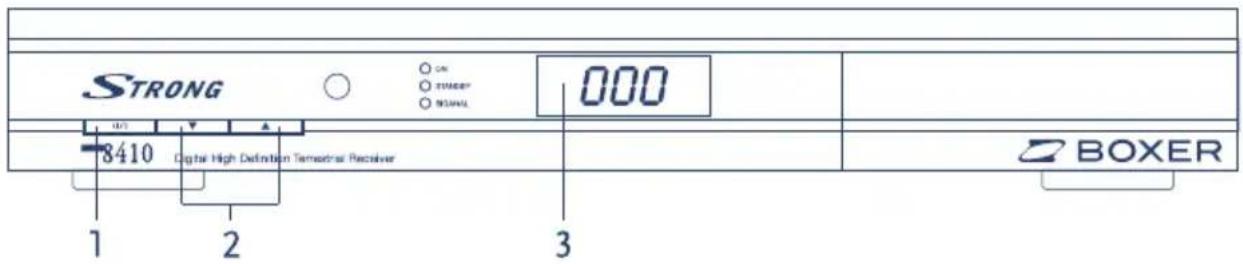
- Power ON/STAND BY
- ▲▼ Chanel up/down
- Display
I In ON mode channel number is shown
2.2 Rear Panel

- ANT IN
To connect your terrestrial antenna
- TO TV
If you want your antenna signals from "ANT IN" connector inject to second receiver or TV set. Use this loop trough output "TO TV" to connect these by using a coaxial cable.
- HDMI
Use this connection to connect the receiver to your TV using HDMI cable.
- S/PDIF Digital audio output
Use this coaxial output to connect your receiver to the input of your digital audio amplifier.
- AUDIO Right (Red RCA) and Left (White RCA)
These connectors give you the possibility to connect the audio signal to an external amplifier or to the audio input of your TV.
- TV SCART Connector
Use this connector to connect your receiver with your TV set using a SCART cable.
- Main power switch
2.3 Remote control
Remove the battery compartment cover and load two AAA (UM-4 or R03) batteries. Make sure that the batteries have been inserted in the correct polarities matching to the symbols +, - marked in the battery compartment. Close the battery compartment cover. If replacing of batteries is necessary, replace both
batteries. Do not mix new and used batteries otherwise the operation lifetime will be much shorter than normal. Remove the batteries if the unit will not be used for a prolonged period of time.
The remote control transmits a directional infrared beam. Be sure to aim the remote control directly at the infrared sensor of the unit during operation. If the sensor has been covered, the sensor will not respond. The sensor may not be able to receive the remote signal when it is exposed to direct sunlight or a strong artificial light (fluorescent or strobe light). In this case, change the direction of the light or reposition the unit to avoid direct lighting.
BE ENVIRONMENTALLY FRIENDLY
Do not dispose batteries as normal rubbish. Please dispose batteries following the Government's regulation.
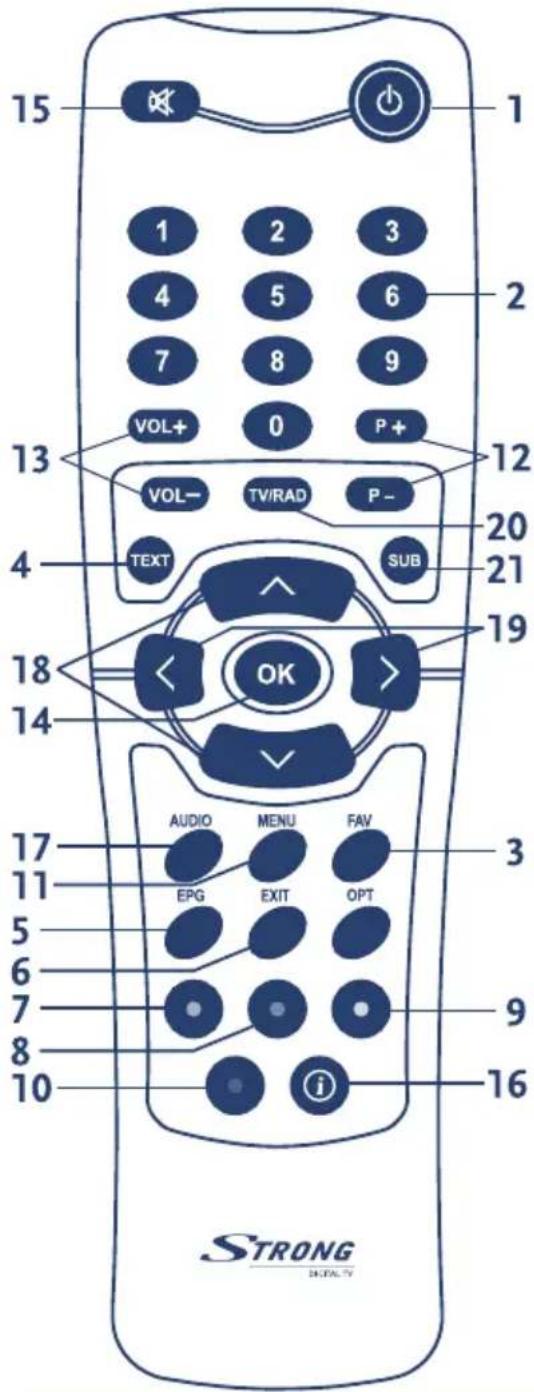
- ⏻ Switch to ON/STANDBY mode
- 0 \~ 9 Enter numeric values and to select the channel directly by entering it's number
- FAV Opens Favorite List
- TEXT Opens Teletext
- EPG Opens Electronic Program Guide Menu
- EXIT Exit from menu
- RED Various functions
- GREEN Various functions
- YELLOW Various functions
- BLUE Various functions
- MENU Opens menu
- P+ / P- Channel Up/Down
- VOL+ / VOL- adjust volume
- OK BConfirms a choice
- MUTE
- i Press for present channel information
- AUDIO Choose audio: Left/Right/Stereo/Mono
- ▲▼ UP/Down
- Left/Right
- TV/RAD Change between Radio and TV
- SUB Subtitle menu
- OPT No function
3.0 CONNECTION
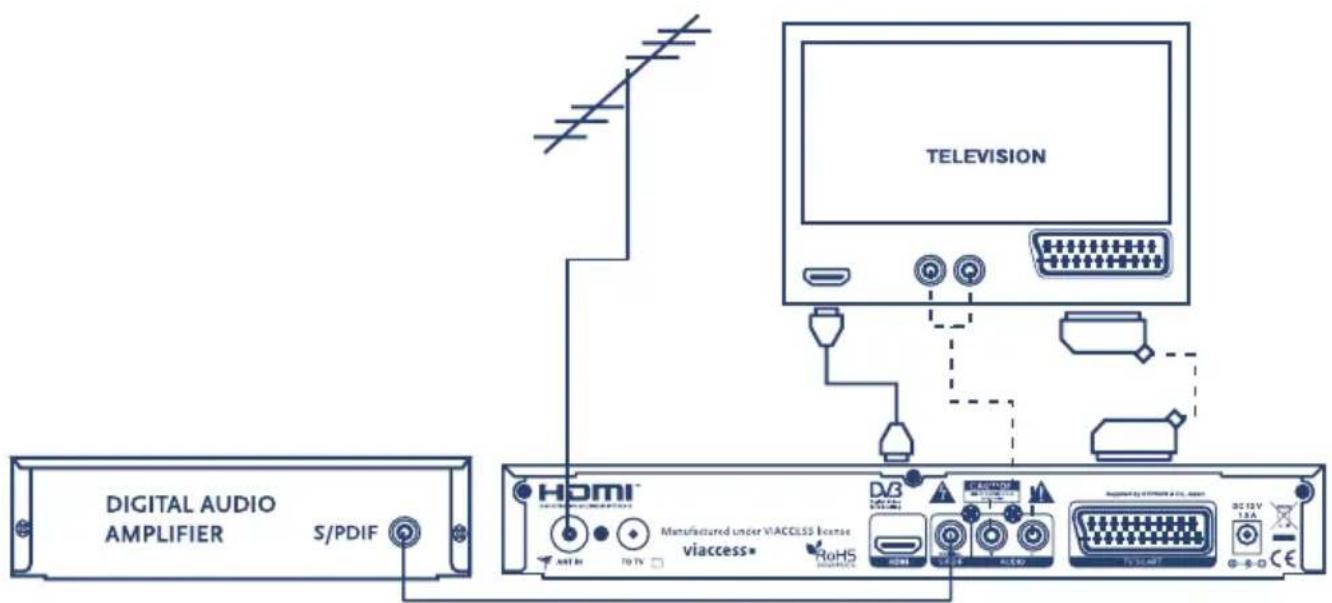
3.1 Connecting to Terrestrial Antenna
You can connect the receiver to the following types:
- Standard Antenna
- Active Antenna with built-in amplifier.

Note: This receiver uses active antenna as standard.
3.2 Connection to TV with HDMI cable
■ Connect the antenna to ANT IN on the receiver
■ Connect the TV HDMI plug on the receiver to the HDMI plug on your TV using a HDMI cable
■ Turn on your TV, connect and turn on your receiver
You might have to choose HDMI channel on your TV to see Digital TV. In some cases your TV will automatically choose this when the receiver is turned on.
3.3 Connecting to TV with SCART cable
■ Connect antenna to the ANT IN input on the receiver.
■ Connect the TV SCART socket on the receiver to the SCART input of your TV set by using a SCART cable.
■ Switch on your TV, plug in and switch on your receiver.
You may need to select the AV (SCART) channel on your TV to watch Digital TV. In some cases your TV will automatically select this channel when the receiver is switched on.
3.4 Connecting a Hi-Fi system
■ Use the AUDIO L/R output for stereo sound to analogue Hi-Fi system.
■ Use the S/PDIF or Optical* output for Digital sound to a Digital input on you Hi-Fi system.

Note: To avoid interference you must use shielded audio cables. Never connect digital output to any analogue input. It is always advisable to consult your Hi-Fi instruction book.
4.0 GETTING STARTED
4.1 Switching On
■ Turn on your TV set.
■ Turn on the main power supply to the receiver and press Power On/Standby.
If TV set does not turn automatically to the SCART input, please select this input with the AV key, or similar on your TV remote control.
4.2 First Time Installation
Set up wizard:
■ When the receiver is turned on for the first time you will see the menu "Set up wizard"
■ Select "Country" by using the ◀▶ buttons
■ Select "Menu language" by using the ◀▶ buttons
■ Select "TV Format" by using the ◀▶ buttons. (use 4:3 if you do not have a widescreen TV otherwise always use 16:9)
■ Select "Antenna supply" OFF and ON (ON for Active Antenna)
■ Press "OK" to use quick setup or "MENU" to use advanced setup
■ If you select quick setup channel searching will commence
If you select advanced setup, "language selection", "TV settings" and "Antenna settings" can be configured manually
■ Select "Language select" by using the ◀▶▲▼ buttons
■ Here you can setup: Menu language, 1st and 2nd audio language as well as 1st and 2nd text language and default subtitles
■ The subtitle setting selects the subtitle setting that is to be used as standard for all programs (if available), the options are: Normal, Hard of hearing or None
■ Select "TV/VCR settings" by using the ◀▶▲▼ buttons
■ Here you can setup: HDMI output, TV format, Picture format, Audio Delay, Digital Audio and HDCP activation
■ When you have made the selections you wish, press the BLUE "Save&Next" button to the next step
4.3 Channel Search
In this menu you can select a channel with signal to adjust your antenna for max signal en reception
- Select "MUX" to choose a channel to test signal strength. Enter the channel number with the numeric keys on the remote control. Press the ▼ button for next step.
- Select "Frequency" to manually enter a frequency to test signal strength. Enter the frequency using the numeric keys on the remote control. Press the ▼ button for next step.

NOTE: the bandwidth changes automatically
■ Press OK to start scanning process.
The channel search progress will be shown on screen.
When the search is done and all channels have been found, a list of favorite networks will be shown and you have to select your favorite network.
After this the receiver will automatically switch to the first channel in the list.
5.0 MAIN MENU
In the Main Menu you find Channel manager, Installation, Timer and Information.
5.1 Channel manager
-
Press MENU button to go to the Main Menu
-
Manage Channels
Press OK to choose sub menus and ▲▼ to choose between the submenus. OK to confirm.
a. Sort Channels
■ Press RED "Sort" to see the options for automatic sorting of the channels.
■ Press GREEN "Move" to move the chosen channel. You choose the channel you want to move with OK and insert with OK
■ Press YELLOW "Save" to save the list.
■ Press BLUE "Save&Exit" to save the list and exit.
b. Add to favorites
■ Choose channel with ▲▼ and favorite list with arrow ◀▶. Confirm with OK.
■ Press YELLOW "Save" to save the favorites.
■ Press BLUE "Save&Exit" to save and exit.
c. Edit Channels
■ Press RED "lock" to lock channels. By pressing RED the from and to time is shown, the channel will be locked within this interval. Standard code is 1234
■ Press GREEN "Edit" to edit the name of the channel list.
■ Press YELLOW "Save" to save changes.
■ Press BLUE "Save&Exit" to save and exit.
3. Installation
Press OK to choose sub menus and ▲▼ to choose between the sub menus. Confirm with OK.
a. Channel set-up
■ Choose band, MUX or frequency with ▲▼◀▶. Press RED "delete" to delete all channels in the box, confirm with OK.
■ Press YELLOW "Manuel" to make a manuel search on a frequency or MUX, choose frequency or type MUX first.
■ Press BLUE "Auto search" to make an automatic search on all frequencies.
b. Terrestrial set-up
■ Choose country or antenna supply with ◀▶▲▼ and OK
■ Press YELLOW "Save" to save the set-up
■ Press BLUE "Save&Exit" to save the set-up and exit.
c. System set-up
■ Language select
■ Choose with ▲▼◀▶ and press OK. Menu language, 1st audio lang, 2nd audio lang, 1st text lang and 2nd text lang.
■ TV/VCR settings
■ Choose with ◀▶▲▼ and OK Standard for: HDMI output, TV Format, Picture Format and HDCP Always Enabled.
■ Time settings
Choose with ◀▶▲▼ and OK set-up for: Country, Timezone Selection, Preferred Timezone and Daylight Savings Time.
- Favorite network
Choose with ◀▶▲▼ and OK favorite network.
■ Software update
Enter PIN code to check if new software is available, if so press OK to start the software download (standard code is 1234)
■ Factory reset
Enter PIN code and press OK to make a factory reset of the receiver. Note! This will delete all settings in the receiver (standard code is 1234).
Do not unplug the power from the receiver during the Update or Factory Reset.
d. Parental Lock
■ Menu lock
Activate or deactivate with the ◀▶▲▼
■ Current PIN-code
Press current PIN code (4 digits) if you want to change the code.
■ New PIN-code
Press the new PIN code (4 digits)
■ Confirm PIN-code
Repeat the wanted PIN code (4 digits)
4. Timer
Press OK to activate this menu item
a. Timer Number
■ Choose with the ◀▶▲▼, start with number 1
b. Timer status
- Choose with the ◀▶▲▼ if the timer should be ON or OFF. Note; Set date and time before turning on the timer.
c. Cycle
- Choose with the ◀▶▲▼ if the timer should run "Once", "Every day" or "Weekly".
d. Date
■ Enter date for the timer in this format: YYYY-MM-DD
e. Time
■ Enter start time for the timer in 24h format.
f. Duration
■ Enter the duration for the timer in 24h format.
g. Channel
- Choose channel for the timer with ◀.
5. Information
Press OK to choose submenu and ▲▼ to choose sub item, activate with OK.
a. System information
In this menu you will find information about your receiver product ID, Software version and Serial no. etc.
b. Smart Card
■ Subscription Status
Here you will find information about your subscription
■ Tokens Status Here you will find information about Tokens
■ Event Status Here you will find information about Pay-per-view events.
■ Messaging Here you will find information from your broadcaster
■ Change CA PIN
Enter CA PIN
Enter the current code for your card
Enter new CA PIN
Enter the desired code
Confirm new CA PIN
Repeat the desired code
■ Maturity Rating
Choose with ▲▼◀▶ the access level for your program card and enter CA code to change the level.
■ About Conax CA
Here you will find information about your program card
6.0 FUNCTIONS
6.1 Standby/Power button
Press Standby/Power to turn on the receiver.
If you press the Standby/Power button again the receiver will go to stand by mode.
6.2 Program Guide
- Press the EPG button on the remote control to go to "Program Guide"
- Use ▲▼◀▶ buttons to choose channel.
- Press RED "Previous day" to see program information for the previous day.
- Press GREEN "Next day" to se program information for the next day.
- Press YELLOW "Details" to see details about the chosen program.
- Press BLUE "Timer" to set up a timer function for the selected program
- Press EXIT to leave the Program Guide.
6.3 Changing Channels
- Stepping through the channel list: To move through the channel list, press the P+ or P- key on the remote control.
- Selection by on-screen channels list: You can also select the required channel directly from on-screen channel list. This is displayed using the remotes OK button.
■ Press ▲▼ buttons to select channel step by step
■ Press ◀▶ buttons to select between the different channel lists.
■ Press OK button to switch to the desired channel.
6.4 Volume Control
The volume level of the receiver can be altered with the VOL+ or VOL- on the remote control.



NOTE:
The volume level selected will remain set, even when the receiver is turned off and on again, until it's altered.
- You can mute the sound from the receiver by pressing the ✗ button. The sound remains muted until the ✗ button is pressed again or the VOL+ or VOL- button is pressed or until the receiver is turned off and on again.
6.5 Audio control
■ You can press the AUDIO button to select different audio tracks
6.6 Accessing the favorite channels
■ Press FAV button
■ Select one of the favorite list and press OK.
■ Alternately you can press OK and use ◀▶ to select the favorite list
6.7 Teletext
■ Press TEXT button to start teletext function.
■ Press EXIT to stop Text function.
6.8 Subtitle
■ Press the SUB button to enter the subtitle menu and use ▲▼ to select the desired subtitle and press OK to activate.
6.9 Show program information
- You can read the present program information by pressing the i button on the remote control. Press i twice for detailed information.
- Press RED button for EPG Details from the running program.
- Press GREEN button to get detailed reception information. Press EXIT to return.
6.10 Switching between DTV and Radio mode
You can switch between Digital TV mode and Radio mode by pressing "TV/RAD" button on your remote.
7.0 SPECIFICATION
Demodulator
Modulation: DVB-T COFDM
Frequency range: 174 \~ 234 MHz (VHF III)
470 \~ 862 MHz (UHF IV/V)
Channel bandwidth: 7/8 MHz switchable bandwidth
MPEG Video Decoder
Standards: ISO13818-2 (MPEG-2) - MP@ML, MP@HL
ISO14496-10 MPEG-4 AVC MP@L3, HP@L4
Formats: 576i25 (SD), 576p50, 720p50 (HD), 1080i25 (HD)
Aspect ratio: 4:3, 16:9, Pan & Scan, Letter Box
Video Scaling: Variable
OSD
Colours: 16/256 colours
Resolution: 2 - 16 bits per pixel
Overlay: MPEG stills/live image insertion
MPEG Audio Decoder
Standard : ISO 11172-3 / ISO 13818-3 (MPEG)
ISO14496-3 MPEG-4 AAC - LC/HE
Dolby Digital (AC3)
Decompression MPEG layers 1, 2 (Mono, Dual Channel, Joint Stereo, Stereo)
HE-AAC (profile v1) level 4 decoding
S/PDIF and HDMI audio output formats:
PCM (decompressed stereo)
Compressed Dolby Digital 5.1 pass-through
DTS with transcoded multichannel HE-AAC
System resources
Processor: ST7101
RAM (system): 64 MBytes
Loader
Full code software download mechanism
Authentication of downloaded material
Front panel
3 digits 7 segments red display.
3 LEDs with backlighted symbols
3 buttons; Smartcard slot
Software & Features
Access control: Viaccess ACS3.0
Setup menu: Automatic channel installation, diagnosis, decoder configuration, parental control
EPG: 7 days of EPG, if available from distributor
Languages: multilingual OSD, audio and signaling supported
Teletext processing
EN 300 472 teletext re-insertion in the composite video signal
EN 300 472 & EN 300 743 teletext and subtitling decoding
Interfaces
Mains input connector: Detachable lead
ANT input: IEC-type, female
TO TV: IEC-type, male (loop-through)
1 Scart: TV with RGB
Analogue Audio: 2 RCA Stereo audio outputs (left and right)
Digital Audio: S/PDIF audio electrical output
Digital Video/Audio: HDMI 1.2A with HDCP copy protection
Smartcard reader: 1 slot, ISO 7816 1, 2 & 3
General data
Mains voltage: 96 \~ 264 V, 48/62 Hz
Power consumption: max 10 W
Typical consumption: 8.5 W in SD / 9.5 W in HD
Power consumption in standby: max 0.5 W
Operating temperature: +10 \~ 40 °C
Product dimensions: 280 x 200 x 35 mm
Weight: 1.2 kg
Subject to alterations. In consequence of continuous research and development technical specifications, design and appearance of products may change. Viaccess is a trademark of France Telecom all other product names are trademarks or registered trademarks of their respective owners.
© STRONG 2009. All rights reserved. 01/2009

NOTE:
Design and Specifications may be changed without warning. Weight and dimensions are approximate.
A.1 TROUBLESHOOTING
In some regions, the digital terrestrial signal may be weak. In this case we recommend using an antenna with built in amplifier.
| Problem Possible cause What do I do | ||
| Standby light not lit Mains | Iain lead unpluggedMains fuse blown | Check mains leadCheck fuse |
| No signal found Terrestrial is disconnectedTerrestrial is damaged/misalignedOut of digital signal area | Check terrestrial leadCheck terrestrialCheck with dealer | |
| No picture or sound Tuned to digital teletext channel Reduce to another channel | ||
| Scrambled channel message | Channel is scrambled Select alternative channel | |
| The remote control does not work | The receiver is turned off. The remote is not pointed correctly towards the receiver.Front panel may be defect. The batteries are dead. | Plug in and turn on the receiver.Aim towards the receiver. Check for any damage. Replace the batteries. |
| Forgotten channel lock code | Re-install channels to cancel channel lock | |
| Forgotten menu lock code | Contact help line | |
| After moving the receiver to another room it no longer receives digital signals | The antenna can be connected to a filter that may reduce the signal. | Try connecting the receiver directly to the antenna. |

Tips: The standard PIN code of the receiver is: 1234
ENVIRONMENTAL ISSUES
STRONG is committed to reducing the impact of its products on the environment. To maximise the benefits of our design enhancements, your co-operation is required.
Electronic product recycling
Do not dispose of this product with your domestic rubbish.
At the end of its useful life, this product contains materials which when processed correctly can be recovered and recycled. By participating in the responsible recycling of this product you will be reducing the requirement for new raw materials and reducing the amount of material that would otherwise end up in landfill.
When you purchase a new, similar product your retailer may offer to take this old one off you. Alternatively, you can take it to your local recycling centre. Your retailer or local municipal authority will advise you of the collection facilities available for waste electronically products in your area. User of this service will be free to you.
Within the scope of the European legislation on Waste Electrical and Electronic Equipment (Directive 2002/96/EC valid as of August 2005) STRONG provides a recycling system free of charge for consumers to returning products after end of life. For more information about STRONG's environmental policy to you:
www.strong.tv - select "About us" and "Environmental Policy" from the submenu.
Packaging
When disposing of this product packaging, please ensure that it is recycled. Packaging material is to be depolluted in waste separation.

Power Saving
To save power and money, please put the product into standby mode when not in use. We also recommend disconnection from mains supply when not in use for longer periods of time.

Batteries
Do not dispose of the batteries from your handset with your domestic waste.
Where they are available, participate in your local municipal or retailer collection schemes for spent batteries. Batteries discarded in landfill sites or incinerated increases the chances of pollutants being dispersed into the atmosphere.
Alternations reserved 01/2009
- SAFETY INSTRUCTIONS
- CAUTION
- Explanation of WARNING symbols
- Read the following instructions carefully
- WARNING: TO REDUCE THE RISK OF FIRE, ELECTRICAL SHOCK OR ANNOYING INTERFERENCE, DO NOT EXPOSE THIS APPLIANCE TO RAIN OR MOISTURE AND ONLY USE THE RECOMMENDED ACCESSORIES.
- GENERAL PRECAUTIONS SAFETY PRECAUTIONS
- SAVE THESE INSTRUCTIONS
- TABLE OF CONTENTS
- INTRODUCTION 2
- INTRODUCTION 6
- CONNECTION 8
- GETTING STARTED 9
- MAIN MENU 10
- FUNCTIONS
- SPECIFICATION 15
- A.1 TROUBLESHOOTING 17
- INTRODUCTION
- Safety Instructions
- IMPORTANT SAFEGUARDS
- INSTALLATION
- Use
- Service
- Safety Warnings
- INTRODUCTION
- Front Panel
- Rear Panel
- Remote control
- BE ENVIRONMENTALLY FRIENDLY
- CONNECTION
- Connecting to Terrestrial Antenna
- Connection to TV with HDMI cable
- Connecting to TV with SCART cable
- Connecting a Hi-Fi system
- GETTING STARTED
- Switching On
- First Time Installation
- Set up wizard:
- Channel Search
- MAIN MENU
- Channel manager
- a. Sort Channels
- b. Add to favorites
- c. Edit Channels
- Installation
- a. Channel set-up
- b. Terrestrial set-up
- c. System set-up
- ■ Time settings
- - Favorite network
- ■ Factory reset
- d. Parental Lock
- Timer
- a. Timer Number
- b. Timer status
- c. Cycle
- d. Date
- e. Time
- f. Duration
- g. Channel
- Information
- a. System information
- b. Smart Card
- ■ Subscription Status
- ■ Change CA PIN
- ■ Maturity Rating
- ■ About Conax CA
- Standby/Power button
- Program Guide
- Changing Channels
- Volume Control
- NOTE:
- Audio control
- Accessing the favorite channels
- Teletext
- Subtitle
- Show program information
- Switching between DTV and Radio mode
- SPECIFICATION
- Demodulator
- MPEG Video Decoder
- OSD
- MPEG Audio Decoder
- System resources
- Loader
- Front panel
- Software & Features
- Teletext processing
- Interfaces
- General data
- A.1 TROUBLESHOOTING
- ENVIRONMENTAL ISSUES
- Electronic product recycling
- Packaging
- Power Saving
- Batteries
Brand : STRONG
Model : SRT 8410
Category : Satellite receiver