
BHM612A - Alarm Clock OREGON SCIENTIFIC - Free user manual and instructions
Find the device manual for free BHM612A OREGON SCIENTIFIC in PDF.


| Product Type | Radio Controlled Alarm Clock |
| Brand | Oregon Scientific |
| Model | BHM612A |
| Dimensions (HxWxD) | 6.64 x 2.32 x 1.28 inches |
| Weight | 5.53 oz |
| Power Source | 2 AAA (UM-4) batteries |
| Display Type | Digital LCD with main and secondary windows |
| Time Synchronization | Auto sync with U.S. Atomic Clock radio signal |
| Time Format | 12-hour |
| Calendar | Month/Day; weekday in English, French, or Spanish |
| Alarm | Daily alarm with gradual volume increase |
| Alarm Duration | 2 minutes (auto silences then reactivates after ~8 minutes) |
| Snooze | Yes, ~8-9 minutes |
| Radio Signal Reception | Automatic; can be disabled for quartz mode |
| Time Zones | Pacific, Mountain, Central, Eastern (US) |
| Operating Temperature | 32°F to 104°F |
| Accuracy (Quartz Mode) | ±0.5 second/day |
| Mounting Options | Table standing or wall mountable (bracket included) |
| Reset Button | Factory default reset |
| Warranty | 1 year from date of purchase |
| Customer Support | Phone: 800-853-8883, Email: helpme@oscientific.com |
Frequently Asked Questions - BHM612A OREGON SCIENTIFIC
User questions about BHM612A OREGON SCIENTIFIC
0 question about this device. Answer the ones you know or ask your own.
Ask a new question about this device
Download the instructions for your Alarm Clock in PDF format for free! Find your manual BHM612A - OREGON SCIENTIFIC and take your electronic device back in hand. On this page are published all the documents necessary for the use of your device. BHM612A by OREGON SCIENTIFIC.
USER MANUAL BHM612A OREGON SCIENTIFIC
Congratulations on purchasing the BHM-612A Radio Controlled Alarm Clock.
A smart-looking and easy-to-operate timepiece, the BHM-612A is designed to automatically synchronize the current time and date with the U.S. Atomic Clock.
The BHM-612A is also equipped with a daily alarm clock plus date and multilingual weekday display.
FEATURES & KEY CONFIGURATION
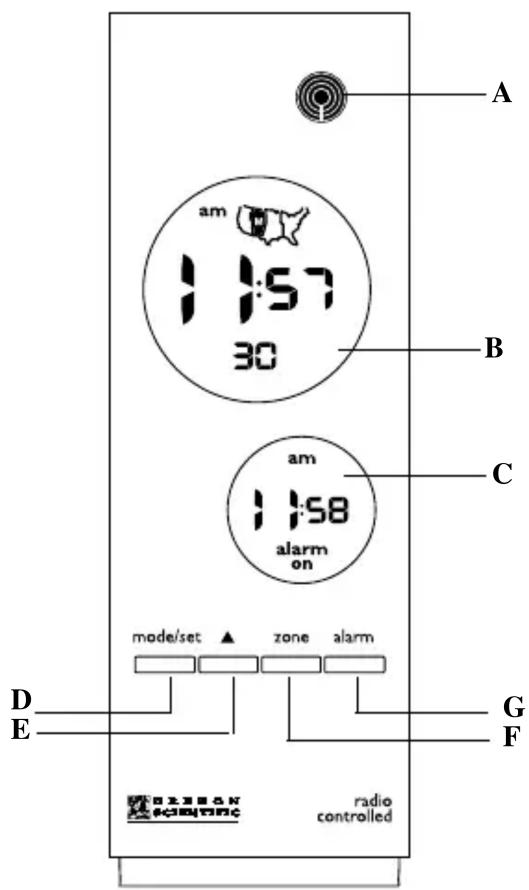
A RF SIGNAL INDICATOR
- Indicates the signal-receiving status of the unit
B MAIN WINDOW
- Displays the current time with seconds or day-of-the week
C SECONDARY WINDOW
- Displays the alarm time and its status or date
D [ MODE/SET ] button
- Changes between seconds and weekday display (Main window) or between calendar and alarm clock display (secondary window)
- Holds to activate the clock setting mode
E [ UP ] button
- Increases the value of a setting by one unit
F [ ZONE ] button
- Press to sequence through the 4 U.S. time-zones: Pacific, Mountain, Central or Eastern.
G [ALARM] button
- Changes the display and operating status of the alarm clock
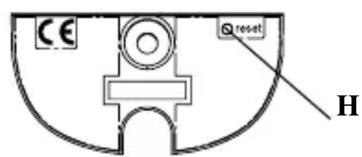
H [RESET] button
- Returns all settings to the factory set default values
BATTERY INSTALLATION
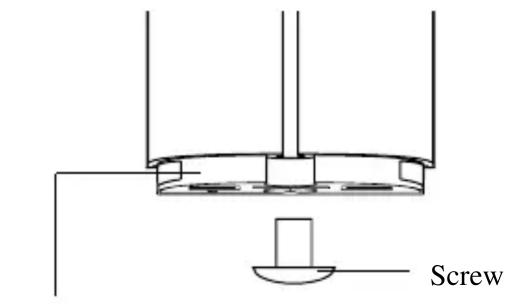
- Open the battery compartment by removing the screw at the bottom of the unit.
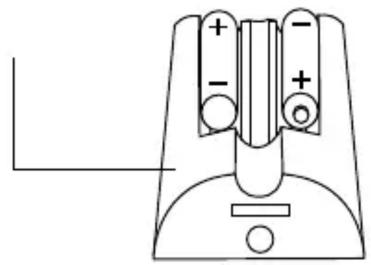
- Pull out the battery holder and insert two AAA-sized (UM-4) batteries in accordance with the polarities shown.
- Slide back the battery holder into the compartment and fasten the screw.
- Press RESET with a blunt stylus.
- When the low battery indicator [☐] appears on the display, follow the above procedures to replace the unit with new batteries.
Note The unit will automatically search for the radio signal when batteries are first installed. When the BHM-612A is new and just out of the box, allow up to 72 hours for the unit to receive the US Atomic Clock signal. To facilitate reception, place the BHM-612A on a window sill away from other signal emitting equipment such as TVs, radios, PCs and microwaves. Stronges signal reception is between midnight and 4AM.
Battery
Holder
natural_image
Simple line drawing of a mechanical component with no text or symbolsDISPLAY MODES
In normal display, the current time, with seconds, will be displayed in the main window and the date will be displayed in the secondary window.
To display the weekday in the main window, press [MODE/SET] once. Press the button again to display seconds.
To display the alarm time in the secondary window, press [ ALARM ] once. Press [ MODE / SET ] to display the date.
ABOUT RECEPTION OF RADIO SIGNAL
The BHM-612A is designed to automatically synchronize its current time and date when within range of the U.S. Atomic Clock.
When the unit is within range, its radio-control mechanism will override all manual settings. The benefit of a RF controlled clock is sustained accuracy without the need of manual adjustment.
| SSignal Search Mode. | 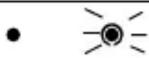 |
| Signal Reception Mode |     |
| No Signal Received | ● |
Complete signal reception generally takes about 2 to 10 minutes, depending on the strength of the radio signal. When the reception is completed, the signal display will be stable. After that, the periodical scanning will only take a few seconds.
For better reception of radio signals, place the clock away from metal objects and electrical appliances to minimize interference.
HOW TO ENABLE OR DISABLE AUTO- RECEPTION
To disable the automatic signal reception feature and cause the BHM-612A to operate as a quartz clock, hold down [ZONE] for three seconds.
To enable the feature again, hold down the [UP] button for three seconds. The RF signal display will start scanning to initiate reception automatically.
HOW TO SET THE CALENDAR CLOCK MANUALLY
When the current time is displayed:
- Press [MODE / SET] for two seconds. Hours digits will flash.
- Set the hour using [ UP ].
- Press [MODE / SET]. Minutes digits will flash.
- Set the minutes using [UP].
- Press [ MODE / SET ].
- Follow the same pattern to enter year, month, day and the display language for the weekday. You can choose among E (English), F (French) and S (Spanish).
- Press [MODE / SET] to save the changes and exit.
If changes are made during the process, the seconds of the clock will reset and start from zero. The unit will also save all changes and return to normal display automatically after the unit has been left idle for a minute.
HOW TO SET AND USE THE ALARM
To set the alarm time:
- Press [ ALARM] to display the alarm time.
- Press and hold [ ALARM ] for two seconds. Hours digits will flash.
- Set the hours using [UP].
- Press [ALARM]. Minutes digits will flash.
- Set the minutes using [UP].
- Press [ ALARM ] to save and exit. The alarm clock will be activated automatically during the setting procedure.
To activate or deactivate the alarm during normal display.
- Press [ ALARM ] to display the alarm time.
- Press [ ALARM ] to change the status of the alarm. The respective indicator will appear.
When the alarm goes off, the alarm sound will gradually increase in volume and speed. The alarm will continue to sound for approximately two minutes unless interrupted when any button is pressed. If the alarm is not interrupted, after 2 minutes the alarm will silence itself and reactivate after approximately eight minutes.
THE RESET BUTTON
The [RESET] button is used to clear all user selected or programmed settings and to cause the settings to return to their factory set default setting. Use a blunt stylus to hold down the button.
TABLE-STANDING OR WALL-MOUNTING
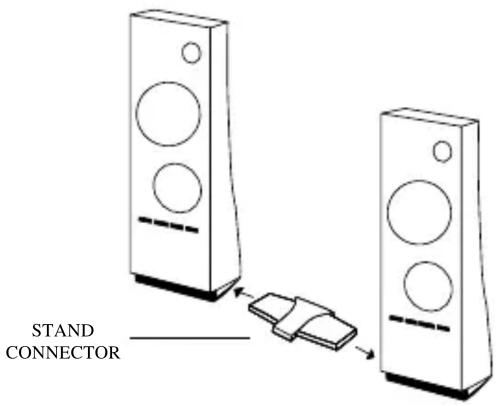
Table-Standing:
The BHM612A unit comes with a stand connector for connecting it to other modular units in the same series.
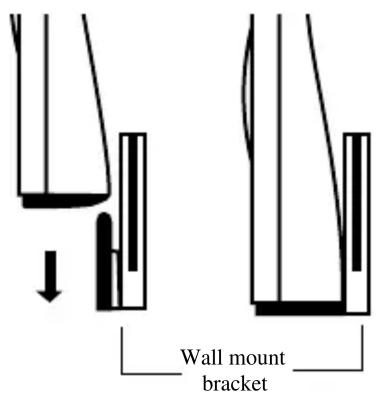
Wall-Mounting:
Connector:
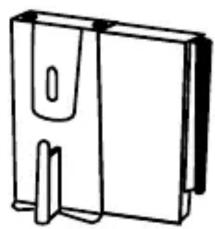
Use wall-mount connector to align with other wall-mount bracket if necessary.
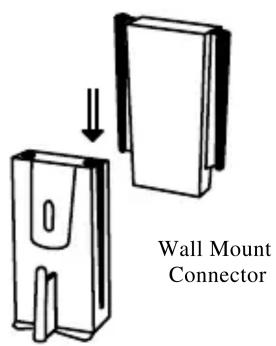
Wall Mount Connector
natural_image
Simple line drawing of a rectangular box with two side cutouts (no text or symbols)Un-install the brackets:
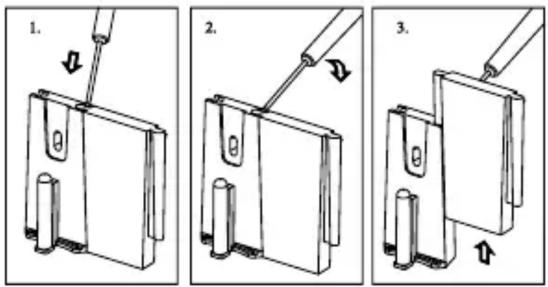
MAINTENANCE
When handled properly, this unit is engineered to give you years of satisfactory service. Here are a few product care instructions:
- Do not immerse the unit in water. If the unit comes in contact with water, dry it immediately with a soft lint-free cloth.
- Do not clean the unit with abrasive or corrosive materials. Abrasive cleaning agents may scratch the plastic parts and corrode the electronic circuit.
- Do not subject the unit to excessive: force, shock, dust, temperature, or humidity. Such treatment may result in malfunction, a shorter electronic life span, damaged batteries, or distorted parts.
- Do not tamper with the unit's internal components. Doing so will terminate the unit's warranty and may cause damage. The unit contains no user-serviceable parts.
- Only use new batteries as specified in this instruction manual. Do not mix new and old batteries as the old batteries may leak.
- Read this instruction manual thoroughly before operating the unit.
SPECIFICATIONS
Operating Temperature : 32^ F to 104^ F
Radio Control : Auto synchronizes current
time and date by Radio
signal generated from the U.S.
Atomic Clock
Calender : Weekday in English /French/
Spanish; Current month / day format
Clock Time : 12-hour format
Alarm Time Duration : 2 minutes
SNOOZE Time Duration : 8-9mins
Accuracy : +/-0.5 second/day (when
operating in quartz clock mode)
Battery Type : Two (2) UM-4 or "AAA" size
Unit Dimension : 6.64" x 2.32" x 1.28" (H x W X D)
Unit Weight : 5.53 oz
CAUTION
— The content of this manual is subject to change without further notice.
— Due to printing limitation, the displays shown in this manual may differ from the actual display.
— The contents of this manual may not be reproduced without the permission of the manufacturer.
CUSTOMER ASSISTANCE
Should you require assistance regarding this product and its operation, please contact our customer care department at 800-853-8883 or via email at helpme@oscientific.com.
WARRANTY
This product is warranted to be free of manufacturing defects for a period of 1 year from date of retail purchase. Defective product should be directed to the place of retail purchase for exchange. Should this not be possible, contact our customer care department for assistance and a return material authorization. No returns may be made without a return authorization. Please retain your retail receipt as you may be asked to provide a copy of it for proof of date purchased.
This warranty does not cover product subjected to abuse, misuse, accidental damage or tampering.
- FEATURES & KEY CONFIGURATION
- A RF SIGNAL INDICATOR
- B MAIN WINDOW
- C SECONDARY WINDOW
- D [ MODE/SET ] button
- E [ UP ] button
- F [ ZONE ] button
- G [ALARM] button
- H [RESET] button
- BATTERY INSTALLATION
- DISPLAY MODES
- ABOUT RECEPTION OF RADIO SIGNAL
- HOW TO ENABLE OR DISABLE AUTO- RECEPTION
- HOW TO SET THE CALENDAR CLOCK MANUALLY
- When the current time is displayed:
- HOW TO SET AND USE THE ALARM
- To set the alarm time:
- To activate or deactivate the alarm during normal display.
- THE RESET BUTTON
- TABLE-STANDING OR WALL-MOUNTING
- Table-Standing:
- Wall-Mounting:
- Connector:
- Un-install the brackets:
- MAINTENANCE
- SPECIFICATIONS
- CAUTION
- CUSTOMER ASSISTANCE
- WARRANTY
Brand : OREGON SCIENTIFIC
Model : BHM612A
Category : Alarm Clock