
Digital sender 9100c - Scanner HP - Free user manual and instructions
Find the device manual for free Digital sender 9100c HP in PDF.
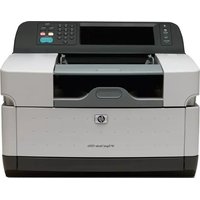


| Product Type | Network digital sender (scanner) for document distribution |
| Model | HP Digital Sender 9100c (also known as HP 9200C) |
| Scanning Method | Flatbed (letter/A4) and Automatic Document Feeder (ADF, up to 50 sheets, legal-size) |
| Scan Resolution | Up to 600 dpi; default for email 150 dpi |
| File Formats Supported | PDF, JPEG, TIFF, MTIFF |
| Connectivity | 10/100Base-T Ethernet, EIO expansion slot, embedded HP Jetdirect |
| Memory (RAM) | 128 MB standard |
| Internal Storage | 20 GB hard disk |
| Control Panel | Interactive touchscreen with keypad, buttons (RESET, MENU, SLEEP, STATUS, STOP, START) |
| Send Destinations | Email, Secondary Email (secure), Fax (LAN/Internet/Windows 2000), Network Folder, Workflow |
| Security Features | Network authentication (login required), secure email encryption, software access controls |
| Supported Paper Sizes | Letter, Executive, A4, A5, B5; Legal via ADF only |
| Paper Weight | 60 to 120 g/m² (16 to 32 lb) |
| ADF Capacity | Up to 50 sheets (max height 5 mm) |
| Sleep Mode | Automatic after 60 minutes; 30 seconds wake-up |
| Maintenance Tasks | Clean ADF rollers and separation pad with damp cloth; replace mylar sheet if vertical streaks appear |
| Spare Parts Available | Mylar sheet replacement kit (HP part Q6496A), ADF Maintenance Kit |
| Software | HP Digital Sending Software (HP DSS) version 4.0, runs on network server |
| Authentication Methods | Novell Bindery/NDS, Windows networking (Username, Password, Domain/Context) |
| Operating Systems Supported for Folders | Windows 98, NT, 2000, XP, Server 2003; Novell NetWare |
| Environmental | Energy-saving sleep mode; 10/100Base-T Ethernet connectivity |
Frequently Asked Questions - Digital sender 9100c HP
User questions about Digital sender 9100c HP
0 question about this device. Answer the ones you know or ask your own.
Ask a new question about this device
Download the instructions for your Scanner in PDF format for free! Find your manual Digital sender 9100c - HP and take your electronic device back in hand. On this page are published all the documents necessary for the use of your device. Digital sender 9100c by HP.
USER MANUAL Digital sender 9100c HP
HP 9200c Digital Sender User Guide


HP 9200C Digital Sender
User Guide
Copyright and License
© 2004 Copyright Hewlett-Packard Development Company, LP
Reproduction, adaptation, or translation without prior written permission is prohibited, except as allowed under the copyright laws.
The information contained in this document is subject to change without notice.
The only warranties for HP products and services are set forth in the express warranty statements accompanying such products and services. Nothing herein should be construed as constituting an additional warranty. HP shall not be liable for technical or editorial errors or omissions contained herein.
Part number Q5916-90910
Edition 1, 11/2004
Trademark Credits
Microsoft®, Windows®, and Windows NT® are U.S. registered trademarks of Microsoft Corporation.
Adobe® and Acrobat® are trademarks of Adobe Systems Incorporated.
Table of contents
1 Digital-sender basics
Quick access to digital-sender information ....2
User-guide links 2
Where to look for more information 2
HP 9200C Digital Sender features ....3
Digital-sender parts ....4
Media specifications ....5
Software 6
Digital-sender software 6
Controlling digital-sending security ....7
Network authentication ....7
Secure e-mail 7
Software security 7
2 Control panel
Control-panel features ....10
Using the control-panel buttons ....10
Understanding digital-sender status ....11
3 Digital-sending tasks
Loading documents ....13
Loading documents in the ADF 13
Avoiding ADF jams 14
Loading documents onto the glass 14
Sending documents 15
Logging in 15
Changing settings 15
File formats ....17
Using e-mail to send a document 17
Using Secondary E-mail 22
Sending to a folder 25
Sending to workflow 27
4 Problem solving
Jams 30
Clearing jams 30
Cleaning 30
Replacing the mylar sheet ....33
Troubleshooting 34
Understanding control-panel error messages ....38
Appendix A Support
HP Customer support ....43
Index
1
Digital-sender basics
This section provides information about the following topics:
- Quick access to digital-sender information HP 9200C Digital Sender features Digital-sender parts Media specifications Software • Controlling digital-sending security
Quick access to digital-sender information
Use these resources to find information about the HP 9200C Digital Sender.
User-guide links
• Control-panel features • Digital-sending tasks - Problem solving
Where to look for more information
Several references are available for use with this digital sender. See http://www.hp.com/support/9200C for more documentation information.
HP 9200C Digital Sender Getting Started Guide (part number Q5916-90901)—Provides step-by-step instructions for installing and setting up the digital sender. This manual comes in the box with the digital sender.
HP 9200C Digital Sender User Guide (this document)—Contains detailed information about using the digital sender and troubleshooting problems. This guide is available on the documentation CD-ROM that came with the digital sender. It is provided in both .PDF file and Web-based help (.CHM) format.
HP 9200C Digital Sender Support Guide (part number Q5916-90930)—Contains information for the administrator of the digital sender, including complete instructions for configuring all of the digital-sending features, and maintenance and cleaning tasks. This guide is also available on the CD-ROM that came with the digital sender. It is provided in both .PDF and Web-based help (.CHM) format.
Online Help—The HP MFP Digital Sending Software Configuration Utility includes online help that contains information about digital-sending options.
HP 9200C Digital Sender features
The HP 9200C Digital Sender helps you quickly and conveniently distribute paper documents in an electronic format. It scans all kinds of documents and then uses the included HP Digital Sending Software (HP DSS) to send them to e-mail addresses, fax destinations, or network folders. The digital sender can also be set up to send documents to workflow destinations, along with metadata files containing workflow information that is captured at the device control-panel interface.
Hardware features
The device includes the following hardware features:
- ADF—The device comes with a legal-size Automatic Document Feeder (ADF) that accepts up to 50 pages.
- Interactive touchscreen control panel—Intuitive onscreen menus and wizards help you complete digital-sending tasks.
- Flatbed scanner—The letter/A4-size scanner can scan both black-and-white and color documents, with the ability to scan up to 1 mm (0.04 inch) from the paper edge.
- Memory—The device comes standard with 128 megabytes (MB) of random access memory (RAM).
- Hard disk—The device includes a 20-gigabyte (GB) internal hard drive for storing documents and settings.
- Connectivity—The device provides a 10/100Base-T port and an enhanced input/output (EIO) port for connectivity.
- HP Jetdirect Inside—An embedded network interface ensures reliable network connectivity.
Software features
The HP DSS program provides the digital sender with the following digital sending features:
- Send to e-mail—Scan a document and send it to one or more e-mail recipients in the form of a .PDF, .JPEG, .TIFF, or .MTIFF file.
- Send to secondary (secure) e-mail—Send a document by using a secure third-party e-mail solution.
- Send to fax—Scan a document and send it to a Local Area Network (LAN) fax, Internet fax, or Windows® 2000 fax destination. (This device does not have analog fax capability.)
- Send to workflow—Scan a document and save it to a network folder or file transfer protocol (FTP) site along with a file containing additional information about the document. A third-party software program can then retrieve and decipher the information, and perform the appropriate operation on the scanned image. A printer can also be set up as a workflow destination, allowing scanned documents to be printed.
- Send to network folder—Scan a document and send it to a folder on the network.
Digital-sender parts
Before using the digital sender, familiarize yourself with its parts.

1 Jam release button 2 Control panel 3 On/off switch 4 Output bin 5 ADF input bin

6 ADF cable 7 Control-panel cable 8 10/100Base-T network port 9 EIO port 10 Power connector
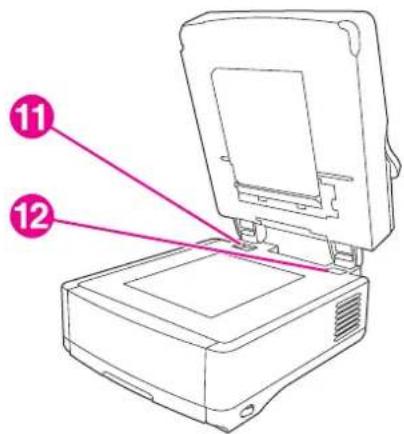
11 Scanner lock 12 Serial number
Media specifications
The HP 9200C Digital Sender supports the following standard paper sizes:
• Letter: 215.9 x 279 mm (8.5 x 11 inches) • Executive: 190 x 254 mm (7.5 x 10 inches) • A4: 210 x 297 mm (8.3 x 11.7 inches) • A5: 148 x 210 mm (5.83 x 8.27 inches) • B5: 176 x 250 mm (6.9 x 9.8 inches) • Legal (from the ADF only): 215.9 x 355.6 mm (8.5 x 14 inches)
Paper weight: 60 to 120 g/m2 (16 to 32 lb)
Up to 50 sheets of paper can be stacked in the ADF, for a maximum height of 5 mm (0.2 inch).
Software
Digital-sender software
To take advantage of the full range of digital-sender features, you must install the HP Digital Sending Software Version 4.0 (HP DSS) that is provided on a CD-ROM with the product. This software runs as a service on a network server. It is not necessary to install any software or drivers on individual users' computers.
See the HP 9200C Digital Sender Getting Started Guide for software installation instructions, and see the Install Notes file on the HP DSS CD-ROM for the latest software information. See the HP 9200C Digital Sender Support Guide for complete software configuration instructions.
The most recent software updates are available on the Internet at http://www.hp.com/support/dss.
Controlling digital-sending security
The digital sender has been designed with security in mind. It includes a variety of features that work to protect the security of the digital-sending process.
Network authentication
The digital sender's most basic security feature is its ability to require a network login before a user can use the digital sending functions. This prevents unauthorized users from walking up to the device and sending documents.
Secure e-mail
For those users concerned about e-mail security, the digital sender comes with a secure e-mail option. A number of third-party software vendors offer services for secure e-mail delivery. The Secondary e-mail feature is designed to work with one of these third-party software programs for users that require an extra measure of data security. It differs from the regular e-mail feature in that the data between the device and the HP DSS server is encrypted. An rfc822-compliant e-mail message that includes the scanned data as an attachment is created in a folder on the HP DSS server. The third-party software program, which is monitoring this folder, processes the e-mail message and sends it out in a secure manner.
Software security
There are also security features that can protect access to the HP DSS software and other software programs that have access to digital-sender settings. See the HP 9200C Digital Sender Support Guide for more information.
2
Control panel
The device comes with an interactive control panel that includes a touchscreen for easy access to digital-sending functions. This section provides information about the control-panel features.
Control-panel features
The digital-sender control panel contains the following items.

1 Touch-screen graphical display 2 Numeric key pad 3 RESET button 4 MENU button 5 SLEEP button and LED 6 STATUS button 7 STOP button 8 START button and LED 9 Attention LED 10 Data LED 11 Ready LED 12 Contrast control wheel
Using the control-panel buttons
| Button Function | |
| RESET | Logs off the current user. Resets the job settings to factory or user-defined default values. |
| MENU | Shows the control-panel menu interface on the control-panel display. For a complete list of control-panel menu items, see the HP 9200C Digital Sender Support Guide. |
| SLEEP | Puts the device into sleep mode, in which it shuts down some functions to conserve energy. |
| STATUS | Shows the digital-sender supply status information on the control-panel display. |
| STOP | Cancels the job that is currently being scanned. After scanning is complete, the job cannot be canceled. |
| START | Begins a digital-sending job or continues a job that has been interrupted. |
Understanding digital-sender status
The digital sender has two buttons and three lights to indicate and control the digital-sender status. To interpret the control-panel lights, see the following table. For information about troubleshooting digital-sender problems, see Problem solving.
Digital Sender status indications
| Element Status indication | |
| SLEEP button When in Sleep mode, the green LED on the button is lit. Push this button to enter or end Sleep mode. | |
| START button The Start LED is green when the device is ready to scan. It is amber if an error exists. | |
| Ready LED | The Ready LED is on when the device is online and able to send data, or flashing when attempting to pause a job. |
| Data LED | The Data LED is on if the job has been paused. It flashes when the device is transmitting data. |
| Attention LED | If the red Attention LED is lit or flashing, the device has encountered an error. |
Sleep mode
After 60 minutes of inactivity, the device automatically enters Sleep mode. In Sleep mode, many of the digital sender's processes are shut down to conserve energy. The user can press any button on the control panel to bring the device out of Sleep mode. The device takes approximately 30 seconds to warm up and return to Ready mode. The settings for Sleep mode can be changed by using the Configure Device menu on the control panel. See the HP 9200C Digital Sender Support Guide for instructions about using this menu.
Digital-sending tasks
This section provides instructions for how to carry out common digital-sending tasks.
Loading documents
You can use either the automatic document feeder (ADF) or the scanner glass to load documents for digital sending. Use the following instructions to load documents.
Loading documents in the ADF
Using the ADF, you can scan up to 50 pages at a time (depending on the thickness of the pages).
To load the ADF
- Load the document face-up into the ADF. See Media specifications for paper size specifications.
- Adjust the paper guides to fit the document size.
- If you are scanning legal-size documents, pull out the paper support for the output bin to accommodate the larger paper size.

- Make any image modifications, and select any scan settings (see the following sections for more information). Press START.
NOTE
If you are scanning a double-sided document, be sure to select the double-sided option in the Original Settings screen before starting so that the ADF duplexer automatically scans both sides of the document. See Changing the Original Settings for more information.
Avoiding ADF jams
Use the following information to avoid jams when using the ADF.
- When loading paper into the ADF, ensure that the paper stack is square and straight and the paper guides are adjusted to the width of the page to be scanned.
- Do not overload the ADF. The ADF was designed to hold 50 sheets of 75 g/m² (20 lb) bond paper.
- If the paper to be scanned using the ADF was previously folded, flatten it to the best of your ability. Try to remove all wrinkles and folds from the paper.
- If the paper to be scanned using the ADF was previously stapled, it might be necessary to “fan” the corner of the page where the staple was inserted. Often, the hole that the staple created makes the pages stick together (that is, interlocks the pages).
- Remove any stick-on notes or labels that are affixed to the pages being scanned. If the labels have deposited excessive residual adhesive to the paper, you might have to clean it off the paper before it is sent through the ADF.
- Paper that has been three-hole punched, been removed from a wire-comb or plastic comb binding, or has perforations might be difficult to send through the ADF.
- If the leading edge of the page to be scanned is excessively worn or frayed, try rotating the paper before scanning.
- Paper can acclimatize to the environment around it. If the operating environment is excessively dry, the paper might become dry and subject to static electricity. Excessively dry sheets of paper tend to stick together, which might lead to difficulty when feeding through the ADF.
Loading documents onto the glass
Use the scanner glass to scan small, lightweight (less than 46 g/m² or 12 lb), or irregularly sized originals, such as receipts, newspaper clippings, photographs, or old or worn documents. The scanner glass can also be used to copy books, magazines, and manuals.
To use the scanner glass
- Open the top of the device.
- Place the document face-down on the scanner glass.
- Close the top of the device.
- Make any image modifications, and select any scan settings, if necessary. Press START.
Sending documents
The digital sender uses the HP Digital Sending Software (HP DSS) to send scanned documents directly to several types of destinations.
Logging in
When you walk up to the digital sender, you will see the following "home" screen. The options displayed are the digital-sending options that have been enabled by your system administrator.

The system administrator can configure the device to require a username and password in order to use some or all of the digital-sender features. If you try to use a feature that requires authentication, a Login screen like the one in the following figure appears. Touch the Username and Password buttons and type your network login information to continue. Contact your system administrator if you are unsure of what to use.

Different login information is required for different network configurations:
• Novell Bindery: Username, Password, Server • Novell NDS: Username, Password, Tree, Context
• Windows networking systems: Username, Password, Domain
After you have logged in, a LOG OUT button appears on the home screen of the control panel. Touch this button, or press the RESET button on the control panel, to log out when you have finished your job. You are also automatically logged out after a period of inactivity. The default timeout setting is 60 seconds. The system administrator can change this setting.
Changing settings
Two types of settings can be changed before scanning a document:
• The original (source document) settings • The scan settings
Changing the Original Settings
Use the Original Settings screen to describe the original document. Changing these settings is not required unless your original is different from the default, which is single-sided letter or A4-size (depending on your country/region). The system administrator can change these default settings.

1 Advanced tab 2 Original size 3 Page orientation 4 Number of sides (1-sided or 2-sided) 5 Page Content button
Touch the Page Content button to specify whether the content to be scanned is text, photo, or mixed.
Touch the Advanced tab to turn on Job Mode (see Job Mode for an explanation of this option).
Changing the scan settings
For each type of send operation, a specific settings screen sets up the scan settings for the final scanned document. See the individual send tasks in the following sections for a description of these scan settings options.
Job Mode
You can use Job Mode to process multiple originals, possibly of different sizes, into a single send job. Activate Job Mode by specifying it on the Advanced tab of the Describe Original settings. Job Mode is also activated automatically if you specify a two-sided job in the Describe Original settings and then use the flatbed to scan the document.
File formats
Documents can be scanned and sent in any of these file formats:
- .PDF: The .PDF file format is the default setting, and it offers the best overall text and graphics quality. However, the recipient must have an Adobe® Acrobat® viewer installed to read .PDF files. This file format produces one e-mail attachment that contains all the scanned pages.
- .JPG: While a .JPG file does not have the same quality as a .PDF, the recipient can view a .JPG file easily with an Internet browser. This file format produces one e-mail attachment for each scanned page. The recipient can manipulate the .JPG files and import them into various programs.
- .TIFF: This standard file format interfaces well with many computer programs and can be manipulated by the recipient. This file format produces one e-mail attachment for each scanned page.
- .MTIFF: An .MTIFF is a multipage .TIFF file that saves multiple scanned pages into a single e-mail attachment.
If the network limits the file size of e-mail attachments, .MTIFF and .PDF files might be divided into multiple e-mail attachments.
Using e-mail to send a document
You can use the device to scan black-and-white or color documents and send them to an e-mail address as an e-mail attachment. The attachment can be sent in one of several file formats, such as .PDF, .TIFF, .MTIFF and .JPG (see File formats). Recipients can then manipulate the document file in various programs to meet their specific needs. Documents retain near-original quality, and can be printed, stored, or forwarded.
The product scans at up to 600 dots-per-inch (dpi) resolution, but the default resolution for e-mail is 150 dpi in order to make the e-mail attachment smaller. You can place originals either on the scanner glass or in the ADF. You can accept the default settings or change the scanning preference and file formats. The following are the default settings:
- Color .PDF file (requires the recipient to have an Adobe® Acrobat® viewer to view the e-mail attachment) • Letter or A4-size originals (depending on your country/region)
The system administrator can change these defaults.
When you touch E-MAIL on the device control-panel display, the following screen appears.

1 To: button 2 E-Mail Settings button 3 Start button 4 Message: button (if enabled) 5 Subject: button 6 CC: button
Sending a basic e-mail message
Use the following instructions to scan and send letter or A4-size originals by using the product default settings.
- Place the document face-up in the ADF or face-down on the scanner glass.
- On the touch screen of the control panel, touch E-MAIL.
- If prompted, provide your network login information.
- Touch From: and, using the pop-up keyboard, type your e-mail address. Touch the backspace key to delete any incorrect keystrokes.
If you are required to log in before using the e-mail function, the From: button is not active. The software automatically retrieves your return e-mail address and adds it as the From address in the e-mail.
- Touch To: and then type the recipient e-mail address.
- Touch CC: and then type the e-mail address of any copy recipients. If you want to send a blind copy to an e-mail address, scroll down and touch BCC:, and then type the address of the blind-copy recipient.
- Touch Subject: and then type the subject of your e-mail.
- Touch Message: and then type in any message that you want to send in the body of the e-mail. The length of the message is limited to 200 characters.
The Message button is only available if the system administrator has enabled this option. If no Message button is available, the software includes a default message in the e-mail.
- Press Start to scan the document and send the e-mail.
Using the auto-complete function
When you type text into the To:, CC:, BCC: or From: text boxes in the E-mail screen, the auto-complete function is invoked. As you type the required address or name at the keyboard screen, the device automatically searches the address book list and shows the first matching address. You can then accept that name by touching OK, or continue typing the name until auto-complete finds the correct entry. If you type a character that does not match any entry in the list, the auto-complete text disappears from the display to show that you are typing an address that is not in the address book.
Changing the settings
Touch the E-Mail Settings button to open the E-Mail Settings screen.

1 Black and white or color 2 Sharpness setting 3 Background Removal setting 4 File size (small, standard, or large) 5 Resolution (dpi) 6 File type
Before you send a document in e-mail, you can change the following settings:
• Color: Select black-and-white or color. - File Type: Select .PDF, .TIFF, .MTIFF, or .JPG.
If the document has multiple pages, the .PDF and .MTIFF formats produce a single e-mail attachment that contains all of the pages. The .TIFF and .JPG formats produce a single file for each scanned page. See File formats for more details about the individual file formats.
• Resolution: 75, 150, 200, or 300 dpi. - File size: Small, standard, or large file size.
There are many factors that affect the size of the file. See Controlling file size for more information on file size.
Image enhancement: Change the sharpness or background-removal settings for the scanned image. The sharpness setting enhances the edges of the printing so that faint or fine text and graphics are reproduced more sharply. The background removal setting is useful when the original is on colored paper or is two-sided. Removing the background can prevent blurring or streaking in the output image.
In addition to these settings, you can also specify the settings of your original document by touching the Describe Original button on the control-panel display. See Changing the Original Settings for details about these settings.
Controlling file size
When sending files with e-mail, it is especially important to be aware of the file size. Large files take a long time for the recipient to download, and if the file is too large it might be split into multiple e-mails or rejected by the receiving e-mail server.
Here are some approximate sample file sizes for different types of documents:
| Document type | File type | DPI setting | File size setting | Scanned file size |
| Legal-sized single page with color graphics content | JPG 300 dpi Large | 2 MB | ||
| Letter-sized single page with mixed text and color graphics | PDF 150 dpi Standard | 517 KB | ||
| Executive-sized single page with black-and-white text content | TIFF 75 dpi Small 9 KB | |||
You can control the file size of your e-mail attachment in two ways:
- Adjust the scan resolution
- Adjust the File size setting
As discussed in the Changing the settings section, you can set the scan resolution of your document in the E-Mail Settings form before you scan the document. The resolution options for e-mail are 75, 150, 200, and 300 dpi. The default setting for e-mail attachments is 150 dpi. If you are scanning a very large document, or if you are concerned that your file attachment will be too large, you can try the 75 dpi setting. Some image quality will be lost, but the file will be much smaller.
When selecting a dpi setting, you should consider how the scanned document will be used. If the document is text that will only be viewed on a computer monitor, 75 dpi should be sufficient. If it is text that is to be printed out, 150 dpi should be sufficient. The only time 300 dpi should be required is for scanning color graphics, such as photos, that need to be printed.
The File Size setting controls how much compression the HP DSS service performs on the file before sending the e-mail. The options are small, standard, or large. Standard is the default. If you are concerned about the size of your file, you should try the small setting. Some image quality will be lost, but the file size will be smaller.
The system administrator can also limit the size of digital-sending e-mail attachments during the digital-sender configuration process. If a file-size limit is set and the e-mail attachment exceeds the limit, the e-mail attachment will be divided up and sent using multiple e-mails.
Using the address book
You can send to a list of recipients by using the address book feature of the digital sender. Touch the button on the keyboard screen to open the address book.

1 All button (shows all address books) 2 Personal button (shows the user's personal address book) 3 Details button (shows details about the selected address) 4 Add button 5 List of selected addresses 6 Remove button 7 Address list
Up to four types of address books are available on the device:
• Public: These addresses are available to all users. They are usually retrieved from a network Lightweight Directory Access Protocol (LDAP) server by the HP DSS service. - Personal: These addresses are retrieved from the user's Outlook contacts list. They are only available if the user logs in to the device, and if Microsoft® Exchange is being used as the network mail server. - Guest: Non-authenticated users can save addresses to the Guest address book. All non-authenticated users can see the contents of this address book. The contents of this address book also include the Guest addresses from all digital senders and other devices that use the same HP DSS service. - Private: Authenticated users can save addresses on the device and can use these addresses the next time they log in. The user can also use this private address book when logging in to any other digital sender or device that uses the same HP DSS service.
Creating a recipient list
To create a recipient list, follow these steps on the touchscreen of the graphical display:
- Touch E-MAIL.
- Touch To: to open the keyboard screen.
- Type the first letter of the name. Touch ☐ to open the address book. Navigate through the address book by using the scroll bar. Hold your finger on the arrow to scroll quickly through the list.
- Highlight the name to select a recipient, and then touch the Add button. You can change the address book that appears by selecting the All button to view all available address books, or the Personal button to see only the addresses from your Outlook address book. You can remove a recipient from the recipient list by scrolling to highlight the recipient, and then touching the Remove button.
- When you are satisfied with your recipient list, touch OK. The names in the recipient list appear in the text line of the keyboard screen. You can also add a recipient that is not found in the address book by using the keyboard to type the e-mail address.
- Touch OK on the keyboard screen. Finish typing any necessary information in the CC:, Subject:, and Message text lines on the E-mail screen. You can verify the list of recipients by touching the down arrow in the To: text line.
- Touch Start or press the START button on the control panel to send the e-mail.
Editing the address book
If you are viewing your Personal address book, an Edit button appears in the lower-left corner of the Address Book screen. Touch the Edit button to add or delete addresses from your address book.
More information
For information about configuring digital sending with e-mail and all other send-to options, and for more information about the digital-sender address books, see the HP 9200C Digital Sender Support Guide.
Using Secondary E-mail
If the system administrator has made the feature available, a Secondary E-mail option will appear on the home screen. Secondary E-mail is designed for solutions that require an extra measure of data security. It differs from the regular e-mail feature in that the data between the device and the HP DSS server is encrypted. An rfc822-compliant e-mail message that includes the scanned data as an attachment is created in a folder on the HP DSS server. A third-party secure e-mail program, which is monitoring this folder, processes the e-mail message and sends it out in a secure manner. See the HP 9200C Digital Sender Support Guide for more information about configuring the Secondary E-mail feature.
The process of sending an e-mail message on the digital sender by using the Secondary E-mail option is exactly the same as it is for normal e-mail.
Faxing a document
If the system administrator has made the feature available, the device can scan a document and send it to a LAN fax, Internet fax, or Windows 2000 fax service destination.
NOTE
Analog fax functionality is not available on the digital sender.
When you touch FAX on the control-panel display, the following screen appears.

1 Fax recipients list 2 One-touch speed-dial buttons 3 Configure button 4 Speed Dial button 5 Remove button 6 Notify button 7 Settings button 8 Next Number button 9 Phone Book button
Follow these instructions to send a fax.
- Place the document face-up in the ADF or face-down on the scanner glass.
- Touch FAX on the control panel.
- Use the control-panel keypad to type the fax number(s) to which you want to send the document, or use one of the one-touch buttons (see the following section for instructions on setting up the one-touch buttons).
If you are sending to more than one fax number, touch Next Number to move down to a new line and type the next number.
- Touch Start to send the fax. Status messages show the progress of the fax operation.
If the system administrator has enabled billing codes, you might be prompted for a billing code after you touch Start. The fax is not sent until the billing code has been typed.
Changing the settings
Touch the Settings button on the Fax screen, and then touch Fax Settings to see the Settings screen.

1 Sharpness and Background Removal settings
Before you send a fax, you can change the Image enhancement settings to control the sharpness or background removal settings of the scanned image.
Fax success or failure notifications
If you are using a LAN fax product that supports it, you can have e-mail sent to you with the status of faxes you have sent. If you select an applicable LAN fax product, a Notify button will appear on the fax home screen. Click this button to select whether you want to receive a status message for every fax sent, or only if there is an error.
Fax notifications are not available if you are using Internet fax or Windows 2000 fax.
Using speed dials and one-touch buttons
The one-touch buttons on the right side of the fax screen can store frequently used fax numbers or lists of numbers. You must first create speed dial numbers, and then assign them to the one-touch buttons.
Adding a new speed dial
Follow these instructions to add a new speed-dial number.
- Touch the Speed Dial button on the Fax screen.
- Touch the Advanced tab.
- Touch the New Speed Dial button.
- Type the number(s) by using the control-panel keypad. You can type either a single fax number or a list of numbers.
- Touch the Name button to add a name to the speed dial entry. Type the name by using the keyboard interface that appears.
- Touch OK to save the entry.
Assigning a speed dial number to a one-touch button
Follow these instructions to assign a speed-dial number to a one-touch button.
- Touch the Configure button on the control-panel Fax screen.
- Touch the button to which you want to assign a speed dial number.
- Select a speed-dial entry by touching the check box.
- Touch OK to return to the Fax screen. A message on the screen indicates that the button has been programmed.
Deleting a speed dial
Follow these instructions to delete a speed-dial number that is no longer needed.
- Touch the Speed Dial button on the Fax screen.
- Touch the Advanced tab.
- Touch the Delete Speed Dial button.
- Use the arrows to scroll through the list. Touch the check box next to each speed dial entry that you want to delete.
- Touch the OK button.
- The program asks you to confirm the delete operation. Touch the Yes button to delete the selected speed-dial entries.
NOTE
If the speed-dial number is associated with a one-touch button, it is automatically unassigned.
Using the phone book
You can send to a list of fax recipients by using the phone book feature of the device.
- Touch the Phone Book button on the control-panel Fax screen to open the fax phone book. Any available fax numbers or lists appear in the Fax Phone Book list on the left side of the screen.
NOTE
If you are logged in to the device, it can retrieve fax numbers from your Exchange contacts list. Touch the Personal button to see this list, if it is available. See your system administrator for more information.
- Select one or more entries and touch the Add button to add them to the address list for your fax.
- Touch OK to accept the address list and return to the Fax screen.
- Touch Start to send the fax.
See your system administrator for information about adding items to the phone book.
Sending to a folder
If the system administrator has made the feature available, the device can scan a file and send it to a folder on the network. Supported operating systems for folder destinations include Windows 98, Windows NT®, Windows 2000, Windows XP, Windows Server 2003, and Novell NetWare.
NOTE
Authentication might be required in order to use this option, or to send to certain folders. See your system administrator for more information.
When you touch the FOLDER option on the control-panel display, the following screen appears.

1 File Name button 2 Folder Settings button 3 Other button 4 Folders list
Follow these instructions to scan a document and send it to a folder.
- Place the document face-up in the ADF or face-down on the scanner glass.
- On the control-panel display touch FOLDER.
- Any folders that the administrator has specified are listed in the Folders list. Touch the check box to select an existing path. To specify a new folder, touch the Other button. Type the path for the folder by using the keyboard interface that appears. Touch OK on the keyboard screen to save the new path. The software verifies that a valid path name has been specified.
NOTE
Specifying a folder does not add it to the list permanently. See the system administrator if you want to add a new folder destination to the default list.
- Specify a file name by touching the File Name button. The File Name interface provides a keyboard for typing the file name. Specifying a file name is optional. If you do not specify one, the software assigns a unique file name to the file when it is saved.
- When you are ready to send, touch Start to begin scanning the document. Status messages show the progress of the send operation.
Changing the settings
Before you send to a folder, you can change the following settings by touching the Folder Settings button:
- Scan Preferences: Select black and white or color.
- File Type: Select .PDF, .TIFF, .MTIFF, or .JPG.
NOTE
If the document has multiple pages, the .PDF and .MTIFF formats produce one file containing all of the pages. The .TIFF and .JPEG formats produce a single file for each scanned page. See File formats for more information about the specific file formats.
- Scanning resolution: 75, 150, 200, 300, 400, or 600 dpi
- File size: Small, standard, or large file size • Image enhancement: Change the sharpness or background removal settings of the scanned image.
Sending to workflow
If the system administrator enables workflow functionality, you can scan a document and send it to a custom workflow destination. A workflow destination gives you the ability to send additional information along with the scanned document to a specified network or FTP location. Prompts at the control panel are used to collect specific information. A third-party software program monitoring the network folder or FTP site can then retrieve and decipher the information, performing the specified operation on the scanned image. The system administrator can also set up a printer as a workflow destination, which allows users to scan a document and then send it directly to a network printer to be printed.
When you touch WORKFLOW on the control-panel display, the following screen appears.

1 Custom workflow buttons
To send to a workflow, touch one of the custom workflow buttons. The administrator sets up the custom workflow buttons. Some workflow buttons might require you to fill in more information to complete the operation. They might specify a certain file type for the scanned document or might interact with third-party software, such as a document management system, so files that are sent to a particular destination can be automatically processed. For more information about setting up custom workflows, see the HP 9200C Digital Sender Support Guide.
4
Problem solving
This chapter contains troubleshooting information to help you resolve problems with the device. See the HP 9200C Digital Sender Support Guide for more advanced troubleshooting information.
Jams
Hint
Follow the instructions in this section to clear and avoid paper jams.
To avoid paper jams, be sure to follow the instructions found in Avoiding ADF jams.
Clearing jams
Follow these instructions to clear paper jams in the digital-sender ADF.
- Press the release button to open the ADF cover.

- Remove any jammed media from this area.
- Make sure that you have removed all of the pieces of torn media.
- Close the ADF cover.

Cleaning
To help avoid paper jams, use the following instructions for cleaning the digital sender.
CAUTION
Cleaning the rollers too frequently could introduce dust into the device.
- Open the ADF.

- Locate the rollers near the vinyl calibration strips.

- Wipe the rollers gently with a clean, water-dampened, lint-free cloth.
CAUTION
Do not pour water directly onto the rollers. Doing so might damage the device.
- Close the ADF.

- Push the release button to open the ADF cover.

- Locate the rollers.

CAUTION
- Wipe the rollers with a clean, water-dampened, lint-free cloth.
Do not pour water directly onto the rollers. Doing so might damage the device.
- Locate the separation pad.
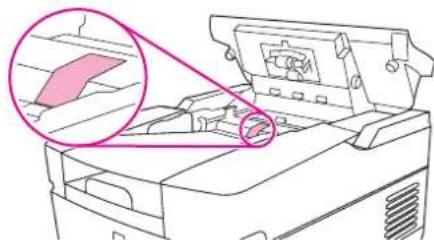
- Wipe the pad with a clean, water-dampened, lint-free cloth.
- Close the ADF cover.

Replacing the mylar sheet
If you start to see vertical streaks on the scanned images, as shown in the figure below, you might need to replace the mylar sheet at the base of the ADF. The device ships with an envelope containing three extra mylar sheets and installation instructions. The envelope is in a pocket behind the ADF vinyl backing, as shown in the following figure.

Follow the instructions that come in the envelope to replace the mylar sheet.
NOTE
If necessary, you can order extra mylar sheet replacement kits from your HP sales representative. The HP part number is Q6496A.
Troubleshooting
Use the following instructions to troubleshoot specific digital-sending problems.
| Problem Action to take | |
| The digital sender is not working. | Make sure that the power cord is securely connected to the device and that it is plugged into the power outlet.Make sure that the device is turned on.Clear any error messages on the control-panel display.Verify that the network cable is securely connected to the device.Verify that one of the two green LEDs just above the device network port is on. |
| The device does not accept your password. | Verify that you are using the correct password.Passwords are case-sensitive. Make sure that you type your password with the correct combination of uppercase and lowercase letters.Have the system administrator check the HP DSS Authentication settings. |
Scanned pages are blank or have repeated patterns when using the ADF. | Make sure that a page is not already on the glass. |
Vertical streaks appear on the scanned image. | Clean the ADF and glass. SeeCleaning. If that does not solve the problem, replace the mylar sheet. SeeReplacing the mylar sheet. |
Placement of the scanned image appears to be wrong. | The scanner might need to be recalibrated. See the HP 9200C Digital Sender Support Guide for instructions. |
| The image quality is poor. | Make sure that the document you are trying to send is placed correctly: face-up in the ADF or face-down on the glass.Make sure that the glass is clean. If the glass is dirty, clean it with a dry, soft cloth.If you are scanning from the ADF, try scanning from the glass. If the image that was scanned from the glass is better, clean the ADF. SeeCleaning.If possible, try changing some of the scan settings, such as resolution or file type, to improve the image quality. |
| The ADF feeds multiple sheets, skews papers, or jams frequently. | Adjust the guides so that they are snug against the stack but do not bend the stack.The maximum number of pages that the ADF can hold is 50 or fewer, depending on the type of paper that is being loaded.The maximum number of pages that the output tray can hold is 50 or fewer. Make sure that more pages are not stacking up in the output tray.Clean the separation pad and the rollers.SeeCleaning.If the mylar sheet has recently been replaced, verify that it was correctly installed. SeeReplacing the mylar sheet.The type of paper that is being loaded might not meet the required specifications. SeeLoading documents in the ADFfor paper specifications.SeeAvoiding ADF jamsfor more suggestions. |
| An e-mail transmission did not arrive at the destination e-mail address. | If you typed the e-mail address at the control panel, resend the e-mail message, making sure that you type the address correctly and that it is in the correct format (has no spaces, contains the required @ sign, and contains the required period).Resend the e-mail. Make sure that you type the name in the correct format in theFrom: field so that the message is not rejected and so that you receive a message back if the e-mail transmission fails.Have the administrator check the activity log to see if it reflects a problem. |
| A fax transmission did not arrive at the destination fax machine. | If you typed the fax number at the control panel, resend the document, making sure that you type the fax number correctly.The receiving fax machine might be turned off or experiencing an error condition (such as out of paper or toner). Contact the recipient.The system might be busy sending other faxes or waiting to redial other faxes. The system might also have reached its maximum limit of pending fax transmissions. Wait and then try again.For information about the transmission, check any fax notifications that might have been returned (for example, e-mail notifications in your e-mail inbox, if these reports are available with your fax service).Resend the fax.If the problem persists, check the log for the fax transport that is being used. Logs often contain information about why a fax transmission was unsuccessful. The location of the fax log depends on the fax method that you are using. |
| A document that was sent to a folder did not arrive at the destination folder. | Resend the document.Verify whether the file name was modified to resolve a duplicate-file-name error.Have the administrator check the activity log for error messages. |
| The bottom of a page that you sent is cut off. | If sent from the glass, the document page might be too long. The maximum length for documents scanned from the glass is A4, or 210 x 297 mm (8.27 x 11.69 inches). |
| The control panel is using the wrong language. | Use the control-panel menu to set the correct language.1. Push the MENU button.2. Touch Configure Device on the control-panel display (the third menu item).3. Touch System Setup (the fourth menu item).4. Touch Language (the last menu item).5. Touch the correct language. |
Understanding control-panel error messages
These error messages can appear on the digital-sender control-panel display. Use the instructions to clear the error message, if necessary.
| Error message Explanation or action needed | |
| Address book is full. To add an address, you must first delete an address. | You cannot add another address to the address book because it is full. The address book is limited to 200,000 entries. You can delete addresses by touching the Edit button on the control-panel Address Book screen and then selecting the Delete option. |
| Access denied | You are trying to use a feature that you do not have authorization to use. Contact your system administrator. |
| Access denied MENUS LOCKED The system administrator has restricted access to the menu that you selected. | |
| ADF COVER OPEN Close the ADF cover. Follow the instructions in the onscreen dialog box. | |
| ADF Empty You must have a document in the ADF for on the glass before you can begin a digital-send operation. | |
| ADF Overfill Too many sheets have been put into the ADF. Remove some of the sheets. Up to 50 sheets of paper can be put into the ADF, with a maximum height of 5 mm, or 0.2 inches. | |
| ADF Paper Jam A jam has occurred in the ADF. Follow the instructions in the onscreen dialog box (see Jams). | |
| ADF Pick Error Make sure that your original contains no more than 50 pages. Follow the instructions in the onscreen dialog box. See Avoiding ADF jams. | |
| ADF Skew Error Make sure that the paper guides are aligned on the sides of the originals, and that all of the originals are the same size. Follow the instructions in the onscreen dialog box. See Avoiding ADF jams. | |
| Authentication information is incorrect. Please re-enter information. | The user name or password that you used is incorrect. Type the information again. See your system administrator for more information. |
| Authentication Required A username and password are required in order to gain access to the feature you selected. See your system administrator for more information. | |
| Canceling send job The device is canceling a send job. The message continues while the job is stopped and any remaining data is discarded. | |
| CHECK CABLES. CHECK SCANNER LOCK. A problem exists with the scanner. Make sure that the scanner lock is in the unlocked position.(See Digital-sender parts for the location of the scanner lock.) Turn the device off and then on again. | |
| Check the glass and remove any paper, then press "Start" | A document needs to be removed from the scanner glass. |
| Clearing event log The device is clearing the event log. | |
| Digital Send server is not respondingalternates withContact administrator | The digital sender cannot communicate with the HP DSS server. Check the network connection and have the system administrator verify that the HP DSS server is running. |
| E-mail Gateway did not accept the job because the attachment was too large | The scanned documents have exceeded the size limit of the e-mail server. Resend the job by using a lower resolution, smaller file size setting, or fewer pages. |
| E-mail Gateway did not respond An e-mail gateway has exceeded the time-out value. Try resending. If the problem persists, contact the system administrator. | |
| E-mail Gateway rejected the job because of the addressing information.alternates withJob failed | One or more of the e-mail addresses is incorrect. Double check the e-mail addresses and send the job again. |
| Error executing digital send job. Job failed An error occurred during an e-mail send job.Verify that you have typed the correct e-mail recipient addresses and try sending again. If this error persists, have the network administrator verify that the SMTP server is functioning correctly. | |
| Event Log Empty You are attempting to view an empty event logby selecting Show Event Log from the control panel. | |
| Flash File System is Full The flash disk or file system has reached maximum capacity. Wait for all pending jobs to be sent and then try again. | |
| Flash is Write Protected The flash file is protected, and no new files can be written to it.To remove this message from the display, turn the device off and then on.If the message returns, contact your system administrator. | |
| HP Digital Sending: Delivery Error Try sending the job again. If you continue to experience problems, check the network connection and contact the system administrator. | |
| Initializing permanent storage This message appears momentarily during power-up when the device hard disk is initializing. | |
| Internal disk not functional The internal hard disk | has failed. Turn the device off, and then on. If this message persists, contact your system administrator. |
| LDAP Server is not responding. Contact Administrator. | The device is unable to communicate with the LDAP server. Contact the system administrator. |
| Name is already added to list You have tried to add a duplicate name in one of the digital-sender address books. | |
| Network connection required for Digital Sending. Contact administrator. | The device is unable to establish a connection with the network. Contact the network administrator. |
| Novell Login Required The device has been configured to require a Novell login in order to use the selected feature. | |
| Password or name is incorrect. Please enter correct login. | The user name or password is incorrect or was mistyped. Retype the user name and password. See your system administrator for more information. |
| Phone book is full. To add a phone number you must first delete a phone number. | You cannot add another phone number to the phone book because it is full. |
| Please refine your search Your search has returned more results than the device can show. Try to narrow your search. | |
| Replace Document Feeder Kit The scan count indicates that it is time to replace the ADF Maintenance Kit. See the HP 9200C Digital Sender Support Guide. | |
| Scan carriage locked Make sure that the scanner lock is in the unlocked position. (See Digital-sender parts for the location of the scanner lock.) | |
| Sleep mode on The device is in sleep mode. Press any control-panel key to bring it out of sleep mode. | |
| SMTP Gateway Not Responding The SMTP gateway has exceeded a timeout value. Try resending. If the problem persists, contact the system administrator. | |
| The Digital Sender is currently processing the maximum number of active jobs allowed. Please try to send your job later. | The digital sender is busy sending other jobs. Wait and try your job in a few minutes. |
| The folder you have entered is not a valid folder. | The device was unable to validate the path you typed in for the send-to-folder feature. Verify that you have typed the correct path. |
| Too many addresses were found to display. Please refine your search. | Your search has returned more results than the device can show. Try to narrow your search. |
| Username or password is incorrect. Please re-enter. | The user name or password is incorrect or was mistyped. Retype the user name and password. |
| Windows Login Required to use this feature Provide your Windows network credentials to use the digital-sending feature. | |
| 11.xx Internal Clock Error The internal clock is not working. The digital sender can still send, but you are prompted to set the date and time whenever the device is turned off and then turned on.Contact your system administrator. | |
| 20 Insufficient Memory The the scanned document contains more data than can fit in the device's available memory. Press START to send the available data (some data might be lost), and then try to make the scan job smaller. | |
| 22 EIO Buffer Overflow Too much data was sent to the EIO card. An incorrect communications protocol might be in use. Turn the device off and then on. If this message persists, contact your system administrator. | |
| 22 Embedded I/O Buffer Overflow Too much data was sent to the embedded HP Jetdirect network interface. Turn the device off and then on. Try to send the job again. If this message persists, contact your system administrator. | |
| 30.1.yy Scan Failure An error has occurred in the flatbed scanner. Turn the device off and then on.A 30.18 Scan Failure message might indicate that the scanner head is locked. Verify that the scanner lock is in the unlocked position. (See Digital-sender parts for the location of the scanner lock.) If the error persists, contact your system administrator. | |
| 40 EIO Bad Transmission The connection between the device and the EIO card has failed. Press START to clear the error and continue sending. | |
| 40 Embedded I/O Bad Transmission The connection with the embedded HP Jetdirect network interface has failed. Turn the device off and then on. | |
| 52.xy Error The scanner has encountered an error. Turn the device off and then on. If this message persists, contact your system administrator. | |
| 57.xx Error The fan motor has encountered an error. Turn the device off and then on. If this message persists, contact your system administrator. | |
| 64 ERRORalternates with To continue turn off then on | A scan buffer error occurred. Turn the device off and then on. If this message persists, contact your system administrator. |
| 68.x Storage Error Settings Changed An error occurred in the device nonvolatile memory (NVRAM), and one or more device settings have been reset to their factory default. Sending can continue, but some unexpected functions might result because the error occurred in permanent storage. Pressing START should clear the message. If this message persists, contact your system administrator. | |
| 68.x Permanent Storage Full The printer NVRAM is full. Some settings saved in the NVRAM might have been reset to the factory defaults. Sending can continue, but some unexpected functions might result because the error occurred in permanent storage. Pressing START should clear the message. If this message persists, contact your system administrator. | |
| 68.x Permanent Storage Write Fail The printer NVRAM is failing to write. Sending can continue, but there might be some unexpected functions because the error occurred in permanent storage. Pressing START should clear the message. If this message persists, contact your system administrator. | |
A
Support
Refer to one of the following resources for HP 9200C Digital Sender support.
HP Customer support
For additional information about the product, see the HP 9200C Digital Sender Getting Started Guide, or the HP 9200C Digital Sender Support Guide on the CD-ROM. For HP Customer Care information, see the support flyer that came with the product. You can also visit http://www.hp.com/support/9200c for more information.
Index
A
access denied 38
address books
troubleshooting 38
using 21
ADF
cleaning 30
jams, clearing 30
loading 13
locating 4
media specifications 5
mylar sheet, replacing 33
Replace Document Feeder Kit 40
troubleshooting 35, 38
attachments, e-mail
file size 20
attachments, e-mail
file formats 17
sending 17
authentication error message 38
auto-complete function, e-mail 19
B
background removal 19
bins, ADF 4
blank pages 34
buttons, control panel 10
C
canceling jobs 38
check cables message 39
check scanner lock message 39
cleaning 30
clearing jams 30
clock errors 41
colored paper, scanning 19
contact administrator message 39
control panel
error messages 38
language 37
lights and buttons 10
locating 4
security 7
cut-off pages 36
D
digital sending file formats 17
documentation 2
documents, loading
in the ADF 13
on the glass 14
E
address books 21
auto-complete function 19
file size 20
recipient lists 21
secondary 22
troubleshooting 36, 39
error messages 38
file formats 17
security 7
sending documents to 17
settings 19
F
fax phone book 25
faxing
sending 22
troubleshooting 36
features 3
file formats 17
flash disk, troubleshooting 39
folders
sending to 25
troubleshooting 36, 40
formats, file 17
G
getting started guide 2
glass, loading documents 14
guest address books 21
H
hard disk 3
hardware features 3
help, online 2
HP Jetdirect Inside 3
image enhancement 19
image quality, troubleshooting 35
interface ports 4
internal clock errors 41
jams
ADF, preventing 14
clearing 30
release button, locating 4
Jetdirect Inside 3
Job Mode 16
JPG 17
keys, control panel 10
L
language, control panel 37
lights, control panel 10
lists, recipient 21
loading documents
in the ADF 13
on the glass 14
lock, scanner 4
logging in 15
long pages 36
M
manuals 2
margins, scanning 3
media
ADF jams, preventing 14
jam release button, locating 4
jams, clearing 30
specifications 5
memory
included 3
troubleshooting 41
Menu button 10
MTIFF 17
mylar sheet, replacing 33
N
network card, included 3
O
on/off switch 4
one-touch buttons, fax 25
online help 2
original settings screen 16
output bins, ADF 4
P
paper
ADF jams, preventing 14
jam release button, locating 4
jams, clearing 30
specifications 5
passwords 7, 34
PDF 17
personal address books 21
phone book, fax 25
ports 4
power switch 4
private address books 21
public address books 21
Q
quality, troubleshooting 35
R
RAM 3
recipient lists 21
release button, jams 4, 30
Replace Document Feeder Kit 40
replacing the mylar sheet 33
Reset button 10
rollers, cleaning 30
S
scan quality, troubleshooting 35
scan settings 15
scanner glass, loading documents 14
scanner head lock 4
secondary e-mail 22
security 7
sending to
e-mail 17
fax 22
folder 25
workflow 27
serial number, locating 4
settings
e-mail 19
fax 24
folder 26
scanning 15
sharpness settings 19
size, file 20
Sleep button 10
Sleep mode 11
software 3, 6
specifications
digital sender features 3
media 5
speed dials, fax 24
Start button 10
Status button 10
status lights 11
Stop button 10
support guide 2
T
TIFF 17
troubleshooting
about 34
address book 38
ADF 35, 38
ADF jams, preventing 14
authentication errors 38
blank pages 34
canceling 38
cleaning 30
contact administrator message 39
control panel language 37
cut-off pages 36
e-mail 36, 39
error messages 38
faxing 36
flash disk 39
folders 36, 40
internal clock errors 41
jams, clearing 30
memory errors 41
mylar sheet, replacing 33
passwords 34
quality 35
Replace Document Feeder Kit 40
scanner lock 39
U
user guide 2
W
Web sites, support 2
workflow, sending to 27
© 2004 Hewlett-Packard Development Company, L.P.
www.hp.com


- HP 9200C DIGITAL SENDER USER GUIDE
- COPYRIGHT AND LICENSE
- TRADEMARK CREDITS
- TABLE OF CONTENTS
- DIGITAL-SENDER BASICS
- CONTROL PANEL
- DIGITAL-SENDING TASKS
- PROBLEM SOLVING
- APPENDIX A SUPPORT
- INDEX
- QUICK ACCESS TO DIGITAL-SENDER INFORMATION
- USER-GUIDE LINKS
- WHERE TO LOOK FOR MORE INFORMATION
- HP 9200C DIGITAL SENDER FEATURES
- HARDWARE FEATURES
- SOFTWARE FEATURES
- DIGITAL-SENDER PARTS
- MEDIA SPECIFICATIONS
- SOFTWARE
- DIGITAL-SENDER SOFTWARE
- CONTROLLING DIGITAL-SENDING SECURITY
- NETWORK AUTHENTICATION
- SECURE E-MAIL
- SOFTWARE SECURITY
- CONTROL-PANEL FEATURES
- USING THE CONTROL-PANEL BUTTONS
- UNDERSTANDING DIGITAL-SENDER STATUS
- SLEEP MODE
- LOADING DOCUMENTS
- LOADING DOCUMENTS IN THE ADF
- TO LOAD THE ADF
- AVOIDING ADF JAMS
- LOADING DOCUMENTS ONTO THE GLASS
- TO USE THE SCANNER GLASS
- SENDING DOCUMENTS
- LOGGING IN
- CHANGING SETTINGS
- CHANGING THE ORIGINAL SETTINGS
- CHANGING THE SCAN SETTINGS
- JOB MODE
- FILE FORMATS
- USING E-MAIL TO SEND A DOCUMENT
- SENDING A BASIC E-MAIL MESSAGE
- USING THE AUTO-COMPLETE FUNCTION
- CHANGING THE SETTINGS
- CONTROLLING FILE SIZE
- USING THE ADDRESS BOOK
- CREATING A RECIPIENT LIST
- EDITING THE ADDRESS BOOK
- MORE INFORMATION
- USING SECONDARY E-MAIL
- FAXING A DOCUMENT
- FAX SUCCESS OR FAILURE NOTIFICATIONS
- USING SPEED DIALS AND ONE-TOUCH BUTTONS
- ADDING A NEW SPEED DIAL
- ASSIGNING A SPEED DIAL NUMBER TO A ONE-TOUCH BUTTON
- DELETING A SPEED DIAL
- NOTE
- USING THE PHONE BOOK
- SENDING TO A FOLDER
- SENDING TO WORKFLOW
- CUSTOM WORKFLOW BUTTONS
- JAMS
- HINT
- CLEARING JAMS
- CLEANING
- CAUTION
- REPLACING THE MYLAR SHEET
- TROUBLESHOOTING
- UNDERSTANDING CONTROL-PANEL ERROR MESSAGES
- A
- SUPPORT
- HP CUSTOMER SUPPORT
- B
- C
- D
- E
- F
- G
- H
- L
- M
- N
- O
- P
- Q
- R
- S
- T
Brand : HP
Model : Digital sender 9100c
Category : Scanner