
Box Operator - Printer Océ - Free user manual and instructions
Find the device manual for free Box Operator Océ in PDF.


| Product Type | Multifunction Printer |
| Dimensions (L x W x H) | 800 x 600 x 500 mm |
| Weight | 50 kg |
| Power Supply | 100-240V, 50/60Hz |
| Power Consumption | 500 W (printing), 50 W (standby) |
| Print Resolution | 1200 x 1200 dpi |
| Print Speed | 20 ppm (A4) |
| Functions | Print, Copy, Scan |
| Paper Capacity | 500 sheets (standard) |
| Connectivity | Ethernet, USB 2.0, Wi-Fi (optional) |
| Display | 7-inch LCD touchscreen |
| Noise Level | 50 dB (printing) |
| Operating Temperature | 10°C to 32°C |
| Operating Humidity | 20% to 80% RH |
| Maintenance | Clean print heads every 5000 pages; replace toner as needed |
| Safety | Security lock, user authentication |
| Spare Parts | Print heads, rollers, fuser unit, toner cartridges |
| Repairability | Modular design, parts widely available |
| Warranty | 1 year |
Frequently Asked Questions - Box Operator Océ
User questions about Box Operator Océ
0 question about this device. Answer the ones you know or ask your own.
Ask a new question about this device
Download the instructions for your Printer in PDF format for free! Find your manual Box Operator - Océ and take your electronic device back in hand. On this page are published all the documents necessary for the use of your device. Box Operator by Océ.
USER MANUAL Box Operator Océ
1.1 System requirements ....1-1
1.2 Restrictions ......1-1
2 Installing Box Operator
2.1 Installation procedure ......2-1
To install the software 2-1
2.2 Uninstalling ......2-1
3 Explore Window Settings
3.1 Explore Window ....3-1
3.1.1 Toolbar 3-2
3.1.2 Icons 3-3
3.2 Box View ....3-4
3.3 Document View ......3-5
4 Connecting to the Multifunctional Product
To connect to a multifunctional product ....4-1
4.1 With user authentication ....4-6
To perform the user authentication operation ....4-6
4.2 With account track 4-8
To perform the account track operation ....4-8
4.3 To view the status of the connection ....4-9
To reconnect to a multifunctional product ....4-9
4.4 To connect to a different box ....4-10
4.5 Disconnecting From a Multifunctional Product ....4-11
To disconnect from the multifunctional product by using a command on the [Box Operator] menu 4-11
4.6 To register a connection ....4-12
To register a device 4-12
4.7 To delete a connection ....4-14
To delete a connected multifunctional product from the Device registration dialog box ....4-14
5 Managing Boxes
5.1 Displaying Boxes ....5-1
5.1.1 Displaying Box Icons ....5-1
5.1.2 Displaying the Box Details ....5-1
5.1.3 Displaying the Box Thumbnails 5-2
5.1.4 Displaying as a List ....5-3
5.1.5 Displaying Box Tiles 5-3
5.2 Creating Boxes ....5-4
To create a box by using a command on the [Box Operator] menu ....5-4
5.3 Changing the Name of the Box ....5-6
To change the name of a box by using a command on the [File] menu ....5-6
5.4 Editing the Box Properties 5-7
To change the properties of a box by using a command on the [File] menu ....5-7
5.5 Deleting a Box ....5-9
To delete a box by using a command on the [File] menu .....5-9
6 Managing Documents
6.1 Displaying documents 6-1
6.1.1 Displaying Document Icons 6-1
6.1.2 Displaying the Document Details 6-2
6.1.3 Displaying the Document 6-2
6.1.4 Displaying the Document List 6-3
6.1.5 Displaying Document Tiles 6-4
6.2 Opening Documents in the Box Operator Viewer 6-5
To open a document in the Box Operator viewer by using a command on the [File] menu 6-7
6.3 Opening Documents in a Specific Application 6-8
To open a document by using a command on the [File] menu ..... 6-8
6.4 To change the document name ......6-10
To change the name of a document by using a command on the [File] menu 6-10
6.5 To save a document onto the computer 6-11
To save a document with a different name by using a command on the [File] menu 6-11
To copy a document to a computer folder by using a command on the [Edit] menu 6-13
To move a document to a computer folder by using a command on the [Edit] menu 6-14
6.6 Copying Documents to Other Boxes ....6-15
To copy a document to another box by using a command on the [Edit] menu 6-15
6.7 Moving Documents to Other Boxes 6-16
To move a document to another box by using a command on the [Edit] menu 6-16
6.8 To delete a document ....6-17
To delete a document by using a command on the [File] menu 6-17
6.9 To print a document 6-18
To print a document from the Box Operator viewer ....6-18 To print a document by using a command on the [File] menu ....6-20
6.10 Quick printing 6-21
To perform the quick print operation 6-21
6.11 Merging and Printing Documents ......6-22
To merge and print documents 6-22
7 Other Operations
7.1 Specifying Cache File Settings 7-1
To specify settings for the cache files 7-1
7.2 To specify settings for temporary files 7-3
To specify temporary file settings 7-3
7.3 Options 7-5
To specify the settings 7-6
About this Product
Box Operator is software that adds functions to Windows Explorer allowing you to access scan or fax files in a box on a multifunctional product and manage the files, such as retrieving, deleting or renaming them.
Trademarks and registered trademarks
Trademark acknowledgements
Adobe, the Adobe logo and Acrobat are either registered trademarks or trademarks of Adobe Systems Incorporated in the United States and/or other countries.
Microsoft ® and Windows ® are either registered trademarks or trademarks of Microsoft Corporation in the United States and/or other countries.
All other company and product names are either trademarks or registered trademarks of their respective companies.
Dialog boxes
The dialog boxes shown in this manual are those that appear in Windows XP.

Note
The dialog boxes that appear in this document may differ from those that appear on your computer, depending on the installed devices and specified settings.

Note
Unauthorized reproduction, translation or duplication of this document, whether in its entirety or in part, is strictly prohibited.
The content of this document is subject to change without notice.
LICENSE ISSUES
The OpenSSL toolkit stays under a dual license, i.e. both the conditions of the OpenSSL License and the original SSLeay license apply to the toolkit. See below for the actual license texts. Actually both licenses are BSD-style Open Source licenses. In case of any license issues related to OpenSSL please contact openssl-core@openssl.org.
OpenSSL License
Copyright © 1998-2004 The OpenSSL Project. All rights reserved. Redistribution and use in source and binary forms, with or without modification, are permitted provided that the following conditions are met:
- Redistributions of source code must retain the above copyright notice, this list of conditions and the following disclaimer.
- Redistributions in binary form must reproduce the above copyright notice, this list of conditions and the following disclaimer in the documentation and/or other materials provided with the distribution.
- All advertising materials mentioning features or use of this software must display the following acknowledgment:
"This product includes software developed by the OpenSSL Project for use in the OpenSSL Toolkit. (http://www.openssl.org/)
- The names "OpenSSL Toolkit" and "OpenSSL Project" must not be used to endorse or promote products derived from this software without prior written permission. For written permission, please contact openssl-core@openssl.org.
- Products derived from this software may not be called "OpenSSL" nor may "OpenSSL" appear in their names without prior written permission of the OpenSSL Project.
- Redistributions of any form whatsoever must retain the following acknowledgment:
"This product includes software developed by the OpenSSL Project for use in the OpenSSL Toolkit (http://www.openssl.org/)"
THIS SOFTWARE IS PROVIDED BY THE OpenSSL PROJECT "AS IS" AND ANY EXPRESSED OR IMPLIED WARRANTIES, INCLUDING, BUT NOT LIMITED TO, THE IMPLIED WARRANTIES OF MERCHANTABILITY AND FITNESS FOR A PARTICULAR PURPOSE ARE DISCLAIMED. IN NO EVENT SHALL THE OpenSSL PROJECT OR ITS CONTRIBUTORS BE LIABLE FOR ANY DIRECT, INDIRECT, INCIDENTAL, SPECIAL, EXEMPLARY, OR CONSEQUENTIAL DAMAGES (INCLUDING, BUT NOT LIMITED TO, PROCUREMENT OF SUBSTITUTE GOODS OR SERVICES; LOSS OF USE, DATA, OR PROFITS; OR BUSINESS INTERRUPTION) HOWEVER CAUSED AND ON ANY THEORY OF LIABILITY, WHETHER IN CONTRACT, STRICT LIABILITY, OR TORT (INCLUDING NEGLIGENCE OR OTHERWISE) ARISING
IN ANY WAY OUT OF THE USE OF THIS SOFTWARE, EVEN IF ADVISED OF THE POSSIBILITY OF SUCH DAMAGE.
This product includes cryptographic software written by Eric Young (eay@cryptsoft.com). This product includes software written by Tim Hudson (tjh@cryptsoft.com).
Original SSLeay License
Copyright © 1995-1998 Eric Young (eay@cryptsoft.com) All rights reserved.
This package is an SSL implementation written by Eric Young (eay@cryptsoft.com).
The implementation was written so as to conform with Netscapes SSL.
This library is free for commercial and non-commercial use as long as the following conditions are aheared to. The following conditions apply to all code found in this distribution, be it the RC4, RSA, lhash, DES, etc., code; not just the SSL code. The SSL documentation included with this distribution is covered by the same copyright terms except that the holder is Tim Hudson (tjh@cryptsoft.com).
Copyright remains Eric Young's, and as such any Copyright notices in the code are not to be removed.
If this package is used in a product, Eric Young should be given attribution as the author of the parts of the library used.
This can be in the form of a textual message at program startup or in documentation (online or textual) provided with the package.
Redistribution and use in source and binary forms, with or without modification, are permitted provided that the following conditions are met:
- Redistributions of source code must retain the copyright notice, this list of conditions and the following disclaimer.
- Redistributions in binary form must reproduce the above copyright notice, this list of conditions and the following disclaimer in the documentation and/or other materials provided with the distribution.
- All advertising materials mentioning features or use of this software must display the following acknowledgement:
"This product includes cryptographic software written by Eric Young (eay@cryptsoft.com)"
The word ‘cryptographic’ can be left out if the rouines from the library being used are not cryptographic related.
- If you include any Windows specific code (or a derivative thereof) from the apps directory (application code) you must include an acknowledgement:
"This product includes software written by Tim Hudson (tjh@cryptsoft.com)"
THIS SOFTWARE IS PROVIDED BY ERIC YOUNG "AS IS" AND ANY EXPRESS OR IMPLIED WARRANTIES, INCLUDING, BUT NOT LIMITED TO, THE IMPLIED WARRANTIES OF MERCHANTABILITY AND FITNESS FOR A PARTICULAR PURPOSE ARE DISCLAIMED. IN NO EVENT SHALL THE AUTHOR OR CONTRIBUTORS BE LIABLE FOR ANY DIRECT, INDIRECT, INCIDENTAL, SPECIAL, EXEMPLARY, OR CONSEQUENTIAL DAMAGES (INCLUDING, BUT NOT LIMITED TO, PROCUREMENT OF SUBSTITUTE GOODS OR SERVICES; LOSS OF USE, DATA, OR PROFITS; OR BUSINESS INTERRUPTION) HOWEVER CAUSED AND ON ANY THEORY OF LIABILITY, WHETHER IN CONTRACT, STRICT LIABILITY, OR TORT (INCLUDING NEGLIGENCE OR OTHERWISE) ARISING IN ANY WAY OUT OF THE USE OF THIS SOFTWARE, EVEN IF ADVISED OF THE POSSIBILITY OF SUCH DAMAGE.
The licence and distribution terms for any publicly available version or derivative of this code cannot be changed. i.e. this code cannot simply be copied and put under another distribution licence [including the GNU Public Licence].
1 Introduction
1.1 System requirements
In order to use Box Operator, the following software must be installed on the computer.
●Adobe Reader or Adobe Acrobat
●Other software required for managing and editing images
In addition, the computer must meet the following requirements.
| Operating system Windows | 2000 Professional (Service Pack 4), Windows 2000 Server (Service Pack 4), Windows XP Home Edition (Service Pack 2), Windows XP Professional (Service Pack 2), Windows Server 2003, Windows Vista Home Basic, Windows Vista Home Premium, Windows Vista Business, and Windows Vista Enterprise |
| Computer PC/AT compatible | able machine installed with a Pentium4 1.6 GHz or faster processor |
| Memory For Windows 2000 | 0: 128 MB or moreOthers: 256 MB or more |
| Network Computer with TCP/IP protocol settings correctly specified | |
| Hard disk 50 MB or more of available space | |
1.2 Restrictions
Depending on the multifunctional product being used, some Box Operator functions may not be available. For details, refer to the support information for your multifunctional product.
2 Installing Box Operator
Follow the procedure described below to install the software.
The enclosed User Software CD-ROM is required to install the software.
2.1 Installation procedure

Note
Before installing the utility, be sure to log in with Administrator privileges.
To install the software
1 Turn on the computer and start Windows.
2 Insert the User Software CD-ROM into the computer's CD-ROM drive.
The CD menu is displayed.
3 Select "Box Operator" from "End User Tools", and then follow the instructions that appear.
Installation begins and the necessary files are copied to the computer. When all of the necessary files have been copied to the computer, the Installation Completed dialog box appears.
4 Click [Finish].
Box Operator is installed.
2.2 Uninstalling
The Box Operator can be uninstalled using either of the following two methods.
- Using "Add or Remove Programs" ("Add/Remove Programs" with Windows 2000)
- Using "Setup.exe" again

Note
Before uninstalling, quit the Box Operator.
3 Explore Window Settings
This section provides detailed descriptions of the Explore Window that appears when Box Operator is started up. For details on starting up Box Operator, refer to “Connecting to the Multifunctional Product” on page 4-1.

Reminder
If Windows Vista is being used, the menu bar may not appear. Display the menu bar before using the software.
3.1 Explore Window
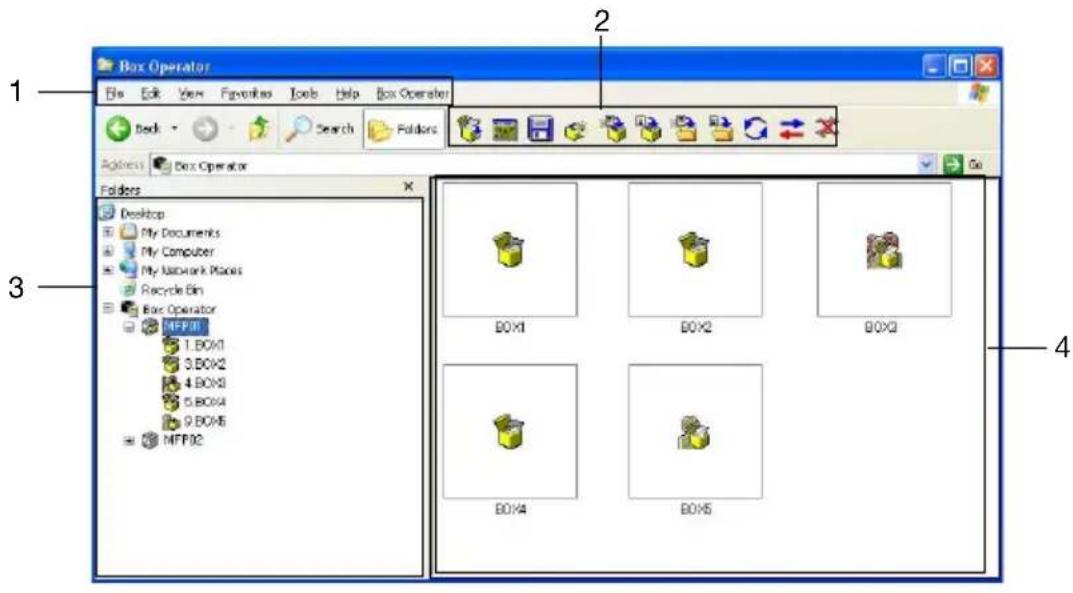
| No. | Item Name Description |
| 1 | Menu bar Use the following menus in Windows Explorer.File: Contains commands for performing box and document operations and for exiting Box Operator.Edit: Contains commands for editing boxes and documents.View: Contains commands for changing the display format.Box Operator: Contains commands for registering multifunctional products and specifying Box Operator settings. |
| 2 | Toolbar Click a button to use the available function. For details, refer to “Toolbar” on page 3-2. |
| 3 | Tree pane The registered multifunctional products and their boxes appear in a hierarchical structure. |
| 4 List pane Displays the contents of the item selected in the tree pane. The display switches between the box view and document view, depending on the selected item. • Box view: Display when a multifunctional product is selected in the tree pane; The list of boxes specified on the multifunctional product is displayed. • Document view: Display when a box is selected in the tree pane; The list of documents saved in the box is displayed. The items can be displayed as icons, a list, a detailed list, tiles (large icons) or thumbnails. For details, refer to “Displaying Boxes” on page 5-1 and “Displaying documents” on page 6-1. | |
3.1.1 Toolbar

| No. | Button Name | Description | Page Reference |
| 1 | Open | Opens the selected item. | “Opening Documents in a Specific Application” on page 6-8 |
| 2 | Open With Box Operator Viewer | Opens the selected document in the Box Operator viewer. | “Opening Documents in the Box Operator Viewer” on page 6-5 |
| 3 Save As | Saves the selected document with a specified name. | “To save a document onto the computer” on page 6-11 | |
| 4 Create User Box | Creates a new box on the connected multifunctional product. | “Creating Boxes” on page 5-4 | |
| 5 | Copy to user box | Copies the selected document to a different box on the connected multifunctional product. | “Copying Documents to Other Boxes” on page 6-15 |
| 6 | Move to user box | Moves the selected document to a different box on the connected multifunctional product. | “Moving Documents to Other Boxes” on page 6-16 |
| 7 Copy to Folder | Copies the selected document to a folder on the computer. | “To save a document onto the computer” on page 6-11 | |
| 8 Move to Folder | Moves the selected document to a folder on the computer. | “To save a document onto the computer” on page 6-11 | |
| 9 Refresh | Updates the contents of the tree pane and the list pane. | (None) | |
| 10 | Connect | Connects to a registered multifunctional product. | “Connecting to the Multifunctional Product” on page 4-1 |
| 11 | Disconnect | Cuts the connection to the connected multifunctional product. | “Disconnecting From a Multifunctional Product” on page 4-11 |
3.1.2 Icons
The icons displayed in the main window and the various dialog boxes have the following meanings.

Reminder
The icon for the application related to the document is displayed in document view.
| Icon Description | |
 | Disconnected multifunctional product |
 | Connected multifunctional product |
 | Public user box |
 | Opened public user box |
 | Personal user box |
 | Opened personal user box |
 | Group user box |
 | Opened group user box |
3.2 Box View
The list of boxes specified on the connected multifunctional product is displayed in the list pane.

Reminder
The format for displaying items in the list pane can be changed. For details, refer to "Displaying Boxes" on page 5-1.

BOX1
BOX2
BOX3
BOX4
BOX5

BOX6

Note
If a search is performed from Windows Explorer, a box cannot be found.
3.3 Document View
The list of documents saved in the connected box is displayed in the list pane.

Reminder
The format for displaying items in the list pane can be changed. For details, refer to "Displaying documents" on page 6-1.

Sc450b05111513440.pdf

5c450b05111513450.tif
5c450b05111513451.tif
Sc450b05111513460.tif

Sc450b05111513480.pdf

Sc450b05111513481.jpg

Note
If a search is performed from Windows Explorer, a file in a box cannot be found.
4 Connecting to the Multifunctional Product
To connect to a multifunctional product
Start up Box Operator, and then display the data in the box on the connected device.
This procedure describes the operation when the Box Operator is first started.
In the [Start] menu, point to [MFP Utility], then [Box Operator], and then click [Box Operator].
- For detailed descriptions of the main window, refer to "Explore Window Settings" on page 3-1.
- If a multifunctional product is already registered, select the multifunctional product to be connected to. Continue with step 6.
The software starts up and the main window appears.
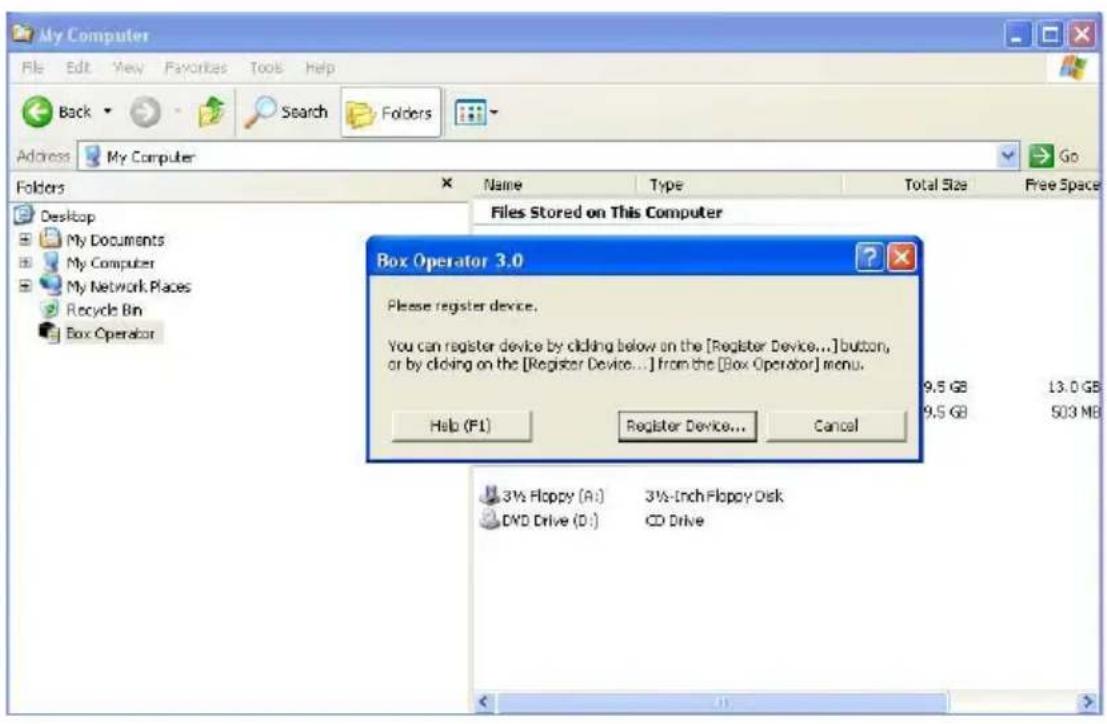
2 Click [Register Device].
The Device registration dialog box appears.

3 Click [New registration].
The New registration dialog box appears.

4 Type in the name and address of the multifunctional product, and then click [OK].
- The information can be entered by searching for a connection. Click [Search for device] to display a list of multifunctional products on the network.
The multifunctional product is registered in the Device registration dialog box.
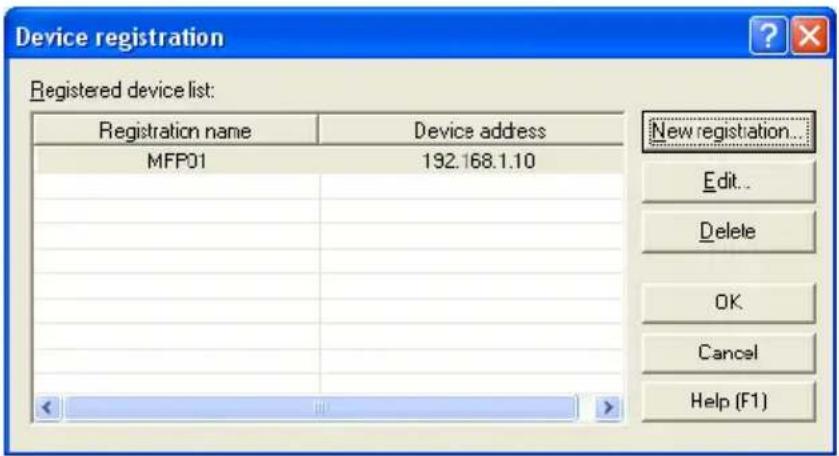
5 Click [OK].
The Device registration dialog box is closed.

6 Double-click the icon for the multifunctional product in the tree pane.
- Click the icon for the multifunctional product, and then click [Connect] in the [Box Operator] menu to display the Connect dialog box.
- If user authentication or account track settings have been specified on the multifunctional product to be connected to, the corresponding authentication dialog box appears. For details, refer to "With user authentication" on page 4-6 and "With account track" on page 4-8.
If a successful connection was established, the list of boxes appears in the list pane.
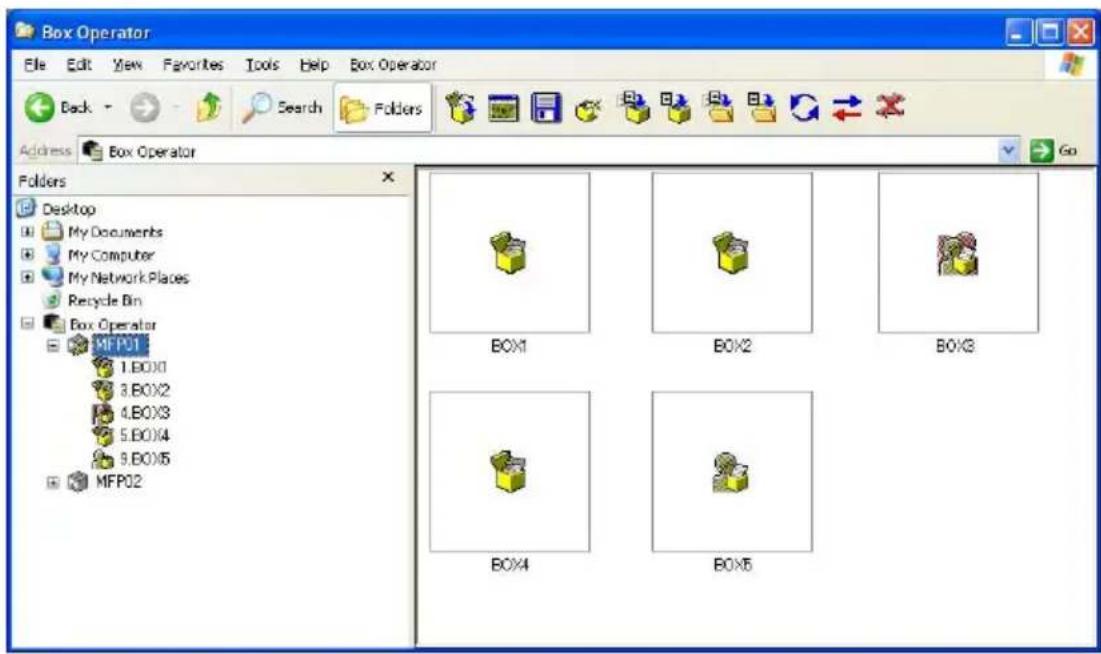
7 In the list pane, double-click the name of the box to be connected to.
- If the box requires a password, type the password into the "Password" box. If you do not have the password, contact the machine administrator.
The list of documents saved in the box is displayed.

4.1 With user authentication
When connecting to a multifunctional product, the User authentication dialog box may appear.
The user name and password specified for user authentication must be entered.
For details, consult with the machine's administrator.
To perform the user authentication operation
1 Select "Log on with the specified user name.".
![User authentication - [mosel] Enter user name and password. Log on as public user. Log on with the specified user name. User name: Password: Save logon user name. Select External Server Help (F1) OK Cancel](/content/2026/05/861935/images/f6c23d59610d7eb6e30cf55d83bf6b59e0531f385e4860a72f82874b1b781c1c.jpg)
- If user authentication was set to allow a public user, this scan function can be used without entering a user name and password. Select "Log on as public user.".
- To save the entered information, select the "Save logon user name." check box. This allows the machine to be accessed the next time without entering the user name.
2 Type in the user name and password, and then click [OK].
![User authentication - [mosel] Enter user name and password. Log on as public user. Log on with the specified user name. User name: User01 Password: xxxxxxxxxxxx Save logon user name. Select External Server Help (F1) OK Cancel](/content/2026/05/861935/images/0d232376b5b3e7af39a486fa6bbca807735d72a920ad531602456452c4812311.jpg)
- If external server authentication was selected for the user authentication setting on the device and if multiple domains have been registered, enter "@domain_name" after the user name. For example, "user01@domain" when the user name is "user01" and the domain name is "domain".
4.2 With account track
When connecting to a multifunctional product, the Account management dialog box may appear.
The account name and password specified for account tracking must be entered.
For details, consult with the machine's administrator.
To perform the account track operation
1 Type in the account name and password.
![Account management - [MFP01] Enter account name and password. Account name: Password: Save logon account name Help (F1) OK Cancel](/content/2026/05/861935/images/a4e3c4f27a8af2ec8ab81bd48a89158aa2b05e4435c1ede17adb1279f57f5b72.jpg)
- To save the entered information, select the "Save logon account name." check box. This allows the machine to be accessed the next time without entering the account name.
2 Click [OK].
![Account management - [MFP01] Enter account name and password. Account name: service Password: ******** Save logon account name Help (F1) OK Cancel](/content/2026/05/861935/images/c0f7820cbce582b166d7f95797ee33eaab54846d72ffc6d3c8d387eb20d0adb7.jpg)
4.3 To view the status of the connection
Information and the status of the connected device can be viewed.
If settings have been specified for user authentication to be performed by the external server, authentication may take some time and a connection error may occur. If an error occurs, select this command if data cannot be transferred correctly with the machine.
To reconnect to a multifunctional product
1 On the [Box Operator] menu, click [Reconnect].

2 Check the status of the connection.

4.4 To connect to a different box
Perform any of the following operations to change the box to be connected to.
- Select the icon for a box in the tree pane, and then wait the specified length of time.

Reminder
Settings can be changed to change the box by selecting a box icon in the list pane and pressing the [Enter] key in the keyboard. For details, refer to "Options" on page 7-5.
4.5 Disconnecting From a Multifunctional Product
Perform any of the following operations to cut the connection to the connected multifunctional product.
- Click [Close] on the [Box Operator] menu.
- Right-click the icon for the multifunctional product, and then click [Close].
- Click [Close] in the toolbar.
To disconnect from the multifunctional product by using a command on the [Box Operator] menu
1 On the [Box Operator] menu, click [Close].
A message appears, requesting confirmation to cut the connection.
2 Click [Yes].
The connection to the multifunctional product is cut and the list of displayed data is cleared.
4.6 To register a connection
Multiple devices can be registered with Box Operator so that a connection can easily be established. The following procedure describes how to register new connections.
To register a device
1 On the [Box Operator] menu, click [Register Device].

The Device registration dialog box appears.

2 Click [New registration].
3 Type in the connection information.

- The information can be entered by searching for a connection. Click [Search for device] to display a list of multifunctional products on the network.
- In the "Registration name" box, type the name of the multifunctional product.
- In the "Device address" box, type the address (IP address or host name) for the multifunctional product to be connected to.
- The numbers of the ports used with the TCP socket interface appear in the "TCP socket setup" group box. These settings must be the same as those specified on the multifunctional product. For details on the settings specified on the multifunctional product, contact the administrator of the multifunctional product. To change the settings, click [Edit].
4 Click [OK].
The entered information is added to the "Registered device list" list.
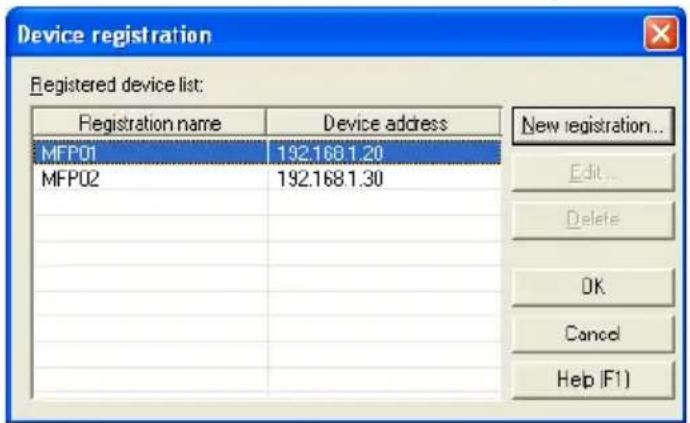
4.7 To delete a connection
Delete a registered connection from the Device registration dialog box.
To delete a connected multifunctional product from the Device registration dialog box
The following procedure describes how to delete a connection.
1 On the [Box Operator] menu, click [Register Device].

The Device registration dialog box appears.

2 Select the device to be deleted, and then click [Delete]. A confirmation message appears.

3 Click [OK].
The selected information is removed from the "Registered device list" list.
5 Managing Boxes
From Box Operator, various operations can be performed on boxes on connected multifunctional products.
5.1 Displaying Boxes
When the icon of a multifunctional product is selected in the tree pane, the list of boxes appears in the list pane. The boxes can be displayed as icons, a list, a detailed list, tiles (large icons) or thumbnails.
In addition, the boxes can be sorted by selecting the desired sorting condition from the menu that appears after clicking [Arrange Icons By] on the [View] menu.
5.1.1 Displaying Box Icons
Perform any of the following operations to display the list of boxes as icons.
- Click [Icons] on the [View] menu.
●Right-click in the list pane, and then click [Icons].

5.1.2 Displaying the Box Details
Perform any of the following operations to display the details for the boxes in the list.
- Click [Details] on the [View] menu.
●Right-click in the list pane, and then click [Details].

5.1.3 Displaying the Box Thumbnails
Perform any of the following operations to display the list of boxes as thumbnails.
- Click [Thumbnails] on the [View] menu.
- Right-click in the list pane, and then click [Thumbnails].

...
Reminder
The user box type is displayed as an icon in thumbnail. For details on the icons, refer to "Icons" on page 3-3.

5.1.4 Displaying as a List
Perform any of the following operations to display the boxes as a list.
- Click [List] on the [View] menu.
●Right-click in the list pane, and then click [List].
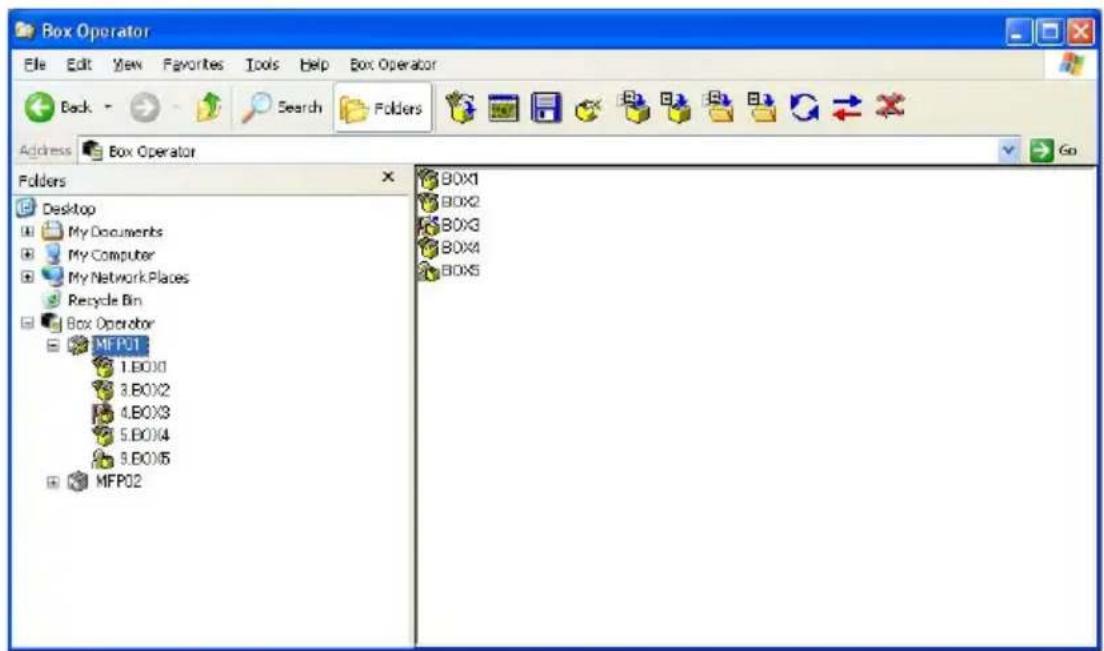
5.1.5 Displaying Box Tiles
Perform any of the following operations to display the boxes as large icons.
- Click [Tiles] on the [View] menu.
●Right-click in the list pane, and then click [Tiles].

5.2 Creating Boxes
Perform any of the following operations to create a new box on the connected multifunctional product.
- Click [Create User Box] on the [Box Operator] menu.
- Right-click anywhere in the list pane except on an icon, and then click [Create User Box].
- Click [Create User Box] in the toolbar.
To create a box by using a command on the [Box Operator] menu
1 On the [Box Operator] menu, click [Create User Box].
The Create user box dialog box appears.
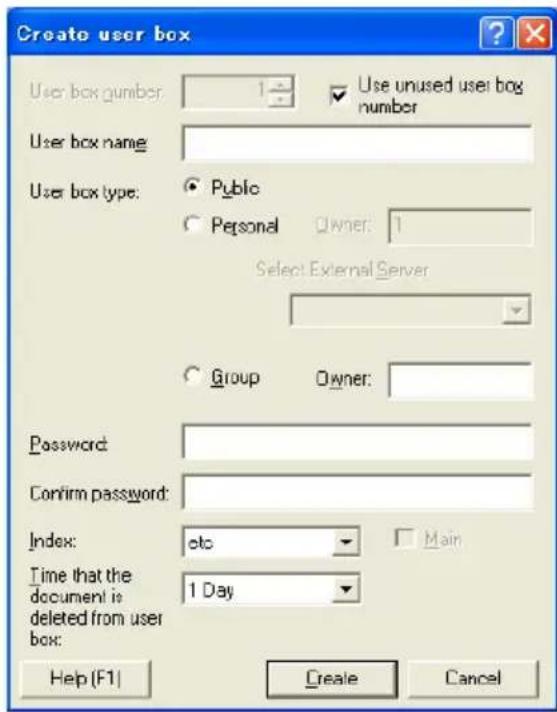
2 Type in the information for the box.
- In the "User box name" box, type the name of the box.
- Beside "User box type", select the user box type. If "Personal" is selected, type the name of the box owner in the "Owner" box. At this time, select an authentication server or type it in according to the multifunctional product settings.
If "Group" is selected, type the name of the group in the "Owner" box.
- In the "Password" box, type the password for the box. Type the same password in the "Confirm password" box.
- From the "Index" list, select the characters used for a search from the control panel of the multifunctional product.
- In the "Time that the document is deleted from user box" list, select the time when documents are automatically deleted from the box.
3 Click [Create].
The box is created and appears in the list pane.
5.3 Changing the Name of the Box
Perform any of the following operations to change the name of the box.
- Select the icon for the box to be renamed, and then click [Rename] on the [File] menu.
- Right-click the icon for the box to be renamed, and then click [Rename].

Note
The name of an open box cannot be changed. In addition, the Memory RX User Box cannot be renamed.
To change the name of a box by using a command on the [File] menu
Before changing the name of a box, check for the following.
√The password is available for the box to be renamed.
1 Select the icon for the box to be renamed.
2 On the [File] menu, click [Rename].
The Rename user box dialog box appears.

3 In the "Name" box, type the name of the box.
- A maximum of 20 characters can be entered.
4 Click [OK].
- If a password has been specified for the box, the Password confirmation dialog box appears. Type in the password for the box, and then click [OK].
The name of the box is changed.
5.4 Editing the Box Properties
The properties (detailed information) for the box can be edited.
Perform any of the following operations to change the properties for the box.
- Select the icon for the box whose properties are to be changed, and then click [Property] on the [File] menu.
- Right-click the icon for the box whose properties are to be changed, and then click [Property].

Note
The properties of an open box cannot be changed. In addition, the properties of the Memory RX User Box cannot be changed.
To change the properties of a box by using a command on the [File] menu
Before changing the properties of a box, check for the following.
√The password is available for the box whose properties are to be changed.
1 Select the icon for the box whose properties are to be changed.
2 On the [File] menu, click [Properties].
The following dialog box appears.
![BOX1 properties User box name: BOX1 User box number: 5 User box type: ○ Public ○ Personal Owner: Select External Server ○ Group Owner: Connected to: model [10.128.41.107] Logged on user: 1 Date/time registered: 2000/04/07 22:23:24 Index: MNO □ Mon Time that the document is deleted from box: 1 Day Cl…](/content/2026/05/861935/images/d2442c742a53809b7a32a2899e3d83966fe4e0701900eeb85572a71e92526586.jpg)
3 Change detailed information for the box, if necessary.
- In the "User box name" box, the name of the box can be changed.
- Beside "User box type", the user box type can be changed. If "Personal" is selected, type the name of the box owner in the "Owner" box. At this time, select an authentication server or type it in according to the multifunctional product settings.
If "Group" is selected, type the name of the group in the "Owner" box. - From the "Index" list, the characters used for a search from the control panel of the multifunctional product can be changed.
- In the "Time that the document is deleted from box" list, the time when documents are automatically deleted from the box can be changed.
- To change the password for the box, click [Change Password].
4 Click [OK].
The properties for the box are changed.
5.5 Deleting a Box
Perform any of the following operations to delete a box.
- Select the icon for the box to be deleted, and then click [Delete] on the [File] menu.
- Right-click the icon for the box to be deleted, and then click [Delete].

Note
An open box cannot be deleted. In addition, the Memory RX User Box cannot be deleted.
To delete a box by using a command on the [File] menu
Before deleting a box, check for the following.
√The password is available for the box to be deleted.
1 Select the icon for the box to be deleted.
2 On the [File] menu, click [Delete].
The confirmation message appears.
3 Click [Yes].
- If a password has been specified for the box, the Password confirmation dialog box appears. Type in the password for the box, and then click [OK].
The box is deleted.
6 Managing Documents
6.1 Displaying documents
When the icon of a box is selected in the tree pane, the list of files appears in the list pane. The files can be displayed as icons, a list, a detailed list, tiles (large icons) or thumbnails.
In addition, when files are displayed, the files can be sorted by selecting the desired sorting condition from the menu that appears after clicking [Arrange Icons By] on the [View] menu.
6.1.1 Displaying Document Icons
Perform any of the following operations to display the list of saved documents as icons.
- Click [Icons] on the [View] menu.
●Right-click in the list pane, and then click [Icons].


Note
The icon of the application linked to the document is displayed. For details on linking documents to applications, refer to the Windows manual and Help.
6.1.2 Displaying the Document Details
Perform any of the following operations to display the details for the saved documents in the list.
- Click [Details] on the [View] menu.
●Right-click in the list pane, and then click [Details].

6.1.3 Displaying the Document
Perform any of the following operations to display the list of saved documents as thumbnails.
- Click [Thumbnails] on the [View] menu.
- Right-click in the list pane, and then click [Thumbnails].


Note
The size of the thumbnails can be adjusted. Select [Thumbnail Size] submenu of the [View] menu.
Only the first page of data that consists of multiple pages is displayed.

Reminder
If the multifunctional product is set so that color documents cannot be transmitted by the user or account that is logged onto Box Operator, thumbnails of color documents will not be displayed.
6.1.4 Displaying the Document List
Perform any of the following operations to display the list of saved documents.
- Click [List] on the [View] menu.
●Right-click in the list pane, and then click [List].
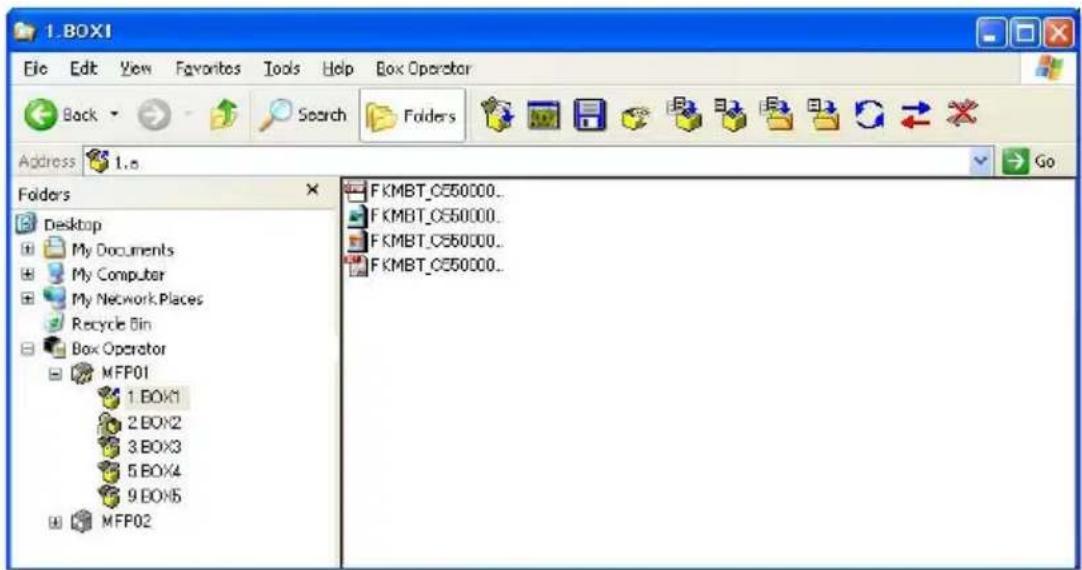
6.1.5 Displaying Document Tiles
Perform any of the following operations to display the list of saved documents as large icons.
- Click [Tiles] on the [View] menu.
●Right-click in the list pane, and then click [Tiles].
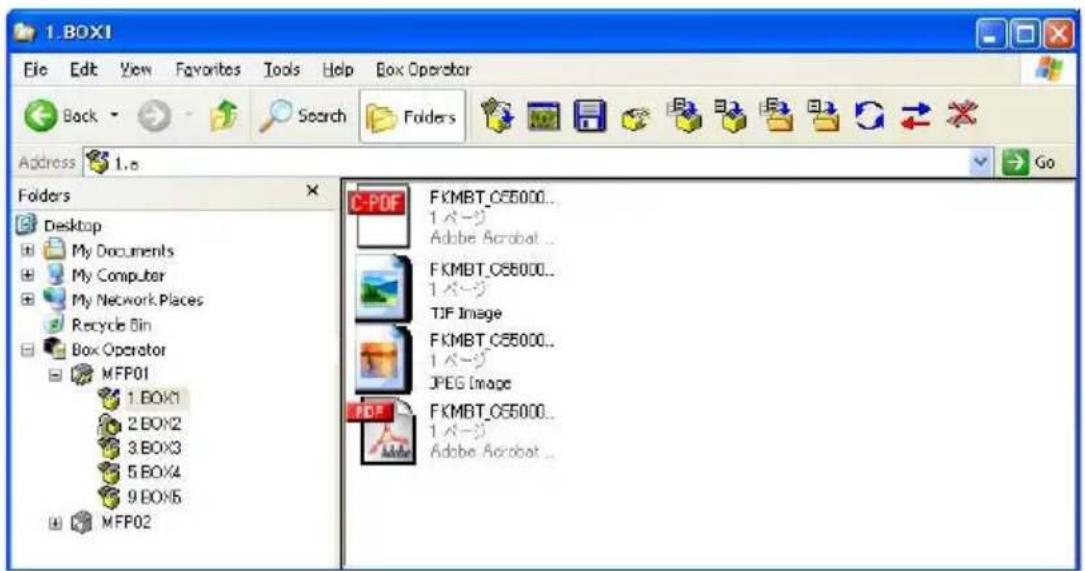
6.2 Opening Documents in the Box Operator Viewer
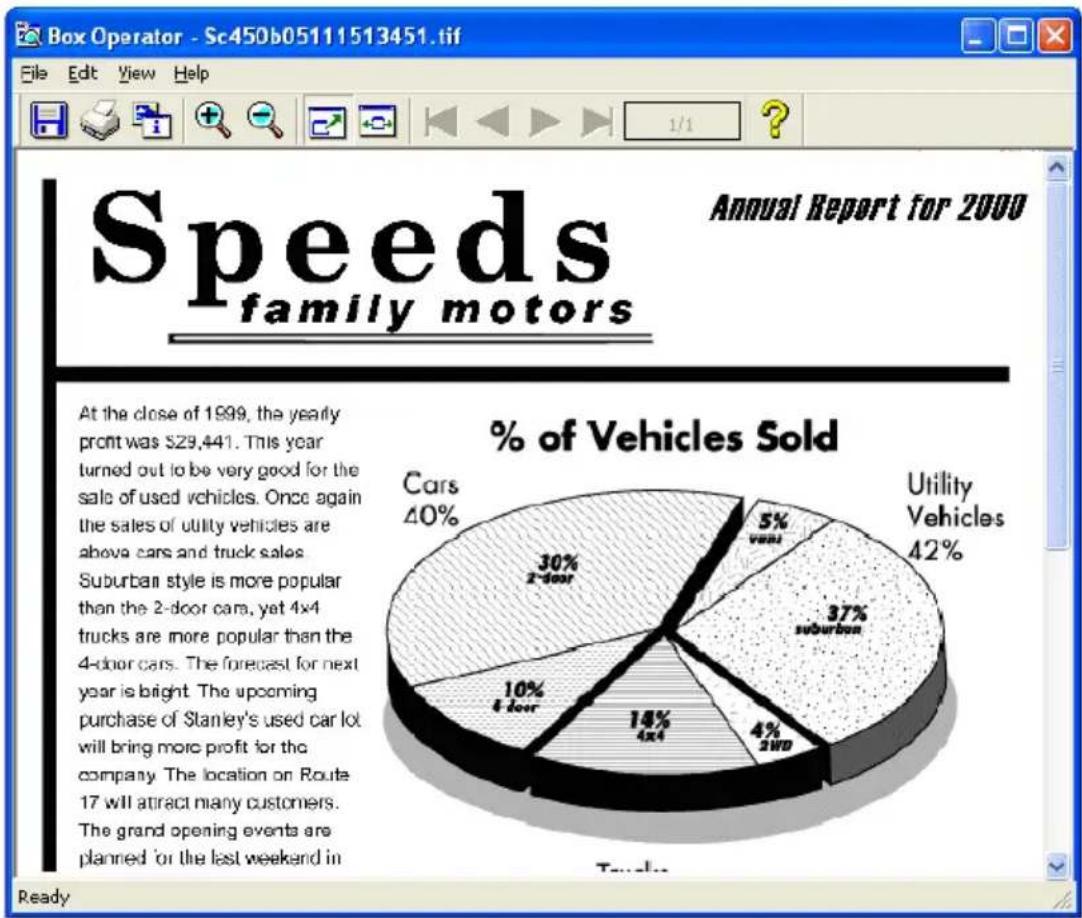
The selected document can be displayed in a separate window.

Note
Documents in the PDF format or the compact PDF format cannot be opened in the Box Operator viewer.

Reminder
If the multifunctional product is set so that color documents cannot be transmitted by the user or account that is logged onto Box Operator, color documents cannot be opened in the Box Operator viewer.
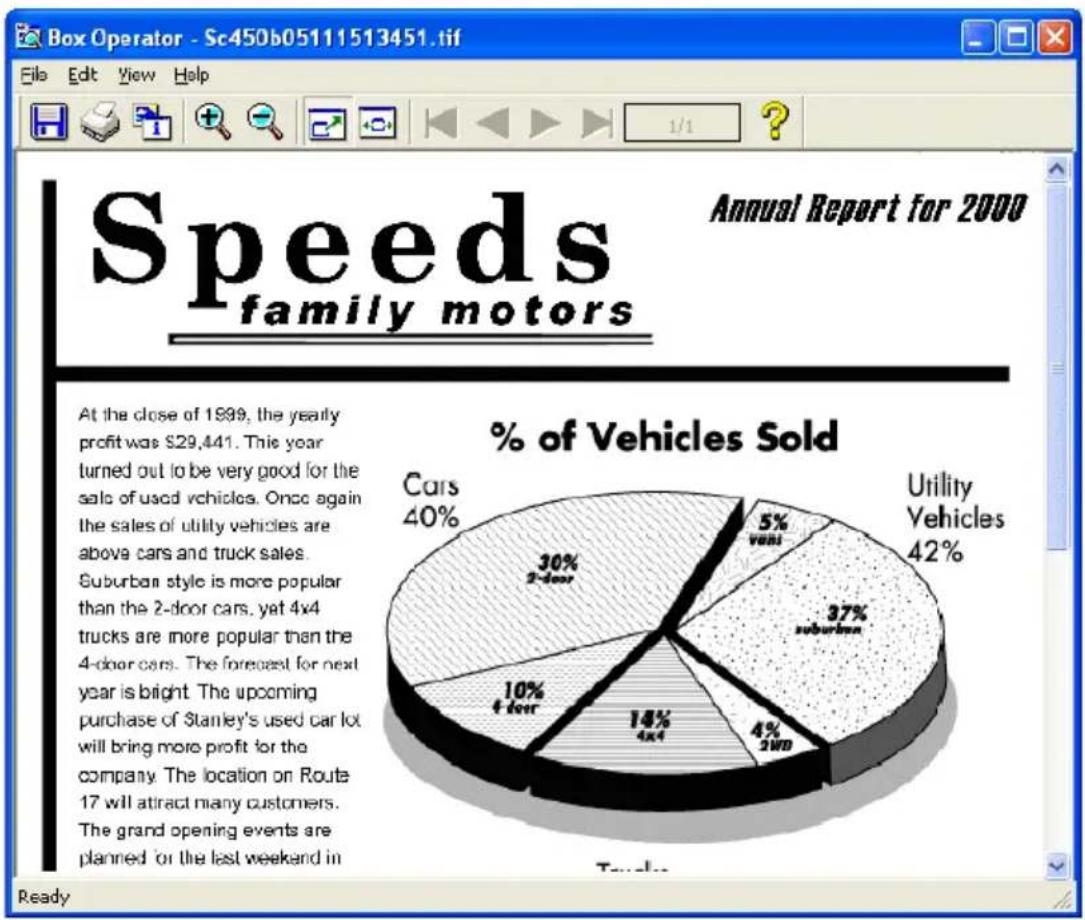
When the data is displayed in a separate window, the following operations can be performed.
| Menu Command Description | |
| File Save As Saves the displayed data to the specified folder on the computer.A different file format cannot be selected. | |
| Page Setup Sets up the layout of the page. | |
| Print Preview Displays a preview of how the image will appear when it is printed. | |
| Print Prints the displayed data. For details, refer to “To print a document” on page 6-18. | |
| Exit Closes the window that is displayed. | |
| Edit Copy Copies the displayed data. | |
| Show Document Information | Displays information such as the name, file type and resolution for the displayed data.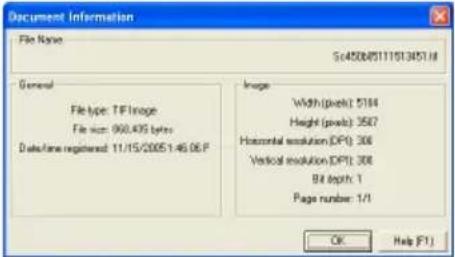 |
| View Toolbar Displays or hides the toolbar. | |
| Status Bar | Displays or hides the status bar. |
| (Zoom ratios) Select the display size. | |
| Fit in Window | Displays the entire document to fit within the window. |
| Fit Width | Displays the document so that its width fits the width of the window. |
| First Page Prev Page Next Page Last Page | Available when a document containing multiple pages is displayed. Select the document page to be displayed. |
| Go To | Available when a document containing multiple pages is displayed. Specify the document page to be displayed. |
| Rotate | Rotates the documents. |
Perform any of the following operations to display a document in the Box Operator viewer.
- Select the icon for the document, and then click [Open With Box Operator Viewer] on the [File] menu.
- Select the icon for the document, and then click [Open With Box Operator Viewer].
To open a document in the Box Operator viewer by using a command on the [File] menu
1 Select the document to be opened in the Box Operator viewer.
2 On the [File] menu, click [Open With Box Operator Viewer].
The Box Operator viewer starts up and the document is displayed.
6.3 Opening Documents in a Specific Application
A document can be opened in an application other than the Box Operator viewer. The application linked to the file format of the selected document is started up.
Perform any of the following operations to display a document in a specific application.
- Double-click the icon for the document.
- Select the icon for the document, and then press the [Enter] key in the keyboard.
- Select the icon for the document, and then click [Open] on the [File] menu.
- Right-click the icon for the document, and then click [Open].

Reminder
When opening the document in an application other than the one linked to it, click [Open With], or drag the document into the window of the application that you wish to open it in.

Reminder
If the multifunctional product is set so that color documents cannot be transmitted by the user or account that is logged onto Box Operator, color documents cannot be opened.
To open a document by using a command on the [File] menu
1 Select the document to be opened.
2 On the [File] menu, click [Open].

- To open the document in an application other than the one that it is linked to, click [Open With].
The application starts up and the document is displayed.
6.4 To change the document name
The file name of a document saved in a box can be changed.
Perform any of the following operations to change the name of the document.
- Select the icon for the document, and then click [Rename] on the [File] menu.
- Right-click the icon for the document, and then click [Rename].
To change the name of a document by using a command on the [File] menu
1 Select the icon for the document to be renamed.
2 On the [File] menu, click [Rename].
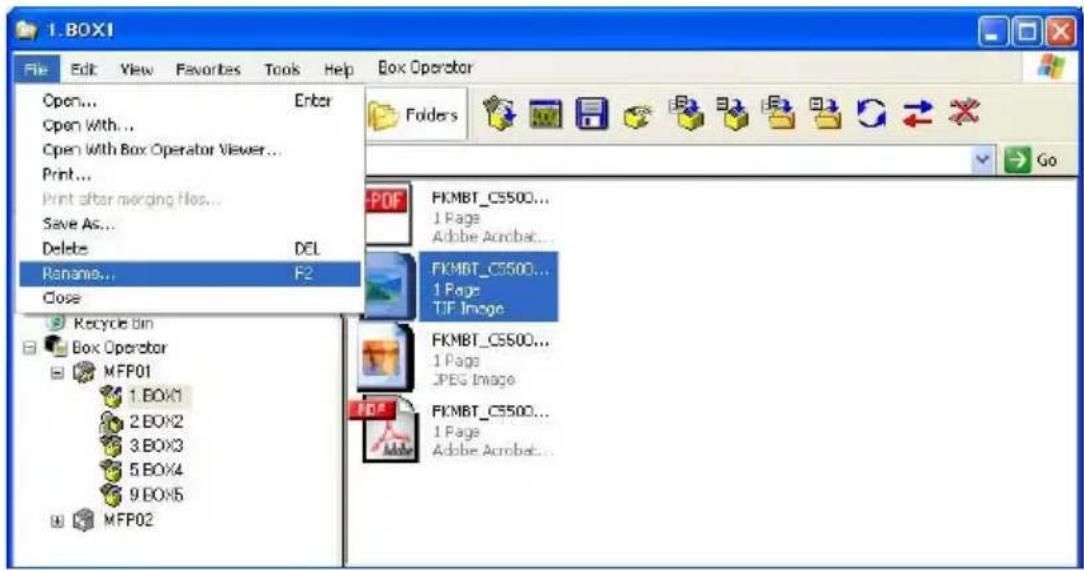
3 Type in the new name, and then click [OK].
![Océ Box Operator - To change the name of a document by using a command on the [File] menu - 2](/content/2026/05/861935/images/1dfbc2c551121ceaa4f2e90e8596f18283921b8ce7d430ed59ade2fd1234a1b1.jpg)
Note
The file extension cannot be changed.
6.5 To save a document onto the computer
A document saved in a box can be saved onto the computer.
Perform any of the following operations to save a document on the computer.
- Select the icon for the document, and then click [Save As] on the [File] menu.
●Right-click the icon for the document, and then click [Save As]. - Select the icon for the document, and then click [Copy To Folder] on the [Edit] menu.
- Right-click the icon for the document, and then click [Copy To Folder].
- Select the icon for the document, and then click [Copy To Folder] in the toolbar.
- Select the icon for the document, and then click [Move To Folder] on the [Edit] menu.
- Right-click the icon for the document, and then click [Move To Folder].
- Select the icon for the document, and then click [Move To Folder] in the toolbar.

Reminder
If the multifunctional product is set so that color documents cannot be transmitted by the user or account that is logged onto Box Operator, documents cannot be saved on the computer.
To save a document with a different name by using a command on the [File] menu
1 Select the icon for the document to be saved.
2 On the [File] menu, click [Save As].

3 Select the drive and folder where the data is to be saved, and then type in the new name if the file is to be renamed.

- From the "Save as type" list, select the type of file to be saved. The file formats that are available are JPEG, TIFF, PDF and compact PDF.
- The file formats that can be selected from the "Save as type" list may be different depending on the multifunctional product being used and the file format of the document selected in the list pane.
- The page to be saved can be specified in the "Page" box. The page number can be specified only when the selected document has the PDF or TIFF format and has multiple pages and when the JPEG format is selected in the "Save as type" list.
4 Click [Save].
To copy a document to a computer folder by using a command on the [Edit] menu
1 Select the icon for the document to be copied.
2 On the [Edit] menu, click [Copy To Folder].
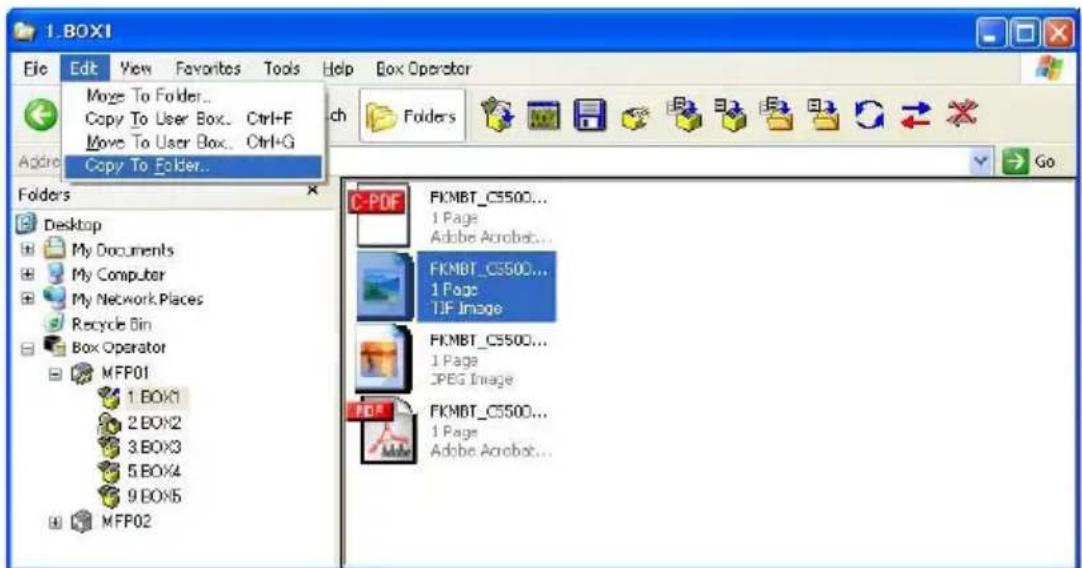
3 Select the folder where the document is to be copied.
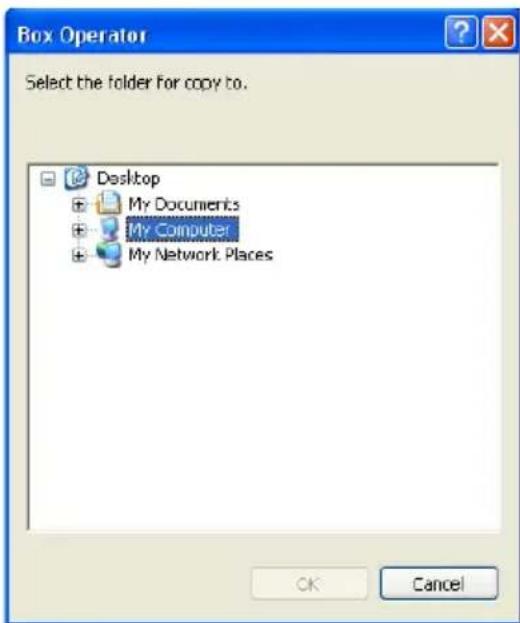
4 Click [OK].
To move a document to a computer folder by using a command on the [Edit] menu
1 Select the icon for the document to be moved.
2 On the [Edit] menu, click [Move To Folder].

3 Select the folder where the document is to be moved.
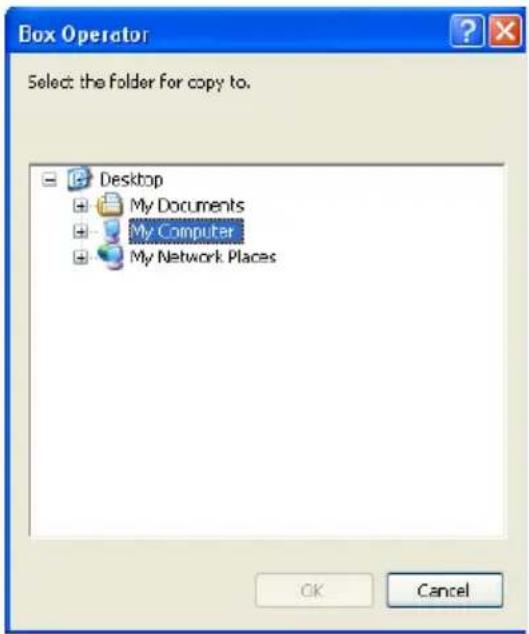
4 Click [OK].
6.6 Copying Documents to Other Boxes
A document in the box can be copied to a different box.
Perform any of the following operations to copy a document to a different box.
- Select the icon for the document, and then click [Copy To User Box] on the [Edit] menu.
- Right-click the icon for the document, and then click [Copy to user box].
- Click [Copy to user box] in the toolbar.

Note
A document cannot be copied to the Memory RX User Box. In addition, a document cannot be copied to a box on a different multifunctional product.
To copy a document to another box by using a command on the [Edit] menu
1 Select the icon for the document to be copied to another box.
- Multiple documents can be selected.
2 On the [Edit] menu, click [Copy To User Box].
The Copy to user box dialog box appears.

3 Select the user box where the document is to be copied to, and then click [OK].
The document is copied to the selected box.
6.7 Moving Documents to Other Boxes
A document in the box can be moved to a different box.
Perform any of the following operations to move a document to a different box.
- Select the icon for the document, and then click [Move To User Box] on the [Edit] menu.
- Right-click the icon for the document, and then click [Move to User Box].
- Click [Move to user box] in the toolbar.

Note
A document cannot be moved to the Memory RX User Box. In addition, a document cannot be moved to a box on a different multifunctional product.
To move a document to another box by using a command on the [Edit] menu
1 Select the icon for the document to be moved to another box.
- Multiple documents can be selected.
2 On the [Edit] menu, click [Move To User Box]. The Move to user box dialog box appears.
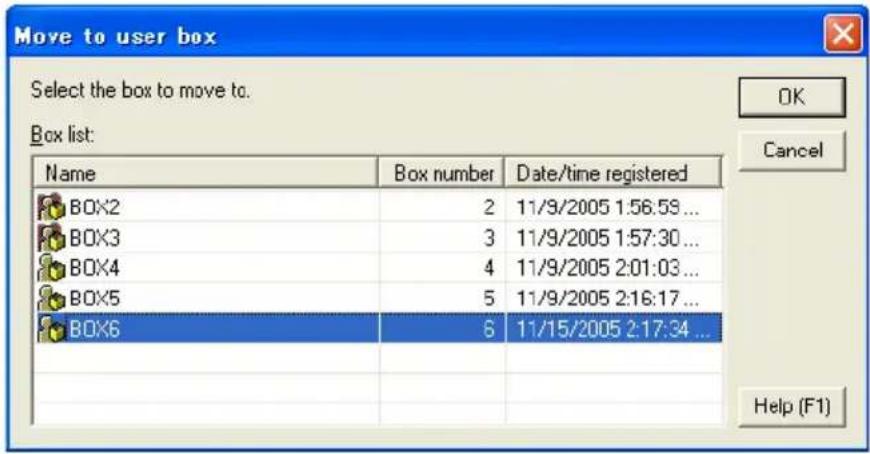
3 Select the user box where the document is to be moved to, and then click [OK].
The document is moved to the selected box.
6.8 To delete a document
Perform any of the following operations to delete a document.
- Select the icon for the document, and then click [Delete] on the [File] menu.
- Right-click the icon for the document, and then click [Delete].
To delete a document by using a command on the [File] menu
1 Select the icon for the document to be deleted.
2 On the [File] menu, click [Delete].

The following confirmation message appears.
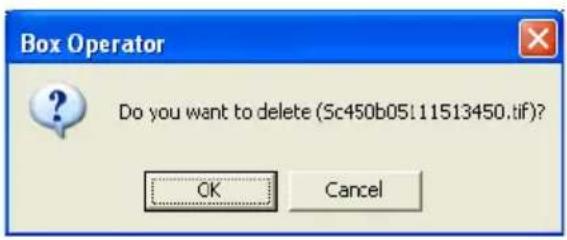
3 Click [OK].
The document is deleted.
6.9 To print a document
Perform any of the following operations to print the selected document.
- Open the document in the Box Operator viewer, and then click [Print] on the [File] menu.
- Open the document in a different application, and then perform the application's print operation.
- Select the icon for the document, and then click [Print] on the [File] menu.
- Select the icon for the document, and then click [Quick Print] on the [File] menu.

Reminder
For details on printing from an application other than the Box Operator viewer, refer to the manual for that application.
To print a document from the Box Operator viewer
1 Open the document to be printed in the Box Operator viewer.

- For details on opening the document in the Box Operator viewer, refer to "Opening Documents in the Box Operator Viewer" on page 6-5.
2 On the [File] menu of the Box Operator viewer, click [Print].
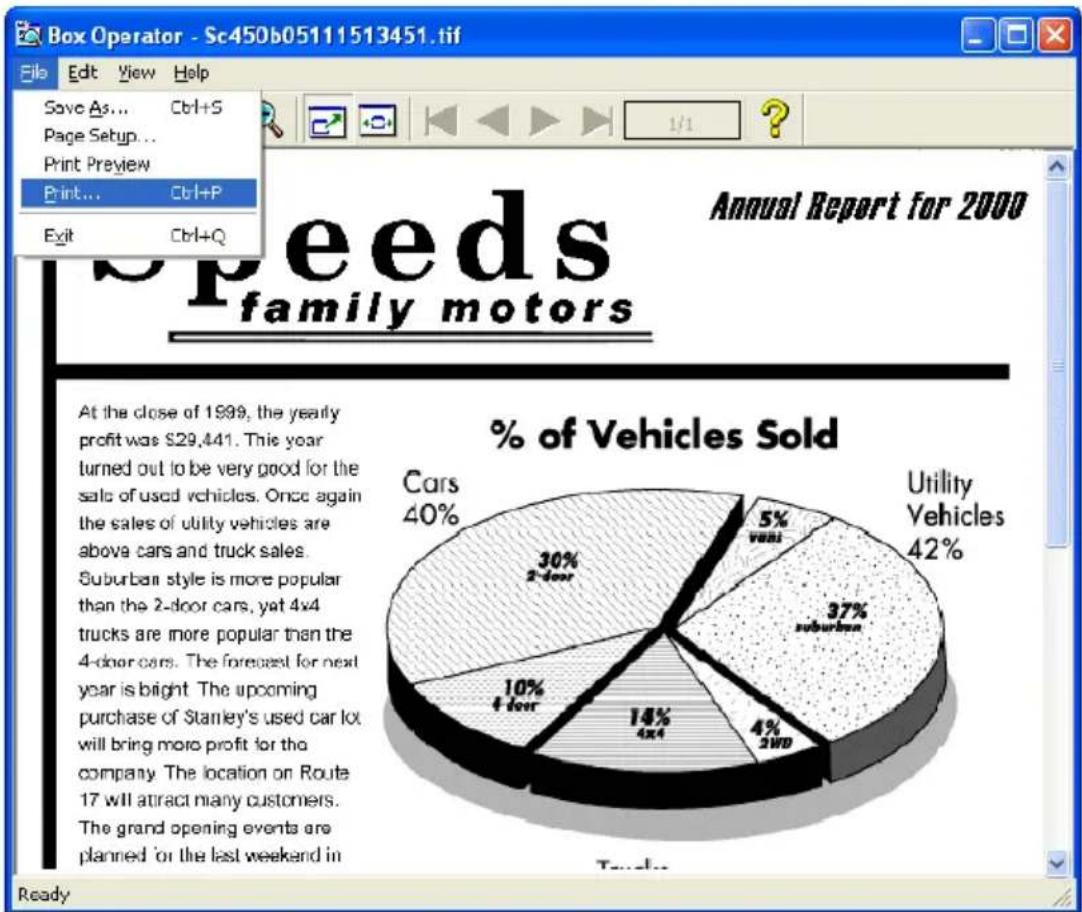
3 Specify the number of copies to be printed, and then click [Print].

To print a document by using a command on the [File] menu
1 Select the icon for the document to be printed.
2 On the [File] menu, click [Print].
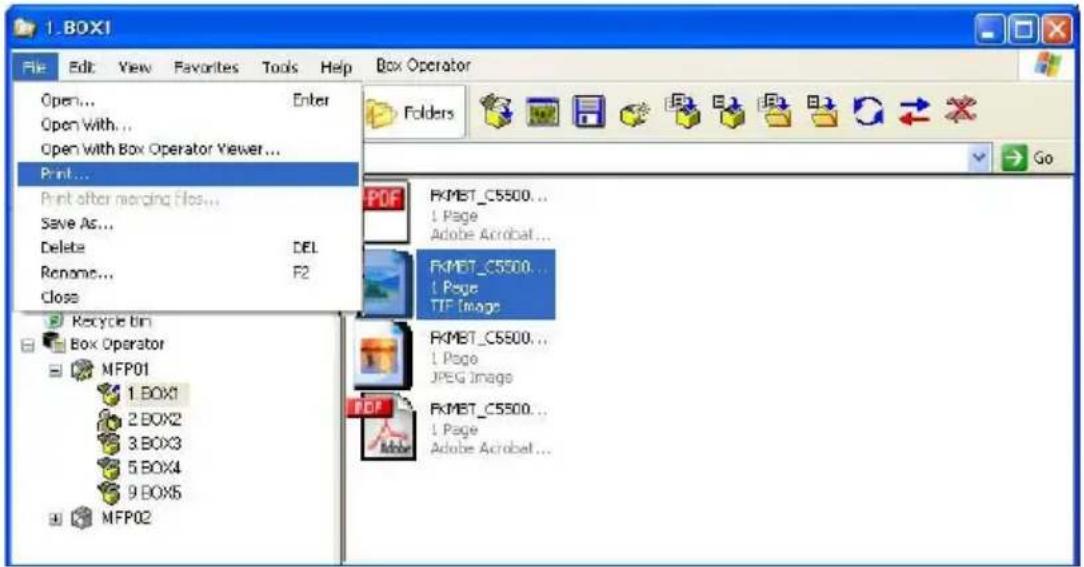
3 Specify the number of copies to be printed, and then click [Print].
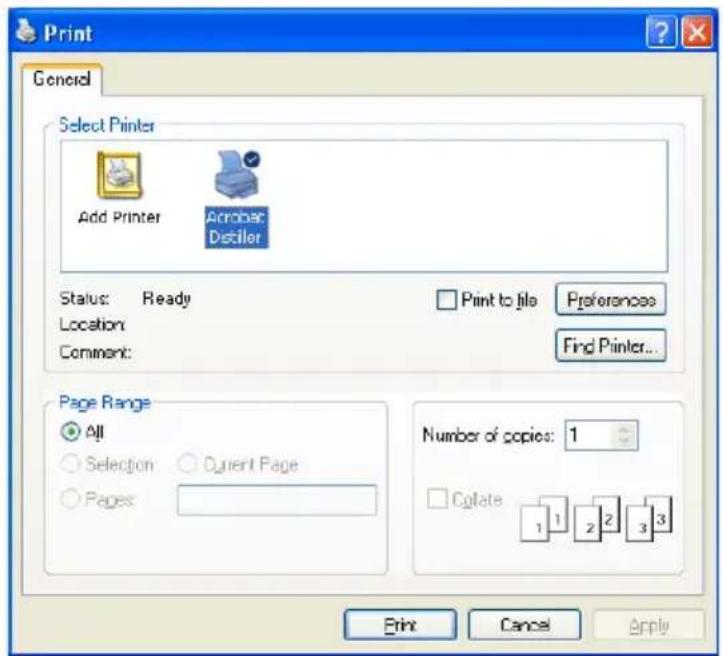
6.10 Quick printing
Using the multifunctional product where a user is logged on, a document in a box can quickly be printed. At this time, print settings can be specified from the Quick Print dialog box.
To perform the quick print operation
1 Select the icon for the document to be printed.
2 Clicking [Quick Print] on the [File] menu displays the Quick Print dialog box.
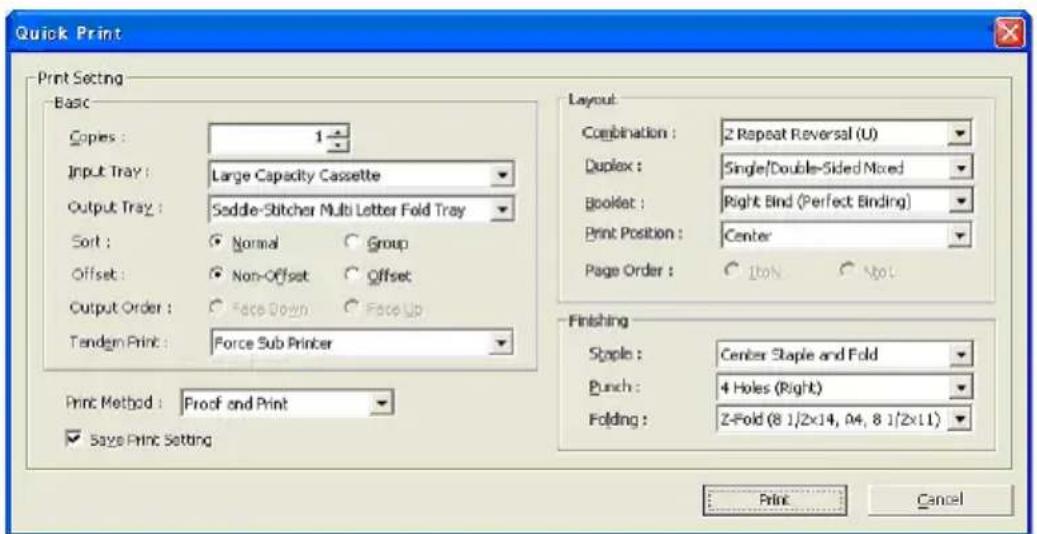
3 The settings that can be specified differ depending on the functions and options that the device is equipped with.
4 To save the specified print settings, select the "Save Print Setting" check box.
5 Click the [Print] button to begin quick printing.
6.11 Merging and Printing Documents
Multiple documents can be merged and printed together.
To merge and print documents
1 Select the icons for the multiple documents to be merged and printed.
2 On the [File] menu, click [Print after merging files].
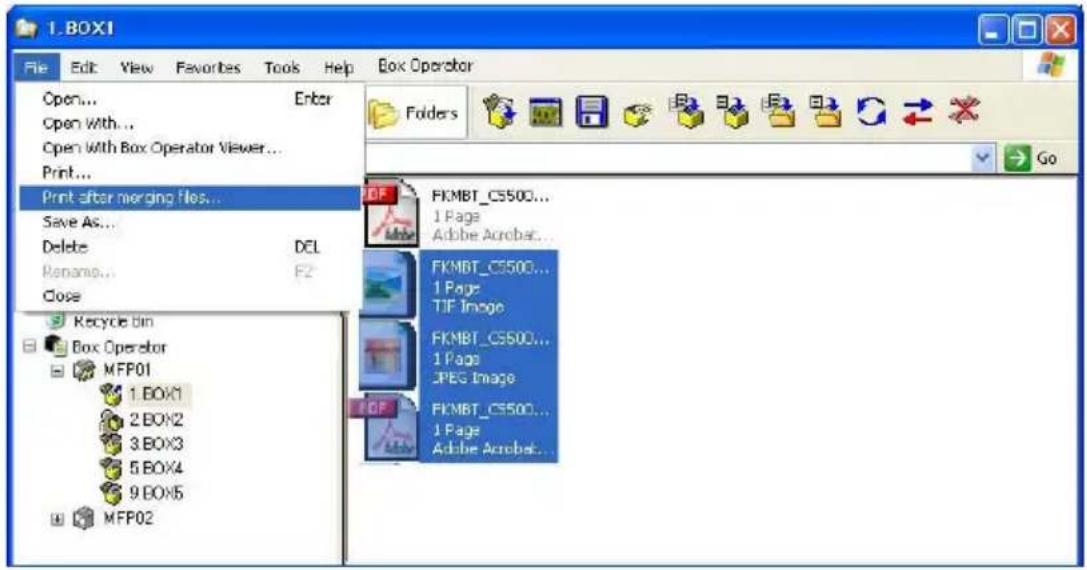
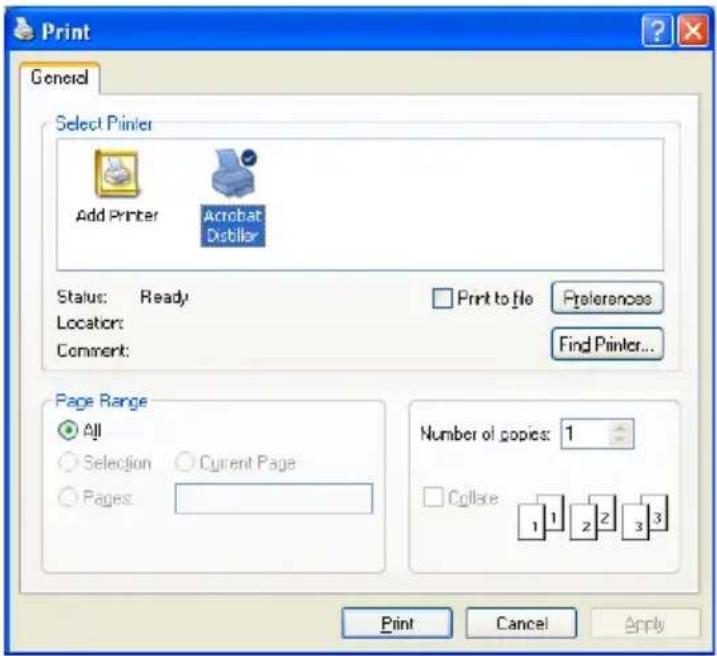
3 Specify the number of copies to be printed, and then click [Print].
7 Other Operations
7.1 Specifying Cache File Settings
In order to display thumbnails, downloaded images are temporarily saved on the computer. These are called cache files. Settings can be specified to manage these cache files.
If a cache file is saved, the thumbnail can quickly be displayed the next time that the data is selected.

Note
When Box Operator is started up, cache files are automatically deleted if they have a modification date older than five days.
The cache file settings cannot be specified while the multifunctional product is connected. In order to specify the settings, disconnect from the multifunctional product.
To specify settings for the cache files
1 On the [Box Operator] menu, click [Cache File Settings].
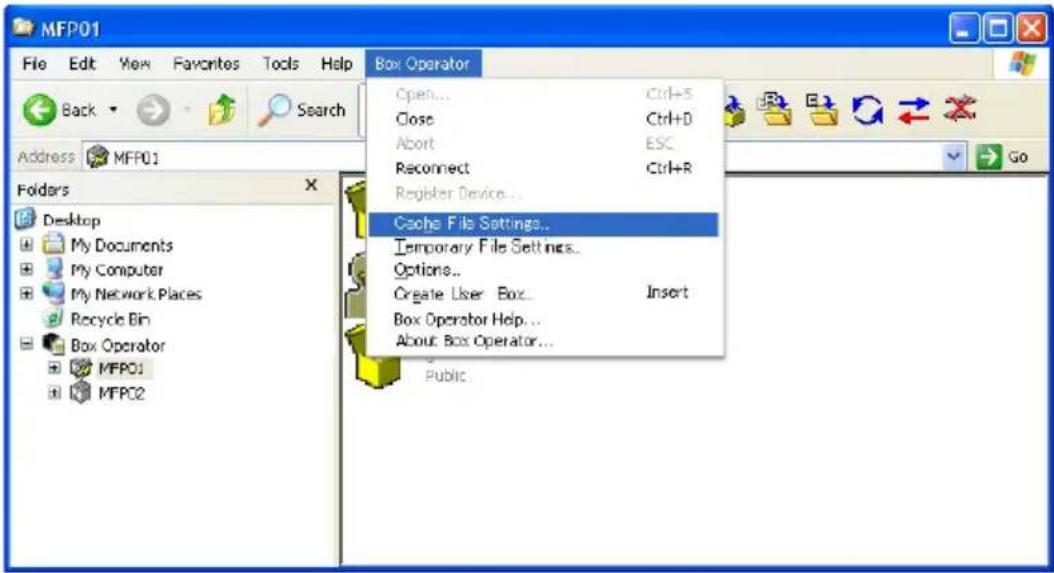
2 Specify the cache settings.
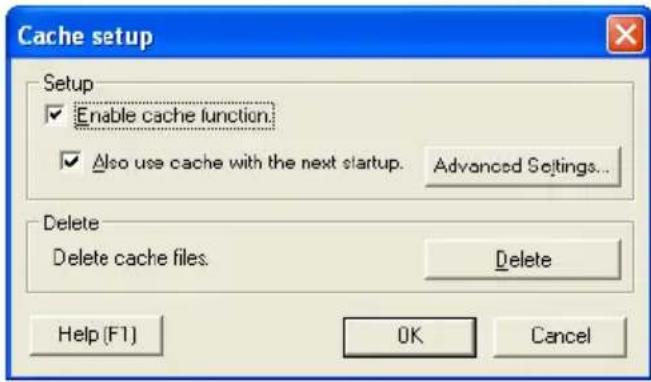
3 Click [OK].
The following settings can be specified.
| Item Description | |
| Enable cache function. Specify whether or not thumbnail images are saved as cache files.To save the cache files, select the check box. | |
| Also use cache with thenext startup. | Specify whether or not cache files are reused the next time thatthe utility starts. To reuse the cache files, select the check box. |
| Delete cache files. To delete | all cache files that are currently saved, click [Delete]. |
To specify more advanced settings for saving the cache files, click [Advanced Settings].
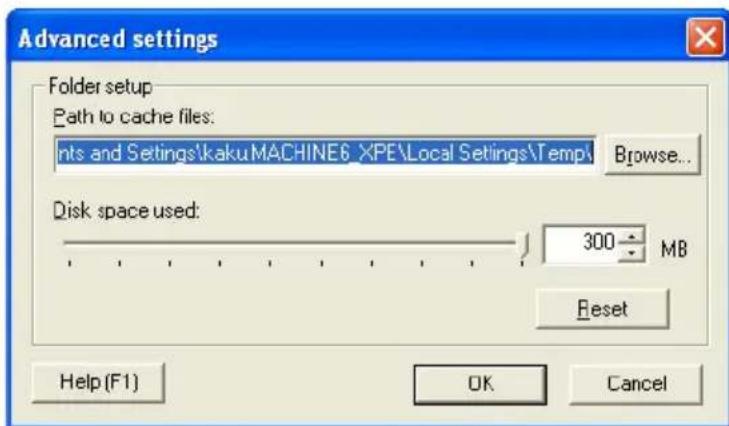
| Item Description | |
| Path to cache files Specify the | folder where the cache files are saved. To change the folder, click [Browse], and then select the folder. |
| Disk space used Specify the | amount of space on the disk where the cache files are saved. Either drag the slider or type in a value. When the cache files exceed the specified value, they are automatically deleted. |
| Reset Click to return all settings | to those immediately after the utility was installed. |
7.2 To specify settings for temporary files
In order to display data, document images are temporarily saved on the computer. These are called temporary files. Settings can be specified to manage these temporary files.
If a temporary file is saved, the document image can quickly be displayed the next time that the data is displayed.

Note
When Windows starts, temporary files are deleted if they have a modification date older than 48 hours.
The temporary file settings cannot be specified while the multifunctional product is connected. In order to specify the settings, disconnect from the multifunctional product.
To specify temporary file settings
1 On the [Box Operator] menu, click [Temporary File Settings].

2 Select when the temporary files are deleted.

3 Click [OK].
7.3 Options
Settings for various other operations can be specified.
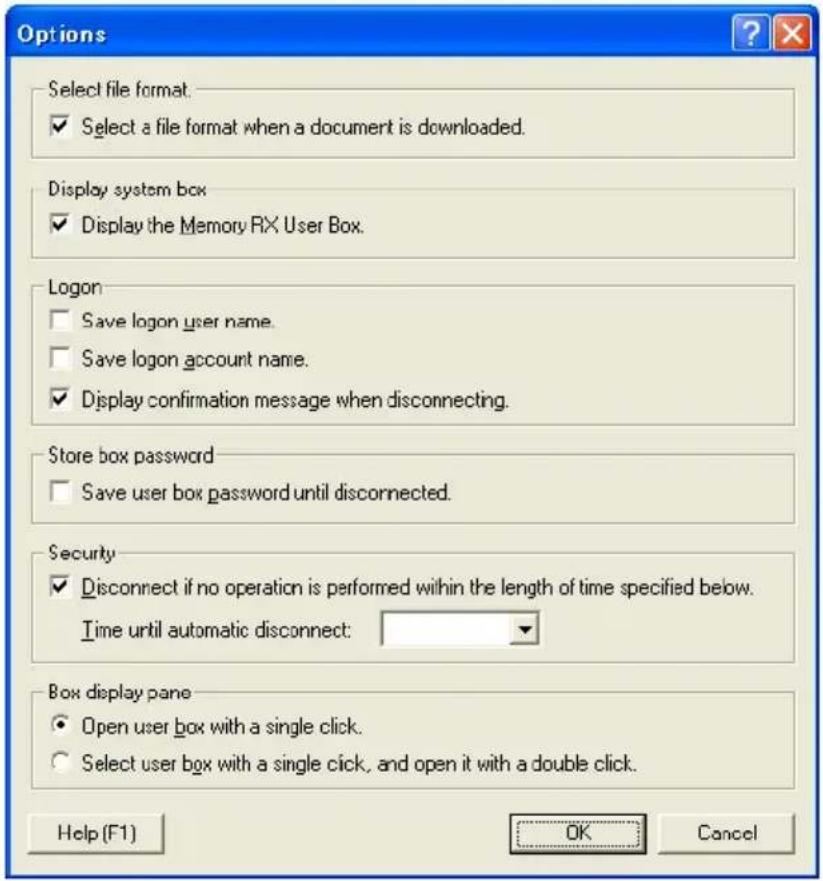
The following settings can be specified.
| Item Description | |
| Select a file format when a document is downloaded. | Specifies whether a file format can be selected when a document is opened in the Box Operator viewer or a different application. |
| Display the Memory RX User Box. | Displays the Memory RX User Box. |
| Save logon user name. Specifies w | whether the name of the logged on user is saved when the multifunctional product performs user authentication. |
| Save logon account name. Specifies | whether the name of the logged on account is saved when the multifunctional product performs account tracking. |
| Display confirmation message when disconnecting. | Specifies whether a confirmation message is displayed when the connection to the multifunctional product is cut. |
| Save box password until disconnected. | Specifies whether the box password is saved until the connection to the multifunctional product is cut. |
| Disconnect if no operation is performed within the length of time specified below. | Specifies whether the transmission is disconnected if no operation is performed for a specified length of time. |
| Time until automatic disconnect | Specify the length of time until the transmission is automatically disconnected when no operation is performed for a specified length of time. |
| Box display pane Specifies how a c | connection to a box is established from the list pane. |
| Open user box with a single click. | Specifies that a connection to a box can be established simply by clicking the icon for the box in the list pane. |
| Select user box with a single click, and open it with a double click. | Specifies that a connection to a box can no longer be established simply by clicking the icon for the box in the list pane.Perform any of the following operations to establish a connection to a box.Double-click the icon for the box.Select the icon for the box, and then press the [Enter] key in the keyboard. |
To specify the settings
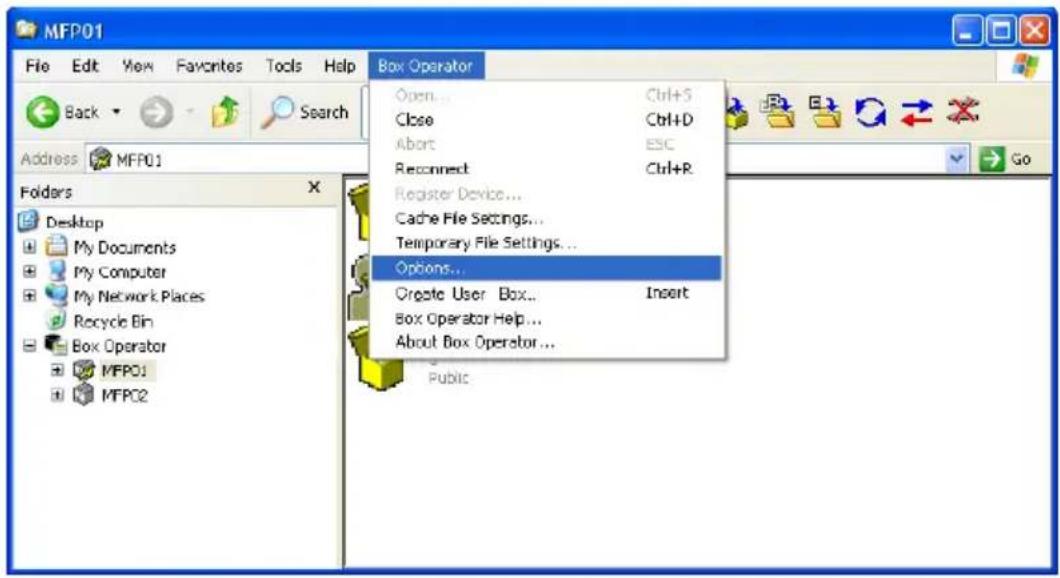
1 On the [Box Operator] menu, click [Options].
2 Specify the desired settings.
3 Click [OK].
Copyright
2006 KONICA MINOLTA BUSINESS TECHNOLOGIES, INC.
- 2 INSTALLING BOX OPERATOR
- 3 EXPLORE WINDOW SETTINGS
- 4 CONNECTING TO THE MULTIFUNCTIONAL PRODUCT
- 5 MANAGING BOXES
- 5.1 DISPLAYING BOXES ....5-1
- 5.2 CREATING BOXES ....5-4
- 5.3 CHANGING THE NAME OF THE BOX ....5-6
- 5.4 EDITING THE BOX PROPERTIES 5-7
- 5.5 DELETING A BOX ....5-9
- 6 MANAGING DOCUMENTS
- 6.1 DISPLAYING DOCUMENTS 6-1
- 6.2 OPENING DOCUMENTS IN THE BOX OPERATOR VIEWER 6-5
- 6.3 OPENING DOCUMENTS IN A SPECIFIC APPLICATION 6-8
- 6.4 TO CHANGE THE DOCUMENT NAME ......6-10
- 6.5 TO SAVE A DOCUMENT ONTO THE COMPUTER 6-11
- 6.6 COPYING DOCUMENTS TO OTHER BOXES ....6-15
- 6.7 MOVING DOCUMENTS TO OTHER BOXES 6-16
- 6.8 TO DELETE A DOCUMENT ....6-17
- 6.9 TO PRINT A DOCUMENT 6-18
- 6.10 QUICK PRINTING 6-21
- 6.11 MERGING AND PRINTING DOCUMENTS ......6-22
- 7 OTHER OPERATIONS
- 7.1 SPECIFYING CACHE FILE SETTINGS 7-1
- 7.2 TO SPECIFY SETTINGS FOR TEMPORARY FILES 7-3
- 7.3 OPTIONS 7-5
- ABOUT THIS PRODUCT
- TRADEMARKS AND REGISTERED TRADEMARKS
- TRADEMARK ACKNOWLEDGEMENTS
- DIALOG BOXES
- NOTE
- LICENSE ISSUES
- OPENSSL LICENSE
- ORIGINAL SSLEAY LICENSE
- 1 INTRODUCTION
- 1.1 SYSTEM REQUIREMENTS
- 1.2 RESTRICTIONS
- 2.1 INSTALLATION PROCEDURE
- TO INSTALL THE SOFTWARE
- 2.2 UNINSTALLING
- REMINDER
- 3.1 EXPLORE WINDOW
- 3.1.1 TOOLBAR
- 3.1.2 ICONS
- 3.2 BOX VIEW
- 3.3 DOCUMENT VIEW
- TO CONNECT TO A MULTIFUNCTIONAL PRODUCT
- 2 CLICK [REGISTER DEVICE]
- 3 CLICK [NEW REGISTRATION]
- 4.1 WITH USER AUTHENTICATION
- TO PERFORM THE USER AUTHENTICATION OPERATION
- 4.2 WITH ACCOUNT TRACK
- TO PERFORM THE ACCOUNT TRACK OPERATION
- 4.3 TO VIEW THE STATUS OF THE CONNECTION
- TO RECONNECT TO A MULTIFUNCTIONAL PRODUCT
- 4.4 TO CONNECT TO A DIFFERENT BOX
- 4.5 DISCONNECTING FROM A MULTIFUNCTIONAL PRODUCT
- TO DISCONNECT FROM THE MULTIFUNCTIONAL PRODUCT BY USING A COMMAND ON THE [BOX OPERATOR] MENU
- 4.6 TO REGISTER A CONNECTION
- TO REGISTER A DEVICE
- 3 TYPE IN THE CONNECTION INFORMATION
- 4 CLICK [OK]
- 4.7 TO DELETE A CONNECTION
- TO DELETE A CONNECTED MULTIFUNCTIONAL PRODUCT FROM THE DEVICE REGISTRATION DIALOG BOX
- 1 ON THE [BOX OPERATOR] MENU, CLICK [REGISTER DEVICE]
- 5.1 DISPLAYING BOXES
- 5.1.1 DISPLAYING BOX ICONS
- 5.1.2 DISPLAYING THE BOX DETAILS
- 5.1.3 DISPLAYING THE BOX THUMBNAILS
- 5.1.4 DISPLAYING AS A LIST
- 5.1.5 DISPLAYING BOX TILES
- 5.2 CREATING BOXES
- TO CREATE A BOX BY USING A COMMAND ON THE [BOX OPERATOR] MENU
- 3 CLICK [CREATE]
- 5.3 CHANGING THE NAME OF THE BOX
- TO CHANGE THE NAME OF A BOX BY USING A COMMAND ON THE [FILE] MENU
- 5.4 EDITING THE BOX PROPERTIES
- TO CHANGE THE PROPERTIES OF A BOX BY USING A COMMAND ON THE [FILE] MENU
- 5.5 DELETING A BOX
- TO DELETE A BOX BY USING A COMMAND ON THE [FILE] MENU
- 6.1 DISPLAYING DOCUMENTS
- 6.1.1 DISPLAYING DOCUMENT ICONS
- 6.1.2 DISPLAYING THE DOCUMENT DETAILS
- 6.1.3 DISPLAYING THE DOCUMENT
- 6.1.4 DISPLAYING THE DOCUMENT LIST
- 6.1.5 DISPLAYING DOCUMENT TILES
- 6.2 OPENING DOCUMENTS IN THE BOX OPERATOR VIEWER
- TO OPEN A DOCUMENT IN THE BOX OPERATOR VIEWER BY USING A COMMAND ON THE [FILE] MENU
- 6.3 OPENING DOCUMENTS IN A SPECIFIC APPLICATION
- TO OPEN A DOCUMENT BY USING A COMMAND ON THE [FILE] MENU
- 2 ON THE [FILE] MENU, CLICK [OPEN]
- 6.4 TO CHANGE THE DOCUMENT NAME
- TO CHANGE THE NAME OF A DOCUMENT BY USING A COMMAND ON THE [FILE] MENU
- 6.5 TO SAVE A DOCUMENT ONTO THE COMPUTER
- TO SAVE A DOCUMENT WITH A DIFFERENT NAME BY USING A COMMAND ON THE [FILE] MENU
- TO COPY A DOCUMENT TO A COMPUTER FOLDER BY USING A COMMAND ON THE [EDIT] MENU
- TO MOVE A DOCUMENT TO A COMPUTER FOLDER BY USING A COMMAND ON THE [EDIT] MENU
- 6.6 COPYING DOCUMENTS TO OTHER BOXES
- TO COPY A DOCUMENT TO ANOTHER BOX BY USING A COMMAND ON THE [EDIT] MENU
- 6.7 MOVING DOCUMENTS TO OTHER BOXES
- TO MOVE A DOCUMENT TO ANOTHER BOX BY USING A COMMAND ON THE [EDIT] MENU
- 6.8 TO DELETE A DOCUMENT
- TO DELETE A DOCUMENT BY USING A COMMAND ON THE [FILE] MENU
- 6.9 TO PRINT A DOCUMENT
- TO PRINT A DOCUMENT FROM THE BOX OPERATOR VIEWER
- TO PRINT A DOCUMENT BY USING A COMMAND ON THE [FILE] MENU
- 6.10 QUICK PRINTING
- TO PERFORM THE QUICK PRINT OPERATION
- 6.11 MERGING AND PRINTING DOCUMENTS
- TO MERGE AND PRINT DOCUMENTS
- 7.1 SPECIFYING CACHE FILE SETTINGS
- TO SPECIFY SETTINGS FOR THE CACHE FILES
- 2 SPECIFY THE CACHE SETTINGS
- 3 CLICK [OK]
- 7.2 TO SPECIFY SETTINGS FOR TEMPORARY FILES
- TO SPECIFY TEMPORARY FILE SETTINGS
- 7.3 OPTIONS
- TO SPECIFY THE SETTINGS
- 1 ON THE [BOX OPERATOR] MENU, CLICK [OPTIONS]
- 2 SPECIFY THE DESIRED SETTINGS
Brand : Océ
Model : Box Operator
Category : Printer