
San Francisco CD70 - Car radio BLAUPUNKT - Free user manual and instructions
Find the device manual for free San Francisco CD70 BLAUPUNKT in PDF.


| Product Type | Car Stereo |
| Brand | Blaupunkt |
| Model | San Francisco CD70 |
| Dimensions (approx.) | 1-DIN (180 x 50 mm) |
| Weight (approx.) | 1.5 kg |
| Power Supply | 14.4 V DC (vehicle battery) |
| Amplifier Power Output | 4 x 25 W RMS (DIN 45324) / 4 x 45 W max |
| Frequency Ranges | FM: 87.5-107.9 MHz; AM: 530-1710 kHz |
| CD Playback | Standard 12 cm CDs (CD-R, not CD-RW) |
| Display Type | LCD with adjustable brightness and viewing angle |
| Key Features | RDS, AF, PTY, DSA 7-band equalizer, DNC, KeyCard anti-theft, CD changer control, subwoofer output, 4-channel pre-amp outputs (5V) |
| Audio Settings | Bass, treble, balance, fader, loudness, switch-on volume, beep tone |
| Radio Scan | Auto scan, preset scan, scan time adjustable (5-30 sec) |
| TPM (Track Programme Memory) | Up to 30 CDs, 40 tracks each; program favourite tracks |
| CD Naming | Up to 30 CD names (8 characters each) in CD mode; 99 names in changer mode |
| External Audio Input | AUX input via adapter (switchable in install menu) |
| High-Pass Filter | 5 levels, switchable on/off |
| Subwoofer Settings | Frequency (80 Hz / 100 Hz) and level adjustable |
| Theft Protection | KeyCard system with master code; optical LED indicator |
| Maintenance | Clean KeyCard contacts with alcohol; avoid dirty or 8 cm CDs |
| Safety Notes | Set volume low for external sirens; operate only when traffic allows |
| Reparability | Replace lost KeyCard via dealer; training procedure with master code |
| Included Accessories | Two KeyCards, microphone for DSA line-up, mounting kit (assumed) |
Frequently Asked Questions - San Francisco CD70 BLAUPUNKT
User questions about San Francisco CD70 BLAUPUNKT
0 question about this device. Answer the ones you know or ask your own.
Ask a new question about this device
Download the instructions for your Car radio in PDF format for free! Find your manual San Francisco CD70 - BLAUPUNKT and take your electronic device back in hand. On this page are published all the documents necessary for the use of your device. San Francisco CD70 by BLAUPUNKT.
USER MANUAL San Francisco CD70 BLAUPUNKT
Operating instructions

BLAUPUNKT
Open here
Ouvrir s.v.p.
Por favor, abrir
Favor abrir
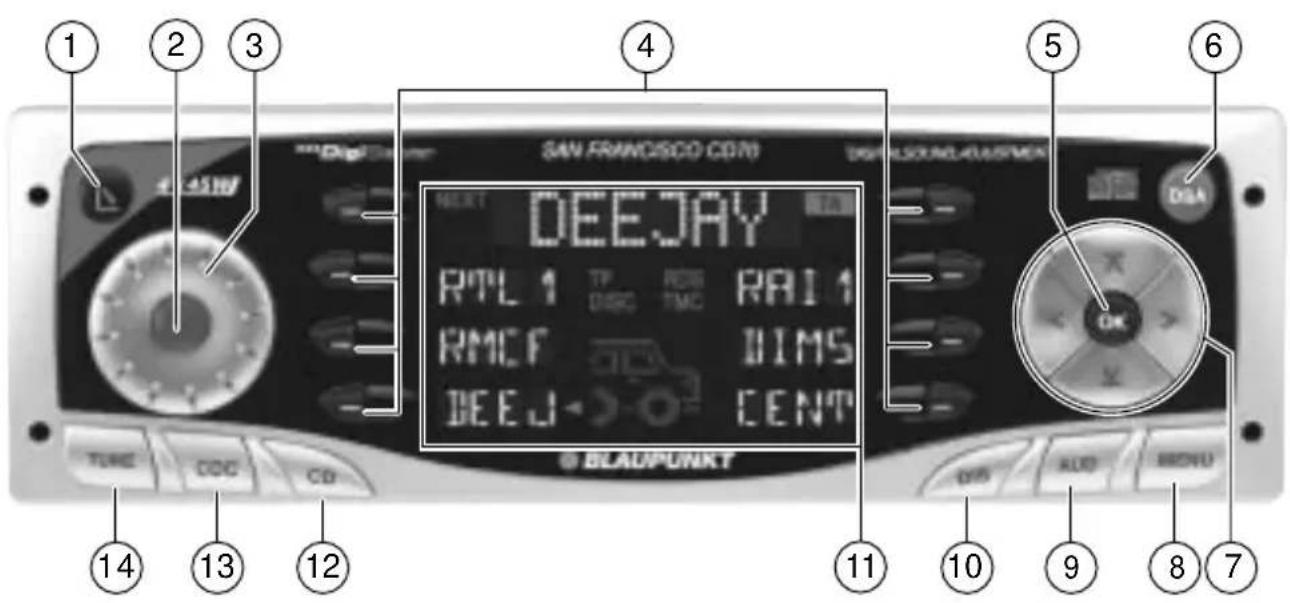
① button - opens the operating panel
② Button - switches the radio and mute function on/off
③Volume control
④Soft keys - the function of the soft keys depends on the current content of the display
⑤ OK button - confirms menu entries and leaves the menu
⑥ DSA button - selects the DSA menu
⑦Multifunction rocker switch
⑧MENU button - selects the menu for basic settings
⑨AUD button - adjusts bass and treble, balance and fader as well as loudness
⑩DIS button - changes display contents
⑪Display
⑫CD button - starts CD playback
⑬CDC button - starts CD changer play-back (only if connected) or plays an external audio source (only if connected)
⑭TUNE button - activates radio mode Selects the radio function menu (only possible in radio mode)
Notes 6
Road safety 6
Installation 6
Accessories.... 6
Guarantee 6
International telephone information...... 6
Theft protection, KeyCard ...... 7
Inserting the KeyCard 7
Removing the KeyCard 7
Replacing / "training" KeyCards...... 7
Lost or damaged KeyCards...... 8
"Training" a new KeyCard / entering the master code 8
Optical theft protection indicator (LED) ... 8
Viewing radio pass data 9
Caring for your KeyCard.... 9
Switching on/off 9
First use 10
Volume adjustment 11
Audio settings 12
Setting the display 13
Radio mode.... 14
Switching to radio mode.... 14
Switching the RDS function on and off . 14
Switching the AF function on and off .... 14
Selecting the frequency range / memory bank 14
Tuning to a station 15
Selecting short-/long-range reception ... 15
Setting station scanning sensitivity ..... 16
Storing stations 16
Storing stations automatically ("Travelstore") 16
Listening to preset stations 17
Radio scan 17
Setting the scan time.... 17
Programme type (PTY) 18
Optimising radio reception 19
Switching between stereo and mono .... 20
Changing the display.... 20
Selecting radio text display.... 20
Naming a station 20
CD Mode.... 22
Switching to CD mode, inserting a CD .. 22
Removing a CD 22
Selecting a track.... 22
Fast search (audible).... 22
Random play (MIX) 22
Scanning tracks (SCAN) 22
Repeating a track (REPEAT).... 23
Changing the display.... 23
Programming favourite CD tracks ..... 23
Naming CDs.... 24
CD changer mode (optional) ..... 25
Switching to CD changer mode...... 25
Selecting a CD 25
Selecting a track.... 25
Fast search (audible).... 25
Changing the display.... 25
Repeating individual tracks or whole CDs (REPEAT).... 25
Random play (MIX) 26
Scanning all tracks on all CDs (SCAN) . 26
Naming CDs.... 26
Programming favourite CD tracks ..... 27
CLOCK time 28
Setting the time 28
Switching between 12- and
24-hour clock mode.... 29
Permanent time display when unit is off . 29
DSA - Digital Sound Adjustment 30
Switching DSA on/off 30
Lining up the equaliser automatically .... 30
Selecting an equaliser.... 31
Select sound preset 31
Setting the equalisers manually ..... 31
Setting aid for the equaliser 32
DNC - Dynamic Noise Covering .. 33
Lining up DNC 33
Switching DNC line-up on/off 33
Setting the DNC increase.... 33
TMC for dynamic navigation systems.... 34
Pre-amplifiers 34
Subout/subwoofer...... 35
High-pass filter 35
External audio sources...... 36
Technical data 36
Installation instructions...... 137
NOTES
Thank you for deciding in favour of a Blaupunkt product. We wish you a great deal of pleasure with your new car radio.
Note
Before using your car radio, please read these instructions carefully and familiarise yourself with the unit. Keep these instructions in your vehicle for later reference.
Road safety
Road safety has priority. Only operate your car radio if road and traffic conditions allow. Familiarise yourself with the unit before setting off on your journey.
You should always be able to hear police, fire and ambulance sirens in good time. For this reason, set the volume of your car radio at a suitable level.
Installation
If you would like to install your car radio yourself, please read the installation and connection instructions at the end of the manual.
Accessories
Please use only Blaupunkt-approved accessories.
Remote controls
The most important functions can be selected safely from the steering wheel using the optional remote controls RC 08 or RC 10. The RC 10 H remote control is included.
Amplifiers
All Blaupunkt amplifiers are suitable for use with the radio.
CD changer
The following Blaupunkt CD changers can be connected to the radio: CDC A 06, CDC A 08, CDC A 072 and IDC A 09.
The CD changers CDC A 5 and CDC A 071 can also be connected if you use an adapter cable (Blaupunkt no.: 7 607 889 093).
Guarantee
The scope of the guarantee complies with the legal provisions applicable in the country in which the unit was bought.
Such legal provisions notwithstanding, Blaupunkt grants a 12-month guarantee.
If you have any queries regarding the terms of the guarantee, please consult your authorised Blaupunkt dealer. The purchase receipt applies in all cases as your guarantee slip.
International telephone information
Should you have any questions about how to use the car radio or require any further information, please call us!
The telephone information service numbers are printed on the last page of this manual.
Theft protection, KeyCard
Your radio comes with two KeyCards.
To replace a lost or damaged KeyCard, contact your Blaupunkt dealer.
If you use two KeyCards, the settings for the first KeyCard are also used for the second KeyCard. You can, however, store the following functions individually:
Preset stations, beep volume, equaliser settings.
In addition, the last values set for frequency range, station, scanning time, and switch-on volume remain stored.
This way, after you insert your KeyCard, the unit will always be in the basic configuration that you have chosen.
Inserting the KeyCard
→ Press the button to open the operating panel ①.
Insert the KeyCard as shown in the picture (Arrow 1) with the contacts facing downward.
Use the slide to push the card carefully in the direction shown by the arrow (2) as far as it will go.

→ Close the operating panel (Arrow 3).
Note:
If a card that does not belong to the unit (for example, a bankcard) is inserted, the display will read "Wrong KC".
Remove the incorrect card and insert a card that the unit is able to recognise.
Removing the KeyCard
To unlock the operating panel,
→ Press the button ①.
This will open the operating panel.
Use the "slide" to push the card to the right as far as it will go.
→ Remove the card from the operating panel.
→ Close the operating panel.
Note:
To discourage theft, always remove your Key-Card before exiting the vehicle and leave the operating panel open.
⚠ For reasons of safety, the operating panel must be closed whenever the vehicle is in motion.
Replacing / "training" KeyCards
Note:
No more than two KeyCards can be used for each unit.
If you already have two KeyCards for your unit and you “train” a third KeyCard, then the unit can no longer be operated with the KeyCard that was not used in training.
To "train" a new KeyCard as a replacement for a lost or unusable KeyCard:
Insert the remaining valid KeyCard and switch on the unit.
→ Press the MENU button ⑧.
→ Press the soft key ④ with the display allocation “KC”.
→ Press the soft key ④ with the display allocation “LRN”.
The display will read "LEARN KC".
Remove the first KeyCard.
The display will read "INSERT".
Insert the new KeyCard.
The display will read "LEARN OK".
To exit the KeyCard menu
→ press the MENU button ⑧ or the OK button ⑤.
Now the car radio can be used with two KeyCards again.
Lost or damaged KeyCards
If all of the KeyCards belonging to a unit have been lost or damaged, first a new KeyCard with the master code of the unit must be "trained". The master code of the unit is contained in the radio pass.
⚠️ Always keep the radio pass in a safe place, but never in your vehicle.
To “train” a new KeyCard, follow the instructions given in the section “Training a new KeyCard / entering the master code”.
If necessary, you can use this KeyCard to train a second KeyCard. For instructions on how to do this, read the section "Replacing / training KeyCards".
New KeyCards can be obtained from your dealer.
"Training" a new KeyCard / entering the master code
If you no longer have any valid KeyCards for your unit and want to "train" a new KeyCard:
Insert a new KeyCard that is unknown to the unit.
→ Close the operating panel.
Turn off the unit if necessary.
→ Simultaneously hold down the TUNE button ⑭ and the second soft key ④ from the top on the left side ②.
The display will read "0000".
Enter the four-digit master code from the radio pass as follows:
Use the Y /A buttons ⑦ to enter the respective digits of the master code. Press the buttons until the desired number appears on the display.
Use the<> buttons ⑦ to move from one digit to the next during input.
Once the master code is displayed correctly, press the OK button ⑤.
The new KeyCard is accepted when the unit switches to play.
Optical theft protection indicator (LED)
The ON/OFF button and the CD bay illumination can be set to blink when the unit is off and the KeyCard has been removed. To do this, the menu setting "LED" must be set to "ON".
Press the MENU button ⑧.
→ Press the soft key ④ with the display allocation “KC”.
→ Press the soft key ④ with the display allocation “LED”.
The display will show the current status "LED ON" or "LED OFF".
Press the soft key ④ with the display allocation “LED” to toggle between “LED ON” and “LED OFF”.
To exit the KeyCard menu
Press the OK button ⑤ to go up one level in the menu or press the MENU button ⑧ to exit the menu. The settings are now stored.
Viewing radio pass data
Using the KeyCard that came with your unit, you can view the radio pass data, such as unit name, type number (76 ...) and serial number, on the display.
Press the MENU button ⑧.
→ Press the soft key ④ with the display allocation “KC”.
Press the soft key ④ with the display allocation “READ”.
The radio pass data will scroll across the display.
To exit the KeyCard menu:
→ Press the MENU button ⑧ or the OK button ⑤.
Caring for your KeyCard
Trouble-free KeyCard function is assured provided that the contacts are free of foreign particles. Avoid direct skin contact with the contacts.
If necessary, clean the KeyCard contacts using a lint-free cloth soaked in alcohol.
Switching on/off
There are various ways of switching the car radio on and off.
Switching on/off using the button ②
To switch the unit on, press the button ②.
The car radio is now switched on.
To switch the unit off, hold the button ② down for more than two seconds.
The car radio is now switched off.
Switching on/off using the ignition
If the car radio is correctly connected to the ignition and has not been switched off using the button ②, it is switched on/off simultaneously with the ignition.
You can also switch on your car radio when the vehicle ignition is off.
To do so, press the button ②.
Note:
To protect the vehicle battery, the unit switches off automatically after one hour.
Switching on/off using the KeyCard
You can switch the car radio on or off by inserting and removing the KeyCard if the unit was previously switched off using the button ②. You can read about inserting/removing the KeyCard in the chapter "Theft protection, KeyCard".
First use
If the unit is being connected for the first time or if the power supply to the unit has been interrupted, the Install menu will appear. The following settings are made in the Install menu:
- Selection of an external audio source instead of a CD changer
- Time setting
- Tuner configuration for US or European operation
- Reset to factory defaults
- Internal amplifier on/off.
You can reopen the Install menu at any time:
Hold down the MENU button ⑧ until the Install menu appears.
Changing settings
Selecting an external audio source
→ Press the soft key ④ with the display allocation “AUX”.
If the display reads "AUX", then the input is already on.
Press the < or > button ⑦ to toggle "AUX" on or off.
→ Press the OK button ⑤.
Note:
If the AUX input is on, it can be selected with the CDC button ⑬.
Setting the clock
→ Press the soft key ④ with the display allocation "CLK".
Set the hour using the 📊 button
⑦.
→ Press the ➤ button ⑦.
Set the minutes using the ☑ button ⑦.
→ Press the OK button ⑤.
Setting the tuner
To ensure proper tuner function in the US the tuner must be set to "US".
→ Press the soft key ④ with the display allocation “TUNE”.
Select "EUROPE" or "US" using the using the < or > button ⑦.
→ Press the OK button ⑤.
Switching the internal amplifier on/off
→ Press the soft key ④ with the display allocation “AMP”.
Select "AMP ON" or "AMP OFF" using the using the◀ or ▶button ⑦.
→ Press the OK button ⑤.
Note:
If you set the internal amplifier to "AMP OFF", there will be no playback via the loudspeakers connected directly to the unit. In this case, playback will be solely via an external amplifier.
Reset (factory defaults)
→ Press the soft key ④ with the display allocation “NORM”.
The display will read "NORMSET".
If you really want to reset the device to the factory presets,
→ press the OK button ⑤.
Exiting the Install menu
To exit the install menu,
press the OK button ⑤. The settings are now stored.
Volume adjustment
The system volume can be adjusted in steps from 0 (off) to 50 (maximum).
To raise the system volume, turn the volume control ③ to the right.
To lower the system volume, turn the volume control ③ to the left.
Setting the switch-on volume
It is possible to adjust the volume that will play when you switch the radio on.
→ Press the MENU button ⑧.
→ Press the soft key ④ with the display allocation “VAR”.
→ Press the soft key ④ with the display allocation “VOL”.
Set the volume using volume control ③ or the Y or X buttons ⑦.
If you wish to set the volume active before the unit was last switched off as the switch-on volume,
→ press the < button ⑦.
"LAST VOL" appears on the display.
⚠️ Risk of serious injury! If the switch-on volume is set at the maximum, the volume can be very high when you switch on your car radio.
⚠️ If the volume was set on maximum before the unit was last switched off and the switch-on volume is set at “LAST VOL”, the volume can be very high when you switch on your car radio.
In both cases, your hearing may suffer serious damage!
Press the OK button ⑤ to go back to the previous menu level or the MENU button ⑧ to leave the menu altogether. The settings are now stored.
Mute setting
This feature enables you to lower the system volume instantaneously (mute).
Briefly press the button ②.
"MUTE" appears on the display.
Deactivating the mute setting
Briefly press the button ②
or
→ turn the volume control ③.
Mute during telephone
If your car radio is connected to a mobile telephone, the volume will be muted as soon as you “pick up” the telephone. In order for this to work, the mobile telephone has to be connected to the car radio as described in the instructions.
Setting the volume for the warning tone (beep)
If you hold down a button for longer than two seconds when using certain functions, e.g. storing a station on a station button, a warning tone (beep) sounds. The volume of this beep is adjustable.
Press the MENU button ⑧.
→ Press the soft key ④ with the display allocation “VAR”.
→ Press the soft key ④ with the display allocation “BEEP”.
Adjust the volume using the 📂nd 📄 buttons.
If you wish to deactivate the beep,
→ press the◀ button ⑦.
"BEEP OFF" appears on the display.
Press the OK button ⑤ to return to the previous menu level or the MENU button ⑧ to leave the menu altogether. The settings are now stored.
Audio settings
Note:
You can adjust the bass, treble and loudness settings separately for each audio source.
Bass settings
Press the AUD button ⑨.
"AUDIO 1" appears on the display.
→ Press the soft key ④ with the display allocation “BASS”.
→ Press the ¥ or △ button ⑦ to adjust the bass.
When the settings have been completed,
→ press the AUD button ⑨.
Treble settings
→ Press the AUD button ⑨.
"AUDIO 1" appears on the display.
→ Press the soft key ④ with the display allocation “TREB”.
→ Press the ¥ or ✗ button ⑦ to adjust the treble.
When the settings have been completed,
→ press the AUD button ⑨.
Loudness
Loudness means the bass levels are aurally compensated, i.e. they are increased at lower volume levels.
→ Press the AUD button ⑨.
"AUDIO 1" appears on the display.
→ Press the soft key ④ with the display allocation “LOUD”.
Press the Y or X button ⑦ to adjust the loudness.
If you want to deactivate the loudness function,
→ press the◀ button ⑦.
"LOUD OFF" appears on the display.
When the settings have been completed,
→ press the AUD button ⑨.
Setting the right/left balance
To set the balance, press the AUD button ⑨.
"AUDIO 1" appears on the display.
→ Press the soft key ④ with the display allocation “BAL”.
Press the< or> button ⑦ to adjust the right/left balance.
When the settings have been completed,
→ press the AUD button ⑨.
Fader settings, front/back
To set the fader, press the AUD button ⑨.
"AUDIO 1" appears on the display.
→ Press the soft key ④ with the display allocation “FADE”.
Press the< or> button ⑦ to adjust the front/back fader.
When the settings have been completed,
→ press the AUD button ⑨.
Setting the display
You can adjust the display to your needs and the position of the car radio in your vehicle.
Setting the reading angle
→ Press the MENU button ⑧.
→ Press the soft key ④ with the display allocation “DISP”.
→ Press the soft key ④ with the display allocation “ANGL”.
Set the reading angle using the Mr △ buttons ⑦.
→ Press the OK button ⑤ to return to the previous menu level or the MENU button ⑧ to leave the menu altogether. The settings are now stored.
Setting the display brightness
If your car radio has been connected as described in the instructions, the display brightness will be activated when you turn on the headlights. The display brightness can be set separately in stages from 1 - 9 for day and night.
Display brightness - day
→ Press the MENU button ⑧.
→ Press the soft key ④ with the display allocation “DISP”.
→ Press the soft key ④ with the display allocation "DAY".
Set the brightness using the button ⑦.
Press the OK button ⑤ to return to the previous menu level or the MENU button ⑧ to leave the menu altogether. The settings are now stored.
Display brightness - night
→ Press the MENU button ⑧.
→ Press the soft key ④ with the display allocation “DISP”.
→ Press the soft key ④ with the display allocation “NGHT”.
Set the brightness using the button ⑦.
→ Press the OK button ⑤ to return to the previous menu level or the MENU button ⑧ to leave the menu altogether. The settings are now stored.
Radio mode
This unit is equipped with an RDS radio receiver. Some FM stations broadcast a signal that contains not only the programme, but also information such as the station name and programme type (PTY).
If it is receivable and the RDS function is on, then the station name will appear on the display. Furthermore, the programme type will be displayed briefly each time you tune to a different station. For more information, please see the section "Programme Type (PTY)".
In addition, this device is equipped with an "Alternative Frequency" (AF) function:
- AF: If the AF function is on, the unit will search automatically for the frequency that provides the best reception of the station to which the radio is tuned.
Note:
Due to differences in broadcasting infrastructure in the US, some car radio functions are not supported. For this reason, the soft keys "REG" in the Radio Function menu and "PTY" in the Radio menu are disabled.
Switching to radio mode
If the unit is in CD or CD changer mode,
→ press the TUNE button ⑭.
Switching the RDS function on and off
To use the RDS function,
in radio mode, press the soft key ④ with the display allocation “TA”.
* The RDS function is on if the display reads "TA" in inverse characters.
To deactivate the RDS function,
in radio mode, press the soft key ④ with the display allocation “TA” again.
The RDS function is off if the display reads "TA" in normal characters.
Switching the AF function on and off
To use the AF function,
in radio mode, press the TUNE button ⑭.
The Radio Function menu will appear on the display.
→ Press the soft key ④ with the display allocation “RDS”.
Press the TUNE button ⑭ or wait eight seconds. The settings are now stored.
The AF function is active if an arrow symbol appears in front of "RDS" on the display.
To deactivate the AF function,
in the Radio Function menu, press the soft key ④ with the display allocation "RDS" again.
The AF function is inactive if there is not an arrow symbol in front of "RDS" on the display.
Selecting the frequency range / memory bank
This unit can be used to receive both FM and AM broadcasts. There are four memory banks for FM stations and two memory banks for AM stations.
Six stations can be stored in each memory bank.
Selecting a frequency range
To select the FM or AM frequency range,
in radio mode, press the TUNE button 14.
The Radio Function menu will appear in the display.
→ Press the soft key ④ with the display allocation “FM” for the FM frequency range.
Press the soft key ④ with the display allocation “AM” for the AM frequency range.
Press the TUNE button ⑭ or wait eight seconds. The settings are now stored.
Selecting a memory bank
To move from one memory bank to the next (FM1, FM2, FM3 or FMT or AM and AMT),
in radio mode, press the soft key ④ with the display allocation “NEXT” until the desired memory bank appears on the display.
Tuning to a station
There are various ways of tuning to a station.
Automatic station scanning
→ Press the Y or X button ⑦.
The radio will be tuned to the next receivable station.
Manual tuning
You can also tune manually.
Press the < or > button ⑦.
Note:
This function is available only when the RDS function is inactive.
Browsing in broadcasting networks (FM only)
If a station provides multiple programmes, then you can browse these so-called “broadcasting networks”.
Press the◀ or▶ button ⑦ to switch to the next station in the network."
Note:
In order to use this function, the RDS convenience function must be activated.
This method can only be used to tune to stations that you have already listened to before. To do this, use the scan or “travelstore” function.
Selecting short-/long-range reception
You can choose whether tuning should be limited to local stations (short-range reception) or also include distant stations (long-range reception).
In radio mode, press the TUNE button 14.
The Radio Function menu will appear on the display.
→ Press the soft key ④ with the display allocation “NEXT”.
The “second page” of the Radio Function menu will appear on the display.
→ Press the soft key ④ with the display allocation “LOC”.
The current status “LOCAL” (short-range reception) or “DISTANCE” (long-range reception) will appear briefly on the display. If the “LOCAL” function is active, an arrow symbol will appear next to “LOC”.
→ press the TUNE button ⑭ or wait eight seconds. The settings are now stored.
Setting station scanning sensitivity
You can set the sensitivity of short- and long-range reception separately for AM and FM reception.
Sensitivity for short-range reception (S-LO)
→ Press the MENU button ⑧.
→ Press the soft key ④ with the display allocation “TUN”.
→ Press the soft key ④ with the display allocation “S-LO”.
Use the <> buttons ⑦ to select whether you want to set the sensitivity for the AM or FM frequency range.
Use the Y / X buttons ⑦ to adjust the sensitivity.
The display will show the current sensitivity value. "LO 3" means maximum sensitivity for short-range reception, while "LO 1" means minimum sensitivity.
→ Press the OK button ⑤ to go up one level in the menu or press the MENU button ⑧ to exit the menu. The settings are now stored.
Sensitivity for long-range reception (S-DX)
→ Press the MENU button ⑧.
→ Press the soft key ④ with the display allocation “TUN”.
Press the soft key ④ with the display allocation "S-DX".
Use the <> buttons ⑦ to select whether you want to set the sensitivity for the AM or FM frequency range.
Press the /voutons to adjust the sensitivity.
The display will show the current sensitivity value. "DX 3" means maximum sensitivity for long-range reception, while "DX 1" means minimum sensitivity.
→ Press the OK button ⑤ to go up one level in the menu or press the MENU button ⑧ to exit the menu. The settings are now stored.
Storing stations
Storing stations manually
Select the desired FM memory bank (FM1, FM2 FM3, FMT) or an AM memory bank (AM or AMT).
→ Tune to the desired station as described in the section “Tuning to a station”.
Hold down one of the six soft keys, under which the station is to be stored, for longer than two seconds.
Storing stations automatically ("Travelstore")
You can automatically store the six strongest stations in the region. These are stored in the FMT or AMT memory bank.
Note:
Any stations previously stored in the memory bank used will be deleted in the process.
To use the "Travelstore" function,
in radio mode, press the TUNE button ⑭.
The Radio Function menu will appear on the display.
→ press the soft key ④ with the display allocation “TS”.
The “Travelstore” process will begin. “T-STORE” will appear on the display. Once the process is complete, the radio will be tuned to the station stored in memory slot 1 of the FMT or AMT memory bank.
Listening to preset stations
Select the frequency range and memory bank.
→ Press the soft key ④ with the display allocation of the station name or frequency of the desired station.
Radio scan
You can scan all receivable stations. The scan time is adjustable within a range of 5-30 seconds.
Starting a radio scan
To start the radio scan,
in radio mode, press the TUNE button 14.
The Radio Function menu will appear on the display.
→ Press the soft key ④ with the display allocation “SCAN”.
The scan will start. The radio will be tuned to the next receivable station, in ascending order.
Preset Scan
You can scan all stations that are stored in the memory banks and can currently be received. The scan time can be adjusted within a range of 5-30 seconds in the menu.
Staring a preset scan
To start the preset scan,
in radio mode, press the TUNE button 14.
The Radio Function menu will appear on the display.
→ Press the soft key ④ with the display allocation “PS”.
The scan will start. The memory banks will be “scanned” one after the other starting with the FM1 memory bank. An arrow symbol will light up next to each memory slot scanned.
Stop scanning, continue listening to station
→ Press the OK button ⑤.
The scan will stop; the radio will remain tuned to the last station scanned.
Setting the scan time
→ Press the MENU button ⑧.
→ Press the soft key ④ with the display allocation “VAR”.
→ Press the soft key ④ with the display allocation “SCAN”.
Press the Y or X button ⑦ repeatedly until the desired scan time appears on the display.
→ Press the OK button ⑤ to return to the previous menu level or the MENU button ⑧ to leave the menu altogether. The settings are now stored.
Note:
The scan time that is set also applies for scanning in CD, cassette, and minidisk mode (depending on how the car radio is equipped) as well as in CD changer mode.
Programme type (PTY)
Besides the station name, some stations also broadcast information about the type of programme that they provide. Your car radio can receive and display this information.
Examples of such programme types include: CULTURE TRAVEL JAZZ
SPORT NEWS POP
ROCK CLASSICS
You can use the PTY function to specifically select stations that broadcast a certain type of programme.
If you start a PTY scan and no stations are found, this scan will continue to run in the background. As soon as a station with the selected programme type is received, the unit will automatically switch from the current station or from CD / CD-changer mode to the station with the selected programme type.
Activating PTY
To use the PTY function,
in radio mode, press the TUNE button 14.
The Radio Function menu will appear on the display.
→ Press the soft key ④ with the display allocation "PTY".
When PTY is activated, the last programme type selected will briefly appear on the display. PTY will light up on the display.
To return to the basic Radio menu,
Press the TUNE button ⑭ or wait eight seconds. The settings are now stored.
Deactivating PTY
In radio mode, press the TUNE button 14.
The Radio Function menu will appear on the display. PTY will light up on the display.
→ Press the soft key ④ with the display allocation “PTY”.
PTY will no longer be lighted on the display.
To return to the basic Radio menu,
press the TUNE button ⑭ or wait eight seconds. The settings are now stored.
Selecting a programme type and starting a scan
→ Press the◀ or▶ button ⑦.
The current programme type will appear on the display.
To select a different programme type,
→ press one of the◀▶ buttons ⑦ repeatedly until the desired programme type appears on the display.
Or
to select a stored programme type,
press one of the soft keys ④ that is with the display allocation with the desired programme type.
→ Press the Y or X button ⑦ to start a scan.
The radio will be tuned to the first receivable station with the selected programme type.
Note:
If no station is found with the selected programme type, then "NO PTY" will appear briefly on the display. The radio will be returned to the last station received.
Storing a programme type under a station button
Use the < or> button ⑦ to select a programme type.
To store a programme type,
hold down one of the soft keys ④ with the display allocation of a programme type for longer than one second.
The programme type will be saved in the selected memory slot.
Optimising radio reception
The HiCut function
The HiCut function improves sound quality under poor reception conditions. When there is interference, the highs and thus the noise level are cut automatically.
Activating/deactivating HiCut
To activate/deactivate HiCut,
→ press the MENU button ⑧.
Press the soft key ④ with the display allocation "TUN".
→ Press the soft key ④ with the display allocation “HCUT”.
Press the < or > button ⑦.
If HiCut is deactivated, "NO HICUT" will appear briefly on the display.
Press the OK button ⑤ to return to the previous menu level or the MENU button ⑧ to leave the menu altogether. The settings are now stored.
Setting the HiCut level
Press the MENU button ⑧.
→ Press the soft key ④ with the display allocation “TUN”.
→ Press the soft key ④ with the display allocation “HCUT”.
Press the Y or X button ⑦ repeatedly until the desired HiCut level is shown on the display.
"HICUT 3" means maximum automatic attenuation of the highs and the noise level.
→ Press the OK button ⑤ to return to the previous menu level or the MENU button ⑧ to leave the menu altogether. The settings are now stored.
Interference-related bandwidth selection (SHARX)
The SHARX function enables you to virtually eliminate interference from neighbouring stations. Activate the SHARX function in areas with high station density.
Activating/deactivating SHARX
To activate/deactivate SHARX,
press the MENU button ⑧.
→ Press the soft key ④ with the display allocation “TUN”.
Press the soft key ④ with the display allocation "SHRX".
The current status “SHARX ON” or “NO SHARX” will appear briefly on the display. If SHARX is activated, an arrow symbol will appear next to “SHRX” on the display.
→ Press the OK button ⑤ to return to the previous menu level or the MENU button ⑧ to leave the menu altogether. The settings are now stored.
Switching between stereo and mono
In the event of poor reception, you can select radio playback in mono. After each time the car radio is switched on, playback is in stereo.
in radio mode, press the TUNE button 14.
The Radio Function menu will appear on the display.
→ Press the soft key ④ with the display allocation “NEXT”.
The “second page” of the Radio Function menu will appear on the display.
→ Press the soft key ④ with the display allocation “MONO”.
The current status "MONO" or "STEREO" will appear briefly on the display. If "MONO" is activated, an arrow symbol will appear next to "MONO".
Press the TUNE button ⑭ or wait eight seconds. The settings are now stored.
Changing the display
You can change what is shown on the display. The top line of the display (headline) can be toggled to show the station name, frequency, programme type, or time.
Press the DIS button ⑩ repeatedly until the desired information (station name, frequency, programme type, or time) appears in the headline.
Selecting radio text display
Some stations also use the RDS signal to broadcast running text, so-called "radio text". You can permit or block radio text display.
In radio mode, press the TUNE button 14.
The Radio Function menu will appear on the display.
Press the soft key ④ with the display allocation "NEXT".
The “second page” of the Radio Function menu will appear on the display.
Press the soft key ④ with the display allocation "RTXT".
If the radio text function is active, an arrow symbol will appear in front of "RTXT".
→ Press the TUNE button ⑭ or wait for eight seconds. The settings are now stored.
Naming a station
You can assign to a stored station your own, four-character name that will be shown on the display.
Press the MENU button ⑧.
Press the soft key ④ with the display allocation “TUN”.
Press the soft key ④ with the display allocation "NAME".
You are now in edit mode. If the selected station has not been assigned a name yet, four underline characters will appear on the display.
→ The current input position will blink.
Use the soft key ④ with the display allocation “PREV” or “NEXT” (for the previous or next stored station in the memory bank) to select the station that you want to name.
Use the Y / X buttons ⑦ to select your character. If a character should remain vacant, select the underline character.
Use the < or > button ⑦ to change the input position.
To store the name, press the OK button ⑤.
→ Press the OK button ⑤ to return to the previous menu level or the MENU button ⑧ to leave the menu altogether. The settings are now stored.
Deleting station names
→ Press the MENU button ⑧.
→ Press the soft key ④ with the display allocation "TUN".
Press the soft key ④ with the display allocation "NAME".
Now you are in edit mode.
Use the soft key ④ with the display allocation "PREV" or "NEXT" (for the previous or next stored station in the memory bank) to select the station for which you want to delete the name.
→ Press the soft key ④ with the display allocation "CLR".
The station name is deleted.
Resetting station names to RDS names
Press the MENU button ⑧.
Press the soft key ④ with the display allocation "TUN".
→ Press the soft key ④ with the display allocation "NAME".
Now you are in edit mode.
Use the soft key ④ with the display allocation "PREV" or "NEXT" (for the previous or next stored station in the memory bank) to select the station for which you want to reset the name.
→ Press the soft key ④ with the display allocation "DEF".
The station name is reset to the abbreviation of the RDS station name.
CD Mode
You can use this unit to play standard CDs with a diameter of 12 cm.
Generally, so-called CD-Rs (home-recorded CDs) can be played, but due to differences in CD quality, Blaupunkt cannot vouch for perfect performance.
Rewritable CDs (CD-RWs) cannot be played on this unit.

Risk of damage to CD drive!
Single CDs with a diameter of 8 cm and CDs which are not circular (“shape CDs”) should not be used.
We accept no liability for any damage to the CD drive that may occur as a result of the use of unsuitable CDs.
Switching to CD mode, inserting a CD
- If there is no CD in the drive,
→ press the button ①.
The operating panel opens.
Gently insert the CD into the CD compartment with the printed side uppermost until you feel some resistance.
The CD will be drawn into the drive automatically.
Do not hinder or assist the drive as it draws the CD in.
→ Close the operating panel using light pressure until you feel it latch into place.
The CD menu appears on the display, CD playback begins.
- If there is already a CD in the drive,
→ press the CD button ⑫.
The CD menu appears on the display and playback begins from the point at which it was last interrupted.
Removing a CD
→ Press the button ①.
The operating panel opens to the front.
Press the ▲button on the open operating panel.
The CD is ejected.
→ Carefully remover the CD.
Note:
If you do not remove the CD within eight seconds, it will be drawn back into the CD drive.
Selecting a track
→ Press one of the buttons on the arrow block ⑦ repeatedly until the number of the desired track appears on the display.
If the ¥ or ◀button ⑦ is pressed once, the current track is played again from the beginning.
Fast search (audible)
For a fast search backwards or forwards
keep the
Random play (MIX)
→ Press the soft key ④ with the display allocation “MIX”.
"MIX CD" appears briefly on the display. The next track played will be randomly selected.
Stopping MIX
→ Press the soft key ④ with the display allocation “MIX” one again.
"MIX OFF" appears briefly on the display.
Scanning tracks (SCAN)
You can briefly listen in to all the tracks on a CD.
Press the soft key ④ with the display allocation “SCAN”.
“SCAN” appears briefly on the display. The CD tracks are played in ascending order.
Note:
The scanning time is adjustable. Read about setting the scanning time in the section “Setting the scanning time” in the chapter “Radio mode”.
Stopping SCAN and continuing playback
→ Press the soft key ④ with the display allocation “SCAN” once again.
The current track will then continue to play.
Repeating a track (REPEAT)
→ Press the soft key ④ with the display allocation “RPT”.
The track is then repeated until RPT is deactivated.
Stopping REPEAT
→ Press the soft key ④ with the display allocation “RPT” once again.
Normal playback is resumed.
Changing the display
In CD mode, you can switch between the various display modes:
• display of track number and time;
• display of track number and playing time;
• display of CD name and track number.
To switch between the different display modes,
press the DIS button ⑩ repeatedly until the desired information appears on the display.
Note:
A CD name can only be displayed if a name has been allocated to the inserted CD. Please see the section "Naming CDs".
Programming favourite CD tracks
With the TPM function (Track Programme Memory), you can programme, store and play your favourite tracks on a particular CD. No matter what order the tracks are programmed, they will always be played back in ascending order. When playback of favourite tracks is activated, only the previously programmed tracks of the CD in the drive will be played. Up to 30 CDs with a maximum of 40 tracks each can be handled in CD mode.
Selecting favourite tracks
Proceed as follows to select your favourite tracks on a CD:
→ insert the CD from which you wish to select your favourite tracks in the CD drive;
choose your first favourite track;
→ press the soft key ④ with the display allocation “TPM” for more than one second.
The track is now included in the list of favourite tracks for this CD.
Proceed in exactly the same way with all your other favourite tracks on the CD.
Switching off playback of favourite tracks
To call up the list of favourite tracks for the inserted CD or to switch off playback of favourite tracks,
→ press the soft key ④ with the display allocation “TPM”.
The current TPM status (“TPM ON” or “TPM OFF”) appears briefly on the display. When playback of favourite tracks is active, an arrow symbol lights up alongside “TPM” on the display.
Clearing preset tracks
In order to clear individual tracks from the list of favourite tracks for a CD,
→ switch on TPM;
→ select the track you wish to clear;
hold down the soft key ④ with the display allocation “CLR” for approx. two seconds.
“TR CLR” appears briefly on the display and the track is cleared from the list.
Clearing the list of favourite tracks for a CD
You can also clear the entire list of favourite tracks for a CD. The CD whose favourite tracks you wish to clear must be inserted at the time of clearance.
Switch on TPM.
Hold down the soft key ④ with the display allocation "CLR" for approx. five seconds.
“CD CLR” appears briefly on the display and the list is cleared.
Naming CDs
To make it easier for you to recognise your CDs, the car radio offers an individual name option for 30 CDs. The names should have a maximum of eight digits.
If you attempt to allocate more than 30 names, "FULL" will appear on the display.
Entering/altering CD names
Listen to the desired CD.
Press the soft key ④ with the display allocation "NAME".
This brings you to the edit mode. If the CD you have selected is not yet known to the unit, eight underlines will appear on the display.
The current input position flashes.
Use the Y or X buttons ⑦ to choose your characters. Should a position remain blank, you select the underline.
Use the < or> button ⑦ to change the input position.
→ Press the OK button ⑤ to store the name.
Clearing a CD name
Listen to the CD whose name you wish to clear.
→ Press the MENU button ⑧.
→ Press the soft key ④ with the display allocation “CD”.
Hold down the soft key ④ with the display allocation “CD” until “CD CLR” appears on the display.
The CD name has now been cleared.
→ Press the OK button ⑤ to return to the previous menu level or the MENU button ⑧ to leave the menu altogether. The settings are now stored.
Clearing all CD names
Listen to a CD.
Press the MENU button ⑧.
→ Press the soft key ④ with the display allocation “CD”.
Hold down the soft key ④ with the display allocation "ALL" until "MEMO CLR" appears on the display.
All CD names have now been cleared.
→ Press the OK button ⑤ to return to the previous menu level or the MENU button ⑧ to leave the menu altogether. The settings are now stored.
CD changer mode (optional)
To find out which CD changer is compatible with this unit, please see page 6 of this manual or consult your Blaupunkt dealer.
Note:
Information on handling CDs, inserting CDs and operating the CD changer can be found in the operating instructions accompanying your CD changer.
Switching to CD changer mode
→ Press the CDC button ⑬.
The CD changer menu appears on the display and playback is resumed at the point where it was interrupted. If the magazine has been removed from the CD changer and re-inserted, the CD magazine will first be scanned. Playback then begins with the first track of the first CD the CD changer recognises.
Selecting a CD
To change up or down to a different CD,
press the soft key ④ with the display allocation of the desired CD (CD1 - CD10). To do this, if necessary press the soft key ④ with the display allocation “NEXT” to the “second page” of the basic CD changer menu
or
press the X or Y button ⑦ repeatedly until the number of the desired CD appears on the display.
Selecting a track
To move up/down from one track to another on the current CD,
press the > or < button ⑦ repeatedly until the number of the desired track appears on the display.
If the ◀button ⑦ is pressed once, the current track begins once more.
Fast search (audible)
For a fast search backwards or forwards
keep the> or< buttons ⑦ pressed until the fast search backwards or forwards begins.
Changing the display
In CD changer mode, you can switch between the various display modes:
• display of CD number and track number;
• display of CD number, track number and playing time;
• display of time and track number.
• display of CD name and track number.
To switch between the different display modes,
→ press the DIS button ⑩ repeatedly until the desired information appears on the display.
Note:
A CD name can only be displayed if a name has been allocated to the inserted CD. Please see the section "Naming CDs".
Repeating individual tracks or whole CDs (REPEAT)
In CD changer mode, press the CDC button ⑬.
The CD changer function menu appears on the display.
→ Press the soft key ④ with the display allocation “RPT”.
“RPT TRCK” appears briefly on the display.
To repeat play of the entire CD,
→ press the soft key ④ with the display allocation “RPT” once again.
“RPT CD” appears briefly on the display.
Stopping REPEAT
To stop the repeat function for the current track or CD,
→ press the soft key ④ with the display allocation “RPT” repeatedly until “RPT OFF” appears briefly on the display.
Random play (MIX)
To play the tracks on the current CD in random order,
press the CDC button ⑬ while in CD changer mode.
The CD changer function menu appears on the display.
→ Press the soft key ④ with the display allocation “MIX”.
"MIX OFF" appears on the display.
Select "MIX CD" using the > button ⑦.
To play all tracks of all inserted CDs in random order,
→ select "MIX ALL" with the ➤ button ⑦.
Note:
In the case of CD changers CDC A 08 and IDC A 09, all CDs and all tracks in the changer are randomly selected. All other changers first play all the tracks on a CD in random selection before moving to the next CD in the changer.
Stopping MIX
Select "MIX OFF" using the button ⑦.
Scanning all tracks on all CDs (SCAN)
To listen in briefly to all the tracks on all inserted CDs in ascending order,
press the button CDC button ⑬ while in CD changer mode.
The CD changer menu appears on the display.
→ Press the soft key ④ with the display allocation “SCAN”
"SCAN" appears in the display alongside a flashing arrow symbol.
Stopping SCAN
To stop scanning,
→ press the soft key ④ with the display allocation “SCAN” once again.
The track last scanned then continues to be played.
Note:
You can set the scanning time as required. Please see the section "Setting the scanning time" in the "Radio mode" chapter.
Naming CDs
To make it easier for you to recognise your CDs, the car radio offers an individual name option for 99 CDs. The names should have a maximum of seven digits.
If you attempt to allocate more than 99 names, "FULL" will appear on the display.
Entering/altering CD names
→ Press the CDC button ⑬ when in CD changer mode.
The CD changer function menu is displayed.
→ Press the soft key ④ with the display allocation “NAME”.
Select the CD you wish to name using the Y / X buttons ⑦ or the soft keys ④ "PREV" (previous) or "NEXT.
This brings you to the edit mode. If the CD you have selected is not yet known to the unit, seven underlines appear on the display and the current input position flashes.
Use the Y / X buttons ⑦ to choose your characters. Should a position remain blank, you select the underline.
User the < or> button ⑦ to change the input position.
→ Press the OK button ⑤ to store the name.
Clearing a CD name
→ Press the MENU button ⑧ when in CD changer mode.
Press the soft key ④ with the display allocation “CDC”.
Select the CD whose name you wish to choose using the Y / Buttons ⑦ or the soft keys "PREV" (previous) or "NEXT".
Hold down the soft key ④ with the display allocation “CD” until “CD CLR” appears on the display.
The CD name has now been cleared.
→ Press the OK button ⑤ to return to the previous menu level or the MENU button ⑧ to leave the menu altogether. The settings are now stored.
Clearing all CD names
Press the MENU button ⑧ while in CD changer mode.
→ Press the soft key ④ with the display allocation “CDC”.
Hold down the soft key ④ with the display allocation “ALL” until “MEMO CLR” appears on the display.
All CD names have now been cleared.
→ Press the OK button ⑤ to return to the previous menu level or the MENU button ⑧ to leave the menu altogether. The settings are now stored.
Programming favourite CD tracks
With the TPM function (Track Programme Memory), you can programme, store and play your favourite tracks on a particular CD. No matter what order the tracks are programmed, they will always be played back in ascending order. When playback of favourite tracks is activated, only the previously programmed tracks of the CD in the drive will be played. Up to 30 CDs with a maximum of 40 tracks each can be handled in CD mode.
Programming favourite tracks
Proceed as follows to select your favourite tracks on a CD:
in the CD changer mode, select the CD from which you wish to select your favourite tracks;
choose your first favourite track;
→ press the soft key ④ with the display allocation “TPM” for more than one second.
The track is now included in the list of favourite tracks for this CD.
Proceed in exactly the same way with all your other favourite tracks on the CD.
Switching playback of favourite tracks on/off
To call up the preset favourite tracks for the inserted CD or to switch off playback of the favourite tracks,
→ press the soft key ④ with the display allocation “TPM”.
The current TPM status (“TPM ON” or “TPM OFF”) appears briefly on the display. When playback of favourite tracks is active, an arrow symbol lights up alongside “TPM” on the display.
Clearing preset of tracks
In order to clear individual tracks from the list of favourite tracks for a CD,
→ switch on TPM;
→ select the track you wish to clear;
hold down the soft key ④ with the display allocation “CLR” until “TR CLR” appears on the display.
The track is now cleared from the list.
Clearing the list of favourite tracks for a CD
You can also clear the entire list of favourite tracks for a CD. The CD for which you wish to clear your favourite tracks must be in play at the time of clearance.
Switch on TPM.
Hold down the soft key ④ with the display allocation “CLR” until “CD CLR” appears briefly on the display.
The list is now cleared.
CLOCK time
Setting the time
The time can be set automatically via the RDS signal. In addition, you can also set the time manually.
Note:
The clock can be synchronised automatically via RDS only if the station that you are receiving supports this function.
AUTOSYNC
To synchronise the time automatically,
→ press the MENU button ⑧.
→ Press the soft key ④ with the display allocation “CLK”.
Press the soft key ④ with the display allocation “SYNC” repeatedly until the display reads “AUTOSYNC”.
If "AUTOSYNC" is selected and the station being received supports the RDS clock time (RDS-CT) function, the clock will be set automatically.
If you do not want the clock time to be synchronised automatically (for example, because you have set the clock to another time zone),
select "SYNCH OFF".
Setting the clock time manually
To set the clock time manual, press the MENU button ⑧.
→ Press the soft key ④ with the display allocation “CLK”.
→ Press the soft key ④ with the display allocation “SET”.
The clock time will appear on the display. The hours blink and can be set.
Set the hours using the /Youtons ⑦.
Once the hours are set, press the button ⑦.
The minutes will blink.
Set the minutes using the / you ons
⑦.
→ Press the OK button ⑤ to return to the previous menu level or the MENU button ⑧ to leave the menu altogether. The settings are now stored.
Switching between 12- and 24-hour clock mode
→ Press the MENU button ⑧.
→ Press the soft key ④ with the display allocation "CLK".
→ Press the soft key ④ with the display allocation "MODE".
Press the < or > button ⑦ to switch between 12- and 24-hour mode.
→ Press the OK button ⑤ to return to the previous menu level or the MENU button ⑧ to leave the menu altogether. The settings are now stored.
Permanent time display when unit is off
To configure the unit to display the time permanently when the unit is off and the ignition is on,
press the MENU button ⑧.
→ Press the soft key ④ with the display allocation "CLK".
→ Press the soft key ④ with the display allocation "VIEW".
Press the< or> button ⑦ to switch between "CLK ON" and "CLK OFF".
Press the OK button ⑤ to return to the previous menu level or the MENU button ⑧ to leave the menu altogether. The settings are now stored.
DSA - Digital Sound Adjustment
This unit is equipped with a digital sound-adjustment system. This consists of three self-aligning, adaptable 7-band equalisers, a dynamic noise covering system (DNC) and five sound presets.
The three 7-band equalisers (EQ1 - EQ3) are each allocated two channels (left and right). The equalisers EQ1 - EQ3 can be automatically lined up with the aid of the microphone supplied. The automatically read values can also be altered manually. You also have the option of setting the equalisers manually.
Switching DSA on/off
To switch the equaliser off,
→ press the DSA button ⑥.
The setting last selected appears on the display.
→ Press the < button ⑦.
"DSA OFF" appears on the display.
Press the DSA button ⑥. The settings are now stored.
To switch the equaliser back on again,
→ press the DSA button ⑥.
"DSA ON" appears on the display.
→ Press the > button ⑦.
The setting last selected appears on the display before the equaliser is switched off.
→ Press the DSA button ⑥. The settings are now stored.
Lining up the equaliser automatically
You can line up the equalisers electronically for three different situations, and store these settings, e.g.:
EQ 1 for the driver alone
EQ 2 for the driver and front passenger
EQ 3 for car occupants in front and back.
Hold the microphone in the appropriate position during line-up.
The position of the microphone for situation 1 (example, driver alone) is directly on a level with the driver's head.
For situation 2, the microphone is between the driver and the front passenger.
For situation 3, the microphone should be in the middle of the vehicle interior (left/right, front/back).
It is a good idea to look for really peaceful surroundings for lining up the system. Outside noises may distort the readings.
Note:
Output from the loudspeakers should not be impaired by objects. All loudspeakers must be connected up. The microphone must be connected to the car radio. Please line up the equaliser before you line up DNC.
To line up an equaliser,
→ press the DSA button ⑥;
→ select the desired equaliser using the Y / Button ⑦;
→ press the soft key ④ with the display allocation “AUTO”;
A countdown starts on the display. During this time, you have the opportunity to position the microphone. Lining up then takes place when the countdown is over.
→ Proceed in the same way with all the equalisers.
Selecting an equaliser
After automatic or manual line-up,
→ press the DSA button ⑥;
→ select one of the equalisers EQ1, EQ2 or EQ3 using the ¥ / 📄utton ⑦;
→ press the OK button ⑤.
Select sound preset
You can preselect sound settings for the following musical styles:
• ROCK
• POP
• JAZZ
- CLASSIC
• VOCAL
The settings for these musical styles are pre-programmed.
Press the DSA button ⑥.
Select the desired sound preset using the Y or X button ⑦.
→ Press the OK button ⑤.
Setting the equalisers manually
We recommend you use a CD you are familiar with when adjusting the equaliser.
Before adjusting the equaliser, set the tone and volume balance to zero and deactivate the loudness function. To do this, please see the chapter "Audio settings".
Listen to a CD.
→ Evaluate the tone impression according to your taste.
Now consult the chart “An aid to adjusting the equaliser” under “Sound impression”.
Set the equaliser values as described under "What to do".
Programming the settings
Press the DSA button ⑥.
Select one of the equalisers EQ1, EQ2 or EQ3 using the Y or A button ⑦.
Select the left or right channel by pressing the "LEFT" or "RGHT" soft key.
To select the frequency,
→ press the< or> button ⑦;
set the frequency level using the button ⑦;
→ select the settings for both channels as described above;
→ press the OK button ⑤.
DSA - DIGITAL SOUND ADJUSTMENT
| Setting aid for the equaliser | |
| Sound impression/problem | What to do |
| Bass reproduction too weak | Raise bass with frequency: 64 to 160 Hz, level: +4 up to +6 dB |
| Impure bassBoomingDisagreeable pressure | Reduce lower mid-section with frequency: 400 Hz, level: approx. -4 dB |
| Sound very dominant, aggressive, no stereo effect | Reduce mid-section with frequency: 1,000 to 2,500 Hz, level: -4 up to -6 dB |
| Muffled reproductionLow transparencyNo instrumental brilliance | Raise tweeter range with frequency: 6,250 to 15,600 Hz, level: +2 up to +4 dB |
DNC - Dynamic Noise Covering
Dynamic Noise Covering – masking of vehicle noise.
When your vehicle is in motion, the DNC system raises the radio volume to the volume you consider pleasant when your vehicle is stationary.
The volume is raised depending upon frequency ranges and noise development inside the vehicle.
As a result, volume and sound remain agreeable even when vehicle noise changes. Short-term noises, such as those arising when you cross a railway track, are not taken into account.
Lining up DNC
For operation to suit your vehicle, the system must be lined up using the special microphone. Please do not line up DNC until you have aligned the hifi. The microphone should be permanently mounted near to the console using the self-adhesive tape provided, however not in the leg area, in resounding places or near the fan/heater vents.
The microphone mouthpiece should point towards the passenger area. It is best to line up the system in a quiet place with the engine switched off.
Starting DNC line-up
→ Press the DSA button ⑥.
Hold down the soft key ④ with the display allocation “DNC” until “DNC ADJ” appears on the display.
DNC line-up now begins. Once "DNC 3" appears on the display, line-up has been completed.
→ Press the OK button ⑤.
Switching DNC line-up on/off
To switch DNC line-up off,
→ press the DSA button ⑥;
→ press the soft key ④ with the display allocation “DNC”.
The last selected DNC increase appears on the display.
→ Press the◀ button ⑦.
“DNC OFF” appears on the display.
→ Press the DSA button ⑥. The settings are now stored.
To switch DNC back on again,
→ press the DSA button ⑥;
→ press the soft key ④ with the display allocation “DNC”.
“DNC ON” appears on the display.
→ Press the▶ button ⑦.
The DNC increase last selected before switching off appears on the display.
→ Press the DSA button ⑥. The settings are now stored.
Setting the DNC increase
You can set the DNC increase, i.e. the sensitivity with which the volume and tone are raised, in five steps.
The “DNC 1” setting is suitable for vehicles with a loud engine and heavy-bass music. The “DNC 5” setting is for vehicles with a quiet engine and classical music. Experiment with the settings to find the one you prefer.
To set the DNC increase,
→ press the DSA button ⑥;
→ press the soft key ④ with the display allocation “DNC”;
→ select the desired increase using the Y or X button ⑦;
→ press the OK button ⑤.
Once you have completed all settings, press the DSA button ⑥.
TMC for dynamic navigation systems
TMC denotes “Traffic Message Channel”. Traffic announcements are transmitted digitally via TMC and can therefore be used by suitable navigation systems for route planning. Your car radio has one TMC output for connection to Blaupunkt navigation systems. Your Blaupunkt dealer will tell you which navigation systems can be used with your car radio. When a navigation system is connected and a TMC station received, “TMC” lights up on the display.
Pre-amplifiers
External pre-amplifiers and a subwoofer can be connected via the appropriate lines of your car radio.
We recommend the use of matching products from the Blaupunkt or Velocity ranges.
Switch-on delay for external pre-amplifier
You can define a switch-on delay for pre-amplifiers connected to the pre-amp output line. The switch-on delay can be set at between 250 ms ("DELAY 1") to 2.25 seconds ("DELAY 9").
Press the MENU button ⑧.
→ Press the soft key ④ with the display allocation “VAR”.
→ Press the soft key ④ with the display allocation “DLAY”.
Press the< or> button ⑦ to set the switch-on delay.
Press the OK button ⑤ to return to the previous menu level or the MENU button ⑧ to leave the menu altogether. The settings are now stored.
Subout/subwoofer
Setting the frequency and level for the subwoofer
You can set the frequency and amplifier level for a connected subwoofer. The settings you make depend on the hifi system in your car and the power of your subwoofer. Experiment to find your ideal setting.
→ Press the AUD button ⑨.
→ Press the soft key ④ with the display allocation “NEXT”.
→ Press the soft key ④ with the display allocation “SUB”.
Press the < or > button ⑦ to select between the frequencies "80 Hz" and "100 Hz".
Set the desired amplifier level using the Y or X button ⑦.
→ Press the OK button ⑤ to return to the previous menu level or the MENU button ⑧ to leave the menu altogether. The settings are now stored.
High-pass filter
Setting the high-pass filter
If a subwoofer is connected to your car radio, you can use a high-pass filter (HP-F) to suppress the output of lower frequencies through the internal final amplifier and an external pre-amplifier that may be connected. This filter has five adjustment levels. The settings depend on the unit installed in your car. Experiment to find your ideal setting.
Press the AUD button ⑨.
→ Press the soft key ④ with the display allocation “NEXT”.
→ Press the soft key ④ with the display allocation “HP-F”.
Press the< or> button ⑦ to switch the high-pass filter on/off.
When the high-pass filter is activated,
→ select the desired amplifier filter, "FILTER1" - "FILTER5" using the Y or X button ⑦.
Press the OK button ⑤ to return to the previous menu level or the MENU button ⑧ to leave the menu altogether. The settings are now stored.
External audio sources
Instead of the CD changer, you can also connect up a different external audio source with a line output. Such sources can be, for example, portable CD players, MiniDisc players or MP3 players.
The AUX output has to be switched on in the install menu.
To connect up an external audio source, you will need an adapter cable, obtainable from any Blaupunkt dealer.
Switching the AUX input on/off
Hold down the MENU button ⑧ until the install menu appears on the display.
→ Press the soft key ④ with the display allocation “AUX”.
When “AUX” appears on the display, the input is already activated.
Press the < or > button ⑦ to switch AUX on or off.
Press the OK button ⑤ to return to the previous menu level or the MENU button ⑧ to leave the menu altogether. The settings are now stored.
Note:
When the AUX input is switched on, it can be selected using the CDC button ⑬.
Technical data
Amplifier
Output power: 4 x 25 watts sine in
accordance with
DIN 45 324 at 14.4V,
4 x 45 watts max.
power
Tuner
Frequency ranges:
FM : 87.5 - 107.9 MHz
AM : 530 - 1 710 kHz
FM transmission range:
30 - 15 000 Hz
CD
Transmission range:
20 - 20 000 Hz
Pre-amp output
4 channels: 5 V / 10 kΩ
AUX input
Input sensitivity: 1,2 V / 10 kΩ
Subject to changes!
Service numbers / Numéros du service après-vente / Números de servicio / Número de serviço
Tel.: Fax:
Deutschland 0 18 05 00 02 25 0 51 21 49 40 02
Caution! Important notice for customers in USA: San Francisco CD70
To ensure that the radio mode on the San Francisco CD70 unit works correctly, the first time you use the radio you have to configure the tuner to receive radio stations in the USA.
To do so, proceed as follows:
When operating the unit for the first time, the “INSTALL” menu appears in the display.
Press the softkey that is labeled in the display as “TUNE”
Press the < or > key until "US" appears in the top row of the display.
Now press the MENU button or OK.
If your unit has already been used and you want to configure the tuner:
Keep the MENU button pressed down until the “INSTALL” menu is displayed (approx. 4 seconds).
→ Proceed as described above.
Thank you, your unit is now ready for radio reception in your country. Please read the enclosed operating instructions to find out how to operate your unit and for further information when using it for the first time.


- Operating instructions
- Notes 6
- Theft protection, KeyCard ...... 7
- Switching on/off 9
- First use 10
- Volume adjustment 11
- Audio settings 12
- Setting the display 13
- Radio mode.... 14
- CD Mode.... 22
- CD changer mode (optional) ..... 25
- CLOCK time 28
- DSA - Digital Sound Adjustment 30
- DNC - Dynamic Noise Covering .. 33
- TMC for dynamic navigation systems.... 34
- Pre-amplifiers 34
- Subout/subwoofer...... 35
- High-pass filter 35
- External audio sources...... 36
- Technical data 36
- Installation instructions...... 137
- NOTES
- Note
- Road safety
- Installation
- Accessories
- Remote controls
- Amplifiers
- CD changer
- Guarantee
- International telephone information
- Theft protection, KeyCard
- Inserting the KeyCard
- Note:
- Removing the KeyCard
- Replacing / "training" KeyCards
- Lost or damaged KeyCards
- "Training" a new KeyCard / entering the master code
- Optical theft protection indicator (LED)
- Viewing radio pass data
- Caring for your KeyCard
- Switching on/off
- Switching on/off using the button ②
- Switching on/off using the ignition
- Switching on/off using the KeyCard
- First use
- Changing settings
- Selecting an external audio source
- Setting the clock
- Setting the tuner
- Switching the internal amplifier on/off
- Reset (factory defaults)
- Exiting the Install menu
- Volume adjustment
- Setting the switch-on volume
- Mute setting
- Deactivating the mute setting
- or
- Mute during telephone
- Setting the volume for the warning tone (beep)
- Audio settings
- Bass settings
- Treble settings
- Loudness
- Setting the right/left balance
- Fader settings, front/back
- Setting the display
- Setting the reading angle
- Setting the display brightness
- Display brightness - day
- Display brightness - night
- Radio mode
- Switching to radio mode
- Switching the RDS function on and off
- Switching the AF function on and off
- Selecting the frequency range / memory bank
- Selecting a frequency range
- Selecting a memory bank
- Tuning to a station
- Automatic station scanning
- Manual tuning
- Browsing in broadcasting networks (FM only)
- Selecting short-/long-range reception
- Setting station scanning sensitivity
- Sensitivity for short-range reception (S-LO)
- Sensitivity for long-range reception (S-DX)
- Storing stations
- Storing stations manually
- Storing stations automatically ("Travelstore")
- Listening to preset stations
- Radio scan
- Starting a radio scan
- Preset Scan
- Staring a preset scan
- Stop scanning, continue listening to station
- Setting the scan time
- Programme type (PTY)
- Activating PTY
- Deactivating PTY
- Selecting a programme type and starting a scan
- Storing a programme type under a station button
- Optimising radio reception
- The HiCut function
- Activating/deactivating HiCut
- Setting the HiCut level
- Interference-related bandwidth selection (SHARX)
- Activating/deactivating SHARX
- Switching between stereo and mono
- Changing the display
- Selecting radio text display
- Naming a station
- Deleting station names
- Resetting station names to RDS names
- CD Mode
- Switching to CD mode, inserting a CD
- Removing a CD
- Selecting a track
- Fast search (audible)
- Random play (MIX)
- Stopping MIX
- Scanning tracks (SCAN)
- Stopping SCAN and continuing playback
- Repeating a track (REPEAT)
- Stopping REPEAT
- Programming favourite CD tracks
- Selecting favourite tracks
- Switching off playback of favourite tracks
- Clearing preset tracks
- Clearing the list of favourite tracks for a CD
- Naming CDs
- Entering/altering CD names
- Clearing a CD name
- Clearing all CD names
- CD changer mode (optional)
- Switching to CD changer mode
- Selecting a CD
- Repeating individual tracks or whole CDs (REPEAT)
- Scanning all tracks on all CDs (SCAN)
- Stopping SCAN
- Programming favourite tracks
- Switching playback of favourite tracks on/off
- Clearing preset of tracks
- CLOCK time
- Setting the time
- AUTOSYNC
- Setting the clock time manually
- Switching between 12- and 24-hour clock mode
- Permanent time display when unit is off
- DSA - Digital Sound Adjustment
- Switching DSA on/off
- Lining up the equaliser automatically
- Selecting an equaliser
- Select sound preset
- Setting the equalisers manually
- Programming the settings
- DNC - Dynamic Noise Covering
- Lining up DNC
- Starting DNC line-up
- Switching DNC line-up on/off
- Setting the DNC increase
- TMC for dynamic navigation systems
- Pre-amplifiers
- Switch-on delay for external pre-amplifier
- Subout/subwoofer
- Setting the frequency and level for the subwoofer
- High-pass filter
- Setting the high-pass filter
- External audio sources
- Switching the AUX input on/off
- Technical data
- Amplifier
- Tuner
- CD
- Pre-amp output
- AUX input
- Service numbers / Numéros du service après-vente / Números de servicio / Número de serviço
- Caution! Important notice for customers in USA: San Francisco CD70
Brand : BLAUPUNKT
Model : San Francisco CD70
Category : Car radio