
FMG3024-D10A - Telephone ZYXEL - Free user manual and instructions
Find the device manual for free FMG3024-D10A ZYXEL in PDF.


| Product Type | Gigabit Active Fiber VoIP IAD |
| Model Number | FMG3024-D10A |
| WAN Interface | Fiber (Ethernet WAN via ONT), up to 6 WAN interfaces |
| LAN Ports | 4 x Gigabit Ethernet (10/100/1000 Mbps) |
| VoIP | 2 analog phone ports, SIP (2 accounts), supports multiple codecs |
| USB Ports | 2 x USB 2.0 (for storage, printer, 3G dongle) |
| CATV Support | Yes (cable TV pass-through) |
| Firewall | SPI firewall, DoS protection, MAC filtering, parental control |
| VPN | IPSec VPN (up to multiple tunnels) |
| QoS | Bandwidth management, queue and class setup |
| Default IP Address | 192.168.1.1 |
| Default Login | Username: admin, Password: 1234 |
| Reset Button | Press 5 seconds to restore factory defaults |
| Firmware Upgrade | Via web configurator or FTP |
| Dimensions (approx.) | 230 x 160 x 35 mm (9.1 x 6.3 x 1.4 in) |
| Weight (approx.) | 1.0 kg (2.2 lbs) |
| Power Supply | 12V DC, 1A (external adapter) |
| Power Consumption | ≤ 12W |
| Operating Temperature | 0°C to 40°C (32°F to 104°F) |
| Safety Compliance | FCC Class B, CE, UL, WEEE |
Frequently Asked Questions - FMG3024-D10A ZYXEL
User questions about FMG3024-D10A ZYXEL
0 question about this device. Answer the ones you know or ask your own.
Ask a new question about this device
Download the instructions for your Telephone in PDF format for free! Find your manual FMG3024-D10A - ZYXEL and take your electronic device back in hand. On this page are published all the documents necessary for the use of your device. FMG3024-D10A by ZYXEL.
USER MANUAL FMG3024-D10A ZYXEL
FMG3024-D10A / FMG3025-D10A Series
Gigabit Active Fiber VoIP IAD
User's Guide
Default Login Details
LAN IP http://192.168.1.1
Address
User Name admin
Password 1234
Version 1.00
Edition 1, 2/2013
www.zyxel.com
ZyXEL
KEEP THIS GUIDE FOR FUTURE REFERENCE.
IMPORTANT!
READ CAREFULLY BEFORE USE.
KEEP THIS GUIDE FOR FUTURE REFERENCE.
Note: This guide is a reference for a series of products. Therefore some features or options in this guide may not be available in your product.
Graphics in this book may differ slightly from the product due to differences in operating systems, operating system versions, or if you installed updated firmware/software for your device. Every effort has been made to ensure that the information in this manual is accurate.
Related Documentation
- Quick Start Guide
The Quick Start Guide shows how to connect the Device and access the Web Configurator. It also contains a connection diagram.
Contents Overview
User's Guide 13
Introduction 15
Introducing the Web Configurator .... 19
Tutorials 25
Technical Reference 59
Connection Status and System Info 61
Broadband 67
Cable TV 91
Home Networking 93
Routing 117
Quality of Service (QoS) 121
Network Address Translation (NAT) 133
Dynamic DNS 141
Interface Group 143
Firewall 145
MAC Filter 153
Parental Control 155
Certificates 159
VPN 167
VoIP 181
Logs 205
Traffic Status 209
User Account 215
Remote MGMT 217
SNMP 219
System 221
Time Setting 223
Log Setting 225
Firmware Upgrade 227
Backup/Restore 229
Diagnostic 233
Auto Provision 235
Troubleshooting 237
Table of Contents
Contents Overview ....3
Table of Contents 5
Part I: User's Guide .... 13
Chapter 1 Introduction......15
1.1 Overview ...... 15
1.2 Applications for the Device .... 15
1.2.1 Internet Access 15
1.2.2 VoIP Features .... 15
1.3 Ways to Manage the Device 17
1.4 Good Habits for Managing the Device ....17
1.5 The RESET Button .... 17
Chapter 2 Introducing the Web Configurator ....19
2.1 Overview ...... 19
2.1.1 Accessing the Web Configurator ....19
2.2 The Web Configurator Layout ....21
2.2.1 Title Bar 21
2.2.2 Main Window 21
2.2.3 Navigation Panel 22
Chapter 3 Tutorials......25
3.1 Overview ......25
3.2 Setting Up Your WAN Connection ....25
3.3 Setting Up NAT Port Forwarding 26
3.4 How to Make a VoIP Call ....27
3.4.1 VoIP Calls With a Registered SIP Account 27
3.5 Using the File Sharing Feature ....30
3.5.1 Set Up File Sharing ....30
3.5.2 Access Your Shared Files From a Computer 32
3.6 Using the Media Server Feature .... 32
3.6.1 Configuring the Device 32
3.6.2 Using Windows Media Player .... 33
3.6.3 Using a Digital Media Adapter .... 36
3.7 Using the Print Server Feature 37
3.8 Configuring Static Route for Routing to Another Network ....51
3.9 Configuring QoS Queue and Class Setup 53
3.10 Access the Device Using DDNS 56
3.10.1 Registering a DDNS Account on www.dyndns.org 56
3.10.2 Configuring DDNS on Your Device 57
3.10.3 Testing the DDNS Setting 57
Part II: Technical Reference....59
Chapter 4
Connection Status and System Info 61
4.1 Overview ......61
4.2 The Connection Status Screen 61
4.3 The System Info Screen 62
Chapter 5
Broadband....67
5.1 Overview 67
5.1.1 What You Can Do in this Chapter 68
5.1.2 What You Need to Know 68
5.1.3 Before You Begin 70
5.2 The Broadband Screen 70
5.2.1 Add/Edit Internet Connection ....71
5.3 The 3G Backup Screen ....81
5.4 Technical Reference 83
Chapter 6
Cable TV 91
6.1 Overview 91
6.2 The CATV Screen 91
Chapter 7
Home Networking 93
7.1 Overview 93
7.1.1 What You Can Do in this Chapter 93
7.1.2 What You Need To Know 93
7.2 The LAN Setup Screen 96
7.3 The Static DHCP Screen 97
7.3.1 Before You Begin 97
7.4 The UPnP Screen 99
7.5 The File Sharing Screen 99
7.5.1 Before You Begin 100
7.5.2 Add/Edit File Sharing 101
7.6 The Media Server Screen 102
7.7 The Printer Server Screen 102
7.7.1 Before You Begin 103
7.8 Technical Reference 104
7.9 Installing UPnP in Windows Example 108
7.10 Using UPnP in Windows XP Example 111
Chapter 8 Routing .... 117
8.1 Overview 117
8.2 Configuring Static Route 117
8.2.1 Add/Edit Static Route 118
Chapter 9 Quality of Service (QoS)....121
9.1 Overview ...... 121
9.1.1 What You Can Do in this Chapter ....121
9.1.2 What You Need to Know 121
9.2 The QoS General Screen 122
9.3 The Queue Setup Screen 123
9.3.1 Add/Edit a QoS Queue 124
9.4 The Class Setup Screen 125
9.4.1 Add/Edit QoS Class 126
9.5 The QoS Monitor Screen 130
9.6 QoS Technical Reference 130
9.6.1 IEEE 802.1Q Tag 131
9.6.2 IP Precedence 131
9.6.3 DiffServ 131
Chapter 10 Network Address Translation (NAT)....133
10.1 Overview 133
10.1.1 What You Can Do in this Chapter 133
10.1.2 What You Need To Know 133
10.2 The Port Forwarding Screen 134
10.2.1 The Port Forwarding Screen .... 134
10.2.2 The Port Forwarding Edit Screen 135
10.3 The Sessions Screen 137
10.4 Technical Reference 137
10.4.1 NAT Definitions .... 137
10.4.2 What NAT Does .... 138
10.4.3 How NAT Works 138
Chapter 11
Dynamic DNS 141
11.1 Overview 141
11.1.1 What You Need To Know 141
11.2 The Dynamic DNS Screen 141
Chapter 12
Interface Group....143
12.1 Overview 143
12.2 The Interface Group Screen 143
12.2.1 Interface Group Configuration 144
Chapter 13
Firewall 145
13.1 Overview 145
13.1.1 What You Can Do in this Chapter .... 145
13.1.2 What You Need to Know 145
13.2 The General Screen 146
13.3 The Services Screen 147
13.3.1 The Add New Services Entry Screen 148
13.4 The Access Control Screen 148
13.4.1 The Add New ACL Rule/Edit Screen 149
13.5 The DoS Screen 151
13.6 Firewall Technical Reference .... 151
13.6.1 Guidelines For Enhancing Security With Your Firewall 151
13.6.2 Security Considerations .... 152
Chapter 14
MAC Filter 153
14.1 Overview 153
14.1.1 What You Need to Know .... 153
14.2 The MAC Filter Screen 153
Chapter 15
Parental Control....155
15.1 Overview 155
15.2 The Parental Control Screen .... 155
15.2.1 Add/Edit a Parental Control Rule .... 156
Chapter 16
Certificates 159
16.1 Overview 159
16.1.1 What You Can Do in this Chapter 159
16.1.2 What You Need to Know 159
16.1.3 Verifying a Certificate 160
16.2 Local Certificates ...... 161
16.3 Trusted CA 163
16.4 Trusted CA Import 163
16.5 View Certificate 164
Chapter 17
VPN 167
17.1 Overview 167
17.2 IPSec VPN 167
17.2.1 The General Screen 167
17.2.2 IPSec VPN: Add 168
17.2.3 The Monitor Screen 173
17.3 Technical Reference 173
17.3.1 IPSec Architecture 173
17.3.2 Encapsulation 174
17.3.3 IKE Phases 175
17.3.4 Negotiation Mode 176
17.3.5 IPSec and NAT 177
17.3.6 VPN, NAT, and NAT Traversal 177
17.3.7 ID Type and Content 178
17.3.8 Pre-Shared Key 179
17.3.9 Diffie-Hellman (DH) Key Groups 179
Chapter 18
VoIP 181
18.1 Overview 181
18.1.1 What You Can Do in this Chapter .... 181
18.1.2 What You Need to Know .... 181
18.1.3 Before You Begin 182
18.2 The SIP Service Provider Screen 183
18.3 The SIP Account Screen 188
18.3.1 Add/Edit SIP Account 188
18.4 Multiple SIP Accounts 191
18.5 Phone Screen 192
18.5.1 Edit Phone Device 192
18.6 The Call Rule Screen 193
18.7 Technical Reference 194
18.7.1 VoIP 194
18.7.2 SIP 194
18.7.3 Quality of Service (QoS) 199
18.7.4 Phone Services Overview 200
Chapter 19
Logs 205
19.1 Overview 205
19.1.1 What You Can Do in this Chapter 205
19.1.2 What You Need To Know ....205
19.2 The System Log Screen 206
19.3 The Phone Log Screen 207
19.4 The VoIP Call History Screen 207
Chapter 20
Traffic Status 209
20.1 Overview ......209
20.1.1 What You Can Do in this Chapter ....209
20.2 The WAN Status Screen ....209
20.3 The LAN Status Screen 210
20.4 The NAT Status Screen 211
20.5 The 3G Backup Status Screen 211
20.6 The VoIP Status Screen 212
Chapter 21
User Account 215
21.1 Overview ......215
21.2 The User Account Screen 215
Chapter 22
Remote MGMT....217
22.1 Overview ...... 217
22.1.1 What You Need to Know ....217
22.2 The Remote MGMT Screen 217
Chapter 23
SNMP 219
23.1 Overview 219
23.2 The SNMP Screen 219
Chapter 24
System 221
24.1 Overview 221
24.1.1 What You Need to Know ....221
24.2 The System Screen 221
Chapter 25
Time Setting 223
25.1 Overview 223
25.2 The Time Setting Screen 223
Chapter 26
Log Setting 225
26.1 Overview 225
26.2 The Log Setting Screen 225
Chapter 27
Firmware Upgrade 227
27.1 Overview 227
27.2 The Firmware Upgrade Screen 227
Chapter 28
Backup/Restore 229
28.1 Overview 229
28.2 The Backup/Restore Screen 229
28.3 The Reboot Screen 231
Chapter 29
Diagnostic 233
29.1 Overview ...... 233
29.2 The Ping/TraceRoute Screen 233
Chapter 30
Auto Provision 235
30.1 Overview 235
30.2 Auto Provision 235
Chapter 31
Troubleshooting....237
31.1 Overview ......237
31.2 Power, Hardware Connections, and LEDs 237
31.3 Device Access and Login 238
31.4 Internet Access 240
31.5 Phone Calls and VoIP 241
31.6 USB Device Connection 241
31.7 UPnP 242
Table of Contents
Appendix A IP Addresses and Subnetting....243
Appendix B Setting Up Your Computer's IP Address 253
Appendix C Pop-up Windows, JavaScript and Java Permissions....283
Appendix D Common Services....291
Appendix E IPv6 295
Appendix F Legal Information....305
Index 309
PART I
User's Guide
Introduction
1.1 Overview
The Device is a fiber WAN router, which also includes Voice over IP (VoIP) communication capabilities to allow you to use a traditional analog telephone to make Internet calls. By integrating all of these features, you are provided with ease of installation and high-speed, shared Internet access. The Device is also a complete security solution with a robust firewall based on Stateful Packet Inspection (SPI) technology and Denial of Service (DoS).
Note: The FMG3024-D10A model has cable TV support.
1.2 Applications for the Device
Here are some example uses for which the Device is well suited.
1.2.1 Internet Access
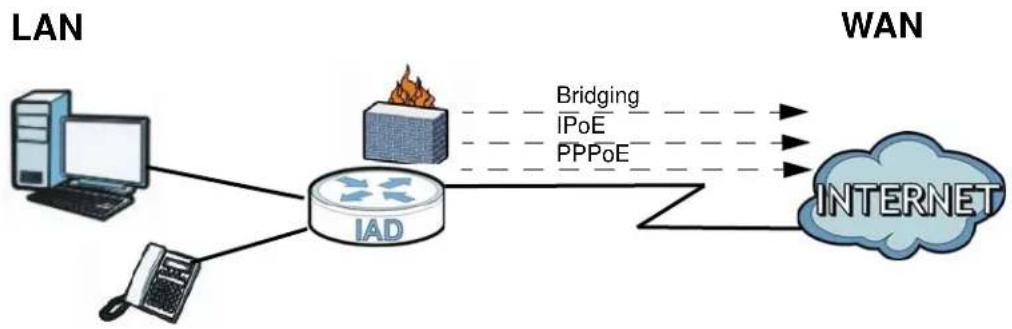
Your Device provides shared Internet access. Computers can connect to the Device's LAN ports.
Figure 1 Device's Internet Access Application
flowchart
graph LR
    A["LAN"] --> B["IAD"]
    B --> C["INTERNET"]
    D["Computer"] --> B
    E["Phone"] --> B
    B --> F["Bridging\nIPoE\nPPPoE"]
    F --> G["Output"]
1.2.2 VoIP Features
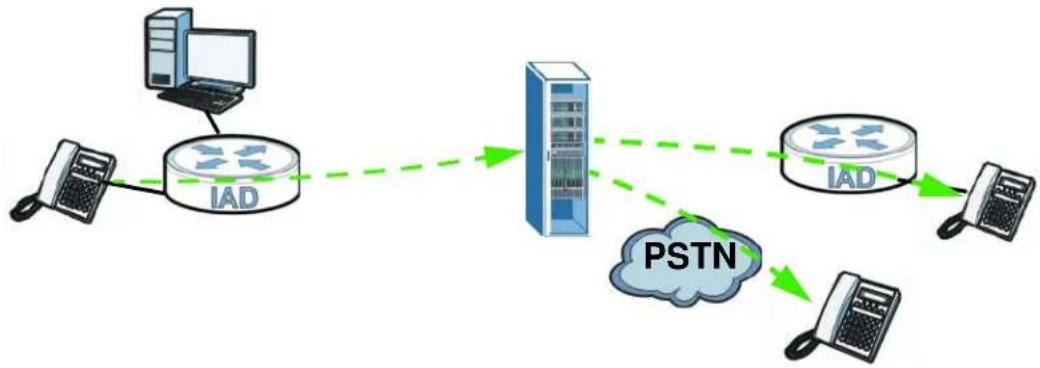
You can register 1 SIP (Session Initiation Protocol) profile (2 accounts for that profile) and use the Device to make and receive VoIP telephone calls:
Figure 2 Device's VoIP Application
flowchart
graph TD
    A["Client Phone"] --> B["IAD"]
    B --> C["Central Server"]
    C --> D["IAD"]
    D --> E["Client Phone"]
    C --> F["PSTN"]
    F --> E
The Device sends your call to a VoIP service provider's SIP server which forwards your calls to either VoIP or PSTN phones.
1.3 Ways to Manage the Device
Use any of the following methods to manage the Device.
- Web Configurator. This is recommended for everyday management of the Device using a (supported) web browser.
- FTP for firmware upgrades and configuration backup/restore.
1.4 Good Habits for Managing the Device
Do the following things regularly to make the Device more secure and to manage the Device more effectively.
- Change the password. Use a password that's not easy to guess and that consists of different types of characters, such as numbers and letters.
- Write down the password and put it in a safe place.
- Back up the configuration (and make sure you know how to restore it). Restoring an earlier working configuration may be useful if the device becomes unstable or even crashes. If you forget your password to access the Web Configurator, you will have to reset the Device to its factory default settings. If you backed up an earlier configuration file, you would not have to totally re-configure the Device. You could simply restore your last configuration. Keep in mind that backing up a configuration file will not back up passwords used to set up PPPoE and VoIP. Write down any information your ISP provides you.
1.5 The RESET Button
If you forget your password or cannot access the web configurator, you will need to use the RESET button at the back of the device to reload the factory-default configuration file. This means that you will lose all configurations that you had previously and the passwords will be reset to the defaults.
1 Make sure the POWER LED is on (not blinking).
2 To set the device back to the factory default settings, press the RESET button for 5 seconds or until the POWER LED begins to blink and then release it. When the POWER LED begins to blink, the defaults have been restored and the device restarts.
Introducing the Web Configurator
2.1 Overview
The web configurator is an HTML-based management interface that allows easy device setup and management via Internet browser. Use Internet Explorer 6.0 and later versions, Mozilla Firefox 3 and later versions, or Safari 2.0 and later versions. The recommended screen resolution is 1024 by 768 pixels.
In order to use the web configurator you need to allow:
- Web browser pop-up windows from your device. Web pop-up blocking is enabled by default in Windows XP SP (Service Pack) 2.
- JavaScript (enabled by default).
- Java permissions (enabled by default).
See Appendix C on page 283 if you need to make sure these functions are allowed in Internet Explorer.
2.1.1 Accessing the Web Configurator
1 Make sure your Device hardware is properly connected (refer to the Quick Start Guide).
2 Launch your web browser.
3 Type "192.168.1.1" as the URL.
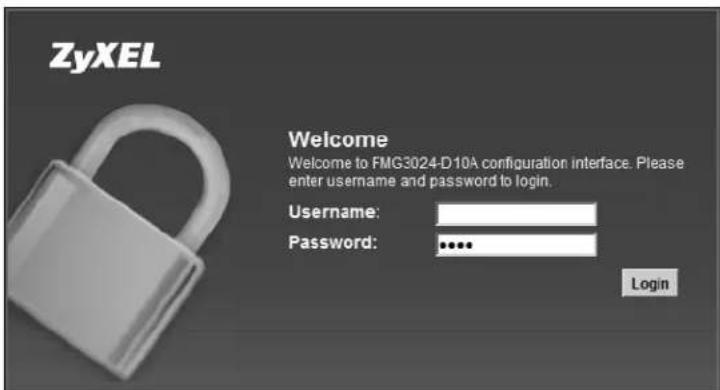
4 A password screen displays. Type "admin" as the default Username and "1234" as the default password to access the device's Web Configurator. Click Login. If you have changed the password, enter your password and click Login.
Figure 3 Password Screen
Note: For security reasons, the Device automatically logs you out if you do not use the web configurator for five minutes (default). If this happens, log in again.
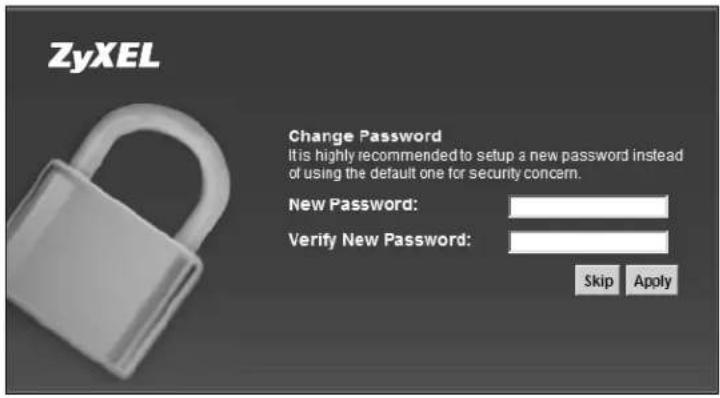
5 The following screen displays if you have not yet changed your password. It is strongly recommended you change the default password. Enter a new password, retype it to confirm and click Apply; alternatively click Skip to proceed to the main menu if you do not want to change the password now.
Figure 4 Change Password Screen
6 The Connection Status screen appears.
Figure 5 Connection Status
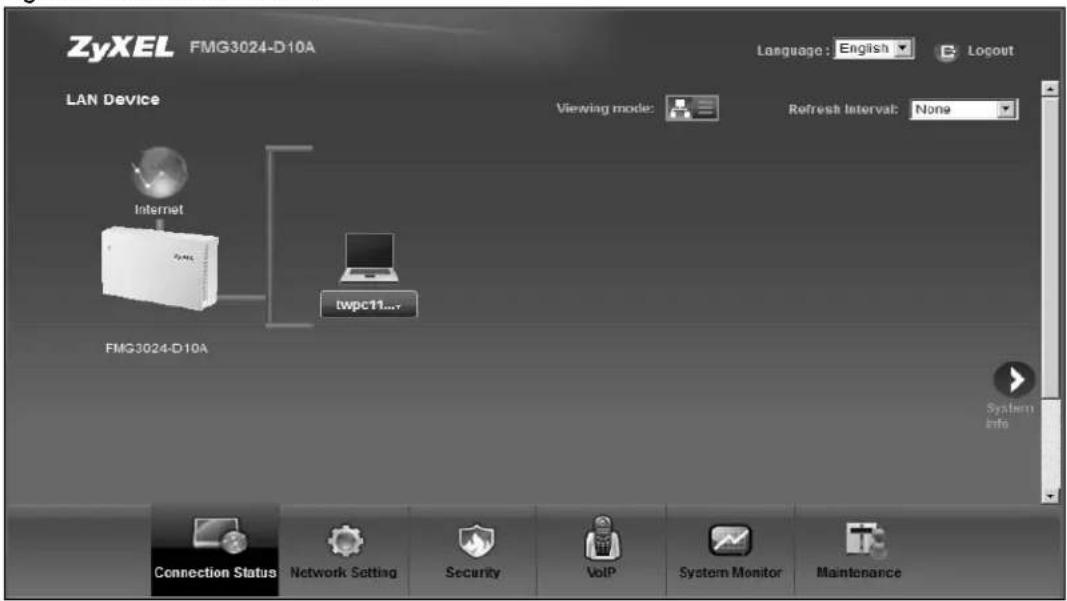
7 Click System Info to display the System Info screen, where you can view the Device's interface and system information.
2.2 The Web Configurator Layout
Click Connection Status > System Info to show the following screen.
Figure 6 Web Configurator Layout
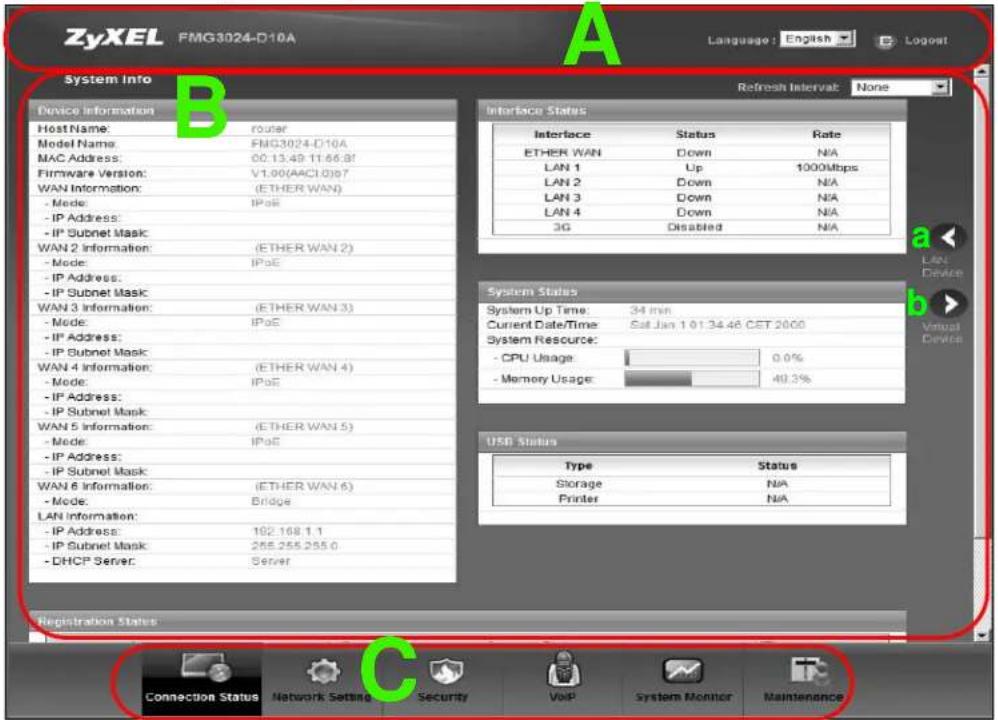
As illustrated above, the main screen is divided into these parts:
• A - title bar
• B - main window
- C - navigation panel
2.2.1 Title Bar
The title bar shows the following icon in the upper right corner.

Click this icon to log out of the web configurator.
2.2.2 Main Window
The main window displays information and configuration fields. It is discussed in the rest of this document.
After you click System Info on the Connection Status screen, the System Info screen is displayed. See Chapter 4 on page 62 for more information about the System Info screen.
If you click LAN Device on the System Info screen (a in Figure 6 on page 21), the Connection Status screen appears. See Chapter 4 on page 61 for more information about the Connection Status screen.
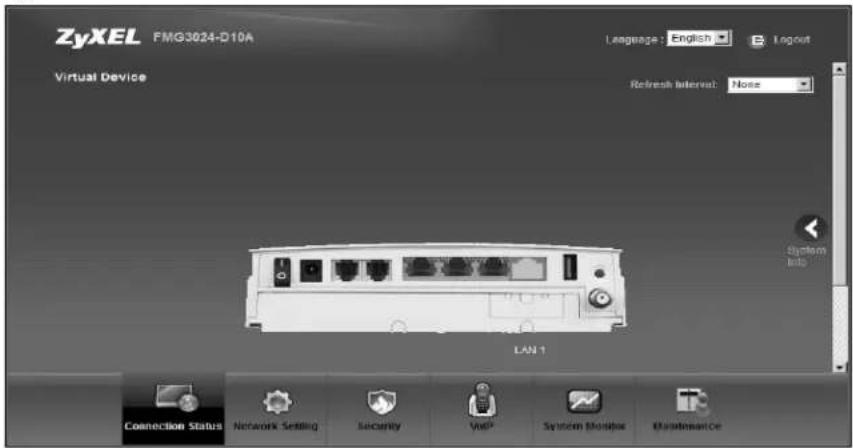
If you click Virtual Device on the System Info screen (b in Figure 6 on page 21), a visual graphic appears, showing the connection status of the Device's ports. The connected ports are in color and disconnected ports are gray.
Figure 7 Virtual Device
2.2.3 Navigation Panel
Use the menu items on the navigation panel to open screens to configure Device features. The following table describes each menu item.
Table 1 Navigation Panel Summary
| LINK TAB FUNCTION | ||
| Connection Status | This screen shows the network status of the Device and computers/devices connected to it. | |
| Network Setting | ||
| Broadband | Broadband | Use this screen to view and modify your WAN interface. You can also configure ISP parameters, WAN IP address assignment, DNS servers and other advanced properties. |
| 3G Backup Use this screen to configure the 3G WAN connection. | ||
| CATV | CATV | Use this screen to enable cable television functions. |
| Home Networking | LAN Setup Use this screen to configure LAN TCP/IP settings, and other advanced properties. | |
| Static DHCP Use this screen to assign specific IP addresses to individual MAC addresses. | ||
| UPnP | Use this screen to enable the UPnP function. | |
| File Sharing | Use this screen to enable file sharing via the Device. | |
| Media Server | Use this screen to enable or disable the sharing of media files. | |
| Printer Server | Use this screen to enable or disable sharing of a USB printer via your Device. | |
| LINK | TAB | FUNCTION |
| Static Route | Static Route | Use this screen to view and set up static routes on the Device. |
| DNS Route DNS | Route Use this screen to view and configure DNS routes. | |
| QoS | General | Use this screen to enable QoS and decide allowable bandwidth using QoS. |
| Queue Setup | Use this screen to configure QoS queue assignment. | |
| Class Setup Use this screen to set up classifiers to sort traffic into different flows and assign priority and define actions to be performed for a classified traffic flow. | ||
| Monitor | Use this screen to view each queue's statistics. | |
| NAT | Port Forwarding | Use this screen to make your local servers visible to the outside world. |
| Sessions Use this screen to limit the number of NAT sessions a single client can establish. | ||
| Dynamic DNS | Dynamic DNS | Use this screen to allow a static hostname alias for a dynamic IP address. |
| Interface Group | Interface Group | Use this screen to create a new interface group. |
| Security | ||
| Firewall | General | Use this screen to activate/deactivate the firewall. |
| Services | Use this screen to set the default action to take on outgoing network traffic. | |
| MAC Filter | MAC Filter | Use this screen to allow specific devices to access the Device. |
| Parental Control | Parental Control | Use this screen to define time periods and days during which the Device performs parental control and/or block web sites with the specific URL. |
| Certificates | Local Certificates | Use this screen to generate and export self-signed certificates or certification requests and import the Device's CA-signed certificates. |
| Trusted CA | Use this screen to save CA certificates to the Device. | |
| VPN VPN | Use this screen to configure VPN settings. | |
| VoIP | ||
| SIP | SIP Service Provider | Use this screen to configure your Device's Voice over IP settings. |
| SIP Account | Use this screen to set up information about your SIP account and configure audio settings such as volume levels for the phones connected to the Device. | |
| Phone | Phone Device | Use this screen to set which phone ports use which SIP accounts. |
| Call Rule | Speed Dial | Use this screen to configure speed dial for SIP phone numbers that you call often. |
| System Monitor | ||
| Log | Phone Log | Use this screen to view the Device's phone logs. |
| VoIP Call History | Use this screen to view the Device's VoIP call history. | |
| Traffic Status | WAN | Use this screen to view the status of all network traffic going through the WAN port of the Device. |
| LAN Use this screen to view the status of all network traffic going through the LAN ports of the Device. | ||
| NAT Use this screen to view the status of NAT sessions on the Device. | ||
| 3G Backup | Use this screen to view the status of 3G Backup on the Device. | |
| VoIP Status | VoIP Status | Use this screen to view the SIP, phone, and call status of the Device. |
| Maintenance | ||
| Users Account | Users Account | Use this screen to configure the passwords your user accounts. |
| Remote MGMT | Remote MGMT | Use this screen to enable specific traffic directions for network services. |
| SNMP | SNMP | Use this screen to configure SNMP settings. |
| System | System | Use this screen to configure the Device's name, domain name, management inactivity time-out. |
| Time | Time Setting | Use this screen to change your Device's time and date. |
| Log Setting | Log Setting | Use this screen to select which logs and/or immediate alerts your device is to record. You can also set it to e-mail the logs to you. |
| Firmware Upgrade | Firmware Upgrade | Use this screen to upload firmware to your device. |
| Backup/Restore | Backup/Restore Use this screen to backup and restore your device's configuration (settings) or reset the factory default settings. | |
| Reboot | Reboot | Use this screen to reboot the Device without turning the power off. |
| Diagnostic | Ping/TraceRoute | Use this screen to test the connections to other devices. |
| Auto Provision | Auto Provision | Use this screen to configure Auto Provision settings for automatically updating the Device settings. |
3.1 Overview
This chapter contains the following tutorials:
- Setting Up Your WAN Connection
- Setting Up NAT Port Forwarding
• How to Make a VoIP Call
• Using the File Sharing Feature
• Using the Media Server Feature
• Using the Print Server Feature - Configuring Static Route for Routing to Another Network
- Configuring QoS Queue and Class Setup
- Access the Device Using DDNS
3.2 Setting Up Your WAN Connection
This tutorial shows you how to set up your Internet connection using the web configurator.
Use the information from your Internet Service Provider (ISP) to configure the Device. Do the following steps:
1 Connect the Device properly. Refer to the Quick Start Guide for details on the Device's hardware connection.
2 Connect one end of a fiber cable to the fiber port for data traffic on your Device.
3 Connect one end of Ethernet cable to an Ethernet port on the Device and the other end to a computer that you will use to access the web configurator.
4 Connect the Device to a power source, turn it on and wait for the POWER LED to become a steady green. Turn on the modem provided by your ISP as well as the computer.
Account Configuration
1 Click Network Setting > Broadband to open the Broadband screen. Click Add new WAN Interface.
2 Enter the settings for your connection as specified by the ISP and save your changes. You should see a summary of your new connection setup in the Broadband screen.
3 Try to connect to a website, such as "www.zyxel.com" to see if you have correctly set up your Internet connection. Be sure to contact your service provider for any information you need to configure the WAN screens.
3.3 Setting Up NAT Port Forwarding
In this tutorial, you manage the Doom server on a computer behind the Device. In order for players on the Internet (like A in the figure below) to communicate with the Doom server, you need to configure the port settings and IP address on the Device. Traffic should be forwarded to the port 666 of the Doom server computer which has an IP address of 192.168.1.34.
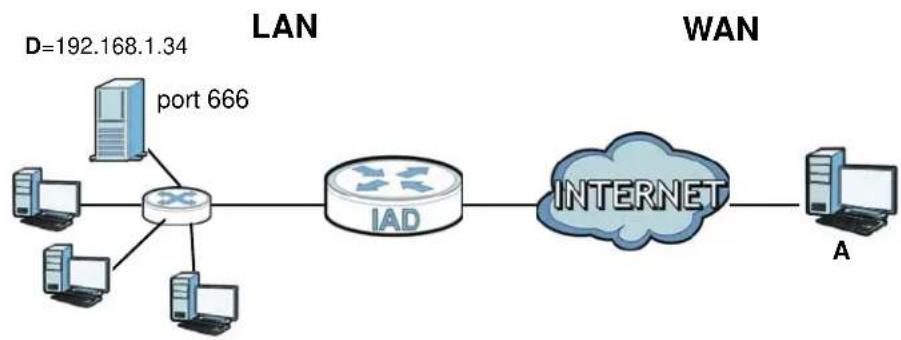
flowchart
graph LR
    A["Port 666"] --> B["LAN"]
    B --> C["IAD"]
    C --> D["INTERNET"]
    D --> E["A"]
    style A fill:#f9f,stroke:#333
    style B fill:#ccf,stroke:#333
    style C fill:#cfc,stroke:#333
    style D fill:#fcc,stroke:#333
    style E fill:#cff,stroke:#333
You may set up the port settings by configuring the port settings for the Doom server computer (see Chapter 10 on page 134 for more information).
1 Click Network Setting > NAT > Port Forwarding. Click Add new rule.
2 Enter the following values:
| Service Name Select User | Defined. |
| WAN Interface | Select the WAN interface through which the Doom service is forwarded. This is the default interface for this example, which is EtherWAN1. |
| Start/End Ports 666 | |
| Translation Start/End Ports | 666 |
| Server IP Address | Enter the IP address of the Doom server. This is 192.168.1.34 for this example. |
| Protocol | Select TCP/UDP. This should be the protocol supported by the Doom server. |
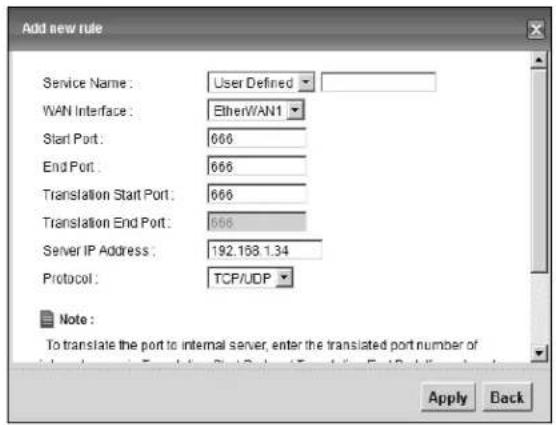
3 Click Apply.
4 The port forwarding settings you configured should appear in the table. Make sure the bulb in Status is the color yellow, meaning it is activated. Click Apply to have the Device start forwarding port 666 traffic to the computer with IP address 192.168.1.34.

Players on the Internet then can have access to your Doom server.
3.4 How to Make a VoIP Call
You can register a SIP account with the SIP server and make voice calls over the Internet to another VoIP device.
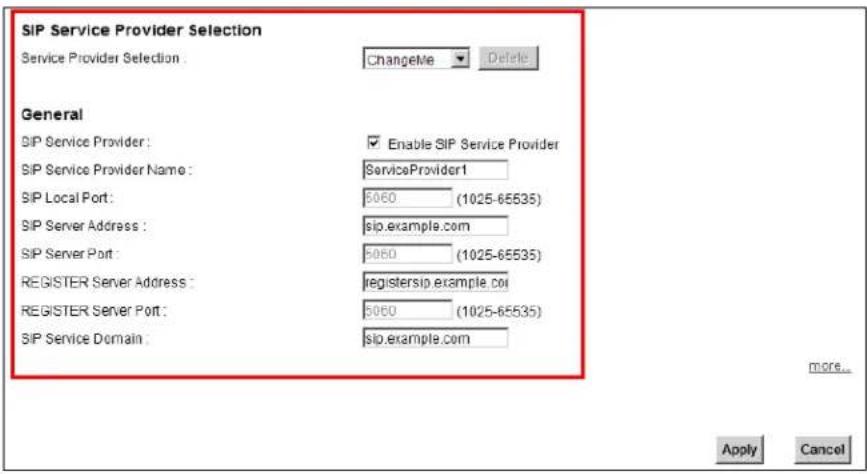
The following parameters are used in this example:
| SIP Service Provider Name Servi | ceProvider1 |
| SIP Server Address sip.example.com | |
| REGISTER Server Address registersip.example.com | |
| SIP Service Domain sip.example.com | |
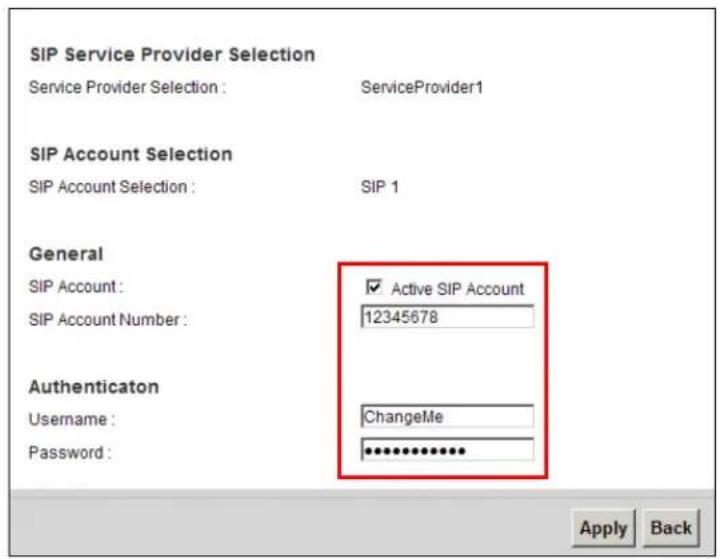
| SIP Account Number 12345678 | |
| Username ChangeMe | |
| Password ThisIsMySIP |
3.4.1 VoIP Calls With a Registered SIP Account
To use a registered SIP account, you should configure the SIP service provider and applied for a SIP account.
3.4.1.1 SIP Service Provider Configuration
Follow the steps below to configure your SIP service provider.
1 Make sure your Device is connected to the Internet.
2 Open the web configurator.
3 Click VolP > SIP to open the SIP Service Provider screen. Select ChangeMe from the Service Provider Selection drop-down list box.
4 Select the Enable check box of SIP Service Provider and enter ServiceProvider1 as the SIP Service Provider Name. Enter the SIP Server Address, REGISTER Server Address, and SIP Service Domain provided by your ISP accordingly. Click Apply.
5 Go to the SIP Account screen, click the Edit icon of SIP 1.

6 Select the Active SIP Account check box, then enter the SIP Account Number, Username, and Password. Leave other settings as default.
7 Click Apply to save your settings.
3.4.1.2 SIP Account Registration
Follow the steps below to register and activate your SIP account.
1 Click Connection Status > System Info to check if your SIP account has been registered successfully. If the status is Not Registered, check your Internet connection and click Register to register your SIP account.

3.4.1.3 Analog Phone Configuration
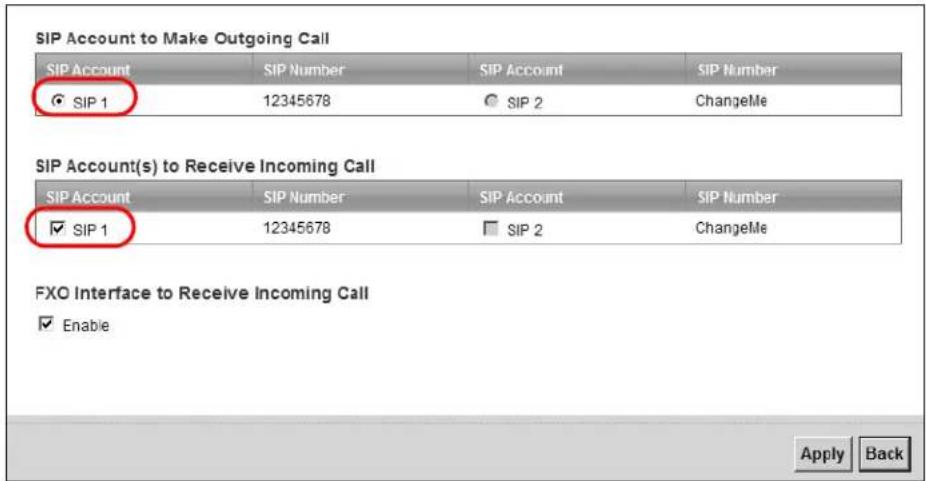
1 Click Vol P > Phone to open the Phone Device screen. Click the Edit icon next to Analog Phone 1 to configure the first phone port.

2 Select SIP 1 from the SIP Account in the SIP Account to Make Outgoing Call section to have the phone (connected to the first phone port) use the registered SIP 1 account to make outgoing calls.
3 Select the SIP 1 check box in the SIP Account(s) to Receive Incoming Call section to have the phone (connected to the first phone port) receive phone calls for the SIP 3 account.
4 Click Apply to save your changes.
1 Make sure you connect a telephone to the first phone port on the Device.
2 Make sure the Device is on and connected to the Internet.
3 Pick up the phone receiver.
4 Dial the VoIP phone number you want to call.
3.5 Using the File Sharing Feature
In this section you can:
- Set up file sharing of your USB device from the Device
- Access the shared files of your USB device from a computer
3.5.1 Set Up File Sharing
To set up file sharing you need to connect your USB device, enable file sharing and set up your share(s).
3.5.1.1 Activate File Sharing
1 Connect your USB device to one of the USB ports at the back panel of the Device.
2 Click Network Setting > Home Networking > File Sharing. Select Enable and click Apply to activate the file sharing function. The Device automatically adds your USB device to the Share Directory List.
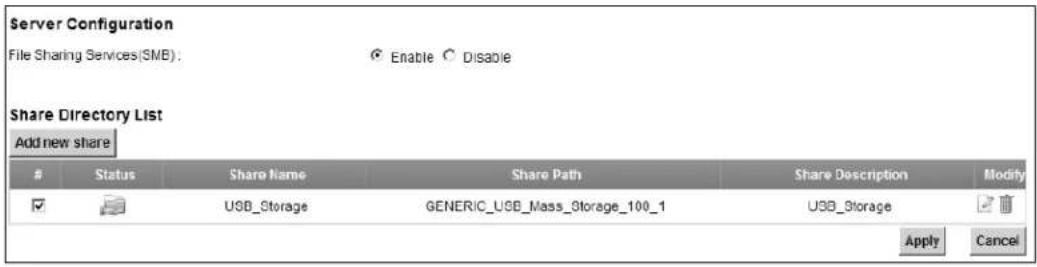
3.5.1.2 Set up File Sharing on Your Device
You also need to set up file sharing on your Device in order to share files.
1 Click Add new share in the File Sharing screen to configure a new share. Select your USB device from the Volume drop-down list box.
2 Click Browse to browse through all the files on your USB device. Select the folder that you want to add as a share. In this example, select Bob's_Share. Click Apply.
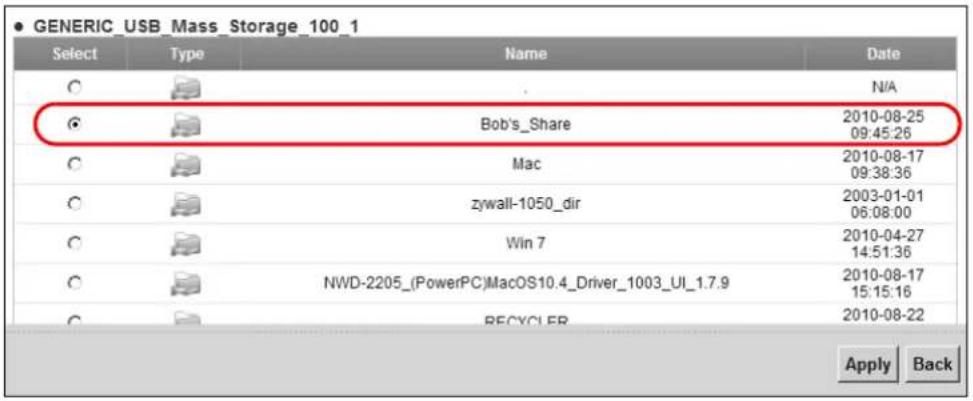
3 You can add a description for the share or leave it blank. The Add Share Directory screen should look like the following.Click Apply to finish.
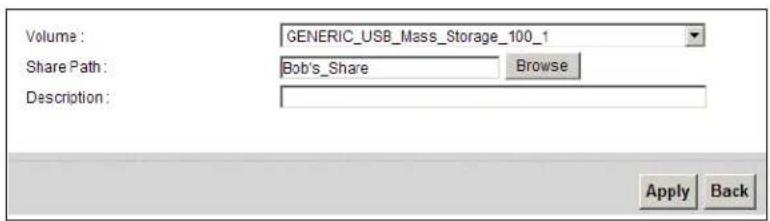
4 This sets up the file sharing server. You can see the USB storage device listed in the table below.

3.5.2 Access Your Shared Files From a Computer
You can use Windows Explorer to access the file storage devices connected to the Device.
Note: The examples in this User's Guide show you how to use Microsoft's Windows XP to browse your shared files. Refer to your operating system's documentation for how to browse your file structure.
Open Windows Explorer to access Bob's Share using Windows Explorer browser.
In Windows Explorer's Address bar type a double backslash "\" followed by the IP address of the Device (the default IP address of the Device is 192.168.1.1) and press [ENTER]. The share folder Bob's_Share is available.
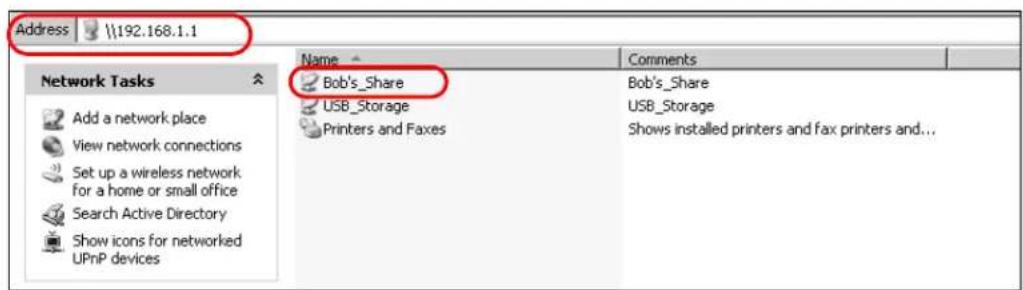
Once you access Bob's_Share via your Device, you do not have to relogin unless you restart your computer.
3.6 Using the Media Server Feature
Use the media server feature to play files on a computer or on your television (using DMA-2500).
This section shows you how the media server feature works using the following media clients:
• Microsoft (MS) Windows Media Player
Media Server works with Windows Vista and Windows 7. Make sure your computer is able to play media files (music, videos and pictures).
• ZyXEL DMA-2500, a digital media adapter
You need to set up the DMA-2500 to work with your television (TV). Refer to the DMA-2500 Quick Start Guide for the correct hardware connections.
Before you begin, connect the USB storage device containing the media files you want to play to the USB port of your Device.
3.6.1 Configuring the Device
Note: The Media Server feature is enabled by default.
To use your Device as a media server, click Network Setting > Home Networking > Media Server.
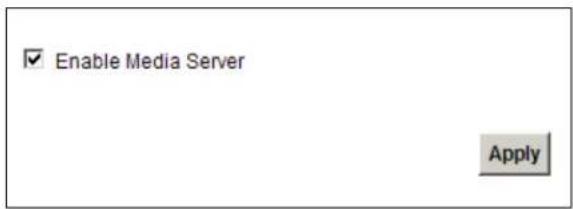
Check Enable Media Server and click Apply. This enables DLNA-compliant media clients to play the video, music and image files in your USB storage device.
3.6.2 Using Windows Media Player
This section shows you how to play the media files on the USB storage device connected to your Device using Windows Media Player.
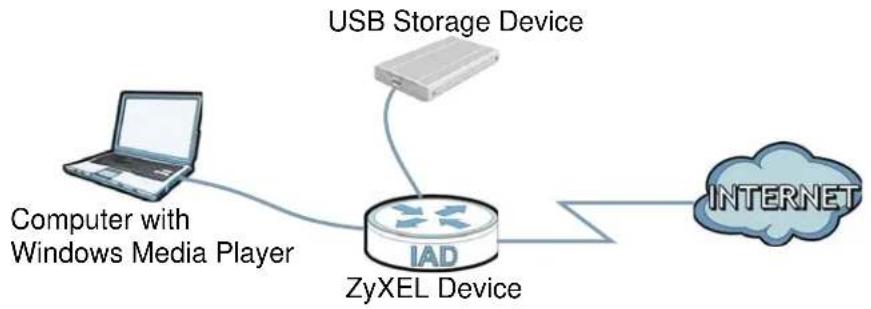
flowchart
graph TD
    A["Computer with Windows Media Player"] --> B["ZyXEL Device"]
    B --> C["USB Storage Device"]
    B --> D["INTERNET"]
Windows Vista
1 Open Windows Media Player and click Library > Media Sharing as follows.
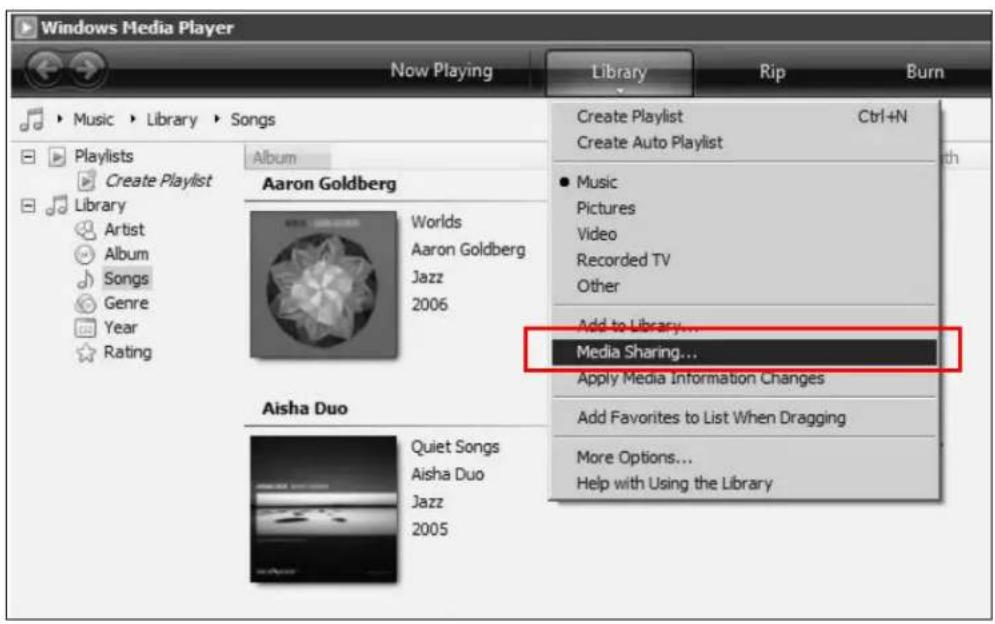
2 Check Find media that others are sharing in the following screen and click OK.
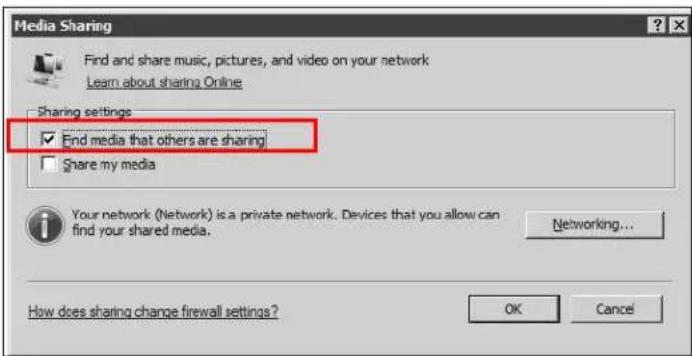
3 In the Library screen, check the left panel. The Windows Media Player should detect the Device.
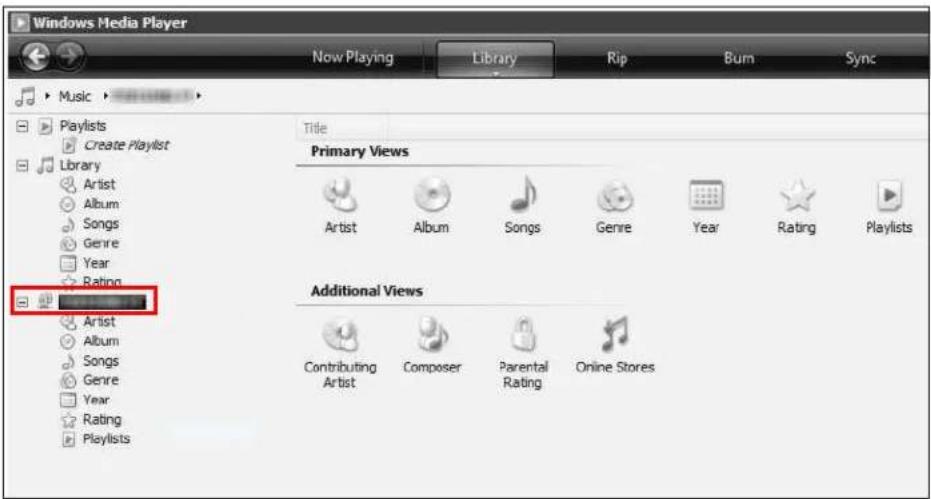
The Device displays as a playlist. Clicking on the category icons in the right panel shows you the media files in the USB storage device attached to your Device.
Windows 7
1 Open Windows Media Player. It should automatically detect the Device.
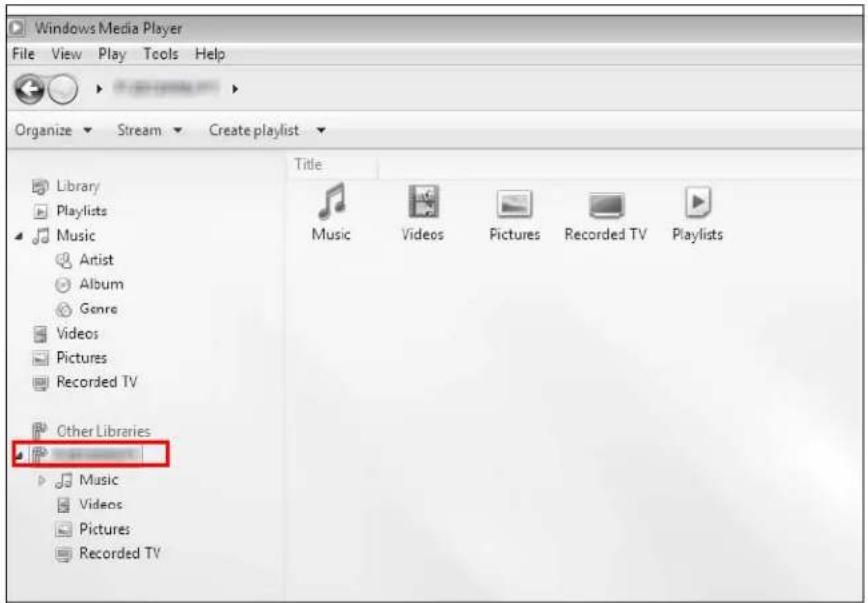
If you cannot see the Device in the left panel as shown above, right-click Other Libraries > Refresh Other Libraries.
2 Select a category in the left panel and wait for Windows Media Player to connect to the Device.
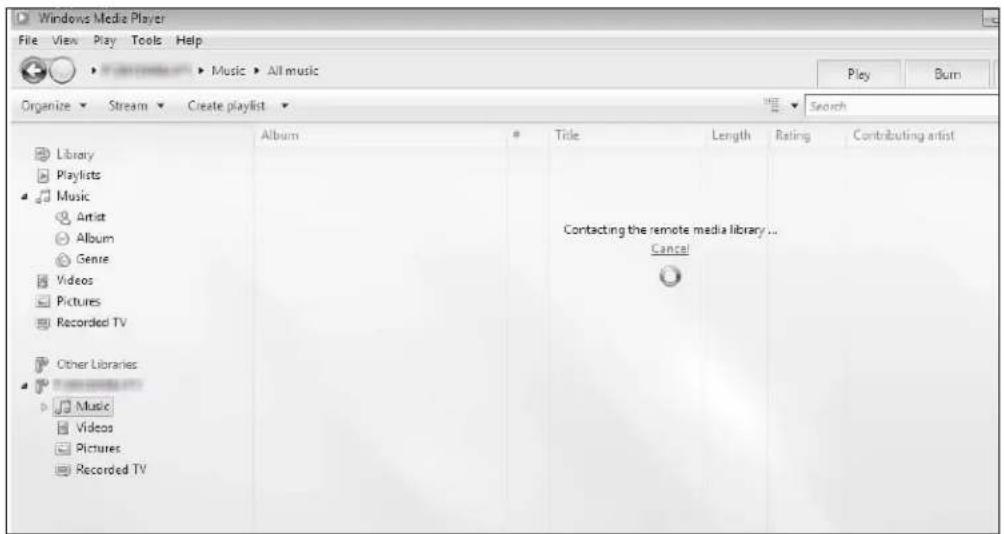
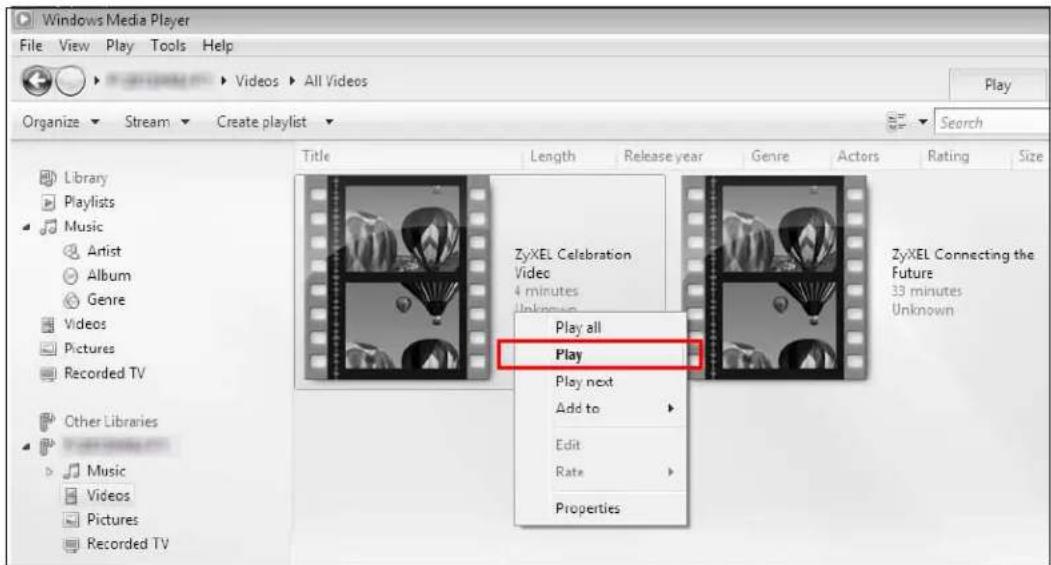
3 In the right panel, you should see a list of files available in the USB storage device.
3.6.3 Using a Digital Media Adapter
This section shows you how you can use the Device with a ZyXEL DMA-2500 to play media files stored in the USB storage device in your TV screen.
Note: For this tutorial, your DMA-2500 should already be set up with the TV according to the instructions in the DMA-2500 Quick Start Guide.
1 Connect the DMA-2500 to an available LAN port in your Device.
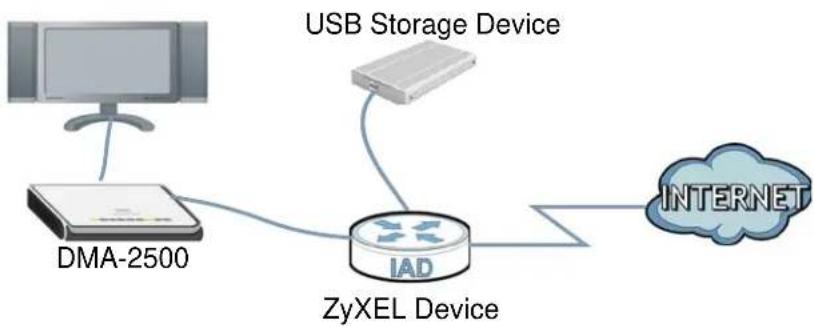
flowchart
graph TD
    A["Computer"] --> B["DMA-2500"]
    B --> C["ZyXEL Device"]
    C --> D["USB Storage Device"]
    C --> E["INTERNET"]
2 Turn on the TV and wait for the DMA-2500 Home screen to appear. Using the remote control, go to MyMedia to open the following screen. Select the Device as your media server.
![[01] F28 349618.47 [02] TWPC 13262-01 [1 / 2]](/content/2026/05/861498/images/94acb0507acb0ca47a95c3cde6814bdc692b7d473d45f155afac1a66f5f5fd28.jpg)
3 The screen shows you the list of available media files in the USB storage device. Select the file you want to open and push the Play button in the remote control.
![[1] Videos [2] ZyXEL Celebration Video [3] ZyXEL Connecting the Future [1 / 3]](/content/2026/05/861498/images/fcb9f430bd91efc546e68bcd269d641ddd12d72561a812f7a041c1feb44c3ce3.jpg)
3.7 Using the Print Server Feature
In this section you can:
- Configure a TCP/IP Printer Port
- Add a New Printer Using Windows
- Add a New Printer Using Macintosh OS X
Configure a TCP/IP Printer Port
This example shows how you can configure a TCP/IP printer port. This example is done using the Windows 2000 Professional operating system. Some menu items may look different on your operating system. The TCP/IP port must be configured with the IP address of the Device and must
use the RAW protocol to communicate with the printer. Consult your operating systems documentation for instructions on how to do this or follow the instructions below if you have a Windows 2000/XP operating system.
1 Click Start > Settings, then right click on Printers and select Open.
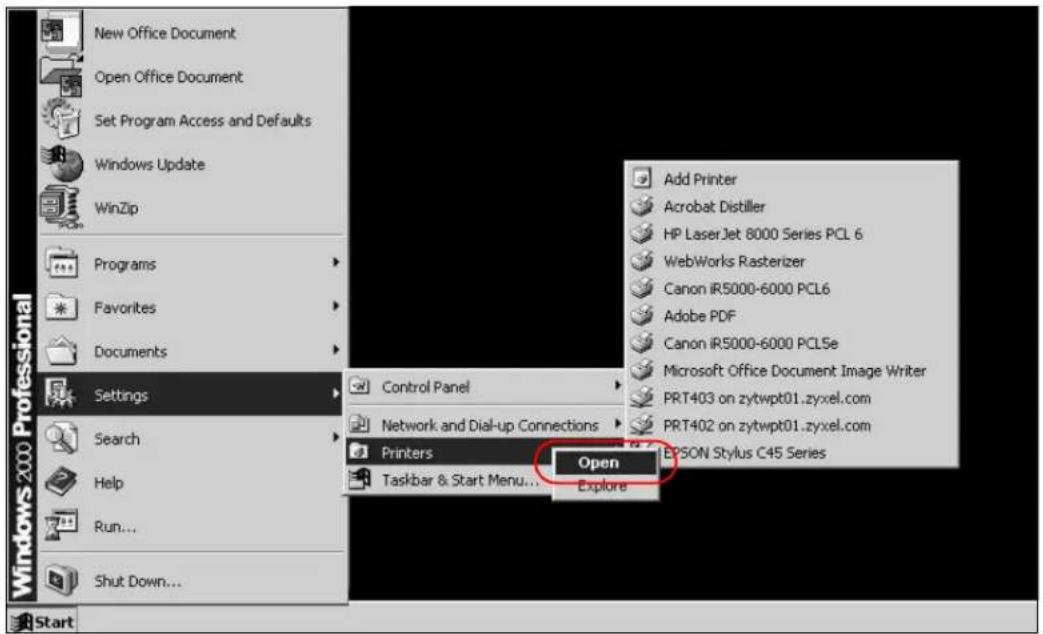
The Printers folder opens up. First you need to open up the properties windows for the printer you want to configure a TCP/IP port.
2 Locate your printer.
3 Right click on your printer and select Properties.
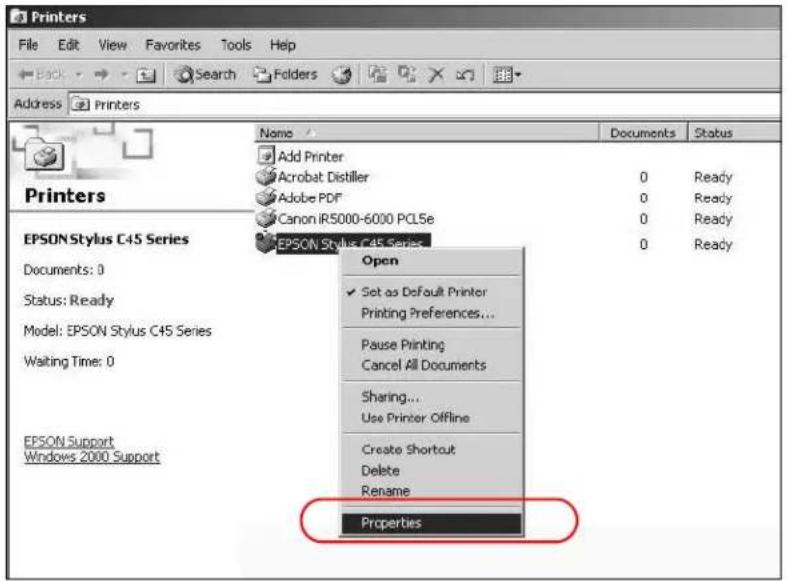
4 Select the Ports tab and click Add Port...
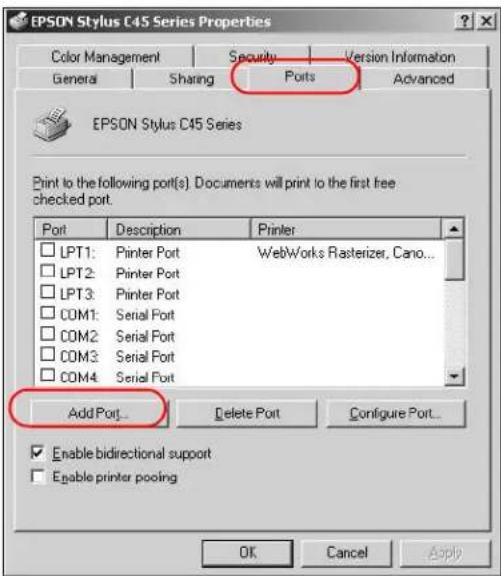
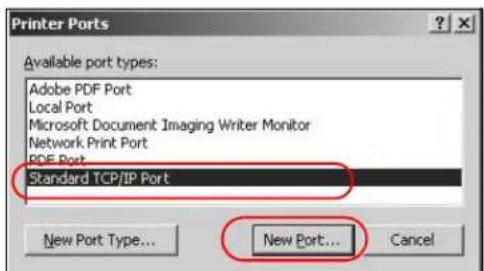
5 A Printer Ports window appears. Select Standard TCP/IP Port and click New Port...
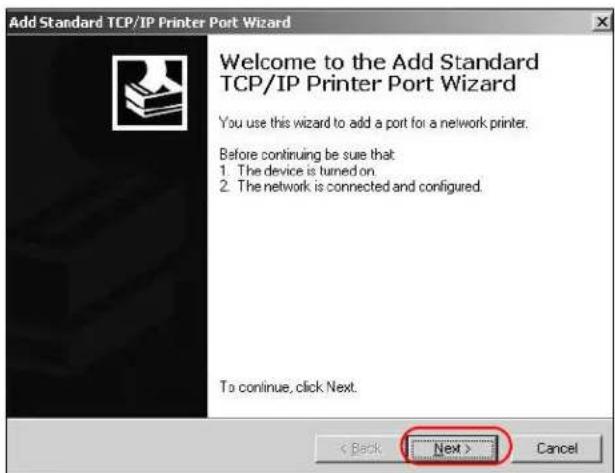
6 Add Standard TCP/IP Printer Port Wizard window opens up. Click Next to start configuring the printer port.
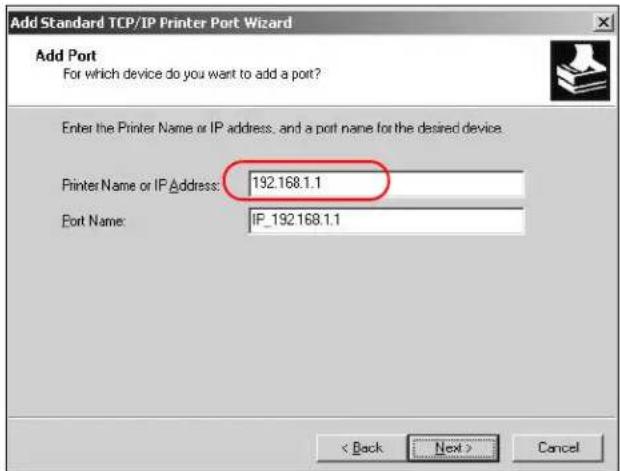
7 Enter the IP address of the Device to which the printer is connected in the Printer Name or IP Address: field. In our example we use the default IP address of the Device, 192.168.1.1. The Port Name field updates automatically to reflect the IP address of the port. Click Next.
Note: The computer from which you are configuring the TCP/IP printer port must be on the same LAN in order to use the printer sharing function.
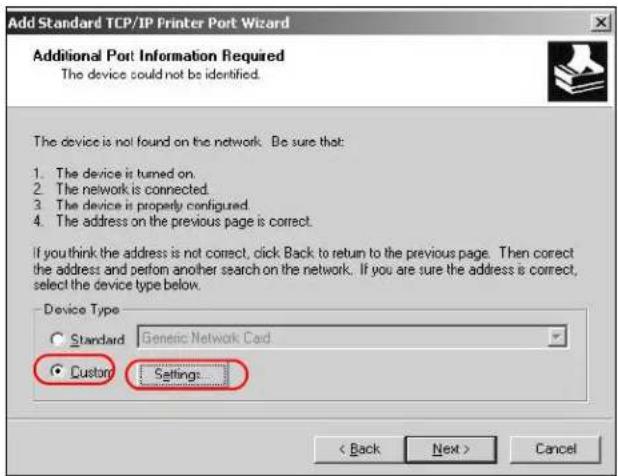
8 Select Custom under Device Type and click Settings.
9 Confirm the IP address of the Device in the IP Address field.
10 Select Raw under Protocol.
11 The Port Number is automatically configured as 9100. Click OK.
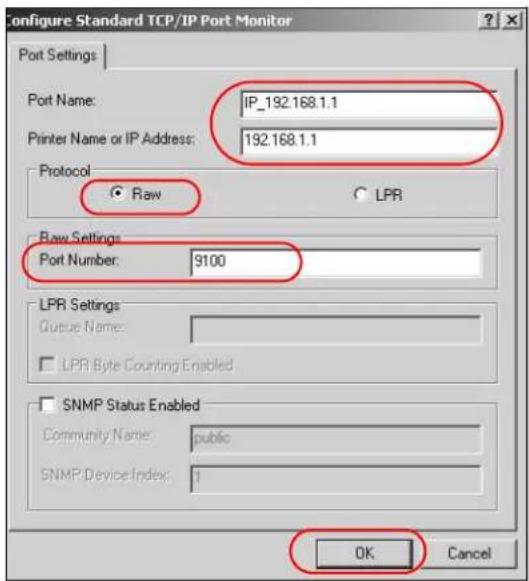
12 Continue through the wizard, apply your settings and close the wizard window.
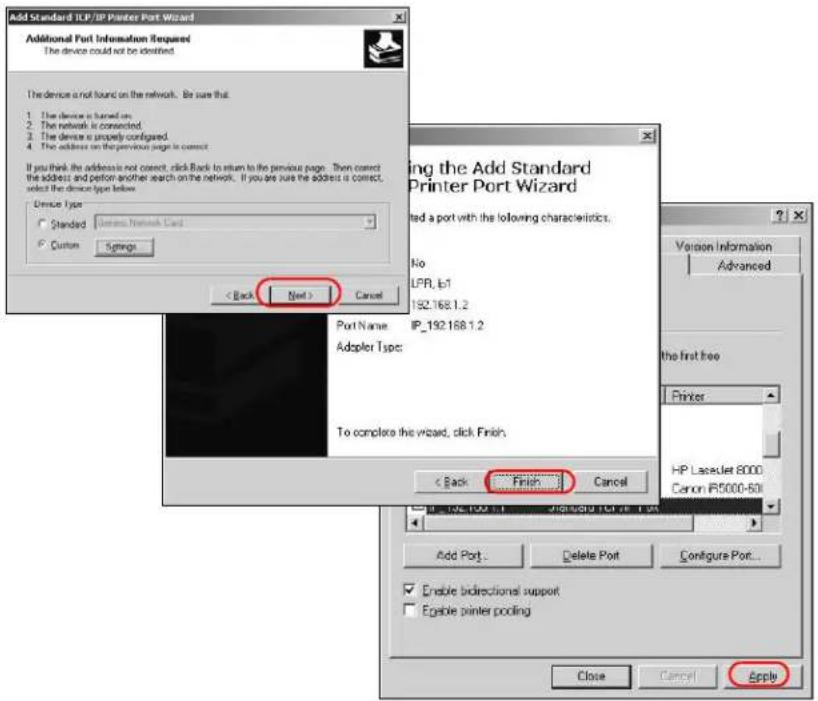
13 Repeat steps 1 to 12 to add this printer to other computers on your network.
Add a New Printer Using Windows
This example shows how to connect a printer to your Device using the Windows XP Professional operating system. Some menu items may look different on your operating system.
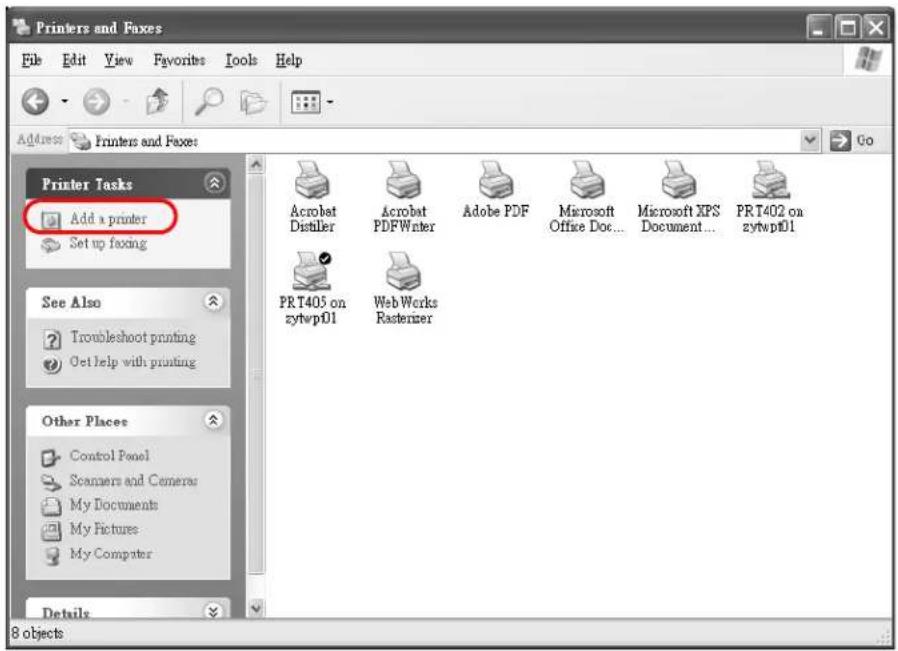
1 Click Start > Control Panel > Printers and Faxes to open the Printers and Faxes screen. Click Add a Printer.
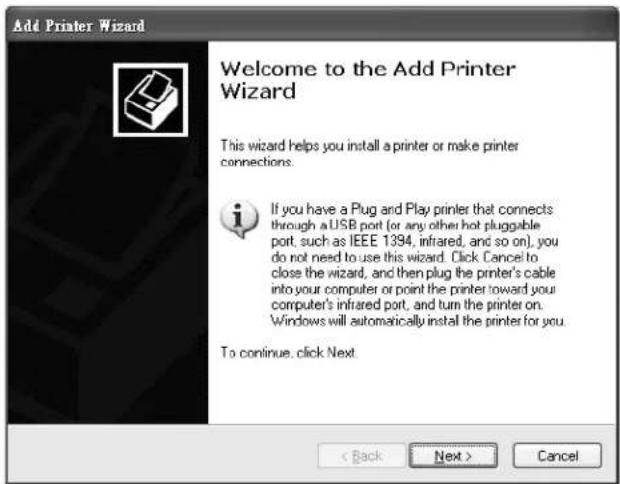
2 The Add Printer Wizard screen displays. Click Next.
3 Select Local printer attached to this computer and click Next.
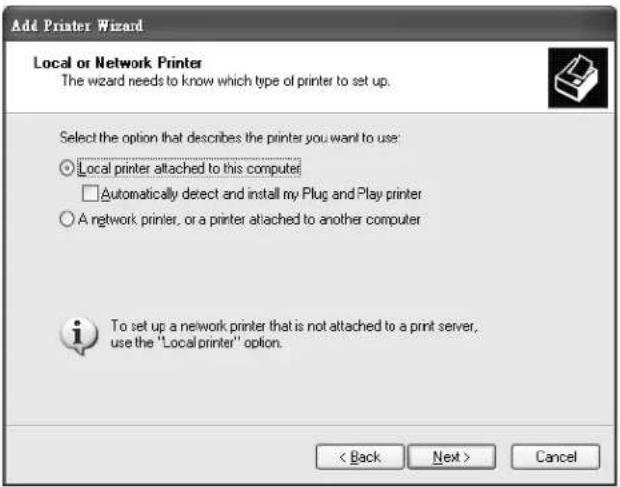
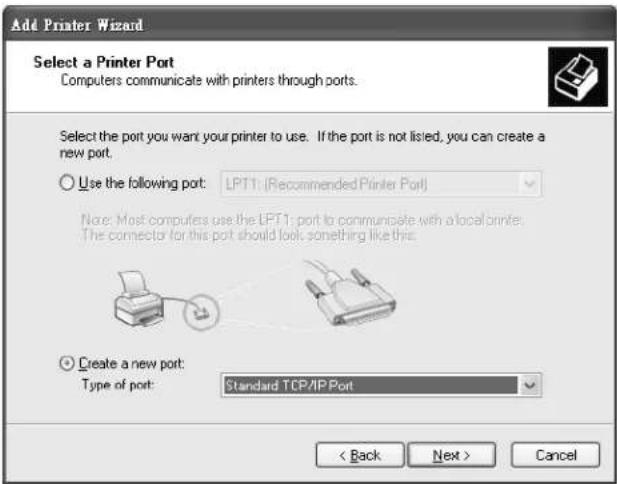
4 Select Create a new port and Standard TCP/IP Port. Click Next.
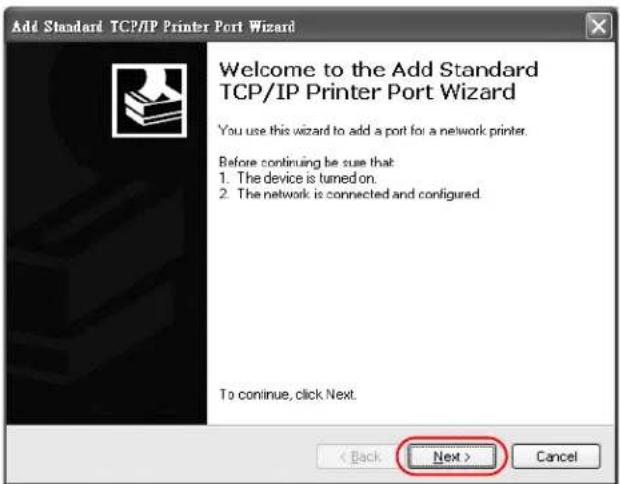
5 Add Standard TCP/IP Printer Port Wizard window opens up. Click Next to start configuring the printer port.
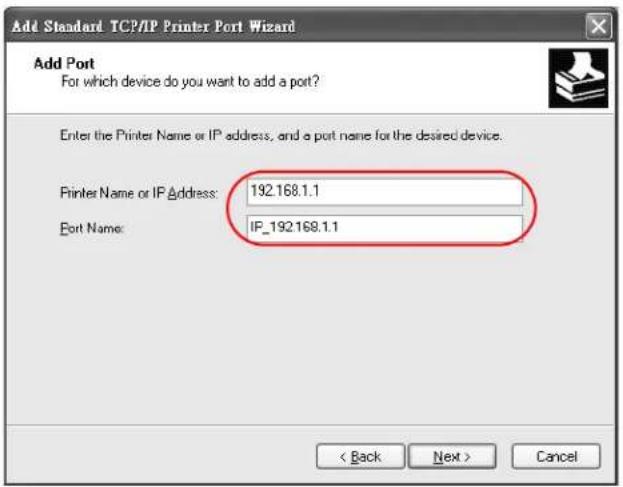
6 Enter the IP address of the Device to which the printer is connected in the Printer Name or IP Address: field. In our example we use the default IP address of the Device, 192.168.1.1. The Port Name field updates automatically to reflect the IP address of the port. Click Next.
Note: The computer from which you are configuring the TCP/IP printer port must be on the same LAN in order to use the printer sharing function.
7 Select Custom under Device Type and click Settings.
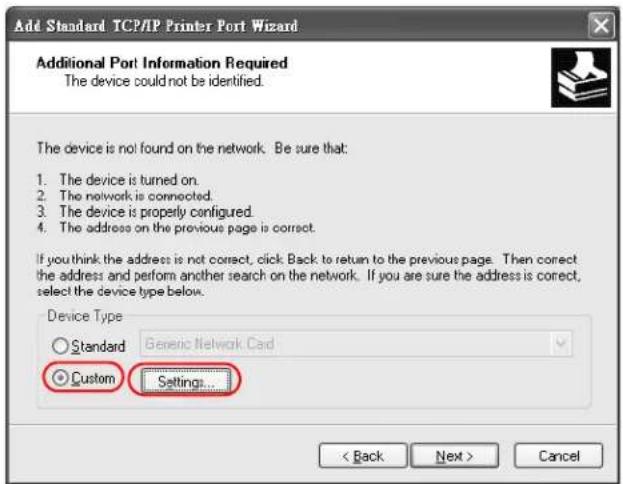
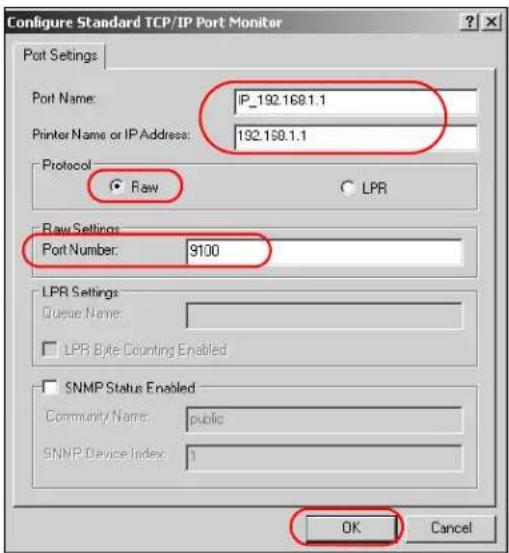
8 Confirm the IP address of the Device in the Printer Name or IP Address field.
9 Select Raw under Protocol.
10 The Port Number is automatically configured as 9100. Click OK to go back to the previous screen and click Next.
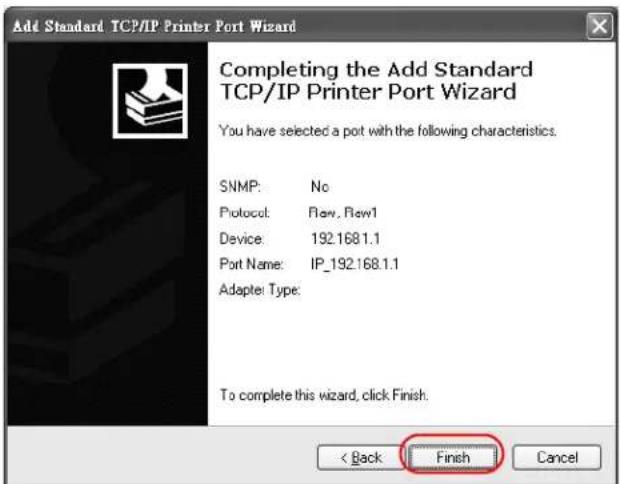
11 Click Finish to close the wizard window.
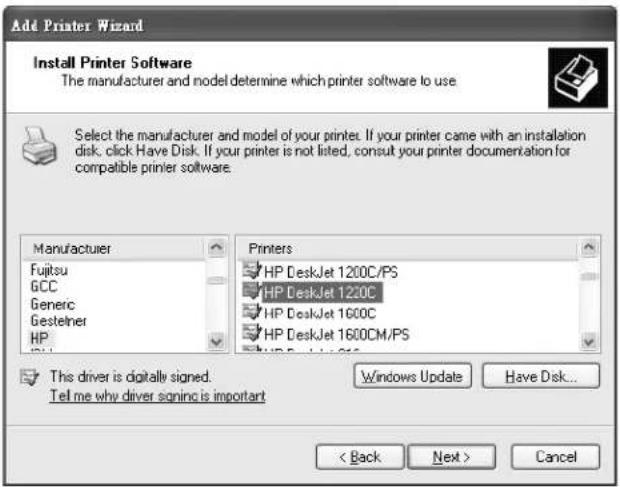
12 Select the make of the printer that you want to connect to the print server in the Manufacturer list of printers.
13 Select the printer model from the list of Printers.
14 If your printer is not displayed in the list of Printers, you can insert the printer driver installation CD/disk or download the driver file to your computer, click Have Disk... and install the new printer driver.
15 Click Next to continue.
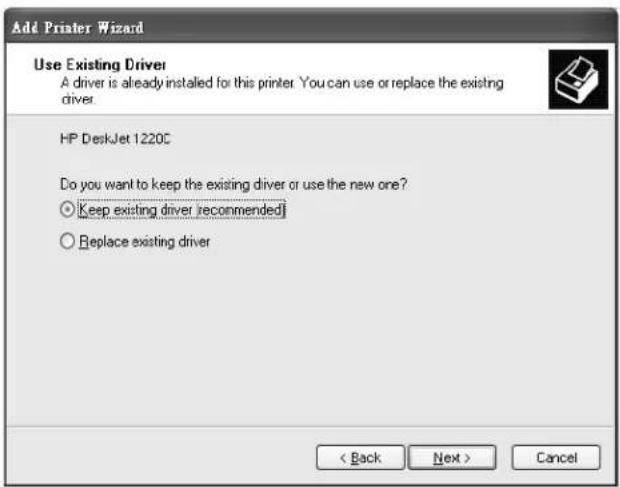
16 If the following screen displays, select Keep existing driver radio button and click Next if you already have a printer driver installed on your computer and you do not want to change it. Otherwise, select Replace existing driver to replace it with the new driver you selected in the previous screen and click Next.
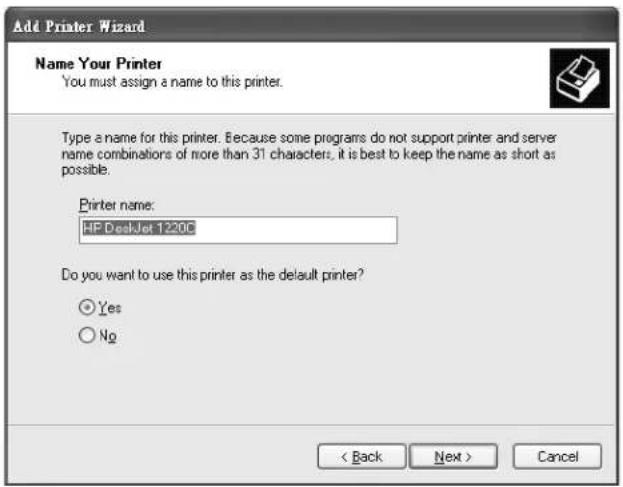
17 Type a name to identify the printer and then click Next to continue.
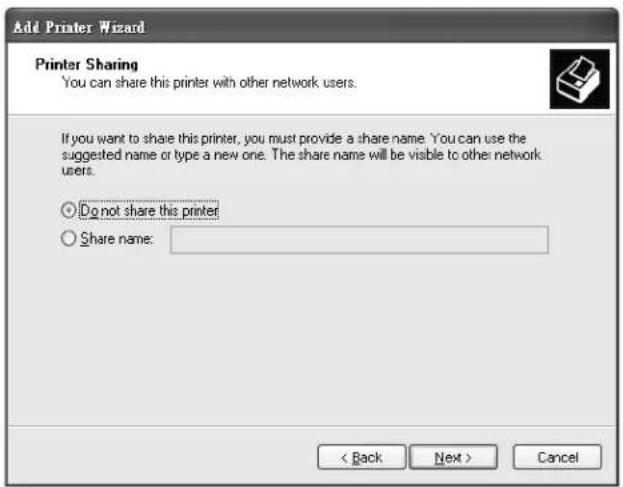
18 The Device is a print server itself and you do not need to have your computer act as a print server by sharing the printer with other users in the same network; just select Do not share this printer and click Next to proceed to the following screen.
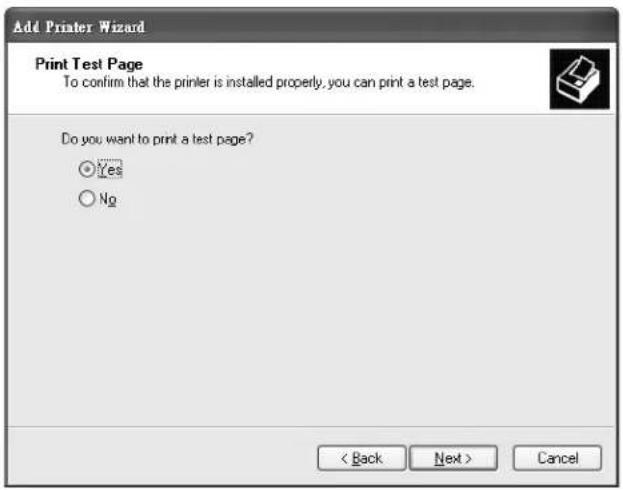
19 Select Yes and then click the Next button if you want to print a test page. A pop-up screen displays to ask if the test page printed correctly. Otherwise select No and then click Next to continue.
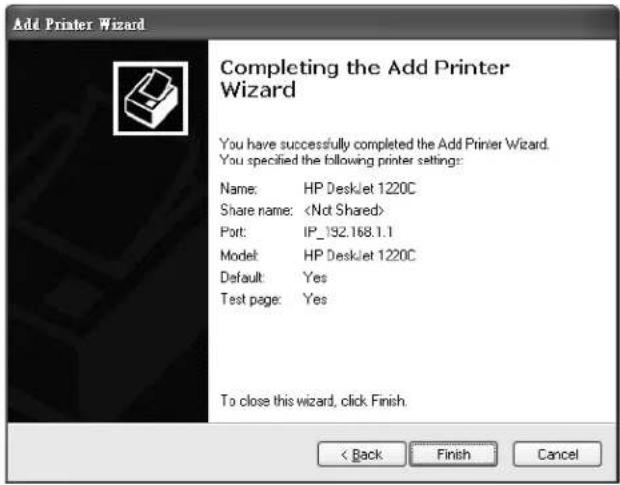
20 The following screen shows your current printer settings. Select Finish to complete adding a new printer.
Add a New Printer Using Macintosh OS X
Complete the following steps to set up a print server driver on your Macintosh computer.
1 Click the Print Center icon [icon] located in the Macintosh Dock (a place holding a series of icons/shortcuts at the bottom of the desktop). Proceed to step 6 to continue. If the Print Center icon is not in the Macintosh Dock, proceed to the next step.
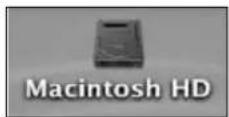
2 On your desktop, double-click the Macintosh HD icon to open the Macintosh HD window.
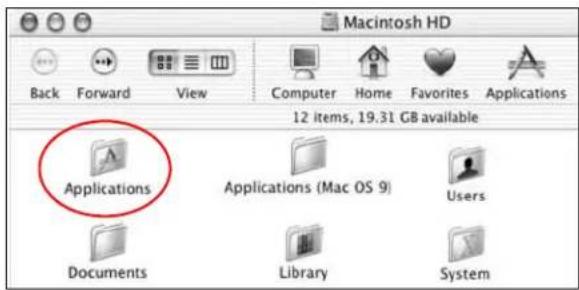
3 Double-click the Applications folder.
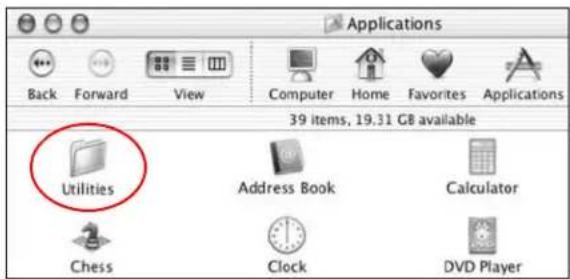
4 Double-click the Utilities folder.
5 Double-click the Print Center icon.
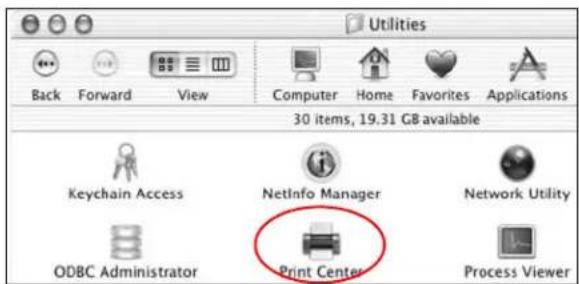
6 Click the Add icon at the top of the screen.
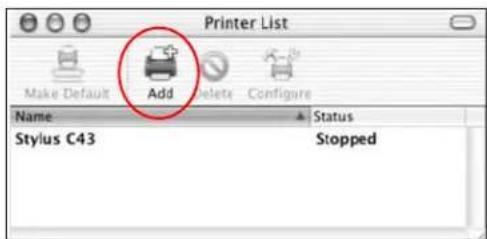
7 Set up your printer in the Printer List configuration screen. Select IP Printing from the dropdown list box.
8 In the Printer's Address field, type the IP address of your Device.
9 Deselect the Use default queue on server check box.
10 Type LP1 in the Queue Name field.
11 Select your Printer Model from the drop-down list box. If the printer's model is not listed, select Generic.
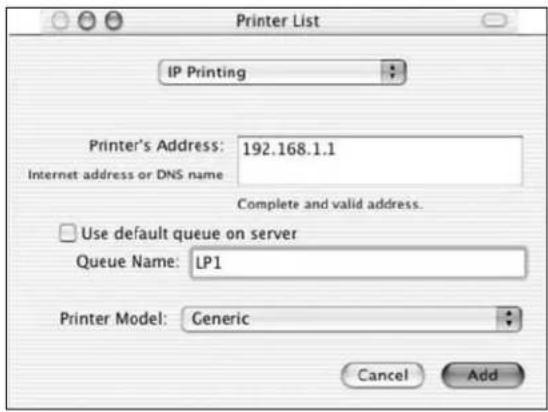
12 Click Add to select a printer model, save and close the Printer List configuration screen.
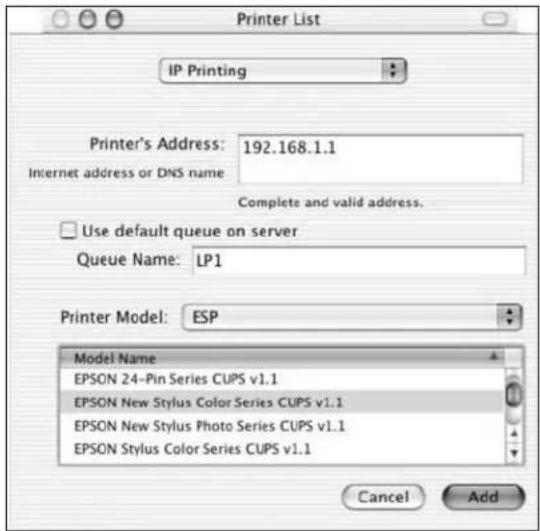
13 The Name LP1 on 192.168.1.1 displays in the Printer List field. The default printer Name displays in bold type.
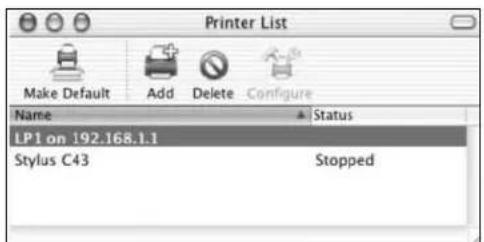
Your Macintosh print server driver setup is complete. You can now use the Device's print server to print from a Macintosh computer.
3.8 Configuring Static Route for Routing to Another Network
In order to extend your Intranet and control traffic flowing directions, you may connect a router to the Device's LAN. The router may be used to separate two department networks. This tutorial shows how to configure a static routing rule for two network routings.
In the following figure, router R is connected to the Device's LAN. R connects to two networks, N1 (192.168.1.x/24) and N2 (192.168.10.x/24). If you want to send traffic from computer A (in N1 network) to computer B (in N2 network), the traffic is sent to the Device's WAN default gateway by default. In this case, B will never receive the traffic.
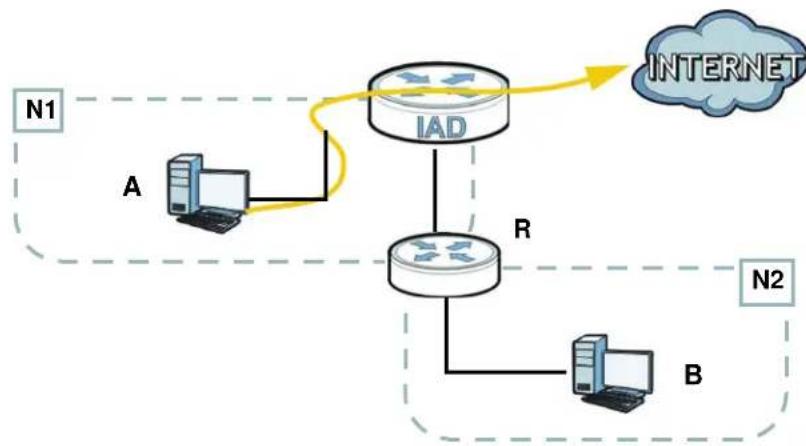
flowchart
graph TD
    N1["Internet"] -->|A| A["Router A"]
    A -->|R| R["Router R"]
    R --> B["Router B"]
    IAD["IAD"] -->|IAD| IAD
You need to specify a static routing rule on the Device to specify R as the router in charge of forwarding traffic to N2. In this case, the Device routes traffic from A to R and then R routes the traffic to B. This tutorial uses the following example IP settings:
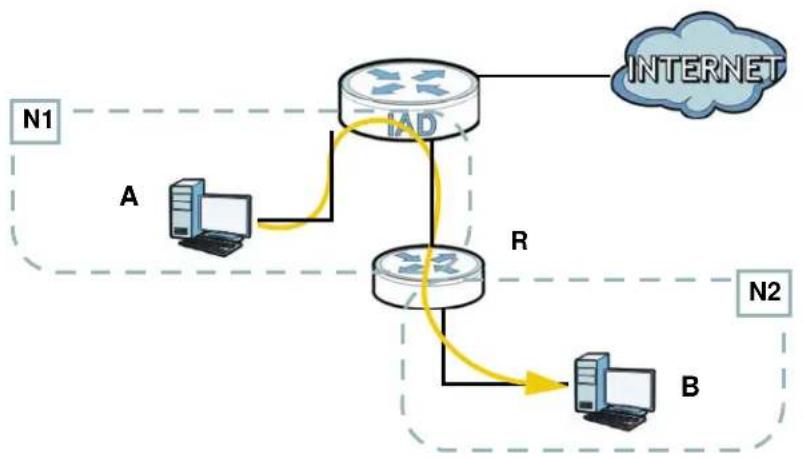
flowchart
graph TD
    N1["Router N1"] -->|A| R["Router R"]
    R -->|B| B["Computer B"]
    R -->|R| R
    R -->|INTERNET| Internet["Internet"]
    style R fill:#f9f,stroke:#333
    style B fill:#ccf,stroke:#333
Table 2 IP Settings in this Tutorial
| DEVICE / COMPUTER IP ADDRESS | |
| The Device's WAN 172.16.1.1 | |
| The Device's LAN 192.168.1.1 | |
| A 192.168.1.34 | |
| R's N1 192.168.1.253 | |
| R's N2 192.168.10.2 | |
| B 192.168.10.33 |
To configure a static route to route traffic from N1 to N2:
1 Click Network Setting > Routing. Click Add New Static Route.

2 Configure the Static Route Setup screen using the following settings:
- Select Active.
- Specify a descriptive name for this routing rule.
- Type 192.168.10.0 and subnet mask 255.255.255.0 for the destination, N2.
- Type 192.168.1.253 (R's N1 address) in the Gateway IP Address field.
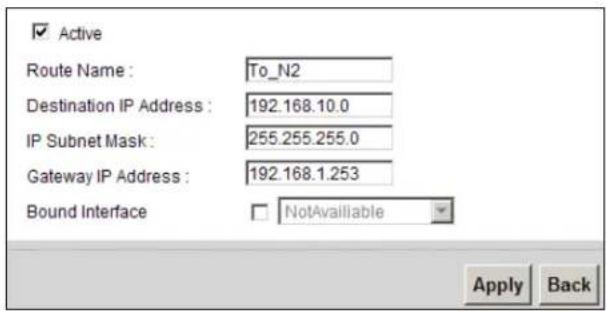
Click Apply. The Routing screen should display the route you just added.

Now B should be able to receive traffic from A. You may need to additionally configure B's firewall settings to allow specific traffic to pass through.
3.9 Configuring QoS Queue and Class Setup
This section contains tutorials on how you can configure the QoS screen.
Note: Voice traffic will not be affected by the user-defined QoS settings on the Device. It always gets the highest priority.
Let's say you are a team leader of a small sales branch office. You want to prioritize e-mail traffic because your task includes sending urgent updates to clients at least twice every hour. You also upload data files (such as logs and e-mail archives) to the FTP server throughout the day. Your colleagues use the Internet for research, as well as chat applications for communicating with other branch offices.
In the following figure, your Internet connection has an upstream transmission bandwidth of 10,000 kbps. For this example, you want to configure QoS so that e-mail traffic gets the highest priority with at least 5,000 kbps. You can do the following:
- Configure a queue to assign the highest priority queue (7) to e-mail traffic from the LAN interface, so that e-mail traffic would not get delayed when there is network congestion.
- Note the IP address (192.168.1.23 for example) and/or MAC address (AA:FF:AA:FF:AA:FF for example) of your computer and map it to queue 7.
Note: QoS is applied to traffic flowing out of the Device.
Traffic that does not match this class is assigned a priority queue based on the internal QoS mapping table on the Device.
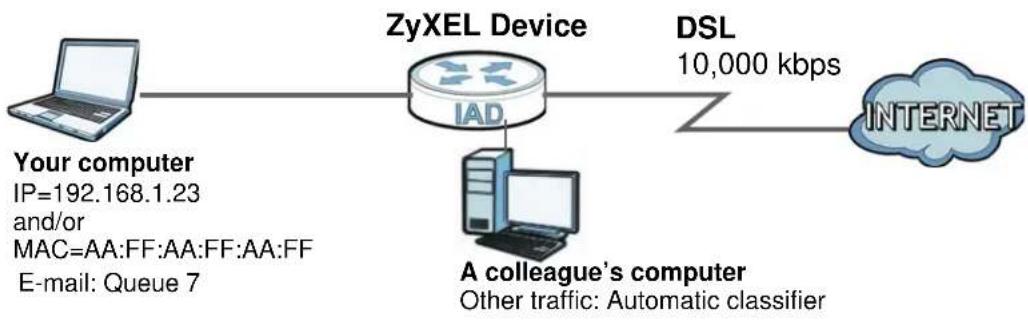
flowchart
graph LR
    A["Your computer\nIP=192.168.1.23\nand/or\nMAC=AA:FF:AA:FF:AA:FF\nE-mail: Queue 7"] --> B["ZyXEL Device\nIAD"]
    B --> C["DSL\n10,000 kbps"]
    C --> D["INTERNET"]
    B --> E["A colleague's computer\nOther traffic: Automatic classifier"]
1 Click Network Setting > QoS > General and check Active. Set your WAN Managed Upstream Bandwidth to 10,000 kbps (or leave this blank to have the Device automatically determine this figure). Click Apply to save your settings.
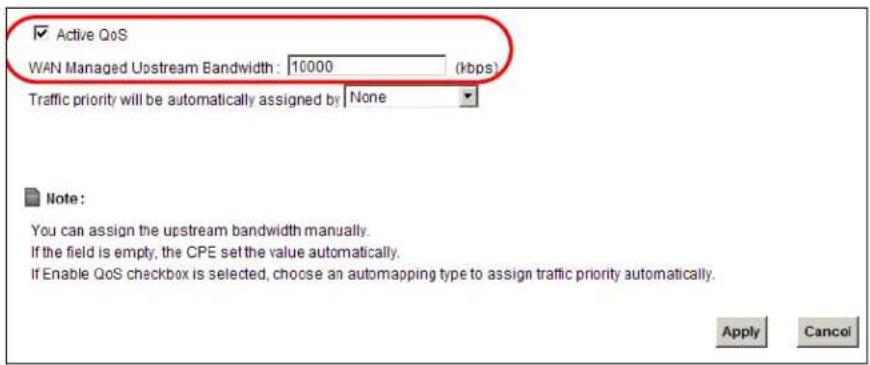
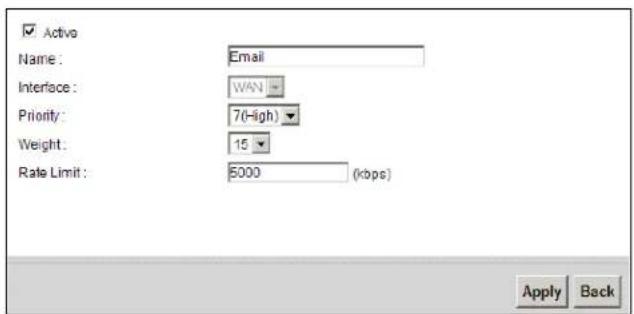
2 Go to Network Setting > QoS > Queue Setup. Click Add new Queue to create a new queue. In the screen that opens, check Active and enter or select the following values, then click Apply.
- Name: Email
• Priority: 7 (High) - Weight: 15
• Rate Limit: 5,000 (kbps)
3 Go to Network Setting > QoS > Class Setup. Click Add new Classifier to create a new class. Check Active and follow the settings as shown in the screen below. Then click Apply.
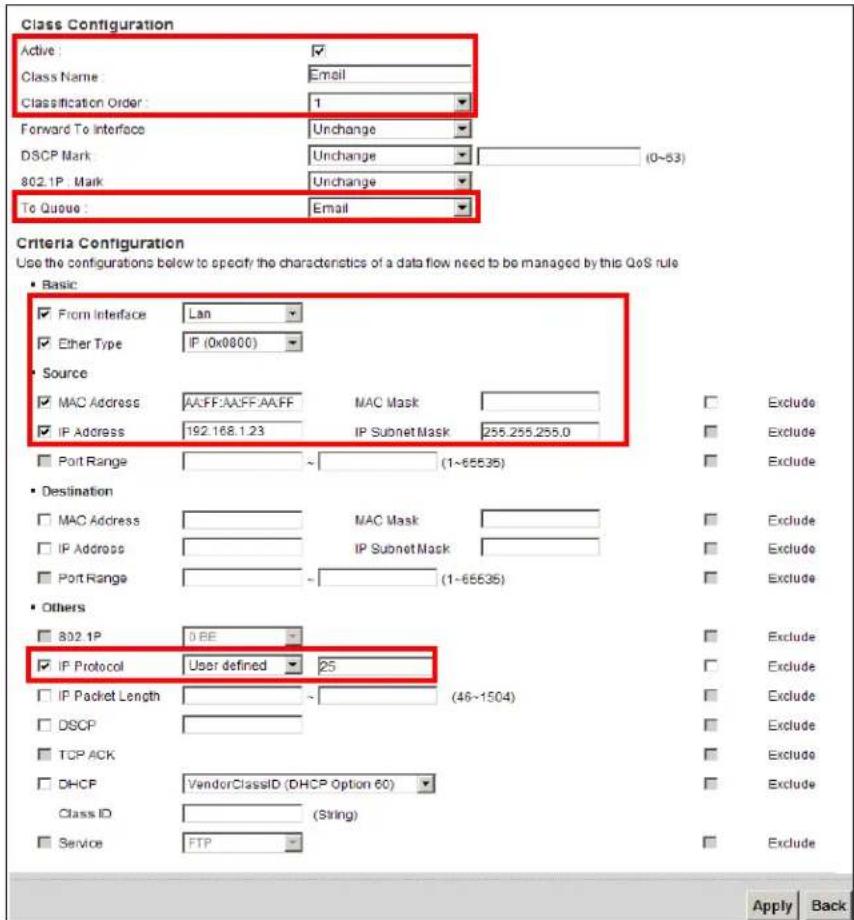
| Class Name | Give a class name to this traffic, such as Email in this example. |
| To Queue | Link this to a queue created in the QoS > Queue Setup screen, which is the Email queue created in this example. |
| From Interface This is | the interface from which the traffic will be coming from. Select Lan. |
| Ether Type | Select IP to identify the traffic source by its IP address or MAC address. |
| MAC Address Type the | MAC address of your computer - AA:FF:AA:FF:AA:FF. Type the MAC Mask if you know it. |
| IP Address | Type the IP address of your computer - 192.168.1.23. Type the IP Subnet Mask if you know it. |
| IP Protocol | Select User defined and enter 25 as the IP Protocol. |
This maps e-mail traffic to queue 7 created in the previous screen (see the IP Protocol field). This also maps your computer's IP address and MAC address to queue 7 (see the Source fields).
4 Verify that the queue setup works by checking Network Setting > QoS > Monitor. This shows the bandwidth allotted to e-mail traffic compared to other network traffic.
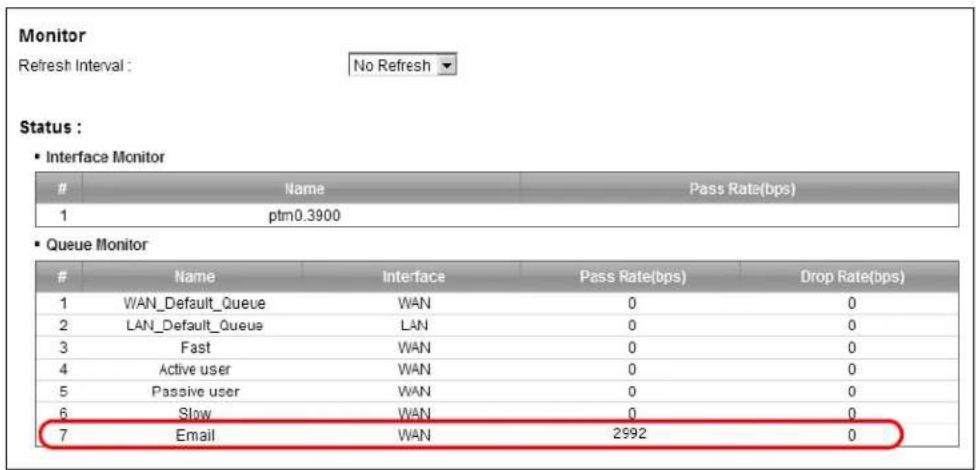
3.10 Access the Device Using DDNS
If you connect your Device to the Internet and it uses a dynamic WAN IP address, it is inconvenient for you to manage the device from the Internet. The Device's WAN IP address changes dynamically. Dynamic DNS (DDNS) allows you to access the Device using a domain name.
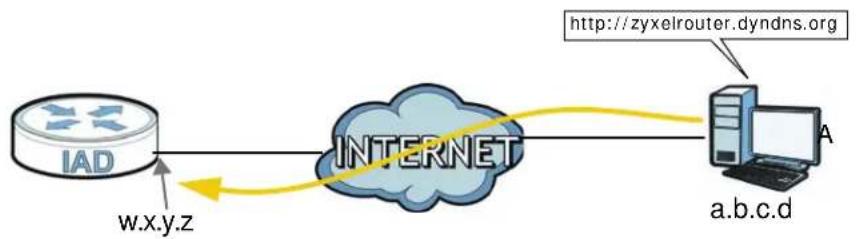
flowchart
graph LR
    A["IAD"] -->|w.x.y.z| B["INTERNET"]
    B --> C["a.b.c.d"]
    C -->|http://zyxelrouter.dyndns.org| D["Computer"]
To use this feature, you have to apply for DDNS service at www.dyndns.org.
This tutorial shows you how to:
- Registering a DDNS Account on www.dyndns.org
- Configuring DDNS on Your Device
- Testing the DDNS Setting
Note: If you have a private WAN IP address, then you cannot use DDNS.
3.10.1 Registering a DDNS Account on www.dyndns.org
1 Open a browser and type http://www.dyndns.org.
2 Apply for a user account. This tutorial uses UserName1 and 12345 as the username and password.
3 Log into www.dyndns.org using your account.
4 Add a new DDNS host name. This tutorial uses the following settings as an example.
- Host name: zyxelrouter.dyndns.org
- Service Type: Host with IP address
- IP Address: Enter the WAN IP address that your Device is currently using. You can find the IP address on the Device's web configurator Status page.
Then you will need to configure the same account and host name on the Device later.
3.10.2 Configuring DDNS on Your Device
Configure the following settings in the Network Setting > Dynamic DNS screen.
- Select Active Dynamic DNS.
- Select Dynamic DNS for the DDNS type.
- Type zyxelrouter.dyndns.org in the Host Name field.
- Enter the user name (UserName1) and password (12345).
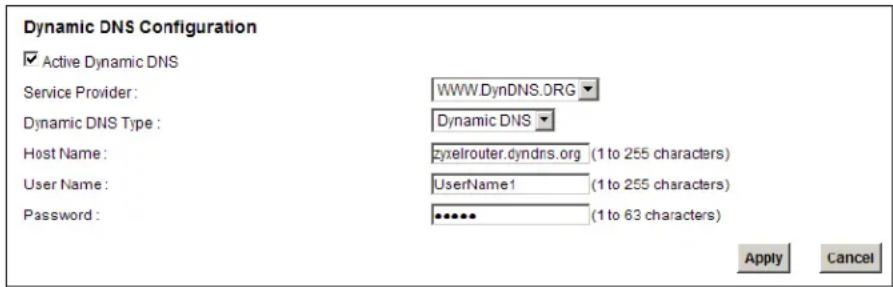
Click Apply.
3.10.3 Testing the DDNS Setting
Now you should be able to access the Device from the Internet. To test this:
1 Open a web browser on the computer (using the IP address a.b.c.d) that is connected to the Internet.
2 Type http://zyxelrouter.dyndns.org and press [Enter].
3 The Device's login page should appear. You can then log into the Device and manage it.
PART II
Technical Reference
The appendices provide general information. Some details may not apply to your Device.
Connection Status and System Info
4.1 Overview
After you log into the web configurator, the Connection Status screen appears. This shows the network connection status of the Device and clients connected to it.
Use the System Info screen to look at the current status of the device, system resources, interfaces (LAN, WAN), and SIP accounts. You can also register and unregister SIP accounts.
If you click Virtual Device on the System Info screen, a visual graphic appears, showing the connection status of the Device's ports. See Section 2.2.2 on page 21 for more information.
4.2 The Connection Status Screen
Use this screen to view the network connection status of the device and its clients. A warning message appears if there is a connection problem.
If you prefer to view the status in a list, click List View in the Viewing mode selection box. You can configure how often you want the Device to update this screen in Refresh Interval.
Figure 8 Connection Status: Icon View
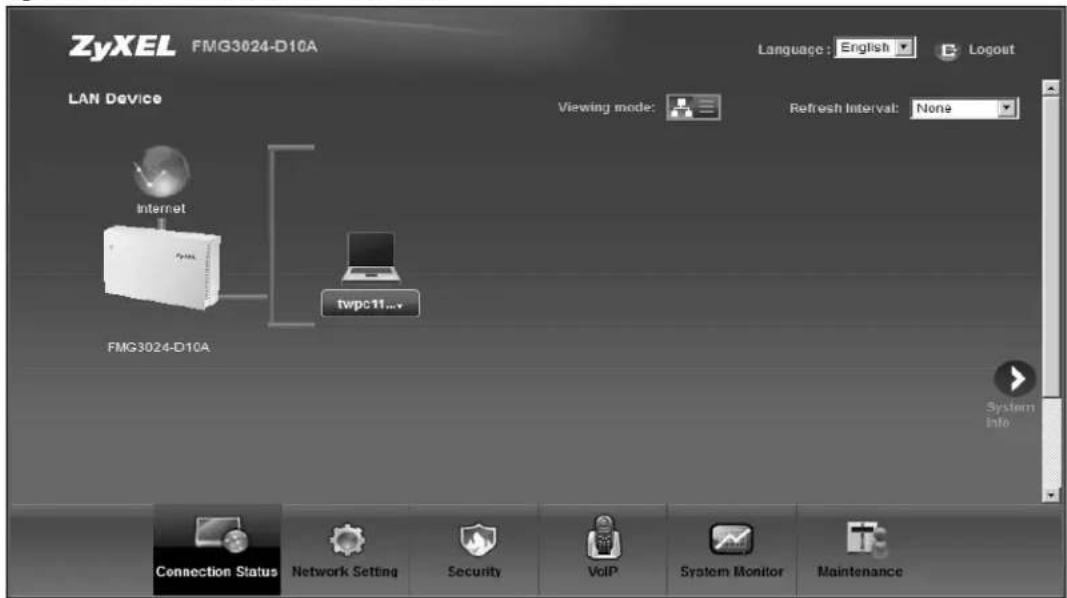
Figure 9 Connection Status: List View
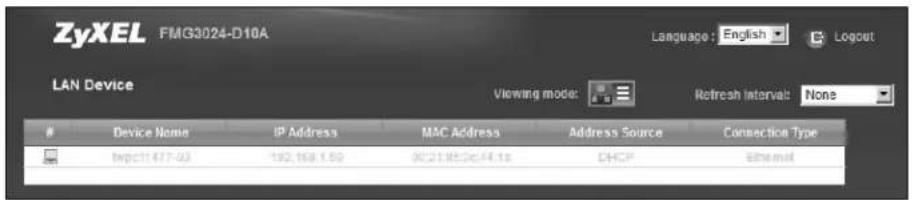
In Icon View, if you want to view information about a client, click the client's name and Info. Click the IP address if you want to change it. If you want to change the name or icon of the client, click Change name/ icon.
In List View, you can also view the client's information.
4.3 The System Info Screen
Click Connection Status > System Info to open this screen.
Figure 10 System Info Screen
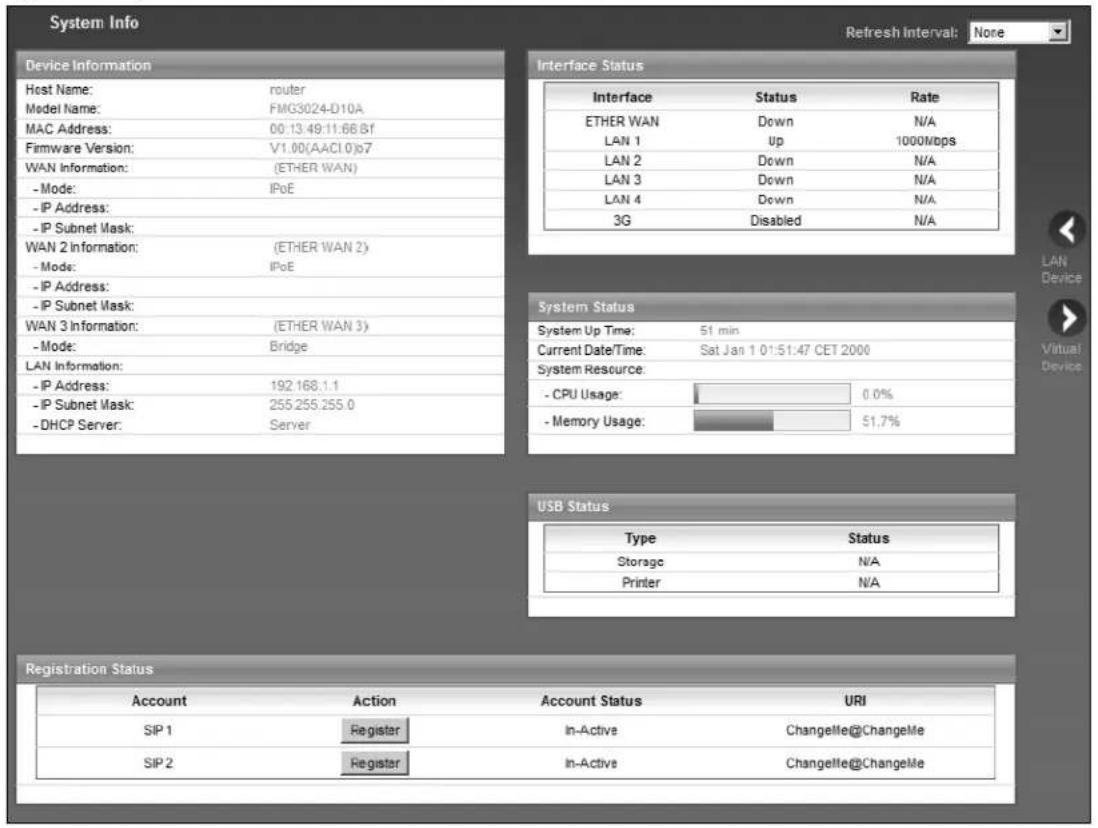
Each field is described in the following table.
Table 3 System Info Screen
| LABEL DESCRIPTION | |
| Language Select the web | configurator language from the drop-down list box. |
| Refresh Interval Select how | ow often you want the Device to update this screen from the drop-down list box. |
| Device Information | |
| Host Name | This field displays the Device system name. It is used for identification. You can change this in the Maintenance > System screen's Host Name field. |
| Model Name This is the model name of your device. | |
| MAC Address | This is the MAC (Media Access Control) or Ethernet address unique to your Device. |
| Firmware Version | This field displays the current version of the firmware inside the device. It also shows the date the firmware version was created. Go to the Maintenance > Firmware Upgrade screen to change it. |
| WAN Information | |
| Mode This is the method of encapsulation used by your ISP. | |
| IP Address This field d | splays the current IP address of the Device in the WAN. |
| IP Subnet Mask This fi | eld displays the current subnet mask in the WAN. |
| LAN Information | |
| IP Address This field d | splays the current IP address of the Device in the LAN. |
| IP Subnet Mask This fi | eld displays the current subnet mask in the LAN. |
| DHCP Server This field | displays what DHCP services the Device is providing to the LAN.Choices are:Server - The Device is a DHCP server in the LAN. It assigns IP addresses to other computers in the LAN.None - The Device is not providing any DHCP services to the LAN. |
| DHCPv6 Server | This field displays what DHCPv6 services the Device is providing to the LAN. Choices are:Server - The Device is a DHCPv6 server in the LAN. It assigns IP addresses to other computers in the LAN.Relay - The Device acts as a surrogate DHCPv6 server and relays DHCP requests and responses between the remote server and the clients.None - The Device is not providing any DHCPv6 services to the LAN. |
| Interface Status | |
| Interface This column | displays each interface the Device has. |
| Status | This field indicates whether or not the Device is using the interface.For the WAN interface, this field displays Up when the Device is using the interface and Down when the Device is not using the interface.For the LAN interface, this field displays Up when the Device is using the interface and Down when the Device is not using the interface.For the 3G interface, it displays Enabled when 3G is enabled or Disabled when 3G is disabled. |
| Rate | For the LAN interface, this displays the port speed and duplex setting.For the WAN interface, this displays the port speed and duplex setting.For the 3G interface, it displays the maximum transmission rate when 3G is enabled or N/ A when 3G is disabled. |
| System Status | |
| System Up Time This field displays how long the Device has been running since it last started up. The Device starts up when you plug it in, when you restart it (Maintenance > Reboot), or when you reset it (see Section 1.5 on page 17). | |
| Current Date/Time | This field displays the current date and time in the Device. You can change this in Maintenance > Time Setting. |
| System Resource | |
| CPU Usage | This field displays what percentage of the Device's processing ability is currently used. When this percentage is close to 100%, the Device is running at full load, and the throughput is not going to improve anymore. If you want some applications to have more throughput, you should turn off other applications. |
| Memory Usage This field displays what percentage of the Device's memory is currently used. Usually, this percentage should not increase much. If memory usage does get close to 100%, the Device is probably becoming unstable, and you should restart the device. See Chapter 28 on page 231, or turn off the device (unplug the power) for a few seconds. | |
| USB Status | |
| Type This shows the type of device connected to the Device. | |
| Status | This shows whether the device is currently active (Up). This shows N/ A if there are no device connected to the Device or the connected device is not working. |
| Registration Status | |
| Account This column displays each SIP account in the Device. | |
| Action | This field displays the current registration status of the SIP account. You have to register SIP accounts with a SIP server to use VoIP.If the SIP account is already registered with the SIP server,Click Unregister to delete the SIP account's registration in the SIP server. This does not cancel your SIP account, but it deletes the mapping between your SIP identity and your IP address or domain name.The second field displays Registered.If the SIP account is not registered with the SIP server,Click Register to have the Device attempt to register the SIP account with the SIP server.The second field displays the reason the account is not registered.Inactive - The SIP account is not active. You can activate it in VoIP > SIP > SIP Settings.Register Fail - The last time the Device tried to register the SIP account with the SIP server, the attempt failed. The Device automatically tries to register the SIP account when you turn on the Device or when you activate it. |
| Account Status | This shows Active when the SIP account has been registered and ready for use or In-Active when the SIP account is not yet registered. |
| URI This field displays | the account number and service domain of the SIP account. You can change these in VoIP > SIP > SIP Settings. |
Broadband
5.1 Overview
This chapter discusses the Device's Broadband screens. Use these screens to configure your Device for Internet access.
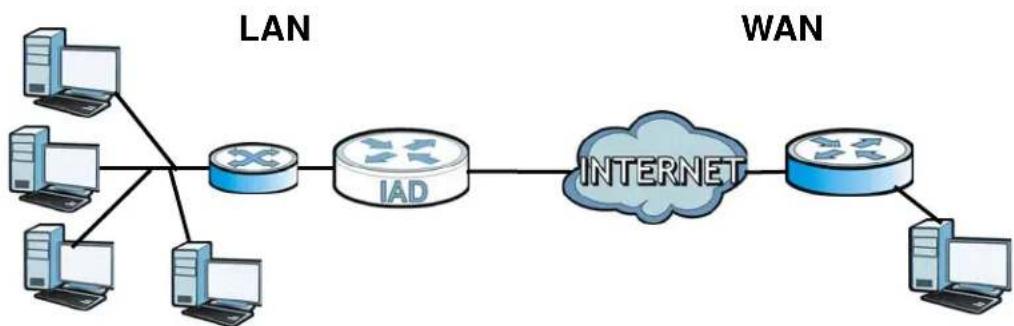
A WAN (Wide Area Network) connection is an outside connection to another network or the Internet. It connects your private networks, such as a LAN (Local Area Network) and other networks, so that a computer in one location can communicate with computers in other locations.
Figure 11 LAN and WAN
flowchart
graph LR
    subgraph LAN
        A["Computer"] --> B["Router"]
        C["Computer"] --> B
        D["Computer"] --> B
    end
    subgraph WAN
        E["Internet"] --> F["Router"]
        G["Computer"] --> F
    end
    B --> H["IAD"]
    H --> I["INTERNET"]
    I --> F
3G (third generation) standards for the sending and receiving of voice, video, and data in a mobile environment.
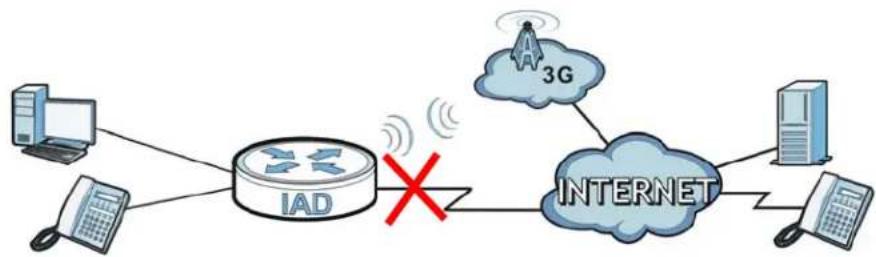
You can attach a 3G wireless adapter to the USB port and set the Device to use this 3G connection as your WAN or a backup when the wired WAN connection fails.
Figure 12 3G WAN Connection
flowchart
graph LR
    A["Computer"] --> B["IAD"]
    C["Client"] --> B
    B --> D["3G"]
    D --> E["INTERNET"]
    E --> F["Server"]
    B -->|X| E
5.1.1 What You Can Do in this Chapter
- Use the Broadband screen to view, remove or add a WAN interface. You can also configure the WAN settings on the ZyXEL Device for Internet access (Section 5.2 on page 70).
- Use the 3G Backup screen to configure 3G WAN connection (Section 5.3 on page 81).
Table 4 WAN Setup Overview
| LAYER-2 INTERFACE INTERNET CONNECTION | |||
| INTERFACE MODE | WAN SERVICE TYPE | CONNECTION SETTINGS | |
| EtherWAN Routing PPPoE | PPP user name and | password, | WAN IP address, DNS server and default gateway |
| IPoE WAN IP address, NAT, DNS server and default gateway | |||
| Bridge N/A N/A | |||
5.1.2 What You Need to Know
The following terms and concepts may help as you read this chapter.
Encapsulation Method
Encapsulation is used to include data from an upper layer protocol into a lower layer protocol. To set up a WAN connection to the Internet, you need to use the same encapsulation method used by your ISP (Internet Service Provider). If your ISP offers a dial-up Internet connection using PPPoE (PPP over Ethernet), they should also provide a username and password (and service name) for user authentication.
WAN IP Address
The WAN IP address is an IP address for the Device, which makes it accessible from an outside network. It is used by the Device to communicate with other devices in other networks. It can be static (fixed) or dynamically assigned by the ISP each time the Device tries to access the Internet.
If your ISP assigns you a static WAN IP address, they should also assign you the subnet mask and DNS server IP address(es).
3G
3G (Third Generation) is a digital, packet-switched wireless technology. Bandwidth usage is optimized as multiple users share the same channel and bandwidth is only allocated to users when they send data. It allows fast transfer of voice and non-voice data and provides broadband Internet access to mobile devices.
IPv6 Introduction
IPv6 (Internet Protocol version 6), is designed to enhance IP address size and features. The increase in IPv6 address size to 128 bits (from the 32-bit IPv4 address) allows up to 3.4 × 10^38 IP addresses. The Device can use IPv4/IPv6 dual stack to connect to IPv4 and IPv6 networks, and supports IPv6 rapid deployment (6RD).
IPv6 Addressing
The 128-bit IPv6 address is written as eight 16-bit hexadecimal blocks separated by colons (:). This is an example IPv6 address 2001:0db8:1a2b:0015:0000:0000:1a2f:0000.
IPv6 addresses can be abbreviated in two ways:
- Leading zeros in a block can be omitted. So 2001:0db8:1a2b:0015:0000:0000:1a2f:0000 can be written as 2001:db8:1a2b:15:0:0:1a2f:0.
- Any number of consecutive blocks of zeros can be replaced by a double colon. A double colon can only appear once in an IPv6 address. So 2001:0db8:0000:0000:1a2f:0000:0000:0015 can be written as 2001:0db8::1a2f:0000:0000:0015, 2001:0db8:0000:0000:1a2f::0015, 2001:db8::1a2f:0:0:15 or 2001:db8:0:0:1a2f::15.
IPv6 Prefix and Prefix Length
Similar to an IPv4 subnet mask, IPv6 uses an address prefix to represent the network address. An IPv6 prefix length specifies how many most significant bits (start from the left) in the address compose the network address. The prefix length is written as "/x" where x is a number. For example,
2001:db8:1a2b:15::1a2f:0/32
means that the first 32 bits (2001:db8) is the subnet prefix.
IPv6 Subnet Masking
Both an IPv6 address and IPv6 subnet mask compose of 128-bit binary digits, which are divided into eight 16-bit blocks and written in hexadecimal notation. Hexadecimal uses four bits for each character (1 \~ 10, A \~ F). Each block's 16 bits are then represented by four hexadecimal characters. For example, FFFF:FFFF:FFFF:FFFF:FC00:0000:0000:0000.
DHCPv6
The Dynamic Host Configuration Protocol for IPv6 (DHCPv6, RFC 3315) is a server-client protocol that allows a DHCP server to assign and pass IPv6 network addresses, prefixes and other configuration information to DHCP clients. DHCPv6 servers and clients exchange DHCP messages using UDP.
Each DHCP client and server has a unique DHCP Unique IDentifier (DUID), which is used for identification when they are exchanging DHCPv6 messages. The DUID is generated from the MAC address, time, vendor assigned ID and/or the vendor's private enterprise number registered with the IANA. It should not change over time even after you reboot the device.
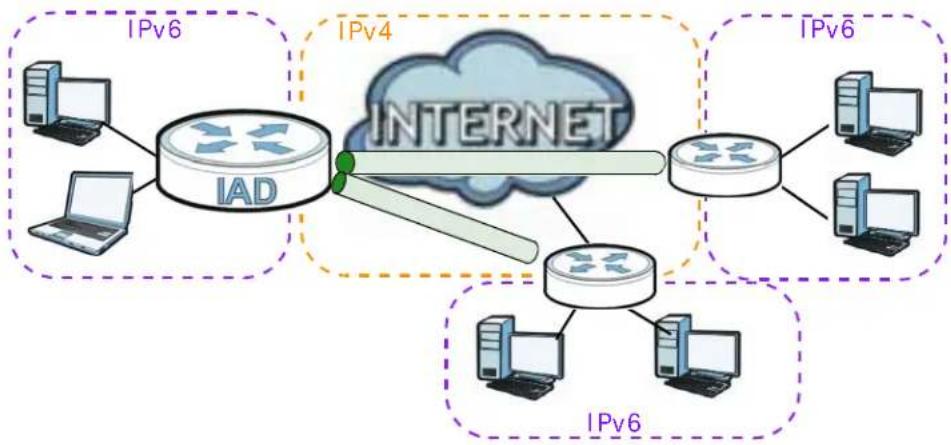
IPv6 6to4 Mode
This mode also enables the Device to convert IPv6 packets to IPv4 packets. But instead of pre-configuring the destination router, you need to configure a 6to4 relay router that helps to route the packets to any IPv6 networks.
In this mode, the Device should get a public IPv4 address for the WAN. The Device adds an IPv4 header to an IPv6 packet when transmitting the packet to the Internet. In reverse, the Device removes the IPv4 header from an IPv6 packet when receiving it from the Internet.
An IPv6 address using the 6to4 mode consists of an IPv4 address, the format is as the following:
2002:[a public IPv4 address in hexadecimal]::/48
For example,
A public IPv4 address is 202.156.30.41. The converted hexadecimal IP string is ca.9c.1E.29. The IPv6 address prefix becomes 2002:ca9c:1e29::/48.
Figure 13 IPv6 6to4 Mode
flowchart
graph TD
    subgraph IPv6
        A["Desktop"] --> B["IAD"]
        C["Desktop"] --> B
        D["Laptop"] --> B
    end
    subgraph IPv4
        E["Desktop"] --> F["Internet Cloud"]
        G["Desktop"] --> F
        H["Laptop"] --> F
    end
    subgraph IPv6
        I["Desktop"] --> J["Desktop"]
        K["Desktop"] --> J
        L["Desktop"] --> J
        M["Desktop"] --> J
    end
    style IPv6 fill:#f9f,stroke:#333
    style IPv4 fill:#ccf,stroke:#333
    style IPv6 fill:#cfc,stroke:#333
Prefix Delegation
Prefix delegation enables an IPv6 router to use the IPv6 prefix (network address) received from the ISP (or a connected uplink router) for its LAN. The Device uses the received IPv6 prefix (for example, 2001:db2::/48) to generate its LAN IP address. Through sending Router Advertisements (RAs) regularly by multicast, the Device passes the IPv6 prefix information to LAN hosts. The hosts use the prefix to generate their IPv6 addresses.
5.1.3 Before You Begin
You need to know your Internet access settings such as encapsulation and WAN IP address. Get this information from your ISP.
5.2 The Broadband Screen
The Device must have a WAN interface to allow users to access the Internet. Use the Broadband screen to view or modify a WAN interface.
Click Network Setting > Broadband. The following screen opens.
Figure 14 Network Setting > Broadband

The following table describes the fields in this screen.
Table 5 Network Setting > Broadband
| LABEL DESCRIPTION | |
| Switch WAN Mode | |
| Add new WAN Interface | Click this to create a new WAN interface. |
| # This is the index number of the connection. | |
| Name This is the service name of the connection. | |
| Mode This shows whether the connection is in routing mode or bridge mode. | |
| Encapsulation This shows the method of encapsulation used by this connection. | |
| IPv6/IPv4 Mode | This shows the IPv6/IPv4 mode: IPv4 Only, IPv6/ IPv4 DualStack - IPv4 and IPv6 at the same time, or IPv6 Only. |
| Vlan8021p | This indicates the 802.1P priority level assigned to traffic sent through this connection. This displays N/ A when there is no priority level assigned. |
| VlanMuxId | This indicates the VLAN ID number assigned to traffic sent through this connection. This displays N/ A when there is no VLAN ID number assigned. |
| IGMP Proxy | This shows whether IGMP (Internet Group Multicast Protocol) is activated or not for this connection. IGMP is not available when the connection uses the bridging service. |
| NAT This shows whether NAT is activated or not for this connection. NAT is not available when the connection uses the bridging service. | |
| Default Gateway | This shows whether the Device uses the interface of this connection as the system default gateway. |
| Modify Click the Edit | icon to configure the connection.Click the Delete icon to delete this connection from the Device. A window displays asking you to confirm that you want to delete the connection. |
5.2.1 Add/Edit Internet Connection
Use this screen to configure a WAN connection. The screen varies depending on the interface type, encapsulation, and WAN service type you select.
5.2.1.1 Routing- PPPoE
Click the Add new WAN Interface in the Network Setting > Broadband screen or the Edit icon next to the connection you want to configure. Select Routing as the encapsulation mode, and PPPoE as the WAN service type.
Figure 15 Broadband Add/Edit: Routing - PPPoE - IPv4 Only
![General Name: Mode: WANServiceType: PPPoE Passthrough IPv6/IPv4 Mode: VLAN Enable VLAN: Enter 802.1P Priority [0-7]: Enter 802.1Q VLAN ID [1-4094]: (3900 ~ 3905 are reserved.) PPP Information PPPUserName: PPPPassword: PPPoEServiceName: Authentication Method: Auto Use Static IP Address Dial on demand (with idle timeout timer) MTU MTU Routing Feature NAT Enable: IGMP Proxy Enable: Apply as Default Gateway: DNS Server Obtain DNS info Automatically Use the following Static DNS IP Address 6 to 4 Tunnel 6to4 Tunneling 6RD Enable 6to4 Tunneling Relay Server IP:](/content/2026/05/861498/images/9f58feccbcebf3465fc873e268d9d5c42cc49f3260975329c06db9f9f06f036c.jpg)
Figure 16 Broadband Add/Edit: Routing - PPPoE - IPv6 IPv4 Dual Stack
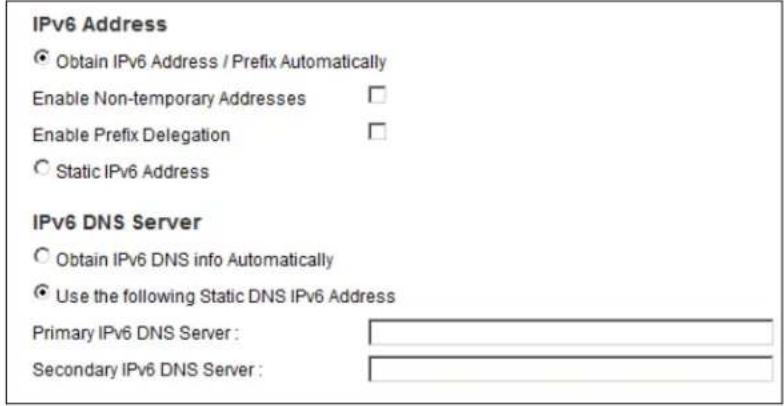
Figure 17 Broadband Add/Edit: Routing - PPPoE - IPv6 Only
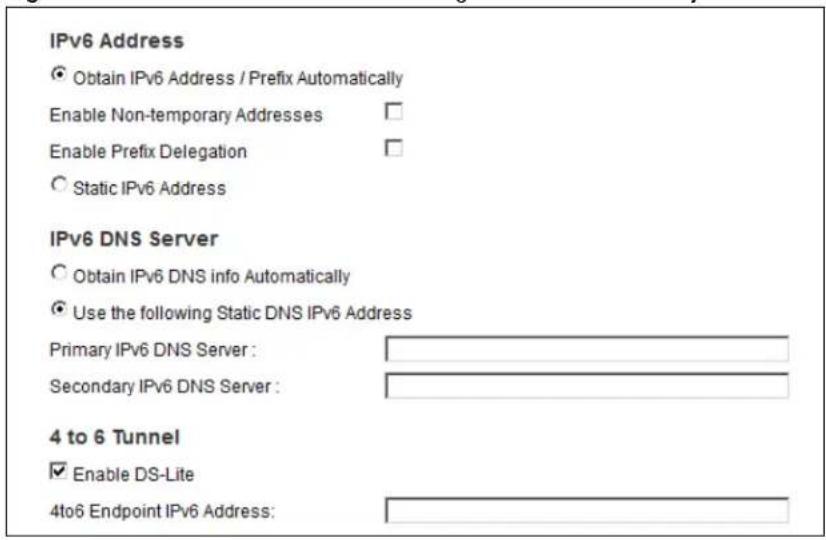
The following table describes the fields in this screen.
Table 6 Broadband Add/Edit: Routing - PPPoE
| LABEL DESCRIPTION | |
| General | |
| Name Enter a service | name of the connection. |
| Mode | SelectRouting(default) from the drop-down list box if your ISP give you one IP address only and you want multiple computers to share an Internet account. |
| WAN Service Type | This field is available only when you selectRoutingin theModefield. Select the method of encapsulation used by your ISP.PPP over Ethernet (PPPoE)- PPPoE (Point to Point Protocol over Ethernet) provides access control and billing functionality in a manner similar to dial-up services using PPP. Select this if you have a username and password for Internet access.IP over Ethernet-In this type of Internet connection, IP packets are routed between the Ethernet interface and the WAN interface and then formatted so that they can be understood in a bridged environment. |
| PPPoE Passthrough | In addition to the Device's built-in PPPoE client, you can enable PPPoE pass through to allow hosts on the LAN to use PPPoE client software on their computers to connect to the ISP via the Device. Each host can have a separate account and a public WAN IP address.PPPoE pass through is an alternative to NAT for application where NAT is not appropriate.Disable PPPoE pass through if you do not need to allow hosts on the LAN to use PPPoE client software on their computers to connect to the ISP. |
| IPv6/IPv4 Mode | Select IPv4 Only if you want the Device to run IPv4 only.Select IPv6/IPv4 DualStack to allow the Device to run IPv4 and IPv6 at the same time.Select IPv6 Only if you want the Device to run IPv6 only. |
| VLAN | |
| Enable VLAN | Select this to add the VLAN tag (specified below) to the outgoing traffic through this connection. |
| Enter 802.1P Priority | IEEE 802.1p defines up to 8 separate traffic types by inserting a tag into a MAC-layer frame that contains bits to define class of service.Type the IEEE 802.1p priority level (from 0 to 7) to add to traffic through this connection. The greater the number, the higher the priority level. |
| Enter 802.1Q VLAN ID | Type the VLAN ID number (from 1 to 4094) for traffic through this connection. |
| PPP Information | This section is available only when you select Routing in the Mode field and PPPoE in the WAN Service Type field. |
| PPP User Name | Enter the user name exactly as your ISP assigned. If assigned a name in the form user@domain where domain identifies a service name, then enter both components exactly as given. |
| PPP Password | Enter the password associated with the user name above. |
| PPPoE Service Name | Type the name of your PPPoE service here. |
| Authentication Mode | The Device supports PAP (Password Authentication Protocol) and CHAP (Challenge Handshake Authentication Protocol). CHAP is more secure than PAP; however, PAP is readily available on more platforms.Use the drop-down list box to select an authentication protocol for outgoing calls. Options are:AUTO: Your Device accepts either CHAP or PAP when requested by this remote node.CHAP: Your Device accepts CHAP only.PAP: Your Device accepts PAP only.MS-CHAP: Your Device accepts MSCHAP only. MS-CHAP is the Microsoft version of the CHAP. |
| Use Static IP Address | A static IP address is a fixed IP that your ISP gives you. A dynamic IP address is not fixed; the ISP assigns you a different one each time you connect to the Internet. Select this if you want to get a dynamic IP address from the ISP. |
| IP Address Enter the | static IP address provided by your ISP. |
| Routing Feature | |
| NAT Enable Select this option to activate NAT on this connection. | |
| IGMP Proxy Enable | Internet Group Multicast Protocol (IGMP) is a network-layer protocol used to establish membership in a Multicast group - it is not used to carry user data.Select this option to have the Device act as an IGMP proxy on this connection. This allows the Device to get subscribing information and maintain a joined member list for each multicast group. It can reduce multicast traffic significantly. |
| Apply as Default Gateway | Select this option to have the Device use the WAN interface of this connection as the system default gateway. |
| DNS Server | The section is not available when you select Bridge in the WAN Service Type field. |
| Obtain DNS info Automatically | Select this to have the Device get the DNS server addresses from the ISP automatically. |
| Use the following Static DNS IP Address | Select this to have the Device use the DNS server addresses you configure manually. |
| Primary DNS Server | Enter the first DNS server address assigned by the ISP. |
| Secondary DNS Server | Enter the second DNS server address assigned by the ISP. |
| IPv6 Address | This section is not available when you select Disable in the IPv6/IPv4 DualStack field. |
| Obtain IPv6 Address Automatically | Select this option if you want to have the Device use the IPv6 prefix from the connected router's Router Advertisement (RA) to generate an IPv6 address. |
| Enable Non-temporary addresses | The DHCPv6 server controls the time at which the client contacts with the server to extend the lifetimes on any addresses before the lifetimes expire. After a first time limit specified by the server is reached, the client sends the server a Renew message. Select this option to have the server renew the lease before the second server specified time limit is reached. |
| Enable Prefix Delegation | Select this to enable Prefix Delegation. This enables an IPv6 router to use the IPv6 prefix (network address) received from the ISP (or a connected uplink router) for its LAN. |
| Static IPv6 Address | Select this option if you have a fixed IPv6 address assigned by your ISP. |
| IPv6 Address | Enter the static IPv6 address provided by your ISP using colon (:) hexadecimal notation. |
| Prefix length Enter the bit number of the IPv6 subnet mask provided by your ISP. | |
| IPv6 Default Gateway | Enter the IPv6 address of the default outgoing gateway using a colon (:) hexadecimal notation. |
| IPv6 DNS Server | Select whether you want to obtain the IPv6 DNS server addresses automatically or configure them manually. |
| Obtain IPv6 DNS info Automatically | Select this to have the Device get the IPv6 DNS server addresses from the ISP automatically. |
| Use the following Static DNS IPv6 Address | Select this to have the Device use the DNS server addresses you configure manually. |
| Primary IPv6 DNS Server | Enter the first IPv6 DNS server address assigned by the ISP. |
| Secondary IPv6 DNS Server | Enter the second IPv6 DNS server address assigned by the ISP. |
| 6to4 Tunneling | The 6 to 4 Tunnel fields display when you set the IPv6/IPv4 Mode field to IPv4 Only.Select 6to4 if the Device is connected to a network that has both IPv6 and IPv4 and the IPv4 addresses are public IP addresses. In this mode, the Device can convert an IPv4 address directly to an IPv6 address. The format is:2002:[IPv4 address in hexadecimal]::/48 |
| 6to4 Tunneling Relay Server IP | Enter the tunneling relay server's IPv4 address in this field. If your WAN Service Type is PPPoE, you need to enter this field in order to use 6to4 Tunneling. |
| 4 to 6 Tunnel | The 4 to 6 Tunnel fields display when you set the IPv6/IPv4 Mode field to IPv6 Only. Enable Dual Stack Lite to let local computers use IPv4 through an ISP's IPv6 network. |
| Enable DS-Lite | Enable Dual Stack Lite to let local computers use IPv4 through an ISP's IPv6 network. |
| 4to6 Endpoint IPv6 Address | Specify the transition router's IPv6 address. |
| Apply | Click Apply to save your changes. |
| Back | Click Back to return to the previous screen. |
5.2.1.2 Routing - IPoE
Click the Add new WAN Interface in the Network Setting > Broadband screen or the Edit icon next to the connection you want to configure. Select Routing as the encapsulation mode and IP over Ethernet as the WAN service type.
Figure 18 Broadband Add/Edit: Routing - IPoE - IPv4 Only
![General Name: Mode: Routing WANServiceType: IP over Ethernet IPv6/IPv4 Mode: IPv4 Only VLAN Enable VLAN: Enter 802.1P Priority [0-7]: Enter 802.1Q VLAN ID [1-4094]: (3900 ~ 3905 are reserved.) MTU MTU 1500 IP Address Obtain an IP Address Automatically Enable DHCP Option 60: Static IP Address Routing Feature NAT Enable: IGMP Proxy Enable: Apply as Default Gateway: DNS Server Obtain DNS info Automatically Use the following Static DNS IP Address 6 to 4 Tunnel 6to4 Tunneling 6RD Enable 6to4 Tunneling Relay Server IP:](/content/2026/05/861498/images/9ffa389a45908dedc76430f87c5fa86a492dca5524971a8fbc443160605b7656.jpg)
Figure 19 Broadband Add/Edit: Routing - IPoE - IPv6 IPv4 Dual Stack
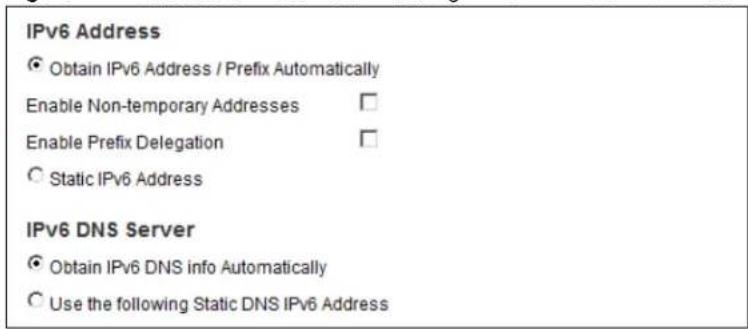
Figure 20 Broadband Add/Edit: Routing - IPoE - IPv6 Only
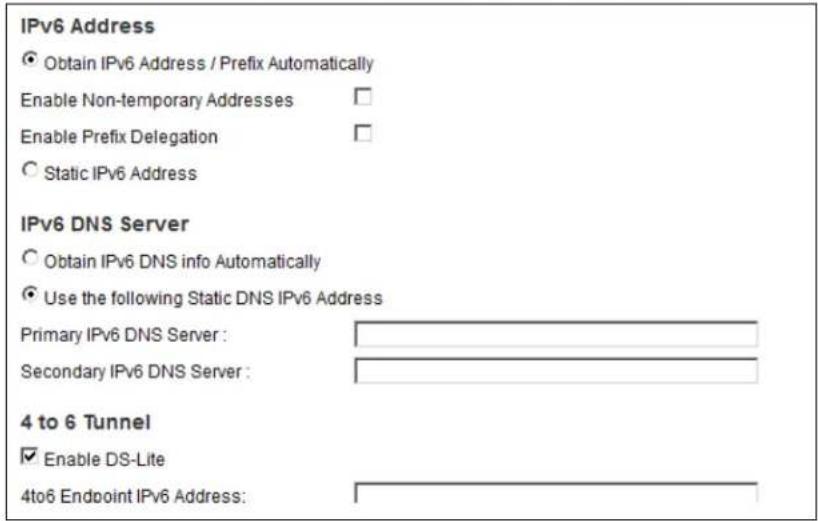
The following table describes the fields in this screen.
Table 7 Broadband Add/Edit: Routing - IPoE
| LABEL DESCRIPTION | |
| General | |
| Name Enter a service | name of the connection. |
| Mode | SelectRouting(default) from the drop-down list box if your ISP give you one IP address only and you want multiple computers to share an Internet account. |
| WAN Service Type | This field is available only when you selectRoutingin the Modefield. Select the method of encapsulation used by your ISP.PPP over Ethernet (PPPoE)- PPPoE (Point to Point Protocol over Ethernet) provides access control and billing functionality in a manner similar to dial-up services using PPP. Select this if you have a username and password for Internet access.IP over Ethernet-In this type of Internet connection, IP packets are routed between the Ethernet interface and the WAN interface and then formatted so that they can be understood in a bridged environment. |
| IPv6/IPv4 Mode | SelectIPv4 Onlyif you want the Device to run IPv4 only.SelectIPv6/IPv4 DualStackto allow the Device to run IPv4 and IPv6 at the same time.SelectIPv6 Onlyif you want the Device to run IPv6 only. |
| VLAN | |
| Enable VLAN | Select this to add the VLAN tag (specified below) to the outgoing traffic through this connection. |
| Enter 802.1P Priority | IEEE 802.1p defines up to 8 separate traffic types by inserting a tag into a MAC-layer frame that contains bits to define class of service.Type the IEEE 802.1p priority level (from 0 to 7) to add to traffic through this connection. The greater the number, the higher the priority level. |
| Enter 802.1Q VLAN ID | Type the VLAN ID number (from 1 to 4094) for traffic through this connection. |
| IP Address | This section is available only when you selectRoutingin the Modefield and IPOE in the WAN Service Type field. |
| Obtain an IP AddressAutomatically | A static IP address is a fixed IP that your ISP gives you. A dynamic IP address is not fixed; the ISP assigns you a different one each time you connect to the Internet. Select this if you have a dynamic IP address. |
| Enable DHCP Option 60 | Select this to identify the vendor and functionality of the Device in DHCP requests that the Device sends to a DHCP server when getting a WAN IP address. |
| Vendor Class Identifier | Enter the Vendor Class Identifier (Option 60), such as the type of the hardware or firmware. |
| Static IP Address | Select this option If the ISP assigned a fixed IP address. |
| IP Address Enter the | static IP address provided by your ISP. |
| Subnet Mask Enter the | the subnet mask provided by your ISP. |
| Gateway IP Address | Enter the gateway IP address provided by your ISP. |
| Routing Feature | |
| NAT Enable Select this option to activate NAT on this connection. | |
| IGMP Proxy Enable | Internet Group Multicast Protocol (IGMP) is a network-layer protocol used to establish membership in a Multicast group - it is not used to carry user data.Select this option to have the Device act as an IGMP proxy on this connection. This allows the Device to get subscribing information and maintain a joined member list for each multicast group. It can reduce multicast traffic significantly. |
| Apply as Default Gateway | Select this option to have the Device use the WAN interface of this connection as the system default gateway. |
| DNS Server | This is available only when you select Apply as Default Gateway in the Routing Feature field. |
| Obtain DNS info Automatically | Select this to have the Device get the DNS server addresses from the ISP automatically. |
| Use the following Static DNS IP Address | Select this to have the Device use the DNS server addresses you configure manually. |
| Primary DNS Server | Enter the first DNS server address assigned by the ISP. |
| Secondary DNS Server | Enter the second DNS server address assigned by the ISP. |
| IPv6 Address | This section is not available when you select Disable in the IPv6/IPv4 DualStack field. |
| Obtain IPv6 AddressAutomatically | Select this option if you want to have the Device use the IPv6 prefix from the connected router's Router Advertisement (RA) to generate an IPv6 address. |
| Enable Non-temporary addresses | The DHCPv6 server controls the time at which the client contacts with the server to extend the lifetimes on any addresses before the lifetimes expire. After a first time limit specified by the server is reached, the client sends the server a Renew message. Select this option to have the server renew the lease before the second server specified time limit is reached. |
| Enable Prefix Delegation | Select this to enable Prefix Delegation. This enables an IPv6 router to use the IPv6 prefix (network address) received from the ISP (or a connected uplink router) for its LAN. |
| Static IPv6 Address | Select this option if you have a fixed IPv6 address assigned by your ISP. |
| IPv6 Address | Enter the static IPv6 address provided by your ISP using colon (:) hexadecimal notation. |
| LABEL DESCRIPTION | |
| Prefix length Enter the bit number of the IPv6 subnet mask provided by your ISP. | |
| IPv6 Default Gateway | Enter the IPv6 address of the default outgoing gateway using a colon (:) hexadecimal notation. |
| IPv6 DNS Server | Select whether you want to obtain the IPv6 DNS server addresses automatically or configure them manually. |
| Obtain IPv6 DNS info Automatically | Select this to have the Device get the IPv6 DNS server addresses from the ISP automatically. |
| Use the following Static DNS IPv6 Address | Select this to have the Device use the DNS server addresses you configure manually. |
| Primary IPv6 DNS Server | Enter the first IPv6 DNS server address assigned by the ISP. |
| Secondary IPv6 DNS Server | Enter the second IPv6 DNS server address assigned by the ISP. |
| 6to4 Tunneling | The 6 to 4 Tunnel fields display when you set the IPv6/ IPv4 Mode field to IPv4 Only.Select 6to4 if the Device is connected to a network that has both IPv6 and IPv4 and the IPv4 addresses are public IP addresses. In this mode, the Device can convert an IPv4 address directly to an IPv6 address. The format is:2002:[IPv4 address in hexadecimal]::/48 |
| 6RD Enable | Select this option to enable IPv6 Rapid Deployment. By enabling this function, the Device uses an ISP's IPv6 address prefix instead of the 2002::/48 prefix. The operational domain of 6RD is limited to and controlled by the ISP's network. 6RD hosts are ensured to be reachable from all native IPv6 addresses as 6RD only uses relay servers within control of the ISP. |
| 6to4 Tunneling Relay Server IP | Enter the tunneling relay server's IPv4 address in this field. |
| 4 to 6 Tunnel | The 4 to 6 Tunnel fields display when you set the IPv6/ IPv4 Mode field to IPv6 Only. Enable Dual Stack Lite to let local computers use IPv4 through an ISP's IPv6 network. |
| Enable DS-Lite | Enable Dual Stack Lite to let local computers use IPv4 through an ISP's IPv6 network. |
| 4to6 Endpoint IPv6 Address | Specify the transition router's IPv6 address. |
| Apply | Click Apply to save your changes. |
| Back | Click Back to return to the previous screen. |
5.2.1.3 Bridge Mode
Click the Add new WAN Interface in the Network Setting > Broadband screen or the Edit icon next to the connection you want to configure. Select Bridge as the encapsulation mode.
Figure 21 Broadband Add/Edit: Bridge
![General Name : Mode : Bridge VLAN Enable VLAN : ✓ Enter 802.1P Priority [0-7] : Enter 802.1Q VLAN ID [1-4094] : (3900 ~ 3905 are reserved.) Enable VLAN on LAN side : □](/content/2026/05/861498/images/a04696bec637178c337cb4a454a8c53f76a7a42ebbc11c079501382e87c3b28c.jpg)
The following table describes the fields in this screen.
Table 8 Broadband Add/Edit: Bridge
| LABEL DESCRIPTION | |
| General | |
| Name Enter a service | name of the connection. |
| Mode | SelectBridgewhen your ISP provides you more than one IP address and you want the connected computers to get individual IP address from ISP's DHCP server directly. If you selectBridge, you cannot use routing functions, such as QoS, Firewall, DHCP server and NAT on traffic from the selected LAN port(s). |
| Enable VLAN Select this to add the VLAN Tag (specified below) to the outgoing traffic through this connection.Specific LAN ports can be selected on the Interface Group screen (Section 12.2 on page 143). | |
| Enter 802.1P Priority | IEEE 802.1p defines up to 8 separate traffic types by inserting a tag into a MAC-layer frame that contains bits to define class of service.Type the IEEE 802.1p priority level (from 0 to 7) to add to traffic through this connection. The greater the number, the higher the priority level. |
| Enter 802.1Q VLAN ID | Type the VLAN ID number (from 1 to 4094) for traffic through this connection. |
| Enable VLAN on LAN side | Select this to have the Device add a VLAN tag to outgoing packets on the LAN ports. |
| Apply | ClickApplyto save your changes. |
| Back | ClickBackto return to the previous screen. |
5.3 The 3G Backup Screen
Use this screen to configure your 3G settings. Click Broadband > 3G Backup.
At the time of writing, the 3G card you can use in the Device is Huawei E220, E270, E160, E169G.
Note: The actual data rate you obtain varies depending the 3G card you use, the signal strength to the service provider's base station, and so on.
If the signal strength of a 3G network is too low, the 3G card may switch to an available 2.5G or 2.75G network. Refer to Section 5.4 on page 83 for a comparison between 2G, 2.5G, 2.75G and 3G wireless technologies.
Figure 22 Broadband > 3G Backup
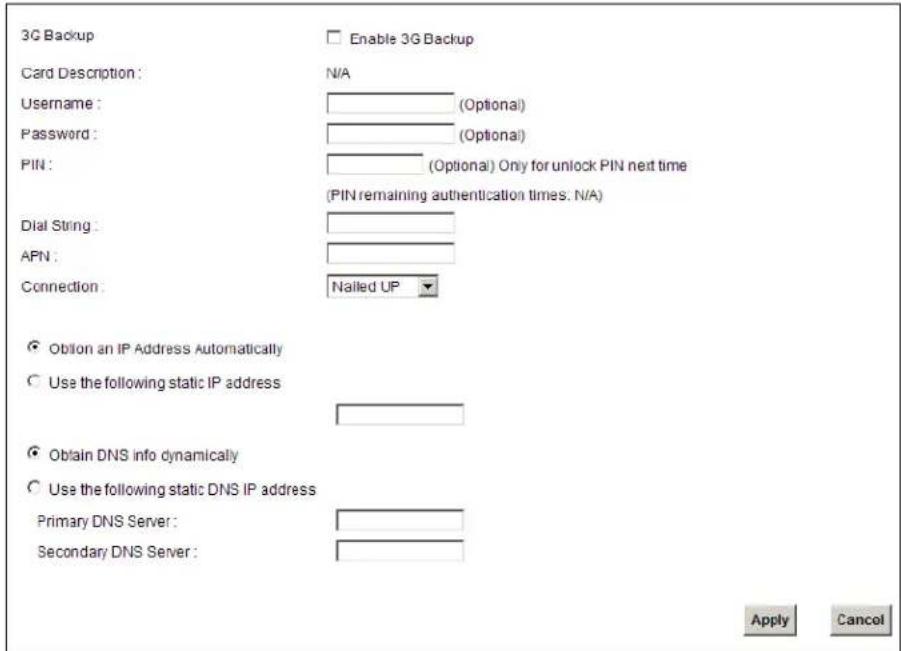
The following table describes the labels in this screen.
Table 9 Broadband > 3G Backup
| LABEL DESCRIPTION | |
| 3G Backup | Select Enable 3G Backup to have the Device use the 3G connection as your WAN or a backup when the wired WAN connection fails. |
| Card Description | This field displays the manufacturer and model name of your 3G card if you inserted one in the Device. Otherwise, it displays N/ A. |
| Username Type the user name (of up to 64 ASCII printable characters) given to you by your service provider. | |
| Password Type the password (of up to 64 ASCII printable characters) associated with the user name above. | |
| PIN A PIN (Personal Identification Number) code is a key to a 3G card. Without the PIN code, you cannot use the 3G card.If your ISP enabled PIN code authentication, enter the 4-digit PIN code (0000 for example) provided by your ISP. If you enter the PIN code incorrectly, the 3G card may be blocked by your ISP and you cannot use the account to access the Internet.If your ISP disabled PIN code authentication, leave this field blank. | |
| Dial String Enter the phone number (dial string) used to dial up a connection to your service provider's base station. Your ISP should provide the phone number.For example, *99# is the dial string to establish a GPRS or 3G connection in Taiwan. | |
| APN Code Enter the APN (Access Point Name) provided by your service provider.Connections with different APNs may provide different services (such as Internet access or MMS (Multi-Media Messaging Service)) and charge method.You can enter up to 32 ASCII printable characters. Spaces are allowed. | |
| Connection | Select Nailed-UP if you do not want the connection to time out.Select On-Demand if you do not want the connection up all the time and specify an idle time-out in the Max Idle Timeout field. |
| Max Idle Timeout | This value specifies the time in minutes that elapses before the Device automatically disconnects from the ISP. |
| Obtain an IP Address Automatically | Select this option If your ISP did not assign you a fixed IP address. |
| Use the following static IP address | Select this option If the ISP assigned a fixed IP address. |
| IP Address | Enter your WAN IP address in this field if you selected Use the following static IP address. |
| Obtain DNS info dynamically | Select this to have the Device get the DNS server addresses from the ISP automatically. |
| Use the following static DNS IP address | Select this to have the Device use the DNS server addresses you configure manually. |
| Primary DNS server | Enter the first DNS server address assigned by the ISP. |
| Secondary DNS server | Enter the second DNS server address assigned by the ISP. |
| Apply | Click Apply to save your changes back to the Device. |
| Cancel | Click Cancel to return to the previous configuration. |
5.4 Technical Reference
The following section contains additional technical information about the Device features described in this chapter.
Encapsulation
Be sure to use the encapsulation method required by your ISP. The Device can work in bridge mode or routing mode. When the Device is in routing mode, it supports the following methods.
IP over Ethernet
IP over Ethernet (IPoE) is an alternative to PPPoE. IP packets are being delivered across an Ethernet network, without using PPP encapsulation. They are routed between the Ethernet interface and the WAN interface and then formatted so that they can be understood in a bridged environment. For instance, it encapsulates routed Ethernet frames into bridged Ethernet cells.
PPP over Ethernet (PPPoE)
Point-to-Point Protocol over Ethernet (PPPoE) provides access control and billing functionality in a manner similar to dial-up services using PPP. PPPoE is an IETF standard (RFC 2516) specifying how a personal computer (PC) interacts with a broadband modem (DSL, cable, wireless, etc.) connection.
For the service provider, PPPoE offers an access and authentication method that works with existing access control systems (for example RADIUS).
One of the benefits of PPPoE is the ability to let you access one of multiple network services, a function known as dynamic service selection. This enables the service provider to easily create and offer new IP services for individuals.
Operationally, PPPoE saves significant effort for both you and the ISP or carrier, as it requires no specific configuration of the broadband modem at the customer site.
By implementing PPPoE directly on the Device (rather than individual computers), the computers on the LAN do not need PPPoE software installed, since the Device does that part of the task. Furthermore, with NAT, all of the LANs' computers will have access.
RFC 1483
RFC 1483 describes two methods for Multiprotocol Encapsulation over ATM Adaptation Layer 5 (AAL5). The first method allows multiplexing of multiple protocols over a single ATM virtual circuit (LLC-based multiplexing) and the second method assumes that each protocol is carried over a separate ATM virtual circuit (VC-based multiplexing). Please refer to RFC 1483 for more detailed information.
Multiplexing
There are two conventions to identify what protocols the virtual circuit (VC) is carrying. Be sure to use the multiplexing method required by your ISP.
VC-based Multiplexing
In this case, by prior mutual agreement, each protocol is assigned to a specific virtual circuit; for example, VC1 carries IP, etc. VC-based multiplexing may be dominant in environments where dynamic creation of large numbers of ATM VCs is fast and economical.
LLC-based Multiplexing
In this case one VC carries multiple protocols with protocol identifying information being contained in each packet header. Despite the extra bandwidth and processing overhead, this method may be advantageous if it is not practical to have a separate VC for each carried protocol, for example, if charging heavily depends on the number of simultaneous VCs.
Traffic Shaping
Traffic Shaping is an agreement between the carrier and the subscriber to regulate the average rate and fluctuations of data transmission over an ATM network. This agreement helps eliminate congestion, which is important for transmission of real time data such as audio and video connections.
Peak Cell Rate (PCR) is the maximum rate at which the sender can send cells. This parameter may be lower (but not higher) than the maximum line speed. 1 ATM cell is 53 bytes (424 bits), so a maximum speed of 832Kbps gives a maximum PCR of 1962 cells/sec. This rate is not guaranteed because it is dependent on the line speed.
Sustained Cell Rate (SCR) is the mean cell rate of each bursty traffic source. It specifies the maximum average rate at which cells can be sent over the virtual connection. SCR may not be greater than the PCR.
Maximum Burst Size (MBS) is the maximum number of cells that can be sent at the PCR. After MBS is reached, cell rates fall below SCR until cell rate averages to the SCR again. At this time, more cells (up to the MBS) can be sent at the PCR again.
If the PCR, SCR or MBS is set to the default of "0", the system will assign a maximum value that correlates to your upstream line rate.
The following figure illustrates the relationship between PCR, SCR and MBS.
Figure 23 Example of Traffic Shaping
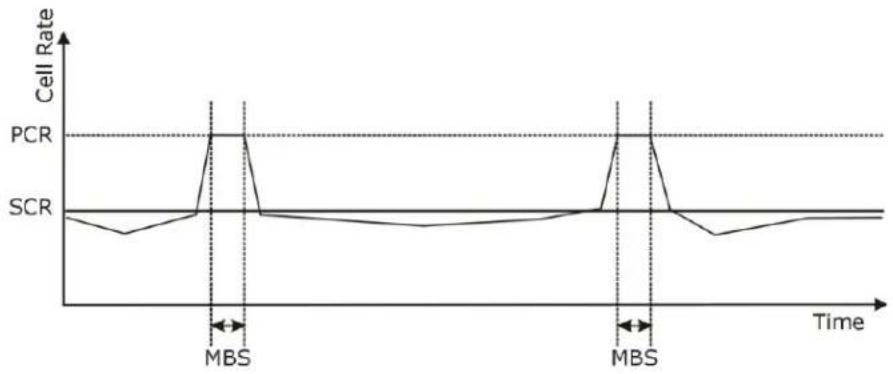
line
| Time | Cell Rate | |------|-----------| | MBS | PCR | | MBS | SCR |ATM Traffic Classes
These are the basic ATM traffic classes defined by the ATM Forum Traffic Management 4.0 Specification.
Constant Bit Rate (CBR)
Constant Bit Rate (CBR) provides fixed bandwidth that is always available even if no data is being sent. CBR traffic is generally time-sensitive (doesn't tolerate delay). CBR is used for connections that continuously require a specific amount of bandwidth. A PCR is specified and if traffic exceeds this rate, cells may be dropped. Examples of connections that need CBR would be high-resolution video and voice.
Variable Bit Rate (VBR)
The Variable Bit Rate (VBR) ATM traffic class is used with bursty connections. Connections that use the Variable Bit Rate (VBR) traffic class can be grouped into real time (VBR-RT) or non-real time (VBR-nRT) connections.
The VBR-RT (real-time Variable Bit Rate) type is used with bursty connections that require closely controlled delay and delay variation. It also provides a fixed amount of bandwidth (a PCR is specified) but is only available when data is being sent. An example of an VBR-RT connection would be video conferencing. Video conferencing requires real-time data transfers and the bandwidth requirement varies in proportion to the video image's changing dynamics.
The VBR-nRT (non real-time Variable Bit Rate) type is used with bursty connections that do not require closely controlled delay and delay variation. It is commonly used for "bursty" traffic typical on LANs. PCR and MBS define the burst levels, SCR defines the minimum level. An example of an VBR-nRT connection would be non-time sensitive data file transfers.
Unspecified Bit Rate (UBR)
The Unspecified Bit Rate (UBR) ATM traffic class is for bursty data transfers. However, UBR doesn't guarantee any bandwidth and only delivers traffic when the network has spare bandwidth. An example application is background file transfer.
IP Address Assignment
A static IP is a fixed IP that your ISP gives you. A dynamic IP is not fixed; the ISP assigns you a different one each time. The Single User Account feature can be enabled or disabled if you have either a dynamic or static IP. However the encapsulation method assigned influences your choices for IP address and default gateway.
Introduction to VLANs
A Virtual Local Area Network (VLAN) allows a physical network to be partitioned into multiple logical networks. Devices on a logical network belong to one group. A device can belong to more than one group. With VLAN, a device cannot directly talk to or hear from devices that are not in the same group(s); the traffic must first go through a router.
In Multi-Tenant Unit (MTU) applications, VLAN is vital in providing isolation and security among the subscribers. When properly configured, VLAN prevents one subscriber from accessing the network resources of another on the same LAN, thus a user will not see the printers and hard disks of another user in the same building.
VLAN also increases network performance by limiting broadcasts to a smaller and more manageable logical broadcast domain. In traditional switched environments, all broadcast packets go to each and every individual port. With VLAN, all broadcasts are confined to a specific broadcast domain.
Introduction to IEEE 802.1Q Tagged VLAN
A tagged VLAN uses an explicit tag (VLAN ID) in the MAC header to identify the VLAN membership of a frame across bridges - they are not confined to the switch on which they were created. The VLANs can be created statically by hand or dynamically through GVRP. The VLAN ID associates a frame with a specific VLAN and provides the information that switches need to process the frame across the network. A tagged frame is four bytes longer than an untagged frame and contains two bytes of TPID (Tag Protocol Identifier), residing within the type/length field of the Ethernet frame) and two bytes of TCI (Tag Control Information), starts after the source address field of the Ethernet frame).
The CFI (Canonical Format Indicator) is a single-bit flag, always set to zero for Ethernet switches. If a frame received at an Ethernet port has a CFI set to 1, then that frame should not be forwarded as it is to an untagged port. The remaining twelve bits define the VLAN ID, giving a possible maximum number of 4,096 VLANs. Note that user priority and VLAN ID are independent of each other. A frame with VID (VLAN Identifier) of null (0) is called a priority frame, meaning that only the priority level is significant and the default VID of the ingress port is given as the VID of the frame. Of the
4096 possible VIDs, a VID of 0 is used to identify priority frames and value 4095 (FFF) is reserved, so the maximum possible VLAN configurations are 4,094.
| TPID | User Priority | CFI | VLAN ID |
| 2 Bytes | 3 Bits | 1 Bit | 12 Bits |
Multicast
IP packets are transmitted in either one of two ways - Unicast (1 sender - 1 recipient) or Broadcast (1 sender - everybody on the network). Multicast delivers IP packets to a group of hosts on the network - not everybody and not just 1.
Internet Group Multicast Protocol (IGMP) is a network-layer protocol used to establish membership in a Multicast group - it is not used to carry user data. IGMP version 2 (RFC 2236) is an improvement over version 1 (RFC 1112) but IGMP version 1 is still in wide use. If you would like to read more detailed information about interoperability between IGMP version 2 and version 1, please see sections 4 and 5 of RFC 2236. The class D IP address is used to identify host groups and can be in the range 224.0.0.0 to 239.255.255.255. The address 224.0.0.0 is not assigned to any group and is used by IP multicast computers. The address 224.0.0.1 is used for query messages and is assigned to the permanent group of all IP hosts (including gateways). All hosts must join the 224.0.0.1 group in order to participate in IGMP. The address 224.0.0.2 is assigned to the multicast routers group.
At start up, the Device queries all directly connected networks to gather group membership. After that, the Device periodically updates this information.
DNS Server Address Assignment
Use Domain Name System (DNS) to map a domain name to its corresponding IP address and vice versa, for instance, the IP address of www.zyxel.com is 204.217.0.2. The DNS server is extremely important because without it, you must know the IP address of a computer before you can access it.
The Device can get the DNS server addresses in the following ways.
1 The ISP tells you the DNS server addresses, usually in the form of an information sheet, when you sign up. If your ISP gives you DNS server addresses, manually enter them in the DNS server fields.
2 If your ISP dynamically assigns the DNS server IP addresses (along with the Device's WAN IP address), set the DNS server fields to get the DNS server address from the ISP.
IPv6 Addressing
The 128-bit IPv6 address is written as eight 16-bit hexadecimal blocks separated by colons (:). This is an example IPv6 address 2001:0db8:1a2b:0015:0000:0000:1a2f:0000.
IPv6 addresses can be abbreviated in two ways:
- Leading zeros in a block can be omitted. So 2001:0db8:1a2b:0015:0000:0000:1a2f:0000 can be written as 2001:db8:1a2b:15:0:0:1a2f:0.
- Any number of consecutive blocks of zeros can be replaced by a double colon. A double colon can only appear once in an IPv6 address. So 2001:0db8:0000:0000:1a2f:0000:0000:0015 can be written as 2001:0db8::1a2f:0000:0000:0015, 2001:0db8:0000:0000:1a2f::0015, 2001:db8::1a2f:0:0:15 or 2001:db8:0:0:1a2f::15.
IPv6 Prefix and Prefix Length
Similar to an IPv4 subnet mask, IPv6 uses an address prefix to represent the network address. An IPv6 prefix length specifies how many most significant bits (start from the left) in the address compose the network address. The prefix length is written as "/x" where x is a number. For example,
2001:db8:1a2b:15::1a2f:0/32
means that the first 32 bits (2001:db8) is the subnet prefix.
3G Comparison Table
See the following table for a comparison between 2G, 2.5G, 2.75G and 3G wireless technologies.
Table 10 2G, 2.5G, 2.75G, 3G and 3.5G Wireless Technologies
| NAME TYPE | MOBILE PHONE AND DATA STANDARDS | DATA SPEED | ||
| GSM-BASED CDMA-BASED | ||||
| 2G | Circuit-switched | GSM (Global System for Mobile Communications), Personal Handy-phone System (PHS), etc. | Interim Standard 95 (IS-95), the first CDMA-based digital cellular standard pioneered by Qualcomm. The brand name for IS-95 is cdmaOne. IS-95 is also known as TIA-EIA-95. | Slow |
| 2.5G Packet-switched | GPRS (General Packet Radio Services), High-Speed Circuit-Switched Data (HSCSD), etc. | CDMA2000 is a hybrid 2.5G / 3G protocol of mobile telecommunications standards that use CDMA, a multiple access scheme for digital radio.CDMA2000 1xRTT (1 times Radio Transmission Technology) is the core CDMA2000 wireless air interface standard. It is also known as 1x, 1xRTT, or IS-2000 and considered to be a 2.5G or 2.75G technology. | ||
| 2.75G Packet-switched | Enhanced Data rates for GSM Evolution (EDGE), Enhanced GPRS (EGPRS), etc. | |||
| 3G | Packet-switched | UMTS (Universal Mobile Telecommunications System), a third-generation (3G) wireless standard defined in ITUA specification, is sometimes marketed as 3GSM. The UMTS uses GSM infrastructures and W-CDMA (Wideband Code Division Multiple Access) as the air interface. | CDMA2000 EV-DO (Evolution-Data Optimized, originally 1x Evolution-Data Only), also referred to as EV-DO, EVDO, or just EV, is an evolution of CDMA2000 1xRTT and enables high-speed wireless connectivity. It is also denoted as IS-856 or High Data Rate (HDR). | |
| 3.5G Packet-switched | HSDPA (High-Speed Downlink Packet Access) is a mobile telephony protocol, used for UMTS-based 3G networks and allows for higher data transfer speeds. | |||
A. The International Telecommunication Union (ITU) is an international organization within which governments and the private sector coordinate global telecom networks and services.
6.1 Overview
This chapter describes the Device's Network Setting > CATV screen. Use this screen to set up your Device's cable television function.
6.2 The CATV Screen
Use this screen to enable cable television functions. Click Network Setting > CATV to open the CATV screen.
Figure 24 Network Setting > CATV

The following table describes the labels in this screen.
Table 11 Network > CATV
| LABEL DESCRIPTION | |
| CATV Select this | to enable the cable TV function. |
| CATV Filter | Select this to enable the cable TV low pass filter, which filters unwanted high frequencies out of the signal. |
| Apply | Click Apply to save your changes back to the Device. |
| Cancel | Click Cancel to restore your previously saved settings. |
Home Networking
7.1 Overview
A Local Area Network (LAN) is a shared communication system to which many computers are attached. A LAN is usually located in one immediate area such as a building or floor of a building.
The LAN screens can help you configure a LAN DHCP server and manage IP addresses.
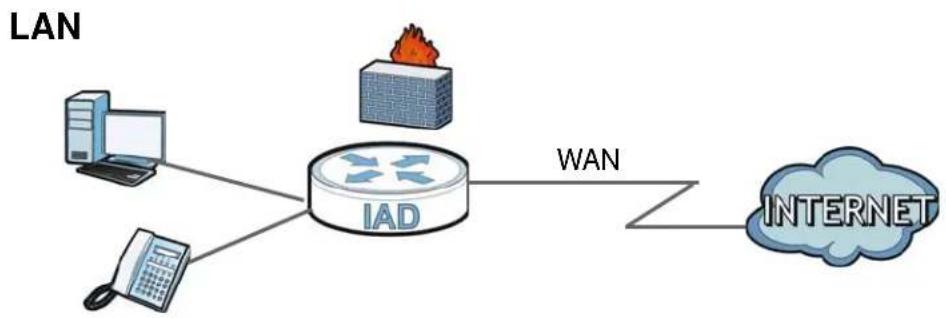
flowchart
graph LR
    A["LAN"] --> B["IAD"]
    B -->|WAN| C["INTERNET"]
    B --> D["Computer"]
    B --> E["Phone"]
    B --> F["Fire Engine"]
7.1.1 What You Can Do in this Chapter
- Use the LAN Setup screen to set the LAN IP address, subnet mask, and DHCP settings (Section 7.2 on page 96).
- Use the Static DHCP screen to assign IP addresses on the LAN to specific individual computers based on their MAC Addresses (Section 7.3 on page 97).
- Use the UPnP screen to enable UPnP (Section 7.4 on page 99).
• Use the File Sharing screen to enable file-sharing server (Section 7.5 on page 99). - Use the Media Server screen to enable or disable the sharing of media files (Section 7.6 on page 102).
- Use the Printer Server screen to enable the print server (Section 7.7 on page 102).
7.1.2 What You Need To Know
The following terms and concepts may help as you read this chapter.
7.1.2.1 About LAN
IP Address
Similar to the way houses on a street share a common street name, so too do computers on a LAN share one common network number. This is known as an Internet Protocol address.
Subnet Mask
The subnet mask specifies the network number portion of an IP address. Your Device will compute the subnet mask automatically based on the IP address that you entered. You don't need to change the subnet mask computed by the Device unless you are instructed to do otherwise.
DHCP
DHCP (Dynamic Host Configuration Protocol) allows clients to obtain TCP/IP configuration at start-up from a server. This Device has a built-in DHCP server capability that assigns IP addresses and DNS servers to systems that support DHCP client capability.
DNS
DNS (Domain Name System) maps a domain name to its corresponding IP address and vice versa. The DNS server is extremely important because without it, you must know the IP address of a computer before you can access it. The DNS server addresses you enter when you set up DHCP are passed to the client machines along with the assigned IP address and subnet mask.
7.1.2.2 About UPnP
How do I know if I'm using UPnP?
UPnP hardware is identified as an icon in the Network Connections folder (Windows XP). Each UPnP compatible device installed on your network will appear as a separate icon. Selecting the icon of a UPnP device will allow you to access the information and properties of that device.
Cautions with UPnP
The automated nature of NAT traversal applications in establishing their own services and opening firewall ports may present network security issues. Network information and configuration may also be obtained and modified by users in some network environments.
When a UPnP device joins a network, it announces its presence with a multicast message. For security reasons, the Device allows multicast messages on the LAN only.
All UPnP-enabled devices may communicate freely with each other without additional configuration. Disable UPnP if this is not your intention.
UPnP and ZyXEL
ZyXEL has achieved UPnP certification from the Universal Plug and Play Forum UPnP™ Implementers Corp. (UIC). ZyXEL's UPnP implementation supports Internet Gateway Device (IGD) 1.0.
See Section 7.9 on page 108 for examples of installing and using UPnP.
7.1.2.3 About File Sharing
Workgroup name
This is the name given to a set of computers that are connected on a network and share resources such as a printer or files. Windows automatically assigns the workgroup name when you set up a network.
Shares
When settings are set to default, each USB device connected to the Device is given a folder, called a "share". If a USB hard drive connected to the Device has more than one partition, then each partition will be allocated a share. You can also configure a "share" to be a sub-folder or file on the USB device.
File Systems
A file system is a way of storing and organizing files on your hard drive and storage device. Often different operating systems such as Windows or Linux have different file systems. The file sharing feature on your Device supports File Allocation Table (FAT) and FAT32.
Common Internet File System
The Device uses Common Internet File System (CIFS) protocol for its file sharing functions. CIFS compatible computers can access the USB file storage devices connected to the Device. CIFS protocol is supported on Microsoft Windows, Linux Samba and other operating systems (refer to your systems specifications for CIFS compatibility).
7.1.2.4 About Printer Server
Print Server
This is a computer or other device which manages one or more printers, and which sends print jobs to each printer from the computer itself or other devices.
Operating System
An operating system (OS) is the interface which helps you manage a computer. Common examples are Microsoft Windows, Mac OS or Linux.
TCP/IP
TCP/IP (Transmission Control Protocol/ Internet Protocol) is a set of communications protocols that most of the Internet runs on.
Port
A port maps a network service such as http to a process running on your computer, such as a process run by your web browser. When traffic from the Internet is received on your computer, the port number is used to identify which process running on your computer it is intended for.
Supported OSs
Your operating system must support TCP/IP ports for printing and be compatible with the RAW (port 9100) protocol.
The following OSs support Device's printer sharing feature.
- Microsoft Windows 95, Windows 98 SE (Second Edition), Windows Me, Windows NT 4.0, Windows 2000, Windows XP or Macintosh OS X.
7.2 The LAN Setup Screen
Click Network Setting > Home Networking to open the LAN Setup screen. Use this screen to set the Local Area Network IP address and subnet mask of your Device and configure the DNS server information that the Device sends to the DHCP client devices on the LAN.
Figure 25 Network Setting > Home Networking > LAN Setup
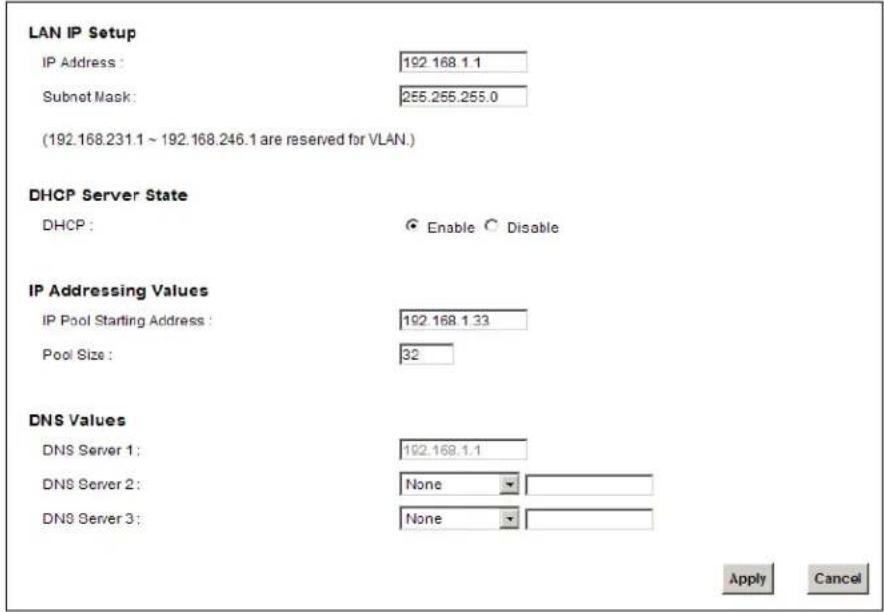
The following table describes the fields in this screen.
Table 12 Network Setting > Home Networking > LAN Setup
| LABEL DESCRIPTION | |
| LAN IP Setup | |
| IP Address Enter the | LAN IP address you want to assign to your Device in dotted decimal notation, for example, 192.168.1.1 (factory default). |
| IP Subnet Mask | Type the subnet mask of your network in dotted decimal notation, for example 255.255.255.0 (factory default). Your Device automatically computes the subnet mask based on the IP address you enter, so do not change this field unless you are instructed to do so. |
| DHCP Server State | |
| DHCP | Select Enable to have your Device assign IP addresses, an IP default gateway and DNS servers to LAN computers and other devices that are DHCP clients.If you select Disable, you need to manually configure the IP addresses of the computers and other devices on your LAN.When DHCP is used, the following fields need to be set. |
| IP Addressing Values | |
| IP Pool Starting Address | This field specifies the first of the contiguous addresses in the IP address pool. |
| Pool Size This field specifies the size, or count of the IP address pool. | |
| DNS Values | |
| DNS Server 1-3 | Select From ISP if your ISP dynamically assigns DNS server information (and the Device's WAN IP address).Select User-Defined if you have the IP address of a DNS server. Enter the DNS server's IP address in the field to the right. If you chose User-Defined, but leave the IP address set to 0.0.0.0, User-Defined changes to None after you click Apply. If you set a second choice to User-Defined, and enter the same IP address, the second User-Defined changes to None after you click Apply.Select None if you do not want to configure DNS servers. You must have another DHCP sever on your LAN, or else the computers must have their DNS server addresses manually configured. If you do not configure a DNS server, you must know the IP address of a computer in order to access it. |
| Apply Click Apply to | save your changes. |
| Cancel | Click Cancel to restore your previously saved settings. |
7.3 The Static DHCP Screen
This table allows you to assign IP addresses on the LAN to specific individual computers based on their MAC Addresses.
Every Ethernet device has a unique MAC (Media Access Control) address. The MAC address is assigned at the factory and consists of six pairs of hexadecimal characters, for example, 00:A0:C5:00:00:02.
7.3.1 Before You Begin
Find out the MAC addresses of your network devices if you intend to add them to the Static DHCP screen.
Use this screen to change your Device's static DHCP settings. Click Network Setting > Home Networking > Static DHCP to open the following screen.
Figure 26 Network Setting > Home Networking > Static DHCP

The following table describes the labels in this screen.
Table 13 Network Setting > Home Networking > Static DHCP
| LABEL DESCRIPTION | |
| Add new static lease | Click this to add a new static DHCP entry. |
| # This is the index | number of the entry. |
| Status This field displays whether the client is connected to the Device. | |
| Host Name This field displays the client host name. | |
| MAC Address The MAC (Media Access Control) or Ethernet address on a LAN (Local Area Network) is unique to your computer (six pairs of hexadecimal notation).A network interface card such as an Ethernet adapter has a hardwired address that is assigned at the factory. This address follows an industry standard that ensures no other adapter has a similar address. | |
| IP Address This field displays the IP address relative to the # field listed above. | |
| Reserve Select the check box in the heading row to automatically select all check boxes or select the check box(es) in each entry to have the Device always assign the selected entry(ies)'s IP address(es) to the corresponding MAC address(es) (and host name(s)). You can select up to 128 entries in this table. | |
| Apply Click Apply to save your changes. | |
| Cancel | Click Cancel to restore your previously saved settings. |
| Refresh Click Refresh to reload the DHCP table. | |
If you click Add new static lease in the Static DHCP screen, the following screen displays.
Figure 27 Static DHCP: Add
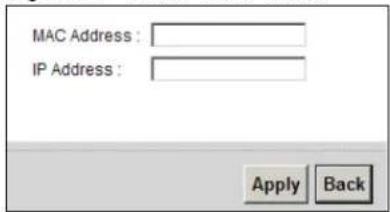
The following table describes the labels in this screen.
Table 14 Static DHCP: Add
| LABEL DESCRIPTION | |
| MAC Address Enter | the MAC address of a computer on your LAN. |
| IP Address Enter the | IP address that you want to assign to the computer on your LAN with the MAC address that you will also specify. |
| Apply Click Apply to save your changes. | |
| Back Click Back to exit this screen without saving. | |
7.4 The UPnP Screen
Universal Plug and Play (UPnP) is a distributed, open networking standard that uses TCP/IP for simple peer-to-peer network connectivity between devices. A UPnP device can dynamically join a network, obtain an IP address, convey its capabilities and learn about other devices on the network. In turn, a device can leave a network smoothly and automatically when it is no longer in use.
See page 108 for more information on UPnP.
Use the following screen to configure the UPnP settings on your Device. Click Network Setting > Home Networking > Static DHCP > UPnP to display the screen shown next.
Figure 28 Network Setting > Home Networking > UPnP
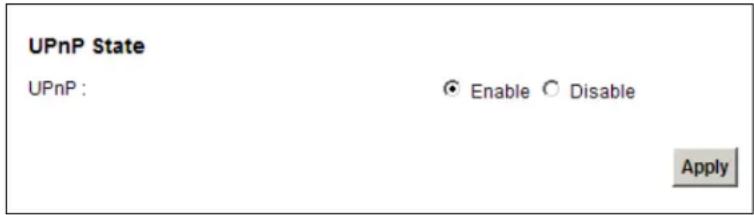
The following table describes the labels in this screen.
Table 15 Network Settings > Home Networking > UPnP
| LABEL DESCRIPTION | |
| UPnP | Select Enable to activate UPnP. Be aware that anyone could use a UPnP application to open the web configurator's login screen without entering the Device's IP address (although you must still enter the password to access the web configurator). |
| Apply Click Apply to save your changes. | |
7.5 The File Sharing Screen
You can share files on a USB memory stick or hard drive connected to your Device with users on your network.
The following figure is an overview of the Device's file server feature. Computers A and B can access files on a USB device (C) which is connected to the Device.
Figure 29 File Sharing Overview
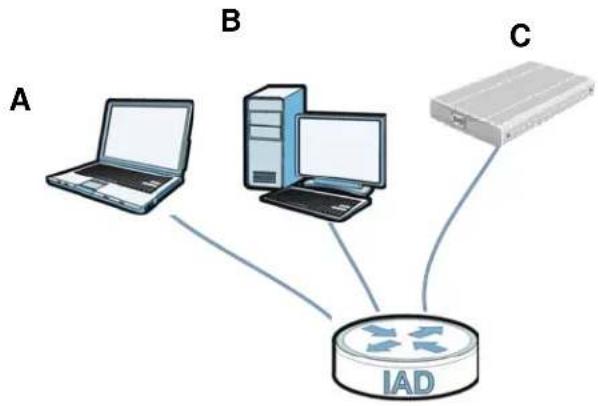
flowchart
graph TD
    A["Device A"] --> R["Router"]
    B["Device B"] --> R
    C["Device C"] --> R
    R --> I["Router"]
The Device will not be able to join the workgroup if your local area network has restrictions set up that do not allow devices to join a workgroup. In this case, contact your network administrator.
7.5.1 Before You Begin
Make sure the Device is connected to your network and turned on.
1 Connect the USB device to one of the Device's USB ports. Make sure the Device is connected to your network.
2 The Device detects the USB device and makes its contents available for browsing. If you are connecting a USB hard drive that comes with an external power supply, make sure it is connected to an appropriate power source that is on.
Note: If your USB device cannot be detected by the Device, see the troubleshooting for suggestions.
Use this screen to set up file sharing using the Device. To access this screen, click Network Setting > Home Networking > File Sharing.
Figure 30 Network Setting > Home Networking > File Sharing
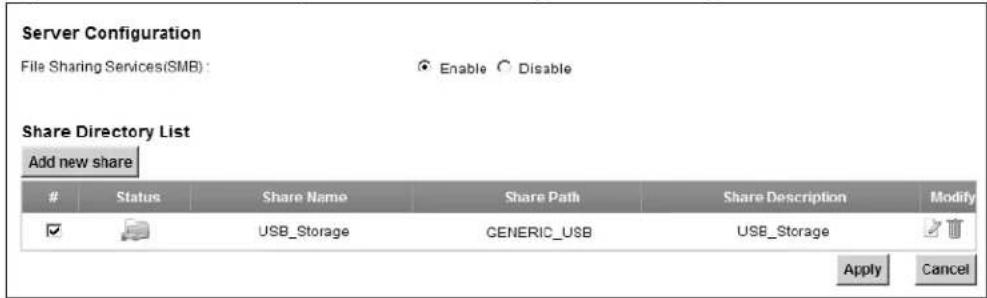
Each field is described in the following table.
Table 16 Network Setting > Home Networking > File Sharing
| LABEL DESCRIPTION | |
| Server Configuration | |
| File Sharing Services (SMB) | Select Enable to activate file sharing through the Device. |
| Add new share Click | this to set up a new share on the Device. |
| # Select the check | box to make the share available to the network. Otherwise, clear this. |
| Status | This shows whether or not the share is available for sharing. |
| Share Name | This field displays the share name on the Device. |
| Share Path | This field displays the path for the share directories (folders) on the Device. These are the directories (folders) on your USB storage device. |
| Share Description | This field displays information about the share. |
| Modify | Click the Edit icon to change the settings of an existing share.Click the Delete icon to delete this share in the list. |
| Apply | Click Apply to save your changes. |
| Cancel | Click Cancel to restore your previously saved settings. |
7.5.2 Add/Edit File Sharing
Use this screen to set up a new share or edit an existing share on the Device. Click Add new share in the File Sharing screen or click the Edit icon next to an existing share.
Figure 31 File Sharing: Add/Edit
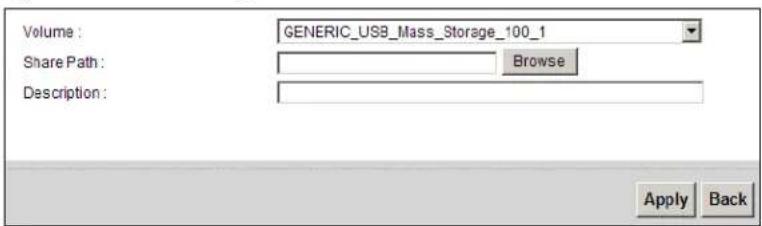
Each field is described in the following table.
Table 17 File Sharing: Add/Edit
| LABEL DESCRIPTION | |
| Volume | Select the volume in the USB storage device that you want to add as a share in the Device.This field is read-only when you are editing the share. |
| Share Path | Manually enter the file path for the share, or click theBrowsebutton and select the folder that you want to add as a share.This field is read-only when you are editing the share. |
| Description | You can either enter a short description of the share, or leave this field blank. |
| Apply | ClickApplyto save your changes. |
| Back | ClickBackto return to the previous screen. |
7.6 The Media Server Screen
The media server feature lets anyone on your network play video, music, and photos from the USB storage device connected to your Device (without having to copy them to another computer). The Device can function as a DLNA-compliant media server. The Device streams files to DLNA-compliant media clients (like Windows Media Player). The Digital Living Network Alliance (DLNA) is a group of personal computer and electronics companies that works to make products compatible in a home network.
The Device media server enables you to:
- Publish all shares for everyone to play media files in the USB storage device connected to the Device.
- Use hardware-based media clients like the DMA-2500 to play the files.
Note: Anyone on your network can play the media files in the published shares. No user name and password or other form of security is used. The media server is enabled by default with the video, photo, and music shares published.
To change your Device's media server settings, click Network Setting > Home Networking > Media Server. The screen appears as shown.
Figure 32 Network Setting > Home Networking > Media Server
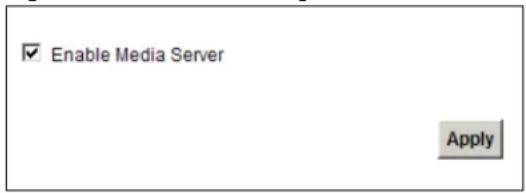
The following table describes the labels in this menu.
Table 18 Network Setting > Home Networking > Media Server
| LABEL DESCRIPTION | |
| Enable Media Server | Check this to have the Device function as a DLNA-compliant media server. Enable the media server to let (DLNA-compliant) media clients on your network play media files located in the shares. |
| Apply | Click Apply to save your changes. |
7.7 The Printer Server Screen
The Device allows you to share a USB printer on your LAN. You can do this by connecting a USB printer to one of the USB ports on the Device and then configuring a TCP/IP port on the computers connected to your network.
Figure 33 Sharing a USB Printer
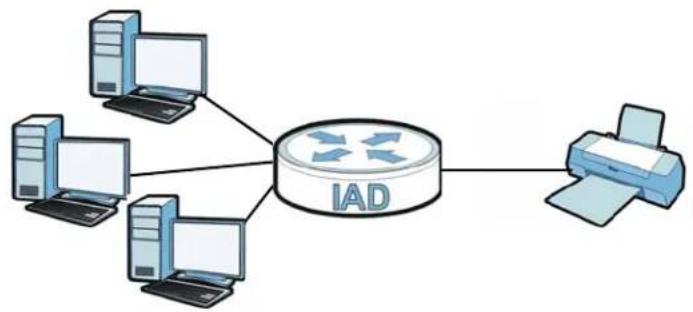
flowchart
graph TD
    A["Server"] --> B["Router"]
    C["Client 1"] --> B
    D["Client 2"] --> B
    E["Client 3"] --> B
    F["Printer"] --> B
    B --> G["Output"]
7.7.1 Before You Begin
To configure the print server you need the following:
- Your Device must be connected to your computer and any other devices on your network. The USB printer must be connected to your Device.
- A USB printer with the driver already installed on your computer.
- The computers on your network must have the printer software already installed before they can create a TCP/IP port for printing via the network. Follow your printer manufacturers instructions on how to install the printer software on your computer.
Note: Your printer's installation instructions may ask that you connect the printer to your computer. Connect your printer to the Device instead.
Use this screen to enable or disable sharing of a USB printer via your Device.
To access this screen, click Network Setting > Home Networking > Printer Server.
Figure 34 Network Setting > Home Networking > Printer Server
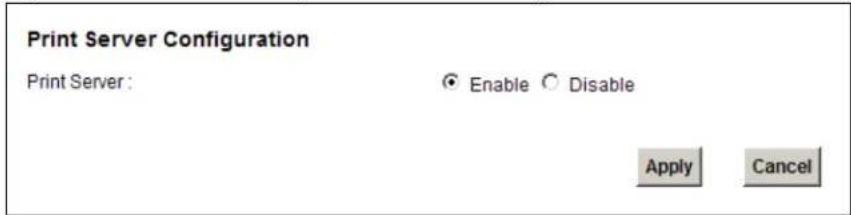
The following table describes the labels in this menu.
Table 19 Network Setting > Home Networking > Print Server
| LABEL DESCRIPTION | |
| Printer Server | Select Enable to have the Device share a USB printer. |
| Apply Click Apply to save your changes. | |
| Cancel | Click Cancel to restore your previously saved settings. |
7.8 Technical Reference
This section provides some technical background information about the topics covered in this chapter.
LANs, WANs and the Device
The actual physical connection determines whether the Device ports are LAN or WAN ports. There are two separate IP networks, one inside the LAN network and the other outside the WAN network as shown next.
Figure 35 LAN and WAN IP Addresses
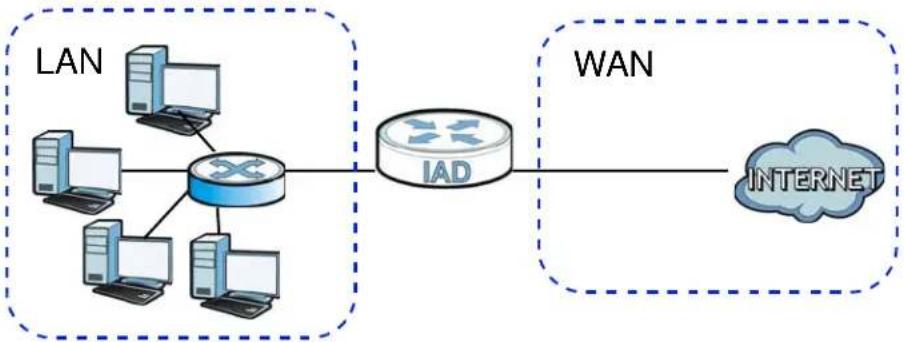
flowchart
graph LR
    subgraph LAN
        A["Computer"] --> C["Router"]
        B["Computer"] --> C
        D["Computer"] --> C
        E["Computer"] --> C
    end
    subgraph WAN
        F["IAD"] --> G["INTERNET"]
    end
DHCP Setup
DHCP (Dynamic Host Configuration Protocol, RFC 2131 and RFC 2132) allows individual clients to obtain TCP/IP configuration at start-up from a server. You can configure the Device as a DHCP server or disable it. When configured as a server, the Device provides the TCP/IP configuration for the clients. If you turn DHCP service off, you must have another DHCP server on your LAN, or else the computer must be manually configured.
IP Pool Setup
The Device is pre-configured with a pool of IP addresses for the DHCP clients (DHCP Pool). See the product specifications in the appendices. Do not assign static IP addresses from the DHCP pool to your LAN computers.
LAN TCP/IP
The Device has built-in DHCP server capability that assigns IP addresses and DNS servers to systems that support DHCP client capability.
IP Address and Subnet Mask
Similar to the way houses on a street share a common street name, so too do computers on a LAN share one common network number.
Where you obtain your network number depends on your particular situation. If the ISP or your network administrator assigns you a block of registered IP addresses, follow their instructions in selecting the IP addresses and the subnet mask.
If the ISP did not explicitly give you an IP network number, then most likely you have a single user account and the ISP will assign you a dynamic IP address when the connection is established. If this is the case, it is recommended that you select a network number from 192.168.0.0 to 192.168.255.0 and you must enable the Network Address Translation (NAT) feature of the Device. The Internet Assigned Number Authority (IANA) reserved this block of addresses specifically for private use; please do not use any other number unless you are told otherwise. Let's say you select 192.168.1.0 as the network number; which covers 254 individual addresses, from 192.168.1.1 to 192.168.1.254 (zero and 255 are reserved). In other words, the first three numbers specify the network number while the last number identifies an individual computer on that network.
Once you have decided on the network number, pick an IP address that is easy to remember, for instance, 192.168.1.1, for your Device, but make sure that no other device on your network is using that IP address.
The subnet mask specifies the network number portion of an IP address. Your Device will compute the subnet mask automatically based on the IP address that you entered. You don't need to change the subnet mask computed by the Device unless you are instructed to do otherwise.
Private IP Addresses
Every machine on the Internet must have a unique address. If your networks are isolated from the Internet, for example, only between your two branch offices, you can assign any IP addresses to the hosts without problems. However, the Internet Assigned Numbers Authority (IANA) has reserved the following three blocks of IP addresses specifically for private networks:
• 10.0.0.0 — 10.255.255.255
• 172.16.0.0 — 172.31.255.255
• 192.168.0.0 — 192.168.255.255
You can obtain your IP address from the IANA, from an ISP or it can be assigned from a private network. If you belong to a small organization and your Internet access is through an ISP, the ISP can provide you with the Internet addresses for your local networks. On the other hand, if you are part of a much larger organization, you should consult your network administrator for the appropriate IP addresses.
Note: Regardless of your particular situation, do not create an arbitrary IP address; always follow the guidelines above. For more information on address assignment, please refer to RFC 1597, "Address Allocation for Private Internets" and RFC 1466, "Guidelines for Management of IP Address Space".
Device Print Server Compatible USB Printers
The following is a list of USB printer models compatible with the Device print server.
Table 20 Compatible USB Printers
| BRAND MODEL | |
| Brother MFC7420 | |
| CANON BJ F9000 | |
| CANON i320 | |
| CANON PIXMA MP450 | |
| CANON PIXMA MP730 | |
| CANON PIXMA MP780 | |
| CANON PIXMA MP830 | |
| CANON PIXUS ip2500 | |
| CANON PIXMA ip4200 | |
| CANON PIXMA ip5000 | |
| CANON PIXUS 990i | |
| EPSON CX3500 | |
| EPSON CX3900 | |
| EPSON EPL-5800 | |
| EPSON EPL-6200L | |
| EPSON LP-2500 | |
| EPSON LP-8900 | |
| EPSON RX 510 | |
| EPSON RX 530 | |
| EPSON Stylus 830U | |
| EPSON Stylus 1270 | |
| EPSON Stylus C43UX | |
| EPSON Stylus C60 | |
| EPSON Stylus Color 670 | |
| HP Deskjet 5550 | |
| HP Deskjet 5652 | |
| HP Deskjet 830C | |
| HP Deskjet 845C | |
| HP Deskjet 1125C | |
| HP Deskjet 1180C | |
| HP Deskjet 1220C | |
| HP Deskjet F4185 | |
| HP Laserjet 1022 | |
| HP Laserjet 1200 | |
| HP Laserjet 2200D | |
| HP Laserjet 2420 | |
| HP Color Laserjet 1500L | |
| HP Laserjet 3015 | |
| HP Officejet 4255 | |
| HP Officejet 5510 | |
| HP Officejet 5610 | |
| HP Officejet 7210 | |
| HP Officejet Pro L7380 | |
| HP Photosmart 2610 | |
| HP Photosmart 3110 | |
| HP Photosmart 7150 | |
| HP Photosmart 7830 | |
| HP Photosmart C5280 | |
| HP Photosmart D5160 | |
| HP PSC 1350 | |
| HP PSC 1410 | |
| IBM Infoprint 1332 | |
| LEXMARK Z55 | |
| LEXMARK Z705 | |
| OKI B4350 | |
| SAMSUNG ML-1710 | |
| SAMSUNG SCX-4016 |
7.9 Installing UPnP in Windows Example
This section shows how to install UPnP in Windows Me and Windows XP.
Installing UPnP in Windows Me
Follow the steps below to install the UPnP in Windows Me.
1 Click Start and Control Panel. Double-click Add/ Remove Programs.
2 Click the Windows Setup tab and select Communication in the Components selection box. Click Details.
Figure 36 Add/Remove Programs: Windows Setup: Communication
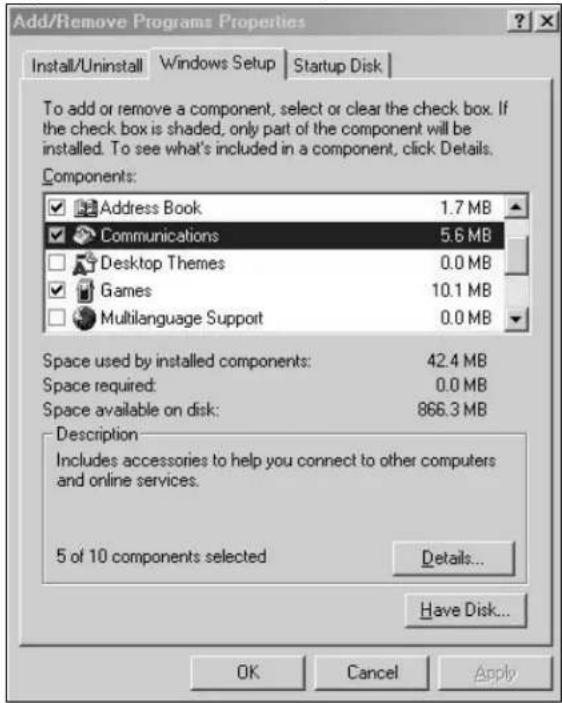
3 In the Communications window, select the Universal Plug and Play check box in the Components selection box.
Figure 37 Add/Remove Programs: Windows Setup: Communication: Components
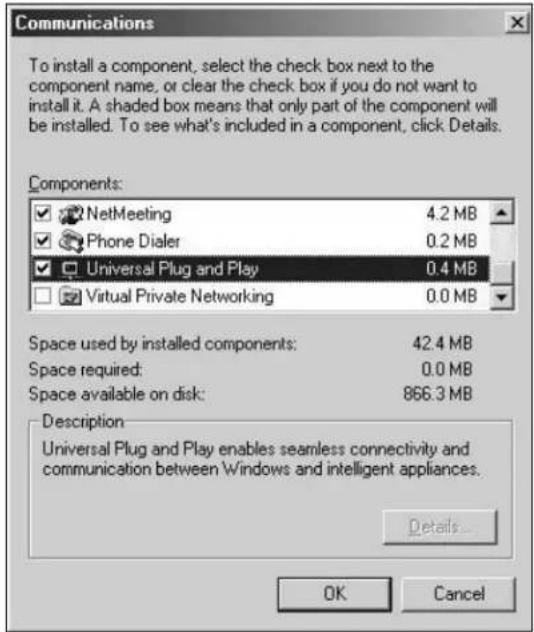
4 Click OK to go back to the Add/ Remove Programs Properties window and click Next.
5 Restart the computer when prompted.
Installing UPnP in Windows XP
Follow the steps below to install the UPnP in Windows XP.
1 Click Start and Control Panel.
2 Double-click Network Connections.
3 In the Network Connections window, click Advanced in the main menu and select Optional Networking Components ....
Figure 38 Network Connections
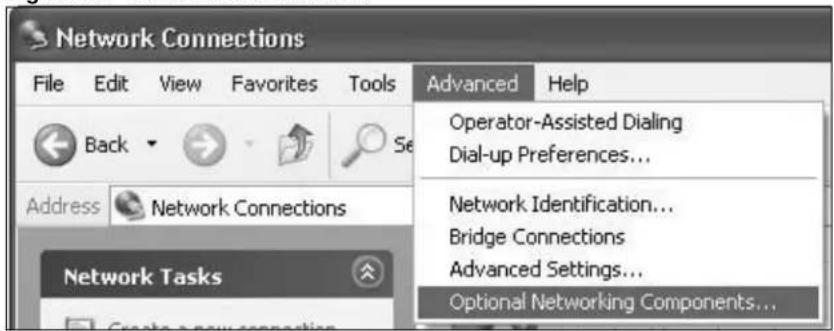
4 The Windows Optional Networking Components Wizard window displays. Select Networking Service in the Components selection box and click Details.
Figure 39 Windows Optional Networking Components Wizard
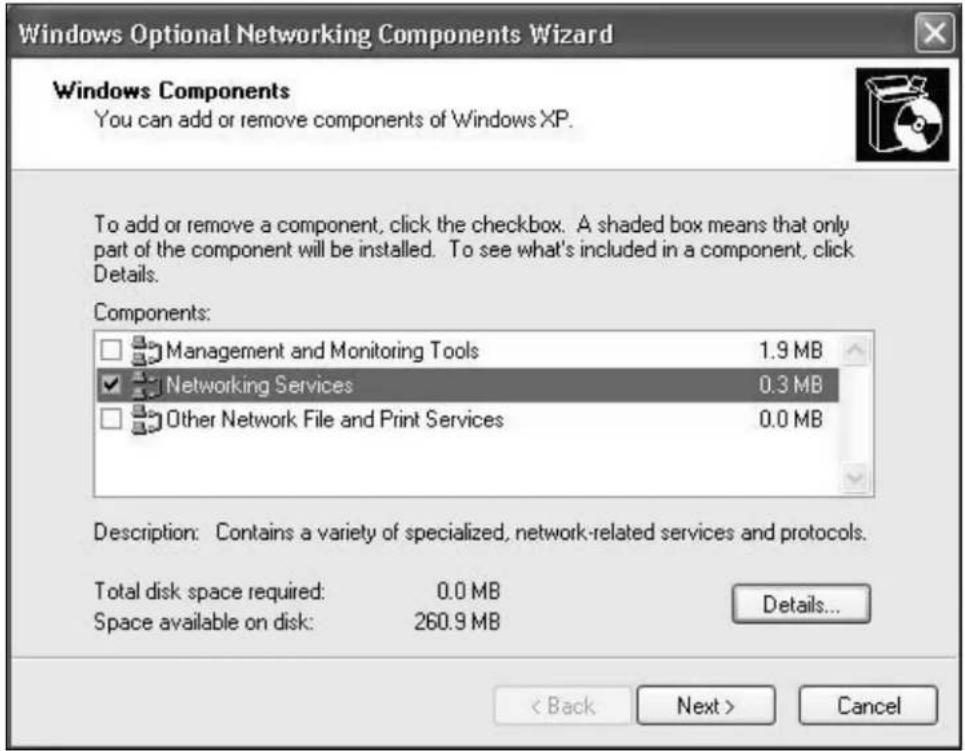
5 In the Networking Services window, select the Universal Plug and Play check box.
Figure 40 Networking Services
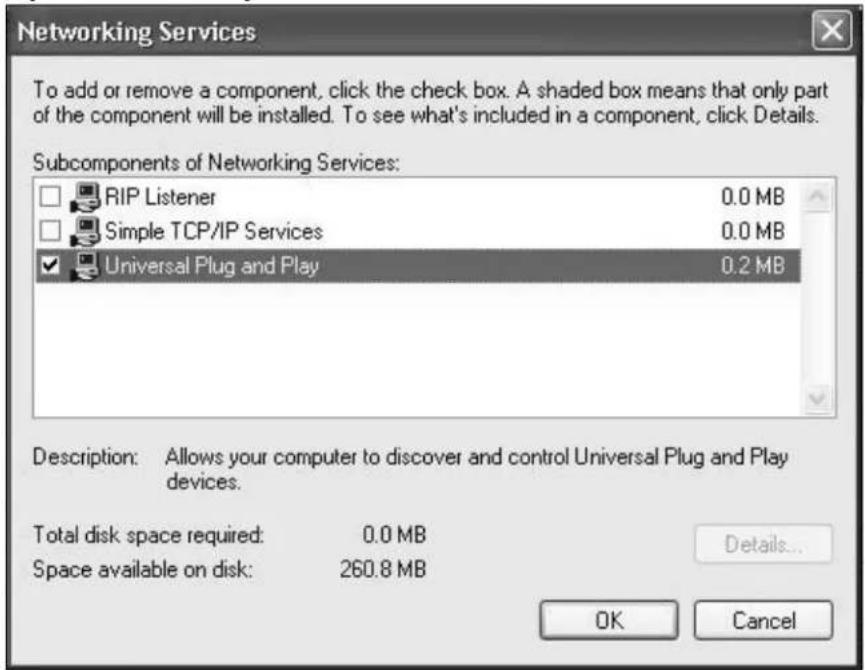
6 Click OK to go back to the Windows Optional Networking Component Wizard window and click Next.
7.10 Using UPnP in Windows XP Example
This section shows you how to use the UPnP feature in Windows XP. You must already have UPnP installed in Windows XP and UPnP activated on the Device.
Make sure the computer is connected to a LAN port of the Device. Turn on your computer and the Device.
Auto-discover Your UPnP-enabled Network Device
1 Click Start and Control Panel. Double-click Network Connections. An icon displays under Internet Gateway.
2 Right-click the icon and select Properties.
Figure 41 Network Connections
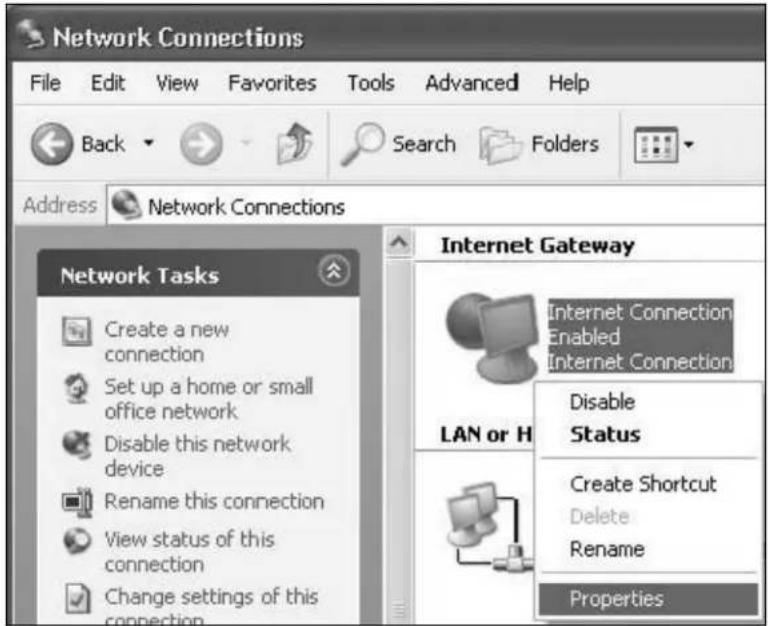
3 In the Internet Connection Properties window, click Settings to see the port mappings there were automatically created.
Figure 42 Internet Connection Properties
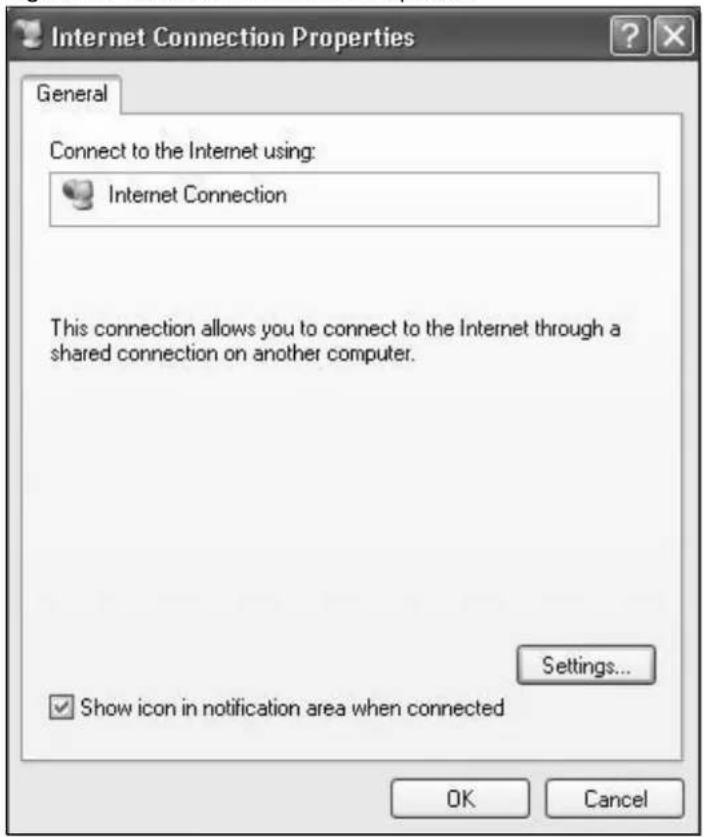
4 You may edit or delete the port mappings or click Add to manually add port mappings.
Figure 43 Internet Connection Properties: Advanced Settings
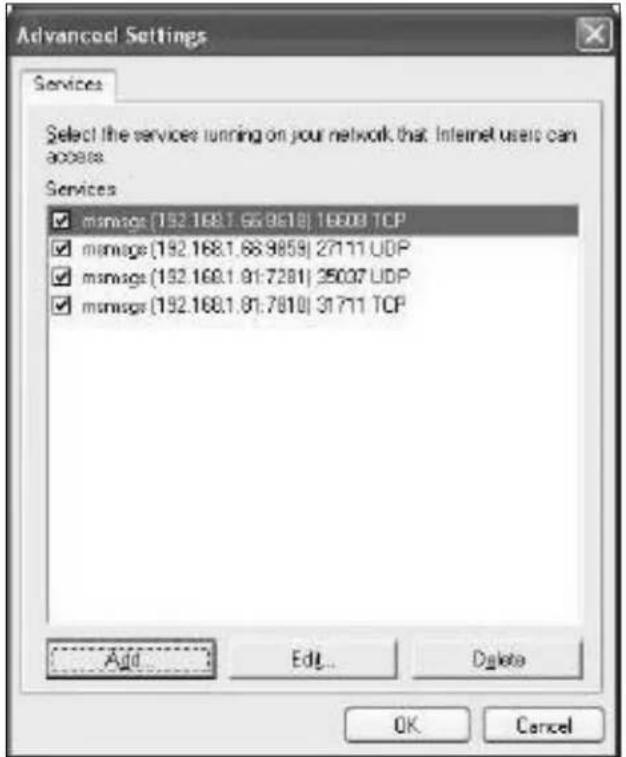
Figure 44 Internet Connection Properties: Advanced Settings: Add
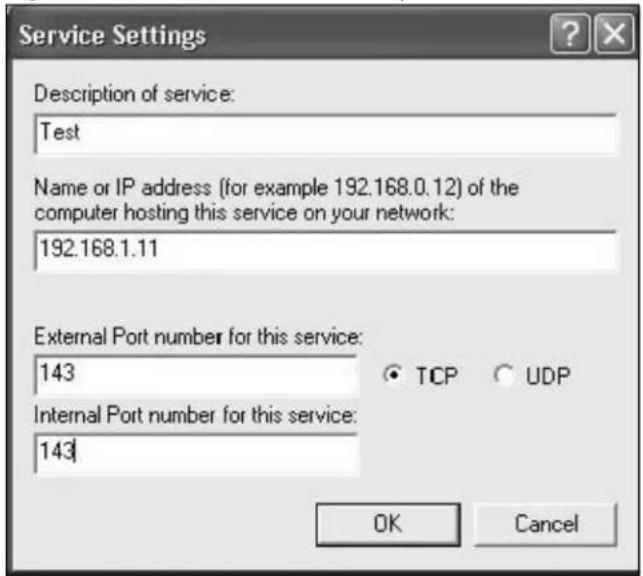
5 When the UPnP-enabled device is disconnected from your computer, all port mappings will be deleted automatically.
6 Select Show icon in notification area when connected option and click OK. An icon displays in the system tray.
Figure 45 System Tray Icon
7 Double-click on the icon to display your current Internet connection status.
Figure 46 Internet Connection Status
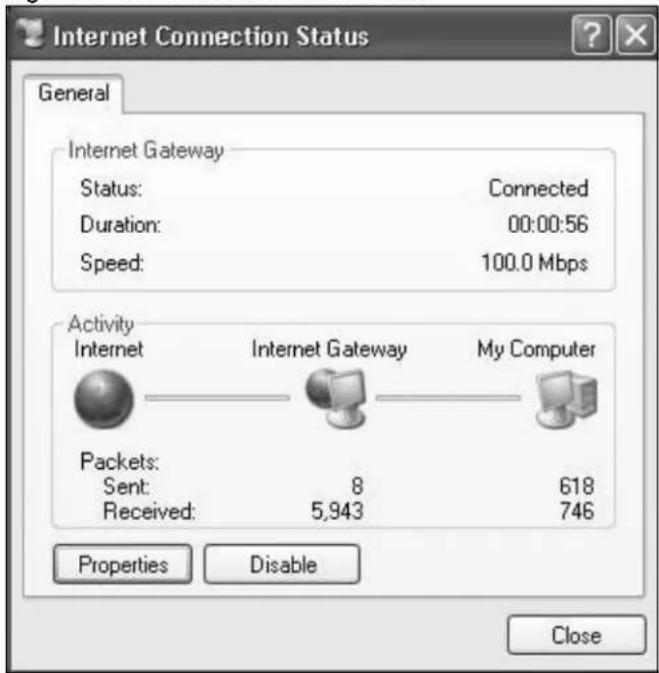
Web Configurator Easy Access
With UPnP, you can access the web-based configurator on the Device without finding out the IP address of the Device first. This comes helpful if you do not know the IP address of the Device.
Follow the steps below to access the web configurator.
1 Click Start and then Control Panel.
2 Double-click Network Connections.
3 Select My Network Places under Other Places.
Figure 47 Network Connections
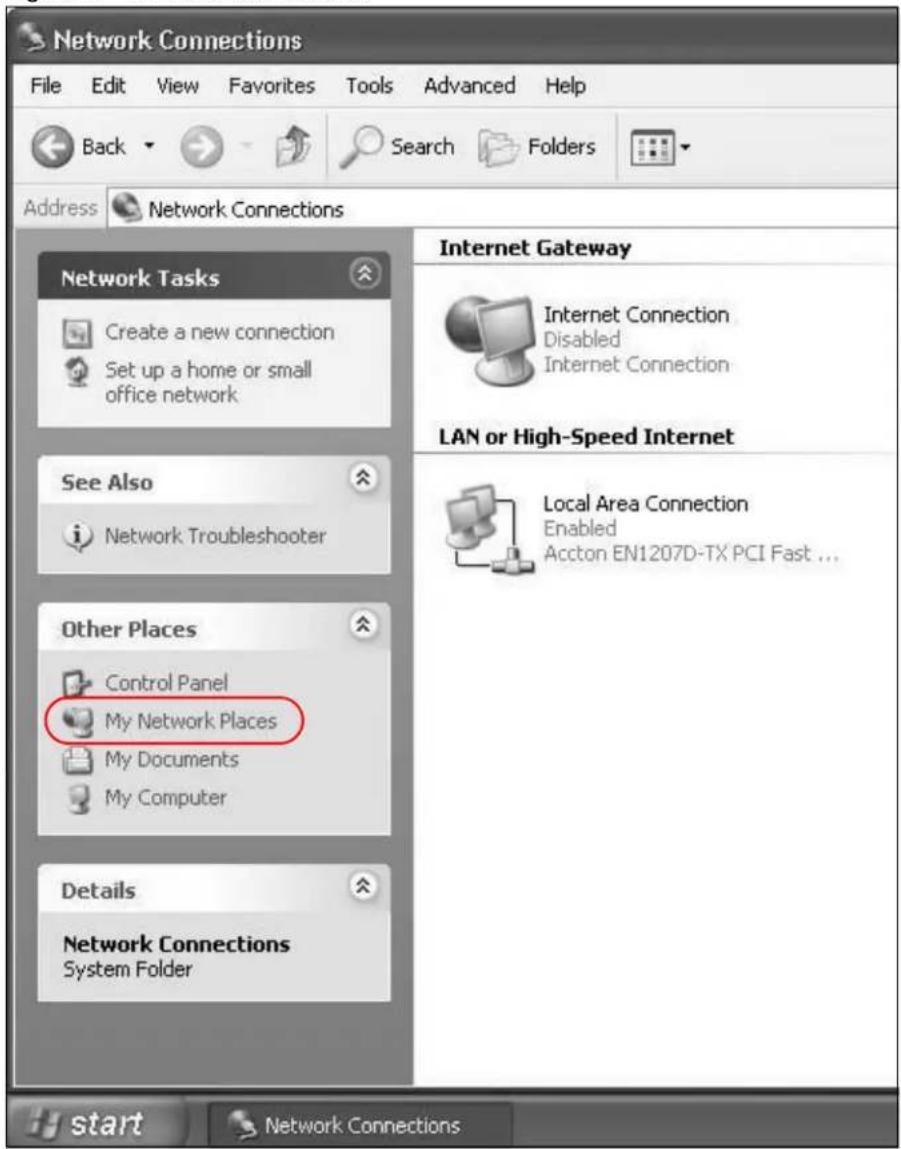
4 An icon with the description for each UPnP-enabled device displays under Local Network.
5 Right-click on the icon for your Device and select Invoke. The web configurator login screen displays.
Figure 48 Network Connections: My Network Places
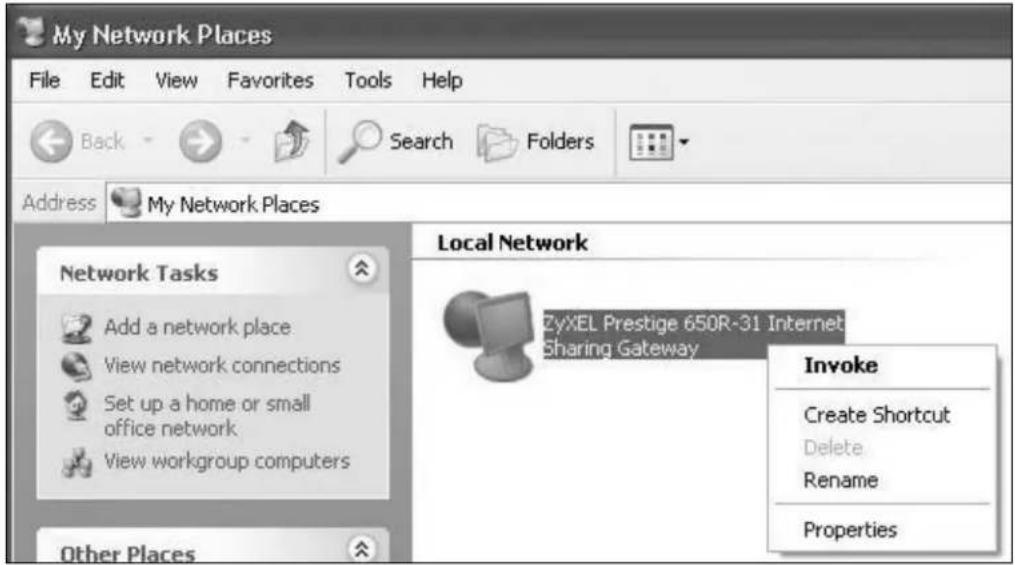
6 Right-click on the icon for your Device and select Properties. A properties window displays with basic information about the Device.
Figure 49 Network Connections: My Network Places: Properties: Example
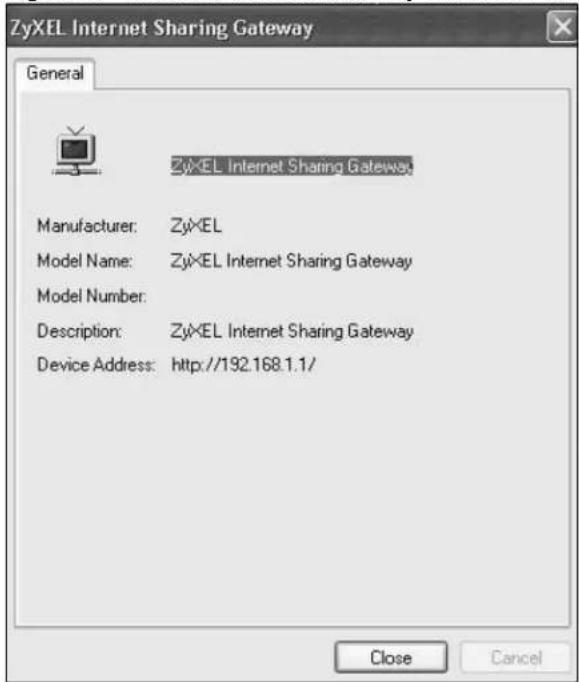
8.1 Overview
The Device usually uses the default gateway to route outbound traffic from computers on the LAN to the Internet. To have the Device send data to devices not reachable through the default gateway, use static routes.
For example, the next figure shows a computer (A) connected to the Device's LAN interface. The Device routes most traffic from A to the Internet through the Device's default gateway (R1). You create one static route to connect to services offered by your ISP behind router R2. You create another static route to communicate with a separate network behind a router R3 connected to the LAN.
Figure 50 Example of Static Routing Topology
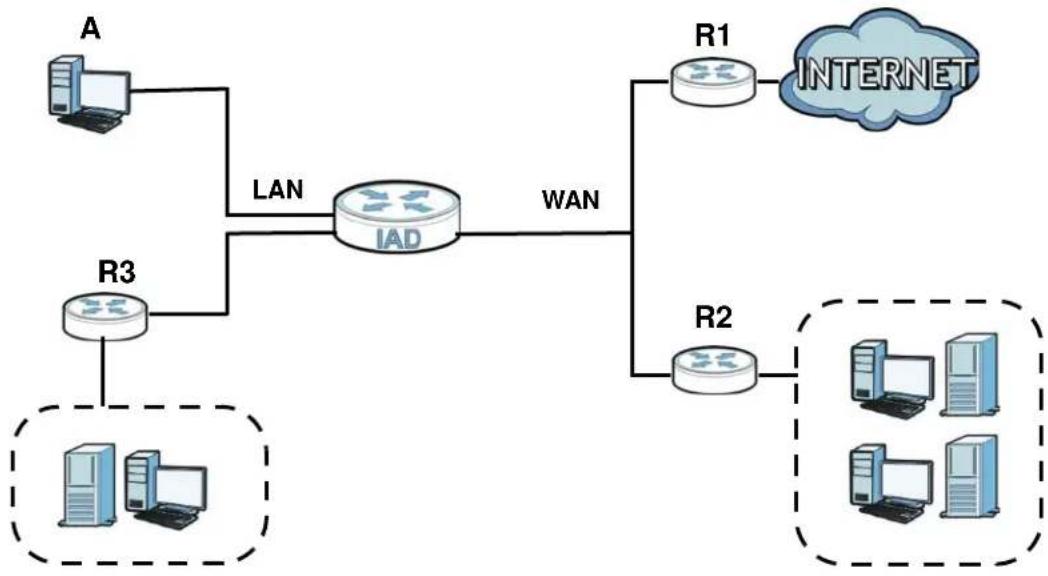
flowchart
graph TD
    A["Computer"] -->|LAN| IAD["IAD"]
    R3["Router R3"] -->|LAN| IAD
    IAD -->|WAN| R1["R1"]
    R1 -->|INTERNET| Cloud["Cloud"]
    R2["R2"] -->|INTERNET| Server1["Server"]
    R2 --> Server2["Server"]
    Server1 --> Server3["Server"]
    Server2 --> Server4["Server"]
8.2 Configuring Static Route
Use this screen to view and configure IP static routes on the Device. Click Network Setting > Static Route to open the following screen.
Figure 51 Network Setting > Static Route

The following table describes the labels in this screen.
Table 21 Network Setting > Static Route
| LABEL DESCRIPTION | |
| Add New Static Route | Click this to set up a new static route on the Device. |
| # This is the number of an individual static route. | |
| Active This indicates whether the rule is active or not.A yellow bulb signifies that this static route is active. A gray bulb signifies that this static route is not active. | |
| Status | This shows whether the static route is currently in use or not. A yellow bulb signifies that this static route is in use. A gray bulb signifies that this static route is not in use. |
| Name | This is the name that describes or identifies this route. |
| Destination IP | This parameter specifies the IP network address of the final destination. Routing is always based on network number. |
| Gateway | This is the IP address of the gateway. The gateway is a router or switch on the same network segment as the device's LAN or WAN port. The gateway helps forward packets to their destinations. |
| Subnet Mask | This parameter specifies the IP network subnet mask of the final destination. |
| Modify | Click the Edit icon to go to the screen where you can set up a static route on the Device.Click the Delete icon to remove a static route from the Device. |
8.2.1 Add/Edit Static Route
Click add new Static Route in the Routing screen or click the Edit icon next to a rule. The following screen appears. Use this screen to configure the required information for a static route.
Figure 52 Routing: Add/Edit
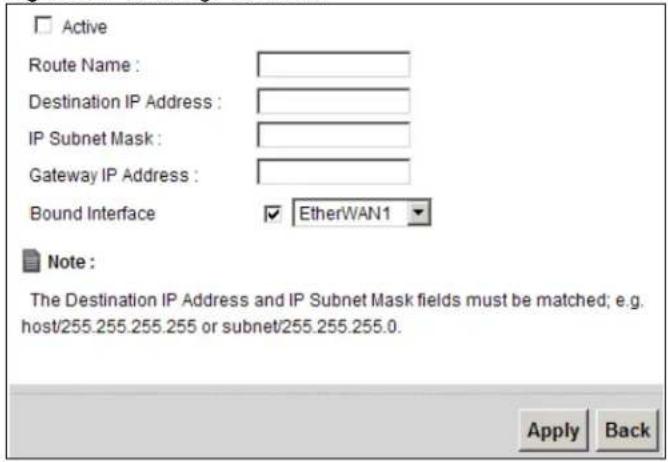
The following table describes the labels in this screen.
Table 22 Routing: Add/Edit
| LABEL DESCRIPTION | |
| Active Click this to activate this static route. | |
| Route Name | Enter the name of the IP static route. Leave this field blank to delete this static route. |
| Destination IP Address | This parameter specifies the IP network address of the final destination. Routing is always based on network number. If you need to specify a route to a single host, use a subnet mask of 255.255.255.255 in the subnet mask field to force the network number to be identical to the host ID. |
| IP Subnet Mask | Enter the IP subnet mask here. |
| Gateway IP Address | You can decide if you want to forward packets to a gateway IP address or a bound interface.If you want to configure Gateway IP Address, enter the IP address of the next-hop gateway. The gateway is a router or switch on the same network segment as the device's LAN or WAN port. The gateway helps forward packets to their destinations. |
| Bound Interface | You can decide if you want to forward packets to a gateway IP address or a bound interface.If you want to configure Bound Interface, select the check box and choose an interface through which the traffic is sent. You must have the WAN interface(s) already configured in the Broadband screen. |
| Apply | Click Apply to save your changes. |
| Back | Click Back to exit this screen without saving. |
Quality of Service (QoS)
9.1 Overview
This chapter discusses the Device's QoS screens. Use these screens to set up your Device to use QoS for traffic management.
Quality of Service (QoS) refers to both a network's ability to deliver data with minimum delay, and the networking methods used to control the use of bandwidth. QoS allows the Device to group and prioritize application traffic and fine-tune network performance.
Without QoS, all traffic data is equally likely to be dropped when the network is congested. This can cause a reduction in network performance and make the network inadequate for time-critical application such as video-on-demand.
The Device assigns each packet a priority and then queues the packet accordingly. Packets assigned a high priority are processed more quickly than those with low priority if there is congestion, allowing time-sensitive applications to flow more smoothly. Time-sensitive applications include both those that require a low level of latency (delay) and a low level of jitter (variations in delay) such as Internet gaming, and those for which jitter alone is a problem such as Internet radio or streaming video.
Note: The Device has built-in configurations for Voice over IP (IP). The Quality of Service (QoS) feature does not affect VoIP traffic.
• See Section 9.6 on page 130 for advanced technical information on SIP.
9.1.1 What You Can Do in this Chapter
- Use the General screen to enable QoS, set the bandwidth, and allow the Device to automatically assign priority to upstream traffic according to the IEEE 802.1p priority level, IP precedence or packet length (Section 9.2 on page 122).
- Use the Queue Setup screen to configure QoS queue assignment (Section 9.3 on page 123).
- Use the Class Setup screen to set up classifiers to sort traffic into different flows and assign priority and define actions to be performed for a classified traffic flow (Section 9.4 on page 125).
- Use the Monitor screen to view the Device's QoS-related packet statistics (Section 9.5 on page 130).
9.1.2 What You Need to Know
The following terms and concepts may help as you read this chapter.
QoS versus Cos
QoS is used to prioritize source-to-destination traffic flows. All packets in the same flow are given the same priority. CoS (class of service) is a way of managing traffic in a network by grouping similar types of traffic together and treating each type as a class. You can use CoS to give different priorities to different packet types.
CoS technologies include IEEE 802.1p layer 2 tagging and DiffServ (Differentiated Services or DS). IEEE 802.1p tagging makes use of three bits in the packet header, while DiffServ is a new protocol and defines a new DS field, which replaces the eight-bit ToS (Type of Service) field in the IP header.
Tagging and Marking
In a QoS class, you can configure whether to add or change the DSCP (DiffServ Code Point) value, IEEE 802.1p priority level and VLAN ID number in a matched packet. When the packet passes through a compatible network, the networking device, such as a backbone switch, can provide specific treatment or service based on the tag or marker.
9.2 The QoS General Screen
Use this screen to enable or disable QoS, set the bandwidth, and select to have the Device automatically assign priority to upstream traffic according to the IEEE 802.1p priority level, IP precedence or packet length.
Click Network Setting > QoS to open the General screen.
Figure 53 Network Setting > QoS > General
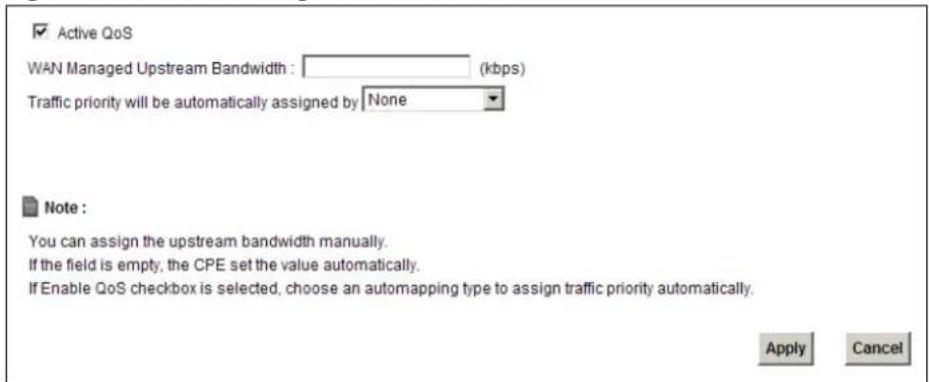
The following table describes the labels in this screen.
Table 23 Network Setting > QoS > General
| LABEL DESCRIPTION | |
| Active QoS | Select the check box to turn on QoS to improve your network performance.You can give priority to traffic that the Device forwards out through the WAN interface. Give high priority to voice and video to make them run more smoothly.Similarly, give low priority to many large file downloads so that they do not reduce the quality of other applications. |
| WAN Managed Upstream Bandwidth | Enter the amount of bandwidth for the WAN interface that you want to allocate using QoS.The recommendation is to set this speed to match the interface's actual transmission speed. For example, set the WAN interface speed to 1000 kbps if your Internet connection has an upstream transmission speed of 1 Mbps.Setting this number higher than the interface's actual transmission speed will stop lower priority traffic from being sent if higher priority traffic uses all of the actual bandwidth.If you set this number lower than the interface's actual transmission speed, the Device will not use some of the interface's available bandwidth.Leave this field blank to have the Device set this value automatically. |
| Traffic priority will be automatically assigned by | These fields are ignored if upstream traffic matches a class you configured in the Class Setup screen.If you select Ethernet Priority, IP Precedence or Packet Length and traffic does not match a class configured in the Class Setup screen, the Device assigns priority to unmatched traffic based on the IEEE 802.1p priority level, IP precedence or packet length.See Section 9.6.1 on page 131 for more information. |
| Apply Click Apply | to save your changes. |
| Cancel | Click Cancel to restore your previously saved settings. |
9.3 The Queue Setup Screen
Use this screen to configure QoS queue assignment. Click Network Setting > QoS > Queue Setup to open the screen as shown next.
Figure 54 Network Setting > QoS > Queue Setup
| # | Status | Name | Interface | Priority | Weight | Buffer Management | Rate Limit (kbps) | Modify |
| 1 | WAN_Default_Queue | WAN | 4 | 1 | DT | |||
| 2 | LAN_Default_Queue | LAN | 4 | 1 | DT | |||
| 3 | Fast | WAN | 7 | 3 | DT | |||
| 4 | Active user | WAN | 5 | 3 | DT | |||
| 5 | Passive user | WAN | 3 | 3 | DT | |||
| 6 | Slow | WAN | 1 | 3 | DT |
The following table describes the labels in this screen.
Table 24 Network Setting > QoS > Queue Setup
| LABEL DESCRIPTION | |
| Add new Queue | Click this to create a new entry. |
| # This is the index number of this entry. | |
| Status This indicates whether the queue is active or not.A yellow bulb signifies that this queue is active. A gray bulb signifies that this queue is not active. | |
| Name This shows the descriptive name of this queue. | |
| Interface | This shows the name of the Device's interface through which traffic in this queue passes. |
| Priority This shows the priority of this queue. | |
| Weight This shows the weight of this queue. | |
| Buffer Management | This shows the queue management algorithm used by the Device. |
| Rate Limit (kbps) | This shows the maximum transmission rate allowed for traffic on this queue. |
| Modify | Click the Edit icon to edit the queue.Click the Delete icon to delete an existing queue. Note that subsequent rules move up by one when you take this action. |
9.3.1 Add/Edit a QoS Queue
Use this screen to configure a queue. Click Add new queue in the Queue Setup screen or the Edit icon next to an existing queue.
Figure 55 Queue Setup: Add/Edit
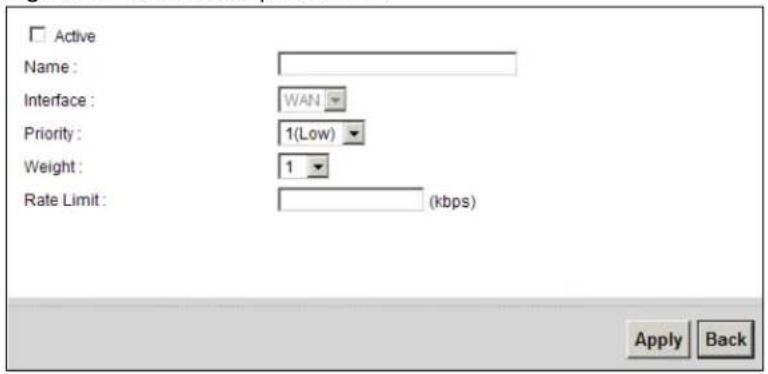
The following table describes the labels in this screen.
Table 25 Queue Setup: Add/Edit
| LABEL DESCRIPTION | |
| Active Select to | enable or disable this queue. |
| Name Enter the | descriptive name of this queue. |
| Interface This shows the interface of this queue. | |
| Priority Select the priority level (from 1 to 7) of this queue.The larger the number, the higher the priority level. Traffic assigned to higher priority queues gets through faster while traffic in lower priority queues is dropped if the network is congested. | |
| Weight Select the weight (from 1 to 15) of this queue.If two queues have the same priority level, the Device divides the bandwidth across the queues according to their weights. Queues with larger weights get more bandwidth than queues with smaller weights. | |
| Rate Limit | Specify the maximum transmission rate (in Kbps) allowed for traffic on this queue. |
| Apply | Click Apply to save your changes. |
| Back | Click Back to return to the previous screen without saving. |
9.4 The Class Setup Screen
Use this screen to add, edit or delete QoS classifiers. A classifier groups traffic into data flows according to specific criteria such as the source address, destination address, source port number, destination port number or incoming interface. For example, you can configure a classifier to select traffic from the same protocol port (such as Telnet) to form a flow.
You can give different priorities to traffic that the Device forwards out through the WAN interface. Give high priority to voice and video to make them run more smoothly. Similarly, give low priority to many large file downloads so that they do not reduce the quality of other applications.
Click Network Setting > QoS > Class Setup to open the following screen.
Figure 56 Network Setting > QoS > Class Setup
| Order | Status | Class Name | Classification Criteria | Foward to | DSCP Mark | 802.1P Mark | To Queue | Modify |
| 1 | From device | Interface: Local | UnChange | UnChange | UnChange | Fast | ||
| 2 | ICMP | Ether Type: IP Protocol: ICMP | UnChange | UnChange | UnChange | Fast | ||
| 3 | HTTP | Ether Type: IP Protocol TCP Destination Port: 80 | UnChange | UnChange | UnChange | Active user | ||
| 4 | HTTP-Proxy | Ether Type: IP Protocol TCP Destination Port: 8000 | UnChange | UnChange | UnChange | Active user | ||
| 5 | HTTPS | Ether Type: IP Protocol TCP Destination Port: 443 | UnChange | UnChange | UnChange | Active user | ||
| 6 | LAN or WLAN TCP po... | Ether Type: IP Protocol TCP Destination Port: 1024... | UnChange | UnChange | UnChange | Slow | ||
| 7 | LAN or WLAN UDP po... | Ether Type: IP Protocol UDP Destination Port: 1024... | UnChange | UnChange | UnChange | Slow |
The following table describes the labels in this screen.
Table 26 Network Setting > QoS > Class Setup
| LABEL DESCRIPTION | |
| Add new Classifier | Click this to create a new classifier. |
| Order | This field displays the order number of the classifier. |
| Status This indicates | whether the classifier is active or not.A yellow bulb signifies that this classifier is active. A gray bulb signifies that this classifier is not active. |
| Class Name This is the name of the classifier. | |
| Classification Criteria | This shows criteria specified in this classifier, for example the interface from which traffic of this class should come and the source MAC address of traffic that matches this classifier. |
| Forward to | This is the interface through which traffic that matches this classifier is forwarded out. |
| DSCP Mark | This is the DSCP number added to traffic of this classifier. |
| 802.1p Mark | This is the IEEE 802.1p priority level assigned to traffic of this classifier. |
| To Queue | This is the name of the queue in which traffic of this classifier is put. |
| Modify | Click the Edit icon to edit the classifier.Click the Delete icon to delete an existing classifier. Note that subsequent rules move up by one when you take this action. |
9.4.1 Add/Edit QoS Class
Click Add new Classifier in the Class Setup screen or the Edit icon next to an existing classifier to configure it.
Figure 57 Class Setup: Add/Edit
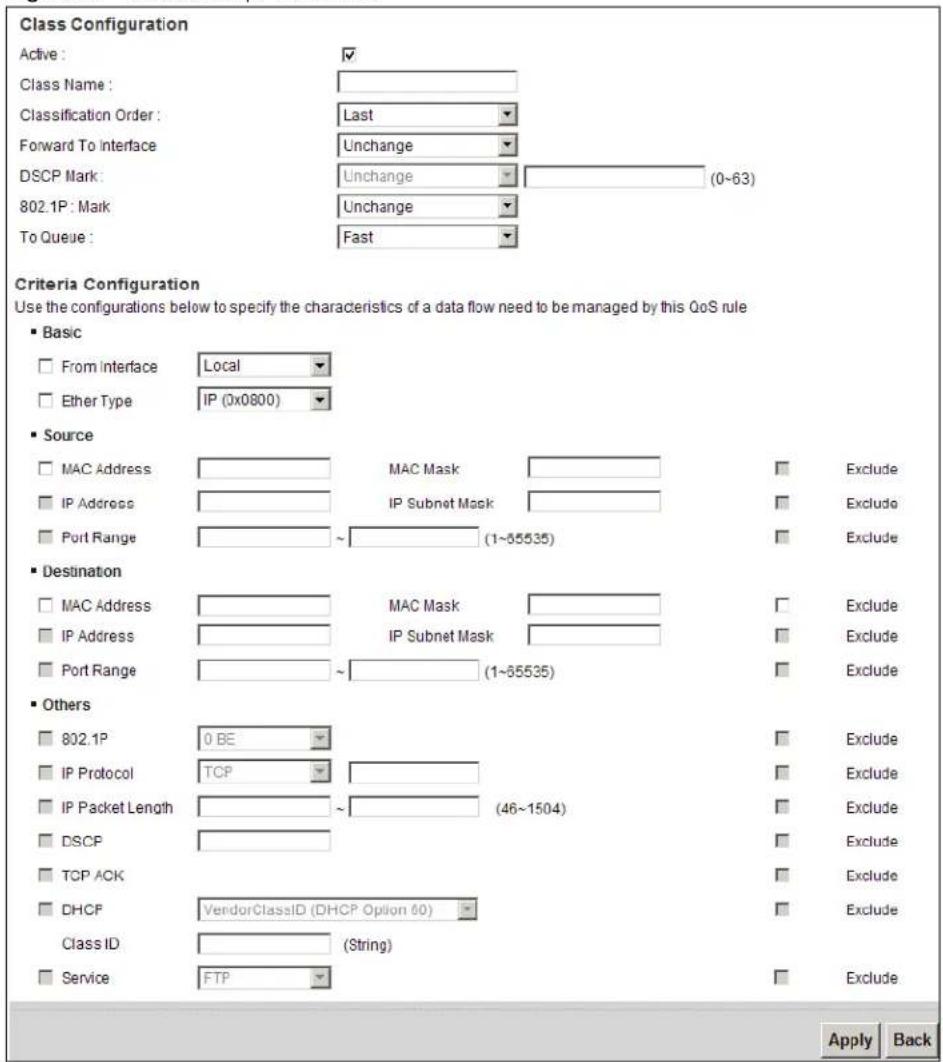
The following table describes the labels in this screen.
Table 27 Class Setup: Add/Edit
| LABEL DESCRIPTION | |
| Class Configuration | |
| Active Select to enable this classifier. | |
| Class Name | Enter a descriptive name of up to 32 printable English keyboard characters, including spaces. |
| Classification Order | Select an existing number for where you want to put this classifier to move the classifier to the number you selected after clickingApply.SelectLastto put this rule in the back of the classifier list. |
| Forward to Interface | Select a WAN interface through which traffic of this class will be forwarded out. If you selectUnchange, the Device forward traffic of this class according to the default routing table. |
| LABEL | DESCRIPTION |
| DSCP Mark | This field is available only when you select the Ether Type check box in Criteria Configuration-Basic section.If you select Mark, enter a DSCP value with which the Device replaces the DSCP field in the packets.If you select Unchange, the Device keep the DSCP field in the packets. |
| 802.1p Mark | Select a priority level with which the Device replaces the IEEE 802.1p priority field in the packets.If you select Unchange, the Device keep the 802.1p priority field in the packets. |
| To Queue Select a queue that applies to this class.You should have configured a queue in the Queue Setup screen already. | |
| Criteria ConfigurationUse the following fields to configure the criteria for traffic classification. | |
| Basic | |
| From Interface | Select whether the traffic class comes from the LAN. |
| Ether Type | Select a predefined application to configure a class for the matched traffic.If you select IP, you also need to configure source or destination MAC address, IP address, DHCP options, DSCP value or the protocol type.If you select 8021Q, you can configure an 802.1p priority level and VLAN ID in the Others section. |
| Source | |
| MAC Address Select the check box and enter the source MAC address of the packet. | |
| MAC Mask | Type the mask for the specified MAC address to determine which bits a packet's MAC address should match.Enter "f" for each bit of the specified source MAC address that the traffic's MAC address should match. Enter "0" for the bit(s) of the matched traffic's MAC address, which can be of any hexadecimal character(s). For example, if you set the MAC address to 00:13:49:00:00:00 and the mask to ff:ff:ff:00:00:00, a packet with a MAC address of 00:13:49:12:34:56 matches this criteria. |
| IP Address | Select the check box and enter the source IP address in dotted decimal notation. A blank source IP address means any source IP address. |
| IP Subnet Mask Enter the source subnet mask. | |
| Port Range | If you select TCP or UDP in the IP Protocol field, select the check box and enter the port number(s) of the source. |
| Exclude Select this option to exclude the packets that match the specified criteria from this classifier. | |
| Destination | |
| MAC Address | Select the check box and enter the destination MAC address of the packet. |
| MAC Mask | Type the mask for the specified MAC address to determine which bits a packet's MAC address should match.Enter "f" for each bit of the specified source MAC address that the traffic's MAC address should match. Enter "0" for the bit(s) of the matched traffic's MAC address, which can be of any hexadecimal character(s). For example, if you set the MAC address to 00:13:49:00:00:12:34:56 matches this criteria. |
| LABEL DESCRIPTION | |
| IP Address | Select the check box and enter the destination IP address in dotted decimal notation. A blank source IP address means any source IP address. |
| IP Subnet Mask Enter the destination subnet mask. | |
| Port Range | If you select TCP or UDP in the IP Protocol field, select the check box and enter the port number(s) of the source. |
| Exclude Select this option to exclude the packets that match the specified criteria from this classifier. | |
| Others | |
| 802.1p | This field is available only when you select 802.1Q in the Ether Type field.Select this option and select a priority level (between 0 and 7) from the drop down list box."0" is the lowest priority level and "7" is the highest. |
| IP Protocol | This field is available only when you select IP in the Ether Type field.Select this option and select the protocol (service type) from TCP or UDP. If you select User defined, enter the protocol (service type) number. |
| IP Packet Length | This field is available only when you select IP in the Ether Type field.Select this option and enter the minimum and maximum packet length (from 46 to 1504) in the fields provided. |
| DSCP | This field is available only when you select IP in the Ether Type field.Select this option and specify a DSCP (DiffServ Code Point) number between 0 and 63 in the field provided. |
| TCP ACK | This field is available only when you select IP in the Ether Type field.If you select this option, the matched TCP packets must contain the ACK (Acknowledge) flag. |
| DHCP | This field is available only when you select IP in the Ether Type field, and UDP in the IP Protocol field.Select this option and select a DHCP option.If you select Vendor Class ID (DHCP Option 60), enter the Class ID of the matched traffic, such as the type of the hardware or firmware.If you select ClientID (DHCP Option 61), enter the Type of the matched traffic and Client ID of the DHCP client.If you select User Class ID (DHCP Option 77), enter the User Class Data, which is a string that identifies the user's category or application type in the matched DHCP packets.If you select VendorSpecificIntro (DHCP Option 125), enter the Enterprise Number of the software of the matched traffic and Vendor Class Data used by all the DHCP clients. |
| Service Select the service classification of the traffic. | |
| Exclude Select this option to exclude the packets that match the specified criteria from this classifier. | |
| Apply | Click Apply to save your changes. |
| Back | Click Back to return to the previous screen without saving. |
9.5 The QoS Monitor Screen
To view the Device's QoS packet statistics, click Network Setting > QoS > Monitor. The screen appears as shown.
Figure 58 Network Setting > QoS > Monitor
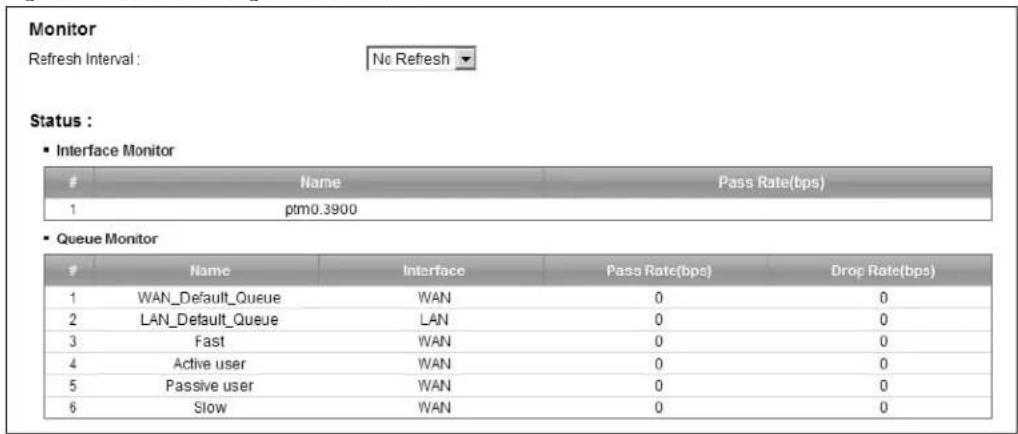
The following table describes the labels in this screen.
Table 28 Network Setting > QoS > Monitor
| LABEL DESCRIPTION | ||
| Monitor | ||
| Refresh Interval | Select how often you want the Device to update this screen. Select No Refresh to stop refreshing statistics. | |
| Status | ||
| # This is the index number of the entry. | ||
| Name | This shows the name of the WAN interface on the Device. | |
| Pass Rate (bps) | This shows how much traffic (bps) forwarded to this interface are transmitted successfully. | |
| Queue Monitor | ||
| # This is the index number of the entry. | ||
| Name This shows the name of the queue. | ||
| Pass Rate (bps) | This shows how much traffic (bps) assigned to this queue are transmitted successfully. | |
| Drop Rate (bps) | This shows how much traffic (bps) assigned to this queue are dropped. | |
9.6 QoS Technical Reference
This section provides some technical background information about the topics covered in this chapter.
9.6.1 IEEE 802.1Q Tag
The IEEE 802.1Q standard defines an explicit VLAN tag in the MAC header to identify the VLAN membership of a frame across bridges. A VLAN tag includes the 12-bit VLAN ID and 3-bit user priority. The VLAN ID associates a frame with a specific VLAN and provides the information that devices need to process the frame across the network.
IEEE 802.1p specifies the user priority field and defines up to eight separate traffic types. The following table describes the traffic types defined in the IEEE 802.1d standard (which incorporates the 802.1p).
Table 29 IEEE 802.1p Priority Level and Traffic Type
| PRIORITY LEVEL | TRAFFIC TYPE |
| Level 7 Typically used for network control traffic such as router configuration messages. | |
| Level 6 | Typically used for voice traffic that is especially sensitive to jitter (jitter is the variations in delay). |
| Level 5 | Typically used for video that consumes high bandwidth and is sensitive to jitter. |
| Level 4 Typically used for controlled load, latency-sensitive traffic such as SNA (Systems Network Architecture) transactions. | |
| Level 3 | Typically used for “excellent effort” or better than best effort and would include important business traffic that can tolerate some delay. |
| Level 2 This is for “spare bandwidth”. | |
| Level 1 | This is typically used for non-critical “background” traffic such as bulk transfers that are allowed but that should not affect other applications and users. |
| Level 0 Typically used for best-effort traffic. | |
9.6.2 IP Precedence
Similar to IEEE 802.1p prioritization at layer-2, you can use IP precedence to prioritize packets in a layer-3 network. IP precedence uses three bits of the eight-bit ToS (Type of Service) field in the IP header. There are eight classes of services (ranging from zero to seven) in IP precedence. Zero is the lowest priority level and seven is the highest.
9.6.3 DiffServ
QoS is used to prioritize source-to-destination traffic flows. All packets in the flow are given the same priority. You can use CoS (class of service) to give different priorities to different packet types.
DiffServ (Differentiated Services) is a class of service (CoS) model that marks packets so that they receive specific per-hop treatment at DiffServ-compliant network devices along the route based on the application types and traffic flow. Packets are marked with DiffServ Code Points (DSCPs) indicating the level of service desired. This allows the intermediary DiffServ-compliant network devices to handle the packets differently depending on the code points without the need to negotiate paths or remember state information for every flow. In addition, applications do not have to request a particular service or give advanced notice of where the traffic is going.
DSCP and Per-Hop Behavior
DiffServ defines a new DS (Differentiated Services) field to replace the Type of Service (TOS) field in the IP header. The DS field contains a 2-bit unused field and a 6-bit DSCP field which can define up to 64 service levels. The following figure illustrates the DS field.
DSCP is backward compatible with the three precedence bits in the ToS octet so that non-DiffServ compliant, ToS-enabled network device will not conflict with the DSCP mapping.
DSCP (6 bits) Unused (2 bits)
The DSCP value determines the forwarding behavior, the PHB (Per-Hop Behavior), that each packet gets across the DiffServ network. Based on the marking rule, different kinds of traffic can be marked for different kinds of forwarding. Resources can then be allocated according to the DSCP values and the configured policies.
Network Address Translation (NAT)
10.1 Overview
NAT (Network Address Translation - NAT, RFC 1631) is the translation of the IP address of a host in a packet, for example, the source address of an outgoing packet, used within one network to a different IP address known within another network.
10.1.1 What You Can Do in this Chapter
- Use the Port Forwarding screen to configure forward incoming service requests to the server(s) on your local network (Section 10.2 on page 134).
- Use the Sessions screen to limit the number of concurrent NAT sessions each client can use (Section on page 136).
10.1.2 What You Need To Know
The following terms and concepts may help as you read this chapter.
Inside/Outside and Global/Local
Inside/outside denotes where a host is located relative to the Device, for example, the computers of your subscribers are the inside hosts, while the web servers on the Internet are the outside hosts.
Global/local denotes the IP address of a host in a packet as the packet traverses a router, for example, the local address refers to the IP address of a host when the packet is in the local network, while the global address refers to the IP address of the host when the same packet is traveling in the WAN side.
NAT
In the simplest form, NAT changes the source IP address in a packet received from a subscriber (the inside local address) to another (the inside global address) before forwarding the packet to the WAN side. When the response comes back, NAT translates the destination address (the inside global address) back to the inside local address before forwarding it to the original inside host.
Port Forwarding
A port forwarding set is a list of inside (behind NAT on the LAN) servers, for example, web or FTP, that you can make visible to the outside world even though NAT makes your whole inside network appear as a single computer to the outside world.
Finding Out More
See Section 10.4 on page 137 for advanced technical information on NAT.
10.2 The Port Forwarding Screen
Use the Port Forwarding screen to forward incoming service requests to the server(s) on your local network.
You may enter a single port number or a range of port numbers to be forwarded, and the local IP address of the desired server. The port number identifies a service; for example, web service is on port 80 and FTP on port 21. In some cases, such as for unknown services or where one server can support more than one service (for example both FTP and web service), it might be better to specify a range of port numbers. You can allocate a server IP address that corresponds to a port or a range of ports.
The most often used port numbers and services are shown in Appendix D on page 291. Please refer to RFC 1700 for further information about port numbers.
Note: Many residential broadband ISP accounts do not allow you to run any server processes (such as a Web or FTP server) from your location. Your ISP may periodically check for servers and may suspend your account if it discovers any active services at your location. If you are unsure, refer to your ISP.
Configuring Servers Behind Port Forwarding (Example)
Let's say you want to assign ports 21-25 to one FTP, Telnet and SMTP server (A in the example), port 80 to another (B in the example) and assign a default server IP address of 10.0.0.35 to a third (C in the example). You assign the LAN IP addresses and the ISP assigns the WAN IP address. The NAT network appears as a single host on the Internet.
Figure 59 Multiple Servers Behind NAT Example
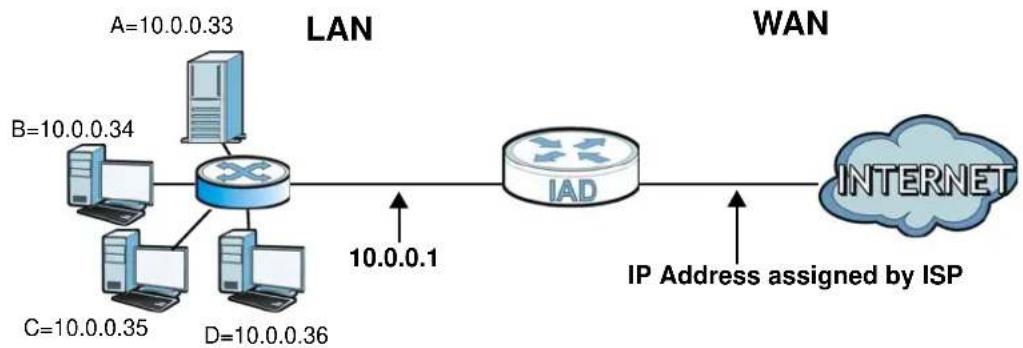
flowchart
graph LR
    subgraph LAN
        A["A=10.0.0.33"] --> B["Router"]
        C["B=10.0.0.34"] --> B
        D["C=10.0.0.35"] --> B
        E["D=10.0.0.36"] --> B
    end
    subgraph WAN
        I["IAD"] --> J["Internet"]
        K["IP Address assigned by ISP"] --> J
    end
    B -->|10.0.0.1| I
    B -->|10.0.0.33| A
    B -->|10.0.0.34| C
    B -->|10.0.0.36| D
10.2.1 The Port Forwarding Screen
Click Network Setting > NAT to open the Port Forwarding screen.
See Appendix D on page 291 for port numbers commonly used for particular services.
Figure 60 Network Setting > NAT > Port Forwarding
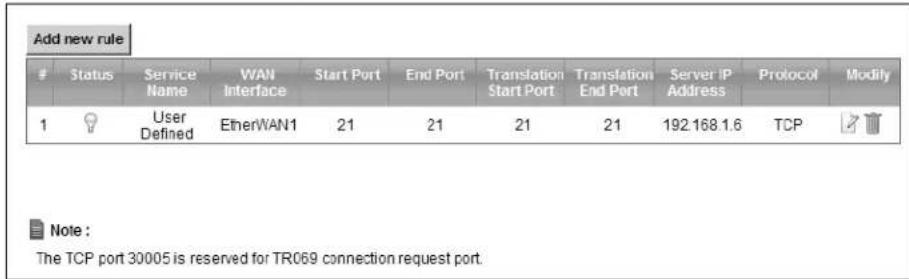
The following table describes the fields in this screen.
Table 30 Network Setting > NAT > Port Forwarding
| LABEL DESCRIPTION | |
| Add new rule Click | this to add a new port forwarding rule. |
| # This is the index | number of the entry. |
| Status This field ind | indicates whether the rule is active or not.A yellow bulb signifies that this rule is active. A gray bulb signifies that this rule is not active. |
| Service Name | This is the service's name. This showsUser Definedif you manually added a service. You can change this by clicking the edit icon. |
| WAN Interface | This shows the WAN interface through which the service is forwarded. |
| Start Port This is | the first external port number that identifies a service. |
| End Port | This is the last external port number that identifies a service. |
| Translation Start Port | This is the first internal port number that identifies a service. |
| Translation End Port | This is the last internal port number that identifies a service. |
| Server IP Address | This is the server's IP address. |
| Protocol | This shows the IP protocol supported by this virtual server, whether it isTCP, UDP, orTCP/UDP. |
| Modify | Click theEditicon to edit the port forwarding rule.Click theDeleteicon to delete an existing port forwarding rule. Note that subsequent address mapping rules move up by one when you take this action. |
| Apply | ClickApplyto save your changes. |
| Cancel | ClickCancelto restore your previously saved settings. |
10.2.2 The Port Forwarding Edit Screen
This screen lets you create or edit a port forwarding rule. Click Add new rule in the Port Forwarding screen or the Edit icon next to an existing rule to open the following screen.
Figure 61 Port Forwarding: Add/Edit
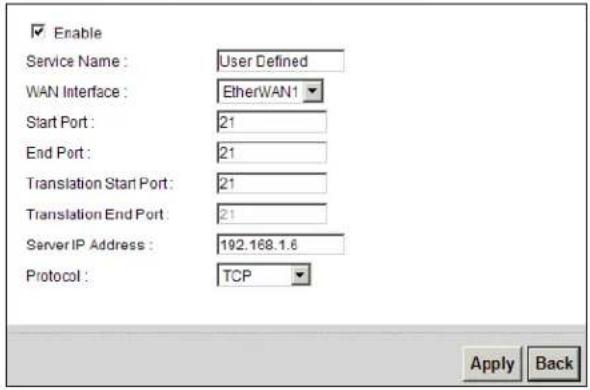
The following table describes the labels in this screen.
Table 31 Port Forwarding: Add/Edit
| LABEL DESCRIPTION | |
| Enable This is available only in the Edit screen.Clear the check box to disable the rule. Select the check box to enable it. | |
| Service Name | Enter a name to identify this rule using keyboard characters (A-Z, a-z, 1-2 and so on). |
| WAN Interface | Select the WAN interface through which the service is forwarded.You must have already configured a WAN connection with NAT enabled. |
| Start Port | Enter the original destination port for the packets.To forward only one port, enter the port number again in the External End Port field.To forward a series of ports, enter the start port number here and the end port number in the External End Port field. |
| End Port | Enter the last port of the original destination port range.To forward only one port, enter the port number in the External Start Port field above and then enter it again in this field.To forward a series of ports, enter the last port number in a series that begins with the port number in the External Start Port field above. |
| Translation Start Port | This shows the port number to which you want the Device to translate the incoming port. For a range of ports, enter the first number of the range to which you want the incoming ports translated. |
| Translation End Port | This shows the last port of the translated port range. |
| Server IP Address | Enter the inside IP address of the virtual server here. |
| Protocol Type | Select the protocol supported by this virtual server. Choices are TCP, UDP, or TCP/UDP. |
| Apply | Click Apply to save your changes. |
| Back | Click Back to return to the previous screen without saving. |
10.3 The Sessions Screen
Use the Sessions screen to limit the number of concurrent NAT sessions each client can use.
Click Network Setting > NAT > Sessions to display the following screen.
Figure 62 Network Setting > NAT > Sessions

The following table describes the fields in this screen.
Table 32 Network Setting > NAT > Sessions
| LABEL DESCRIPTION | |
| MAX NAT Session | Use this field to set a common limit to the number of concurrent NAT sessions each client computer can have.If only a few clients use peer to peer applications, you can raise this number to improve their performance. With heavy peer to peer application use, lower this number to ensure no single client uses too many of the available NAT sessions. |
| Apply Click Apply to save your changes. | |
| Cancel | Click Cancel to restore your previously saved settings. |
10.4 Technical Reference
This section provides some technical background information about the topics covered in this chapter.
10.4.1 NAT Definitions
Inside/outside denotes where a host is located relative to the Device, for example, the computers of your subscribers are the inside hosts, while the web servers on the Internet are the outside hosts.
Global/local denotes the IP address of a host in a packet as the packet traverses a router, for example, the local address refers to the IP address of a host when the packet is in the local network, while the global address refers to the IP address of the host when the same packet is traveling in the WAN side.
Note that inside/outside refers to the location of a host, while global/local refers to the IP address of a host used in a packet. Thus, an inside local address (ILA) is the IP address of an inside host in a packet when the packet is still in the local network, while an inside global address (IGA) is the IP
address of the same inside host when the packet is on the WAN side. The following table summarizes this information.
Table 33 NAT Definitions
| ITEM DESCRIPTION | |
| Inside This refers to the host on the LAN. | |
| Outside This refers to the host on the WAN. | |
| Local | This refers to the packet address (source or destination) as the packet travels on the LAN. |
| Global | This refers to the packet address (source or destination) as the packet travels on the WAN. |
NAT never changes the IP address (either local or global) of an outside host.
10.4.2 What NAT Does
In the simplest form, NAT changes the source IP address in a packet received from a subscriber (the inside local address) to another (the inside global address) before forwarding the packet to the WAN side. When the response comes back, NAT translates the destination address (the inside global address) back to the inside local address before forwarding it to the original inside host. Note that the IP address (either local or global) of an outside host is never changed.
The global IP addresses for the inside hosts can be either static or dynamically assigned by the ISP. In addition, you can designate servers, for example, a web server and a Telnet server, on your local network and make them accessible to the outside world. If you do not define any servers, NAT offers the additional benefit of firewall protection. With no servers defined, your Device filters out all incoming inquiries, thus preventing intruders from probing your network. For more information on IP address translation, refer to RFC 1631, The IP Network Address Translator (NAT).
10.4.3 How NAT Works
Each packet has two addresses – a source address and a destination address. For outgoing packets, the ILA (Inside Local Address) is the source address on the LAN, and the IGA (Inside Global Address) is the source address on the WAN. For incoming packets, the ILA is the destination address on the LAN, and the IGA is the destination address on the WAN. NAT maps private (local) IP addresses to globally unique ones required for communication with hosts on other networks. It replaces the original IP source address (and TCP or UDP source port numbers for Many-to-One and Many-to-Many Overload NAT mapping) in each packet and then forwards it to the Internet. The Device keeps track of the original addresses and port numbers so incoming reply packets can have their original values restored. The following figure illustrates this.
Figure 63 How NAT Works
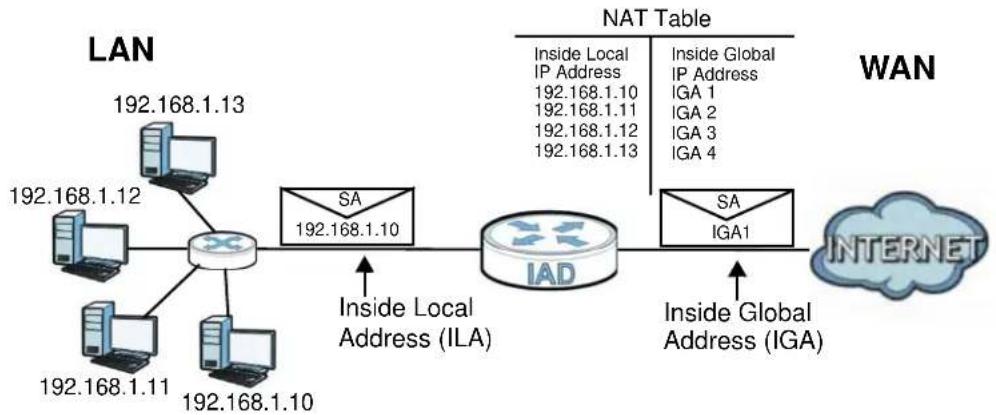
flowchart
graph LR
    subgraph LAN
        A["192.168.1.13"] --> B["Switch"]
        C["192.168.1.12"] --> B
        D["192.168.1.11"] --> B
        E["192.168.1.10"] --> B
    end
    B --> F["SA 192.168.1.10"]
    F --> G["IAD"]
    G --> H["SA IGA1"]
    H --> I["Inside Global Address (IGA)"]
    style LAN fill:#f9f,stroke:#333
    style WAN fill:#ccf,stroke:#333
    note right of F Inside Local Address (ILA)
    note right of H Inside Global Address (IGA)
    note right of H Inside Global Address (IGA)
    note right of H Inside Local IP Address
    note right of H Inside Global IP Address
    note right of H Inside Global IP Address
    note right of H Inside Global IP Address
    note right of H Inside Global IP Address
    note right of H Inside Global IP Address
    note right of H Inside Global IP Address
    note right of H Inside Global IP Address
    note right of H Inside Global IP Address
11.1 Overview
This chapter discusses how to configure your Device to use Dynamic DNS.
Dynamic DNS allows you to update your current dynamic IP address with one or many dynamic DNS services so that anyone can contact you (in applications such as NetMeeting and CU-SeeMe). You can also access your FTP server or Web site on your own computer using a domain name (for instance myhost.dhs.org, where myhost is a name of your choice) that will never change instead of using an IP address that changes each time you reconnect. Your friends or relatives will always be able to call you even if they don't know your IP address.
First of all, you need to have registered a dynamic DNS account with www.dyndns.org. This is for people with a dynamic IP from their ISP or DHCP server that would still like to have a domain name. The Dynamic DNS service provider will give you a password or key.
11.1.1 What You Need To Know
DYNDNS Wildcard
Enabling the wildcard feature for your host causes *.yourhost.dyndns.org to be aliased to the same IP address as yourhost.dyndns.org. This feature is useful if you want to be able to use, for example, www.yourhost.dyndns.org and still reach your hostname.
If you have a private WAN IP address, then you cannot use Dynamic DNS.
11.2 The Dynamic DNS Screen
Use the Dynamic DNS screen to enable DDNS and configure the DDNS settings on the Device. To change your Device's DDNS, click Network Setting > DNS. The screen appears as shown.
Figure 64 Network Setting > DNS
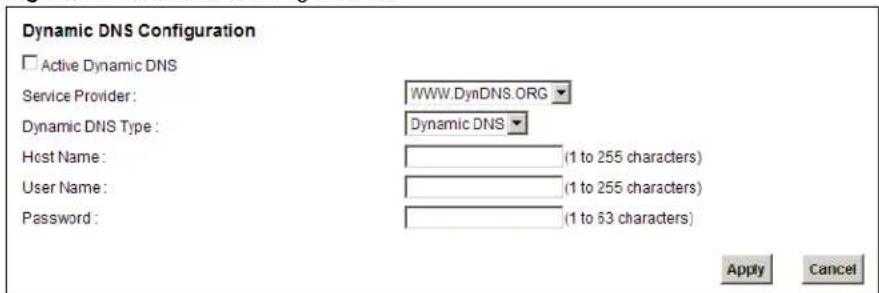
The following table describes the fields in this screen.
Table 34 Network Setting > DNS
| LABEL DESCRIPTION | |
| Dynamic DNS Configuration | |
| Active Dynamic DNS | Select this check box to use dynamic DNS. |
| Service Provider | Select the name of your Dynamic DNS service provider. |
| Dynamic DNS Type | Select the type of service that you are registered for from your Dynamic DNS service provider. |
| Host Name | Type the domain name assigned to your Device by your Dynamic DNS provider.You can specify up to two host names in the field separated by a comma (","). |
| User Name Type your user name. | |
| Password Type the password assigned to you. | |
| Apply | Click Apply to save your changes. |
| Cancel | Click Cancel to restore your previously saved settings. |
12.1 Overview
By default, all LAN and WAN interfaces on the Device are in the same group and can communicate with each other. Create interface groups to have the Device assign the IP addresses in different domains to different groups. Each group acts as an independent network on the Device. This lets devices connected to an interface group's LAN interfaces communicate through the interface group's WAN or LAN interfaces but not other WAN or LAN interfaces.
12.2 The Interface Group Screen
You can manually add a LAN interface to a new group. Use the LAN screen to configure the private IP addresses the DHCP server on the Device assigns to the clients in the default and/or user-defined groups.
Figure 65 Interface Grouping Application
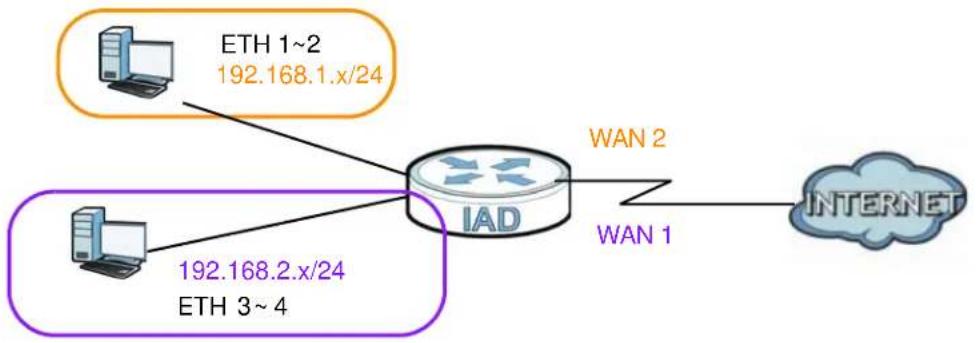
flowchart
graph TD
    A["Computer"] -->|ETH 1~2\n192.168.1.x/24| C["IAD"]
    B["Computer"] -->|ETH 3~4\n192.168.2.x/24| C["IAD"]
    C["IAD"] -->|WAN 2\nWAN 1| D["INTERNET"]
Click Network Setting > Interface Group to open the following screen.
Figure 66 Network Setting > Interface Group
| Add New Interface Group | |||
| Group Name | WAN Interface | LAN Interfaces | Modify |
| ETHER | 22 33 44 66 br11 | LAN1, LAN3, LAN4, . . . | |
| 2 | EtherWAN1 | LAN2 | |
The following table describes the fields in this screen.
Table 35 Network Setting > Interface Group
| LABEL DESCRIPTION | |
| Add New Interface Group | Click this button to create a new interface group. |
| Group Name This shows the descriptive name of the group. | |
| WAN Interface This shows the WAN interfaces in the group. | |
| LAN Interfaces This shows the LAN interfaces in the group. | |
| Criteria This shows the filtering criteria for the group. | |
| Modify | Click the Delete icon to remove the group. |
| Add Click this button to create a new group. | |
12.2.1 Interface Group Configuration
Click the Add New Interface Group button in the Interface Group screen to open the following screen. Use this screen to create a new interface group.
Note: An interface can belong to only one group at a time.
Figure 67 Interface Group Configuration
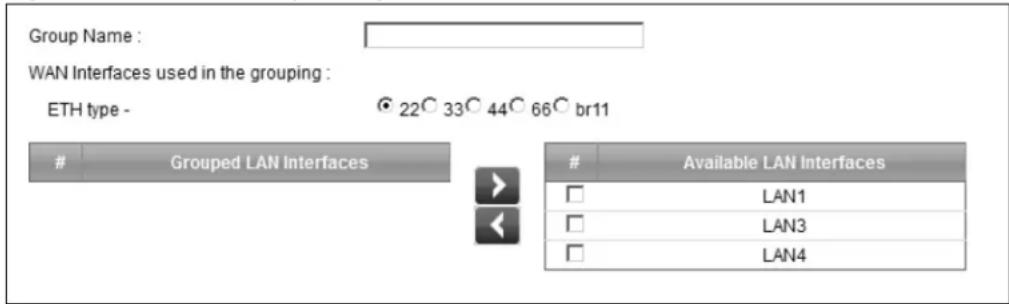
The following table describes the fields in this screen.
Table 36 Interface Group Configuration
| LABEL DESCRIPTION | |
| Group Name | Enter a name to identify this group. You can enter up to 30 characters. You can use letters, numbers, hyphens (-) and underscores (_). Spaces are not allowed. |
| WAN Interface used in the grouping | Select the WAN interface this group uses. |
| Grouped LAN InterfacesAvailable LAN Interfaces | Select one or more LAN interfaces in the Available LAN Interfaces list and use the left arrow to move them to the Grouped LAN Interfaces list to add the interfaces to this group.To remove a LAN interface from the Grouped LAN Interfaces, use the right-facing arrow. |
| Remove | Click the Remove icon to delete this rule from the Device. |
| Apply | Click Apply to save your changes back to the Device. |
| Cancel | Click Cancel to exit this screen without saving. |
13.1 Overview
Use the Device firewall screens to enable and configure the firewall that protects your Device and network from attacks by hackers on the Internet and control access to it. By default the firewall:
- Allows traffic that originates from your LAN computers to go to all other networks.
- Blocks traffic that originates on other networks from going to the LAN.
The following figure illustrates the default firewall action. User A can initiate an IM (Instant Messaging) session from the LAN to the WAN (1). Return traffic for this session is also allowed (2). However other traffic initiated from the WAN is blocked (3 and 4).
Figure 68 Default Firewall Action
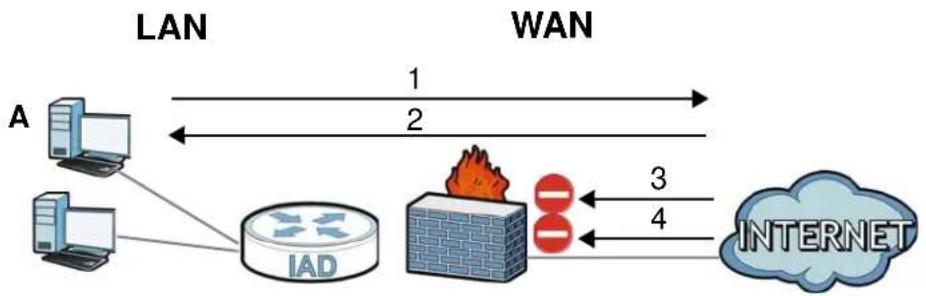
flowchart
graph LR
    A["Server A"] -->|LAN 1| LAN
    A -->|LAN 2| LAN
    LAN -->|WAN 3| IAD["IAD"]
    LAN -->|WAN 4| INTERNET["INTERNET"]
    IAD -->|IP address| Firewall["Fire"]
    Firewall -->|IP address| Internet
13.1.1 What You Can Do in this Chapter
- Use the General screen to enable or disable the Device's firewall (Section 13.2 on page 146).
- Use the Services screen to view the configured firewall rules and add, edit or remove a firewall rule (Section 13.3 on page 147).
- Use the Access Control screen to view and configure incoming/outgoing filtering rules (Section 13.4 on page 148).
- Use the DoS screen to enable or disable Denial of Service (DoS) protection (Section 13.5 on page 151).
13.1.2 What You Need to Know
Firewall
The Device's firewall feature physically separates the LAN and the WAN and acts as a secure gateway for all data passing between the networks.
It is designed to protect against Denial of Service (DoS) attacks when activated. The Device's purpose is to allow a private Local Area Network (LAN) to be securely connected to the Internet. The Device can be used to prevent theft, destruction and modification of data, as well as log events, which may be important to the security of your network.
The Device is installed between the LAN and a broadband modem connecting to the Internet. This allows it to act as a secure gateway for all data passing between the Internet and the LAN.
The Device has one Ethernet WAN port and four Ethernet LAN ports, which are used to physically separate the network into two areas. The WAN (Wide Area Network) port attaches to the broadband (cable or DSL) modem to the Internet.
The LAN (Local Area Network) port attaches to a network of computers, which needs security from the outside world. These computers will have access to Internet services such as e-mail, FTP and the World Wide Web. However, "inbound access" is not allowed (by default) unless the remote host is authorized to use a specific service.
ICMP
Internet Control Message Protocol (ICMP) is a message control and error-reporting protocol between a host server and a gateway to the Internet. ICMP uses Internet Protocol (IP) datagrams, but the messages are processed by the TCP/IP software and directly apparent to the application user.
Finding Out More
See Section 13.6 on page 151 for advanced technical information on firewall.
13.2 The General Screen
Use this screen to enable or disable the Device's firewall. Click Security > Firewall to open the General screen.
Figure 69 Security > Firewall > General
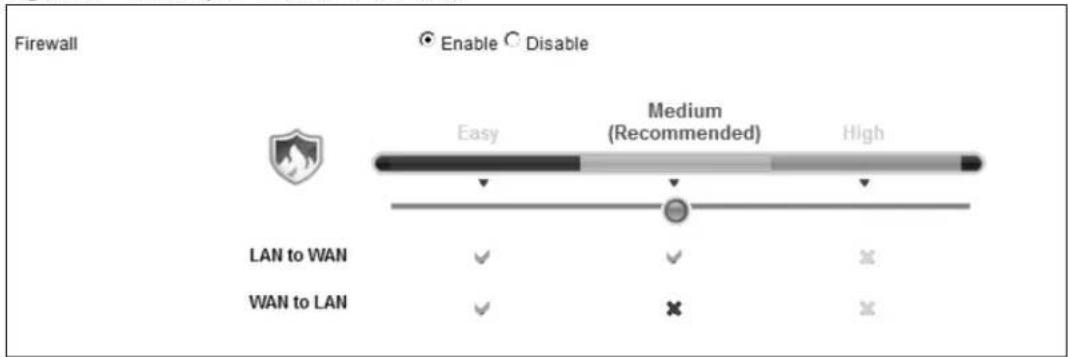
The following table describes the labels in this screen.
Table 37 Security > Firewall > General
| LABEL DESCRIPTION | |
| Firewall | Select Enable to activate the firewall. The Device performs access control and protects against Denial of Service (DoS) attacks when the firewall is activated. |
| Easy, Medium, High | Select Easy to have the firewall allow both LAN-to-WAN and WAN-to-LAN traffic to flow through the Device.Select Medium to have the firewall only allow traffic sent from the LAN to the WAN. All access and traffic originating from the WAN will be blocked.Select High to have the firewall only allow Telnet, FTP, HTTP, HTTPS, DNS, POP3, and SMTP traffic sent from the LAN to the WAN. Other traffic will be blocked. |
| Apply | Click Apply to save your changes. |
| Cancel | Click Cancel to restore your previously saved settings. |
13.3 The Services Screen
Use this screen to view the configured service list. To access this screen, click Security > Firewall > Services. You have to configure at least one service in this screen before configuring the Security > Firewall > Access Control > Add New ACL Rule/ Edit screen.
Figure 70 Security > Firewall > Services

Each field is described in the following table.
Table 38 Security > Firewall > Services
| LABEL DESCRIPTION | |
| Add New Service Entry | Click this to define a new service. |
| Name | This is the name of a configured service. |
| Type | This is the protocol type (TCP, UDP, ICMP or Others) of the service. |
| Port Number | This displays a range of port numbers that defines the service. |
| Modify | Click the Edit icon to edit the service.Click the Delete icon to delete the service. Note that subsequent rules move up by one when you take this action. Deleting a service rule also deletes the related ACL rules which are configured in the Security > Firewall > Access Control screen. |
13.3.1 The Add New Services Entry Screen
Use this screen to configure a service that you want to use in an ACL rule in the Security > Firewall > Access Control > Add New ACL Rule/ Edit screen. To access this screen, click Security > Firewall > Services and then the Add New Service Entry button.
Figure 71 Security > Firewall > Services > Add New Service Entry
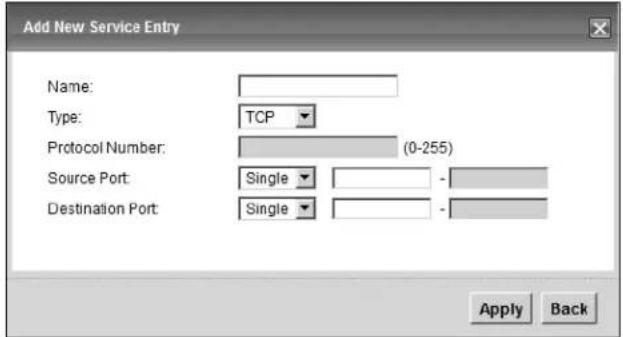
Each field is described in the following table.
Table 39 Security > Firewall > Services > Add New Service Entry
| LABEL DESCRIPTION | |
| Name Type a descriptive name for the service. | |
| Type | Select the protocol type (TCP, UDP or ICMP or Others) of the service. |
| Protocol Number | Enter the protocol number of the service type. |
| Source Port, Destination Port | The source port defines from which port number(s) the service traffic is sent. The destination port defines the port number(s) the destination hosts use to receive the service traffic.Select Single if the service uses one and only one source or destination port, then enter the port number.Select Multiple if the service uses two or more source or destination ports, then enter a port range. For example, suppose you want to define the Gnutella service. Select TCP type and enter a port range of 6345-6349. |
| Apply | Click Apply to save your changes. |
| Back | Click Back to exit this screen without saving your changes. |
13.4 The Access Control Screen
Click Security > Firewall > Access Control to display the following screen. This screen displays a list of the configured incoming or outgoing filtering rules.
Figure 72 Security > Firewall > Access Control

Each field is described in the following table.
Table 40 Security > Firewall > Access Control
| LABEL DESCRIPTION | |
| Add new ACL rule | Click this to go to add a filter rule for incoming or outgoing IP traffic. |
| Name This displays | the name of the rule. |
| Src IP | This displays the source IP addresses to which this rule applies. Please note that a blank source address is equivalent to Any. |
| Dst IP | This displays the destination IP addresses to which this rule applies. Please note that a blank destination address is equivalent to Any. |
| Services | This displays the protocol type and a port range that define the service to which this rule applies. |
| Policy | This field displays whether the rule silently discards packets (DROP), discards packets and sends a TCP reset packet or an ICMP destination-unreachable message to the sender (REJECT) or allows the passage of packets (PERMIT). |
| Modify | Click the Edit icon to edit the rule.Click the Delete icon to delete an existing rule. Note that subsequent rules move up by one when you take this action. |
13.4.1 The Add New ACL Rule/Edit Screen
Click Add New ACL Rule or the Edit icon next to an existing ACL rule in the Access Control screen. The following screen displays.
Figure 73 Security > Firewall > Access Control > Add New ACL Rule/Edit
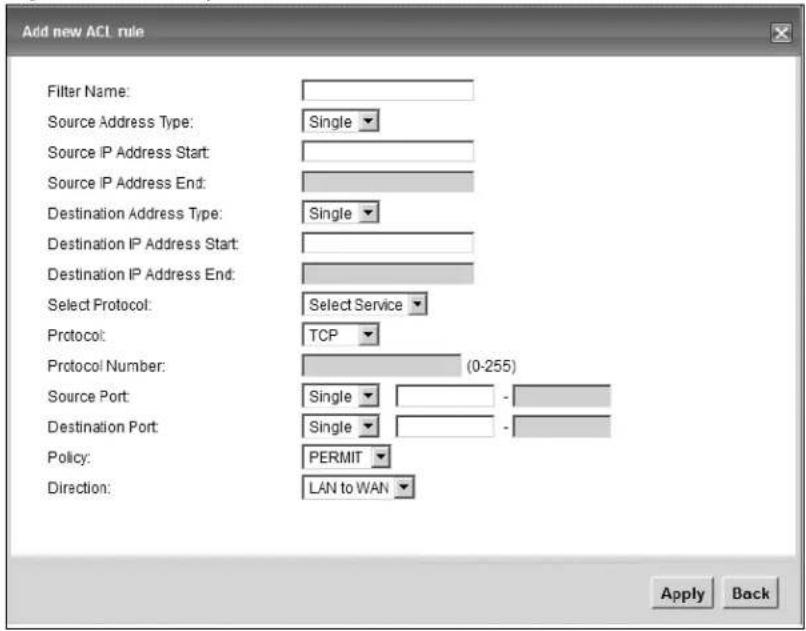
Each field is described in the following table.
Table 41 Security > Firewall > Access Control > Add New ACL Rule/Edit
| LABEL DESCRIPTION | |
| Filter Name | Enter a descriptive name of up to 16 alphanumeric characters, not including spaces, underscores, and dashes.You must enter the filter name to add an ACL rule. This field is read-only if you are editing the ACL rule. |
| Source Address Type | Select Single or Range depending on whether you want to enter a single or a range of source IP address(es) to which the ACL rule applies. Select Any to indicate any source IP address. |
| Source IP Address Start | Enter an IP address or the starting IP address of the source IP range. |
| Source IP Address End | Enter the ending IP address of the source IP range. |
| Destination Address Type | Select Single or Range depending on whether you want to enter a single or a range of destination IP address(es) to which the ACL rule applies. Select Any to indicate any destination IP address. |
| Destination IP Address Start | Enter an IP address or the starting IP address of the destination IP range. |
| Destination IP Address End | Enter the ending IP address of the destination IP range. |
| Select Protocol | Select the name of a configured service or select Select Service to define a new service in this screen. |
| Protocol | This field is available when you select Select Service in Select Protocol.Choose the protocol type (TCP, UDP, ICMP or Others) of the service. |
| Protocol Number | This field is available when you select Others in Protocol.Enter the protocol number of the service type to which this ACL rule applies. |
| Source Port | This field is displayed only when you select Select Service in Select Protocol and TCP or UDP in Protocol.Select Single or Range and then enter a single port number or the range of port numbers of the source. Select Any to indicate any source port. |
| Destination Port | This field is displayed only when you select Select Service in Select Protocol and TCP or UDP in Protocol.Select Single or Range and then enter a single port number or the range of port numbers of the destination. Select Any to indicate any destination port. |
| Policy | Use the drop-down list box to select whether to silently discard (DROP), deny and send an ICMP destination-unreachable message to the sender of (REJECT) or allow the passage of (PERMIT) packets that match this rule. |
| Direction | Use the drop-down list box to select the direction of traffic to which this rule applies. The possible options are LAN to DEVICE, LAN to WAN, WAN to LAN, and WAN to DEVICE. |
| Apply | Click Apply to save your changes. |
| Back | Click Back to exit this screen without saving your changes. |
13.5 The DoS Screen
Click Security > Firewall > DoS to display the following screen. Use this screen to enable or disable Denial of Service (DoS) protection.
Figure 74 Security > Firewall > DoS
| DoS Protection Blocking: | ○ Enable ○ Disable | Apply | Cancel |
Each field is described in the following table.
Table 42 Security > Firewall > DoS
| LABEL DESCRIPTION | |
| DoS Protection Blocking | DoS (Denial of Service) attacks can flood your Internet connection with invalid packets and connection requests, using so much bandwidth and so many resources that Internet access becomes unavailable.Select Enable to enable protection against DoS attacks or Disable to disable it. |
| Apply | Click Apply to save the DoS Protection settings. |
| Cancel | Click Cancel to restore your previously saved settings. |
13.6 Firewall Technical Reference
This section provides some technical background information about the topics covered in this chapter.
13.6.1 Guidelines For Enhancing Security With Your Firewall
1 Change the default password via web configurator.
2 Think about access control before you connect to the network in any way.
3 Limit who can access your Device.
4 Don't enable any local service (such as Telnet or FTP) that you don't use. Any enabled service could present a potential security risk. A determined hacker might be able to find creative ways to misuse the enabled services to access the firewall or the network.
5 For local services that are enabled, protect against misuse. Protect by configuring the services to communicate only with specific peers, and protect by configuring rules to block packets for the services at specific interfaces.
6 Keep the firewall in a secured (locked) room.
13.6.2 Security Considerations
Note: Incorrectly configuring the firewall may block valid access or introduce security risks to the Device and your protected network. Use caution when creating or deleting firewall rules and test your rules after you configure them.
Consider these security ramifications before creating a rule:
1 Does this rule stop LAN users from accessing critical resources on the Internet? For example, if IRC is blocked, are there users that require this service?
2 Is it possible to modify the rule to be more specific? For example, if IRC is blocked for all users, will a rule that blocks just certain users be more effective?
3 Does a rule that allows Internet users access to resources on the LAN create a security vulnerability? For example, if FTP ports (TCP 20, 21) are allowed from the Internet to the LAN, Internet users may be able to connect to computers with running FTP servers.
4 Does this rule conflict with any existing rules?
Once these questions have been answered, adding rules is simply a matter of entering the information into the correct fields in the web configurator screens.
14.1 Overview
This chapter discusses MAC address filtering.
You can configure the Device to permit access to clients based on their MAC addresses in the MAC Filter screen.
14.1.1 What You Need to Know
Every Ethernet device has a unique MAC (Media Access Control) address. The MAC address is assigned at the factory and consists of six pairs of hexadecimal characters, for example, 00:A0:C5:00:00:02. You need to know the MAC address of the devices to configure this screen.
14.2 The MAC Filter Screen
Use the MAC Filter screen to allow LAN clients access to the Device. To change your Device's MAC filter settings, click Security > MAC Filter. The screen appears as shown.
Figure 75 Security > MAC Filter
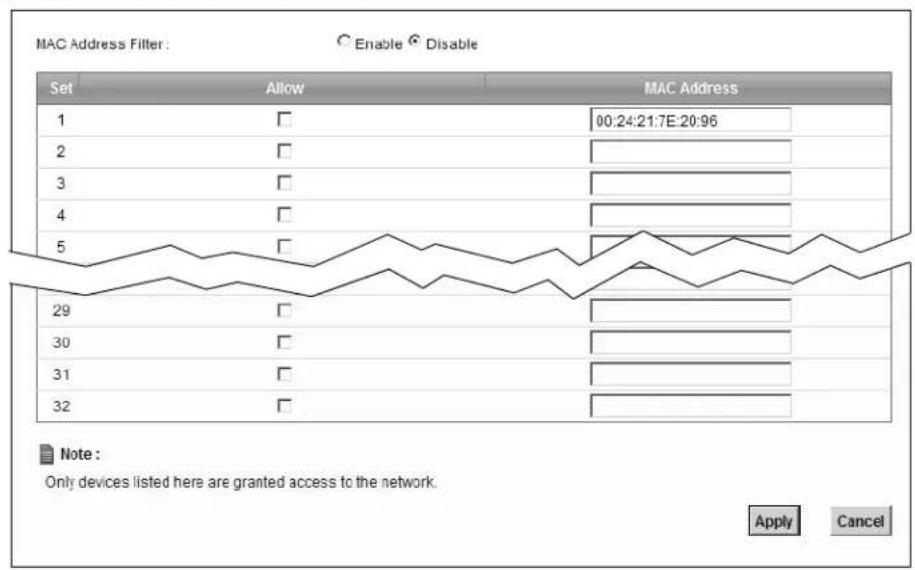
The following table describes the labels in this menu.
Table 43 Security > MAC Filter
| LABEL DESCRIPTION | |
| MAC Address Filter | Select Enable to activate MAC address filtering. |
| Set This is the | index number of the MAC address. |
| Allow | Select Allow to permit access to the Device. MAC addresses not listed will be denied access to the Device.If you clear this, the MAC Address field for this set clears. |
| MAC Address | Enter the MAC addresses of the LAN devices that are allowed access to the Device in these address fields. Enter the MAC addresses in a valid MAC address format, that is, six hexadecimal character pairs, for example, 12:34:56:78:9a:bc. |
| Apply | Click Apply to save your changes. |
| Cancel | Click Cancel to restore your previously saved settings. |
Parental Control
15.1 Overview
Parental control allows you to block web sites with the specific URL. You can also define time periods and days during which the Device performs parental control on a specific user.
15.2 The Parental Control Screen
Use this screen to enable parental control, view the parental control rules and schedules.
Click Security > Parental Control to open the following screen.
Figure 76 Security > Parental Control
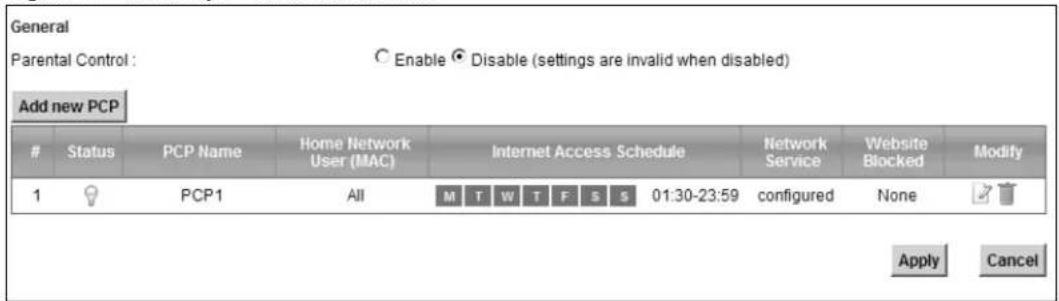
The following table describes the fields in this screen.
Table 44 Parental Control > Parental Control
| LABEL DESCRIPTION | |
| Parental Control | Select Enable to activate parental control. |
| Add new PCP Click this if you want to configure a new parental control rule. | |
| # This shows the index number of the rule. | |
| Status This indicates | whether the rule is active or not.A yellow bulb signifies that this rule is active. A gray bulb signifies that this rule is not active. |
| PCP Name This shows the name of the rule. | |
| Home Network User (MAC) | This shows the MAC address of the LAN user's computer to which this rule applies. |
| Internet Access Schedule | This shows the day(s) and time on which parental control is enabled. |
| Network Service | This shows whether the network service is configured. If not, None will be shown. |
| LABEL DESCRIPTION | |
| Website Blocked | This shows whether the website block is configured. If not, None will be shown. |
| Modify | Click the Edit icon to go to the screen where you can edit the rule.Click the Delete icon to delete an existing rule. |
| Add | Click Add to create a new schedule. |
| Apply | Click Apply to save your changes back to the Device. |
15.2.1 Add/Edit a Parental Control Rule
Click Add new PCP in the Parental Control screen to add a new rule or click the Edit icon next to an existing rule to edit it. Use this screen to configure a restricted access schedule and/or URL filtering settings to block the users on your network from accessing certain web sites.
Figure 77 Add/Edit Parental Control Rule
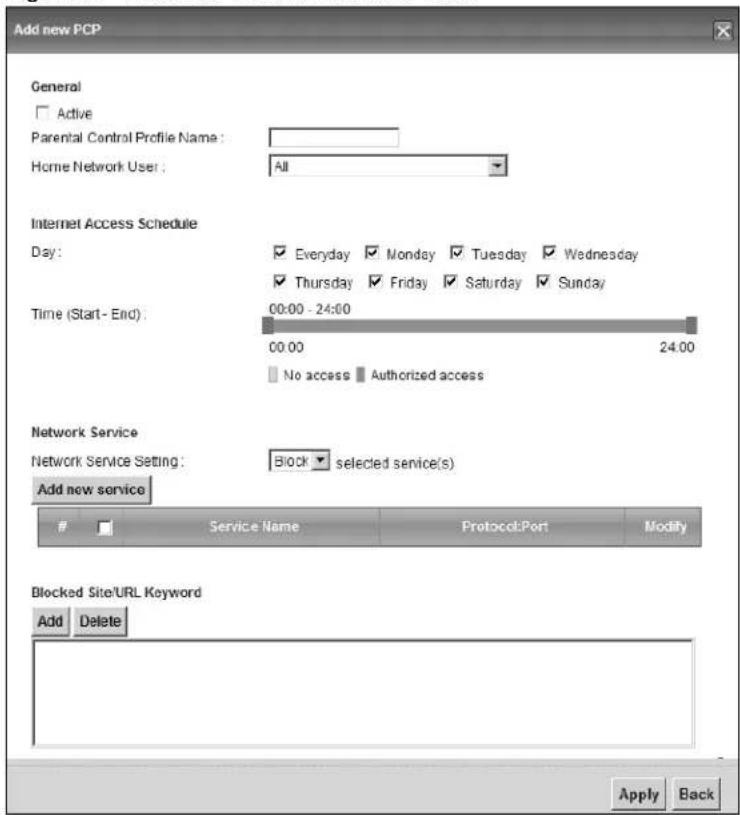
The following table describes the fields in this screen.
Table 45 Add/Edit Parental Control Rule
| LABEL DESCRIPTION | |
| General | |
| Active | Select the checkbox to activate this parental control rule. |
| Parental Control Profile Name | Enter a descriptive name for the rule. |
| Home Network User | Select the LAN user that you want to apply this rule to from the drop-down list box. If you select Custom, enter the LAN user's MAC address. If you select All, the rule applies to all LAN users. |
| Internet Access Schedule | |
| Day | Select check boxes for the days that you want the Device to perform parental control. |
| Time | Drag the time bar to define the time that the LAN user is allowed access. |
| Network Service | |
| Network Service Setting | If you select Block, the Device prohibits the users from viewing the Web sites with the URLs listed below.If you select Access, the Device blocks access to all URLs except ones listed below. |
| Add new service | Click this to show a screen in which you can add a new service rule. You can configure the Service Name, Protocol, and Name of the new rule. |
| # | This shows the index number of the rule. Select the checkbox next to the rule to activate it. |
| Service Name This shows the name of the rule. | |
| Protocol:Port This shows the protocol and the port of the rule. | |
| Modify | Click the Edit icon to go to the screen where you can edit the rule.Click the Delete icon to delete an existing rule. |
| Blocked Site/URL Keyword | Click Add to show a screen to enter the URL of web site or URL keyword to which the Device blocks access. Click Delete to remove it. |
| Apply | Click this button to save your settings back to the Device. |
| Back | Click this button to return to the previous screen without saving any changes. |
16.1 Overview
The Device can use certificates (also called digital IDs) to authenticate users. Certificates are based on public-private key pairs. A certificate contains the certificate owner's identity and public key. Certificates provide a way to exchange public keys for use in authentication.
16.1.1 What You Can Do in this Chapter
- Use the Local Certificates screen to view and import the Device's CA-signed certificates (Section 16.2 on page 161).
- Use the Trusted CA screen to save the certificates of trusted CAs to the Device. You can also export the certificates to a computer (Section 16.3 on page 163).
16.1.2 What You Need to Know
The following terms and concepts may help as you read this chapter.
Certification Authorities
A Certification Authority (CA) issues certificates and guarantees the identity of each certificate owner. There are commercial certification authorities like CyberTrust or VeriSign and government certification authorities.
Public and Private Keys
When using public-key cryptology for authentication, each host has two keys. One key is public and can be made openly available; the other key is private and must be kept secure. Public-key encryption in general works as follows.
1 Tim wants to send a private message to Jenny. Tim generates a public-private key pair. What is encrypted with one key can only be decrypted using the other.
2 Tim keeps the private key and makes the public key openly available.
3 Tim uses his private key to encrypt the message and sends it to Jenny.
4 Jenny receives the message and uses Tim's public key to decrypt it.
5 Additionally, Jenny uses her own private key to encrypt a message and Tim uses Jenny's public key to decrypt the message.
The Device uses certificates based on public-key cryptology to authenticate users attempting to establish a connection. The method used to secure the data that you send through an established connection depends on the type of connection. For example, a VPN tunnel might use the triple DES encryption algorithm.
The certification authority uses its private key to sign certificates. Anyone can then use the certification authority's public key to verify the certificates.
Certification Path
A certification path is the hierarchy of certification authority certificates that validate a certificate. The Device does not trust a certificate if any certificate on its path has expired or been revoked.
Certificate Directory Servers
Certification authorities maintain directory servers with databases of valid and revoked certificates. A directory of certificates that have been revoked before the scheduled expiration is called a CRL (Certificate Revocation List). The Device can check a peer's certificate against a directory server's list of revoked certificates. The framework of servers, software, procedures and policies that handles keys is called PKI (public-key infrastructure).
Advantages of Certificates
Certificates offer the following benefits.
- The Device only has to store the certificates of the certification authorities that you decide to trust, no matter how many devices you need to authenticate.
- Key distribution is simple and very secure since you can freely distribute public keys and you never need to transmit private keys.
Certificate File Formats
The certification authority certificate that you want to import has to be in one of these file formats:
- Binary X.509: This is an ITU-T recommendation that defines the formats for X.509 certificates.
- PEM (Base-64) encoded X.509: This Privacy Enhanced Mail format uses 64 ASCII characters to convert a binary X.509 certificate into a printable form.
- Binary PKCS#7: This is a standard that defines the general syntax for data (including digital signatures) that may be encrypted. The Device currently allows the importation of a PKS#7 file that contains a single certificate.
- PEM (Base-64) encoded PKCS#7: This Privacy Enhanced Mail (PEM) format uses 64 ASCII characters to convert a binary PKCS#7 certificate into a printable form.
Note: Be careful not to convert a binary file to text during the transfer process. It is easy for this to occur since many programs use text files by default.
16.1.3 Verifying a Certificate
Before you import a trusted CA or trusted remote host certificate into the Device, you should verify that you have the actual certificate. This is especially true of trusted CA certificates since the Device also trusts any valid certificate signed by any of the imported trusted CA certificates.
You can use a certificate's fingerprint to verify it. A certificate's fingerprint is a message digest calculated using the MD5 or SHA1 algorithms. The following procedure describes how to check a certificate's fingerprint to verify that you have the actual certificate.
1 Browse to where you have the certificate saved on your computer.
2 Make sure that the certificate has a ".cer" or ".crt" file name extension.
Figure 78 Certificates on Your Computer
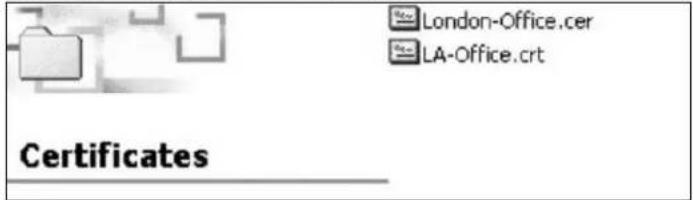
3 Double-click the certificate's icon to open the Certificate window. Click the Details tab and scroll down to the Thumbprint Algorithm and Thumbprint fields.
Figure 79 Certificate Details
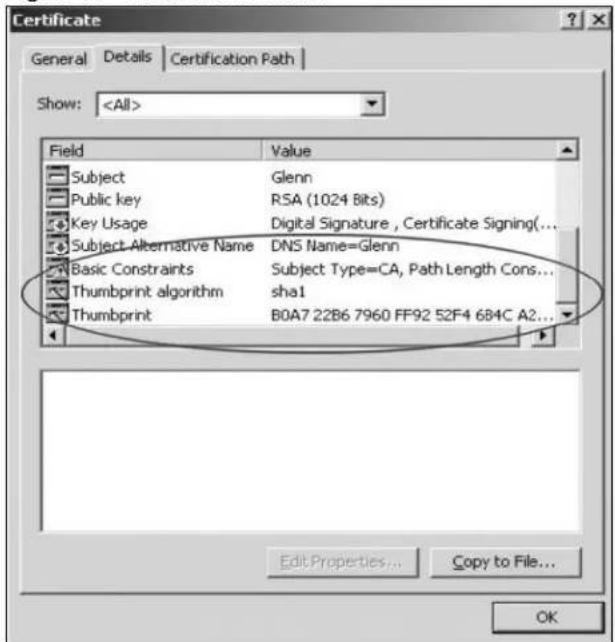
4 Use a secure method to verify that the certificate owner has the same information in the Thumbprint Algorithm and Thumbprint fields. The secure method may very based on your situation. Possible examples would be over the telephone or through an HTTPS connection.
16.2 Local Certificates
Use this screen to view the Device's summary list of certificates and certification requests. You can import the following certificates to your Device:
- Web Server - This certificate secures HTTP connections.
- SIP TLS - This certificate secures VoIP connections.
- SSH/SCP/SFTP - This certificate secures remote connections.
Click Security > Certificates to open the Local Certificates screen.
Figure 80 Security > Certificates > Local Certificates
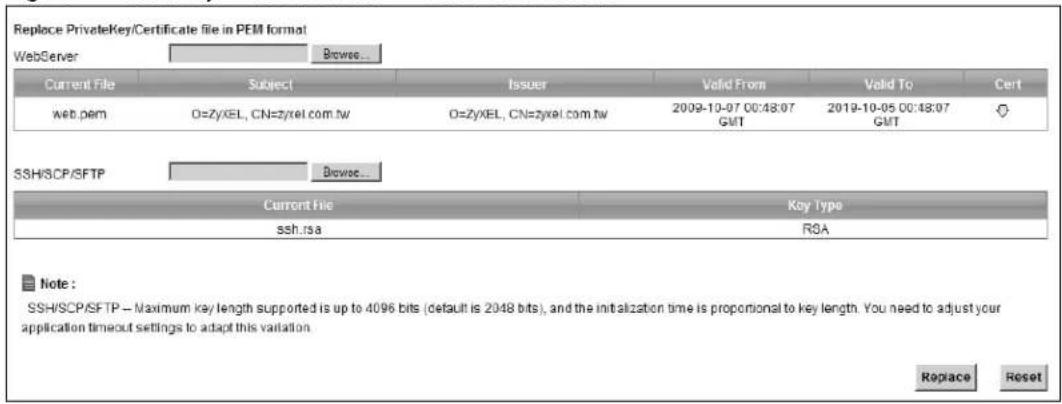
The following table describes the labels in this screen.
Table 46 Security > Certificates > Local Certificates
| LABEL DESCRIPTION | |
| WebServer | Click Browse... to find the certificate file you want to upload. |
| Current File | This field displays the name used to identify this certificate. It is recommended that you give each certificate a unique name. |
| Subject | This field displays identifying information about the certificate's owner, such as CN (Common Name), OU (Organizational Unit or department), O (Organization or company) and C (Country). It is recommended that each certificate have unique subject information. |
| Issuer This field displays identifying information about the certificate's issuing certification authority, such as a common name, organizational unit or department, organization or company and country. | |
| Valid From | This field displays the date that the certificate becomes applicable. The text displays in red and includes a Not Yet Valid! message if the certificate has not yet become applicable. |
| Valid To | This field displays the date that the certificate expires. The text displays in red and includes an Expiring! or Expired! message if the certificate is about to expire or has already expired. |
| Cert | Click this button and then Save in the File Download screen. The Save As screen opens, browse to the location that you want to use and click Save. |
| SSH/SCP/SFTP | Type in the location of the SSH/ SCP/ SFTP certificate file you want to upload in this field or click Browse to find it. |
| Choose file Click this link to find the certificate file you want to upload. | |
| Current File | This field displays the name used to identify this certificate. It is recommended that you give each certificate a unique name. |
| Key Type | This field applies to the SSH/ SCP/ SFTP certificate.This shows the file format of the current certificate. |
| Replace | Click this to replace the certificate(s) and save your changes back to the Device. |
| Reset | Click this to clear your settings. |
16.3 Trusted CA
Use this screen to view a summary list of certificates of the certification authorities that you have set the Device to accept as trusted. The Device accepts any valid certificate signed by a certification authority on this list as being trustworthy; thus you do not need to import any certificate that is signed by one of these certification authorities.
Click Security > Certificates > Trusted CA to open the Trusted CA screen.
Figure 81 Security > Certificates > Trusted CA
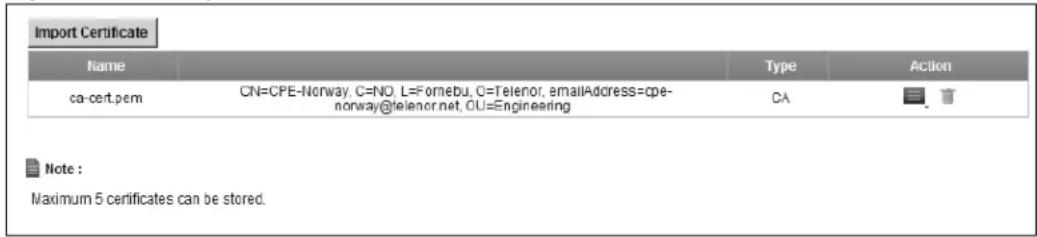
The following table describes the labels in this screen.
Table 47 Security > Certificates > Trusted CA
| LABEL DESCRIPTION | |
| Import Certificate | Click this button to open a screen where you can save the certificate of a certification authority that you trust to the Device. |
| Name This field displays the name used to identify this certificate. | |
| Subject This field displays information that identifies the owner of the certificate, such as Common Name (CN), OU (Organizational Unit or department), Organization (O), State (ST) and Country (C). It is recommended that each certificate have unique subject information. | |
| Type | This field displays general information about the certificate. ca means that a Certification Authority signed the certificate. |
| Action | Click the View icon to open a screen with an in-depth list of information about the certificate (or certification request).Click the Delete icon to delete the certificate (or certification request). You cannot delete a certificate that one or more features is configured to use. |
16.4 Trusted CA Import
Click Import Certificate in the Trusted CA screen to open the Import Certificate screen. You can save a trusted certification authority's certificate to the Device.
Note: You must remove any spaces from the certificate's filename before you can import the certificate.
Figure 82 Trusted CA > Import
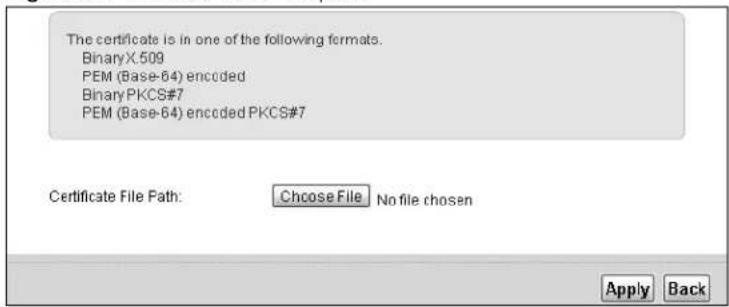
The following table describes the labels in this screen.
Table 48 Security > Certificates > Trusted CA > Import
| LABEL DESCRIPTION | |
| Certificate File Path | Type in the location of the file you want to upload in this field or clickBrowseto find it. |
| Browse | ClickBrowseto find the certificate file you want to upload. |
| Apply Click Apply | to save the certificate on the Device. |
| Back | ClickBackto return to the previous screen. |
16.5 View Certificate
Use this screen to view in-depth information about the certification authority's certificate, change the certificate's name and set whether or not you want the Device to check a certification authority's list of revoked certificates before trusting a certificate issued by the certification authority.
Click Security > Certificates > Trusted CA to open the Trusted CA screen. Click the View icon to open the View Certificate screen.
Figure 83 Trusted CA: View
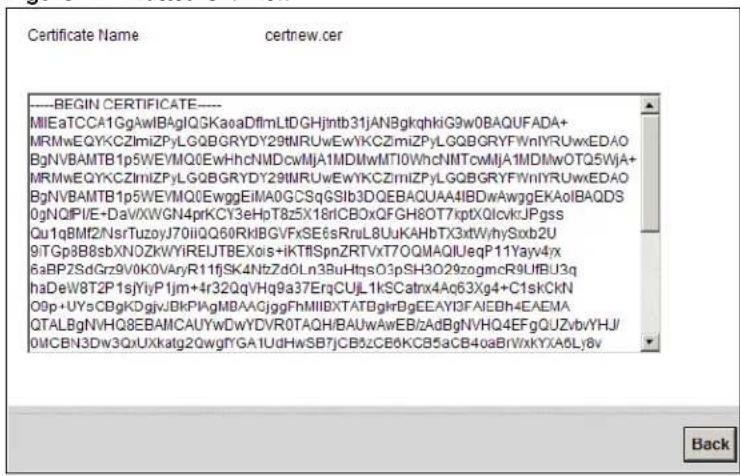
The following table describes the labels in this screen.
Table 49 Trusted CA: View
| LABEL DESCRIPTION | |
| Certificate Name | This field displays the identifying name of this certificate. If you want to change the name, type up to 31 characters to identify this key certificate. You may use any character (not including spaces). |
| Certificate Detail | This read-only text box displays the certificate or certification request in Privacy Enhanced Mail (PEM) format. PEM uses 64 ASCII characters to convert the binary certificate into a printable form.You can copy and paste the certificate into an e-mail to send to friends or colleagues or you can copy and paste the certificate into a text editor and save the file on a management computer for later distribution (via floppy disk for example). |
| Back Click this to return to the previous screen. | |
17.1 Overview
A virtual private network (VPN) provides secure communications over the Internet. Internet Protocol Security (IPSec) is a standards-based VPN that provides confidentiality, data integrity, and authentication. This chapter shows you how to configure the Device's VPN settings.
17.2 IPSec VPN
17.2.1 The General Screen
Use this screen to view and manage your VPN tunnel policies. The following figure helps explain the main fields in the web configurator.
Figure 84 IPSec Fields Summary
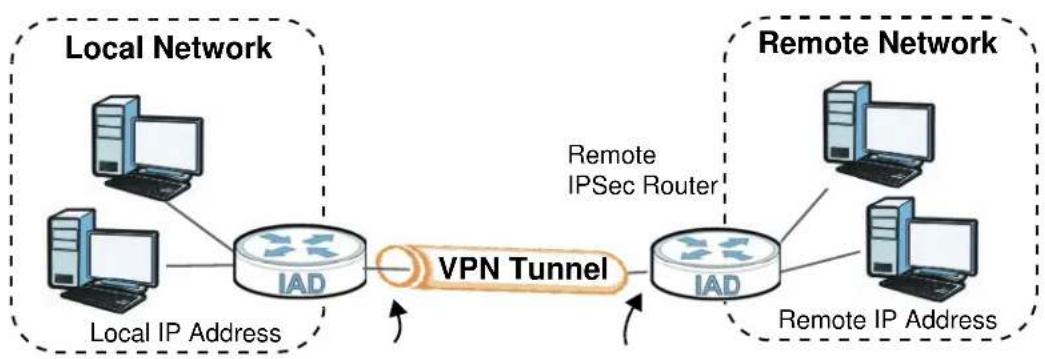
flowchart
graph LR
    subgraph_Local_Network["Local Network"]
        A["Computer"] --> B["IAD"]
        C["Computer"] --> B
        B --> D["VPN Tunnel"]
        D --> E["Remote IPSec Router"]
        E --> F["IAD"]
        F --> G["Remote IP Address"]
    end
    subgraph_Remote_Network["Remote Network"]
        H["Computer"] --> I["Remote IP Sec Router"]
        J["Computer"] --> I
        K["Computer"] --> I
        I --> L["Remote IP Address"]
    end
Click Security > VPN to open this screen as shown next.
Figure 85 IPSec VPN

This screen contains the following fields:
Table 50 IPSec VPN
| LABEL DESCRIPTION | |
| Add New Tunnel Click this button to add an item to the list. | |
| # This is the VPN policy index number. | |
| Active This displays if the VPN policy is enabled. | |
| Tunnel Name The name of the VPN connection. | |
| Local Address This displays the IP address of the Device. | |
| Remote Address | This displays the IP address of the remote IPSec router. |
| IPSec Algorithm This displays the encryption algorithm for the VPN connection. | |
| Modify | Click the Edit icon to go to the screen where you can edit the rule.Click the Delete icon to delete an existing rule. |
17.2.2 IPSec VPN: Add
Use these settings to add or edit VPN policies. Click Security > VPN > Add New Tunnel to open this screen as shown next.
Figure 86 IPSec VPN: Add
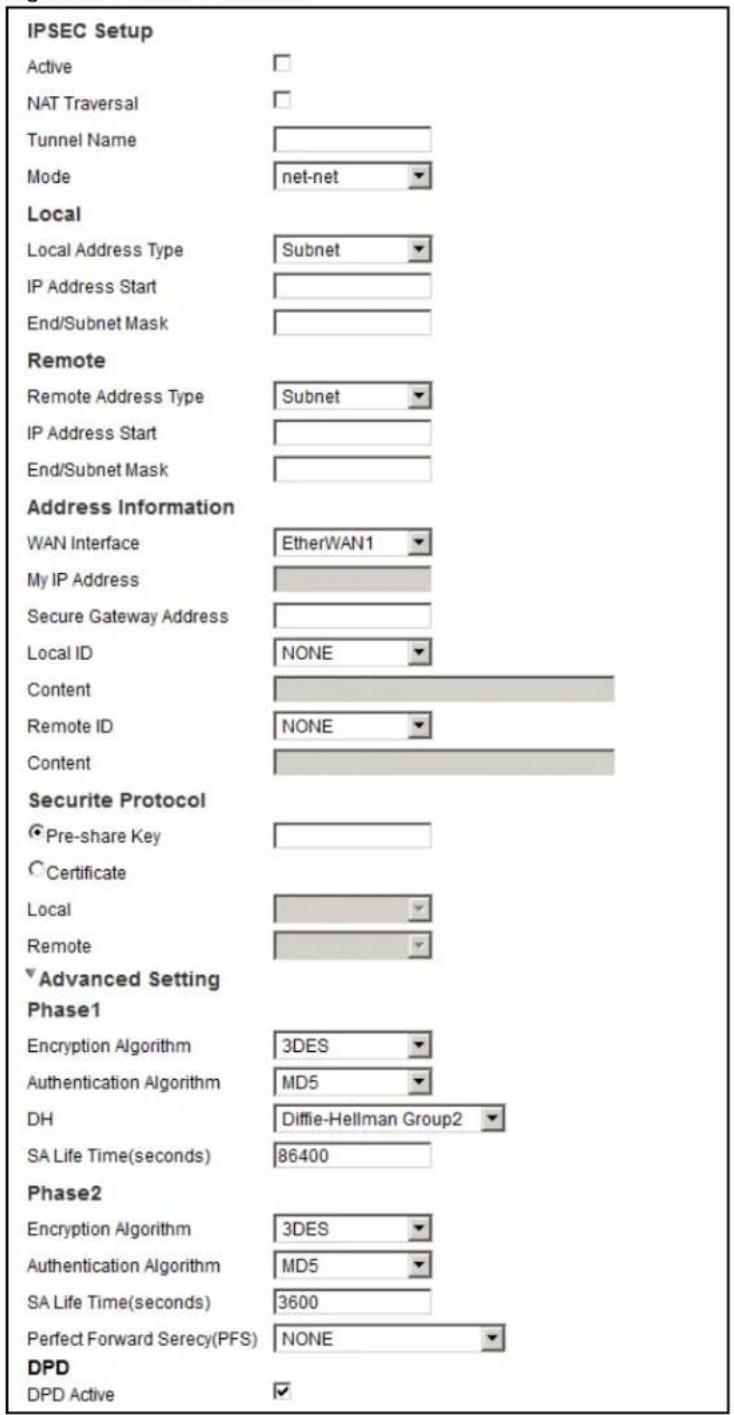
This screen contains the following fields:
Table 51 IPSec VPN: Add
| LABEL DESCRIPTION | |
| IPSEC Setup | |
| Active Select Active to activate this VPN policy. | |
| NAT Traversal Select this if any of these conditions are satisfied.This IKE SA might be used to negotiate IPSec SAs that use ESP as the active protocol.There are one or more NAT routers between the Device and remote IPSec router, and these routers do not support IPSec pass-thru or a similar feature.The remote IPSec router must also enable NAT traversal, and the NAT routers have to forward packets with UDP port 500 and UDP 4500 headers unchanged. | |
| Tunnel Name Enter the name of the VPN connection. | |
| Mode | Select the encapsulation mode. When net-net is selected, the connection will operate in tunnel mode. |
| Local | |
| Local Address Type | Select Single to have only one local LAN IP address use the VPN tunnel. Select Subnet to specify local LAN IP addresses by their subnet mask. |
| IP Address Start | If Single is selected, enter a (static) IP address on the LAN behind your Device.If Subnet is selected, specify IP addresses on a network by their subnet mask by entering a (static) IP address on the LAN behind your Device. Then enter the subnet mask to identify the network address. |
| End/Subnet Mask | If Subnet is selected, enter the subnet mask to identify the network address. |
| Remote | |
| Remote Address Type | Select Single to have only one remote LAN IP address use the VPN tunnel.Select Subnet to specify remote LAN IP addresses by their subnet mask. |
| IP Address Start | If Single is selected, enter a (static) IP address on the LAN behind the remote IPSec's router.If Subnet is selected, specify IP addresses on a network by their subnet mask by entering a (static) IP address on the LAN behind the remote IPSec's router. Then enter the subnet mask to identify the network address. |
| End/Subnet Mask | If Subnet is selected, enter the subnet mask to identify the network address. |
| Address Information | |
| WAN Interface Select the interface for the VPN gateway. | |
| My IP Address Enter the IP address of the Device in the IKE SA. | |
| Secure Gateway Address | Enter the IP address of the remote IPSec router in the IKE SA. |
| Local ID | Select IP to identify the Device by its IP address.Select DNS to identify this Device by a domain name.Select E-mail to identify this Device by an e-mail address. |
Table 51 IPSec VPN: Add
| LABEL DESCRIPTION | |
| Content | When you select IP in the Local ID field, type the IP address of your computer in the Content field. If you configure the Content field to 0.0.0.0 or leave it blank, the Device automatically uses the Pre-Share Key (refer to the Pre-Share Key field description).It is recommended that you type an IP address other than 0.0.0.0 in the Content field or use the DNS or E-mail ID type in the following situations.When there is a NAT router between the two IPSec routers.When you want the remote IPSec router to be able to distinguish between VPN connection requests that come in from IPSec routers with dynamic WAN IP addresses.When you select DNS or E-mail in the Local ID field, type a domain name or e-mail address by which to identify this Device in the Content field. Use up to 31 ASCII characters including spaces, although trailing spaces are truncated. The domain name or e-mail address is for identification purposes only and can be any string. |
| Remote ID | Select IP to identify the remote IPSec router by its IP address.Select DNS to identify the remote IPSec router by a domain name.Select E-mail to identify the remote IPSec router by an e-mail address. |
| Content The con | Configuration of the remote content depends on the remote ID type.For IP, type the IP address of the computer with which you will make the VPN connection. If you configure this field to 0.0.0.0 or leave it blank, the Device will use the address in the Secure Gateway Address field (refer to the Secure Gateway Address field description).For DNS or E-mail, type a domain name or e-mail address by which to identify the remote IPSec router. Use up to 31 ASCII characters including spaces, although trailing spaces are truncated. The domain name or e-mail address is for identification purposes only and can be any string.It is recommended that you type an IP address other than 0.0.0.0 or use the DNS or E-mail ID type in the following situations:When there is a NAT router between the two IPSec routers.When you want the Device to distinguish between VPN connection requests that come in from remote IPSec routers with dynamic WAN IP addresses. |
| Security Protocol | |
| Pre-Shared Key | Type your pre-shared key in this field. A pre-shared key identifies a communicating party during a phase 1 IKE negotiation.Type from 8 to 31 case-sensitive ASCII characters or from 16 to 62 hexadecimal ("0-9", "A-F") characters. You must precede a hexadecimal key with a "0x" (zero x), which is not counted as part of the 16 to 62 character range for the key. For example, in "0x0123456789ABCDEF", "0x" denotes that the key is hexadecimal and "0123456789ABCDEF" is the key itself. |
| Advanced Setting - Phase 1 | |
| Encryption Algorithm | Select which key size and encryption algorithm to use in the IKE SA. Choices are:3DES - a 168-bit key with the DES encryption algorithmAES128 - a 128-bit key with the AES encryption algorithmAES256 - a 256-bit key with the AES encryption algorithmThe Device and the remote IPSec router must use the same key size and encryption algorithm. Longer keys require more processing power, resulting in increased latency and decreased throughput. |
Table 51 IPSec VPN: Add
| LABEL DESCRIPTION | |
| Authentication Algorithm | Select which hash algorithm to use to authenticate packet data. Choices are MD5, SHA1, SHA2-256 and SHA2-512. SHA is generally considered stronger than MD5, but it is also slower. |
| DH Select which | Diffie-Hellman key group you want to use for encryption keys.Choices are:Diffie-Hellman Group2 - use a 1024-bit random numberDiffie-Hellman Group5 - use a 1536-bit random numberDiffie-Hellman Group14 - use a 2048-bit random numberThe longer the key, the more secure the encryption, but also the longer it takes to encrypt and decrypt information. Both routers must use the same DH key group. |
| SA Life Time | Define the length of time before an IPSec SA automatically renegotiates in this field.A short SA Life Time increases security by forcing the two VPN gateways to update the encryption and authentication keys. However, every time the VPN tunnel renegotiates, all users accessing remote resources are temporarily disconnected. |
| Phase 2 | |
| Encryption Algorithm | Select which key size and encryption algorithm to use in the IKE SA. Choices are:DES - a 56-bit key with the DES encryption algorithm3DES - a 168-bit key with the DES encryption algorithmAES128 - a 128-bit key with the AES encryption algorithmAES256 - a 256-bit key with the AES encryption algorithmThe Device and the remote IPSec router must use the same key size and encryption algorithm. Longer keys require more processing power, resulting in increased latency and decreased throughput. |
| Authentication Algorithm | Select which hash algorithm to use to authenticate packet data. Choices are MD5, SHA1. SHA is generally considered stronger than MD5, but it is also slower. |
| SA Life Time | Define the length of time before an IPSec SA automatically renegotiates in this field.A short SA Life Time increases security by forcing the two VPN gateways to update the encryption and authentication keys. However, every time the VPN tunnel renegotiates, all users accessing remote resources are temporarily disconnected. |
Table 51 IPSec VPN: Add
| LABEL DESCRIPTION | |
| Perfect Forward Secrecy (PFS) | Select whether or not you want to enable Perfect Forward Secrecy (PFS)PFS changes the root key that is used to generate encryption keys for each IPSec SA. The longer the key, the more secure the encryption, but also the longer it takes to encrypt and decrypt information. Both routers must use the same DH key group. Choices are:Diffie-Hellman Group2 - use a 1024-bit random numberDiffie-Hellman Group5 - use a 1536-bit random numberDiffie-Hellman Group14 - use a 2048-bit random number |
| DPD Active Enable | Dead Peer Detection (DPD) Active check box if you want the Device to make sure the remote IPSec router is there before it transmits data through the IKE SA. The remote IPSec router must support DPD. If the remote IPSec router does not respond, the Device shuts down the IKE SA. |
17.2.3 The Monitor Screen
Use this screen to view active VPN connections. The following figure helps explain the main fields in the web configurator.
Click Security > VPN > Monitor to open this screen as shown next.
Figure 87 Monitor

This screen contains the following fields:
Table 52 Monitor
| LABEL DESCRIPTION | |
| # This is the VPN policy index number. | |
| Status This displays if the VPN policy is connected. | |
| Tunnel Name Enter the name of the VPN connection. | |
| IPSec Algorithm This displays the encryption algorithm being used for the VPN connection. | |
| Refresh | Click this button to refresh the information on the screen. |
17.3 Technical Reference
This section provides some technical background information about the topics covered in this section.
17.3.1 IPSec Architecture
The overall IPSec architecture is shown as follows.
Figure 88 IPSec Architecture
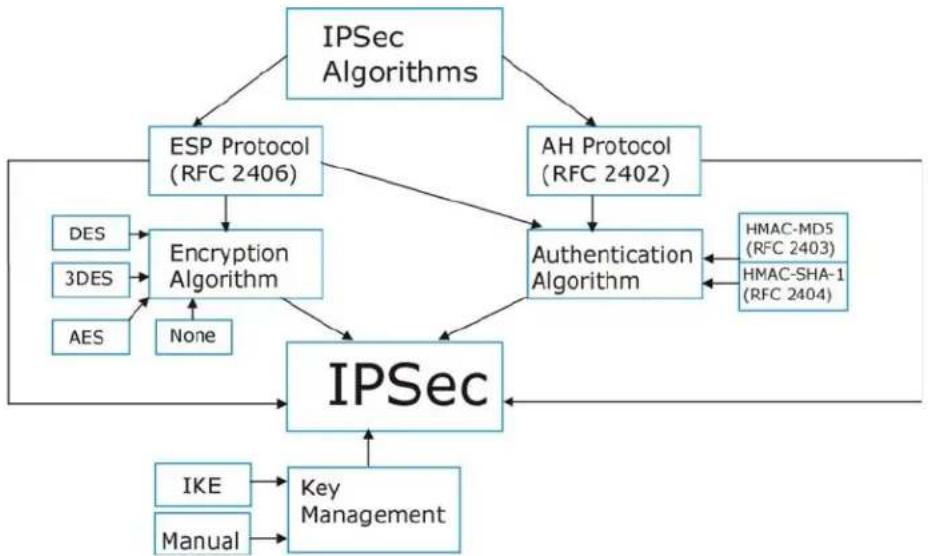
flowchart
graph TD
    A["IPSec Algorithms"] --> B["ESP Protocol (RFC 2406)"]
    A --> C["AH Protocol (RFC 2402)"]
    B --> D["Encryption Algorithm"]
    C --> D
    D --> E["IPSec"]
    E --> F["Key Management"]
    G["DES"] --> D
    H["3DES"] --> D
    I["AES"] --> D
    J["None"] --> D
    K["IKE"] --> E
    L["Manual"] --> E
    M["HMAC-MD5 (RFC 2403)"] --> N["Authentication Algorithm"]
    O["HMAC-SHA-1 (RFC 2404)"] --> N
    N --> E
IPSec Algorithms
The ESP (Encapsulating Security Payload) Protocol (RFC 2406) and AH (Authentication Header) protocol (RFC 2402) describe the packet formats and the default standards for packet structure (including implementation algorithms).
The Encryption Algorithm describes the use of encryption techniques such as DES (Data Encryption Standard) and Triple DES algorithms.
The Authentication Algorithms, HMAC-MD5 (RFC 2403) and HMAC-SHA-1 (RFC 2404, provide an authentication mechanism for the AH and ESP protocols.
Key Management
Key management allows you to determine whether to use IKE (ISAKMP) or manual key configuration in order to set up a VPN.
17.3.2 Encapsulation
The two modes of operation for IPSec VPNs are Transport mode and Tunnel mode. At the time of writing, the Device supports Tunnel mode only.
Figure 89 Transport and Tunnel Mode IPSec Encapsulation
| OriginalIP Packet | IPHeader | TCPHeader | Data |
| Transport ModeProtected Packet | IPSecHeader | IPHeader | TCPHeader | Data |
| Tunnel ModeProtected Packet | IPHeader | IPSecHeader | IPHeader | TCPHeader | Data |
Transport Mode
Transport mode is used to protect upper layer protocols and only affects the data in the IP packet. In Transport mode, the IP packet contains the security protocol (AH or ESP) located after the original IP header and options, but before any upper layer protocols contained in the packet (such as TCP and UDP).
With ESP, protection is applied only to the upper layer protocols contained in the packet. The IP header information and options are not used in the authentication process. Therefore, the originating IP address cannot be verified for integrity against the data.
With the use of AH as the security protocol, protection is extended forward into the IP header to verify the integrity of the entire packet by use of portions of the original IP header in the hashing process.
Tunnel Mode
Tunnel mode encapsulates the entire IP packet to transmit it securely. A Tunnel mode is required for gateway services to provide access to internal systems. Tunnel mode is fundamentally an IP tunnel with authentication and encryption. This is the most common mode of operation. Tunnel mode is required for gateway to gateway and host to gateway communications. Tunnel mode communications have two sets of IP headers:
- Outside header: The outside IP header contains the destination IP address of the VPN gateway.
- Inside header: The inside IP header contains the destination IP address of the final system behind the VPN gateway. The security protocol appears after the outer IP header and before the inside IP header.
17.3.3 IKE Phases
There are two phases to every IKE (Internet Key Exchange) negotiation – phase 1 (Authentication) and phase 2 (Key Exchange). A phase 1 exchange establishes an IKE SA and the second one uses that SA to negotiate SAs for IPSec.
Figure 90 Two Phases to Set Up the IPSec SA
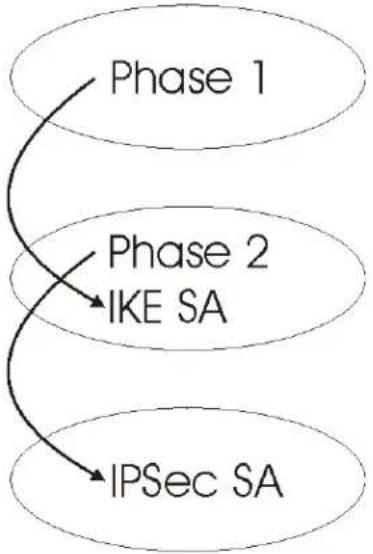
flowchart
graph TD
    A["Phase 1"] --> B["Phase 2 IKE SA"]
    B --> C["IPSec SA"]
In phase 1 you must:
- Choose a negotiation mode.
- Authenticate the connection by entering a pre-shared key.
- Choose an encryption algorithm.
- Choose an authentication algorithm.
- Choose a Diffie-Hellman public-key cryptography key group.
- Set the IKE SA lifetime. This field allows you to determine how long an IKE SA should stay up before it times out. An IKE SA times out when the IKE SA lifetime period expires. If an IKE SA times out when an IPSec SA is already established, the IPSec SA stays connected.
In phase 2 you must:
- Choose an encryption algorithm.
- Choose an authentication algorithm
- Choose a Diffie-Hellman public-key cryptography key group.
- Set the IPSec SA lifetime. This field allows you to determine how long the IPSec SA should stay up before it times out. The Device automatically renegotiates the IPSec SA if there is traffic when the IPSec SA lifetime period expires. If an IPSec SA times out, then the IPSec router must renegotiate the SA the next time someone attempts to send traffic.
17.3.4 Negotiation Mode
The phase 1 Negotiation Mode you select determines how the Security Association (SA) will be established for each connection through IKE negotiations.
- Main Mode ensures the highest level of security when the communicating parties are negotiating authentication (phase 1). It uses 6 messages in three round trips: SA negotiation, Diffie-Hellman exchange and an exchange of nonces (a nonce is a random number). This mode features identity protection (your identity is not revealed in the negotiation).
- Aggressive Mode is quicker than Main Mode because it eliminates several steps when the communicating parties are negotiating authentication (phase 1). However the trade-off is that faster speed limits its negotiating power and it also does not provide identity protection. It is useful in remote access situations where the address of the initiator is not known by the responder and both parties want to use pre-shared key authentication.
17.3.5 IPSec and NAT
Read this section if you are running IPSec on a host computer behind the Device.
NAT is incompatible with the AH protocol in both Transport and Tunnel mode. An IPSec VPN using the AH protocol digitally signs the outbound packet, both data payload and headers, with a hash value appended to the packet. When using AH protocol, packet contents (the data payload) are not encrypted.
A NAT device in between the IPSec endpoints will rewrite either the source or destination address with one of its own choosing. The VPN device at the receiving end will verify the integrity of the incoming packet by computing its own hash value, and complain that the hash value appended to the received packet doesn't match. The VPN device at the receiving end doesn't know about the NAT in the middle, so it assumes that the data has been maliciously altered.
IPSec using ESP in Tunnel mode encapsulates the entire original packet (including headers) in a new IP packet. The new IP packet's source address is the outbound address of the sending VPN gateway, and its destination address is the inbound address of the VPN device at the receiving end. When using ESP protocol with authentication, the packet contents (in this case, the entire original packet) are encrypted. The encrypted contents, but not the new headers, are signed with a hash value appended to the packet.
Tunnel mode ESP with authentication is compatible with NAT because integrity checks are performed over the combination of the "original header plus original payload," which is unchanged by a NAT device.
Transport mode ESP with authentication is not compatible with NAT.
Table 53 VPN and NAT
| SECURITY PROTOCOL MODE NAT | ||
| AH Transport N | ||
| AH Tunnel N | ||
| ESP Transport N | ||
| ESP Tunnel Y | ||
17.3.6 VPN, NAT, and NAT Traversal
NAT is incompatible with the AH protocol in both transport and tunnel mode. An IPSec VPN using the AH protocol digitally signs the outbound packet, both data payload and headers, with a hash value appended to the packet, but a NAT device between the IPSec endpoints rewrites the source or destination address. As a result, the VPN device at the receiving end finds a mismatch between the hash value and the data and assumes that the data has been maliciously altered.
NAT is not normally compatible with ESP in transport mode either, but the Device's NAT Traversal feature provides a way to handle this. NAT traversal allows you to set up an IKE SA when there are NAT routers between the two IPSec routers.
Figure 91 NAT Router Between IPSec Routers

flowchart
graph LR
    A["IAD"] --> B["Router"]
    B --> C["INTERNET"]
    C --> D["IAD"]
Normally you cannot set up an IKE SA with a NAT router between the two IPSec routers because the NAT router changes the header of the IPSec packet. NAT traversal solves the problem by adding a UDP port 500 header to the IPSec packet. The NAT router forwards the IPSec packet with the UDP port 500 header unchanged. In the above figure, when IPSec router A tries to establish an IKE SA, IPSec router B checks the UDP port 500 header, and IPSec routers A and B build the IKE SA.
For NAT traversal to work, you must:
- Use ESP security protocol (in either transport or tunnel mode).
- Use I KE keying mode.
- Enable NAT traversal on both IPSec endpoints.
- Set the NAT router to forward UDP port 500 to IPSec router A.
Finally, NAT is compatible with ESP in tunnel mode because integrity checks are performed over the combination of the "original header plus original payload," which is unchanged by a NAT device. The compatibility of AH and ESP with NAT in tunnel and transport modes is summarized in the following table.
Table 54 VPN and NAT
| SECURITY PROTOCOL MODE NAT | ||
| AH Transport N | ||
| AH Tunnel N | ||
| ESP Transport Y* | ||
| ESP Tunnel Y |
Y* - This is supported in the Device if you enable NAT traversal.
17.3.7 ID Type and Content
With aggressive negotiation mode (see Section 17.3.4 on page 176), the Device identifies incoming SAs by ID type and content since this identifying information is not encrypted. This enables the Device to distinguish between multiple rules for SAs that connect from remote IPSec routers that have dynamic WAN IP addresses.
Regardless of the ID type and content configuration, the Device does not allow you to save multiple active rules with overlapping local and remote IP addresses.
With main mode (see Section 17.3.4 on page 176), the ID type and content are encrypted to provide identity protection. In this case the Device can distinguish between different incoming SAs that connect from remote IPSec routers that have dynamic WAN IP addresses. The Device can distinguish different incoming SAs and you can select between different encryption algorithms, authentication algorithms and key groups when you configure a VPN rule. The ID type and content act as an extra level of identification for incoming SAs.
The type of ID can be a domain name, an IP address or an e-mail address. The content is the IP address, domain name, or e-mail address.
Table 55 Local ID Type and Content Fields
| LOCAL ID TYPE= | CONTENT= |
| IP Type the IP address of your computer. | |
| DNS | Type a domain name (up to 31 characters) by which to identify this Device. |
| E-mail Type an e-mail address (up to 31 characters) by which to identify this Device. | |
| The domain name or e-mail address that you use in theLocal ID Contentfield is used for identification purposes only and does not need to be a real domain name or e-mail address. | |
17.3.7.1 ID Type and Content Examples
Two IPSec routers must have matching ID type and content configuration in order to set up a VPN tunnel.
The two Devices in this example can complete negotiation and establish a VPN tunnel.
Table 56 Matching ID Type and Content Configuration Example
| Device A Device B | |
| Local ID type: E-mail Local ID type: IP | |
| Local ID content: tom@yourcompany.com Local | ID content: 1.1.1.2 |
| Remote ID type: IP Remote ID type: E-mail | |
| Remote ID content: 1.1.1.2 Remote ID content: | tom@yourcompany.com |
The two Devices in this example cannot complete their negotiation because Device B's Local ID type is IP, but Device A's Remote ID type is set to E-mail. An "ID mismatched" message displays in the IPSEC LOG.
Table 57 Mismatching ID Type and Content Configuration Example
| DEVICE A DEVICE B | |
| Local ID type: IP Local ID type: IP | |
| Local ID content: 1.1.1.10 | Local ID content: 1.1.1.2 |
| Remote ID type: E-mail | Remote ID type: IP |
| Remote ID content: aa@yahoo.com | Remote ID content: 1.1.1.0 |
17.3.8 Pre-Shared Key
A pre-shared key identifies a communicating party during a phase 1 IKE negotiation (see Section 17.3.3 on page 175 for more on IKE phases). It is called “pre-shared” because you have to share it with another party before you can communicate with them over a secure connection.
17.3.9 Diffie-Hellman (DH) Key Groups
Diffie-Hellman (DH) is a public-key cryptography protocol that allows two parties to establish a shared secret over an unsecured communications channel. Diffie-Hellman is used within IKE SA setup to establish session keys. Upon completion of the Diffie-Hellman exchange, the two peers have a shared secret, but the IKE SA is not authenticated. For authentication, use pre-shared keys.
18.1 Overview
Use this chapter to:
- Connect an analog phone to the Device.
- Make phone calls over the Internet, as well as the regular phone network.
- Configure settings such as speed dial.
- Configure network settings to optimize the voice quality of your phone calls.
18.1.1 What You Can Do in this Chapter
These screens allow you to configure your Device to make phone calls over the Internet and your regular phone line, and to set up the phones you connect to the Device.
- Use the SIP Service Provider screen to configure the SIP server information, QoS for VoIP calls, the numbers for certain phone functions (Section 18.3 on page 188).
- Use the SIP Account screen to set up information about your SIP account, control which SIP accounts the phones connected to the Device use and configure audio settings such as volume levels for the phones connected to the ZyXEL Device (Section 18.3 on page 188).
- Use the Phone Device screen to control which SIP accounts the phones connected to the Device use (Section 18.5 on page 192).
- Use the Call Rule screen to set up shortcuts for dialing frequently-used (VoIP) phone numbers (Section 18.6 on page 193).
You don't necessarily need to use all these screens to set up your account. In fact, if your service provider did not supply information on a particular field in a screen, it is usually best to leave it at its default setting.
18.1.2 What You Need to Know
The following terms and concepts may help as you read this chapter.
VoIP
VoIP stands for Voice over IP. IP is the Internet Protocol, which is the message-carrying standard the Internet runs on. So, Voice over IP is the sending of voice signals (speech) over the Internet (or another network that uses the Internet Protocol).
SIP
SIP stands for Session Initiation Protocol. SIP is a signalling standard that lets one network device (like a computer or the Device) send messages to another. In VoIP, these messages are about phone calls over the network. For example, when you dial a number on your Device, it sends a SIP message over the network asking the other device (the number you dialed) to take part in the call.
SIP Accounts
A SIP account is a type of VoIP account. It is an arrangement with a service provider that lets you make phone calls over the Internet. When you set the Device to use your SIP account to make calls, the Device is able to send all the information about the phone call to your service provider on the Internet.
Strictly speaking, you don't need a SIP account. It is possible for one SIP device (like the Device) to call another without involving a SIP service provider. However, the networking difficulties involved in doing this make it tremendously impractical under normal circumstances. Your SIP account provider removes these difficulties by taking care of the call routing and setup - figuring out how to get your call to the right place in a way that you and the other person can talk to one another.
Voice Activity Detection/Silence Suppression
Voice Activity Detection (VAD) detects whether or not speech is present. This lets the Device reduce the bandwidth that a call uses by not transmitting “silent packets” when you are not speaking.
Comfort Noise Generation
When using VAD, the Device generates comfort noise when the other party is not speaking. The comfort noise lets you know that the line is still connected as total silence could easily be mistaken for a lost connection.
Echo Cancellation
G.168 is an ITU-T standard for eliminating the echo caused by the sound of your voice reverberating in the telephone receiver while you talk.
Use this screen to maintain basic information about each SIP account. You can also enable and disable each SIP account, configure the volume, echo cancellation and VAD (Voice Activity Detection) settings for each individual phone port on the Device.
How to Find Out More
See Chapter 3 on page 25 for a tutorial showing how to set up these screens in an example scenario.
See Section on page 194 for advanced technical information on SIP.
18.1.3 Before You Begin
- Before you can use these screens, you need to have a VoIP account already set up. If you don't have one yet, you can sign up with a VoIP service provider over the Internet.
- You should have the information your VoIP service provider gave you ready, before you start to configure the Device.
18.2 The SIP Service Provider Screen
Use this screen to configure the SIP server information, QoS for VoIP calls, the numbers for certain phone functions and dialing plan. Click VoIP > SIP to open the SIP Service Provider screen.
Note: Click more... to see all the fields in the screen. You don't necessarily need to use all these fields to set up your account. Click hide more to see and configure only the fields needed for this feature.
Figure 92 VoIP > SIP > SIP Service Provider
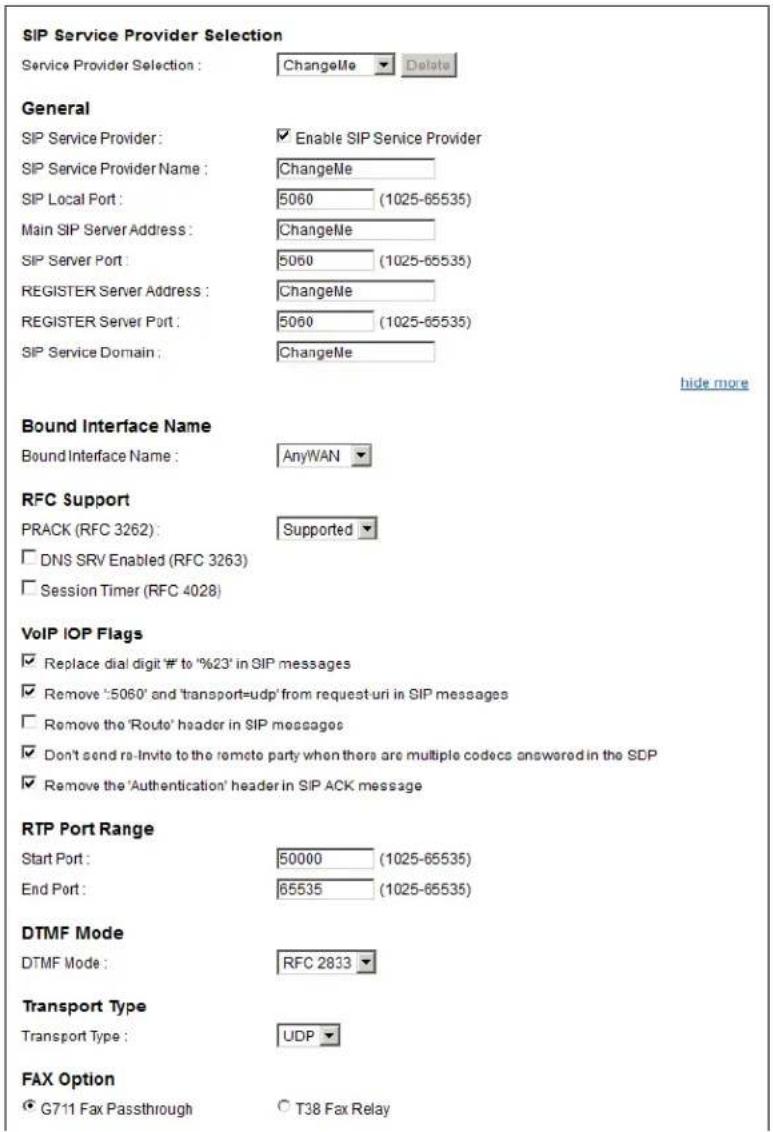
Figure 93 VoIP > SIP > SIP Service Provider (continued)
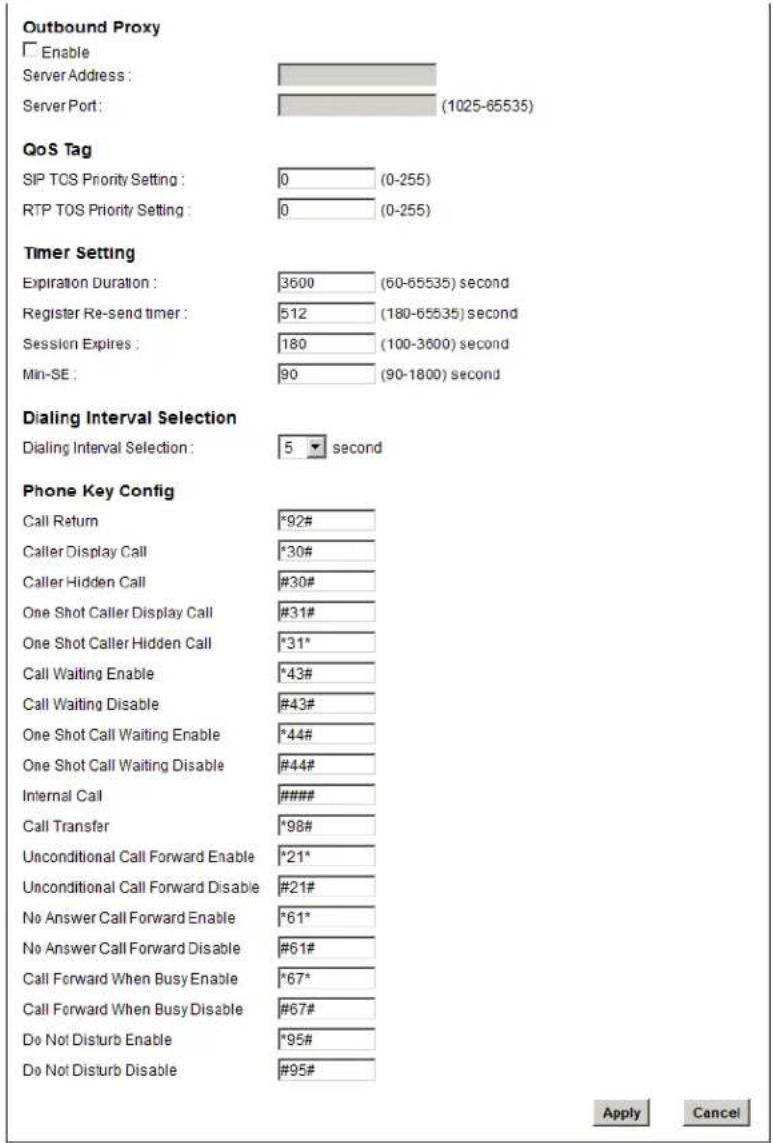
The following table describes the labels in this screen.
Table 58 VoIP > SIP > SIP Service Provider
| LABEL DESCRIPTION | |
| SIP Service Provider Selection | |
| Service Provider Selection | Select the SIP service provider profile you want to use for the SIP account you configure in this screen. If you change this field, the screen automatically refreshes. |
| General | |
| SIP Service Provider | Select this if you want the Device to use this SIP provider. Clear it if you do not want the Device to use this SIP provider. |
| SIP Service Provider Name | Enter the name of your SIP service provider. |
| SIP Local Port | Enter the Device's listening port number, if your VoIP service provider gave you one. Otherwise, keep the default value. |
| Main SIP Server Address | Enter the IP address or domain name of the SIP server provided by your VoIP service provider. You can use up to 95 printable ASCII characters. It does not matter whether the SIP server is a proxy, redirect or register server. |
| SIP Server Port Enter | Enter the SIP server's listening port number, if your VoIP service provider gave you one. Otherwise, keep the default value. |
| REGISTER Server Address | Enter the IP address or domain name of the SIP register server, if your VoIP service provider gave you one. Otherwise, enter the same address you entered in the SIP Server Address field. You can use up to 95 printable ASCII characters. |
| REGISTER Server Port | Enter the SIP register server's listening port number, if your VoIP service provider gave you one. Otherwise, enter the same port number you entered in the SIP Server Port field. |
| SIP Service Domain | Enter the SIP service domain name. In the full SIP URI, this is the part after the @ symbol. You can use up to 127 printable ASCII Extended set characters. |
| Bound Interface Name | |
| Bound Interface Name | If you select AnyWAN, the Device automatically activates the VoIP service when any WAN connection is up.If you select MultiWAN, you also need to select the pre-configured WAN connections. The VoIP service is activated only when one of the selected WAN connections is up. |
| RFC Support | |
| PRACK (RFC 3262) | RFC 3262 defines a mechanism to provide reliable transmission of SIP provisional response messages, which convey information on the processing progress of the request. This uses the option tag 100rel and the Provisional Response ACKnowledgement (PRACK) method.Select Supported or Required to have the Device include a SIP Require/ Supported header field with the option tag 100rel in all INVITE requests. When the Device receives a SIP response message indicating that the phone it called is ringing, the Device sends a PRACK message to have both sides confirm the message is received.If you select Supported, the peer device supports the option tag 100rel to send provisional responses reliably.If you select Required, the peer device requires the option tag 100rel to send provisional responses reliably.Select Disabled to turn off this function. |
| Session Timer (RFC 4028) | Select this to have the Device support RFC 4028.This makes sure that SIP sessions do not hang and the SIP line can always be available for use. |
| VoIP IOP Flags - Select VoIP inter-operability settings. | |
| Replace dial digit '#' to '%23' in SIP messages. | |
| Remove ':5060' and 'transport=udp' from request-uri in SIP messages. | |
| Remove the 'Route' header in SIP messages. | |
| Don't send re-Invite to the remote party when there are multiple codecs answered in the Session Description Protocol (SDP). | |
| Remove the 'Authorization' header in SIP ACK messages. | |
| RTP Port Range | |
| Start PortEnd Port | Enter the listening port number(s) for RTP traffic, if your VoIP service provider gave you this information. Otherwise, keep the default values.To enter one port number, enter the port number in the Start Port and End Port fields.To enter a range of ports,• enter the port number at the beginning of the range in the Start Port field.• enter the port number at the end of the range in the End Port field. |
| DTMF Mode | Control how the Device handles the tones that your telephone makes when you push its buttons. You should use the same mode your VoIP service provider uses.RFC2833 - send the DTMF tones in RTP packets.PCM - send the DTMF tones in the voice data stream. This method works best when you are using a codec that does not use compression (like G.711). Codecs that use compression (like G.729 and G.726) can distort the tones.SIP INFO - send the DTMF tones in SIP messages. |
| Transport Type | |
| Transport Type | Select the transport layer protocol UDP or TCP (usually UDP) used for SIP. |
| FAX Option This field controls how the Device handles fax messages. | |
| G711 Fax Passthrough | Select this if the Device should use G.711 to send fax messages. The peer devices must also use G.711. |
| T38 Fax Relay | Select this if the Device should send fax messages as UDP or TCP/IP packets through IP networks. This provides better quality, but it may have interoperability problems. The peer devices must also use T.38. |
| Outbound Proxy | |
| Enable Select this if | your VoIP service provider has a SIP outbound server to handle voice calls. This allows the Device to work with any type of NAT router and eliminates the need for STUN or a SIP ALG. Turn off any SIP ALG on a NAT router in front of the Device to keep it from re-translating the IP address (since this is already handled by the outbound proxy server). |
| Server Address Enter | the IP address or domain name of the SIP outbound proxy server. |
| Server Port Enter the SIP outbound proxy server's listening port, if your VoIP service provider gave you one. Otherwise, keep the default value. | |
| QoS Tag | |
| SIP TOS Priority Setting | Enter the DSCP (DiffServ Code Point) number for SIP message transmissions. The Device creates Class of Service (CoS) priority tags with this number to SIP traffic that it transmits. |
| RTP TOS Priority Setting | Enter the DSCP (DiffServ Code Point) number for RTP voice transmissions. The Device creates Class of Service (CoS) priority tags with this number to RTP traffic that it transmits. |
| Timer Setting | |
| Expiration Duration | Enter the number of seconds your SIP account is registered with the SIP register server before it is deleted. The Device automatically tries to re-register your SIP account when one-half of this time has passed. (The SIP register server might have a different expiration.) |
| Register Re-send timer | Enter the number of seconds the Device waits before it tries again to register the SIP account, if the first try failed or if there is no response. |
| Session Expires Enter | the number of seconds the Device lets a SIP session remain idle (without traffic) before it automatically disconnects the session. |
| Min-SE Enter the m | minimum number of seconds the Device lets a SIP session remain idle (without traffic) before it automatically disconnects the session. When two SIP devices start a SIP session, they must agree on an expiration time for idle sessions. This field is the shortest expiration time that the Device accepts. |
| Dialing Interval Selection | |
| Dialing Interval Selection | Enter the number of seconds the Device should wait after you stop dialing numbers before it makes the phone call. The value depends on how quickly you dial phone numbers. |
| Phone Key ConfigUse this section to customize the phone keypad combinations you use to access certain features on the Device. | |
| Call Return | Specify the key combinations that you can enter to place a call to the last number that called you. |
| Caller Display Call | This code is used to display the caller ID for outgoing calls. |
| Caller Hidden Call | This code is used to hide the caller ID for outgoing calls. |
| One Shot Caller Display Call | This code is used to display the caller ID only for the phone call your are going to make. |
| One Shot Caller Hidden Call | This code is used to hide the caller ID only for the phone call your are going to make. |
| Call Waiting Enable | This code is used to turn the call waiting feature on. With call waiting, you hear a special beep notifying you of another incoming call while you have a call. It allows you to place the first incoming call on hold and answer the second call so that you won't miss any important calls. |
| Call Waiting Disable | This code is used to turn the call waiting feature off. |
| One Shot Call Waiting Enable | This code is used to enable call waiting only for the phone call your are going to make. See the description for the Call Waiting Enable field for more information. |
| One Shot Call Waiting Disable | This code is used to disable one shot call waiting. |
| Internal Call | Specify the key combinations that you can enter to call the phone(s) connected to the Device. |
| Call Transfer | This code is used to enable call transfer that allows you to transfer an incoming call (that you have answered) to another phone. |
| Unconditional Call Forward Enable | This code is used to enable unconditional call forwarding. Incoming calls are always forwarded to a specified number without any condition. |
| Unconditional Call Forward Disable | This code is used to disable unconditional call forwarding. |
| No Answer Call Forward Enable | This code is used to enable call forwarding when there is no answer at a SIP number (no one picked up the connected phone that uses the SIP number). |
| No Answer Call Forward Disable | This code is used to disable call forwarding when there is no answer at a SIP number (no one picked up the connected phone that uses the SIP number). |
| Call Forward When Busy Enable | This code is used to enable call forwarding when the phone is busy. |
| Call Forward When Busy Disable | This code is used to disable call forwarding when the phone is busy. |
| Do Not Disturb Enable | This code is used to turn the do not disturb feature on. This has the Device reject all calls destined to the phone line. |
| Do Not Disturb Disable | This code is used to turn the Do Not Disturb feature off. |
| Apply | Click Apply to save your changes. |
| Cancel | Click Cancel to restore your previously saved settings. |
18.3 The SIP Account Screen
The Device uses a SIP account to make outgoing VoIP calls and check if an incoming call's destination number matches your SIP account's SIP number. In order to make or receive a VoIP call, you need to enable and configure a SIP account, and map it to a phone port. The SIP account contains information that allows your Device to connect to your VoIP service provider.
See Section 18.3 on page 188 for how to map a SIP account to a phone port.
To access the following screen, click VoIP > SIP > SIP Account.
Figure 94 VoIP > SIP > SIP Account
| Add new SIP account | |||||
| # | Active | SIP Account | SIP Service Provider | Account No. | Modify |
| 1 | SIP 1 | ChangeMe | ChangeMe | ||
| 2 | SIP 2 | ChangeMe | ChangeMe | ||
The following table describes the labels in this screen.
Table 59 VolP > SIP > SIP Account
| LABEL DESCRIPTION | |
| # This is the index | number of the entry. |
| Active This shows w | whether the SIP account is activated or not.A yellow bulb signifies that this SIP account is activated. A gray bulb signifies that this SIP account is activated. |
| SIP Account | This shows the name of the SIP account. |
| SIP Service Provider | This shows the name of the SIP service provider. |
| Account No. | This shows the SIP number. |
| Modify | Click the Edit icon to configure the SIP account.Click the Delete icon to delete this SIP account from the Device. |
18.3.1 Add/Edit SIP Account
You can configure a new SIP account or edit one. To access this screen, click Add new SIP Account in the SIP Account screen or Edit icon next to an existing account.
Figure 95 SIP Account: Add/Edit
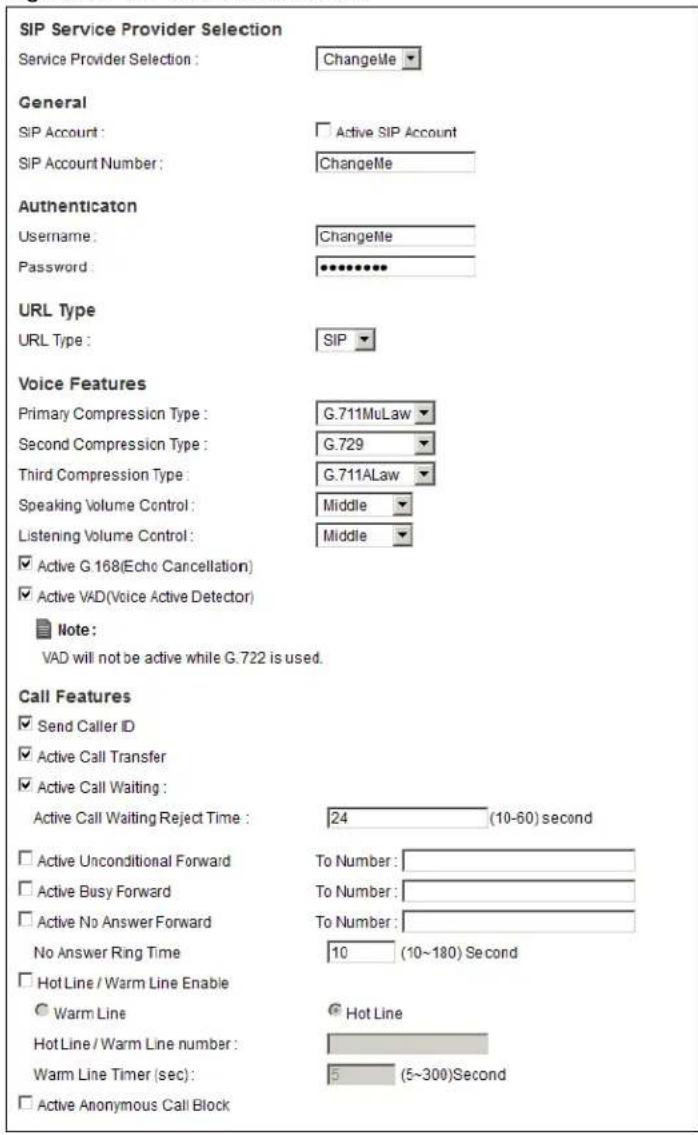
Each field is described in the following table.
Table 60 SIP Account: Edit
| LABEL DESCRIPTION | |
| SIP Service Provider Selection | |
| Service Provider Selection | Select the SIP service provider profile you want to use for the SIP account you configure in this screen.This field is view-only if you are editing the SIP account. |
| SIP Account Selection | |
| SIP Account Selection | This shows the SIP account you are configuring. |
| General | |
| SIP Account | Select the Active SIP Account check box if you want to use this account. Clear it if you do not want to use this account. |
| SIP Account Number | Enter your SIP number. In the full SIP URI, this is the part before the @ symbol. You can use up to 127 printable ASCII characters. |
| Authentication | |
| Username | Enter the user name for registering this SIP account, exactly as it was given to you. You can use up to 95 printable ASCII characters. |
| Password Enter the | password for registering this SIP account, exactly as it was given to you. You can use up to 95 printable ASCII characters. |
| URL Type | |
| URL Type Select wh | ether or not to include the SIP service domain name when the Device sends the SIP number.SIP - include the SIP service domain name.TEL - do not include the SIP service domain name. |
| Voice Features | |
| Primary Compression TypeSecondary Compression TypeThird Compression Type | Select the type of voice coder/decoder (codec) that you want the Device to use. G.711 provides higher voice quality but requires more bandwidth (64 kbps).G.711MuLaw is typically used in North America and Japan.G.711ALaw is typically used in Europe.G.729 only requires 8 kbps.G.726-32 operates at 16, 24, 32 or 40 kbps.G.722 operates at 48, 56 and 64 kbps.The Device must use the same codec as the peer. When two SIP devices start a SIP session, they must agree on a codec.Select the Device's first choice for voice coder/decoder.Select the Device's second choice for voice coder/decoder. Select None if you only want the Device to accept the first choice.Select the Device's third choice for voice coder/decoder. Select None if you only want the Device to accept the first or second choice. |
| Speaking Volume Control | Enter the loudness that the Device uses for speech that it sends to the peer device.Minimum is the quietest, and Maximum is the loudest. |
| Listening Volume Control | Enter the loudness that the Device uses for speech that it receives from the peer device.Minimum is the quietest, and Maximum is the loudest. |
| Active G.168 (Echo Cancellation) | Select this if you want to eliminate the echo caused by the sound of your voice reverberating in the telephone receiver while you talk. |
| Active VAD (Voice Active Detector) | Select this if the Device should stop transmitting when you are not speaking. This reduces the bandwidth the Device uses. |
| Call Features | |
| Send Caller ID | Select this if you want to send identification when you make VoIP phone calls. Clear this if you do not want to send identification. |
| Active Call Transfer | Select this to enable call transfer on the Device. This allows you to transfer an incoming call (that you have answered) to another phone. |
| Active Call Waiting | Select this to enable call waiting on the Device. This allows you to place a call on hold while you answer another incoming call on the same telephone (directory) number. |
| Active Call Waiting Reject Time | Specify a time of seconds that the Device waits before rejecting the second call if you do not answer it. |
| Active Unconditional Forward | Select this if you want the Device to forward all incoming calls to the specified phone number.Specify the phone number in the To Number field on the right. |
| Active Busy Forward | Select this if you want the Device to forward incoming calls to the specified phone number if the phone port is busy.Specify the phone number in the To Number field on the right.If you have call waiting, the incoming call is forwarded to the specified phone number if you reject or ignore the second incoming call. |
| Active No Answer Forward | Select this if you want the Device to forward incoming calls to the specified phone number if the call is unanswered. (See No Answer Time.)Specify the phone number in the To Number field on the right. |
| No Answer Ring Time | This field is used by the Active No Answer Forward feature.Enter the number of seconds the Device should wait for you to answer an incoming call before it considers the call is unanswered. |
| Hot Line/Warm Line Enable | Enable Warm Line or Hot Line feature on the Device. A hot line or warm line number is a phone number. Hot Line is the number to be immediately dialed once the phone is off the hook. Warm Line is the number to dial once the phone remains off the hook for a time surpassing the delay period. |
| Hot Line/Warm Line number | Enter the number to be dialed once the phone is off the hook immediately (Hot Line) or after the time the phone remains off the hook has surpassed the delay period (Warm Line). |
| Warm Line Timer (sec) | Enter the duration the phone can remain off the hook before automatically dialing the warm line number. You can set the delay from 5 to 300 seconds. |
| Active Anonymous Call Block | Select this if you do not want the phone to ring when someone tries to call you with caller ID deactivated. |
| Apply | Click Apply to save your changes. |
| Back | Click Back to return to the previous screen without saving. |
18.4 Multiple SIP Accounts
You can set up two SIP accounts on your Device and your Device is equipped with two phone ports. By default, SIP1 of the Device maps to phone port 1 for incoming and outgoing, and SIP2 maps to phone port 2 for incoming and outgoing.
18.5 Phone Screen
Use this screen to control which SIP accounts and PSTN line each phone uses. Click VoIP > Phone to access the Phone Device screen.
Figure 96 VoIP > Phone > Phone Device
| Analog Phone | |||
| # | Phone ID | Outgoing SIP Number | Modify |
| 1 | Analog Phone 1 | ChangeMe | |
| 2 | Analog Phone 2 | ChangeMe | |
The following table describes the labels in this screen.
Table 61 VolP > Phone > Phone Device
| LABEL DESCRIPTION | |
| # This is the index | number of the entry. |
| Phone ID This is the | phone device number. |
| Outgoing SIP Number | This is the outgoing SIP number of the phone device. |
| Modify | Click the Edit icon to configure the SIP account. |
18.5.1 Edit Phone Device
You can decide which SIP accounts the phones connected to the Device use by clicking the Edit icon next to a Phone ID. The following screen displays.
You cannot edit the account if it is not activated. Go to Vol P > SIP > SIP Account > Edit to activate a SIP account (see Section 18.3 on page 188 for more information).
Figure 97 Phone Device: Edit
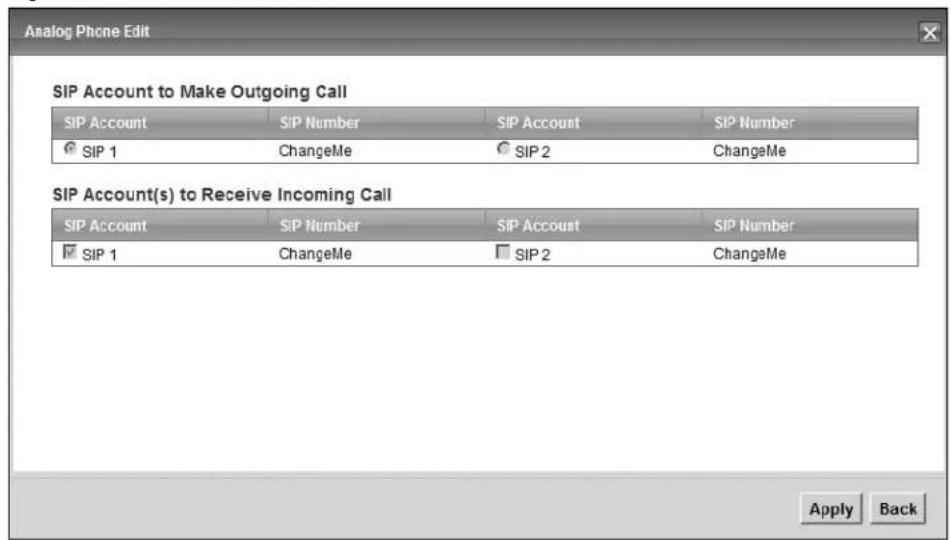
The following table describes the labels in this screen.
Table 62 Phone Device: Edit
| LABEL DESCRIPTION | |
| SIP Account to Make Outgoing Call | |
| SIP Account Select | the SIP account you want to use when making outgoing calls with the analog phone connected to this phone port. |
| SIP Number | This shows the SIP account number. |
| SIP Account(s) to Receive Incoming Call | |
| SIP Account Select | a SIP account if you want to receive phone calls for the selected SIP account on this phone port.If you select more than one SIP account for incoming calls, there is no way to distinguish between them when you receive phone calls. If you do not select a source for incoming calls, you cannot receive any calls on this phone port. |
| SIP Number | This shows the SIP account number. |
| Apply | Click Apply to save your changes. |
| Back | Click Back to return to the previous screen without saving. |
18.6 The Call Rule Screen
Use this screen to add, edit, or remove speed-dial numbers for outgoing calls. Speed dial provides shortcuts for dialing frequently-used (VoIP) phone numbers. You also have to create speed-dial entries if you want to call SIP numbers that contain letters. Once you have configured a speed dial rule, you can use a shortcut (the speed dial number, #01 for example) on your phone's keypad to call the phone number.
To access this screen, click VoIP > Call Rule.
Figure 98 VoIP > Call Rule
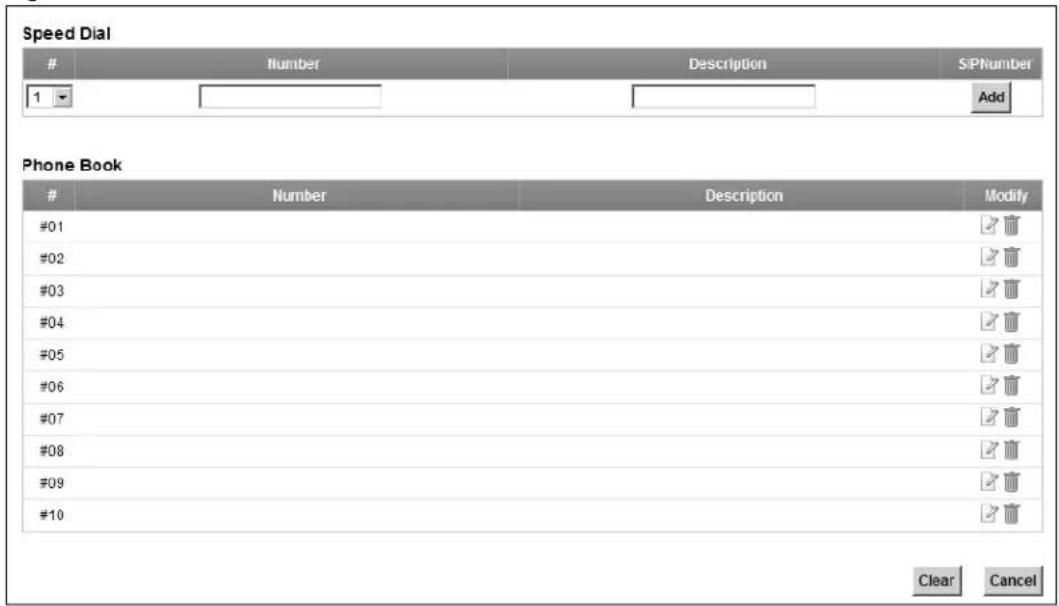
Each field is described in the following table.
Table 63 VoIP > Call Rule
| LABEL DESCRIPTION | |
| Speed Dial Use this | section to create or edit speed-dial entries. |
| # | Select the speed-dial number you want to use for this phone number. |
| Number Enter the $IP number you want the Device to call when you dial the speed-dial number. | |
| Description | Enter a short description to identify the party you call when you dial the speed-dial number. You can use up to 127 printable ASCII characters. |
| Add | Click this to use the information in the Speed Dial section to update the Speed Dial Phone Book section. |
| Phone Book Use this | section to look at all the speed-dial entries and to erase them. |
| # This field displays | the speed-dial number you should dial to use this entry. |
| Number | This field displays the SIP number the Device calls when you dial the speed-dial number. |
| Description | This field displays a short description of the party you call when you dial the speed-dial number. |
| Modify Use this field | to edit or erase the speed-dial entry.Click the Edit icon to copy the information for this speed-dial entry into the Speed Dial section, where you can change it. Click Add when you finish editing to change the configurations.Click the Delete icon to erase this speed-dial entry. |
| Clear | Click this to erase all the speed-dial entries. |
| Cancel | Click this to set every field in this screen to its last-saved value. |
18.7 Technical Reference
This section contains background material relevant to the VoIP screens.
18.7.1 VoIP
VoIP is the sending of voice signals over Internet Protocol. This allows you to make phone calls and send faxes over the Internet at a fraction of the cost of using the traditional circuit-switched telephone network. You can also use servers to run telephone service applications like PBX services and voice mail. Internet Telephony Service Provider (ITSP) companies provide VoIP service.
Circuit-switched telephone networks require 64 kilobits per second (Kbps) in each direction to handle a telephone call. VoIP can use advanced voice coding techniques with compression to reduce the required bandwidth.
18.7.2 SIP
The Session Initiation Protocol (SIP) is an application-layer control (signaling) protocol that handles the setting up, altering and tearing down of voice and multimedia sessions over the Internet.
SIP signaling is separate from the media for which it handles sessions. The media that is exchanged during the session can use a different path from that of the signaling. SIP handles telephone calls and can interface with traditional circuit-switched telephone networks.
SIP Identities
A SIP account uses an identity (sometimes referred to as a SIP address). A complete SIP identity is called a SIP URI (Uniform Resource Identifier). A SIP account's URI identifies the SIP account in a way similar to the way an e-mail address identifies an e-mail account. The format of a SIP identity is SIP-Number@SIP-Service-Domain.
SIP Number
The SIP number is the part of the SIP URI that comes before the “@” symbol. A SIP number can use letters like in an e-mail address (johndoe@your-ITSP.com for example) or numbers like a telephone number (1122334455@VoIP-provider.com for example).
SIP Service Domain
The SIP service domain of the VoIP service provider is the domain name in a SIP URI. For example, if the SIP address is 1122334455@VoIP-provider.com, then “VoIP-provider.com” is the SIP service domain.
SIP Registration
Each Device is an individual SIP User Agent (UA). To provide voice service, it has a public IP address for SIP and RTP protocols to communicate with other servers.
A SIP user agent has to register with the SIP registrar and must provide information about the users it represents, as well as its current IP address (for the routing of incoming SIP requests). After successful registration, the SIP server knows that the users (identified by their dedicated SIP URIs) are represented by the UA, and knows the IP address to which the SIP requests and responses should be sent.
Registration is initiated by the User Agent Client (UAC) running in the VoIP gateway (the Device). The gateway must be configured with information letting it know where to send the REGISTER message, as well as the relevant user and authorization data.
A SIP registration has a limited lifespan. The User Agent Client must renew its registration within this lifespan. If it does not do so, the registration data will be deleted from the SIP registrar's database and the connection broken.
The Device attempts to register all enabled subscriber ports when it is switched on. When you enable a subscriber port that was previously disabled, the Device attempts to register the port immediately.
Authorization Requirements
SIP registrations (and subsequent SIP requests) require a username and password for authorization. These credentials are validated via a challenge / response system using the HTTP digest mechanism (as detailed in RFC3261, "SIP: Session Initiation Protocol").
SIP Servers
SIP is a client-server protocol. A SIP client is an application program or device that sends SIP requests. A SIP server responds to the SIP requests.
When you use SIP to make a VoIP call, it originates at a client and terminates at a server. A SIP client could be a computer or a SIP phone. One device can act as both a SIP client and a SIP server.
SIP User Agent
A SIP user agent can make and receive VoIP telephone calls. This means that SIP can be used for peer-to-peer communications even though it is a client-server protocol. In the following figure, either A or B can act as a SIP user agent client to initiate a call. A and B can also both act as a SIP user agent to receive the call.
Figure 99 SIP User Agent
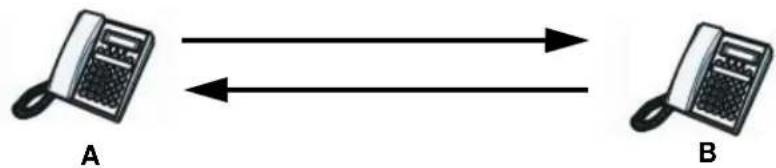
flowchart
graph LR
    A["Phone A"] <--> B["Phone B"]
SIP Proxy Server
A SIP proxy server receives requests from clients and forwards them to another server.
In the following example, you want to use client device A to call someone who is using client device C.
1 The client device (A in the figure) sends a call invitation to the SIP proxy server B.
2 The SIP proxy server forwards the call invitation to C.
Figure 100 SIP Proxy Server
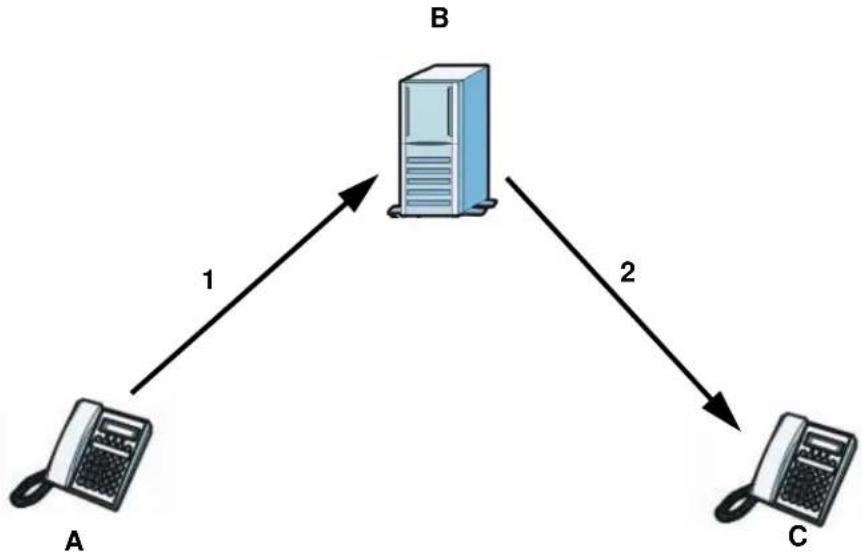
flowchart
graph TD
    A["A"] -->|1| B["B"]
    B -->|2| C["C"]
SIP Redirect Server
A SIP redirect server accepts SIP requests, translates the destination address to an IP address and sends the translated IP address back to the device that sent the request. Then the client device that originally sent the request can send requests to the IP address that it received back from the redirect server. Redirect servers do not initiate SIP requests.
In the following example, you want to use client device A to call someone who is using client device C.
1 Client device A sends a call invitation for C to the SIP redirect server B.
2 The SIP redirect server sends the invitation back to A with C's IP address (or domain name).
3 Client device A then sends the call invitation to client device C.
Figure 101 SIP Redirect Server
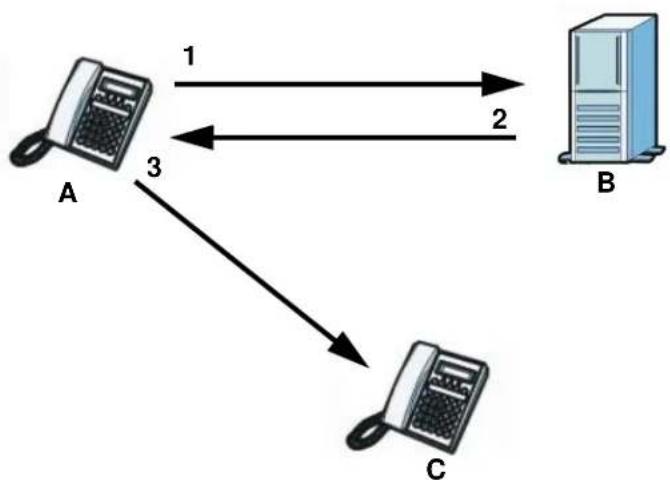
flowchart
graph TD
    A["A"] -->|1| B["B"]
    A -->|3| C["C"]
    B -->|2| C
SIP Register Server
A SIP register server maintains a database of SIP identity-to-IP address (or domain name) mapping. The register server checks your user name and password when you register.
RTP
When you make a VoIP call using SIP, the RTP (Real time Transport Protocol) is used to handle voice data transfer. See RFC 3550 for details on RTP.
Pulse Code Modulation
Pulse Code Modulation (PCM) measures analog signal amplitudes at regular time intervals and converts them into bits.
SIP Call Progression
The following figure displays the basic steps in the setup and tear down of a SIP call. A calls B.
Table 64 SIP Call Progression
| A | B | |
| 1. INVITE | ||
| 2. Ringing | ||
| 3. OK | ||
| 4. ACK | ||
| 5. Dialogue (voice traffic) | ||
| 6. BYE | ||
| 7. OK |
1 A sends a SIP INVITE request to B. This message is an invitation for B to participate in a SIP telephone call.
2 B sends a response indicating that the telephone is ringing.
3 B sends an OK response after the call is answered.
4 A then sends an ACK message to acknowledge that B has answered the call.
5 Now A and B exchange voice media (talk).
6 After talking, A hangs up and sends a BYE request.
7 B replies with an OK response confirming receipt of the BYE request and the call is terminated.
Voice Coding
A codec (coder/decoder) codes analog voice signals into digital signals and decodes the digital signals back into analog voice signals. The Device supports the following codecs.
- G.711 is a Pulse Code Modulation (PCM) waveform codec. PCM measures analog signal amplitudes at regular time intervals and converts them into digital samples. G.711 provides very good sound quality but requires 64 kbps of bandwidth.
- G.726 is an Adaptive Differential PCM (ADPCM) waveform codec that uses a lower bitrate than standard PCM conversion. ADPCM converts analog audio into digital signals based on the difference between each audio sample and a prediction based on previous samples. The more similar the audio sample is to the prediction, the less space needed to describe it. G.726 operates at 16, 24, 32 or 40 kbps.
- G.729 is an Analysis-by-Synthesis (AbS) hybrid waveform codec that uses a filter based on information about how the human vocal tract produces sounds. G.729 provides good sound quality and reduces the required bandwidth to 8 kbps.
PSTN Call Setup Signaling
Dual-Tone MultiFrequency (DTMF) signaling uses pairs of frequencies (one lower frequency and one higher frequency) to set up calls. It is also known as Touch Tone®. Each of the keys on a DTMF telephone corresponds to a different pair of frequencies.
Pulse dialing sends a series of clicks to the local phone office in order to dial numbers. ^1
MWI (Message Waiting Indication)
Enable Message Waiting Indication (MWI) enables your phone to give you a message—waiting (beeping) dial tone when you have a voice message(s). Your VoIP service provider must have a messaging system that sends message waiting status SIP packets as defined in RFC 3842.
18.7.3 Quality of Service (QoS)
Quality of Service (QoS) refers to both a network's ability to deliver data with minimum delay, and the networking methods used to provide bandwidth for real-time multimedia applications.
Type of Service (ToS)
Network traffic can be classified by setting the ToS (Type of Service) values at the data source (for example, at the Device) so a server can decide the best method of delivery, that is the least cost, fastest route and so on.
DiffServ
DiffServ is a class of service (CoS) model that marks packets so that they receive specific per-hop treatment at DiffServ-compliant network devices along the route based on the application types and traffic flow. Packets are marked with DiffServ Code Points (DSCP) indicating the level of service desired. This allows the intermediary DiffServ-compliant network devices to handle the packets differently depending on the code points without the need to negotiate paths or remember state information for every flow. In addition, applications do not have to request a particular service or give advanced notice of where the traffic is going. ^2
DSCP and Per-Hop Behavior
DiffServ defines a new DS (Differentiated Services) field to replace the Type of Service (TOS) field in the IP header. The DS field contains a 2-bit unused field and a 6-bit DSCP field which can define up to 64 service levels. The following figure illustrates the DS field.
DSCP is backward compatible with the three precedence bits in the ToS octet so that non-DiffServ compliant, ToS-enabled network device will not conflict with the DSCP mapping.
Figure 102 DiffServ: Differentiated Service Field
| DSCP(6-bit) | Unused(2-bit) |
The DSCP value determines the forwarding behavior, the PHB (Per-Hop Behavior), that each packet gets across the DiffServ network. Based on the marking rule, different kinds of traffic can be marked for different priorities of forwarding. Resources can then be allocated according to the DSCP values and the configured policies.
VLAN Tagging
Virtual Local Area Network (VLAN) allows a physical network to be partitioned into multiple logical networks. Only stations within the same group can communicate with each other.
Your Device can add IEEE 802.1Q VLAN ID tags to voice frames that it sends to the network. This allows the Device to communicate with a SIP server that is a member of the same VLAN group. Some ISPs use the VLAN tag to identify voice traffic and give it priority over other traffic.
18.7.4 Phone Services Overview
Supplementary services such as call hold, call waiting, and call transfer. are generally available from your VoIP service provider. The Device supports the following services:
- Call Hold
- Call Waiting
- Making a Second Call
- Call Transfer
• Three-Way Conference - Internal Calls
- Do not Disturb
Note: To take full advantage of the supplementary phone services available through the Device's phone ports, you may need to subscribe to the services from your VoIP service provider.
The Flash Key
Flashing means to press the hook for a short period of time (a few hundred milliseconds) before releasing it. On newer telephones, there should be a "flash" key (button) that generates the signal electronically. If the flash key is not available, you can tap (press and immediately release) the hook by hand to achieve the same effect. However, using the flash key is preferred since the timing is much more precise. With manual tapping, if the duration is too long, it may be interpreted as hanging up by the Device.
You can invoke all the supplementary services by using the flash key.
Europe Type Supplementary Phone Services
This section describes how to use supplementary phone services with the Europe Type Call Service Mode. Commands for supplementary services are listed in the table below.
After pressing the flash key, if you do not issue the sub-command before the default sub-command time-out (2 seconds) expires or issue an invalid sub-command, the current operation will be aborted.
Table 65 European Flash Key Commands
| COMMAND SUB-COMMAND DES | CRIPTION | |
| Flash Put a current call on hold to | place a second call.Switch back to the call (if there is no second call). | |
| Flash 0 Drop the call presently on hold | or reject an incoming call which is waiting for answer. | |
| Flash 1 Disconnect the current phone connection and answer the incoming call or resume with caller presently on hold. | ||
| Flash 2 1. Switch back and forth between two calls. | ||
| 2. Put a current call on hold to answer an incoming call.3. Separate the current three-way conference call into two individual calls (one is on-line, the other is on hold). | ||
| Flash 3 Create three-way conference connection. | ||
| Flash | *98# | Transfer the call to another phone. |
European Call Hold
Call hold allows you to put a call (A) on hold by pressing the flash key.
If you have another call, press the flash key and then "2" to switch back and forth between caller A and B by putting either one on hold.
Press the flash key and then "0" to disconnect the call presently on hold and keep the current call on line.
Press the flash key and then "1" to disconnect the current call and resume the call on hold.
If you hang up the phone but a caller is still on hold, there will be a remind ring.
European Call Waiting
This allows you to place a call on hold while you answer another incoming call on the same telephone (directory) number.
If there is a second call to a telephone number, you will hear a call waiting tone. Take one of the following actions.
- Reject the second call.
Press the flash key and then press "0". - Disconnect the first call and answer the second call.
- Put the first call on hold and answer the second call.
Press the flash key and then "2".
Either press the flash key and press "1", or just hang up the phone and then answer the phone after it rings.
European Call Transfer
Do the following to transfer a call (that you have answered) to another phone number.
1 Press the flash key to put the caller on hold.
2 When you hear the dial tone, dial “*98#” followed by the number to which you want to transfer the call. to operate the Intercom.
3 After you hear the ring signal or the second party answers it, hang up the phone.
European Three-Way Conference
Use the following steps to make three-way conference calls.
1 When you are on the phone talking to someone, press the flash key to put the call on hold and get a dial tone.
2 Dial a phone number directly to make another call.
3 When the second call is answered, press the flash key and press "3" to create a three-way conversation.
4 Hang up the phone to drop the connection.
5 If you want to separate the activated three-way conference into two individual connections (one is on-line, the other is on hold), press the flash key and press "2".
19.1 Overview
The web configurator allows you to choose which categories of events and/or alerts to have the Device log and then display the logs or have the Device send them to an administrator (as e-mail) or to a syslog server.
19.1.1 What You Can Do in this Chapter
- Use the System Log screen to see the system logs for the categories that you select (Section 19.2 on page 206).
- Use the Phone Log screen to view phone logs and alert messages (Section 19.3 on page 207).
- Use The VoIP Call History screen to view the details of the calls performed on the Device (Section 19.4 on page 207).
19.1.2 What You Need To Know
The following terms and concepts may help as you read this chapter.
Alerts and Logs
An alert is a type of log that warrants more serious attention. They include system errors, attacks (access control) and attempted access to blocked web sites. Some categories such as System Errors consist of both logs and alerts. You may differentiate them by their color in the View Log screen. Alerts display in red and logs display in black.
Syslog Overview
The syslog protocol allows devices to send event notification messages across an IP network to syslog servers that collect the event messages. A syslog-enabled device can generate a syslog message and send it to a syslog server.
Syslog is defined in RFC 3164. The RFC defines the packet format, content and system log related information of syslog messages. Each syslog message has a facility and severity level. The syslog facility identifies a file in the syslog server. Refer to the documentation of your syslog program for details. The following table describes the syslog severity levels.
Table 66 Syslog Severity Levels
| CODE SEVERITY |
| 0 Emergency: The system is unusable. |
| 1 Alert: Action must be taken immediately. |
| 2 Critical: The system condition is critical. |
Table 66 Syslog Severity Levels
| CODE SEVERITY | |
| 3 Error: There is an error condition on the system. | |
| 4 Warning: There is a warning condition on the system. | |
| 5 Notice: There is a normal but significant condition on the system. | |
| 6 | Informational: The syslog contains an informational message. |
| 7 Debug: The message is intended for debug-level purposes. | |
19.2 The System Log Screen
Click System Monitor > Log to open the System Log screen. Use the System Log screen to see the system logs for the categories that you select in the upper left drop-down list box.
Figure 103 System Monitor > Log > System Log
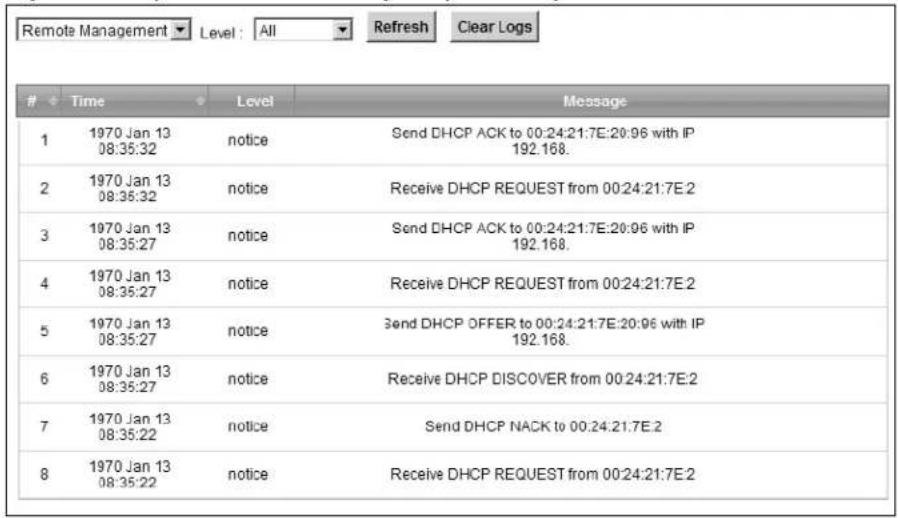
The following table describes the fields in this screen.
Table 67 System Monitor > Log > System Log
| LABEL DESCRIPTION | |
| Level | Select a severity level from the drop-down list box. This filters search results according to the severity level you have selected. When you select a severity, the Device searches through all logs of that severity or higher. |
| Refresh Click this | to renew the log screen. |
| Clear Log Click this | this to delete all the logs. |
| # | This field is a sequential value and is not associated with a specific entry. |
| Time This field displays the time the log was recorded. | |
| Level | This field displays the severity level of the logs that the device is to send to this syslog server. |
| Messages This field states the reason for the log. | |
19.3 The Phone Log Screen
Click System Monitor > Log to open the Phone Log screen. Use this screen to view phone logs and alert messages. You can select the type of log and level of severity to display.
Figure 104 System Monitor > Log > Phone Log
![All Logs Level: All Refresh Clear Logs Time Level Message 1 Aug 20 07:37:17 err SIP Registration: SIP:12875: Register Fail, error_cause 43 2 Aug 20 07:37:40 info [ChangeMe] [FXS2] Phone Event: OFFHOOK 3 Aug 20 07:37:43 info [ChangeMe] [FXS2] Phone Event: ONHOOK 4 Aug 20 07:37:43 info [ChangeMe] [FXS2] Phone Event: idle 5 Aug 20 07:39:05 info [ChangeMe] [FXS2] Phone Event: OFFHOOK 6 Aug 20 07:39:20 info [ChangeMe] [FXS2] Phone Event: ONHOOK 7 Aug 20 07:39:20 info [ChangeMe] [FXS2] Phone Event: idle 8 Aug 20 07:41:14 info SIP Registration: SIP:128752: Register Success 9 Aug 20 07:41:49 info [ChangeMe] [FXS2] Phone Event: OFFHOOK 10 Aug 20 07:41:56 info [ChangeMe] [FXS2] Phone Event: ONHOOK](/content/2026/05/861498/images/7acf2d82c02141a23067989d22280ca9b2f85c168017827883cf6a8409d0f12c.jpg)
The following table describes the fields in this screen.
Table 68 System Monitor > Log > Phone Log
| LABEL DESCRIPTION | |
| Select a category of logs to view from the drop-down list box. select All Logs to view all logs. | |
| Level Select the severity level that you want to view. | |
| Refresh Click this to renew the log screen. | |
| Clear Logs Click this to delete all the logs. | |
| # | This field is a sequential value and is not associated with a specific entry. |
| Time This field displays the time the log was recorded. | |
| Level | This field displays the severity level of the logs that the device is to send to this syslog server. |
| Message This field states the reason for the log. | |
19.4 The VoIP Call History Screen
Click System Monitor > Log > VoIP Call History to open the VoIP Call History screen. Use this screen to see the details of the calls performed on the Device.
Figure 105 System Monitor > Log > VoIP Call History

The following table describes the fields in this screen.
Table 69 System Monitor > Log > VoIP Call History
| LABEL DESCRIPTION | |
| Select a category of call records to view from the drop-down list box. select All Call History to view all call records. | |
| Refresh Click this | to renew the log screen. |
| Clear Logs Click | this to delete all the logs. |
| # | This field is a sequential value and is not associated with a specific entry. |
| Time This field displays the time the call was recorded. | |
| Local Number | This field displays the phone number you used to make or receive this call. |
| Peer Number | This field displays the phone number you called or from which this call is made. |
| Interface This field displays the type of the call. | |
| Duration This field displays how long the call lasted. | |
Traffic Status
20.1 Overview
Use the Traffic Status screens to look at network traffic status and statistics of the WAN, LAN interfaces and NAT.
20.1.1 What You Can Do in this Chapter
- Use the WAN screen to view the WAN traffic statistics (Section 20.2 on page 209).
- Use the LAN screen to view the LAN traffic statistics (Section 20.3 on page 210).
- Use the NAT screen to view the NAT status of the Device's client(s) (Section 20.4 on page 211).
- Use the 3G Backup screen to view the 3G connection traffic statistics (Section 20.6 on page 212).
- Use the VoIP Status screen to view the VoIP traffic statistics (Section 20.6 on page 212).
20.2 The WAN Status Screen
Click System Monitor > Traffic Status to open the WAN screen. You can view the WAN traffic statistics in this screen.
Figure 106 System Monitor > Traffic Status > WAN
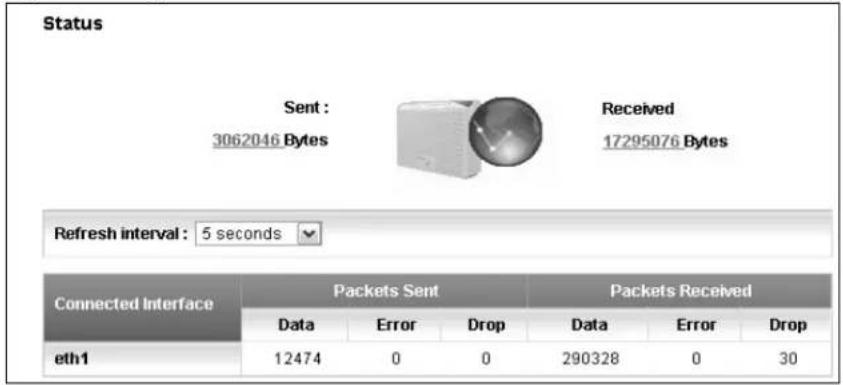
The following table describes the fields in this screen.
Table 70 System Monitor > Traffic Status > WAN
| LABEL DESCRIPTION | |
| Status | This shows the number of bytes received and sent through the WAN interface of the Device. |
| Refresh Interval | Select how often you want the Device to update this screen from the drop-down list box. |
| Connected Interface | This shows the name of the WAN interface that is currently connected. |
| Packets Sent | |
| Data This indicates the number of transmitted packets on this interface. | |
| Error | This indicates the number of frames with errors transmitted on this interface. |
| Drop | This indicates the number of outgoing packets dropped on this interface. |
| Packets Received | |
| Data | This indicates the number of received packets on this interface. |
| Error | This indicates the number of frames with errors received on this interface. |
| Drop This indicates the number of received packets dropped on this interface. | |
20.3 The LAN Status Screen
Click System Monitor > Traffic Status > LAN to open the following screen. You can view the LAN traffic statistics in this screen.
Figure 107 System Monitor > Traffic Status > LAN
| Interface | LAN1 | LAN2 | LAN3 | LAN4 | |
| Bytes Sent | 0 | 0 | 1329628 | 0 | |
| Bytes Received | 0 | 0 | 236957 | 0 | |
| Interface | LAN1 | LAN2 | LAN3 | LAN4 | |
| Sent (Packet) | Data | 0 | 0 | 2241 | 0 |
| Error | 0 | 0 | 0 | 0 | |
| Drop | 0 | 0 | 0 | 0 | |
| Received (Packet) | Data | 0 | 0 | 2000 | 0 |
| Error | 0 | 0 | 0 | 0 | |
| Drop | 0 | 0 | 0 | 0 | |
The following table describes the fields in this screen.
Table 71 System Monitor > Traffic Status > LAN
| LABEL DESCRIPTION | |
| Refresh Interval | Select how often you want the Device to update this screen from the drop-down list box. |
| Interface This shows the LAN interface. | |
| Bytes Sent This indicates the number of bytes transmitted on this interface. | |
| Bytes Received | This indicates the number of bytes received on this interface. |
| Interface This shows the LAN interface. | |
| Sent (Packet) | |
| Data This indicates the number of transmitted packets on this interface. | |
| Error | This indicates the number of frames with errors transmitted on this interface. |
| Drop | This indicates the number of outgoing packets dropped on this interface. |
| Received (Packet) | |
| Data | This indicates the number of received packets on this interface. |
| Error | This indicates the number of frames with errors received on this interface. |
| Drop This indicates the number of received packets dropped on this interface. | |
20.4 The NAT Status Screen
Click System Monitor > Traffic Status > NAT to open the following screen. You can view the NAT status of the Device's client(s) in this screen.
Figure 108 System Monitor > Traffic Status > NAT
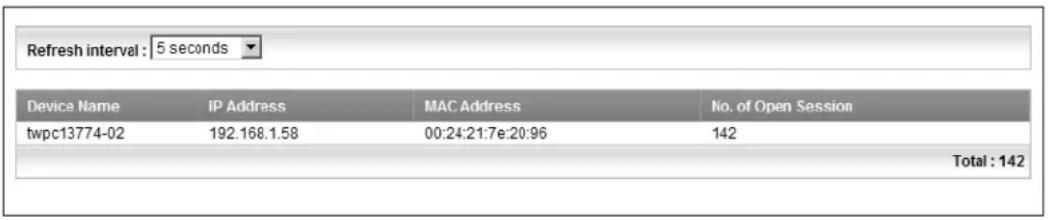
The following table describes the fields in this screen.
Table 72 System Monitor > Traffic Status > NAT
| LABEL DESCRIPTION | |
| Refresh Interval | Select how often you want the Device to update this screen from the drop-down list box. |
| Device Name This | shows the name of the client. |
| IP Address This shows the IP address of the client. | |
| MAC Address This | shows the MAC address of the client. |
| No. of Open Session | This shows the number of NAT sessions used by the client. |
20.5 The 3G Backup Status Screen
Click System Monitor > Traffic Status > 3G Backup to open the following screen. You can view the 3G connection traffic statistics in this screen.
Figure 109 System Monitor > Traffic Status > 3G Backup
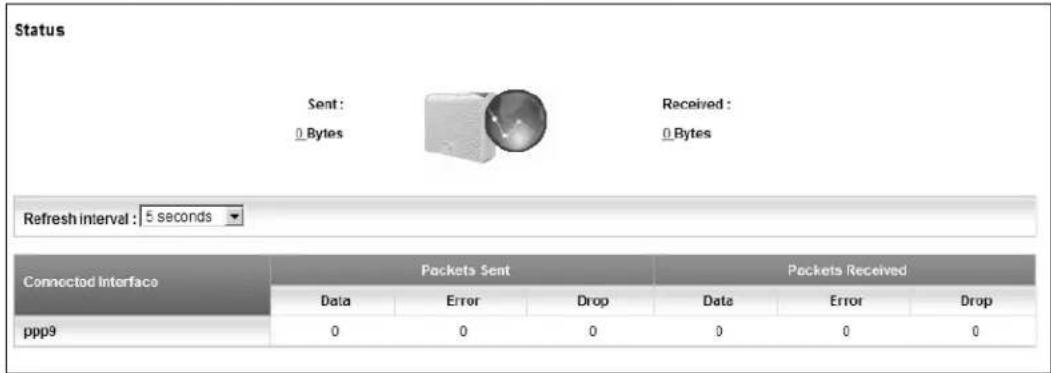
The following table describes the fields in this screen.
Table 73 System Monitor > Traffic Status > 3G backup
| LABEL DESCRIPTION | |
| Status | This shows the number of bytes received and sent through the 3G interface of the Device. |
| Refresh Interval | Select how often you want the Device to update this screen from the drop-down list box. |
| Connected Interface | This shows the name of the 3G connection interface that is currently connected. |
| Packets Sent | |
| Data This indicates the number of transmitted packets on this interface. | |
| Error | This indicates the number of frames with errors transmitted on this interface. |
| Drop | This indicates the number of outgoing packets dropped on this interface. |
| Packets Received | |
| Data | This indicates the number of received packets on this interface. |
| Error | This indicates the number of frames with errors received on this interface. |
| Drop This indicates the number of received packets dropped on this interface. | |
20.6 The VoIP Status Screen
Click System Monitor > VoIP Status to open the following screen. You can view the VoIP traffic statistics in this screen.
Figure 110 System Monitor > VoIP Status
Refresh interval: 5 seconds
SIP Status
| Account | Registration | Last Registration | URI | Message Waiting | Last Incoming Number | Last Outgoing Number |
| SIP 1 | Disabled | 0:00:00 | ChangeMe@ChangeMe | NO | N/A | N/A |
| SIP 2 | Disabled | 0:00:00 | ChangeMe@ChangeMe | NO | N/A | N/A |
Call Status
| Account | Duration | Status | Codec | Peer Number |
| SIP 1 | 0 Day(s), 0 Hour(s), 0 Minute(s), 0 Second(s) | Idle | None | |
| SIP 2 | 0 Day(s), 0 Hour(s), 0 Minute(s), 0 Second(s) | Idle | None |
Phone Status
| Account | Outgoing Number | Incoming Number | Phone State |
| Phone 1 | ChangeMe | ChangeMe | ONHOOK |
| Phone 2 | ChangeMe | ChangeMe | ONHOOK |
The following table describes the fields in this screen.
Table 74 System Monitor > VoIP Status
| LABEL DESCRIPTION | |
| Refresh Interval | Select how often you want the Device to update this screen from the drop-down list box. |
| SIP Status | |
| Account This column displays each SIP account in the Device. | |
| Registration | This field displays the current registration status of the SIP account. You can change this in theStatusscreen.Registered- The SIP account is registered with a SIP server.Not Registered- The last time the Device tried to register the SIP account with the SIP server, the attempt failed. The Device automatically tries to register the SIP account when you turn on the Device or when you activate it.Inactive- The SIP account is not active. You can activate it in Vol P > SIP > SIP Account. |
| Last Registration | This field displays the last time you successfully registered the SIP account. The field is blank if you never successfully registered this account. |
| URI This field displays the account number and service domain of the SIP account. You can change these in the Vol P > SIP screens. | |
| Message Waiting | This field indicates whether or not there are any messages waiting for the SIP account. |
| Last Incoming Number | This field displays the last number that called the SIP account. The field is blank if no number has ever dialed the SIP account. |
| Last Outgoing Number | This field displays the last number the SIP account called. The field is blank if the SIP account has never dialed a number. |
| Call Status | |
| Account This column displays each SIP account in the Device. | |
| Duration This field displays how long the current call has lasted. | |
| Status This field displays the current state of the phone call.Idle - There are no current VoIP calls, incoming calls or outgoing calls being made.Dial - The callee's phone is ringing.Ring - The phone is ringing for an incoming VoIP call.Process - There is a VoIP call in progress.DISC - The callee's line is busy, the callee hung up or your phone was left off the hook. | |
| Codec | This field displays what voice codec is being used for a current VoIP call through a phone port. |
| Peer Number | This field displays the SIP number of the party that is currently engaged in a VoIP call through a phone port. |
| Phone Status | |
| Account This field | displays the phone accounts of the Device. |
| Outgoing Number | This field displays the SIP number that you use to make calls on this phone port. |
| Incoming Number | This field displays the SIP number that you use to receive calls on this phone port. |
| Phone State | This field shows whether or the phone connected to the subscriber port is on-hook ONHOOK) or off-hook (OFFHOOK). |
21.1 Overview
You can configure system password for different user accounts in the User Account screen.
21.2 The User Account Screen
Use the User Account screen to configure system password.
Click Maintenance > User Account to open the following screen.
Figure 111 Maintenance > User Account
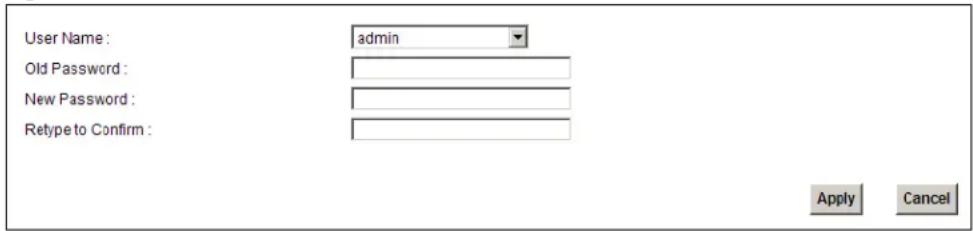
The following table describes the labels in this screen.
Table 75 Maintenance > User Account
| LABEL DESCRIPTION | |
| User Name | You can configure the password for the Power User and Admin accounts. |
| Old Password | Type the default password or the existing password you use to access the system in this field. |
| New Password | Type your new system password (up to 30 characters). Note that as you type a password, the screen displays a (*) for each character you type. After you change the password, use the new password to access the Device. |
| Retype to Confirm | Type the new password again for confirmation. |
| Apply | Click Apply to save your changes. |
| Cancel | Click Cancel to restore your previously saved settings. |
22.1 Overview
Remote MGMT allows you to manage your Device from a remote location through the following interfaces:
• LAN
- W A N o n l y
Note: The Device is managed using the web configurator.
22.1.1 What You Need to Know
The following terms and concepts may help as you read this chapter
TR-064
TR-064 is a LAN-Side DSL CPE Configuration protocol defined by the DSL Forum. TR-064 is built on top of UPnP. It allows the users to use a TR-064 compliant CPE management application on their computers from the LAN to discover the CPE and configure user-specific parameters, such as the username and password.
SSH/SCP/SFTP
Secure Shell (SSH) is a secure communication protocol that combines authentication and data encryption to provide secure encrypted communication between two hosts over an unsecured network. The following file transfer methods use SSH:
- Secure Copy (SC) is a secure way of transferring files between computers. It uses port 22.
- SSH File Transfer Protocol or Secure File Transfer Protocol (SFTP) is an old way of transferring files between computers. It uses port 22.
22.2 The Remote MGMT Screen
Use this screen to decide what services you may use to access which Device interface. Click Maintenance > Remote MGMT to open the following screen.
Figure 112 Maintenance > Remote MGMT
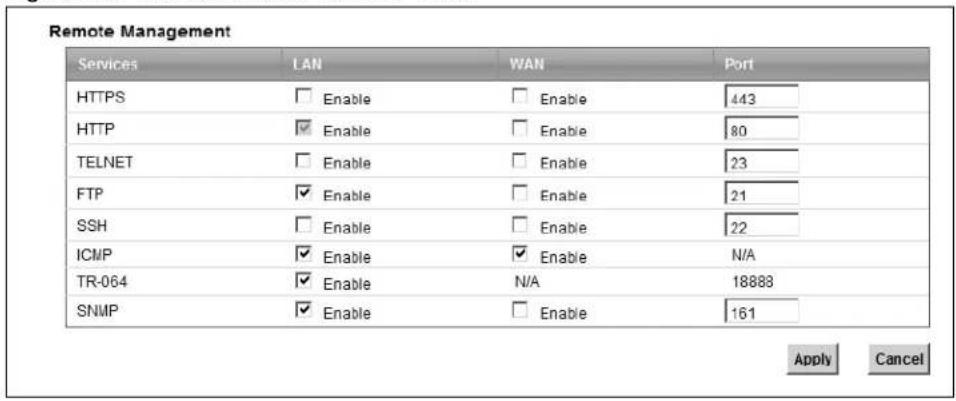
The following table describes the fields in this screen.
Table 76 Maintenance > Remote MGMT
| LABEL DESCRIPTION | |
| Services This is the | service you may use to access the Device. |
| LAN | Select the Enable check box for the corresponding services that you want to allow access to the Device from the LAN. |
| WAN | Select the Enable check box for the corresponding services that you want to allow access to the Device from the WAN. |
| Port | You may change the server port number for a service if needed, however you must use the same port number in order to use that service for remote management. |
| Apply Click Apply to | save your changes. |
| Cancel | Click Cancel to restore your previously saved settings. |
23.1 Overview
This chapter explains how to configure the SNMP settings on the Device.
23.2 The SNMP Screen
Simple Network Management Protocol is a protocol used for exchanging management information between network devices. Your Device supports SNMP agent functionality, which allows a manager station to manage and monitor the Device through the network. The Device supports SNMP version one (SNMPv1) and version two (SNMPv2c). The next figure illustrates an SNMP management operation.
Figure 113 SNMP Management Model
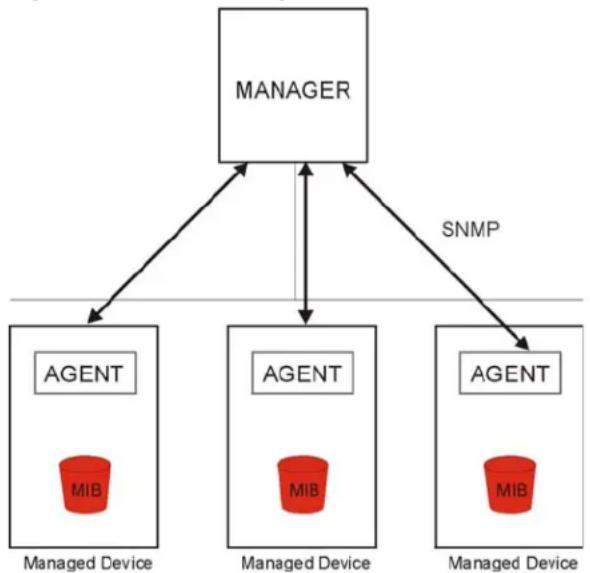
flowchart
graph TD
    A["MANAGER"] --> B["AGENT"]
    A --> C["AGENT"]
    A --> D["AGENT"]
    B --> E["Managed Device"]
    C --> F["Managed Device"]
    D --> G["Managed Device"]
    style A fill:#f9f,stroke:#333
    style B fill:#ccf,stroke:#333
    style C fill:#ccf,stroke:#333
    style D fill:#ccf,stroke:#333
    note right of A: SNMP
    note left of B: MIB
    note right of C: MIB
An SNMP managed network consists of two main types of component: agents and a manager.
An agent is a management software module that resides in a managed device (the Device). An agent translates the local management information from the managed device into a form compatible with SNMP. The manager is the console through which network administrators perform network management functions. It executes applications that control and monitor managed devices.
The managed devices contain object variables/managed objects that define each piece of information to be collected about a device. Examples of variables include such as number of packets received, node port status etc. A Management Information Base (MIB) is a collection of managed objects. SNMP allows a manager and agents to communicate for the purpose of accessing these objects.
SNMP itself is a simple request/response protocol based on the manager/agent model. The manager issues a request and the agent returns responses using the following protocol operations:
- Get - Allows the manager to retrieve an object variable from the agent.
- GetNext - Allows the manager to retrieve the next object variable from a table or list within an agent. In SNMPv1, when a manager wants to retrieve all elements of a table from an agent, it initiates a Get operation, followed by a series of GetNext operations.
- Set - Allows the manager to set values for object variables within an agent.
- Trap - Used by the agent to inform the manager of some events.
Click Maintenance > SNMP to open the following screen. Use this screen to configure the Device SNMP settings.
Figure 114 Maintenance > SNMP
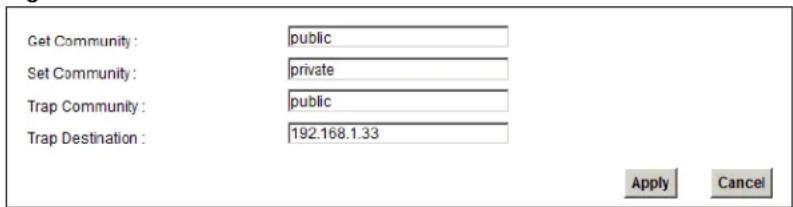
The following table describes the fields in this screen.
Table 77 Maintenance > SNMP
| LABEL DESCRIPTION | |
| Get Community | Enter the Get Community, which is the password for the incoming Get and GetNext requests from the management station. The default is public and allows all requests. |
| Set Community | Enter the Set community, which is the password for incoming Set requests from the management station. The default is public and allows all requests. |
| Trap Community | Type the trap community, which is the password sent with each trap to the SNMP manager. The default is public and allows all requests. |
| Trap Destination Type | the IP address of the station to send your SNMP traps to. |
| Apply | Click Apply to save your changes back to the Device. |
| Cancel | Click Cancel to restore your previously saved settings. |
24.1 Overview
You can configure system settings, including the host name, domain name and the inactivity timeout interval in the System screen.
24.1.1 What You Need to Know
The following terms and concepts may help as you read this chapter.
Domain Name
This is a network address that identifies the owner of a network connection. For example, in the network address "www.zyxel.com/support/files", the domain name is "www.zyxel.com".
24.2 The System Screen
Use the System screen to configure the system's host name, domain name, and inactivity time-out interval.
The Host Name is for identification purposes. However, because some ISPs check this name you should enter your computer's "Computer Name". Find the system name of your Windows computer.
In Windows XP, click start, My Computer, View system information and then click the Computer Name tab. Note the entry in the Full computer name field and enter it as the Device System Name.
Click Maintenance > System to open the following screen.
Figure 115 Maintenance > System

The following table describes the labels in this screen.
Table 78 Maintenance > System
| LABEL DESCRIPTION | |
| Host Name | Choose a descriptive name for identification purposes. It is recommended you enter your computer's “Computer name” in this field. This name can be up to 30 alphanumeric characters long. Spaces are not allowed, but dashes “-” and underscores ”_” are accepted. |
| Domain Name | Enter the domain name (if you know it) here. If you leave this field blank, the ISP may assign a domain name via DHCP.The domain name entered by you is given priority over the ISP assigned domain name. |
| Administrator Inactivity Timer | Type how many minutes a management session (either via the web configurator) can be left idle before the session times out. The default is 5 minutes. After it times out you have to log in with your password again. Very long idle timeouts may have security risks. A value of "0" means a management session never times out, no matter how long it has been left idle (not recommended). |
| Apply Click this to | save your changes back to the Device. |
| Cancel | Click this to begin configuring this screen afresh. |
25.1 Overview
You can configure the system's time and date in the Time Setting screen.
25.2 The Time Setting Screen
To change your Device's time and date, click Maintenance > Time. The screen appears as shown. Use this screen to configure the Device's time based on your local time zone.
Figure 116 Maintenance > Time Setting
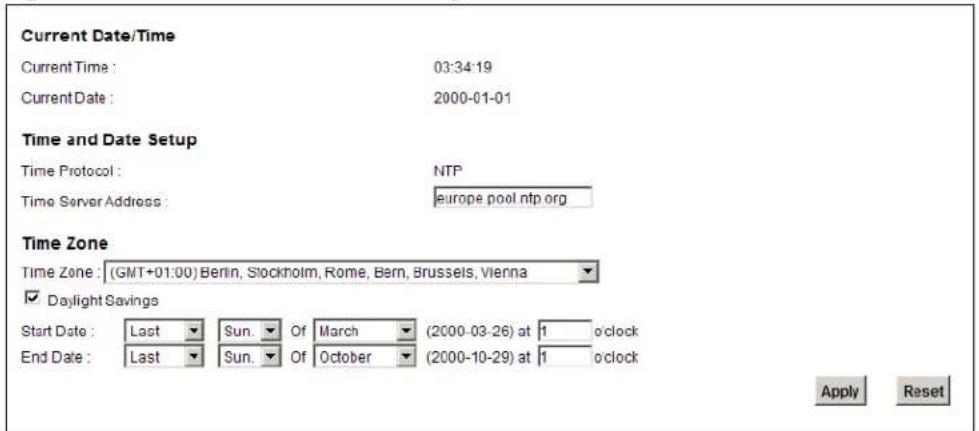
The following table describes the fields in this screen.
Table 79 Maintenance > System > Time Setting
| LABEL DESCRIPTION | |
| Current Date/Time | |
| Current Time This field displays the time of your Device. | |
| Current Date This field displays the date of your Device. | |
| Time and Date Setup | |
| Time Protocol | This shows the time service protocol that your time server sends when you turn on the Device. |
| Time Server Address | Enter the IP address or URL (up to 31 extended ASCII characters in length) of your time server. Check with your ISP/network administrator if you are unsure of this information. |
| Time Zone | Choose the time zone of your location. This will set the time difference between your time zone and Greenwich Mean Time (GMT). |
| Daylight Savings | Daylight saving is a period from late spring to early fall when many countries set their clocks ahead of normal local time by one hour to give more daytime light in the evening. Select this option if you use Daylight Saving Time. |
| Start Date | Configure the day and time when Daylight Saving Time starts if you selected Daylight Savings. The o'clock field uses the 24 hour format. Here are a couple of examples:Daylight Saving Time starts in most parts of the United States on the second Sunday of March. Each time zone in the United States starts using Daylight Saving Time at 2 A.M. local time. So in the United States you would select Second, Sunday, March and type 2 in the o'clock field.Daylight Saving Time starts in the European Union on the last Sunday of March. All of the time zones in the European Union start using Daylight Saving Time at the same moment (1 A.M. GMT or UTC). So in the European Union you would select Last, Sunday, March. The time you type in the o'clock field depends on your time zone. In Germany for instance, you would type 2 because Germany's time zone is one hour ahead of GMT or UTC (GMT+1). |
| End Date | Configure the day and time when Daylight Saving Time ends if you selected Daylight Savings. The o'clock field uses the 24 hour format. Here are a couple of examples:Daylight Saving Time ends in the United States on the first Sunday of November. Each time zone in the United States stops using Daylight Saving Time at 2 A.M. local time. So in the United States you would select First, Sunday, November and type 2 in the o'clock field.Daylight Saving Time ends in the European Union on the last Sunday of October. All of the time zones in the European Union stop using Daylight Saving Time at the same moment (1 A.M. GMT or UTC). So in the European Union you would select Last, Sunday, October. The time you type in the o'clock field depends on your time zone. In Germany for instance, you would type 2 because Germany's time zone is one hour ahead of GMT or UTC (GMT+1). |
| Apply | Click Apply to save your changes. |
| Reset | Click Reset to begin configuring this screen afresh. |
26.1 Overview
You can configure where the Device sends logs and which logs and/or immediate alerts the Device records in the Log Setting screen.
26.2 The Log Setting Screen
To change your Device's log settings, click Maintenance > Log Setting. The screen appears as shown.
Figure 117 Maintenance > Log Setting
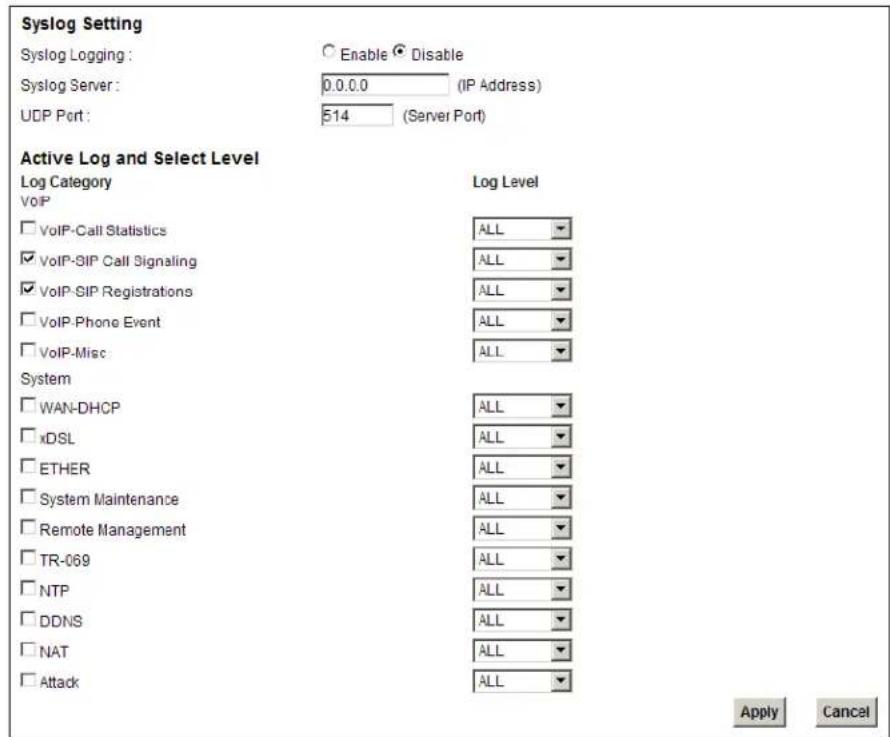
The following table describes the fields in this screen.
Table 80 Maintenance > Log Setting
| LABEL DESCRIPTION | |
| Syslog Setting | |
| Syslog Logging | The Device sends a log to an external syslog server. Select the Enable check box to enable syslog logging. |
| Syslog Server | Enter the server name or IP address of the syslog server that will log the selected categories of logs. |
| UDP Port Enter the port number used by the syslog server. | |
| Active Log and Select Level | |
| Log Category | Select the categories of logs that you want to record. |
| Log Level | Select the severity level of logs that you want to record. If you want to record all logs, select ALL. |
| Apply Click Apply | to save your changes. |
| Cancel | Click Cancel to restore your previously saved settings. |
Firmware Upgrade
27.1 Overview
This chapter explains how to upload new firmware to your Device. You can download new firmware releases from your nearest ZyXEL FTP site (or www.zyxel.com) to use to upgrade your device's performance.
Only use firmware for your device's specific model. Refer to the label on the bottom of your Device.
27.2 The Firmware Upgrade Screen
Click Maintenance > Firmware Upgrade to open the following screen. The upload process uses HTTP (Hypertext Transfer Protocol) and may take up to three minutes. After a successful upload, the system will reboot.
Do NOT turn off the Device while firmware upload is in progress!
Figure 118 Maintenance > Firmware Upgrade

The following table describes the labels in this screen.
Table 81 Maintenance > Firmware Upgrade
| LABEL DESCRIPTION | |
| Current Firmware Version | This is the present Firmware version. |
| File Path | Type in the location of the file you want to upload in this field or click Browse ... to find it. |
| Browse... | Click this to find the .bin file you want to upload. Remember that you must decompress compressed (.zip) files before you can upload them. |
| Upload | Click this to begin the upload process. This process may take up to three minutes. |
After you see the firmware updating screen, wait a few minutes before logging into the Device again.
Figure 119 Firmware Uploading
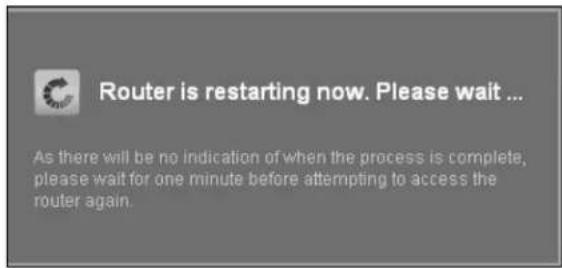
The Device automatically restarts in this time causing a temporary network disconnect. In some operating systems, you may see the following icon on your desktop.
Figure 120 Network Temporarily Disconnected
After two minutes, log in again and check your new firmware version in the Status screen.
If the upload was not successful, an error screen will appear. Click OK to go back to the Firmware Upgrade screen.
Figure 121 Error Message
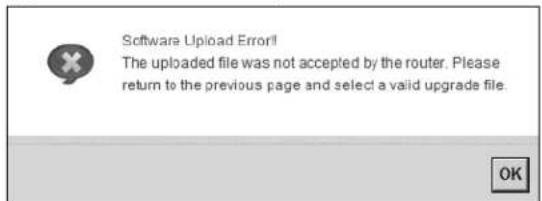
Backup/Restore
28.1 Overview
The Backup/Restore screen allows you to backup and restore device configurations. You can also reset your device settings back to the factory default.
28.2 The Backup/Restore Screen
Click Maintenance > Backup/Restore. Information related to factory defaults, backup configuration, and restoring configuration appears in this screen, as shown next.
Figure 122 Maintenance > Backup/Restore
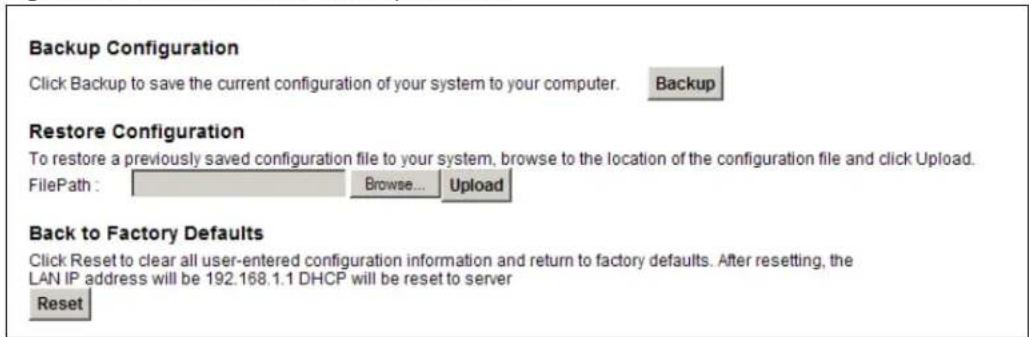
Backup Configuration
Backup Configuration allows you to back up (save) the Device's current configuration to a file on your computer. Once your Device is configured and functioning properly, it is highly recommended that you back up your configuration file before making configuration changes. The backup configuration file will be useful in case you need to return to your previous settings.
Click Backup to save the Device's current configuration to your computer.
Restore Configuration
Restore Configuration allows you to upload a new or previously saved configuration file from your computer to your Device.
Table 82 Restore Configuration
| LABEL DESCRIPTION | |
| File Path | Type in the location of the file you want to upload in this field or clickBrowse... to find it. |
| Browse... | Click this to find the file you want to upload. Remember that you must decompress compressed (.ZIP) files before you can upload them. |
| Upload Click | this to begin the upload process. |
| Reset | Click this to reset your device settings back to the factory default. |
Do not turn off the Device while configuration file upload is in progress.
After the Device configuration has been restored successfully, the login screen appears. Login again to restart the Device.
The Device automatically restarts in this time causing a temporary network disconnect. In some operating systems, you may see the following icon on your desktop.
Figure 123 Network Temporarily Disconnected
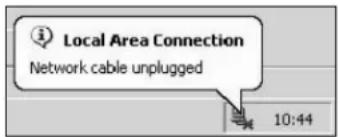
If you restore the default configuration, you may need to change the IP address of your computer to be in the same subnet as that of the default device IP address (192.168.1.1). See Appendix B on page 253 for details on how to set up your computer's IP address.
If the upload was not successful, an error screen will appear. Click OK to go back to the Configuration screen.
Reset to Factory Defaults
Click the Reset button to clear all user-entered configuration information and return the Device to its factory defaults. The following warning screen appears.
Figure 124 Reset Warning Message
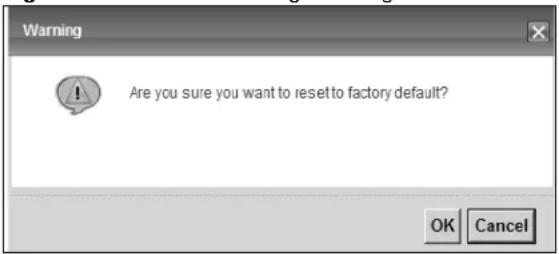
Figure 125 Reset In Process Message
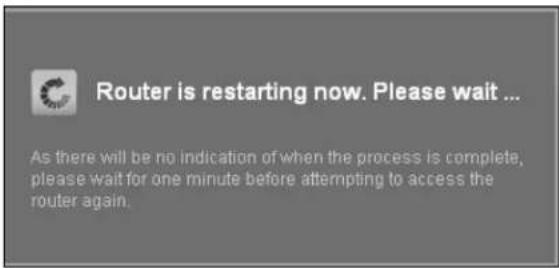
You can also press the RESET button on the back panel to reset the factory defaults of your Device. Refer to Section 1.5 on page 17 for more information on the RESET button.
28.3 The Reboot Screen
System restart allows you to reboot the Device remotely without turning the power off. You may need to do this if the Device hangs, for example.
Click Maintenance > Reboot. Click the Reboot button to have the Device reboot. This does not affect the Device's configuration.
29.1 Overview
You can use different diagnostic methods to test a connection and see the detailed information. These read-only screens display information to help you identify problems with the Device.
29.2 The Ping/TraceRoute Screen
Ping and traceroute help check availability of remote hosts and also help troubleshoot network or Internet connections. Click Maintenance > Diagnostic to open the Ping/ TraceRoute screen shown next.
Figure 126 Maintenance > Diagnostic > Ping/TraceRoute
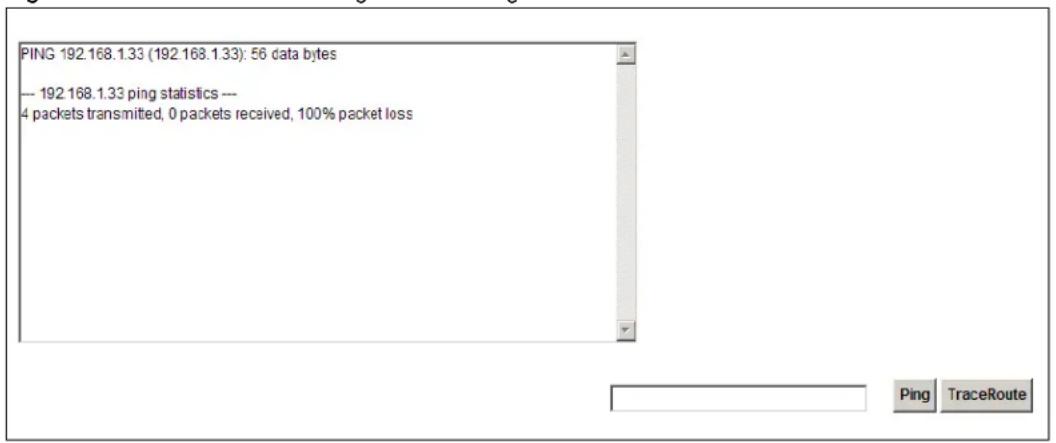
The following table describes the fields in this screen.
Table 83 Maintenance > Diagnostic > Ping/TraceRoute
| LABEL DESCRIPTION | |
| Ping | Type the IP address of a computer that you want to ping in order to test a connection. Click Ping and the ping statistics will show in the diagnostic . |
| TraceRoute | Click this button to perform the traceroute function. This determines the path a packet takes to the specified host. |
Auto Provision
30.1 Overview
You can use auto provision to automatically update the configuration settings on the Device. The Auto Provision feature uses the http protocol with encryption, and can be used to upgrade firmware or configuration information to the Device. The device must access an Auto Provision server. In the figure below, three different Devices (ZD1, ZD2, ZD3) are controlled by auto provision server S.
Figure 127 Auto Provision
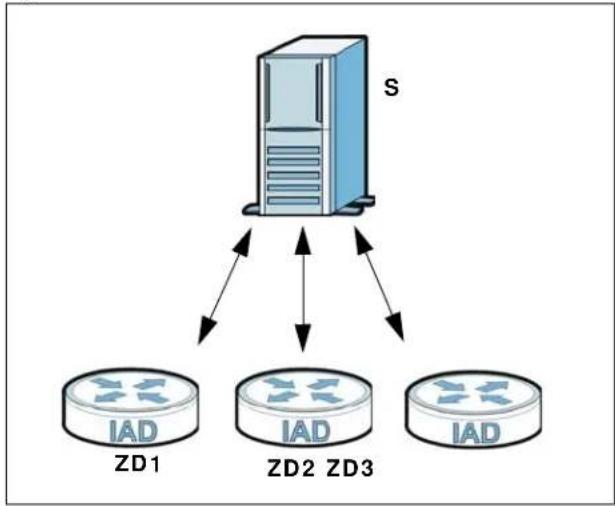
flowchart
graph TD
    S["Server S"] --> ZD1["IAD ZD1"]
    S --> ZD2["IAD ZD2"]
    S --> ZD3["IAD ZD3"]
30.2 Auto Provision
Use this screen to configure Auto Provision settings for automatically updating the Device settings. Click Maintenance > Auto Provision to open the Auto Provision screen shown next.
Figure 128 Maintenance > Auto Provision
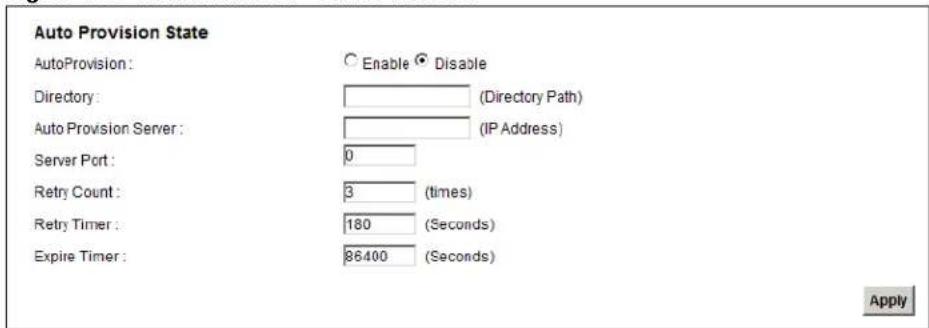
The following table describes the fields in this screen.
Table 84 Maintenance > Auto Provision
| LABEL DESCRIPTION | |
| Auto Provision | Enable or disable auto provision. |
| Directory | Enter the directory path where the auto provision file is located. |
| Auto Provision Server | Enter the IP address of the auto provision server. |
| Server Port | Enter the port number used by the auto provision server. |
| Retry Count | Enter the number of times to retry auto provisioning. |
| Retry Timer | Enter the number of seconds to wait before retrying the auto provisioning attempt. |
| Expire Timer Enter the number of seconds to wait before downloading the configuration file again, if the configuration file from the server is the same as the configuration file on the device, thereby retrying the download until an updated configuration file is downloaded. | |
| Apply Click Apply to save your changes. | |
Troubleshooting
31.1 Overview
This chapter offers some suggestions to solve problems you might encounter. The potential problems are divided into the following categories.
• Power, Hardware Connections, and LEDs
• Device Access and Login
- Internet Access
• Phone Calls and VoIP
- USB Device Connection
- UPnP
31.2 Power, Hardware Connections, and LEDs
The Device does not turn on. None of the LEDs turn on.
1 Make sure the Device is turned on.
2 Make sure you are using the power adaptor or cord included with the Device.
3 Make sure the power adaptor or cord is connected to the Device and plugged in to an appropriate power source. Make sure the power source is turned on.
4 Turn the Device off and on.
5 If the problem continues, contact the vendor.
One of the LEDs does not behave as expected.
1 Make sure you understand the normal behavior of the LED.
2 Check the hardware connections. See the Quick Start Guide.
3 Inspect your cables for damage. Contact the vendor to replace any damaged cables.
4 Turn the Device off and on.
5 If the problem continues, contact the vendor.
31.3 Device Access and Login
I forgot the IP address for the Device.
1 The default IP address is 192.168.1.1.
2 If you changed the IP address and have forgotten it, you might get the IP address of the Device by looking up the IP address of the default gateway for your computer. To do this in most Windows computers, click Start > Run, enter cmd, and then enter ipconfig. The IP address of the Default Gateway might be the IP address of the Device (it depends on the network), so enter this IP address in your Internet browser.
3 If this does not work, you have to reset the device to its factory defaults. See Section 1.5 on page 17.
I forgot the password.
1 The default admin password is 1234 and the default user password is 1234.
2 If you can't remember the password, you have to reset the device to its factory defaults. See Section 1.5 on page 17.
I cannot see or access the Login screen in the web configurator.
1 Make sure you are using the correct IP address.
• The default IP address is 192.168.1.1.
- If you changed the IP address (Section on page 104), use the new IP address.
- If you changed the IP address and have forgotten it, see the troubleshooting suggestions for I forgot the IP address for the Device.
2 Check the hardware connections, and make sure the LEDs are behaving as expected. See the Quick Start Guide.
3 Make sure your Internet browser does not block pop-up windows and has JavaScript and Java enabled. See Appendix C on page 283.
4 Reset the device to its factory defaults, and try to access the Device with the default IP address. See Section 1.5 on page 17.
5 If the problem continues, contact the network administrator or vendor, or try one of the advanced suggestions.
Advanced Suggestions
- Try to access the Device using another service, such as Telnet. If you can access the Device, check the remote management settings and firewall rules to find out why the Device does not respond to HTTP.
- If your computer is connected to the WAN port, use a computer that is connected to a ETHERNET port.
I can see the Login screen, but I cannot log in to the Device.
1 Make sure you have entered the user name and password correctly. The default user name is admin. These fields are case-sensitive, so make sure [Caps Lock] is not on.
2 You cannot log in to the web configurator while someone is using Telnet to access the Device. Log out of the Device in the other session, or ask the person who is logged in to log out.
3 Turn the Device off and on.
4 If this does not work, you have to reset the device to its factory defaults. See Section 31.2 on page 237.
I cannot Telnet to the Device.
See the troubleshooting suggestions for I cannot see or access the Login screen in the web configurator. Ignore the suggestions about your browser.
I cannot use FTP to upload / download the configuration file. / I cannot use FTP to upload new firmware.
See the troubleshooting suggestions for I cannot see or access the Login screen in the web configurator. Ignore the suggestions about your browser.
31.4 Internet Access
I cannot access the Internet.
1 Check the hardware connections, and make sure the LEDs are behaving as expected. See the Quick Start Guide.
2 Make sure you entered your ISP account information correctly. These fields are case-sensitive, so make sure [Caps Lock] is not on.
3 Disconnect all the cables from your device, and follow the directions in the Quick Start Guide again.
4 If the problem continues, contact your ISP.
I cannot create multiple connections of the same type.
Your WAN interface must enable VLAN and fill each WAN connection with different VLAN IDs.
I cannot access the Internet anymore. I had access to the Internet (with the Device), but my Internet connection is not available anymore.
1 Check the hardware connections, and make sure the LEDs are behaving as expected. See the Quick Start Guide.
2 Turn the Device off and on.
3 If the problem continues, contact your ISP.
The Internet connection is slow or intermittent.
1 There might be a lot of traffic on the network. If the Device is sending or receiving a lot of information, try closing some programs that use the Internet, especially peer-to-peer applications.
2 Turn the Device off and on.
3 If the problem continues, contact the network administrator or vendor, or try one of the advanced suggestions.
Advanced Suggestions
- Check the settings for QoS. If it is disabled, you might consider activating it. If it is enabled, you might consider raising or lowering the priority for some applications.
31.5 Phone Calls and VoIP
The telephone port won't work or the telephone lacks a dial tone.
1 Check the telephone connections and telephone wire.
I can access the Internet, but cannot make VoIP calls.
1 The PHONE light should come on. Make sure that your telephone is connected to the PHONE port.
2 You can also check the VoIP status in the System Info screen.
3 If the VoIP settings are correct, use speed dial to make peer-to-peer calls. If you can make a call using speed dial, there may be something wrong with the SIP server, contact your VoIP service provider.
31.6 USB Device Connection
The Device fails to detect my USB device.
1 Disconnect the USB device.
2 Reboot the Device.
3 If you are connecting a USB hard drive that comes with an external power supply, make sure it is connected to an appropriate power source that is on.
4 Re-connect your USB device to the Device.
31.7 UPnP
When using UPnP and the Device reboots, my computer cannot detect UPnP and refresh My Network Places > Local Network.
1 Disconnect the Ethernet cable from the Device's LAN port or from your computer.
2 Re-connect the Ethernet cable.
The Local Area Connection icon for UPnP disappears in the screen.
Restart your computer.
I cannot open special applications such as white board, file transfer and video when I use the MSN messenger.
1 Wait more than three minutes.
2 Restart the applications.
IP Addresses and Subnetting
This appendix introduces IP addresses and subnet masks.
IP addresses identify individual devices on a network. Every networking device (such as computers, servers, routers, and printers) needs an IP address to communicate across the network. These networking devices are also known as hosts.
Subnet masks determine the maximum number of possible hosts on a network. You can also use subnet masks to divide one network into multiple sub-networks.
Introduction to IP Addresses
One part of the IP address is the network number, and the other part is the host ID. In the same way that houses on a street share a common street name, the hosts on a network share a common network number. Similarly, as each house has its own house number, each host on the network has its own unique identifying number - the host ID. Routers use the network number to send packets to the correct network, while the host ID determines to which host on the network the packets are delivered.
Structure
An IP address is made up of four parts, written in dotted decimal notation (for example, 192.168.1.1). Each of these four parts is known as an octet. An octet is an eight-digit binary number (for example 11000000, which is 192 in decimal notation).
Therefore, each octet has a possible range of 00000000 to 11111111 in binary, or 0 to 255 in decimal.
The following figure shows an example IP address in which the first three octets (192.168.1) are the network number, and the fourth octet (16) is the host ID.
Figure 129 Network Number and Host ID
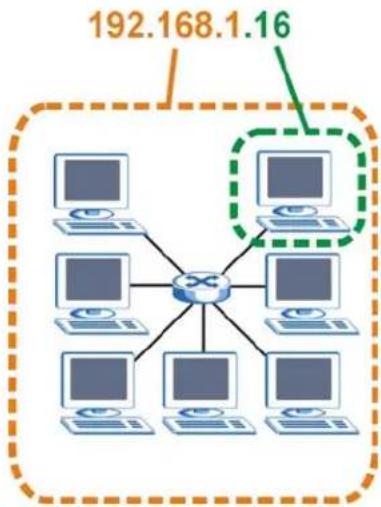
flowchart
graph TD
    A["Router"] --> B["Client 1"]
    A --> C["Client 2"]
    A --> D["Client 3"]
    A --> E["Client 4"]
    A --> F["Client 5"]
    A --> G["Client 6"]
    A --> H["Client 7"]
    A --> I["Client 8"]
    A --> J["Client 9"]
    A --> K["Client 10"]
    A --> L["Client 11"]
    A --> M["Client 12"]
    A --> N["Client 13"]
    A --> O["Client 14"]
    A --> P["Client 15"]
    A --> Q["Client 16"]
    A --> R["Client 17"]
    A --> S["Client 18"]
    A --> T["Client 19"]
    A --> U["Client 20"]
    A --> V["Client 21"]
    A --> W["Client 22"]
    A --> X["Client 23"]
    A --> Y["Client 24"]
    A --> Z["Client 25"]
    A --> AA["Client 26"]
    A --> AB["Client 27"]
    A --> AC["Client 28"]
    A --> AD["Client 29"]
    A --> AE["Client 30"]
    A --> AF["Client 31"]
    A --> AG["Client 32"]
    A --> AH["Client 33"]
    A --> AI["Client 34"]
    A --> AJ["Client 35"]
    A --> AK["Client 36"]
    A --> AL["Client 37"]
    A --> AM["Client 38"]
    A --> AN["Client 39"]
    A --> AO["Client 40"]
    A --> AP["Client 41"]
    A --> AQ["Client 42"]
    A --> AR["Client 43"]
    A --> AS["Client 44"]
    A --> AT["Client 45"]
    A --> AU["Client 46"]
    A --> AV["Client 47"]
    A --> AW["Client 48"]
    A --> AX["Client 49"]
    A --> AY["Client 50"]
How much of the IP address is the network number and how much is the host ID varies according to the subnet mask.
Subnet Masks
A subnet mask is used to determine which bits are part of the network number, and which bits are part of the host ID (using a logical AND operation). The term "subnet" is short for "sub-network".
A subnet mask has 32 bits. If a bit in the subnet mask is a "1" then the corresponding bit in the IP address is part of the network number. If a bit in the subnet mask is "0" then the corresponding bit in the IP address is part of the host ID.
The following example shows a subnet mask identifying the network number (in bold text) and host ID of an IP address (192.168.1.2 in decimal).
Table 85 IP Address Network Number and Host ID Example
| 1ST OCTET:(192) | 2NDOCTET:(168) | 3RDOCTET:(1) | 4TH OCTET(2) | |
| IP Address (Binary) 11000000 | 10101000 0000 | 0001 0000001 | 0 | |
| Subnet Mask (Binary) 111111 | 11 11111111 | 11111111 00 | 000000 | |
| Network Number 11000000 1 | 0101000 0000 | 0001 | ||
| Host ID 00000010 |
By convention, subnet masks always consist of a continuous sequence of ones beginning from the leftmost bit of the mask, followed by a continuous sequence of zeros, for a total number of 32 bits.
Subnet masks can be referred to by the size of the network number part (the bits with a "1" value). For example, an "8-bit mask" means that the first 8 bits of the mask are ones and the remaining 24 bits are zeroes.
Subnet masks are expressed in dotted decimal notation just like IP addresses. The following examples show the binary and decimal notation for 8-bit, 16-bit, 24-bit and 29-bit subnet masks.
Table 86 Subnet Masks
| BINARY | DECIMAL | ||||
| 1ST OCTET | 2ND OCTET | 3RD OCTET | 4TH OCTET | ||
| 8-bit mask 1111 | 1111 00000000 | 00000000 00 | 000000 255.0.0 | ||
| 16-bit mask 111 | 1111 1111111 | 1 00000000 0 | 0000000 255.2 | 55.0.0 | |
| 24-bit mask 111 | 1111 1111111 | 1 11111111 0 | 0000000 255.2 | 55.255.0 | |
| 29-bit mask 111 | 1111 1111111 | 1 11111111 1 | 1111000 255.2 | 55.255.248 | |
Network Size
The size of the network number determines the maximum number of possible hosts you can have on your network. The larger the number of network number bits, the smaller the number of remaining host ID bits.
An IP address with host IDs of all zeros is the IP address of the network (192.168.1.0 with a 24-bit subnet mask, for example). An IP address with host IDs of all ones is the broadcast address for that network (192.168.1.255 with a 24-bit subnet mask, for example).
As these two IP addresses cannot be used for individual hosts, calculate the maximum number of possible hosts in a network as follows:
Table 87 Maximum Host Numbers
| SUBNET MASK HOST ID SIZE | MAXIMUM NUMBER OFHOSTS | |||
| 8 bits 255.0.0.0 24 bits 2 | ^24 - 2 1677 | 7214 | ||
| 16 bits 255.255.0.0 16 bits 2 | ^16 - 2 6553 | 4 | ||
| 24 bits 255.255.255.0 | 8 b ts | 2 | ^8 - 2 | 254 |
| 29 bits 255.255.255.248 | 3 b ts | 2 | ^3 - 2 | 6 |
Notation
Since the mask is always a continuous number of ones beginning from the left, followed by a continuous number of zeros for the remainder of the 32 bit mask, you can simply specify the number of ones instead of writing the value of each octet. This is usually specified by writing a “/” followed by the number of bits in the mask after the address.
For example, 192.1.1.0 /25 is equivalent to saying 192.1.1.0 with subnet mask 255.255.255.128.
The following table shows some possible subnet masks using both notations.
Table 88 Alternative Subnet Mask Notation
| SUBNET MASK | ALTERNATIVE NOTATION | LAST OCTET (BINARY) | LAST OCTET (DECIMAL) |
| 255.255.255.0 | /24 | 0000 0000 | 0 |
| 255.255.255.128 | /25 | 1000 0000 | 128 |
| 255.255.255.192 | /26 | 1100 0000 | 192 |
| 255.255.255.224 | /27 | 1110 0000 | 224 |
| 255.255.255.240 /28 11 | 11 0000 240 | ||
| 255.255.255.248 /29 11 | 11 1000 248 | ||
| 255.255.255.252 /30 11 | 11 1100 252 |
Subnetting
You can use subnetting to divide one network into multiple sub-networks. In the following example a network administrator creates two sub-networks to isolate a group of servers from the rest of the company network for security reasons.
In this example, the company network address is 192.168.1.0. The first three octets of the address (192.168.1) are the network number, and the remaining octet is the host ID, allowing a maximum of 2^8 - 2 or 254 possible hosts.
The following figure shows the company network before subnetting.
Figure 130 Subnetting Example: Before Subnetting
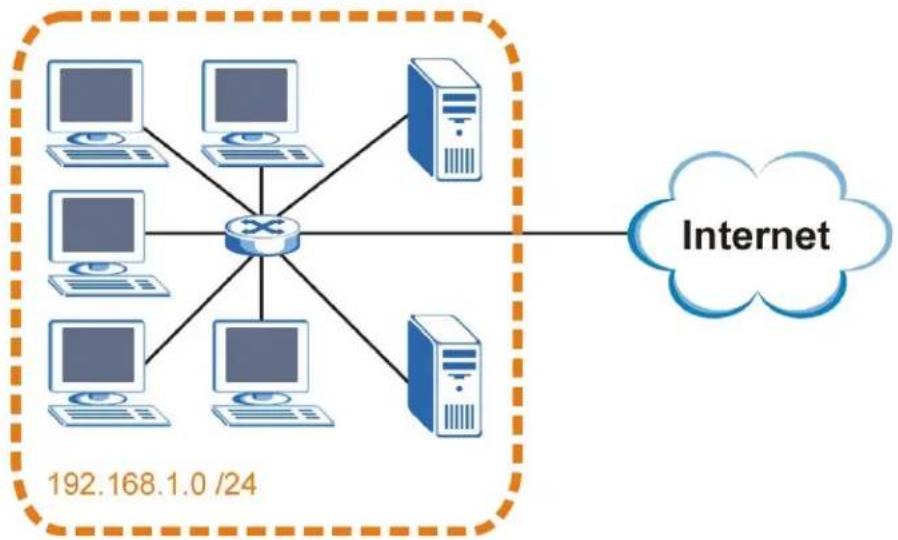
You can "borrow" one of the host ID bits to divide the network 192.168.1.0 into two separate sub-networks. The subnet mask is now 25 bits (255.255.255.128 or /25).
The "borrowed" host ID bit can have a value of either 0 or 1, allowing two subnets; 192.168.1.0 /25 and 192.168.1.128 /25.
The following figure shows the company network after subnetting. There are now two sub-networks, A and B.
Figure 131 Subnetting Example: After Subnetting
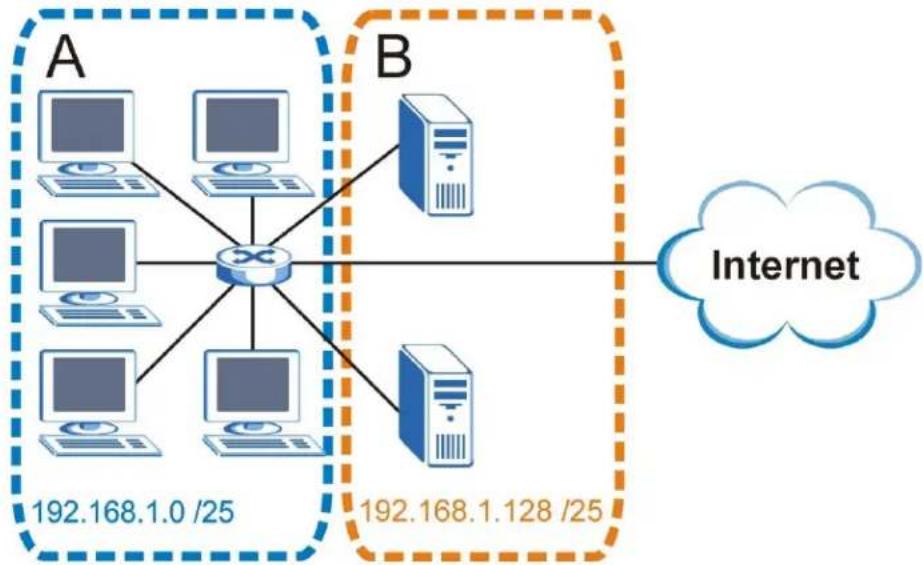
flowchart
graph TD
    subgraph_A["Network"]
        A1["Computer 1"] --> A2["Computer 2"]
        A3["Computer 3"] --> A4["Computer 4"]
        A5["Computer 5"] --> A6["Computer 6"]
        A7["Computer 7"] --> A8["Computer 8"]
    end
    subgraph_B["Internet"]
        B1["Server 1"] --> B2["Server 2"]
        B3["Server 3"] --> B4["Server 4"]
    end
    A --> B
    B --> C["Internet"]
    style A fill:#f9f,stroke:#333
    style B fill:#bbf,stroke:#333
    note right of A: 192.168.1.0 /25
    note right of B: 192.168.1.128 /25
In a 25-bit subnet the host ID has 7 bits, so each sub-network has a maximum of 2^7 - 2 or 126 possible hosts (a host ID of all zeroes is the subnet's address itself, all ones is the subnet's broadcast address).
192.168.1.0 with mask 255.255.255.128 is subnet A itself, and 192.168.1.127 with mask 255.255.255.128 is its broadcast address. Therefore, the lowest IP address that can be assigned to an actual host for subnet A is 192.168.1.1 and the highest is 192.168.1.126.
Similarly, the host ID range for subnet B is 192.168.1.129 to 192.168.1.254.
Example: Four Subnets
The previous example illustrated using a 25-bit subnet mask to divide a 24-bit address into two subnets. Similarly, to divide a 24-bit address into four subnets, you need to "borrow" two host ID bits to give four possible combinations (00, 01, 10 and 11). The subnet mask is 26 bits (11111111.11111111.11111111.11000000) or 255.255.255.192.
Each subnet contains 6 host ID bits, giving 2^6 - 2 or 62 hosts for each subnet (a host ID of all zeroes is the subnet itself, all ones is the subnet's broadcast address).
Table 89 Subnet 1
| IP/SUBNET MASK NETWORK NUMBER | LAST OCTET BIT VALUE | |
| IP Address (Decimal) 192.168.1.0 | ||
| IP Address (Binary) | 11000000.10101000.00000001. | 00000000 |
| Subnet Mask (Binary) | 11111111.11111111.11111111. | 11000000 |
| Subnet Address: 192.168.1.0 | Lowest Host ID: 192.168.1.1 | |
| Broadcast Address: 192.168.1.63 | Highest Host ID: 192.168.1.62 | |
Table 90 Subnet 2
| IP/SUBNET MASK NETWORK NUMBER | LAST OCTET BIT VALUE | |
| IP Address 192.168.1.64 | ||
| IP Address (Binary) | 11000000.10101000.00000001. | 01000000 |
| Subnet Mask (Binary) | 11111111.11111111.11111111. | 11000000 |
| Subnet Address: 192.168.1.64 | Lowest Host ID: 192.168.1.65 | |
| Broadcast Address: 192.168.1.127 | Highest Host ID: 192.168.1.126 | |
Table 91 Subnet 3
| IP/SUBNET MASK NETWORK NUMBER | LAST OCTET BIT VALUE | |
| IP Address 192.168.1.128 | ||
| IP Address (Binary) | 11000000.10101000.00000001. | 10000000 |
| Subnet Mask (Binary) | 11111111.11111111.11111111. | 11000000 |
| Subnet Address: 192.168.1.128 | Lowest Host ID: 192.168.1.129 | |
| Broadcast Address: 192.168.1.191 | Highest Host ID: 192.168.1.190 | |
Table 92 Subnet 4
| IP/SUBNET MASK NETWORK NUMBER | LAST OCTET BIT VALUE | |
| IP Address | 192.168.1. | 192 |
| IP Address (Binary) | 11000000.10101000.00000001. | 11000000 |
| Subnet Mask (Binary) | 11111111.11111111.11111111. | 11000000 |
| Subnet Address: 192.168.1.192 | Lowest Host ID: 192.168.1.193 | |
| Broadcast Address: 192.168.1.255 | Highest Host ID: 192.168.1.254 | |
Example: Eight Subnets
Similarly, use a 27-bit mask to create eight subnets (000, 001, 010, 011, 100, 101, 110 and 111).
The following table shows IP address last octet values for each subnet.
Table 93 Eight Subnets
| SUBNET | SUBNET ADDRESS | FIRST ADDRESS | LAST ADDRESS | BROADCAST ADDRESS |
| 1 | 0 | 1 | 30 | 31 |
| 2 | 32 | 33 | 62 | 63 |
| 3 | 64 | 65 | 94 | 95 |
| 4 | 96 | 97 | 126 | 127 |
| 5 | 128 | 129 | 158 | 159 |
| 6 | 160 | 161 | 190 | 191 |
| 7 192 193 222 | 223 | |||
| 8 224 225 254 | 255 |
Subnet Planning
The following table is a summary for subnet planning on a network with a 24-bit network number.
Table 94 24-bit Network Number Subnet Planning
| NO. “BORROWED”HOST BITS | SUBNET MASK NO. SUBNETS | NO. HOSTS PERSUBNET | |
| 1 255.255.255.128 (/25) | 2 126 | ||
| 2 255.255.255.192 (/26) | 4 62 | ||
| 3 255.255.255.224 (/27) | 8 30 | ||
| 4 255.255.255.240 (/28) | 16 14 | ||
| 5 255.255.255.248 (/29) | 32 6 | ||
| 6 255.255.255.252 (/30) | 64 2 | ||
| 7 255.255.255.254 (/31) | 128 1 |
The following table is a summary for subnet planning on a network with a 16-bit network number.
Table 95 16-bit Network Number Subnet Planning
| NO. “BORROWED”HOST BITS | SUBNET MASK NO. SUBNETS | NO. HOSTS PER SUBNET | |
| 1 255.255.128.0 (/17) 2 | 32766 | ||
| 2 255.255.192.0 (/18) 4 | 16382 | ||
| 3 255.255.224.0 (/19) 8 | 8190 | ||
| 4 255.255.240.0 (/20) 16 | 4094 | ||
| 5 255.255.248.0 (/21) 32 | 2046 | ||
| 6 255.255.252.0 (/22) 64 | 1022 | ||
| 7 255.255.254.0 (/23) 128 510 | |||
| 8 255.255.255.0 (/24) 256 254 | |||
| 9 255.255.255.128 (/25) | 512 126 | ||
| 10 | 255.255.255.192 (/26) | 1024 | 62 |
| 11 | 255.255.255.224 (/27) | 2048 | 30 |
| 12 | 255.255.255.240 (/28) | 4096 | 14 |
| 13 | 255.255.255.248 (/29) | 8192 | 6 |
| 14 | 255.255.255.252 (/30) | 16384 | 2 |
| 15 | 255.255.255.254 (/31) | 32768 | 1 |
Configuring IP Addresses
Where you obtain your network number depends on your particular situation. If the ISP or your network administrator assigns you a block of registered IP addresses, follow their instructions in selecting the IP addresses and the subnet mask.
If the ISP did not explicitly give you an IP network number, then most likely you have a single user account and the ISP will assign you a dynamic IP address when the connection is established. If this is the case, it is recommended that you select a network number from 192.168.0.0 to 192.168.255.0. The Internet Assigned Number Authority (IANA) reserved this block of addresses specifically for private use; please do not use any other number unless you are told otherwise. You must also enable Network Address Translation (NAT) on the Device.
Once you have decided on the network number, pick an IP address for your Device that is easy to remember (for instance, 192.168.1.1) but make sure that no other device on your network is using that IP address.
The subnet mask specifies the network number portion of an IP address. Your Device will compute the subnet mask automatically based on the IP address that you entered. You don't need to change the subnet mask computed by the Device unless you are instructed to do otherwise.
Private IP Addresses
Every machine on the Internet must have a unique address. If your networks are isolated from the Internet (running only between two branch offices, for example) you can assign any IP addresses to the hosts without problems. However, the Internet Assigned Numbers Authority (IANA) has reserved the following three blocks of IP addresses specifically for private networks:
• 10.0.0.0 — 10.255.255.255
• 172.16.0.0 — 172.31.255.255
• 192.168.0.0 — 192.168.255.255
You can obtain your IP address from the IANA, from an ISP, or it can be assigned from a private network. If you belong to a small organization and your Internet access is through an ISP, the ISP can provide you with the Internet addresses for your local networks. On the other hand, if you are part of a much larger organization, you should consult your network administrator for the appropriate IP addresses.
Regardless of your particular situation, do not create an arbitrary IP address; always follow the guidelines above. For more information on address assignment, please refer to RFC 1597, Address Allocation for Private Internets and RFC 1466, Guidelines for Management of IP Address Space.
IP Address Conflicts
Each device on a network must have a unique IP address. Devices with duplicate IP addresses on the same network will not be able to access the Internet or other resources. The devices may also be unreachable through the network.
Conflicting Computer IP Addresses Example
More than one device can not use the same IP address. In the following example computer A has a static (or fixed) IP address that is the same as the IP address that a DHCP server assigns to
computer B which is a DHCP client. Neither can access the Internet. This problem can be solved by assigning a different static IP address to computer A or setting computer A to obtain an IP address automatically.
Figure 132 Conflicting Computer IP Addresses Example
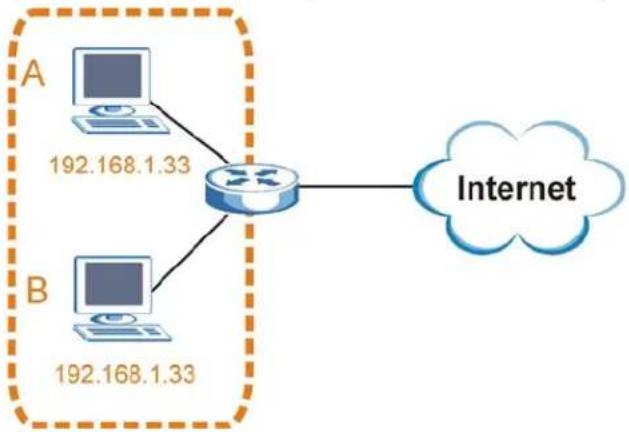
flowchart
graph TD
    A["Computer 192.168.1.33"] --> R["Router"]
    B["Computer 192.168.1.33"] --> R
    R --> Internet["Internet"]
Conflicting Router IP Addresses Example
Since a router connects different networks, it must have interfaces using different network numbers. For example, if a router is set between a LAN and the Internet (WAN), the router's LAN and WAN addresses must be on different subnets. In the following example, the LAN and WAN are on the same subnet. The LAN computers cannot access the Internet because the router cannot route between networks.
Figure 133 Conflicting Computer IP Addresses Example
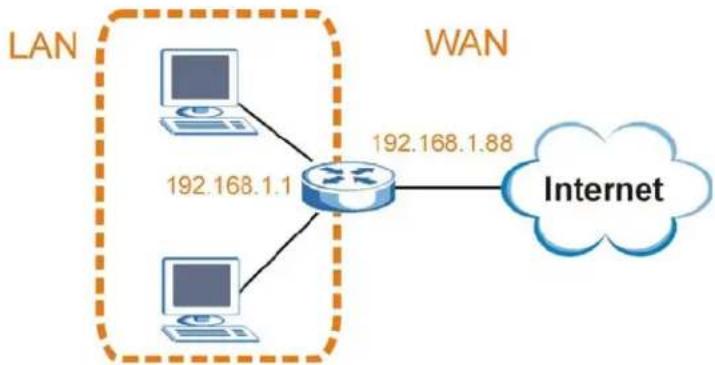
flowchart
graph TD
    A["LAN"] --> B["192.168.1.1"]
    A --> C["192.168.1.88"]
    B --> D["Router"]
    C --> D
    D --> E["Internet"]
Conflicting Computer and Router IP Addresses Example
More than one device can not use the same IP address. In the following example, the computer and the router's LAN port both use 192.168.1.1 as the IP address. The computer cannot access the Internet. This problem can be solved by assigning a different IP address to the computer or the router's LAN port.
Figure 134 Conflicting Computer and Router IP Addresses Example
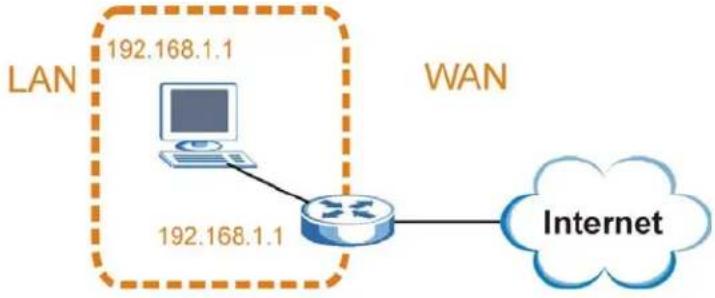
flowchart
graph LR
    A["LAN 192.168.1.1"] --> B["Router"]
    C["Internet"] --> B
    B --> D["WAN"]
Setting Up Your Computer's IP Address
Note: Your specific Device may not support all of the operating systems described in this appendix. See the product specifications for more information about which operating systems are supported.
This appendix shows you how to configure the IP settings on your computer in order for it to be able to communicate with the other devices on your network. Windows Vista/XP/2000, Mac OS 9/OS X, and all versions of UNIX/LINUX include the software components you need to use TCP/IP on your computer.
If you manually assign IP information instead of using a dynamic IP, make sure that your network's computers have IP addresses that place them in the same subnet.
In this appendix, you can set up an IP address for:
• Windows XP/NT/2000 on page 253
• Windows Vista on page 257
- Windows 7 on page 261
• Mac OS X: 10.3 and 10.4 on page 265
• Mac OS X: 10.5 on page 268
• Linux: Ubuntu 8 (GNOME) on page 272
• Linux: openSUSE 10.3 (KDE) on page 276
Windows XP/NT/2000
The following example uses the default Windows XP display theme but can also apply to Windows 2000 and Windows NT.
1 Click Start > Control Panel.
Figure 135 Windows XP: Start Menu
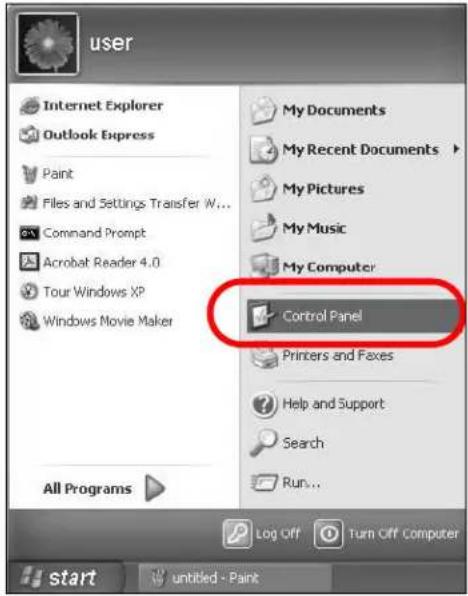
2 In the Control Panel, click the Network Connections icon.
Figure 136 Windows XP: Control Panel
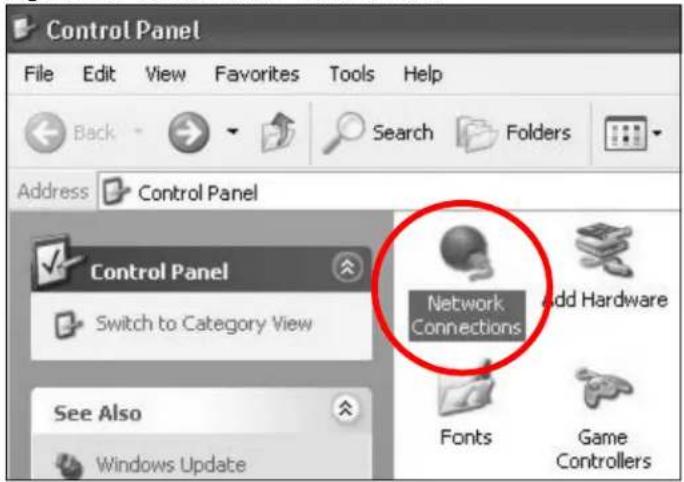
3 Right-click Local Area Connection and then select Properties.
Figure 137 Windows XP: Control Panel > Network Connections > Properties
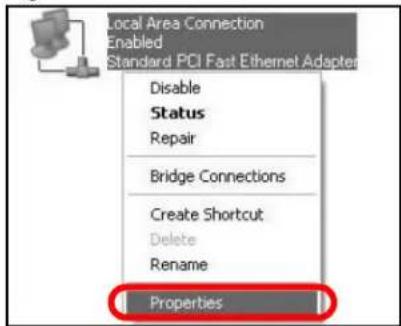
4 On the General tab, select Internet Protocol (TCP/IP) and then click Properties.
Figure 138 Windows XP: Local Area Connection Properties
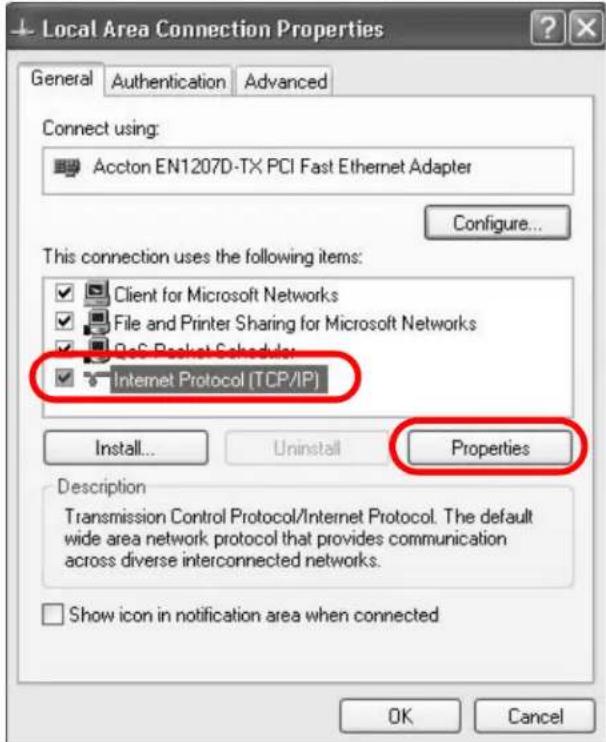
5 The Internet Protocol TCP/IP Properties window opens.
Figure 139 Windows XP: Internet Protocol (TCP/IP) Properties
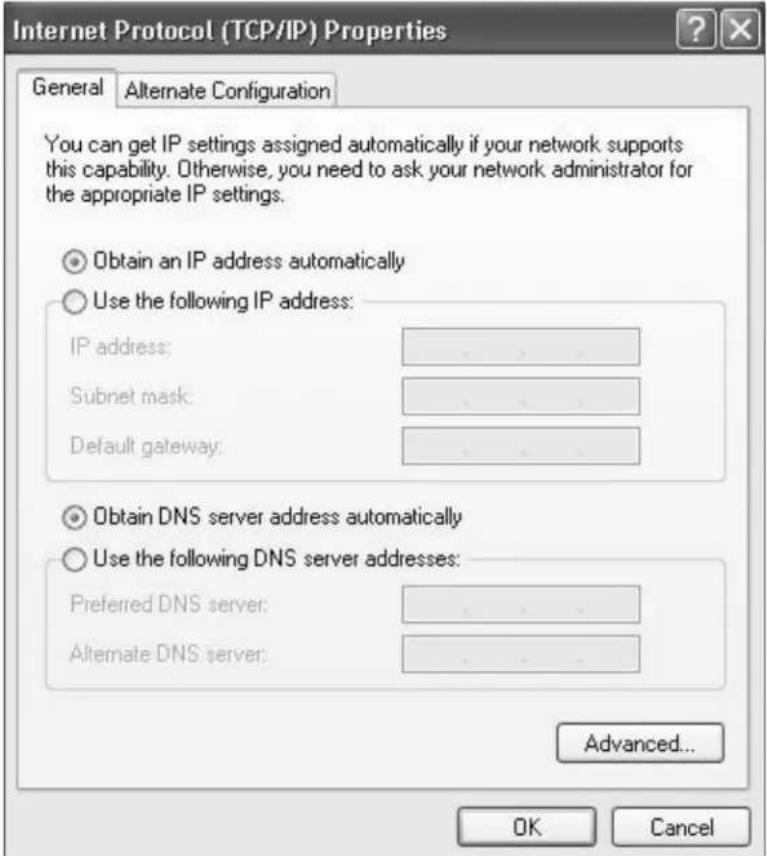
6 Select Obtain an IP address automatically if your network administrator or ISP assigns your IP address dynamically.
Select Use the following IP Address and fill in the IP address, Subnet mask, and Default gateway fields if you have a static IP address that was assigned to you by your network administrator or ISP. You may also have to enter a Preferred DNS server and an Alternate DNS server, if that information was provided.
7 Click OK to close the Internet Protocol (TCP/IP) Properties window.
8 Click OK to close the Local Area Connection Properties window.
Verifying Settings
1 Click Start > All Programs > Accessories > Command Prompt.
2 In the Command Prompt window, type "ipconfig" and then press [ENTER].
You can also go to Start > Control Panel > Network Connections, right-click a network connection, click Status and then click the Support tab to view your IP address and connection information.
Windows Vista
This section shows screens from Windows Vista Professional.
1 Click Start > Control Panel.
Figure 140 Windows Vista: Start Menu
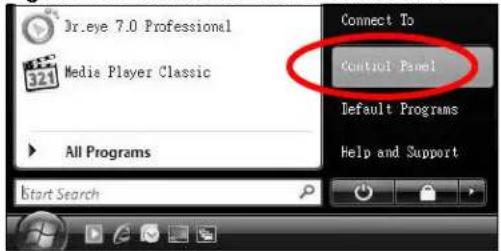
2 In the Control Panel, click the Network and Internet icon.
Figure 141 Windows Vista: Control Panel
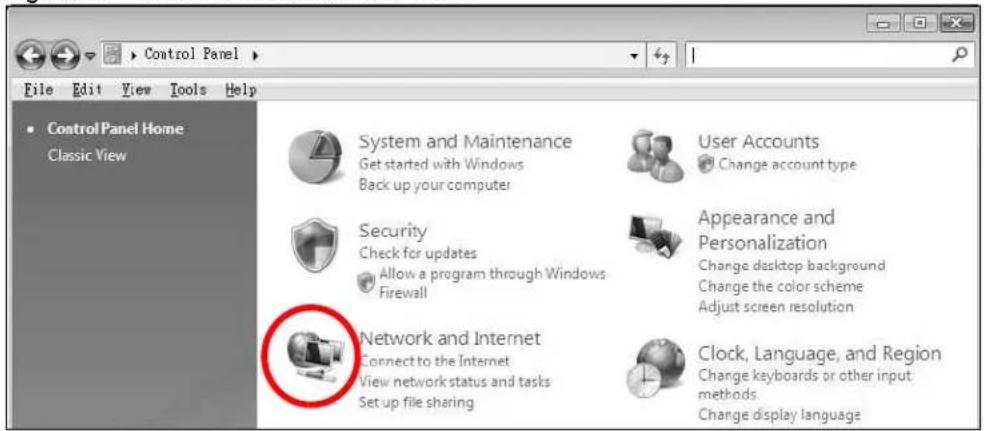
3 Click the Network and Sharing Center icon.
Figure 142 Windows Vista: Network And Internet
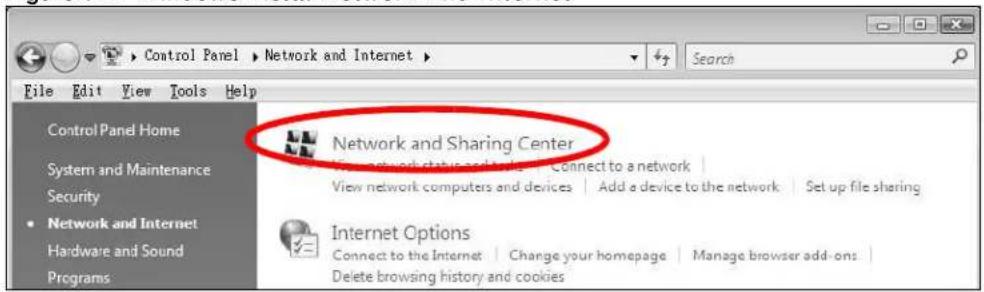
4 Click Manage network connections.
Figure 143 Windows Vista: Network and Sharing Center
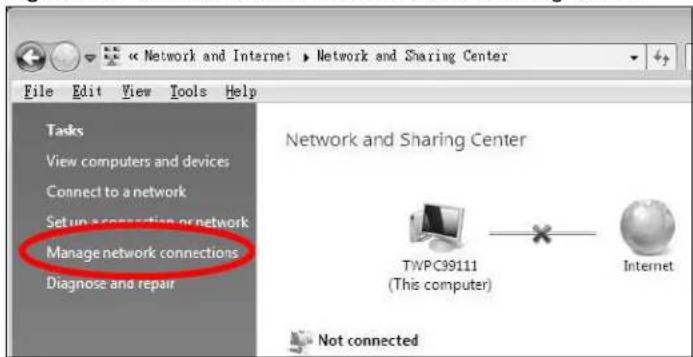
5 Right-click Local Area Connection and then select Properties.
Figure 144 Windows Vista: Network and Sharing Center
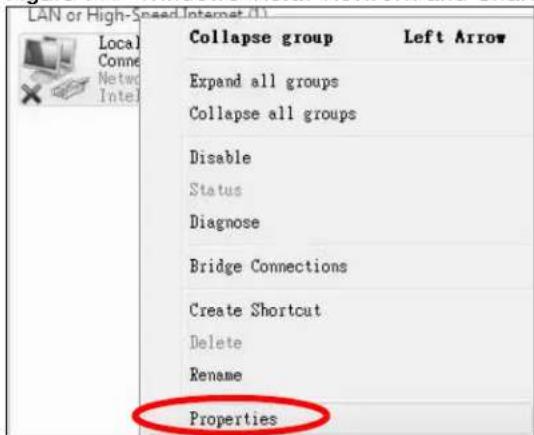
Note: During this procedure, click Continue whenever Windows displays a screen saying that it needs your permission to continue.
6 Select Internet Protocol Version 4 (TCP/IPv4) and then select Properties.
Figure 145 Windows Vista: Local Area Connection Properties
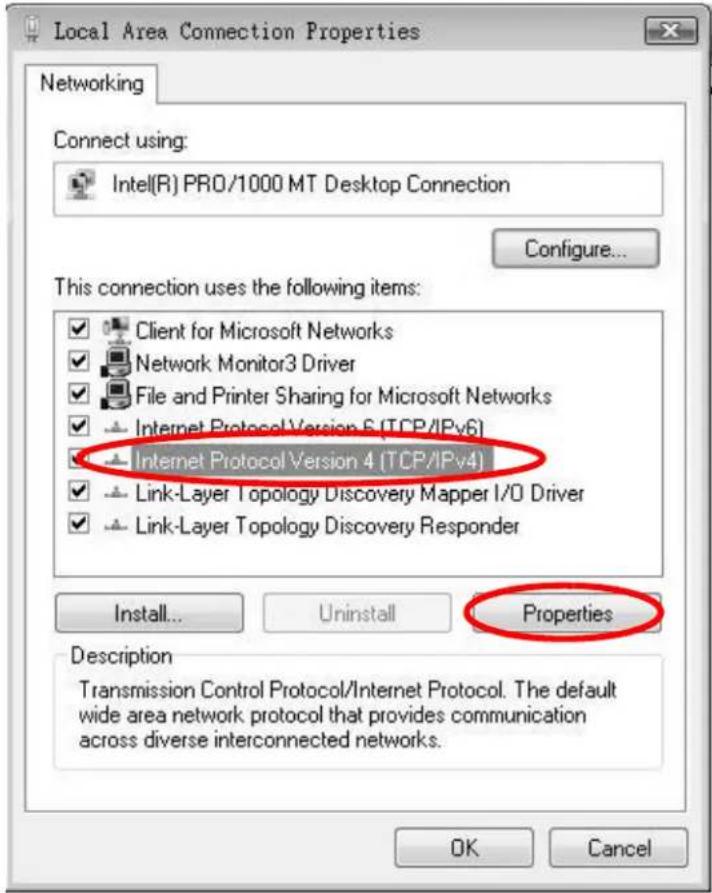
7 The Internet Protocol Version 4 (TCP/IPv4) Properties window opens.
Figure 146 Windows Vista: Internet Protocol Version 4 (TCP/IPv4) Properties
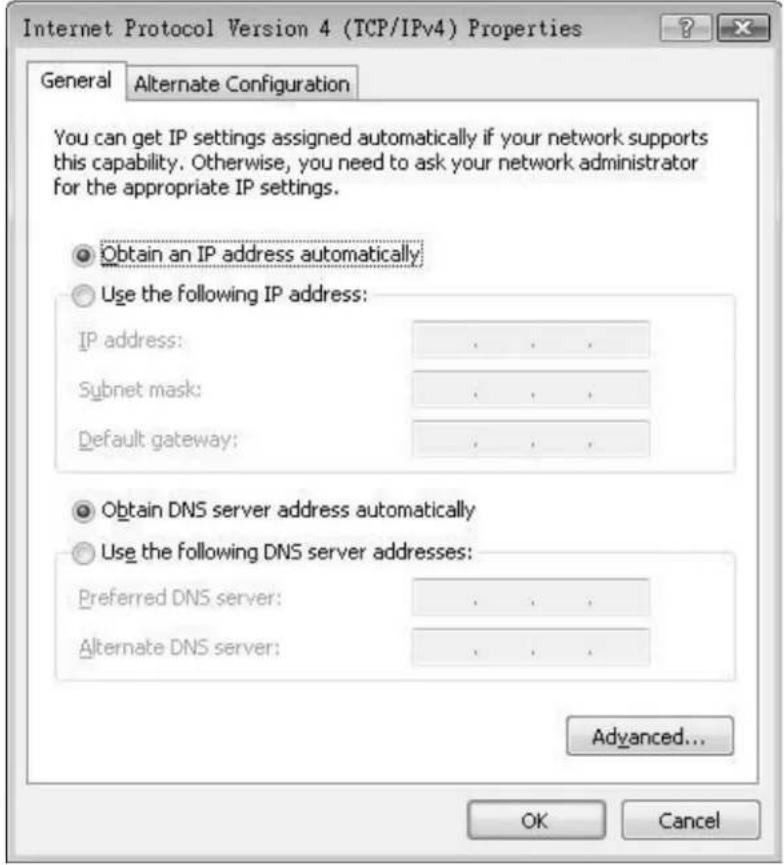
8 Select Obtain an IP address automatically if your network administrator or ISP assigns your IP address dynamically.
Select Use the following IP Address and fill in the IP address, Subnet mask, and Default gateway fields if you have a static IP address that was assigned to you by your network administrator or ISP. You may also have to enter a Preferred DNS server and an Alternate DNS server, if that information was provided. Click Advanced.
9 Click OK to close the Internet Protocol (TCP/IP) Properties window.
10 Click OK to close the Local Area Connection Properties window.
Verifying Settings
1 Click Start > All Programs > Accessories > Command Prompt.
2 In the Command Prompt window, type "ipconfig" and then press [ENTER].
You can also go to Start > Control Panel > Network Connections, right-click a network connection, click Status and then click the Support tab to view your IP address and connection information.
Windows 7
This section shows screens from Windows 7 Enterprise.
1 Click Start > Control Panel.
Figure 147 Windows 7: Start Menu
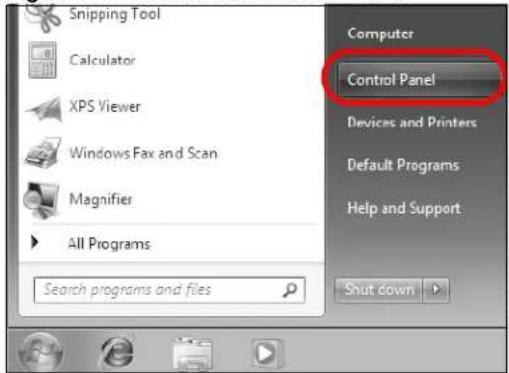
2 In the Control Panel, click View network status and tasks under the Network and Internet category.
Figure 148 Windows 7: Control Panel
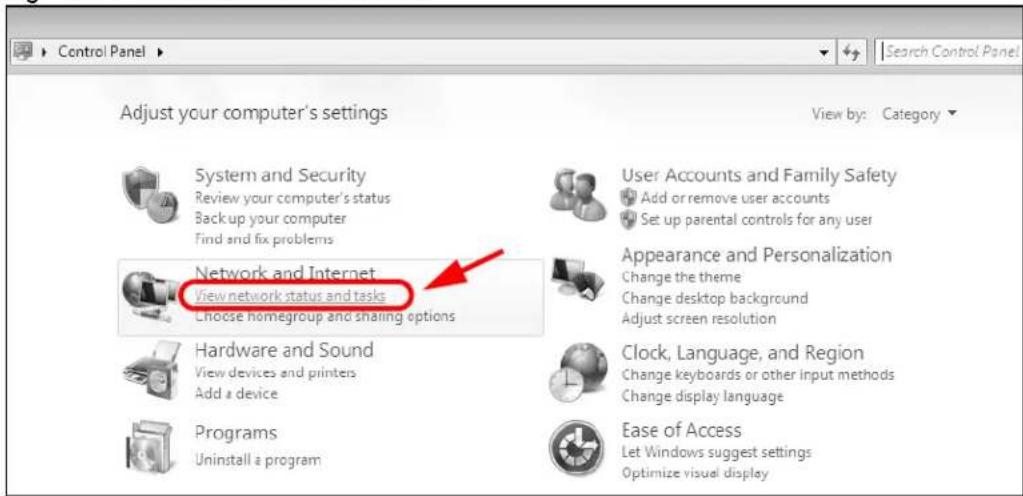
3 Click Change adapter settings.
Figure 149 Windows 7: Network And Sharing Center
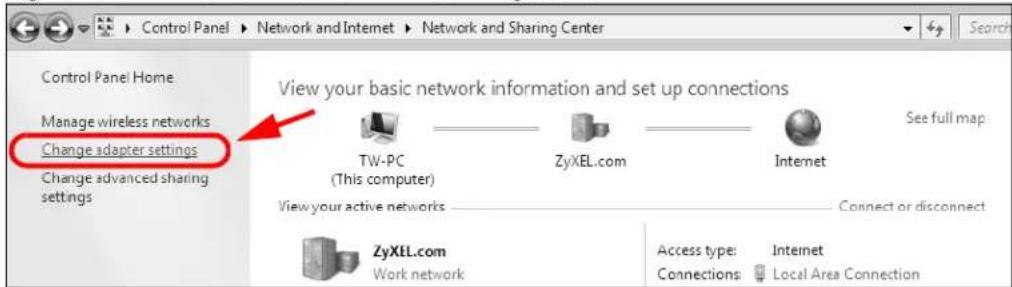
4 Double click Local Area Connection and then select Properties.
Figure 150 Windows 7: Local Area Connection Status
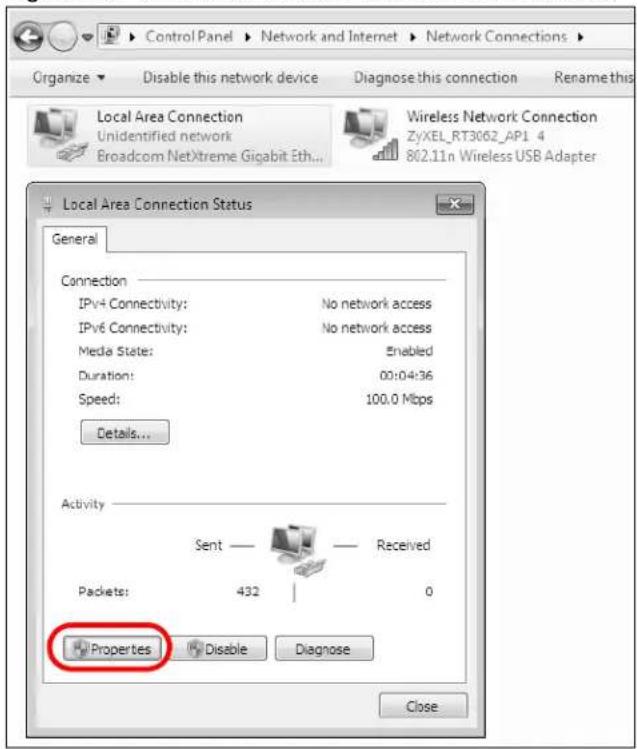
Note: During this procedure, click Continue whenever Windows displays a screen saying that it needs your permission to continue.
5 Select Internet Protocol Version 4 (TCP/IPv4) and then select Properties.
Figure 151 Windows 7: Local Area Connection Properties
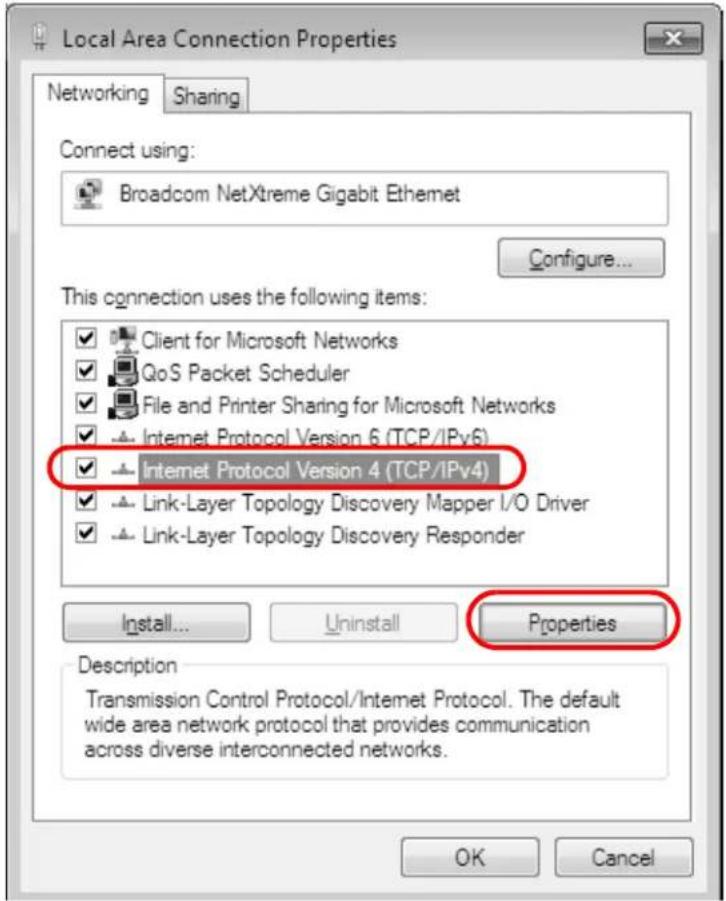
6 The Internet Protocol Version 4 (TCP/IPv4) Properties window opens.
Figure 152 Windows 7: Internet Protocol Version 4 (TCP/IPv4) Properties
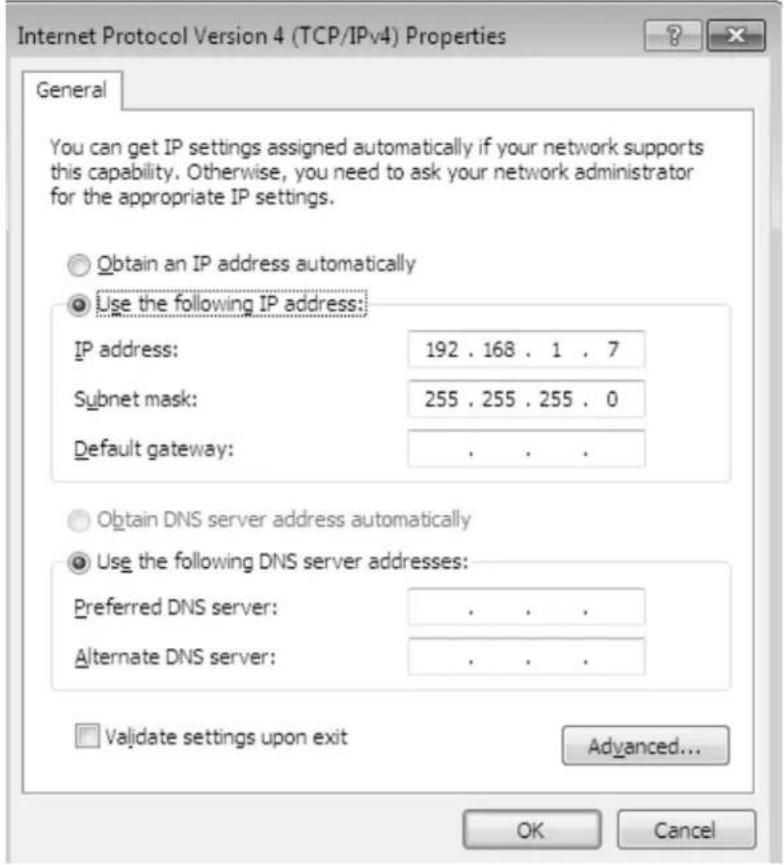
7 Select Obtain an IP address automatically if your network administrator or ISP assigns your IP address dynamically.
Select Use the following IP Address and fill in the IP address, Subnet mask, and Default gateway fields if you have a static IP address that was assigned to you by your network administrator or ISP. You may also have to enter a Preferred DNS server and an Alternate DNS server, if that information was provided. Click Advanced if you want to configure advanced settings for IP, DNS and WINS.
8 Click OK to close the Internet Protocol (TCP/IP) Properties window.
9 Click OK to close the Local Area Connection Properties window.
Verifying Settings
1 Click Start > All Programs > Accessories > Command Prompt.
2 In the Command Prompt window, type "ipconfig" and then press [ENTER].
3 The IP settings are displayed as follows.
Figure 153 Windows 7: Internet Protocol Version 4 (TCP/IPv4) Properties
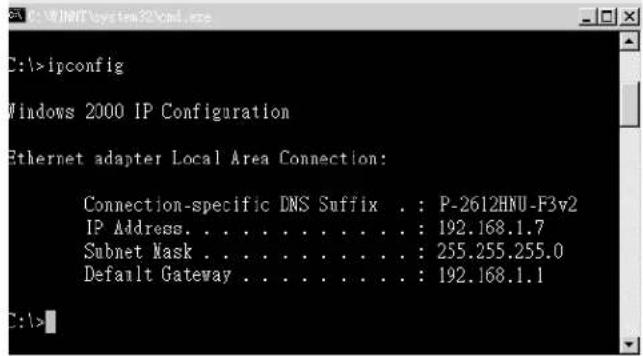
Mac OS X: 10.3 and 10.4
The screens in this section are from Mac OS X 10.4 but can also apply to 10.3.
1 Click Apple > System Preferences.
Figure 154 Mac OS X 10.4: Apple Menu
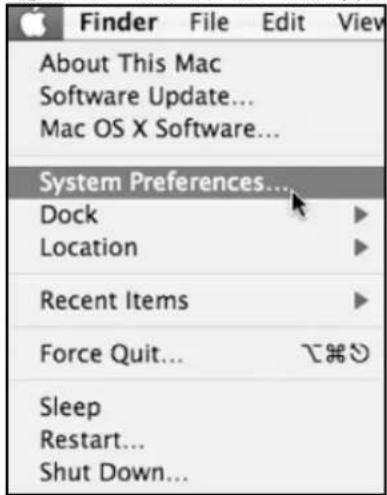
2 In the System Preferences window, click the Network icon.
Figure 155 Mac OS X 10.4: System Preferences
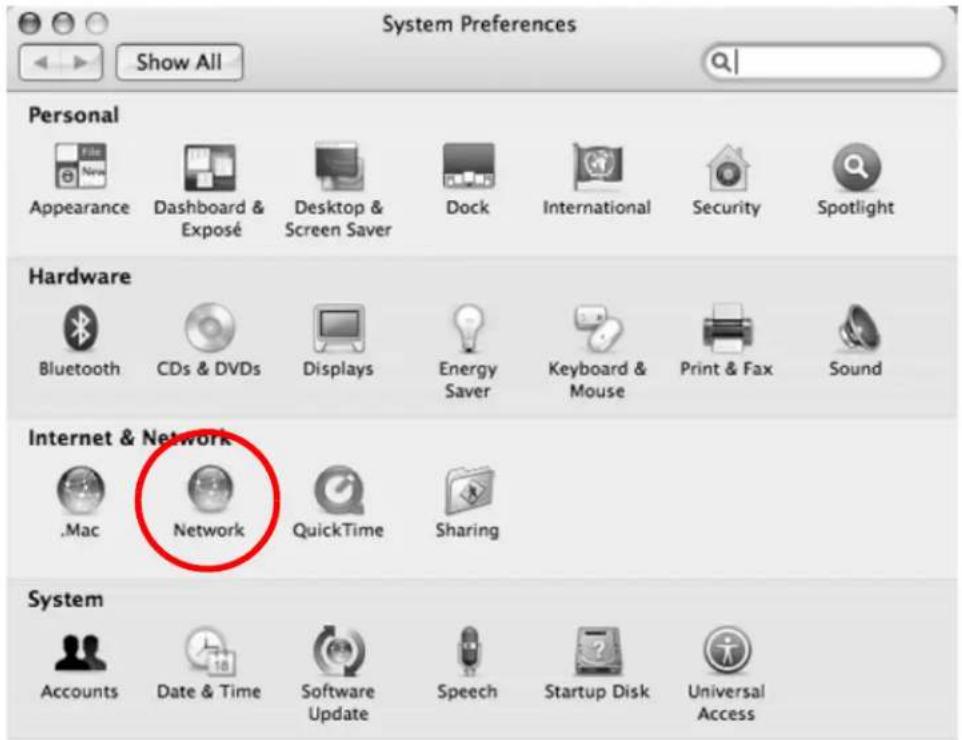
3 When the Network preferences pane opens, select Built-in Ethernet from the network connection type list, and then click Configure.
Figure 156 Mac OS X 10.4: Network Preferences
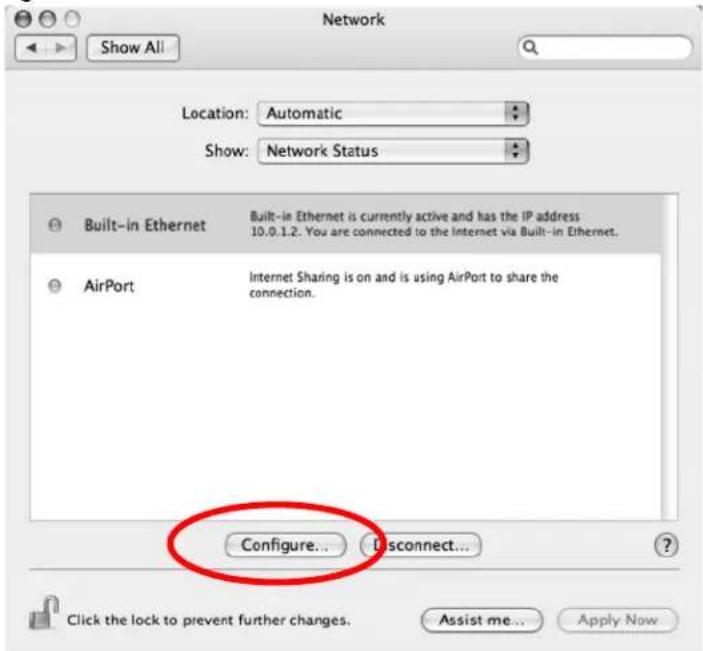
4 For dynamically assigned settings, select Using DHCP from the Configure IPv4 list in the TCP/IP tab.
Figure 157 Mac OS X 10.4: Network Preferences > TCP/IP Tab.
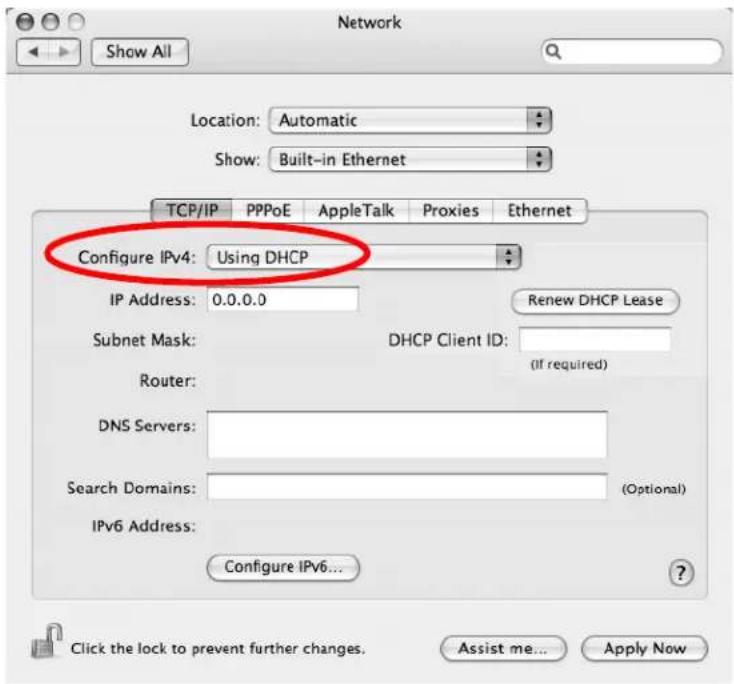
5 For statically assigned settings, do the following:
- From the Configure IPv4 list, select Manually.
- In the IP Address field, type your IP address.
- In the Subnet Mask field, type your subnet mask.
- In the Router field, type the IP address of your device.
Figure 158 Mac OS X 10.4: Network Preferences > Ethernet
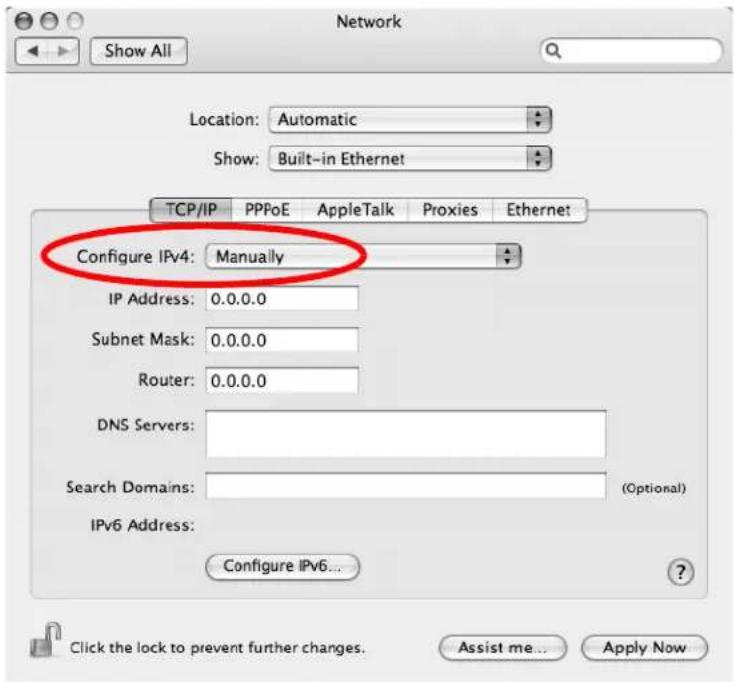
6 Click Apply Now and close the window.
Verifying Settings
Check your TCP/IP properties by clicking Applications > Utilities > Network Utilities, and then selecting the appropriate Network Interface from the Info tab.
Figure 159 Mac OS X 10.4: Network Utility
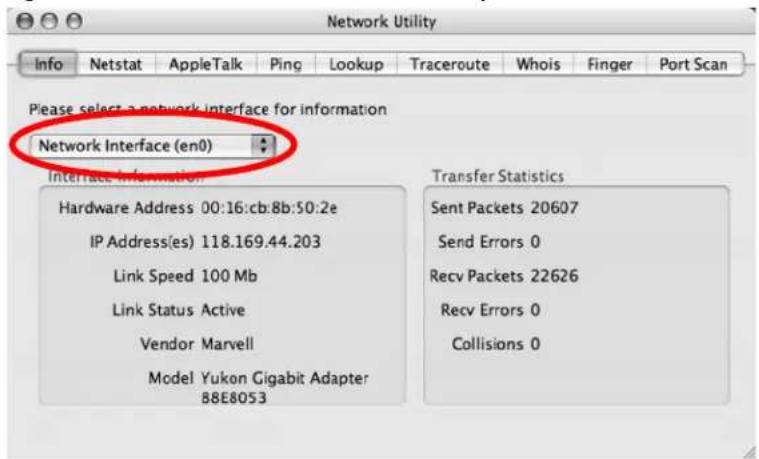
Mac OS X: 10.5
The screens in this section are from Mac OS X 10.5.
1 Click Apple > System Preferences.
Figure 160 Mac OS X 10.5: Apple Menu
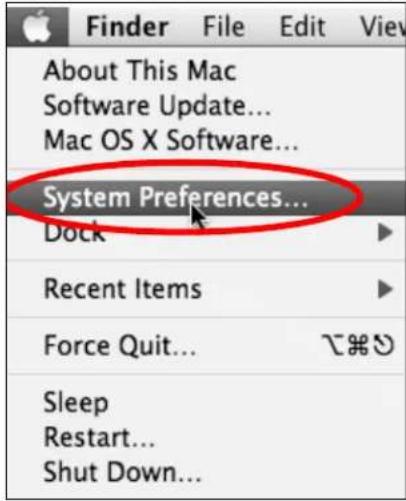
2 In System Preferences, click the Network icon.
Figure 161 Mac OS X 10.5: Systems Preferences
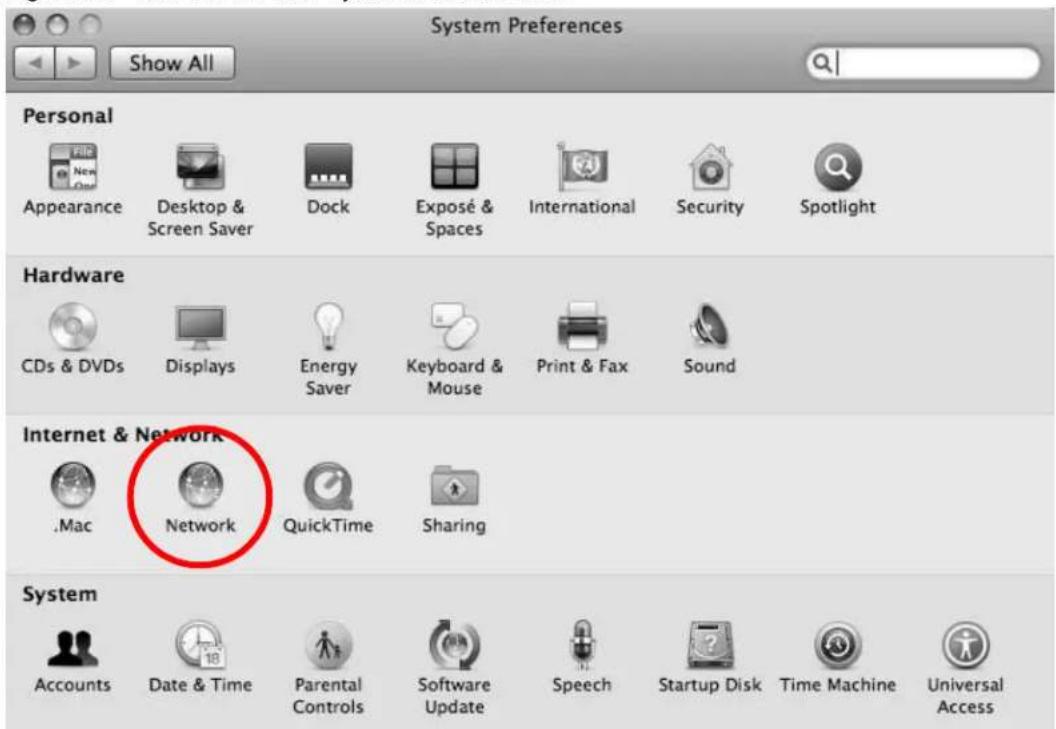
3 When the Network preferences pane opens, select Ethernet from the list of available connection types.
Figure 162 Mac OS X 10.5: Network Preferences > Ethernet
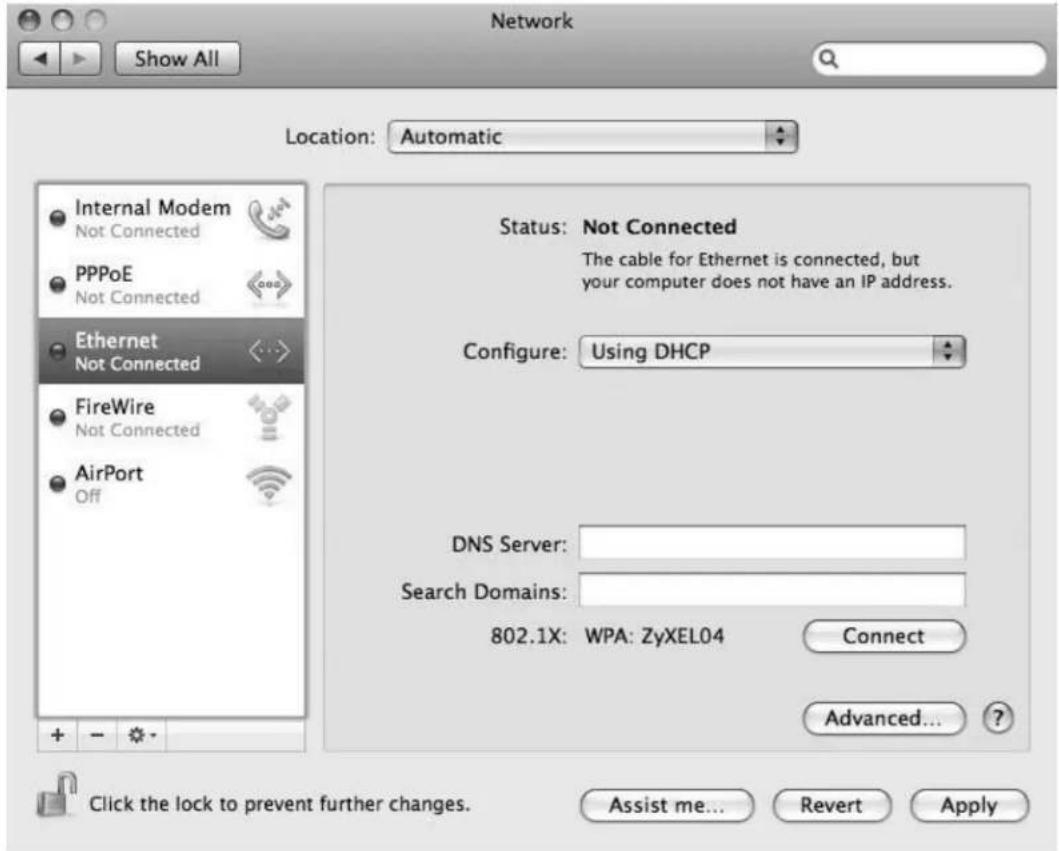
4 From the Configure list, select Using DHCP for dynamically assigned settings.
5 For statically assigned settings, do the following:
• From the Configure list, select Manually.
- In the IP Address field, enter your IP address.
- In the Subnet Mask field, enter your subnet mask.
- In the Router field, enter the IP address of your Device.
Figure 163 Mac OS X 10.5: Network Preferences > Ethernet
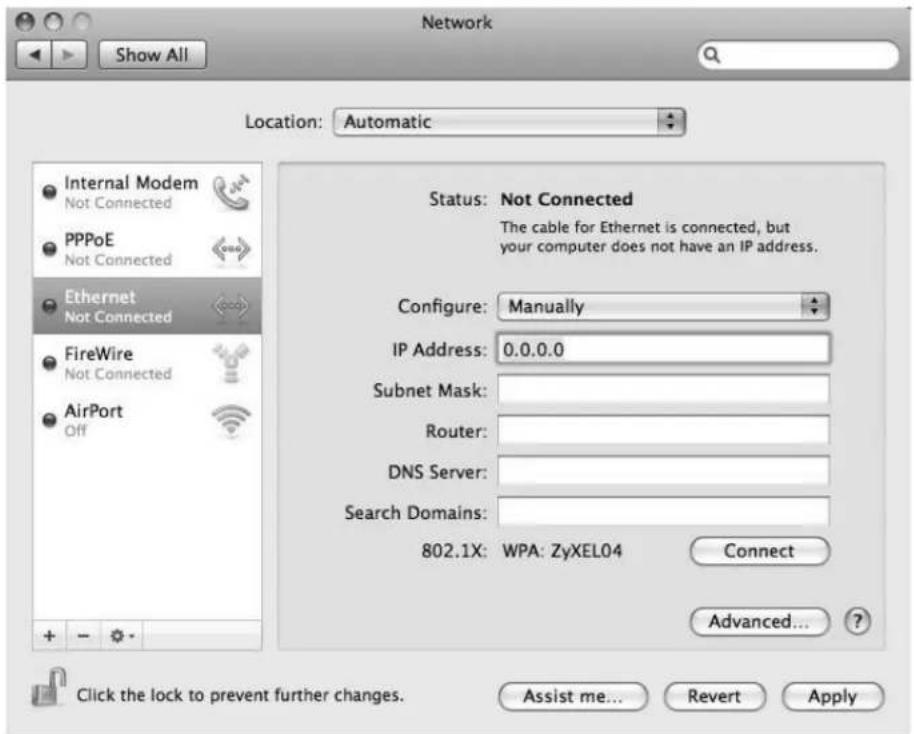
6 Click Apply and close the window.
Verifying Settings
Check your TCP/IP properties by clicking Applications > Utilities > Network Utilities, and then selecting the appropriate Network interface from the Info tab.
Figure 164 Mac OS X 10.5: Network Utility
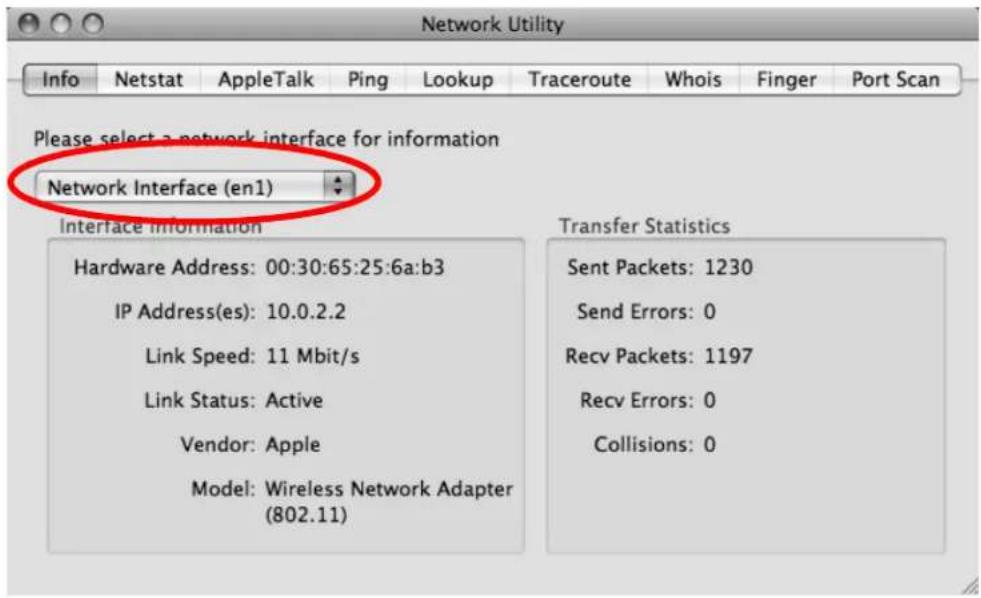
Linux: Ubuntu 8 (GNOME)
This section shows you how to configure your computer's TCP/IP settings in the GNU Object Model Environment (GNOME) using the Ubuntu 8 Linux distribution. The procedure, screens and file locations may vary depending on your specific distribution, release version, and individual configuration. The following screens use the default Ubuntu 8 installation.
Note: Make sure you are logged in as the root administrator.
Follow the steps below to configure your computer IP address in GNOME:
1 Click System > Administration > Network.
Figure 165 Ubuntu 8: System > Administration Menu
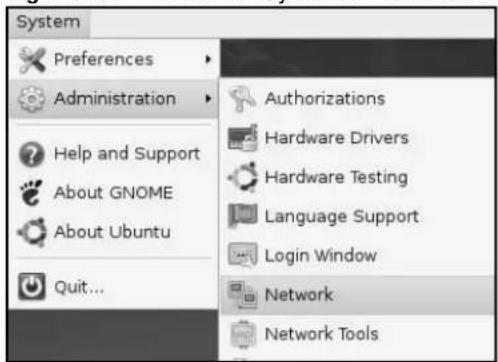
2 When the Network Settings window opens, click Unlock to open the Authenticate window. (By default, the Unlock button is greyed out until clicked.) You cannot make changes to your configuration unless you first enter your admin password.
Figure 166 Ubuntu 8: Network Settings > Connections
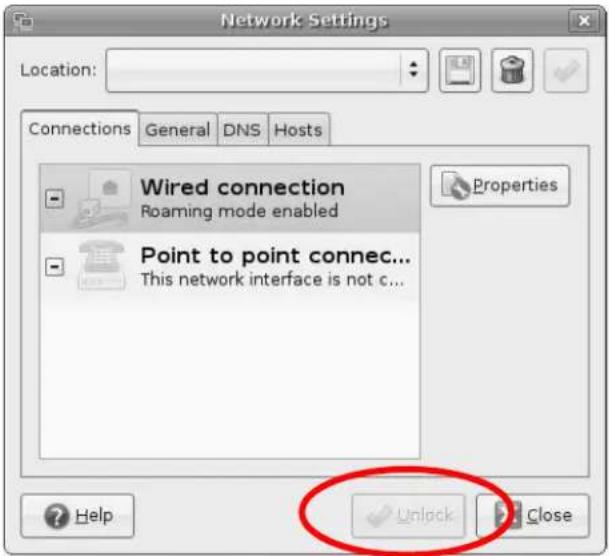
3 In the Authenticate window, enter your admin account name and password then click the Authenticate button.
Figure 167 Ubuntu 8: Administrator Account Authentication
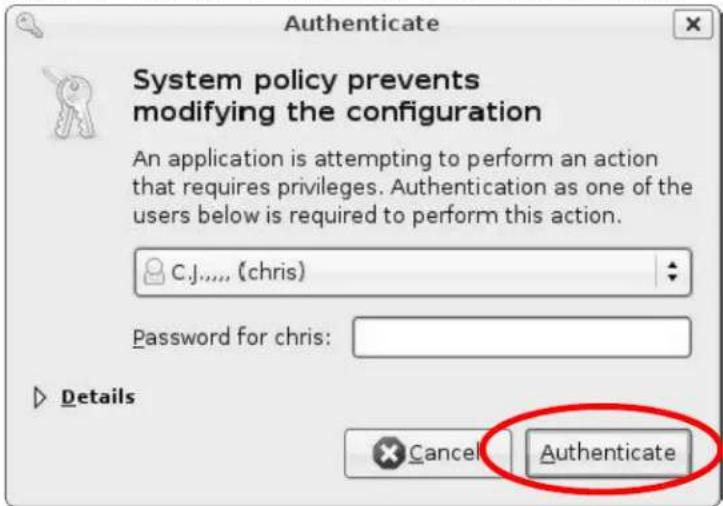
4 In the Network Settings window, select the connection that you want to configure, then click Properties.
Figure 168 Ubuntu 8: Network Settings > Connections
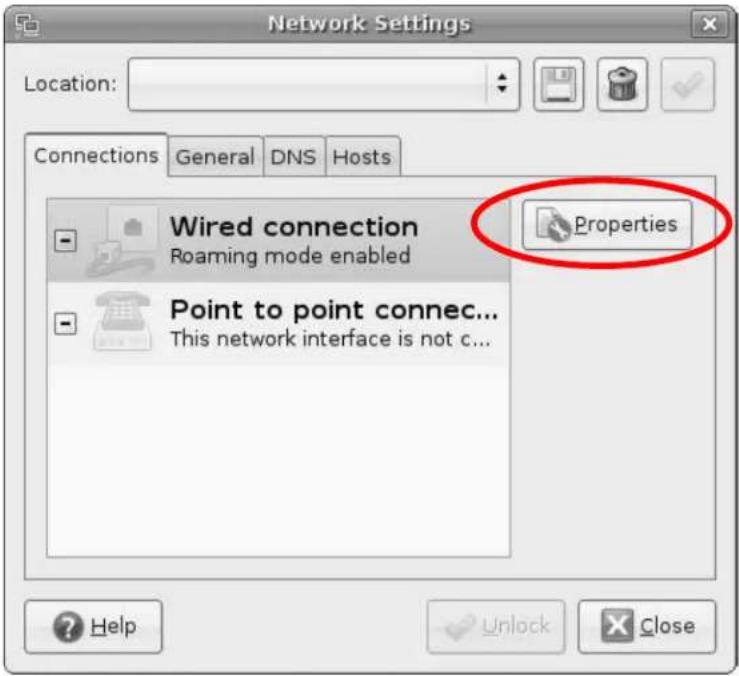
5 The Properties dialog box opens.
Figure 169 Ubuntu 8: Network Settings > Properties
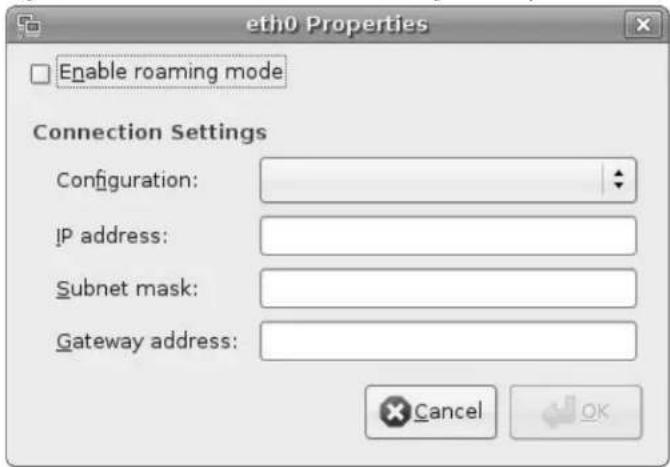
- In the Configuration list, select Automatic Configuration (DHCP) if you have a dynamic IP address.
- In the Configuration list, select Static IP address if you have a static IP address. Fill in the IP address, Subnet mask, and Gateway address fields.
6 Click OK to save the changes and close the Properties dialog box and return to the Network Settings screen.
7 If you know your DNS server IP address(es), click the DNS tab in the Network Settings window and then enter the DNS server information in the fields provided.
Figure 170 Ubuntu 8: Network Settings > DNS
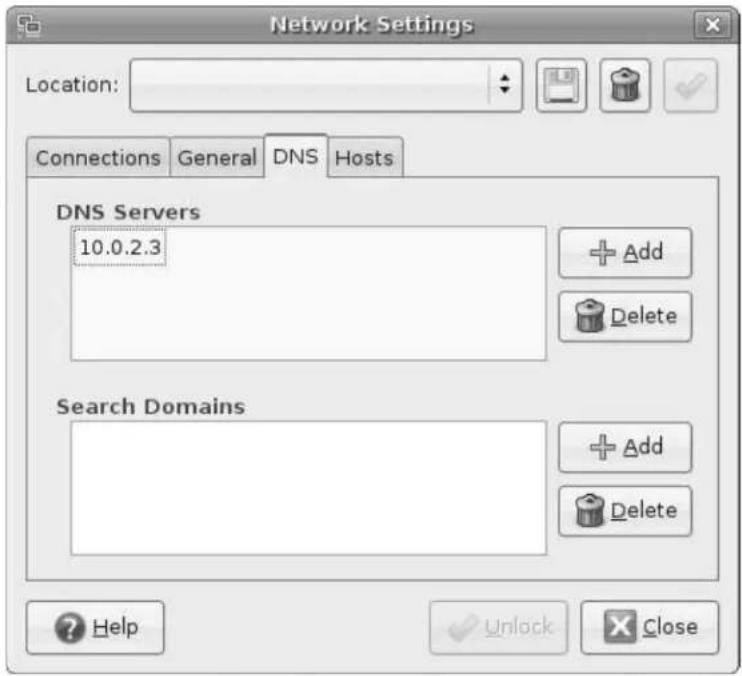
8 Click the Close button to apply the changes.
Verifying Settings
Check your TCP/IP properties by clicking System > Administration > Network Tools, and then selecting the appropriate Network device from the Devices tab. The Interface Statistics column shows data if your connection is working properly.
Figure 171 Ubuntu 8: Network Tools
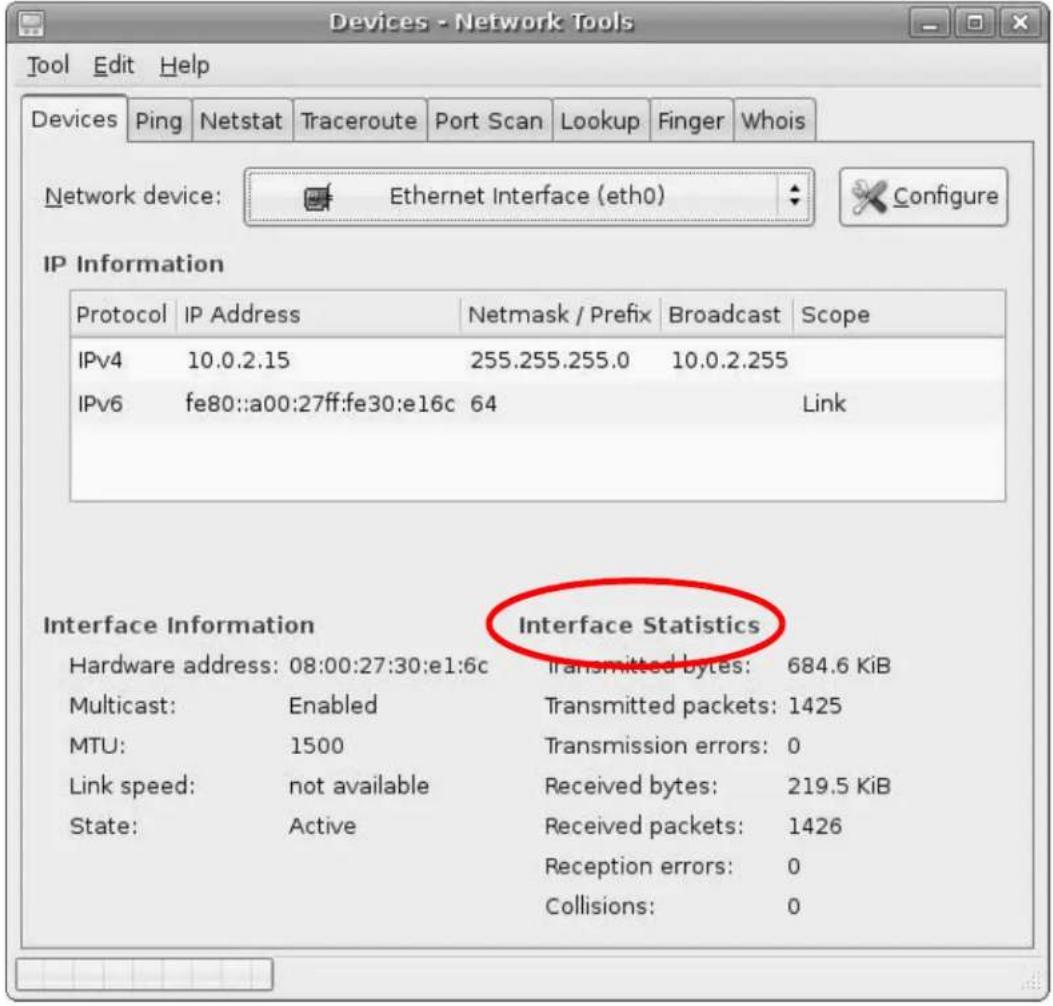
Linux: openSUSE 10.3 (KDE)
This section shows you how to configure your computer's TCP/IP settings in the K Desktop Environment (KDE) using the openSUSE 10.3 Linux distribution. The procedure, screens and file locations may vary depending on your specific distribution, release version, and individual configuration. The following screens use the default openSUSE 10.3 installation.
Note: Make sure you are logged in as the root administrator.
Follow the steps below to configure your computer IP address in the KDE:
1 Click K Menu > Computer > Administrator Settings (YaST).
Figure 172 openSUSE 10.3: K Menu > Computer Menu
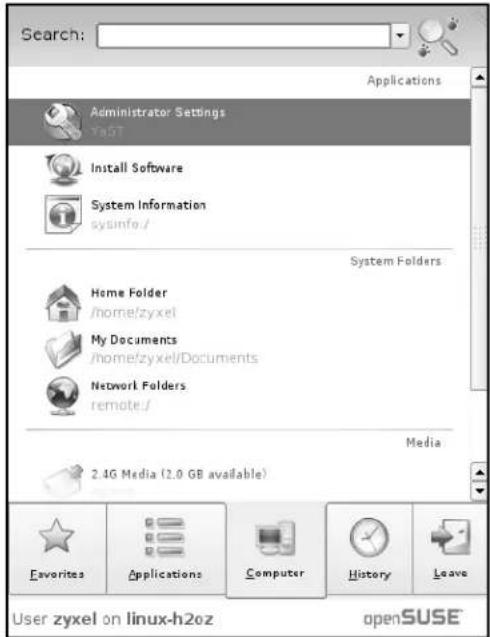
2 When the Run as Root - KDE su dialog opens, enter the admin password and click OK.
Figure 173 openSUSE 10.3: K Menu > Computer Menu
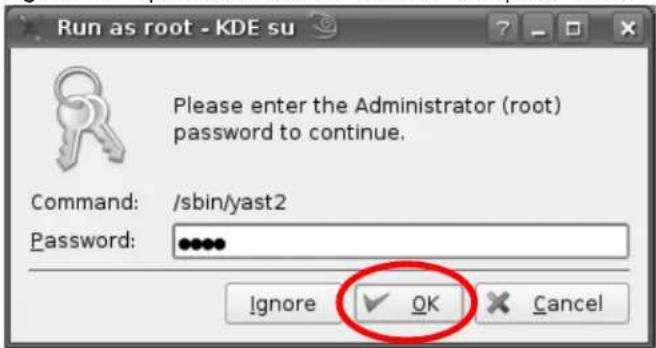
3 When the YaST Control Center window opens, select Network Devices and then click the Network Card icon.
Figure 174 openSUSE 10.3: YaST Control Center
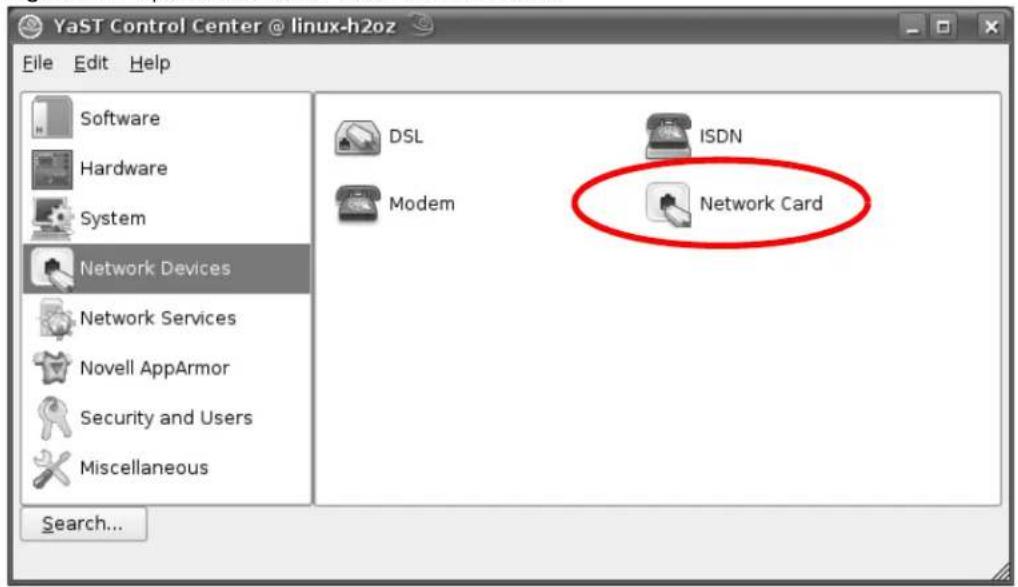
4 When the Network Settings window opens, click the Overview tab, select the appropriate connection Name from the list, and then click the Configure button.
Figure 175 openSUSE 10.3: Network Settings
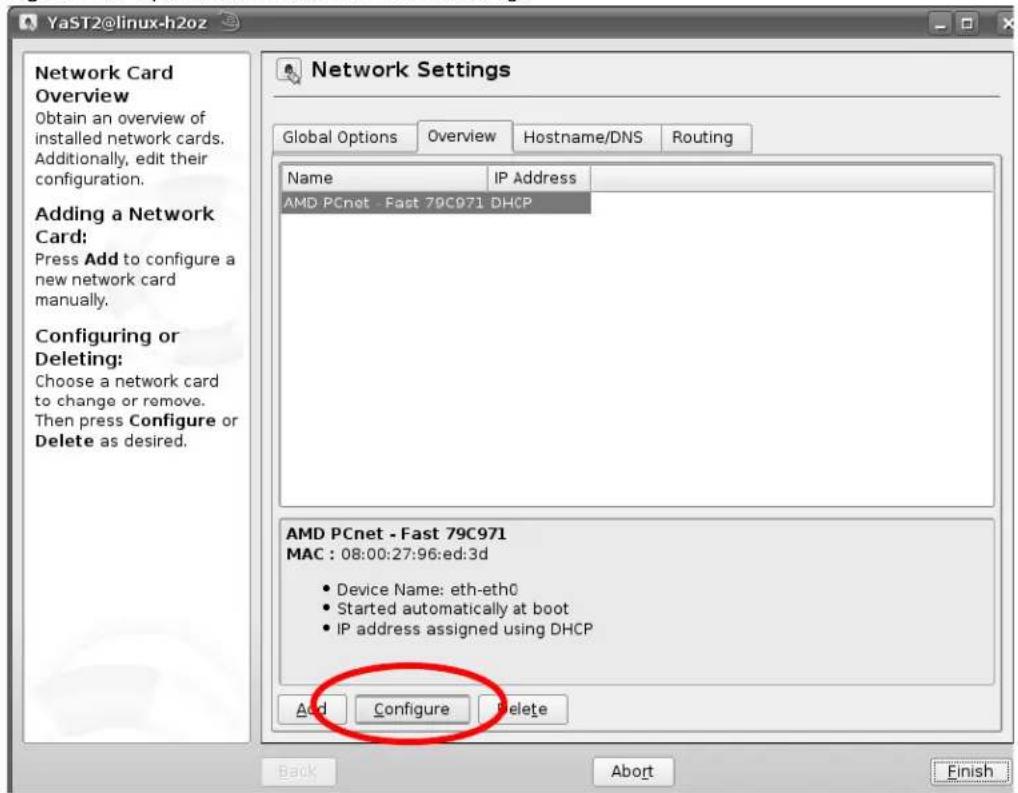
5 When the Network Card Setup window opens, click the Address tab
Figure 176 openSUSE 10.3: Network Card Setup
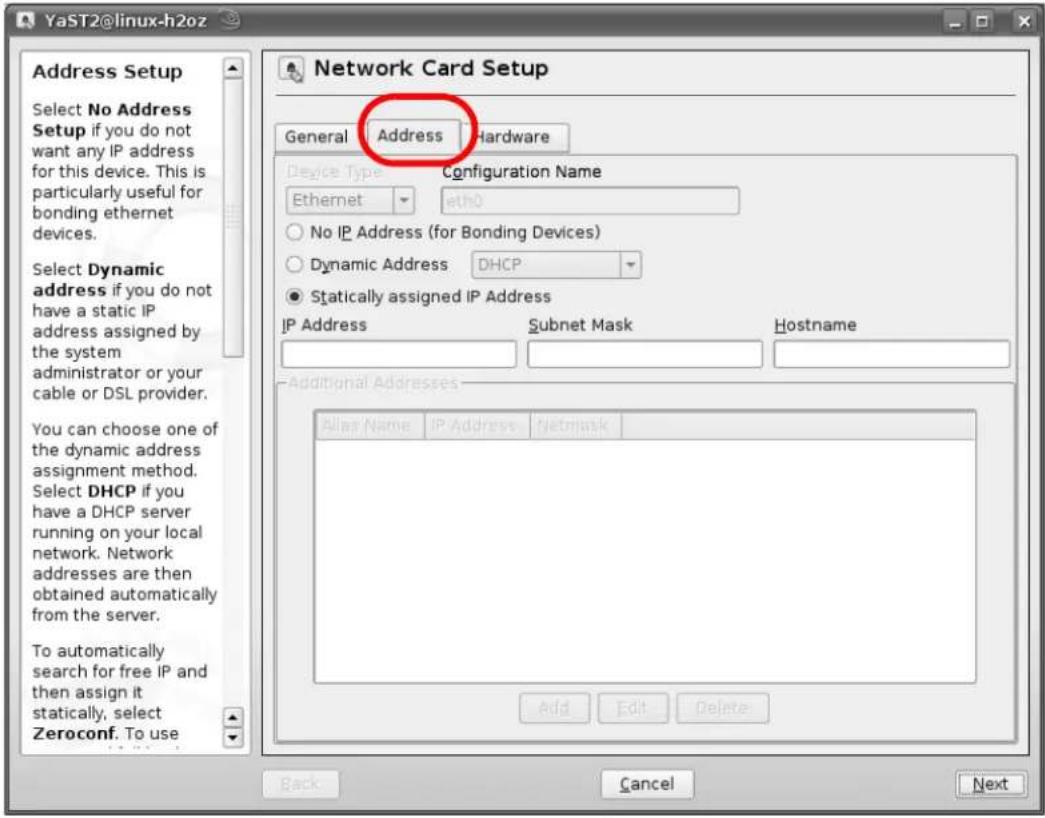
6 Select Dynamic Address (DHCP) if you have a dynamic IP address.
Select Statically assigned IP Address if you have a static IP address. Fill in the IP address, Subnet mask, and Hostname fields.
7 Click Next to save the changes and close the Network Card Setup window.
8 If you know your DNS server IP address(es), click the Hostname/ DNS tab in Network Settings and then enter the DNS server information in the fields provided.
Figure 177 openSUSE 10.3: Network Settings
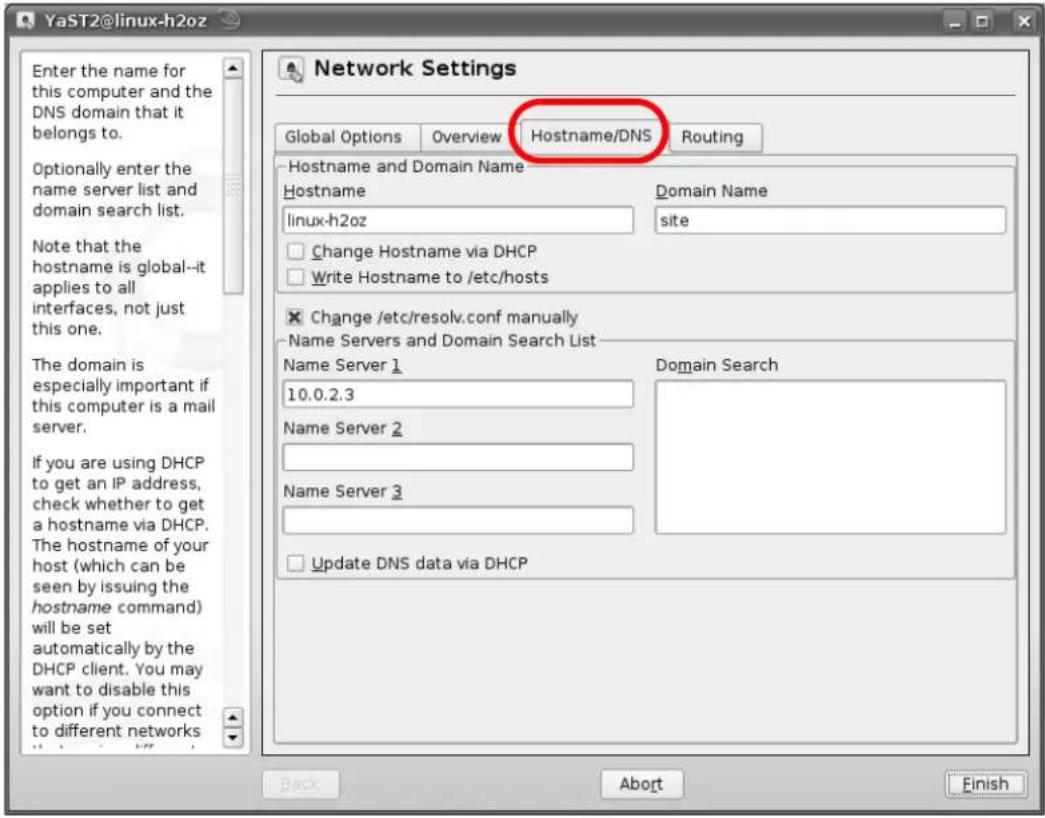
9 Click Finish to save your settings and close the window.
Verifying Settings
Click the KNetwork Manager icon on the Task bar to check your TCP/IP properties. From the Options sub-menu, select Show Connection Information.
Figure 178 openSUSE 10.3: KNetwork Manager
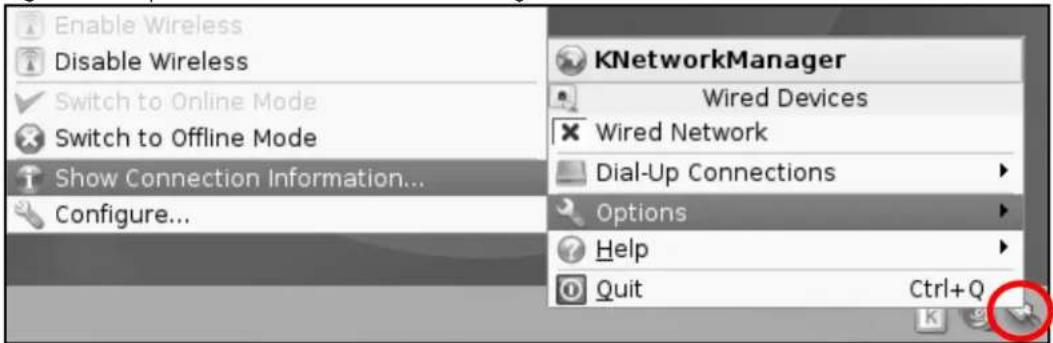
When the Connection Status - KNetwork Manager window opens, click the Statistics tab to see if your connection is working properly.
Figure 179 openSUSE: Connection Status - KNetwork Manager
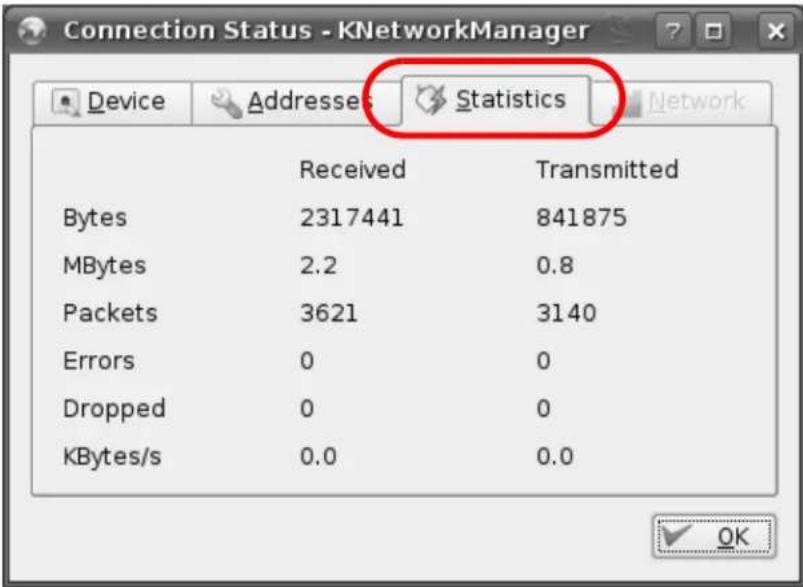
Pop-up Windows, JavaScript and Java Permissions
In order to use the web configurator you need to allow:
- Web browser pop-up windows from your device.
- JavaScript (enabled by default).
- Java permissions (enabled by default).
Note: Internet Explorer 6 screens are used here. Screens for other Internet Explorer versions may vary.
Internet Explorer Pop-up Blockers
You may have to disable pop-up blocking to log into your device.
Either disable pop-up blocking (enabled by default in Windows XP SP (Service Pack) 2) or allow pop-up blocking and create an exception for your device's IP address.
Disable Pop-up Blockers
1 In Internet Explorer, select Tools, Pop-up Blocker and then select Turn Off Pop-up Blocker.
Figure 180 Pop-up Blocker
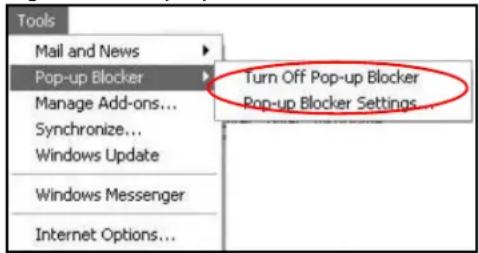
You can also check if pop-up blocking is disabled in the Pop-up Blocker section in the Privacy tab.
1 In Internet Explorer, select Tools, Internet Options, Privacy.
2 Clear the Block pop-ups check box in the Pop-up Blocker section of the screen. This disables any web pop-up blockers you may have enabled.
Figure 181 Internet Options: Privacy
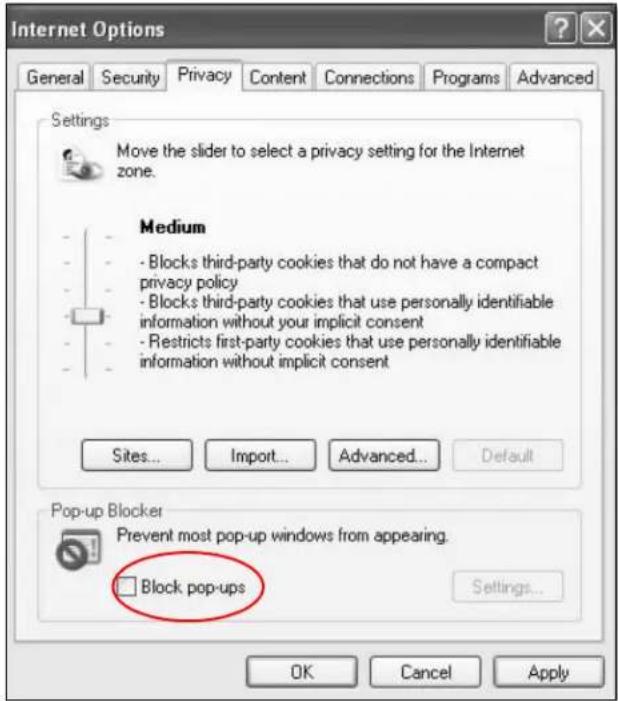
3 Click Apply to save this setting.
Enable Pop-up Blockers with Exceptions
Alternatively, if you only want to allow pop-up windows from your device, see the following steps.
1 In Internet Explorer, select Tools, Internet Options and then the Privacy tab.
2 Select Settings...to open the Pop-up Blocker Settings screen.
Figure 182 Internet Options: Privacy
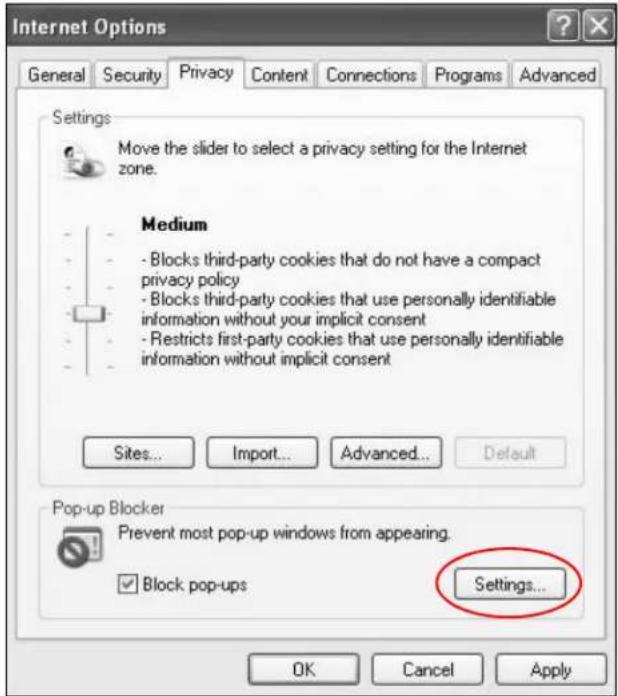
3 Type the IP address of your device (the web page that you do not want to have blocked) with the prefix "http://". For example, http://192.168.167.1.
4 Click Add to move the IP address to the list of Allowed sites.
Figure 183 Pop-up Blocker Settings
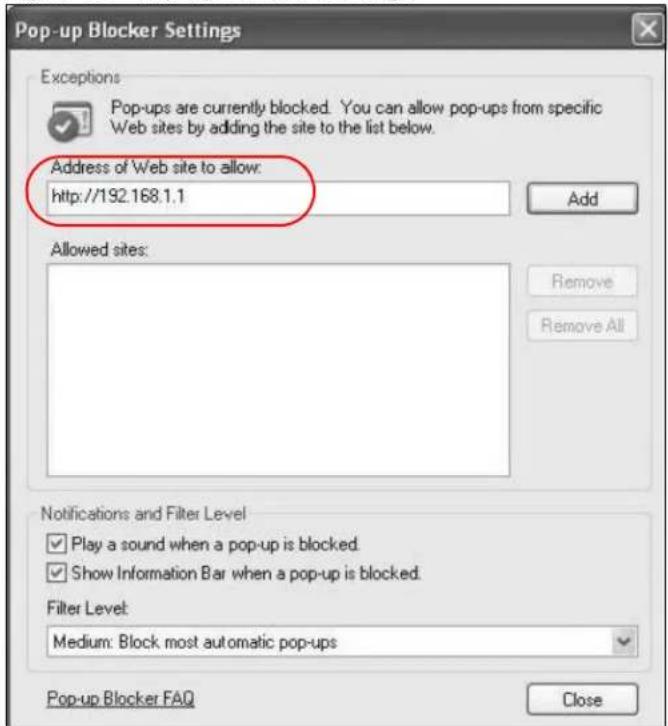
5 Click Close to return to the Privacy screen.
6 Click Apply to save this setting.
JavaScript
If pages of the web configurator do not display properly in Internet Explorer, check that JavaScript are allowed.
1 In Internet Explorer, click Tools, Internet Options and then the Security tab.
Figure 184 Internet Options: Security
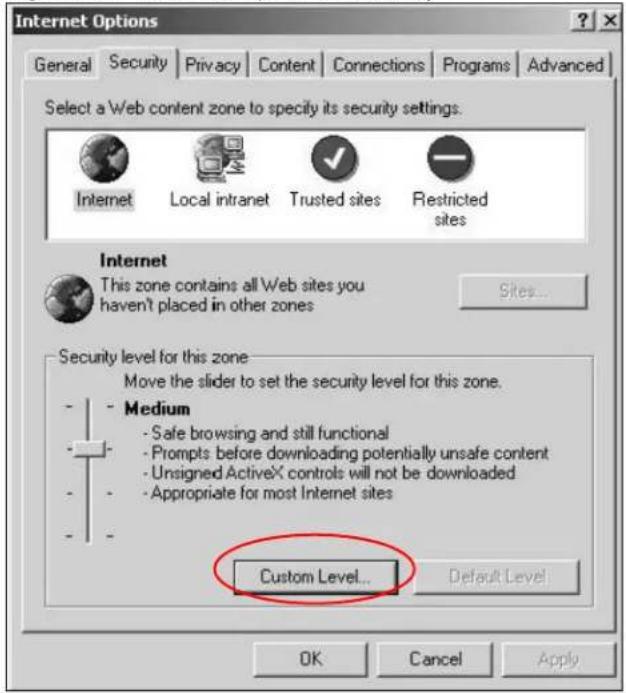
2 Click the Custom Level... button.
3 Scroll down to Scripting.
4 Under Active scripting make sure that Enable is selected (the default).
5 Under Scripting of Java applets make sure that Enable is selected (the default).
6 Click OK to close the window.
Figure 185 Security Settings - Java Scripting
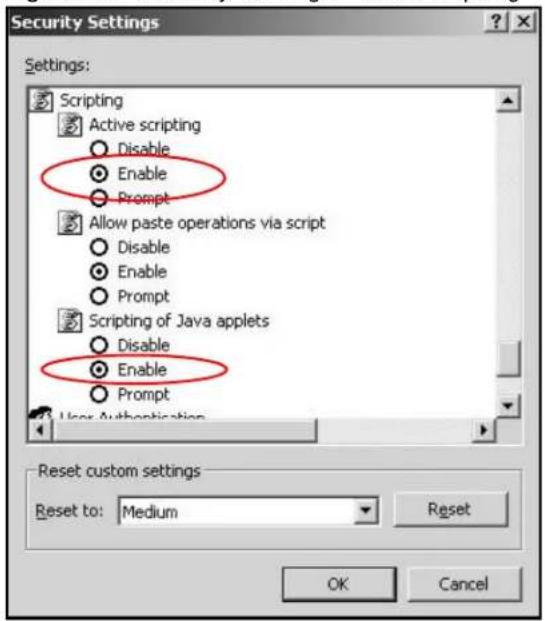
Java Permissions
1 From Internet Explorer, click Tools, Internet Options and then the Security tab.
2 Click the Custom Level... button.
3 Scroll down to Microsoft VM.
4 Under Java permissions make sure that a safety level is selected.
5 Click OK to close the window.
Figure 186 Security Settings - Java
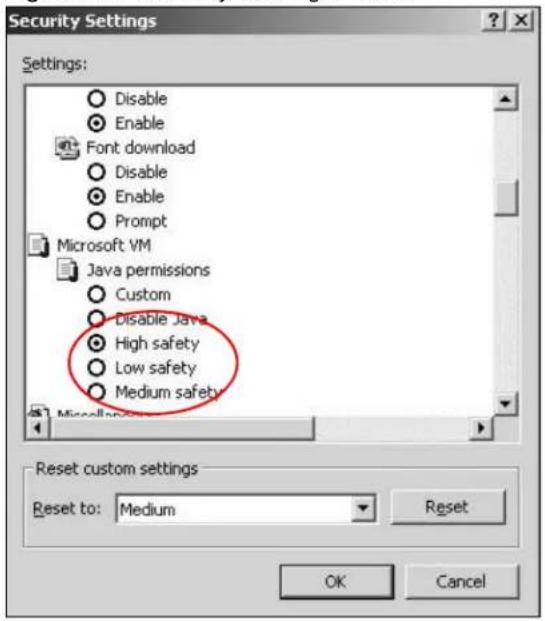
JAVA (Sun)
1 From Internet Explorer, click Tools, Internet Options and then the Advanced tab.
2 Make sure that Use Java 2 for
Figure 187 Java (Sun)
![Internet Options General Security Privacy Content Connections Programs Advanced Settings: Use inline AutoComplete Use Passive FTP (for firewall and DSL modem compatibility) Use smooth scrolling HTTP 1.1 settings Use HTTP 1.1 Use HTTP 1.1 through proxy connections Java [Sun] Use Java 2 v1.4.1_07 for (requires restart) Microsoft VM Java console enabled (requires restart) Java logging enabled JIT compiler for virtual machine enabled (requires restart) Multimedia Always show Internet Explorer (5.0 or later) Radio toolbar Don't display online media content in the media bar Enable Automatic Image Resizing Restore Defaults OK Cancel Apply](/content/2026/05/861498/images/8c84cc333511864615a1075fcdde5f66d5826e8f6c2e5aa99399d2c2bb5567bf.jpg)
Mozilla Firefox
Mozilla Firefox 2.0 screens are used here. Screens for other versions may vary.
You can enable Java, JavaScript and pop-ups in one screen. Click Tools, then click Options in the screen that appears.
Figure 188 Mozilla Firefox: Tools > Options
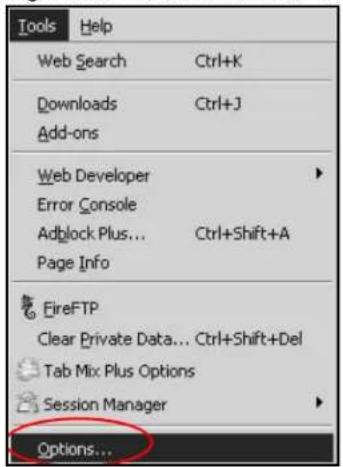
Click Content.to show the screen below. Select the check boxes as shown in the following screen.
Figure 189 Mozilla Firefox Content Security
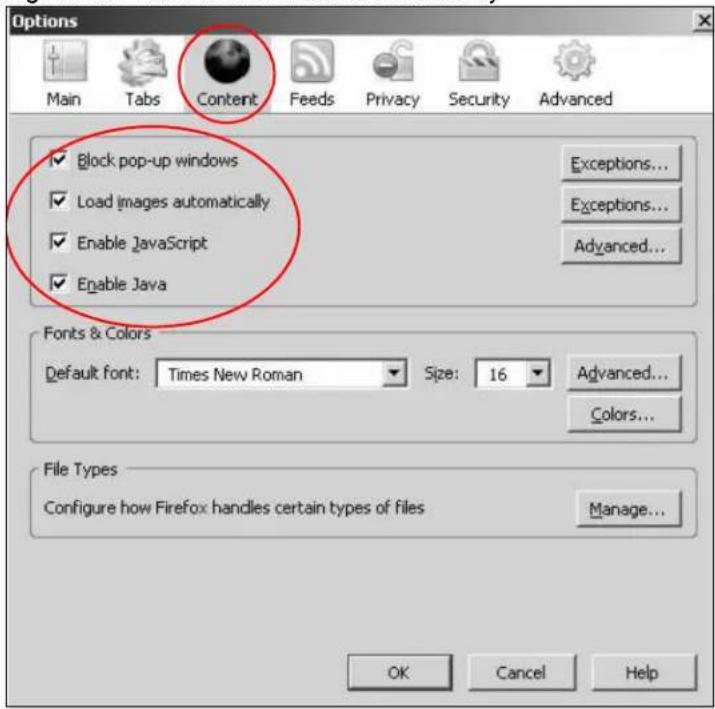
Common Services
The following table lists some commonly-used services and their associated protocols and port numbers. For a comprehensive list of port numbers, ICMP type/code numbers and services, visit the IANA (Internet Assigned Number Authority) web site.
- Name: This is a short, descriptive name for the service. You can use this one or create a different one, if you like.
- Protocol: This is the type of IP protocol used by the service. If this is TCP/UDP, then the service uses the same port number with TCP and UDP. If this is USER-DEFINED, the Port(s) is the IP protocol number, not the port number.
- Port(s): This value depends on the Protocol. Please refer to RFC 1700 for further information about port numbers.
- If the Protocol is TCP, UDP, or TCP/UDP, this is the IP port number.
- If the Protocol is USER, this is the IP protocol number.
- Description: This is a brief explanation of the applications that use this service or the situations in which this service is used.
Table 96 Commonly Used Services
| NAME PROTOCOL PORT(S) DESCRIPTION | |||
| AH(IPSEC_TUNNEL) | User-Defined 51 The | PSEC AH (Authentication Header)tunneling protocol uses this service. | |
| AIM/New-ICQ | TCP | 5190 | AOL's Internet Messenger service. It is also used as a listening port by ICQ. |
| AUTH | TCP | 113 | Authentication protocol used by some servers. |
| BGP | TCP | 179 | Border Gateway Protocol. |
| BOOTP_CLIENT | UDP | 68 | DHCP Client. |
| BOOTP_SERVER | UDP | 67 | DHCP Server. |
| CU-SEEME | TCP | 7648 | A popular videoconferencing solution from White Pines Software. |
| UDP | 24032 | ||
| DNS | TCP/UDP | 53 | Domain Name Server, a service that matches web names (for example www.zyxel.com) to IP numbers. |
| ESP(IPSEC_TUNNEL) | User-Defined 50 The | PSEC ESP (Encapsulation Security Protocol) tunneling protocol uses this service. | |
| FINGER | TCP | 79 | Finger is a UNIX or Internet related command that can be used to find out if a user is logged on. |
| FTP | TCP | 20 | File Transfer Program, a program to enable fast transfer of files, including large files that may not be possible by e-mail. |
| TCP | 21 | ||
| H.323 | TCP | 1720 | NetMeeting uses this protocol. |
| NAME | PROTOCOL | PORT(S) | DESCRIPTION |
| HTTP | TCP | 80 | Hyper Text Transfer Protocol - a client/server protocol for the world wide web. |
| HTTPS | TCP | 443 | HTTPS is a secured http session often used in e-commerce. |
| ICMP | User-Defined | 1 | Internet Control Message Protocol is often used for diagnostic or routing purposes. |
| ICQ | UDP | 4000 | This is a popular Internet chat program. |
| IGMP (MULTICAST) | User-Defined | 2 | Internet Group Management Protocol is used when sending packets to a specific group of hosts. |
| IKE | UDP | 500 | The Internet Key Exchange algorithm is used for key distribution and management. |
| IRC | TCP/UDP | 6667 | This is another popular Internet chat program. |
| MSN Messenger | TCP | 1863 | Microsoft Networks' messenger service uses this protocol. |
| NEW-ICQ | TCP | 5190 | An Internet chat program. |
| NEWS | TCP | 144 | A protocol for news groups. |
| NFS | UDP | 2049 | Network File System - NFS is a client/server distributed file service that provides transparent file sharing for network environments. |
| NNTP | TCP | 119 | Network News Transport Protocol is the delivery mechanism for the USENET newsgroup service. |
| PING | User-Defined | 1 | Packet INternet Groper is a protocol that sends out ICMP echo requests to test whether or not a remote host is reachable. |
| POP3 | TCP | 110 | Post Office Protocol version 3 lets a client computer get e-mail from a POP3 server through a temporary connection (TCP/IP or other). |
| PPTP | TCP | 1723 | Point-to-Point Tunneling Protocol enables secure transfer of data over public networks. This is the control channel. |
| PPTP_TUNNEL (GRE) | User-Defined 47 PPTP | (Point-to-Point Tunneling Protocol) enables secure transfer of data over public networks. This is the data channel. | |
| RCMD | TCP | 512 | Remote Command Service. |
| REAL_AUDIO | TCP | 7070 | A streaming audio service that enables real time sound over the web. |
| REXEC | TCP | 514 | Remote Execution Daemon. |
| RLOGIN | TCP | 513 | Remote Login. |
| RTELNET | TCP | 107 | Remote Telnet. |
| RTSP | TCP/UDP | 554 | The Real Time Streaming (media control) Protocol (RTSP) is a remote control for multimedia on the Internet. |
| SFTP | TCP | 115 | Simple File Transfer Protocol. |
| SMTP | TCP | 25 | Simple Mail Transfer Protocol is the message-exchange standard for the Internet. SMTP enables you to move messages from one e-mail server to another. |
| SNMP | TCP/UDP | 161 | Simple Network Management Program. |
| SNMP-TRAPS | TCP/UDP | 162 | Traps for use with the SNMP (RFC:1215). |
| SQL-NET | TCP | 1521 | Structured Query Language is an interface to access data on many different types of database systems, including mainframes, midrange systems, UNIX systems and network servers. |
| SSH | TCP/UDP | 22 | Secure Shell Remote Login Program. |
| STRM WORKS | UDP | 1558 | Stream Works Protocol. |
| SYSLOG | UDP | 514 | Syslog allows you to send system logs to a UNIX server. |
| TACACS | UDP | 49 | Login Host Protocol used for (Terminal Access Controller Access Control System). |
| TELNET | TCP | 23 | Telnet is the login and terminal emulation protocol common on the Internet and in UNIX environments. It operates over TCP/IP networks. Its primary function is to allow users to log into remote host systems. |
| TFTP | UDP | 69 | Trivial File Transfer Protocol is an Internet file transfer protocol similar to FTP, but uses the UDP (User Datagram Protocol) rather than TCP (Transmission Control Protocol). |
| VDOLIVE | TCP | 7000 | Another videoconferencing solution. |
Overview
IPv6 (Internet Protocol version 6), is designed to enhance IP address size and features. The increase in IPv6 address size to 128 bits (from the 32-bit IPv4 address) allows up to 3.4 × 10^38 IP addresses.
IPv6 Addressing
The 128-bit IPv6 address is written as eight 16-bit hexadecimal blocks separated by colons (:) . This is an example IPv6 address 2001:0db8:1a2b:0015:0000:0000:1a2f:0000.
IPv6 addresses can be abbreviated in two ways:
- Leading zeros in a block can be omitted. So 2001:0db8:1a2b:0015:0000:0000:1a2f:0000 can be written as 2001:db8:1a2b:15:0:0:1a2f:0.
- Any number of consecutive blocks of zeros can be replaced by a double colon. A double colon can only appear once in an IPv6 address. So 2001:0db8:0000:0000:1a2f:0000:0000:0015 can be written as 2001:0db8::1a2f:0000:0000:0015, 2001:0db8:0000:0000:1a2f::0015, 2001:db8::1a2f:0:0:15 or 2001:db8:0:0:1a2f::15.
Prefix and Prefix Length
Similar to an IPv4 subnet mask, IPv6 uses an address prefix to represent the network address. An IPv6 prefix length specifies how many most significant bits (start from the left) in the address compose the network address. The prefix length is written as "/x" where x is a number. For example,
2001:db8:1a2b:15::1a2f:0/32
means that the first 32 bits (2001:db8) is the subnet prefix.
Link-local Address
A link-local address uniquely identifies a device on the local network (the LAN). It is similar to a "private IP address" in IPv4. You can have the same link-local address on multiple interfaces on a device. A link-local unicast address has a predefined prefix of fe80::/10. The link-local unicast address format is as follows.
Table 97 Link-local Unicast Address Format
| 1111 1110 10 0 Interface ID | ||
| 10 bits 54 bits 64 bits |
Global Address
A global address uniquely identifies a device on the Internet. It is similar to a "public IP address" in IPv4. A global unicast address starts with a 2 or 3.
Unspecified Address
An unspecified address (0:0:0:0:0:0:0 or ::) is used as the source address when a device does not have its own address. It is similar to "0.0.0.0" in IPv4.
Loopback Address
A loopback address (0:0:0:0:0:0:0:1 or ::1) allows a host to send packets to itself. It is similar to "127.0.0.1" in IPv4.
Multicast Address
In IPv6, multicast addresses provide the same functionality as IPv4 broadcast addresses. Broadcasting is not supported in IPv6. A multicast address allows a host to send packets to all hosts in a multicast group.
Multicast scope allows you to determine the size of the multicast group. A multicast address has a predefined prefix of ff00::/8. The following table describes some of the predefined multicast addresses.
Table 98 Predefined Multicast Address
| MULTICAST ADDRESS DESCRIPTION | |
| FF01:0:0:0:0:0:0:1 All hosts on a | local node. |
| FF01:0:0:0:0:0:0:2 All routers on | a local node. |
| FF02:0:0:0:0:0:0:1 All hosts on a | local connected link. |
| FF02:0:0:0:0:0:0:2 All routers on | a local connected link. |
| FF05:0:0:0:0:0:0:2 All routers on | a local site. |
| FF05:0:0:0:0:0:1:3 All DHCP severs on a local site. | |
The following table describes the multicast addresses which are reserved and can not be assigned to a multicast group.
Table 99 Reserved Multicast Address
Both an IPv6 address and IPv6 subnet mask compose of 128-bit binary digits, which are divided into eight 16-bit blocks and written in hexadecimal notation. Hexadecimal uses four bits for each character (1 \~ 10, A \~ F). Each block's 16 bits are then represented by four hexadecimal characters. For example, FFFF:FFFF:FFFF:FFFF:FC00:0000:0000:0000.
Interface ID
In IPv6, an interface ID is a 64-bit identifier. It identifies a physical interface (for example, an Ethernet port) or a virtual interface (for example, the management IP address for a VLAN). One interface should have a unique interface ID.
EUI-64
The EUI-64 (Extended Unique Identifier) defined by the IEEE (Institute of Electrical and Electronics Engineers) is an interface ID format designed to adapt with IPv6. It is derived from the 48-bit (6-byte) Ethernet MAC address as shown next. EUI-64 inserts the hex digits fffe between the third and fourth bytes of the MAC address and complements the seventh bit of the first byte of the MAC address. See the following example.

With stateless autoconfiguration in IPv6, addresses can be uniquely and automatically generated. Unlike DHCPv6 (Dynamic Host Configuration Protocol version six) which is used in IPv6 stateful autoconfiguration, the owner and status of addresses don't need to be maintained by a DHCP server. Every IPv6 device is able to generate its own and unique IP address automatically when IPv6 is initiated on its interface. It combines the prefix and the interface ID (generated from its own Ethernet MAC address, see Interface ID and EUI-64) to form a complete IPv6 address.
When IPv6 is enabled on a device, its interface automatically generates a link-local address (beginning with fe80).
When the interface is connected to a network with a router and the Device is set to automatically obtain an IPv6 network prefix from the router for the interface, it generates ^3 another address which
combines its interface ID and global and subnet information advertised from the router. This is a routable global IP address.
DHCPv6
The Dynamic Host Configuration Protocol for IPv6 (DHCPv6, RFC 3315) is a server-client protocol that allows a DHCP server to assign and pass IPv6 network addresses, prefixes and other configuration information to DHCP clients. DHCPv6 servers and clients exchange DHCP messages using UDP.
Each DHCP client and server has a unique DHCP Unique IDentifier (DUID), which is used for identification when they are exchanging DHCPv6 messages. The DUID is generated from the MAC address, time, vendor assigned ID and/or the vendor's private enterprise number registered with the IANA. It should not change over time even after you reboot the device.
Identity Association
An Identity Association (IA) is a collection of addresses assigned to a DHCP client, through which the server and client can manage a set of related IP addresses. Each IA must be associated with exactly one interface. The DHCP client uses the IA assigned to an interface to obtain configuration from a DHCP server for that interface. Each IA consists of a unique IAID and associated IP information.
The IA type is the type of address in the IA. Each IA holds one type of address. IA_NA means an identity association for non-temporary addresses and IA_TA is an identity association for temporary addresses. An IA_NA option contains the T1 and T2 fields, but an IA_TA option does not. The DHCPv6 server uses T1 and T2 to control the time at which the client contacts with the server to extend the lifetimes on any addresses in the IA_NA before the lifetimes expire. After T1, the client sends the server (S1) (from which the addresses in the IA_NA were obtained) a Renew message. If the time T2 is reached and the server does not respond, the client sends a Rebind message to any available server (S2). For an IA_TA, the client may send a Renew or Rebind message at the client's discretion.
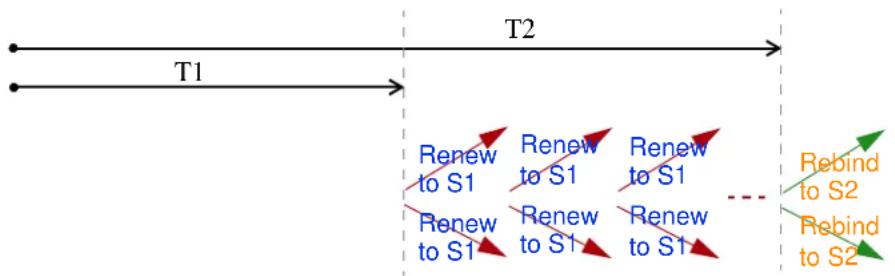
flowchart
graph LR
    A["T1"] --> B["T2"]
    B --> C["..."]
    C --> D["Rebind to S2"]
    C --> E["Rebind to S2"]
    B --> F["Renew to S1"]
    B --> G["Renew to S1"]
    B --> H["Renew to S1"]
    B --> I["Renew to S1"]
    style A fill:#fff,stroke:#000
    style B fill:#fff,stroke:#000
    style C fill:#fff,stroke:#000
    style D fill:#fff,stroke:#000
    style E fill:#fff,stroke:#000
    style F fill:#fff,stroke:#000
    style G fill:#fff,stroke:#000
    style H fill:#fff,stroke:#000
    style I fill:#fff,stroke:#000
DHCP Relay Agent
A DHCP relay agent is on the same network as the DHCP clients and helps forward messages between the DHCP server and clients. When a client cannot use its link-local address and a well-known multicast address to locate a DHCP server on its network, it then needs a DHCP relay agent to send a message to a DHCP server that is not attached to the same network.
The DHCP relay agent can add the remote identification (remote-ID) option and the interface-ID option to the Relay-Forward DHCPv6 messages. The remote-ID option carries a user-defined string,
such as the system name. The interface-ID option provides slot number, port information and the VLAN ID to the DHCPv6 server. The remote-ID option (if any) is stripped from the Relay-Reply messages before the relay agent sends the packets to the clients. The DHCP server copies the interface-ID option from the Relay-Forward message into the Relay-Reply message and sends it to the relay agent. The interface-ID should not change even after the relay agent restarts.
Prefix Delegation
Prefix delegation enables an IPv6 router to use the IPv6 prefix (network address) received from the ISP (or a connected uplink router) for its LAN. The Device uses the received IPv6 prefix (for example, 2001:db2::/48) to generate its LAN IP address. Through sending Router Advertisements (RAs) regularly by multicast, the Device passes the IPv6 prefix information to its LAN hosts. The hosts then can use the prefix to generate their IPv6 addresses.
ICMPv6
Internet Control Message Protocol for IPv6 (ICMPv6 or ICMP for IPv6) is defined in RFC 4443. ICMPv6 has a preceding Next Header value of 58, which is different from the value used to identify ICMP for IPv4. ICMPv6 is an integral part of IPv6. IPv6 nodes use ICMPv6 to report errors encountered in packet processing and perform other diagnostic functions, such as "ping".
Neighbor Discovery Protocol (NDP)
The Neighbor Discovery Protocol (NDP) is a protocol used to discover other IPv6 devices and track neighbor's reachability in a network. An IPv6 device uses the following ICMPv6 messages types:
- Neighbor solicitation: A request from a host to determine a neighbor's link-layer address (MAC address) and detect if the neighbor is still reachable. A neighbor being “reachable” means it responds to a neighbor solicitation message (from the host) with a neighbor advertisement message.
- Neighbor advertisement: A response from a node to announce its link-layer address.
- Router solicitation: A request from a host to locate a router that can act as the default router and forward packets.
- Router advertisement: A response to a router solicitation or a periodical multicast advertisement from a router to advertise its presence and other parameters.
IPv6 Cache
An IPv6 host is required to have a neighbor cache, destination cache, prefix list and default router list. The Device maintains and updates its IPv6 caches constantly using the information from response messages. In IPv6, the Device configures a link-local address automatically, and then sends a neighbor solicitation message to check if the address is unique. If there is an address to be resolved or verified, the Device also sends out a neighbor solicitation message. When the Device receives a neighbor advertisement in response, it stores the neighbor's link-layer address in the neighbor cache. When the Device uses a router solicitation message to query for a router and receives a router advertisement message, it adds the router's information to the neighbor cache, prefix list and destination cache. The Device creates an entry in the default router list cache if the router can be used as a default router.
When the Device needs to send a packet, it first consults the destination cache to determine the next hop. If there is no matching entry in the destination cache, the Device uses the prefix list to
determine whether the destination address is on-link and can be reached directly without passing through a router. If the address is unlink, the address is considered as the next hop. Otherwise, the Device determines the next-hop from the default router list or routing table. Once the next hop IP address is known, the Device looks into the neighbor cache to get the link-layer address and sends the packet when the neighbor is reachable. If the Device cannot find an entry in the neighbor cache or the state for the neighbor is not reachable, it starts the address resolution process. This helps reduce the number of IPv6 solicitation and advertisement messages.
Multicast Listener Discovery
The Multicast Listener Discovery (MLD) protocol (defined in RFC 2710) is derived from IPv4's Internet Group Management Protocol version 2 (IGMPv2). MLD uses ICMPv6 message types, rather than IGMP message types. MLDv1 is equivalent to IGMPv2 and MLDv2 is equivalent to IGMPv3.
MLD allows an IPv6 switch or router to discover the presence of MLD listeners who wish to receive multicast packets and the IP addresses of multicast groups the hosts want to join on its network.
MLD snooping and MLD proxy are analogous to IGMP snooping and IGMP proxy in IPv4.
MLD filtering controls which multicast groups a port can join.
MLD Messages
A multicast router or switch periodically sends general queries to MLD hosts to update the multicast forwarding table. When an MLD host wants to join a multicast group, it sends an MLD Report message for that address.
An MLD Done message is equivalent to an IGMP Leave message. When an MLD host wants to leave a multicast group, it can send a Done message to the router or switch. The router or switch then sends a group-specific query to the port on which the Done message is received to determine if other devices connected to this port should remain in the group.
Example - Enabling IPv6 on Windows XP/2003/Vista
By default, Windows XP and Windows 2003 support IPv6. This example shows you how to use the ipv6 install command on Windows XP/2003 to enable IPv6. This also displays how to use the ipconfig command to see auto-generated IP addresses.
C:\>ipv6 install
Installing...
Succeeded.

C:\>ipconfig

Windows IP Configuration

Ethernet adapter Local Area Connection:

Connection-specific DNS Suffix . :
IP Address. . . . . . . . . . . . : 10.1.1.46
Subnet Mask . . . . . . . . . . . . : 255.255.255.0
IP Address. . . . . . . . . . . . . : fe80::2d0:59ff:feb8:103c%4
Default Gateway . . . . . . . . . : 10.1.1.254
IPv6 is installed and enabled by default in Windows Vista. Use the ipconfig command to check your automatic configured IPv6 address as well. You should see at least one IPv6 address available for the interface on your computer.
Example - Enabling DHCPv6 on Windows XP
Windows XP does not support DHCPv6. If your network uses DHCPv6 for IP address assignment, you have to additionally install a DHCPv6 client software on your Windows XP. (Note: If you use static IP addresses or Router Advertisement for IPv6 address assignment in your network, ignore this section.)
This example uses Dibbler as the DHCPv6 client. To enable DHCPv6 client on your computer:
1 Install Dibbler and select the DHCPv6 client option on your computer.
2 After the installation is complete, select Start > All Programs > Dibbler-DHCPv6 > Client Install as service.
3 Select Start > Control Panel > Administrative Tools > Services.
4 Double click Dibbler - a DHCPv6 client.
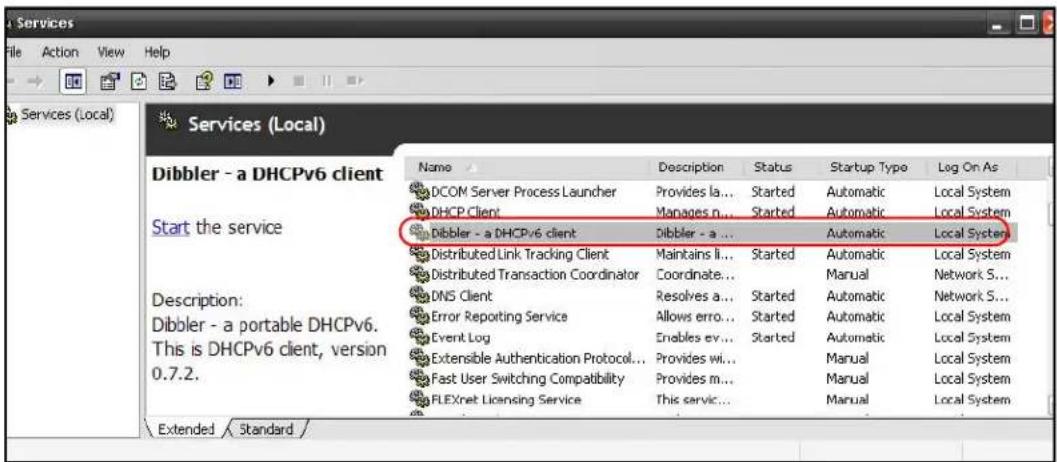
5 Click Start and then OK.
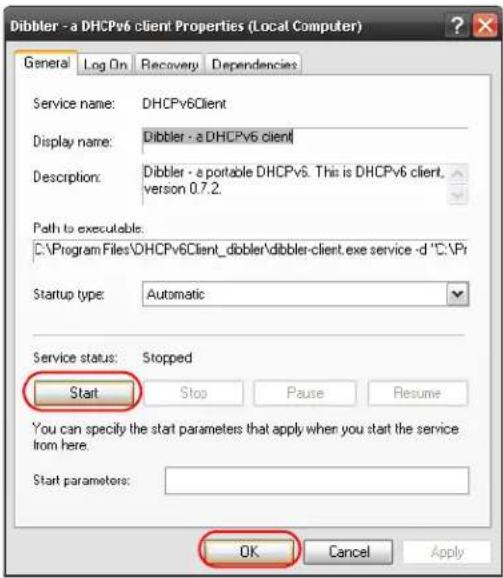
6 Now your computer can obtain an IPv6 address from a DHCPv6 server.
Example - Enabling IPv6 on Windows 7
Windows 7 supports IPv6 by default. DHCPv6 is also enabled when you enable IPv6 on a Windows 7 computer.
To enable IPv6 in Windows 7:
1 Select Control Panel > Network and Sharing Center > Local Area Connection.
2 Select the Internet Protocol Version 6 (TCP/IPv6) checkbox to enable it.
3 Click OK to save the change.
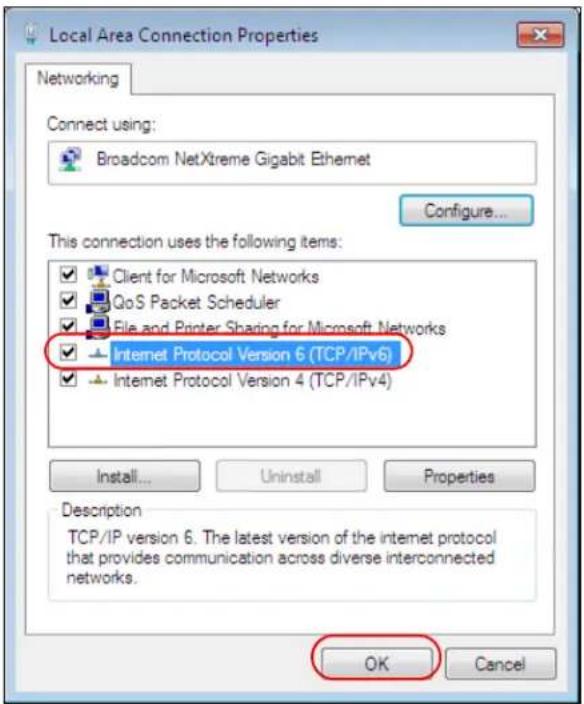
4 Click Close to exit the Local Area Connection Status screen.
5 Select Start > All Programs > Accessories > Command Prompt.
6 Use the ipconfig command to check your dynamic IPv6 address. This example shows a global address (2001:b021:2d::1000) obtained from a DHCP server.
C:>ipconfig
Windows IP Configuration
Ethernet adapter Local Area Connection:
Connection-specific DNS Suffix . :
IPv6 Address. . . . . . . . . . . : 2001:b021:2d::1000
Link-local IPv6 Address. . . . . . : fe80::25d8:dcab:c80a:5189%11
IPv4 Address. . . . . . . . . . . : 172.16.100.61
Subnet Mask. . . . . . . . . . . : 255.255.255.0
Default Gateway. . . . . . . . . . : fe80::213:49ff:feaa:7125%11
172.16.100.254
Legal Information
Copyright
Copyright © 2013 by ZyXEL Communications Corporation.
The contents of this publication may not be reproduced in any part or as a whole, transcribed, stored in a retrieval system, translated into any language, or transmitted in any form or by any means, electronic, mechanical, magnetic, optical, chemical, photocopying, manual, or otherwise, without the prior written permission of ZyXEL Communications Corporation.
Published by ZyXEL Communications Corporation. All rights reserved.
Disclaimers
ZyXEL does not assume any liability arising out of the application or use of any products, or software described herein. Neither does it convey any license under its patent rights nor the patent rights of others. ZyXEL further reserves the right to make changes in any products described herein without notice. This publication is subject to change without notice.
Your use of the Device is subject to the terms and conditions of any related service providers. Use with products that have NAT, and/or 3G.
Do not use the Device for illegal purposes. Illegal downloading or sharing of files can result in severe civil and criminal penalties. You are subject to the restrictions of copyright laws and any other applicable laws, and will bear the consequences of any infringements thereof. ZyXEL bears NO responsibility or liability for your use of the download service feature. Use for products that have a download service.
Make sure all data and programs on the Device are also stored elsewhere. ZyXEL is not responsible for any loss of or damage to any data, programs, or storage media resulting from the use, misuse, or disuse of this or any other ZyXEL product. Use for storage/backup devices.
Trademarks
This item incorporates copy protection technology that is protected by U.S. patents and other intellectual property rights of Rovi Corporation. Reverse engineering and disassembly are prohibited. Use for STBs that need Rovi certification.
Certifications (Class B)
Federal Communications Commission (FCC) Interference Statement
The device complies with Part 15 of FCC rules. Operation is subject to the following two conditions:
- This device may not cause harmful interference.
- This device must accept any interference received, including interference that may cause undesired operations.
This device has been tested and found to comply with the limits for a Class B digital device pursuant to Part 15 of the FCC Rules. These limits are designed to provide reasonable protection against harmful interference in a residential installation. This device generates, uses, and can radiate radio frequency energy, and if not installed and used in accordance with the instructions, may cause harmful interference to radio communications. However, there is no guarantee that interference will not occur in a particular installation.
If this device does cause harmful interference to radio/television reception, which can be determined by turning the device off and on, the user is encouraged to try to correct the interference by one or more of the following measures:
1 Reorient or relocate the receiving antenna.
2 Increase the separation between the equipment and the receiver.
3 Connect the equipment into an outlet on a circuit different from that to which the receiver is connected.
4 Consult the dealer or an experienced radio/TV technician for help.
FCC Caution: Any changes or modifications not expressly approved by the party responsible for compliance could void the user's authority to operate this equipment.

FCC Radiation Exposure Statement
- This transmitter must not be co-located or operating in conjunction with any other antenna or transmitter.
- IEEE 802.11b, 802.11g or 802.11n(20MHz) operation of this product in the U.S.A. is firmware-limited to channels 1 through 11. IEEE 802.11n(40MHz) operation of this product in the U.S.A. is firmware-limited to channels 3 through 9.
- IEEE 802.11b or 802.11g operation of this product in the U.S.A. is firmware-limited to channels 1 through 11.
注意!
依據 低功率電波輻射性電機管理辦法
Changes or modifications not expressly approved by the party responsible for compliance could void the user's authority to operate the equipment.
This device is designed for the WLAN 2.4 GHz and/or 5 GHz networks throughout the EC region and Switzerland, with restrictions in France.
This Class B digital apparatus complies with Canadian ICES-003.
"PRODUCT COMPLIES WITH 21 CFR 1040.10 AND 1040.11"
"PRODUIT CONFORME SELON 21CFR 1040.10 ET 1040.11"
CLASS 1 LASER PRODUCT
APPAREIL À LASER DE CLASSE 1
Viewing Certifications
1 Go to http://www.zyxel.com.
2 Select your product on the ZyXEL home page to go to that product's page.
3 Select the certification you wish to view from this page.
ZyXEL Limited Warranty
ZyXEL warrants to the original end user (purchaser) that this product is free from any defects in material or workmanship for a specific period (the Warranty Period) from the date of purchase. The Warranty Period varies by region. Check with your vendor and/or the authorized ZyXEL local distributor for details about the Warranty Period of this product. During the warranty period, and upon proof of purchase, should the product have indications of failure due to faulty workmanship and/or materials, ZyXEL will, at its discretion, repair or replace the defective products or components without charge for either parts or labor, and to whatever extent it shall deem necessary to restore the product or components to proper operating condition. Any replacement will consist of a new or re-manufactured functionally equivalent product of equal or higher value, and will be solely at the discretion of ZyXEL. This warranty shall not apply if the product has been modified, misused, tampered with, damaged by an act of God, or subjected to abnormal working conditions.
Note
Repair or replacement, as provided under this warranty, is the exclusive remedy of the purchaser. This warranty is in lieu of all other warranties, express or implied, including any implied warranty of
merchantability or fitness for a particular use or purpose. ZyXEL shall in no event be held liable for indirect or consequential damages of any kind to the purchaser.
To obtain the services of this warranty, contact your vendor. You may also refer to the warranty policy for the region in which you bought the device at http://www.zyxel.com/web/support_warranty_info.php.
Registration
Register your product online to receive e-mail notices of firmware upgrades and information at www.zyxel.com.
Safety Warnings
- Do NOT use this product near water, for example, in a wet basement or near a swimming pool.
- Do NOT expose your device to dampness, dust or corrosive liquids.
- Do NOT store things on the device.
- Do NOT install, use, or service this device during a thunderstorm. There is a remote risk of electric shock from lightning.
- Connect ONLY suitable accessories to the device.
- Do NOT open the device or unit. Opening or removing covers can expose you to dangerous high voltage points or other risks. ONLY qualified service personnel should service or disassemble this device. Please contact your vendor for further information.
- Make sure to connect the cables to the correct ports.
- Place connecting cables carefully so that no one will step on them or stumble over them.
• Always disconnect all cables from this device before servicing or disassembling. - Use ONLY an appropriate power adaptor or cord for your device.
- Connect the power adaptor or cord to the right supply voltage (for example, 110V AC in North America or 230V AC in Europe).
- Do NOT remove the plug and connect it to a power outlet by itself; always attach the plug to the power adaptor first before connecting it to a power outlet.
- Do NOT allow anything to rest on the power adaptor or cord and do NOT place the product where anyone can walk on the power adaptor or cord.
- Do NOT use the device if the power adaptor or cord is damaged as it might cause electrocution.
• If the power adaptor or cord is damaged, remove it from the device and the power source. - Do NOT attempt to repair the power adaptor or cord. Contact your local vendor to order a new one.
- Do not use the device outside, and make sure all the connections are indoors. There is a remote risk of electric shock from lightning.
- Do NOT obstruct the device ventilation slots, as insufficient airflow may harm your device.
- Use only No. 26 AWG (American Wire Gauge) or larger telecommunication line cord.
• If you wall mount your device, make sure that no electrical lines, gas or water pipes will be damaged. - This product is for indoor use only (utilisation intérieure exclusivement).
Your product is marked with this symbol, which is known as the WEEE mark. WEEE stands for Waste Electronics and Electrical Equipment. It means that used electrical and electronic products should not be mixed with general waste. Used electrical and electronic equipment should be treated separately.

Index
Numbers
6to4 mode 69
A
ACK message 199
activation
media server 102
adding a printer example 42
administrator password 19
AH 174
algorithms 174
alternative subnet mask notation 245
applications
Internet access 15
media server 102
activation 102
iTunes server 102
VoIP 15
automatic logout 20
B
backup
configuration 229
bandwidth management 121
Broadband 67
broadcast 87
BYE request 199
C
CA 159
call hold 202
call rule 193
call service mode 201
call transfer 202
call waiting 202
Canonical Format Indicator See CFI
certificate
factory default 162
certificates 159
CA 159
replacing 162
storage space 162
thumbprint algorithms 161
thumbprints 161
trusted CAs 163
verifying fingerprints 161
Certification Authority, see CA
certifications 305
notices 307
viewing 307
CFI 86
Class of Service 200
Class of Service, see CoS
client list 97
client-server protocol 196
comfort noise generation 182
configuration 104
backup 229
reset 230
restoring 230
copyright 305
CoS 131, 200
D
default LAN IP address 19
DH 179
DHCP 63, 94, 104, 141
DHCPv6 69
diagnostic 233
differentiated services 200
Differentiated Services, see DiffServ
Diffie-Hellman key groups 179
DiffServ (Differentiated Services) 200
code points 200
marking rule 132, 200
disclaimer 305
DLNA 102
DNS 94
DNS server address assignment 87
documentation
related 2
domain name system, see DNS
Domain Name System. See DNS.
DS (Differentiated Services) 132
DS field 132, 200
DSCP 131, 200
DTMF 199
Dual-Tone MultiFrequency, see DTMF
DUID 69
dynamic DNS 141
Dynamic Host Configuration Protocol, see DHCP
DYNDNS wildcard 141
E
echo cancellation 182
Encapsulation 83
MER 83
PPP over Ethernet 83
encapsulation 68, 174
RFC 1483 84
ESP 174
Europe type call service mode 201
F
FCC interference statement 305
File Sharing 99
firewalls 145
configuration 147, 148
security 151
firmware 227
flash key 201
flashing 201
FTP 134
G
G.168 182
Guide
Quick Start 2
H
host 215
host name 63
|
IANA 105, 250
ID type and content 178
IEEE 802.1Q 86
IEEE 802.1Q VLAN 200
IGMP 87
version 87
IKE phases 175
importing trusted CAs 163
inside header 175
install UPnP 108
Windows Me 108
Windows XP 109
Internet access 15
Internet Assigned Numbers Authority See IANA
Internet Assigned Numbers Authority, see IANA
Internet Key Exchange 175
Internet Protocol version 6 68
Internet Protocol version 6, see IPv6
Internet Service Provider, see ISP
IP address 63, 104
default 19
WAN 68
IP Address Assignment 86
IP pool 97
IP pool setup 104
IPSec
algorithms 174
architecture 173
NAT 177
IPSec VPN 167
IPv6 68, 295
addressing 69, 87, 295
DHCP 69
EUI-64 297
global address 296
interface ID 297
link-local address 295
Neighbor Discovery Protocol 295
ping 295
prefix 69, 88, 295
prefix delegation 70
prefix length 69, 88, 295
stateless autoconfiguration 297
unspecified address 296
IPv6 modes
6to4 mode 69
ISP 68
iTunes server 102
ITU-T 182
M
MAC 63, 153
MAC address 98
MAC address filtering 153
MAC filter 153
Management Information Base (MIB) 220
managing the device
good habits 17
using FTP. See FTP.
Maximum Burst Size (MBS) 85
Media access control 153
Media Access Control, see MAC Address
media server 102
activation 102
iTunes server 102
model name 63
MTU (Multi-Tenant Unit) 86
multicast 87
multimedia 194
multiplexing 84
LLC-based 84
VC-based 84
multiprotocol encapsulation 84
L
LAN 93
and USB printer 103
client list 97
MAC address 98
LAN TCP/IP 104
listening port 186
Local Area Network, see LAN
login
passwords 19
logout 20
automatic 20
logs 205, 225
N
NAT 105, 134, 250
definitions 137
how it works 138
IPSec 177
traversal 177
what it does 138
negotiation mode 176
Network Address Translation, see NAT
network map 22
non-proxy calls 193
O
OK response 199
other documentation 2
outside header 175
P
passwords 19
Peak Cell Rate (PCR) 84
peer-to-peer calls 193
Per-Hop Behavior, see PHB
PHB 132, 200
phone book
speed dial 193
PPP over Ethernet, see PPPoE
PPPoE 68, 84
Benefits 84
prefix delegation 70
pre-shared key 179
Printer Server 102
printer sharing
and LAN 103
configuration 37
requirements 103
TCP/IP port 37
product registration 308
protocol 68
PSTN call setup signaling 199
pulse dialing 199
Q
QoS 121, 122, 131, 199
Quality of Service, see QoS
Quick Start Guide 2, 19
R
Real time Transport Protocol, see RTP
registration
product 308
related documentation 2
reset 230
RESET button 17
restart 231
restoring configuration 230
RFC 1483 84
RFC 1631 133
RFC 1889 198
RFC 3164 205
router advertisements 70
router features 15
RTP 198
s
security, network 151
service access control 217
Session Initiation Protocol, see SIP
network components 219
Set 220
Trap 220
versions 219
speed dial 193
static route 117
static VLAN
status 61
subnet 243
subnet mask 104, 244
subnetting 246
supplementary services 200
Sustained Cell Rate (SCR) 85
syslog
protocol 205
severity levels 205
system
firmware 227
passwords 19
status 61
System Info 62
system name 63, 222
T
Tag Control Information See TCI
Tag Protocol Identifier See TPID
TCI
TCP/IP port 37
The 68
three-way conference 202
ToS 200
TPID 86
trademarks 305
traffic shaping 84
transport mode 175
trusted CAs, and certificates 163
tunnel mode 175
tutorial
VoIP 27
Type of Service, see ToS
U
unicast 87
Uniform Resource Identifier 195
Universal Plug and Play, see UPnP
upgrading firmware 227
UPnP 99
forum 94
security issues 94
V
VAD 182
version
firmware
version 63
VID
Virtual Circuit (VC) 84
Virtual Local Area Network See VLAN
Virtual Local Area Network, see VLAN
VLAN 86, 200
group 200
ID 200
ID tags 200
Introduction 86
number of possible VIDs
priority frame
static
VLAN ID 86
VLAN Identifier See VID
VLAN tag 86
voice activity detection 182
voice coding 199
VoIP 194
features 15
peer-to-peer calls 193
tutorial 27
VoIP features 15
VoIP status 212
W
WAN
Wide Area Network, see WAN 67
warranty 307
note 307
Web Configurator 19
web configurator
passwords 19

- FMG3024-D10A / FMG3025-D10A Series
- User's Guide
- Default Login Details
- Related Documentation
- Contents Overview
- User's Guide 13
- Technical Reference 59
- Table of Contents
- Part II: Technical Reference....59
- Chapter 4
- Connection Status and System Info 61
- Chapter 5
- Broadband....67
- Chapter 6
- Cable TV 91
- Chapter 7
- Home Networking 93
- Chapter 8 Routing .... 117
- Chapter 9 Quality of Service (QoS)....121
- Chapter 10 Network Address Translation (NAT)....133
- Chapter 11
- Dynamic DNS 141
- Chapter 12
- Interface Group....143
- Chapter 13
- Firewall 145
- Chapter 14
- MAC Filter 153
- Chapter 15
- Parental Control....155
- Chapter 16
- Certificates 159
- Chapter 17
- VPN 167
- Chapter 18
- VoIP 181
- Chapter 19
- Logs 205
- Chapter 20
- Traffic Status 209
- Chapter 21
- User Account 215
- Chapter 22
- Remote MGMT....217
- Chapter 23
- SNMP 219
- Chapter 24
- System 221
- Chapter 25
- Time Setting 223
- Chapter 26
- Log Setting 225
- Chapter 27
- Firmware Upgrade 227
- Chapter 28
- Backup/Restore 229
- Chapter 29
- Diagnostic 233
- Chapter 30
- Auto Provision 235
- Chapter 31
- Troubleshooting....237
- PART I
- Introduction
- Overview
- Applications for the Device
- Internet Access
- VoIP Features
- Ways to Manage the Device
- Good Habits for Managing the Device
- The RESET Button
- Introducing the Web Configurator
- Overview
- Accessing the Web Configurator
- The Web Configurator Layout
- Title Bar
- Main Window
- Navigation Panel
- Overview
- Setting Up Your WAN Connection
- Account Configuration
- Setting Up NAT Port Forwarding
- Click Apply.
- Status Service Name WAN Interface Start Port End Port Translation ... Translation ... Server IP Ad... Protocol Modify
- How to Make a VoIP Call
- VoIP Calls With a Registered SIP Account
- SIP Service Provider Configuration
- Active SIP Account SIP Service Provider Account No. Modify
- SIP Account Registration
- Analog Phone Configuration
- Phone ID Outgoing SIP Number Modify
- Using the File Sharing Feature
- Set Up File Sharing
- Activate File Sharing
- Status Share Name Share Path Share Description Modify
- Set up File Sharing on Your Device
- Access Your Shared Files From a Computer
- Using the Media Server Feature
- Configuring the Device
- Using Windows Media Player
- Windows Vista
- Windows 7
- Using a Digital Media Adapter
- Using the Print Server Feature
- Configure a TCP/IP Printer Port
- Add a New Printer Using Windows
- Add a New Printer Using Macintosh OS X
- Configuring Static Route for Routing to Another Network
- Active Status MName Destination IP Gateway Subnet Mask Interface Modify
- Active Status MName Destination IP Gateway Subnet Mask Interface Modify
- Configuring QoS Queue and Class Setup
- Name Pass Rate(bps)
- Name Interface Pass Rate(bps) Drop Rate(bps)
- Access the Device Using DDNS
- Registering a DDNS Account on www.dyndns.org
- Configuring DDNS on Your Device
- Testing the DDNS Setting
- PART II
- Technical Reference
- Connection Status and System Info
- Overview
- The Connection Status Screen
- Device Name IP Address MAC Address Address Source Connection Type
- The System Info Screen
- Broadband
- Overview
- What You Can Do in this Chapter
- What You Need to Know
- Encapsulation Method
- WAN IP Address
- 3G
- IPv6 Introduction
- IPv6 Addressing
- IPv6 Prefix and Prefix Length
- IPv6 Subnet Masking
- DHCPv6
- IPv6 6to4 Mode
- Prefix Delegation
- Before You Begin
- The Broadband Screen
- Name Mode Encapsulation IPv6IPv4 Mode Vlan6821p VlanMoxld IGMP Proxy NAT Default Gate_ Modify
- Add/Edit Internet Connection
- Routing- PPPoE
- Routing - IPoE
- Bridge Mode
- The 3G Backup Screen
- Technical Reference
- Encapsulation
- IP over Ethernet
- PPP over Ethernet (PPPoE)
- RFC 1483
- Multiplexing
- Traffic Shaping
- ATM Traffic Classes
- IP Address Assignment
- Introduction to VLANs
- Introduction to IEEE 802.1Q Tagged VLAN
- Multicast
- DNS Server Address Assignment
- 3G Comparison Table
- Overview
- The CATV Screen
- Home Networking
- Overview
- What You Can Do in this Chapter
- What You Need To Know
- About LAN
- IP Address
- Subnet Mask
- DHCP
- DNS
- About UPnP
- How do I know if I'm using UPnP?
- Cautions with UPnP
- UPnP and ZyXEL
- About File Sharing
- Workgroup name
- Shares
- File Systems
- Common Internet File System
- About Printer Server
- Print Server
- Operating System
- TCP/IP
- Port
- Supported OSs
- The LAN Setup Screen
- The Static DHCP Screen
- Before You Begin
- Status Host Name MAC Address IP Address Reserve
- The UPnP Screen
- The File Sharing Screen
- Before You Begin
- Add/Edit File Sharing
- The Media Server Screen
- The Printer Server Screen
- Before You Begin
- Technical Reference
- LANs, WANs and the Device
- DHCP Setup
- IP Pool Setup
- LAN TCP/IP
- IP Address and Subnet Mask
- Private IP Addresses
- Device Print Server Compatible USB Printers
- Installing UPnP in Windows Example
- Installing UPnP in Windows Me
- Installing UPnP in Windows XP
- Using UPnP in Windows XP Example
- Auto-discover Your UPnP-enabled Network Device
- Web Configurator Easy Access
- Overview
- Configuring Static Route
- Active Status Name Destination IP Gateway Subnet Mask Interface Modify
- Add/Edit Static Route
- Quality of Service (QoS)
- Overview
- What You Can Do in this Chapter
- What You Need to Know
- QoS versus Cos
- Tagging and Marking
- The QoS General Screen
- The Queue Setup Screen
- Add/Edit a QoS Queue
- The Class Setup Screen
- Add/Edit QoS Class
- The QoS Monitor Screen
- QoS Technical Reference
- IEEE 802.1Q Tag
- IP Precedence
- DiffServ
- DSCP and Per-Hop Behavior
- Network Address Translation (NAT)
- Overview
- What You Can Do in this Chapter
- What You Need To Know
- Inside/Outside and Global/Local
- NAT
- Port Forwarding
- Finding Out More
- The Port Forwarding Screen
- Configuring Servers Behind Port Forwarding (Example)
- The Port Forwarding Screen
- Status Service WAN Start Port End Port Translation Translation Server IP Protocol Modify
- The Port Forwarding Edit Screen
- The Sessions Screen
- Technical Reference
- NAT Definitions
- What NAT Does
- How NAT Works
- Overview
- What You Need To Know
- DYNDNS Wildcard
- The Dynamic DNS Screen
- Overview
- The Interface Group Screen
- Interface Group Configuration
- Grouped LAN Interfaces
- Available LAN Interfaces
- Overview
- What You Can Do in this Chapter
- What You Need to Know
- Firewall
- ICMP
- The General Screen
- The Services Screen
- The Add New Services Entry Screen
- The Access Control Screen
- The Add New ACL Rule/Edit Screen
- The DoS Screen
- Firewall Technical Reference
- Guidelines For Enhancing Security With Your Firewall
- Security Considerations
- Overview
- What You Need to Know
- The MAC Filter Screen
- Parental Control
- Overview
- The Parental Control Screen
- Status PCP Name Home Network User (MAC) Internet Access Schedule Network Service Website Blocked Modify
- Add/Edit a Parental Control Rule
- Service Name Protocol:Port Modify
- Overview
- What You Can Do in this Chapter
- What You Need to Know
- Certification Authorities
- Public and Private Keys
- Certification Path
- Certificate Directory Servers
- Advantages of Certificates
- Certificate File Formats
- Verifying a Certificate
- Local Certificates
- Trusted CA
- Trusted CA Import
- View Certificate
- Overview
- IPSec VPN
- The General Screen
- Active Tunnel Name Local Address Remote Address IPSec Algorithm Modify
- IPSec VPN: Add
- The Monitor Screen
- Status Tunnel Name IPSec Algorithm
- Technical Reference
- IPSec Architecture
- IPSec Algorithms
- Key Management
- Encapsulation
- Transport Mode
- Tunnel Mode
- IKE Phases
- Negotiation Mode
- IPSec and NAT
- VPN, NAT, and NAT Traversal
- ID Type and Content
- ID Type and Content Examples
- Pre-Shared Key
- Diffie-Hellman (DH) Key Groups
- Overview
- What You Can Do in this Chapter
- What You Need to Know
- VoIP
- SIP
- SIP Accounts
- Voice Activity Detection/Silence Suppression
- Comfort Noise Generation
- Echo Cancellation
- How to Find Out More
- Before You Begin
- The SIP Service Provider Screen
- The SIP Account Screen
- Add/Edit SIP Account
- Multiple SIP Accounts
- Phone Screen
- Edit Phone Device
- The Call Rule Screen
- Technical Reference
- VoIP
- SIP
- SIP Identities
- SIP Number
- SIP Service Domain
- SIP Registration
- Authorization Requirements
- SIP Servers
- SIP User Agent
- SIP Proxy Server
- SIP Redirect Server
- SIP Register Server
- RTP
- Pulse Code Modulation
- SIP Call Progression
- Voice Coding
- PSTN Call Setup Signaling
- MWI (Message Waiting Indication)
- Quality of Service (QoS)
- Type of Service (ToS)
- DiffServ
- VLAN Tagging
- Phone Services Overview
- The Flash Key
- Europe Type Supplementary Phone Services
- European Call Hold
- European Call Waiting
- European Call Transfer
- European Three-Way Conference
- Overview
- What You Can Do in this Chapter
- What You Need To Know
- Alerts and Logs
- Syslog Overview
- The System Log Screen
- Time Level Message
- The Phone Log Screen
- The VoIP Call History Screen
- Traffic Status
- Overview
- What You Can Do in this Chapter
- The WAN Status Screen
- The LAN Status Screen
- The NAT Status Screen
- The 3G Backup Status Screen
- The VoIP Status Screen
- Overview
- The User Account Screen
- Overview
- What You Need to Know
- TR-064
- SSH/SCP/SFTP
- The Remote MGMT Screen
- Overview
- The SNMP Screen
- Overview
- What You Need to Know
- Domain Name
- The System Screen
- Overview
- The Time Setting Screen
- Overview
- The Log Setting Screen
- Firmware Upgrade
- Overview
- The Firmware Upgrade Screen
- Do NOT turn off the Device while firmware upload is in progress!
- Backup/Restore
- Overview
- The Backup/Restore Screen
- Backup Configuration
- Restore Configuration
- Do not turn off the Device while configuration file upload is in progress.
- Reset to Factory Defaults
- The Reboot Screen
- Overview
- The Ping/TraceRoute Screen
- Auto Provision
- Overview
- Auto Provision
- Troubleshooting
- Overview
- Power, Hardware Connections, and LEDs
- Device Access and Login
- I forgot the IP address for the Device.
- I forgot the password.
- I cannot see or access the Login screen in the web configurator.
- Advanced Suggestions
- I can see the Login screen, but I cannot log in to the Device.
- I cannot Telnet to the Device.
- Internet Access
- I cannot access the Internet.
- I cannot create multiple connections of the same type.
- I cannot access the Internet anymore. I had access to the Internet (with the Device), but my Internet connection is not available anymore.
- The Internet connection is slow or intermittent.
- Phone Calls and VoIP
- USB Device Connection
- UPnP
- IP Addresses and Subnetting
- Introduction to IP Addresses
- Structure
- Subnet Masks
- Network Size
- Notation
- Subnetting
- Example: Four Subnets
- Example: Eight Subnets
- Subnet Planning
- Configuring IP Addresses
- IP Address Conflicts
- Conflicting Computer IP Addresses Example
- Conflicting Router IP Addresses Example
- Conflicting Computer and Router IP Addresses Example
- Setting Up Your Computer's IP Address
- Windows XP/NT/2000
- Verifying Settings
- Click Start > Control Panel.
- In the Control Panel, click the Network and Internet icon.
- Click the Network and Sharing Center icon.
- Click Manage network connections.
- Right-click Local Area Connection and then select Properties.
- Select Internet Protocol Version 4 (TCP/IPv4) and then select Properties.
- In the Control Panel, click View network status and tasks under the Network and Internet category.
- Click Change adapter settings.
- Double click Local Area Connection and then select Properties.
- Mac OS X: 10.3 and 10.4
- Click Apple > System Preferences.
- Mac OS X: 10.5
- In System Preferences, click the Network icon.
- Linux: Ubuntu 8 (GNOME)
- Click System > Administration > Network.
- Linux: openSUSE 10.3 (KDE)
- Pop-up Windows, JavaScript and Java Permissions
- Internet Explorer Pop-up Blockers
- Disable Pop-up Blockers
- Enable Pop-up Blockers with Exceptions
- JavaScript
- Java Permissions
- JAVA (Sun)
- Mozilla Firefox
- Common Services
- Overview
- Prefix and Prefix Length
- Link-local Address
- Global Address
- Unspecified Address
- Loopback Address
- Multicast Address
- Interface ID
- EUI-64
- Identity Association
- DHCP Relay Agent
- ICMPv6
- Neighbor Discovery Protocol (NDP)
- IPv6 Cache
- Multicast Listener Discovery
- MLD Messages
- Example - Enabling IPv6 on Windows XP/2003/Vista
- Example - Enabling DHCPv6 on Windows XP
- Example - Enabling IPv6 on Windows 7
- Legal Information
- Copyright
- Disclaimers
- Trademarks
- Certifications (Class B)
- Federal Communications Commission (FCC) Interference Statement
- FCC Radiation Exposure Statement
- 注意!
- Viewing Certifications
- ZyXEL Limited Warranty
- Note
- Registration
- Safety Warnings
- Index
- Numbers
- A
- B
- C
- D
- E
- F
- G
- H
- |
- M
- L
- N
- O
- P
- Q
- R
- s
- T
- U
- V
- W
Brand : ZYXEL
Model : FMG3024-D10A
Category : Telephone